Welcome to Hex-Rays docs
Discover the core of Hex-Rays guides and manuals, guiding you through IDA features and real-life usage scenarios.
Getting Started
New to IDA? Explore our selection of documentation to guide you through the installation process and jumpstart your reverse engineering journey.
| Install IDA | Get your IDA instance up and running on your local machine. |
| Manage your license | Check how to handle your license key file to keep IDA subscription active. |
| Check basic features | Reverse your first binary file and discover the capabilities of disassembly and decompilation. |
Our Guides
Delve into detailed guides to discover IDA features and maximize its capabilities.
| User Guide | Explore the main IDA interface and features, learn how to customize your experience and take advantage of plugins or utilities. |
| Developer Guide | Explore the intuitive Domain API and start scripting with ease, or dive deeper with the low-level C++ and IDAPython SDK. |
| Admin Guide | Check how to install and manage Teams and Lumina servers as well as handle floating licenses. |
What’s new in Docs?
Check the latest changes in the Hex-Rays documentation, including new tutorials and manuals, along with significant revisions to existing content.
November 2025
Introducing IDA Plugin Manager and Enhanced Plugin Ecosystem
With the rollout of the IDA Plugin Manager and a refined plugin ecosystem for discovering, installing and maintaining plugins we’re entering a new era of plugin management; for both plugin users and plugin authors.
For Plugin Users:
Plugin Manager transforms how you discover and install plugins. Browse available plugins via HCLI and install them in IDA with just a few clicks. Read the Plugin Manager docs for more.
For Plugin Developers:
Manual submissions via My Hex-Rays portal are a thing of the past. Publishing your plugin into new IDA Plugin Repository now follows a transparent, automated process that gets plugins into users’ hands faster. Ensure your plugin is compatible with HCLI and Plugin Manager, and it’s ready to be listed!
To ease the adoption, we’ve prepared a set of documents to make your plugin compatible with HCLI and Plugin Manager:
Repository Architecture | Packaging Format | Publishing guidelines | Testing checklist |
What’s Changed in a nutshell:
ida.plugin.jsonfile has new required and optional fields.- Plugins need to be packed into ZIP Archive
- You should publish releases on GitHub
Migrating your existing plugins
Already submitted a plugin under the plugins.hex-rays.com? Check our FAQ for guidance on updating to the new ecosystem.
October 2025
Introducing HCLI Commands and Documentation Resources
With the release of HCLI - an extendable command-line interface for managing licenses, downloads, and more - the docs now include hint boxes showing HCLI commands as faster alternatives to certain actions. This is especially worth taking a glimpse at for admins who manage multiple license environments or plugin authors looking to automate their workflows.
Getting started:
- Check out the HCLI documentation for installation steps, usage examples, and guidance on creating extensions.
Automation workflow:
- Are you a plugin developer who wants to automate plugin testing and workflows? Take a look at the HCLI IDA GitHub Action for CI/CD integration that automatically installs IDA Pro and allows you to run tests across multiple platforms.
August 2025
Domain API Documentation Resources
The easy-to-use Domain API is our newly released, Pythonic interface for developing IDA plugins and scripts. To help you get up and running quickly with this open-source API, we’ve prepared a set of documentation resources:
- Getting Started Guide, including installation and first steps
- Real-life Code Examples
- Domain API Reference
Not sure if the Domain API is right for you?
If you’re new to the Domain API, start with our FAQ to see how it compares with existing approaches and whether it suits your needs.
June 2025
Revamped Subviews Overview
We refreshed and updated the Subviews listing and overview.
March 2025
Improved IDC Reference
We’ve refined the experience for the IDC Reference documentation. Starting now, you can explore it just like the IDAPython and C++ SDK references. To improve searchability and usability, we’ve moved the IDC function lists to a dedicated site. Meanwhile, conceptual documentation, such as core concepts, remains under the Developer Guide.
License Server on WSL – New Guide
We updated our Admin Guide with a step-by-step tutorial on how to configure the license server on WSL, making it easier for Windows users to set up and manage the Hex-Rays server for floating licenses.
February 2025
Debugger Tutorials – revamped and expanded
- The local Linux Debugger and WinDbg Debugger tutorials have been revamped for clarity and updated.
- A brand-new WinDbg Time Travel Debugging (TTD) tutorial has been added, covering installation, setup and essential commands.
License management command line options
The -Olicense command line switch is now documented as a part of the license manager.
January 2025
New Floating Licenses User Guide
We’ve introduced a Floating Licenses User Guide, that explains core concepts such as seats allocation, checking out, and borrowing licenses.
December 2024
Updated Porting Guides
With the recent changes to our API that came into life with SP1 for IDA 9.0, we updated Porting Guides for IDAPython and C++ SDK.
New IDAPython examples
With the new or reworked IDAPython examples that were added to our examples library, we revamped the examples categories to make the navigation among them more intuitive. Take a look at the new Working with types category for samples that utilize our updated Types endpoints.
Revamped IDAPython reference
We updated the UI layout of IDAPython Reference Documentation and improve cross-referencing.
November 2024
Other updates
- To reflect the current state of Local Types window as a one hub to all types-related operations, we updated the Subviews.
October 2024
With IDA 9.0, we changed how the Hex-Rays documentation is organized and added new guides and tutorials to kickstart your IDA journey and ease the migration from previous IDA versions.
New Structure
Our docs are divided into three main categories:
- User Guide, dedicated to individual users and covering whole IDA products (including add-ons, like Teams and Lumina). Most of the documentation regarding IDA, like manuals or tutorials, is currently accessible under the User Guide.
- Developer Guide, which focuses on developer’s needs, covers the reference and contextual documentation for IDAPython API and C++ SDK, as well as native IDC language. This part is mainly dedicated to plugin authors and devs interested in enhancing basic IDA capabilities with our development kit or scripting.
- Admin Guide mainly focuses on administrators installing and managing servers for Teams and Lumina or floating licenses.
In Archive, we gathered docs with rather historical value that some of you may still find interesting but focused on previous versions of IDA.
New Getting Started Guides
We prepared a Getting Started section for IDA newbies and also gathered additional materials to help you find your way around our IDAPython API or IDA SDK.
Migration and Porting Guides
For those familiar with previous versions of IDA, we prepared Porting Guides for IDAPython and C++ SDK. If you use the Flexera server for floating licenses, check our Migration Guide for new Hex-Rays license server.
New features described
We added installation and setup guides for IDA Feeds plugin and idalib.
Getting Started
First experience with IDA? Great, you are in the right place. Here you can find guides designed to quickly onboard you into IDA. We will walk you through license activation and IDA installation to the essential tasks you can perform in IDA.
| Activate your license | Check how to activate your license in My Hex-Rays portal. |
| Install your IDA | Get smoothly through installation process on your machine. |
| Start using IDA | Check basic features of IDA and reverse your first binary. |
| Begin scripting with Domain API | Explore a simple and open-source Python API for common tasks. |
Install IDA
By following the steps in this guide, you can successfully install your IDA instance on macOS, Linux, and Windows.
The installation steps are valid for all product versions: IDA Pro, IDA Home, or IDA Free.
This installation guide is dedicated to individual users.
Minimum system requirements
{% tabs %} {% tab title=“macOS” %} macOS 12 (Monterey) or later (x64 or ARM64) {% endtab %}
{% tab title=“Linux” %} x64 (x86_64) CentOS 7 or later, Ubuntu 16.04 or later. Other equivalent distributions may work but not guaranteed. {% endtab %}
{% tab title=“Windows” %} Windows 8 or later (x64) {% endtab %} {% endtabs %}
Pre-installation steps
Activate your named or computer license via My Hex-Rays portal.
Installation on macOS
Prerequisites:
- Ensure that you have activated your computer/named license and downloaded your license file (ida.hexlic) locally.
- Make sure Python 3 or later is installed on your computer for the IDAPython API to function properly.
Step 1: Download the installer
- Download the macOS version of IDA Pro from Download Center in My Hex-Rays portal.
Quick alternative
{% hint style=“success” %}
HCLI Commands | See HCLI Docs
hcli download
{% endhint %}
Step 2: Run the installer
- Extract the .zip archive.
- Double-click on the extracted file to run the instalation wizard.
- Follow the wizard’s instructions to complete the installation:
- accept the license agreement and installation directory;
- copy your
ida.hexlicfile to IDA installation directory or to$HOME/.idaprodirectory before launching IDA.
Quick alternative {% hint style=“success” %}
HCLI Commands | See HCLI Docs
hcli ida install <path-to-installer>
{% endhint %}
Step 3: Launch IDA Pro for the first time
- Double-click on the IDA Pro icon to launch the application.
Step 4: Point to your named/computer license
{% hint style=“info” %} The step below is valid for named and computer licenses for individual use. If you are going to use floating licenses, check this alternative step. {% endhint %}
- In the License manager pop-up window, specify the path of your license file and click OK.
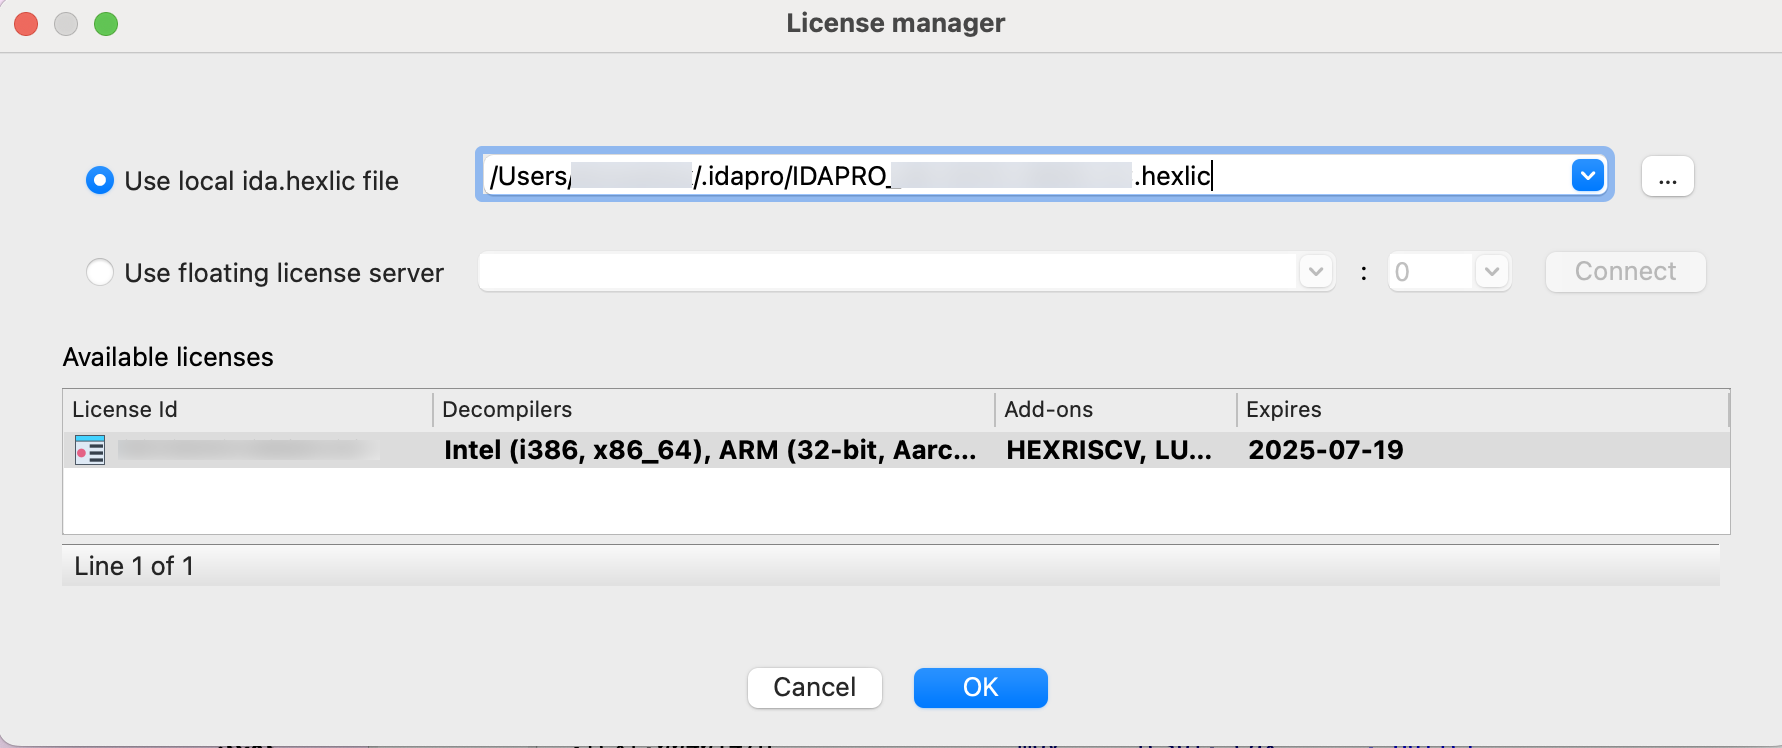
{% hint style=“info” %} You won’t be asked about your license again unless the subscription period expires or you move your license file to a different location. {% endhint %}
Installation on Linux
Prerequisites:
- Ensure that you have activated your computer/named license and downloaded your license file (ida.hexlic) locally.
- Make sure Python 3 or later is installed on your computer for the IDAPython API to function properly.
- Verify that you have the required libraries installed. Use your package manager to install any missing dependencies. Common dependencies include
libx11,libxext,libxrender, andlibglib2.0.
Step 1: Download the installer
- Download the Linux version of IDA Pro from Download Center in My Hex-Rays portal.
Quick alternative
{% hint style=“success” %}
HCLI Commands | See HCLI Docs
hcli download
{% endhint %}
Step 2: Run the installer
- Navigate to the directory containing your IDA installer, and make it executable.
- Run the installer by double-click it or enter
./<your_IDA_version_>linux.runin the terminal to execute it. - Follow the wizard’s instructions to complete the installation:
- accept the license agreement and installation directory;
- copy your
ida.hexlicfile to IDA installation directory or to$HOME/.idaprodirectory before launching IDA.
Quick alternative {% hint style=“success” %}
HCLI Commands | See HCLI Docs
hcli ida install <path-to-installer>
{% endhint %}
Step 3: Launch IDA Pro for the first time
- Go to the directory where IDA is installad and run the command:
./ida90
Step 4: Point to your named/computer license
{% hint style=“info” %} The step below is valid for named and computer licenses for individual use. If you are going to use floating licenses, check this alternative step. {% endhint %}
- In the License manager pop-up window, specify the path of your license file and click OK.
{% hint style=“info” %} You won’t be asked about your license again unless the subscription period expires or you move your license file to a different location. {% endhint %}
Installation on Windows
- Ensure that you have activated your computer/named license and downloaded your license file (ida.hexlic) locally.
- Make sure Python 3 or later is installed on your computer for the IDAPython API to function properly.
Step 1: Download the installer
- Download the Windows version of IDA Pro from Download Center in My Hex-Rays portal.
Quick alternative
{% hint style=“success” %}
HCLI Commands | See HCLI Docs
hcli download
{% endhint %}
Step 2: Run the installer
- Locate the downloaded
.exefile and double-click it to run the installer. - Follow the installation wizard’s instructions to complete the installation:
- accept the license agreement and installation directory;
- copy your
ida.hexlicfile to IDA installation directory or to%APPDATA%/Hex-Rays/IDA Prodirectory before launching IDA.
Quick alternative {% hint style=“success” %}
HCLI Commands | See HCLI Docs
hcli ida install <path-to-installer>
{% endhint %}
Step 3: Launch IDA Pro for the first time
- Navigate to the Start Menu or desktop shortcut and launch IDA Pro.
Step 4: Point to your named/computer license
{% hint style=“info” %} The step below is valid for named and computer licenses for individual use. If you are going to use floating licenses, check this alternative step. {% endhint %}
- In the License Manager pop-up window, specify the path of your license file and click OK.
{% hint style=“info” %} You won’t be asked about your license again unless the subscription period expires or you move your license file to a different location. {% endhint %}
Use floating license server
Step 1: In the License manager pop-up window, select the option Use floating license server and then type a license server hostname provided by your administrator.
Step 2: Borrow one of the licenses visible under the available licenses list and click OK.
Note that you don’t need a license file stored on your machine locally while using floating licenses.
Common Post-Installation Steps
Step 1: Update IDA Pro
- After installation, check for any available updates. Hex-Rays often releases patches and updates for IDA Pro. You can check for updates within the application via Help -> Check for free update or download the latest version from My Hex-Rays portal.
Step 2: Configure environment (optional)
- Customize your IDA Pro environment settings to suit your preferences. This can include configuring hotkeys, and adjusting appearance settings.
Step 3: Install additional plugins (optional)
- You can extend the functionality of IDA Pro by installing additional plugins that can be found on the official Hex-Rays repository or other trusted sources in the reverse engineering community.
Licensing
In this document, we covered the fundamentals of our licensing model—including how to activate your license based on its type, check license’s details and share them with your team members.
Here, you can learn how to:
- Activate your licenses
Named | Computer | Floating | In Bulk - Add and activate servers
Lumina | Teams | License server - Check license details or modify them
- Download your license files
- Invite team members
- Change your current plan or renew your current plan
Licenses overview
License types
At Hex-Rays, we offer two basic license types for IDA products, which are suitable for individual users:
- Named licenses, that are assigned to specific individuals.
- Computer licenses that are assigned to specific devices.
There is also an additional type, called floating licenses, that allow a set number of concurrent users but are not assigned to specific individuals or devices.
{% hint style=“info” %} Floating licenses are available only for IDA Pro and dedicated to business/organization purposes. {% endhint %}
How many licenses should I have?
Beside the license for IDA product, you need also a separate active license for each server available in your subscription.
The components of your subscription that require their own license:
- Base IDA license (e.g., IDA PRO Expert 4)
- Teams server for Teams add-on
- Lumina server for Lumina add-on
- License server for floating licenses
Example: You’ve purchased IDA PRO Expert 4 Plan with Teams and Private Lumina, along with floating type of license with 6 seats. In this case, you’ll need to activate the following four licenses:
- License server license
- Private Lumina server license
- Teams server license
- IDA PRO Expert 4 license
What’s a license file?
The .hexlic license file contains your license ID and other data, and is required to make your IDA instance fully operative after installation (or your Lumina, Teams or License server). You can download your license files from My Hex-Rays portal, after their activation.
{% hint style=“info” %} Once you’ve downloaded your license, it cannot be modified. {% endhint %}
License activation
To complete the installation, you need an active IDA license with an assigned owner (for a named license) or a MAC address (for a computer/floating license). Without activation, you cannot download your license file.
What is needed to activate my license?
- for named licenses: the email address of the owner,
- for computer licenses: the MAC address of a specific device
- for floating licenses: the MAC address of the device where the license server will be running
{% hint style=“info” %} The license type (named/computer/floating) is selected when you purchase your subscription. {% endhint %}
Where can I activate my license?
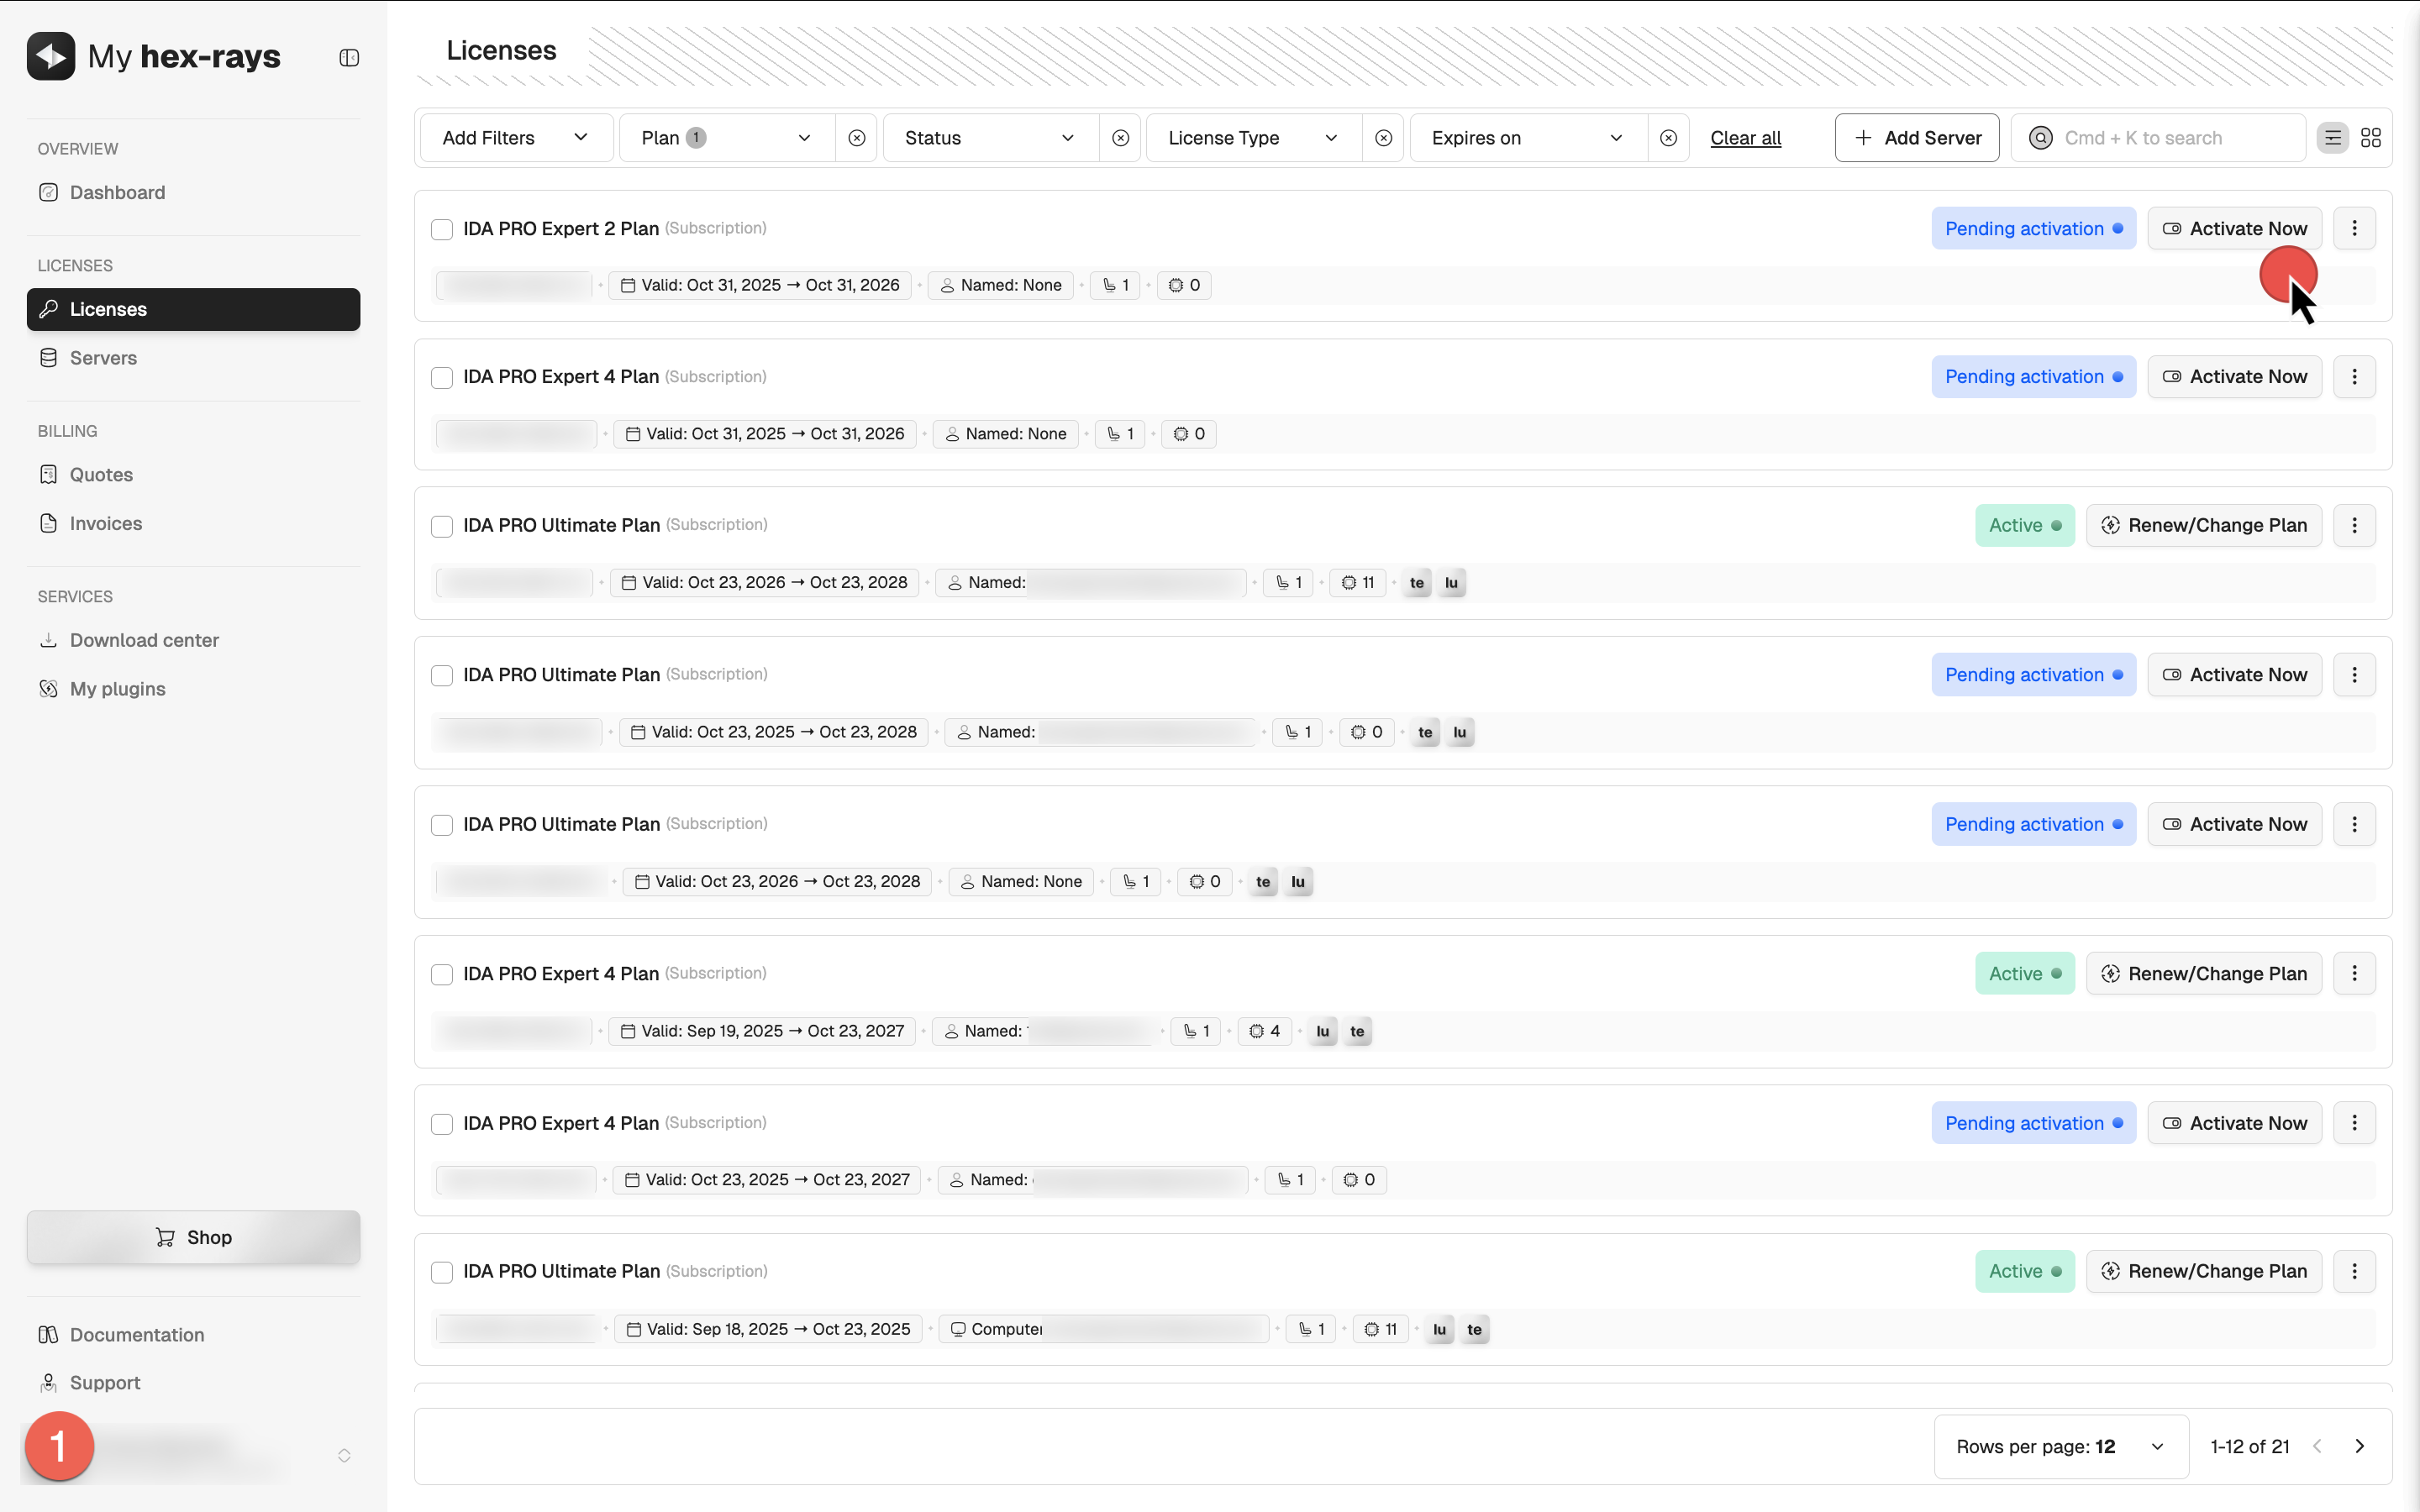
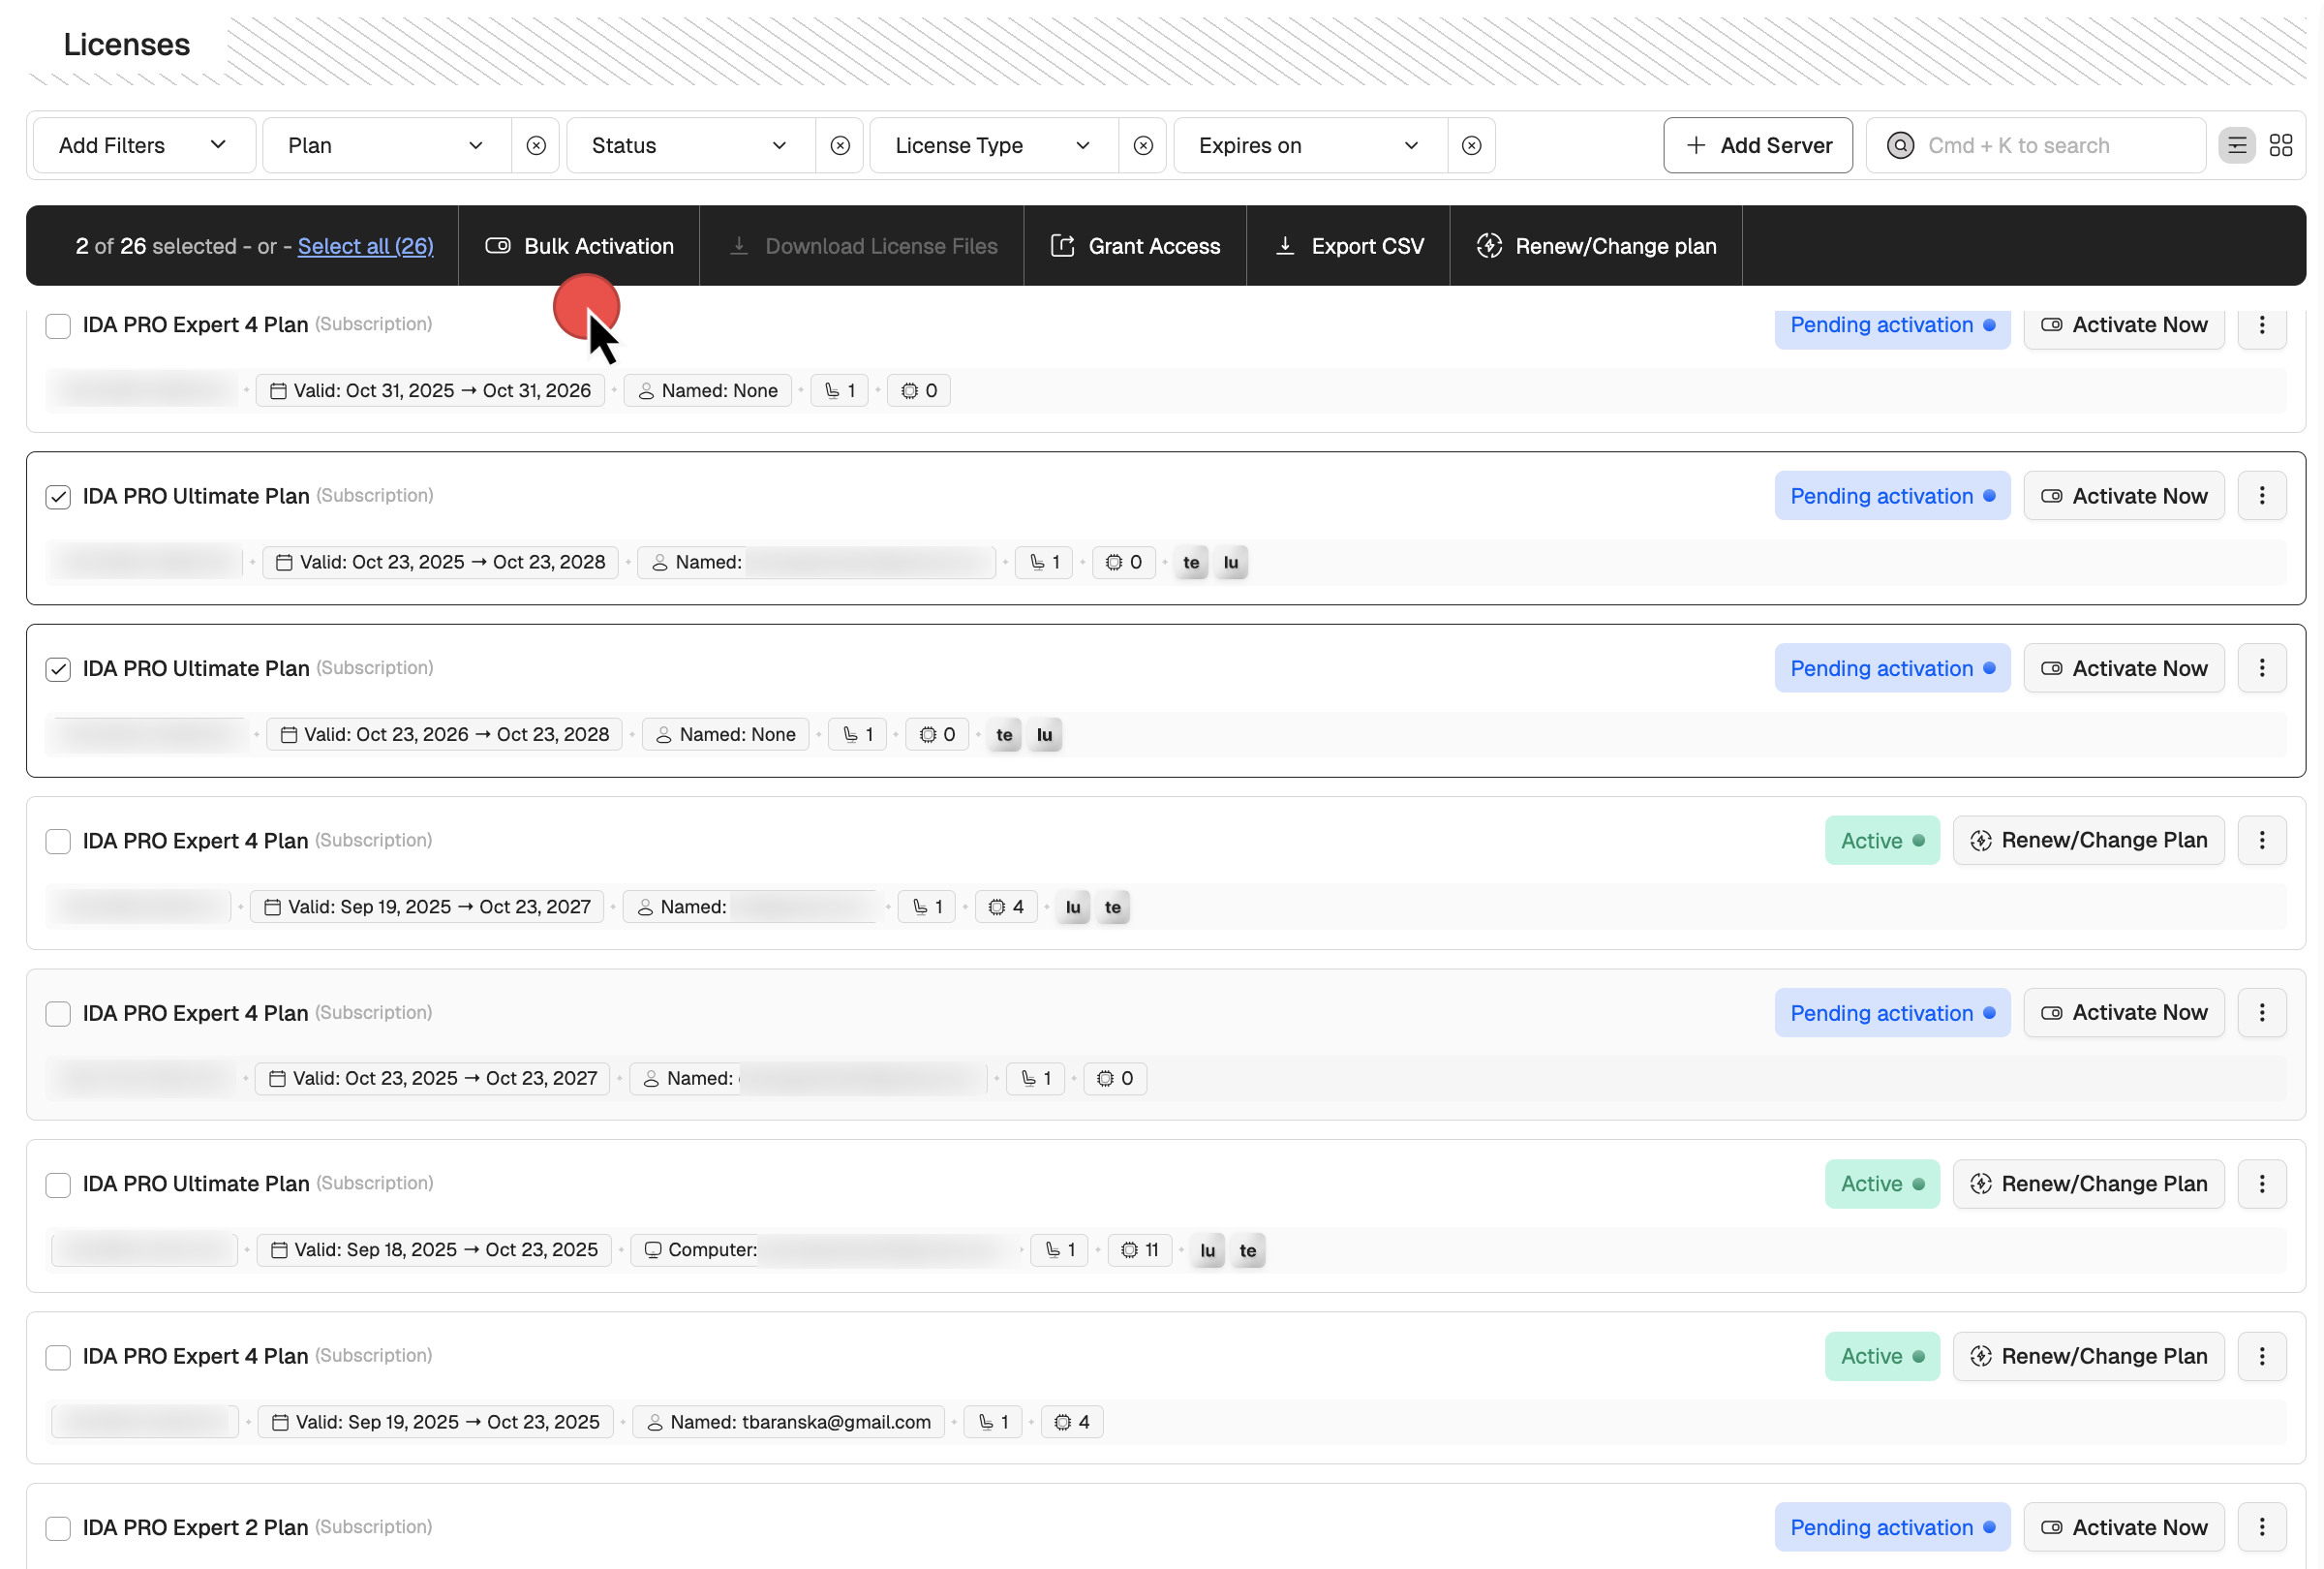
From the License tab in My Hex-Rays portal, you can initiate the activation process and open the License activation dialog from several locations:
- In the table, locate your license and click Activate Now (1),
- Click on the desired license to open its detail view, then click Activate License (2), or
- Select multiple licenses of the same type by ticking their checkboxes, then click Bulk Activation (3).
Named licenses activation
- Go to My Hex-Rays portal and navigate to the Licenses tab.
- Locate the license ID you want to activate. Ensure it has the Pending activation status.
{% hint style=“info” %} If you haven’t completed the KYC procedure yet, you will need to do so for accessing paid products. A Pending KYC status indicates that your verification is still in progress and must be completed before you can activate your license. {% endhint %}
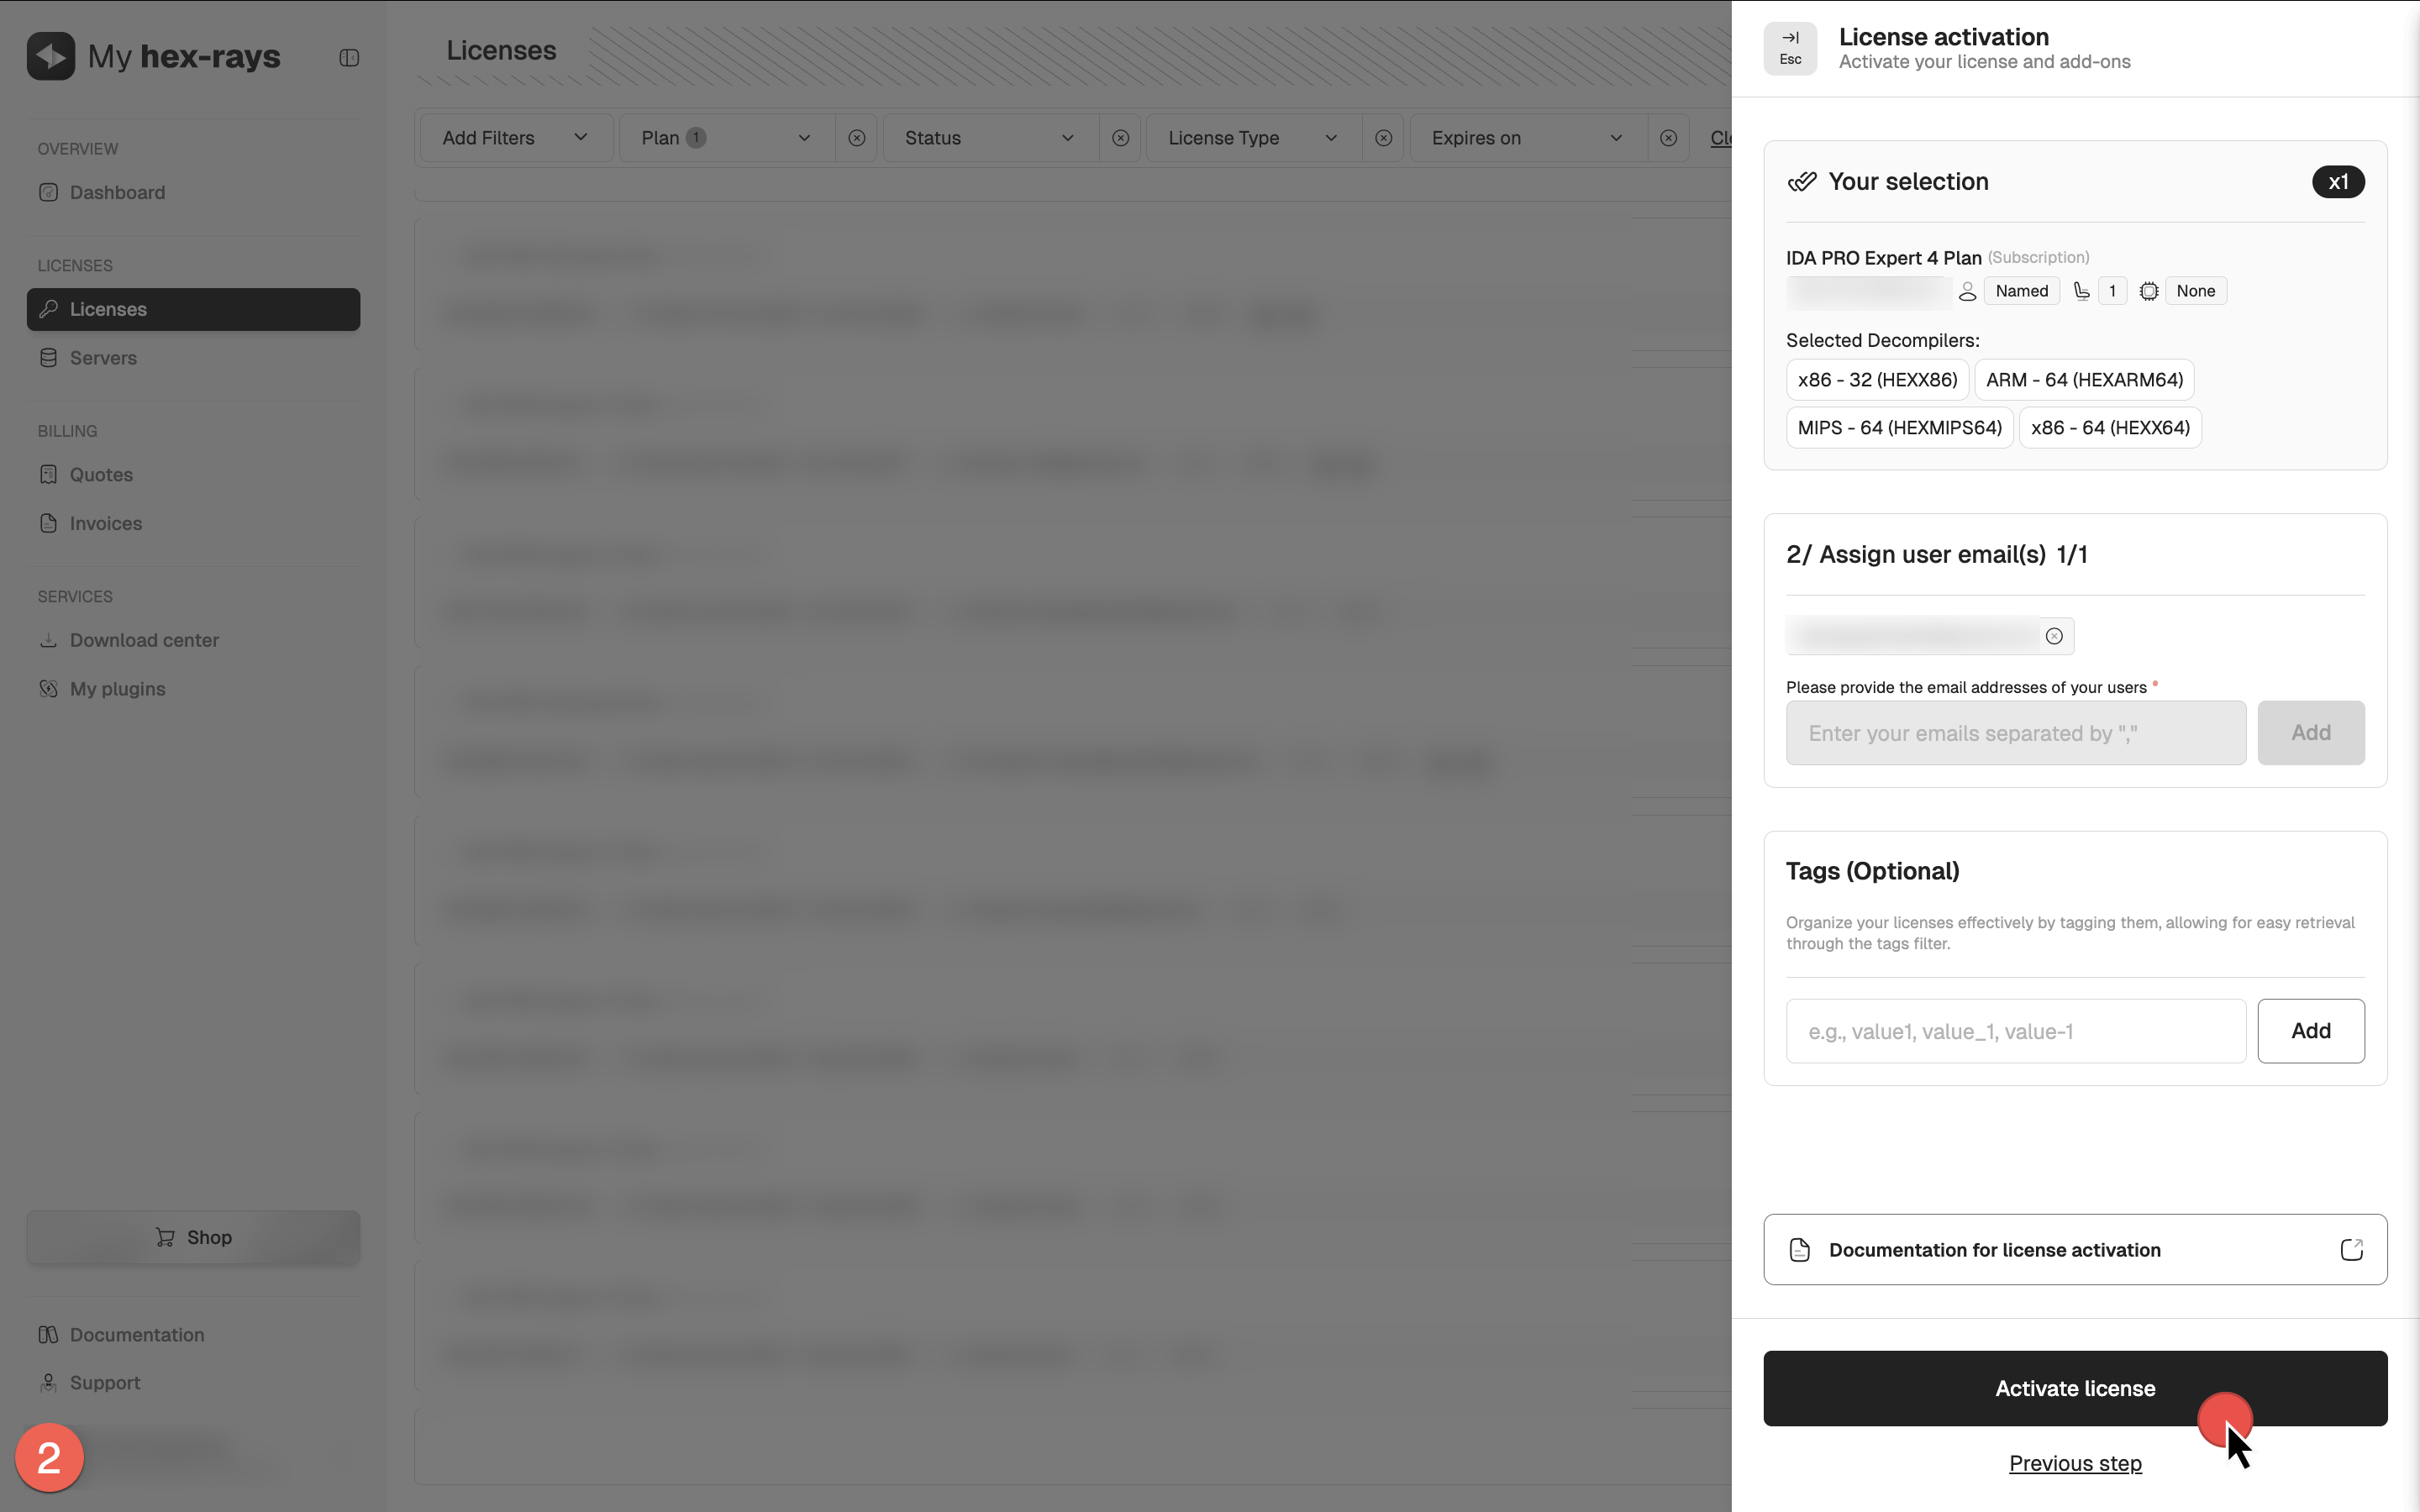
- Open the License activation dialog, select decompilers and click Next.
- Assign the ownership of the license: set the email address for this IDA instance user (it can be yours) and click Activate license.

Your license is now active.
You can check the license details and modify it if needed. If all details are correct, you can download your license key.
Computer licenses activation
- Go to My Hex-Rays portal and navigate to the Licenses tab.
- Locate the license ID you want to activate. Ensure it has the Pending activation status.
{% hint style=“info” %} If you haven’t completed the KYC procedure yet, you will need to do so for accessing paid products. A Pending KYC status indicates that your verification is still in progress and must be completed before you can activate your license. {% endhint %}
- Open the License activation dialog, select decompilers and click Next.
- Add the MAC address of the machine where this IDA instance will be installed and running (it can be yours) and click Activate license.
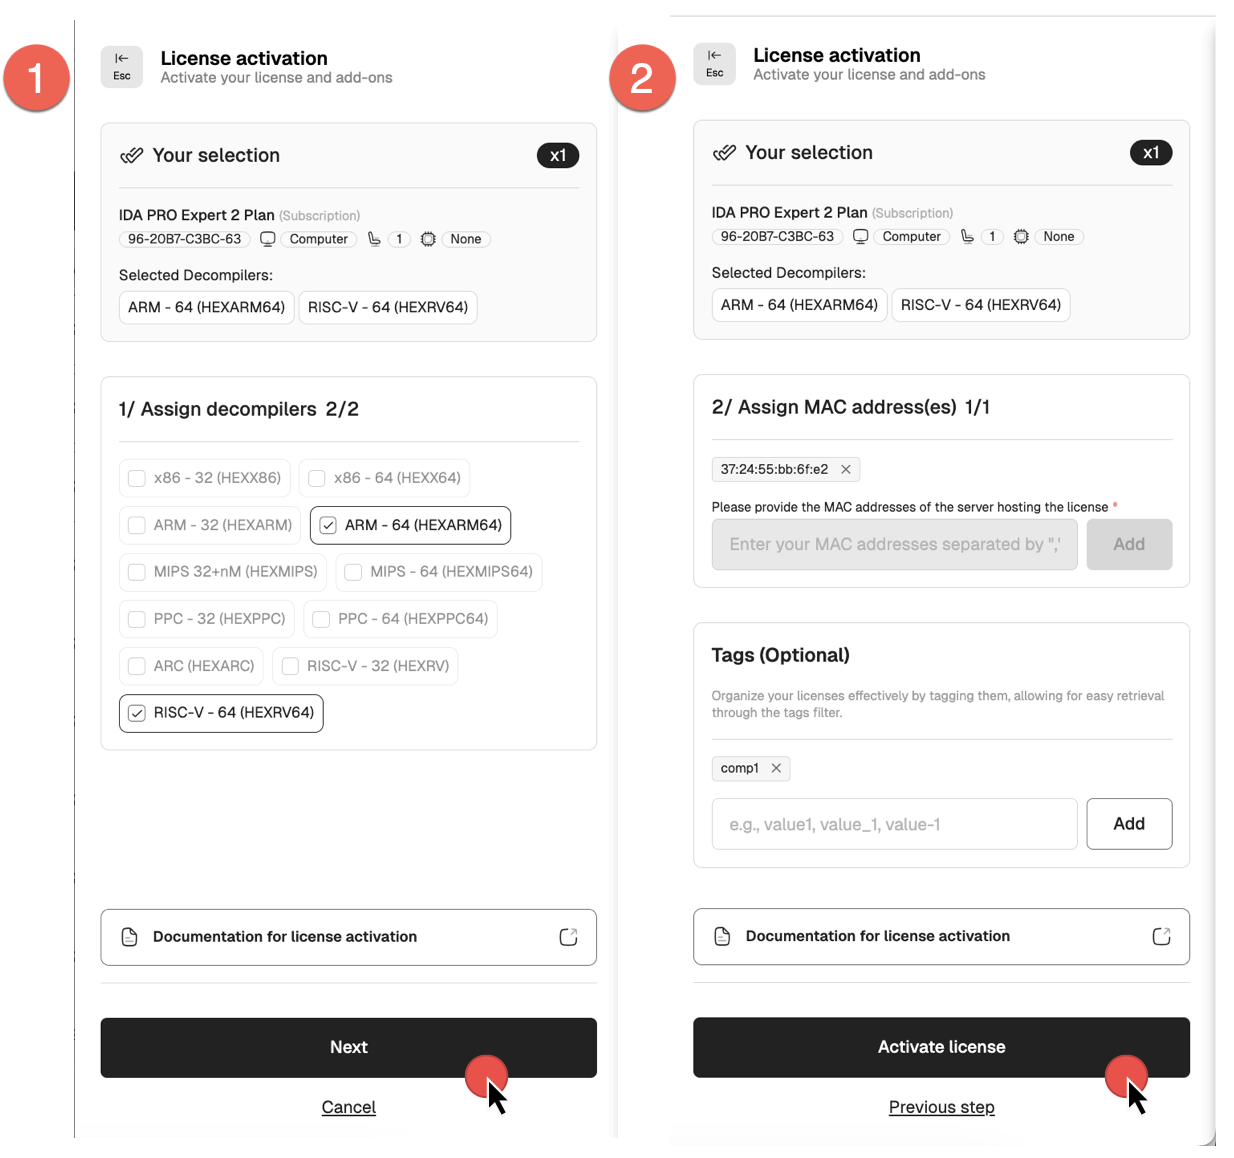
Your license is now active.
You can check the license details and modify it if needed. If all details are correct, you can download your license key.
Download the license files
If you are sure that all of the license details are correct, you can go ahead and download your license hexlic file. You will need it to complete the installation process.
{% hint style=“warning” %} Downloading the license locks the configuration and prevents further edits. {% endhint %}
- Go to the Licenses tab in My Hex-Rays portal.
- Under the Actions column, click the three dots and then Download hexlic from the dropdown menu (1), or, alternatively, in the license detail view, click Download hexlic.
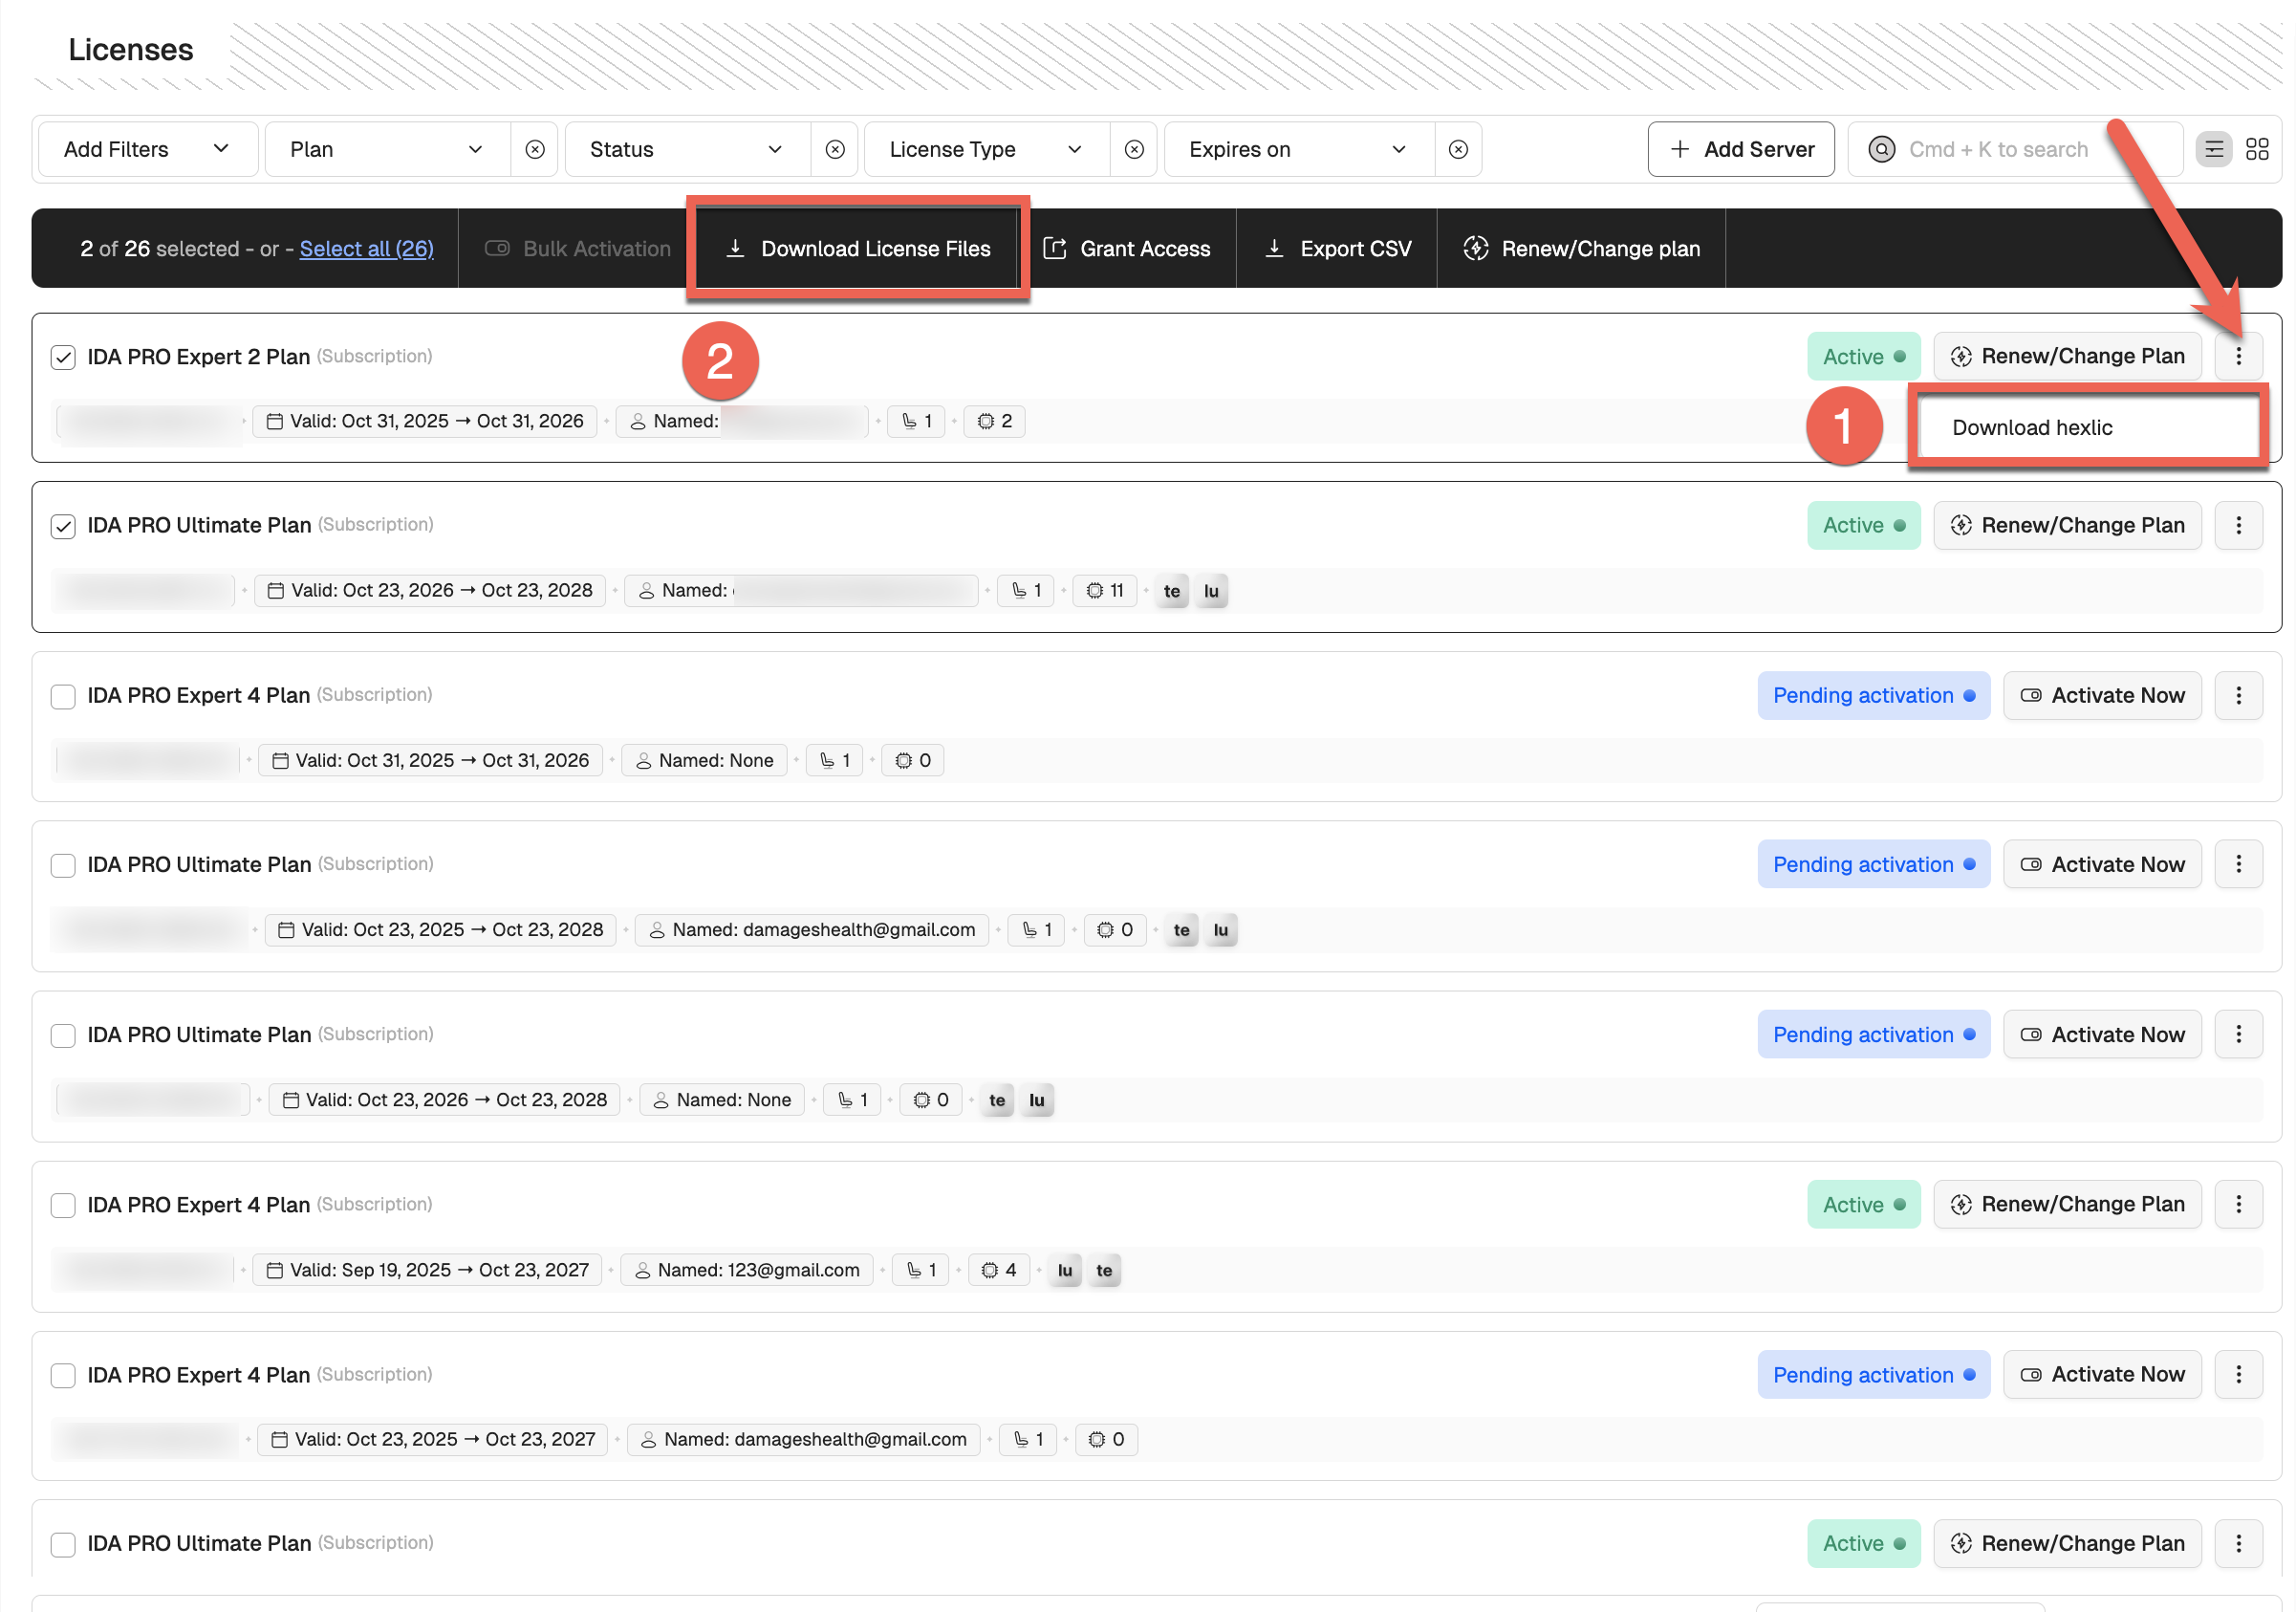
- To download multiple license files at once, select the desired licenses by ticking their checkboxes, or click Select all. Then, click Download License Files (2). You’ll receive an email with a link to download all license files and a CSV.
Download the floating license files
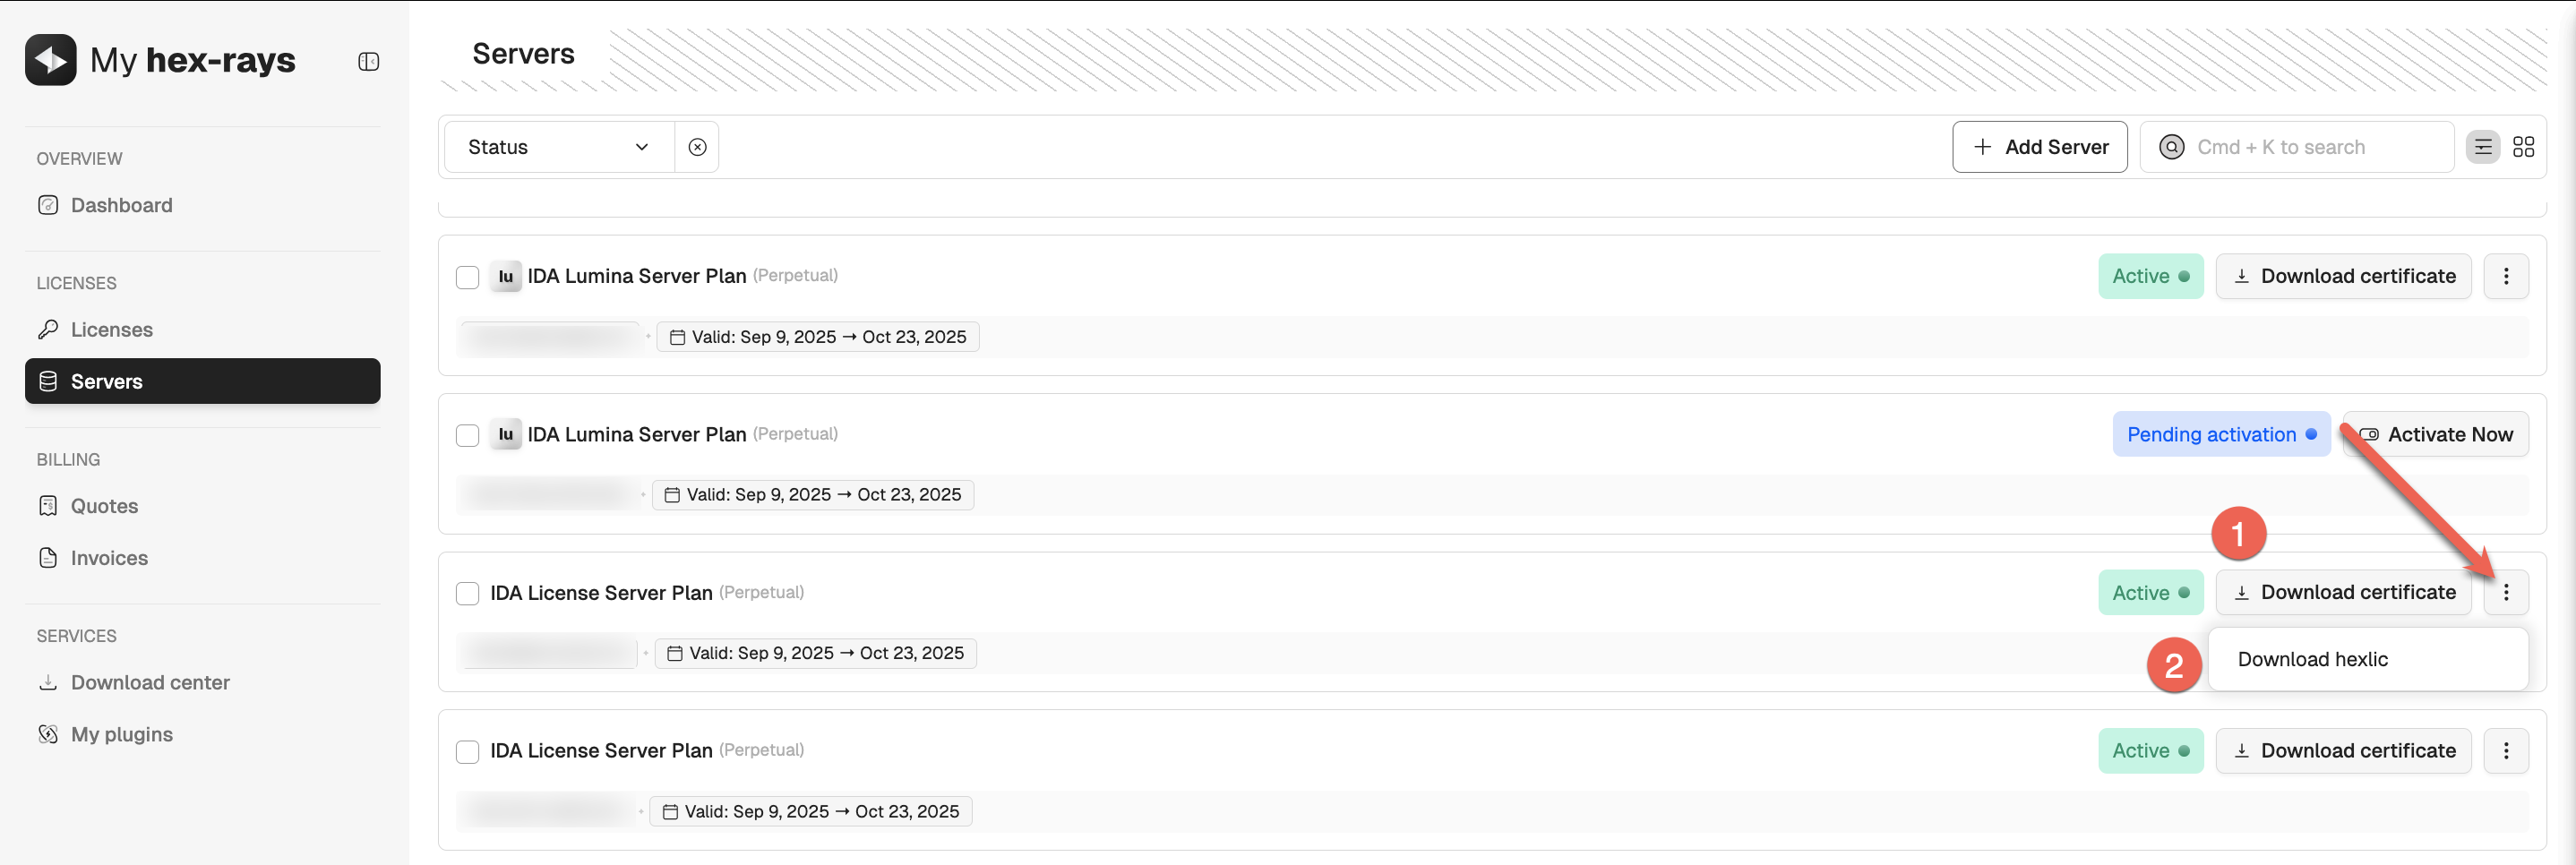
- Go to the Servers tab in My Hex-Rays portal and locate your IDA License Server Plan.
- Under the Actions column, click the three dots and then Download hexlic from the dropdown menu.
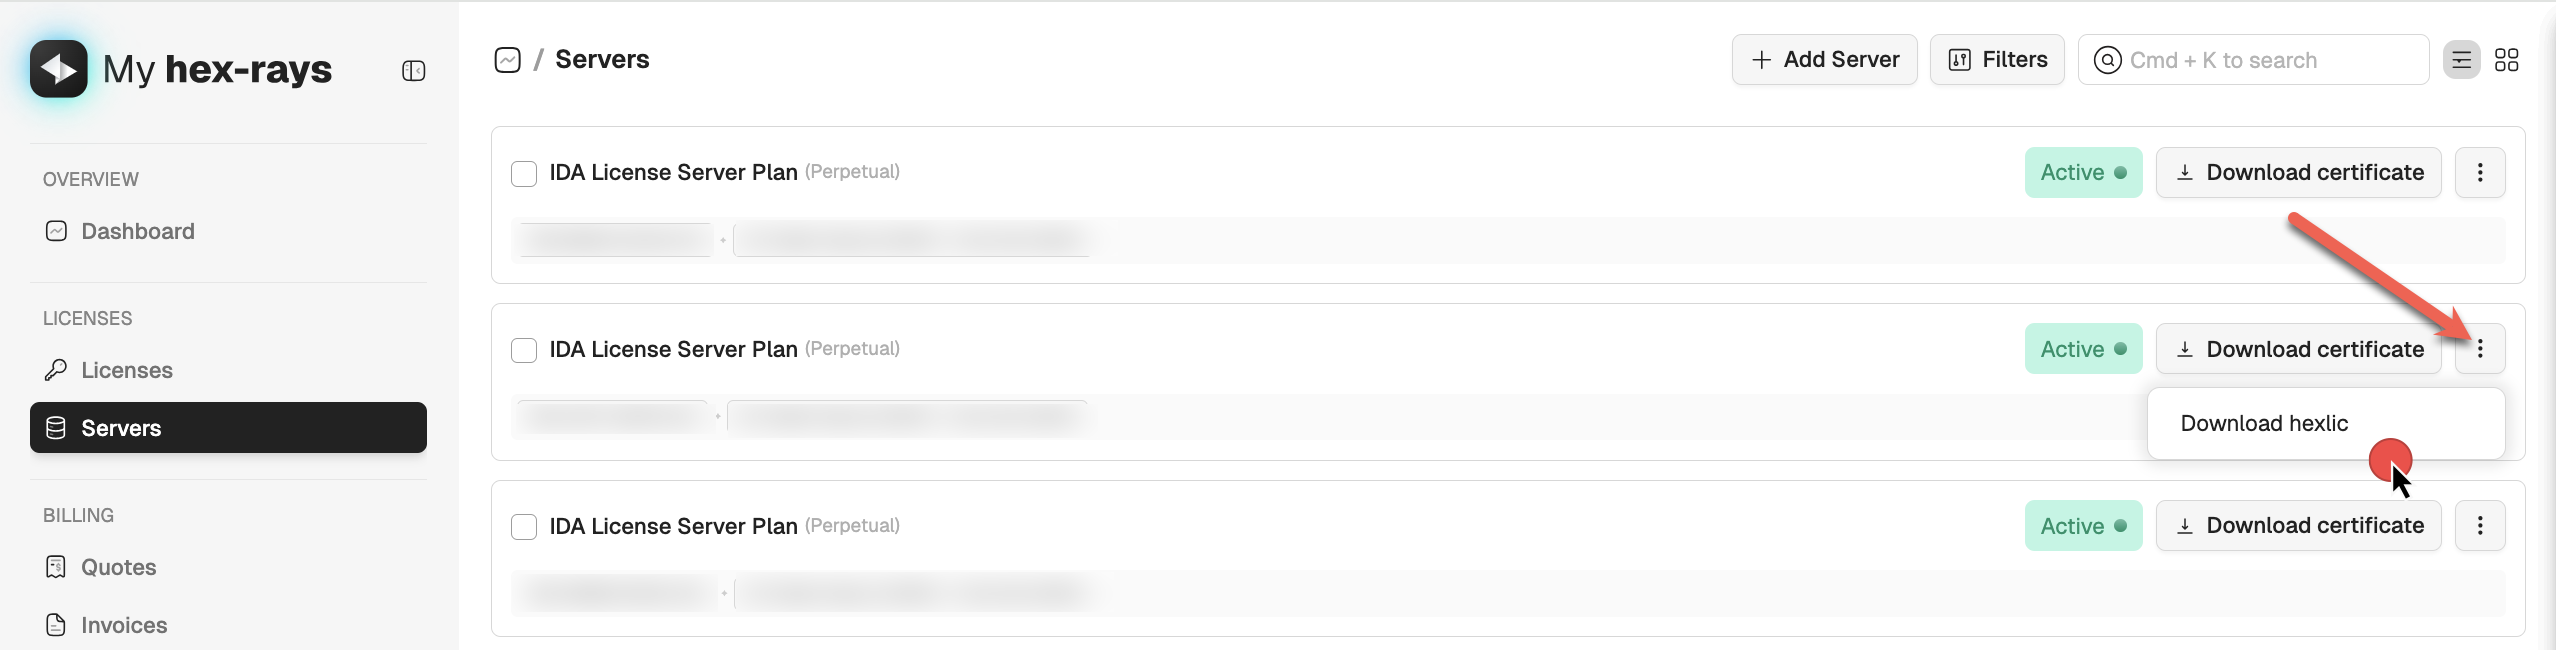
{% hint style=“info” %} In a floating license setup, you don’t need the individual hexlic files for the IDA clients installed on users’ machines. {% endhint %}
Quick alternative {% hint style=“success” %}
HCLI Commands | See HCLI Docs
hcli license get
{% endhint %}
What’s next?
Now you are ready to install your IDA instance.
Floating licenses activation
To use floating licenses, you need to activate:
- A license for your license server
- A base IDA Pro license linked to that server
Both licenses can be activated and linked in a single step, as described below.
- Navigate to the Licenses tab and look for your IDA license with Floating label. Ensure it has the Pending activation status.
- Open the License activation dialog, select decompilers and click Next.
- Assign a license server. If you added the license server before, select the Use existing server option and then tick the server from the list. If you haven’t done it yet, you can add and activate a license server now—select Add new server option, type the MAC address and click Add.
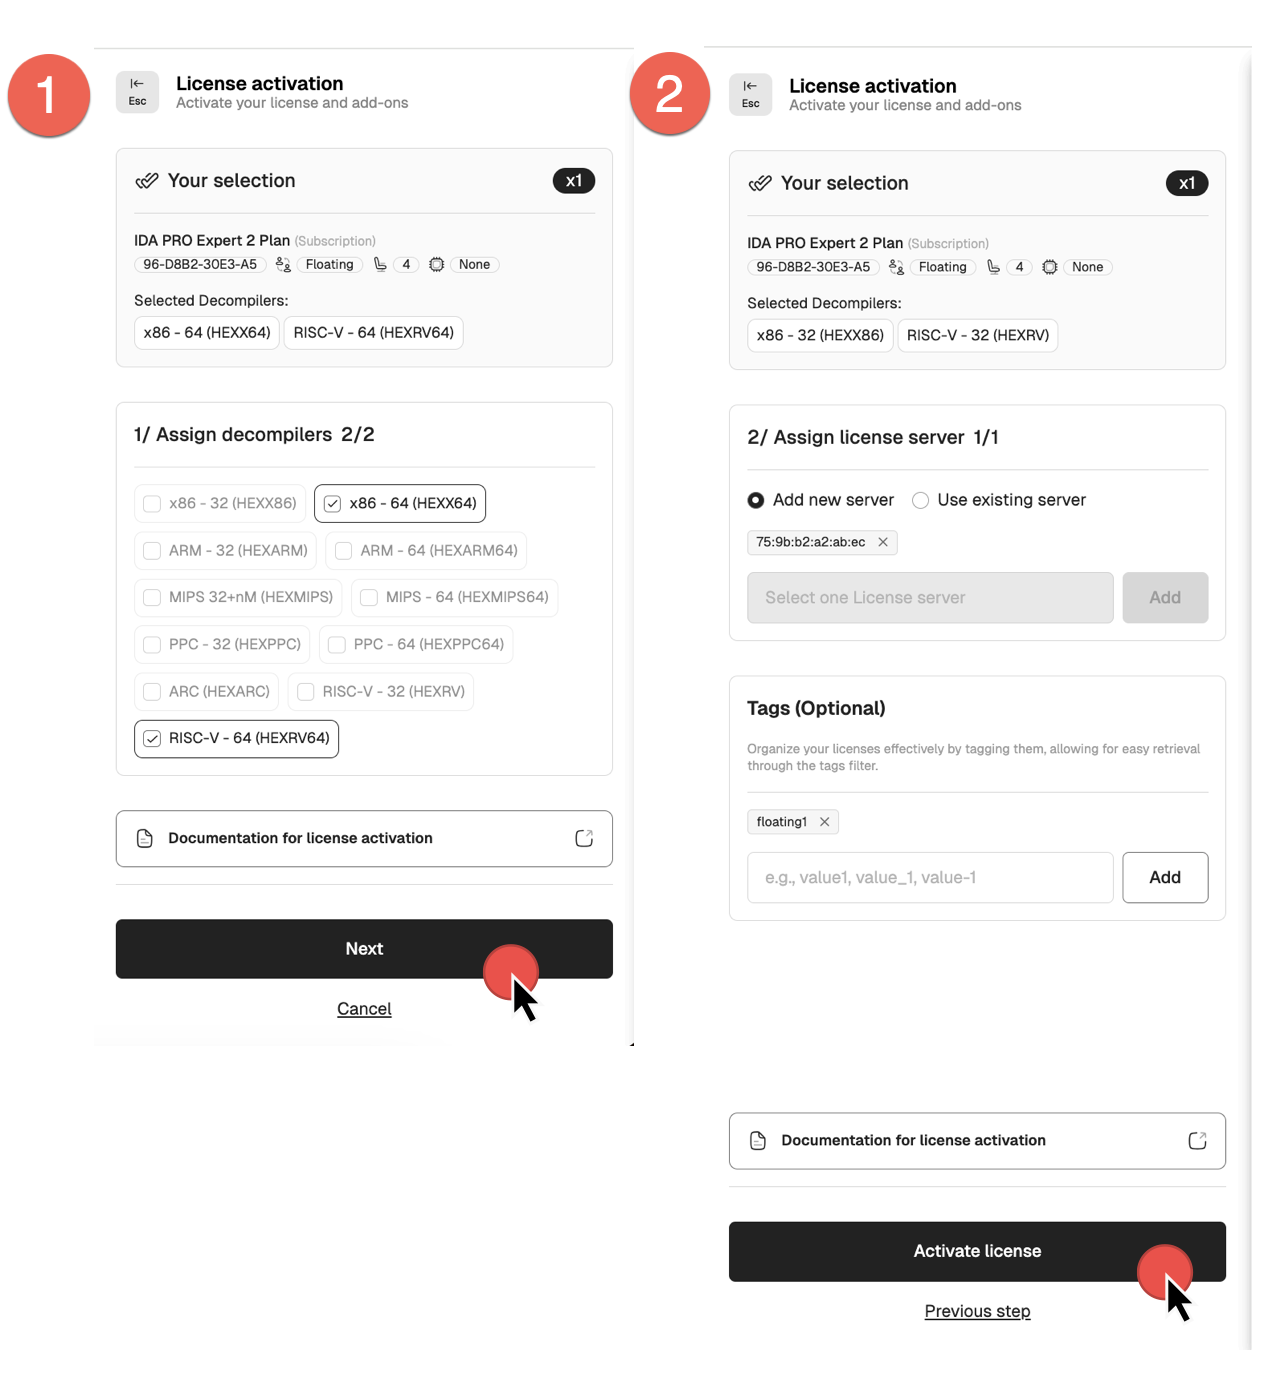
- Add tags if needed, and click Activate license to finalize.
- Your license(s) is now active.
You can check the license details and modify it if needed.
If all details are correct, you can download your license key and license files for the license server.
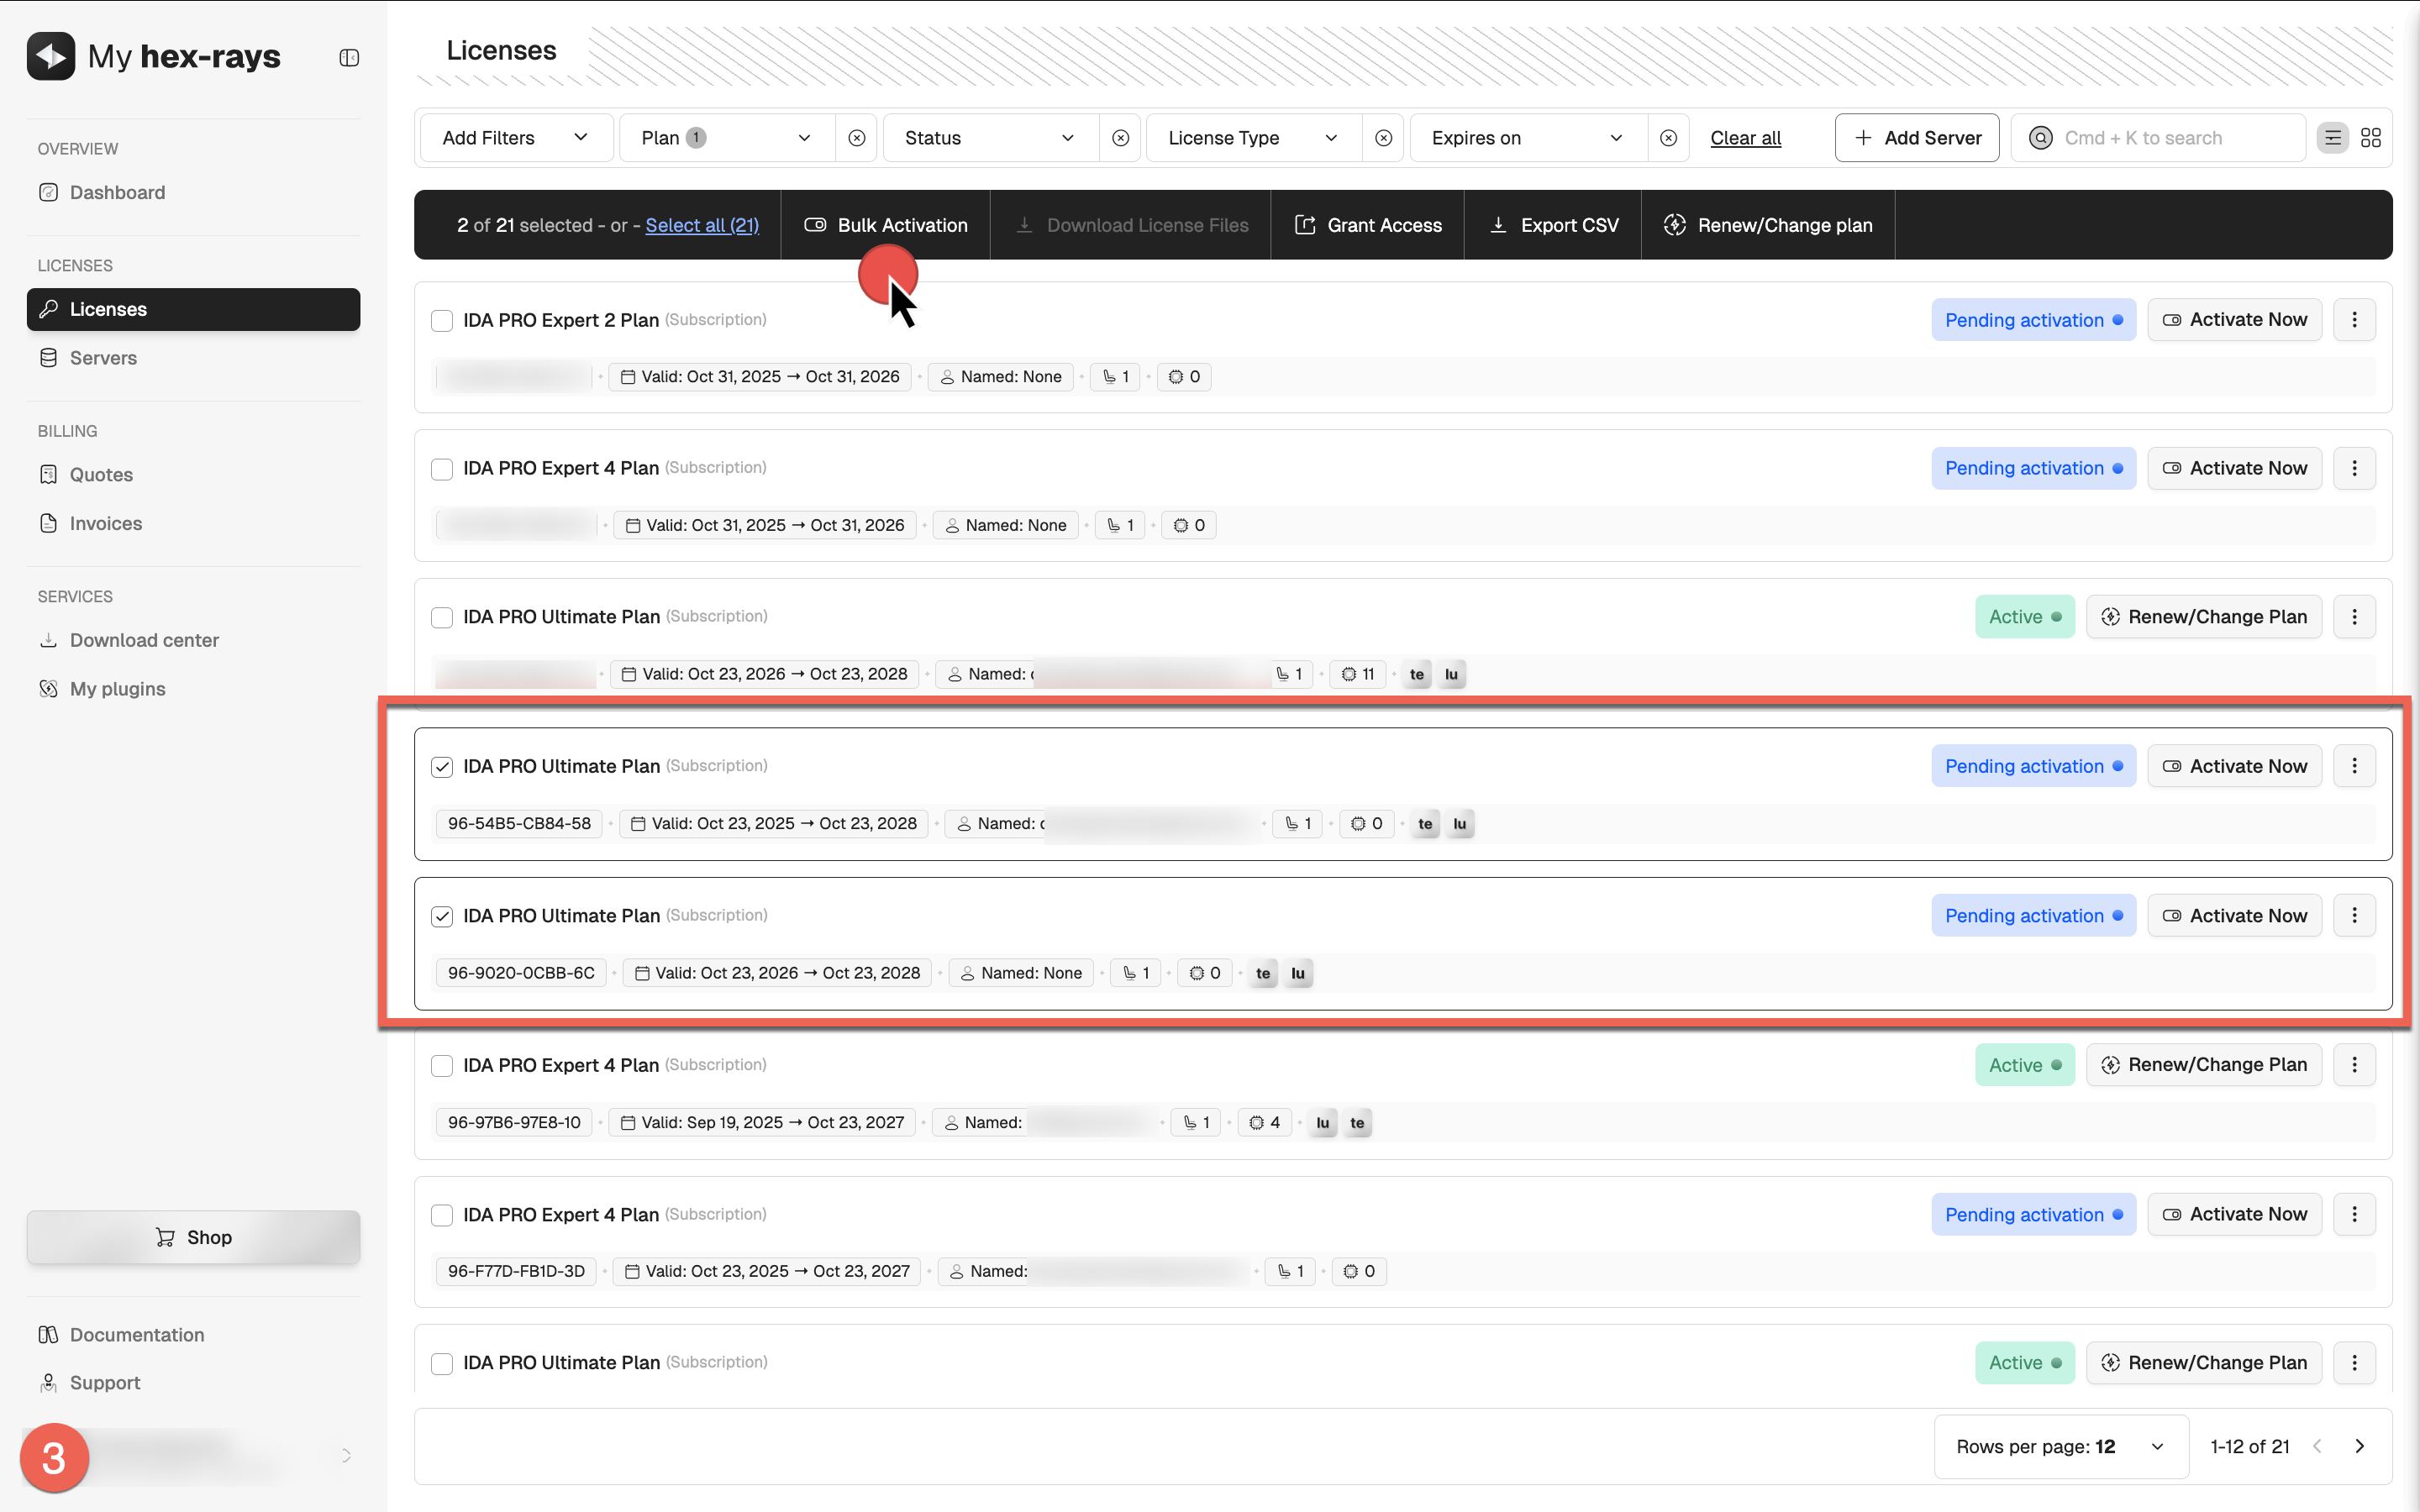
Bulk activation
If you have multiple licenses of the same type (for example, ten IDA PRO Expert 2 licenses), you can activate them all in a single batch operation. All licenses activated in bulk will share the same configuration details, decompilers set, and add-ons, while allowing for unique owner email addresses and MAC addresses.
- Go to My Hex-Rays portal and navigate to the Licenses tab.
- Locate the licenses you want to activate with the Pending activation status. Select all of them by ticking the checkboxes on their left side.
- In the top menu that appears after selection, click Bulk Activation.
- In the new dialog, select decompilers (this action is done for all licenses in a batch) and click Next.
- Depending on your licenses type, assign the license user’s emails or set the MAC addresses. Optionally, you can add tags.
- Click Activate Licenses.
You’ve noticed a mistake? No worries, you can still edit your selected licenses before downloading them.
Bulk download the license files
- In the Licenses tab, select the licenses for bulk download and click Download License Files.
- After confirmation, you’ll get an email with link to download all license files + CSV.
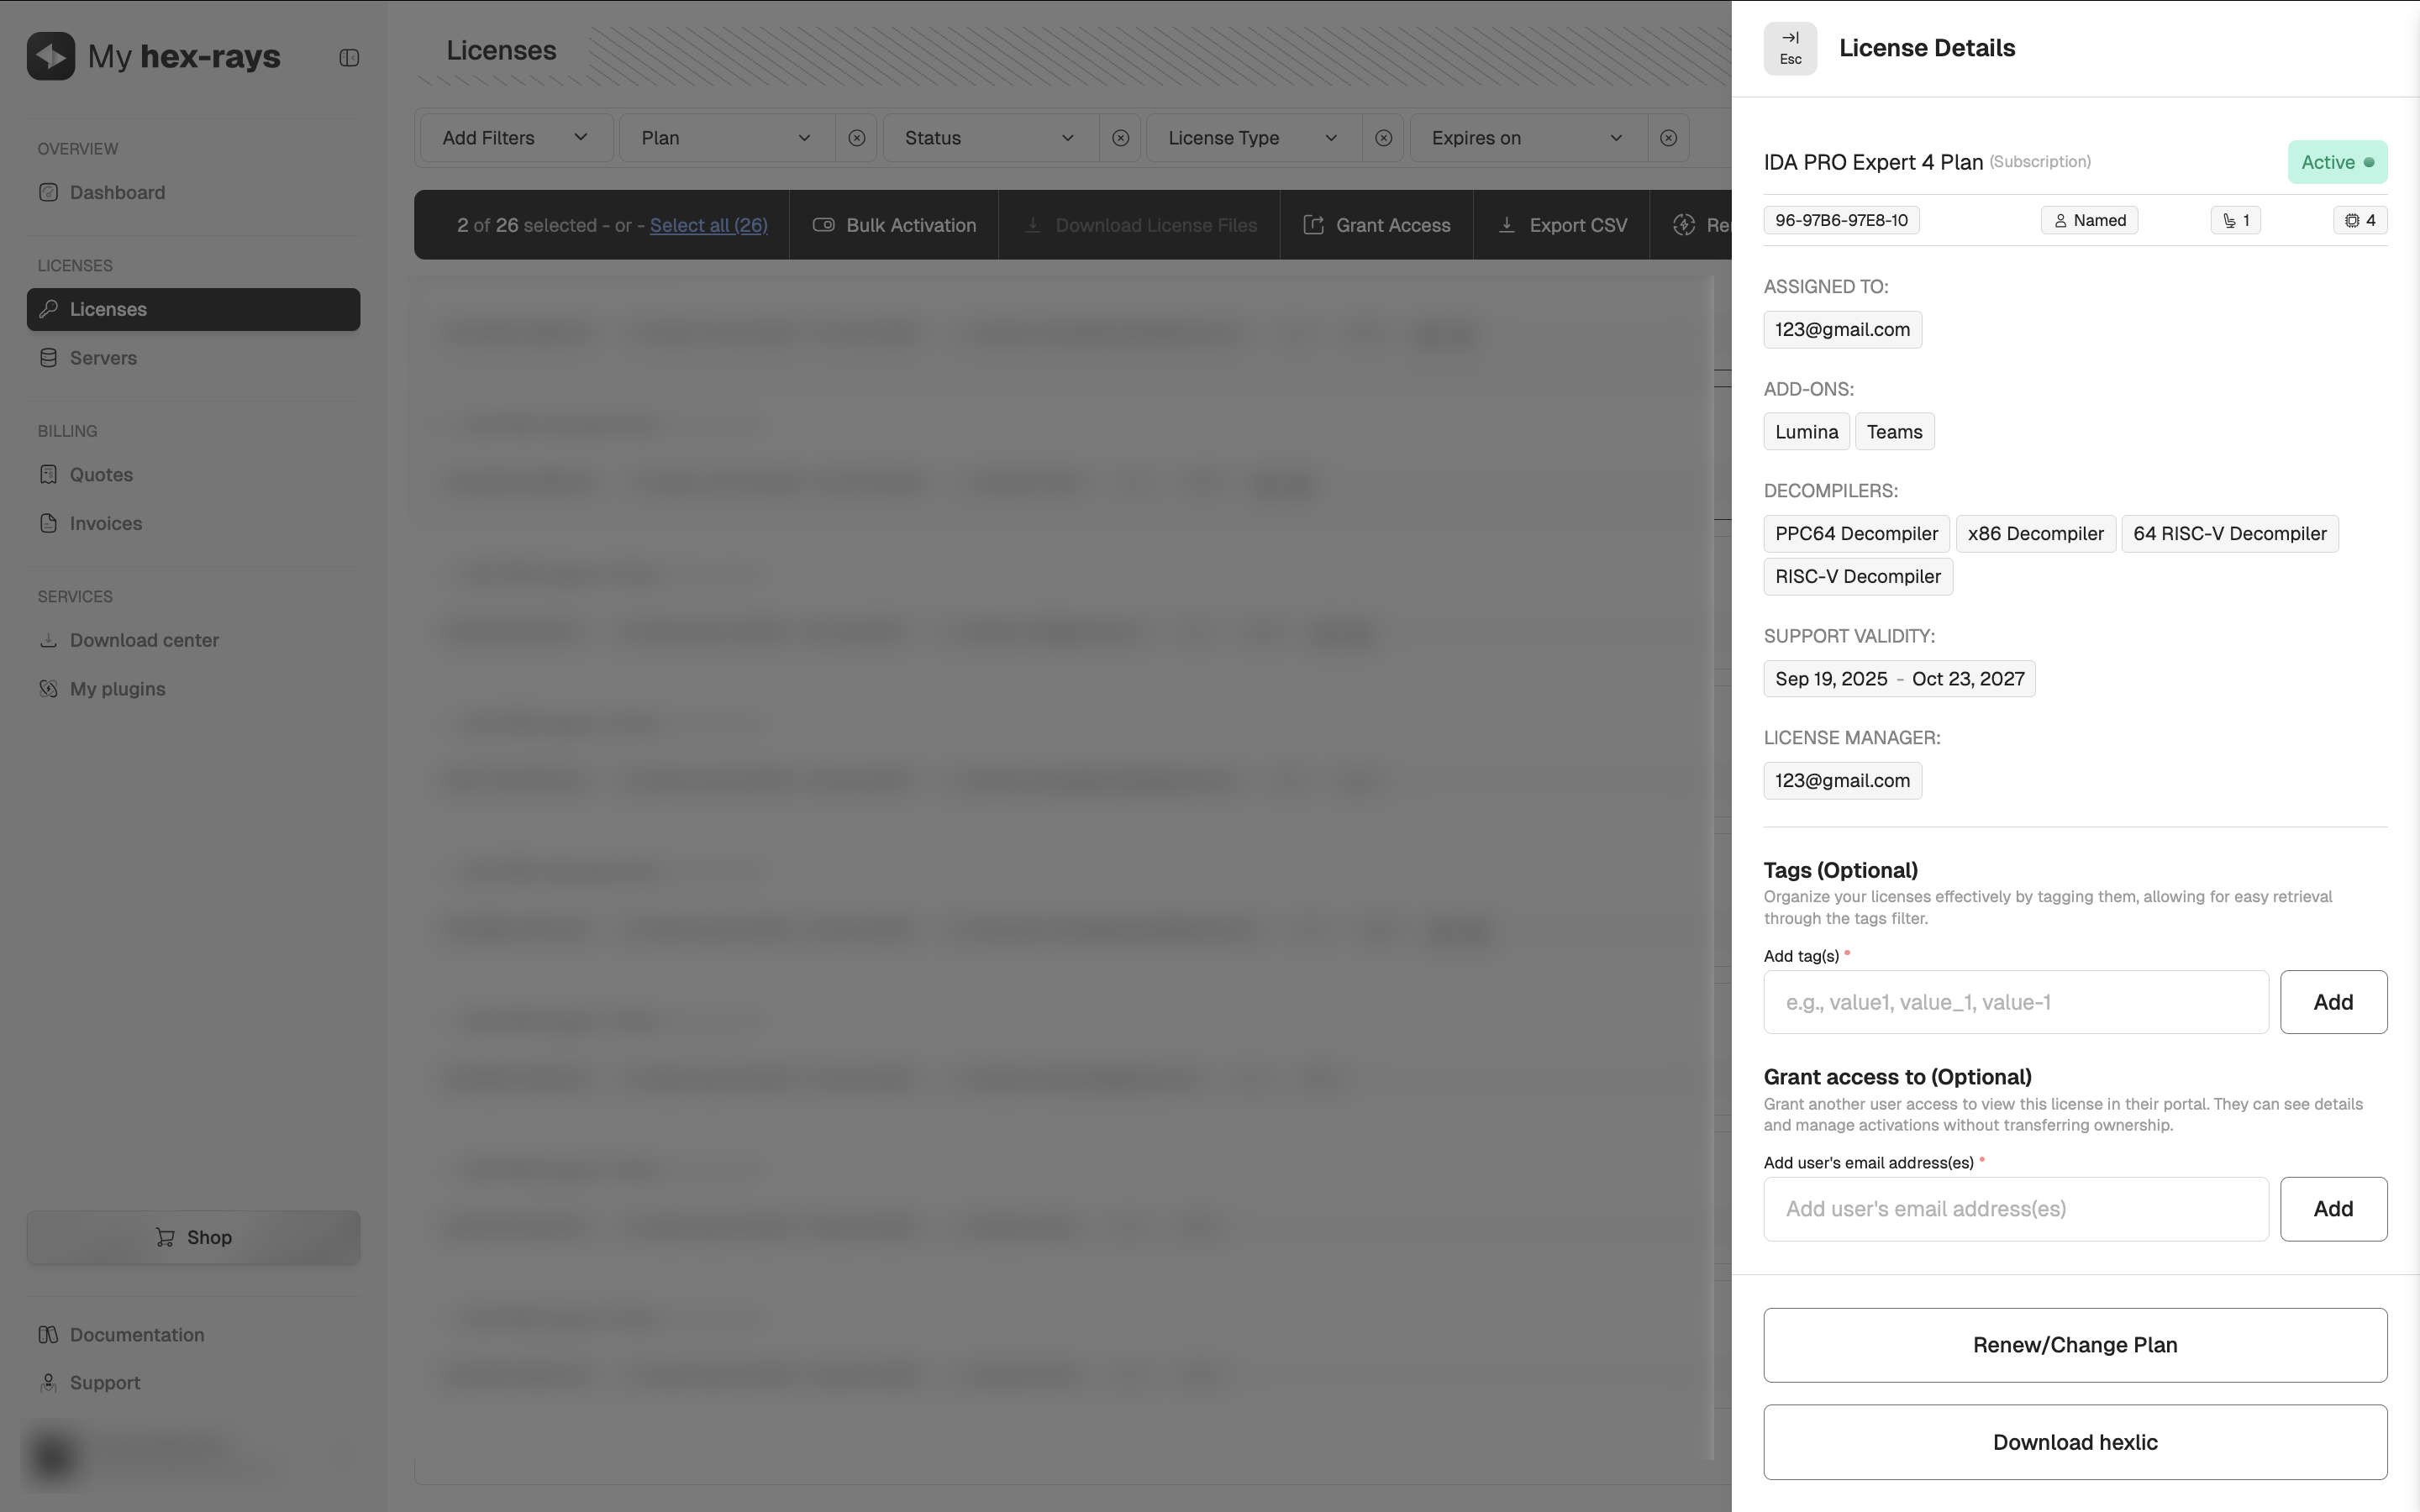
License details
The License Details card provides a complete overview of the license, including assigned decompilers and users it has been shared with. You can edit access permissions and tags at any time, even for active and already downloaded licenses.
To open the License Details view, go to the My Hex-Rays portal, open the License or Servers tab, and click the license you want to view.
License editing
When you activate your license using one of the methods shown above, you can still make changes—such as modifying the decompiler set—as long as you have not downloaded the license file(s). Once the license file(s) are downloaded, further modifications will no longer be possible.
To edit the license:
- Go to My Hex-Rays portal and navigate to the Licenses or Servers tab.
- Locate the licenses you want to edit with the Active status. Under the Actions column, click the three dots and then Edit from the dropdown menu, or alternatively, in the license detail view, click Edit. If the Edit option is not visible, it means the license has already been downloaded and can no longer be edited.
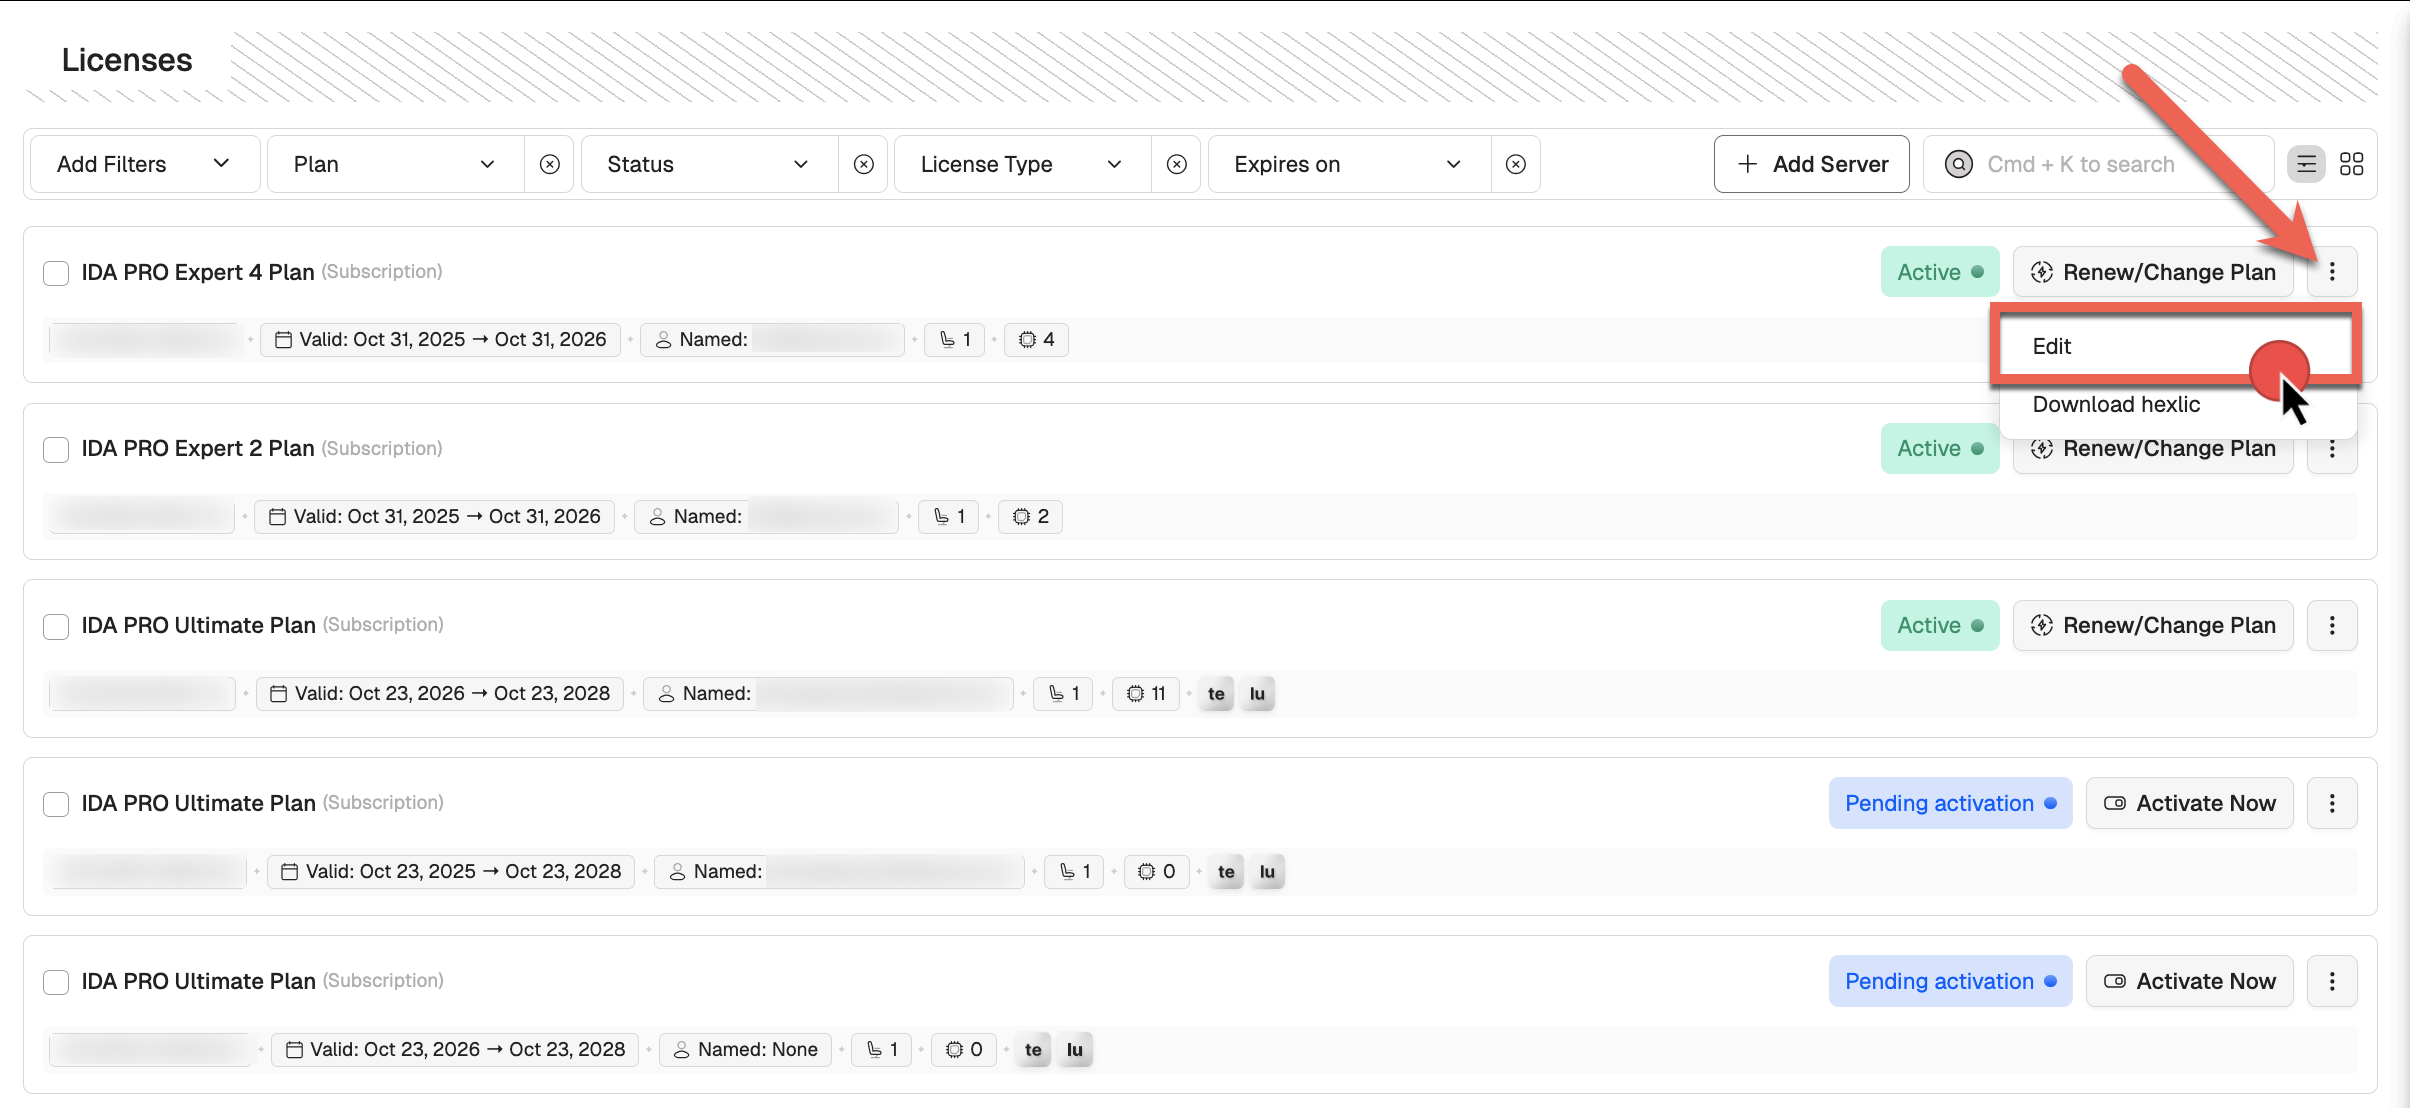
- Make changes and click on Next/Activate license to confirm.
Server licenses
If your subscription includes a server (for Private Lumina, Teams or floating licenses), you’ll need to activate the corresponding server licenses to download the license files. To do so, make sure to add the relevant servers to your account.
{% hint style=“info” %} You can create and activate the license server simultaneously during the IDA floating license activation process. {% endhint %}
Add servers
- In My Hex-Rays portal, go to the Servers tab and click + Add server.
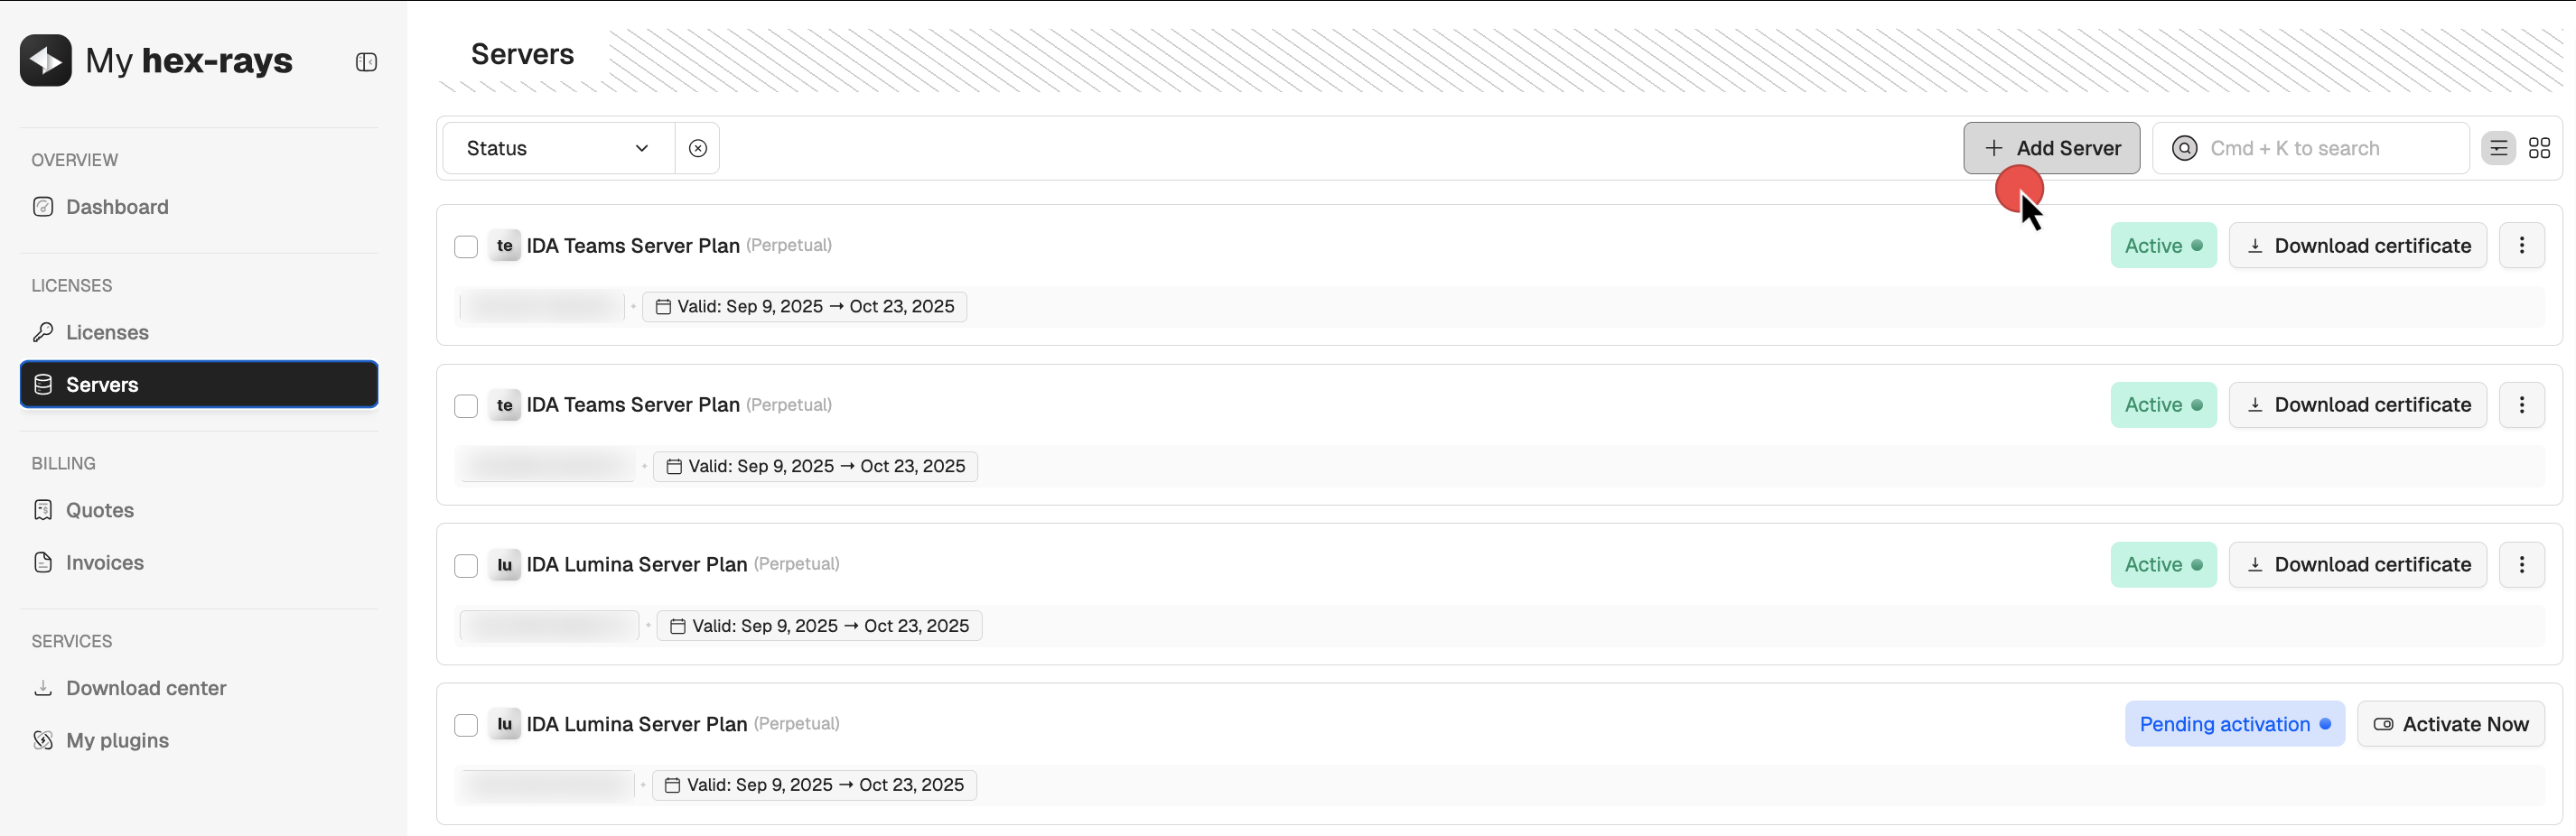
- Select the type of server(s) you want to add and click Next. You may add multiple servers at one go.
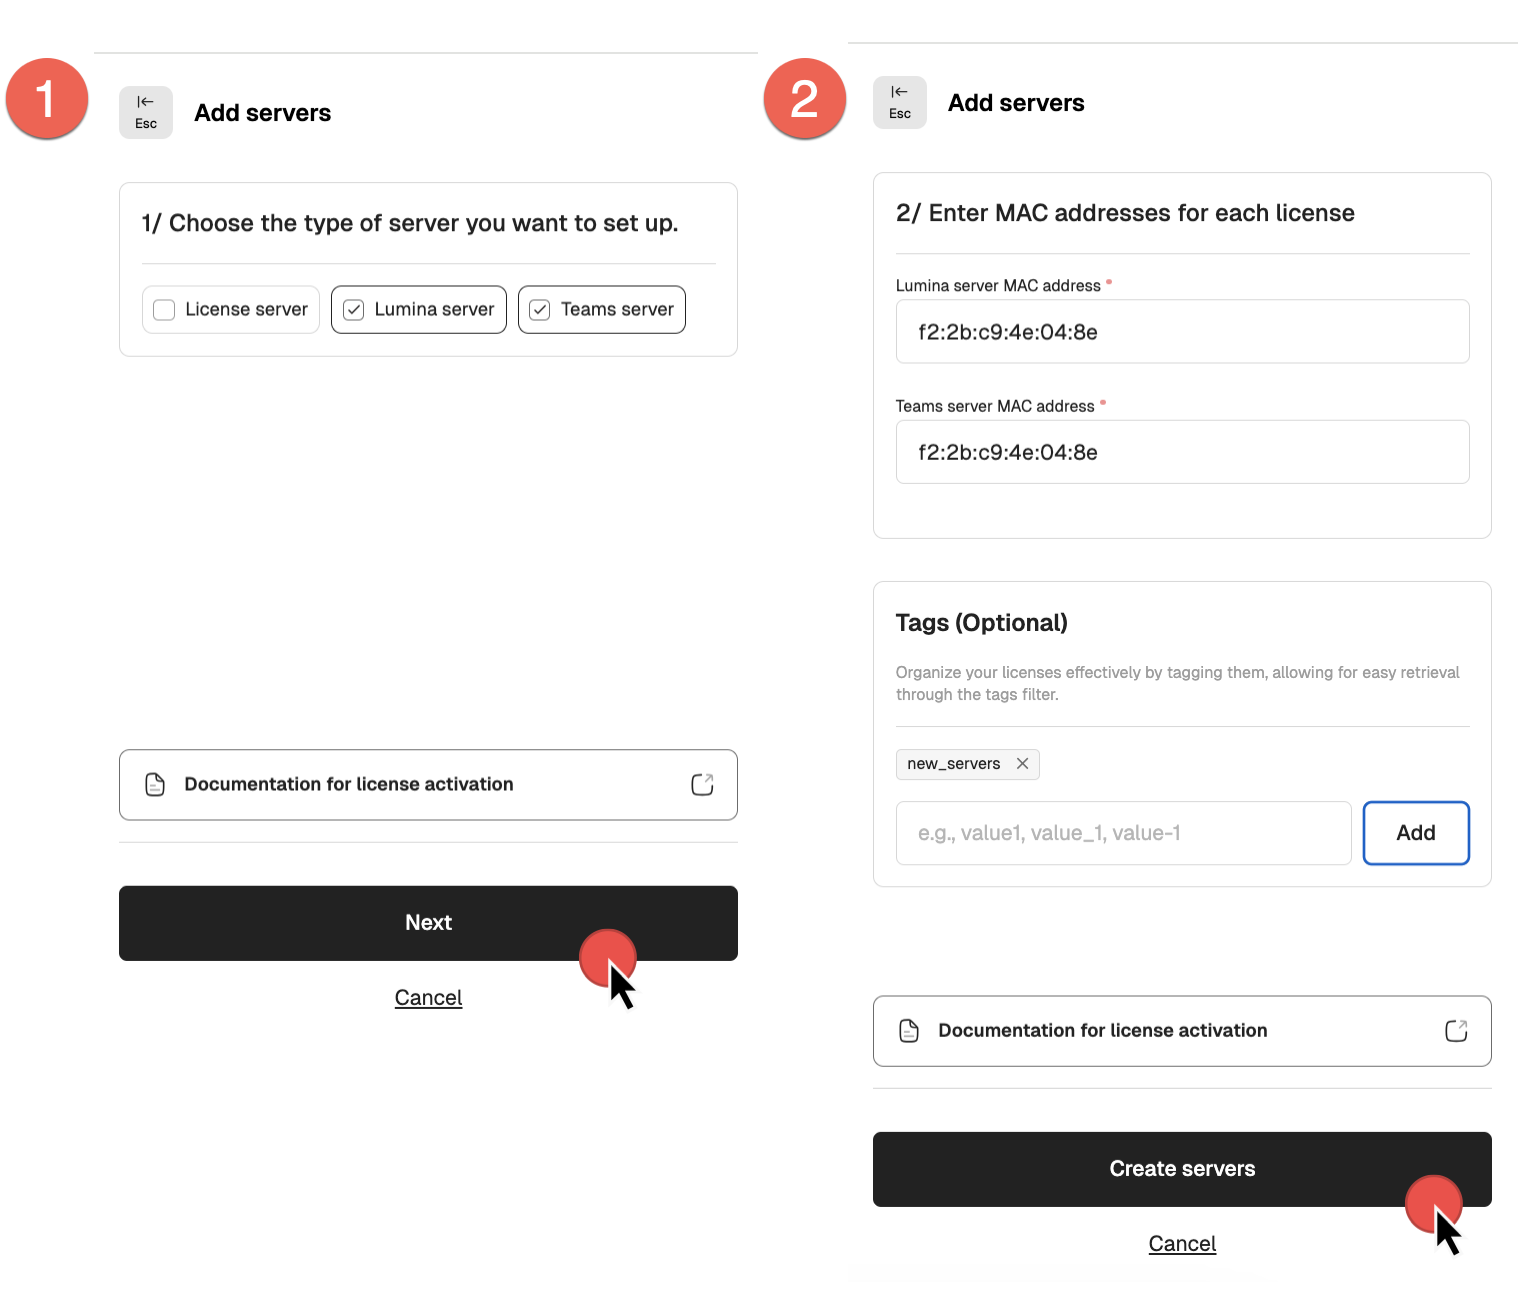
- Assign MAC addresses and click Create servers to finalize.
- After that, your servers will appear in the Servers list with an Active status, allowing you to download the server certificates (1) and hexlic files (2).
- If you are using floating licenses, you can now go ahead and activate your IDA licenses that uses the server.
{% hint style=“info” %} Ensure all floating license plans associated with the license server are activated before downloading the license server hexlic file. {% endhint %}
Downloading the server license files
Once all IDA PRO licenses intended for use with your floating license server have been activated, you can proceed to download the server’s hexlic file and license certificate.
Maintaining this order is crucial—the hexlic file contains essential details about the linked licenses, which are properly embedded only when the IDA license is associated with the specific floating license server.
License server installation for admins
Server installation for floating licenses should be done by the administrator. Check our Admin Guide for details.
How can I start using IDA as a floating license user?
Once your administrator installs a license server, adds particular license seats to the pool, and hands over the credentials, you are ready to install your IDA instance.
You don’t need to download a license file/key to your local machine while using the floating licenses server.
New to the floating licenses? Check our Floating Licenses User Guide.
Floating licenses check-out
Every time you launch IDA, you’ll see the License Manager pop-up window. As long as there are free seats, you can check-out one of the available licenses and start using IDA.
{% hint style=“info” %} Note that some of the available licenses may have different decompilers and add-ons enabled. {% endhint %}
Add-ons servers’ licenses
Private Lumina server activation for admins
Each of our add-ons, Teams and Private Lumina, requires an active license to work properly. To proceed with Lumina installation and setup, an active server’s license is required.
- Add server in your account (activate the license).
- Locate your server license on the Servers tab and download the following files:
- lumina server certificate (1)
- .hexlic file (license key) (2)
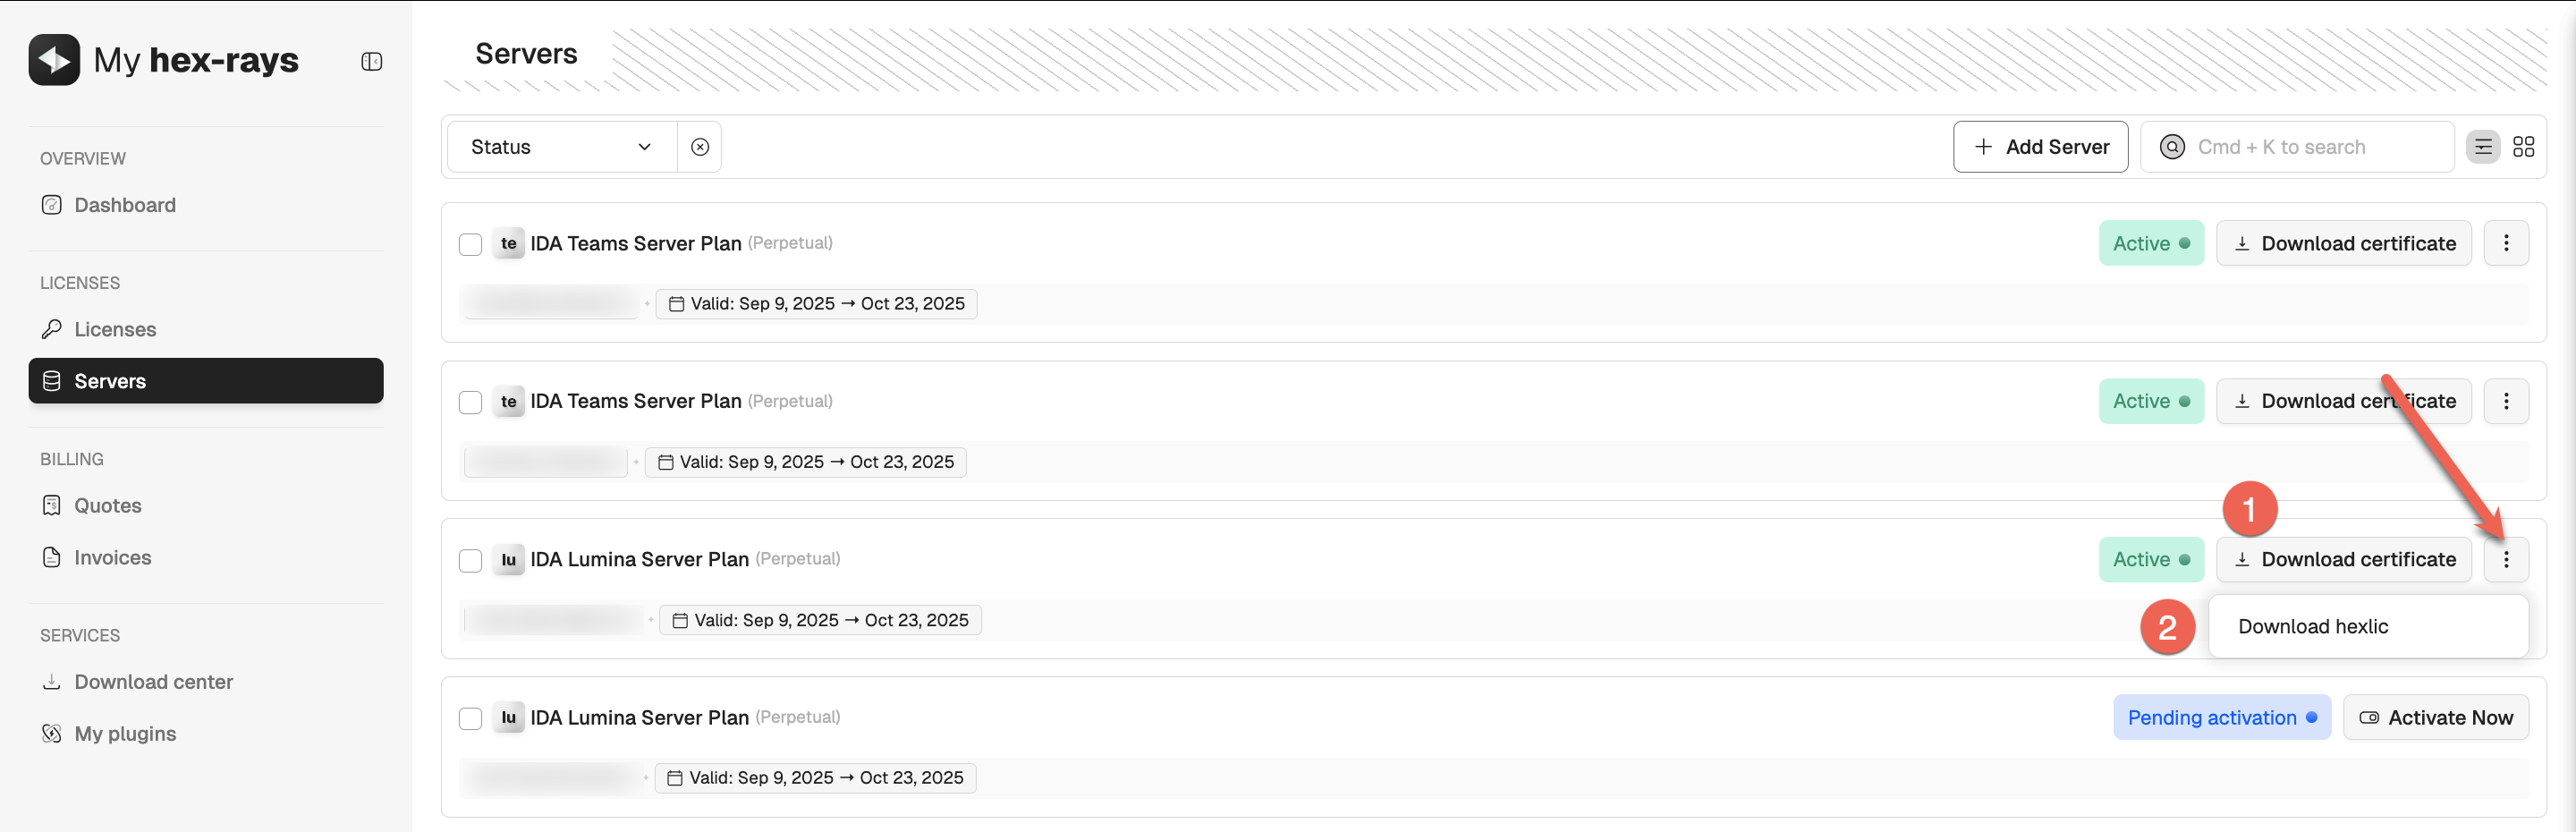
You’ll need both files to continue with the server installation and setup.
Quick alternative {% hint style=“success” %}
HCLI Commands | See HCLI Docs
hcli license get
{% endhint %}
Private Lumina server installation for admins
Server installation for Private Lumina should be done by the administrator. Check our Admin Guide for details.
Teams server activation for admins
Each of our add-ons, Teams and Private Lumina, requires an active license to work properly. To proceed with Teams installation and setup, an active server’s license is required.
- Add server in your account (activate the license).
- Locate your server license on the Servers tab and download the following files:
- teams server certificate (1)
- .hexlic file (license key) (2)
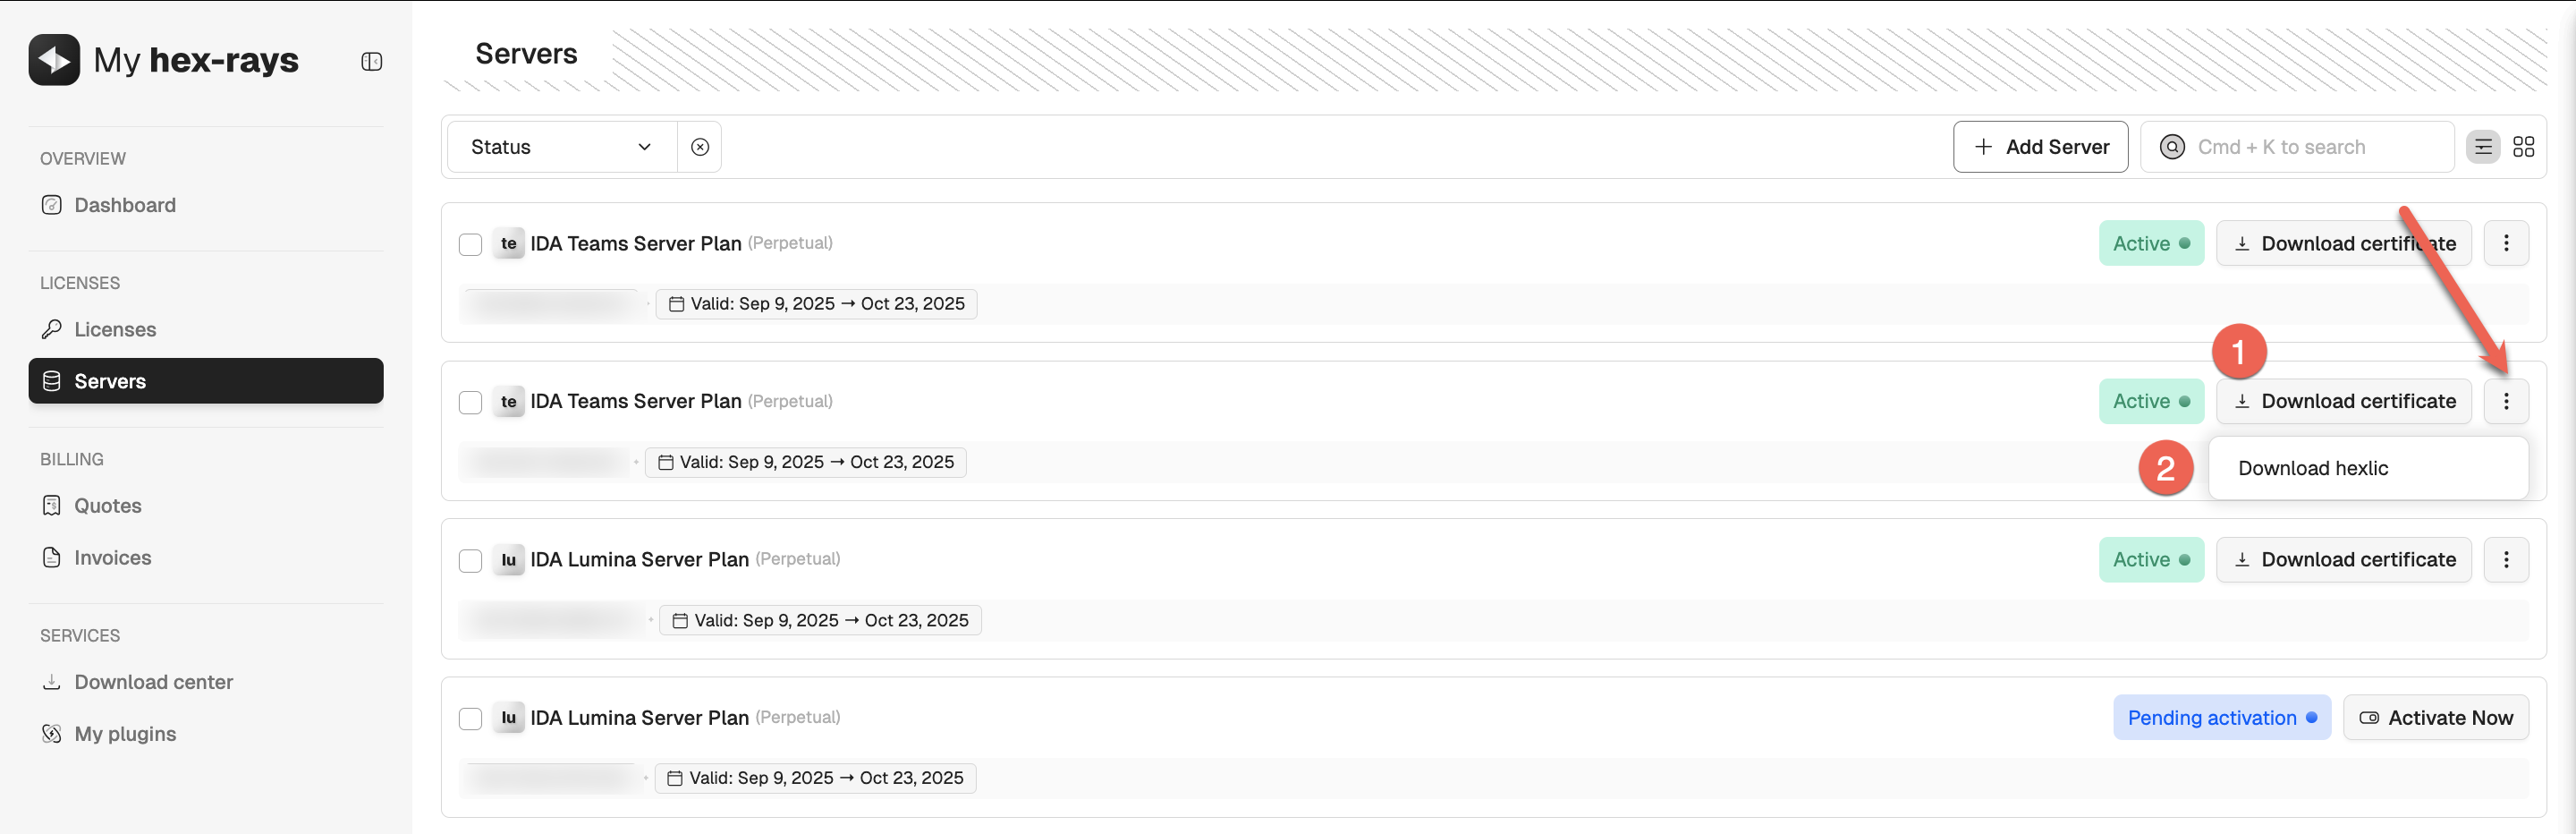
You’ll need both files to continue with the server installation and setup.
Quick alternative {% hint style=“success” %}
HCLI Commands | See HCLI Docs
hcli license get
{% endhint %}
Teams server installation for admins
Server installation for Teams should be done by the administrator. Check our Admin Guide for details.
Grant access to manage licenses
You can invite your teammates to view and activate licenses via their own My Hex-Rays account. To grant access:
- Select license(s) you want to share and click Grant Access (1).
- Add the email address of your teammate and click Confirm (2).
- Your team member will receive an email invitation to log in to the portal and access the shared licenses.
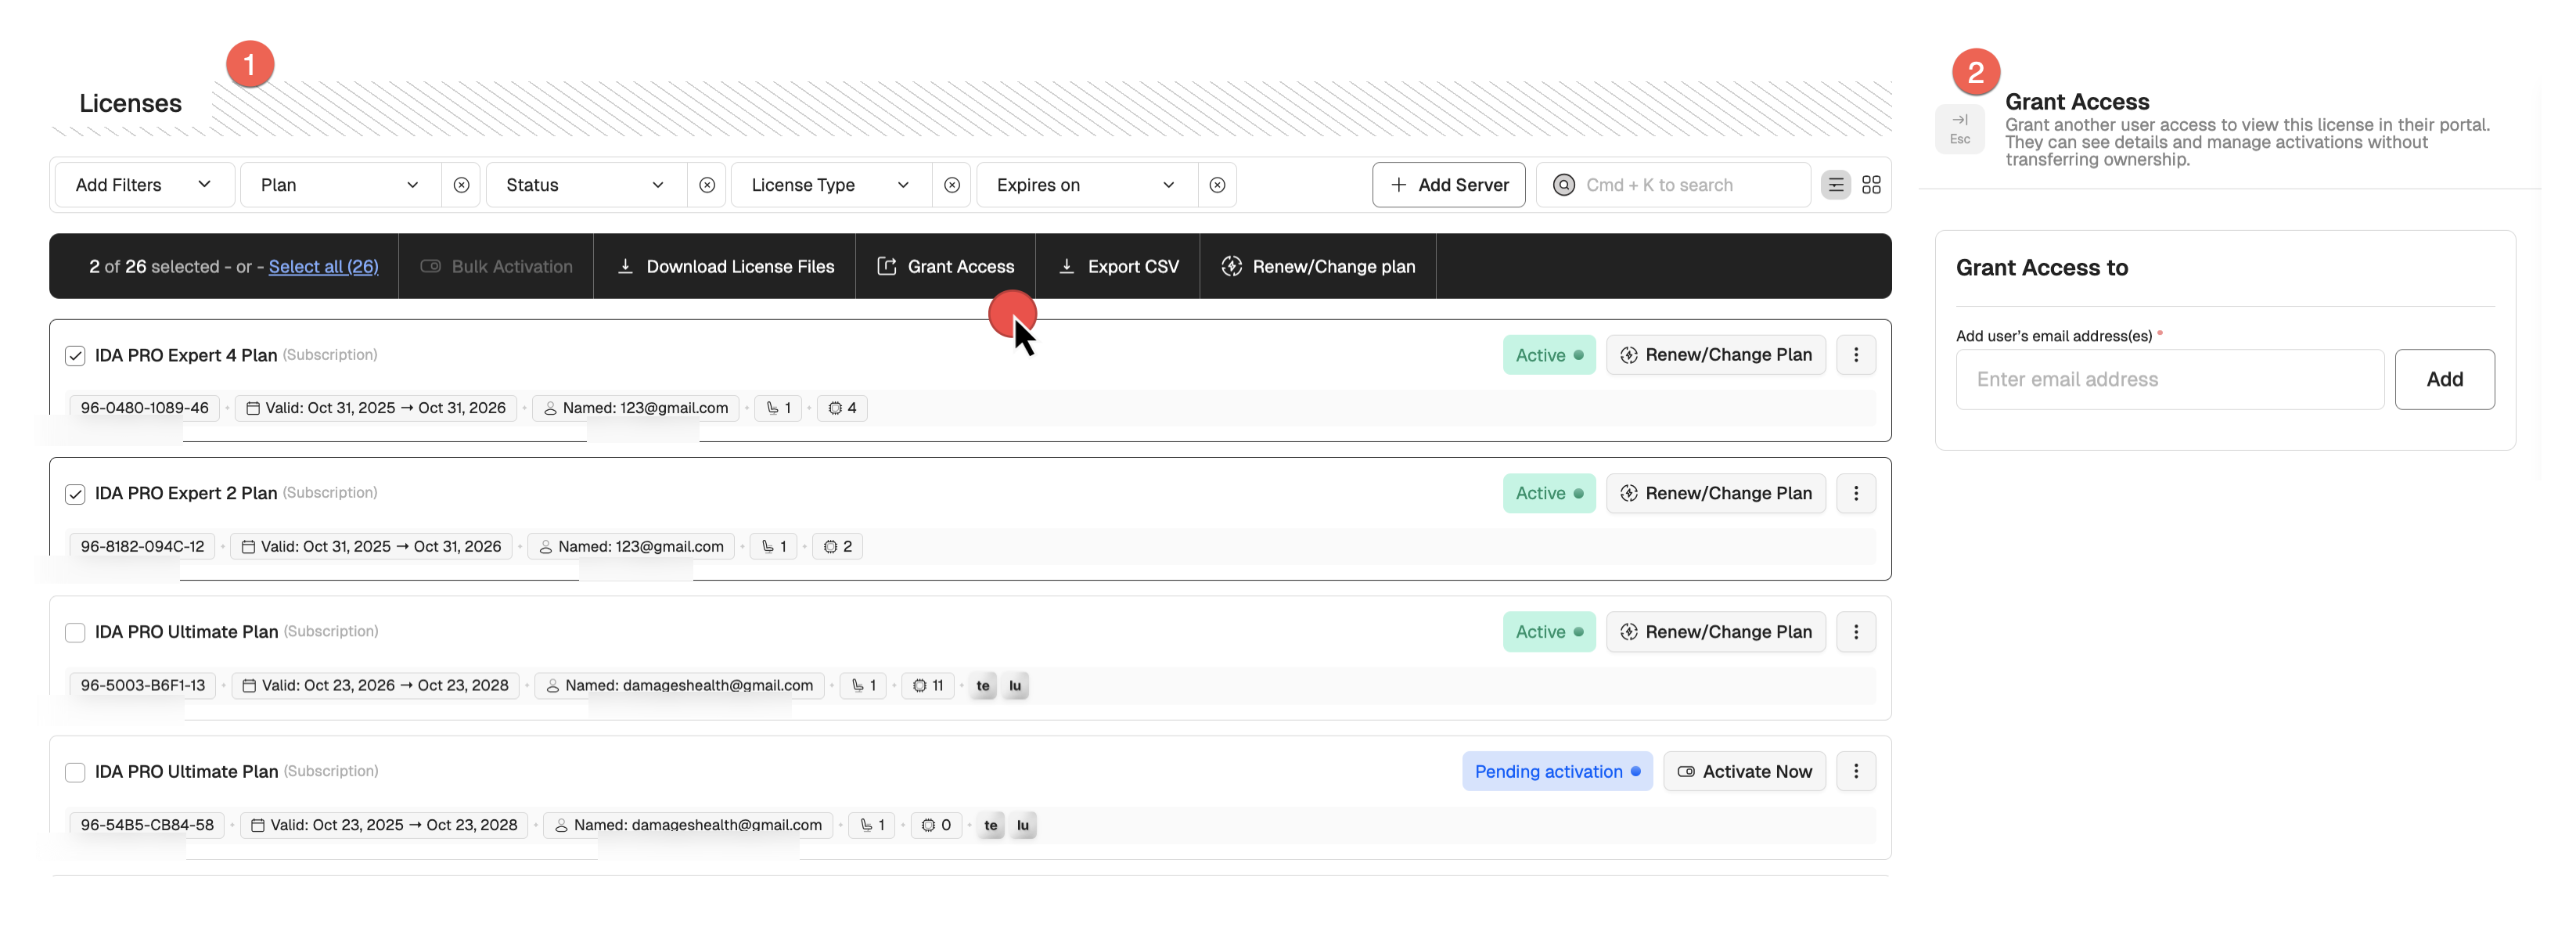
The License Details view allows you to review who currently has access to the license, remove users, or grant access to new ones.
Key points:
- Once a license has been downloaded, it cannot be modified.
- Multiple licenses of the same type can be activated in bulk.
- You can grant the access to manage licenses to other teammates, while the ownership of the license remains the same.
Change your plan
If you need additional decompilers or add-ons, you can upgrade your plan at any time through My Hex-Rays portal.
Steps to update your plan:
- Go to the Licenses tab.
- Find/select the IDA license plan you want to renew.
- Click Renew/Change plan in the top panel or in the license’s row in the table.
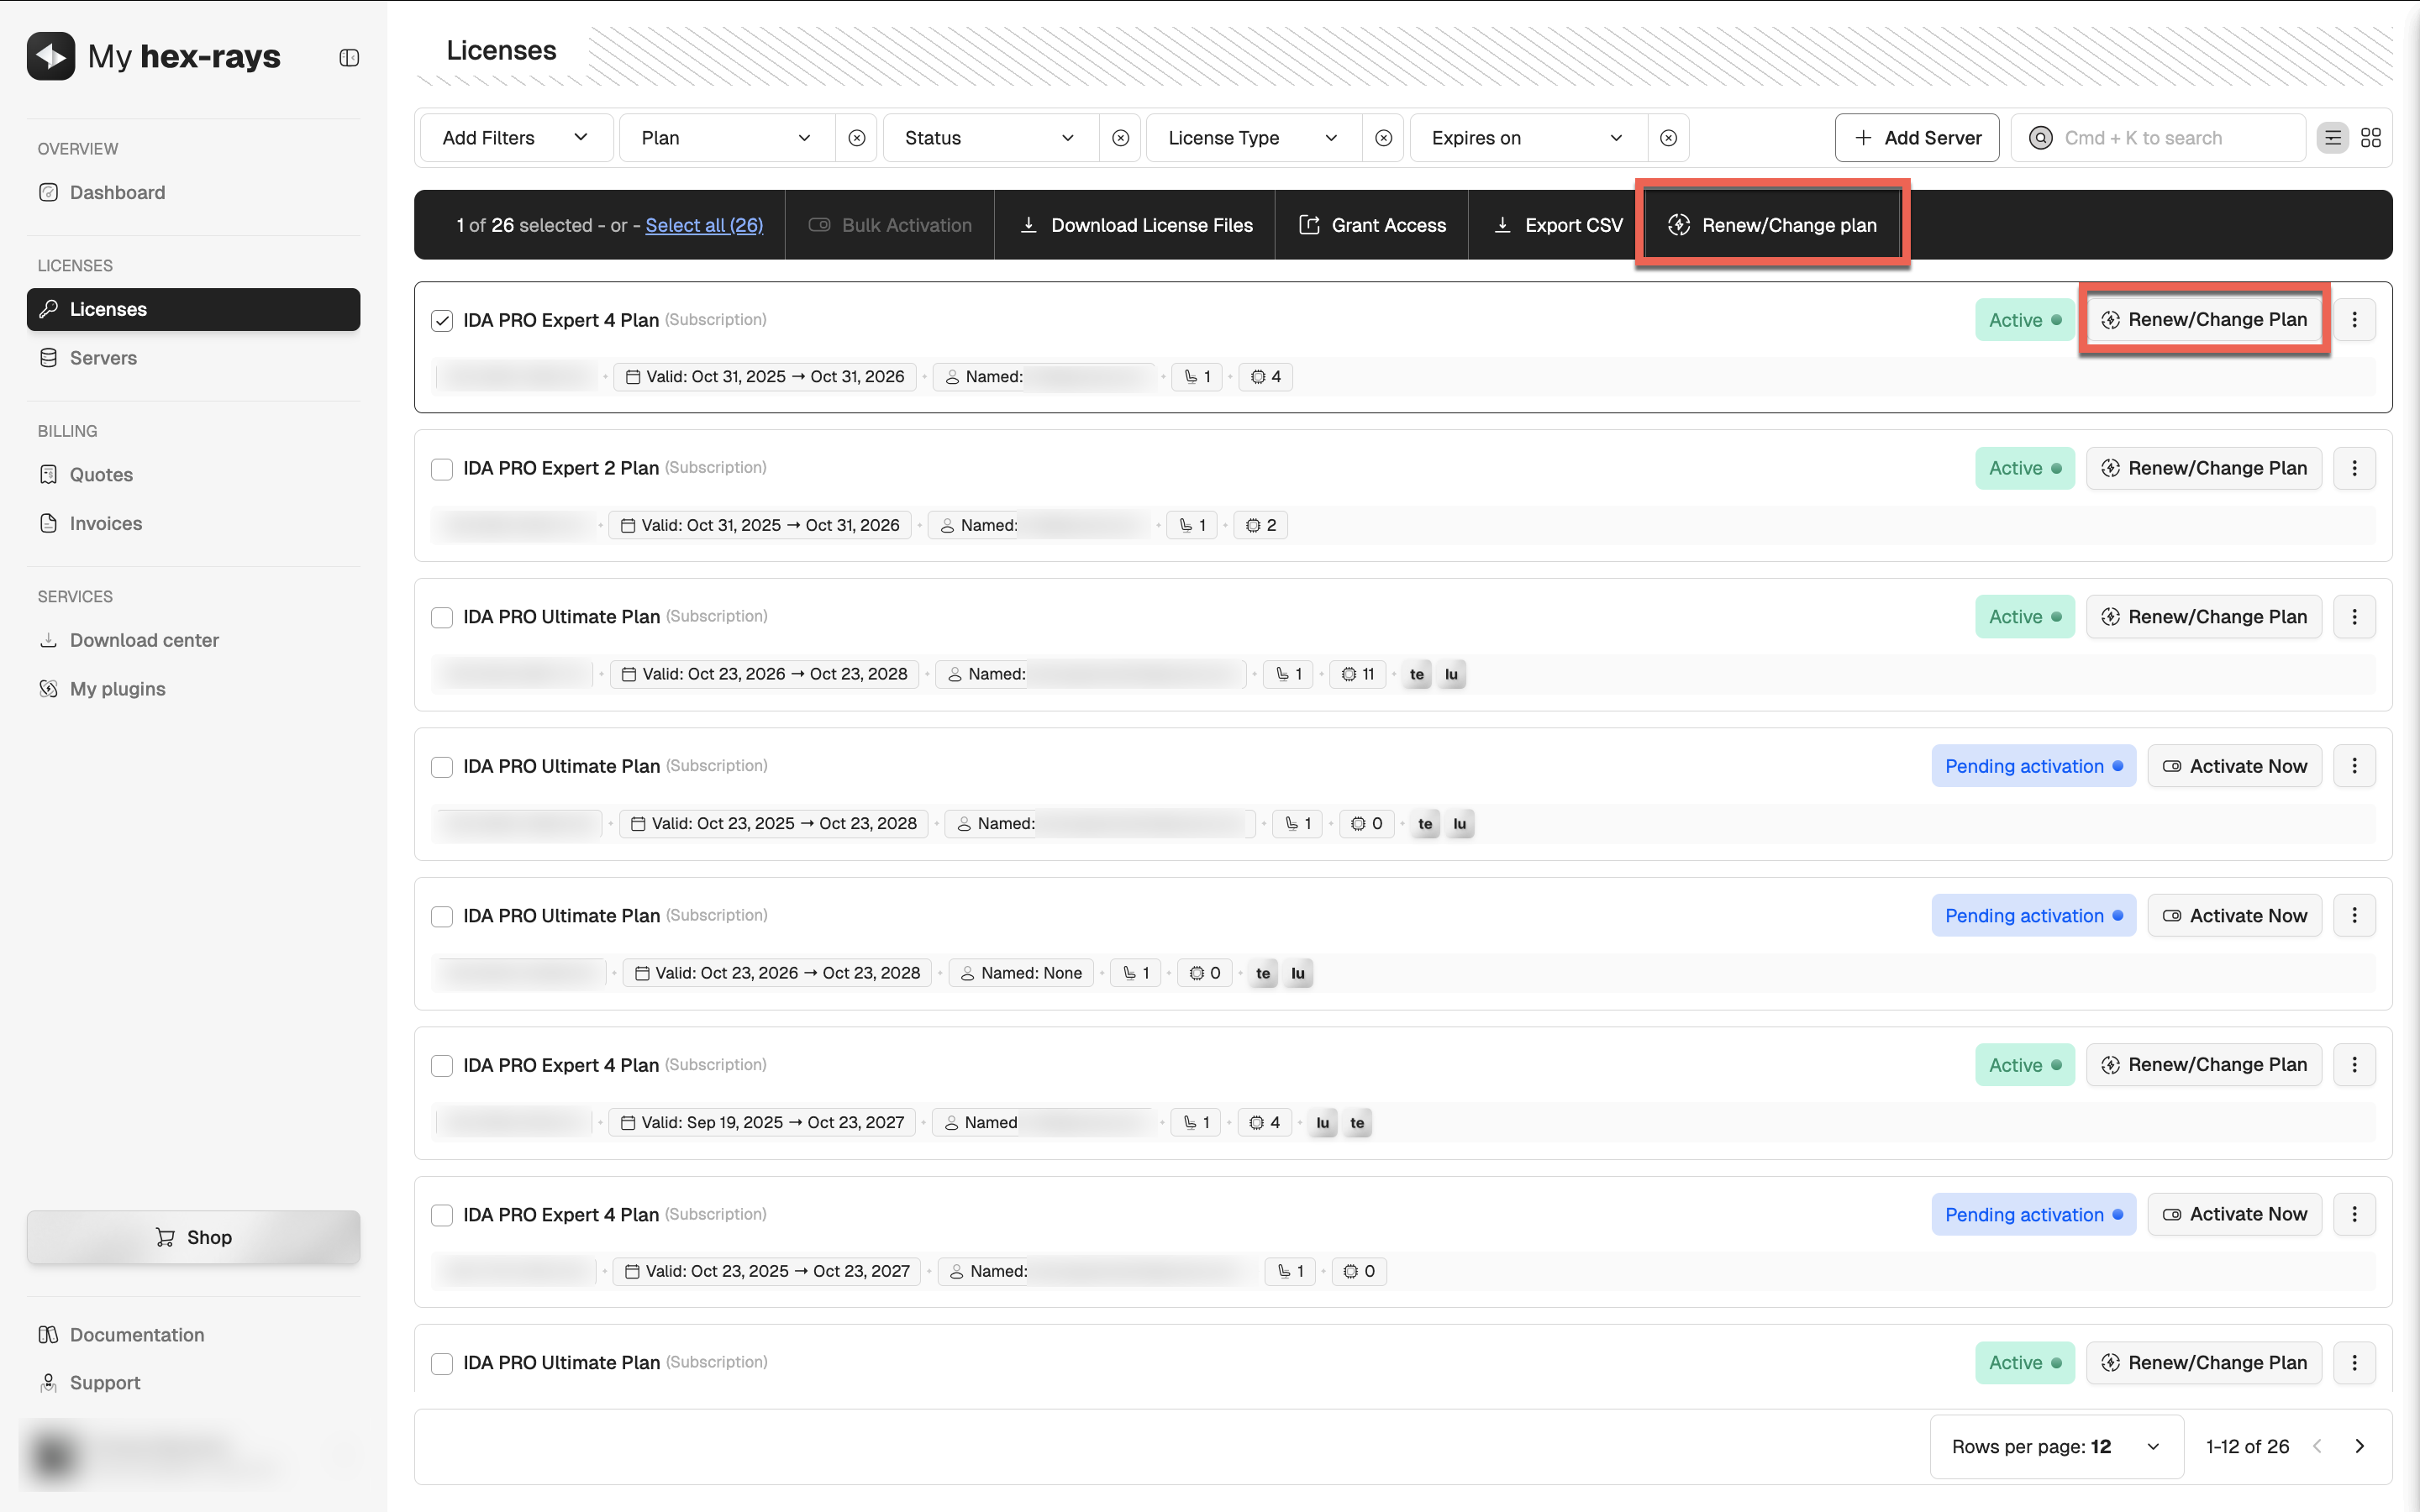
- Review the plan options. You can upgrade your plan, change the license type to floating, and add seats or add-ons.
- Select Change plan (starts immediately) to apply the changes right after the upgrade. Click Continue to Payment to finalize.
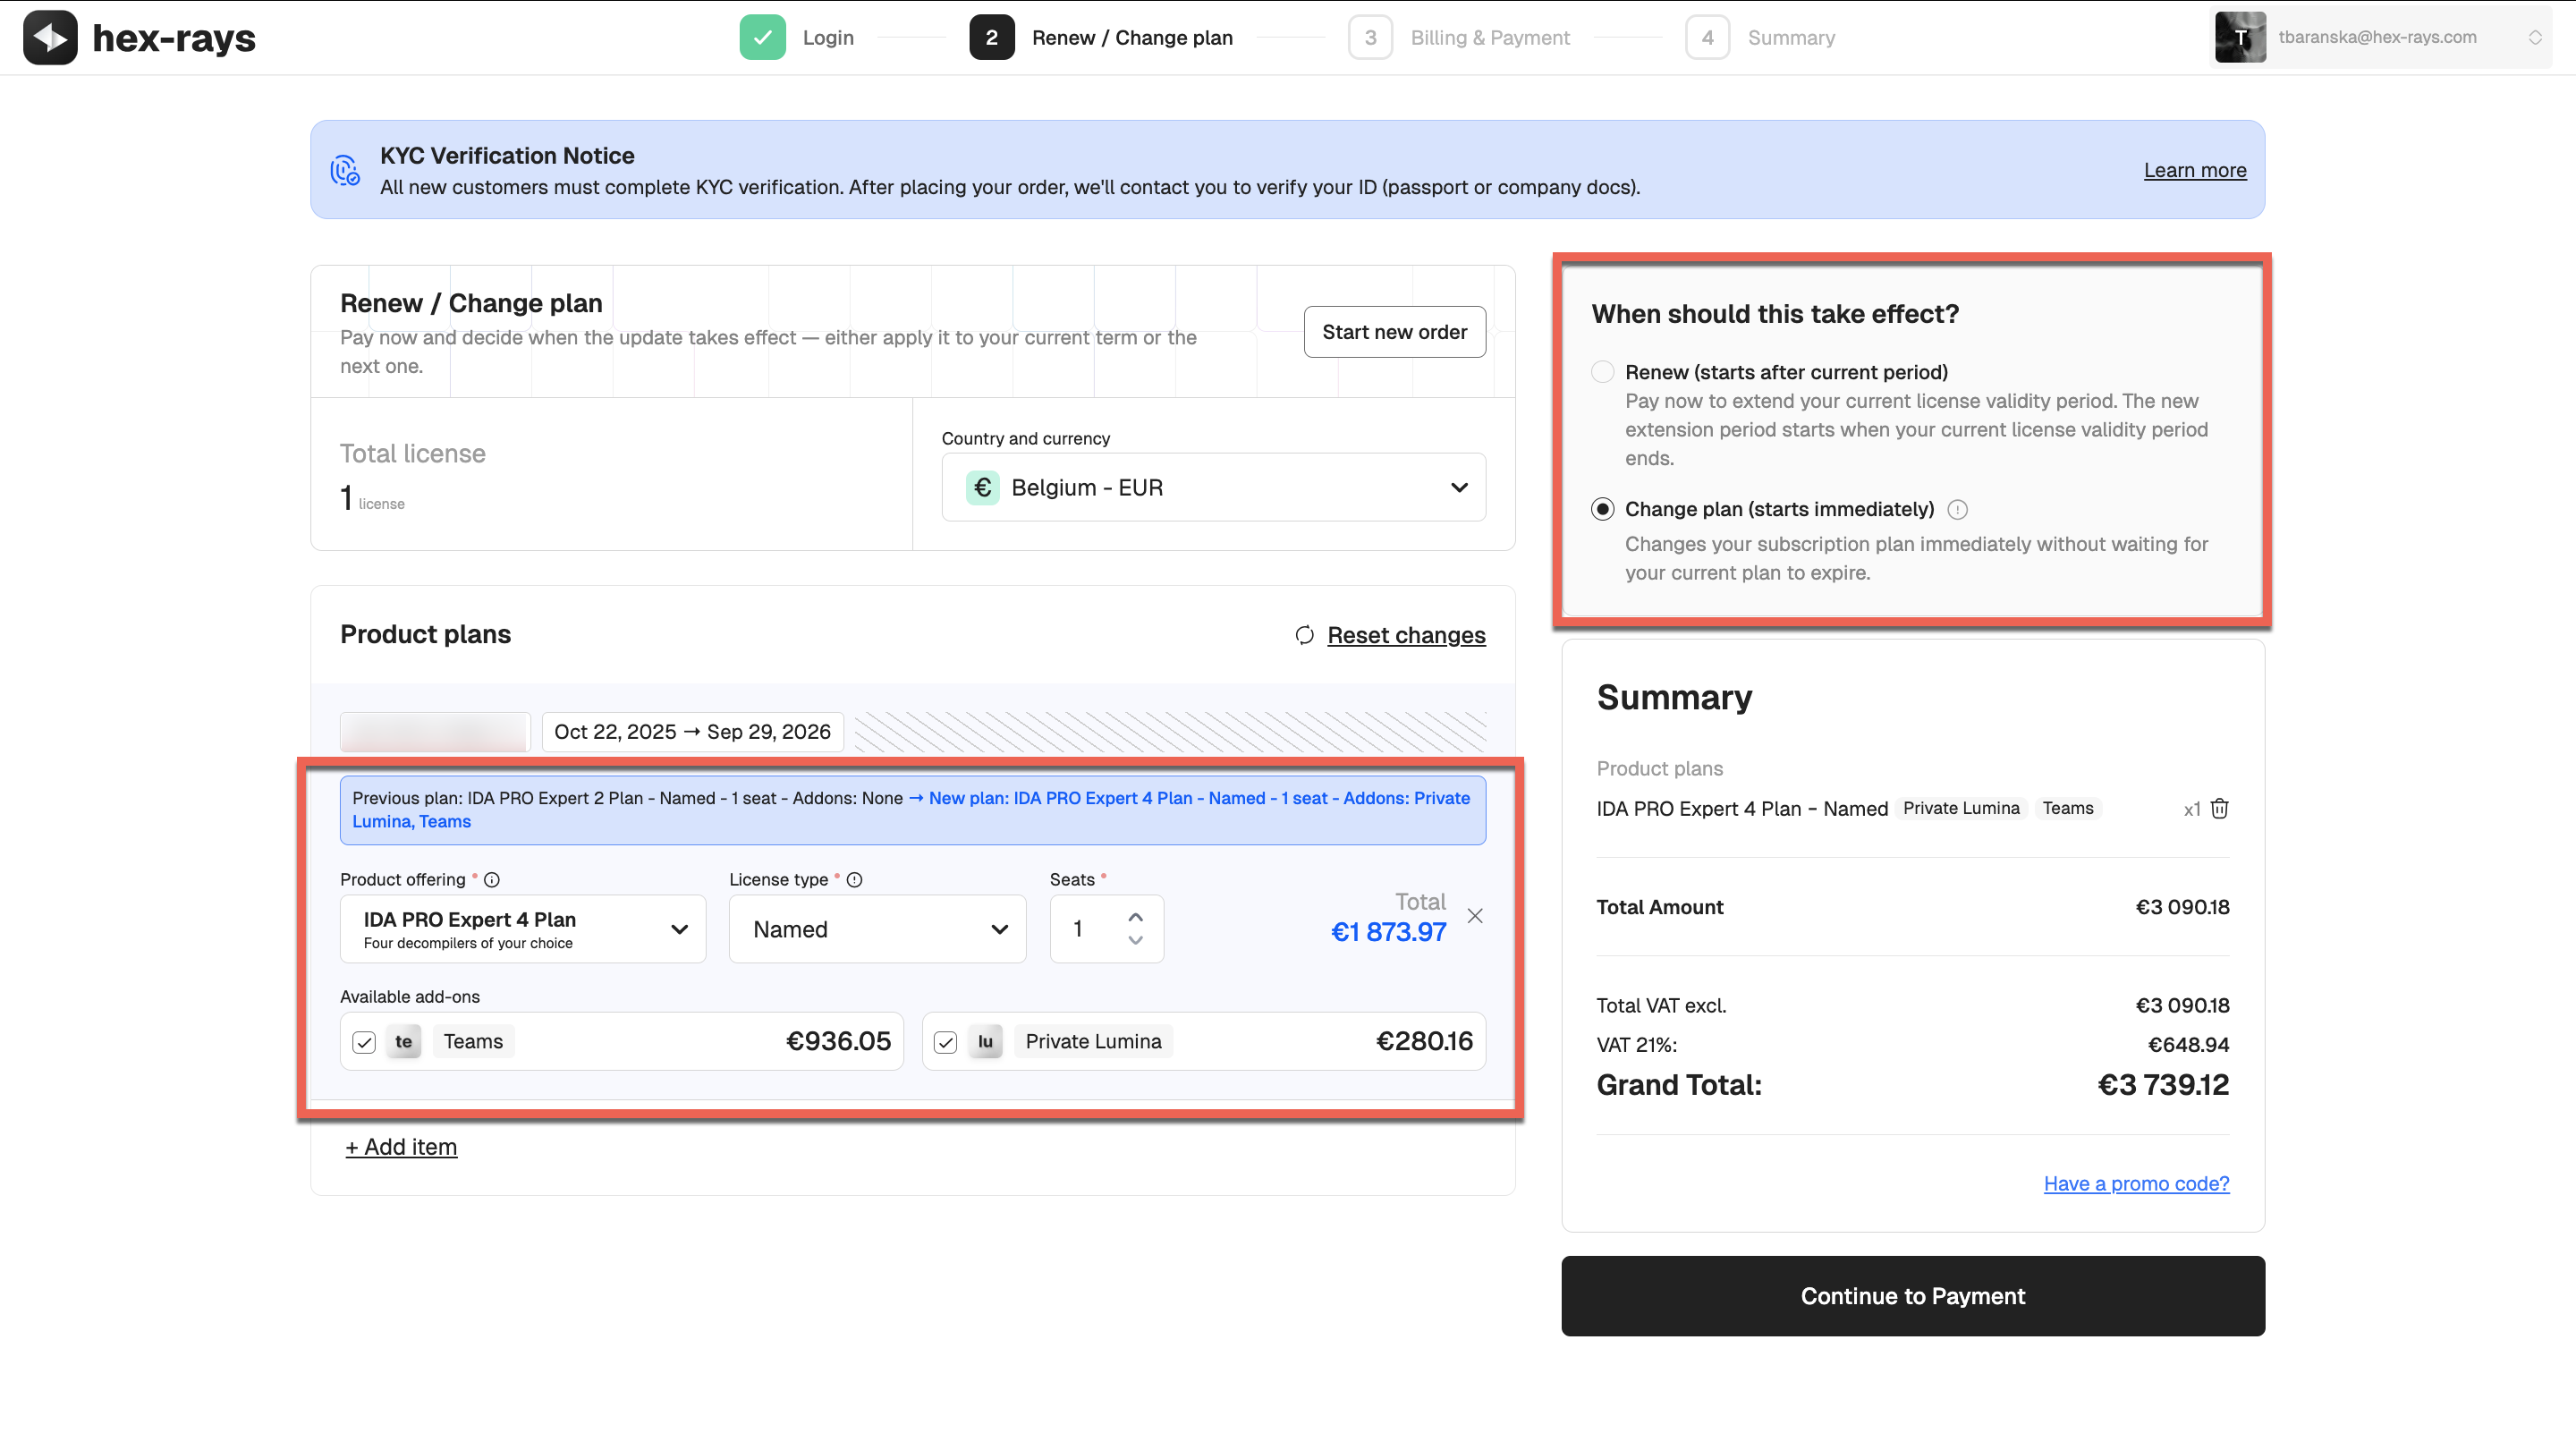
- The new plan will appear under the Licenses tab with a Pending Activation status. Activate the license to start using the updated plan.
{% hint style=“info” %}
Actions Required After Update
If you upgraded your plan (for example, from IDA PRO Expert 2 to IDA PRO Expert 4), you will need to activate your new license and download the new license files before you can use the updated plan. {% endhint %}
Renew your plan
You can renew your subscription and, if needed, change your plan(s) in one go through My Hex-Rays portal.
Steps to renew and change your plan:
- Go to the Licenses tab.
- Find/select the IDA license plan you want to renew.
- Click Renew/Change plan in the top panel or in the license’s row in the table.
- Select subscription duration and review the plan options. You can upgrade/downgrade your plan, change the license type, and add seats or add-ons.
- Select one of the following options:
- Renew (starts after current period), if you want all changes to be applied at the renewal date, or
- Change plan (starts immediately), if you want the changes to take effect right away. Click Continue to Payment to finalize.
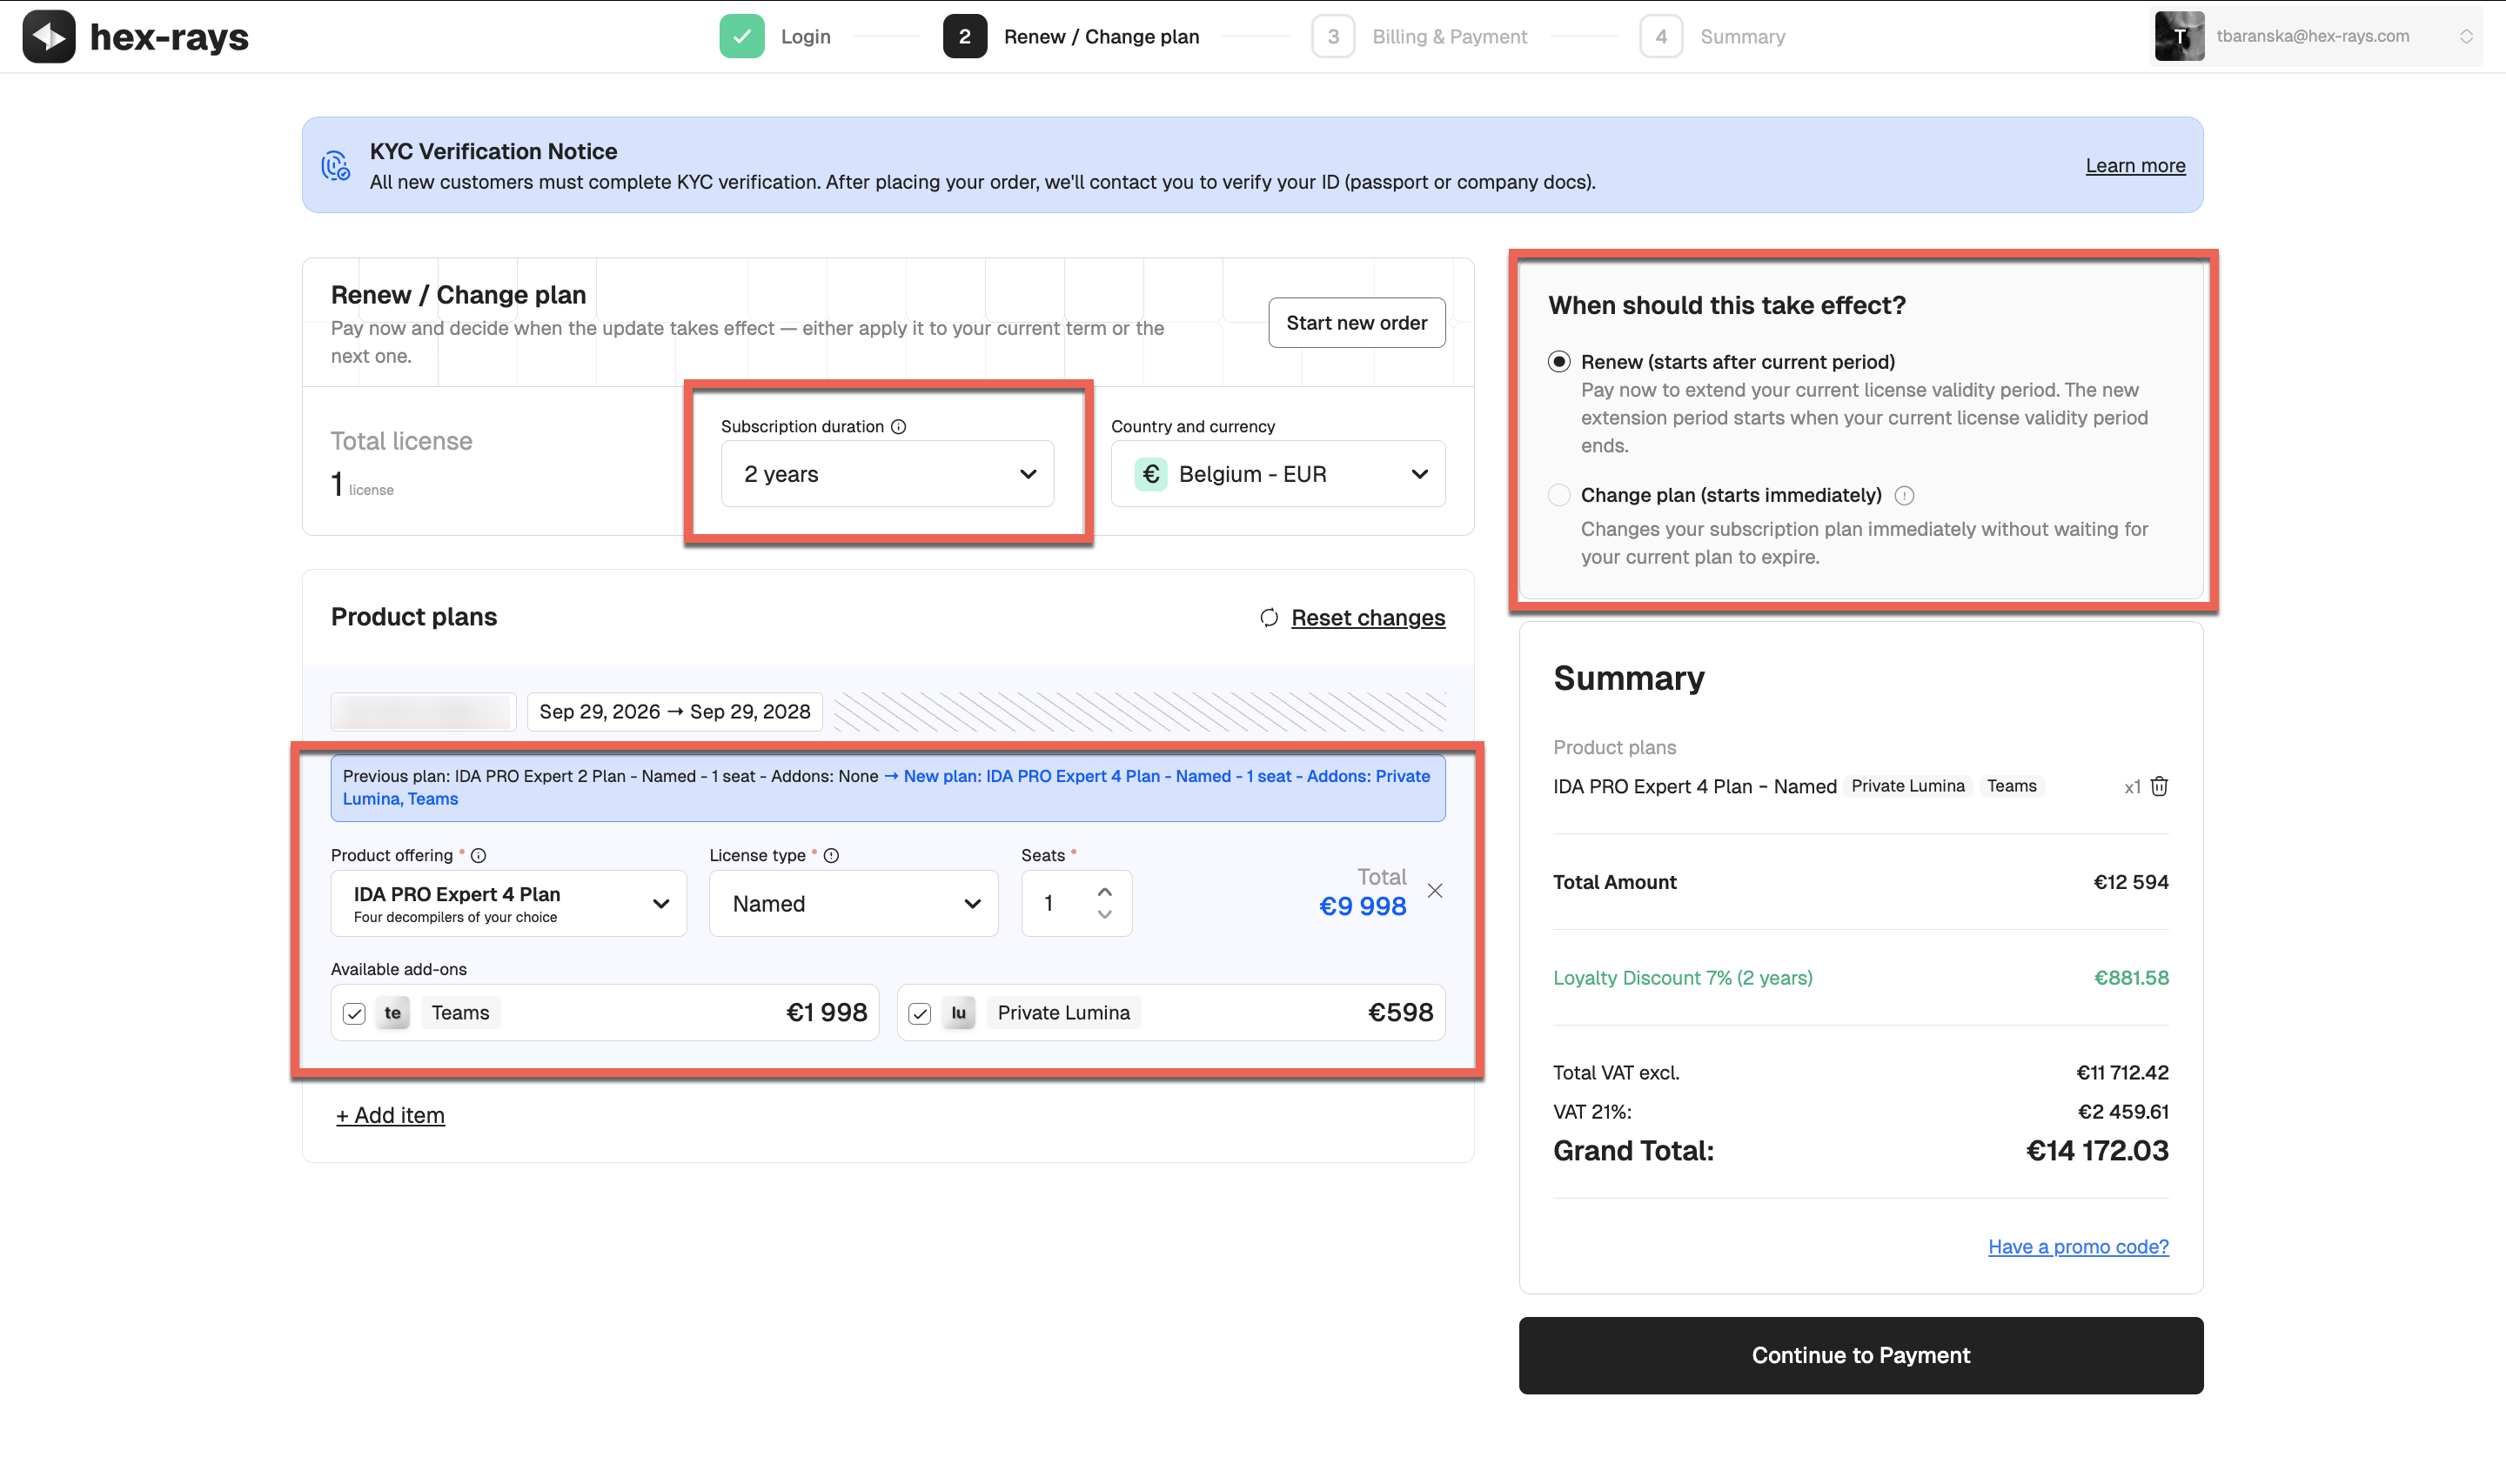
- Based on your selection, follow the appropriate scenario:
- a. Renewal without plan change: The subscription validity is automatically extended. Re-download the license files and save them in your usual location (You can check and change the .hexlic location via Help → License Manager…).
- b. Renewal with plan change: The new plan will appear under the Licenses tab with a Pending Activation status. You need to activate it, then download and save the new license file locally.
{% hint style=“info” %} If you would like to downgrade your current plan, you can do that at your next renewal date only. {% endhint %}
{% hint style=“info” %}
Actions Required After Renewal With/Without Upgrade
If you upgraded your plan (for example, from IDA PRO Expert 2 to IDA PRO Expert 4), you will need to activate your new license and download the new license files before you can use the updated plan. If you renewed your existing plan without changes, re-download a license file to apply the extended validity period. {% endhint %}
License Renewal and Update FAQ
How can I change only my decompilers?
If you only want to change the type of decompilers (not the number of decompilers, and without upgrading or downgrading your plan), this can be done after your current plan expires. Instead of renewing the current plan, you will need to place a new order. A new license will then be generated, and during activation you will be able to choose different decompilers.
How can I add more decompilers to my current plan?
To add more decompilers to your active subscription, you’ll need to upgrade to a higher plan that includes the desired number of decompilers. You can upgrade your plan at any time through My Hex-Rays portal, and choose to apply the changes immediately.
What changes can I make during renewal?
You can apply the following changes during renewal via My Hex-Rays portal:
- Switch to a different license type
- Upgrade or downgrade your plan
- Add optional add-ons (Teams or Lumina)
- Add additional seats
Some changes, such as downgrading a plan or changing the license type from computer to named, can only take effect at the next term, not during the active subscription period.
For other modifications, such as changing an active license type from named to computer, contact our Sales team
What changes can I make to my active license?
During your current subscription period, you can:
- Upgrade to a higher plan
- Add seats or add-ons
- Switch to a floating license type
You can apply these changes immediately to your active license.
Can I change the license type of my active subscription plan?
During an active subscription period, the only license type change you can make yourself via My Hex-Rays portal is switching to a floating license. Other changes (e.g., switching between named and computer licenses) are only possible at renewal for the next term, or require assistance from our Sales team.
Can I downgrade my active license?
Downgrades are possible only for your next renewal date.
I have IDA Pro Essential and want to upgrade to IDA Pro Expert 4. How can I do this?
You can upgrade your plan at any time through the Customer Portal, and choose to apply the changes immediately, or at your next renewal date. Check the details on how to change your current plan.
I have named license, can I change the license type to computer?
You can change the license type (for example, from the named to computer) via customer portal only while renewing for the next term. In other words, you cannot change the license type for active subscription period. If you need to do that for some reason, contact our Sales team.
Why can’t I renew or change the license?
If the Renew/Change plan option is missing or greyed out, it means the license was shared with you and bought by someone else. Only the person who purchased the license can renew or modify the plan.
Basic Usage
Basic Usage
In this document, we’ll explore the essentials of IDA capabilities to kickstart your journey and disassemble your first binary file.
Prerequisites
Your IDA instance is installed and running.
Before you begin
What files and processors are supported?
IDA natively recognizes plenty of file formats and processors.
If you later realize that’s not enough, you can always use one of our community plugins that add additional formats or processor types or try to write your own with C++ SDK.
What are IDA database files?
IDA stores the analysis results in the IDA Database files (called IDB), with the extension .i64. This allows you to save your work and continue from the same point later. After loading a file at the beginning, IDA does not require access to the binary.
Any modifications you make are saved in the database and do not affect the original executable file.
Dive deeper
- Blog: :pencil: Check what exactly IDB contains in Igor’s tip of the week about IDA database.
What decompilers can I work with?
IDA provides decompilers designed to work with multiple processor architectures. The number of decompilers and their type (local or remote) available in your IDA instance depends on your chosen product and subscription plan and affects your ability to produce C-like pseudocode.
Where can I find exemplary binaries to work with?
Check CrackMe, from where you can download executable files to test your reverse engineering skills.
Part 1: Loading your file
When you launch IDA, you will see a Quick Start dialog that offers three ways to continue. For now, we’ll focus on loading a new file and proceeding to disassembly results.
- Launch IDA and in the Quick start dialog (1), click New.
- Specify the path for your binary file.
- In the Load a new file dialog (2), IDA presents loaders that are suited to deal with a selected file. Accepting the loader default selection and then the processor type is a good strategy for beginners. Click OK to confirm your selection.
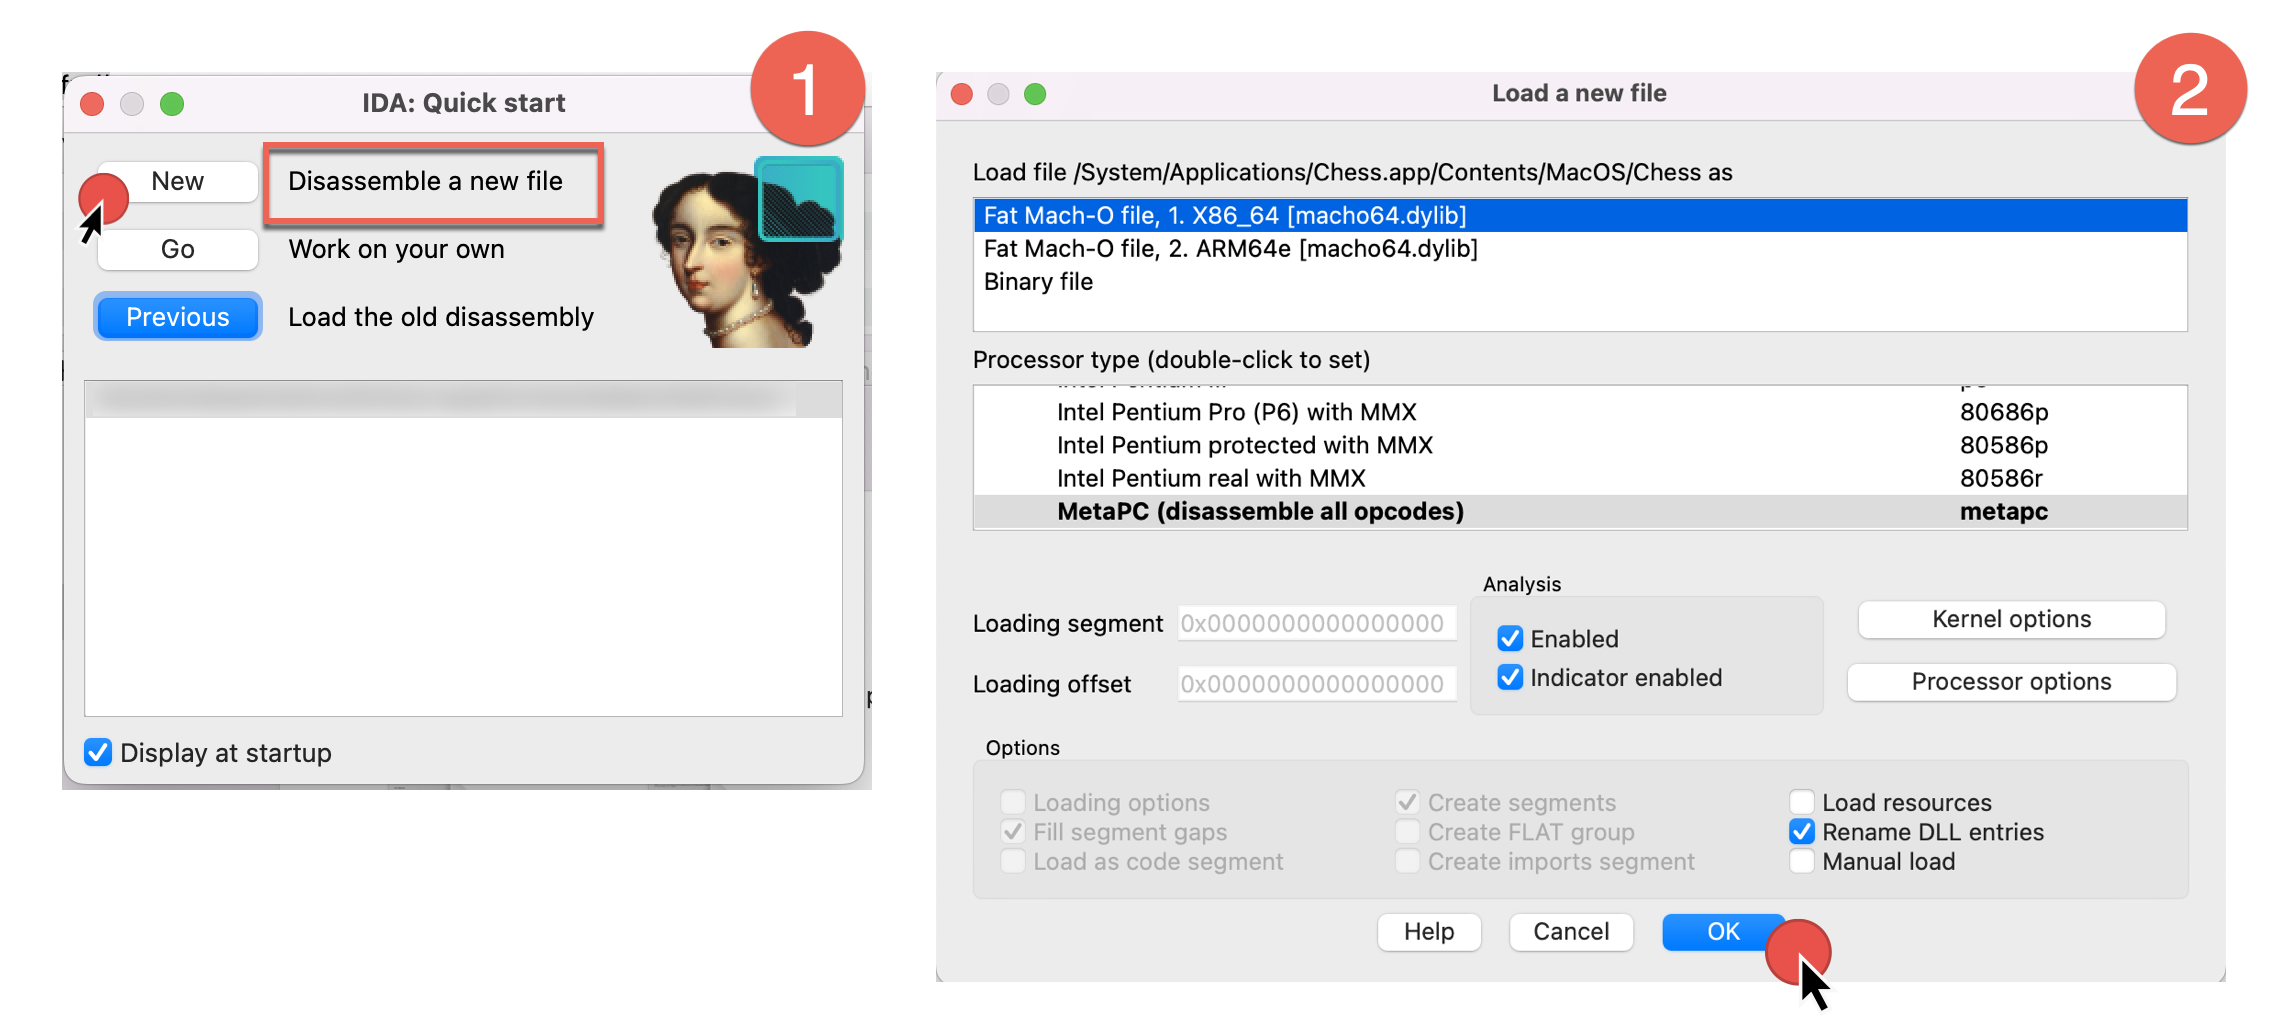
- IDA begins autoanalysis of your binary file.
After completion, you will be present with the default IDA desktop layout, that we’ll describe in the next part.
Dive deeper
- Video: :video_camera: Watch different ways of loading files in our channel.
Part 2: UI overview
After autoanalysis is done, you’ll see the main IDA desktop with the initial results. Let’s examine the default desktop layout and commonly used UI elements.
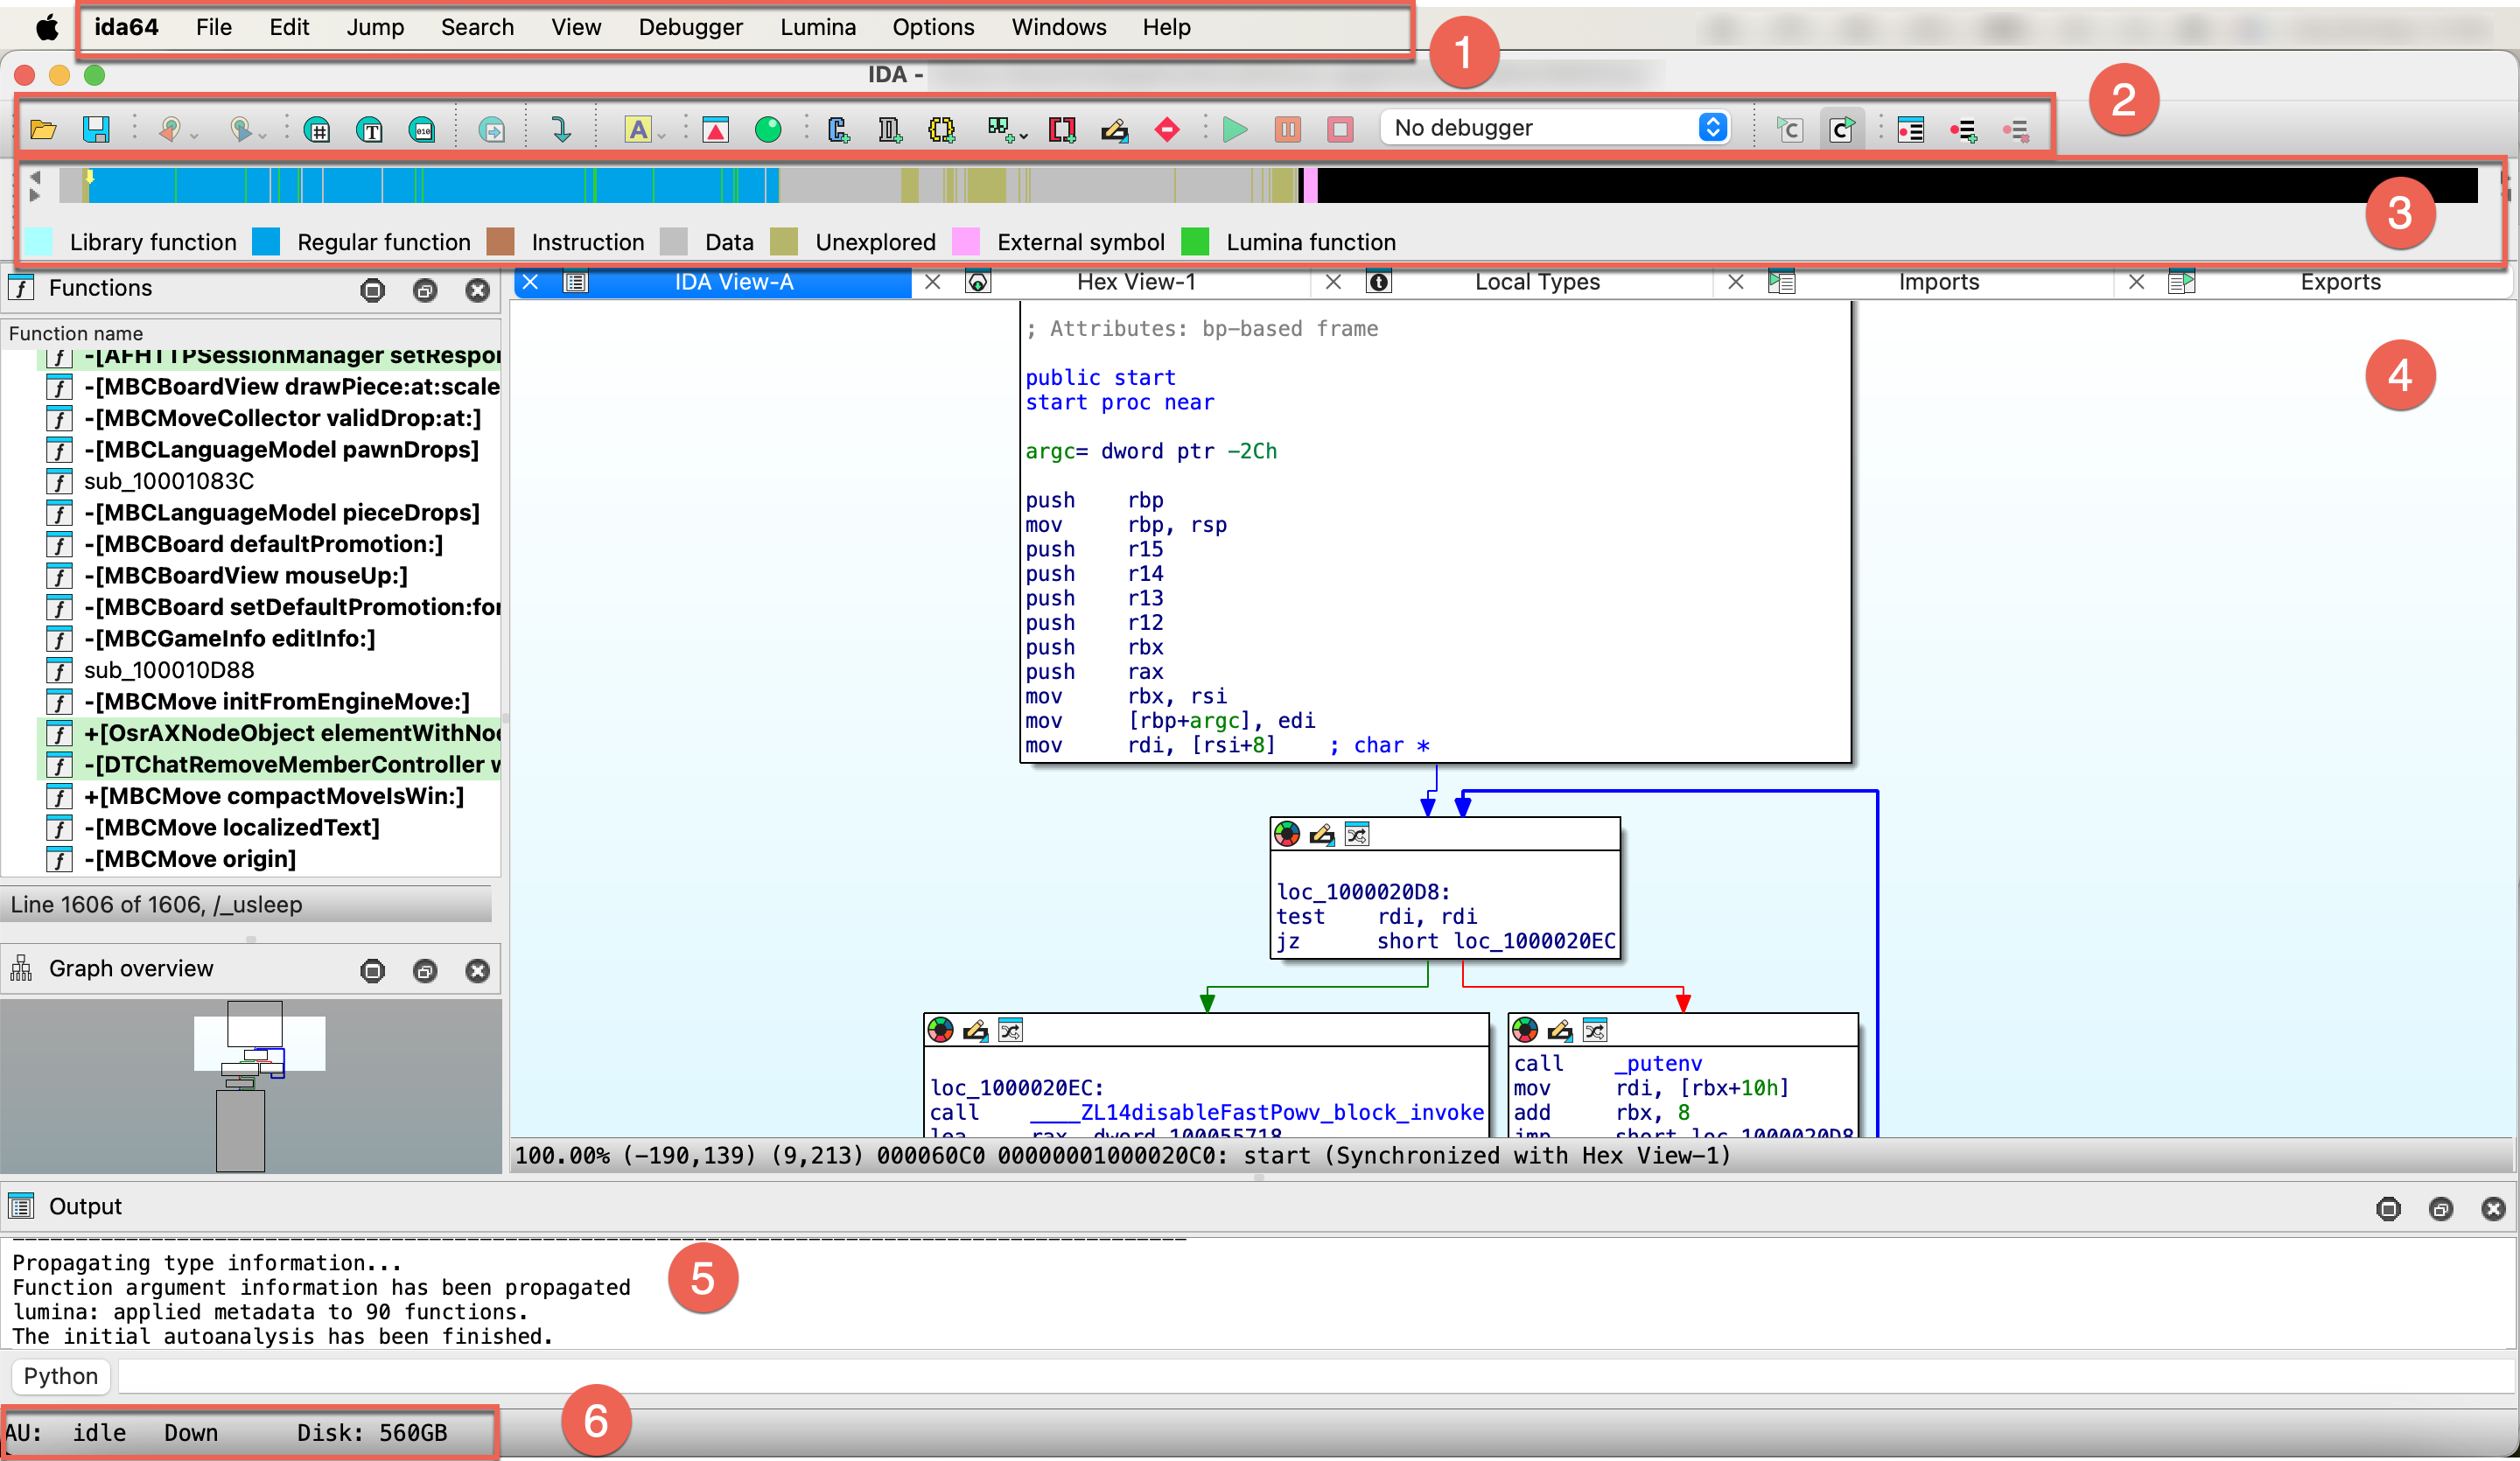
- Main menu bar (1)
- Toolbar (2)
- Navigation band (3)
- Subviews (4)
- Output (5)
- Status bar (6)
Main menu bar
The main menu bar provides quick access to essential features. Moreover, almost all menu commands can be quickly accessible via customizable shortcuts.

For a handy cheatsheet of all commands and their hotkeys, check Options -> Show command palette….
Dive deeper
- Docs: :book: Check our User Guide for a comprehensive description of all menu items.
Toolbar
Below the main menu bar, you will see a toolbar with icons that give you quick access to common functionalities (available also via the main menu/shortcuts). It has just one line by default, but you can customize it by adding or rearranging your actions.

Dive deeper
- Video: :video_camera: Curious about practical ways to set up your toolbar? Watch our video tutorial.
Navigation band
The navigation band shows the graphical representation of the analyzed binary file and gives a short overview of its contents and which areas may need your attention. The yellow arrow (indicator) shows where the cursor is currently positioned in the disassembly view.

As you’ll soon recognize, the colors used in the nav band match those in other views.
Dive deeper
- Blog: :pencil: A detailed navigation band overview with the full colors legend you can found in Igor’s tip of the week.
Output
The output window is a place where various messages and logs are displaying, often describing what currently IDA is doing, like analyzing data or running a script. In the CLI box you can type commands in IDC language or IDAPython.
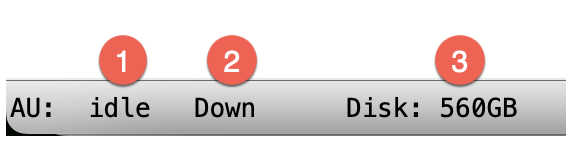
Status bar
At the bottom left corner of the IDA window, you can see the status bar, which contains:
- analysis indicator
AU, which shows the actual status of autoanalysis (1). In our case, it isidle, which means the autoanalysis is already finished. - search direction indicator (2)
- remaining free disk space (3)
Right-clicking on the status bar brings up a context menu that allows you to reanalyze the program.
Dive deeper
- Docs: :book: To check all possible values and their meaning, take a look at analysis options.
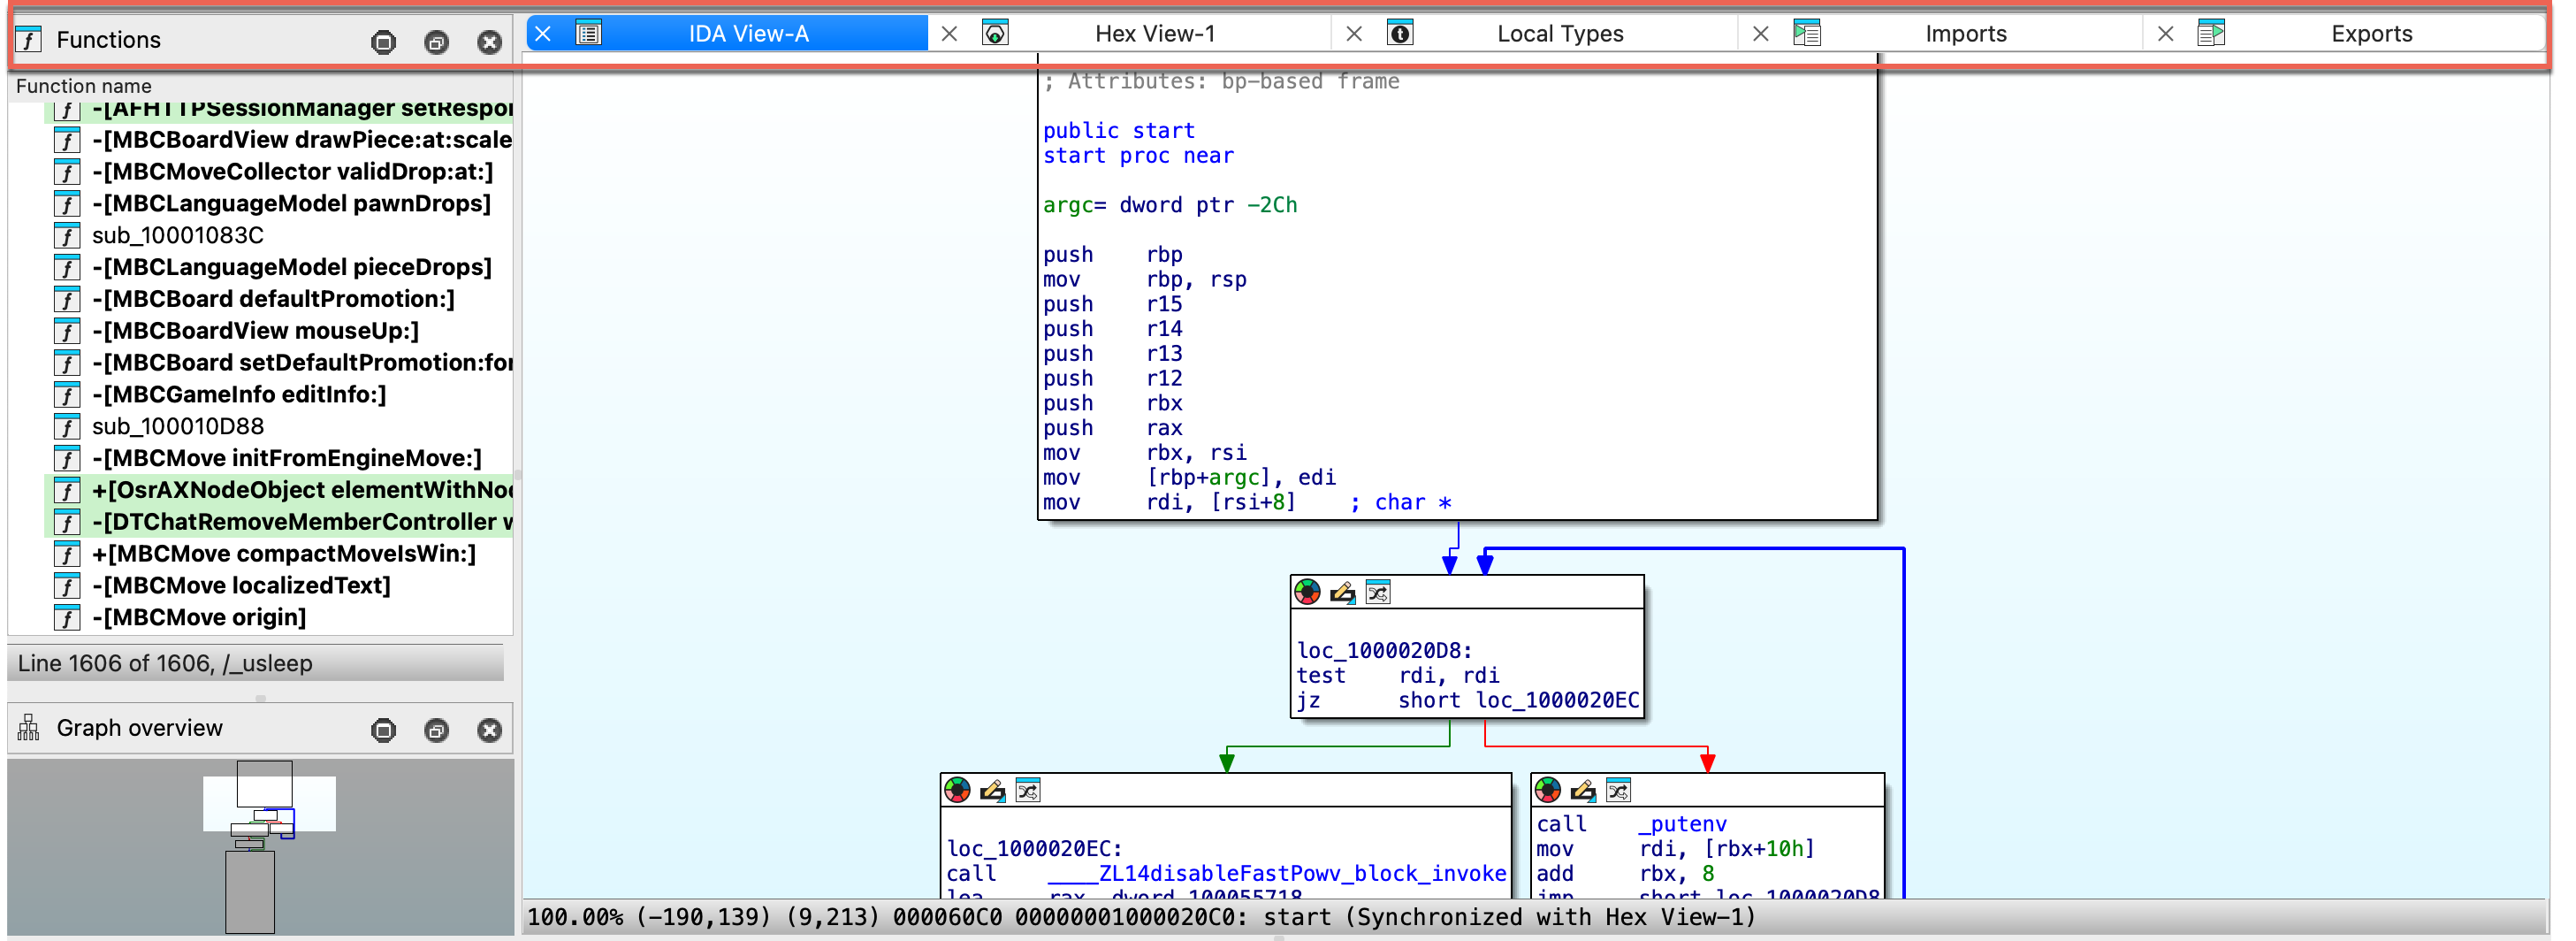
Subviews
The subviews are one of the most prominent parts of your everyday work with IDA. These additional views (behaving like tabs) give a different perspective and information on the binary file, but the number of native IDA subviews may be a bit overwhelming. Here, we will focus on the most versatile and common subviews for beginners, where you’ll spend most of the time, like:
- IDA View
- Pseudocode
- Hex Dump View
- Local Types
- Functions View
IDA View / Disassembly Window
When autoanalysis is done, you will see a graph view inside an IDA View by default. This flowchart graph should help you to understand the flow of the functions.
{% hint style=“info” %} The graph view is available only for the part of the binary that IDA has recognized as functions. {% endhint %}
IDA view has three modes:
- graph view (1), that shows instructions grouped in blocks,
- linear view (2), that lists all instructions and data in order of their addresses,
- and proximity view (3), which allows you to see relations between functions, global variables, and other parts of the program.
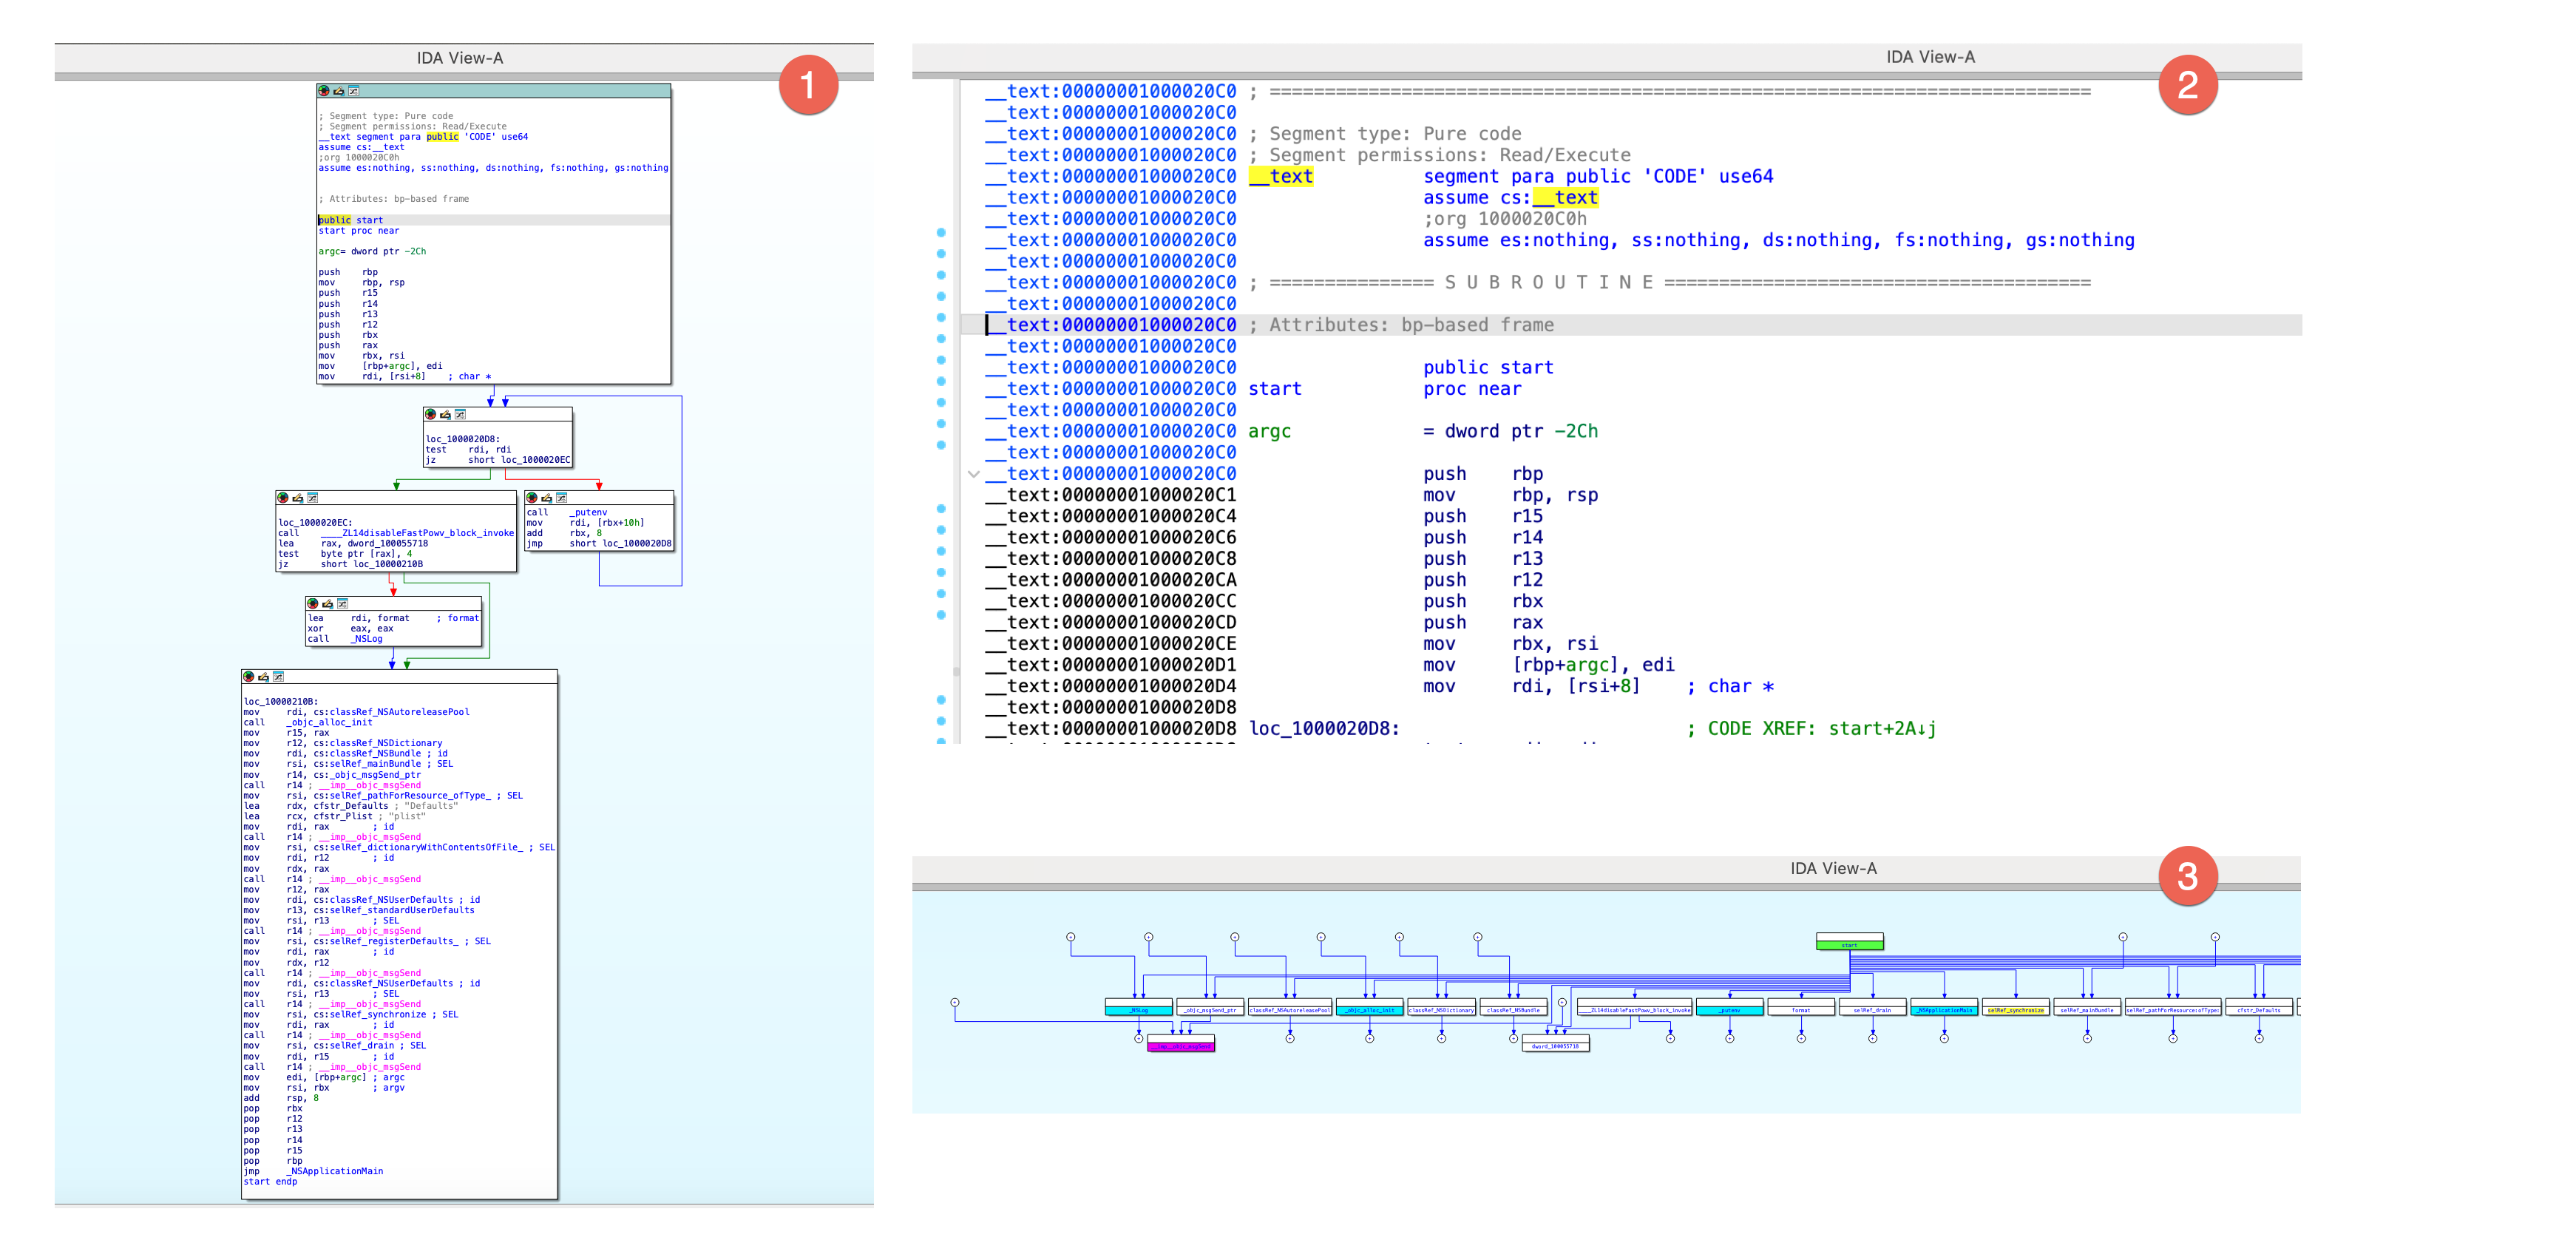
{% hint style=“info” %}
Press Space to switch between graph and linear mode. Proximity view is available from the context menu in IDA view.
{% endhint %}
Dive deeper
- Video: :video_camera: Check our video tutorial covering the basics of graph view.
- Blog: :pencil: Read the graph mode overview in Igor’s tip of the week.
Hex View Window
In hex view, you can see the raw bytes of the program’s instructions.
There are two ways of highlighting the data in this view:
- Text match highlight, which shows matches of the selected text anywhere in the views.
- Current item highlight, which shows the bytes group constituting the current item.

{% hint style=“info” %} The IDA view, pseudocode, and hex view can be synchronized, meaning that they highlight the same part of the analyzed program, and changes made inside one of the views are visible in the others. {% endhint %}
Dive deeper
- Video: :video_camera: Listen about hex view and others in our video tutorial.
- Blog: :pencil: Detailed overview of the hex view you can read in Igor’s tip of the week.
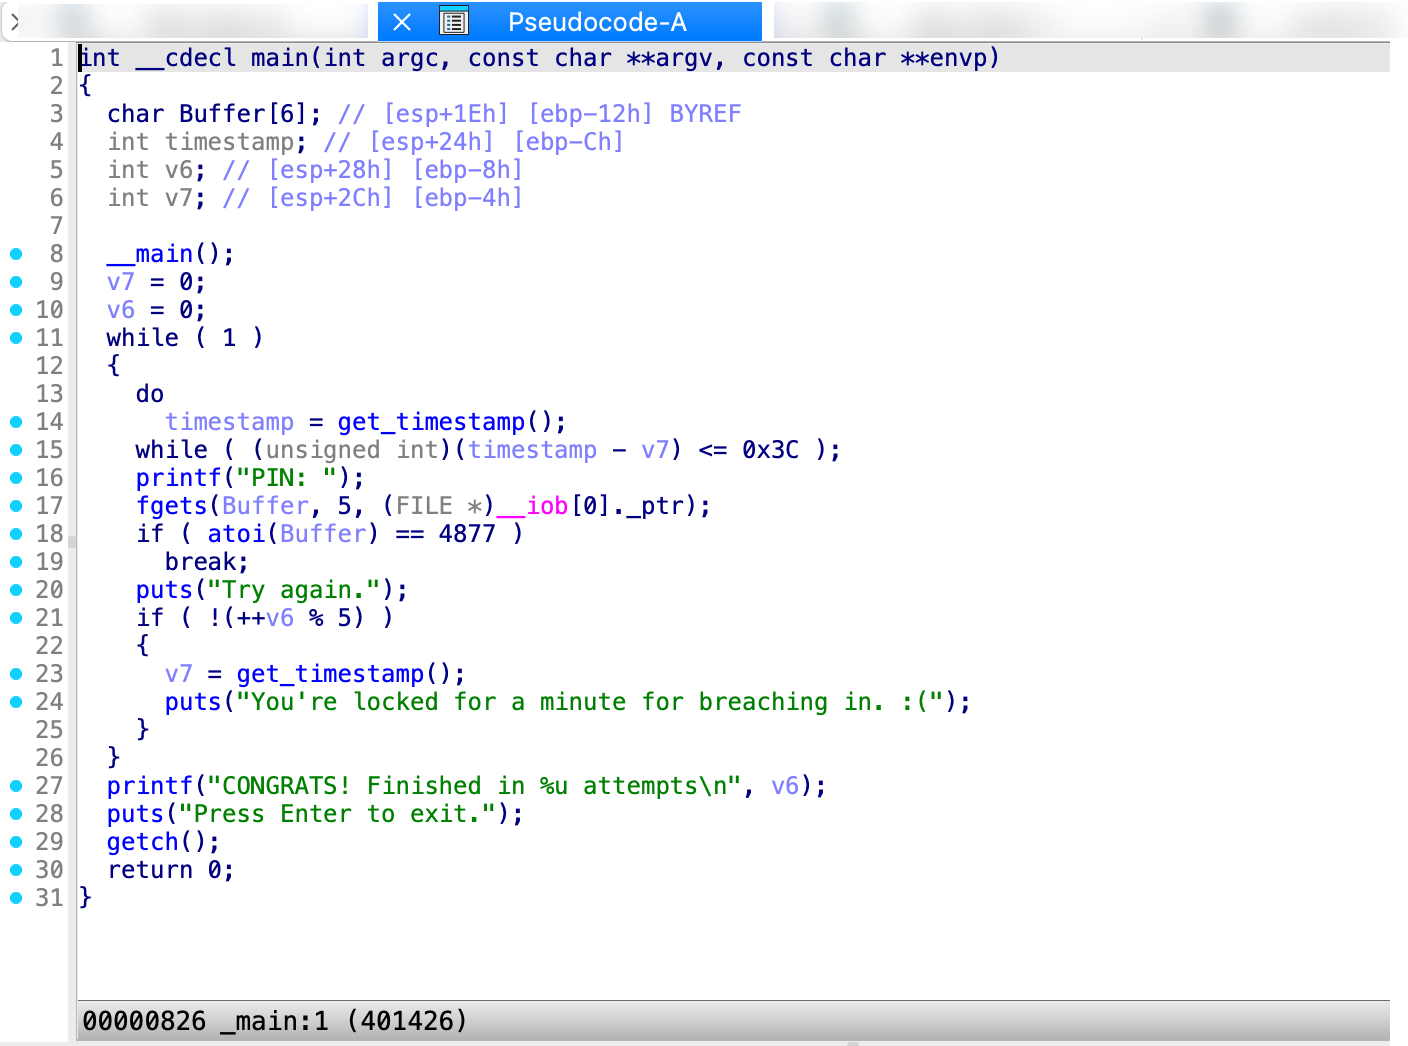
Pseudocode Window
Generated by the famous F5 shortcut, the pseudocode shows the assembly language translated into human-readable, C-like pseudocode. Click Tab to jump right into the Pseudocode view.
Local Types Window
This view shows the high-level types used in databases, like structs or enums.
Dive deeper
- Docs: :book: Check our manual giving an overview of Local Types window.
Functions Window
This window displays all the functions recognized by IDA, along with key details for each:
- Function name
- Segment the segment that contains the function
- Start: the function starting address
- Length: the size of the function in bytes
- Local: the amount of stack space taken by local variables
- Arguments: the amount of stack space taken by arguments
By default, the entire window is not visible, so you may scroll horizontally to see the hidden elements. As you probably noticed, the colors in Functions window match the colors in navigation band; in our example, green highlighting shows functions recognized by Lumina.
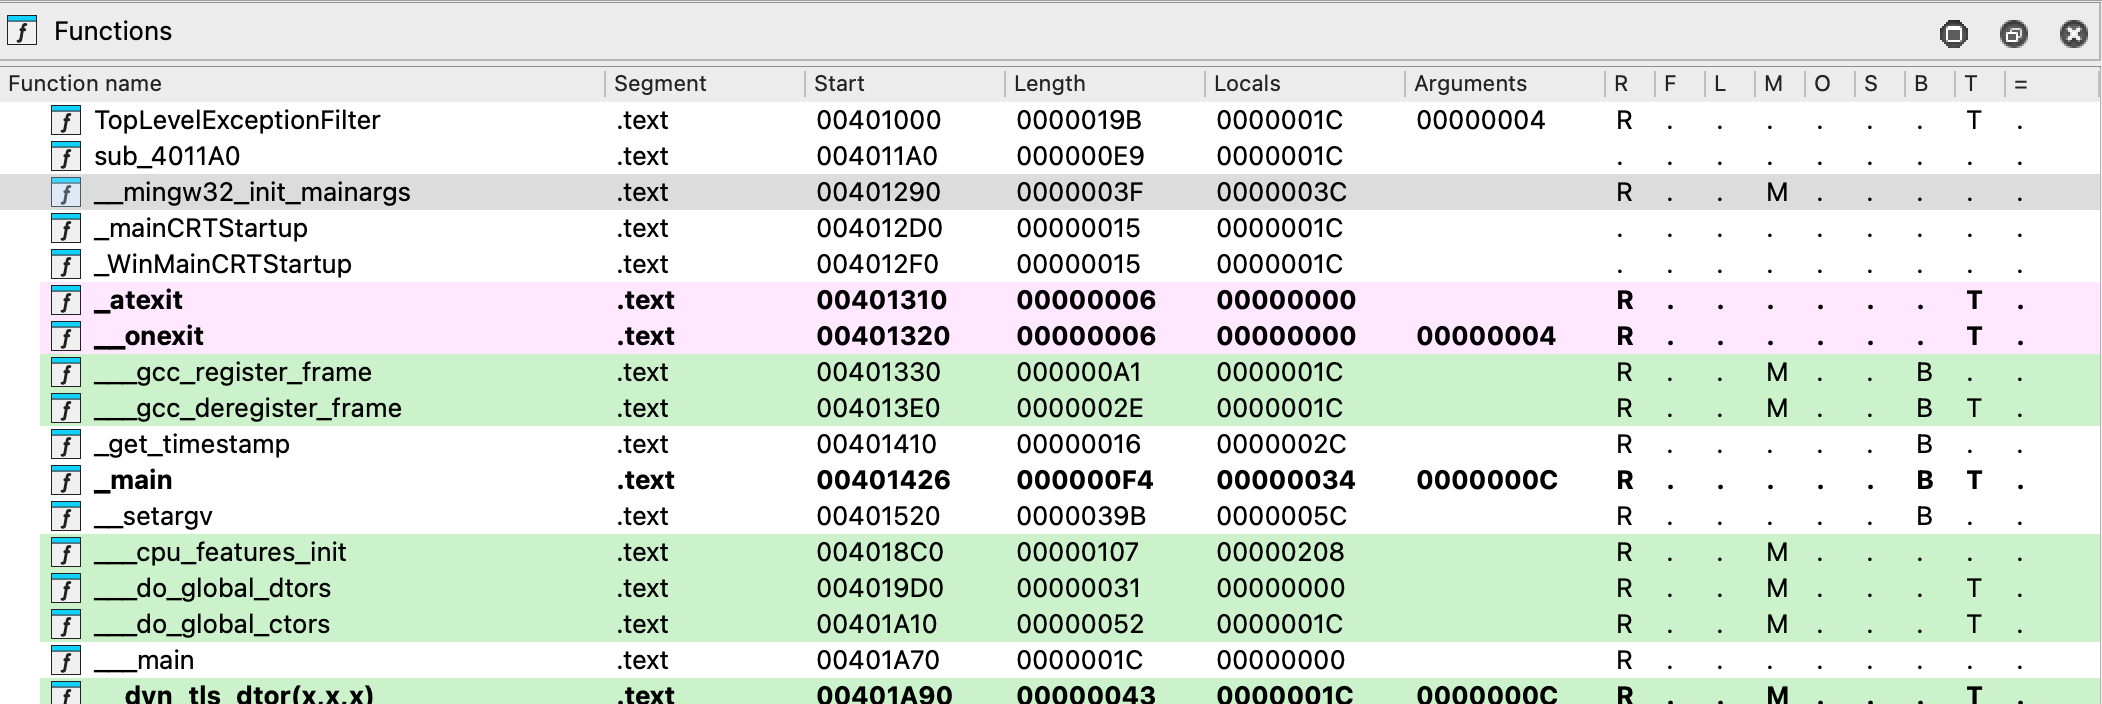
This view is read-only, but you can automatically synchronize the function list with the IDA view, pseudocode, or hex view. Click to open the context menu and select Turn on synchronization.
Dive deeper
- Docs: :book: Read the manual explaining all of the function window columns in detail.
- Video: :video_camera: Watch our video tutorial exploring the functions view.
Part 3: Basic navigation
A crucial step in mastering IDA is learning how to navigate quickly to specific locations in the output. To help you get started, we’ll cover essential commands and hotkeys commonly used for efficient navigation in IDA.
Double-click and jump to the location
When you double-click on an item, such as a name or address, IDA automatically jumps to that location and relocate the display.
Jump to address
- Go to Jump -> Jump to address.. or press
Ghotkey - Enter the item name or hex address in the dialog box, then click OK.
To jump back to the previous position, press Esc. To jump to the next position, press Ctrl + Enter. You can also navigate using the arrows in the toolbar.
See the list of cross-references
- Position the cursor on a function or instruction, then go to Jump -> Jump to xref to operand… or press
Xto see the dialog with listed all cross-references to this identifier. - Select an item from the list and click OK to jump to that location.
Dive deeper
- Video: :video_camera: Explore the rest of the jump commands in our video tutorial
Part 4: Manipulate your disassembly results
Now that the initial autoanalysis is done and you’ve mastered the basics of navigation, it’s time to explore the basic interactive operations that reveal the true power of IDA in transforming your analysis.
Rename a stack variable
One of the first steps you might take is to enhance readability by assigning meaningful names to local or global variables, but also functions, registers and other objects that IDA initially assigned a dummy name.
- In the IDA View, right-click on the variable you want to rename and click Rename or press
Nwhen the variable is cursor-highlighted. - In the newly opened dialog, insert a new name and click OK.
If at any point you want to go back to the original dummy name given by IDA, leave the field blank and click OK. It will reset the name to the default one.
{% hint style=“info” %} Once you change the name, IDA will propagate the changes through the decompiler and Pseudocode view. {% endhint %}
Dive deeper
- Video: :video_camera: Watch our step-by-step tutorial on renaming techniques.
- Blog: :pencil: Check Igor’s tips of the week for expert advice on renaming.
Add a comment
Adding comments may be a useful way to annotate your work.
- Highlight the line where you want to insert a comment and press
:. - In the dialog box, type your comment (you can use multiple lines) and click OK. This will add a regular (non-repeatable) comment to the location.
{% hint style=“info” %} If you want to add a repeatable comment in every location that refers to the original comment, press ‘;’. {% endhint %}
Dive deeper
- Video: :video_camera: Watch our tutorial about commenting.
Part 5: Customizing IDA
Nearly every UI element is customizable, allowing you to rearrange and align widgets to suit your habits. You can save your personalized desktop layout by going to Windows -> Save desktop.
Most of the basic appearance you can change under Options menu.
- To change the colors or theme, go to Options -> Colors.
- To change the font, go to Options -> Fonts.
If you need more control over customization settings, you may check the IDA configuration files.
Part 6: Debug your file
If you are ready to delve into dynamic analysis and start debugging your programs, here are some key steps to get you started:
- Select the right debugger and complete the setup: Go to Debugger -> Select debugger… and pick up one of the available debuggers. Under Debugger -> Debugger options, you can configure the setup in detail.
- Add breakpoints: Right-click on the line where you want to stop the execution and select Add breakpoint from the context menu, or press
F2. - Start the process: Run the debugging session by pressing
F9or click a green arrow on the tooltip.
Dive Deeper
- Docs: :book: Read our User Guide for local and remote debugging manuals, or check step-by-step tutorials for specific debuggers.
Part 7: Install a plugin
One of the most common way of extending IDA capabilities is to use one of our community-developed plugins.
Where can I find IDA plugins?
You can find a variety of plugins in the official Hex-Rays plugin repository, or via HCLI and Plugin Manager.
{% hint style=“success” %}
HCLI Commands | See HCLI Docs
hcli plugin search
{% endhint %}
Installing your plugin
For this guide purposes, we’ll walk you through general installation steps.
{% hint style=“info” %} The installation process can vary depending on the plugin and some of them may required installing dependencies or further configuration. Don’t hesitate to refer to the specific instructions provided by the plugin author. {% endhint %}
Quick alternative
{% hint style=“success” %}
HCLI Commands | See HCLI Docs
hcli plugin install <plugin-name>
{% endhint %}
Load your plugin
- Copy your plugin folder to the plugins directory inside your IDA installation directory.
- Alternatively, you can load the plugin from the command line in IDA by using File -> Script file… and selecting
app.entry.pyfile.
Run your plugin
- Navigate to Edit -> Plugins -> your_plugin_name or use the assigned hotkey.
{% hint style=“info” %} You may need to restart IDA to see your plugin in the list. {% endhint %}
Dive deeper
- Docs: :book: Want to learn about writing your own plugins?
- For an easy entry point, check our Domain API.
- Need more low-level control? Check our Developer Guide on how to create a plugin in IDAPython or with C++ SDK.
Key hotkeys cheatsheet
Here’s a handy list of all of the shortcuts we used so far.
SpaceSwitches between graph and linear mode in the IDA ViewF5Generates pseudocodeTabJumps into pseudocode ViewGOpens Jump to address dialogEscJumps back to the previous positionCtrl + EnterJumps to the next positionXShows the list of all cross-referencesNOpens dialog to rename the current item;Adds repeatable comment:Adds regular comment
Domain API: Beginner-friendly scripting and plugin development in IDA
Looking to extend IDA’s capabilities with your own scripts or plugins? Meet the Domain API—a high-level, Pythonic interface designed to simplify development and make interacting with IDA more intuitive.
- Check Getting Started with the Domain API, and
- Browse Real-life Domain API Examples to kickstart.
What’s next?
| Enroll in our trainings | Maksimize your IDA experience with trainigs tailored to all skill levels. |
| Watch tutorials | Explore the full collection of IDA Pro tutorial videos on our Hex-Rays channel. |
| Delve into the User Guide | Read in-depth manuals that cover every aspect of IDA. |
| Check the blog | Learn more about IDA with Igor's tip of the week and explore recent news from Hex-Rays. |
User Guide
Explore our in-depth guides, crafted to help you navigate through IDA features and master its advanced capabilities.
| User Interface | Check the overview of the IDA interface with menu and windows views and their corresponding options |
| Disassembler | Analize your binary and learn how to manipulate the disassembly output |
| Decompiler | Discover strategies for optimizing pseudocode |
| Debugger | Learn how to take advantage of all debugger features and dynamic analysis |
| Signatures | Check how to identify known code functions and standard libraries |
| Type Libraries | Improve your work with collections of predefined data types |
| Configuration | Personalize IDA to meet your needs—change themes, fonts, shortcuts and more |
| Teams | Get advantage of collaborative engineering work |
| Lumina | Get fast function recognition with Lumina server |
| Plugins | Learn how to install plugins and write your own |
| Helper Tools | Check all utilities ready to extend IDA functionality |
| Subviews | Explore the various subviews available in IDA |
User Interface
| Menu Bar | Discover all available actions and context-sensitive options in the main menu bar |
| Desktops | Understand how to create, save, and switch between different desktops |
| Subviews | Explore the various subviews available in IDA |
Menu Bar
{% hint style=“info” %} The menu bar in IDA gives you access to whole range of commands. All menus are always available, but some adapt their content based on your current view and your cursor position. {% endhint %}
Context-Independent Menus
These menus provide the same options regardless of which view you’re working in:
- File: Handles opening and loading binaries, importing/exporting data, and producing output files.
- View: Provides fast access and options to show and organize views, graphs, and toolbars.
- Debugger: Provides controls for running, stepping through, and analyzing programs in real-time.
- Lumina: Connects to Private or Public Lumina service to share and retrieve function metadata across different binaries.
- Options: Configures IDA’s appearance, fonts, colors, disassembly preferences, and more.
- Windows: Opens various tool windows and manages desktops.
- Help: Your gateway to various help resources and license manager.
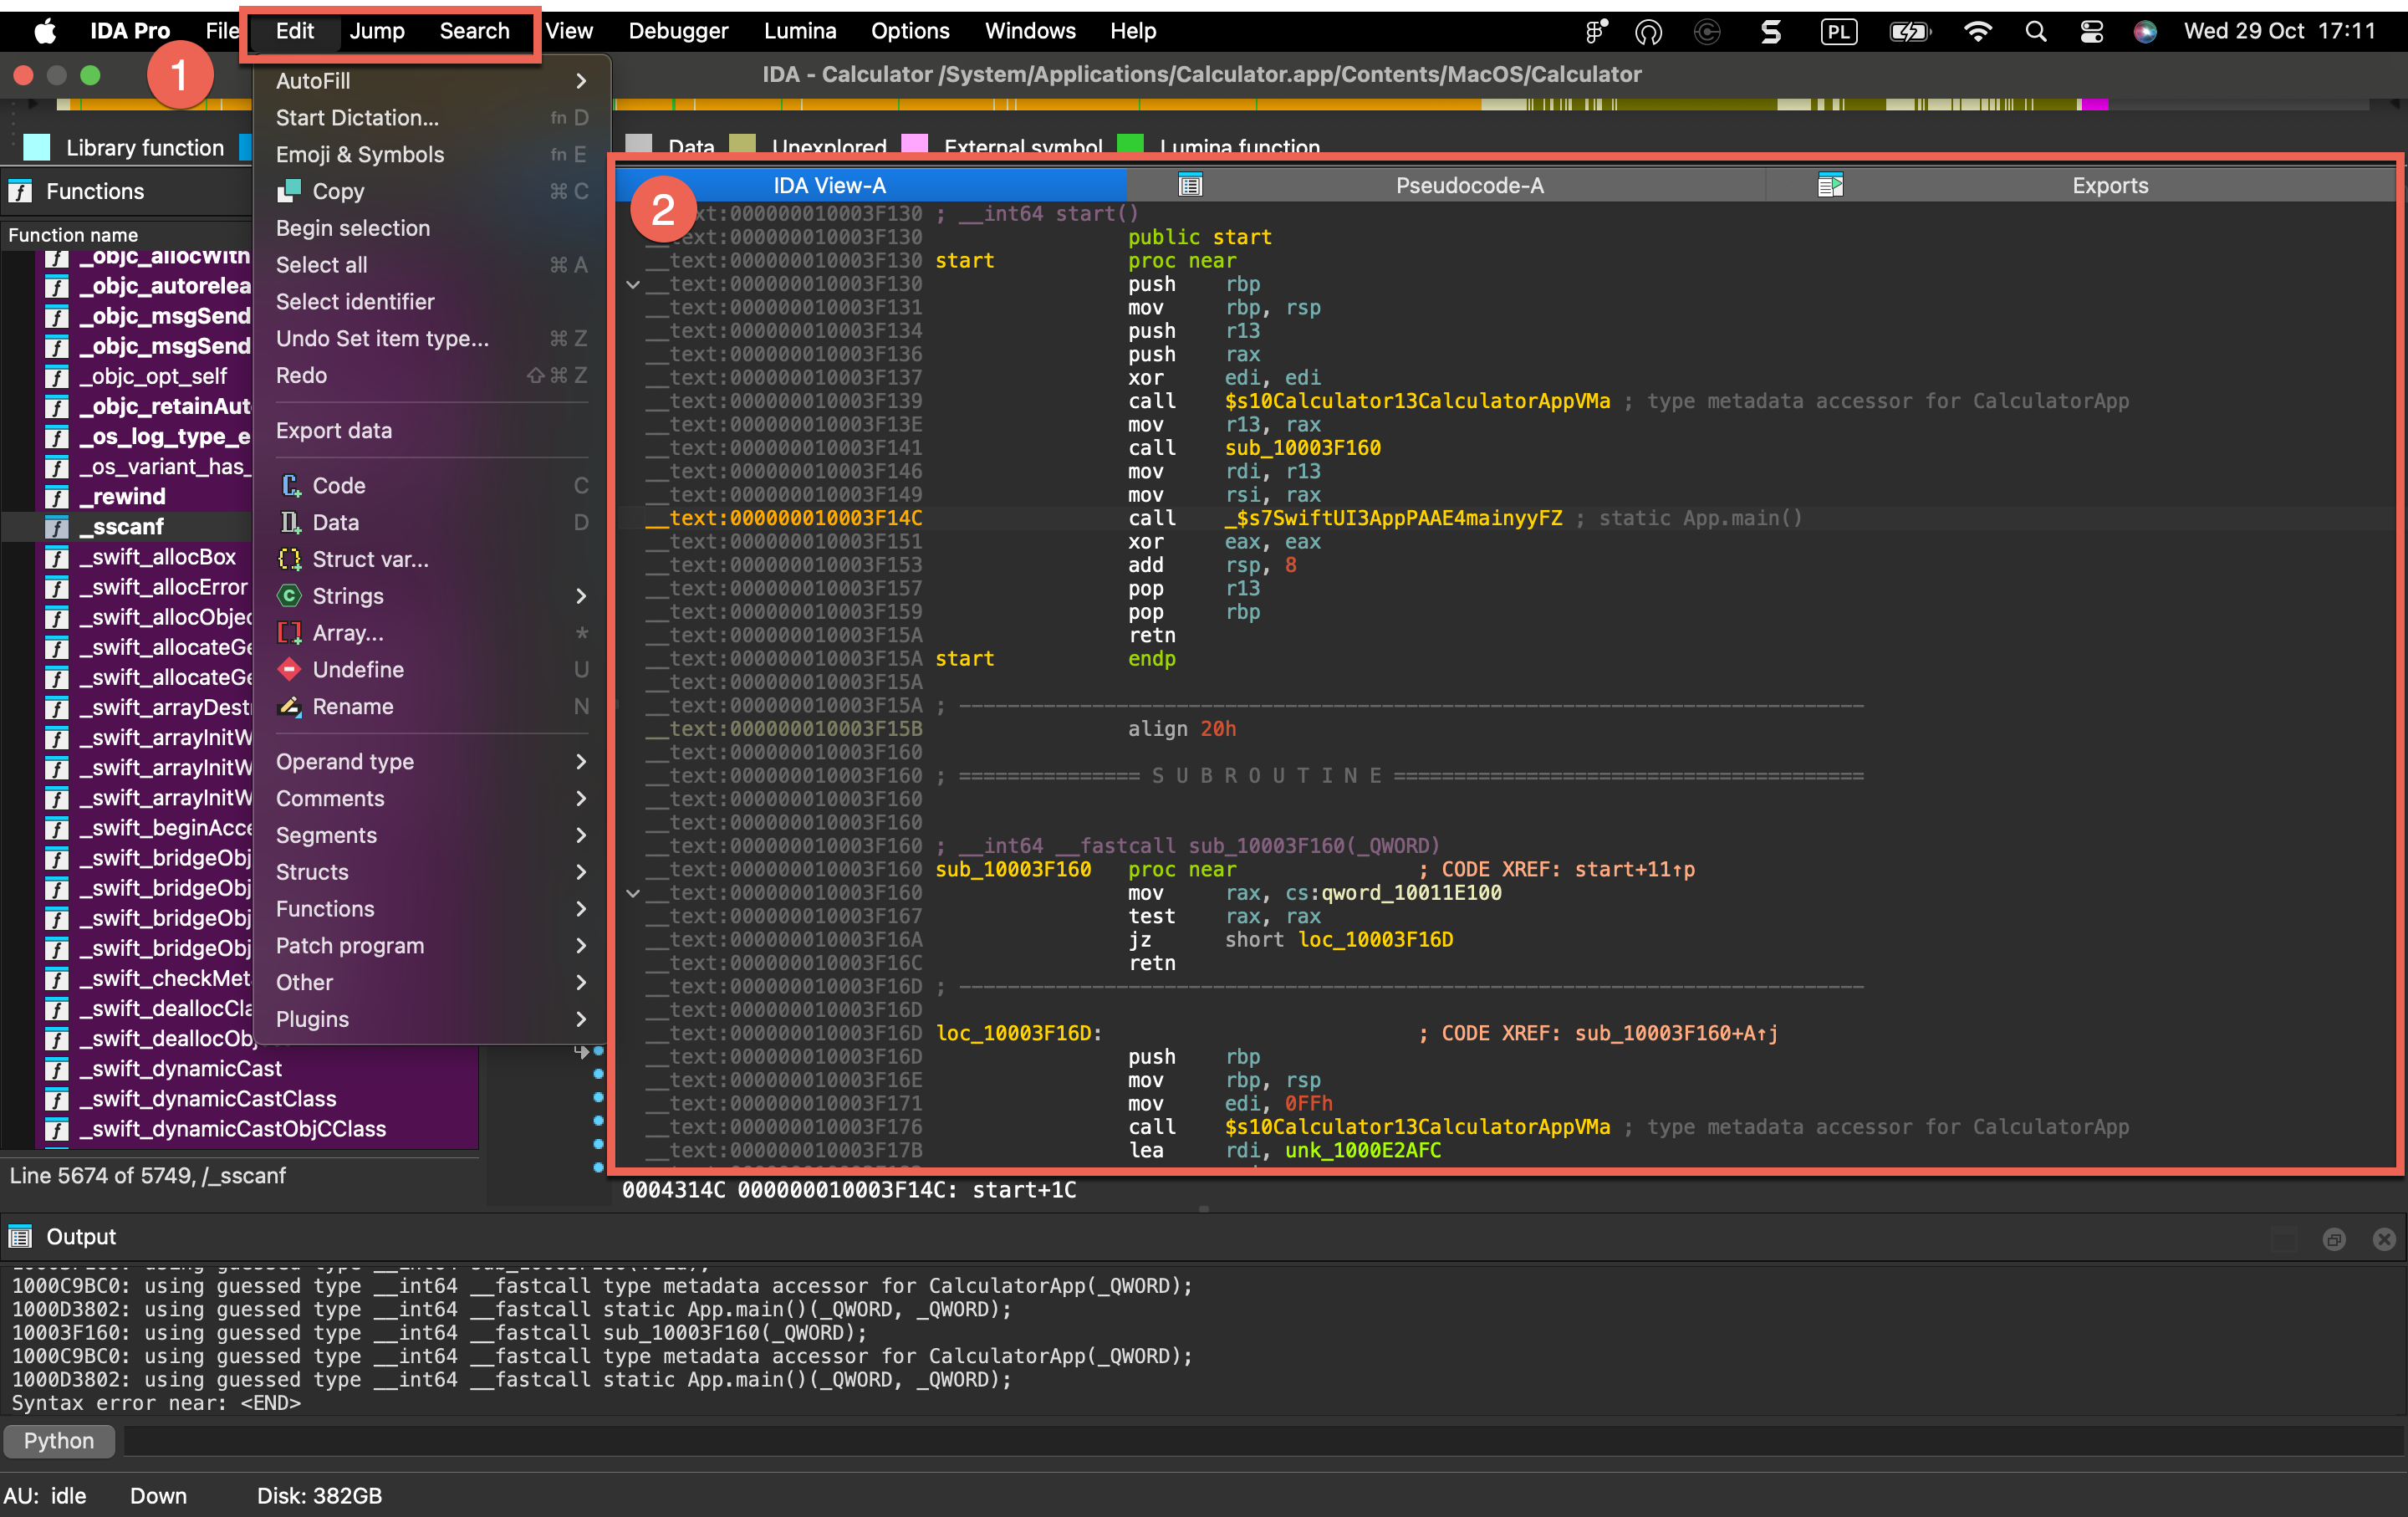
View-Dependent Menus
The following top-level menus (1) dynamically change their content based on your active view (2) and cursor location.
- Edit - Provides context-sensitive editing operations like patching bytes, modifying instructions, renaming symbols, and changing data types.
- Jump - Navigates to addresses, functions, cross-references, and other locations within the binary.
- Search - Search for strings, patterns, instructions, constants, and references in the disassembly.
| Icon | Current View | Context-Sensitive Menu Actions |
|---|---|---|
| Disassembly/IDA View | • Edit • Jump • Search | |
| Hex View | • Edit • Jump • Search | |
| Pseudocode | • Edit • Jump • Search | |
| Local Types | • Edit • Jump • Search | |
| Functions | • Edit • Jump • Search |
File menu actions for Common
Below is an overview of all actions that can be accessed from this menu.
| UI Action Name | Action Name | Description |
|---|---|---|
| New instance | NewInstance | Open a new IDA instance |
| Open… | LoadNewFile | Load a new file or database |
| Load file | `` | |
| Reload the input file | ReloadFile | Reload the input file. More… |
| Additional binary file… | LoadFile | Load additional binary file. More… |
| IDS/IDT file… | LoadIdsFile | Load a symbol file (IDS). More… |
| PDB file… | LoadPdbFile | Load a debug information file (PDB). More… |
| DBG file… | LoadDbgFile | Load a debug information file (DBG). More… |
| TDS file… | LoadTdsFile | Load a debug information file (TDS). More… |
| FLIRT signature file… | LoadSigFile | Load a FLIRT signature file. More… |
| Parse C header file… | LoadHeaderFile | This command allows you to apply type declarations from a C header file to the program. More… |
| Produce file | `` | |
| Create MAP file… | ProduceMap | Create a map information file. More… |
| Create ASM file… | ProduceAsm | Create an assembler file. More… |
| Create INC file… | ProduceInc | Create an include file. More… |
| Create LST file… | ProduceLst | Create a listing file. More… |
| Create EXE file… | ProduceExe | Create an executable file. More… |
| Create DIF file… | ProduceDiff | Create a difference file. More… |
| Create C file… | hx:CreateCFile | Create C file |
| Create HTML file… | ProduceHtml | Create a HTML file. More… |
| Create SIG file… | makesig:create_signature | Create SIG file |
| Create flow chart GDL… | ProduceFuncGdl | Create flow chart GDL. More… |
| Create call graph GDL… | ProduceCallGdl | Create call graph GDL. More… |
| Create C header file… | ProduceHeader | Creates a header file from local types. More… |
| Dump database to IDC file… | DumpDatabase | Dump database to IDC file. This command saves current IDA database into a text file. More… |
| Dump typeinfo to IDC file… | DumpTypes | Dump type information to IDC file. This command saves information about the user-defined types from the IDA database into a text file. More… |
| Script file… | Execute | Execute a script file |
| Script command… | ExecuteLine | Execute a script command |
| Save | SaveBase | Save the database |
| Save as… | SaveBaseAs | Save the database as… |
| Take database snapshot… | SaveBaseSnap | Take database snapshot. More… |
| Close | CloseBase | Close |
| Quick start | QuickStart | Display the quick start window |
| Exit | QuitIDA | Save everything and exit IDA |
Reload the input file
Reload the input file. This command reloads the same input file into the database. IDA tries to retain as much information as possible in the database. All the names, comments, segmentation information and similar will be retained. Only the values of individual bytes will be changed. This command works for some input file types only: if the file was loaded into the database with special settings, this command may fail. In this case, use Dump database to IDC file command and reload the file manually.
Additional binary file…
Load additional binary file. The new file is added to the current database and all existing information is retained. The file content will appear as unexplored bytes in the program. This command only allows you to load binary files.
IDS/IDT file…
Load a symbol file (IDS). An IDS file contains information about well-known functions (such as functions from MS Windows API), namely:
- their names
- their ordinal number in the DLL
- an eventual informative comment
- the number of parameters passed on the stack
- the number of parameters purged when returning IDS files are automatically loaded if they are found in the IDS directory. This command allows you to load an IDS file from any directory, even after the main file has been loaded into the database.
PDB file…
Load a debug information file (PDB).
If the program being disassembled has a companion PDB file, then this command may be used to load information from the PDB file into the database.
By default IDA uses in-house code to parse and load PDB files. However, our code can not parse old v2.0 PDB files. For them, IDA can fall back to using Microsoft DLLs (the default is “do not fall back”). Please read more in cfg/pdb.cfg.
Command line switch -Opdb:option1:option2 overrides for ida session the value in cfg/pdb.cfg.
DBG file…
Load a debug information file (DBG). This command loads a DBG file. If the program being disassembled has a companion DBG file, then this command may be used to load information from a DBG file into the database. IDA loads DBG files automatically if it can find them in the directory with the input file. The built-in debug information loader cannot load NB10 format files and PDB files. To load those files, please use a special plugin, PDB.DLL, which can be run manually using Edit → Plugins submenu. This plugin uses MS Windows DLLs to load the debug information and therefore has the following limitations:
- it works only under MS Windows
- it will load only PDBs compatible with the currently installed IMAGEHLP.DLL
TDS file…
Load a debug information file (TDS).
If the program being disassembled has a companion TDS file, this command may be used to load information from the TDS file into the database.
The TDS file must be placed in the same directory together with the input file.
The LoadTdsFile command launches a special plugin TDS.DLL, which can be run manually using Edit → Plugins submenu.
FLIRT signature file…
Load a FLIRT signature file. This command allows you to apply an additional signature file to the program. A signature file contains patterns of standard runtime functions. With their help, IDA is able to recognize the standard functions and names them accordingly. IDA attempts to detect the necessary signature files automatically but unfortunately, this is not always possible. This command adds the specified signature file into the planned signature files queue. Signature files reside in the subdirectories of the SIG directory. Each processor has its own subdirectory. The name of the subdirectory is equivalent to the name of the processor module file (z80 for z80.w32, for example). Note: IBM PC signatures are located in the SIG directory itself. Note: the IDASGN environment variable can be used to specify the location of the signatures directory.
There is another way to load a signature file: you may insert/delete signature files in the following way:
- open the signatures window
- press Ins to insert a signature file to the queue
- press Del to delete a signature file from the queue
This is a preferred way of applying signatures because useful information, such as the number of identified functions is displayed in the signature window.
{% hint style=“info” %} FLIRT works only for the processors with normal byte size. The byte size must be equal to 8 (processors with wide bytes like AVR or DSP56K are not supported) {% endhint %}
Parse C header file…
This command allows you to apply type declarations from a C header file to the program. IDA reads and parses the specified header file as a C compiler does. In other words, it mimics the front-end of a C compiler with some restrictions:
- Only type declarations are allowed. The function definitions in the input file are skipped.
- Not all C++ header files are not supported, only simple classes can be parsed.
- The compiler specific predefined macros are not defined, you have to define them manually in the header file.
Don’t forget to specify the compiler and memory model in the compiler setup dialog box (Options → Compiler…) before loading a header file. All type declarations found in the input file are stored in the current database in the form of a type library. These type declarations can be used to define new structure and enumeration definitions.
In the case of an error in the input file, the error messages appear in the message window. In any case, the function declarations that are already parsed are not deleted from the database. IDA stops parsing the input file when 20 errors occur. IDA 7.7 introduced an alternative header file parser based on libclang.
Create MAP file…
Create a map information file. Please enter a file name for the map. IDA will write the following information about this file:
- current segmentation
- list of names sorted by values
You may disable the generation of the segmentation information. You may also enable or disable dummy names (Options → Name representation…) in the output file. You can use this map file for your information, and also for debugging (for example, Periscope from Periscope Company or Borland’s Turbo Debugger can read this file).
Create ASM file…
Create an assembler file.
Please enter a file name for the assembler text file. IDA will write the disassembled text to this file.
If you have selected a range on the screen using the Begin selection command (action Anchor), IDA will write only the selected range (from the current address to the anchor).
If some I/O problem (e.g., disk full) occurs during writing to the file, IDA will stop and a partial file will be created.
Create INC file…
Create an include file. Please enter a file name for the assembler include file. IDA will write the information about the defined types (structures and enums) to this file. If some I/O problem (e.g. disk full) occurs during writing to the file, IDA will stop and a partial file will be created.
Create LST file…
Create a listing file.
Enter a file name for the assembler listing file. IDA will write the disassembled text to this file.
If you’ve selected a range on the screen using the Begin selection command (action Anchor), IDA will write only the selected range (from the current address to the anchor).
If some I/O problem (e.g. disk full) occurs during writing to the file, IDA will stop and a partial file will be created.
Create EXE file…
Create an executable file.
Enter a file name for the new executable file. Usually this command is used after patching (see actions PatchByte, PatchWord) to obtain a patched version of the file.
IDA produces executable files only for:
- MS DOS .exe
- MS DOS .com
- MS DOS .drv
- MS DOS .sys
- general binary
- Intel Hex Object Format
- MOS Technology Hex Object Format
For other file formats please create a difference file (the Create DIFF file command; action ProduceDiff).
{% hint style=“info” %}
Only Change byte… and Change word… commands (see actions PatchByte, PatchWord) affect the executable file contents, other commands (including the Manual… command) will not affect the content of the disassembled file.
{% endhint %}
EXE files: Output files will have the same EXE-header and relocation table as the input file. IDA will fill unused ranges of the EXE file (e.g. between relocation table and loadable pages) with zeroes.
Create DIF file…
Create a difference file. This command will prompt you for a filename and then will create a plain text difference file of the following format:
 comment
 filename
 offset: oldval  newval
Create HTML file…
Create a HTML file.
Please enter a file name for the HTML file. IDA will write the disassembled text to this file.
If you’ve selected a range on the screen using the Begin selection command (action Anchor), IDA will write only the selected range (from the current address to the anchor).
If some I/O problem (e.g. disk full) occurs during writing to the file, IDA will stop and a partial file will be created.
This command is available only in the graphical version of IDA.
Create flow chart GDL…
Create flow chart GDL. This command creates a GDL (graph description file) with the flow chart of the current function. If there is an active selection, its flow chart will be generated. IDA will ask for the output file name. Regardless of the specified extension, the .GDL extension will be used.
Create call graph GDL…
Create call graph GDL. This command creates a GDL (graph description file) with the graph of the function calls. IDA will ask for the output file name. Regardless of the specified extension, the .GDL extension will be used.
Create C header file…
Creates a header file from local types. This command saves all definitions in the local types window into a C header file.
Dump database to IDC file…
Dump database to IDC file. This command saves current IDA database into a text file.
You can use it as a safety command:
- to protect your work from disasters
- to migrate information into new database formats of IDA.
This command is used when you want to switch to a new version of IDA. Usually each new version of IDA has its own database format. To create a new format database, you need:
- to issue the ‘Dump…’ command for the old database (using old version of IDA). You will get an IDC file containing all information from your old database.
- to reload your database using new IDA with switch -x.
- to compile and execute the IDC file with command ‘Execute IDC file’ (usually F2)
Please note that this command does not save everything to text file. Any information about the local variables will be lost!
Dump typeinfo to IDC file…
Dump type information to IDC file. This command saves information about the user-defined types from the IDA database into a text file.
Information about enums, structure types and other user-defined types is saved in a text form as an IDC program.
You can use this command to migrate the type definitions from one database to another.
Take database snapshot…
Take database snapshot. The snapshot can be later restored from the database snapshot manager.
{% hint style=“info” %} Snapshots work only with regular databases. Unpacked databases do not support them. {% endhint %}
Edit
Edit menu actions for IDA View
{% hint style=“info” %} The options below appear when the Edit menu is opened from the IDA View. In other views, the menu adapts dynamically and may show a different set of options. {% endhint %}
Below is an overview of all actions that can be accessed from this menu.
| UI Action Name | Action Name | Description |
|---|---|---|
| Copy | EditCopy | Copy |
| Begin selection | Anchor | Begin selection. Some IDA commands such as selecting a portion of file to output or specifying a segment to move need an anchor. More… |
| Select all | SelectAll | Select all |
| Select identifier | SelectIdentifier | Select identifier |
| Undo | UndoAction | This command reverts the database to the state before executing the last user action. More… |
| Redo | RedoAction | This command reverts the previously issued Undo command. More… |
| Export data | ExportData | Export data |
| Code | MakeCode | Convert to instruction. More… |
| Data | MakeData | Convert to data. More… |
| Struct var… | DeclareStructVar | Declare a structure variable. More… |
| Strings | `` | |
| String | MakeStrlit | Convert to string. More… |
| C-style (0 terminated) | StringC | C-style (0 terminated) |
| DOS style ($ terminated) | StringDOS | DOS style ($ terminated) |
| Pascal style (1 byte length) | StringPascal1 | Pascal style (1 byte length) |
| Wide pascal (2 byte length) | StringPascal2 | Wide pascal (2 byte length) |
| Delphi (4 byte length) | StringDelphi | Delphi (4 byte length) |
| Unicode | StringUnicode | Unicode |
| Unicode pascal (2 byte length) | StringUnicodePascal2 | Unicode pascal (2 byte length) |
| Unicode wide pascal (4 byte length) | StringUnicodePascal4 | Unicode wide pascal (4 byte length) |
| Array… | MakeArray | Convert to array. More… |
| Undefine | MakeUnknown | Convert to undefined. More… |
| Rename | MakeName | Rename the current location. More… |
| Operand type | `` | |
| Offset | `` | |
| Offset (data segment) | OpOffset | Convert the current operand to an offset in the data segment. More… |
| Offset (current segment) | OpOffsetCs | Convert the current operand to an offset in the current segment. More… |
| Offset by (any segment)… | OpAnyOffset | Convert the current operand to an offset in any segment. More… |
| Offset (user-defined)… | OpUserOffset | Convert the current operand to an offset with any base. More… |
| Offset (struct)… | OpStructOffset | Convert the current operand to a structure offset. More… |
| Number | `` | |
| Number (default) | OpNumber | Convert the current operand to a number. More… |
| Hexadecimal | OpHex | Convert the current operand to a hexadecimal number. More… |
| Decimal | OpDecimal | Convert the current operand to a decimal number. More… |
| Octal | OpOctal | Convert the current operand to a octal number. More… |
| Binary | OpBinary | Convert the current operand to a binary number. More… |
| Floating point | OpFloat | Convert to floating point. More… |
| Toggle leading zeroes | ToggleLeadingZeroes | Toggle leading zeroes. More… |
| Character | OpChar | Convert the current operand to a character constant |
| Segment | OpSegment | Convert the current operand to a segment base |
| Enum member… | OpEnum | Convert the current operand to a symbolic constant |
| Stack variable | OpStackVariable | Convert the current operand to a stack variable |
| Change sign | ChangeSign | Change the sign of the current operand |
| Bitwise negate | BitwiseNegate | Perform bitwise negation of the current operand |
| Manual… | ManualOperand | Enter the current operand manually. More… |
| Set operand type… | SetOpType | Set the current operand’s type |
| Comments | `` | |
| Copy pseudocode to disassembly | hx:EditCmt | Edit func comment |
| Add pseudocode comments… | hx:AddPseudoCmt | Add pseudocode comments |
| Delete pseudocode comments… | hx:DelPseudoCmt | Delete pseudocode comments |
| Enter comment… | MakeComment | Enter a regular comment. More… |
| Enter repeatable comment… | MakeRptCmt | Enter repeatable comment. More… |
| Enter anterior lines… | MakeExtraLineA | Enter lines preceding the generated lines. More… |
| Enter posterior lines… | MakeExtraLineB | Enter lines following the generated lines |
| Edit block comment… | mv:EditBlockCmt | Edit block comment of microcode line |
| Edit comment… | mv:EditCmt | Edit comment of microcode line |
| Segments | `` | |
| Create segment… | CreateSegment | This command allows you to create a new segment. More… |
| Edit segment… | EditSegment | Edit segment attributes. More… |
| Delete segment… | KillSegment | Delete segment. More… |
| Move current segment… | MoveSegment | Change the current segment boundaries. More… |
| Rebase program… | RebaseProgram | Rebase program. More… |
| Change segment translation… | SegmentTranslation | Change the current segment translation table |
| Change segment register value… | SetSegmentRegister | Change segment register value. More… |
| Set default segment register value… | SetSegmentRegisterDefault | Set default segment register value. More… |
| Structs | `` | |
| Struct var… | DeclareStructVar | Declare a structure variable. More… |
| Force zero offset field | ZeroStructOffset | Toggle display of the first field of a structure in an offset expression. More… |
| Select union member… | SelectUnionMember | Choose the representation of a union member. More… |
| Create struct from selection | CreateStructFromData | This command defines a new structure from data already defined. The new structure is created with adequate data types, and each member uses the current data name if it is available. More… |
| Copy field info to pointers | CopyFieldsToPointers | Copy field info to pointed addresses. This command scans the current struct variable and renames the locations pointed by offset expressions unless they already have a non-dummy name. More… |
| Functions | `` | |
| Create function… | MakeFunction | Create a new function in the disassembly. More… |
| Edit function… | EditFunction | Edit function attributes - change function properties, including bounds, name, flags, and stack frame parameters. More… |
| Append function tail… | AppendFunctionTail | This command appends an arbitrary range of the program to a function definition. A range must be selected before applying this command. This range must not intersect with other function chunks (however, an existing tail can be added to multiple functions). More… |
| Remove function tail… | RemoveFunctionTail | Remove function tail. More… |
| Delete function | DelFunction | Delete function. Deleting a function deletes only information about a function, such as information about stack variables, comments, function type, etc. The instructions composing the function will remain intact. |
| Set function end | FunctionEnd | Change the function end address. This command changes the current or previous function bounds so that its end will be set at the cursor. If it is not possible, IDA beeps. |
| Stack variables… | OpenStackVariables | Open the stack variables window. See subviews for more. |
| Change stack pointer… | ChangeStackPointer | Change stack pointer. This command allows you to specify how the stack pointer (SP) is modified by the current instruction. More… |
| Rename register… | RenameRegister | Rename a general processor register. More… |
| Set type… | SetType | Set type information for an item or current function. More… |
| Patch program | `` | |
| Change byte… | PatchByte | Change program bytes. More… |
| Change word… | PatchWord | Change program words |
| Assemble… | Assemble | This command allows you to assemble instructions. Currently, only the IBM PC processors provide an assembler, nonetheless, plugin writers can extend or totally replace the built-in assembler by writing their own. More… |
| Patched bytes | PatchedBytes | Open the Patched bytes window. More… |
| Apply patches to input file… | ApplyPatches | Apply previously patched bytes back to the input file. If the “Restore” option is selected, then the original bytes will be applied to the input file. More… |
| Other | `` | |
| Specify switch idiom… | uiswitch:SpecSwitchIdiom | Specify switch idiom |
| Create alignment directive… | MakeAlignment | Create alignment directive. More… |
| Manual instruction… | ManualInstruction | Specify alternate representation of the current instruction. More… |
| Color instruction… | ColorInstruction | This command allows you to specify the background color for the current instruction or data item. More… |
| Reset decompiler information… | hx:ResTypeInfo | Reset decompiler information |
| Toggle skippable instructions… | hx:ToggleSkippableInsn | Toggle skippable instructions |
| Decompile as call… | hx:UserDefinedCall | Decompile as call |
| Toggle border | ToggleBorder | Toggle the display of a border between code and data. More… |
| detect and parse golang metadata | golang:detect_and_parse | detect and parse golang metadata |
| Open picture in default viewer | picture_search:open_in_viewer | Open picture in default viewer |
| Save picture | picture_search:save_picture | Save picture |
| Plugins | `` | |
| Quick run plugins | QuickRunPlugins | Quickly run a plugin |
Begin selection
Begin selection. Some IDA commands such as selecting a portion of file to output or specifying a segment to move need an anchor.
To drop the anchor, you can either use the Alt + L key or the Shift + ↑, ←, →, ↓ combination, which is more convenient. You can also drop the anchor with the mouse by simply clicking and dragging it.
After you’ve dropped the anchor, you can navigate freely using arrows, etc. Any command that uses the anchor, raises it.
The anchored range is displayed with another color.
When you exit from IDA, the anchor value is lost.
Undo
This command reverts the database to the state before executing the last user action. It is possible to apply Undo multiple times, in this case multiple user actions will be reverted.
Please note the entire database is reverted, including all modifications that were made to the database after executing the user action and including the ones that are not connected to the user action. For example, if a third party plugin modified the database during or after the user action, this modification will be reverted. In theory it is possible to go back in time to the very beginning and revert the database to the state that was present immediately after performing the very first user action. However, in practice the undo buffers overflow because of the changes made by autoanalysis.
Autoanalysis (Options → General… → Analysis) generates copious amounts of undo data. Also, please note that maintaining undo data during autoanalysis slows it down a bit. In practice, it is not a big deal because the limit on the undo data is reached quite quickly (in a matter of minutes). Therefore, if during analysis the user does not perform any actions that modify the database, the undo feature will turn itself off temporarily.
However, if you prefer not to collect undo data at all during the initial autoanalysis, just turn off the UNDO_DURING_AA parameter in ida.cfg.
The configuration file ida.cfg has 2 more undo-related parameters:
| Parameter | Description | Default |
|---|---|---|
| UNDO_MAXSIZE | Max size of undo buffers. Once this limit is reached, the undo info about the oldest user action will be forgotten. | 128MB |
| UNDO_DEPTH | Max number of user actions to remember. If set to 0, the undo feature will be unavailable. | 1000000 |
Since there is a limit on the size of undo buffers, any action, even the tiniest, may become non-undoable after some time. This is true because the analysis or plugins may continue to modify the database and overflow the buffers. Some massive actions, like deleting a segment, may be non-undoable just because of the sheer amount of undo data they generate.
Please note that Undo does not affect the state of IDC or Python scripts. Script variables will not change their values because of Undo. Also nothing external to the database can be changed: created files will not be deleted, etc.
Some actions cannot be undone. For example, launching a debugger or resuming from a breakpoint cannot be undone.
Redo
This command reverts the previously issued Undo command. It is possible to use Redo multiple times.
This command also reverts all changes that were done to the database after the last Undo command, including the eventual useful modifications made by the autoanalysis. In other words, the entire database is modified to get to the exact state that it had before executing the last Undo command.
Code
Convert to instruction. This command converts the current unexplored bytes to instruction(s). IDA will warn you if it is not possible.
If you have selected a range using the Anchor action, all the bytes from this range will be converted to instructions.
If you apply this command to an instruction, it will be reanalyzed.
Data
Convert to data. This command converts the current unexplored bytes to data. If it is not possible, IDA will warn you.
Multiple using of this command will change the data type:
 db -> dw -> dd -> float -> dq -> double -> dt -> packreal -> octa \;
 ^                                                                 |;
 \---------<----------------<--------------<-----------------------/;
You may remove some items from this list using the Setup data types… command (action SetupData).
If the target assembler (Options → General… → Analysis) does not support double words or another data type, it will be skipped. To create a structure variable, use the Struct var… command (action DeclareStructVar). To create an array, use the Array… command (action MakeArray). To convert back, use the Undefine command (action MakeUnknown).
Struct var…
Declare a structure variable. IDA will ask you to choose a structure type. You must have some structure types defined in order to use this command. If the target assembler supports it, IDA will display the structure in terse form (using just one line). To uncollapse a terse structure variable use the Unhide command. You can also use this command to declare a structure field in another structure (i.e., nested structures are supported too).
String
Convert to string.
This command converts the current unexplored bytes to a string.
The set of allowed characters is specified in the configuration file, parameter StrlitChars. Character ‘\0’ is not allowed in any case. If the current assembler (Options → General → Analysis → Target assembler) does not allow characters above 0x7F, characters with high bit set are not allowed.
If the anchor has been dropped, IDA will take for the string all characters between the current cursor position and the anchor.
Use the anchor if the string starts a disallowed character.
This command also generates a name for the string. In the configuration file, you can specify the characters allowed in names (NameChars).
You can change the literal string length using Array… command (action MakeArray).
The GUI version allows you to assign a special hotkey to create Unicode strings. To do so, change the value of the StringUnicode parameter in the IDAGUI.CFG file.
Array…
Convert to array. This command allows you to create arrays and change their sizes.
The arrays are created in 2 simple steps:
-
Create the first element of array using the data definition commands (data, string, structs)
-
Apply the array command to the created data item. Enter array size in current array elements (not bytes). The suggested array size is the minimum of the following values:
- the address of the next item with a cross reference
- the address of the next user-defined name For string literals, you can use this command to change the length of the string.
The dialog box contains the following fields:
-
Items on a line (meaningless for string literals):
- 0 - place maximal number of items on a line
- other value - number of items on a line Please note that the margin parameter affects the number of items on a line too.
-
Alignment (meaningless for string literals):
- -1 - do not align items
- 0 - align automatically
- other value - width of each item
-
Signed elements: if checked, IDA treats all elements as signed numbers. Only meaningful for numbers (not for offsets and segments and strings)
-
Display indexes: if checked, IDA will display the indexes of array elements in the form of comments (0,1,2…)
-
Create as array: if not checked, IDA will create a separate item for each array element. Useful for creating huge arrays. If the box is unchecked when this command is applied to string literals, IDA will create many string literals instead of one big string.
If applied to a variable-sized structure, this command is used to specify the overall size of the structure. You cannot create arrays of variable-sized structures.
Undefine
Convert to undefined. This command deletes the current instruction or data, converting it to ‘unexplored’ bytes. IDA will delete the subsequent instructions if there are no more references to them (functions are never deleted).
If you have selected a range using the Anchor action, all the bytes in this range will be converted into ‘unexplored’ bytes. In this case, IDA will not delete any other instructions even if there are no references to them after the deletion.
Rename
Rename the current location. This command gives name/renames/deletes name for the current item.
To delete a name, simply give an empty name.
If the current item is referenced, you cannot delete its name. Even if you try, IDA will generate a dummy name (See Options → Name representation…).
List of available options:
-
Local name: The name is considered to be defined only in the current function. Please note that IDA does not check the uniqueness of the local names in the whole program. However, it does verify that the name is unique for the function.
-
Include in name list: Here you can also include/remove the name from the name list (see the Jump by name… command; action
JumpName). If the name is hidden, you will not see it in the names window. -
Public name: You can declare a name as a public (global) name. If the current assembler supports the “public” directive, IDA will use it. Otherwise, the publicness of the name will be displayed as a comment.
-
Autogenerated name: An autogenerated name will appear in a different color. If the item is indefined, it will disappear automatically.
-
Weak name: You can declare a name as a weak name. If the current assembler supports the “weak” directive, IDA will use it. Otherwise, the weakness of the name will be displayed as a comment.
-
Create name anyway: If this flag is on, and if the specified name already exists, IDA will try to variate the specified name by appending a suffix to it.
Offset (data segment)
Convert the current operand to an offset in the data segment. This command converts the immediate operand of the current instruction/data to an offset from the current data segment (DS). If the current DS value is unknown (or equal 0xFFFF) IDA will warn you - it will beep. In this case, you have to define DS register value for the current byte. The best way to do it is:
- jump to segment register change point (the Jump to segment register… command; action
JumpSegmentRegister), - change value of DS (the Change segment register value… command; action
SetSegmentRegister) - return (the Jump back command; action
Return) or you can change default value of DS for the current segment (the Set default segment register value… command; actionSetSegmentRegisterDefault).
If you want to delete offset definition, you can use this command again - it works as trigger.
If the cursor is on the first operand (the cursor is before ‘,’) then the first operand will be affected; otherwise, all other operands will be affected.
If a range is selected using the anchor, IDA will perform ‘en masse’ conversion. It will convert immediate operands of all instructions in the selected range to offsets. However, IDA will ask you first the lower and upper limits of immediate operand value. If the operand value is >= lower limit and <= upper limit then the operand will be converted to offset, otherwise it will be left unmodified.
To create offsets to structure members use the Offset (struct)… command (action OpStructOffset).
Offset (current segment)
Convert the current operand to an offset in the current segment.
If the cursor is on the first operand (the cursor is before ‘,’) then the first operand will be affected; otherwise, all other operands will be affected.
If a range is selected using the anchor, IDA will perform ‘en masse’ conversion. It will convert immediate operands of all instructions in the selected range to offsets. However, IDA will ask you first the lower and upper limits of immediate operand value. If the operand value is >= lower limit and <= upper limit then the operand will be converted to offset, otherwise, it will be left unmodified.
If this command is applied to a structure member in the Local types window, then IDA will create an “automatic offset”. An automatic offset is an offset with the base equal to 0xFFFFFFFF. This base value means that the actual value of the base will be calculated by IDA when a structure instance is created.
To create offsets to structure members use the Offset (struct)… command (action OpStructOffset).
Offset by (any segment)…
Convert the current operand to an offset in any segment.
This command converts the immediate operand of the current instruction/data to an offset from any segment.
IDA will ask to choose a base segment for the offset.
If a range is selected using the anchor, IDA will perform ‘en masse’ conversion. It will convert immediate operands of all instructions in the selected range to offsets. However, IDA will ask you first the lower and upper limits of immediate operand value. If the operand value is >= lower limit and <= upper limit then the operand will be converted to offset, otherwise it will be left unmodified.
If the cursor is on the first operand (the cursor is before ‘,’) then the first operand will be affected; otherwise, all other operands will be affected.
To create offsets to structure members use Offset (struct)… command (action OpStructOffset).
Offset (user-defined)…
Convert the current operand to an offset with any base. If the cursor is on the first operand (the cursor is before ‘,’) then the first operand will be affected; otherwise, all other operands will be affected. If the offset base is specified as 0xFFFFFFFF, then IDA will create “an automatic offset”. Automatic offsets mean that the actual value of the base will be calculated by IDA.
The following offset attributes are available:
| Option | Description |
|---|---|
| Treat the base address as a plain number | if checked, IDA will treat the base address as a number. In this case, IDA will not create a cross-reference to it and the base address will be printed as a number, not as an offset expression. |
| Offset points past the main object | Offsets of this type point past an object end. They do not cause an object created/deletion. |
| Use image base as offset base | These offsets are based on the image base. There is no need to explicitly specify the offset base. These offsets are displayed in a concise form: rva func instead of offset func - imagebase. If you intend to reassemble the output file, execute the following IDC statement: set_inf_attr(INF_GENFLAGS, get_inf_attr(INF_GENFLAGS) & ~INFFL_ALLASM); |
| Subtract operand value | Use this option when the operand value should be substracted from the base to get the target address. In this case the displayed expression will be displayed as offset base - target instead of the usual offset target - base |
| Signed operand | Use this option if the operand should be interpreted as a signed value. This option is only available for OFF_REF8, OFF_REF16, OFF_REF32 and OFF_REF64 offset types. |
| Operand value of 0 is invalid | If the operand value is 0, the value will be highlighted in red. |
| Operand value of NOT 0 is invalid | If the operand value is zero’s complement (i.e. all bits are set), the value will be highlighted in red. For example a OFF_REF16 with an operand value of 0xFFFF would be invalid. |
| Use the current address as the offset base | The offset base is dynamically calculated and is equal to the address of the current element: - for standalone items: their start address - for arrays: the start of the array element - for structures: the start of the structure field |
The offset expression is displayed in the following concise form: offset target - $ where “$” denotes the start of the element (and is assembler-dependent).
To create offsets to structure members use the Offset (struct)… command (action OpStructOffset).
Offset (struct)…
Convert the current operand to a structure offset. This command permits to convert all immediate operands of instructions in a range selection to a path of offsets through a structure and its possible sub unions. If no selection is active, IDA will simply permit to convert the current operand. In this case, it will display a simple dialog box the same way as the text version (see below). You can select the desired register in the drop-down list: all operands relative to this register will be added to the ‘Offsets’ list. A special empty line in the drop-down list is used to directly work on immediate values. Checkboxes in the ‘Offsets’ list allow you to select which operand you indeed want to modify. By default, IDA will select only undefined operands, to avoid overwriting previous type definitions. This list is sorted by operand value, by instruction address and finally by operand number. You can easily see the instructions related to the operand by moving the mouse over it, and wait for a hint to be displayed. The ‘Structures and Unions’ tree will contain all selectable structures, and sub unions. Once you select or move over a structure, the ‘Offsets’ list updates itself for each checked offset: the computed name of the operand is displayed, according to the selected structure in the tree. An icon is also drawn, to easily know if a specific structure matches the offset or not, or if the offset is too big for the selected structure. The structures who match the most offsets will be near the top of the tree. You can also move your mouse over structures in the tree to obtain an interesting hint. A ‘?’ icon can also appear, if the offset can be specialized by selecting an union member. In this case, if you expand the structure in the tree, you can select the adequate union member simply by checking the desired radio button. IDA automatically corrects the related name in the ‘Offsets’ list. The ‘Offset delta’ value represents the difference between the structure start and the pointer value. For example, if you have an operand 4 and want to convert in into an expression like “mystruct.field_6-2”, then you have to enter 2 as the delta. Usually the delta is zero, i.e. the pointer points to the start of the structure. The ‘Hide sub structures without sub unions’ option (checked by default) avoids to add unnecessary sub structures to the tree, to keep it as small as possible. If you uncheck this option, all sub structures will be added to the tree. By default, IDA displays the structure member at offset 0. To change this behavior, you can directly disable the ‘Force zero offset field’ in the ‘Options’ frame. Later zero offsets can be forced using Edit → Structs → Force zero offset menu item.
Text version
This command converts immediate operand(s) type of the current instruction/data to an offset within the specified structure. Before using this command, you have to define a structure type. First of all, IDA will ask a so-called “struct offset delta”. This value represents the difference between the structure start and the pointer value. For example, if you have an operand 4 and want to convert in into an expression like “mystruct.field_6-2”, then you have to enter 2 as the delta. Usually the delta is zero, i.e. the pointer points to the start of the structure. If a range is selected using the anchor, IDA will perform ‘en masse’ conversion. It will convert immediate operands of all instructions in the selected range to offsets. However, IDA will ask you first the lower and upper limits of immediate operand value. If the an operand value is >= lower limit and <= upper limit then the operand will be converted to offset, otherwise it will be left unmodified. When you use this command, IDA deletes the manually entered operand. If the cursor is on the first operand (the cursor is before ‘,’) then the first operand will be affected; otherwise, all other operands will be affected. By default IDA doesn’t display the structure member at offset 0. To change this behavior, use the Force zero offset field command. Moreover, if there are several possible representations (this can happen if unions are used), select the desired representation using the Select union member… command.
Number (default)
Convert the current operand to a number.
That way, you can delete suspicious mark of the item.
The number is represented in the default radix for the current processor (usually hex, but octal for PDP-11, for example).
When you use this command, IDA deletes the manually entered operand (via the Manual… command; action ManualOperand).
If the cursor is on the first operand (the cursor is before ‘,’) then the first operand will be affected; otherwise, all other operands will be affected.
Hexadecimal
Convert the current operand to a hexadecimal number.
This command converts the immediate operand(s) type of the current instruction/data to a hex number, so that you can delete the suspicious mark of the item.
When you use this command, IDA deletes the manually entered operand (via the Manual… command; action ManualOperand).
If the cursor is on the first operand (the cursor is before ‘,’) then the first operand will be affected; otherwise, all other operands will be affected.
Decimal
Convert the current operand to a decimal number.
This command converts the immediate operand(s) type of the current instruction/data to decimal. Therefore, it becomes a ‘number’.
When you use this command, IDA deletes the manually entered operand (via the Manual… command; action ManualOperand).
If the cursor is on the first operand (the cursor is before ‘,’) then the first operand will be affected; otherwise, all other operands will be affected.
Octal
Convert the current operand to a octal number.
IDA always uses 123o notation for octal numbers even if the current assembler does not support octal numbers.
When you use this command, IDA deletes the manually entered operand (via the Manual… command; action ManualOperand).
If the cursor is on the first operand (the cursor is before ‘,’) then the first operand will be affected; otherwise, all other operands will be affected.
Binary
Convert the current operand to a binary number.
This command makes the current instruction or data operand type binary. IDA always uses 123b notation for binary numbers even if the current assembler does not support binary numbers.
When you use this command, IDA deletes the manually entered operand (via the Manual… command; action ManualOperand).
If the cursor is on the first operand (the cursor is before ‘,’) then the first operand will be affected; otherwise, all other operands will be affected.
Floating point
Convert to floating point.
When you use this command, IDA deletes the manually entered operand (via the Manual… command; action ManualOperand).
If the cursor is on the first operand (the cursor is before ‘,’) then the first operand will be affected; otherwise, all other operands will be affected.
Toggle leading zeroes
Toggle leading zeroes.
This command displays or hides the leading zeroes of the current operand. Example: if the instruction looked like this:
and ecx, 40h
then after applying the command it will look like this:
and ecx, 00000040h
If you prefer to see leading zeroes in all cases, then open the calculator and enter the following expression: set_inf_attr (INF_GENFLAGS, get_inf_attr(INF_GENFLAGS) | INFFL_LZERO); This will toggle the default for the current database and all numbers without leading zeroes will become numbers with leading zeroes, and vice versa. See also Edit|Operand types submenu.
Manual…
Enter the current operand manually. You may specify any string instead of an operand if IDA does not represent the operand in the desired form. In this case, IDA will simply display the specified string in the instruction instead of the default operand.
The current operand (under the cursor) will be affected.
You can use this command not only with instructions but with data items too.
IDA proposes the previous manual operand as the default value in the input form.
To delete the manual operand and revert back to the default text, specify an empty string.
IDA automatically deletes manually entered operands when you change operand representation using Edit → Operand types submenu.
{% hint style=“info” %} A text offset reference is generated if you use a label in the program as the operand string. In other cases no cross-references are generated. {% endhint %}
Enter comment…
Enter a regular comment. If you stand at the function start and your cursor is on a function name, IDA will ask you to enter a function comment. If you stand at the segment start and your cursor is on a segment name, IDA will ask you to enter a segment comment. If this command is issued in the Local types window, it allows you to change the comment of a structure/enum, or structure/enum member. If the cursor is on the structure/enum name, the structure/enum comment will be changed, otherwise the member comment will be changed. Otherwise, this command allows you to enter a normal indented comment for the current item. You can show/hide all comments in Options → General → Disassembly → Display disassembly line parts: Comments.
Enter repeatable comment…
Enter repeatable comment. A repeatable comment will appear attached to the current item and all other items referencing it. If you stand at the function start, IDA will ask you to enter a function comment. If this command is issued in the Local types window, it allows you to change the comment of a structure/enum, or structure/enum member. If the cursor is on the structure/enum name, the structure/enum comment will be changed, otherwise the member comment will be changed. Otherwise, this command allows you to enter a repeatable comment for the current item.
{% hint style=“info” %} You cannot enter repeatable segment comments. {% endhint %}
All items that refer to the current item will have this comment by default. Note that if you have defined both comment types (regular and repeatable), the regular comment will be displayed for the current item and the repeatable comment will be displayed for all items that refer to the current item, if they do not have their own comments. The repeatable comments may be used to describe subroutines, data items, etc., because all calls to the subroutine will have the repeatable comment. You can show/hide all comments in Options → General → Disassembly → Display disassembly line parts: Comments.
Enter anterior lines…
Enter lines preceding the generated lines. If you want to enter multi-line comments or additional instructions, you can use this feature of IDA.
There are two kinds of extra lines: the ones generated before the instruction line and the ones generated after the instruction line.
Do not forget that the maximal number of lines for an item is 500.
IDA does not insert a comment symbol at the beginning of the lines.
Create segment…
This command allows you to create a new segment.
If you select a range using the anchor, IDA will propose the start address and the end address of the selection as defaults for the segment bounds.
You need to specify at least:
- the segment start address
- the segment end address (excluded from the range)
- the segment base
Click here to learn about addressing model used in IDA.
If “sparse storage” is set, IDA will use special sparse storage method for the segment. This method is recommended for huge segments. Later, it is possible to change the storage method of any region using set_storage_type IDC function.
If another segment already exists at the specified address, the existing segment is truncated and the new segment lasts from the specified start address to the next segment (or specified end address, whichever is lower). If the old and the new segments have the same base address, instructions/data will not be discarded by IDA. Otherwise, IDA will discard all instructions/data of the new segment.
An additional segment may be created by IDA to cover the range after the end of the new segment.
Edit segment…
Edit segment attributes. This command opens the Change segment attributes dialog.
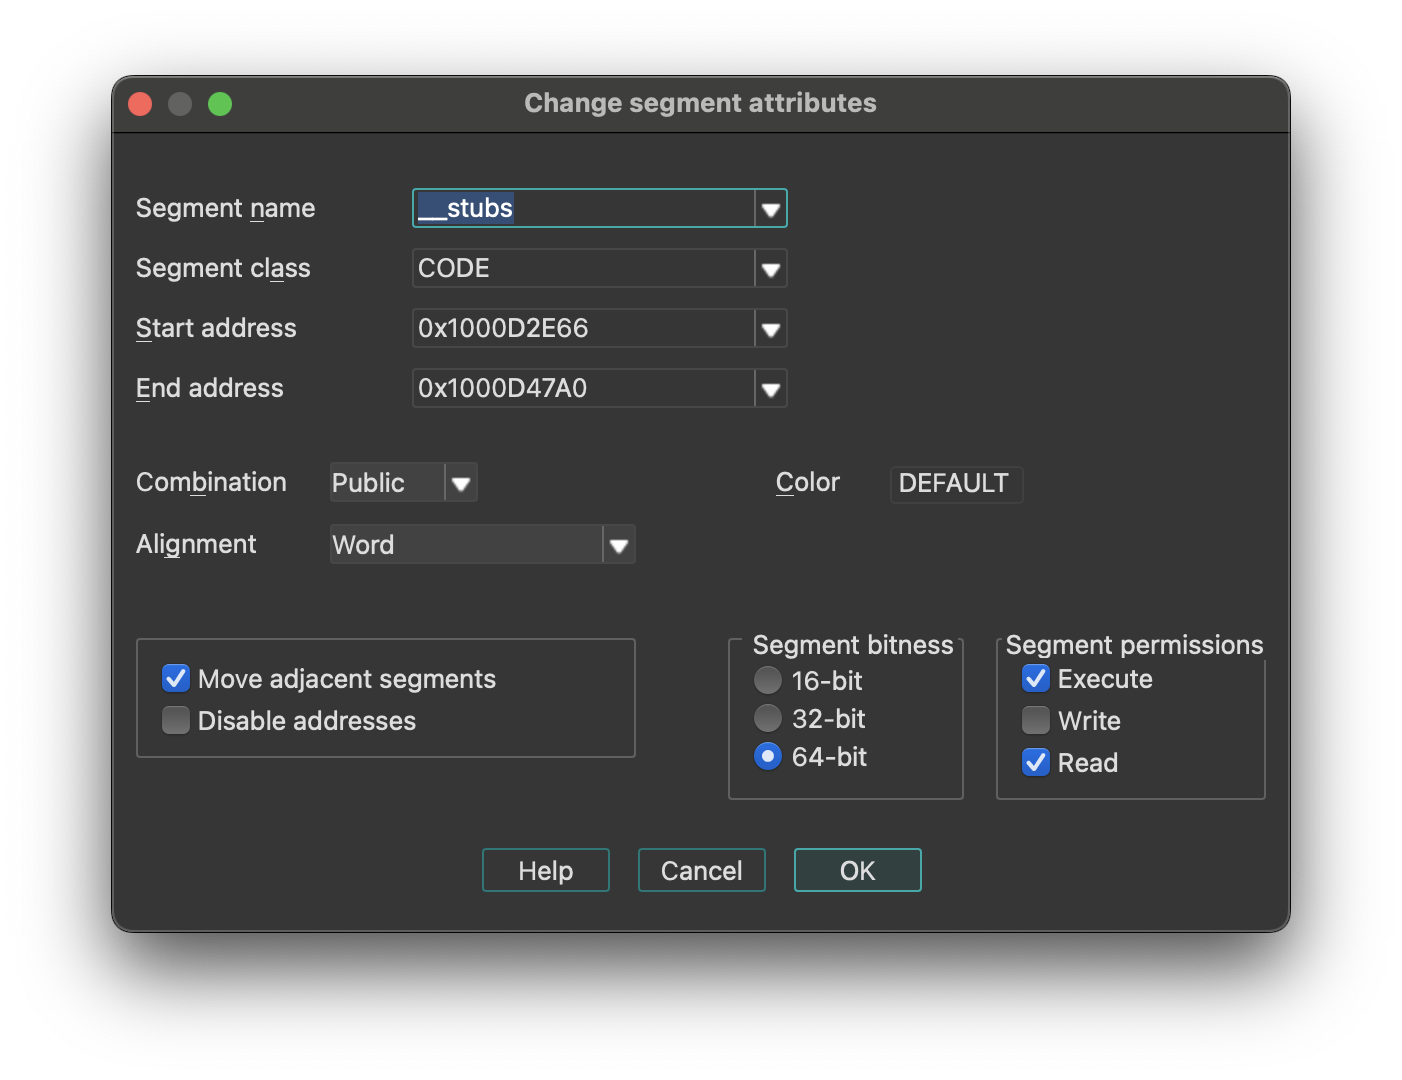
Change segment attributes options
- How to change segment name
- How to change segment class
- How to change segment addressing mode (16/32)
- How to change segment alignment
- How to change segment combination
{% hint style=“info” %} Changing the segment class may change the segment type. {% endhint %}
-
Move Adjacent Segments: means that the previous and next segments will be shrunk or expanded to fill gaps between segments. Click here for more information.
-
Disable Addresses: if set, when a segment is shrunk, all information about bytes going out of the segment will be completely removed.. Otherwise, IDA will discard information about instructions/data, comments etc, but will retain byte values so that another segment can be created later and it will use the existing byte values.
If IDA creates 2 segments where only one segment must exist, you may try the following sequence:
- Delete one segment (action
KillSegment). Choose one with bad segment base value. Do not disable addresses occupied by the segment being deleted. - Change bounds of another segment. Note that the Create segment… command (action
CreateSegment) changes the boundaries of the overlapping segment automatically.
Segments with the “debugger” attribute are the segments whose memory contents are not saved in the database. Usually, these segments are created by the debugger to reflect the current memory state of the program.
However, the user can modify this attribute.
If it is cleared, then the segment will permanently stay in the database after closing the debugger session. The database will reflect the state of the segment which was at the time when the status is changed.
If it is set, then the segment will become a temporary segment and will be deleted at the end of the debugging session.
The debugger segment checbkox is available only during debugging sessions.
The “loader” segments are the segment created by the file loader. The segment having this attribute are considered to be part of the input file.
A segment with the “debugger” attribute set and the “loader” attribute not set is considered to be an ephemeral segment. Such segments are not analyzed automatically by IDA.
“Segment permissions” group box can be used to modify Segment access permissions (Read/Write/Execute)
Segment Name
Enter a new name for the segment. A segment name is up to 8 characters long. IDA does check if the length is ok. Try to give mnemonic names for the segments.
Class Name
The segment class name identifies the segment with a class name (such as CODE, FAR_DATA, or STACK). The linker places segments with the same class name into a contiguous range of memory in the runtime memory map.
Changing the segment class changes only the segment definition on the screen. There are the following predefined segment class names:
| Segment class | Description |
|---|---|
| CODE | Pure code |
| DATA | Pure data |
| CONST | Pure data |
| BSS | Uninitialized data |
| STACK | Uninitialized data |
| XTRN | Extern definitions segment |
If you change segment class and the segment type is “Regular”, then the segment type will be changed accordingly.
In order to set the segment type “Regular”, you should change the segment class to “UNK”.
{% hint style=“info” %} Segment class names are never deleted. Once you define a segment class name, you cannot reuse it as a name of another object. {% endhint %}
Segment bitness
You can choose between 16-bit and 32-bit segment addressing.
IDA will delete all instructions and data in the segment if the segment address is changed.
Never do it if you are not sure. It may have irreversible consequences, all instructions/data will be converted to undefined bytes.
Segment Alignment
You can specify the segment alignment for the selected segment. By default, IDA assumes ‘byte’ alignment.
Changing the alignment changes only the segment definition on the screen. Nothing else will happen.
Segment Combination
A field that describes how the linker can combine the segment with other segments. Under MS-DOS, segments with the same name and class can be combined in two ways: they can be concatenated to form one logical segment, or they can be overlapped. In the latter case, they have either the same start address or the same end address, and they describe a common range in memory. Values for the field are:
- Private: Do not combine with any other program segment.
- Public: Combine by appending at an offset that meets the alignment requirement.
- Stack: Combine as for Public. This combine type forces byte alignment.
- Common: Combine by overlay using maximum size.
Changing segment combination changes only the segment definition on the screen. Nothing else will happen.
Delete segment…
Delete segment. IDA will ask your the permission to disable the addresses occupied by the segment. If you allow this operation, all information about the segment will be deleted. In other words, IDA will discard the information about instructions or data, comments etc.
If you check the “disable addresses” checkbox, IDA will mark the addresses occupied by the segment as “nonexistent” in the program. You will lose ALL information, including byte values.
It is impossible to disassemble the content of addresses not located in any segment, therefore you must create a new segment if you want to resume the disassembly of that part of the code.
You can also edit an adjacent segment to expand it to those addresses (Edit → Segments → Edit segment…).
IDA will ask your the permission to disable addresses occupied by the segment. If you give your permission, information about the segment will be deleted, otherwise IDA will discard information about instruction/data, comments etc, but retain byte values so that you will be able to create another segment afterwards. To disassemble the addresses occupied by the segment, you need to create a new segment again (i.e. you cannot disassemble bytes without a segment). You can also expand another adjacent segment to these addresses.
Move current segment…
Change the current segment boundaries. This command open the Move segment dialog and allows you to move segment(s) to another address. Use it if the segment(s) are loaded at a wrong address. This command shifts (moves) the selected segments in the memory to the target address. There must be enough free space at the target address for the segments. All information in the segment will be moved to the new address, but since the addresses change, the disassembly might be not valid anymore (especially if the program is moved to the wrong addresses and the relocation information is not available).
Fix up the relocated segment
This option allows IDA to modify the references to/from the relocated segment(s). If it is turned off, the references might be wrong after the move.
Rebase program…
Rebase program. The whole program will be shifted by the specified amount of bytes in the memory. The following options are available (we strongly recommend to leave them turned on):
- Fix up relocations: This option allows IDA to modify the references to/from the relocated segment(s). If it is turned off, the references might be wrong after the move.
- Rebase the whole image: This option is accessible only if the whole program is selected. It allows IDA to adjust internal variables on the whole program.
Please note rebasing the program might remove user-defined xrefs.
Change segment register value…
Change segment register value.
Relevant only for processors with the segment registers. Currently this command works for IBM PC, TMS320C2, Intel80196, and PowerPC processors.
This command creates or updates a segment register change point.
See also the Jump to segment register… command (action JumpSegmentRegister) for more info.
Set default segment register value…
Set default segment register value. Relevant only for processors with the segment registers. You can specify a default value of a segment register for the current segment. When you change the default value, IDA will reanalyze the segment, taking the default value when it cannot determine the actual value of the register. This takes time, so do not be surprised if references are not corrected immediately.
To specify a value other than the default value of a segment register, you can use the Change segment register value… command (action SetSegmentRegister).
Struct var…
Declare a structure variable. IDA will ask you to choose a structure type. You must have some structure types defined in order to use this command. If the target assembler supports it, IDA will display the structure in terse form (using just one line). To uncollapse a terse structure variable use the Unhide command. You can also use this command to declare a structure field in another structure (i.e., nested structures are supported too).
Force zero offset field
Toggle display of the first field of a structure in an offset expression. This command forces IDA to display a full structure member name even if the offset of the member is equal to zero.
If used twice, the command cancels itself.
Example: Suppose we have the following structure:
    xxx     struc
    a       db ?
    b       db ?
    c       db ?
    xxx     ends

    dloc    xxx ?
Normally IDA displays references to it like this:
    mov     eax, offset dloc
    mov     eax, offset dloc.b
If you force IDA, then it displays member ‘a’:
    mov     eax, offset dloc.a
    mov     eax, offset dloc.b
Select union member…
Choose the representation of a union member. This command tells IDA how to display references to a union from the current cursor location.
Example: Suppose we have the following union:
        xxx     union
        a       db ?
        b       dw ?
        c       dd ?
        ends   xxx
        dloc    xxx ?
Normally, IDA displays references to “dloc” like this:
        mov     al,  byte ptr dloc
        mov     eax, word ptr dloc
After using this command, IDA can display the union members:
        mov     al,  dloc.b
        mov     eax, dloc.d
Create struct from selection
This command defines a new structure from data already defined. The new structure is created with adequate data types, and each member uses the current data name if it is available.
This command is available only in the graphical version of IDA.
Copy field info to pointers
Copy field info to pointed addresses. This command scans the current struct variable and renames the locations pointed by offset expressions unless they already have a non-dummy name.
It also copies the type info from the struct members to pointed locations.
Create function…
Create a new function in the disassembly. You can specify function boundaries using the anchor. If you don’t specify any, IDA will try to find the boundaries automatically:
- function start point is equal to the current cursor position;
- function end point is calculated by IDA.
A function cannot contain references to undefined instructions. If a function has already been defined at the specified addresses, IDA will jump to its start address, showing you a warning message. A function must start with an instruction.
Edit function…
Edit function attributes - change function properties, including bounds, name, flags, and stack frame parameters. This command opens an Edit Function dialog, and allows you to modify function characteristics and stack frame structure. If the current address does not belong to any function, IDA will beep.
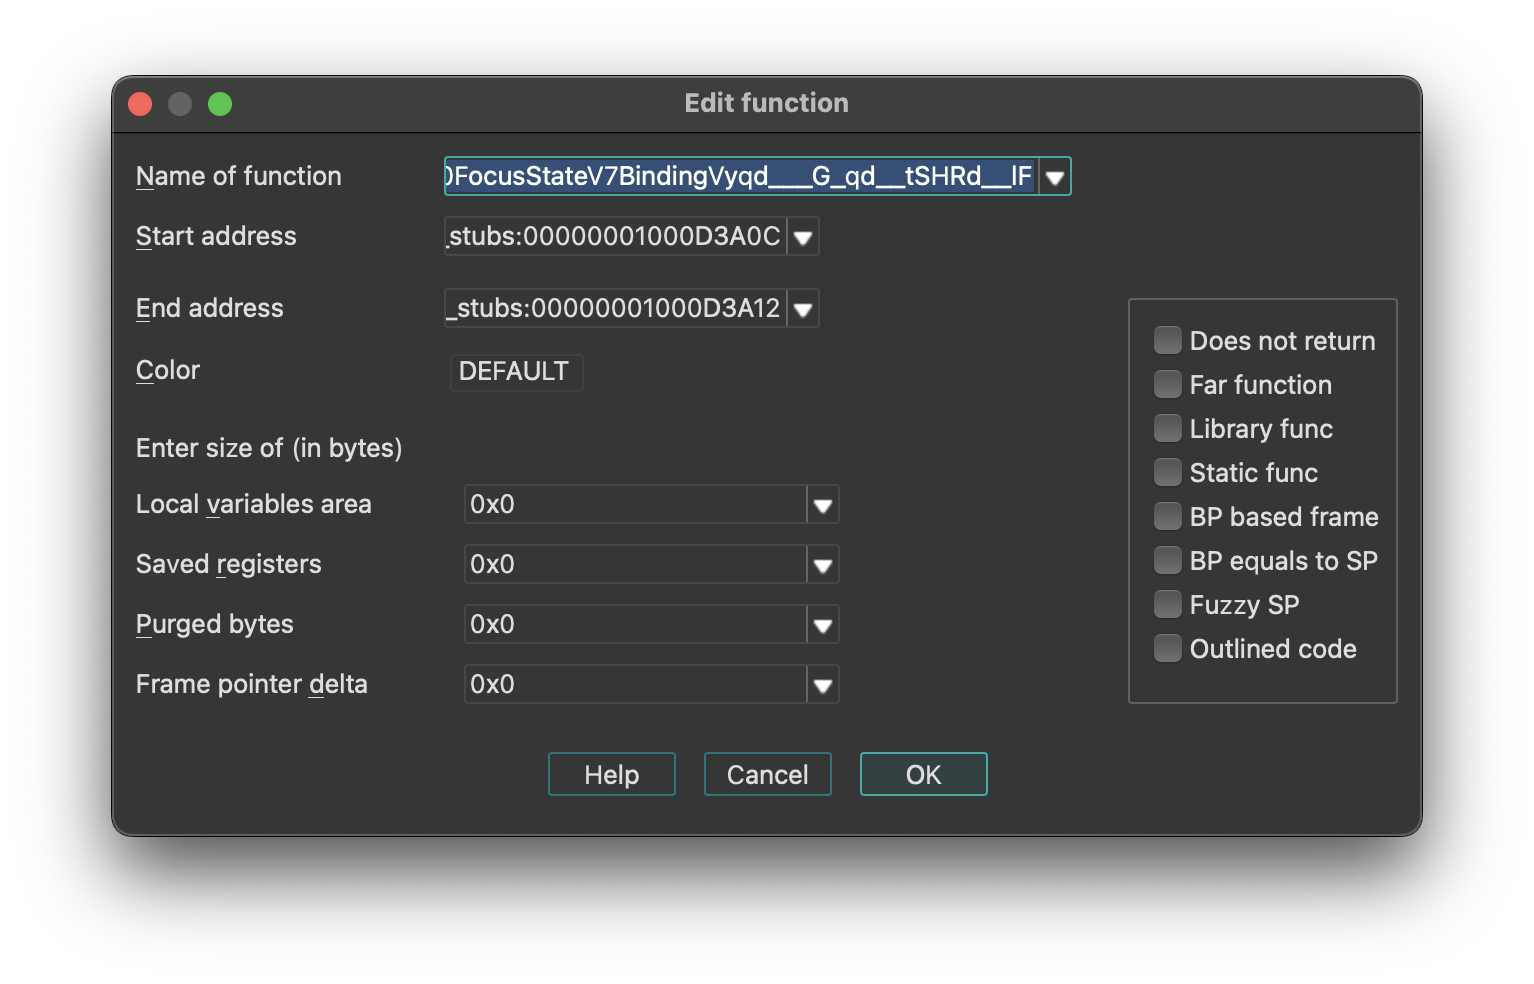
To change only the function end address, use the FunctionEnd command instead.
This command allows you to change the function frame parameters too. You can change sizes of some parts of frame structure.
Stack Frame Structure
IDA represents the stack using the following structure:
| Stack Section | Pointer |
|---|---|
| function arguments | - |
| return address | - |
| saved registers (SI, DI, etc) | ← BP |
| local variables | ← SP |
{% hint style=“info” %} For some processors or functions, BP may equal SP, meaning it points to the bottom of the stack frame. {% endhint %}
You may specify the number of bytes in each part of the stack frame. The size of the return address is calculated by IDA (possibly depending on the far function flag).
           push    ebp
           lea     ebp, [esp-78h]
           sub     esp, 588h
           push    ebx
           push    esi
           lea     eax, [ebp+74h]
      +------------------------------+
      | function arguments           |
      +------------------------------+
      | return address               |
      +------------------------------+
      | saved registers (SI,DI,etc)  |
      +------------------------------+  <- typical BP
      |                              |
      |                              |
      |                              |  <- actual BP
      | local variables              |
      |                              |
      |                              |
      |                              |
      +------------------------------+  <- SP
In our example, the saved registers area is empty (since EBP has been initialized before saving EBX and ESI). The difference between the ‘typical BP’ and ‘actual BP’ is 0x78 and this is the value of FPD.
After specifying FPD=0x78 the last instruction of the example becomes
lea eax, [ebp+78h+var_4]
where var_4 = -4
Most of the time, IDA calculates the FPD value automatically. If it fails, the user can specify the value manually.
If the value of the stack pointer is modified in an unpredictable way, (e.g. “and esp, -16”), then IDA marks the function as “fuzzy-sp”.
If this command is invoked for an imported function, then a simplified dialog box will appear on the screen.
See also:
- Igor’s Tip of the Week #126: Non-returning functions
- Igor’s tip of the week #106: Outlined functions
Configurable Parameters
- Stack Frame Sizes: You can specify the number of bytes in each part of the stack frame. The return address size is calculated automatically by IDA (may depend on the far function flag).
- Purged Bytes: Specifies the number of bytes added to SP upon function return. This value calculates SP changes at call sites (used in calling conventions such as
__stdcallin Windows 32-bit programs). - BP Based Frame: Enables IDA to automatically convert [BP+xxx] operands to stack variables.
- BP Equal to SP: Indicates that the frame pointer points to the bottom of the stack. Commonly used for processors that set up the stack frame with EBP and ESP both pointing to the bottom (e.g., MC6816, M32R).
- Reanalysis: Pressing
Enter without changing any parameter will cause IDA to reanalyze the function.
Append function tail…
This command appends an arbitrary range of the program to a function definition. A range must be selected before applying this command. This range must not intersect with other function chunks (however, an existing tail can be added to multiple functions).
IDA will ask to select the parent function for the selection and will append the range to the function definition.
Remove function tail…
Remove function tail. This command removes the function tail at the cursor from a function definition. If there are several parent functions for the current function tail range, IDA will ask to select the parent function(s) to remove the tail from. After the confirmation, the current function tail range will be removed from the selected function definition. If the parent was the only owner of the current tail, then the tail will be destroyed. Otherwise it will still be present in the database. If the removed parent was the owner of the tail, then another function will be selected as the owner.
Change stack pointer…
Change stack pointer. This command allows you to specify how the stack pointer (SP) is modified by the current instruction.
You cannot use this command if the current instruction does not belong to any function.
You will need to use this command only if IDA was not able to trace the value of the SP register. Usually IDA can handle it but in some special cases it fails. An example of such a situation is an indirect call of a function that purges its parameters from the stack. In this case, IDA has no information about the function and cannot properly trace the value of SP.
Please note that you need to specify the difference between the old and new values of SP.
The value of SP is used if the current function accesses local variables by [ESP+xxx] notation.
See also how to convert to stack variable (Action OpStackVariable).
Rename register…
Rename a general processor register. This command allows you to rename a processor general register to some meaningful name. While this is not used very often on IBM PCs, it is especially useful on RISC processors with lots of registers. For example, a general register R9 is not very meaningful and a name like ‘CurrentTime’ is much better.
This command can be used to define a new register name as well as to remove it. Just move the cursor on the register name and press enter. If you enter the new register name as an empty string, then the definition will be deleted.
If you have selected a range before using this command, then the definition will be restricted to the selected range. But in any case, the definition cannot cross the function boundaries.
You cannot use this command if the current instruction does not belong to any function.
Set type…
Set type information for an item or current function. This command allows you to specify the type of the current item. If the cursor is located on a name, the type of the named item will be edited. Otherwise, the current function type (if there is a function) or the current item type (if it has a name) will be edited.
The function type must be entered as a C declaration. Hidden arguments (like ‘this’ pointer in C++) should be specified explicitly. IDA will use the type information to comment the disassembly with the information about function arguments. It can also be used by the Hex-Rays decompiler plugin for better decompilation. Here is an example of a function declaration:
int main(int argc, const char *argv[]);
It is also possible to specify a function name coming from a type library. For example, if entering “LoadLibraryW” would yield its prototype:
HMODULE __stdcall LoadLibraryW(LPCWSTR lpLibFileName);
provided that the corresponding type library is in memory. To delete a type declaration, just enter an empty string. IDA supports the user-defined calling convention. In this calling convention, the user can explicitly specify the locations of arguments and the return value. For example:
int __usercall func@<ebx>(int x, int y@<esi>);
denotes a function with 2 arguments: the first argument is passed on the stack (IDA automatically calculates its offset) and the second argument is passed in the ESI register and the return value is stored in the EBX register. Stack locations can be specified explicitly:
int __usercall runtime_memhash@<^12.4>(void *p@<^0.4>, int q@<^4.4>, int r@<^8.4>)
There is a restriction for a __usercall function type: all stack locations should be specified explicitly or all are automatically calculated by IDA. General rules for the user defined prototypes are:
-
the return value must be in a register. Exception: stack locations are accepted for the __golang and __usercall calling conventions.
-
if the return type is ‘void’, the return location must not be specified
-
if the argument location is not specified, it is assumed to be on the stack; consequent stack locations are allocated for such arguments
-
it is allowed to declare nested declarations, for example: int **__usercall func16@
(int *(__usercall *x)@ (int, long@ , int)@ ); Here the pointer “x” is passed in the ESI register; The pointed function is a usercall function and expects its second argument in the ECX register, its return value is in the EBX register. The rule of thumb to apply in such complex cases is to specify the the registers just before the opening brace for the parameter list.
-
registers used for the location names must be valid for the current processor; some registers are unsupported (if the register name is generated on the fly, it is unsupported; inform us about such cases; we might improve the processor module if it is easy)
-
register pairs can be specified with a colon like edx:eax
-
for really complicated cases this syntax can be used. IDA also understands the “__userpurge” calling convention. It is the same thing as __usercall, the only difference is that the callee cleans the stack.
The name used in the declaration is ignored by IDA. If the default calling convention is __golang then explicit specification of stack offsets is permitted. For example:
  __attribute__((format(printf,2,3)))
  int myprnt(int id, const char *format, ...);
This declaration means that myprnt is a print-like function; the format string is the second argument and the variadic argument list starts at the third argument.
Below is the full list of attributes that can be handled by IDA.
| Attribute | Description |
|---|---|
packed | pack structure/union fields tightly, without gaps |
aligned | specify the alignment |
noreturn | declare as not returning function |
ms_struct | use microsoft layout for the structure/union |
format | possible formats: printf, scanf, strftime, strfmon |
Data Declaration Keywords
For data declarations, the following custom __attribute((annotate(X))) keywords have been added. The control the representation of numbers in the output:
| Keyword | Description |
|---|---|
__bin | unsigned binary number |
__oct | unsigned octal number |
__hex | unsigned hexadecimal number |
__dec | signed decimal number |
__sbin | signed binary number |
__soct | signed octal number |
__shex | signed hexadecimal number |
__udec | unsigned decimal number |
__float | floating point |
__char | character |
__segm | segment name |
__enum() | enumeration member (symbolic constant) |
__off | offset expression (a simpler version of __offset) |
__offset() | offset expression |
__strlit() | string |
__stroff() | structure offset |
__custom() | custom data type and format |
__invsign | inverted sign |
__invbits | inverted bitwise |
__lzero | add leading zeroes |
__tabform() | tabular form |
Type Declaration Keywords
The following additional keywords can be used in type declarations:
| Keyword | Description |
|---|---|
_BOOL1 | a boolean type with explicit size specification (1 byte) |
_BOOL2 | a boolean type with explicit size specification (2 bytes) |
_BOOL4 | a boolean type with explicit size specification (4 bytes) |
__int8 | a integer with explicit size specification (1 byte) |
__int16 | a integer with explicit size specification (2 bytes) |
__int32 | a integer with explicit size specification (4 bytes) |
__int64 | a integer with explicit size specification (8 bytes) |
__int128 | a integer with explicit size specification (16 bytes) |
_BYTE | an unknown type; the only known info is its size: 1 byte |
_WORD | an unknown type; the only known info is its size: 2 bytes |
_DWORD | an unknown type; the only known info is its size: 4 bytes |
_QWORD | an unknown type; the only known info is its size: 8 bytes |
_OWORD | an unknown type; the only known info is its size: 16 bytes |
_TBYTE | 10-byte floating point value |
_UNKNOWN | no info is available |
__pure | pure function: always returns the same value and does not modify memory in a visible way |
__noreturn | function does not return |
__usercall | user-defined calling convention; see above |
__userpurge | user-defined calling convention; see above |
__golang | golang calling convention |
__swiftcall | swift calling convention |
__spoils | explicit spoiled-reg specification; see above |
__hidden | hidden function argument; this argument was hidden in the source code (e.g. ‘this’ argument in c++ methods is hidden) |
__return_ptr | pointer to return value; implies hidden |
__struct_ptr | was initially a structure value |
__array_ptr | was initially an array |
__unused | unused function argument |
__cppobj | a c++ style struct; the struct layout depends on this keyword |
__ptr32 | explicit pointer size specification (32 bits) |
__ptr64 | explicit pointer size specification (64 bits) |
__shifted | shifted pointer declaration |
__high | high level prototype (does not explicitly specify hidden arguments like ‘this’, for example) this keyword may not be specified by the user but IDA may use it to describe high level prototypes |
__bitmask | a bitmask enum, a collection of bit groups |
__tuple | a tuple, a special kind of struct. tuples behave like structs but have more relaxed comparison rules: the field names and alignments are ignored. |
Change byte…
Change program bytes.
You can modify the executable file and eventually generate a new file (the Create EXE file… command; action ProduceExe).
If you patch bytes, then you may enter multiple bytes (see also Binary string format).
If this command is invoked when the debugger is active, then IDA will modify the memory and the database. If the database does not contain the patched bytes, then only the process memory will be modified.
You can create a difference file too (the Create DIFF file… command; action ProduceDiff).
See also How to Enter a Number.
Assemble…
This command allows you to assemble instructions. Currently, only the IBM PC processors provide an assembler, nonetheless, plugin writers can extend or totally replace the built-in assembler by writing their own.
The assembler requires to enclose all memory references into square brackets. For example:
mov ax, [counter]
Also, the keyword ‘offset’ must not be used. Instead of
mov eax, offset name
you must write
mov eax, name
See also How to Enter a Number.
Patched bytes
Open the Patched bytes window. The Patched bytes view shows the list of the patched locations in the database. It also allows you to revert modifications selectively.

Reverting changes
Select location(s) and click Revert… from the context menu to revert this modification.
Patching bytes
You can change individual bytes via Edit → Patch program → Change byte….
Apply patches to input file…
Apply previously patched bytes back to the input file. If the “Restore” option is selected, then the original bytes will be applied to the input file.
See also ProduceDiff action.
Create alignment directive…
Create alignment directive. The alignment directive will replace a number of useless bytes inserted by the linker to align code and data to paragraph boundary or any other address which is equal to a power of two. You can select a range to be converted to an alignment directive. If you have selected a range, IDA will try to determine a correct alignment automatically.
There are at least two requirements for this command to work:
- There must be enough unexplored bytes at the current address.
- An alignment directive must always end at an address which is divisible by a power or two.
Manual instruction…
Specify alternate representation of the current instruction.
Use it if IDA cannot represent the current instruction as desired. If the instruction itself is ok and only one operand is misrepresented, then use Manual… command (action ManualOperand).
To delete the manual representation, specify an empty string.
Color instruction…
This command allows you to specify the background color for the current instruction or data item. Only GUI version supports different background colors. Specifying a non-defined custom color will reset the instruction color.
Toggle border
Toggle the display of a border between code and data. This command allows you to hide a thin border which is like the one generated automatically by IDA between instructions and data. If the border was already hidden, then it is displayed again.
Edit menu actions for Pseudocode View
{% hint style=“info” %} The options below appear when the Edit menu is opened from the Pseudocode View. In other views, the menu adapts dynamically and may show a different set of options. {% endhint %}
Below is an overview of all actions that can be accessed from this menu.
| UI Action Name | Action Name | Description |
|---|---|---|
| Copy | EditCopy | Copy |
| Begin selection | Anchor | Begin selection. Some IDA commands such as selecting a portion of file to output or specifying a segment to move need an anchor. More… |
| Select all | SelectAll | Select all |
| Select identifier | SelectIdentifier | Select identifier |
| Undo | UndoAction | This command reverts the database to the state before executing the last user action. More… |
| Redo | RedoAction | This command reverts the previously issued Undo command. More… |
| Export data | ExportData | Export data |
| Code | MakeCode | Convert to instruction. More… |
| Data | MakeData | Convert to data. More… |
| Struct var… | DeclareStructVar | Declare a structure variable. More… |
| Strings | `` | |
| String | MakeStrlit | Convert to string. More… |
| C-style (0 terminated) | StringC | C-style (0 terminated) |
| DOS style ($ terminated) | StringDOS | DOS style ($ terminated) |
| Pascal style (1 byte length) | StringPascal1 | Pascal style (1 byte length) |
| Wide pascal (2 byte length) | StringPascal2 | Wide pascal (2 byte length) |
| Delphi (4 byte length) | StringDelphi | Delphi (4 byte length) |
| Unicode | StringUnicode | Unicode |
| Unicode pascal (2 byte length) | StringUnicodePascal2 | Unicode pascal (2 byte length) |
| Unicode wide pascal (4 byte length) | StringUnicodePascal4 | Unicode wide pascal (4 byte length) |
| Array… | MakeArray | Convert to array. More… |
| Undefine | MakeUnknown | Convert to undefined. More… |
| Rename | MakeName | Rename the current location. More… |
| Operand type | `` | |
| Offset | `` | |
| Offset (data segment) | OpOffset | Convert the current operand to an offset in the data segment. More… |
| Offset (current segment) | OpOffsetCs | Convert the current operand to an offset in the current segment. More… |
| Offset by (any segment)… | OpAnyOffset | Convert the current operand to an offset in any segment. More… |
| Offset (user-defined)… | OpUserOffset | Convert the current operand to an offset with any base. More… |
| Offset (struct)… | OpStructOffset | Convert the current operand to a structure offset. More… |
| Number | `` | |
| Number (default) | OpNumber | Convert the current operand to a number. More… |
| Hexadecimal | OpHex | Convert the current operand to a hexadecimal number. More… |
| Decimal | OpDecimal | Convert the current operand to a decimal number. More… |
| Octal | OpOctal | Convert the current operand to a octal number. More… |
| Binary | OpBinary | Convert the current operand to a binary number. More… |
| Floating point | OpFloat | Convert to floating point. More… |
| Toggle leading zeroes | ToggleLeadingZeroes | Toggle leading zeroes. More… |
| Character | OpChar | Convert the current operand to a character constant |
| Segment | OpSegment | Convert the current operand to a segment base |
| Enum member… | OpEnum | Convert the current operand to a symbolic constant |
| Stack variable | OpStackVariable | Convert the current operand to a stack variable |
| Change sign | ChangeSign | Change the sign of the current operand |
| Bitwise negate | BitwiseNegate | Perform bitwise negation of the current operand |
| Manual… | ManualOperand | Enter the current operand manually. More… |
| Set operand type… | SetOpType | Set the current operand’s type |
| Comments | `` | |
| Edit func comment… | hx:EditCmt | Edit func comment |
| Add pseudocode comments… | hx:AddPseudoCmt | Add pseudocode comments |
| Delete pseudocode comments… | hx:DelPseudoCmt | Delete pseudocode comments |
| Enter comment… | MakeComment | Enter a regular comment. More… |
| Enter repeatable comment… | MakeRptCmt | Enter repeatable comment. More… |
| Enter anterior lines… | MakeExtraLineA | Enter lines preceding the generated lines. More… |
| Enter posterior lines… | MakeExtraLineB | Enter lines following the generated lines |
| Edit block comment… | mv:EditBlockCmt | Edit block comment of microcode line |
| Edit comment… | mv:EditCmt | Edit comment of microcode line |
| Segments | `` | |
| Create segment… | CreateSegment | This command allows you to create a new segment. More… |
| Edit segment… | EditSegment | Edit segment attributes. More… |
| Delete segment… | KillSegment | Delete segment. More… |
| Move current segment… | MoveSegment | Change the current segment boundaries. More… |
| Rebase program… | RebaseProgram | Rebase program. More… |
| Change segment translation… | SegmentTranslation | Change the current segment translation table |
| Change segment register value… | SetSegmentRegister | Change segment register value. More… |
| Set default segment register value… | SetSegmentRegisterDefault | Set default segment register value. More… |
| Structs | `` | |
| Struct var… | DeclareStructVar | Declare a structure variable. More… |
| Force zero offset field | ZeroStructOffset | Toggle display of the first field of a structure in an offset expression. More… |
| Select union member… | SelectUnionMember | Choose the representation of a union member. More… |
| Create struct from selection | CreateStructFromData | This command defines a new structure from data already defined. The new structure is created with adequate data types, and each member uses the current data name if it is available. More… |
| Copy field info to pointers | CopyFieldsToPointers | Copy field info to pointed addresses. This command scans the current struct variable and renames the locations pointed by offset expressions unless they already have a non-dummy name. More… |
| Functions | `` | |
| Create function… | MakeFunction | Create a new function in the disassembly. More… |
| Edit function… | EditFunction | Edit function attributes - change function properties, including bounds, name, flags, and stack frame parameters. More… |
| Append function tail… | AppendFunctionTail | This command appends an arbitrary range of the program to a function definition. A range must be selected before applying this command. This range must not intersect with other function chunks (however, an existing tail can be added to multiple functions). More… |
| Remove function tail… | RemoveFunctionTail | Remove function tail. More… |
| Delete function | DelFunction | Delete function. Deleting a function deletes only information about a function, such as information about stack variables, comments, function type, etc. The instructions composing the function will remain intact. |
| Set function end | FunctionEnd | Change the function end address. This command changes the current or previous function bounds so that its end will be set at the cursor. If it is not possible, IDA beeps. |
| Stack variables… | OpenStackVariables | Open the stack variables window. See subviews for more. |
| Change stack pointer… | ChangeStackPointer | Change stack pointer. This command allows you to specify how the stack pointer (SP) is modified by the current instruction. More… |
| Rename register… | RenameRegister | Rename a general processor register. More… |
| Set type… | SetType | Set type information for an item or current function. More… |
| Patch program | `` | |
| Change byte… | PatchByte | Change program bytes. More… |
| Change word… | PatchWord | Change program words |
| Assemble… | Assemble | This command allows you to assemble instructions. Currently, only the IBM PC processors provide an assembler, nonetheless, plugin writers can extend or totally replace the built-in assembler by writing their own. More… |
| Patched bytes | PatchedBytes | Open the Patched bytes window. More… |
| Apply patches to input file… | ApplyPatches | Apply previously patched bytes back to the input file. If the “Restore” option is selected, then the original bytes will be applied to the input file. More… |
| Other | `` | |
| Specify switch idiom… | uiswitch:SpecSwitchIdiom | Specify switch idiom |
| Create alignment directive… | MakeAlignment | Create alignment directive. More… |
| Manual instruction… | ManualInstruction | Specify alternate representation of the current instruction. More… |
| Color instruction… | ColorInstruction | This command allows you to specify the background color for the current instruction or data item. More… |
| Reset decompiler information… | hx:ResTypeInfo | Reset decompiler information |
| Toggle skippable instructions… | hx:ToggleSkippableInsn | Toggle skippable instructions |
| Decompile as call… | hx:UserDefinedCall | Decompile as call |
| Toggle border | ToggleBorder | Toggle the display of a border between code and data. More… |
| detect and parse golang metadata | golang:detect_and_parse | detect and parse golang metadata |
| Open picture in default viewer | picture_search:open_in_viewer | Open picture in default viewer |
| Save picture | picture_search:save_picture | Save picture |
| Plugins | `` | |
| Quick run plugins | QuickRunPlugins | Quickly run a plugin |
Begin selection
Begin selection. Some IDA commands such as selecting a portion of file to output or specifying a segment to move need an anchor.
To drop the anchor, you can either use the Alt + L key or the Shift + ↑, ←, →, ↓ combination, which is more convenient. You can also drop the anchor with the mouse by simply clicking and dragging it.
After you’ve dropped the anchor, you can navigate freely using arrows, etc. Any command that uses the anchor, raises it.
The anchored range is displayed with another color.
When you exit from IDA, the anchor value is lost.
Undo
This command reverts the database to the state before executing the last user action. It is possible to apply Undo multiple times, in this case multiple user actions will be reverted.
Please note the entire database is reverted, including all modifications that were made to the database after executing the user action and including the ones that are not connected to the user action. For example, if a third party plugin modified the database during or after the user action, this modification will be reverted. In theory it is possible to go back in time to the very beginning and revert the database to the state that was present immediately after performing the very first user action. However, in practice the undo buffers overflow because of the changes made by autoanalysis.
Autoanalysis (Options → General… → Analysis) generates copious amounts of undo data. Also, please note that maintaining undo data during autoanalysis slows it down a bit. In practice, it is not a big deal because the limit on the undo data is reached quite quickly (in a matter of minutes). Therefore, if during analysis the user does not perform any actions that modify the database, the undo feature will turn itself off temporarily.
However, if you prefer not to collect undo data at all during the initial autoanalysis, just turn off the UNDO_DURING_AA parameter in ida.cfg.
The configuration file ida.cfg has 2 more undo-related parameters:
| Parameter | Description | Default |
|---|---|---|
| UNDO_MAXSIZE | Max size of undo buffers. Once this limit is reached, the undo info about the oldest user action will be forgotten. | 128MB |
| UNDO_DEPTH | Max number of user actions to remember. If set to 0, the undo feature will be unavailable. | 1000000 |
Since there is a limit on the size of undo buffers, any action, even the tiniest, may become non-undoable after some time. This is true because the analysis or plugins may continue to modify the database and overflow the buffers. Some massive actions, like deleting a segment, may be non-undoable just because of the sheer amount of undo data they generate.
Please note that Undo does not affect the state of IDC or Python scripts. Script variables will not change their values because of Undo. Also nothing external to the database can be changed: created files will not be deleted, etc.
Some actions cannot be undone. For example, launching a debugger or resuming from a breakpoint cannot be undone.
Redo
This command reverts the previously issued Undo command. It is possible to use Redo multiple times.
This command also reverts all changes that were done to the database after the last Undo command, including the eventual useful modifications made by the autoanalysis. In other words, the entire database is modified to get to the exact state that it had before executing the last Undo command.
Code
Convert to instruction. This command converts the current unexplored bytes to instruction(s). IDA will warn you if it is not possible.
If you have selected a range using the Anchor action, all the bytes from this range will be converted to instructions.
If you apply this command to an instruction, it will be reanalyzed.
Data
Convert to data. This command converts the current unexplored bytes to data. If it is not possible, IDA will warn you.
Multiple using of this command will change the data type:
 db -> dw -> dd -> float -> dq -> double -> dt -> packreal -> octa \;
 ^                                                                 |;
 \---------<----------------<--------------<-----------------------/;
You may remove some items from this list using the Setup data types… command (action SetupData).
If the target assembler (Options → General… → Analysis) does not support double words or another data type, it will be skipped. To create a structure variable, use the Struct var… command (action DeclareStructVar). To create an array, use the Array… command (action MakeArray). To convert back, use the Undefine command (action MakeUnknown).
Struct var…
Declare a structure variable. IDA will ask you to choose a structure type. You must have some structure types defined in order to use this command. If the target assembler supports it, IDA will display the structure in terse form (using just one line). To uncollapse a terse structure variable use the Unhide command. You can also use this command to declare a structure field in another structure (i.e., nested structures are supported too).
String
Convert to string.
This command converts the current unexplored bytes to a string.
The set of allowed characters is specified in the configuration file, parameter StrlitChars. Character ‘\0’ is not allowed in any case. If the current assembler (Options → General → Analysis → Target assembler) does not allow characters above 0x7F, characters with high bit set are not allowed.
If the anchor has been dropped, IDA will take for the string all characters between the current cursor position and the anchor.
Use the anchor if the string starts a disallowed character.
This command also generates a name for the string. In the configuration file, you can specify the characters allowed in names (NameChars).
You can change the literal string length using Array… command (action MakeArray).
The GUI version allows you to assign a special hotkey to create Unicode strings. To do so, change the value of the StringUnicode parameter in the IDAGUI.CFG file.
Array…
Convert to array. This command allows you to create arrays and change their sizes.
The arrays are created in 2 simple steps:
-
Create the first element of array using the data definition commands (data, string, structs)
-
Apply the array command to the created data item. Enter array size in current array elements (not bytes). The suggested array size is the minimum of the following values:
- the address of the next item with a cross reference
- the address of the next user-defined name For string literals, you can use this command to change the length of the string.
The dialog box contains the following fields:
-
Items on a line (meaningless for string literals):
- 0 - place maximal number of items on a line
- other value - number of items on a line Please note that the margin parameter affects the number of items on a line too.
-
Alignment (meaningless for string literals):
- -1 - do not align items
- 0 - align automatically
- other value - width of each item
-
Signed elements: if checked, IDA treats all elements as signed numbers. Only meaningful for numbers (not for offsets and segments and strings)
-
Display indexes: if checked, IDA will display the indexes of array elements in the form of comments (0,1,2…)
-
Create as array: if not checked, IDA will create a separate item for each array element. Useful for creating huge arrays. If the box is unchecked when this command is applied to string literals, IDA will create many string literals instead of one big string.
If applied to a variable-sized structure, this command is used to specify the overall size of the structure. You cannot create arrays of variable-sized structures.
Undefine
Convert to undefined. This command deletes the current instruction or data, converting it to ‘unexplored’ bytes. IDA will delete the subsequent instructions if there are no more references to them (functions are never deleted).
If you have selected a range using the Anchor action, all the bytes in this range will be converted into ‘unexplored’ bytes. In this case, IDA will not delete any other instructions even if there are no references to them after the deletion.
Rename
Rename the current location. This command gives name/renames/deletes name for the current item.
To delete a name, simply give an empty name.
If the current item is referenced, you cannot delete its name. Even if you try, IDA will generate a dummy name (See Options → Name representation…).
List of available options:
-
Local name: The name is considered to be defined only in the current function. Please note that IDA does not check the uniqueness of the local names in the whole program. However, it does verify that the name is unique for the function.
-
Include in name list: Here you can also include/remove the name from the name list (see the Jump by name… command; action
JumpName). If the name is hidden, you will not see it in the names window. -
Public name: You can declare a name as a public (global) name. If the current assembler supports the “public” directive, IDA will use it. Otherwise, the publicness of the name will be displayed as a comment.
-
Autogenerated name: An autogenerated name will appear in a different color. If the item is indefined, it will disappear automatically.
-
Weak name: You can declare a name as a weak name. If the current assembler supports the “weak” directive, IDA will use it. Otherwise, the weakness of the name will be displayed as a comment.
-
Create name anyway: If this flag is on, and if the specified name already exists, IDA will try to variate the specified name by appending a suffix to it.
Offset (data segment)
Convert the current operand to an offset in the data segment. This command converts the immediate operand of the current instruction/data to an offset from the current data segment (DS). If the current DS value is unknown (or equal 0xFFFF) IDA will warn you - it will beep. In this case, you have to define DS register value for the current byte. The best way to do it is:
- jump to segment register change point (the Jump to segment register… command; action
JumpSegmentRegister), - change value of DS (the Change segment register value… command; action
SetSegmentRegister) - return (the Jump back command; action
Return) or you can change default value of DS for the current segment (the Set default segment register value… command; actionSetSegmentRegisterDefault).
If you want to delete offset definition, you can use this command again - it works as trigger.
If the cursor is on the first operand (the cursor is before ‘,’) then the first operand will be affected; otherwise, all other operands will be affected.
If a range is selected using the anchor, IDA will perform ‘en masse’ conversion. It will convert immediate operands of all instructions in the selected range to offsets. However, IDA will ask you first the lower and upper limits of immediate operand value. If the operand value is >= lower limit and <= upper limit then the operand will be converted to offset, otherwise it will be left unmodified.
To create offsets to structure members use the Offset (struct)… command (action OpStructOffset).
Offset (current segment)
Convert the current operand to an offset in the current segment.
If the cursor is on the first operand (the cursor is before ‘,’) then the first operand will be affected; otherwise, all other operands will be affected.
If a range is selected using the anchor, IDA will perform ‘en masse’ conversion. It will convert immediate operands of all instructions in the selected range to offsets. However, IDA will ask you first the lower and upper limits of immediate operand value. If the operand value is >= lower limit and <= upper limit then the operand will be converted to offset, otherwise, it will be left unmodified.
If this command is applied to a structure member in the Local types window, then IDA will create an “automatic offset”. An automatic offset is an offset with the base equal to 0xFFFFFFFF. This base value means that the actual value of the base will be calculated by IDA when a structure instance is created.
To create offsets to structure members use the Offset (struct)… command (action OpStructOffset).
Offset by (any segment)…
Convert the current operand to an offset in any segment.
This command converts the immediate operand of the current instruction/data to an offset from any segment.
IDA will ask to choose a base segment for the offset.
If a range is selected using the anchor, IDA will perform ‘en masse’ conversion. It will convert immediate operands of all instructions in the selected range to offsets. However, IDA will ask you first the lower and upper limits of immediate operand value. If the operand value is >= lower limit and <= upper limit then the operand will be converted to offset, otherwise it will be left unmodified.
If the cursor is on the first operand (the cursor is before ‘,’) then the first operand will be affected; otherwise, all other operands will be affected.
To create offsets to structure members use Offset (struct)… command (action OpStructOffset).
Offset (user-defined)…
Convert the current operand to an offset with any base. If the cursor is on the first operand (the cursor is before ‘,’) then the first operand will be affected; otherwise, all other operands will be affected. If the offset base is specified as 0xFFFFFFFF, then IDA will create “an automatic offset”. Automatic offsets mean that the actual value of the base will be calculated by IDA.
The following offset attributes are available:
| Option | Description |
|---|---|
| Treat the base address as a plain number | if checked, IDA will treat the base address as a number. In this case, IDA will not create a cross-reference to it and the base address will be printed as a number, not as an offset expression. |
| Offset points past the main object | Offsets of this type point past an object end. They do not cause an object created/deletion. |
| Use image base as offset base | These offsets are based on the image base. There is no need to explicitly specify the offset base. These offsets are displayed in a concise form: rva func instead of offset func - imagebase. If you intend to reassemble the output file, execute the following IDC statement: set_inf_attr(INF_GENFLAGS, get_inf_attr(INF_GENFLAGS) & ~INFFL_ALLASM); |
| Subtract operand value | Use this option when the operand value should be substracted from the base to get the target address. In this case the displayed expression will be displayed as offset base - target instead of the usual offset target - base |
| Signed operand | Use this option if the operand should be interpreted as a signed value. This option is only available for OFF_REF8, OFF_REF16, OFF_REF32 and OFF_REF64 offset types. |
| Operand value of 0 is invalid | If the operand value is 0, the value will be highlighted in red. |
| Operand value of NOT 0 is invalid | If the operand value is zero’s complement (i.e. all bits are set), the value will be highlighted in red. For example a OFF_REF16 with an operand value of 0xFFFF would be invalid. |
| Use the current address as the offset base | The offset base is dynamically calculated and is equal to the address of the current element: - for standalone items: their start address - for arrays: the start of the array element - for structures: the start of the structure field |
The offset expression is displayed in the following concise form: offset target - $ where “$” denotes the start of the element (and is assembler-dependent).
To create offsets to structure members use the Offset (struct)… command (action OpStructOffset).
Offset (struct)…
Convert the current operand to a structure offset. This command permits to convert all immediate operands of instructions in a range selection to a path of offsets through a structure and its possible sub unions. If no selection is active, IDA will simply permit to convert the current operand. In this case, it will display a simple dialog box the same way as the text version (see below). You can select the desired register in the drop-down list: all operands relative to this register will be added to the ‘Offsets’ list. A special empty line in the drop-down list is used to directly work on immediate values. Checkboxes in the ‘Offsets’ list allow you to select which operand you indeed want to modify. By default, IDA will select only undefined operands, to avoid overwriting previous type definitions. This list is sorted by operand value, by instruction address and finally by operand number. You can easily see the instructions related to the operand by moving the mouse over it, and wait for a hint to be displayed. The ‘Structures and Unions’ tree will contain all selectable structures, and sub unions. Once you select or move over a structure, the ‘Offsets’ list updates itself for each checked offset: the computed name of the operand is displayed, according to the selected structure in the tree. An icon is also drawn, to easily know if a specific structure matches the offset or not, or if the offset is too big for the selected structure. The structures who match the most offsets will be near the top of the tree. You can also move your mouse over structures in the tree to obtain an interesting hint. A ‘?’ icon can also appear, if the offset can be specialized by selecting an union member. In this case, if you expand the structure in the tree, you can select the adequate union member simply by checking the desired radio button. IDA automatically corrects the related name in the ‘Offsets’ list. The ‘Offset delta’ value represents the difference between the structure start and the pointer value. For example, if you have an operand 4 and want to convert in into an expression like “mystruct.field_6-2”, then you have to enter 2 as the delta. Usually the delta is zero, i.e. the pointer points to the start of the structure. The ‘Hide sub structures without sub unions’ option (checked by default) avoids to add unnecessary sub structures to the tree, to keep it as small as possible. If you uncheck this option, all sub structures will be added to the tree. By default, IDA displays the structure member at offset 0. To change this behavior, you can directly disable the ‘Force zero offset field’ in the ‘Options’ frame. Later zero offsets can be forced using Edit → Structs → Force zero offset menu item.
Text version
This command converts immediate operand(s) type of the current instruction/data to an offset within the specified structure. Before using this command, you have to define a structure type. First of all, IDA will ask a so-called “struct offset delta”. This value represents the difference between the structure start and the pointer value. For example, if you have an operand 4 and want to convert in into an expression like “mystruct.field_6-2”, then you have to enter 2 as the delta. Usually the delta is zero, i.e. the pointer points to the start of the structure. If a range is selected using the anchor, IDA will perform ‘en masse’ conversion. It will convert immediate operands of all instructions in the selected range to offsets. However, IDA will ask you first the lower and upper limits of immediate operand value. If the an operand value is >= lower limit and <= upper limit then the operand will be converted to offset, otherwise it will be left unmodified. When you use this command, IDA deletes the manually entered operand. If the cursor is on the first operand (the cursor is before ‘,’) then the first operand will be affected; otherwise, all other operands will be affected. By default IDA doesn’t display the structure member at offset 0. To change this behavior, use the Force zero offset field command. Moreover, if there are several possible representations (this can happen if unions are used), select the desired representation using the Select union member… command.
Number (default)
Convert the current operand to a number.
That way, you can delete suspicious mark of the item.
The number is represented in the default radix for the current processor (usually hex, but octal for PDP-11, for example).
When you use this command, IDA deletes the manually entered operand (via the Manual… command; action ManualOperand).
If the cursor is on the first operand (the cursor is before ‘,’) then the first operand will be affected; otherwise, all other operands will be affected.
Hexadecimal
Convert the current operand to a hexadecimal number.
This command converts the immediate operand(s) type of the current instruction/data to a hex number, so that you can delete the suspicious mark of the item.
When you use this command, IDA deletes the manually entered operand (via the Manual… command; action ManualOperand).
If the cursor is on the first operand (the cursor is before ‘,’) then the first operand will be affected; otherwise, all other operands will be affected.
Decimal
Convert the current operand to a decimal number.
This command converts the immediate operand(s) type of the current instruction/data to decimal. Therefore, it becomes a ‘number’.
When you use this command, IDA deletes the manually entered operand (via the Manual… command; action ManualOperand).
If the cursor is on the first operand (the cursor is before ‘,’) then the first operand will be affected; otherwise, all other operands will be affected.
Octal
Convert the current operand to a octal number.
IDA always uses 123o notation for octal numbers even if the current assembler does not support octal numbers.
When you use this command, IDA deletes the manually entered operand (via the Manual… command; action ManualOperand).
If the cursor is on the first operand (the cursor is before ‘,’) then the first operand will be affected; otherwise, all other operands will be affected.
Binary
Convert the current operand to a binary number.
This command makes the current instruction or data operand type binary. IDA always uses 123b notation for binary numbers even if the current assembler does not support binary numbers.
When you use this command, IDA deletes the manually entered operand (via the Manual… command; action ManualOperand).
If the cursor is on the first operand (the cursor is before ‘,’) then the first operand will be affected; otherwise, all other operands will be affected.
Floating point
Convert to floating point.
When you use this command, IDA deletes the manually entered operand (via the Manual… command; action ManualOperand).
If the cursor is on the first operand (the cursor is before ‘,’) then the first operand will be affected; otherwise, all other operands will be affected.
Toggle leading zeroes
Toggle leading zeroes.
This command displays or hides the leading zeroes of the current operand. Example: if the instruction looked like this:
and ecx, 40h
then after applying the command it will look like this:
and ecx, 00000040h
If you prefer to see leading zeroes in all cases, then open the calculator and enter the following expression: set_inf_attr (INF_GENFLAGS, get_inf_attr(INF_GENFLAGS) | INFFL_LZERO); This will toggle the default for the current database and all numbers without leading zeroes will become numbers with leading zeroes, and vice versa. See also Edit|Operand types submenu.
Manual…
Enter the current operand manually. You may specify any string instead of an operand if IDA does not represent the operand in the desired form. In this case, IDA will simply display the specified string in the instruction instead of the default operand.
The current operand (under the cursor) will be affected.
You can use this command not only with instructions but with data items too.
IDA proposes the previous manual operand as the default value in the input form.
To delete the manual operand and revert back to the default text, specify an empty string.
IDA automatically deletes manually entered operands when you change operand representation using Edit → Operand types submenu.
{% hint style=“info” %} A text offset reference is generated if you use a label in the program as the operand string. In other cases no cross-references are generated. {% endhint %}
Enter comment…
Enter a regular comment. If you stand at the function start and your cursor is on a function name, IDA will ask you to enter a function comment. If you stand at the segment start and your cursor is on a segment name, IDA will ask you to enter a segment comment. If this command is issued in the Local types window, it allows you to change the comment of a structure/enum, or structure/enum member. If the cursor is on the structure/enum name, the structure/enum comment will be changed, otherwise the member comment will be changed. Otherwise, this command allows you to enter a normal indented comment for the current item. You can show/hide all comments in Options → General → Disassembly → Display disassembly line parts: Comments.
Enter repeatable comment…
Enter repeatable comment. A repeatable comment will appear attached to the current item and all other items referencing it. If you stand at the function start, IDA will ask you to enter a function comment. If this command is issued in the Local types window, it allows you to change the comment of a structure/enum, or structure/enum member. If the cursor is on the structure/enum name, the structure/enum comment will be changed, otherwise the member comment will be changed. Otherwise, this command allows you to enter a repeatable comment for the current item.
{% hint style=“info” %} You cannot enter repeatable segment comments. {% endhint %}
All items that refer to the current item will have this comment by default. Note that if you have defined both comment types (regular and repeatable), the regular comment will be displayed for the current item and the repeatable comment will be displayed for all items that refer to the current item, if they do not have their own comments. The repeatable comments may be used to describe subroutines, data items, etc., because all calls to the subroutine will have the repeatable comment. You can show/hide all comments in Options → General → Disassembly → Display disassembly line parts: Comments.
Enter anterior lines…
Enter lines preceding the generated lines. If you want to enter multi-line comments or additional instructions, you can use this feature of IDA.
There are two kinds of extra lines: the ones generated before the instruction line and the ones generated after the instruction line.
Do not forget that the maximal number of lines for an item is 500.
IDA does not insert a comment symbol at the beginning of the lines.
Create segment…
This command allows you to create a new segment.
If you select a range using the anchor, IDA will propose the start address and the end address of the selection as defaults for the segment bounds.
You need to specify at least:
- the segment start address
- the segment end address (excluded from the range)
- the segment base
Click here to learn about addressing model used in IDA.
If “sparse storage” is set, IDA will use special sparse storage method for the segment. This method is recommended for huge segments. Later, it is possible to change the storage method of any region using set_storage_type IDC function.
If another segment already exists at the specified address, the existing segment is truncated and the new segment lasts from the specified start address to the next segment (or specified end address, whichever is lower). If the old and the new segments have the same base address, instructions/data will not be discarded by IDA. Otherwise, IDA will discard all instructions/data of the new segment.
An additional segment may be created by IDA to cover the range after the end of the new segment.
Edit segment…
Edit segment attributes. This command opens the Change segment attributes dialog.
Change segment attributes options
- How to change segment name
- How to change segment class
- How to change segment addressing mode (16/32)
- How to change segment alignment
- How to change segment combination
{% hint style=“info” %} Changing the segment class may change the segment type. {% endhint %}
-
Move Adjacent Segments: means that the previous and next segments will be shrunk or expanded to fill gaps between segments. Click here for more information.
-
Disable Addresses: if set, when a segment is shrunk, all information about bytes going out of the segment will be completely removed.. Otherwise, IDA will discard information about instructions/data, comments etc, but will retain byte values so that another segment can be created later and it will use the existing byte values.
If IDA creates 2 segments where only one segment must exist, you may try the following sequence:
- Delete one segment (action
KillSegment). Choose one with bad segment base value. Do not disable addresses occupied by the segment being deleted. - Change bounds of another segment. Note that the Create segment… command (action
CreateSegment) changes the boundaries of the overlapping segment automatically.
Segments with the “debugger” attribute are the segments whose memory contents are not saved in the database. Usually, these segments are created by the debugger to reflect the current memory state of the program.
However, the user can modify this attribute.
If it is cleared, then the segment will permanently stay in the database after closing the debugger session. The database will reflect the state of the segment which was at the time when the status is changed.
If it is set, then the segment will become a temporary segment and will be deleted at the end of the debugging session.
The debugger segment checbkox is available only during debugging sessions.
The “loader” segments are the segment created by the file loader. The segment having this attribute are considered to be part of the input file.
A segment with the “debugger” attribute set and the “loader” attribute not set is considered to be an ephemeral segment. Such segments are not analyzed automatically by IDA.
“Segment permissions” group box can be used to modify Segment access permissions (Read/Write/Execute)
Segment Name
Enter a new name for the segment. A segment name is up to 8 characters long. IDA does check if the length is ok. Try to give mnemonic names for the segments.
Class Name
The segment class name identifies the segment with a class name (such as CODE, FAR_DATA, or STACK). The linker places segments with the same class name into a contiguous range of memory in the runtime memory map.
Changing the segment class changes only the segment definition on the screen. There are the following predefined segment class names:
| Segment class | Description |
|---|---|
| CODE | Pure code |
| DATA | Pure data |
| CONST | Pure data |
| BSS | Uninitialized data |
| STACK | Uninitialized data |
| XTRN | Extern definitions segment |
If you change segment class and the segment type is “Regular”, then the segment type will be changed accordingly.
In order to set the segment type “Regular”, you should change the segment class to “UNK”.
{% hint style=“info” %} Segment class names are never deleted. Once you define a segment class name, you cannot reuse it as a name of another object. {% endhint %}
Segment bitness
You can choose between 16-bit and 32-bit segment addressing.
IDA will delete all instructions and data in the segment if the segment address is changed.
Never do it if you are not sure. It may have irreversible consequences, all instructions/data will be converted to undefined bytes.
Segment Alignment
You can specify the segment alignment for the selected segment. By default, IDA assumes ‘byte’ alignment.
Changing the alignment changes only the segment definition on the screen. Nothing else will happen.
Segment Combination
A field that describes how the linker can combine the segment with other segments. Under MS-DOS, segments with the same name and class can be combined in two ways: they can be concatenated to form one logical segment, or they can be overlapped. In the latter case, they have either the same start address or the same end address, and they describe a common range in memory. Values for the field are:
- Private: Do not combine with any other program segment.
- Public: Combine by appending at an offset that meets the alignment requirement.
- Stack: Combine as for Public. This combine type forces byte alignment.
- Common: Combine by overlay using maximum size.
Changing segment combination changes only the segment definition on the screen. Nothing else will happen.
Delete segment…
Delete segment. IDA will ask your the permission to disable the addresses occupied by the segment. If you allow this operation, all information about the segment will be deleted. In other words, IDA will discard the information about instructions or data, comments etc.
If you check the “disable addresses” checkbox, IDA will mark the addresses occupied by the segment as “nonexistent” in the program. You will lose ALL information, including byte values.
It is impossible to disassemble the content of addresses not located in any segment, therefore you must create a new segment if you want to resume the disassembly of that part of the code.
You can also edit an adjacent segment to expand it to those addresses (Edit → Segments → Edit segment…).
IDA will ask your the permission to disable addresses occupied by the segment. If you give your permission, information about the segment will be deleted, otherwise IDA will discard information about instruction/data, comments etc, but retain byte values so that you will be able to create another segment afterwards. To disassemble the addresses occupied by the segment, you need to create a new segment again (i.e. you cannot disassemble bytes without a segment). You can also expand another adjacent segment to these addresses.
Move current segment…
Change the current segment boundaries. This command open the Move segment dialog and allows you to move segment(s) to another address. Use it if the segment(s) are loaded at a wrong address. This command shifts (moves) the selected segments in the memory to the target address. There must be enough free space at the target address for the segments. All information in the segment will be moved to the new address, but since the addresses change, the disassembly might be not valid anymore (especially if the program is moved to the wrong addresses and the relocation information is not available).
Fix up the relocated segment
This option allows IDA to modify the references to/from the relocated segment(s). If it is turned off, the references might be wrong after the move.
Rebase program…
Rebase program. The whole program will be shifted by the specified amount of bytes in the memory. The following options are available (we strongly recommend to leave them turned on):
- Fix up relocations: This option allows IDA to modify the references to/from the relocated segment(s). If it is turned off, the references might be wrong after the move.
- Rebase the whole image: This option is accessible only if the whole program is selected. It allows IDA to adjust internal variables on the whole program.
Please note rebasing the program might remove user-defined xrefs.
Change segment register value…
Change segment register value.
Relevant only for processors with the segment registers. Currently this command works for IBM PC, TMS320C2, Intel80196, and PowerPC processors.
This command creates or updates a segment register change point.
See also the Jump to segment register… command (action JumpSegmentRegister) for more info.
Set default segment register value…
Set default segment register value. Relevant only for processors with the segment registers. You can specify a default value of a segment register for the current segment. When you change the default value, IDA will reanalyze the segment, taking the default value when it cannot determine the actual value of the register. This takes time, so do not be surprised if references are not corrected immediately.
To specify a value other than the default value of a segment register, you can use the Change segment register value… command (action SetSegmentRegister).
Struct var…
Declare a structure variable. IDA will ask you to choose a structure type. You must have some structure types defined in order to use this command. If the target assembler supports it, IDA will display the structure in terse form (using just one line). To uncollapse a terse structure variable use the Unhide command. You can also use this command to declare a structure field in another structure (i.e., nested structures are supported too).
Force zero offset field
Toggle display of the first field of a structure in an offset expression. This command forces IDA to display a full structure member name even if the offset of the member is equal to zero.
If used twice, the command cancels itself.
Example: Suppose we have the following structure:
    xxx     struc
    a       db ?
    b       db ?
    c       db ?
    xxx     ends

    dloc    xxx ?
Normally IDA displays references to it like this:
    mov     eax, offset dloc
    mov     eax, offset dloc.b
If you force IDA, then it displays member ‘a’:
    mov     eax, offset dloc.a
    mov     eax, offset dloc.b
Select union member…
Choose the representation of a union member. This command tells IDA how to display references to a union from the current cursor location.
Example: Suppose we have the following union:
        xxx     union
        a       db ?
        b       dw ?
        c       dd ?
        ends   xxx
        dloc    xxx ?
Normally, IDA displays references to “dloc” like this:
        mov     al,  byte ptr dloc
        mov     eax, word ptr dloc
After using this command, IDA can display the union members:
        mov     al,  dloc.b
        mov     eax, dloc.d
Create struct from selection
This command defines a new structure from data already defined. The new structure is created with adequate data types, and each member uses the current data name if it is available.
This command is available only in the graphical version of IDA.
Copy field info to pointers
Copy field info to pointed addresses. This command scans the current struct variable and renames the locations pointed by offset expressions unless they already have a non-dummy name.
It also copies the type info from the struct members to pointed locations.
Create function…
Create a new function in the disassembly. You can specify function boundaries using the anchor. If you don’t specify any, IDA will try to find the boundaries automatically:
- function start point is equal to the current cursor position;
- function end point is calculated by IDA.
A function cannot contain references to undefined instructions. If a function has already been defined at the specified addresses, IDA will jump to its start address, showing you a warning message. A function must start with an instruction.
Edit function…
Edit function attributes - change function properties, including bounds, name, flags, and stack frame parameters. This command opens an Edit Function dialog, and allows you to modify function characteristics and stack frame structure. If the current address does not belong to any function, IDA will beep.
To change only the function end address, use the FunctionEnd command instead.
This command allows you to change the function frame parameters too. You can change sizes of some parts of frame structure.
Stack Frame Structure
IDA represents the stack using the following structure:
| Stack Section | Pointer |
|---|---|
| function arguments | - |
| return address | - |
| saved registers (SI, DI, etc) | ← BP |
| local variables | ← SP |
{% hint style=“info” %} For some processors or functions, BP may equal SP, meaning it points to the bottom of the stack frame. {% endhint %}
You may specify the number of bytes in each part of the stack frame. The size of the return address is calculated by IDA (possibly depending on the far function flag).
           push    ebp
           lea     ebp, [esp-78h]
           sub     esp, 588h
           push    ebx
           push    esi
           lea     eax, [ebp+74h]
      +------------------------------+
      | function arguments           |
      +------------------------------+
      | return address               |
      +------------------------------+
      | saved registers (SI,DI,etc)  |
      +------------------------------+  <- typical BP
      |                              |
      |                              |
      |                              |  <- actual BP
      | local variables              |
      |                              |
      |                              |
      |                              |
      +------------------------------+  <- SP
In our example, the saved registers area is empty (since EBP has been initialized before saving EBX and ESI). The difference between the ‘typical BP’ and ‘actual BP’ is 0x78 and this is the value of FPD.
After specifying FPD=0x78 the last instruction of the example becomes
lea eax, [ebp+78h+var_4]
where var_4 = -4
Most of the time, IDA calculates the FPD value automatically. If it fails, the user can specify the value manually.
If the value of the stack pointer is modified in an unpredictable way, (e.g. “and esp, -16”), then IDA marks the function as “fuzzy-sp”.
If this command is invoked for an imported function, then a simplified dialog box will appear on the screen.
See also:
- Igor’s Tip of the Week #126: Non-returning functions
- Igor’s tip of the week #106: Outlined functions
Configurable Parameters
- Stack Frame Sizes: You can specify the number of bytes in each part of the stack frame. The return address size is calculated automatically by IDA (may depend on the far function flag).
- Purged Bytes: Specifies the number of bytes added to SP upon function return. This value calculates SP changes at call sites (used in calling conventions such as
__stdcallin Windows 32-bit programs). - BP Based Frame: Enables IDA to automatically convert [BP+xxx] operands to stack variables.
- BP Equal to SP: Indicates that the frame pointer points to the bottom of the stack. Commonly used for processors that set up the stack frame with EBP and ESP both pointing to the bottom (e.g., MC6816, M32R).
- Reanalysis: Pressing
Enter without changing any parameter will cause IDA to reanalyze the function.
Append function tail…
This command appends an arbitrary range of the program to a function definition. A range must be selected before applying this command. This range must not intersect with other function chunks (however, an existing tail can be added to multiple functions).
IDA will ask to select the parent function for the selection and will append the range to the function definition.
Remove function tail…
Remove function tail. This command removes the function tail at the cursor from a function definition. If there are several parent functions for the current function tail range, IDA will ask to select the parent function(s) to remove the tail from. After the confirmation, the current function tail range will be removed from the selected function definition. If the parent was the only owner of the current tail, then the tail will be destroyed. Otherwise it will still be present in the database. If the removed parent was the owner of the tail, then another function will be selected as the owner.
Change stack pointer…
Change stack pointer. This command allows you to specify how the stack pointer (SP) is modified by the current instruction.
You cannot use this command if the current instruction does not belong to any function.
You will need to use this command only if IDA was not able to trace the value of the SP register. Usually IDA can handle it but in some special cases it fails. An example of such a situation is an indirect call of a function that purges its parameters from the stack. In this case, IDA has no information about the function and cannot properly trace the value of SP.
Please note that you need to specify the difference between the old and new values of SP.
The value of SP is used if the current function accesses local variables by [ESP+xxx] notation.
See also how to convert to stack variable (Action OpStackVariable).
Rename register…
Rename a general processor register. This command allows you to rename a processor general register to some meaningful name. While this is not used very often on IBM PCs, it is especially useful on RISC processors with lots of registers. For example, a general register R9 is not very meaningful and a name like ‘CurrentTime’ is much better.
This command can be used to define a new register name as well as to remove it. Just move the cursor on the register name and press enter. If you enter the new register name as an empty string, then the definition will be deleted.
If you have selected a range before using this command, then the definition will be restricted to the selected range. But in any case, the definition cannot cross the function boundaries.
You cannot use this command if the current instruction does not belong to any function.
Set type…
Set type information for an item or current function. This command allows you to specify the type of the current item. If the cursor is located on a name, the type of the named item will be edited. Otherwise, the current function type (if there is a function) or the current item type (if it has a name) will be edited.
The function type must be entered as a C declaration. Hidden arguments (like ‘this’ pointer in C++) should be specified explicitly. IDA will use the type information to comment the disassembly with the information about function arguments. It can also be used by the Hex-Rays decompiler plugin for better decompilation. Here is an example of a function declaration:
int main(int argc, const char *argv[]);
It is also possible to specify a function name coming from a type library. For example, if entering “LoadLibraryW” would yield its prototype:
HMODULE __stdcall LoadLibraryW(LPCWSTR lpLibFileName);
provided that the corresponding type library is in memory. To delete a type declaration, just enter an empty string. IDA supports the user-defined calling convention. In this calling convention, the user can explicitly specify the locations of arguments and the return value. For example:
int __usercall func@<ebx>(int x, int y@<esi>);
denotes a function with 2 arguments: the first argument is passed on the stack (IDA automatically calculates its offset) and the second argument is passed in the ESI register and the return value is stored in the EBX register. Stack locations can be specified explicitly:
int __usercall runtime_memhash@<^12.4>(void *p@<^0.4>, int q@<^4.4>, int r@<^8.4>)
There is a restriction for a __usercall function type: all stack locations should be specified explicitly or all are automatically calculated by IDA. General rules for the user defined prototypes are:
-
the return value must be in a register. Exception: stack locations are accepted for the __golang and __usercall calling conventions.
-
if the return type is ‘void’, the return location must not be specified
-
if the argument location is not specified, it is assumed to be on the stack; consequent stack locations are allocated for such arguments
-
it is allowed to declare nested declarations, for example: int **__usercall func16@
(int *(__usercall *x)@ (int, long@ , int)@ ); Here the pointer “x” is passed in the ESI register; The pointed function is a usercall function and expects its second argument in the ECX register, its return value is in the EBX register. The rule of thumb to apply in such complex cases is to specify the the registers just before the opening brace for the parameter list.
-
registers used for the location names must be valid for the current processor; some registers are unsupported (if the register name is generated on the fly, it is unsupported; inform us about such cases; we might improve the processor module if it is easy)
-
register pairs can be specified with a colon like edx:eax
-
for really complicated cases this syntax can be used. IDA also understands the “__userpurge” calling convention. It is the same thing as __usercall, the only difference is that the callee cleans the stack.
The name used in the declaration is ignored by IDA. If the default calling convention is __golang then explicit specification of stack offsets is permitted. For example:
  __attribute__((format(printf,2,3)))
  int myprnt(int id, const char *format, ...);
This declaration means that myprnt is a print-like function; the format string is the second argument and the variadic argument list starts at the third argument.
Below is the full list of attributes that can be handled by IDA.
| Attribute | Description |
|---|---|
packed | pack structure/union fields tightly, without gaps |
aligned | specify the alignment |
noreturn | declare as not returning function |
ms_struct | use microsoft layout for the structure/union |
format | possible formats: printf, scanf, strftime, strfmon |
Data Declaration Keywords
For data declarations, the following custom __attribute((annotate(X))) keywords have been added. The control the representation of numbers in the output:
| Keyword | Description |
|---|---|
__bin | unsigned binary number |
__oct | unsigned octal number |
__hex | unsigned hexadecimal number |
__dec | signed decimal number |
__sbin | signed binary number |
__soct | signed octal number |
__shex | signed hexadecimal number |
__udec | unsigned decimal number |
__float | floating point |
__char | character |
__segm | segment name |
__enum() | enumeration member (symbolic constant) |
__off | offset expression (a simpler version of __offset) |
__offset() | offset expression |
__strlit() | string |
__stroff() | structure offset |
__custom() | custom data type and format |
__invsign | inverted sign |
__invbits | inverted bitwise |
__lzero | add leading zeroes |
__tabform() | tabular form |
Type Declaration Keywords
The following additional keywords can be used in type declarations:
| Keyword | Description |
|---|---|
_BOOL1 | a boolean type with explicit size specification (1 byte) |
_BOOL2 | a boolean type with explicit size specification (2 bytes) |
_BOOL4 | a boolean type with explicit size specification (4 bytes) |
__int8 | a integer with explicit size specification (1 byte) |
__int16 | a integer with explicit size specification (2 bytes) |
__int32 | a integer with explicit size specification (4 bytes) |
__int64 | a integer with explicit size specification (8 bytes) |
__int128 | a integer with explicit size specification (16 bytes) |
_BYTE | an unknown type; the only known info is its size: 1 byte |
_WORD | an unknown type; the only known info is its size: 2 bytes |
_DWORD | an unknown type; the only known info is its size: 4 bytes |
_QWORD | an unknown type; the only known info is its size: 8 bytes |
_OWORD | an unknown type; the only known info is its size: 16 bytes |
_TBYTE | 10-byte floating point value |
_UNKNOWN | no info is available |
__pure | pure function: always returns the same value and does not modify memory in a visible way |
__noreturn | function does not return |
__usercall | user-defined calling convention; see above |
__userpurge | user-defined calling convention; see above |
__golang | golang calling convention |
__swiftcall | swift calling convention |
__spoils | explicit spoiled-reg specification; see above |
__hidden | hidden function argument; this argument was hidden in the source code (e.g. ‘this’ argument in c++ methods is hidden) |
__return_ptr | pointer to return value; implies hidden |
__struct_ptr | was initially a structure value |
__array_ptr | was initially an array |
__unused | unused function argument |
__cppobj | a c++ style struct; the struct layout depends on this keyword |
__ptr32 | explicit pointer size specification (32 bits) |
__ptr64 | explicit pointer size specification (64 bits) |
__shifted | shifted pointer declaration |
__high | high level prototype (does not explicitly specify hidden arguments like ‘this’, for example) this keyword may not be specified by the user but IDA may use it to describe high level prototypes |
__bitmask | a bitmask enum, a collection of bit groups |
__tuple | a tuple, a special kind of struct. tuples behave like structs but have more relaxed comparison rules: the field names and alignments are ignored. |
Change byte…
Change program bytes.
You can modify the executable file and eventually generate a new file (the Create EXE file… command; action ProduceExe).
If you patch bytes, then you may enter multiple bytes (see also Binary string format).
If this command is invoked when the debugger is active, then IDA will modify the memory and the database. If the database does not contain the patched bytes, then only the process memory will be modified.
You can create a difference file too (the Create DIFF file… command; action ProduceDiff).
See also How to Enter a Number.
Assemble…
This command allows you to assemble instructions. Currently, only the IBM PC processors provide an assembler, nonetheless, plugin writers can extend or totally replace the built-in assembler by writing their own.
The assembler requires to enclose all memory references into square brackets. For example:
mov ax, [counter]
Also, the keyword ‘offset’ must not be used. Instead of
mov eax, offset name
you must write
mov eax, name
See also How to Enter a Number.
Patched bytes
Open the Patched bytes window. The Patched bytes view shows the list of the patched locations in the database. It also allows you to revert modifications selectively.
Reverting changes
Select location(s) and click Revert… from the context menu to revert this modification.
Patching bytes
You can change individual bytes via Edit → Patch program → Change byte….
Apply patches to input file…
Apply previously patched bytes back to the input file. If the “Restore” option is selected, then the original bytes will be applied to the input file.
See also ProduceDiff action.
Create alignment directive…
Create alignment directive. The alignment directive will replace a number of useless bytes inserted by the linker to align code and data to paragraph boundary or any other address which is equal to a power of two. You can select a range to be converted to an alignment directive. If you have selected a range, IDA will try to determine a correct alignment automatically.
There are at least two requirements for this command to work:
- There must be enough unexplored bytes at the current address.
- An alignment directive must always end at an address which is divisible by a power or two.
Manual instruction…
Specify alternate representation of the current instruction.
Use it if IDA cannot represent the current instruction as desired. If the instruction itself is ok and only one operand is misrepresented, then use Manual… command (action ManualOperand).
To delete the manual representation, specify an empty string.
Color instruction…
This command allows you to specify the background color for the current instruction or data item. Only GUI version supports different background colors. Specifying a non-defined custom color will reset the instruction color.
Toggle border
Toggle the display of a border between code and data. This command allows you to hide a thin border which is like the one generated automatically by IDA between instructions and data. If the border was already hidden, then it is displayed again.
Edit menu actions for Hex View
{% hint style=“info” %} The options below appear when the Edit menu is opened from the Hex View. In other views, the menu adapts dynamically and may show a different set of options. {% endhint %}
Below is an overview of all actions that can be accessed from this menu.
| UI Action Name | Action Name | Description |
|---|---|---|
| Copy | EditCopy | Copy |
| Begin selection | Anchor | Begin selection. Some IDA commands such as selecting a portion of file to output or specifying a segment to move need an anchor. More… |
| Select all | SelectAll | Select all |
| Select identifier | SelectIdentifier | Select identifier |
| Undo | UndoAction | This command reverts the database to the state before executing the last user action. More… |
| Redo | RedoAction | This command reverts the previously issued Undo command. More… |
| Export data | ExportData | Export data |
| Code | MakeCode | Convert to instruction. More… |
| Data | MakeData | Convert to data. More… |
| Struct var… | DeclareStructVar | Declare a structure variable. More… |
| Strings | `` | |
| String | MakeStrlit | Convert to string. More… |
| C-style (0 terminated) | StringC | C-style (0 terminated) |
| DOS style ($ terminated) | StringDOS | DOS style ($ terminated) |
| Pascal style (1 byte length) | StringPascal1 | Pascal style (1 byte length) |
| Wide pascal (2 byte length) | StringPascal2 | Wide pascal (2 byte length) |
| Delphi (4 byte length) | StringDelphi | Delphi (4 byte length) |
| Unicode | StringUnicode | Unicode |
| Unicode pascal (2 byte length) | StringUnicodePascal2 | Unicode pascal (2 byte length) |
| Unicode wide pascal (4 byte length) | StringUnicodePascal4 | Unicode wide pascal (4 byte length) |
| Array… | MakeArray | Convert to array. More… |
| Undefine | MakeUnknown | Convert to undefined. More… |
| Rename | MakeName | Rename the current location. More… |
| Operand type | `` | |
| Offset | `` | |
| Offset (data segment) | OpOffset | Convert the current operand to an offset in the data segment. More… |
| Offset (current segment) | OpOffsetCs | Convert the current operand to an offset in the current segment. More… |
| Offset by (any segment)… | OpAnyOffset | Convert the current operand to an offset in any segment. More… |
| Offset (user-defined)… | OpUserOffset | Convert the current operand to an offset with any base. More… |
| Offset (struct)… | OpStructOffset | Convert the current operand to a structure offset. More… |
| Number | `` | |
| Number (default) | OpNumber | Convert the current operand to a number. More… |
| Hexadecimal | OpHex | Convert the current operand to a hexadecimal number. More… |
| Decimal | OpDecimal | Convert the current operand to a decimal number. More… |
| Octal | OpOctal | Convert the current operand to a octal number. More… |
| Binary | OpBinary | Convert the current operand to a binary number. More… |
| Floating point | OpFloat | Convert to floating point. More… |
| Toggle leading zeroes | ToggleLeadingZeroes | Toggle leading zeroes. More… |
| Character | OpChar | Convert the current operand to a character constant |
| Segment | OpSegment | Convert the current operand to a segment base |
| Enum member… | OpEnum | Convert the current operand to a symbolic constant |
| Stack variable | OpStackVariable | Convert the current operand to a stack variable |
| Change sign | ChangeSign | Change the sign of the current operand |
| Bitwise negate | BitwiseNegate | Perform bitwise negation of the current operand |
| Manual… | ManualOperand | Enter the current operand manually. More… |
| Set operand type… | SetOpType | Set the current operand’s type |
| Comments | `` | |
| Copy pseudocode to disassembly | hx:EditCmt | Edit func comment |
| Add pseudocode comments… | hx:AddPseudoCmt | Add pseudocode comments |
| Delete pseudocode comments… | hx:DelPseudoCmt | Delete pseudocode comments |
| Enter comment… | MakeComment | Enter a regular comment. More… |
| Enter repeatable comment… | MakeRptCmt | Enter repeatable comment. More… |
| Enter anterior lines… | MakeExtraLineA | Enter lines preceding the generated lines. More… |
| Enter posterior lines… | MakeExtraLineB | Enter lines following the generated lines |
| Edit block comment… | mv:EditBlockCmt | Edit block comment of microcode line |
| Edit comment… | mv:EditCmt | Edit comment of microcode line |
| Segments | `` | |
| Create segment… | CreateSegment | This command allows you to create a new segment. More… |
| Edit segment… | EditSegment | Edit segment attributes. More… |
| Delete segment… | KillSegment | Delete segment. More… |
| Move current segment… | MoveSegment | Change the current segment boundaries. More… |
| Rebase program… | RebaseProgram | Rebase program. More… |
| Change segment translation… | SegmentTranslation | Change the current segment translation table |
| Change segment register value… | SetSegmentRegister | Change segment register value. More… |
| Set default segment register value… | SetSegmentRegisterDefault | Set default segment register value. More… |
| Structs | `` | |
| Struct var… | DeclareStructVar | Declare a structure variable. More… |
| Force zero offset field | ZeroStructOffset | Toggle display of the first field of a structure in an offset expression. More… |
| Select union member… | SelectUnionMember | Choose the representation of a union member. More… |
| Create struct from selection | CreateStructFromData | This command defines a new structure from data already defined. The new structure is created with adequate data types, and each member uses the current data name if it is available. More… |
| Copy field info to pointers | CopyFieldsToPointers | Copy field info to pointed addresses. This command scans the current struct variable and renames the locations pointed by offset expressions unless they already have a non-dummy name. More… |
| Functions | `` | |
| Create function… | MakeFunction | Create a new function in the disassembly. More… |
| Edit function… | EditFunction | Edit function attributes - change function properties, including bounds, name, flags, and stack frame parameters. More… |
| Append function tail… | AppendFunctionTail | This command appends an arbitrary range of the program to a function definition. A range must be selected before applying this command. This range must not intersect with other function chunks (however, an existing tail can be added to multiple functions). More… |
| Remove function tail… | RemoveFunctionTail | Remove function tail. More… |
| Delete function | DelFunction | Delete function. Deleting a function deletes only information about a function, such as information about stack variables, comments, function type, etc. The instructions composing the function will remain intact. |
| Set function end | FunctionEnd | Change the function end address. This command changes the current or previous function bounds so that its end will be set at the cursor. If it is not possible, IDA beeps. |
| Stack variables… | OpenStackVariables | Open the stack variables window. See subviews for more. |
| Change stack pointer… | ChangeStackPointer | Change stack pointer. This command allows you to specify how the stack pointer (SP) is modified by the current instruction. More… |
| Rename register… | RenameRegister | Rename a general processor register. More… |
| Set type… | SetType | Set type information for an item or current function. More… |
| Patch program | `` | |
| Change byte… | PatchByte | Change program bytes. More… |
| Change word… | PatchWord | Change program words |
| Assemble… | Assemble | This command allows you to assemble instructions. Currently, only the IBM PC processors provide an assembler, nonetheless, plugin writers can extend or totally replace the built-in assembler by writing their own. More… |
| Patched bytes | PatchedBytes | Open the Patched bytes window. More… |
| Apply patches to input file… | ApplyPatches | Apply previously patched bytes back to the input file. If the “Restore” option is selected, then the original bytes will be applied to the input file. More… |
| Other | `` | |
| Specify switch idiom… | uiswitch:SpecSwitchIdiom | Specify switch idiom |
| Create alignment directive… | MakeAlignment | Create alignment directive. More… |
| Manual instruction… | ManualInstruction | Specify alternate representation of the current instruction. More… |
| Color instruction… | ColorInstruction | This command allows you to specify the background color for the current instruction or data item. More… |
| Reset decompiler information… | hx:ResTypeInfo | Reset decompiler information |
| Toggle skippable instructions… | hx:ToggleSkippableInsn | Toggle skippable instructions |
| Decompile as call… | hx:UserDefinedCall | Decompile as call |
| Toggle border | ToggleBorder | Toggle the display of a border between code and data. More… |
| detect and parse golang metadata | golang:detect_and_parse | detect and parse golang metadata |
| Open picture in default viewer | picture_search:open_in_viewer | Open picture in default viewer |
| Save picture | picture_search:save_picture | Save picture |
| Plugins | `` | |
| Quick run plugins | QuickRunPlugins | Quickly run a plugin |
Begin selection
Begin selection. Some IDA commands such as selecting a portion of file to output or specifying a segment to move need an anchor.
To drop the anchor, you can either use the Alt + L key or the Shift + ↑, ←, →, ↓ combination, which is more convenient. You can also drop the anchor with the mouse by simply clicking and dragging it.
After you’ve dropped the anchor, you can navigate freely using arrows, etc. Any command that uses the anchor, raises it.
The anchored range is displayed with another color.
When you exit from IDA, the anchor value is lost.
Undo
This command reverts the database to the state before executing the last user action. It is possible to apply Undo multiple times, in this case multiple user actions will be reverted.
Please note the entire database is reverted, including all modifications that were made to the database after executing the user action and including the ones that are not connected to the user action. For example, if a third party plugin modified the database during or after the user action, this modification will be reverted. In theory it is possible to go back in time to the very beginning and revert the database to the state that was present immediately after performing the very first user action. However, in practice the undo buffers overflow because of the changes made by autoanalysis.
Autoanalysis (Options → General… → Analysis) generates copious amounts of undo data. Also, please note that maintaining undo data during autoanalysis slows it down a bit. In practice, it is not a big deal because the limit on the undo data is reached quite quickly (in a matter of minutes). Therefore, if during analysis the user does not perform any actions that modify the database, the undo feature will turn itself off temporarily.
However, if you prefer not to collect undo data at all during the initial autoanalysis, just turn off the UNDO_DURING_AA parameter in ida.cfg.
The configuration file ida.cfg has 2 more undo-related parameters:
| Parameter | Description | Default |
|---|---|---|
| UNDO_MAXSIZE | Max size of undo buffers. Once this limit is reached, the undo info about the oldest user action will be forgotten. | 128MB |
| UNDO_DEPTH | Max number of user actions to remember. If set to 0, the undo feature will be unavailable. | 1000000 |
Since there is a limit on the size of undo buffers, any action, even the tiniest, may become non-undoable after some time. This is true because the analysis or plugins may continue to modify the database and overflow the buffers. Some massive actions, like deleting a segment, may be non-undoable just because of the sheer amount of undo data they generate.
Please note that Undo does not affect the state of IDC or Python scripts. Script variables will not change their values because of Undo. Also nothing external to the database can be changed: created files will not be deleted, etc.
Some actions cannot be undone. For example, launching a debugger or resuming from a breakpoint cannot be undone.
Redo
This command reverts the previously issued Undo command. It is possible to use Redo multiple times.
This command also reverts all changes that were done to the database after the last Undo command, including the eventual useful modifications made by the autoanalysis. In other words, the entire database is modified to get to the exact state that it had before executing the last Undo command.
Code
Convert to instruction. This command converts the current unexplored bytes to instruction(s). IDA will warn you if it is not possible.
If you have selected a range using the Anchor action, all the bytes from this range will be converted to instructions.
If you apply this command to an instruction, it will be reanalyzed.
Data
Convert to data. This command converts the current unexplored bytes to data. If it is not possible, IDA will warn you.
Multiple using of this command will change the data type:
 db -> dw -> dd -> float -> dq -> double -> dt -> packreal -> octa \;
 ^                                                                 |;
 \---------<----------------<--------------<-----------------------/;
You may remove some items from this list using the Setup data types… command (action SetupData).
If the target assembler (Options → General… → Analysis) does not support double words or another data type, it will be skipped. To create a structure variable, use the Struct var… command (action DeclareStructVar). To create an array, use the Array… command (action MakeArray). To convert back, use the Undefine command (action MakeUnknown).
Struct var…
Declare a structure variable. IDA will ask you to choose a structure type. You must have some structure types defined in order to use this command. If the target assembler supports it, IDA will display the structure in terse form (using just one line). To uncollapse a terse structure variable use the Unhide command. You can also use this command to declare a structure field in another structure (i.e., nested structures are supported too).
String
Convert to string.
This command converts the current unexplored bytes to a string.
The set of allowed characters is specified in the configuration file, parameter StrlitChars. Character ‘\0’ is not allowed in any case. If the current assembler (Options → General → Analysis → Target assembler) does not allow characters above 0x7F, characters with high bit set are not allowed.
If the anchor has been dropped, IDA will take for the string all characters between the current cursor position and the anchor.
Use the anchor if the string starts a disallowed character.
This command also generates a name for the string. In the configuration file, you can specify the characters allowed in names (NameChars).
You can change the literal string length using Array… command (action MakeArray).
The GUI version allows you to assign a special hotkey to create Unicode strings. To do so, change the value of the StringUnicode parameter in the IDAGUI.CFG file.
Array…
Convert to array. This command allows you to create arrays and change their sizes.
The arrays are created in 2 simple steps:
-
Create the first element of array using the data definition commands (data, string, structs)
-
Apply the array command to the created data item. Enter array size in current array elements (not bytes). The suggested array size is the minimum of the following values:
- the address of the next item with a cross reference
- the address of the next user-defined name For string literals, you can use this command to change the length of the string.
The dialog box contains the following fields:
-
Items on a line (meaningless for string literals):
- 0 - place maximal number of items on a line
- other value - number of items on a line Please note that the margin parameter affects the number of items on a line too.
-
Alignment (meaningless for string literals):
- -1 - do not align items
- 0 - align automatically
- other value - width of each item
-
Signed elements: if checked, IDA treats all elements as signed numbers. Only meaningful for numbers (not for offsets and segments and strings)
-
Display indexes: if checked, IDA will display the indexes of array elements in the form of comments (0,1,2…)
-
Create as array: if not checked, IDA will create a separate item for each array element. Useful for creating huge arrays. If the box is unchecked when this command is applied to string literals, IDA will create many string literals instead of one big string.
If applied to a variable-sized structure, this command is used to specify the overall size of the structure. You cannot create arrays of variable-sized structures.
Undefine
Convert to undefined. This command deletes the current instruction or data, converting it to ‘unexplored’ bytes. IDA will delete the subsequent instructions if there are no more references to them (functions are never deleted).
If you have selected a range using the Anchor action, all the bytes in this range will be converted into ‘unexplored’ bytes. In this case, IDA will not delete any other instructions even if there are no references to them after the deletion.
Rename
Rename the current location. This command gives name/renames/deletes name for the current item.
To delete a name, simply give an empty name.
If the current item is referenced, you cannot delete its name. Even if you try, IDA will generate a dummy name (See Options → Name representation…).
List of available options:
-
Local name: The name is considered to be defined only in the current function. Please note that IDA does not check the uniqueness of the local names in the whole program. However, it does verify that the name is unique for the function.
-
Include in name list: Here you can also include/remove the name from the name list (see the Jump by name… command; action
JumpName). If the name is hidden, you will not see it in the names window. -
Public name: You can declare a name as a public (global) name. If the current assembler supports the “public” directive, IDA will use it. Otherwise, the publicness of the name will be displayed as a comment.
-
Autogenerated name: An autogenerated name will appear in a different color. If the item is indefined, it will disappear automatically.
-
Weak name: You can declare a name as a weak name. If the current assembler supports the “weak” directive, IDA will use it. Otherwise, the weakness of the name will be displayed as a comment.
-
Create name anyway: If this flag is on, and if the specified name already exists, IDA will try to variate the specified name by appending a suffix to it.
Offset (data segment)
Convert the current operand to an offset in the data segment. This command converts the immediate operand of the current instruction/data to an offset from the current data segment (DS). If the current DS value is unknown (or equal 0xFFFF) IDA will warn you - it will beep. In this case, you have to define DS register value for the current byte. The best way to do it is:
- jump to segment register change point (the Jump to segment register… command; action
JumpSegmentRegister), - change value of DS (the Change segment register value… command; action
SetSegmentRegister) - return (the Jump back command; action
Return) or you can change default value of DS for the current segment (the Set default segment register value… command; actionSetSegmentRegisterDefault).
If you want to delete offset definition, you can use this command again - it works as trigger.
If the cursor is on the first operand (the cursor is before ‘,’) then the first operand will be affected; otherwise, all other operands will be affected.
If a range is selected using the anchor, IDA will perform ‘en masse’ conversion. It will convert immediate operands of all instructions in the selected range to offsets. However, IDA will ask you first the lower and upper limits of immediate operand value. If the operand value is >= lower limit and <= upper limit then the operand will be converted to offset, otherwise it will be left unmodified.
To create offsets to structure members use the Offset (struct)… command (action OpStructOffset).
Offset (current segment)
Convert the current operand to an offset in the current segment.
If the cursor is on the first operand (the cursor is before ‘,’) then the first operand will be affected; otherwise, all other operands will be affected.
If a range is selected using the anchor, IDA will perform ‘en masse’ conversion. It will convert immediate operands of all instructions in the selected range to offsets. However, IDA will ask you first the lower and upper limits of immediate operand value. If the operand value is >= lower limit and <= upper limit then the operand will be converted to offset, otherwise, it will be left unmodified.
If this command is applied to a structure member in the Local types window, then IDA will create an “automatic offset”. An automatic offset is an offset with the base equal to 0xFFFFFFFF. This base value means that the actual value of the base will be calculated by IDA when a structure instance is created.
To create offsets to structure members use the Offset (struct)… command (action OpStructOffset).
Offset by (any segment)…
Convert the current operand to an offset in any segment.
This command converts the immediate operand of the current instruction/data to an offset from any segment.
IDA will ask to choose a base segment for the offset.
If a range is selected using the anchor, IDA will perform ‘en masse’ conversion. It will convert immediate operands of all instructions in the selected range to offsets. However, IDA will ask you first the lower and upper limits of immediate operand value. If the operand value is >= lower limit and <= upper limit then the operand will be converted to offset, otherwise it will be left unmodified.
If the cursor is on the first operand (the cursor is before ‘,’) then the first operand will be affected; otherwise, all other operands will be affected.
To create offsets to structure members use Offset (struct)… command (action OpStructOffset).
Offset (user-defined)…
Convert the current operand to an offset with any base. If the cursor is on the first operand (the cursor is before ‘,’) then the first operand will be affected; otherwise, all other operands will be affected. If the offset base is specified as 0xFFFFFFFF, then IDA will create “an automatic offset”. Automatic offsets mean that the actual value of the base will be calculated by IDA.
The following offset attributes are available:
| Option | Description |
|---|---|
| Treat the base address as a plain number | if checked, IDA will treat the base address as a number. In this case, IDA will not create a cross-reference to it and the base address will be printed as a number, not as an offset expression. |
| Offset points past the main object | Offsets of this type point past an object end. They do not cause an object created/deletion. |
| Use image base as offset base | These offsets are based on the image base. There is no need to explicitly specify the offset base. These offsets are displayed in a concise form: rva func instead of offset func - imagebase. If you intend to reassemble the output file, execute the following IDC statement: set_inf_attr(INF_GENFLAGS, get_inf_attr(INF_GENFLAGS) & ~INFFL_ALLASM); |
| Subtract operand value | Use this option when the operand value should be substracted from the base to get the target address. In this case the displayed expression will be displayed as offset base - target instead of the usual offset target - base |
| Signed operand | Use this option if the operand should be interpreted as a signed value. This option is only available for OFF_REF8, OFF_REF16, OFF_REF32 and OFF_REF64 offset types. |
| Operand value of 0 is invalid | If the operand value is 0, the value will be highlighted in red. |
| Operand value of NOT 0 is invalid | If the operand value is zero’s complement (i.e. all bits are set), the value will be highlighted in red. For example a OFF_REF16 with an operand value of 0xFFFF would be invalid. |
| Use the current address as the offset base | The offset base is dynamically calculated and is equal to the address of the current element: - for standalone items: their start address - for arrays: the start of the array element - for structures: the start of the structure field |
The offset expression is displayed in the following concise form: offset target - $ where “$” denotes the start of the element (and is assembler-dependent).
To create offsets to structure members use the Offset (struct)… command (action OpStructOffset).
Offset (struct)…
Convert the current operand to a structure offset. This command permits to convert all immediate operands of instructions in a range selection to a path of offsets through a structure and its possible sub unions. If no selection is active, IDA will simply permit to convert the current operand. In this case, it will display a simple dialog box the same way as the text version (see below). You can select the desired register in the drop-down list: all operands relative to this register will be added to the ‘Offsets’ list. A special empty line in the drop-down list is used to directly work on immediate values. Checkboxes in the ‘Offsets’ list allow you to select which operand you indeed want to modify. By default, IDA will select only undefined operands, to avoid overwriting previous type definitions. This list is sorted by operand value, by instruction address and finally by operand number. You can easily see the instructions related to the operand by moving the mouse over it, and wait for a hint to be displayed. The ‘Structures and Unions’ tree will contain all selectable structures, and sub unions. Once you select or move over a structure, the ‘Offsets’ list updates itself for each checked offset: the computed name of the operand is displayed, according to the selected structure in the tree. An icon is also drawn, to easily know if a specific structure matches the offset or not, or if the offset is too big for the selected structure. The structures who match the most offsets will be near the top of the tree. You can also move your mouse over structures in the tree to obtain an interesting hint. A ‘?’ icon can also appear, if the offset can be specialized by selecting an union member. In this case, if you expand the structure in the tree, you can select the adequate union member simply by checking the desired radio button. IDA automatically corrects the related name in the ‘Offsets’ list. The ‘Offset delta’ value represents the difference between the structure start and the pointer value. For example, if you have an operand 4 and want to convert in into an expression like “mystruct.field_6-2”, then you have to enter 2 as the delta. Usually the delta is zero, i.e. the pointer points to the start of the structure. The ‘Hide sub structures without sub unions’ option (checked by default) avoids to add unnecessary sub structures to the tree, to keep it as small as possible. If you uncheck this option, all sub structures will be added to the tree. By default, IDA displays the structure member at offset 0. To change this behavior, you can directly disable the ‘Force zero offset field’ in the ‘Options’ frame. Later zero offsets can be forced using Edit → Structs → Force zero offset menu item.
Text version
This command converts immediate operand(s) type of the current instruction/data to an offset within the specified structure. Before using this command, you have to define a structure type. First of all, IDA will ask a so-called “struct offset delta”. This value represents the difference between the structure start and the pointer value. For example, if you have an operand 4 and want to convert in into an expression like “mystruct.field_6-2”, then you have to enter 2 as the delta. Usually the delta is zero, i.e. the pointer points to the start of the structure. If a range is selected using the anchor, IDA will perform ‘en masse’ conversion. It will convert immediate operands of all instructions in the selected range to offsets. However, IDA will ask you first the lower and upper limits of immediate operand value. If the an operand value is >= lower limit and <= upper limit then the operand will be converted to offset, otherwise it will be left unmodified. When you use this command, IDA deletes the manually entered operand. If the cursor is on the first operand (the cursor is before ‘,’) then the first operand will be affected; otherwise, all other operands will be affected. By default IDA doesn’t display the structure member at offset 0. To change this behavior, use the Force zero offset field command. Moreover, if there are several possible representations (this can happen if unions are used), select the desired representation using the Select union member… command.
Number (default)
Convert the current operand to a number.
That way, you can delete suspicious mark of the item.
The number is represented in the default radix for the current processor (usually hex, but octal for PDP-11, for example).
When you use this command, IDA deletes the manually entered operand (via the Manual… command; action ManualOperand).
If the cursor is on the first operand (the cursor is before ‘,’) then the first operand will be affected; otherwise, all other operands will be affected.
Hexadecimal
Convert the current operand to a hexadecimal number.
This command converts the immediate operand(s) type of the current instruction/data to a hex number, so that you can delete the suspicious mark of the item.
When you use this command, IDA deletes the manually entered operand (via the Manual… command; action ManualOperand).
If the cursor is on the first operand (the cursor is before ‘,’) then the first operand will be affected; otherwise, all other operands will be affected.
Decimal
Convert the current operand to a decimal number.
This command converts the immediate operand(s) type of the current instruction/data to decimal. Therefore, it becomes a ‘number’.
When you use this command, IDA deletes the manually entered operand (via the Manual… command; action ManualOperand).
If the cursor is on the first operand (the cursor is before ‘,’) then the first operand will be affected; otherwise, all other operands will be affected.
Octal
Convert the current operand to a octal number.
IDA always uses 123o notation for octal numbers even if the current assembler does not support octal numbers.
When you use this command, IDA deletes the manually entered operand (via the Manual… command; action ManualOperand).
If the cursor is on the first operand (the cursor is before ‘,’) then the first operand will be affected; otherwise, all other operands will be affected.
Binary
Convert the current operand to a binary number.
This command makes the current instruction or data operand type binary. IDA always uses 123b notation for binary numbers even if the current assembler does not support binary numbers.
When you use this command, IDA deletes the manually entered operand (via the Manual… command; action ManualOperand).
If the cursor is on the first operand (the cursor is before ‘,’) then the first operand will be affected; otherwise, all other operands will be affected.
Floating point
Convert to floating point.
When you use this command, IDA deletes the manually entered operand (via the Manual… command; action ManualOperand).
If the cursor is on the first operand (the cursor is before ‘,’) then the first operand will be affected; otherwise, all other operands will be affected.
Toggle leading zeroes
Toggle leading zeroes.
This command displays or hides the leading zeroes of the current operand. Example: if the instruction looked like this:
and ecx, 40h
then after applying the command it will look like this:
and ecx, 00000040h
If you prefer to see leading zeroes in all cases, then open the calculator and enter the following expression: set_inf_attr (INF_GENFLAGS, get_inf_attr(INF_GENFLAGS) | INFFL_LZERO); This will toggle the default for the current database and all numbers without leading zeroes will become numbers with leading zeroes, and vice versa. See also Edit|Operand types submenu.
Manual…
Enter the current operand manually. You may specify any string instead of an operand if IDA does not represent the operand in the desired form. In this case, IDA will simply display the specified string in the instruction instead of the default operand.
The current operand (under the cursor) will be affected.
You can use this command not only with instructions but with data items too.
IDA proposes the previous manual operand as the default value in the input form.
To delete the manual operand and revert back to the default text, specify an empty string.
IDA automatically deletes manually entered operands when you change operand representation using Edit → Operand types submenu.
{% hint style=“info” %} A text offset reference is generated if you use a label in the program as the operand string. In other cases no cross-references are generated. {% endhint %}
Enter comment…
Enter a regular comment. If you stand at the function start and your cursor is on a function name, IDA will ask you to enter a function comment. If you stand at the segment start and your cursor is on a segment name, IDA will ask you to enter a segment comment. If this command is issued in the Local types window, it allows you to change the comment of a structure/enum, or structure/enum member. If the cursor is on the structure/enum name, the structure/enum comment will be changed, otherwise the member comment will be changed. Otherwise, this command allows you to enter a normal indented comment for the current item. You can show/hide all comments in Options → General → Disassembly → Display disassembly line parts: Comments.
Enter repeatable comment…
Enter repeatable comment. A repeatable comment will appear attached to the current item and all other items referencing it. If you stand at the function start, IDA will ask you to enter a function comment. If this command is issued in the Local types window, it allows you to change the comment of a structure/enum, or structure/enum member. If the cursor is on the structure/enum name, the structure/enum comment will be changed, otherwise the member comment will be changed. Otherwise, this command allows you to enter a repeatable comment for the current item.
{% hint style=“info” %} You cannot enter repeatable segment comments. {% endhint %}
All items that refer to the current item will have this comment by default. Note that if you have defined both comment types (regular and repeatable), the regular comment will be displayed for the current item and the repeatable comment will be displayed for all items that refer to the current item, if they do not have their own comments. The repeatable comments may be used to describe subroutines, data items, etc., because all calls to the subroutine will have the repeatable comment. You can show/hide all comments in Options → General → Disassembly → Display disassembly line parts: Comments.
Enter anterior lines…
Enter lines preceding the generated lines. If you want to enter multi-line comments or additional instructions, you can use this feature of IDA.
There are two kinds of extra lines: the ones generated before the instruction line and the ones generated after the instruction line.
Do not forget that the maximal number of lines for an item is 500.
IDA does not insert a comment symbol at the beginning of the lines.
Create segment…
This command allows you to create a new segment.
If you select a range using the anchor, IDA will propose the start address and the end address of the selection as defaults for the segment bounds.
You need to specify at least:
- the segment start address
- the segment end address (excluded from the range)
- the segment base
Click here to learn about addressing model used in IDA.
If “sparse storage” is set, IDA will use special sparse storage method for the segment. This method is recommended for huge segments. Later, it is possible to change the storage method of any region using set_storage_type IDC function.
If another segment already exists at the specified address, the existing segment is truncated and the new segment lasts from the specified start address to the next segment (or specified end address, whichever is lower). If the old and the new segments have the same base address, instructions/data will not be discarded by IDA. Otherwise, IDA will discard all instructions/data of the new segment.
An additional segment may be created by IDA to cover the range after the end of the new segment.
Edit segment…
Edit segment attributes. This command opens the Change segment attributes dialog.
Change segment attributes options
- How to change segment name
- How to change segment class
- How to change segment addressing mode (16/32)
- How to change segment alignment
- How to change segment combination
{% hint style=“info” %} Changing the segment class may change the segment type. {% endhint %}
-
Move Adjacent Segments: means that the previous and next segments will be shrunk or expanded to fill gaps between segments. Click here for more information.
-
Disable Addresses: if set, when a segment is shrunk, all information about bytes going out of the segment will be completely removed.. Otherwise, IDA will discard information about instructions/data, comments etc, but will retain byte values so that another segment can be created later and it will use the existing byte values.
If IDA creates 2 segments where only one segment must exist, you may try the following sequence:
- Delete one segment (action
KillSegment). Choose one with bad segment base value. Do not disable addresses occupied by the segment being deleted. - Change bounds of another segment. Note that the Create segment… command (action
CreateSegment) changes the boundaries of the overlapping segment automatically.
Segments with the “debugger” attribute are the segments whose memory contents are not saved in the database. Usually, these segments are created by the debugger to reflect the current memory state of the program.
However, the user can modify this attribute.
If it is cleared, then the segment will permanently stay in the database after closing the debugger session. The database will reflect the state of the segment which was at the time when the status is changed.
If it is set, then the segment will become a temporary segment and will be deleted at the end of the debugging session.
The debugger segment checbkox is available only during debugging sessions.
The “loader” segments are the segment created by the file loader. The segment having this attribute are considered to be part of the input file.
A segment with the “debugger” attribute set and the “loader” attribute not set is considered to be an ephemeral segment. Such segments are not analyzed automatically by IDA.
“Segment permissions” group box can be used to modify Segment access permissions (Read/Write/Execute)
Segment Name
Enter a new name for the segment. A segment name is up to 8 characters long. IDA does check if the length is ok. Try to give mnemonic names for the segments.
Class Name
The segment class name identifies the segment with a class name (such as CODE, FAR_DATA, or STACK). The linker places segments with the same class name into a contiguous range of memory in the runtime memory map.
Changing the segment class changes only the segment definition on the screen. There are the following predefined segment class names:
| Segment class | Description |
|---|---|
| CODE | Pure code |
| DATA | Pure data |
| CONST | Pure data |
| BSS | Uninitialized data |
| STACK | Uninitialized data |
| XTRN | Extern definitions segment |
If you change segment class and the segment type is “Regular”, then the segment type will be changed accordingly.
In order to set the segment type “Regular”, you should change the segment class to “UNK”.
{% hint style=“info” %} Segment class names are never deleted. Once you define a segment class name, you cannot reuse it as a name of another object. {% endhint %}
Segment bitness
You can choose between 16-bit and 32-bit segment addressing.
IDA will delete all instructions and data in the segment if the segment address is changed.
Never do it if you are not sure. It may have irreversible consequences, all instructions/data will be converted to undefined bytes.
Segment Alignment
You can specify the segment alignment for the selected segment. By default, IDA assumes ‘byte’ alignment.
Changing the alignment changes only the segment definition on the screen. Nothing else will happen.
Segment Combination
A field that describes how the linker can combine the segment with other segments. Under MS-DOS, segments with the same name and class can be combined in two ways: they can be concatenated to form one logical segment, or they can be overlapped. In the latter case, they have either the same start address or the same end address, and they describe a common range in memory. Values for the field are:
- Private: Do not combine with any other program segment.
- Public: Combine by appending at an offset that meets the alignment requirement.
- Stack: Combine as for Public. This combine type forces byte alignment.
- Common: Combine by overlay using maximum size.
Changing segment combination changes only the segment definition on the screen. Nothing else will happen.
Delete segment…
Delete segment. IDA will ask your the permission to disable the addresses occupied by the segment. If you allow this operation, all information about the segment will be deleted. In other words, IDA will discard the information about instructions or data, comments etc.
If you check the “disable addresses” checkbox, IDA will mark the addresses occupied by the segment as “nonexistent” in the program. You will lose ALL information, including byte values.
It is impossible to disassemble the content of addresses not located in any segment, therefore you must create a new segment if you want to resume the disassembly of that part of the code.
You can also edit an adjacent segment to expand it to those addresses (Edit → Segments → Edit segment…).
IDA will ask your the permission to disable addresses occupied by the segment. If you give your permission, information about the segment will be deleted, otherwise IDA will discard information about instruction/data, comments etc, but retain byte values so that you will be able to create another segment afterwards. To disassemble the addresses occupied by the segment, you need to create a new segment again (i.e. you cannot disassemble bytes without a segment). You can also expand another adjacent segment to these addresses.
Move current segment…
Change the current segment boundaries. This command open the Move segment dialog and allows you to move segment(s) to another address. Use it if the segment(s) are loaded at a wrong address. This command shifts (moves) the selected segments in the memory to the target address. There must be enough free space at the target address for the segments. All information in the segment will be moved to the new address, but since the addresses change, the disassembly might be not valid anymore (especially if the program is moved to the wrong addresses and the relocation information is not available).
Fix up the relocated segment
This option allows IDA to modify the references to/from the relocated segment(s). If it is turned off, the references might be wrong after the move.
Rebase program…
Rebase program. The whole program will be shifted by the specified amount of bytes in the memory. The following options are available (we strongly recommend to leave them turned on):
- Fix up relocations: This option allows IDA to modify the references to/from the relocated segment(s). If it is turned off, the references might be wrong after the move.
- Rebase the whole image: This option is accessible only if the whole program is selected. It allows IDA to adjust internal variables on the whole program.
Please note rebasing the program might remove user-defined xrefs.
Change segment register value…
Change segment register value.
Relevant only for processors with the segment registers. Currently this command works for IBM PC, TMS320C2, Intel80196, and PowerPC processors.
This command creates or updates a segment register change point.
See also the Jump to segment register… command (action JumpSegmentRegister) for more info.
Set default segment register value…
Set default segment register value. Relevant only for processors with the segment registers. You can specify a default value of a segment register for the current segment. When you change the default value, IDA will reanalyze the segment, taking the default value when it cannot determine the actual value of the register. This takes time, so do not be surprised if references are not corrected immediately.
To specify a value other than the default value of a segment register, you can use the Change segment register value… command (action SetSegmentRegister).
Struct var…
Declare a structure variable. IDA will ask you to choose a structure type. You must have some structure types defined in order to use this command. If the target assembler supports it, IDA will display the structure in terse form (using just one line). To uncollapse a terse structure variable use the Unhide command. You can also use this command to declare a structure field in another structure (i.e., nested structures are supported too).
Force zero offset field
Toggle display of the first field of a structure in an offset expression. This command forces IDA to display a full structure member name even if the offset of the member is equal to zero.
If used twice, the command cancels itself.
Example: Suppose we have the following structure:
    xxx     struc
    a       db ?
    b       db ?
    c       db ?
    xxx     ends

    dloc    xxx ?
Normally IDA displays references to it like this:
    mov     eax, offset dloc
    mov     eax, offset dloc.b
If you force IDA, then it displays member ‘a’:
    mov     eax, offset dloc.a
    mov     eax, offset dloc.b
Select union member…
Choose the representation of a union member. This command tells IDA how to display references to a union from the current cursor location.
Example: Suppose we have the following union:
        xxx     union
        a       db ?
        b       dw ?
        c       dd ?
        ends   xxx
        dloc    xxx ?
Normally, IDA displays references to “dloc” like this:
        mov     al,  byte ptr dloc
        mov     eax, word ptr dloc
After using this command, IDA can display the union members:
        mov     al,  dloc.b
        mov     eax, dloc.d
Create struct from selection
This command defines a new structure from data already defined. The new structure is created with adequate data types, and each member uses the current data name if it is available.
This command is available only in the graphical version of IDA.
Copy field info to pointers
Copy field info to pointed addresses. This command scans the current struct variable and renames the locations pointed by offset expressions unless they already have a non-dummy name.
It also copies the type info from the struct members to pointed locations.
Create function…
Create a new function in the disassembly. You can specify function boundaries using the anchor. If you don’t specify any, IDA will try to find the boundaries automatically:
- function start point is equal to the current cursor position;
- function end point is calculated by IDA.
A function cannot contain references to undefined instructions. If a function has already been defined at the specified addresses, IDA will jump to its start address, showing you a warning message. A function must start with an instruction.
Edit function…
Edit function attributes - change function properties, including bounds, name, flags, and stack frame parameters. This command opens an Edit Function dialog, and allows you to modify function characteristics and stack frame structure. If the current address does not belong to any function, IDA will beep.
To change only the function end address, use the FunctionEnd command instead.
This command allows you to change the function frame parameters too. You can change sizes of some parts of frame structure.
Stack Frame Structure
IDA represents the stack using the following structure:
| Stack Section | Pointer |
|---|---|
| function arguments | - |
| return address | - |
| saved registers (SI, DI, etc) | ← BP |
| local variables | ← SP |
{% hint style=“info” %} For some processors or functions, BP may equal SP, meaning it points to the bottom of the stack frame. {% endhint %}
You may specify the number of bytes in each part of the stack frame. The size of the return address is calculated by IDA (possibly depending on the far function flag).
           push    ebp
           lea     ebp, [esp-78h]
           sub     esp, 588h
           push    ebx
           push    esi
           lea     eax, [ebp+74h]
      +------------------------------+
      | function arguments           |
      +------------------------------+
      | return address               |
      +------------------------------+
      | saved registers (SI,DI,etc)  |
      +------------------------------+  <- typical BP
      |                              |
      |                              |
      |                              |  <- actual BP
      | local variables              |
      |                              |
      |                              |
      |                              |
      +------------------------------+  <- SP
In our example, the saved registers area is empty (since EBP has been initialized before saving EBX and ESI). The difference between the ‘typical BP’ and ‘actual BP’ is 0x78 and this is the value of FPD.
After specifying FPD=0x78 the last instruction of the example becomes
lea eax, [ebp+78h+var_4]
where var_4 = -4
Most of the time, IDA calculates the FPD value automatically. If it fails, the user can specify the value manually.
If the value of the stack pointer is modified in an unpredictable way, (e.g. “and esp, -16”), then IDA marks the function as “fuzzy-sp”.
If this command is invoked for an imported function, then a simplified dialog box will appear on the screen.
See also:
- Igor’s Tip of the Week #126: Non-returning functions
- Igor’s tip of the week #106: Outlined functions
Configurable Parameters
- Stack Frame Sizes: You can specify the number of bytes in each part of the stack frame. The return address size is calculated automatically by IDA (may depend on the far function flag).
- Purged Bytes: Specifies the number of bytes added to SP upon function return. This value calculates SP changes at call sites (used in calling conventions such as
__stdcallin Windows 32-bit programs). - BP Based Frame: Enables IDA to automatically convert [BP+xxx] operands to stack variables.
- BP Equal to SP: Indicates that the frame pointer points to the bottom of the stack. Commonly used for processors that set up the stack frame with EBP and ESP both pointing to the bottom (e.g., MC6816, M32R).
- Reanalysis: Pressing
Enter without changing any parameter will cause IDA to reanalyze the function.
Append function tail…
This command appends an arbitrary range of the program to a function definition. A range must be selected before applying this command. This range must not intersect with other function chunks (however, an existing tail can be added to multiple functions).
IDA will ask to select the parent function for the selection and will append the range to the function definition.
Remove function tail…
Remove function tail. This command removes the function tail at the cursor from a function definition. If there are several parent functions for the current function tail range, IDA will ask to select the parent function(s) to remove the tail from. After the confirmation, the current function tail range will be removed from the selected function definition. If the parent was the only owner of the current tail, then the tail will be destroyed. Otherwise it will still be present in the database. If the removed parent was the owner of the tail, then another function will be selected as the owner.
Change stack pointer…
Change stack pointer. This command allows you to specify how the stack pointer (SP) is modified by the current instruction.
You cannot use this command if the current instruction does not belong to any function.
You will need to use this command only if IDA was not able to trace the value of the SP register. Usually IDA can handle it but in some special cases it fails. An example of such a situation is an indirect call of a function that purges its parameters from the stack. In this case, IDA has no information about the function and cannot properly trace the value of SP.
Please note that you need to specify the difference between the old and new values of SP.
The value of SP is used if the current function accesses local variables by [ESP+xxx] notation.
See also how to convert to stack variable (Action OpStackVariable).
Rename register…
Rename a general processor register. This command allows you to rename a processor general register to some meaningful name. While this is not used very often on IBM PCs, it is especially useful on RISC processors with lots of registers. For example, a general register R9 is not very meaningful and a name like ‘CurrentTime’ is much better.
This command can be used to define a new register name as well as to remove it. Just move the cursor on the register name and press enter. If you enter the new register name as an empty string, then the definition will be deleted.
If you have selected a range before using this command, then the definition will be restricted to the selected range. But in any case, the definition cannot cross the function boundaries.
You cannot use this command if the current instruction does not belong to any function.
Set type…
Set type information for an item or current function. This command allows you to specify the type of the current item. If the cursor is located on a name, the type of the named item will be edited. Otherwise, the current function type (if there is a function) or the current item type (if it has a name) will be edited.
The function type must be entered as a C declaration. Hidden arguments (like ‘this’ pointer in C++) should be specified explicitly. IDA will use the type information to comment the disassembly with the information about function arguments. It can also be used by the Hex-Rays decompiler plugin for better decompilation. Here is an example of a function declaration:
int main(int argc, const char *argv[]);
It is also possible to specify a function name coming from a type library. For example, if entering “LoadLibraryW” would yield its prototype:
HMODULE __stdcall LoadLibraryW(LPCWSTR lpLibFileName);
provided that the corresponding type library is in memory. To delete a type declaration, just enter an empty string. IDA supports the user-defined calling convention. In this calling convention, the user can explicitly specify the locations of arguments and the return value. For example:
int __usercall func@<ebx>(int x, int y@<esi>);
denotes a function with 2 arguments: the first argument is passed on the stack (IDA automatically calculates its offset) and the second argument is passed in the ESI register and the return value is stored in the EBX register. Stack locations can be specified explicitly:
int __usercall runtime_memhash@<^12.4>(void *p@<^0.4>, int q@<^4.4>, int r@<^8.4>)
There is a restriction for a __usercall function type: all stack locations should be specified explicitly or all are automatically calculated by IDA. General rules for the user defined prototypes are:
-
the return value must be in a register. Exception: stack locations are accepted for the __golang and __usercall calling conventions.
-
if the return type is ‘void’, the return location must not be specified
-
if the argument location is not specified, it is assumed to be on the stack; consequent stack locations are allocated for such arguments
-
it is allowed to declare nested declarations, for example: int **__usercall func16@
(int *(__usercall *x)@ (int, long@ , int)@ ); Here the pointer “x” is passed in the ESI register; The pointed function is a usercall function and expects its second argument in the ECX register, its return value is in the EBX register. The rule of thumb to apply in such complex cases is to specify the the registers just before the opening brace for the parameter list.
-
registers used for the location names must be valid for the current processor; some registers are unsupported (if the register name is generated on the fly, it is unsupported; inform us about such cases; we might improve the processor module if it is easy)
-
register pairs can be specified with a colon like edx:eax
-
for really complicated cases this syntax can be used. IDA also understands the “__userpurge” calling convention. It is the same thing as __usercall, the only difference is that the callee cleans the stack.
The name used in the declaration is ignored by IDA. If the default calling convention is __golang then explicit specification of stack offsets is permitted. For example:
  __attribute__((format(printf,2,3)))
  int myprnt(int id, const char *format, ...);
This declaration means that myprnt is a print-like function; the format string is the second argument and the variadic argument list starts at the third argument.
Below is the full list of attributes that can be handled by IDA.
| Attribute | Description |
|---|---|
packed | pack structure/union fields tightly, without gaps |
aligned | specify the alignment |
noreturn | declare as not returning function |
ms_struct | use microsoft layout for the structure/union |
format | possible formats: printf, scanf, strftime, strfmon |
Data Declaration Keywords
For data declarations, the following custom __attribute((annotate(X))) keywords have been added. The control the representation of numbers in the output:
| Keyword | Description |
|---|---|
__bin | unsigned binary number |
__oct | unsigned octal number |
__hex | unsigned hexadecimal number |
__dec | signed decimal number |
__sbin | signed binary number |
__soct | signed octal number |
__shex | signed hexadecimal number |
__udec | unsigned decimal number |
__float | floating point |
__char | character |
__segm | segment name |
__enum() | enumeration member (symbolic constant) |
__off | offset expression (a simpler version of __offset) |
__offset() | offset expression |
__strlit() | string |
__stroff() | structure offset |
__custom() | custom data type and format |
__invsign | inverted sign |
__invbits | inverted bitwise |
__lzero | add leading zeroes |
__tabform() | tabular form |
Type Declaration Keywords
The following additional keywords can be used in type declarations:
| Keyword | Description |
|---|---|
_BOOL1 | a boolean type with explicit size specification (1 byte) |
_BOOL2 | a boolean type with explicit size specification (2 bytes) |
_BOOL4 | a boolean type with explicit size specification (4 bytes) |
__int8 | a integer with explicit size specification (1 byte) |
__int16 | a integer with explicit size specification (2 bytes) |
__int32 | a integer with explicit size specification (4 bytes) |
__int64 | a integer with explicit size specification (8 bytes) |
__int128 | a integer with explicit size specification (16 bytes) |
_BYTE | an unknown type; the only known info is its size: 1 byte |
_WORD | an unknown type; the only known info is its size: 2 bytes |
_DWORD | an unknown type; the only known info is its size: 4 bytes |
_QWORD | an unknown type; the only known info is its size: 8 bytes |
_OWORD | an unknown type; the only known info is its size: 16 bytes |
_TBYTE | 10-byte floating point value |
_UNKNOWN | no info is available |
__pure | pure function: always returns the same value and does not modify memory in a visible way |
__noreturn | function does not return |
__usercall | user-defined calling convention; see above |
__userpurge | user-defined calling convention; see above |
__golang | golang calling convention |
__swiftcall | swift calling convention |
__spoils | explicit spoiled-reg specification; see above |
__hidden | hidden function argument; this argument was hidden in the source code (e.g. ‘this’ argument in c++ methods is hidden) |
__return_ptr | pointer to return value; implies hidden |
__struct_ptr | was initially a structure value |
__array_ptr | was initially an array |
__unused | unused function argument |
__cppobj | a c++ style struct; the struct layout depends on this keyword |
__ptr32 | explicit pointer size specification (32 bits) |
__ptr64 | explicit pointer size specification (64 bits) |
__shifted | shifted pointer declaration |
__high | high level prototype (does not explicitly specify hidden arguments like ‘this’, for example) this keyword may not be specified by the user but IDA may use it to describe high level prototypes |
__bitmask | a bitmask enum, a collection of bit groups |
__tuple | a tuple, a special kind of struct. tuples behave like structs but have more relaxed comparison rules: the field names and alignments are ignored. |
Change byte…
Change program bytes.
You can modify the executable file and eventually generate a new file (the Create EXE file… command; action ProduceExe).
If you patch bytes, then you may enter multiple bytes (see also Binary string format).
If this command is invoked when the debugger is active, then IDA will modify the memory and the database. If the database does not contain the patched bytes, then only the process memory will be modified.
You can create a difference file too (the Create DIFF file… command; action ProduceDiff).
See also How to Enter a Number.
Assemble…
This command allows you to assemble instructions. Currently, only the IBM PC processors provide an assembler, nonetheless, plugin writers can extend or totally replace the built-in assembler by writing their own.
The assembler requires to enclose all memory references into square brackets. For example:
mov ax, [counter]
Also, the keyword ‘offset’ must not be used. Instead of
mov eax, offset name
you must write
mov eax, name
See also How to Enter a Number.
Patched bytes
Open the Patched bytes window. The Patched bytes view shows the list of the patched locations in the database. It also allows you to revert modifications selectively.
Reverting changes
Select location(s) and click Revert… from the context menu to revert this modification.
Patching bytes
You can change individual bytes via Edit → Patch program → Change byte….
Apply patches to input file…
Apply previously patched bytes back to the input file. If the “Restore” option is selected, then the original bytes will be applied to the input file.
See also ProduceDiff action.
Create alignment directive…
Create alignment directive. The alignment directive will replace a number of useless bytes inserted by the linker to align code and data to paragraph boundary or any other address which is equal to a power of two. You can select a range to be converted to an alignment directive. If you have selected a range, IDA will try to determine a correct alignment automatically.
There are at least two requirements for this command to work:
- There must be enough unexplored bytes at the current address.
- An alignment directive must always end at an address which is divisible by a power or two.
Manual instruction…
Specify alternate representation of the current instruction.
Use it if IDA cannot represent the current instruction as desired. If the instruction itself is ok and only one operand is misrepresented, then use Manual… command (action ManualOperand).
To delete the manual representation, specify an empty string.
Color instruction…
This command allows you to specify the background color for the current instruction or data item. Only GUI version supports different background colors. Specifying a non-defined custom color will reset the instruction color.
Toggle border
Toggle the display of a border between code and data. This command allows you to hide a thin border which is like the one generated automatically by IDA between instructions and data. If the border was already hidden, then it is displayed again.
Edit menu actions for Functions View
{% hint style=“info” %} The options below appear when the Edit menu is opened from the Functions View. In other views, the menu adapts dynamically and may show a different set of options. {% endhint %}
Below is an overview of all actions that can be accessed from this menu.
| UI Action Name | Action Name | Description |
|---|---|---|
| Create folder… | DirTreeCreateFolder | Create folder with items |
| Insert… | DirTreeInsert | Create a structure, union, or enumeration |
| Delete function(s)… | DirTreeDelete | Delete a type |
| Edit function… | DirTreeEdit | Open type editor for type |
| Undo | UndoAction | This command reverts the database to the state before executing the last user action. More… |
| Redo | RedoAction | This command reverts the previously issued Undo command. More… |
| Copy | DirTreeCopy | Copy |
| Copy all | DirTreeCopyAll | Copy all |
| Unsort | DirTreeUnsort | Unsort |
| Quick filter | DirTreeQuickFilter | Quick filter |
| Modify filters… | DirTreeModifyFilters | Modify filters |
| Reset filters | DirTreeResetFilters | Reset filters |
Undo
This command reverts the database to the state before executing the last user action. It is possible to apply Undo multiple times, in this case multiple user actions will be reverted.
Please note the entire database is reverted, including all modifications that were made to the database after executing the user action and including the ones that are not connected to the user action. For example, if a third party plugin modified the database during or after the user action, this modification will be reverted. In theory it is possible to go back in time to the very beginning and revert the database to the state that was present immediately after performing the very first user action. However, in practice the undo buffers overflow because of the changes made by autoanalysis.
Autoanalysis (Options → General… → Analysis) generates copious amounts of undo data. Also, please note that maintaining undo data during autoanalysis slows it down a bit. In practice, it is not a big deal because the limit on the undo data is reached quite quickly (in a matter of minutes). Therefore, if during analysis the user does not perform any actions that modify the database, the undo feature will turn itself off temporarily.
However, if you prefer not to collect undo data at all during the initial autoanalysis, just turn off the UNDO_DURING_AA parameter in ida.cfg.
The configuration file ida.cfg has 2 more undo-related parameters:
| Parameter | Description | Default |
|---|---|---|
| UNDO_MAXSIZE | Max size of undo buffers. Once this limit is reached, the undo info about the oldest user action will be forgotten. | 128MB |
| UNDO_DEPTH | Max number of user actions to remember. If set to 0, the undo feature will be unavailable. | 1000000 |
Since there is a limit on the size of undo buffers, any action, even the tiniest, may become non-undoable after some time. This is true because the analysis or plugins may continue to modify the database and overflow the buffers. Some massive actions, like deleting a segment, may be non-undoable just because of the sheer amount of undo data they generate.
Please note that Undo does not affect the state of IDC or Python scripts. Script variables will not change their values because of Undo. Also nothing external to the database can be changed: created files will not be deleted, etc.
Some actions cannot be undone. For example, launching a debugger or resuming from a breakpoint cannot be undone.
Redo
This command reverts the previously issued Undo command. It is possible to use Redo multiple times.
This command also reverts all changes that were done to the database after the last Undo command, including the eventual useful modifications made by the autoanalysis. In other words, the entire database is modified to get to the exact state that it had before executing the last Undo command.
Edit menu actions for Local Types View
{% hint style=“info” %} The options below appear when the Edit menu is opened from the Local Types View. In other views, the menu adapts dynamically and may show a different set of options. {% endhint %}
Below is an overview of all actions that can be accessed from this menu.
| UI Action Name | Action Name | Applies to | Description |
|---|---|---|---|
| Copy | EditCopy | Enum, Structure, Typedef | Copy |
| Copy full type(s) | CopyFullType | Enum, Structure, Typedef | Copies the full type(s) and its dependencies |
| Undo | UndoAction | Enum, Structure, Typedef | This command reverts the database to the state before executing the last user action. More… |
| Redo | RedoAction | Enum, Structure, Typedef | This command reverts the previously issued Undo command. More… |
| Add type… | TilAddType | Enum, Structure, Typedef | Create a structure, union, or enumeration |
| Delete type… | TilDelType | Enum, Structure, Typedef | Delete a type |
| Edit type… | TilEditType | Enum, Structure, Typedef | Open type editor for type |
| Add enum member… | MakeData | Enum, Structure | Convert to data. More… |
| Delete type member | TilDelTypeMember | Enum, Structure | Delete a type member |
| Change calling convention… | FuncChangeCC | Enum | Change calling convention |
| Rename | MakeName | Enum, Structure, Typedef | Rename the current location. More… |
| Edit enum member… | TilEditConst | Enum | Edit a symbolic constant |
| Edit location… | EditArgloc | Enum | Edit argument location |
| Show arguments location | ToggleArgloc | Enum | Show arguments location |
| Enter comment… | TilMakeComment | Enum, Structure, Typedef | Enter a comment |
| Toggle leading zeroes | ToggleLeadingZeroes | Enum, Structure | Toggle leading zeroes. More… |
| C-like format | TilCSyntax | Enum, Structure, Typedef | Toggle between assembly & C-like representation |
Undo
This command reverts the database to the state before executing the last user action. It is possible to apply Undo multiple times, in this case multiple user actions will be reverted.
Please note the entire database is reverted, including all modifications that were made to the database after executing the user action and including the ones that are not connected to the user action. For example, if a third party plugin modified the database during or after the user action, this modification will be reverted. In theory it is possible to go back in time to the very beginning and revert the database to the state that was present immediately after performing the very first user action. However, in practice the undo buffers overflow because of the changes made by autoanalysis.
Autoanalysis (Options → General… → Analysis) generates copious amounts of undo data. Also, please note that maintaining undo data during autoanalysis slows it down a bit. In practice, it is not a big deal because the limit on the undo data is reached quite quickly (in a matter of minutes). Therefore, if during analysis the user does not perform any actions that modify the database, the undo feature will turn itself off temporarily.
However, if you prefer not to collect undo data at all during the initial autoanalysis, just turn off the UNDO_DURING_AA parameter in ida.cfg.
The configuration file ida.cfg has 2 more undo-related parameters:
| Parameter | Description | Default |
|---|---|---|
| UNDO_MAXSIZE | Max size of undo buffers. Once this limit is reached, the undo info about the oldest user action will be forgotten. | 128MB |
| UNDO_DEPTH | Max number of user actions to remember. If set to 0, the undo feature will be unavailable. | 1000000 |
Since there is a limit on the size of undo buffers, any action, even the tiniest, may become non-undoable after some time. This is true because the analysis or plugins may continue to modify the database and overflow the buffers. Some massive actions, like deleting a segment, may be non-undoable just because of the sheer amount of undo data they generate.
Please note that Undo does not affect the state of IDC or Python scripts. Script variables will not change their values because of Undo. Also nothing external to the database can be changed: created files will not be deleted, etc.
Some actions cannot be undone. For example, launching a debugger or resuming from a breakpoint cannot be undone.
Redo
This command reverts the previously issued Undo command. It is possible to use Redo multiple times.
This command also reverts all changes that were done to the database after the last Undo command, including the eventual useful modifications made by the autoanalysis. In other words, the entire database is modified to get to the exact state that it had before executing the last Undo command.
Add enum member…
Convert to data. This command converts the current unexplored bytes to data. If it is not possible, IDA will warn you.
Multiple using of this command will change the data type:
 db -> dw -> dd -> float -> dq -> double -> dt -> packreal -> octa \;
 ^                                                                 |;
 \---------<----------------<--------------<-----------------------/;
You may remove some items from this list using the Setup data types… command (action SetupData).
If the target assembler (Options → General… → Analysis) does not support double words or another data type, it will be skipped. To create a structure variable, use the Struct var… command (action DeclareStructVar). To create an array, use the Array… command (action MakeArray). To convert back, use the Undefine command (action MakeUnknown).
Rename
Rename the current location. This command gives name/renames/deletes name for the current item.
To delete a name, simply give an empty name.
If the current item is referenced, you cannot delete its name. Even if you try, IDA will generate a dummy name (See Options → Name representation…).
List of available options:
-
Local name: The name is considered to be defined only in the current function. Please note that IDA does not check the uniqueness of the local names in the whole program. However, it does verify that the name is unique for the function.
-
Include in name list: Here you can also include/remove the name from the name list (see the Jump by name… command; action
JumpName). If the name is hidden, you will not see it in the names window. -
Public name: You can declare a name as a public (global) name. If the current assembler supports the “public” directive, IDA will use it. Otherwise, the publicness of the name will be displayed as a comment.
-
Autogenerated name: An autogenerated name will appear in a different color. If the item is indefined, it will disappear automatically.
-
Weak name: You can declare a name as a weak name. If the current assembler supports the “weak” directive, IDA will use it. Otherwise, the weakness of the name will be displayed as a comment.
-
Create name anyway: If this flag is on, and if the specified name already exists, IDA will try to variate the specified name by appending a suffix to it.
Toggle leading zeroes
Toggle leading zeroes.
This command displays or hides the leading zeroes of the current operand. Example: if the instruction looked like this:
and ecx, 40h
then after applying the command it will look like this:
and ecx, 00000040h
If you prefer to see leading zeroes in all cases, then open the calculator and enter the following expression: set_inf_attr (INF_GENFLAGS, get_inf_attr(INF_GENFLAGS) | INFFL_LZERO); This will toggle the default for the current database and all numbers without leading zeroes will become numbers with leading zeroes, and vice versa. See also Edit|Operand types submenu.
Jump
Jump menu actions for IDA View
{% hint style=“info” %} The options below appear when the Jump menu is opened from the IDA View. In other views, the menu adapts dynamically and may show a different set of options. {% endhint %}
Below is an overview of all actions that can be accessed from this menu.
| UI Action Name | Action Name | Description |
|---|---|---|
| Jump to operand | JumpEnter | Jump to the specified address. More… |
| Jump in a new window | JumpEnterNew | Jump in a new window |
| Jump to previous position | Return | Return to the previous saved position. More… |
| Jump to next position | UndoReturn | Go to the next saved position. More… |
| Empty navigation stack | EmptyStack | Remove everything from the jumps stack |
| Jump to pseudocode | hx:JumpPseudo | Jump to pseudocode |
| Jump to address… | JumpAsk | Jump to the specified address. More… |
| Jump by name… | JumpName | Jump to the selected name. This command allows you to jump to a name definition by selecting it from the list of the names. More… |
| Jump to function… | JumpFunction | Jump to the selected function. This command shows you a list of functions: you can jump to the selected one by pressing Enter. |
| Jump to segment… | JumpSegment | Jump to the selected segment. More… |
| Jump to segment register… | JumpSegmentRegister | Jump to the selected segment register change point. More… |
| Jump to problem… | JumpQ | Jump to the selected problematic location. More… |
| List cross references to… | JumpXref | Jump to the selected cross reference |
| List cross references from… | JumpXrefFrom | Jump to a cross reference from current location |
| Jump to xref to operand… | JumpOpXref | Jump to the selected cross reference to operand. This command shows you a list of cross-references to the current operand: you can jump to the selected one by pressing Enter. More… |
| Jump to entry point… | JumpEntryPoint | This command shows you a list of entry points: you can jump to the selected one by pressing Enter. More… |
| Jump to file offset… | JumpFileOffset | Jump to file offset. IDA will ask you for a target file offset. This command jumps to the address corresponding to this specified file offset. If this file offset corresponds to a valid address then: More… |
| Mark position… | MarkPosition | Remember the current position in the disassembly. More… |
| Jump to marked position… | JumpPosition | Jump to the selected marked position. More… |
| Clear mark… | ClearMark | Clear mark |
Jump to operand
Jump to the specified address.
By pressing Enter you navigate in the program in the same way as in a hypertext (the way the web browsers and help screens use).
This is the easiest way to explore the program: just position the cursor at the desired name and press JumpEnter.
Your current address is saved in the jump stack.
The Jump to previous position command (action Return, usually Esc) will return you back.
If the cursor is at a stack variable, a window with stack variables is opened and the definition of the stack variable is displayed.
Jump to previous position
Return to the previous saved position. It takes positions from Jumps Stack.
Jump to next position
Go to the next saved position. This command cancels the last Jump to previous position command.
Jump to address…
Jump to the specified address. This command jumps to the specified address in the program. IDA will ask you for the target address. You can enter a name or an address as a hexadecimal number with or without a segment. If you enter a valid address then:
- the current address is saved in the jump stack.
- the cursor is positioned to the specified address.
The Jump to previous position command ( action Return, usually Esc) will return you back.
In the structure and enum views, the cursor will be moved to the corresponding offset in the current type.
See also How to enter an address
Jump by name…
Jump to the selected name. This command allows you to jump to a name definition by selecting it from the list of the names.
IDA will display the list of the names (sorted by addresses) and you can choose a name. Dummy names (generated by IDA) are not listed. Hidden names are not listed either. You can control which names are listed in the Names representation dialog box (Action SetNameType, Options → Name representation…).
See also How to use the lister.
Jump to segment…
Jump to the selected segment. IDA will ask you to select the target segment. After:
- the current address is saved in the jump stack.
- the cursor is positioned to the specified address.
The Jump to previous position command (action
Return, usually Esc) will return you back. See also: How to choose a segment.
Jump to segment register…
Jump to the selected segment register change point. IDA will ask you to select a target change point, and after:
- the current address is saved in the jump stack.
- the cursor is positioned to the specified address.
Jump to problem…
Jump to the selected problematic location.
IDA will display the Problems List and will allow you to select a problem. The Jump to previous position command (action Return, usually Esc)(usually Esc) will return you back.
Jump to xref to operand…
Jump to the selected cross reference to operand. This command shows you a list of cross-references to the current operand: you can jump to the selected one by pressing Enter. See also the description of the cross references window.
Jump to entry point…
This command shows you a list of entry points: you can jump to the selected one by pressing Enter.
The list of entry points is created at the database creation time. It is not modified after that (for example, renaming an exported function does not change the list of entry points).
Jump to file offset…
Jump to file offset. IDA will ask you for a target file offset. This command jumps to the address corresponding to this specified file offset. If this file offset corresponds to a valid address then:
the current address is saved in the jump stack.
the cursor is positioned to the corresponding address. The Jump to previous position command (action Return, usually Esc) will return you back.
Mark position…
Remember the current position in the disassembly. You can mark certain locations of the file to be able to jump to them quickly (use the Jump to marked position… command). Text description of the location may help to find a desired location easily. First select a slot for the mark, then enter a description for the location.
Jump to marked position…
Jump to the selected marked position.
IDA will ask you to select a target position. After:
- the current address is saved in the jump stack.
- the cursor is positioned to the specified address.
The Jump to previous position command (action
Return, usually Esc) will return you back. You can mark the position using the Jump to marked position… command (actionJumpPosition).
Jump menu actions for Pseudocode View
{% hint style=“info” %} The options below appear when the Jump menu is opened from the Pseudocode View. In other views, the menu adapts dynamically and may show a different set of options. {% endhint %}
Below is an overview of all actions that can be accessed from this menu.
| UI Action Name | Action Name | Description |
|---|---|---|
| Jump to operand | JumpEnter | Jump to the specified address. More… |
| Jump in a new window | JumpEnterNew | Jump in a new window |
| Jump to previous position | Return | Return to the previous saved position. More… |
| Jump to next position | UndoReturn | Go to the next saved position. More… |
| Empty navigation stack | EmptyStack | Remove everything from the jumps stack |
| Jump to pseudocode | hx:JumpPseudo | Jump to pseudocode |
| Jump to address… | JumpAsk | Jump to the specified address. More… |
| Jump by name… | JumpName | Jump to the selected name. This command allows you to jump to a name definition by selecting it from the list of the names. More… |
| Jump to function… | JumpFunction | Jump to the selected function. This command shows you a list of functions: you can jump to the selected one by pressing Enter. |
| Jump to segment… | JumpSegment | Jump to the selected segment. More… |
| Jump to segment register… | JumpSegmentRegister | Jump to the selected segment register change point. More… |
| Jump to problem… | JumpQ | Jump to the selected problematic location. More… |
| List cross references to… | JumpXref | Jump to the selected cross reference |
| List cross references from… | JumpXrefFrom | Jump to a cross reference from current location |
| Jump to xref to operand… | JumpOpXref | Jump to the selected cross reference to operand. This command shows you a list of cross-references to the current operand: you can jump to the selected one by pressing Enter. More… |
| Jump to entry point… | JumpEntryPoint | This command shows you a list of entry points: you can jump to the selected one by pressing Enter. More… |
| Jump to file offset… | JumpFileOffset | Jump to file offset. IDA will ask you for a target file offset. This command jumps to the address corresponding to this specified file offset. If this file offset corresponds to a valid address then: More… |
| Mark position… | MarkPosition | Remember the current position in the disassembly. More… |
| Jump to marked position… | JumpPosition | Jump to the selected marked position. More… |
| Clear mark… | ClearMark | Clear mark |
Jump to operand
Jump to the specified address.
By pressing Enter you navigate in the program in the same way as in a hypertext (the way the web browsers and help screens use).
This is the easiest way to explore the program: just position the cursor at the desired name and press JumpEnter.
Your current address is saved in the jump stack.
The Jump to previous position command (action Return, usually Esc) will return you back.
If the cursor is at a stack variable, a window with stack variables is opened and the definition of the stack variable is displayed.
Jump to previous position
Return to the previous saved position. It takes positions from Jumps Stack.
Jump to next position
Go to the next saved position. This command cancels the last Jump to previous position command.
Jump to address…
Jump to the specified address. This command jumps to the specified address in the program. IDA will ask you for the target address. You can enter a name or an address as a hexadecimal number with or without a segment. If you enter a valid address then:
- the current address is saved in the jump stack.
- the cursor is positioned to the specified address.
The Jump to previous position command ( action Return, usually Esc) will return you back.
In the structure and enum views, the cursor will be moved to the corresponding offset in the current type.
See also How to enter an address
Jump by name…
Jump to the selected name. This command allows you to jump to a name definition by selecting it from the list of the names.
IDA will display the list of the names (sorted by addresses) and you can choose a name. Dummy names (generated by IDA) are not listed. Hidden names are not listed either. You can control which names are listed in the Names representation dialog box (Action SetNameType, Options → Name representation…).
See also How to use the lister.
Jump to segment…
Jump to the selected segment. IDA will ask you to select the target segment. After:
- the current address is saved in the jump stack.
- the cursor is positioned to the specified address.
The Jump to previous position command (action
Return, usually Esc) will return you back. See also: How to choose a segment.
Jump to segment register…
Jump to the selected segment register change point. IDA will ask you to select a target change point, and after:
- the current address is saved in the jump stack.
- the cursor is positioned to the specified address.
Jump to problem…
Jump to the selected problematic location.
IDA will display the Problems List and will allow you to select a problem. The Jump to previous position command (action Return, usually Esc)(usually Esc) will return you back.
Jump to xref to operand…
Jump to the selected cross reference to operand. This command shows you a list of cross-references to the current operand: you can jump to the selected one by pressing Enter. See also the description of the cross references window.
Jump to entry point…
This command shows you a list of entry points: you can jump to the selected one by pressing Enter.
The list of entry points is created at the database creation time. It is not modified after that (for example, renaming an exported function does not change the list of entry points).
Jump to file offset…
Jump to file offset. IDA will ask you for a target file offset. This command jumps to the address corresponding to this specified file offset. If this file offset corresponds to a valid address then:
the current address is saved in the jump stack.
the cursor is positioned to the corresponding address. The Jump to previous position command (action Return, usually Esc) will return you back.
Mark position…
Remember the current position in the disassembly. You can mark certain locations of the file to be able to jump to them quickly (use the Jump to marked position… command). Text description of the location may help to find a desired location easily. First select a slot for the mark, then enter a description for the location.
Jump to marked position…
Jump to the selected marked position.
IDA will ask you to select a target position. After:
- the current address is saved in the jump stack.
- the cursor is positioned to the specified address.
The Jump to previous position command (action
Return, usually Esc) will return you back. You can mark the position using the Jump to marked position… command (actionJumpPosition).
Jump menu actions for Hex View
{% hint style=“info” %} The options below appear when the Jump menu is opened from the Hex View. In other views, the menu adapts dynamically and may show a different set of options. {% endhint %}
Below is an overview of all actions that can be accessed from this menu.
| UI Action Name | Action Name | Description |
|---|---|---|
| Jump to operand | JumpEnter | Jump to the specified address. More… |
| Jump in a new window | JumpEnterNew | Jump in a new window |
| Jump to previous position | Return | Return to the previous saved position. More… |
| Jump to next position | UndoReturn | Go to the next saved position. More… |
| Empty navigation stack | EmptyStack | Remove everything from the jumps stack |
| Jump to pseudocode | hx:JumpPseudo | Jump to pseudocode |
| Jump to address… | JumpAsk | Jump to the specified address. More… |
| Jump by name… | JumpName | Jump to the selected name. This command allows you to jump to a name definition by selecting it from the list of the names. More… |
| Jump to function… | JumpFunction | Jump to the selected function. This command shows you a list of functions: you can jump to the selected one by pressing Enter. |
| Jump to segment… | JumpSegment | Jump to the selected segment. More… |
| Jump to segment register… | JumpSegmentRegister | Jump to the selected segment register change point. More… |
| Jump to problem… | JumpQ | Jump to the selected problematic location. More… |
| List cross references to… | JumpXref | Jump to the selected cross reference |
| List cross references from… | JumpXrefFrom | Jump to a cross reference from current location |
| Jump to xref to operand… | JumpOpXref | Jump to the selected cross reference to operand. This command shows you a list of cross-references to the current operand: you can jump to the selected one by pressing Enter. More… |
| Jump to entry point… | JumpEntryPoint | This command shows you a list of entry points: you can jump to the selected one by pressing Enter. More… |
| Jump to file offset… | JumpFileOffset | Jump to file offset. IDA will ask you for a target file offset. This command jumps to the address corresponding to this specified file offset. If this file offset corresponds to a valid address then: More… |
| Mark position… | MarkPosition | Remember the current position in the disassembly. More… |
| Jump to marked position… | JumpPosition | Jump to the selected marked position. More… |
| Clear mark… | ClearMark | Clear mark |
Jump to operand
Jump to the specified address.
By pressing Enter you navigate in the program in the same way as in a hypertext (the way the web browsers and help screens use).
This is the easiest way to explore the program: just position the cursor at the desired name and press JumpEnter.
Your current address is saved in the jump stack.
The Jump to previous position command (action Return, usually Esc) will return you back.
If the cursor is at a stack variable, a window with stack variables is opened and the definition of the stack variable is displayed.
Jump to previous position
Return to the previous saved position. It takes positions from Jumps Stack.
Jump to next position
Go to the next saved position. This command cancels the last Jump to previous position command.
Jump to address…
Jump to the specified address. This command jumps to the specified address in the program. IDA will ask you for the target address. You can enter a name or an address as a hexadecimal number with or without a segment. If you enter a valid address then:
- the current address is saved in the jump stack.
- the cursor is positioned to the specified address.
The Jump to previous position command ( action Return, usually Esc) will return you back.
In the structure and enum views, the cursor will be moved to the corresponding offset in the current type.
See also How to enter an address
Jump by name…
Jump to the selected name. This command allows you to jump to a name definition by selecting it from the list of the names.
IDA will display the list of the names (sorted by addresses) and you can choose a name. Dummy names (generated by IDA) are not listed. Hidden names are not listed either. You can control which names are listed in the Names representation dialog box (Action SetNameType, Options → Name representation…).
See also How to use the lister.
Jump to segment…
Jump to the selected segment. IDA will ask you to select the target segment. After:
- the current address is saved in the jump stack.
- the cursor is positioned to the specified address.
The Jump to previous position command (action
Return, usually Esc) will return you back. See also: How to choose a segment.
Jump to segment register…
Jump to the selected segment register change point. IDA will ask you to select a target change point, and after:
- the current address is saved in the jump stack.
- the cursor is positioned to the specified address.
Jump to problem…
Jump to the selected problematic location.
IDA will display the Problems List and will allow you to select a problem. The Jump to previous position command (action Return, usually Esc)(usually Esc) will return you back.
Jump to xref to operand…
Jump to the selected cross reference to operand. This command shows you a list of cross-references to the current operand: you can jump to the selected one by pressing Enter. See also the description of the cross references window.
Jump to entry point…
This command shows you a list of entry points: you can jump to the selected one by pressing Enter.
The list of entry points is created at the database creation time. It is not modified after that (for example, renaming an exported function does not change the list of entry points).
Jump to file offset…
Jump to file offset. IDA will ask you for a target file offset. This command jumps to the address corresponding to this specified file offset. If this file offset corresponds to a valid address then:
the current address is saved in the jump stack.
the cursor is positioned to the corresponding address. The Jump to previous position command (action Return, usually Esc) will return you back.
Mark position…
Remember the current position in the disassembly. You can mark certain locations of the file to be able to jump to them quickly (use the Jump to marked position… command). Text description of the location may help to find a desired location easily. First select a slot for the mark, then enter a description for the location.
Jump to marked position…
Jump to the selected marked position.
IDA will ask you to select a target position. After:
- the current address is saved in the jump stack.
- the cursor is positioned to the specified address.
The Jump to previous position command (action
Return, usually Esc) will return you back. You can mark the position using the Jump to marked position… command (actionJumpPosition).
Jump menu actions for Functions View
{% hint style=“info” %} The options below appear when the Jump menu is opened from the Functions View. In other views, the menu adapts dynamically and may show a different set of options. {% endhint %}
Below is an overview of all actions that can be accessed from this menu.
| UI Action Name | Action Name | Description |
|---|---|---|
| Jump to operand | JumpEnter | Jump to the specified address. More… |
| Jump in a new window | JumpEnterNew | Jump in a new window |
| Jump to previous position | Return | Return to the previous saved position. More… |
| Jump to next position | UndoReturn | Go to the next saved position. More… |
| Empty navigation stack | EmptyStack | Remove everything from the jumps stack |
| Jump to pseudocode | hx:JumpPseudo | Jump to pseudocode |
| Jump to address… | JumpAsk | Jump to the specified address. More… |
| Jump by name… | JumpName | Jump to the selected name. This command allows you to jump to a name definition by selecting it from the list of the names. More… |
| Jump to function… | JumpFunction | Jump to the selected function. This command shows you a list of functions: you can jump to the selected one by pressing Enter. |
| Jump to segment… | JumpSegment | Jump to the selected segment. More… |
| Jump to segment register… | JumpSegmentRegister | Jump to the selected segment register change point. More… |
| Jump to problem… | JumpQ | Jump to the selected problematic location. More… |
| List cross references to… | JumpXref | Jump to the selected cross reference |
| List cross references from… | JumpXrefFrom | Jump to a cross reference from current location |
| Jump to xref to operand… | JumpOpXref | Jump to the selected cross reference to operand. This command shows you a list of cross-references to the current operand: you can jump to the selected one by pressing Enter. More… |
| Jump to entry point… | JumpEntryPoint | This command shows you a list of entry points: you can jump to the selected one by pressing Enter. More… |
| Jump to file offset… | JumpFileOffset | Jump to file offset. IDA will ask you for a target file offset. This command jumps to the address corresponding to this specified file offset. If this file offset corresponds to a valid address then: More… |
| Mark position… | MarkPosition | Remember the current position in the disassembly. More… |
| Jump to marked position… | JumpPosition | Jump to the selected marked position. More… |
| Clear mark… | ClearMark | Clear mark |
Jump to operand
Jump to the specified address.
By pressing Enter you navigate in the program in the same way as in a hypertext (the way the web browsers and help screens use).
This is the easiest way to explore the program: just position the cursor at the desired name and press JumpEnter.
Your current address is saved in the jump stack.
The Jump to previous position command (action Return, usually Esc) will return you back.
If the cursor is at a stack variable, a window with stack variables is opened and the definition of the stack variable is displayed.
Jump to previous position
Return to the previous saved position. It takes positions from Jumps Stack.
Jump to next position
Go to the next saved position. This command cancels the last Jump to previous position command.
Jump to address…
Jump to the specified address. This command jumps to the specified address in the program. IDA will ask you for the target address. You can enter a name or an address as a hexadecimal number with or without a segment. If you enter a valid address then:
- the current address is saved in the jump stack.
- the cursor is positioned to the specified address.
The Jump to previous position command ( action Return, usually Esc) will return you back.
In the structure and enum views, the cursor will be moved to the corresponding offset in the current type.
See also How to enter an address
Jump by name…
Jump to the selected name. This command allows you to jump to a name definition by selecting it from the list of the names.
IDA will display the list of the names (sorted by addresses) and you can choose a name. Dummy names (generated by IDA) are not listed. Hidden names are not listed either. You can control which names are listed in the Names representation dialog box (Action SetNameType, Options → Name representation…).
See also How to use the lister.
Jump to segment…
Jump to the selected segment. IDA will ask you to select the target segment. After:
- the current address is saved in the jump stack.
- the cursor is positioned to the specified address.
The Jump to previous position command (action
Return, usually Esc) will return you back. See also: How to choose a segment.
Jump to segment register…
Jump to the selected segment register change point. IDA will ask you to select a target change point, and after:
- the current address is saved in the jump stack.
- the cursor is positioned to the specified address.
Jump to problem…
Jump to the selected problematic location.
IDA will display the Problems List and will allow you to select a problem. The Jump to previous position command (action Return, usually Esc)(usually Esc) will return you back.
Jump to xref to operand…
Jump to the selected cross reference to operand. This command shows you a list of cross-references to the current operand: you can jump to the selected one by pressing Enter. See also the description of the cross references window.
Jump to entry point…
This command shows you a list of entry points: you can jump to the selected one by pressing Enter.
The list of entry points is created at the database creation time. It is not modified after that (for example, renaming an exported function does not change the list of entry points).
Jump to file offset…
Jump to file offset. IDA will ask you for a target file offset. This command jumps to the address corresponding to this specified file offset. If this file offset corresponds to a valid address then:
the current address is saved in the jump stack.
the cursor is positioned to the corresponding address. The Jump to previous position command (action Return, usually Esc) will return you back.
Mark position…
Remember the current position in the disassembly. You can mark certain locations of the file to be able to jump to them quickly (use the Jump to marked position… command). Text description of the location may help to find a desired location easily. First select a slot for the mark, then enter a description for the location.
Jump to marked position…
Jump to the selected marked position.
IDA will ask you to select a target position. After:
- the current address is saved in the jump stack.
- the cursor is positioned to the specified address.
The Jump to previous position command (action
Return, usually Esc) will return you back. You can mark the position using the Jump to marked position… command (actionJumpPosition).
Jump menu actions for Local Types View
{% hint style=“info” %} The options below appear when the Jump menu is opened from the Local Types View. In other views, the menu adapts dynamically and may show a different set of options. {% endhint %}
Below is an overview of all actions that can be accessed from this menu.
| UI Action Name | Action Name | Applies to | Description |
|---|---|---|---|
| Jump by name… | JumpName | Enum, Structure | Jump to the selected name. This command allows you to jump to a name definition by selecting it from the list of the names. More… |
| Mark position… | MarkPosition | Enum, Structure, Typedef | Remember the current position in the disassembly. More… |
| Jump to marked position… | JumpPosition | Enum, Structure, Typedef | Jump to the selected marked position. More… |
| Clear mark… | ClearMark | Enum, Structure, Typedef | Clear mark |
Jump by name…
Jump to the selected name. This command allows you to jump to a name definition by selecting it from the list of the names.
IDA will display the list of the names (sorted by addresses) and you can choose a name. Dummy names (generated by IDA) are not listed. Hidden names are not listed either. You can control which names are listed in the Names representation dialog box (Action SetNameType, Options → Name representation…).
See also How to use the lister.
Mark position…
Remember the current position in the disassembly. You can mark certain locations of the file to be able to jump to them quickly (use the Jump to marked position… command). Text description of the location may help to find a desired location easily. First select a slot for the mark, then enter a description for the location.
Jump to marked position…
Jump to the selected marked position.
IDA will ask you to select a target position. After:
- the current address is saved in the jump stack.
- the cursor is positioned to the specified address.
The Jump to previous position command (action
Return, usually Esc) will return you back. You can mark the position using the Jump to marked position… command (actionJumpPosition).
Search
Search menu actions for IDA View
{% hint style=“info” %} The options below appear when the Search menu is opened from the IDA View. In other views, the menu adapts dynamically and may show a different set of options. {% endhint %}
Below is an overview of all actions that can be accessed from this menu.
| UI Action Name | Action Name | Description |
|---|---|---|
| Next code | JumpCode | Search for the next instruction in the current direction |
| Next data | JumpData | Search for the next defined data item in the current direction |
| Next explored | JumpExplored | Search for the next instruction or data (first defined byte) in the current direction |
| Next unexplored | JumpUnknown | Search for the next unexplored byte |
| Immediate value… | AskNextImmediate | This command searches for the first instruction or data byte that contains the specified immediate value. More… |
| Next immediate value | JumpImmediate | Repeat search for immediate value |
| Text… | AskNextText | This command searches for the specified substring in the text representation of the disassembly. More… |
| Next text | JumpText | Repeat search for text |
| Sequence of bytes… | AskBinaryText | |
| Next sequence of bytes | JumpBinaryText | Repeat search for sequence of bytes. This command repeats search for text in core command. |
| Not function | JumpNotFunction | Search for instruction not belonging to any function |
| Next void | JumpSuspicious | Search for the next instruction with void operand. More… |
| Error operand | JumpError | This command searches for the ‘error’ operands. Usually, these operands are displayed with a red color. More… |
| All void operands | FindAllSuspicious | All void operands. This command searches for all suspicious operands and presents a list of them. You may use this list to examine the operands and modify them as needed. More… |
| All error operands | FindAllErrors | All error operands. This command searches for all strings containing any error and presents a list of them. You may use this list to examine errors and correct them as needed. More… |
| Search for pictures | picture_search:search_for_pictures | Search for pictures |
| Search direction | SetDirection | Change the search direction. More… |
| Search highlight up | SearchHighlightUp | Search highlight up |
| Search highlight down | SearchHighlightDown | Search highlight down |
| Lock highlight | `` | |
| … (unassigned) | LockHighlight_0 | Lock/unlock highlight color 1 |
| … (unassigned) | LockHighlight_1 | Lock/unlock highlight color 2 |
| … (unassigned) | LockHighlight_2 | Lock/unlock highlight color 3 |
| … (unassigned) | LockHighlight_3 | Lock/unlock highlight color 4 |
| … (unassigned) | LockHighlight_4 | Lock/unlock highlight color 5 |
| … (unassigned) | LockHighlight_5 | Lock/unlock highlight color 6 |
| … (unassigned) | LockHighlight_6 | Lock/unlock highlight color 7 |
| … (unassigned) | LockHighlight_7 | Lock highlight color 8 |
| Find register definition | FindRegisterDefinition | Find register definition |
| Find register use | FindRegisterUse | Find register use |
Immediate value…
This command searches for the first instruction or data byte that contains the specified immediate value. The command is relatively slow (but much faster than the text search), because it disassembles each instruction to find the operand values.
If the immediate value in an instruction has been logically or bitwise negated, then this command will check against the modified value. Example:
mov al, -2
will be found if the user searches for the immediate value 2 but not when he searches for 0xFE.
If the checkbox “any untyped value” is checked, then the “value” field is ignored. IDA will look for all immediate values without type in this case.
Text…
This command searches for the specified substring in the text representation of the disassembly. This command is a slow command, because it disassembles each instruction to get the text representation. IDA will show its progress on the indicator (Options → General → Analysis). You can interrupt this command pressing Ctrl-Break.
You may search for regular expressions too.
If a range is selected using anchor (action Anchor), IDA will search for the specified substring in the range.
Note that this command searches the same as what you see on your screen (and not in binary image).
For binary search, look at AskBinaryText action.
Next void
Search for the next instruction with void operand. Suspicious operands are the operands that need your attention because they contain an immediate value that could be a number or an offset. IDA does not know about it, so it marks these instructions as ‘suspicious’. You can change the suspiciousness of the operands using set lower limit of suspicious operands and set upper limit of suspicious operands commands (Options → General → Disassembly). Data arrays are considered to be suspicious if the first element of the data array is within the lower and upper suspicious limits. Values of other elements are not examined.
{% hint style=“info” %} We strongly recommend that before producing an ASM file you go through all ‘suspicious’ marks and get rid of them. After this, you have a certain level of confidence that the file has been disassembled correctly. {% endhint %}
Error operand
This command searches for the ‘error’ operands. Usually, these operands are displayed with a red color. Below is the list of probable causes of error operands:
- reference to an unexisting address
- illegal offset base
- unprintable character constant
- invalid structure or enum reference
- and so on…
All void operands
All void operands. This command searches for all suspicious operands and presents a list of them. You may use this list to examine the operands and modify them as needed.
See also JumpSuspicious action.
All error operands
All error operands. This command searches for all strings containing any error and presents a list of them. You may use this list to examine errors and correct them as needed.
See also JumpError action.
Search direction
Change the search direction. The current direction for searches is displayed in the right upper corner of the screen. Using this command, you can toggle the display. See also Options top menu.
Search menu actions for Pseudocode View
{% hint style=“info” %} The options below appear when the Search menu is opened from the Pseudocode View. In other views, the menu adapts dynamically and may show a different set of options. {% endhint %}
Below is an overview of all actions that can be accessed from this menu.
| UI Action Name | Action Name | Description |
|---|---|---|
| Next code | JumpCode | Search for the next instruction in the current direction |
| Next data | JumpData | Search for the next defined data item in the current direction |
| Next explored | JumpExplored | Search for the next instruction or data (first defined byte) in the current direction |
| Next unexplored | JumpUnknown | Search for the next unexplored byte |
| Immediate value… | AskNextImmediate | This command searches for the first instruction or data byte that contains the specified immediate value. More… |
| Next immediate value | JumpImmediate | Repeat search for immediate value |
| Text… | AskNextText | This command searches for the specified substring in the text representation of the disassembly. More… |
| Next text | JumpText | Repeat search for text |
| Sequence of bytes… | AskBinaryText | |
| Next sequence of bytes | JumpBinaryText | Repeat search for sequence of bytes. This command repeats search for text in core command. |
| Not function | JumpNotFunction | Search for instruction not belonging to any function |
| Next void | JumpSuspicious | Search for the next instruction with void operand. More… |
| Error operand | JumpError | This command searches for the ‘error’ operands. Usually, these operands are displayed with a red color. More… |
| All void operands | FindAllSuspicious | All void operands. This command searches for all suspicious operands and presents a list of them. You may use this list to examine the operands and modify them as needed. More… |
| All error operands | FindAllErrors | All error operands. This command searches for all strings containing any error and presents a list of them. You may use this list to examine errors and correct them as needed. More… |
| Search for pictures | picture_search:search_for_pictures | Search for pictures |
| Search direction | SetDirection | Change the search direction. More… |
| Search highlight up | SearchHighlightUp | Search highlight up |
| Search highlight down | SearchHighlightDown | Search highlight down |
| Lock highlight | `` | |
| … (unassigned) | LockHighlight_0 | Lock/unlock highlight color 1 |
| … (unassigned) | LockHighlight_1 | Lock/unlock highlight color 2 |
| … (unassigned) | LockHighlight_2 | Lock/unlock highlight color 3 |
| … (unassigned) | LockHighlight_3 | Lock/unlock highlight color 4 |
| … (unassigned) | LockHighlight_4 | Lock/unlock highlight color 5 |
| … (unassigned) | LockHighlight_5 | Lock/unlock highlight color 6 |
| … (unassigned) | LockHighlight_6 | Lock/unlock highlight color 7 |
| … (unassigned) | LockHighlight_7 | Lock highlight color 8 |
| Find register definition | FindRegisterDefinition | Find register definition |
| Find register use | FindRegisterUse | Find register use |
Immediate value…
This command searches for the first instruction or data byte that contains the specified immediate value. The command is relatively slow (but much faster than the text search), because it disassembles each instruction to find the operand values.
If the immediate value in an instruction has been logically or bitwise negated, then this command will check against the modified value. Example:
mov al, -2
will be found if the user searches for the immediate value 2 but not when he searches for 0xFE.
If the checkbox “any untyped value” is checked, then the “value” field is ignored. IDA will look for all immediate values without type in this case.
Text…
This command searches for the specified substring in the text representation of the disassembly. This command is a slow command, because it disassembles each instruction to get the text representation. IDA will show its progress on the indicator (Options → General → Analysis). You can interrupt this command pressing Ctrl-Break.
You may search for regular expressions too.
If a range is selected using anchor (action Anchor), IDA will search for the specified substring in the range.
Note that this command searches the same as what you see on your screen (and not in binary image).
For binary search, look at AskBinaryText action.
Next void
Search for the next instruction with void operand. Suspicious operands are the operands that need your attention because they contain an immediate value that could be a number or an offset. IDA does not know about it, so it marks these instructions as ‘suspicious’. You can change the suspiciousness of the operands using set lower limit of suspicious operands and set upper limit of suspicious operands commands (Options → General → Disassembly). Data arrays are considered to be suspicious if the first element of the data array is within the lower and upper suspicious limits. Values of other elements are not examined.
{% hint style=“info” %} We strongly recommend that before producing an ASM file you go through all ‘suspicious’ marks and get rid of them. After this, you have a certain level of confidence that the file has been disassembled correctly. {% endhint %}
Error operand
This command searches for the ‘error’ operands. Usually, these operands are displayed with a red color. Below is the list of probable causes of error operands:
- reference to an unexisting address
- illegal offset base
- unprintable character constant
- invalid structure or enum reference
- and so on…
All void operands
All void operands. This command searches for all suspicious operands and presents a list of them. You may use this list to examine the operands and modify them as needed.
See also JumpSuspicious action.
All error operands
All error operands. This command searches for all strings containing any error and presents a list of them. You may use this list to examine errors and correct them as needed.
See also JumpError action.
Search direction
Change the search direction. The current direction for searches is displayed in the right upper corner of the screen. Using this command, you can toggle the display. See also Options top menu.
Search menu actions for Hex View
{% hint style=“info” %} The options below appear when the Search menu is opened from the Hex View. In other views, the menu adapts dynamically and may show a different set of options. {% endhint %}
Below is an overview of all actions that can be accessed from this menu.
| UI Action Name | Action Name | Description |
|---|---|---|
| Next code | JumpCode | Search for the next instruction in the current direction |
| Next data | JumpData | Search for the next defined data item in the current direction |
| Next explored | JumpExplored | Search for the next instruction or data (first defined byte) in the current direction |
| Next unexplored | JumpUnknown | Search for the next unexplored byte |
| Immediate value… | AskNextImmediate | This command searches for the first instruction or data byte that contains the specified immediate value. More… |
| Next immediate value | JumpImmediate | Repeat search for immediate value |
| Text… | AskNextText | This command searches for the specified substring in the text representation of the disassembly. More… |
| Next text | JumpText | Repeat search for text |
| Sequence of bytes… | AskBinaryText | |
| Next sequence of bytes | JumpBinaryText | Repeat search for sequence of bytes. This command repeats search for text in core command. |
| Not function | JumpNotFunction | Search for instruction not belonging to any function |
| Next void | JumpSuspicious | Search for the next instruction with void operand. More… |
| Error operand | JumpError | This command searches for the ‘error’ operands. Usually, these operands are displayed with a red color. More… |
| All void operands | FindAllSuspicious | All void operands. This command searches for all suspicious operands and presents a list of them. You may use this list to examine the operands and modify them as needed. More… |
| All error operands | FindAllErrors | All error operands. This command searches for all strings containing any error and presents a list of them. You may use this list to examine errors and correct them as needed. More… |
| Search for pictures | picture_search:search_for_pictures | Search for pictures |
| Search direction | SetDirection | Change the search direction. More… |
| Search highlight up | SearchHighlightUp | Search highlight up |
| Search highlight down | SearchHighlightDown | Search highlight down |
| Lock highlight | `` | |
| … (unassigned) | LockHighlight_0 | Lock/unlock highlight color 1 |
| … (unassigned) | LockHighlight_1 | Lock/unlock highlight color 2 |
| … (unassigned) | LockHighlight_2 | Lock/unlock highlight color 3 |
| … (unassigned) | LockHighlight_3 | Lock/unlock highlight color 4 |
| … (unassigned) | LockHighlight_4 | Lock/unlock highlight color 5 |
| … (unassigned) | LockHighlight_5 | Lock/unlock highlight color 6 |
| … (unassigned) | LockHighlight_6 | Lock/unlock highlight color 7 |
| … (unassigned) | LockHighlight_7 | Lock highlight color 8 |
| Find register definition | FindRegisterDefinition | Find register definition |
| Find register use | FindRegisterUse | Find register use |
Immediate value…
This command searches for the first instruction or data byte that contains the specified immediate value. The command is relatively slow (but much faster than the text search), because it disassembles each instruction to find the operand values.
If the immediate value in an instruction has been logically or bitwise negated, then this command will check against the modified value. Example:
mov al, -2
will be found if the user searches for the immediate value 2 but not when he searches for 0xFE.
If the checkbox “any untyped value” is checked, then the “value” field is ignored. IDA will look for all immediate values without type in this case.
Text…
This command searches for the specified substring in the text representation of the disassembly. This command is a slow command, because it disassembles each instruction to get the text representation. IDA will show its progress on the indicator (Options → General → Analysis). You can interrupt this command pressing Ctrl-Break.
You may search for regular expressions too.
If a range is selected using anchor (action Anchor), IDA will search for the specified substring in the range.
Note that this command searches the same as what you see on your screen (and not in binary image).
For binary search, look at AskBinaryText action.
Next void
Search for the next instruction with void operand. Suspicious operands are the operands that need your attention because they contain an immediate value that could be a number or an offset. IDA does not know about it, so it marks these instructions as ‘suspicious’. You can change the suspiciousness of the operands using set lower limit of suspicious operands and set upper limit of suspicious operands commands (Options → General → Disassembly). Data arrays are considered to be suspicious if the first element of the data array is within the lower and upper suspicious limits. Values of other elements are not examined.
{% hint style=“info” %} We strongly recommend that before producing an ASM file you go through all ‘suspicious’ marks and get rid of them. After this, you have a certain level of confidence that the file has been disassembled correctly. {% endhint %}
Error operand
This command searches for the ‘error’ operands. Usually, these operands are displayed with a red color. Below is the list of probable causes of error operands:
- reference to an unexisting address
- illegal offset base
- unprintable character constant
- invalid structure or enum reference
- and so on…
All void operands
All void operands. This command searches for all suspicious operands and presents a list of them. You may use this list to examine the operands and modify them as needed.
See also JumpSuspicious action.
All error operands
All error operands. This command searches for all strings containing any error and presents a list of them. You may use this list to examine errors and correct them as needed.
See also JumpError action.
Search direction
Change the search direction. The current direction for searches is displayed in the right upper corner of the screen. Using this command, you can toggle the display. See also Options top menu.
Search menu actions for Functions View
{% hint style=“info” %} The options below appear when the Search menu is opened from the Functions View. In other views, the menu adapts dynamically and may show a different set of options. {% endhint %}
Below is an overview of all actions that can be accessed from this menu.
| UI Action Name | Action Name | Description |
|---|---|---|
| Search… | DirTreeSearch | Search |
| Search again | DirTreeSearchAgain | Search again |
Search menu actions for Local Types View
{% hint style=“info” %} The options below appear when the Search menu is opened from the Local Types View. In other views, the menu adapts dynamically and may show a different set of options. {% endhint %}
Below is an overview of all actions that can be accessed from this menu.
| UI Action Name | Action Name | Applies to | Description |
|---|---|---|---|
| Text… | AskNextText | Enum, Structure, Typedef | This command searches for the specified substring in the text representation of the disassembly. More… |
| Next text | JumpText | Enum, Structure, Typedef | Repeat search for text |
| Search direction | SetDirection | Enum, Structure, Typedef | Change the search direction. More… |
Text…
This command searches for the specified substring in the text representation of the disassembly. This command is a slow command, because it disassembles each instruction to get the text representation. IDA will show its progress on the indicator (Options → General → Analysis). You can interrupt this command pressing Ctrl-Break.
You may search for regular expressions too.
If a range is selected using anchor (action Anchor), IDA will search for the specified substring in the range.
Note that this command searches the same as what you see on your screen (and not in binary image).
For binary search, look at AskBinaryText action.
Search direction
Change the search direction. The current direction for searches is displayed in the right upper corner of the screen. Using this command, you can toggle the display. See also Options top menu.
View menu actions for Common
Below is an overview of all actions that can be accessed from this menu.
| UI Action Name | Action Name | Description |
|---|---|---|
| Open subviews | `` | |
| Quick view | QuickView | Quickly open a view |
| Disassembly | WindowOpen | Open disassembly view |
| Proximity browser | GraphNewProximityView | Open new proximity browser |
| Generate microcode | mv:GenMicro | |
| Generate pseudocode | hx:GenPseudo | |
| Hex dump | ToggleDump | Open hexadecimal view |
| Address details | AddressDetails | Address details |
| Exports | OpenExports | Open exports window. See subviews for more. |
| Imports | OpenImports | Open imports window. See subviews for more. |
| Names | OpenNames | Open names window. See subviews for more. |
| Functions | OpenFunctions | Open functions window. See subviews for more. |
| Strings | OpenStrings | Open string window. See subviews for more. |
| Segments | OpenSegments | Open segments window. See subviews for more. |
| Segment registers | OpenSegmentRegisters | Open segment registers window. See subviews for more. |
| Selectors | OpenSelectors | Open selectors window. See subviews for more. |
| Signatures | OpenSignatures | Open signatures window. See subviews for more. |
| Type libraries | OpenTypeLibraries | Open types window. See subviews for more. |
| Local types | OpenLocalTypes | Open local type definitions window. See subviews for more. |
| Cross references | OpenXrefs | Open cross references window. See subviews for more. |
| Cross references tree | OpenXrefsTree | Open cross references tree. See subviews for more. |
| Bookmarks | OpenBookmarks | Open bookmarks window. See subviews for more. |
| Open picture | picture_search:open_picture | |
| Notepad | OpenNotepad | Open notepad window to create general notes about the current database. See subviews for more. |
| Problems | OpenProblems | Open problems window. See subviews for more. |
| Patched bytes | PatchedBytes | Open the Patched bytes window. More… |
| Misc. tools | `` | |
| Navigation history | ShowViewNavigationHistory | Navigation history |
| Undo history | ShowUndoHistory | Undo history |
| Graphs | `` | |
| Xrefs to | ChartXrefsTo | Display chart of xrefs to current identifier |
| Xrefs from | ChartXrefsFrom | Display graph of xrefs from current identifier |
| Function calls | xref_graph:FuncCallXrefGraph | |
| Toolbars | `` | |
| Calculator… | Calculate | Open calculator. More… |
| Full screen | FullScreen | Display the current view in full screen |
| Graph Overview | GraphOverview | Display the graph overview if hidden |
| Recent scripts | RecentScripts | Recent scripts |
| Database snapshot manager… | ShowSnapMan | Show the database snapshot manager. More… |
| Increase Font Size | FontSizeIncrease | Increase Font Size |
| Decrease Font Size | FontSizeDecrease | Decrease Font Size |
| Reset Font Size | FontSizeReset | Reset Font Size |
| Print segment registers | ShowRegisters | Print segment registers in the messages window. More… |
| Print internal flags | ShowFlags | Print internal flags in the messages window |
| Print register value | FindRegisterValue | Print register value |
| Hide | Hide | Hide the current function, segment, structure, enumeration or create a hidden range. More… |
| Unhide | UnHide | Unhide the current function, segment, structure, enumeration or hidden range. More… |
| Hide all | HideAll | Hide all functions, structs or enums. More… |
| Unhide all | UnHideAll | Unhide all functions, structs or enums |
| Delete hidden range | DelHiddenRange | Delete the current hidden range, or all hidden ranges in a range. More… |
| Setup hidden items… | SetupHidden | Setup hidden items |
Patched bytes
Open the Patched bytes window. The Patched bytes view shows the list of the patched locations in the database. It also allows you to revert modifications selectively.

Reverting changes
Select location(s) and click Revert… from the context menu to revert this modification.
Patching bytes
You can change individual bytes via Edit → Patch program → Change byte….
Calculator…
Open calculator. A simple calculator is provided. You can enter constant C-style expressions. Syntax of the expressions is the same is the syntax of IDC expressions. The result is displayed in the message window in three forms: hexadecimal, decimal and character. All the names created during a disassembly may be used in these expressions. IDA can also pick up the name or number under the cursor and to store it into the input line.
Database snapshot manager…
Show the database snapshot manager. This command shows the database snapshot manager. In this dialog, it is possible to restore previously saved snapshots, rename or delete them.
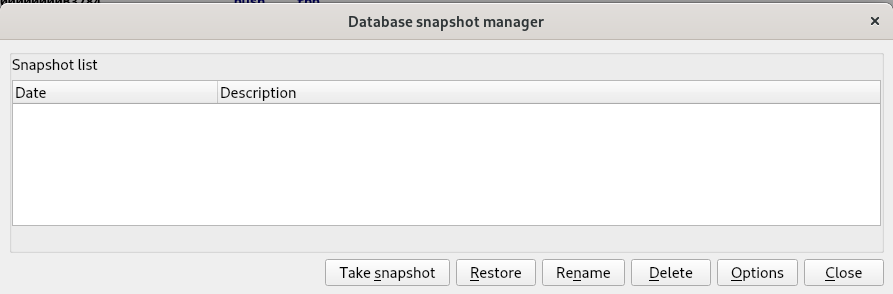
{% hint style=“info” %} Snapshots work only with regular databases. Unpacked databases do not support them. {% endhint %}
Print segment registers
Print segment registers in the messages window. This command displays segment register contents in the output window. You may use this command to refresh the disassembly window too.
Hide
Hide the current function, segment, structure, enumeration or create a hidden range. This command allows you to hide a part of disassembly. You can hide a function, a segment, or create a special hidden range.
If a range is specified, a special hidden range is created on this range.
If the cursor is on the segment name at the start of the segment, the segment will be hidden. IDA will display only the header of the hidden segment.
If the cursor is on a structure variable and if the target assembler has the ‘can display terse structures or the INFFL_ALLASM’ bit on, then the structure will be collapsed into one line and displayed in the terse form.
Otherwise, the current function will be hidden. IDA will display only the header of the hidden function.
If there is no current function then IDA will beep.
If you want to see hidden items on the screen, you may use Unhide command or Setup hidden items… (action SetupHidden) command to display the hidden items. If you want to delete a previously created hidden range, you may use the Delete hidden range command (action DelHiddenRange).
Unhide
Unhide the current function, segment, structure, enumeration or hidden range. This command allows you to unhide a hidden part of disassembly.
This command unhides the element located under the cursor, following these rules:
- If the cursor is on the hidden function name, the function will be unhidden.
- If the cursor is on the terse structure variable, the structure will be uncollapsed and displayed in the regular form.
- If the cursor is on the hidden range, the hidden range will be unhidden.
- If the cursor is on the hidden segment name, the segment will be unhidden.
Hide all
Hide all functions, structs or enums. This command allows you to hide all functions and hidden ranges if invoked in the disassembly window. IDA will display only the header of the hidden items.
If you want to see hidden items on the screen, you may use the Unhide command or Setup hidden items… (action SetupHidden) command.
Delete hidden range
Delete the current hidden range, or all hidden ranges in a range. This command allows you to delete a hidden range of disassembly (previously defined by using the Hide command).
Debugger menu actions for Common
Below is an overview of all actions that can be accessed from this menu.
| UI Action Name | Action Name | Description |
|---|---|---|
| Quick debug view | QuickDbgView | Quickly open a debug view |
| Debugger windows | `` | |
| Debugger window | Debugger | Open debugging window. More… |
| Thread list | Threads | Open threads window. More… |
| Module list | Modules | Open modules window. More… |
| Locals | Locals | Open local variables window |
| Stack view | StackView | Stack view |
| Stack trace | StackTrace | Open the stack trace window. More… |
| Watch view | WatchView | Open a new watch window |
| Breakpoints | `` | |
| Breakpoint list | Breakpoints | Open breakpoints window. In this window, you can view information related to existing breakpoints. Breakpoints are saved in the database, and restored as soon as possible (once the memory becomes writeable). More… |
| Add breakpoint | BreakpointAdd | Add a breakpoint to the current address. More… |
| Delete breakpoint | BreakpointDel | Delete the breakpoint at the current address |
| Watches | `` | |
| Watch list | WatchList | Open the watch list window. More… |
| Add watch | AddWatch | Add a variable to watch. This command adds a watch at the current address. The watch is visible in the Watch list window (accessible via the WatchList action). |
| Delete watch | DelWatch | Delete an existing watch. |
| Tracing | `` | |
| Tracing window | TracingWindow | Open tracing window. More… |
| Clear trace | ClearTrace | This command removes all trace events from the Tracing window. It also removes any loaded trace file used for diffing against the currently loaded trace. |
| Instruction tracing | ToggleTraceInstructions | Toggle instruction tracing. More… |
| Basic block tracing | ToggleTraceBasicBlocks | Toggle basic block tracing. More… |
| Function tracing | ToggleTraceFunctions | Toggle function tracing. More… |
| Add write trace | WriteTraceAdd | Add a write trace to the current address. More… |
| Add read/write trace | ReadWriteTraceAdd | Add a read/write trace to the current address. More… |
| Add execution trace | ExecTraceAdd | Add an execution trace to the current address. More… |
| Tracing options… | SetupTracing | This command opens a dialog box that allows you to specify different settings related to the tracing features. More… |
| Start process | ProcessStart | Start a new process in the debugger or continue a debugged process. |
| Attach to process… | ProcessAttach | Attach the debugger to a running process |
| Process options… | SetupProcess | Open the Process options dialog. More… |
| Pause process | ProcessPause | Pause or continue the debugged process |
| Terminate process | ProcessExit | Terminate the debugged process |
| Detach from process | ProcessDetach | Detach the debugger from the debugged process |
| Refresh memory | RefreshMemcfg | Refresh memory. More… |
| Take memory snapshot | TakeSnapshot | Take memory snapshot. More… |
| Step into | ThreadStepInto | Execute each instruction |
| Step over | ThreadStepOver | Execute instructions without entering into functions |
| Run until return | ThreadRunUntilReturn | Run until execution returns from the current function. More… |
| Run to cursor | ThreadRunToCursor | Execute instructions until instruction under the cursor is reached |
| Continue backwards | ProcessGoBackwards | Continue execution backwards in a trace (with supported debuggers) |
| Step into (backwards) | ThreadStepIntoBackwards | Execute each instruction backwards |
| Step over (backwards) | ThreadStepOverBackwards | Execute instructions backwards without entering into functions. More… |
| Run to cursor (backwards) | ThreadRunToCursorBackwards | Execute instructions backwards until instruction under the cursor is reached |
| Switch to source | SwitchToSource | Switch from disassembly to source view |
| Use source-level debugging | ToggleSourceDebug | Use source-level debugging |
| Open source file… | OpenSourceFile | Open a source file |
| Debugger options… | SetupDebugger | Open Debugger setup dialog. More… |
| Switch debugger… | SwitchDebugger | Select debugger. More… |
Debugger window
Open debugging window. In this window, you can view the register values for the selected thread. The debugger always selects the thread where the latest debugging event occurred.
For most registers, we have two different boxes:
- the first box (on the left) indicates the current value of the register. Blue indicates that the value has changed since the last debugging event. Purple indicates that the value has been modified by the user. A popup menu is available on this control, offering different commands.
- the second box (on the right) shows the current value of the register, interpreted like an address (if possible).
For a segment register, we only have one box indicating the current value.
For the flags register, we have one box indicating the current value, and small boxes indicating the status of the most important flags.
A popup menu is accessible everywhere in the window, which allows the user to show or hide different parts of the window: toolbar, thread list and available register classes.
Thread list
Open threads window. In this window, you can view all the threads of the debugged process. Double clicking on a thread jumps to its current instruction (available only if the process has been suspended). Double clicking also changes the current thread for the CPU window.
The right click brings a popup menu, where you can suspend or resume threads. The following thread states are possible:
- Running: the thread is running
- Ready: the thread is ready to run but the application has been suspended
- Suspended: the thread has been suspended by the user
Module list
Open modules window. Opens the modules window. This window lists all the modules loaded by the debugged process. Double click on a module to see the list of its exported names.
The right click menu allows for loading debug information for the current module. For that, select the “Load debug symbols” command from the popup menu. If IDA manages to find and load the corresponding debug information file, it will import all symbols from it into the database. Currently, only PDB files are supported. The operation result is displayed in the message window.
Stack trace
Open the stack trace window. This window displays the function calls that brought the current instruction.
The top of the Stack Trace window lists the last function called by the program. Below this is the listing for the previously called functions. Each line indicates the name of the function which called the function represented by the previous line. Double clicking on a line jumps to the exact address of the instruction realizing this call.
Currently, IDA uses the EBP frame pointer values to gather the stack trace information. It will fail for functions using other methods for the frame.
Breakpoint list
Open breakpoints window. In this window, you can view information related to existing breakpoints. Breakpoints are saved in the database, and restored as soon as possible (once the memory becomes writeable).
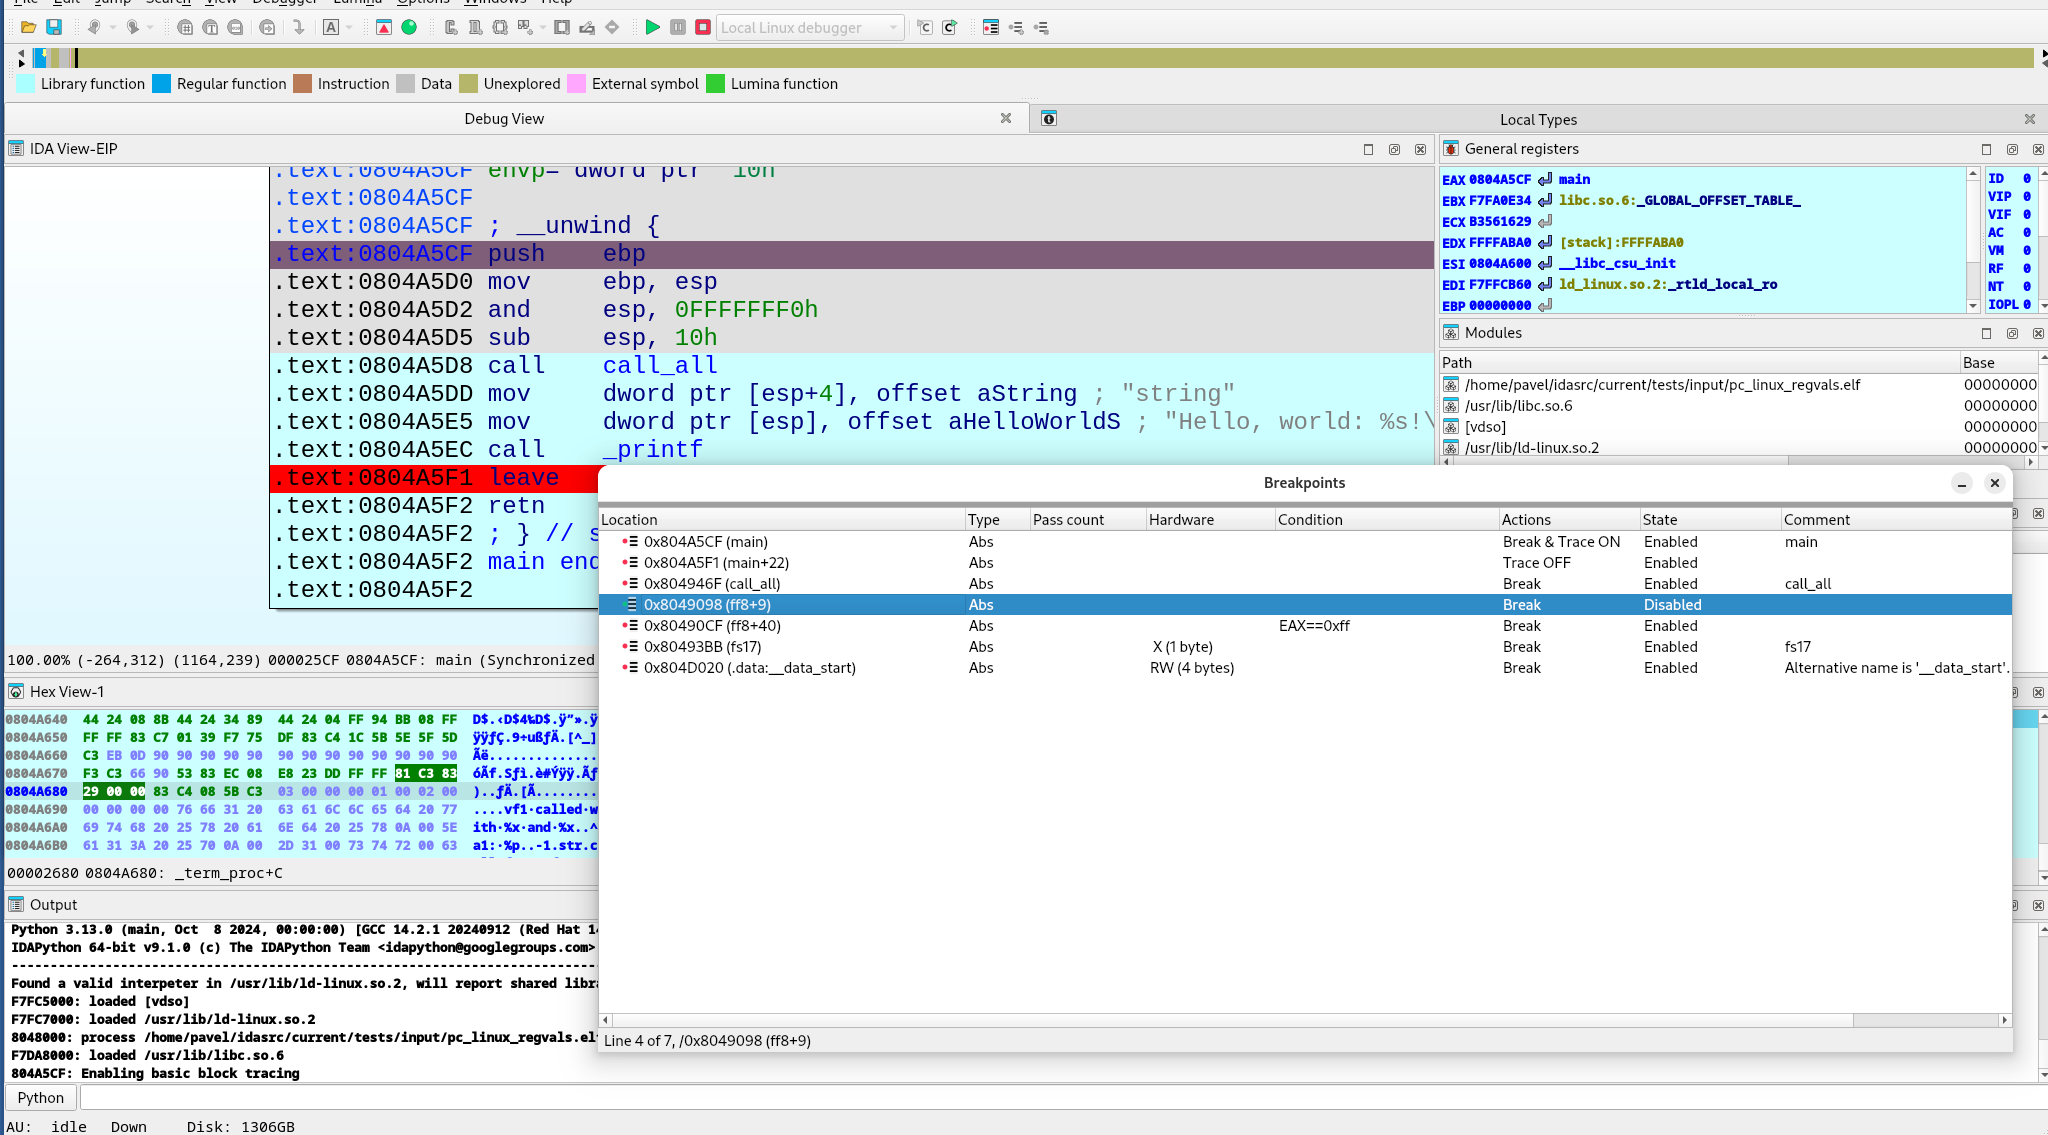
The “Pass count” column indicates how many times the program needs to hit the breakpoint before being suspended (0 means “always suspend”).
Add breakpoint
Add a breakpoint to the current address.
If an instruction exists at this address, an instruction breakpoint is created. Otherwise, IDA offers to create a hardware breakpoint and allows the user to edit breakpoint settings (Action BreakpointEdit). Hardware breakpoints can be either real hardware breakpoints or page breakpoints.
Watch list
Open the watch list window. Opens the assembler level watch list window. In this window you can view memorized watches. A watch allows the user to continuously see the value of a defined item.
Tracing window
Open tracing window. In this window, you can view some information related to all traced events. The tracing events are the information saved during the execution of a program. Different type of trace events are available:
- instruction tracing events ,
- function tracing events and
- write,
- read/write, or
- execution tracing events.
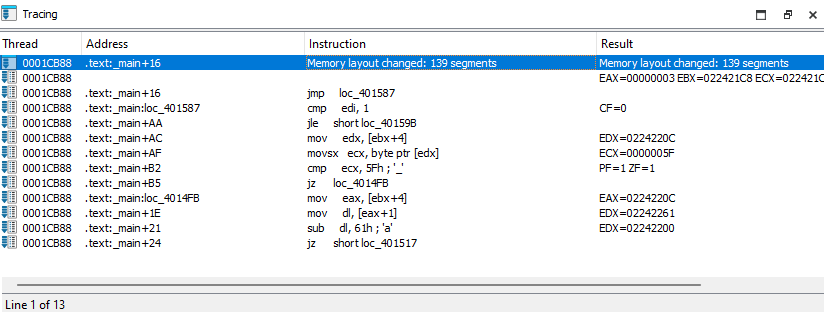
During the execution, the list of traced events is disabled, as it couldn’t be continuously synchronized with the execution without rendering the whole tracing very slow. If a ‘=’ character is displayed in the ‘Thread’ and ‘Address’ columns, it indicates that the trace event occurred in the same thread and at the same address as the previous trace event.
Instruction tracing
Toggle instruction tracing. This command starts instruction tracing. You can then use all the debugger commands as usual: the debugger will save all the modified register values for each instruction.
When you click on an instruction trace event in the Tracing window, IDA displays the corresponding register values preceding the execution of this instruction. In the ‘Result’ column of the Tracing window, you can also see which registers were modified by this instruction. By using this information, you can for example quickly determine which instruction modified a specific register, or you can even backtrace the execution flow. Note that the IP register is never printed in the ‘Result’ column, although it is usually modified by almost any instruction (except perhaps some prefixed instructions like REP MOVSB, …).
Internally, the debugger runs the current thread step by step to properly obtain all the required register values. This explains why instruction tracing is slower than a normal execution.
Basic block tracing
Toggle basic block tracing. This command starts basic block tracing. You can then use all debugger commands as usual: the debugger will save all addresses where a temporary basic block breakpoint was reached.
Internally, the debugger runs the current thread normally, setting temporary breakpoints in the last instruction of every basic block of every function referenced from the current function and also at any call instruction in the middle of the traced basic blocks.
Basic block tracing is slower than normal execution but faster than instruction or function tracing.
Function tracing
Toggle function tracing. This command starts function tracing. You can then use all debugger commands as usual: the debugger will save all addresses where a call to a function or a return from a function occurred.
Internally, the debugger runs the current thread step by step to properly detect all function calls and returns. This explains why functions tracing is slower than a normal execution.
Add write trace
Add a write trace to the current address. Each time the given address will be accessed in write mode, the debugger will add a trace event to the Tracing window. In fact, write traces are nothing more than breakpoints with special properties: they don’t stop and they simply add a trace event when the breakpoints are reached.
Internally, the debugger will add a hardware breakpoint on the given address, so all the restrictions for hardware breakpoints are also valid for write traces.
Add read/write trace
Add a read/write trace to the current address. This command adds a read/write trace to the current address. Each time the given address will be accessed in read or write mode, the debugger will add a trace event to the Tracing window. In fact, read/write traces are nothing more than breakpoints with special properties: they don’t stop and they simply add a trace event when the breakpoints are reached. Internally, the debugger will add a hardware breakpoint on the given address, so all the restrictions for hardware breakpoints are also valid for read/write traces.
Add execution trace
Add an execution trace to the current address. Each time the instruction at the given address will be run, the debugger will add a trace event to the Tracing window.
In fact, execution traces are nothing more than breakpoints with special properties: they don’t stop and they simply add a trace event when the breakpoints are reached.
Internally, the debugger will add a breakpoint instruction at the given address.
Tracing options…
This command opens a dialog box that allows you to specify different settings related to the tracing features.

-
Trace buffer size: This setting indicates how many tracing events can fit in the trace buffer. If the debugger must insert a new event and the buffer is full, the oldest tracing event will be removed. However, if you specify a size of 0, the buffer size isn’t limited. Notice that, for example, in the case of an instructions trace, all executed instructions could be logged, which would quickly fill up the memory!
-
Trace file: If a filename is specified, all future traced events will be appended to it.
-
Trace directory: The directory were trace files for the current database will be saved. If not specified, the IDB directory will be used.
-
Stop condition: This IDC expression will be evaluated before the execution of each instruction. If the expression returns true, the debugger will suspend the execution. Please note that you can use register names in the condition.
Tracing:
- Trace over debugger segments: If selected, the debugger will not go step by step in debugger segments (segments not available in the database).
- Trace over library functions: If selected, the debugger will not go step by step in library functions.
{% hint style=“info” %} Enabling these options will speed up the execution, as many instructions (from debugger segments and/or library functions) will not be traced. Disabling these options can quickly fill the Tracing window, as all instructions in DLLs and system functions will be executed step by step. Notice that both options influence the way instruction and function tracings will work. {% endhint %}
Internally, the debugger proceeds like this:
-
Memorize the return address associated with the last executed call instruction in database segments (the previously saved one is overwritten).
-
Setup a temporary breakpoint on this address once the IP is in a debugger segment or library function, disable step by step, and run the thread.
-
Reenable step by step once this temporary breakpoint is reached.
-
Do not log already logged IP: If selected, already executed instructions will not be logged if they are executed again.
-
Skip loops: If selected, tracing will be temporarily disabled for some loops constructs.
Highlight:
- Highlight instructions in IDA views: If selected, recorded instructions will be displayed in IDA views (disassembly views) with a different background color.
Instruction tracing:
- Log if same IP: If selected, the debugger will also log all register modifications occurring during the execution of prefixed instructions like REP MOVSB, …
Function tracing:
- Log return instructions: If selected, the debugger will also log function returns. If disabled, only function calls are logged.
Basic block and function tracing:
- Log internal instructions: If selected, all instructions from the current basic block will be logged and displayed in the ‘Tracing’ window, instead of only the last instruction of the basic block.
Process options…
Open the Process options dialog. It allows to specify different settings related to the process being debugged.
| Application | Host application to launch. When the debugging target (== 'input file') is an executable file, this field is equal to the 'input file'. If this field is wrong, IDA will not be able to launch the program. For remoting debugging, this field denotes a remote file. |
| Input file | The input file used to create the database. For remoting debugging, this field denotes a remote file. |
| Directory | Directory to start the application. If empty, then the current directory will be used. For remoting debugging, this field denotes a remote directory. |
| Parameters | Optional parameters to pass to the debugged application (or the host application) when it starts. This field may be empty. The standard input/output/error channels can be redirected using the bash shell notations. For example: >output 2>&1 |
| Hostname | If entered, denotes the name of the remote host with the application to debug. In this case, a remote IDA server on this host must be launched. Click here to see the list of remote servers. |
| Port | The port number of the remote server |
| Password | Optional password to protect your server from strangers connecting to it and running arbitrary commands. The same password switch must be specified on the remote server. |
The hostname, port, and password are not available for debuggers connected locally to the computer.
See also How to launch remote debugging
Refresh memory
Refresh memory. This command refreshes the segments and memory contents in IDA. It is available only during a debugging session. NOTE: this command is currently hidden from the user interface because IDA does synchronize with the process memory automatically.
Please note that IDA itself tries to keep the program segments in sync with the debugged process. However, in order to accelerate the debugger, the synchronization is done only at major events, for example when dynamic library gets loaded or unloaded or a thread is created or deleted. If the memory configuration is changed because of a simple system call (think of VirtualAlloc), IDA might miss it. Use the “refresh memory” command in these cases.
{% hint style=“info” %} When IDA detects a discrepancy in the segments, it will automatically synchronize with the process. {% endhint %}
Take memory snapshot
Take memory snapshot. This command copies the contents of the process memory to the database. It is available during a debugging session.
The memory contents will be copied to the database. The user may specify that only the segments with the ‘loader’ attribute will be saved in the database.
The segments with the loader attribute are created by the input file loader and usually contain information from the input file. However, in some cases (like attaching to an existing process), there will not be any loader segments because the input file was not loaded by IDA.
To be able to make a partial snapshot in this case and other similar cases, the user can set or clear the ‘loader’ attribute of the desired segments using the Edit segment… (action EditSegment) command.
After applying this command, the user can terminate the debugging process and continue to analyze the program in the database.
Please note that it is possible to save the database without taking a memory snapshot. Such a database might be used to keep global information about the program like the breakpoint information, notes, etc. However, we recommend to take a memory snapshot of at least the ‘loader’ segments because it will allow to save also information about the program functions, names, comments, etc.
Run until return
Run until execution returns from the current function. This command executes assembler instructions and stops on the instruction immediately following the instruction that called the current function.
Internally, IDA executes each instruction in the current function until a ‘return from function’ instruction is reached.
Step over (backwards)
Execute instructions backwards without entering into functions. This command backward-executes one assembler instruction at a time, stepping over procedures while executing them as a single unit. Internally, in the case of a function call, IDA setups a temporary breakpoint on the instruction preceding this function call.
Debugger options…
Open Debugger setup dialog. This dialog box allows to specify different settings related to the debugger.
Events
-
Suspend on debugging start
If selected, the debugger will suspend directly once the debugging starts.
-
Evaluate event condition on exit
If selected, the debugger will evaluate the event condition immediately before closing the debugging session (once we receive PROCESS_EXITED or PROCESS_DETACHED event)
-
Suspend on process entry point
If selected, the debugger will insert a temporary breakpoint at the main entry point of the debugged application.
-
Suspend on thread start/exit
If selected, the debugger will suspend if a new thread starts or if an existing thread terminates.
-
Suspend on library load/unload
If selected, the debugger will suspend if a new library is loaded or if a previously loaded library is unloaded.
-
Suspend on debugging message
If selected, the debugger will suspend if the debugged application generates a message destined to the debugger.
Event condition
When one or more debug events (see above) are checked, then this option is used to specify a condition. In the following example, the debugger will suspend the process whenever a module with the name test.dll is loaded:
get_event_id() == LIB_LOADED && strstr(get_event_module_name(), "test.dll") != -1
Log
-
Segment modifications
If selected, the debugger will print information regarding segment modifications (creation, deletion, or resizing of segments) since the last event. Note that the debugger doesn’t continuously track segment modifications, but detects those only if a debugging event occurs.
-
Thread start/exit
If selected, the debugger will print a message if a new thread starts or if an existing thread terminates.
-
Library load/unload
If selected, the debugger will print a message if a new library is loaded or if a previously loaded library is unloaded.
-
Breakpoint
If selected, the debugger will print a message if the debugged process reaches a breakpoint.
-
Debugging message
If selected, the debugger will print debugging messages from the application.
Options
-
Reconstruct the stack
If selected, the debugger will try to reconstruct the chain of stack frames, based on information available on the stack and in the function stack variables.
-
Show debugger breakpoint instructions
If selected, the debugger will show breakpoint instructions inserted by the debugger itself. This function is mainly useful if the user wants to see the real content of the memory.
-
Use hardware temporary breakpoints
If selected, IDA will try to use hardware breakpoints for the temporary breakpoints used to implement the “step over” and “run to” functionality. This feature is useful when debugging read-only or self-modifying code, since it does not change the contents of the memory. IDA will fall back to software breakpoints if the attempt to set a hardware breakpoint fails.
-
Autoload PDB files
If selected, IDA will invoke the PDB plugin to try to load PDB symbols for every new module loaded into process.
-
Optimize single-stepping
Prevent debugger memory refreshes when single-stepping. See debugger_t::DBG_FLAG_FAST_STEP
-
Disable ASLR
Disable Address space layout randomization (ASLR). Optional, valid if debugger declares this option is supported, see debugger_t::DBG_FLAG_DISABLE_ASLR
-
Set as just-in-time debugger
If changed from off to on, IDA will try to register itself as a just-in-time debugger (invoked by the system in case of application crashes) on dialog close. Optional, valid only for Windows OS.
Buttons
-
Edit exceptions
This button allows the user to setup exceptions (#exceptions) how the debugger will react to specific exceptions.
-
Reload exceptions
This button reloads the exception table from the exceptions.cfg file.
-
Set specific options
Set debugger options (parameters that are specific to the debugger module). Optional, valid if debugger has the additional specific options. See debugger_t::ev_set_dbg_options
Exceptions
This dialog box allows to setup how the debugger will react to specific exceptions. For each exception, two settings can be specified, simply by selecting the desired exception, and clicking the ‘Edit’ button in the popup menu.
-
Suspend program: Specify whether the debugger will suspend when the exception occurs. If ‘Passed to’ == application and the application handles the exception successfully, the execution will not be suspended regardless of the ‘Suspend’ value.
-
Passed to: Specify whether the exception will be passed to the application itself or handled by the debugger. If the debugged program contains exception handling code, it is better to select ‘Application’.
Report:
- Warn: Show a warning message with the exception information.
- Log: Instead of displaying a warning message, log to the output window the exception information.
- Silent: Do not show a warning message nor log to the output window.
For new exceptions being added by the “Insert” command, you have to specify the exception name and code. These values must be unique, the name cannot be empty, and the code cannot be zero.
Switch debugger…
Select debugger. This command allows the user to select a debugger if there are several debuggers available for the current database. For example, Window32 program can be debugged with a remote or a local debugger.
Lumina menu actions for Common
Below is an overview of all actions that can be accessed from this menu.
| UI Action Name | Action Name | Description |
|---|---|---|
| Pull all | LuminaPullAllMds | Pull all metadata from the primary server. More… |
| Push all | LuminaPushAllMds | Push all metadata to the primary server. More… |
| View all | LuminaViewAllMds | View all metadata from the primary server. More… |
| Pull function main | LuminaPullMd | Pull function metadata from the primary server |
| Push function main | LuminaPushMd | Push function metadata to the primary server |
| Secondary server | `` | |
| Pull all | LuminaSecondaryPullAllMds | Pull all metadata from the secondary server |
| Push all | LuminaSecondaryPushAllMds | Push all metadata to the secondary server |
| View all | LuminaSecondaryViewAllMds | View all metadata from the secondary server |
| Pull function main | LuminaSecondaryPullMd | Pull function metadata from the secondary server |
| Push function main | LuminaSecondaryPushMd | Push function metadata to the secondary server |
| Revert function main | LuminaRevertMd | Revert function metadata |
Pull all
Pull all metadata from the primary server. This commands retrieves metadata about the current database from Lumina.
IDA will calculate checksums for all non-trivial functions in the database and send it to Lumina. This information will be used to match and retrieve metadata, which will be automatically applied.
Please note that this may overwrite your changes, so taking a database snapshot and saving the database before invoking this command is a good idea.
By non-trivial functions we mean:
- long enough functions (>=16 bytes)
- non-library functions
- non-imported functions (functions with real body)
Lumina Metadata
Metadata currently consists of the following information:
- function address, name, prototype
- function frame layout
- stack variables
- user-defined sp change points
- representation of instruction operands
- function and instruction comments
Push all
Push all metadata to the primary server. This commands sends metadata about the current database to Lumina.
IDA will calculate checksums for all non-trivial functions in the database, extract metadata about them, and send it to Lumina. The metadata includes function names and types, user comments, operand types, etc.
If Lumina already has metadata about the involved functions, it will be replaced only if the new metadata is better and more complete.
Only functions with non-trivial names are pushed by this command.
View all
View all metadata from the primary server. This commands retrieves metadata about the current database from Lumina.
IDA will calculate checksums for all non-trivial functions in the database and send it to Lumina. This information will be used to match and retrieve metadata. After that IDA will display list of matched functions.
The user can then select the desired metadata and apply it to the database. If the result is not satisfactory, it is possible to revert the changes.
Once the window is closed, it is not possible to revert the changes anymore.
At the bottom of the window there are convenience buttons to apply or revert all available metadata.
Options menu actions for Common
Below is an overview of all actions that can be accessed from this menu.
| UI Action Name | Action Name | Description |
|---|---|---|
| General… | Options | Open the General IDA Options dialog, where settings are organized thematically across multiple tabs. More… |
| Colors… | SetColors | Setup colors. More… |
| Font… | SetFont | Setup font. More… |
| Feature Flags… | ShowFeatureFlags | Configure feature flags. More… |
| Shortcuts… | ShortcutEditor | Edit shortcuts. More… |
| Show command palette… | CommandPalette | Show command palette. This command opens a dialog, that provides quick access to all available IDA actions with shortcuts and descriptions. More… |
| Repeat last palette command | RepeatLastPaletteCommand | Repeat last palette command |
| Disable undo | UndoToggle | Disable undo |
| Reset undo history | ResetUndoHistory | Reset undo history. More… |
| Assembler directives… | SetDirectives | Setup assembler directive generation. More… |
| Name representation… | SetNameType | Setup name representation. More… |
| Demangled names… | SetDemangledNames | Setup C++ demangled name representation. More… |
| Compiler… | SetupCompiler | Setup target compiler and its parameters. More… |
| String literals… | SetStrlitStyle | Setup string literal style. More… |
| Setup data types… | SetupData | Setup data types. More… |
| Source paths… | SetupSrcPaths | Setup source paths. More… |
General…
Open the General IDA Options dialog, where settings are organized thematically across multiple tabs.
- Disassembly
- Analysis
- Cross references
- String options…
- Browser options…
- Graph options
- Lumina options
- Misc
Disassembly options
This tab configures the appearance of the disassembly.
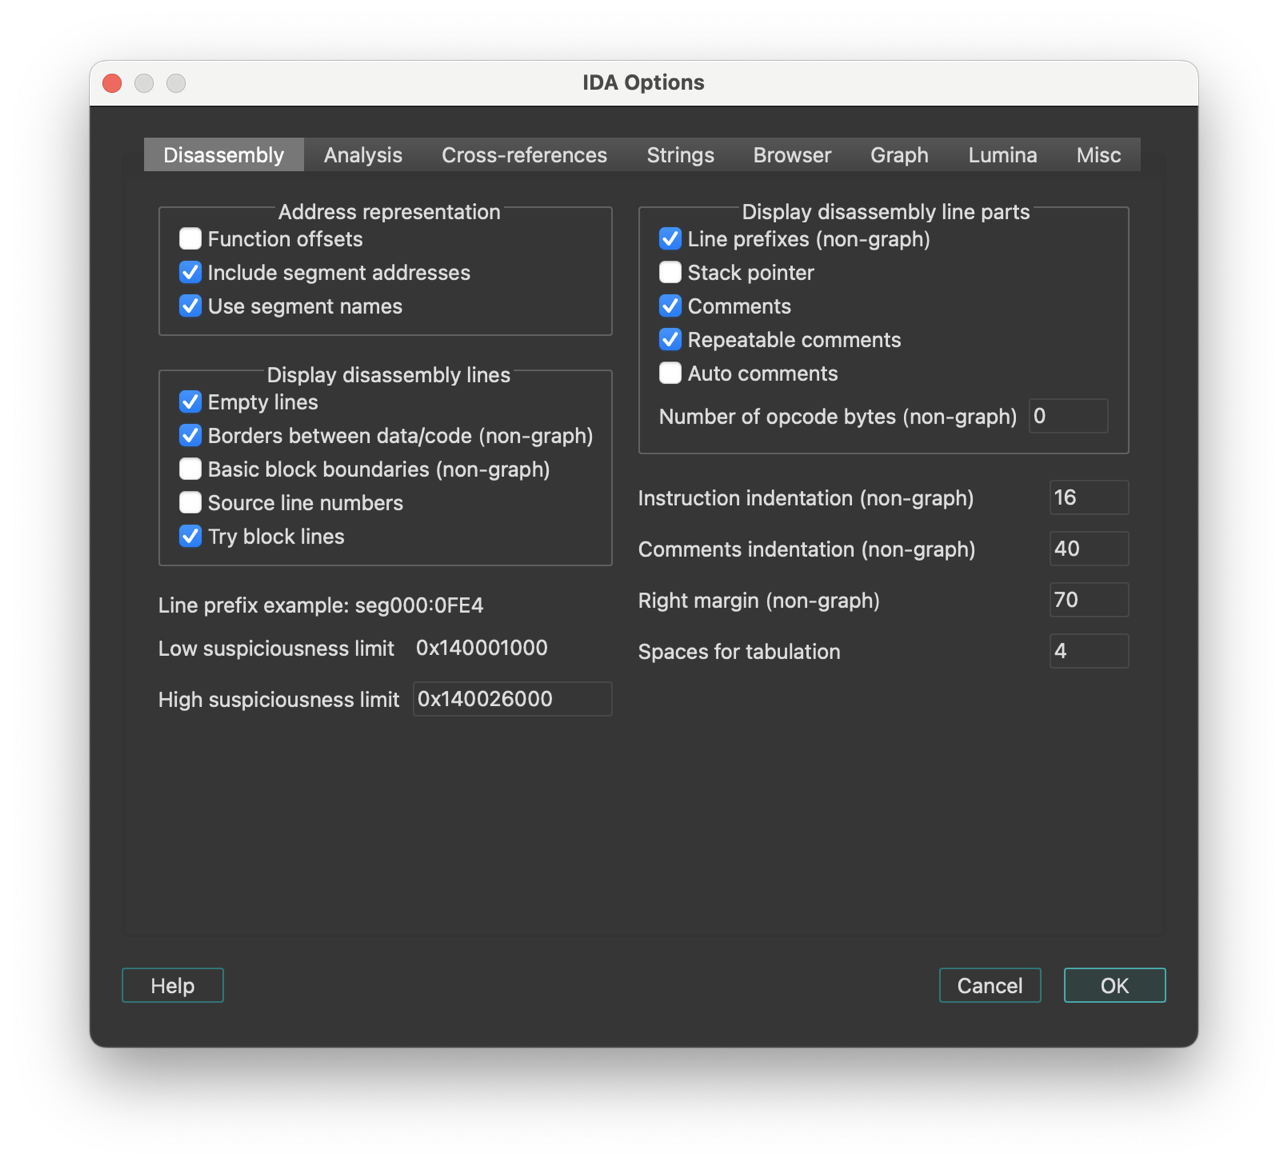
The checkboxes/input fields are organized into several categories:
Display disassembly line parts
Line prefixes (non-graph)
This checkbox enables or disables line prefixes display. Line prefix is the address of the current byte:
         3000:1000      mov ax, bx
         ^^^^^^^^^
IDA.CFG parameter: SHOW_LINEPREFIXES
Stack pointer
If this option is set, IDA will display the value of the stack pointer in the line prefix.
IDA.CFG parameter: SHOW_SP
Number of opcode bytes (non-graph)
The opcode is the operation code of the current instruction. For the data items, the opcodes are elements of data directives. Sometimes there is not enough place to display all bytes of an item (of a large array, for example). In this case, IDA will display just the few first bytes of the item. For the code items, IDA will try to display all bytes of the instruction, even if it requires adding more lines just for the opcode bytes. If this behavior is not desired, the number of opcode bytes can be specified as a negative value. A negative value -N means to display N opcode bytes on a line but never display empty lines just for the opcode bytes. By default, IDA does not display the opcodes.
Opcode bytes are shown below:
        3000:1000 55           push    bp
                  ^^^^^^^^^
IDA.CFG parameter: OPCODE_BYTES
Comments-related options:
| Option | IDA.CFG Parameter |
|---|---|
| Comments | n/a |
| Repeatable comments | SHOW_REPEATABLE_COMMENTS |
| Auto comments | SHOW_AUTOCOMMENTS |
{% hint style=“info” %} Auto comments are predefined comments for all instructions. If you forgot the meaning of a certain instruction, you can use this command to get comments for all lines on the screen. IDA does not give comments to very simple instructions, such as the ‘mov’ instruction, and does not override existing comments. {% endhint %}
Address representation
| Option | Description | Enabled | Disabled | IDA.CFG Parameter |
|---|---|---|---|---|
| Function offsets | This option controls the appearance of the line prefixes. If it is enabled, the addresses will be displayed as offsets from a function beginning. | somefunc+0x44 | cseg:0x4544 | SHOW_SEGMENTS |
| Include segment addresses | Marking this checkbox, you can enable segment addresses in the disassembly. IDA will show only offsets. | codeseg:0034 | 0034 | SHOW_SEGMENTS |
| Use segment names | This option controls the appearance of the segment names in the addresses. (codeseg has base 3000) | codeseg:0034 | 3000:0034 | USE_SEGMENT_NAMES |
Display disassembly lines
Empty lines
This option enables or disables the presence of the autogenerated empty lines in the disassembly. It could be useful to decrease the number of the blank lines on the screen increasing amount of information on it.
IDA.CFG parameter: SHOW_EMPTYLINES
Borders between data/code (non-graph)
This command enables or disables the presence of the autogenerated border lines in the disassembly. It could be useful to decrease the number of the blank lines on the screen increasing amount of information on it. A border line looks like this:
;---------------------------------------------------------
Note that you can hide a particular border by using the Toggle border command (action ToggleBorder).
IDA.CFG parameter: SHOW_BORDERS
Basic block boundaries (non-graph)
This option enables or disables the presence of the autogenerated empty lines at the end of basic blocks in the disassembly.
IDA.CFG(../../configuration/configuration-files.md) parameter: SHOW_BASIC_BLOCKS
Source line numbers
This options controls the presence of the source line number information in the disassembly. Some object files have this information.
IDA.CFG parameter: SHOW_SOURCE_LINNUM
Try block lines
This option controls the display of the try block information in the disassembly.
IDA.CFG parameter: SHOW_TRYBLOCKS
Other text formatting options
Instruction identation (non-graph)
You can change indention of disassembled instructions:
                         mov ax, bx
         <-------------->
            indention
IDA.CFG parameter: INDENTION
Comments identation (non-graph)
You can change indention of comments:
                mov ax, bx                      ; this is a comment
        <-------------------------------------->
                       indention
IDA.CFG parameter: COMMENTS_INDENTION
Right margin (non-graph)
This option controls the length of disassembly lines for data directives.
IDA.CFG parameter: MAX_DATALINE_LENGTH
Low and high suspiciousness limit
If IDA suspects that an operand can be represented as something different from a plain number, it will mark the operand as “suspicious” and display it in red/orange.
Two values control the definition of suspiciousness. An operand is ‘suspicious’ if it has an immediate value between low and high ‘suspicious’ limits. The comparison is always unsigned, i.e., in the instruction:
mov ax,[bp-2]
the immediate operand is 0xFFFE, not -2.
IDA uses a simple heuristic to determine initial suspiciousness limits. You may change these limits any time you want.
Analysis options
This tab allows you to configure analysis settings and processor-specific options.
- Target processor: Change the processor type (if multiple types are supported by the current processor module)
- Target assembler: Select the assembler style
Additional options (buttons):
- Kernel options
- Processor specific analysis options: Configure processor-specific settings (available when the current processor supports additional options)
- Memory mapping: Define memory mapping ranges (available when the current processor supports memory mapping)
- Reanalyze program
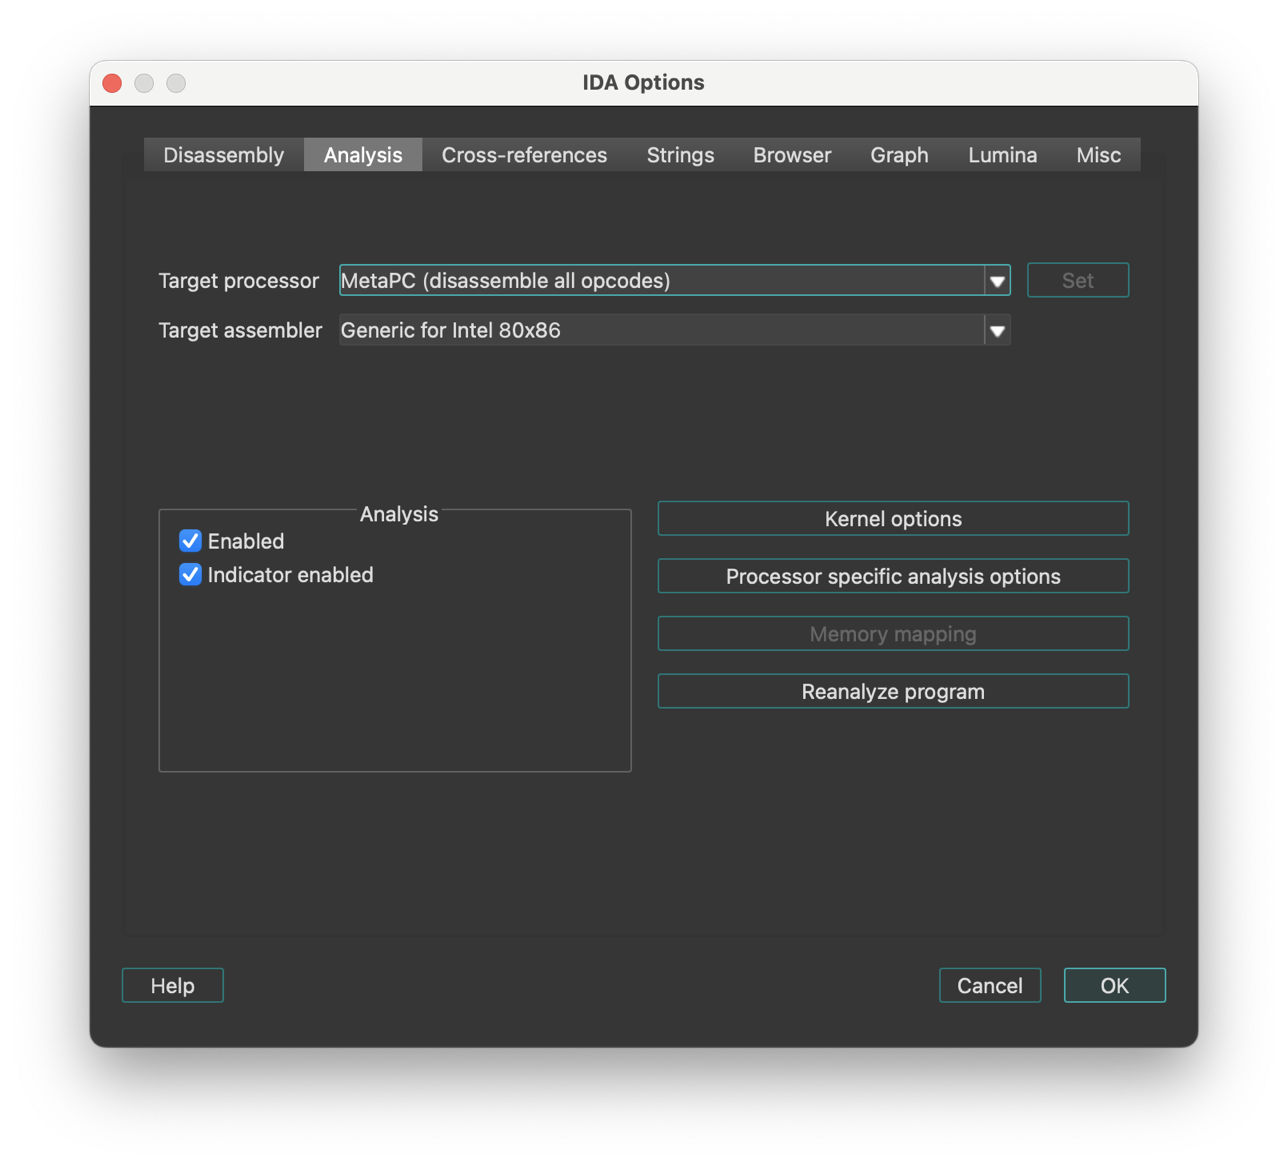
Analysis section
The checkboxes:
- Enabled
- Indicator enabled
allows you to disable and enable the autoanalysis and its indicator.
By default, the auto analysis and indicator are enabled. Disable them only if you are sure it will help.
Action name: SetAuto
The analysis indicator is located in the bottom left corner of the main IDA window (upper right corner in text version). Possible values of the indicator:
| Indicator | Description |
|---|---|
| (empty) | Indicator is turned off |
AU: idle | Autoanalysis is finished |
AU:disabled | Autoanalysis is disabled |
FL:<address> | Execution flow is being traced |
PR:<address> | A function is being created |
TL:<address> | A function tail is being created |
SP:<address> | The stack pointer is being traced |
AC:<address> | The address is being analyzed |
LL:<number> | A signature file is being loaded |
L1:<address> | The first pass of FLIRT |
L2:<address> | The second pass of FLIRT |
L3:<address> | The third pass of FLIRT |
TP:<address> | Type information is being applied |
FI:<address> | The final pass of autoanalysis |
WF:<address> | Weak execution flow is being traced |
??:<address> | The address becomes unexplored |
@:<number> | Indication of various activity |
{% hint style=“success” %} Hint: you can right-click the analysis indicator to quickly disable or enable it, or to reanalyze the program. {% endhint %}
See also auto analysis explanation.
Processor Type
| Type | Description | Family |
|---|---|---|
8086 | Intel 8086 | IBM PC family |
80286r | Intel 80286 real mode | IBM PC family |
80286p | Intel 80286 protected mode | IBM PC family |
80386r | Intel 80386 real mode | IBM PC family |
80386p | Intel 80386 protected mode | IBM PC family |
80486r | Intel 80486 real mode | IBM PC family |
80486p | Intel 80486 protected mode | IBM PC family |
80586r | Intel Pentium & MMX real mode | IBM PC family |
80586p | Intel Pentium & MMX prot mode | IBM PC family |
80686p | Intel Pentium Pro & MMX | IBM PC family |
k62 | AMD K6-2 with 3DNow! | IBM PC family |
p2 | Intel Pentium II | IBM PC family |
p3 | Intel Pentium III | IBM PC family |
athlon | AMD K7 | IBM PC family |
p4 | Intel Pentium 4 | IBM PC family |
metapc | Disassemble all IBMPC opcodes | IBM PC family |
8085 | Intel 8085 | Zilog 80 family |
z80 | Zilog 80 | Zilog 80 family |
z180 | Zilog 180 | Zilog 80 family |
z380 | Zilog 380 | Zilog 80 family |
64180 | Hitachi HD64180 | Zilog 80 family |
gb | Gameboy | Zilog 80 family |
z8 | Zilog 8 | Zilog 8 family |
860xr | Intel 860 XR | Intel 860 family |
860xp | Intel 860 XP | Intel 860 family |
8051 | Intel 8051 | Intel 51 family |
80196 | Intel 80196 | Intel 80196 family |
80196NP | Intel 80196NP, NU | Intel 80196 family |
m6502 | MOS 6502 | MOS Technology 65xx family |
m65c02 | MOS 65c02 | MOS Technology 65xx family |
pdp11 | DEC PDP/11 | PDP family |
68000 | Motorola MC68000 | Motorola 680x0 family |
68010 | Motorola MC68010 | Motorola 680x0 family |
68020 | Motorola MC68020 | Motorola 680x0 family |
68030 | Motorola MC68030 | Motorola 680x0 family |
68040 | Motorola MC68040 | Motorola 680x0 family |
68330 | Motorola CPU32 (68330) | Motorola 680x0 family |
68882 | Motorola MC68020 with MC68882 | Motorola 680x0 family |
68851 | Motorola MC68020 with MC68851 | Motorola 680x0 family |
68020EX | Motorola MC68020 with both | Motorola 680x0 family |
colfire | Motorola ColdFire | Motorola 680x0 family |
68K | Motorola MC680x0 all opcodes | Motorola 680x0 family |
6800 | Motorola MC68HC00 | Motorola 8bit family |
6801 | Motorola MC68HC01 | Motorola 8bit family |
6803 | Motorola MC68HC03 | Motorola 8bit family |
6301 | Hitachi HD 6301 | Motorola 8bit family |
6303 | Hitachi HD 6303 | Motorola 8bit family |
6805 | Motorola MC68HC05 | Motorola 8bit family |
6808 | Motorola MC68HC08 | Motorola 8bit family |
6809 | Motorola MC68HC09 | Motorola 8bit family |
6811 | Motorola MC68HC11 | Motorola 8bit family |
6812 | Motorola MC68HC12 | |
hcs12 | Motorola MC68HCS12 | |
6816 | Motorola MC68HC16 | |
java | java | Java family |
ppc | PowerPC big endian | PowerPC family |
ppcl | PowerPC little endian | PowerPC family |
arm | ARM little endian | ARM family |
armb | ARM big endian | ARM family |
tms320c2 | TMS320C2x series | TMS 16bit addressing family |
tms320c5 | TMS320C5x series | TMS 16bit addressing family |
tms320c6 | TMS320C6x series | TMS VLIW family |
tms320c3 | TMS320C3x series | TMS VLIW family |
tms32054 | TMS320C54xx series | |
tms32055 | TMS320C55xx series | |
sh3 | Renesas SH-3 (little endian) | Renesas SuperH series |
sh3b | Renesas SH-3 (big endian) | Renesas SuperH series |
sh4 | Renesas SH-4 (little endian) | Renesas SuperH series |
sh4b | Renesas SH-4 (big endian) | Renesas SuperH series |
sh2a | Renesas SH-2A (big endian) | Renesas SuperH series |
avr | ATMEL AVR | ATMEL family |
mipsl | MIPS little endian | MIPS family: R2000, R3000, R4000, R4200, R4300, R4400, R4600, R8000, R10000 |
mipsb | MIPS big endian | MIPS family: R2000, R3000, R4000, R4200, R4300, R4400, R4600, R8000, R10000 |
mipsrl | MIPS & RSP little | MIPS family: R2000, R3000, R4000, R4200, R4300, R4400, R4600, R8000, R10000 |
mipsr | MIPS & RSP big | MIPS family: R2000, R3000, R4000, R4200, R4300, R4400, R4600, R8000, R10000 |
r5900l | MIPS R5900 little | MIPS family: R2000, R3000, R4000, R4200, R4300, R4400, R4600, R8000, R10000 |
r5900r | MIPS R5900 big | MIPS family: R2000, R3000, R4000, R4200, R4300, R4400, R4600, R8000, R10000 |
h8300 | H8/300x in normal mode | Hitachi H8 family |
h8300a | H8/300x in advanced mode | Hitachi H8 family |
h8s300 | H8S in normal mode | Hitachi H8 family |
h8s300a | H8S in advanced mode | Hitachi H8 family |
h8500 | H8/500 | Hitachi H8/500 family |
pic12cxx | Microchip PIC 12-bit (12xxx) | PIC family |
pic16cxx | Microchip PIC 14-bit (16xxx) | PIC family |
pic18cxx | Microchip PIC 16-bit (18xxx) | PIC family |
sparcb | SPARC big endian | SPARC family |
sparcl | SPARC little endian | SPARC family |
alphab | DEC Alpha big endian | ALPHA family |
alphal | DEC Alpha little endian | ALPHA family |
hppa | HP PA-RISC big endian | HP PA-RISC family |
dsp56k | Motorola DSP 5600x | DSP 56K family |
dsp561xx | Motorola DSP 561xx | DSP 56K family |
dsp563xx | Motorola DSP 563xx | DSP 56K family |
dsp566xx | Motorola DSP 566xx | DSP 56K family |
c166 | Siemens C166 | C166 family |
c166v1 | Siemens C166 v1 family | C166 family |
c166v2 | Siemens C166 v2 family | C166 family |
st10 | SGS-Thomson ST10 | C166 family |
super10 | Super10 | C166 family |
st20 | SGS-Thomson ST20/C1 | ST20 family |
st20c4 | SGS-Thomson ST20/C2-C4 | |
st7 | SGS-Thomson ST7 | ST7 family |
ia64l | Intel Itanium little endian | IA64 family |
ia64b | Intel Itanium big endian | IA64 family |
cli | Microsoft.Net platform | |
net | Microsoft.Net platform (alias) | |
i960l | Intel 960 little endian | i960 family |
i960b | Intel 960 big endian | i960 family |
f2mc16l | Fujitsu F2MC-16L | Fujitsu F2MC family |
f2mc16lx | Fujitsu F2MC-16LX | Fujitsu F2MC family |
78k0 | NEC 78k/0 | |
78k0s | NEC 78k/0s | |
m740 | Mitsubishi 8-bit | |
m7700 | Mitsubishi 16-bit | Mitsubishi 16-bit family |
m7750 | Mitsubishi 16-bit | Mitsubishi 16-bit family |
m32r | Mitsubishi 32-bit | Mitsubishi 32-bit family |
m32rx | Mitsubishi 32-bit extended | Mitsubishi 32-bit family |
st9 | STMicroelectronics ST9+ | |
fr | Fujitsu FR family | |
m7900 | Mitsubishi M7900 | |
kr1878 | Angstrem KR1878 | |
ad218x | Analog Devices ADSP | |
oakdsp | Atmel OAK DSP | |
tricore | Infineon Tricore | |
ebc | EFI Bytecode | |
msp430 | Texas Instruments MSP430 |
Processor modules can accept additional options that can be passed on the commandline with the -p switch. Currently only the ARM module supports it. For example, -parm:ARMv7-A will turn on options specific for the ARMv7-A architecture, such as NEON instruction set.
For information about additional processor modules, please check supported processors
Please note that when you change the processor type, IDA may change the target assembler, so check it out.
You may get a message saying that IDA does not know the specified processor if IDA fails to load the corresponding processor module:
- Windows IDA uses .dll file extension
- Linux IDA uses .so file extension
- Mac IDA uses .dylib file extension
{% hint style=“info” %} Modules compiled with support for 64-bit address space, will feature a ‘64’ suffix before the extension. E.g., ‘pc64.dll’ {% endhint %}
{% hint style=“info” %} Changing the processor type leads to reanalysis of the whole program. Sometimes this is useful. {% endhint %}
{% hint style=“info” %} When you load a new processor module, all analysis options are reset to the values specified in the configuration file. {% endhint %}
IDA determines the default processor using the input file extension and the contents of the input file. The table which describes the input file extensions and the corresponding processor types is located in IDA.CFG file and looks like this:
 DEFAULT_PROCESSOR = {
 /* Extension   Processor */
  "com" :       "8086"                  // IDA will try the specified
  "exe" :       "80386r"                // extensions if no extension is
  "dll" :       "80386r"                // given.
  "drv" :       "80386r"
  "o"   :       "68000"
  "prc" :       "68000"                 // PalmPilot programs
  "axf" :       "arm"
  "h68" :       "68000"                 // MC68000 for *.H68 files
  "i51" :       "8051"                  // i8051   for *.I51 files
  "sav" :       "pdp11"                 // PDP-11  for *.SAV files
  "rom" :       "z80"                   // Z80     for *.ROM files
  "cla" :       "java"                  // Java classes
  "class":      "java"                  // Java classes
  "s19":        "6811"
  "*":          "80386p"                // Default processor
}
If you want to change the default processor type, you need to change this table. You may add/delete rows in this table.
See also: ARM processor specifics.
ARM processor specifics
Since architecture version v4 (introduced in ARM7 cores), ARM processors have a new 16-bit instruction set called Thumb (the original 32-bit set is referred to as “ARM”). Since these two sets have different instruction encodings and can be mixed in one segment, we need a way to specify how to disassemble instructions. For this purpose, IDA uses a virtual segment register named ‘T’. If its value is 0, then ARM mode is used. Otherwise, Thumb mode is used. ARM is the default mode. Please note that if you change the value of T register for a range, IDA will destroy all instructions in that range because their disassembly is no longer correct.
IDA use UAL (Unified Assembly Language) syntax by default which uses the same syntax for both ARM and Thumb mode. If necessary, legacy assembler syntax can be selected in Analysis options.
To decode Aarch64 (ARM64) instructions the segment with instructions must be set to 64-bit (see Edit segment… command; action EditSegment).
Processor options for ARM
- Simplify instructions: If this option is on, IDA will simplify instructions and replace them by clearer pseudo-instructions. For example:
MOV PC, LR
is replaced by
RET
- Disable pointer dereferencing: If this option is on, IDA will not use =label syntax for loads from literal pools. For example,
                    LDR     R1, =dst
                    ...
      off_0_1003C   DCD dst
will be shown as
LDR R1, off_0_1003C
-
No automatic ARM-Thumb switch: If this option is on, IDA will not propagate ARM-Thumb modes automatically when following jumps and calls.
-
Disable BL jumps detection: Some ARM compilers in Thumb mode use BL (branch-and-link) instead of B (branch) for long jumps, since BL has more range. By default, IDA tries to determine if BL is a jump or a call. You can override IDA’s decision using commands in Edit → Other menu (Force BL call/Force BL jump). If your target does not use this trick, you can set this option and IDA will always treat BL as a call.
-
Scattered MOVT/MOVW pairs analysis: A pair of MOVT and MOVW instructions can be used to load any 32-bit constant into a register without having to use the literal pool. For example: MOVW R1, #0xABA2 MOVT R1, #0x32AA is simplified by IDA into MOV R1, 0x32AAABA2 (unless macro creation is turned off). However, if there is an unrelated instruction between them, such simplification is not possible. If you enable the conversion, then IDA will try to convert operands of even scattered instructions. The example above could be represented as:
      MOVW  R1, #:lower16:0x32AAABA2
      [other instructions]
      MOVT  R1, #:upper16:0x32AAABA2
It is possible to select how aggressively IDA should try to handle such pairs:
-
leave them as is, convert only if the result a valid address, or try to
-
convert all pairs even if the result does not look like a valid address.
-
Edit ARM architecture options: This button allows you to edit various features of the ARM architecture. This will affect the disassembly of some instructions depending on whether the selected architecture supports them. For details, see the ARM Architecture Reference Manual.
Command-line options
You can configure the architecture options from the command line. For that, use the -parm:<option1[;option2...]> switch.
The following options are accepted:
ARMv<N>- base ARM architecture version (e.g. ARMv4, ARMv4T, ARMv5TE, …, ARMv7-M, ARMv7-A), or<name>- ARM core name (e.g. ARM7TDMI, ARM926EJ-S, PXA270, Cortex-M3, Cortex-A8)
Additionally, a special name “armmeta” can be used to enable decoding of all known instructions.
The options above will set some default values that can be adjusted further:
| Option | Description |
|---|---|
NoVFP/VFPv<N> | disable or enable support for VFP instructions (e.g. VFPv3). |
NoNEON/NEON/NEON-FMA | disable or enable support for NEON (aka Advanced SIMD) instructions. |
NoThumb/Thumb/Thumb-2 | disable or enable support for Thumb (16-bit) or Thumb-2 (16/32-bit) instructions. |
NoARM/ARM | disable or enable support for ARM instructions. |
XScale | support for XScale-specific instructions. Implies ARMv5TE. |
NoWMMX/WMMXv1/WMMXv2 | support for Intel Wireless MMX extensions (v1 or v2). Implies XScale. |
See also
- Change segment register value command (action
SetSegmentRegister) - Set default segment register value… command (action
SetSegmentRegisterDefault) to specify the segment register value.
Specify Target Assembler
This command allows you to change the target assembler, i.e. the assembler for which the output is generated. You select the target assembler from a menu. The menu items depend on the current processor type.
{% hint style=“info” %} Currently, IDA supports only a generic assembler for 80x86 processors. We recommend the use of Borland’s TASM to compile the output assembler files. {% endhint %}
Kernel options
Here you can change various kernel analysis options:
Kernel analysis options 1
- Trace execution flow:
This option allows IDA to trace execution flow and convert all references bytes to instructions (the Code command; action
MakeCode) Mark typical code sequences as code. IDA knows some typical code sequences for each processor. For example, it knows about typical sequence
          push    bp
          mov     bp, sp
If this option is enabled, IDA will search for all typical sequences and convert them to instructions even if there are no references to them. The search is performed at the loading time.
-
Locate and create jump tables: This option allows IDA to try to guess the address and size of jump tables. Please note that disabling this option will not disable the recognition of C-style typical switch constructs.
-
Control flow to data segment is ignored: If set, IDA will not analyze code reference targets in pure data segments. Usually pure data segments have some instructions (e.g., thunk functions), that’s why this option is set off by default. For Mach-O files, it is set on because pure data segment do not contain instructions in them.
-
Analyze and create all xrefs: If this option is disabled, IDA will not thoroughly analyze the program: it will simply trace execution flow, nothing more (no xrefs, no additional checks, etc.)
-
Delete instructions with no xrefs: This option allows IDA to undefine instructions without any xrefs to them. For example, if you undefine (Edit → Undefine) an instruction at the start of a function, IDA will trace execution flow and delete all instructions that lose references to them.
-
Create function if data xref data->code32 exists: If IDA encounters a data reference from DATA segment to 32bit CODE segment, it will check for the presence of meaningful (disassemblable) instruction at the target. If there is an instruction, it will mark it as an instruction and will create a function there.
-
Create functions if call is present This option allows IDA to create function (Edit → Create function…) (proc) if a call instruction is present. For example, the presence of:
call loc_1234
leads to creation of a function at label loc_1234
-
Create function tails: This option allows IDA to find and append separately located function tails to function definitions.
-
Create stack variables: This option allows IDA to automatically create stack variables and function parameters.
-
Propagate stack argument information:
This option propagates the stack argument information (the type and the name) to the caller’s stack. If the caller is called, then the information will be propagated further through the whole program. Currently, the type propagation is really simple and non-intelligent: the first encountered type for a stack variable will be used.
-
Propagate register argument information: This option propagates the register argument information (the type and the name) to the caller. If the caller is also called, then the information will be propagated further through the whole program.
-
Trace stack pointer: This option allows IDA to trace (Edit → Functions → Change stack pointer…) the value of the SP register.
-
Perform full stack pointer analysis: This option allows IDA to perform the stack pointer analysis using the simplex method. This option is valid only for the IBM PC processor.
-
Perform ‘no-return’ analysis: This option allows IDA to perform the control flow analysis and determine functions which do not return to their callers. The ‘exit()’ function, for example, does not return to its caller.
-
Try to guess member function types: If set, IDA will guess member function types using the demangled names. Please note that this rule may occasionally produce wrong results, for example, for static member functions. IDA has no means of distinguishing them from non-static member functions. If clear, IDA will guess only types of non-member functions.
See also:
Kernel analysis options 2
-
Truncate functions upon code deletion: Truncate functions when the code at the function end gets deleted. If this option is turned off, IDA does not modify function definitions when code is deleted.
-
Create string literals if data xref exists: If IDA encounters a data reference to an undefined item, it checks for the presence of the string literal at the target. If the length of the candidate string literal is big enough (more than 4 chars in 16bit or data segments; more than 16 chars otherwise), IDA will automatically create a string literal(Edit → Strings → String).
-
Check for unicode strings: This option allows IDA to check for the presence of the unicode strings in the program and creates them if necessary. IDA will check for the unicode strings only if the string style is set to “C-style (0 terminated)” or “Unicode”.
-
Create offsets and segments using fixup info: IDA will use relocation information to make the disassembly nicer. More precisely, it will convert all data items with relocation information to words or dwords like this:
          dd offset label
          dw seg seg000
If an instruction has a relocation information attached to it, IDA will convert its immediate operand to an offset or segment:
mov eax, offset label
You can display the relocation information attached to the current item by using the Print internal flags command.
-
Create offset if data xref to seg32 exists: If IDA encounters a data reference to 32bit segment and the target contains 32bit value which can be represented as an offset expression, IDA will convert it to an offset.
-
Convert 32bit instruction operand to offset: This option works only in 32bit and 64bit segments. If an instruction has an immediate operand and the operand can be represented as a meaningful offset expression, IDA will convert it to an offset. However, the value of immediate operand must be higher than 0x10000.
-
Automatically convert data to offsets:
This option allows IDA to convert all newly created data items to offsets if the following conditions are satisfied:
-
the offset target is a valid address in the program
-
the target address is higher than 0x20
-
the target does not point into the middle of an item
-
if the target is code, the execution does not flow to it from the previous instruction
-
the data is dword (4 bytes) in a 32-bit segment or qword(8 bytes) in a 64-bit segment
-
the segment type is not special (extern, communal, abs…)
-
Use flirt signatures: Allows usage of FLIRT technology
-
Comment anonymous library functions: This option appends a comment to anonymous library functions. The comment consists of the description of the FLIRT signature which has recognized the function and marked it as coming from a library.
-
Multiple copy library function recognition: This option allows FLIRT to recognize several copies of the same function in the program.
-
Automatically hide libary functions: This option hides the functions recognized by FLIRT. It will have effect only from the time it is set.
-
Rename jump functions as j_…: This option allows IDA to rename simple functions containing only
jmp somewhere
instruction to “j_somewhere”.
-
Rename empty functions as nullsub_…: This option allows IDA to rename empty functions containing only a “return” instruction as “nullsub_…” (… is replaced by a serial number: 0,1,2,3…)
-
Coagulate data at the final pass: This option is meaningful only if “Make final analysis pass” is enabled. It allows IDA to convert unexplored bytes (Edit → Undefine) to data arrays in the non-code segments.
-
Coagulate code at the final pass: This option is meaningful only if “Make final analysis pass” is enabled. It allows IDA to convert unexplored bytes to data arrays in the code segments. Make final analysis pass This option allows IDA to coagulate all unexplored bytes by converting them to data or instructions. See also analysis options 1 analysis options 3
Kernel analysis options 3
-
Enable EH analysis: If this option is set on, IDA uses EH information of the binary for more detailed analysis.
-
Enable RTTI analysis: If this option is set on, IDA tries to detect C++ Run-Time Type Identification and does additional analysis based on this information.
-
Enable macros: This option is disabled if the processor module does not support macros. If this option is on, IDA will combine several instructions into one macro instruction. For example for the ARM processor:
      ADRP Rx, label@PAGE
      ADD  Rx, Rx, label@PAGEOFF
will be replaced by
ADRL Rx, label
- Merge strlits: If the analysis option “Create string literals if data xref exists” is set and the target string literal ends at the existing one (without a termination character), IDA will merge these strlits into one.
Cross-References options
This tab configures how cross-references (xrefs) are displayed.
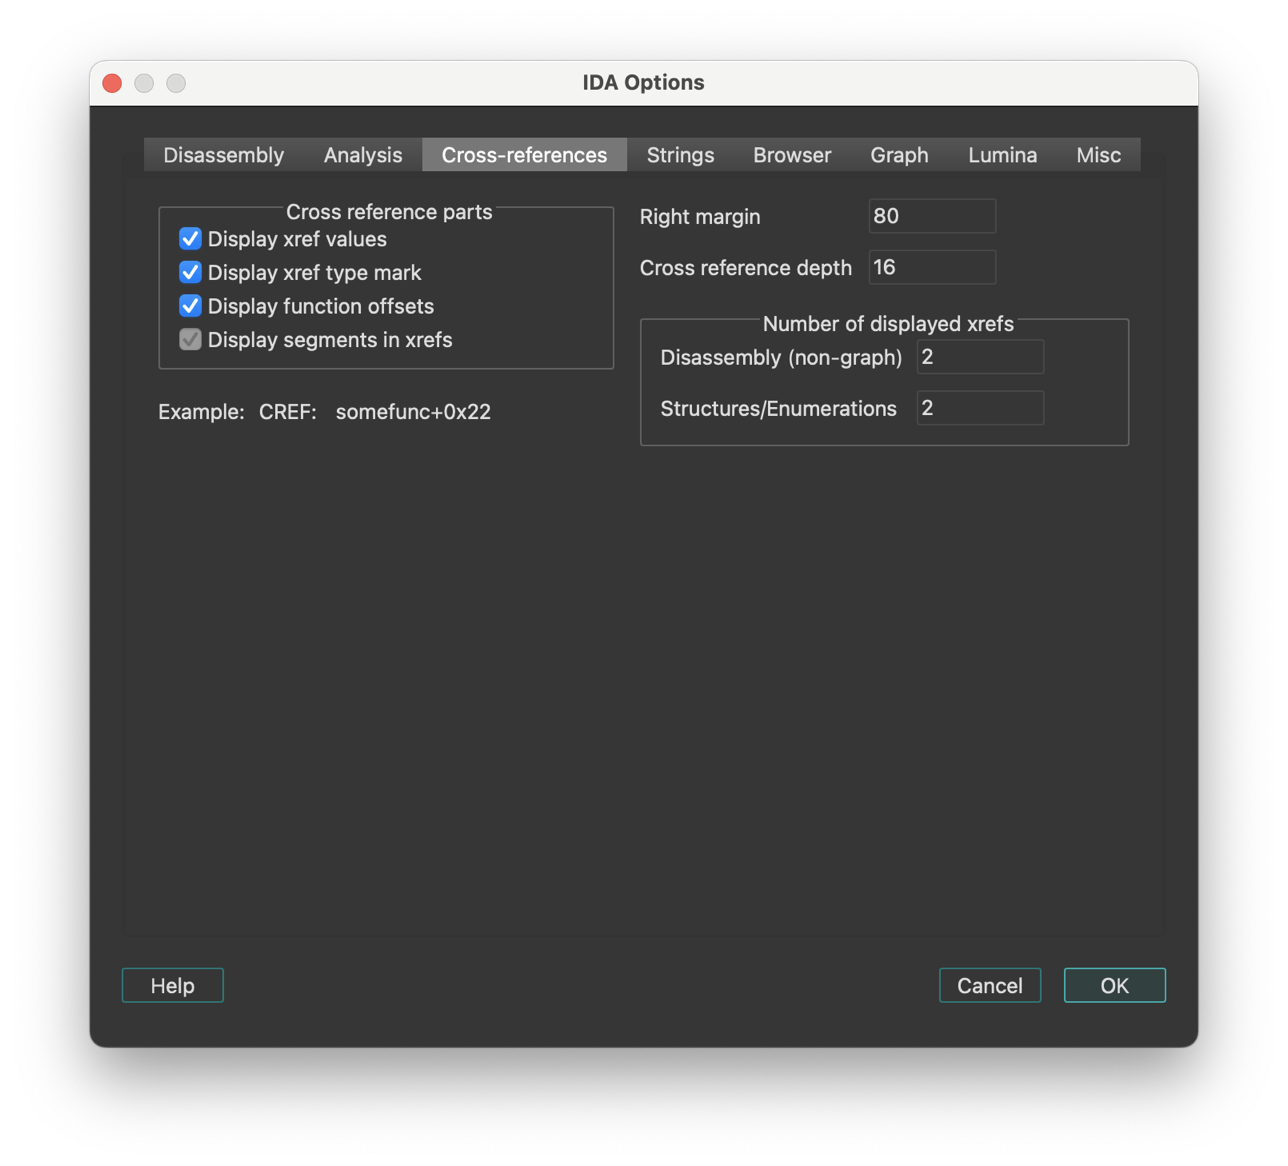
IDA maintains cross-references automatically. Of course, when IDA starts to disassemble a new file, the cross-references will not appear immediately; they will be collected during background analysis.
Cross-reference parts
- Display segments in xrefs: This checkbox enables or disables segments in cross references:
           Enabled:     ; CODE XREF: 3000:1025
           Disabled:    ; CODE XREF: 1025
- Display xref type mark: If this option is disabled, IDA will not display “CODE” or “DATA” in the cross-references.
IDA.CFG parameter: SHOW_XREF_TYPES
- Display function offsets: This option controls the appearance of the cross-reference addresses. If it is enabled, the addresses will be displayed as offsets from a function beginning.
Example:
           Enabled:     somefunc+0x44
           Disabled:    cseg:0x4544
IDA.CFG parameter: SHOW_XREF_FUNC
- Display xref values: If this option is disabled, IDA will just display the presence of cross-references, like this:
; CODE XREF: ...
IDA.CFG parameter: SHOW_XREF_VALUES
- Right margin: Determines the maximal length of a line with the cross references.
IDA.CFG parameter: MAX_XREF_LENGTH
- Cross reference depth: This value “how many bytes of an object to look at to collect cross references”. For example, we have an array:
A db 100 dup(0)
If some instruction refers to the 5-th element of the array:
                mov     al,A+5

         with TD=3      we'll have no xrefs displayed
         with TD=10     we'll have this xref
IDA.CFG parameter: MAX_TAIL
- Number of displayed xrefs:
Determines the maximal number of the cross references to display. You may keep this value low because you can access all xrefs by using the List cross references to/from… command.
IDA.CFG parameter: SHOW_XREFS
String options
This tab sets up the string literals options.
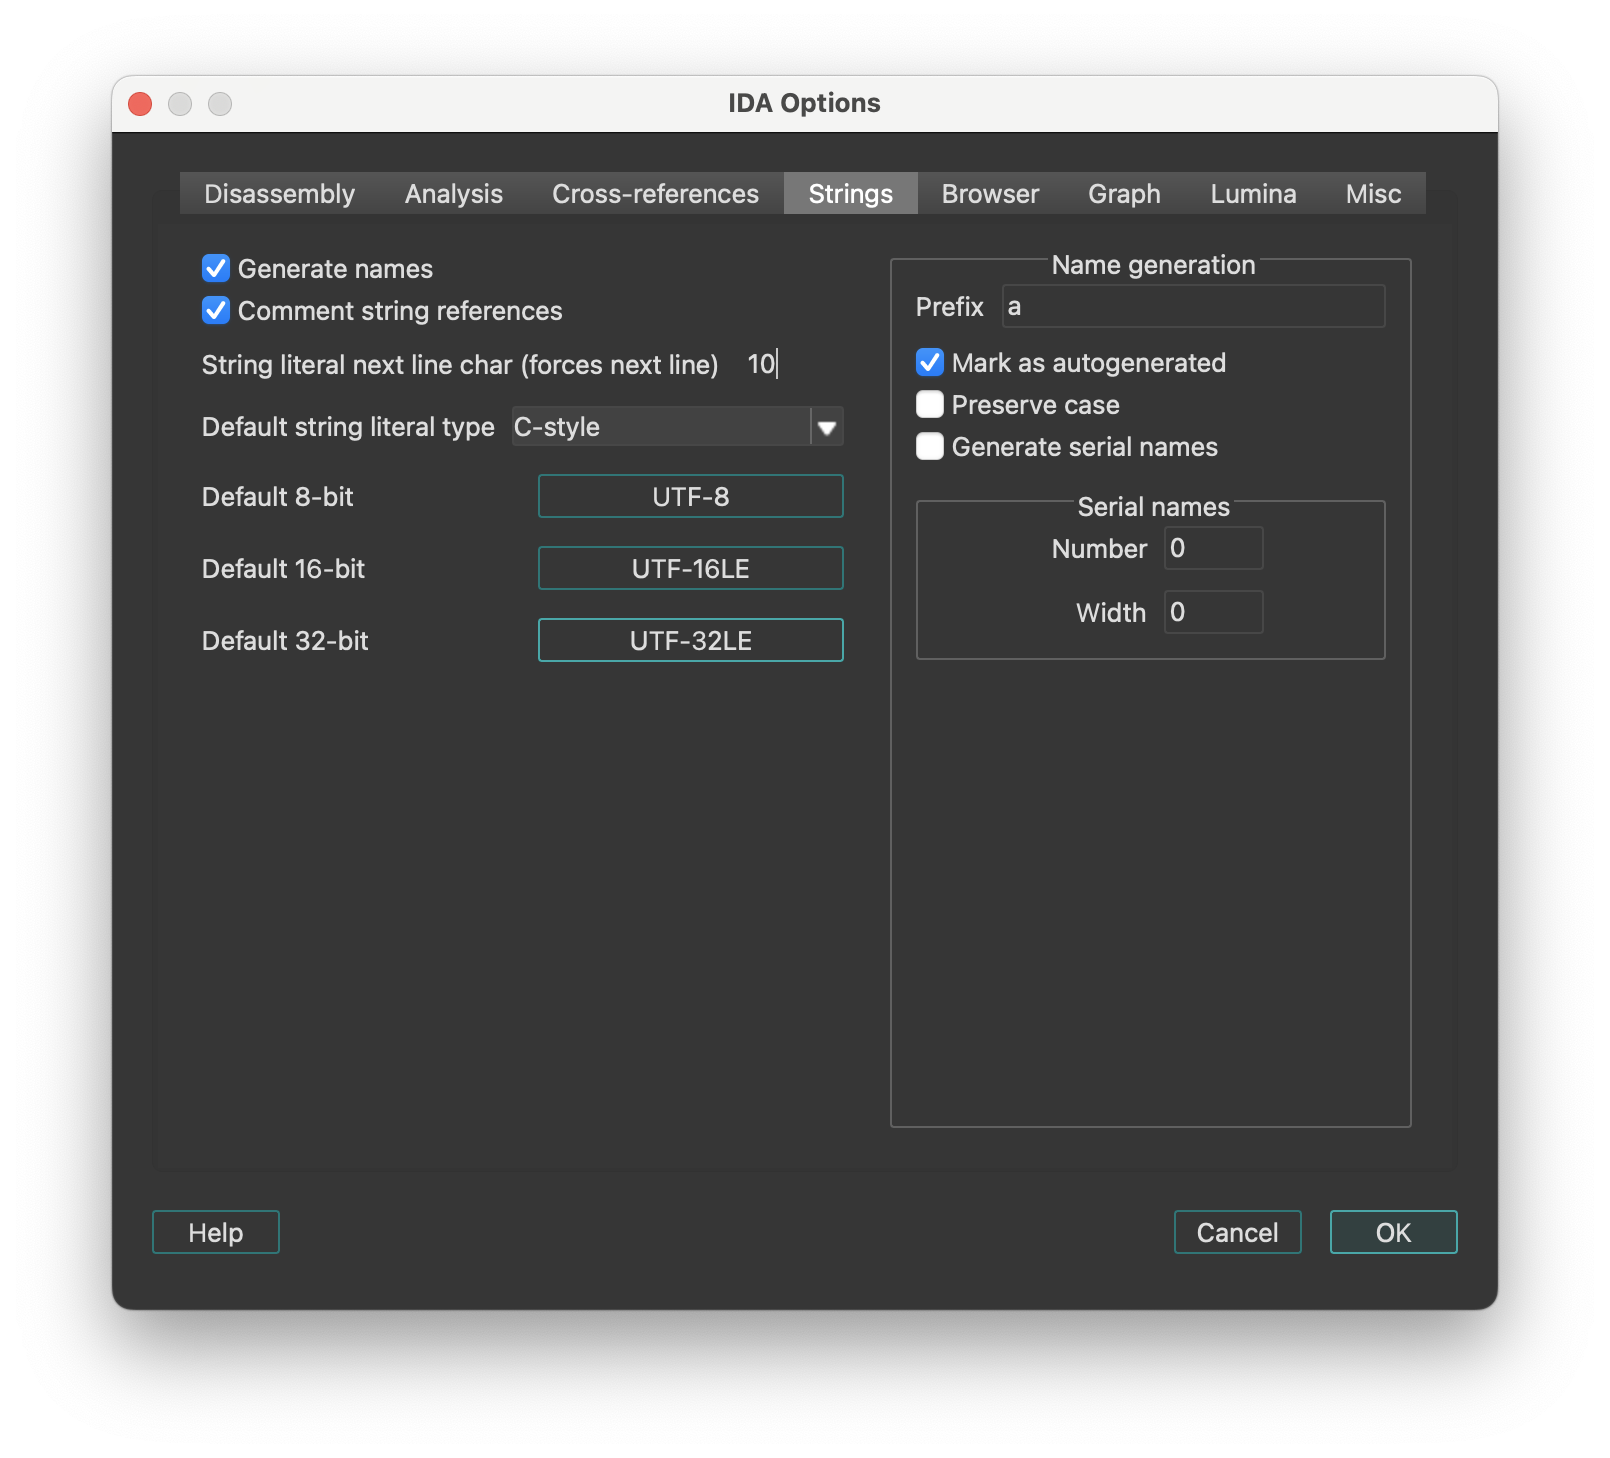
- Generate names If this option is set, IDA will give meaningful names to newly created string literals.
Name generation
-
Prefix: The prefix inserted in the field will be used to form the string name.
-
Mark as autogenerated: If a name is marked as autogenerated, it will be displayed in a different color and will be included in the list of names [action
JumpName] depending on the current setting. -
Generate serial names: IDA can generate serial names for string literals, i.e.
pref_001,pref_002,pref_003 etc...
To enable serial names generation, specify prefix for names, starting serial number, and number of leading zeroes.
Each time you create a string literal (Edit → Strings → String), IDA generates a new serial name and assigns it to the string.
-
String literal next line char: This symbol, when encountered in the string, will make IDA start a new line in the string representation in the disassembly. Usually it is the line feed character (‘\n’).
-
Comment string literal references: This option tells IDA to display the contents of the string literal next to the instruction or offset that refers to the string.
Browser options
This tab of IDA Options configures the disassembly browser’s display behavior, hints, highlighting and navigation features. There are two groups of settings:
- The first group is for hints that are displayed when the mouse is hovered over some text.
- The second group is for other navigation and display settings, like highlighting.
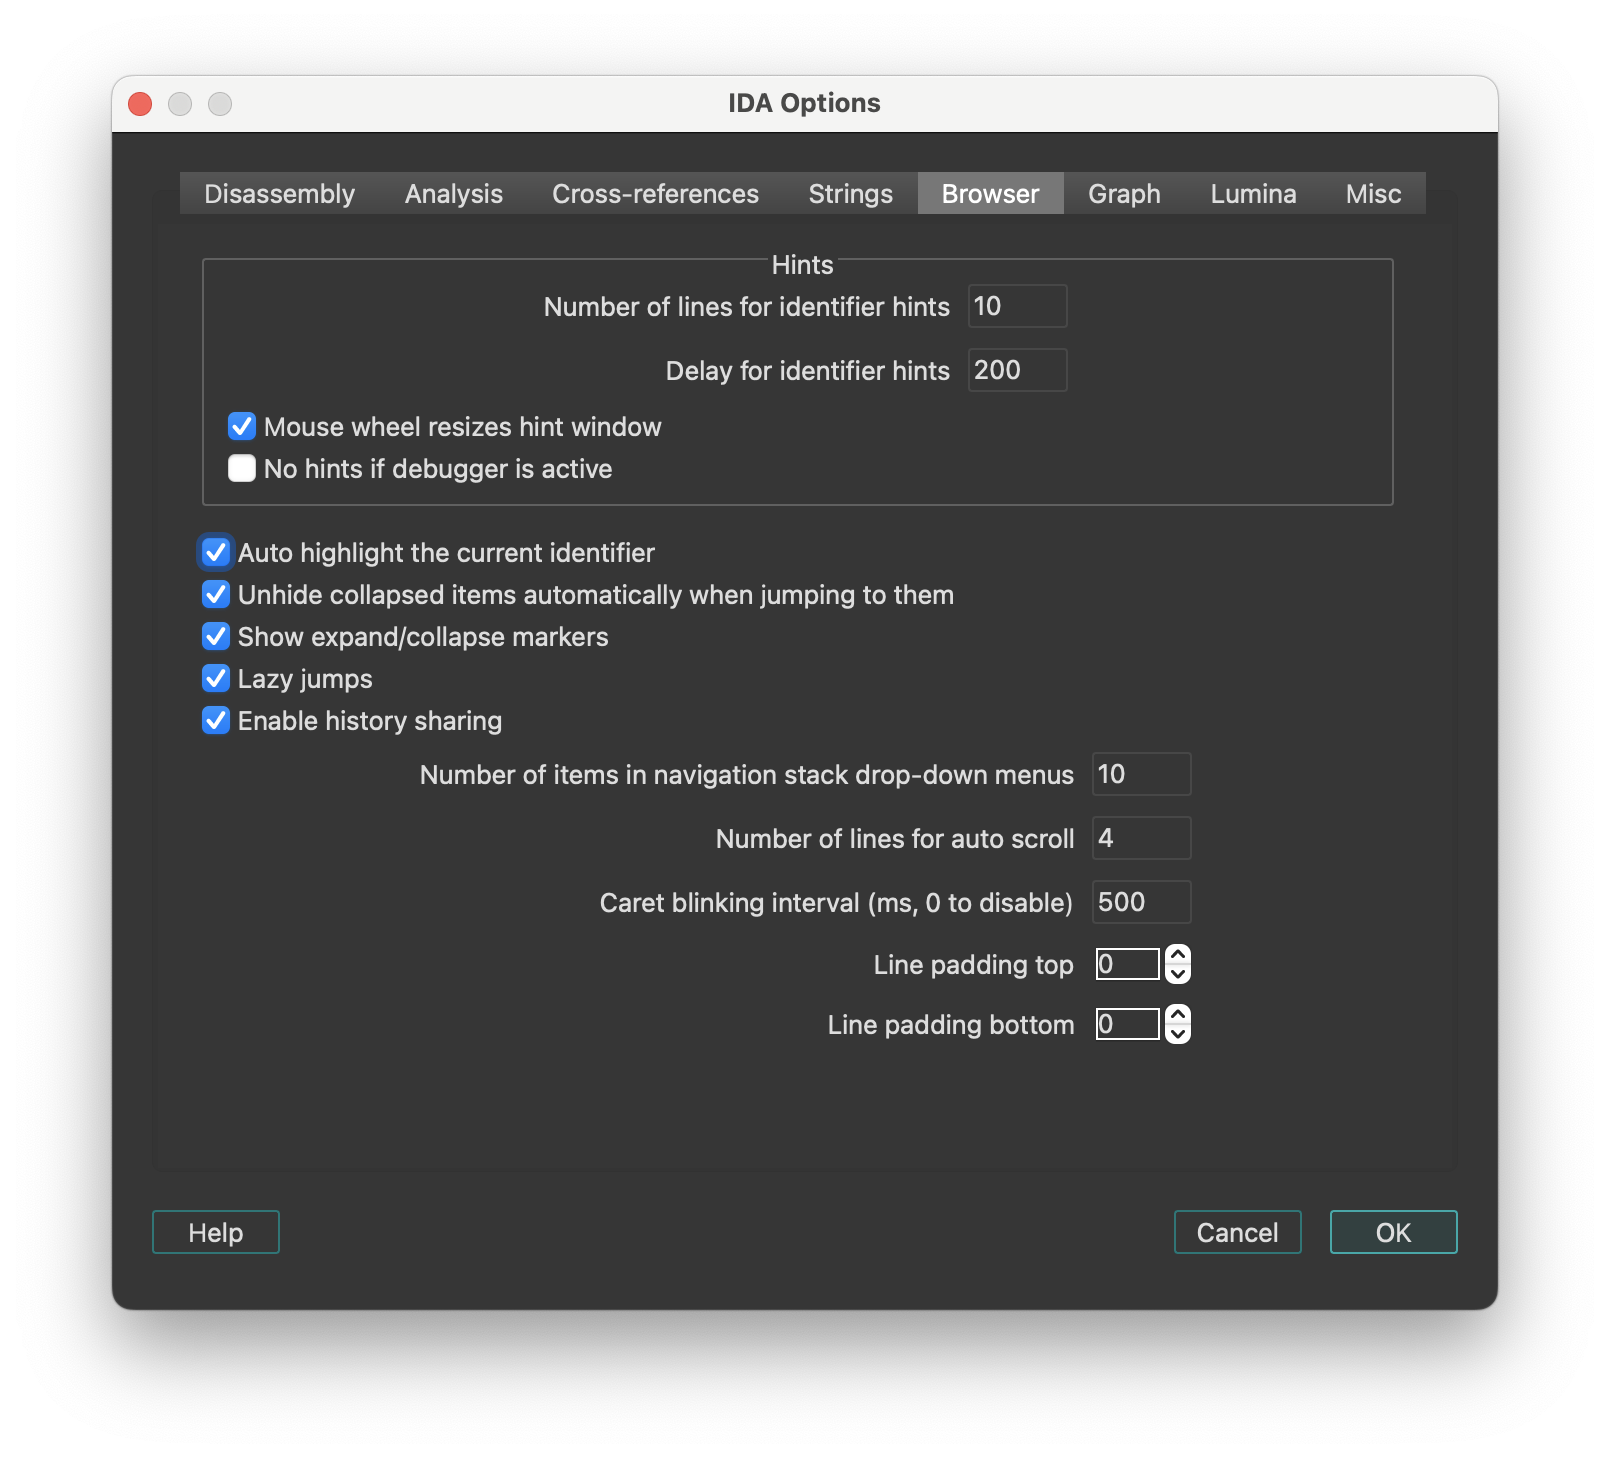
Hints
| Option | Description |
|---|---|
| Number of lines for identifier hints | Specifies how tall the hint window will be initially. IDA may decide to display less lines than specified if the hint is small. The user can resize the hint window using the mouse wheel. |
| Delay for identifier hints | Milliseconds that pass before the hint appears when the user hovers the mouse pointer over an identifier. |
| Mouse wheel resizes hint window | Permit to resize the hint window by using the mouse wheel. Can be turned off if the user does not want to resize the hints. |
| No hints if debugger is active | Hints will be disabled when the debugger is active. This may be useful to speed of debugging: calculating hints for zero filled ranges can be very expensive. |
Other settings
| Option | Description |
|---|---|
| Auto highlight the current identifier | Highlight the current identifier everywhere on the screen. IDA tries to determine if the current identifier denotes a register. In this case it will highlight references to other parts of the register. For example, if “AL” is highlighted, IDA will also highlight “AH”, “AX”, and “EAX” (if the current processor is x86). |
| Unhide collapsed items automatically when jumping to them | If this option is set on, IDA will automatically uncollapse hidden functions if the user decides to jump to them. As soon as the user quits the function by pressing Esc, the function is automatically collapsed again. |
| Lazy jumps | If this option is set on, IDA will not redraw the disassembly window if the jump target is already on the screen. In this case, it will just move the cursor to the specified address. This option leads to less screen redraws and less jumpy behavior. |
| Enable history sharing | This option is enabled by default. It keeps a shared global history across multiple widgets (including Disassembly, Pseudocode, Local Types, and Stack), allowing you to navigate back and forward between them. |
| Number of items in navigation stack drop-down menus | Specifies the number of entries in the drop-down menu for the ‘Jump’ toolbar. |
| Number of lines for auto scroll | Specifies how many lines force automatic scrolling of the disassembly view. |
| Caret blinking interval | Specifies how fast the input caret blinks (in milliseconds). Must be greater than or equal to 500, or zero. Zero means to disable blinking. |
Graph options
This tab configures the visual appearance and behavior of graph view and proximity view.
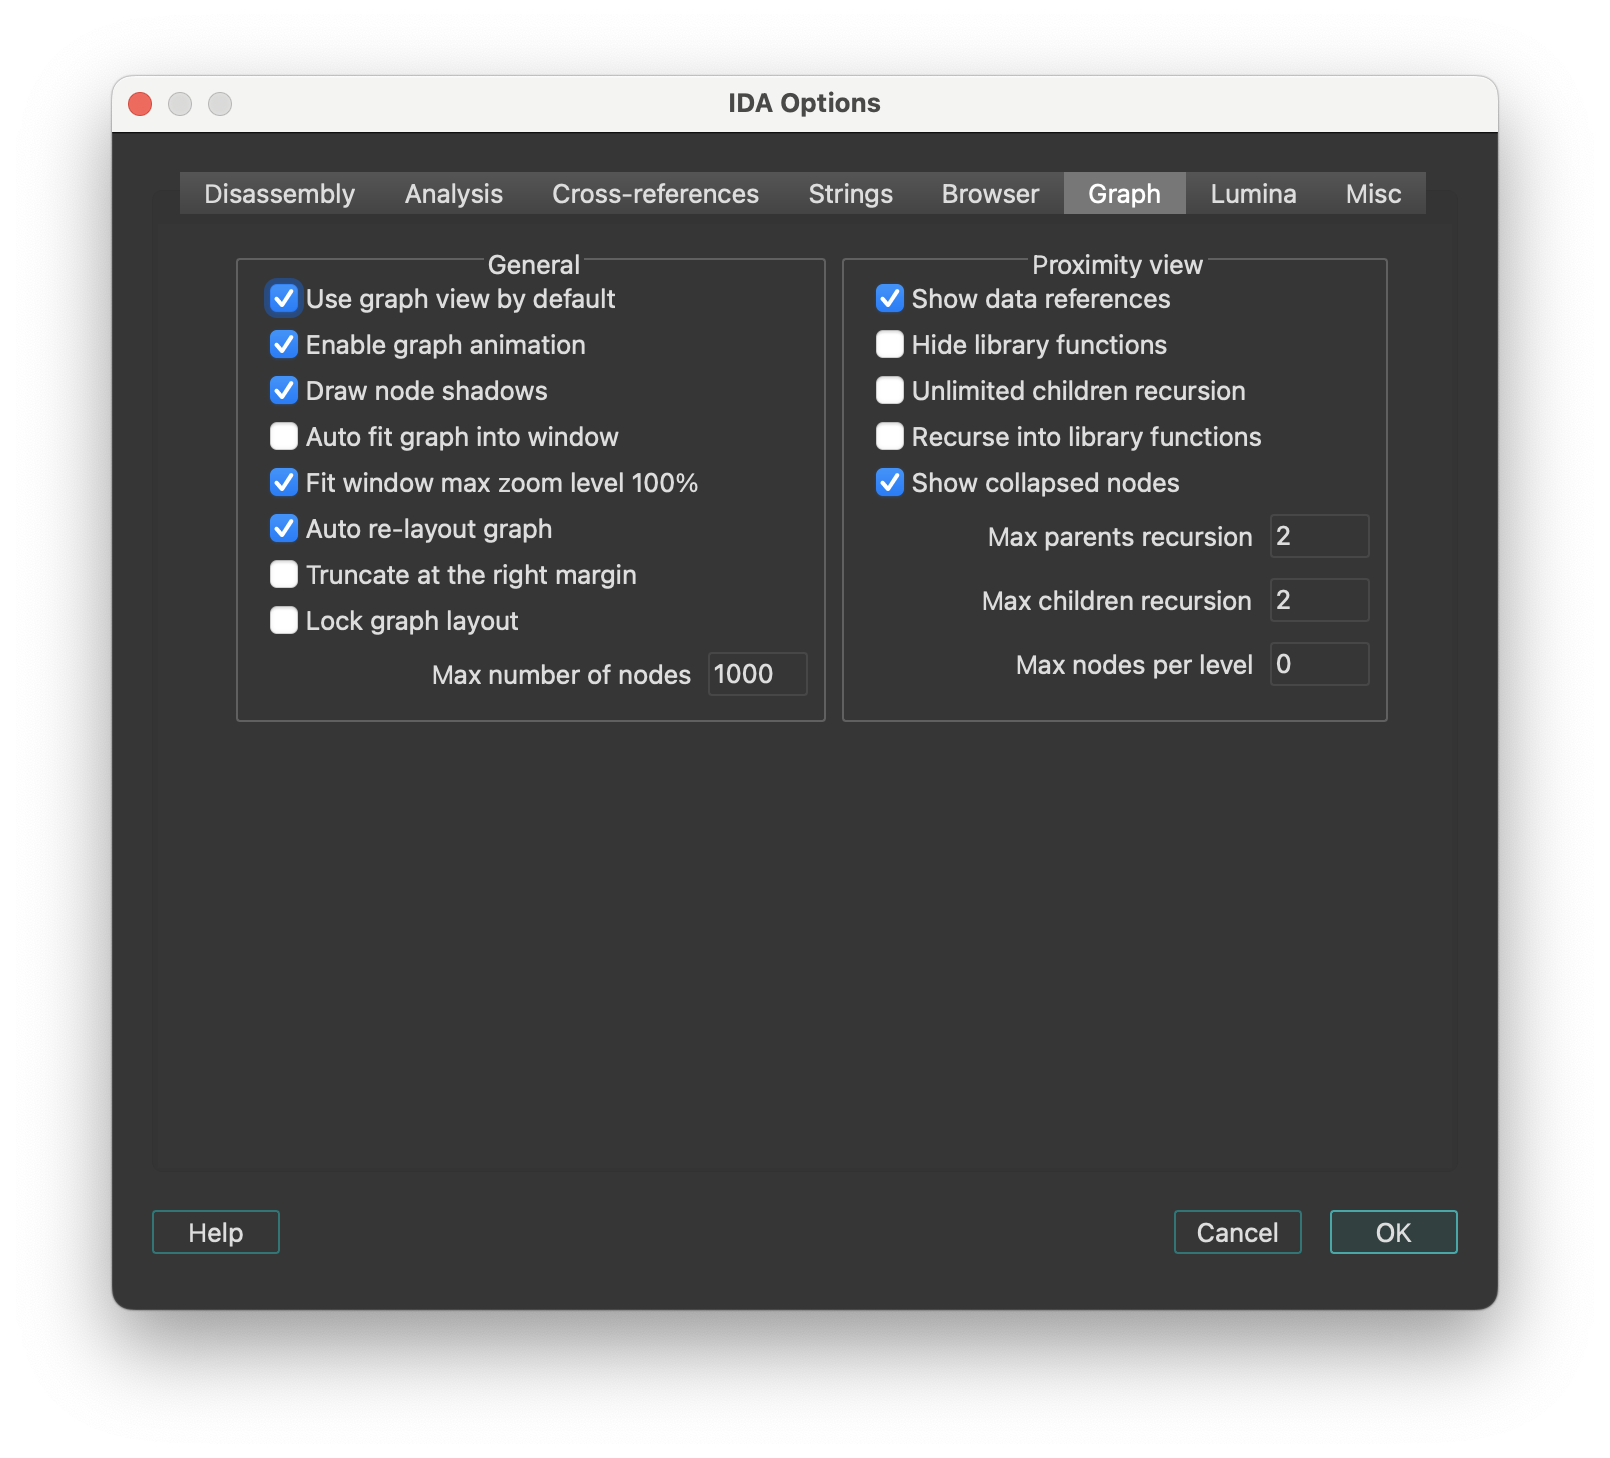
General
| Option | Description |
|---|---|
| Use graph view by default | IDA switches to graph mode for each ‘jump’ command. |
| Enable graph animation | Animate the graph layout, movement, and group collapsing/uncollapsing. While animation takes time, it gives the user some idea what’s going on. |
| Draw node shadows | Display shadows for each graph node. Shadows are not displayed for really huge or ridiculously small nodes. |
| Auto fit graph into window | Zoom the graph so that it occupies the whole window. |
| Fit window max zoom level 100% | The ‘fit window’ command maximal zoom level is 100%. |
| Re-layout graph if nodes overlap | IDA recomputes the graph layout if a node overlap is detected. The presence of a custom layout (if the user has displaced some graph nodes) effectively turns off this option. |
| Re-layout graph upon screen refresh | IDA recomputes the graph layout at each screen refresh. Turning this option off accelerates IDA but then a manual layout might be required after some operations. |
| Truncate at the right margin | All nodes at truncated at the right margin. The right margin is specified in the Options → General → Disassembly tab. This option narrows the graph but hides some information by truncating long lines. |
| Lock graph layout | Locks the graph layout by ignoring attempts to displace nodes. This prevents the creation of custom layouts that might lead to ugly graph layouts when nodes change their sizes. |
Proximity view
| Option | Description |
|---|---|
| Show data references | Show data cross-referenced items in proximity view. |
| Hide library functions | Do not show data or code cross-references to library functions, only show cross-referenced local functions. |
| Unlimited children recursion | Recurse until there are no more callees (children) of the currently selected central node and all of his children. |
| Recurse into library functions | Displays children data or code cross-references from library functions. |
| Max parents recursion | Maximum recursion level for displaying parents of the currently selected central node. The value 0 disables parents recursion. |
| Max children recursion | Maximum recursion level for displaying children of the currently selected central node. The value 0 means no maximum recursion level. |
| Max nodes per level | Maximum number of nodes to show per level of children and parents. |
Lumina options
This tab configures Lumina server connection settings.
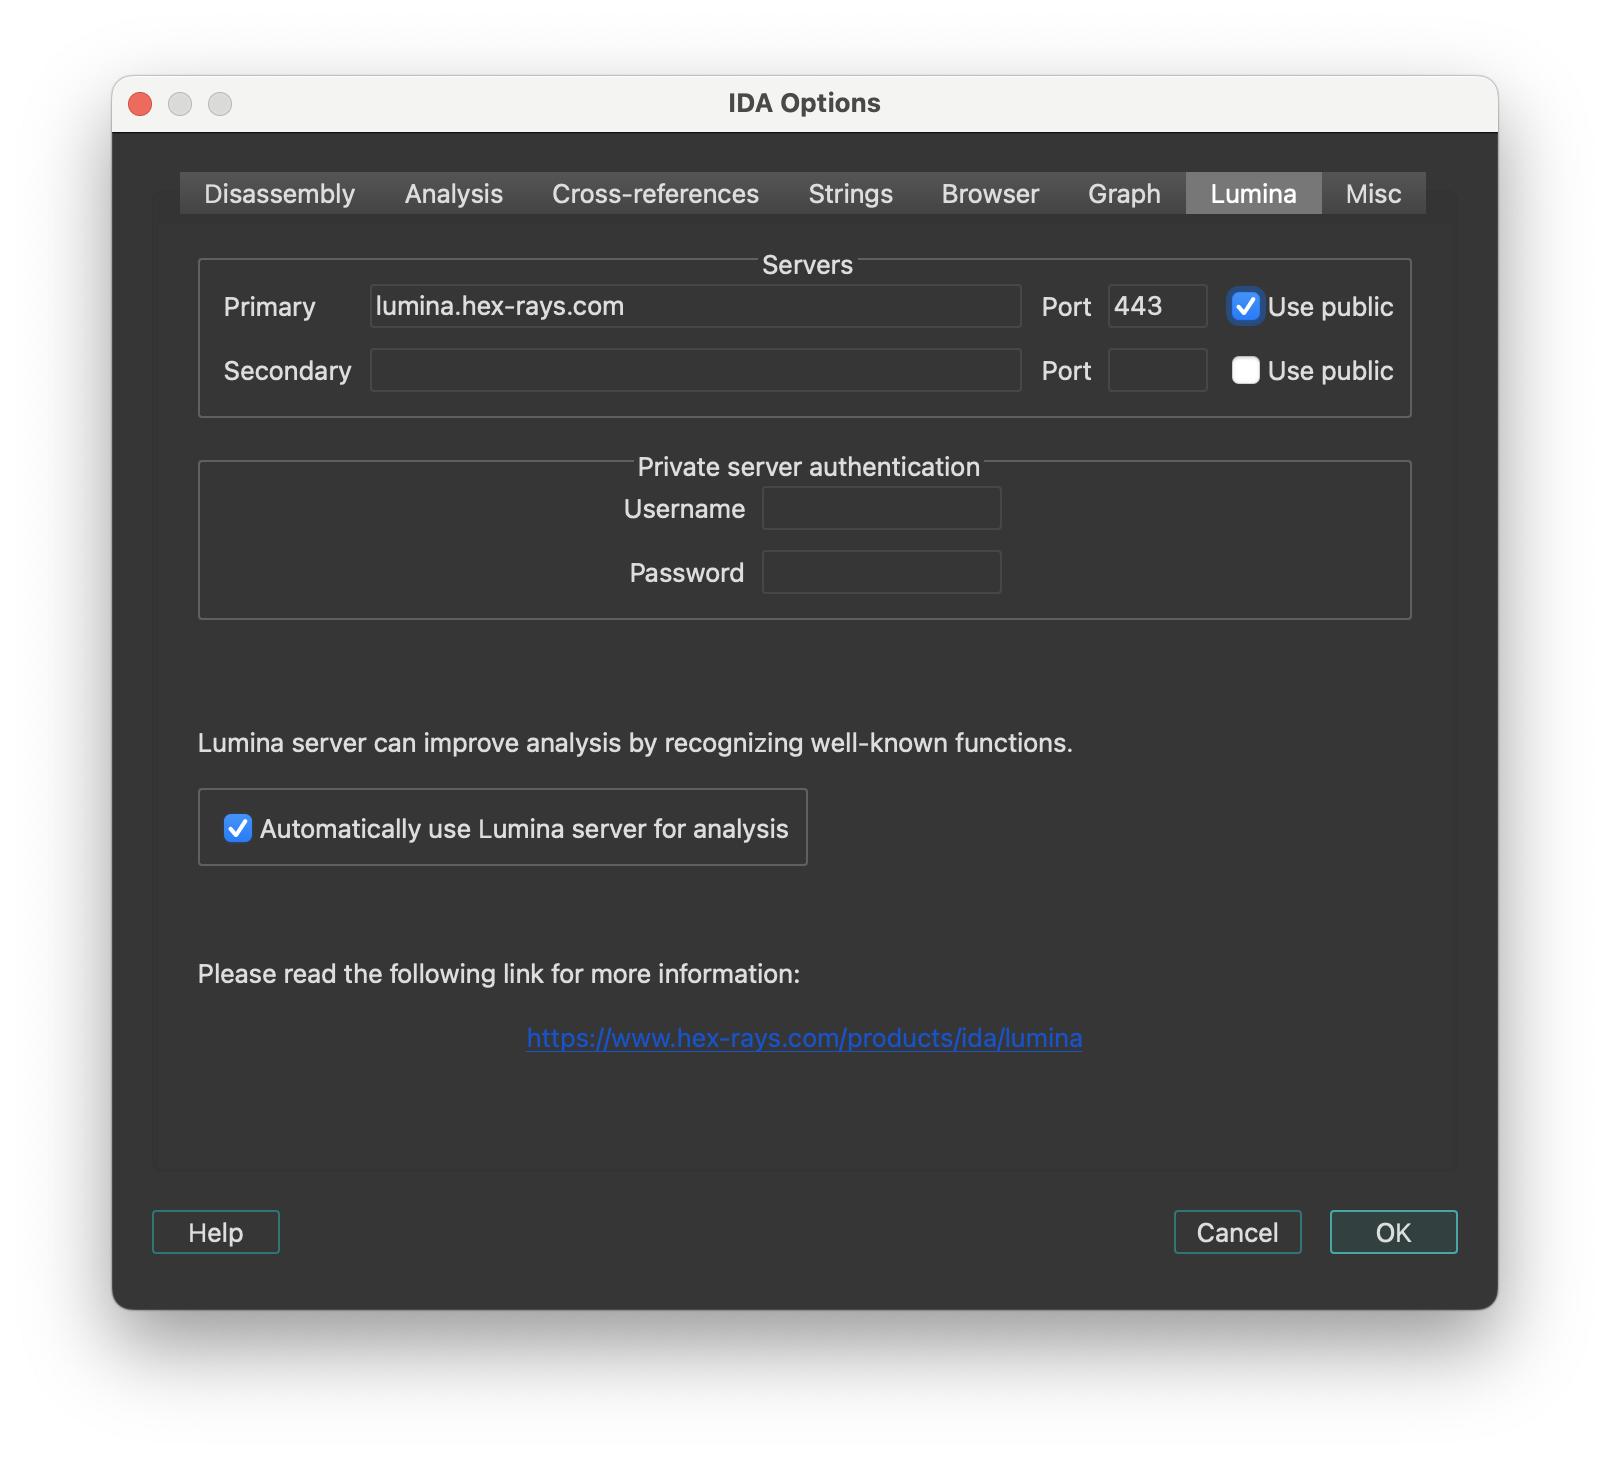
Servers
- Use public: Sets host and port to the default public server hosted by Hex-Rays. No username or password is required.
Private server authentication
Specify the username and password credentials for a Private Lumina server.
Automatically use Lumina server for analysis
Instructs IDA to fetch function metadata from the current Lumina server, after the initial auto-analysis is complete. This helps with the recognition of known functions stored in the database of the Lumina server.
Lumina command line options
Command line switch '-Olumina' overrides for ida session the primary server and '-Osecondary_lumina' the secondary one.
List of options
| Option | Description |
|---|---|
host | lumina server host |
port | lumina server port |
user | username for authentification on private lumina |
pass | password for authentification on private lumina |
proxy_host | proxy host |
proxy_port | proxy port |
proxy_user | username for authentification on proxy |
proxy_pass | password for authentification on proxy |
Example
-Osecondary_lumina:host=lumina.hex-rays.com:port=443
Use the public lumina as secondary server for this ida session
Miscellaneous options
This tab configures miscellaneous options including editor settings, encoding and types autocompletion.
-
Editor: A text editor is to be used when the user decides to edit an IDC script using the IDC toolbar.
-
Navigation band refresh interval (milliseconds): Specifies how often the navigation band will be refreshed. IDA tries to minimize the number of redrawings because they could be really time and processor consuming (imagine a huge program, 50-100 megabytes of code. It would take a long time to refresh information on the navigation band because the whole program will be examined to determine how to draw the band). If this option is set to
0, the navigation band is refreshed only when the cursor is moved far enough to reflect its movement on the band. -
Convert already defined bytes: Determines how IDA should behave when user operations would end up redefining some already-defined bytes.
-
Associate .IDB file extension with IDA: Whether or not the .IDB extension should be associated, at the OS-level, with IDA.
-
Enable autocomplete in forms: Determines whether input fields should provide an auto-complete combo box by default.
-
Output files encoding: The encoding used to generate output text files from IDA. The value ‘
’ means that the IDB’s default 8 bit-per-unit encoding will be used.
Types autocompletion
| Option | Description |
|---|---|
| Enable autocomplete for types | Enables or disables the entire autocomplete mechanism for types. If you uncheck the box, the behavior will not differ from previous versions. Enabled by default. |
| Case sensitive | Changes case sensitivity. When enabled, for example, the prefix b will show bucket but not BigStruct. Disabled by default. |
| Enable autocomplete for curly braces | Enables or disables autocompletion of curly braces and indents. When enabled, typing { inserts a closing brace on a new line, with an indented empty line and the cursor placed in between. Enabled by default. |
| Enable type hints | Enables or disables hints when selecting a type from the autocomplete suggestions. These hints behave similarly to the hints in Local Types. Enabled by default. |
Colors…
Setup colors. The IDA Colors dialog lets you change the active theme or fine-tune the one currently in use. Each tab lets you customize specific parts of the UI.
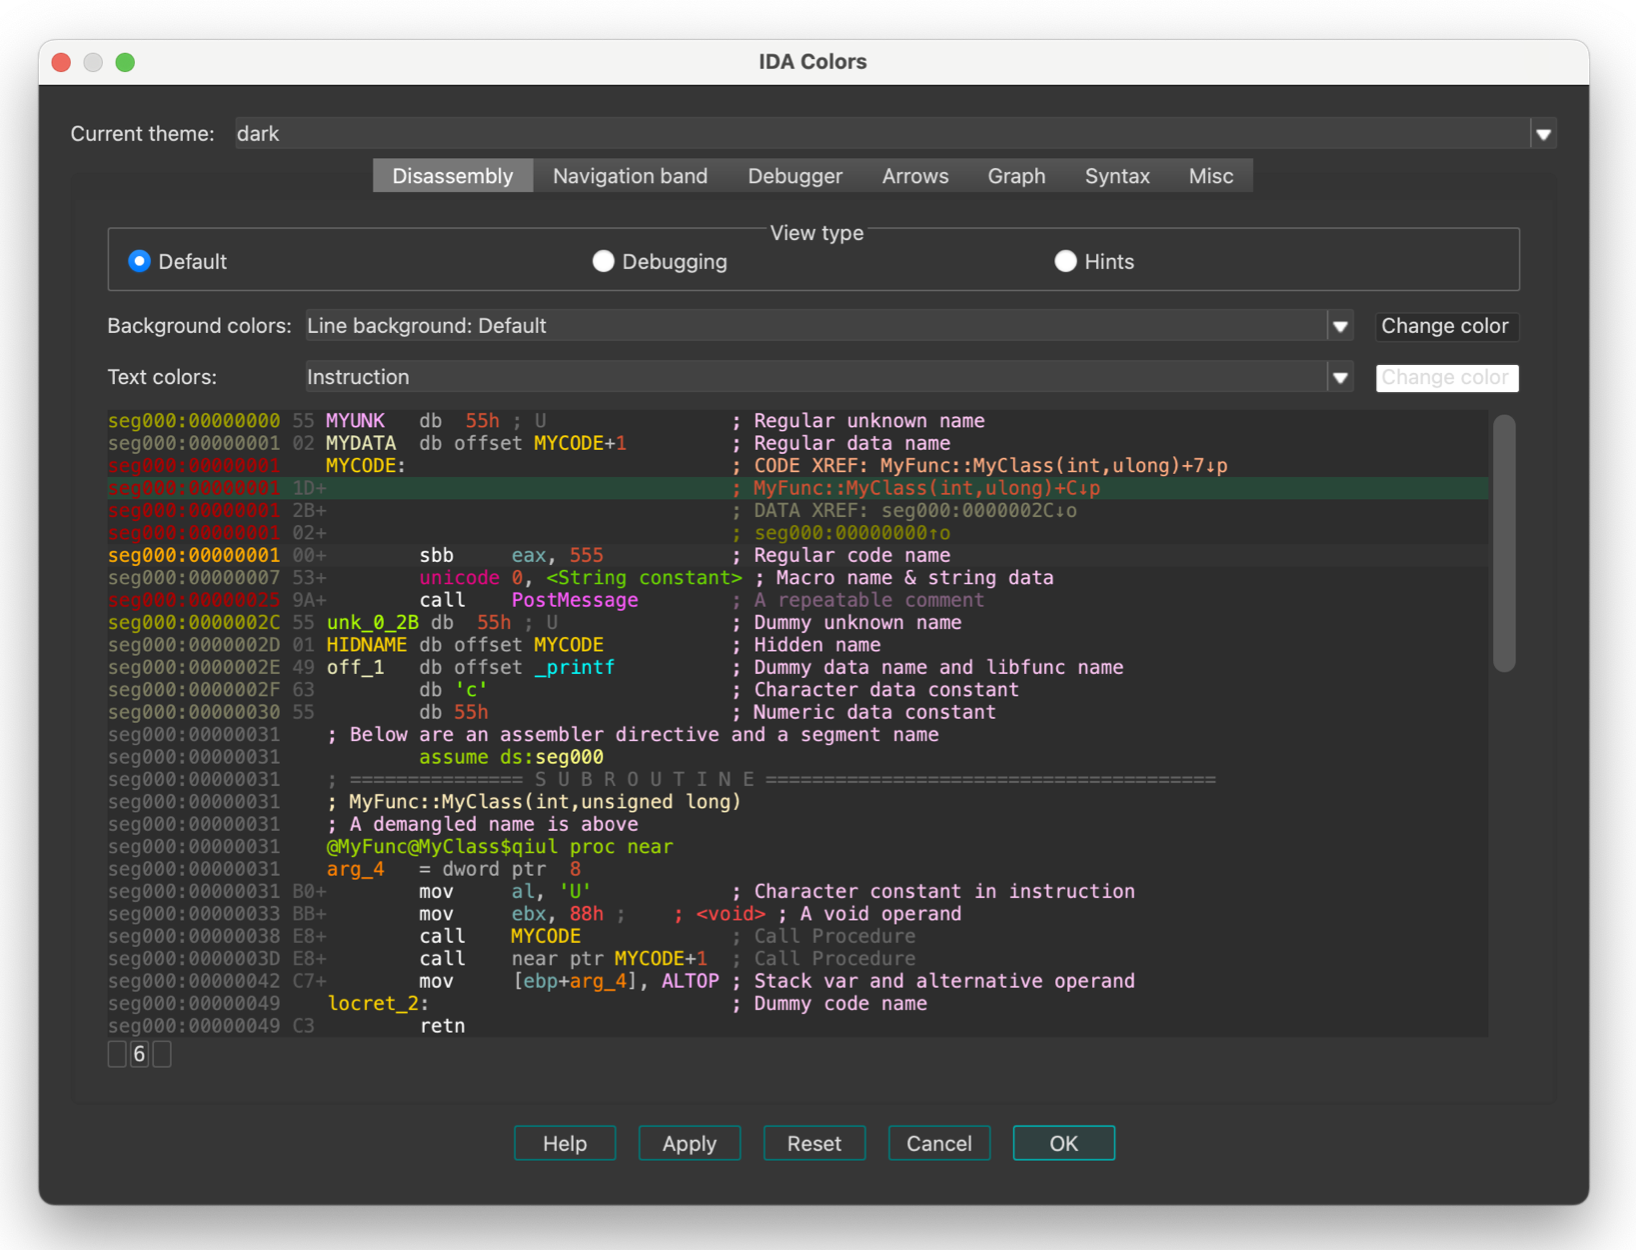
IDA keeps the color configuration in the registry. There are 3 predefined schemes. The user can modify the existing schemes or add his own schemes. New schemes should be added to the “themes” subdirectory in IDA.
Windows 11 style contrast
By default, IDA uses the “out-of-the-box” Qt style - named windows11.
That style mimics the core Microsoft Windows 11 theme, with which some users have reported some discomfort due to low-contrast hints.
This is observable especially in “tabular” widgets, where the selection painted using an somewhat discrete overlay:
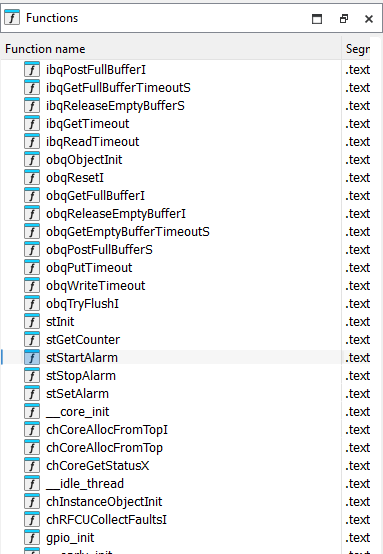
Addressing this naïvely (e.g., by overriding the selection entries through CSS) might do more harm than good though, so we have decided against that.
Instead, we recommend using the Qt “Fusion” style, which offers significantly better contrast:
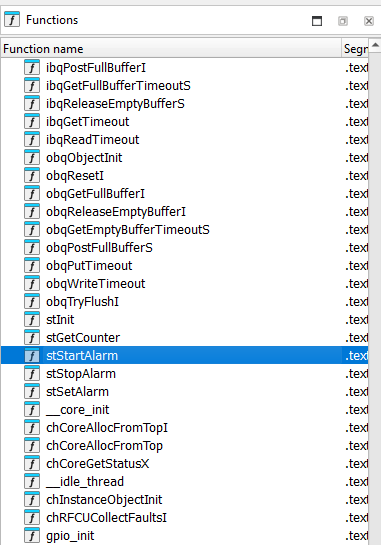
This is achievable by opening the “Environment variables” dialog, and adding an entry called QT_STYLE_OVERRIDE with the value fusion.
Font…
Setup font. This dialog allows you to customize the font used in listings.
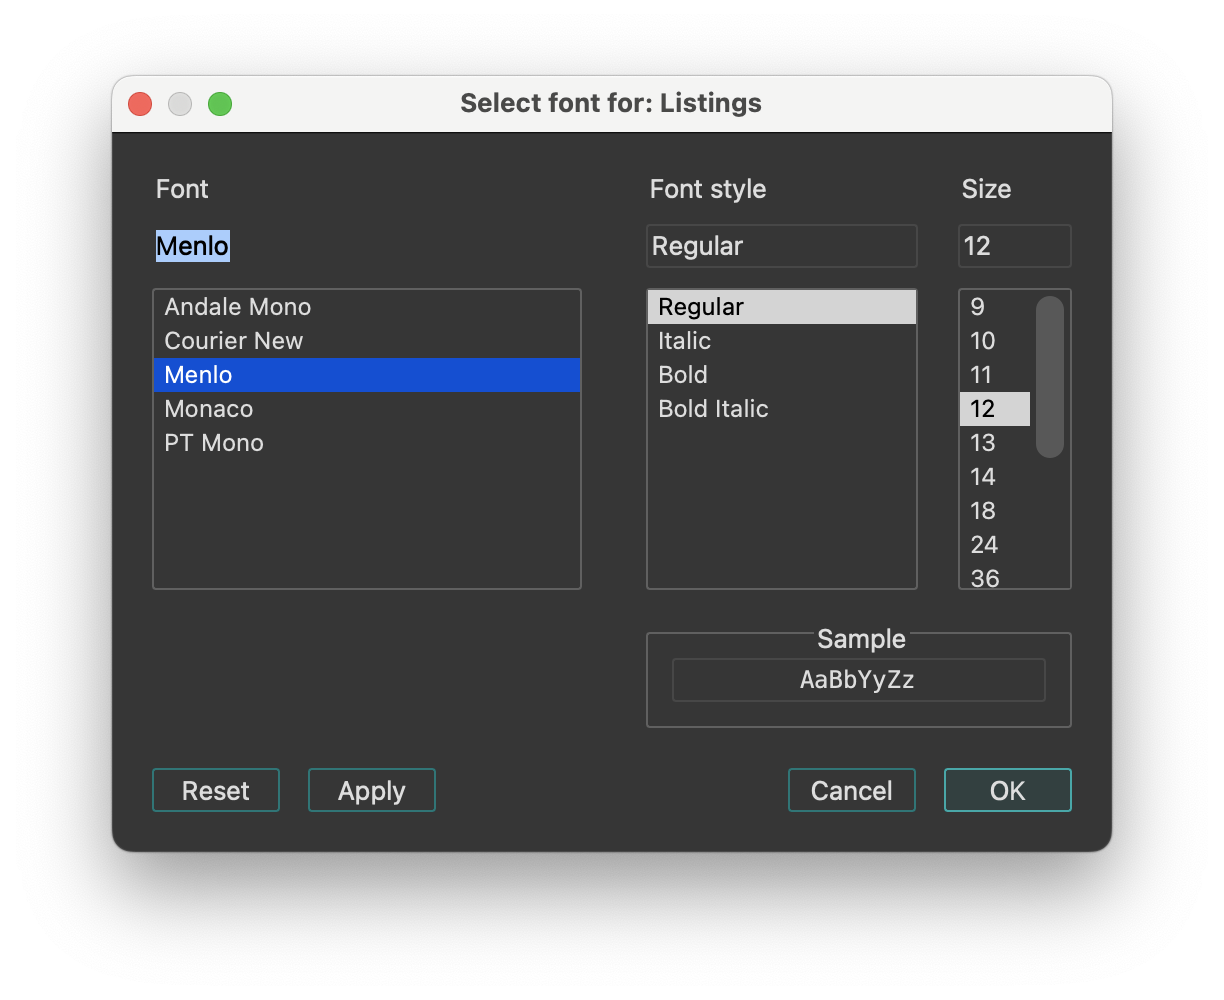
Feature Flags…
Configure feature flags.
This dialog lists optional features that can be enabled or disabled. By default, the two options below are enabled, supporting the new JumpAnywhere feature:
- Override G shortcut with new Jump Anywhere dialog.
- (If disabled, the G will continue to trigger “Jump to address…” dialog).
- Enable preview pane in Jump Anywhere dialog.
Shortcuts…
Edit shortcuts. This dialog allows you to view and customize all keyboard shortcuts used in IDA. You can use Ctrl + F to search by command name or keyboard shortcut.
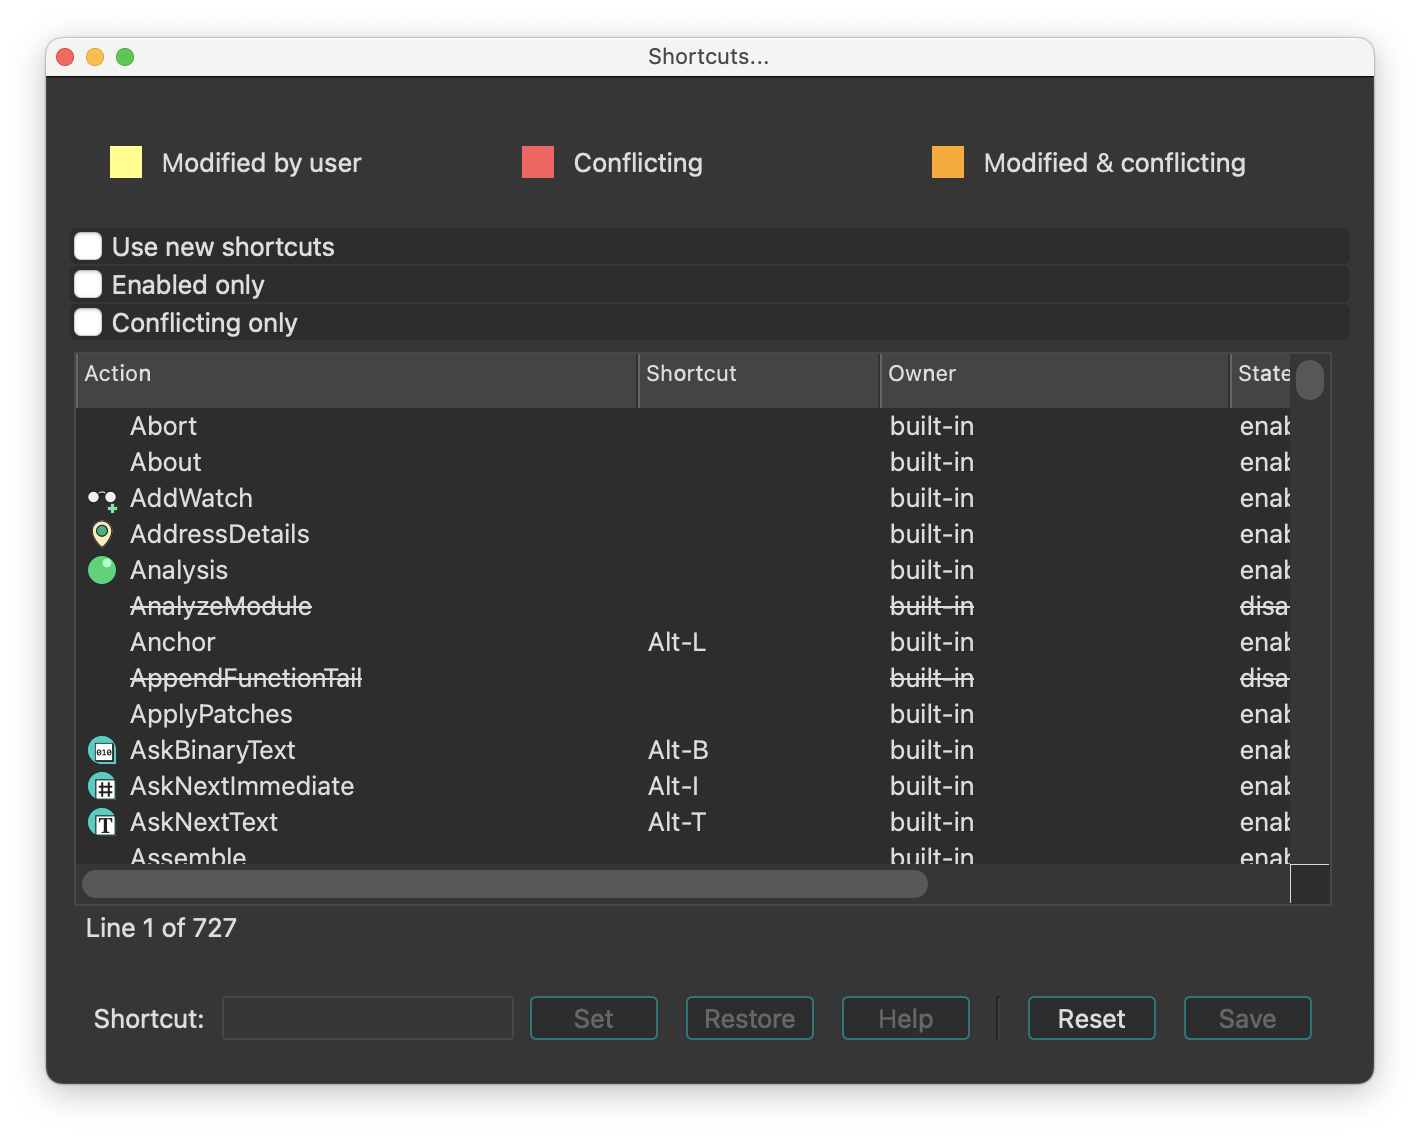
Show command palette…
Show command palette. This command opens a dialog, that provides quick access to all available IDA actions with shortcuts and descriptions.
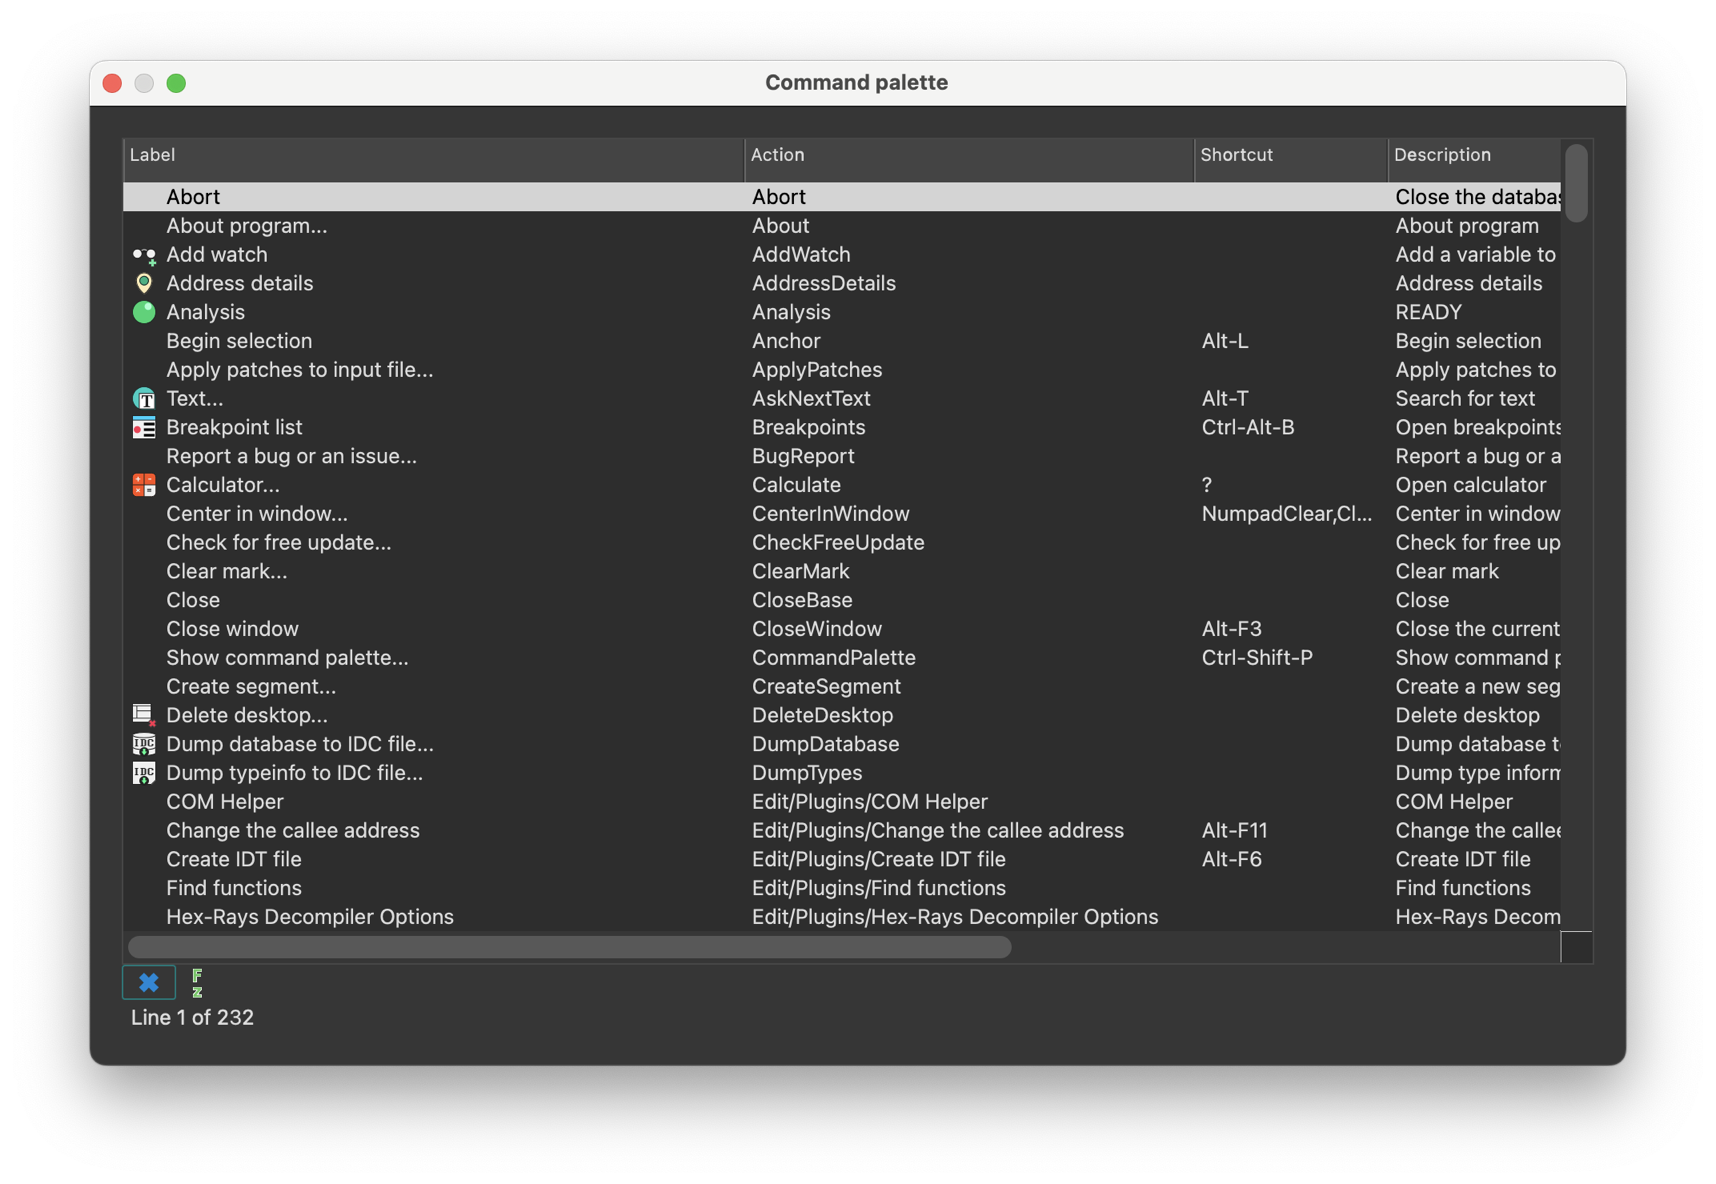
Reset undo history
Reset undo history. This command clears the undo history. After it the Undo and Redo commands become unavailable. However, once the user performs a new action, IDA will again start journaling all database modifications.
A side effect of this command is fast autoanalysis: since there is no user action to revert yet, IDA does not maintain undo buffers and this speeds up the analysis.
Assembler directives…
Setup assembler directive generation.
This command enables/disables the generation of some assembler directives, namely:
- assume directive
- origin directive Sometimes (when you do not intend to assemble the output file), you may want to disable their generation.
Name representation…
Setup name representation. Dummy names are automatically generated by IDA. They are used to denote subroutines, program locations and data. Dummy names have various prefixes depending on the item type and value:
| Prefix | Description |
|---|---|
sub_ | instruction, subroutine start |
locret_ | ‘return’ instruction |
loc_ | instruction |
off_ | data, contains offset value |
seg_ | data, contains segment address value |
asc_ | data, string literal |
byte_ | data, byte |
word_ | data, 16-bit |
dword_ | data, 32-bit |
qword_ | data, 64-bit |
byte3_ | data, 3 bytes |
xmmword_ | data, 128-bit |
ymmword_ | data, 256-bit |
packreal_ | data, packed real |
flt_ | floating point data, 32-bit |
dbl_ | floating point data, 64-bit |
tbyte_ | floating point data, 80-bit |
stru_ | structure |
custdata_ | custom data type |
algn_ | alignment directive |
unk_ | unexplored byte |
You can change representation of dummy names. IDA supports several types of dummy names:
| Format | Example | Description |
|---|---|---|
0 | loc_0_1234 | segment base address relative to program base address & offset from the segment base |
1 | loc_1000_1234 | segment base address & offset from the segment base |
2 | loc_dseg_1234 | segment name & offset from the segment base |
3 | loc_0_11234 | segment relative to base address & full address |
4 | loc_1000_11234 | segment base address & full address |
5 | loc_dseg_11234 | segment name & full address |
6 | loc_12 | full address |
7 | loc_0012 | full address (at least 4 digits) |
8 | loc_00000012 | full address (at least 8 digits) |
9 | dseg_1234 | the same as 2, but without data type specifier |
10 | loc_1 | enumerated names (loc_1,loc_2,loc_3…) |
If you have selected names type 10 (enumerated names), you may renumber them using a checkbox. The process is relatively fast, surprisingly.
The best representation for MS DOS programs is #0, for 16-bit processors - #7, and for 32-bit processors - #8. You can change dummy names type any time you want.
You can also set up types of names included in the name list (Jump by name… command, action JumpName). IDA knows about the following types of names:
- normal names
- public names
- weak public or extern names
- autogenerated (meaningful) names.
- dummy (meaningless) names.
Dummy names may be public or weak, but they never appear in the list of names. You can specify the type of a name when you create or rename it.
You can also set maximal length of new names. Old names will not be affected by this parameter.
See also: the Rename command.
Demangled names…
Setup C++ demangled name representation. IDA can demangle mangled C++ names of the most popular C++ compilers:
- Microsoft
- Borland
- Watcom
- Visual Age
- GNU
The demangled names are represented in two forms: short and long form. The short form is used when a name is used as a reference, the long form is used at the declaration.
You can set how demangled C++ names must be represented:
- as comments: this representation allows you to obtain recompilable source text
- instead of mangled names: this representation makes the output more readable (the disadvantage is that you cannot recompile the output)
- don’t display demangled names.
You can setup short and long forms of demangled names. Short form is used when a reference to the name is made; long form is used at the declaration.
To make demangled names more readable, we introduce the possibility to suppress pointer modifiers (near/far/huge).
To demangle GNU C v3.x names, the “Assume GCC v3.x names” checkbox should be set, otherwise such names might not be demangled. Furthermore, to make the demangled name more compact, unsigned types may be displayed as uchar, uint, ushort, ulong. The same with signed basic types.
If the “Override type info” checkbox is set, the demangled name overrides the type information if both are present.
See also How to customize demangled names
Compiler…
Setup target compiler and its parameters. This dialog allows the user to specify the compiler used to create the program along with the memory model, default calling convention, ABI and other parameters. Please note that while some combinations of the parameters are meaningless, IDA doesn’t check them for validity. It is up to the user to specify a correct combination.
IDA tries to determine the correct values automatically.
The include directories are a list of directories that look for the standard C headers. This parameter is used during parsing C header files (the Parse C header file… command; action LoadHeaderFile). The directories must be separated by ‘;’ in MS Windows and ‘:’ in Linux. The predefined macros field has the same format and is used similarly. Please note that IDA doesn’t define any compiler-specific macros by default.
Parser options
You can select between different parsers using the parser settings located at the bottom of the Compiler options dialog.
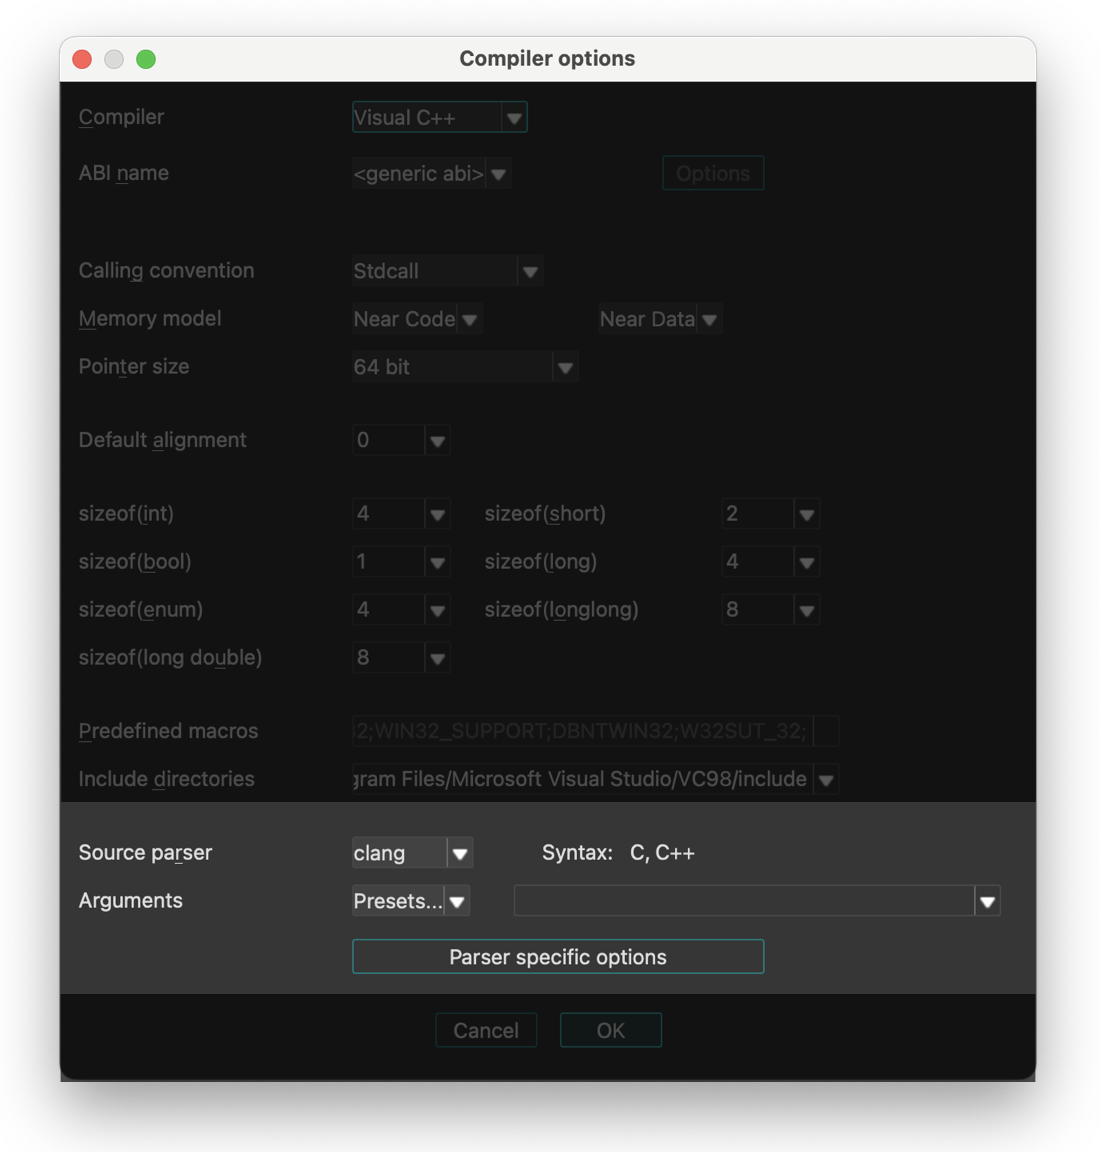
IDA provides three parser options:
- legacy - old internal IDA parser (will be removed in future versions)
- old_clang - previous parser based on clang
- clang - new parser introduced in IDA 9.2, (based on LLVM)
Parser Configuration
The old_clang and new clang parser can be fine-tuned using the Parser specific options dialog.
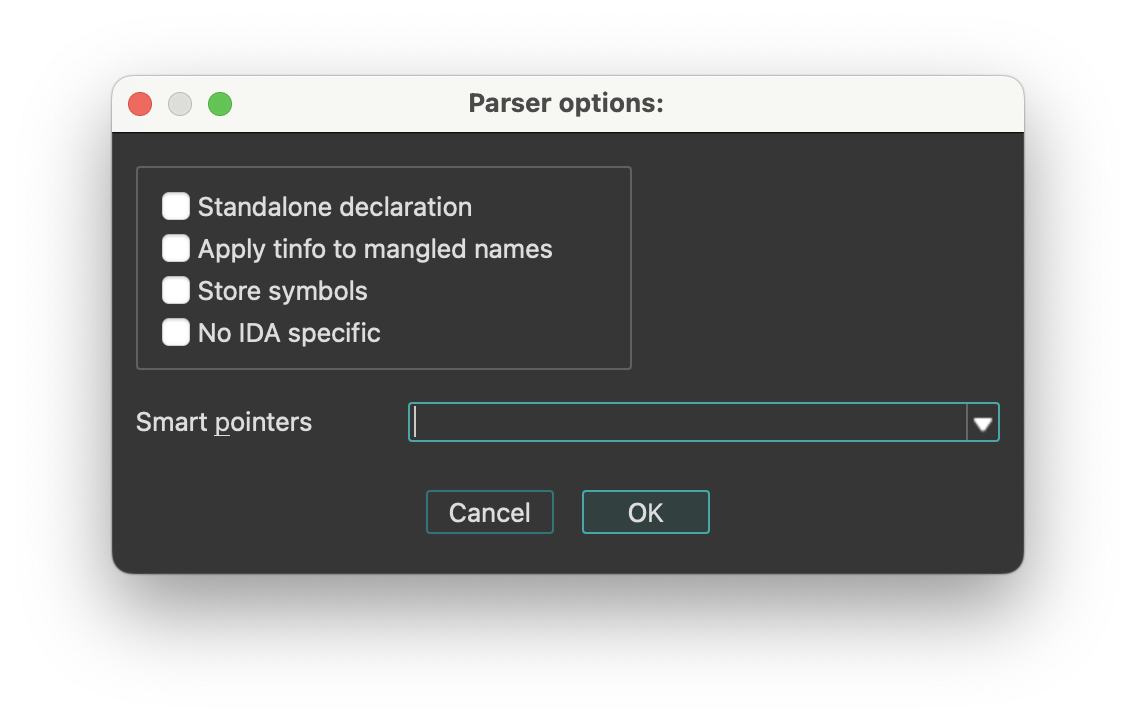
String literals…
Setup string literal style. With this dialog you can setup string styles and also create a new string immediately at the current location.
The following string styles are defined:
- C-style (zero-terminated)
- DOS style ($ terminated)
- Pascal style (one byte length prefix)
- Wide pascal (two-byte length prefix)
- Delphi (four-byte length prefix)
- Unicode (UTF-16)
- Unicode pascal style (two-byte length prefix)
- Unicode wide pascal style (four-byte length prefix)
- Character terminated
If you select “character terminated” string style then you may specify up to 2 termination characters. The string will be terminated by any of these characters. If the second character is equal to 0, then it is ignored. In IDA Qt you can also set a specific encoding to be used to display the string, or change the defaults for all strings.
String encodings
IDA Qt can display program strings using different encodings. You can specify default encodings for all strings or override the encoding of a specific string.
The following encodings can be used:
<default>- the default encoding for this string type (8-bit or 16-bit)<no conversion>- the string bytes are printed using the current system encoding (after translating with XlatAsciiOutput array in the configuration file).- Windows codepages (e.g., 866, CP932, windows-1251)
- Charset names (e.g., Shift-JIS, UTF-8, Big5)
You can add new encodings to the list using the context menu item Insert (Ins hotkey).
On Linux/OS X, you can run “iconv -l” to see the available encodings. Please note that some encodings are not supported on all systems.
Setup data types…
Setup data types.
This command allows you to select the data types used in the round-robin carousel in the Data (action MakeData) command.
Valid data types are:
| Data Type | Size |
|---|---|
| byte | |
| word | 2 bytes |
| double word | 4 bytes |
| float | 4 bytes |
| quadro word | 8 bytes |
| double | 8 bytes |
| long double | 10 or 12 bytes |
| packed real | 10 or 12 bytes |
| octa word | 16 bytes |
Naturally, not all data types are usable for all processors. For example, Intel 8051 processor doesn’t have the ‘double word’ type. Furthermore, this command allows you to select a data type for the current undefined item and convert it to data. Please note that if the current processor does not support a data type, you cannot assign it even if you have selected it. If you unselect all data types, IDA will use the ‘byte’ type.
Source paths…
Setup source paths. In this dialog you can configure path mappings to help IDA locate source files in different locations.
Windows menu actions for Common
Below is an overview of all actions that can be accessed from this menu.
| UI Action Name | Action Name | Description |
|---|---|---|
| Load desktop… | LoadDesktop | This commands show all available desktops (stored in the database or in the registry). More… |
| Save desktop… | SaveDesktop | This command saves the current desktop configuration to a desktop. More… |
| Delete desktop… | DeleteDesktop | This command deletes a desktop containing a desktop configuration. |
| Reset desktop | ResetDesktop | This command resets all windows (IDA main window and database windows) by loading the original IDA disassembly desktop or debugger desktop(if the debugger is active). |
| Reset hidden messages… | ResetHiddenMessages | Reset hidden messages |
| Windows list | WindowsList | Display list of the currently open windows |
| Next window | NextWindow | Switch to the next window |
| Previous window | PrevWindow | Switch to the previous window |
| Close window | CloseWindow | Close the current window |
| Focus command line | FocusCLI2 | Focus command line |
| Output window | OutputWindow | Display the output window if hidden. More… |
| Functions | WindowActivate1 | Functions |
| IDA View-A | WindowActivate2 | IDA View-A |
| Pseudocode-A | WindowActivate3 | Pseudocode-A |
| Hex View-1 | WindowActivate4 | Hex View-1 |
| Local Types | WindowActivate5 | Local Types |
| Imports | WindowActivate6 | Imports |
| Exports | WindowActivate7 | Exports |
| Switch to window #8 | WindowActivate8 | Switch to window #8 |
| Switch to window #9 | WindowActivate9 | Switch to window #9 |
Load desktop…
This commands show all available desktops (stored in the database or in the registry). Pressing Enter loads the desktop configuration from the selected desktop. Pressing Del> deletes the selected desktop.
Save desktop…
This command saves the current desktop configuration to a desktop. If you enter a name, IDA saves the current configuration to a named desktop in the database or registry. If you select ‘Default’, IDA saves the current configuration to the Default or Default debugger desktop (if the debugger is active) in the registry.
Output window
Display the output window if hidden. The Output window appears at the bottom of IDA’s interface by default and serves two key purposes:
- Displays various IDA messages and notifications.
- Provides a command line interface (CLI) for executing IDC or IDAPython commands.

If closed, you can reopen it via Windows -> Output window.
Context Menu Options
Right-click in the Output window to access these options:
- Select All: Selects all content in the window
- Find/Find next: Searches for a specific string
- Clear: Removes all previous messages from the window
- Copy to CLI: Places selected text into CLI field
- Save to file: Exports window content to a .log file
- Show timestamps: Displays time information with each message
- Font…: Customizes the text appearance (font, style, size)
You can duplicate all messages appearing in this window to a file. To do this, you have to define an environment variable before starting IDA:
set IDALOG=logfile
Command Line Providers
Currently, the following command line providers exist:

When these plugins are active, they will process the entered commands. The current command language can be changed by clicking the button to the left of the input field. The current language can be set as default by choosing “Default CLI” from the context menu of the command line.
The command-line input field can be activated by pressing ., while Esc switches back to the previous window.
Help menu actions for Common
Below is an overview of all actions that can be accessed from this menu.
| UI Action Name | Action Name | Description |
|---|---|---|
| Online help | ToggleOnlineManual | Use either the online, or bundled IDA manual |
| Help | ShowHelp | Help |
| API Documentation | `` | |
| Python API | HelpPythonAPI | Python API |
| IDA SDK | HelpIDASDK | IDA SDK |
| Decompiler SDK | HelpHexraysSDK | Decompiler SDK |
| IDC Functions | HelpIDCFunctions | IDC Functions |
| About program… | About | About program |
| License manager… | LicenseManager | Open license manager. More… |
| How to buy IDA | BuyIDA | How to buy IDA |
| IDA home page | Homepage | IDA home page |
| IDA support forum | SupportForum | IDA support forum |
| Send database… | hx:SendIDB | Send database |
| Extract function… | hx:ExtractFunc | Extract function |
| Check for free update… | CheckFreeUpdate | Check for free update |
| Report a bug or an issue… | BugReport | Report a bug or an issue |
License manager…
Open license manager. The license manager dialog (Help -> License manager…) lets you pick a license to use IDA with.
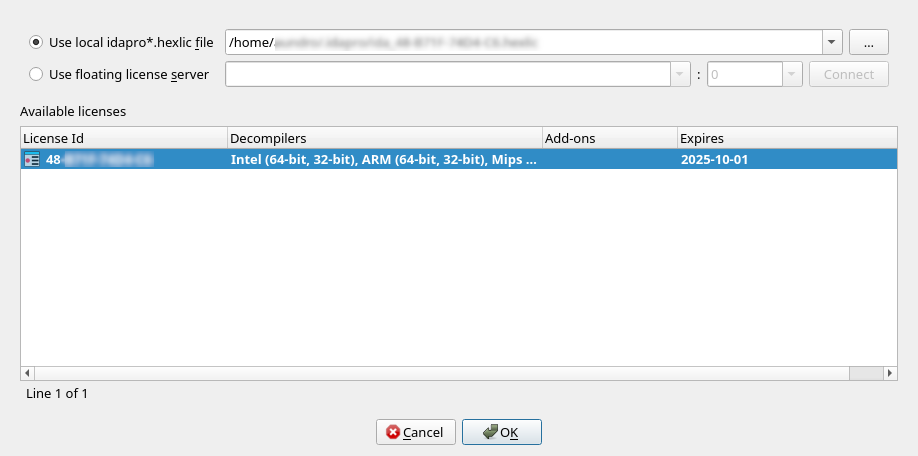
Depending on your licensing plan (e.g., floating), you may have the possibility to switch between various licenses located on the same license server (but having different sets of add-ons & decompilers, for example).
The active license is represented in bold in the list. Double-clicking on a line in the list, will make that license active, and make it the preferred license.
Preferred license
Doing so will also make it the “preferred” license – that is, it will be remembered for later sessions as being the default license to use.
Borrowing & returning licenses
When using floating licenses from a server, it is possible to borrow the license for an extended period of time, thereby allowing offline work. Please use the context menu to achieve that.
License management command line options
IDA recognizes the -Olicense command-line switch, with the following format:
-Olicense:keyfile=<path-to-.hexlic-file>[:setpref]-Olicense:server[:host=<hostname>][:port=<port>][:lid=<xx-xxxx-xxxx-xx>][:setpref]
Where the optional bits are:
keyfile | Path to the license file |
host | The license server host name |
port | The license server port |
lid | The license ID to use |
setpref | Whether the selected license should be remembered as the preferred license |
The command-line switch -Olicense takes precedence over both:
- the preferred license information possibly stored in the registry, and
- the
IDA_LICENSEenvironment variable
NOTE: The -Olicense switch (or IDA_LICENSE)
will not, by default, overwrite the “preferred” license information in the registry.
Specify setpref to achieve that.
NOTE: On Windows, the <DriveLetter>: scheme is recognized.
Therefore -Olicense:keyfile=C:/tmp/my.hexlic:setpref will work as expected.
License management environment variable
Alternatively, the IDA_LICENSE environment variable can be used
to specify licensing information, and accepts the same format
as the -Olicense option
E.g., IDA_LICENSE=server:host=<hostname>:…
Desktops
IDA saves different settings in desktops: the main window configuration, the toolbars configuration, and the configuration of all database windows.
Different desktops are available:
-
<Database>
This desktop configuration is stored in the database itself, and is automatically loaded each time you open this database. IDA also automatically saves the current desktop configuration to this desktop if you close and save the database. -
<Database debugger>
This desktop configuration is also stored in the database, and is loaded each time you start the debugger. As for the <Database> desktop, IDA automatically saves the current desktop configuration to this desktop once the debugger stops. -
<Default>
This desktop configuration is stored in the registry, and is loaded each time you start IDA without opening a database, or the first time you create a new database. -
<Default debugger>
This desktop configuration is stored in the registry, and is loaded the first time you start the debugger. -
Named desktops
These desktop configurations are stored in the registry, and can be loaded manually by the user during the disassembly or the debugging.
Notice IDA will use a default configuration for main windows and toolbars if the screen resolution changed.
Subviews
Subviews (also referred to as windows, widgets, or simply views) are an essential part of working with IDA, providing different perspectives and detailed information about the loaded binary.
Subviews essentials
- Some subviews are opened by default, while others can be accessed at any time via View → Open subviews.
- Certain subviews, (known as choosers) are list views, that allow you to interact with and manipulate their contents using list viewer commands.
- All subviews windows can be moved, rearranged and docked in various parts of the IDA interface.
The following is a list of all available subviews.
| Icon | View | Access Mode | Shortcut |
|---|---|---|---|
| Disassembly/IDA View | Interactive (r/w), address-based | - | |
| Pseudocode | Interactive (r/w), address-based | F5 | |
| Hex View | Interactive (r/w), address-based | - | |
| Address details | Read-only chooser | - | |
| Exports | Read-only chooser | - | |
| Imports | Read-only chooser | - | |
| Names | Read-only chooser | Shift + F4 | |
| Functions | Read-only chooser | Shift + F3 | |
| Strings | Read-only chooser | Shift + F12 | |
| Stack Variables | Interactive (r/w) | Ctrl + K | |
| Segments | Interactive (r/w) | Shift + F7 | |
| Segments Registers | Interactive (r/w) | Shift + F8 | |
| Selectors | Interactive (r/w) | - | |
| Signatures | Interactive (r/w) | Shift + F5 | |
| Type libraries | Interactive (r/w) | Shift + F11 | |
| Local Types | Interactive (r/w) | Shift + F1 | |
| Cross References | Interactive (r/w) | - | |
| Cross References Tree | Interactive (r/w) | Shift + X | |
| Function calls | Read-only chooser | - | |
| Bookmarks | Interactive (r/w) | Ctrl + Shift + M | |
| Notepad | Interactive (r/w) | - | |
| Problems | Read-only chooser | - | |
| Patched bytes | Read-only chooser | Ctrl + Option + P | |
| N/A | Navigation history | Read-only chooser | - |
| Undo history | Read-only chooser | - | |
| Microcode | Interactive | Ctrl + Shift + F8 |
IDA View / Disassembly window
{% hint style=“info” %} While working in the IDA/Disassembly view, the actions available under the Edit, Jump and Search menus may differ from those in other views. For more information, see View-Dependent Menus. {% endhint %}
IDA View has three modes:
- Flat/linear mode (1)
- Graph mode (2)
- Proximity mode (3)
IDA automatically opens one disassembly window (IDA view) at the start. If the current location is an instruction belonging to a function, then the graph view is available. You can toggle between the flat and graph view using the Space key. You can also switch to proximity view by zooming out to the callgraph using the - key.

Arrows on the left side of the flat mode represents the control flow. The IDA UI highlights the current identifier.
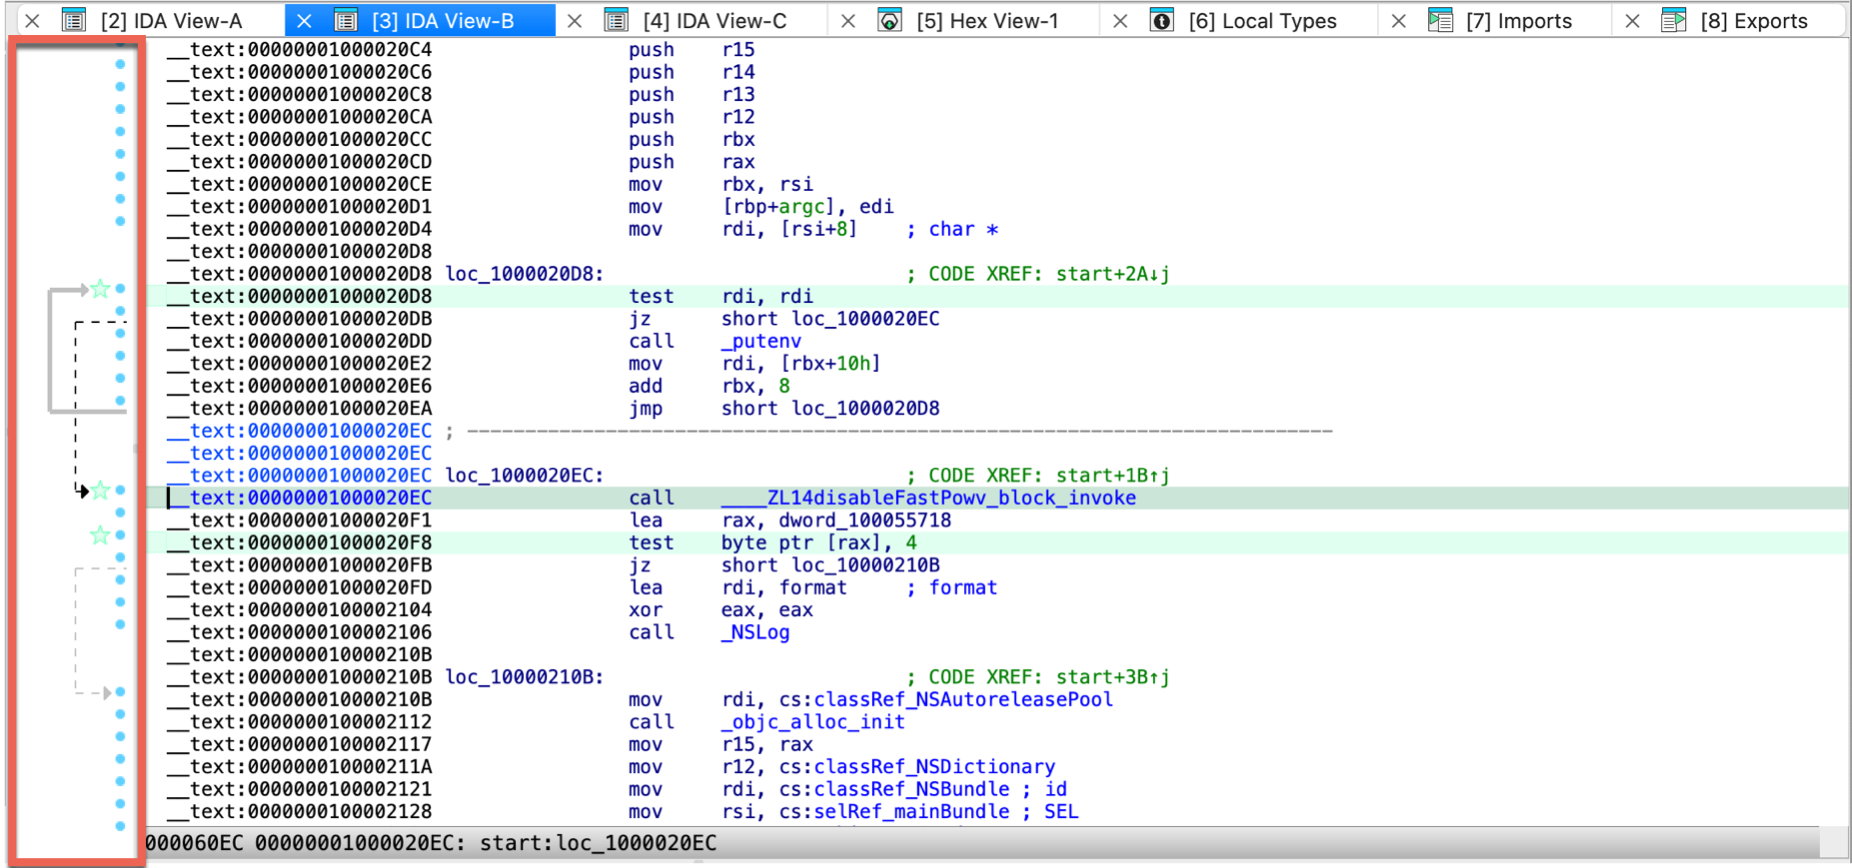
{% hint style=“info” %}
Synchronized views
By default, the IDA View and Hex View are synchronized. Navigating in one of these views automatically updates the cursor position in the others. You can disable/enable this behavior via the context menu by selecting Synchronize with. It’s worth mentioning that any address-based view (including IDA View, Pseudocode, or Hex View) can be synchronized with another. For more information on view synchronization, see Igor’s Tip of the Week on synchronized views. {% endhint %}
Arrows window
There is a small window with arrows on the left of the disassembly. These arrows represent the execution flow, namely the branch and jump instructions. The arrow color can be:
- red: means that the arrow source and destination do not belong to the same function. Usually, the branches are within functions and the red color will conspicuously represent branches from or to different functions.
- black: the currently selected arrow. The selection is made by moving to the beginning or the end of the arrow using the Up or Down keys or left-clicking on the arrow start or the arrow end. The selection is not changed by pressing the PageUp, PageDown, Home, End keys or using the scrollbar. This allows to trace the selected arrow far away.
- grey: all other arrows
The arrow thickness can be:
- thick: a backward arrow. Backward arrows usually represent loops. Thick arrows represent the loops in a clear and notable manner.
- thin: forward arrows.
Finally, the arrows can be solid or dotted:
- the dotted arrows represent conditional branches,
- the solid arrows represent unconditional branches.
You can resize the arrows window using a vertical splitter or even fully hide it. If it is hidden, the arrows window will not be visible on the screen but you can reveal it by dragging the splitter to the right. IDA remembers the current arrow window size in the registry when you close the disassembly window.
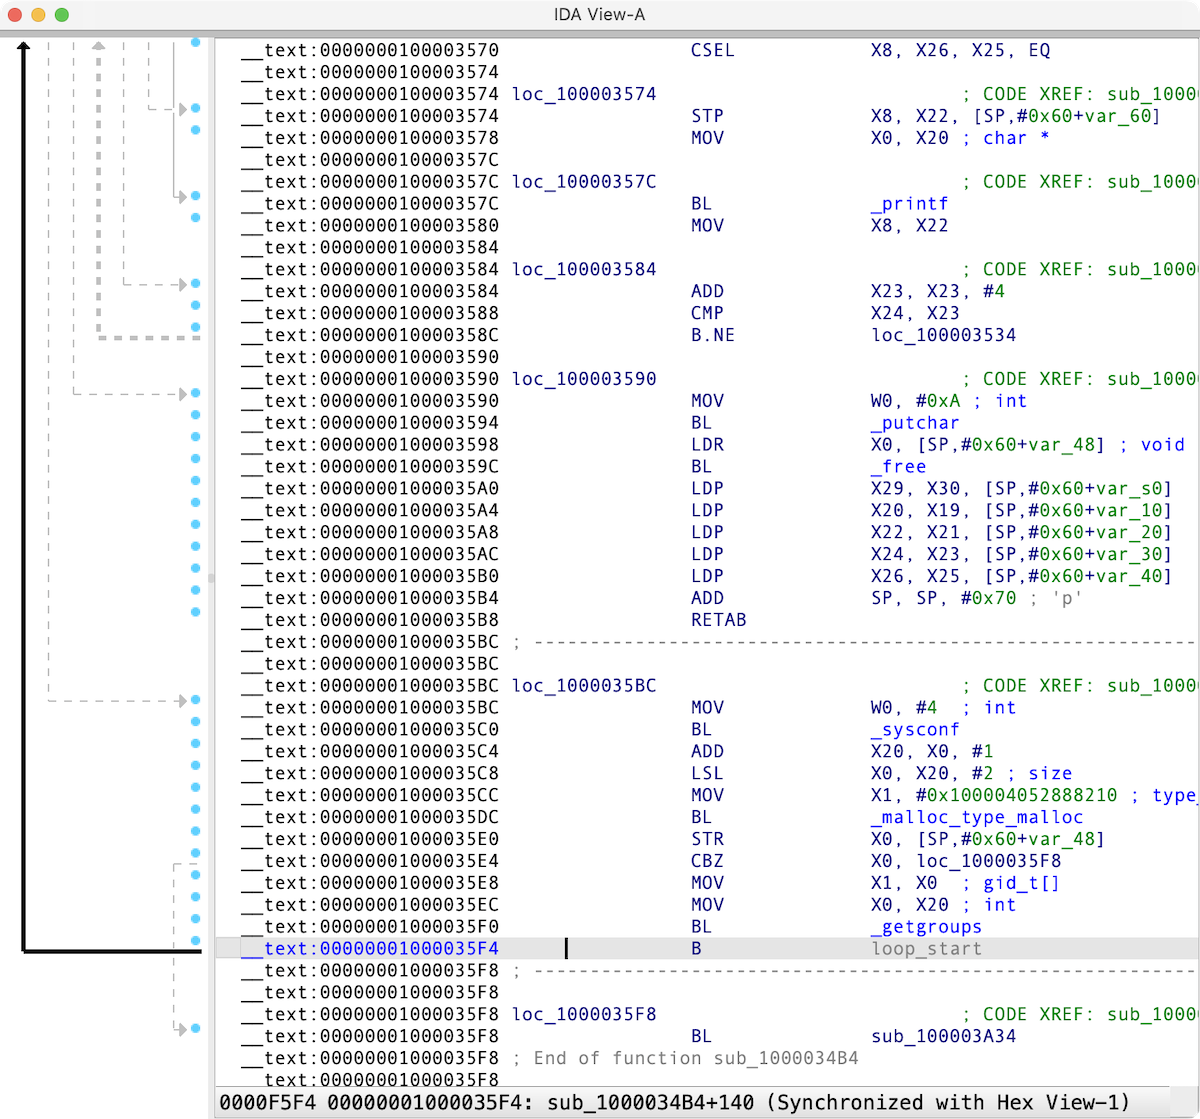
Refine the disassembly results
Use the disassembly editing commands to improve the listing.
Set the anchor
Use Shift + ↑ ↓ → ← or Alt + L to drop the anchor. If you have a mouse, you can drop the anchor with it too.
A double click of the mouse is equivalent to the Enter key.
Set disassembler options
Go to the Options → General → Disassembly to customize what information is displayed in the disassembly window.
Pseudocode window
{% hint style=“info” %} While working in the Pseudocode view, the actions available under the Edit, Jump and Search menus may differ from those in other views. For more information, see View-Dependent Menus. {% endhint %}
The Pseudocode view shows the assembly language translated into human-readable, C-like pseudocode. You can decompile the current function by F5 shortcut, and navigate between IDA disassembly and pseudocode with Tab.
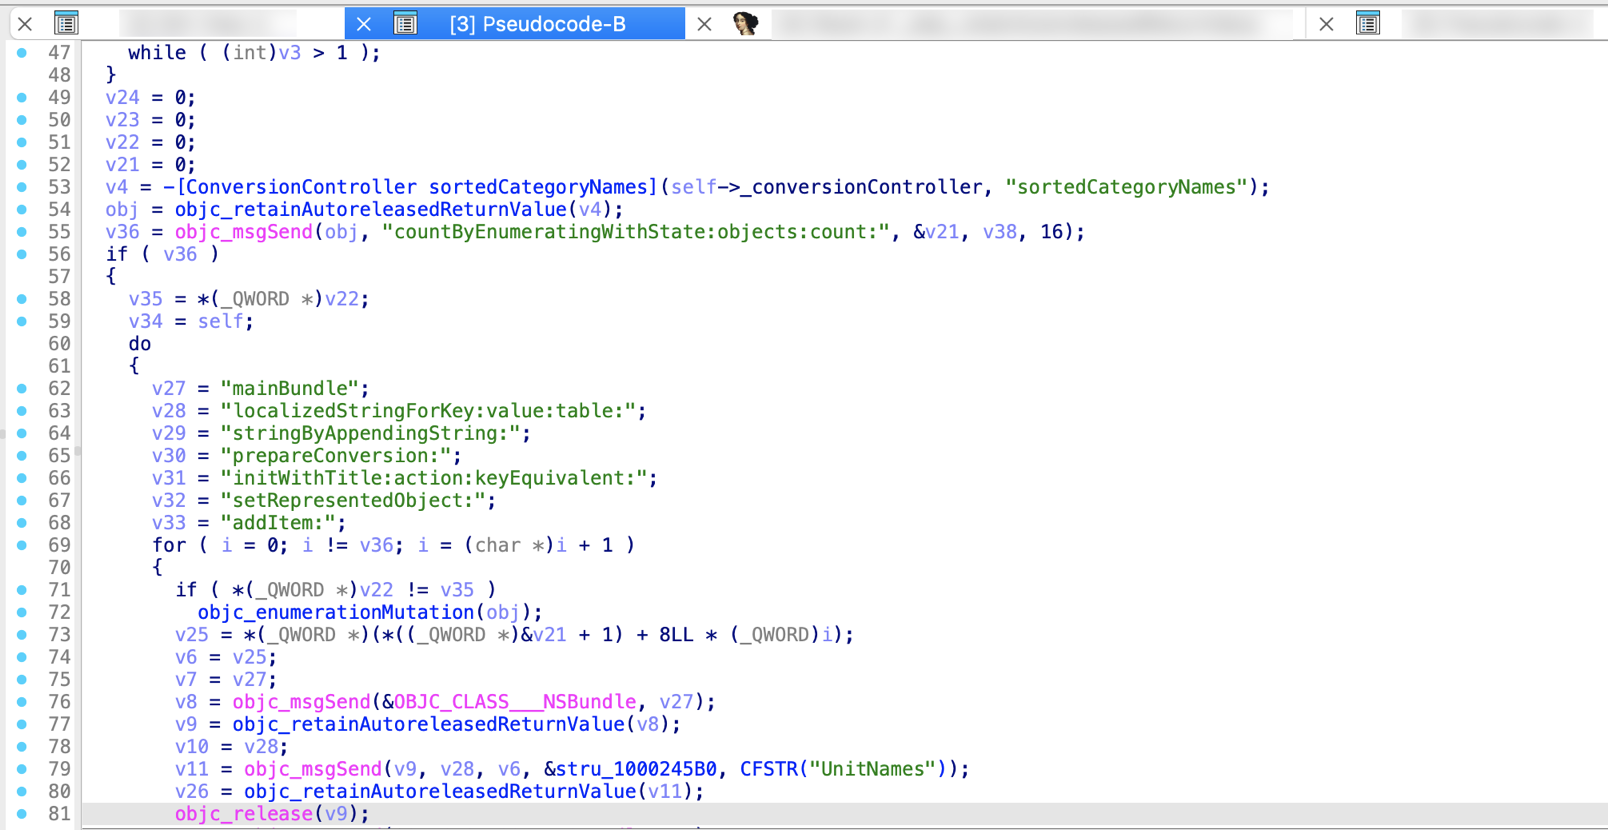
Hex View / Hex dump window
{% hint style=“info” %} While working in the Hex view, the actions available under the Edit, Jump and Search menus may differ from those in other views. For more information, see View-Dependent Menus. {% endhint %}
Hex View shows the raw bytes of the program’s instructions or data.
There are two ways of highlighting the data in the Hex Dump:
- Text match highlight, which shows matches of the selected text anywhere in the views
- Current item highlight, which shows the bytes group constituting the current item

Related topics
- Learn the Hex View features and tricks
- Change Hex View encoding
Address details window
The Address details view displays detailed information about the current address selected in the IDA View, Hex View, or Pseudocode window. It updates automatically as you change location. By default, it opens on the right side of the main IDA window and consist of the below sections:
- Name assigned to address; allows you to rename location (1)
- Flags displays low-level details associated with the address, alternatively to print internal flags action (2)
- Data inspector displays how the bytes at the current address can be interpreted in different formats (3)
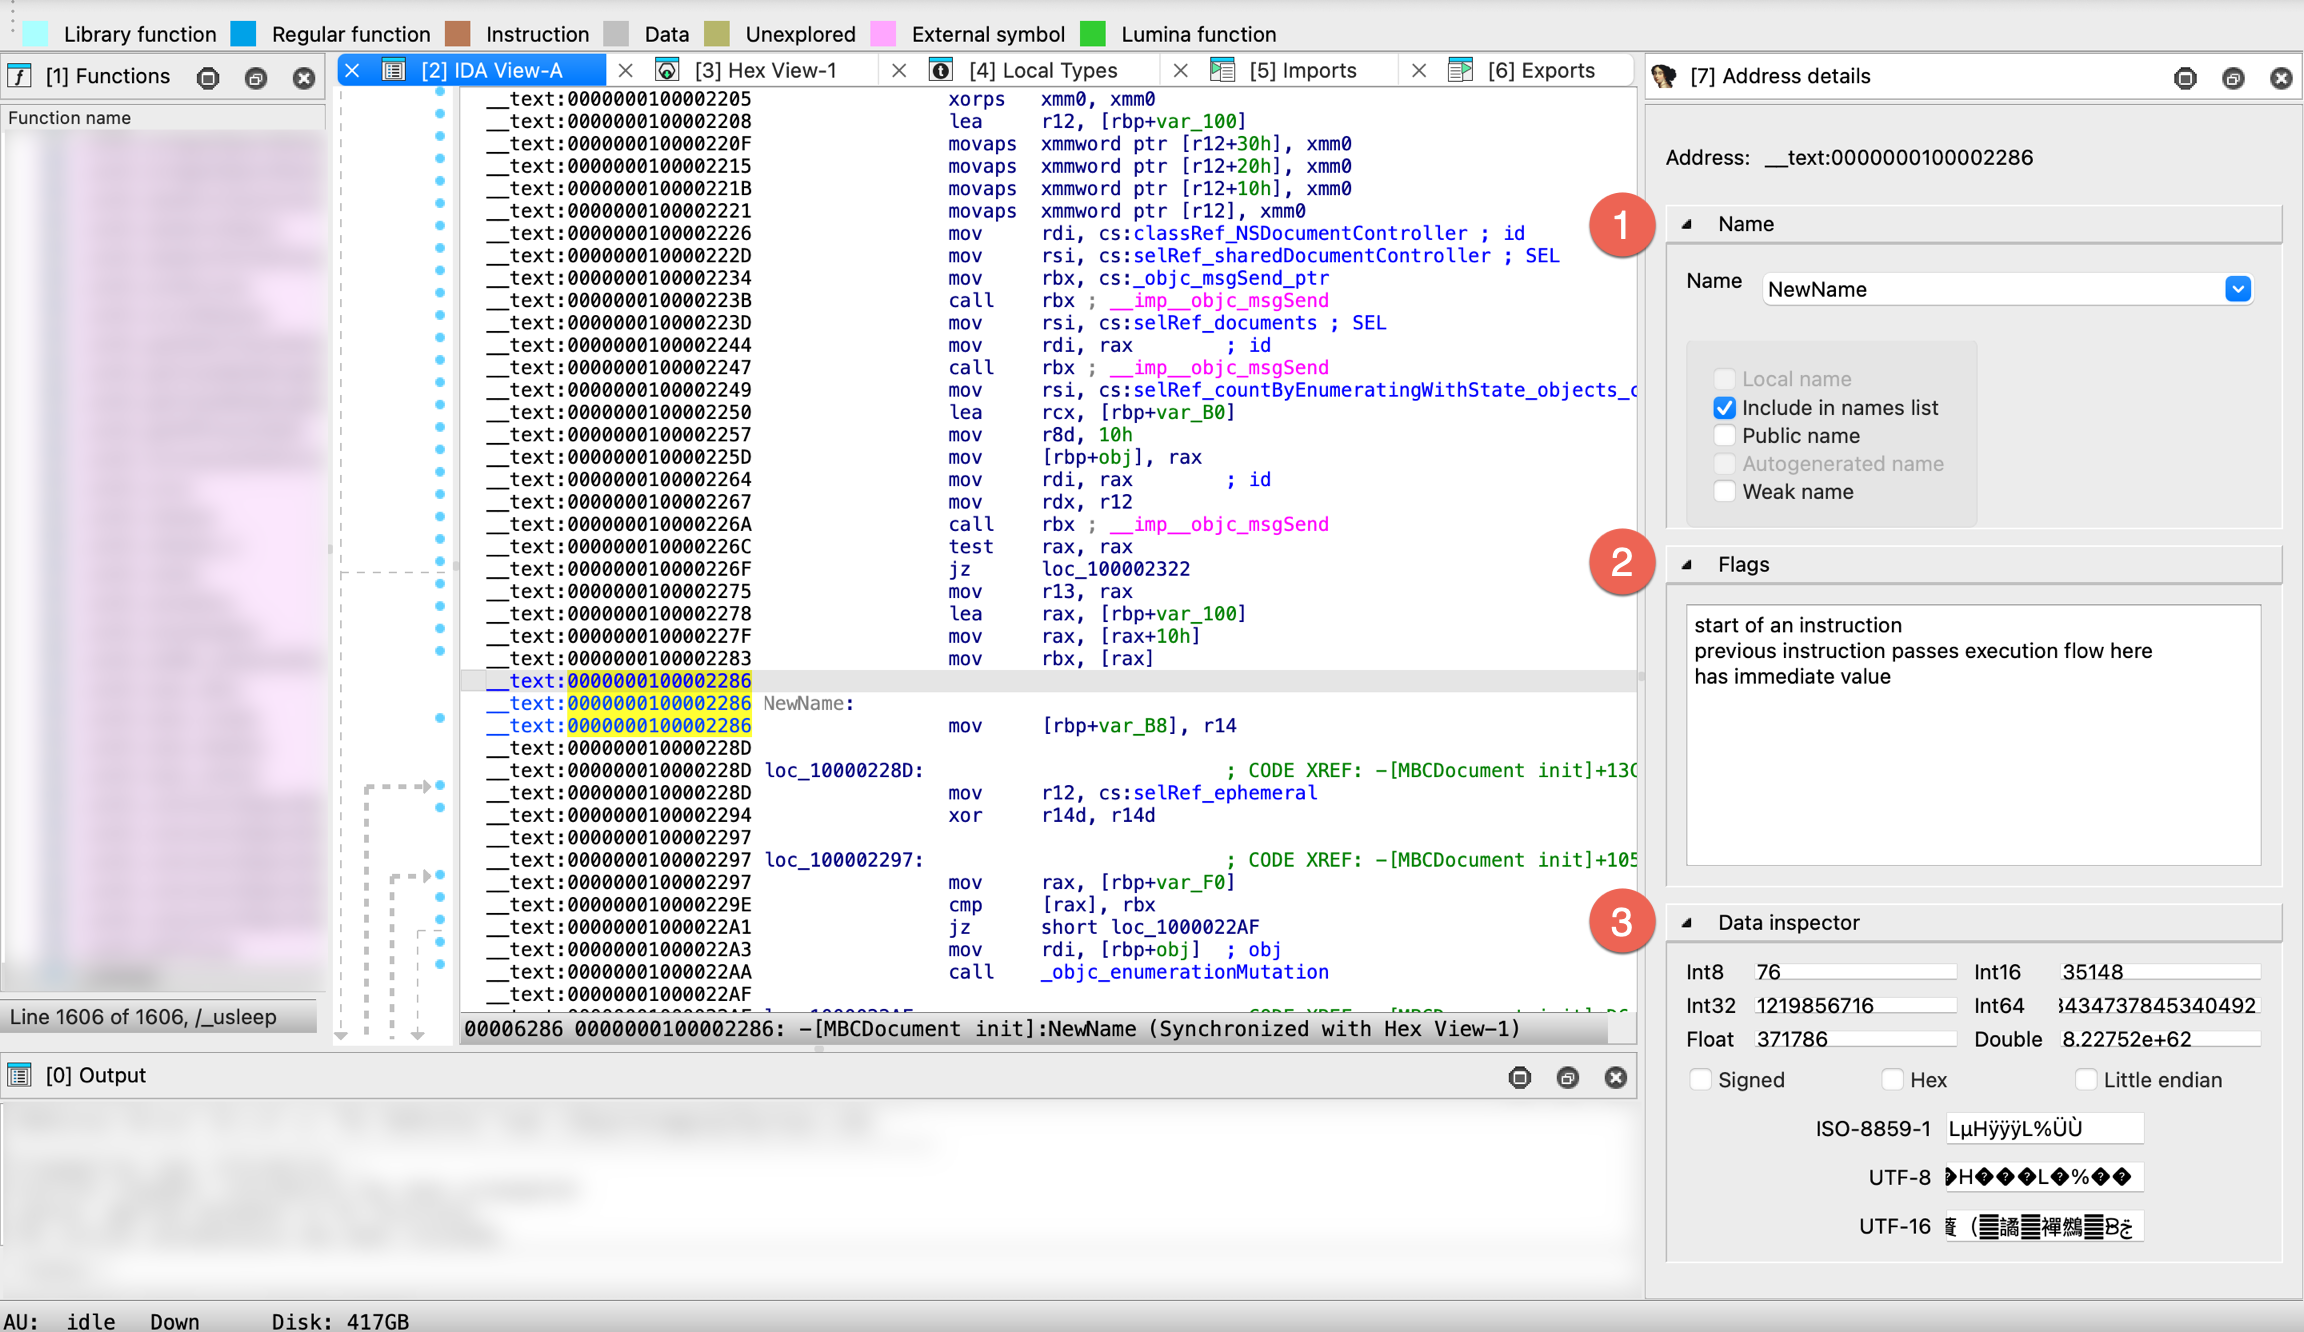
Exports window
This view shows list of all exported symbols. The columns display the following information:
- Name of the exported symbol
- Address of the exported symbol inside the analyzed program
- Ordinal of the exported symbol

You can use list viewer commands in this window.
Imports window
This view shows list of all symbols imported through dynamic linking. The columns display the following information:
- Address of the imported symbol (located in virtual imports segment)
- Ordinal of the imported symbol
- Name of the imported symbol
- Shared Library name from which the symbol is imported
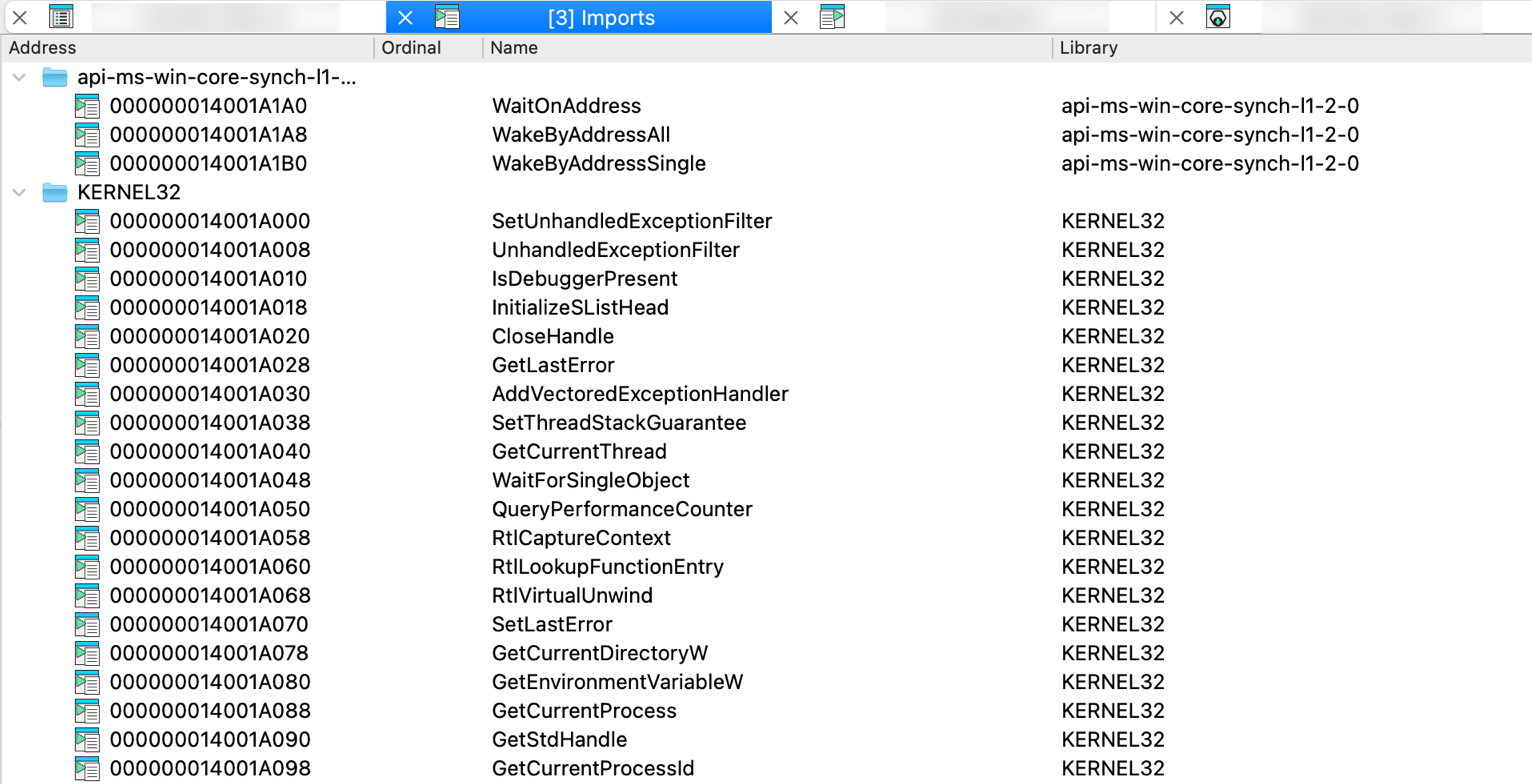
You can use list viewer commands in this window.
Functions window
{% hint style=“info” %} While working in the Functions view, the actions available under the Edit, Jump and Search menus may differ from those in other views. For more information, see View-Dependent Menus. {% endhint %}
This view presents all functions in the program. Functions view is a part of IDA’s default desktop layout and displays on the left side of the screen. You can add, delete, modify functions using list viewer commands.
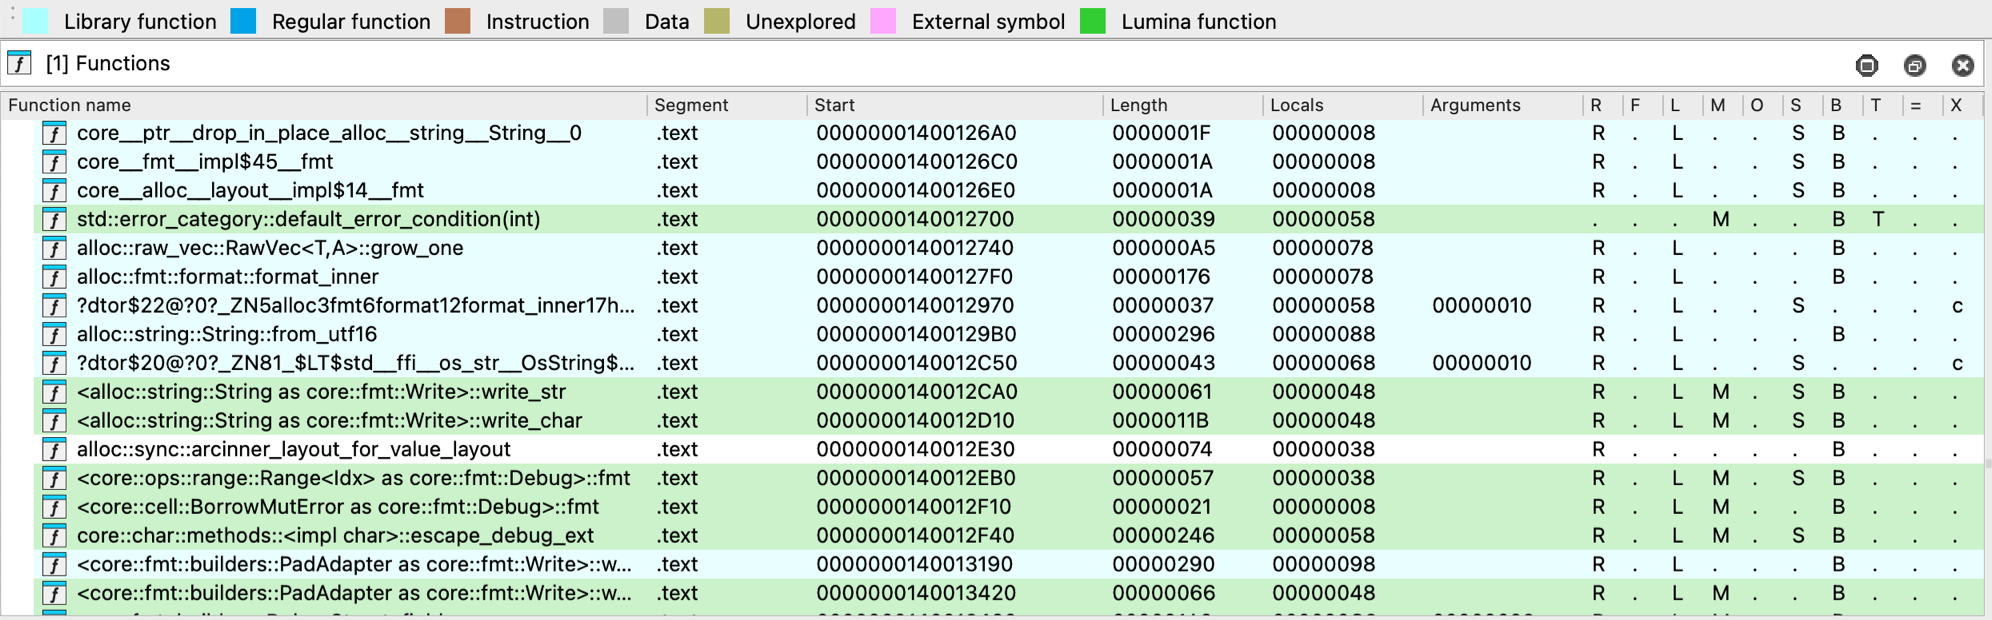
Each function entry includes the following details:
- Function name
- Segment that contains the function
- Function Start address
- Function Length in bytes
- size (in bytes) of Locals + saved registers
- size (in bytes) of Arguments passed to the function
The last column of this window has the following format:
| Symbol | Meaning |
|---|---|
R | Function Returns to the caller |
F | Far function |
L | Library function |
S | Static function |
M | Lumina function |
O | Outlined function |
B | BP based frame. IDA will automatically convert all frame pointer [BP+xxx] operands to stack variables. |
T | function has Type information |
= | Frame Pointer is equal to the initial stack pointer. In this case, the frame pointer points to the bottom of the frame |
X | exception handling code; c stands for “catch” block, u means that the corresponding function is an unwind handler. |
Colors and style indicators
Some functions in the list may appear with colored backgrounds. In most cases, these colors correspond to the legend used in the navigation band. Additional colors may be manually assigned the user via Edit function… in the context menu.
Functions displayed in bold have a definitive, user-specified prototype. Some plugins may also mark functions this way. The decompiler takes such prototypes as they are, while other prototypes are considered only as a starting point during decompilation.
Synchronize Functions view
You can automatically synchronize the function list with the active Disassembly, Pseudocode, or Hex view. To enable this, right-click in the function list and select Turn on synchronization in the context menu.
Related topics
For a thorough overview of the Functions view, refer to Igor’s Tip of the Week #28.
Names window
Names view displays the list of all names existing in the database, not only function names but also instruction or data items names.
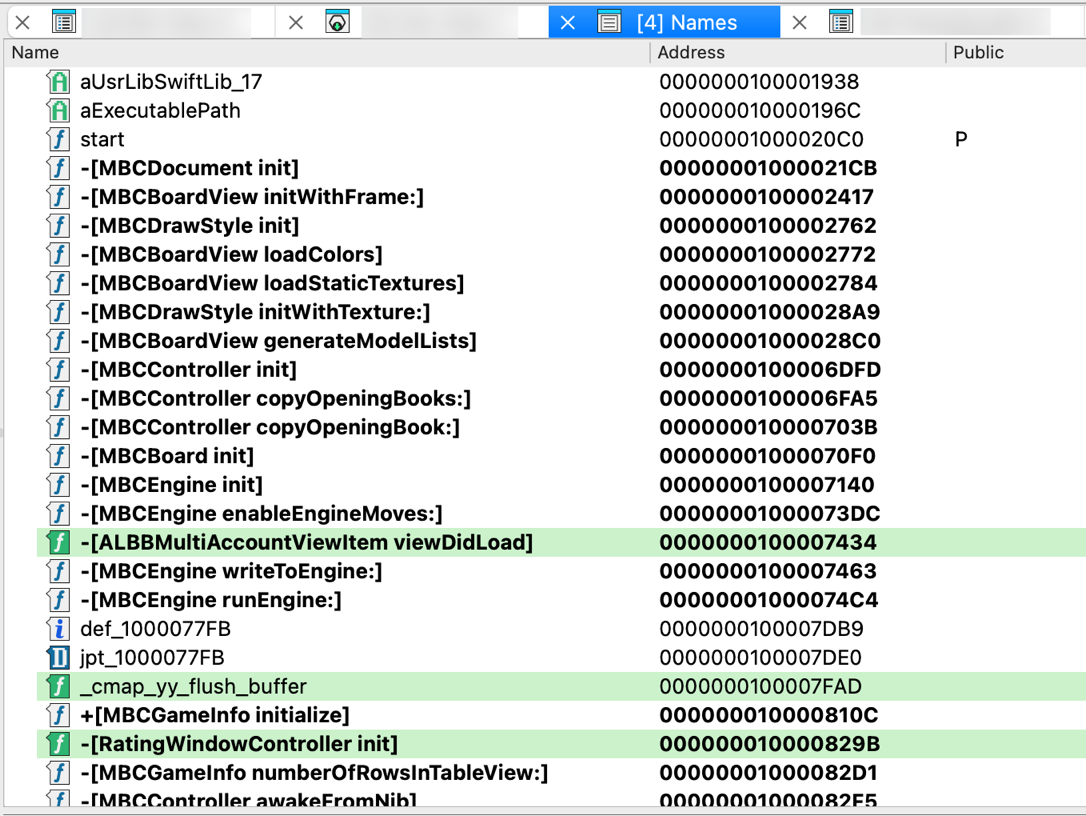
On the left side of the Name column, this view displays a small icon for each name:
| Symbol | Meaning |
|---|---|
L | library function |
𝑓 | regular function |
C | instruction |
A | string literal |
D | data |
I | imported name |
You can use list viewer commands in this window.
Signatures window
This view displays both applied and planned signatures, and allows you to apply new ones.
For each signature, the following columns are shown:
- Name of the file with the signature
- State of the signature:
- Planned: the signature will be applied
- Current: the signature is being applied
- Applied: the signature has been applied
- #func: number of functions found using the signature
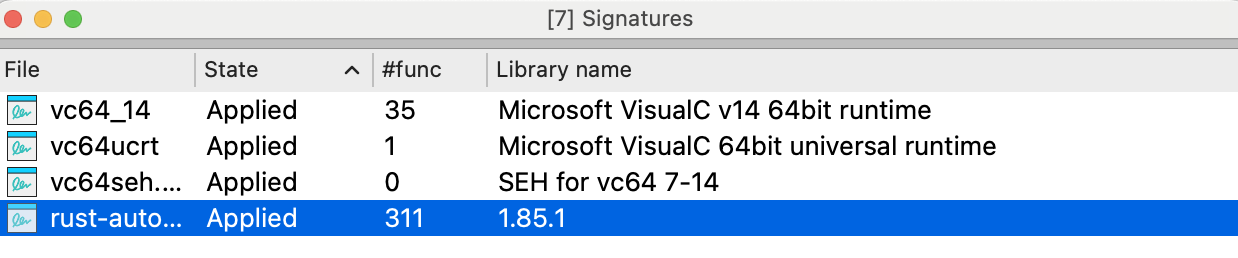
In this view, you can modify the list of planned signatures and add or remove library modules to be used during disassembly. Note that applied signatures cannot be removed from the list.
Add signatures
To add a signature to the list, right-click in the signatures view and click Apply new signature… in the context menu or press Ins. You will see a list of signatures that can be applied to the program being disassembled.
Text version: Not all signature files will be displayed (for example, 32 bit signatures will not be shown for a 16 bit program). If you want to see the full list of signatures, select the first line of the list saying SWITCH TO FULL LIST OF SIGNATURES.
Signature files location / SIG directory
Signature files reside in the subdirectories of the SIG directory. Each processor has its own subdirectory. The name of the subdirectory is equal to the name of the processor module file (z80 for z80.w32, for example). Note: IBM PC signatures are located in the SIG directory itself.
{% hint style=“info” %} The IDASGN environment variable can be used to specify the location of the signatures directory. {% endhint %}
Segments window
This view lists information about memory segments containing code and data.
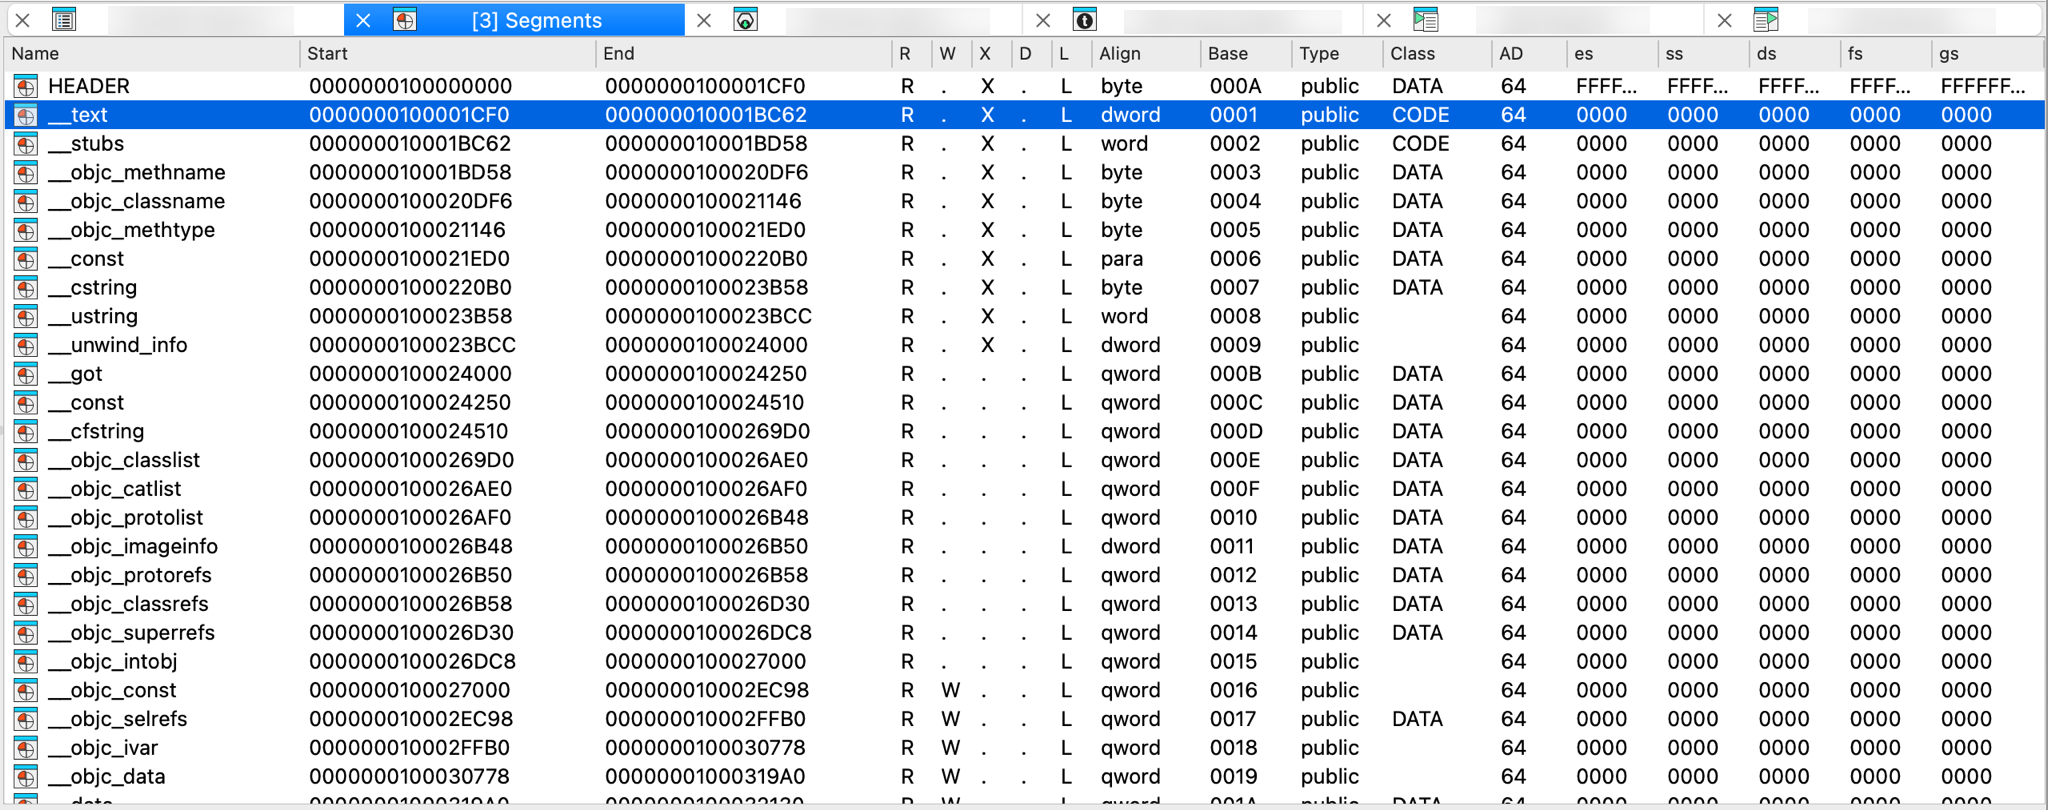
Each segment is represented by a line in the list. Please note that the end address of the segment never belongs to the segment in IDA.
The following columns (segment attributes) are displayed:
| Attribute | Meaning |
|---|---|
| Name | Segment name |
| Start | Virtual start address |
| End | Virtual end address |
| R | R: readable, .: not readable, ?: unknown |
| W | W: writable, .: not writable, ?: unknown |
| X | X: executable, .: not executable, ?: unknown |
| D | D: debugger only, .: regular |
| L | L: created by loader, .: no |
| Align | Segment alignment |
| Base | Segment base selector or address |
| Type | Segment type |
| Class | Segment class — CODE: machine code instructions DATA, CONST: initialized data segment BSS, STACK: uninitialized data segment XTRN: imports |
| AD | Segment addressing width |
The rest of the columns display the default values of the segment registers for the segment.
By default, the cursor is located on the current segment.
You can use list viewer commands in this window.
In order to change the selector values, use selectors window.
Add new segment
To add a new segment to the list, right-click in the Segments view and click Add new segment… in the context menu or press Ins.
Segment registers window
This view contains segment register change points list.
Depending on the current processor type, you will see various segment registers such as DS, ES, SS, and potentially FS and GS.
The Tag column indicates how each change point was created:
a— added automatically by IDA during autoanalysisu— specified by the user or defined by a plugin
a— added automatically by IDA during autoanalysisu— specified by the user or defined by a plugin
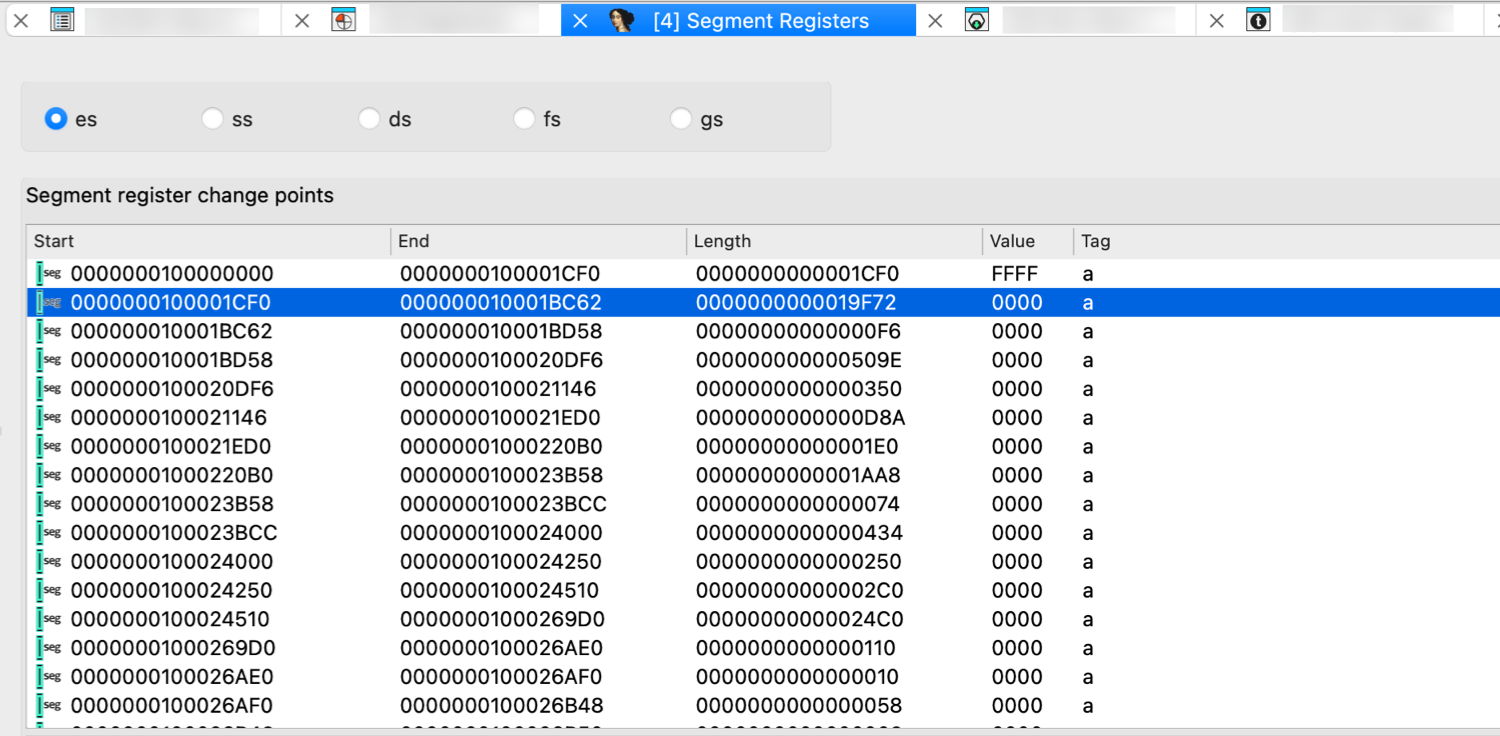
You can use list viewer commands in this window.
Change points essentials
When IDA encounters an instruction which changes a segment register, it creates a segment register change point. So, mostly change points are maintained by IDA itself. IDA assumes that the segment registers do not change their values between change points. If you find out that IDA failed to locate a segment register change, or if you want to change a register value, you can create a change point using the Change segment register value… command (action SetSegmentRegister). You can change the value of a segment register using the Set default segment register value… command too (action SetSegmentRegisterDefault).
IDA generates the appropriate ‘assume’ instructions for the change points if it was not disabled (Options → Assembler directives…)
Related topics
- For additional segment management options, refer to the Edit → Segments submenu.
Selectors window
Here you can change the “selector to base” mapping. The selector table is used to look up the selector values when calculating the addresses that are visible in the disassembly listing.
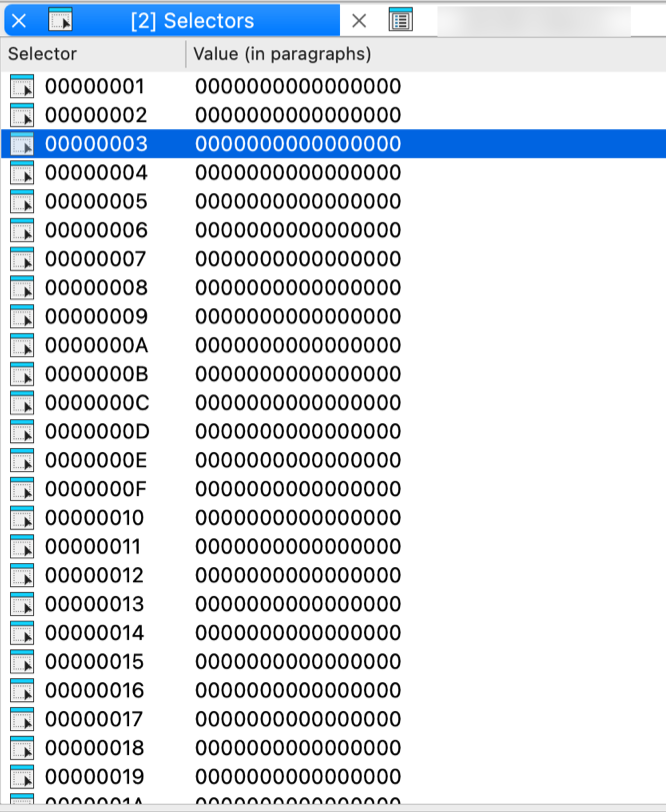
You can use list viewer commands in this window:
- jump to the paragraph pointed by the selector
- add a new selector
- delete selector (if it is not used by any segment)
- change selector value (this leads to reanalysis of all program)
- jump to the paragraph pointed by the selector
- add a new selector
- delete selector (if it is not used by any segment)
- change selector value (this leads to reanalysis of all program)
Cross references window
This view contains all cross references (xrefs) to the current location. You can use list viewer commands in this window.
Cross reference attributes
The cross reference dialog displays a list of references to the various items. Each line has the following attributes:
-
Direction: Up or Down. Meaningful for program address; denotes where the reference comes from, from the lower addresses than the reference target (down) or from higher addresses (up).
-
Type: The following types exist:
| Type | Description |
|---|---|
o | offset, the address of the item is taken |
r | read access |
w | write access |
t | textual referenced (used for manually specified operands) |
i | informational (e.g. a derived class refers to its base class) |
J | far (intersegment) jump |
j | near (intrasegment) jump |
P | far (intersegment) call |
p | near (intrasegment) call |
^ | ordinary flow |
s | xref from a structure |
m | xref from a structure member |
k | xref from a stack variable |
-
Address:
- For ‘xrefs to’ dialogs: where the reference comes from (source)
- For ‘xrefs from’ dialogs: where the reference goes to (destination)
-
Text: Additional info about the cross reference
Add cross reference (1)
To add a new cross reference to the list, right-click in the xrefs view and click Add cross-reference… in the context menu or press Ins.
In the Add Cross Reference dialog, you should specify the From and To address, as well as the xref type.
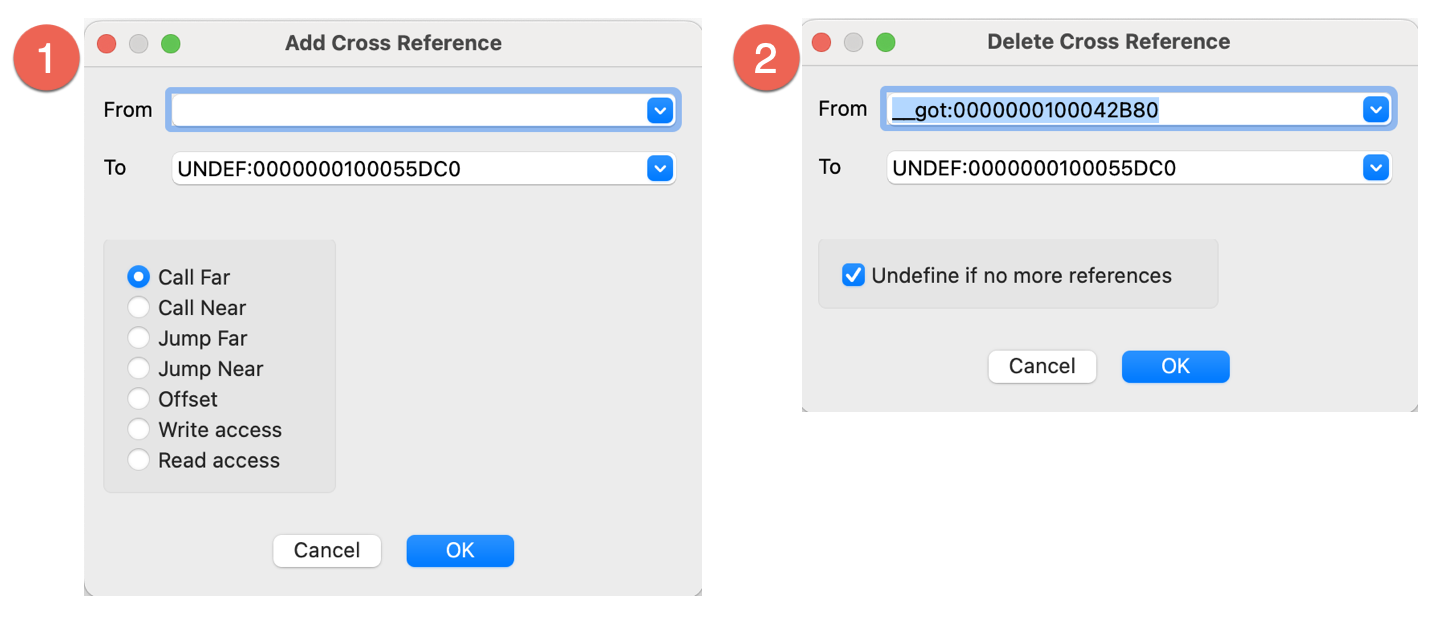
Delete cross reference (2)
To remove a cross reference from the list, right-click in the xrefs view and click Delete cross-reference… in the context menu or press Del. If the Undefine if no more xrefs is checked, then the instruction at the target address will be undefined upon the deletion of the last xref.
{% hint style=“info” %} IDA undefines instructions only if they do not start a function. {% endhint %}
Related topics
- For a comprehensive overview of cross-references in IDA, including both code and data xrefs, refer to Igor’s Tip of the Week #16: Cross-References.
Cross references tree window
The cross references tree view provides a comprehensive, textual view of inter-function code and data relationships. This non-modal widget displays both code and data references in a hierarchical tree format and is designed to complement the Xref Graph. The view shows both references to and from the current function, providing a clear overview of function call hierarchies.
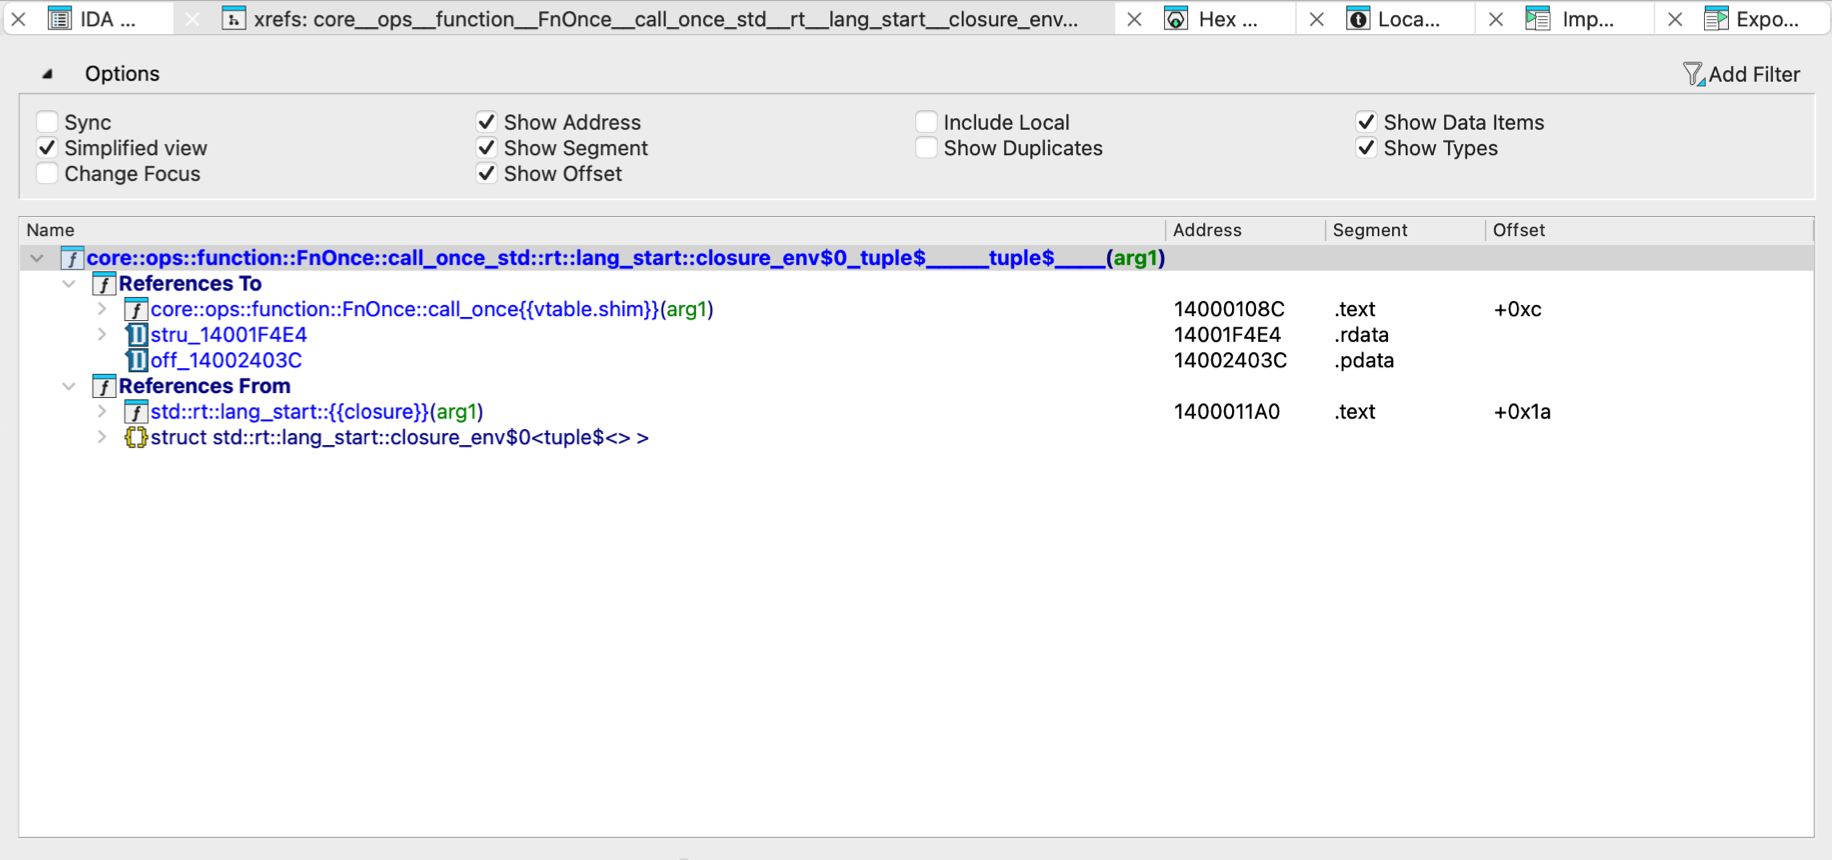
Key features:
- Non-modal/multiple instances: You can open several windows simultaneously, each displaying different functions
- Real-time updates: Nodes update as you navigate through the database
Options
Click Options above the view to expand the available settings. Key options to be aware of:
- Sync: synchronizes the current tree with the IDA View
- Simplified view: when unchecked, displays the full function names, e.g.,
int main(int argc, char **argv) - Allow Duplicates: when checked, shows multiple cross-references to the same function
Function calls window
This view displays an overview of calls to and from the current function:
- All functions who call the current function are displayed at the top section of the window (1)
- All functions called from the current function are displayed at the bottom section of the window (2)
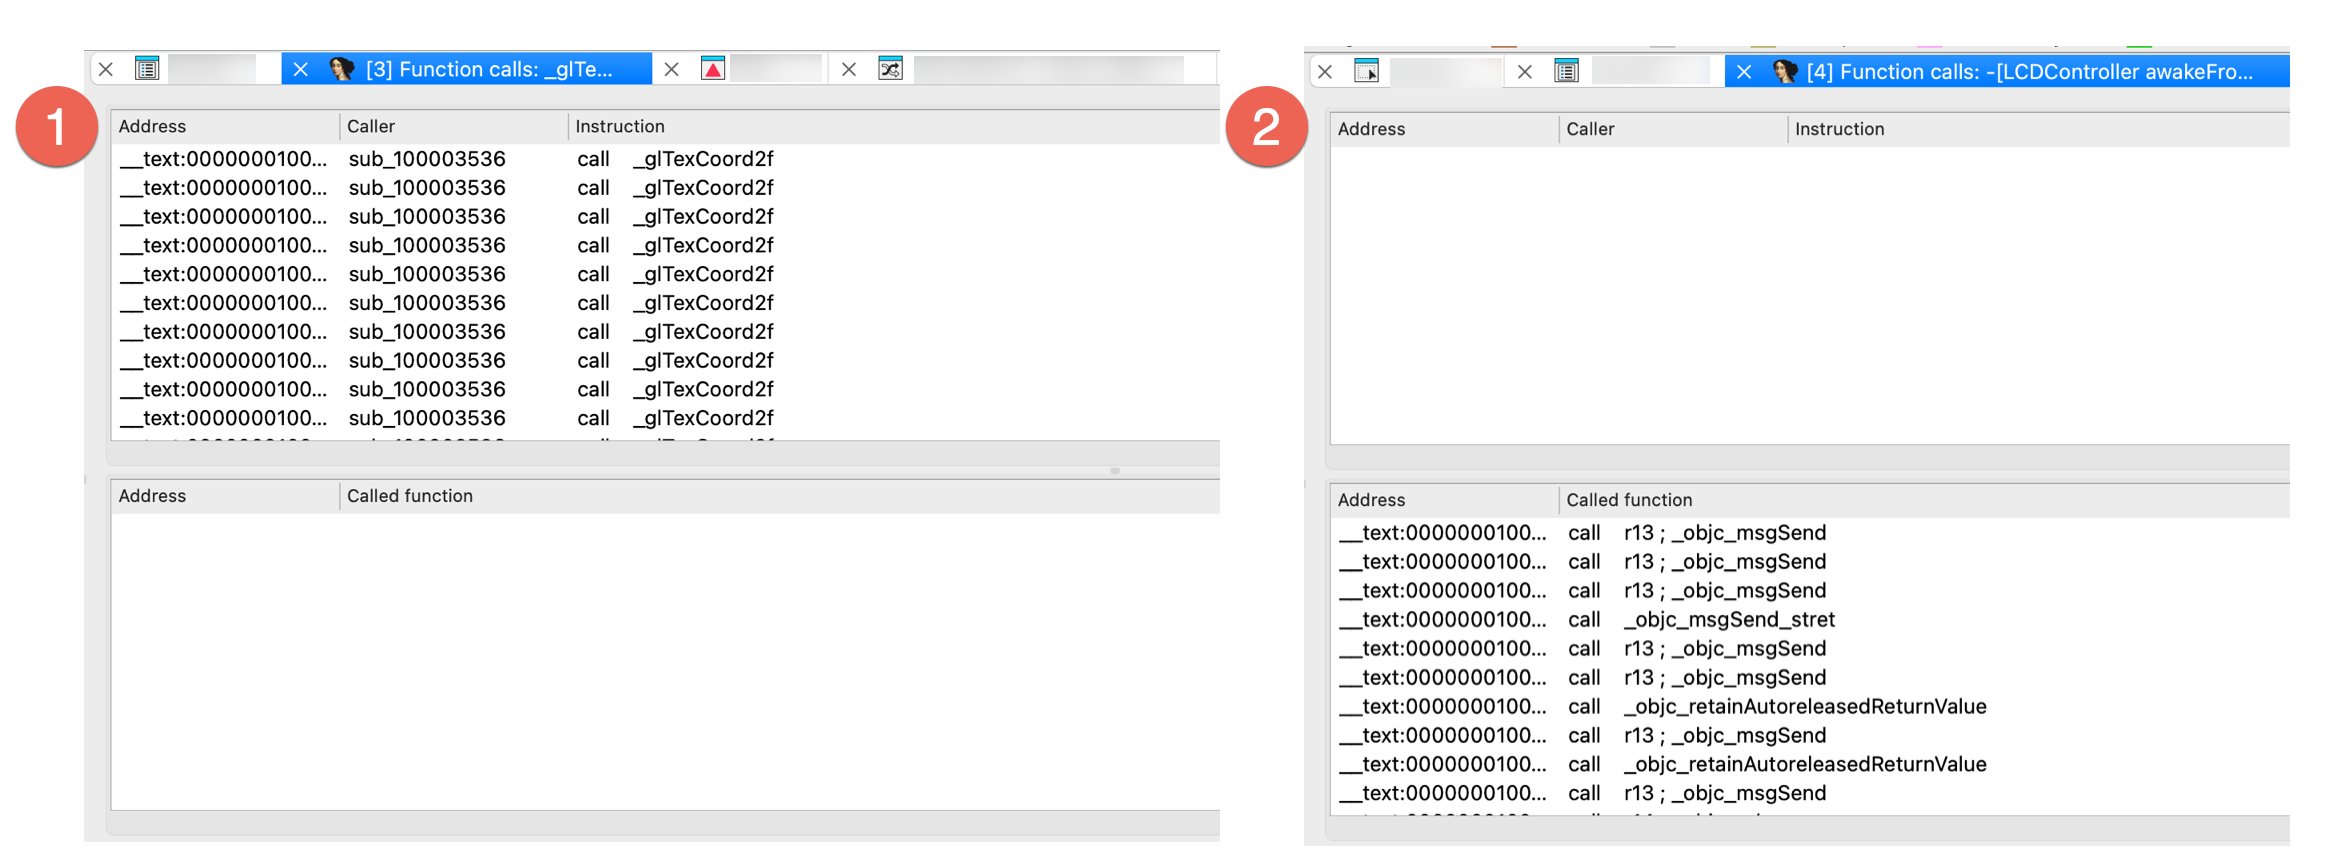
The list is automatically refreshed when the cursor is moved to another function.
Local Types window
{% hint style=“info” %} While working in the Local Types view, the actions available under the Edit, Jump and Search menus may differ from those in other views. For more information, see View-Dependent Menus. {% endhint %}
The Local Types window serves as your central hub for managing custom data types within your IDA database. It allows you to create and edit custom types—such as structures, unions, and enumerations—and import definitions from loaded type libraries.
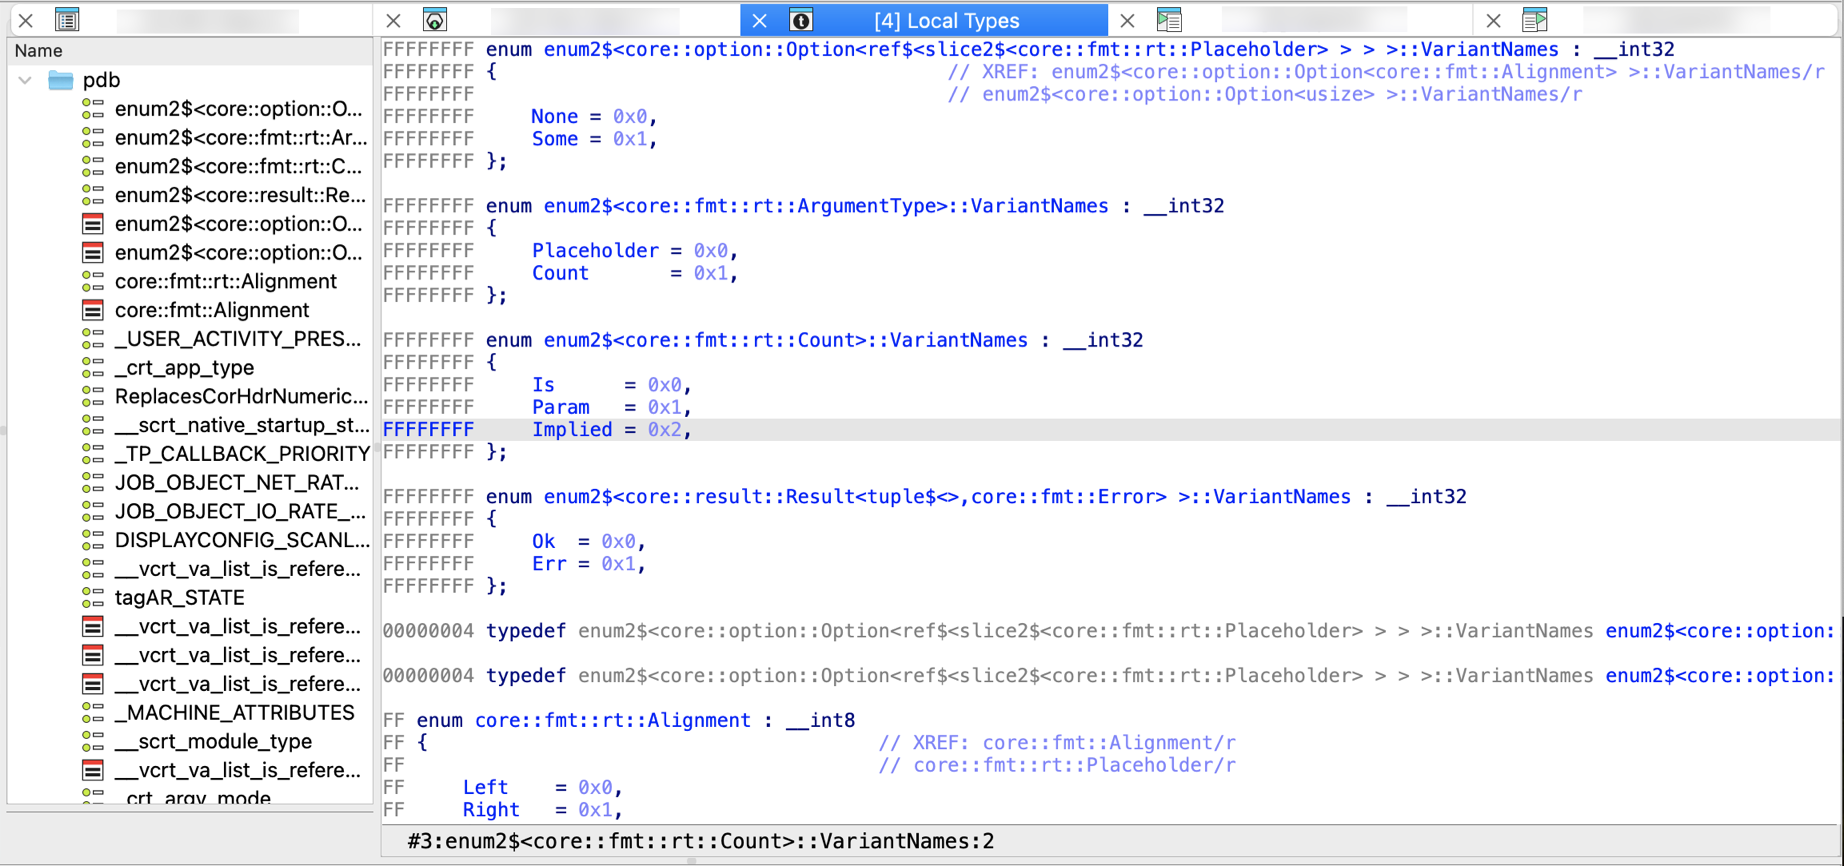
Each database has a local type library embedded into it. This type library (til) is used to store types that are local to the current database. They are usually created by parsing a header file.
{% hint style=“info” %} As of IDA 9.0, the legacy Structure and Enums windows have been removed and their functionality consolidated by the Local types window. This view serves as a centralized place for all type-related actions. {% endhint %}
Local types essentials
In the Local types view, you can directly manage custom data types:
- the existing types can be modified (the default hotkey is Ctrl+E, context menu Edit type…)
- the existing types can be deleted (the default hotkey is Del, context menu Delete type…)
- new types can be added (the default hotkey is Ins, context menu Add type…)
- multiple types can be added at once by parsing declarations (context menu Parse declarations…)
Please note that Ins can be used to add many types at once. For that the user just needs to enter multiple declarations, one after another in the dialog box.
However, Ctrl + E permits for editing of one type at a time. This may cause problems with complex structure types with nested types. Nested types will not be saved by Ctrl + E.
If the edited type corresponds to an idb type (struct or enum), then the corresponding type will be automatically synchronized.
Some types in this list are created automatically by IDA. They are copies of the types defined in the Local Types views. Such types are displayed in gray, as if they are disabled.
Types displayed in black are considered as C level types. Read more.
Each type in the local type library has an ordinal number and may have a name.
Be careful when deleting existing types because if there are references to them, they will be invalidated.
A local type can be mapped to another type. Such an operation deletes the existing type and redirects all its references to the destination type. Circular dependencies are forbidden. In the case of a user mistake, a mapped type can be deleted and recreated with the correct information.
Related topics
Type libraries window

This view displays the currently loaded type libraries and allows you to load or unload them as needed.
The standard type libraries contain type definitions from the standard C header supplied with compilers. Usually, IDA tries to determine the target compiler and its type libraries automatically but if it fails, this window allows you to load the appropriate type library.
Loading/unloading additional libraries
To load new libraries, right-click in the view and click Load type library… in the context menu or press Ins. Analogically, use Unload type library(ies)… to remove it from the list.
Configure compiler and memory model
Don’t forget to specify the compiler and memory model in the compiler setup (Options → Compiler…) dialog box.
Local Types bookmarks
Check Choose marked location help message.
Strings window
The Strings view contains all strings in the program. However, if a range of addresses was selected before opening the window, only the selected range will be examined for strings.
The columns display the following information:
- Address
- Length in bytes
- Type:
Cfor standard 8-bit strings, orC16for Unicode (UTF-16)
- String text
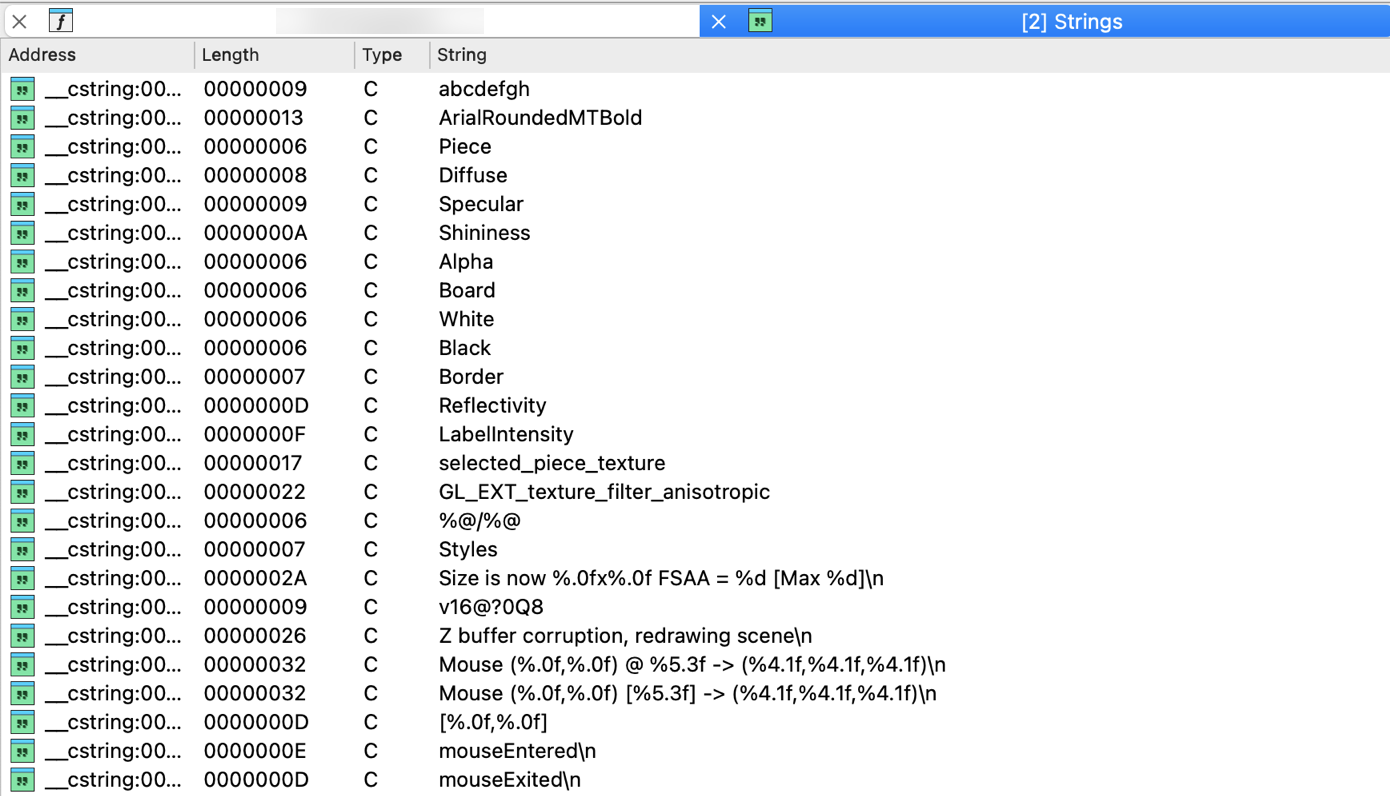
Strings view options
You can set up the list parameters by clicking Setup in the context menu.
The list always contains strings defined in the program, regardless of the settings in this dialog box, but the user can ask IDA to display strings not yet explicitly defined as strings.
The following parameters are available:
Display only defined strings
If checked, IDA will display only strings explicitly marked as string items (using the convert to string (action MakeStrlit) command). In this case, the other checkboxes are ignored.
Ignore instructions/data definitions
If checked, IDA will ignore instruction/data definitions and will try to treat them as strings. If it can build a string with the length greater than the minimal length, the string will be displayed in the list. This setting is ignored if ‘only defined strings’ is on.
Strict ASCII (7-bit) strings
If checked, only strings containing exclusively 7-bit characters (8th bit must be zero) will be added to the list. Please note that the user can specify which characters are accepted in the strings by modifying the StrlitChars parameter in the ida.cfg file. This setting is ignored if ‘only defined strings’ is on.
Allowed string types
Allows the user to specify the string types included in the list. This setting is ignored if ‘only defined strings’ is on.
Minimal string length
The minimal length the string must have to be added to the list.
{% hint style=“info” %} Click Rebuild… from the context menu to refresh the list after changing the options. {% endhint %}
Stack variables window
The Stack view displays local variables and function parameters for the currently analyzed function. It allows you to view, create, edit, and rename stack variables for the current function. To open it:
- Go to Edit → Functions → Stack variables… or press Ctrl + K
- Double-click or press Enter on a stack variable (in the Pseudocode or Disassembly/IDA View).
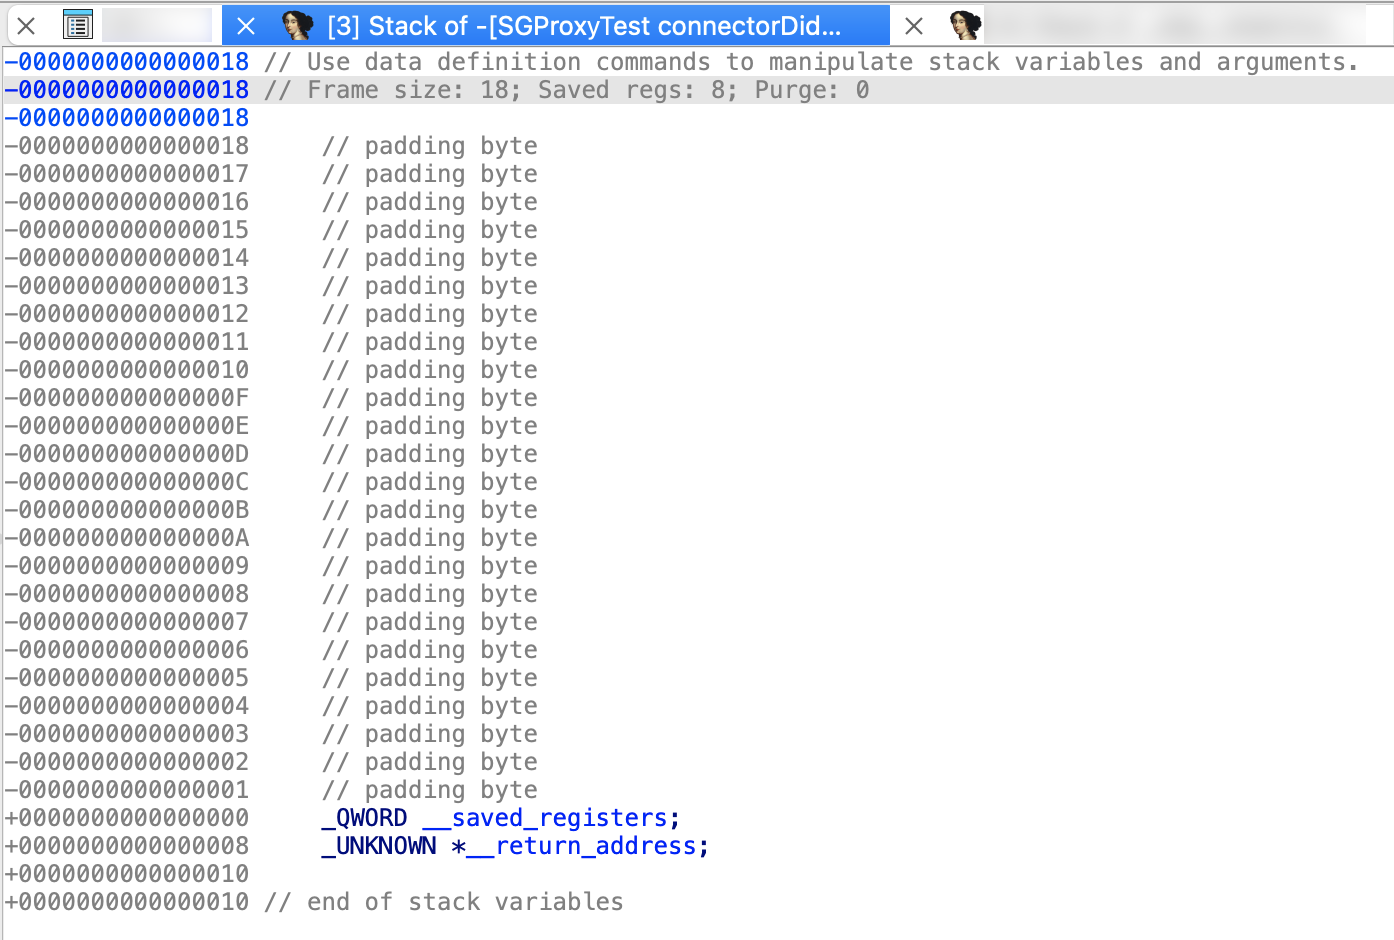
Bookmarks window
This view displays list of all bookmarks and allows you to manage them. In IDA, bookmarks can be placed on any address in the database, so you can use them to quickly find a location.
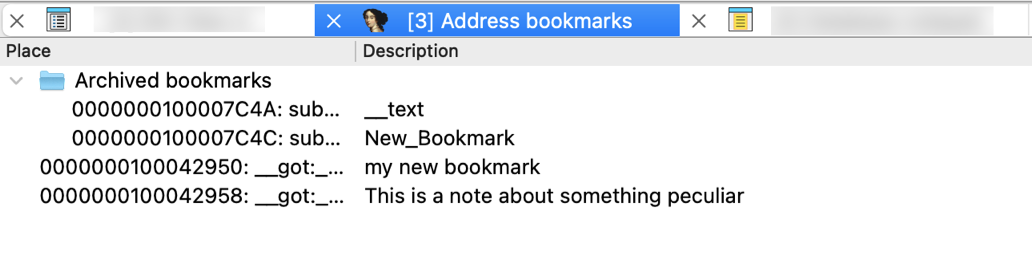
In the IDA View, bookmarks are shown in the arrows panel. The active bookmark is highlighted in celadon and marked with a star icon. Double-clicking an active bookmark will remove it.

Adding bookmarks
You can add a bookmark to the selected location from Jump → Mark position to every address-based view (IDA View, Hex View and Pseudocode), as well to the Local types view. In the opened dialog, enter the bookmark description and click OK.
Creating folders
To organize your bookmarks into folders, select the chosen bookmarks, right-click in the view and click Create folder with items… in the context menu or press Ins.
Notepad window
The Notepad window is a convenient place to store general notes related to the current database. All notes entered here are automatically saved within the database itself.
Common shortcuts
- Alt + T search for text
- Ctrl + T repeat the last search
Problems window
The Problems window contains the list of all problems encountered by IDA during disassembling the program. You can jump to a problem by pressing Enter. The selected problem will be deleted from the list.
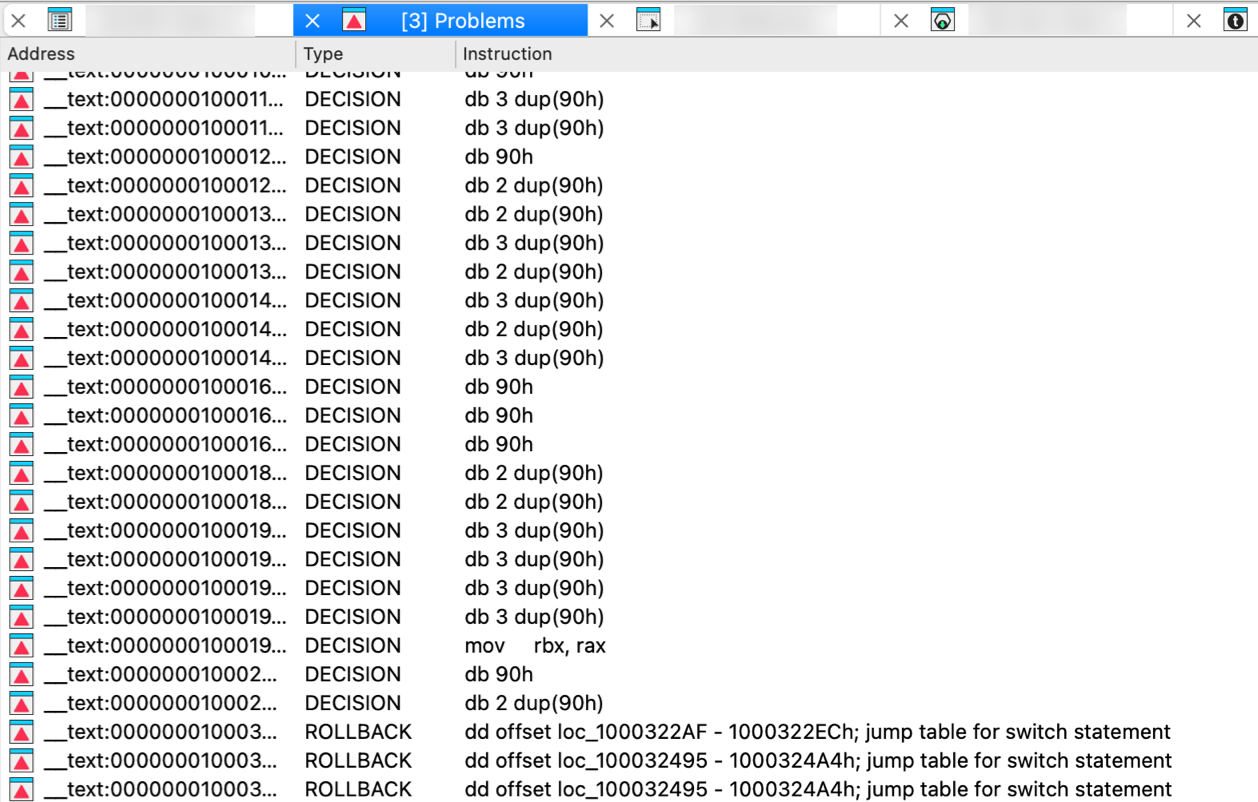
Patched bytes window
The Patched bytes view shows the list of the patched locations in the database. It also allows you to revert modifications selectively.
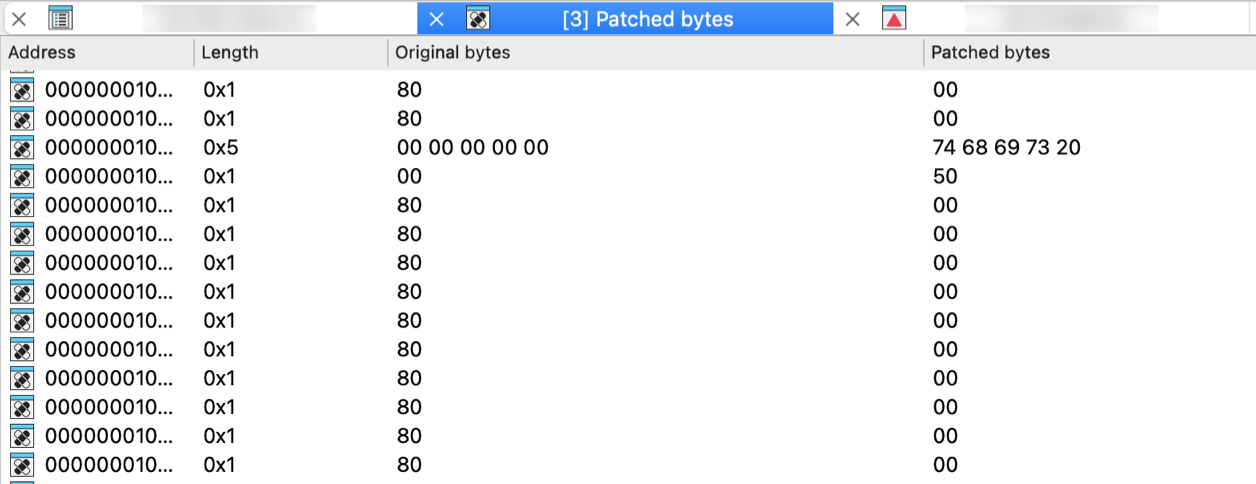
Reverting changes
Select location(s) and click Revert… from the context menu to revert this modification.
Patching bytes
You can change individual bytes via Edit → Patch program → Change byte….
Navigation history window
This view displays the saved navigation history. When history sharing is enabled (default setting, that can be changed under Options → General → Browser), it shows a shared history stack across multiple views (Disassembly, Pseudocode, Local Types, and Stack). Otherwise, it displays the navigation history for the currently active widget only. The bolded entry indicates the current cursor position.

Enable/disable history sharing
History sharing is enabled by default. You can enable or disable this behavior in Options → General → Browser.
Undo history window
This view shows the history of all undo actions.
Double clicking on a line reverts the database to the state before the corresponding action.

Truncate history
It is possible to truncate the undo history by using the corresponding context menu command Truncate history. The undo information for the selected action will be removed together with the information about all preceding actions.
Style indicators
The redoable user actions are displayed in italics. The current position in the undo buffers is displayed in bold; it usually denotes the first redoable user action.
Microcode window
The Microcode view displays the decompiler’s microcode - an intermediate form that bridges CPU-specific assembly and high-level pseudocode. It shows micro instructions organized into blocks, along with control flow transfers and use-definition chains that track how data flows through the code. You can explore microcode at different maturity levels.
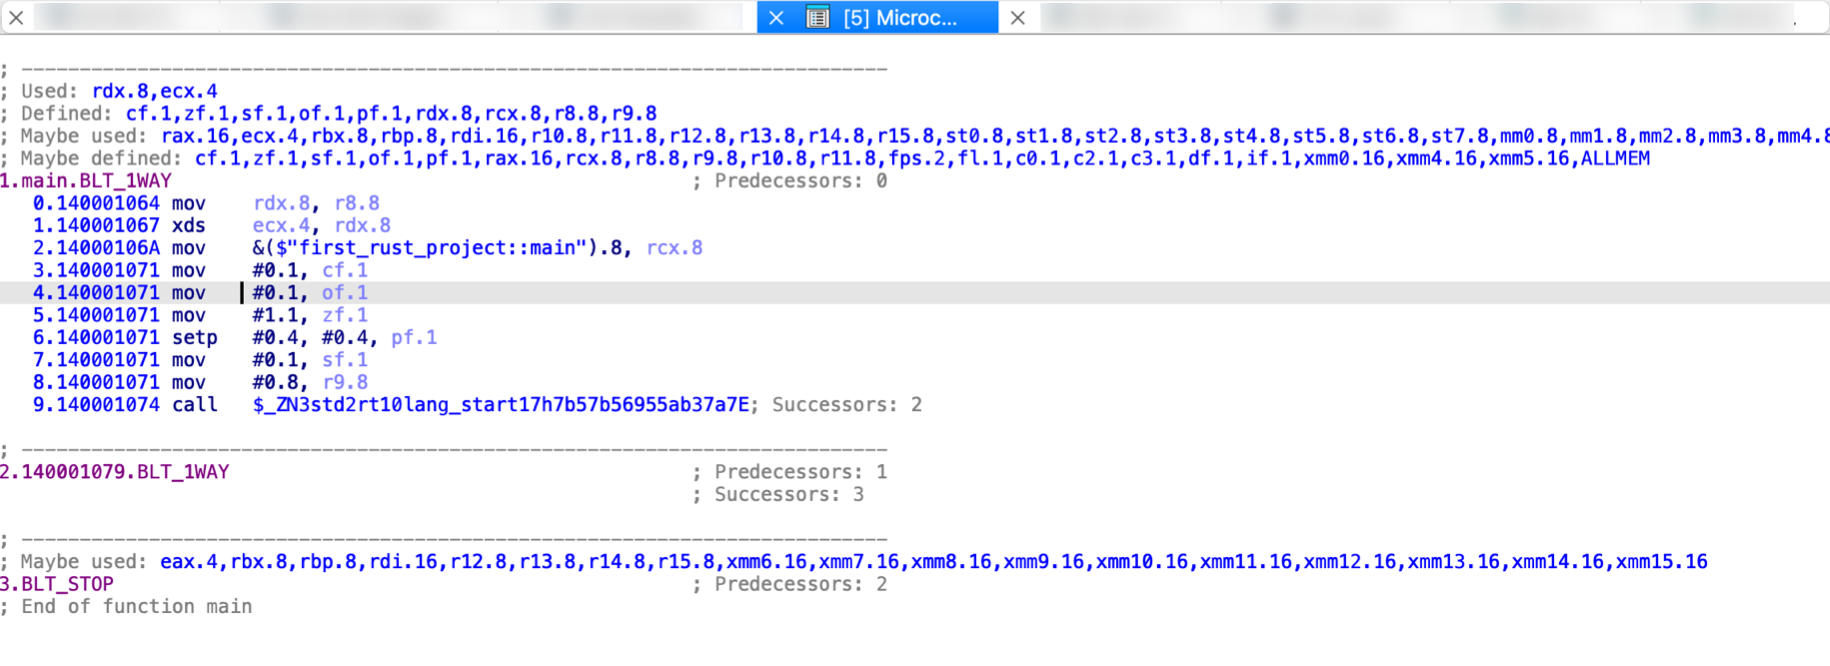
Key features and interaction
- Maturity level: Increase or decrease maturity level using
>and<keys or via the context menu. - Synchronized Views: You can sync currently opened Microcode window with Disassembly, Pseudocode, or other Microcode views via the context menu.
How To Use List Viewers in IDA
The following commands work in the list viewers:
1. All usual movement keys: PgUp, PgDn, Home, End and arrows (↑ ↓ → ←).
2. It is possible to position to a line simply by typing in the desired line number.
3. It is possible to position on a line by typing in its beginning. In this case the user can use: Backspace key to erase the last character typed in. Ctrl+Enter to find another line with the same prefix. Please note that List Viewer ignores the prefix of a line up to the last backslash (\\) or slash (/) if it exists.
4. Alt+T search for a substring (case-insensitive). Ctrl+T repeat last search.
5. If the list is not in dialog mode, you can use the following keys:
- Enter: jump to the selected item in the last IDA View window
- Ctrl+E: edit the current item
- Del delete the current item
- Ins insert a new item
- Ctrl+U refresh information in the window
6. Quick filtering is available using Ctrl+F. More complex filters can be defined with a right click (only the GUI mode).
7. The list can be sorted by any column by clicking on it. Please note that maintaining a frequently modified list sorted can be very time consuming, so try not to sort non-modal lists during the initial analysis. (sorting is available only in the GUI mode).
8. Right-click may show additional functionality for the list viewer.
Esc or Enter close modal list viewers.
Concepts
Segment Address Space and Creation
Here we explains IDA address space model and how to create segments with proper address translation. It covers the relationship between linear addresses, virtual addresses, and segment bases, with practical examples for different processor architectures.
Address space model
Internally, IDA has 32-bit linear address space (IDA64 uses 64-bit address space). The internal addresses are called “linear addresses”. The input program is loaded into this linear address space.
Please note that usually the linear addresses are not used in the program directly. During disassembling, we use so-called “virtual addresses”, which are calculated by the following formula:
VirtualAddress = LinearAddress - (SegmentBase << 4);
We see that the SegmentBase determines what addresses will be displayed on the screen. More than that, IDA allows to create several segments with the same virtual address in them. For this, you just need to create segments with correct segment base values.
Normally a SegmentBase is a 16bit quantity. To create a segment with base >= 0x10000, you need to use selectors window . However, if you try to create a segment with a segment base >= 0x10000, IDA will automatically choose appropriately a free selector and setup for the new segment.
All SegmentBases are looked up in the selector table.
There are some address restrictions in IDA.
There is a range of addresses that are used for internal housekeeping. This range can be specified by the configuration variable PRIVRANGE (start address and size). It is not recommended to use these addresses for other purposes.
There is also one address which must never be used in the disassembly. It is the ‘all ones’ address, or -1. Internally, it is used as a BADADDR (bad address). No address or address range can include BADADDR.
Segment Creation Examples
Create segment - simple case (PC)
IBM PC case
Suppose we need to create a segment occupying addresses F000:1000..F000:2000 Let’s calculate linear addresses:
        start = (0xF000 << 4) + 0x1000 = 0xF1000
        end   = (0xF000 << 4) + 0x2000 = 0xF2000
The segment base must be selected so that the first offset in our segment will be 0x1000. Let’s find it using the following equation:
        VirtualAddress = LinearAddress - (SegmentBase << 4);
        0x1000         = 0xF1000 - (base << 4);
After solving this equation, we see that the segment base is equal to 0xF000. (you see, this is really a very simple case :) )
Now, we can create a segment entering:
        segment start address:  0xF1000
        segment end address:    0xF2000
        segment base:           0xF000
Please note that the end address never belongs to the segment in IDA.
Create segment - simple case (Z80)
Suppose we need to create a segment occupying virtual addresses 8000-C000. Since we are free to place our segment anywhere in the linear address space, we choose the linear addresses at our convenience. Let’s say we choose a linear address 0x20000:
        start = 0x20000
        end   = start + 0x4000 = 0x24000
The segment base must be selected so that the virtual address in our segment will be 0x8000. Let’s find it using the following equation:
        VirtualAddress = LinearAddress - (SegmentBase << 4);
        0x8000         = 0x20000 - (base << 4);
        base << 4      = 0x20000 - 0x8000
        base << 4      = 0x18000
        base           = 0x1800
After solving this equation, we see that the segment base is equal to 0x1800.
Now we can create a segment entering:
        segment start address:  0x20000
        segment end address:    0x24000
        segment base:           0x1800
Please note that the end address never belongs to the segment in IDA.
Create segment - automatically chosen selector case
Suppose we need to create a segment occupying linear addresses 200000-200C00 and the virtual addresses must have be 0000..0C00. If we simply enter
        segment start address:  0x200000
        segment end address:    0x200C00
        segment base:           0x20000
Then IDA will notice that the segment base is too big and does not fit into 16bits. Because of this IDA will find a free selector (let’s say it has found selector number 5), define it to point at paragraph 0x20000 and create a segment. After all this we will have:
        - a new selector is defined (5 -> 0x20000)
        - a new segment is created. Its attributes:
                start = 0x200000
                end   = 0x200C00
                base  = 5
The first virtual address in the segment will be 0:
        VirtualAddress = LinearAddress - (SelectorValue(SegmentBase) << 4)
                       = 0x200000      - (SelectorValue(5) << 4)
                       = 0x200000      - (0x20000 << 4)
                       = 0x200000      - 0x200000
                       = 0
Please note that the end address never belongs to the segment in IDA.
Create segment - user-defined selector case
If the previous example we saw how IDA allocates a selector automatically. You could make it yourself:
- Create a selector. For this, open the selectors window and press Ins. Enter a selector number and its value.
- Create a segment. Specify the selector number as the segment base.
Change segment translation
A call like:
call 1000
in the segment C obviously refers to the segment B, while the instruction:
call 500
refers to the segment A.
However, IDA does not try to link these references unless you tell it to do so: include the segments A and B into a translation list of the segment C. It means that you have to create a translation list
A B
for the segment C.
Below is a more complicated example:
                start   end
        A       0000    1000
        B       1000    2000
        C       1000    2000
        D       3000    4000
        E       3000    4000
translations
        B:      A
        C:      A
        D:      A B
        E:      A C
allow you to emulate overlays (the first set is A B D, the second A C E)
{% hint style=“info” %} If you use the segment translations, make sure that all segments have unique segment bases. If two segments are placed in the linear address space so that they must have the same segment base, you may assign different selectors with equal values to them. {% endhint %}
{% hint style=“info” %} IDA supports only one translation list per segment. This translation is applied by default to all instruction in the segment. If the segment uses other mappings, then these individual mappings can be specified for each instruction separately by using the convert operand commands. {% endhint %}
{% hint style=“info” %} Since only code references are affected by the segment translations, try to create the RAM segment at its usual place (i.e., its linear address in IDA corresponds to its address in the processor memory). This will make all data references to it to be correct without any segment translation. For the data references to other segments you’ll need to use the convert operand commands for each such reference. {% endhint %}
Binary string format
It is possible to enter a sequence of the following items:
- a number in the selected radix (hexadecimal, decimal or octal)
- a string constant:
"string" - a Unicode string constant:
L"unicode string" - a question mark
?to ignore variable bytes
The sequence must be separated by a space or a comma.
An entered number will occupy the minimal number of bytes it fits in with the restriction that the number of bytes is a power of 2 (1, 2, or 4 bytes).
Two question marks without a space between them are the same as one question mark. One question mark corresponds to one CPU byte. One CPU byte may consist of multiple octets for a wide-byte CPU, like TMS320C28.
Example:
CD 21          - bytes 0xCD, 0x21
21CD           - bytes 0xCD, 0x21 (the order depends on the endiannes)
"Hello", 0     - the null terminated string "Hello"
L"Hello"       - 'H', 0, 'e', 0, 'l', 0, 'l', 0, 'o', 0
B8 ? ? ? ? 90  - byte 0xB8, 4 bytes with any value, byte 0x90
Breakpoints
IDA’s debugger supports various types of breakpoints to control program execution. This guide covers page breakpoints (memory access breakpoints) and how to use conditions to control breakpoint behavior.
Page breakpoints
Page breakpoints are memory access breakpoints that can be set to detect when the application reads, writes, or executes code/data in a specific memory range. Page breakpoints are very similar to hardware breakpoints but there is no limitation on the number of page breakpoints that can be set or their size, in contrast with normal hardware breakpoints.
Memory access breakpoints are implemented by removing page permissions according to the specified type of the page breakpoint to be added (for example, for a write page breakpoint, the write permission will be removed from the page). When the access violation exception occurs because the application tries to access the specific memory region, IDA reports a breakpoint hit.
As page breakpoints can be set for a small part of a memory page but the permissions of the whole page must be changed, page breakpoints can slow down the debugger because many access violation exceptions may be generated. If the application accesses memory outside of the desired range but on the same page, the generated exception must be silently handled and the application resumed. Specifically, page breakpoints in the code segment can slow down the debugger very much.
Memory access breakpoints are supported since IDA version 6.3 for the following debuggers:
-
Win32: Page breakpoints are supported for both local and remote debugging of 32 and 64bit applications.
-
WinDbg: Page breakpoints are supported only for local debugging of 32-bit applications.
-
Bochs: Page breakpoints are supported for both of 32 and 64bit applications. Page breakpoints in the bochs debugger are just like normal hardware breakpoints but with no limit on the number of breakpoints or their size. Please note that hardware breakpoints in the bochs debugger occur AFTER the instruction is executed while regular page breakpoints occur BEFORE the instruction is actually executed.
Regular Expression Syntax Summary
The full syntax and semantics of the regular expressions that are supported by PCRE2 are described in the pcre2pattern documentation. This document contains a quick-reference summary of the syntax.
QUOTING
  \x         where x is non-alphanumeric is a literal x
  \Q...\E    treat enclosed characters as literal
ESCAPED CHARACTERS
This table applies to ASCII and Unicode environments.
  \a         alarm, that is, the BEL character (hex 07)
  \cx        "control-x", where x is any ASCII printing character
  \e         escape (hex 1B)
  \f         form feed (hex 0C)
  \n         newline (hex 0A)
  \r         carriage return (hex 0D)
  \t         tab (hex 09)
  \0dd       character with octal code 0dd
  \ddd       character with octal code ddd, or backreference
  \o{ddd..}  character with octal code ddd..
  \U         "U" if PCRE2_ALT_BSUX is set (otherwise is an error)
  \uhhhh     character with hex code hhhh (if PCRE2_ALT_BSUX is set)
  \xhh       character with hex code hh
  \x{hhh..}  character with hex code hhh..
Note that \0dd is always an octal code. The treatment of backslash followed by a non-zero digit is complicated; for details see the section "Non-printing characters" in the pcre2pattern documentation, where details of escape processing in EBCDIC environments are also given.
When \x is not followed by {, from zero to two hexadecimal digits are read, but if PCRE2_ALT_BSUX is set, \x must be followed by two hexadecimal digits to be recognized as a hexadecimal escape; otherwise it matches a literal "x". Likewise, if \u (in ALT_BSUX mode) is not followed by four hexadecimal digits, it matches a literal "u".
CHARACTER TYPES
  .          any character except newline;
               in dotall mode, any character whatsoever
  \C         one code unit, even in UTF mode (best avoided)
  \d         a decimal digit
  \D         a character that is not a decimal digit
  \h         a horizontal white space character
  \H         a character that is not a horizontal white space character
  \N         a character that is not a newline
  \p{xx}     a character with the xx property
  \P{xx}     a character without the xx property
  \R         a newline sequence
  \s         a white space character
  \S         a character that is not a white space character
  \v         a vertical white space character
  \V         a character that is not a vertical white space character
  \w         a "word" character
  \W         a "non-word" character
  \X         a Unicode extended grapheme cluster
\C is dangerous because it may leave the current matching point in the middle of a UTF-8 or UTF-16 character. The application can lock out the use of \C by setting the PCRE2_NEVER_BACKSLASH_C option. It is also possible to build PCRE2 with the use of \C permanently disabled.
By default, \d, \s, and \w match only ASCII characters, even in UTF-8 mode or in the 16-bit and 32-bit libraries. However, if locale-specific matching is happening, \s and \w may also match characters with code points in the range 128-255. If the PCRE2_UCP option is set, the behaviour of these escape sequences is changed to use Unicode properties and they match many more characters.
GENERAL CATEGORY PROPERTIES FOR \p and \P
  C          Other
  Cc         Control
  Cf         Format
  Cn         Unassigned
  Co         Private use
  Cs         Surrogate

  L          Letter
  Ll         Lower case letter
  Lm         Modifier letter
  Lo         Other letter
  Lt         Title case letter
  Lu         Upper case letter
  L&         Ll, Lu, or Lt

  M          Mark
  Mc         Spacing mark
  Me         Enclosing mark
  Mn         Non-spacing mark

  N          Number
  Nd         Decimal number
  Nl         Letter number
  No         Other number

  P          Punctuation
  Pc         Connector punctuation
  Pd         Dash punctuation
  Pe         Close punctuation
  Pf         Final punctuation
  Pi         Initial punctuation
  Po         Other punctuation
  Ps         Open punctuation

  S          Symbol
  Sc         Currency symbol
  Sk         Modifier symbol
  Sm         Mathematical symbol
  So         Other symbol

  Z          Separator
  Zl         Line separator
  Zp         Paragraph separator
  Zs         Space separator
PCRE2 SPECIAL CATEGORY PROPERTIES FOR \p and \P
  Xan        Alphanumeric: union of properties L and N
  Xps        POSIX space: property Z or tab, NL, VT, FF, CR
  Xsp        Perl space: property Z or tab, NL, VT, FF, CR
  Xuc        Univerally-named character: one that can be
               represented by a Universal Character Name
  Xwd        Perl word: property Xan or underscore
Perl and POSIX space are now the same. Perl added VT to its space character set at release 5.18.
SCRIPT NAMES FOR \p AND \P
Ahom, Anatolian_Hieroglyphs, Arabic, Armenian, Avestan, Balinese, Bamum, Bassa_Vah, Batak, Bengali, Bopomofo, Brahmi, Braille, Buginese, Buhid, Canadian_Aboriginal, Carian, Caucasian_Albanian, Chakma, Cham, Cherokee, Common, Coptic, Cuneiform, Cypriot, Cyrillic, Deseret, Devanagari, Duployan, Egyptian_Hieroglyphs, Elbasan, Ethiopic, Georgian, Glagolitic, Gothic, Grantha, Greek, Gujarati, Gurmukhi, Han, Hangul, Hanunoo, Hatran, Hebrew, Hiragana, Imperial_Aramaic, Inherited, Inscriptional_Pahlavi, Inscriptional_Parthian, Javanese, Kaithi, Kannada, Katakana, Kayah_Li, Kharoshthi, Khmer, Khojki, Khudawadi, Lao, Latin, Lepcha, Limbu, Linear_A, Linear_B, Lisu, Lycian, Lydian, Mahajani, Malayalam, Mandaic, Manichaean, Meetei_Mayek, Mende_Kikakui, Meroitic_Cursive, Meroitic_Hieroglyphs, Miao, Modi, Mongolian, Mro, Multani, Myanmar, Nabataean, New_Tai_Lue, Nko, Ogham, Ol_Chiki, Old_Hungarian, Old_Italic, Old_North_Arabian, Old_Permic, Old_Persian, Old_South_Arabian, Old_Turkic, Oriya, Osmanya, Pahawh_Hmong, Palmyrene, Pau_Cin_Hau, Phags_Pa, Phoenician, Psalter_Pahlavi, Rejang, Runic, Samaritan, Saurashtra, Sharada, Shavian, Siddham, SignWriting, Sinhala, Sora_Sompeng, Sundanese, Syloti_Nagri, Syriac, Tagalog, Tagbanwa, Tai_Le, Tai_Tham, Tai_Viet, Takri, Tamil, Telugu, Thaana, Thai, Tibetan, Tifinagh, Tirhuta, Ugaritic, Vai, Warang_Citi, Yi.
CHARACTER CLASSES
  [...]       positive character class
  [^...]      negative character class
  [x-y]       range (can be used for hex characters)
  [[:xxx:]]   positive POSIX named set
  [[:^xxx:]]  negative POSIX named set

  alnum       alphanumeric
  alpha       alphabetic
  ascii       0-127
  blank       space or tab
  cntrl       control character
  digit       decimal digit
  graph       printing, excluding space
  lower       lower case letter
  print       printing, including space
  punct       printing, excluding alphanumeric
  space       white space
  upper       upper case letter
  word        same as \w
  xdigit      hexadecimal digit
In PCRE2, POSIX character set names recognize only ASCII characters by default, but some of them use Unicode properties if PCRE2_UCP is set. You can use \Q...\E inside a character class.
QUANTIFIERS
  ?           0 or 1, greedy
  ?+          0 or 1, possessive
  ??          0 or 1, lazy
  *           0 or more, greedy
  *+          0 or more, possessive
  *?          0 or more, lazy
  +           1 or more, greedy
  ++          1 or more, possessive
  +?          1 or more, lazy
  {n}         exactly n
  {n,m}       at least n, no more than m, greedy
  {n,m}+      at least n, no more than m, possessive
  {n,m}?      at least n, no more than m, lazy
  {n,}        n or more, greedy
  {n,}+       n or more, possessive
  {n,}?       n or more, lazy
ANCHORS AND SIMPLE ASSERTIONS
  \b          word boundary
  \B          not a word boundary
  ^           start of subject
                also after an internal newline in multiline mode
                (after any newline if PCRE2_ALT_CIRCUMFLEX is set)
  \A          start of subject
  $           end of subject
                also before newline at end of subject
                also before internal newline in multiline mode
  \Z          end of subject
                also before newline at end of subject
  \z          end of subject
  \G          first matching position in subject
MATCH POINT RESET
\K reset start of match
\K is honoured in positive assertions, but ignored in negative ones.
ALTERNATION
expr|expr|expr...
CAPTURING
  (...)           capturing group
  (?<name>...)    named capturing group (Perl)
  (?'name'...)    named capturing group (Perl)
  (?P<name>...)   named capturing group (Python)
  (?:...)         non-capturing group
  (?|...)         non-capturing group; reset group numbers for
                   capturing groups in each alternative
ATOMIC GROUPS
(?>...) atomic, non-capturing group
COMMENT
(?#....) comment (not nestable)
OPTION SETTING
  (?i)            caseless
  (?J)            allow duplicate names
  (?m)            multiline
  (?s)            single line (dotall)
  (?U)            default ungreedy (lazy)
  (?x)            extended (ignore white space)
  (?-...)         unset option(s)
The following are recognized only at the very start of a pattern or after one of the newline or \R options with similar syntax. More than one of them may appear. (*LIMIT_MATCH=d) set the match limit to d (decimal number)
  (*LIMIT_RECURSION=d) set the recursion limit to d (decimal number)
  (*NOTEMPTY)     set PCRE2_NOTEMPTY when matching
  (*NOTEMPTY_ATSTART) set PCRE2_NOTEMPTY_ATSTART when matching
  (*NO_AUTO_POSSESS) no auto-possessification (PCRE2_NO_AUTO_POSSESS)
  (*NO_DOTSTAR_ANCHOR) no .* anchoring (PCRE2_NO_DOTSTAR_ANCHOR)
  (*NO_JIT)       disable JIT optimization
  (*NO_START_OPT) no start-match optimization (PCRE2_NO_START_OPTIMIZE)
  (*UTF)          set appropriate UTF mode for the library in use
  (*UCP)          set PCRE2_UCP (use Unicode properties for \d etc)
Note that LIMIT_MATCH and LIMIT_RECURSION can only reduce the value of the limits set by the caller of pcre2_match(), not increase them. The application can lock out the use of (*UTF) and (*UCP) by setting the PCRE2_NEVER_UTF or PCRE2_NEVER_UCP options, respectively, at compile time.
NEWLINE CONVENTION
These are recognized only at the very start of the pattern or after option settings with a similar syntax.
  (*CR)           carriage return only
  (*LF)           linefeed only
  (*CRLF)         carriage return followed by linefeed
  (*ANYCRLF)      all three of the above
  (*ANY)          any Unicode newline sequence
WHAT \R MATCHES
These are recognized only at the very start of the pattern or after option setting with a similar syntax.
  (*BSR_ANYCRLF)  CR, LF, or CRLF
  (*BSR_UNICODE)  any Unicode newline sequence
LOOKAHEAD AND LOOKBEHIND ASSERTIONS
  (?=...)         positive look ahead
  (?!...)         negative look ahead
  (?<=...)        positive look behind
  (?<!...)        negative look behind
Each top-level branch of a look behind must be of a fixed length.
BACKREFERENCES
  \n              reference by number (can be ambiguous)
  \gn             reference by number
  \g{n}           reference by number
  \g{-n}          relative reference by number
  \k<name>        reference by name (Perl)
  \k'name'        reference by name (Perl)
  \g{name}        reference by name (Perl)
  \k{name}        reference by name (.NET)
  (?P=name)       reference by name (Python)
SUBROUTINE REFERENCES (POSSIBLY RECURSIVE)
  (?R)            recurse whole pattern
  (?n)            call subpattern by absolute number
  (?+n)           call subpattern by relative number
  (?-n)           call subpattern by relative number
  (?&name)        call subpattern by name (Perl)
  (?P>name)       call subpattern by name (Python)
  \g<name>        call subpattern by name (Oniguruma)
  \g'name'        call subpattern by name (Oniguruma)
  \g<n>           call subpattern by absolute number (Oniguruma)
  \g'n'           call subpattern by absolute number (Oniguruma)
  \g<+n>          call subpattern by relative number (PCRE2 extension)
  \g'+n'          call subpattern by relative number (PCRE2 extension)
  \g<-n>          call subpattern by relative number (PCRE2 extension)
  \g'-n'          call subpattern by relative number (PCRE2 extension)
CONDITIONAL PATTERNS
  (?(condition)yes-pattern)
  (?(condition)yes-pattern|no-pattern)

  (?(n)               absolute reference condition
  (?(+n)              relative reference condition
  (?(-n)              relative reference condition
  (?(<name>)          named reference condition (Perl)
  (?('name')          named reference condition (Perl)
  (?(name)            named reference condition (PCRE2)
  (?(R)               overall recursion condition
  (?(Rn)              specific group recursion condition
  (?(R&name)          specific recursion condition
  (?(DEFINE)          define subpattern for reference
  (?(VERSION[>]=n.m)  test PCRE2 version
  (?(assert)          assertion condition
BACKTRACKING CONTROL
The following act immediately they are reached:
  (*ACCEPT)       force successful match
  (*FAIL)         force backtrack; synonym (*F)
  (*MARK:NAME)    set name to be passed back; synonym (*:NAME)
The following act only when a subsequent match failure causes a backtrack to reach them. They all force a match failure, but they differ in what happens afterwards. Those that advance the start-of-match point do so only if the pattern is not anchored. (*COMMIT) overall failure, no advance of starting point
  (*PRUNE)        advance to next starting character
  (*PRUNE:NAME)   equivalent to (*MARK:NAME)(*PRUNE)
  (*SKIP)         advance to current matching position
  (*SKIP:NAME)    advance to position corresponding to an earlier
                  (*MARK:NAME); if not found, the (*SKIP) is ignored
  (*THEN)         local failure, backtrack to next alternation
  (*THEN:NAME)    equivalent to (*MARK:NAME)(*THEN)
CALLOUTS
  (?C)            callout (assumed number 0)
  (?Cn)           callout with numerical data n
  (?C"text")      callout with string data
The allowed string delimiters are ` ' " ^ % # $ (which are the same for the start and the end), and the starting delimiter { matched with the ending delimiter }. To encode the ending delimiter within the string, double it.
Problems list
These problems appear in the Problems window (View → Open subviews → Problems). IDA automatically detects and lists potential issues during analysis, helping you identify areas that may need manual review or correction.
The following problems may occur:
- NOOFFSET Cannot find offset base
- NONAME Cannot find name
- NOFORCED Cannot find alternative string for an operand
- NOCMT Cannot find comment
- NOREF Cannot find references
- INDIRJMP Indirect execution flow
- NODISASM Cannot disassemble
- ALREADY Already data or code
- BOUNDS Execution flows beyond limits
- OVERFLOW Too many lines
- BADSTACK Failed to trace the value of the stack pointer
- LOOKHERE Attention! Probably erroneous situation
- DECISION Decision to convert to instruction/data is made by IDA
- ROLLBACK The decision made by IDA was wrong and rolled back
- COLISION FLIRT collision: the function with the given name already exists
- SIGFNREF FLIRT match indecision: reference to function expected\
Problem: Cannot find offset base
Description: The current item has an operand marked as an offset, but IDA cannot find the offset base in the database.
Possible reason(s): The database is probably corrupted. This may occur if the database was corrupted and repaired.
What to do: Mark the operand again as an offset. Use one of the following commands:
- Offset (data segment) (action
OpOffset) - Offset (current segment) (action
OpOffsetCs) - Offset by (any segment)… (action
OpAnyOffset) - Offset (user-defined)… (action
OpUserOffset)
Problem: Cannot find name
Description: Two reasons can cause this problem:
- Reference to an illegal address is made in the program being disassembled;
- IDA couldn’t find a name for the address but it must exist.
What to do:
- If this problem is caused by a reference to an illegal address:
- Try to enter the operand manually (The Manual… command; action
ManualOperand), or - Make the illegal address legal by creating a new segment (Create segment… command; action
CreateSegment)
- Otherwise, the database is corrupt.
Problem: Cannot find alternative string for an operand
Description: The current item has an operand marked as entered manually, but IDA cannot find the manually entered string in the database.
Possible reason(s): The database is corrupt.
What to do:
Enter the operand manually again. Use the Manual… command (action ManualOperand).
Problem: Cannot find comment
Description: Should not happen. Please inform the author if you encounter this problem.
Problem: Cannot find references
Description: The current item is marked as referenced from other place(s) in the program, but IDA cannot find any reference to it.
Possible reason(s): The database is corrupt.
What to do: Database is corrupt, the best thing to do is to reload the database.
Problem: Indirect execution flow
Description: Actually, this is not a problem. IDA warns you that here it encountered an indirect jump and couldn’t follow the execution.
What to do: Nothing, this entry is just for your information
Problem: Cannot disassemble
Description: IDA cannot represent the specified bytes as an instruction.
Possible reason(s):
- The specified bytes do not form an instruction.
- The current processor type (Options → General… → Analysis) is incorrect.
What to do:
If you are sure that the specified bytes contain an instruction, you can try to change processor type (Options → General… → Analysis) and mark these bytes as an instruction using the following command: Code (action MakeCode)
Problem: Already data or code
Description: IDA cannot convert this byte(s) to an instruction or data because it would overlap another instruction.
What to do:
Make the following overlapping instruction or data ‘unexplored’ using the Undefine command (action MakeUnknown).
Problem: Execution flows beyond limits
Description: IDA encountered a jump or call instruction to an illegal address. Namely:
- jump/call beyond program segments
- near jump/call beyond the current segment
What to do:
- Enter the operand manually (The Manual… command; action
ManualOperand), or - Create a new segment making the illegal address legal (Create segment… command; action
CreateSegment), or - Change the current segment bounds using one of the following:
- change segment attributes (Edit → Segments → Edit segment…)
- move a segment (Edit → Segments → move current segment…)
Problem: Too many lines
Description: The current item (instruction or data) occupies more lines on the screen than it is allowed by the current configuration.
What to do:
- If the current item is an array or string literal, try to divide it, or
- Delete additional comment lines (added via Edit → Comments → Enter anterior/posterior lines…), or
- Disable cross-references display (Options → General… → Cross-references), or
- Increase the limit in IDA.CFG; the parameter name is MAX_ITEM_LINES.
Problem: Failed to trace the value of the stack pointer
Description: The value of the stack pointer at the end of the function is different from its value at the start of the function. IDA checks for the difference only if the function is ended by a “return” instruction. The most probable cause is that stack tracing has failed. This problem is displayed in the disassembly listing with the “sp-analysis failed” comment.
What to do:
- Examine the value of stack pointer (Edit → Functions → Change stack pointer…) at various locations of the function and try to find out why the stack tracing has failed. Usually, it fails because some called function changed the stack pointer (by purging the input parameters, for example)
- If you have found the offending function, change (Edit → Functions → Edit function…) its attributes (namely, number of bytes purged upon return).
- Another way is to specify manually how the stack pointer is modified. See the Edit → Functions → Change stack pointer… command.
Problem: Attention! Probably erroneous situation
Description: This is a generic problem message. IDA uses it when no more detailed information is available or the problem is processor-specific.
Problem: Decision to convert to instruction/data is made by IDA
Description: In fact, this is not exactly a problem: IDA collects all the locations where it has decided to convert undefined bytes to instructions or data even if they don’t have any references to them. We consider this decision as dangerous and therefore we provide you with a way to examine all such places.
What to do: Examine the result of conversion and modify the instructions or data if IDA has made a wrong conversion.
Problem: The decision made by IDA was wrong and rolled back
Description: This problem occurs when IDA has converted unexplored bytes to instruction(s) and later found that the decision was wrong. For example:
            mov     ax, bx
            db 0FFh, 0FFh
0FFh, 0FFh cannot be converted to an instruction, therefore the mov instruction cannot be here.
In this case, IDA automatically destroys the instruction(s) and enlists the address as problematic.
What to do: Examine the end result and modify it accordingly.
FLIRT collision: the function with the given name already exists
Description: It means that IDA recognized the function as coming from a standard library but there already was another function with the same name in the program.
What to do: Examine the function and rename it as you wish.
FLIRT match indecision: reference to function expected
Description: IDA matched code bytes against at least one signature entry, but failed finding expected cross-references at certain offsets in the code.
Consider the following .pat file contents:
            5589E583EC18A1........890424E8........C9C3...................... 00 0000 0015 :0000 _test ^000F _my_fun0
            5589E583EC18A1........890424E8........C9C3...................... 00 0000 0015 :0000 _smuk ^000F _my_fun1
Now, turn that .pat file into a signature (.sig) file, telling sigmake to include function references into signature (using the -r switch).Then, apply that .sig file to a binary that you are examining.
If IDA recognizes the 0x15-bytes long pattern in the binary, it will check that, at offset 0xF from the start of the match, a call to either “_my_fun0” or “_my_fun1” is performed. If either one of the two is found, then that code will be named “test”, or “smuk”, respectively. Otherwise, a SIGFNREF problem will be signalled.
What to do: Examine the code pointed to by the address at the given offset (i.e., 0xF) and try and determine whether that function could be “_my_fun0”, or “_my_fun1”. If so, name it accordingly and re-apply the signature.
An alternative is to generate the signature (.sig) file without the cross-references to functions (i.e., dropping the ‘-r’ switch). But beware of collisions: a pattern like the one above will inevitably create a collision, since the pattern bytes are similar for the two entries.
Various dialog help messages
- Packed Files
- Bad Relocation Table
- Additional information at the end of file
- Overlayed files
- Error loading overlays
- Maximal number of segments is reached
- Cannot generate executable file
- Bad input file format
- Choose mark number
- Enter mark description
- Choose marked location
- IDA View bookmarks
- Structs bookmarks
- Enums bookmarks
- Cannot Rename a Byte
- Cannot find file segmentation
- Negative Offsets
- DataBase is not closed
- Obsolete Database Format
- The Name List is Empty
- Upgrading IDA database
- Unexpected Database Format
- Imported module is not found
- Load file dialog
- PE .idata section has additional data
- Repeat search for instruction/data with the specified operand (see Next immediate value command; action
JumpImmediate) - Repeat search for substring in the disassembly (see Next text command; action
JumpText) - Repeat search for substring in the file (see Sequence of bytes… command; action
AskBinaryText) - Moving Segment
- Deleting a Segment
- Auto analysis is not completed
- Silent mode of IDA
- Rename a structure/member
- Delete a structure member
- Unpacked database is dangerous
- Database Is Empty
- Illegal Usage of the Switch
- Cannot Find Input File
- Patched Bytes Are Skipped
- Patched bytes have relocation information
- No Segment for the current byte
- Empty Program
- Load additional binary file
- Patching Relocation Bytes
- NotVaFile
- VaTooHighVersion
- Desktops
- Can’t create segment registers range
- Cannot assign to Segment Register
Packed Files
Sometimes, executable files are shipped in a packed form. It means that to disassemble these files you need to unpack them.
IDA displays this message if the relocation table of the input MZ executable file is empty.
Bad Relocation Table
Relocation table has references beyond program limits.
Additional information at the end of file
The file being loaded is not completely loaded to memory by the operating system. This may be because:
- the file is overlayed; IDA does not know this type of overlays
- the file has debugging information attached to its end
- the file has other type of information at the end
Anyway, IDA will not load the additional information.
Overlayed files
Some EXE files are built with overlays. This means that the whole file is not loaded into the memory at the start of the program, but only a part of it. Other parts are loaded by the program itself into the dynamic memory or over some subroutines of the program. This fact leads to many difficulties when you disassemble such a program.
Currently, IDA knows about overlays created by Borland and Microsoft C and Pascal compilers.
Error loading overlays
One of the following occurred:
        - overlay stub is not found
        - overlay relocation data is incorrect
i.e. the input file structure is bad.
Maximal number of segments is reached
When IDA tried to delete bytes outside of any segment, the maximal number of contiguous chunks is reached. This is NOT a fatal error.
Some bytes outside of any segment will be present => the output text will be incorrect because of these bytes. However, you can delete them in the output text using a text editor.
Cannot generate executable file
IDA produces executable files only for:
- MS DOS .exe
- MS DOS .com
- MS DOS .drv
- MS DOS .sys
- general binary
- Intel Hex Object Format
- MOS Technology Hex Object Format
Furthermore, external loaders may or may not support the creation of user-defined input file formats.
Bad input file format
The input file does not conform to the following definitions:
Intel Hex Object Format ▀▀▀▀▀▀▀▀▀▀▀▀▀▀▀▀▀▀▀▀▀▀ This is the default format. This format is line oriented and uses only printable ASCII characters except for the carriage return/line feed at the end of each line. Each line in the file assumes the following format:
:NNAAAARRHHHHHHHHHHHHHHHHHHHHHHHHHHHHHHHHHHHHHHHHHHHHHHHHCCTT
Where:
All fields marked ‘hex’ consist of two or four ASCII hexadecimal digits (0-9, A-F). A maximum of 24 data bytes will be represented on each line.
 :      = Record Start Character
 NN     = Byte Count (hex)
 AAAA   = Address of first byte (hex)
 RR     = Record Type (hex, 00 except for last record which is 01)
 HH     = Data Bytes (hex)
 CC     = Check Sum (hex)
 TT     = Line Terminator (carriage return, line feed)
The last line of the file will be a record conforming to the above format with a byte count of zero (‘:00000001FF’).
The checksum is defined as:
        sum      =  byte_count + address_hi + address_lo +
                        record_type + (sum of all data bytes)
        checksum =  ((-sum) & ffh)
MOS Technology Hex Object Format ▀▀▀▀▀▀▀▀▀▀▀▀▀▀▀▀▀▀▀▀▀▀▀▀▀▀▀▀▀▀▀▀▀ This format is line oriented and uses only printable ASCII characters except for the carriage return/line feed at the end of each line. Each line in the file assumes the following format:
;NNAAAAHHHHHHHHHHHHHHHHHHHHHHHHHHHHHHHHHHHHHHHHHHHHHHHHCCCCTT
Where:
All fields marked ‘hex’ consist of two or four ASCII hexadecimal digits (0-9, A-F). A maximum of 24 data bytes will be represented on each line.
 ;      = Record Start Character
 NN     = Byte Count (hex)
 AAAA   = Address of first byte (hex)
 HH     = Data Bytes (hex)
 CCCC   = Check Sum (hex)
 TT     = Line Terminator (carriage return, line feed)
The last line of the file will be a record with a byte count of zero (‘;00’).
The checksum is defined as:
        sum      =  byte_count + address_hi + address_lo +
                        (sum of all data bytes)
        checksum =  (sum & ffffh)
Choose mark number
This command allows you to mark a location so that afterwards you can jump to the marked location immediately. Select any line from the list. The selected line will be used for mark description. Afterwards, you will be able to jump to the marked location using <Alt-J> key.
You can use <Up>, <Down>, <PgUp>, <PgDn>, <Home>, <End> keys. If you select the first line of the list, nothing will be selected.
Press <Enter> to select line, <Esc> to cancel.
See also: How to jump to the marked location
Enter mark description
Mark description is any text line. The description is for your information only.
Choose marked location
This command allows you to jump to the previously marked location. Select any line. You will jump to the selected location.
You can use <Up>, <Down>, <PgUp>, <PgDn>, <Home>, <End> keys. If you select the first line of the list, nothing will be selected.
Press <Enter> to select line, <Esc> to cancel.
See also: How to mark a location
IDA View bookmarks
Structs bookmarks
Enums bookmarks
Cannot rename a location
It might be because of one of the following reasons:
1. The name is ill-formed:
- it is a reserved word
{% hint style=“info” %} IDA does not allow the use of register names as byte names. {% endhint %}
- it contains bad characters. The list of allowed characters is specified in IDA.CFG
- it starts with a reserved prefix. Some prefixes are used by IDA to generate names. See Names Representation dialog for the list of prefixes.
- The name is already used in the program. Try to use another name. In order to know where the name is used, you can try to jump to it using Jump to the Named Location
3. The address cannot have a name:
     - IDA refuses to rename tail bytes (i.e. the second, third...
       bytes of instruction/data).
     - the address does not belong to the program
Cannot find file segmentation
The database is empty or corrupt. Unfortunately, all information has been lost.
Please use a backup copy of the database if there is any.
If you have previously saved your database into a text file, you can load it. See the Dump database command for explanations.
Negative Offsets
A segment cannot have bytes with negative offset from the segment base. Example: if a segment base is 0x3000, this segment can have a start address above or equal to 0x30000, but it cannot have a start address 0x2FFFF.
Obsolete Database Format
Please use an old version of IDA. The current version of IDA does not support this database.
Database is not closed
The database was not closed after the last IDA session. Most probably this happened due to a power fault, unexpected reboot of the computer, or another abnormal session termination.
You may try to repair the database but the best solution would be to use the intact packed database or use a backup.
The repairing may fail to recover the database.
See also the Dump database command.
The Name List is Empty
is command allows you to select a name from the user defined names. It means that no such names are defined now, or that all user-defined names are hidden. To give a name to the location, use Rename or [Rename any]../edit/other/rename-any-address.md) commands.
Upgrading IDA database
If IDA finds out that your database has an old format, it will try to upgrade the database to a new format. The upgrade process is completely automatic, no user intervention is needed. However, after upgrading your database, you will not be able to work with it using old versions of IDA. That is why IDA asks your confirmation before upgrading the database.
This feature works only for databases starting from IDA version 2.05.
Unexpected Database Format
Database format is newer than expected. That is because you are using an old version of IDA. The only thing you can do is to get a new version of IDA.
Imported module is not found
IDA did not find the specified module in:
-
the current directory
-
the operating system directory (see switch -W and configuration file parameters WINDIR,OS2DIR)
OR
      - the module cannot be accepted because:
      - the module name (recorded in the file) doesn't match
        the expected name
      - the module does not contains any exported names (all exported functions
        are exported by ordinal numbers)
Entries imported by ordinal entries will not be commented. If IDA finds a module, all entries that are imported by ordinal will be commented like this:
  KERNEL_91:
                retf            ; INITTASK
                                  ^^^^^^^^^
                                  comment
This comment will be propagated (repeated - see the Enter repeatable comment… command) to all locations which call this entry:
call far ptr KERNEL_91 ; INITTASK
IDA searches all files named “modulename.*” for the module. If you know that the imported module resides in another directory, copy it to your current directory. If the module file name is different from “modulename.*”, rename it. After the database is loaded, you can delete the copied module.
IDA also looks for file “modulename.ids” in the current directory in the IDS subdirectory of the directory where IDA.EXE resides in the PATHed directories
You can create such a file yourself. For an example, look at DOSCALLS.IDS in the IDS subdirectory.
Load file dialog
Below is the description of dialog box fields:
 Load address - the paragraph where the file will be loaded.
                Meaningful only for EXE and binary files. For new exe
                files, please use 'manual load' feature.
 Load offset  - relevant only for binary files.
                specifies offset of the first byte from the start of
                the first segment. For example, if load offset=0x2700 and
                load address=0x1000, the first byte of the file will
                be at 1000:2700.
 DLL directory - path where IDA will look up referenced DLL files.
                Note that if IDA finds .IDS file, it does not look for
                .DLL file.
 Create segments        - relevant for binary files.
                          If not checked, IDA does not create segments.
 Load resources         - If not checked, IDA does not load resources from
                          NE files.
 Rename DLL entries     - If not checked, IDA makes repeatable comments
                          for entries imported by ordinals. Otherwise,
                          IDA renames the entries to meaningful names.
 Manual load            - relevant only for NE,LE,LX,ELF files.
                          If checked, IDA will ask loading addresses
                          and selectors for each object of the file.
                          For experienced users only!
 Fill segment gaps      - relevant only for COFF & OMF files.
                          If checked, IDA will fill gaps between
                          segments, creating one big chunk.
                          This option facilitates loading of big
                          object files.
 Make imports section   - relevant only for PE files.
                          If checked, IDA will convert .idata section
                          definitions to "extrn" directives and truncate it.
                          Unfortunately, sometimes there are some additional
                          data in .idata section so you'll need to disable
                          this feature if some information is not loaded
                          into the database.
 Create FLAT group      - relevant only for IBM PC PE files.
                          If checked, IDA will automatically create FLAT
                          group and use its selector as the default value
                          for the segment registers.
 Code segment           - If checked, IDA creates a code but not a data
                          segment. Relevant for processors with different
                          code/data segment addressing schemes (for
                          example, Atmel AVR).
 Loading options        - relevant only ELF,JAVA files.
                          If checked, IDA will ask additional loader
                          options. For experienced users only!
PE .idata section has additional data
If “create imports section” in the file loading dialog is checked, IDA will convert .idata section definitions to “extrn” directives and truncate it so it will not contain empty lines.
Unfortunately, sometimes there is some additional data in .idata section so you’ll need to disable this feature if some information is not loaded into the database.
IDA tries to detect additional data in .idata section automatically.
If you disable conversion of .idata section to a segment with “extrn” directives, you will see
somename dd ?
instead of
extrn somename
directives.
Another impact is that the .idata segment will not be truncated in any way.
Moving the Segment Start
When you edit the segment boundaries, you can check the “move the adjacent segments” checkbox.
IDA will try to shrink/expand the previous segment in order to move the beginning of the selected segment. Of course, you cannot move the start of the segment ‘too far’:
  - the segment must have at least 1 byte
  - the start address of the segment must be less than the end of the segment
  - no segments can be killed during moving
  - the segment cannot have bytes with negative offsets
You cannot shrink a segment to zero bytes. A segment must have at least one byte.
This command is mostly used when IDA does not detect the boundary between segments correctly.
Sometimes, IDA creates 2 segments where only one segment must exist. In this case, you should not use this command. Use the following sequence instead:
- [delete](see the Delete segment… command) one segment. Choose the one with the bad segment base value. Do not disable addresses occupied by the segment being deleted.
- change boundaries of the other segment. Caution: moving the first segment of the program will delete all information about the bytes between the old start of the segment and the new start of the segment!
See also another command that changes segment bounds in the Edit → Segments submenu.
Deleting a Segment
Deleting a Segment
If you want to delete the segment, please mark ‘CONFIRM DELETION’ checkbox
Disable addresses checkbox
CAUTION: ALL INFORMATION ABOUT THE SEGMENT WILL BE LOST!
If you disable the addresses occupied by the segment, all information about these addresses will be lost. You will not see them on the screen anymore.
Otherwise, the segment will be deleted, but its data will remain unchanged. You can create another segment(s) for these addresses using the Create segment… command.
Auto analysis is not completed
As long as auto analysis is not completed, the IDA database is not consistent:
- not all cross-references are found
- not all instructions are disassembled
- not all data items are explored
See also:
- auto analysis
- Set up auto analysis via Options → General… → Analysis
Silent mode of IDA
In this mode, IDA will not display dialog boxes on the screen. Instead, it will assume the default answer and proceed. For example, if you press @<Quit>, IDA will promptly exit to OS without asking for any confirmation.
To return to normal mode you will need to execute an IDC function: batch(0); i.e. disable batch “silent” mode. To execute a script command, select File → Script command… menu item or press @<ExecuteLine> hotkey.
Rename a structure/member
IDA maintains separate namespaces for each structure. For example, you can define something like this:
 xxx    struc
 xxx    db ?
 xxx    struc
Beware, usually assemblers have one common namespace and do not allow the mentioned above example.
An empty name cannot be specified.
This command is available when you open a Local Types window.
If the cursor is on the structure name at the beginning of the structure definition, IDA proposes to rename the structure. Otherwise, IDA proposes to rename a structure field.
If a structure is being renamed, the option “Don’t include in the list” means that the structure will not be included in the list of the structures which appears when the user applies the structure definition (for example, when the user creates a variable of this structure type). We recommend to mark this checkbox when you have defined all variables of this structure type and want to reduce the number of choices in the list.
See also:
- Edit → Structs submenu.
- How to Enter an Identifier
Delete a structure member
Please remember that deleting a member deletes also all information
about this member, including comments, member name etc.
See also Edit → Structs submenu.
Unpacked database is dangerous
First of all, you may lose all information because you will not have a backup copy of the database. IDA makes modifications to the unpacked database and if some unexpected condition occurs, the unpacked database is usually damaged. IDA is able to repair this database, but some information could be irreversibly lost, leading to disastrous consequences.
The only advantage of the unpacked database is that it is loaded very fast. the same way, exiting IDA is fast too.
If packing is disabled, the Abort command will not be available the next time the database is loaded.
We strongly discourage using unpacked databases.
To disable this prompt in the future, simply modify ASK_EXIT_UNPACKED parameter in IDATUI.CFG or IDAGUI.CFG file.
Please note that when the “File -> Save as” is used with an unpacked database, IDA will continue to use the unpacked database and not the newly created database (the saved as one). In this case, please close and re-open the newly created database to ensure that IDA will use it instead of the original database.
Database Is Empty
Although the database exists, it is empty. Please delete it and start over.
If you have previously saved your database into a text file, you can load it. See Dump database to IDC file… command for explanations. See also IDA usage help
Illegal Usage of the Switch
Not all switches can be used when you start IDA for the second or more time. Below are valid switches: -a disable auto analysis -d debug
See also IDA usage help
Cannot Find Input File
IDA has tried to find a file with the extensions mentioned in the IDA.CFG file, but could not find anything.
The default extension table looks like this:
 Extension    Processor

  "com" :       ""
  "exe" :       ""
  "dll" :       ""
  "drv" :       ""
  "sys" :       ""
  "bin" :       ""
  "ovl" :       ""
  "ovr" :       ""
  "ov?" :       ""
  "nlm" :       ""
  "lan" :       ""
  "dsk" :       ""
  "obj" :       ""
  "prc" :       "68000"
  "axf" :       "arm710a"
  "h68" :       "68000"
  "i51" :       "8051"
  "sav" :       "pdp11"
  "rom" :       "z80"
  "cla*":       "java"
  "s19":        "6811"
  "epoc":       "arm"
  "o":          ""
See also IDA usage help
Patched Bytes Are Skipped
Some bytes in program memory have no corresponding byte in the executable file. For example, uninitialized data is not kept in the file. OS/2 Warp and Window support compressed pages.
In this case, IDA cannot create a full difference file. It shows the skipped byte addresses along with their values in the message window.
Patched bytes have relocation information
List of Functions
You can use list viewer commands in this window. Here is the format of this window.
No Segment for the current byte
Some commands cannot be applied to the addresses without a segment.
Create a segment first. You can do this using the Create segment… command.
Empty Program
The input file doesn’t contain any instructions or data, i.e. there is nothing to disassemble.
Some file formats allow the situation when the file is not empty but it doesn’t contain anything to disassemble. For example, COFF/OMF/EXE formats could contain a file header which just declares that there are no executable sections in the file.
There could be type information, compiler options and other auxiliary information in the file. This is the reason why the file doesn’t look empty but IDA doesn’t find anything to disassemble.
Load additional binary file
Below is the description of dialog box fields:
 Load segment    - The paragraph where the file will be loaded.
 Load offset     - Specifies offset of the first byte from the start of
                   the first segment. For example, if load offset=0x2700
                   and load segment=0x1000, the first byte of the file will
                   be at 1000:2700, or in linear addressing, 0x12700.
 File offset     - Offset in the input file to load bytes from.
 Number of bytes - Number of bytes to load from the file.
                   0 means load as many as possible.
 Create segments        - If not checked, IDA does not create segments.
 Code segment           - If checked, IDA creates a code segment.
                          relevant for processors which have different
                          code/data segment addressing schemes (for
                          example, Atmel AVR).
Patching Relocation Bytes
If a byte has relocation information attached to it, then the value of this byte is changed when the file is loaded into the memory by the system loader or linker. Therefore, it doesn’t make much sense (and sometimes it is simply illegal) to modify the byte.
We recommend to return the original value of the byte(s).
You can see the relocation information attached to an item by using the Print internal flags command.
NotVaFile
Not a virtual array file
The most probable error is that you tried to use an incompatible version of IDA. Starting from IDA 2.0 beta2 the format of virtual files was changed.
VaTooHighVersion
Virtual Array: Too high VA version
The most probable error is that you tried to open database with old version of IDA. Please use newer version of IDA to open this database.
Cannot assign to Segment Register | Cannot create segment registers range
This error happens because of the database corruption. Try to finish your work as soon as possible and generate the text source file.
The best choice would be to restore from a backup because the database is corrupted.
Advanced Type Annotations
IDA extends standard C/C++ type declarations with specialized annotations that provide control over data interpretation and display in disassembly and decompiled code.
For a complete list of all type system keywords, see the Type System Keywords
Shifted Pointers
Sometimes in binary code we can encounter a pointer to the middle of a structure. Such pointers usually do not exist in the source code but an optimizing compiler may introduce them to make the code shorter or faster.
Such pointers can be described using shifted pointers. A shifted pointer is a regular pointer with additional information about the name of the parent structure and the offset from its beginning. For example:
        struct mystruct
        {
          char buf[16];
          int dummy;
          int value;            // <- myptr points here
          double fval;
        };
        int *__shifted(mystruct,20) myptr;
The above declaration means that myptr is a pointer to ‘int’ and if we decrement it by 20 bytes, we will end up at the beginning of ‘mystruct’.
Please note that IDA does not limit parents of shifted pointers to structures. A shifted pointer after the adjustment may point to any type except ‘void’.
Also, negative offsets are supported too. They mean that the pointer points to the memory before the structure.
When a shifted pointer is used with an adjustment, it will be displayed with the ‘ADJ’ helper function. For example, if we refer to the memory 4 bytes further, it can be represented like this:
ADJ(myptr)->fval
Shifted pointers are an improvement compared to the CONTAINING_RECORD macro because expressions with them are shorter and easier to read.
Scattered Argument Locations
Modern compilers may pass structure arguments across multiple registers or mixed register/stack locations. Scattered argument locations describe these complex calling conventions.
  00000000 struc_1         struc ; (sizeof=0xC)
  00000000 c1              db ?
  00000001                 db ? ; undefined
  00000002 s2              dw ?
  00000004 c3              db ?
  00000005                 db ? ; undefined
  00000006                 db ? ; undefined
  00000007                 db ? ; undefined
  00000008 i4              dd ?
  0000000C struc_1         ends
If we have this function prototype:
void myfunc(struc_1 s);
the 64bit GNU compiler will pass the structure like this:
  RDI: c1, s2, and c3
  RSI: i4
Since compilers can use such complex calling conventions, IDA needs some mechanism to describe them. Scattered argument locations are used for that. The above calling convention can be described like this:
void __usercall myfunc(struc_1 s@<0:rdi.1, 2:rdi^2.2, 4:rdi^4.1, 8:rsi.4>);
It reads:
- 1 byte at offset 0 of the argument is passed in byte 0 of RDI
- 2 bytes at offset 2 of the argument are passed in bytes 1–2 of RDI
- 1 byte at offset 4 of the argument is passed in byte 3 of RDI
- 4 bytes at offset 8 of the argument are passed starting from byte 0 of RSI
In other words, the following syntax is used:
argoff:register^regoff.size
where:
- argoff — offset within the argument
- register — register name used to pass part of the argument
- regoff — offset within the register
- size — number of bytes
The regoff and size fields can be omitted if there is no ambiguity.
If the register is not specified, the expression describes a stack location:
argoff:^stkoff.size
where:
- argoff - offset within the argument
- stkoff - offset in the stack frame (the first stack argument is at offset 0)
- size - number of bytes
Please note that while IDA checks the argument location specifiers for soundness, it cannot perform all checks and some wrong locations may be accepted. In particular, IDA in general does not know the register sizes and accepts any offsets within them and any sizes.
See also the Set type… (action SetType) command.
Data Representation Annotations
Data representation: enum member
Syntax:
__enum(enum_name)
Instead of a plain number, a symbolic constant from the specified enum will be used. The enum can be a regular enum or a bitmask enum. For bitmask enums, a bitwise combination of symbolic constants will be printed. If the value to print cannot be represented using the specified enum, it will be displayed in red.
Example:
   enum myenum { A=0, B=1, C=3 };
   short var __enum(myenum);
If var is equal to 1, it will be represented as “B”
Another example:
   enum mybits __bitmask { INITED=1, STARTED=2, DONE=4 };
   short var __enum(mybits);
If var is equal to 3, it will be represented as “INITED|STARTED”
This annotation is useful if the enum size is not equal to the variable size. Otherwise using the enum type for the declaration is better:
myenum var; // is 4 bytes, not 2 as above
Data representation: offset expression
Syntax:
  __offset(type, base, tdelta, target)
  __offset(type, base, tdelta)
  __offset(type, base)
  __offset(type|AUTO, tdelta)
  __offset(type)
  __off
where type is one of:
| Type | Description |
|---|---|
OFF8 | 8-bit full offset |
OFF16 | 16-bit full offset |
OFF32 | 32-bit full offset |
OFF64 | 64-bit full offset |
LOW8 | low 8 bits of 16-bit offset |
LOW16 | low 16 bits of 32-bit offset |
HIGH8 | high 8 bits of 16-bit offset |
HIGH16 | high 16 bits of 32-bit offset |
The type can also be the name of a custom refinfo.
It can be combined with the following keywords:
| Keyword | Description |
|---|---|
RVAOFF | based reference (rva) |
PASTEND | reference past an item; it may point to an nonexistent address |
NOBASE | forbid the base xref creation; implies that the base can be any value Note: base xrefs are created only if the offset base points to the middle of a segment |
SUBTRACT | the reference value is subtracted from the base value instead of (as usual) being added to it |
SIGNEDOP | the operand value is sign-extended (only supported for REF_OFF8/16/32/64) |
NO_ZEROS | an opval of 0 will be considered invalid |
NO_ONES | an opval of ~0 will be considered invalid |
SELFREF | the self-based reference |
The base, target delta, and the target can be omitted. If the base is BADADDR, it can be omitted by combining the type with AUTO:
__offset(type|AUTO, tdelta)
Zero based offsets without any additional attributes and having the size that corresponds the current application target (e.g. REF_OFF32 for a 32-bit bit application), the shoft __off form can be used.
Examples:
- A 64-bit offset based on the image base:
int var __offset(OFF64|RVAOFF);
- A 32-bit offset based on 0 that may point to an non-existing address:
int var __offset(OFF32|PASTEND|AUTO);
- A 32-bit offset based on 0x400000:
int var __offset(OFF32, 0x400000);
- A simple zero based offset that matches the current application bitness:
int var __off;
This annotation is useful when the type of the pointed object is unknown, or the variable size is different from the usual pointer size. Otherwise, it is better to use a pointer:
type *var;
Data representation: string
Syntax:
  __strlit(strtype, "encoding")
  __strlit(strtype, char1, char2, "encoding")
  __strlit(strtype)
where strtype is one of:
| Type | Description |
|---|---|
C | Zero-terminated string, 8 bits per symbol |
C_16 | Zero-terminated string, 16 bits per symbol |
C_32 | Zero-terminated string, 32 bits per symbol |
PASCAL | Pascal string: 1-byte length prefix, 8 bits per symbol |
PASCAL_16 | Pascal string: 1-byte length prefix, 16 bits per symbol |
LEN2 | Wide Pascal string: 2-byte length prefix, 8 bits per symbol |
LEN2_16 | Wide Pascal string: 2-byte length prefix, 16 bits per symbol |
LEN4 | Delphi string: 4-byte length prefix, 8 bits per symbol |
LEN4_16 | Delphi string: 4-byte length prefix, 16 bits per symbol |
It may be followed by two optional string termination characters (only for C). Finally, the string encoding may be specified, as the encoding name or “no_conversion” if the string encoding was not explicitly specified.
Example:
- A zero-terminated string in windows-1252 encoding:
char array[10] __strlit(C,"windows-1252");
- A zero-terminated string in utf-8 encoding:
char array[10] __strlit(C,"UTF-8");
Data representation: structure offset
Syntax:
  __stroff(structname)
  __stroff(structname, delta)
Instead of a plain number, the name of a struct or union member will be used. If delta is present, it will be subtracted from the value before converting it into a struct/union member name.
Example:
An integer variable named var that hold an offset from the beginning of the mystruct structure:
int var __stroff(mystruct);
If mystruct is defined like this:
  struct mystruct
  {
    char a;
    char b;
    char c;
    char d;
  }
The value 2 will be represented as mystruct.c
Another example: A structure offset with a delta:
int var __stroff(mystruct, 1);
The value 2 will be represented as mystruct.d-1
Data representation: custom data type and format
Syntax:
__custom(dtid, fid)
where dtid is the name of a custom data type and fid is the name of a custom data format. The custom type and format must be registered by a plugin beforehand, at the database opening time. Otherwise, custom data type and format ids will be displayed instead of names.
Data representation: tabular form
Syntax:
  __tabform(flags)
  __tabform(flags,lineitems)
  __tabform(flags,lineitems,alignment)
  __tabform(,lineitems,alignment)
  __tabform(,,alignment)
This keyword is used to format arrays. The following flags are accepted:
| Flag | Description |
|---|---|
NODUPS | do not use the dup keyword |
HEX | use hexadecimal numbers to show array indexes |
OCT | use octal numbers to show array indexes |
BIN | use binary numbers to show array indexes |
DEC | use decimal numbers to show array indexes |
It is possible to combine NODUPS with the index radix: NODUPS|HEX
The `lineitems` and `alignment` attributes have the meaning described for the Array… (action MakeArray) command.
Example:
Display the array in tabular form, 4 decimal numbers on a line, each number taking 8 positions. Display indexes as comments in hexadecimal:
char array[16] __tabform(HEX,4,8) __dec;
A possible array may look like:
  dd   50462976, 117835012, 185207048, 252579084; 0
  dd  319951120, 387323156, 454695192, 522067228; 4
  dd  589439264, 656811300, 724183336, 791555372; 8
  dd  858927408, 926299444, 993671480,1061043516; 0Ch
Without this annotation, the `dup` keyword is permitted, number of items on a line and the alignment are not defined.
Type System Keywords and Attributes
Below is the full list of attributes that can be handled by IDA:
- packed: pack structure/union fields tightly, without gaps
- aligned: specify the alignment
- noreturn: declare as not returning function
- ms_struct: use microsoft layout for the structure/union
- format: possible formats: printf, scanf, strftime, strfmon
For data declarations, the following custom __attribute((annotate(X))) keywords have been added. The control the representation of numbers in the output:
__bin unsigned binary number
__oct unsigned octal number
__hex unsigned hexadecimal number
__dec signed decimal number
__sbin signed binary number
__soct signed octal number
__shex signed hexadecimal number
__udec unsigned decimal number
__float floating point
__char character
__segm segment name
__enum() enumeration member (symbolic constant)
__off offset expression (a simpler version of __offset)
__offset() offset expression
__strlit() string __stroff() structure offset
__custom() custom data type and format
__invsign inverted sign
__invbits inverted bitwise
__lzero add leading zeroes
__tabform() tabular form
The following additional keywords can be used in type declarations:
_BOOL1 a boolean type with explicit size specification (1 byte)
_BOOL2 a boolean type with explicit size specification (2 bytes)
_BOOL4 a boolean type with explicit size specification (4 bytes)
__int8 a integer with explicit size specification (1 byte)
__int16 a integer with explicit size specification (2 bytes)
__int32 a integer with explicit size specification (4 bytes)
__int64 a integer with explicit size specification (8 bytes)
__int128 a integer with explicit size specification (16 bytes)
_BYTE an unknown type; the only known info is its size: 1 byte
_WORD an unknown type; the only known info is its size: 2 bytes
_DWORD an unknown type; the only known info is its size: 4 bytes
_QWORD an unknown type; the only known info is its size: 8 bytes
_OWORD an unknown type; the only known info is its size: 16 bytes
_TBYTE 10-byte floating point value
_UNKNOWN no info is available
__pure pure function: always returns the same value and does not modify memory in a visible way
__noreturn function does not return
__usercall user-defined calling convention; see above
__userpurge user-defined calling convention; see above
__golang golang calling convention
__swiftcall swift calling convention
__spoils explicit spoiled-reg specification; see above
__hidden hidden function argument; this argument was hidden in the source code (e.g. ‘this’ argument in c++ methods is hidden)
__return_ptr pointer to return value; implies hidden
__struct_ptr was initially a structure value
__array_ptr was initially an array
__unused unused function argument __cppobj a c++ style struct; the struct layout depends on this keyword
__ptr32 explicit pointer size specification (32 bits)
__ptr64 explicit pointer size specification (64 bits)
__shifted shifted pointer declaration
__high high level prototype (does not explicitly specify hidden arguments like ‘this’, for example) this keyword may not be specified by the user but IDA may use it to describe high level prototypes
__bitmask a bitmask enum, a collection of bit groups
__tuple a tuple, a special kind of struct. tuples behave like structs but have more relaxed comparison rules: the field names and alignments are ignored.
Environment variables
The following environment variables are used by IDA:
TMP or TEMP
Specifies the directory where the temporary files will be created.
Default: C:\TEMP
EDITOR
The name of the preferred text editor.
IDALOG
Specifies the name of the log file. Everything appearing in the message window will be dumped there.
Default: none
IDALOG_SILENT
Suppress all output to the message window. If the IDALOG variable is set, messages will continue to be written to the log file. Otherwise, they will be lost.
IDADIR
Specifies the IDA directory.
Default: the directory where IDA executable is located
IDA_LOADALL
The selected loader will load all segments without asking.
IDAUSR
Specifies the directory for user-specific settings.
Default:
- Windows:
%APPDATA%/Hex-Rays/IDA Pro - Linux:
$HOME/.idapro - Mac OS X:
$HOME/.idapro
This variable can contain multiple paths, in which case they must be separated by the platform’s path separator character (i.e., ; on Windows, and : on Linux & Mac OS X.)
-
Using %IDAUSR% for loading plugins:
%IDAUSR% will be considered when scanning for plugins: for each directory component of %IDAUSR%, IDA will iterate on files in its “plugins” subdirectory, in alphabetical order.
Plugins with the same case-insensitive file name (without extension) are considered to be duplicates and are ignored; only the first plugin with a given name will be considered. Thus, let’s say %IDAUSR% is set to
C:\my_idausr, and a fileC:\my_idausr\plugins\DWARF.pyexists, thenC:\my_idausr\plugins\DWARF.pywill be picked up first while%IDADIR%\plugins\dwarf.dllwill be considered conflicting, and thus ignored.In addition, in each directory, IDA first looks for plugins with the native extension (e.g.,
.dllon Windows) and only then looks for files with extensions corresponding to extension languages (e.g.,.idc,.py, …). Consequently, if two files, sayfoo.dllandfoo.py, are present in the same directory,foo.dllwill be picked first, andfoo.pywill be considered conflicting, and thus ignored. -
Using %IDAUSR% for overriding configuration:
%IDAUSR% will be considered when looking for configuration files, after the config file found in %IDADIR%\cfg has been read.
After
%IDADIR%\cfg\<filename>has been read & applied, for each directory component of %IDAUSR%, IDA will look forcfg/<filename>in it, and, if found, read & apply its contents as well. This enables users to have their own small, fine-tuned configuration files containing just the bits they wanted to override, stored in one (or more) folder(s) of their choosing. -
Using %IDAUSR% for specifying themes:
%IDAUSR% will be considered when scanning for themes: for each directory component of %IDAUSR%, IDA will iterate on subdirectories in its “themes” subdirectory.
-
Using %IDAUSR% for providing additional loaders, processor modules, .til files, .sig and .ids files:
%IDAUSR% will also be considered when building the list of existing loaders, processor modules,
.til,.sigand.idsfiles.The following directories will be inspected:
%IDAUSR%\loaders%IDAUSR%\procs%IDAUSR%\til\<arch-name>%IDAUSR%\sig\<arch-name>%IDAUSR%\ids\<platform-name>
IDA_MINIDUMP
Platform: Windows only
If IDA crashes, it creates a minidump file with the MiniDumpWrite(). Use this environment variable to specify MiniDump flags (a combination of MINIDUMP_TYPE flags as a hexadecimal number). If set to NO, IDA will not write a dump.
IDA_MDMP_INIT
Platform: Windows only
Let IDA load dbghlp.dll on startup so it is used for crash dump file generation in case of a crash. If not set, IDA will load dbghlp.dll dynamically (if needed). Using this option may cause the Windbg debugger plugin to malfunction in case its dbghlp.dll does not match the one loaded by IDA.
IDA_NOEH
If set, disable IDA’s own exception handler and let all possible crashes to be handled by the OS or active debugger. It is useful if you’re debugging a crash in a plugin or processor module.
IDAIDS
Specifies the directory with the IDS files.
Default: %IDADIR%\IDS
IDASGN
Specifies the directory with the SIG files.
Default: %IDADIR%\SIG
IDATIL
Specifies the directory with the TIL files.
Default: %IDADIR%\TIL
IDAIDC
Specifies the directory with the IDC files.
Default: %IDADIR%\IDC
IDA_LIBC_PATH
Platform: Android remote host only
Specifies the exact path to the system libc.so
IDA_SKIP_SYMS
Platform: Linux host only
Turns off loading of exported symbols for the main executable file at the start of a debugging session.
IDA_NONAMES
Disables the name resolution.
IDA_NO_HISTORY
Disables updating file history.
IDA_NORELOC
Disables processing of the relocation information for some file formats.
IDA_NOEXP
Disables processing of the export information for some file formats.
IDA_NOTLS
Disables processing of the TLS entries for some file formats.
H8_NOSIZER
Disables the display of the operand sizes for H8 module.
IDA_LOADALL
Load all segments of the input file without further confirmations.
IDA_DEBUGBREAKPROCESS
Platform: Windows only
IDA debugger will use the DebugBreakProcess() API to break into the process. Otherwise it will
instead attempt to set temporary breakpoints for all threads.
IDA_NO_REBASE
IDA Debugger will not rebase the program when debugging.
(This will be in effect even if the debugger plugin implements the rebase_if_required_to callback).
IDABXPATHMAP
Variables related to the Bochs debugger.
IDABXENVMAP
See plugins/bochs/startup.* for more details.
IDA_NOWIN
Platform: Text MS Windows version only
Bypass the code trying to find out the foreground window. This code causes problems under WINE.
IDA_DONT_SWITCH_SCREENS
Platform: Text version only
Tells IDA to keep only one screen even during local debugging sessions. For local debugging sessions, IDA keeps by default one screen for the debugged application and one screen for itself.
IDA_NOAUTOCOMP
Do not autodetect compiler for name demangling. If this variable is absent and the current compiler is one of MS, Borland and Watcom, the compiler is autodetected.
IDA_ELF_PATCH_MODE
Overrides patch mode for the new ELF files. If this variable is defined, it must contain a number. Each bit of this number corresponds to an option from the following list:
IDA_ELF_PATCH_MODE
Overrides patch mode for the new ELF files. If this variable is defined, it must contain a number. Each bit of this number corresponds to an option from the following list:
| Bit | Description |
|---|---|
| 0 | Replace PIC form of ‘Procedure Linkage Table’ to non PIC form |
| 1 | Direct jumping from PLT (without GOT) regardless of its form |
| 2 | Convert PIC form of loading ‘GLOBAL_OFFSET_TABLE[]’ of address |
| 3 | Obliterate auxiliary bytes in PLT & GOT for ‘final autoanalysis’ |
| 4 | Natural form of PIC GOT address loading in relocatable file |
| 5 | Unpatched form of PIC GOT references in relocatable file |
| 6 | Mark ‘allocated’ objects as library-objects (MIPS only) |
IDA_DYLD_SHARED_CACHE_SLIDE
Mach-O loader: specify the dyld shared cache image ASLR slide value (hexadecimal) or 'search' for automatic detection. If not set, slide is assumed to be 0 (unslid image).
Linux-Specific Variables
The following variables are used to fine-tune the Linux version of IDA:
TVLOG
Specifies the name of the log file. If not defined, use syslog with LOG_WARNING priority.
TERM
The terminal definition (see terminfo).
TVHEADLESS
Disable all output (for i/o redirection). If this variable is defined, the TVOPT variable is ignored. This environment variable also works in graphical versions of IDA. When set, the graphical interface will not restore desktops, toolbars or show the main window.
TVOPT
The end-user flags. It has many subfields, delimited by commas ','.
noX11- when libX11.so is not compatiblenoGPM- when libgpm.so is not compatibleansi- ORmono- when the terminfo data of your display does not declare it as having the ANSI-color supportign8- ignore '8bit as meta key' in the terminfo descriptionxtrack- if your xterm-emulator in telnet client does not support mode 1002 (only 1000), set this flagalt866- do not encode pseudographic symbols (for the console with alt-font loaded)cyrcvt=- Cyrillic conversion (oem/koi8r). Possible values are:linux- for linux russian users and PuTTY (in/out koi8r)kwin- output in koi8 and input in cp1251 - any telnetwindows- for many telnet and any linux users (in/out 1251)
| Client name | Terminal | TVOPT | Client settings |
|---|---|---|---|
| SecureCRT | xterm-scokey | xtrack | Emulation->Terminal: xterm, Emulation->keyboard: either the built-in keyboard, either custom ‘xt-sco.key’ file Advanced->Terminaltype: xterm-scokey |
| SecureCRT | xterm | xtrack | Emulation->Terminal: xterm+internal kbd |
| Putty | xterm-scokey | - | Terminal,Keyboard: Control?, Standard, SCO, Normal, Normal |
| Putty | xterm | - | Terminal,Keyboard: ControlH, Standard, ~num, Normal, Normal |
| Console | linux | - | default |
| X11:xterm | xterm | - | default |
We recommend to use the ‘xterm-scokey’ terminal type for remote clients.
When the terminal type is xterm-scokey, add the following string to /etc/inputrc (or to ~/.inputrc):
"\e[.": delete-char
When working on the console without GPM installed, append noGPM to TVOPT.
Russian Language Support
Russian users should append the following settings to the above:
| Append to TVOPT | Append to Client Settings | |
|---|---|---|
| Console | alt866,cyrcvt=linux | - |
| X11 | cyrcvt=linux | - |
| Putty | cyrcvt=linux | Window,Translation: use font in both ANSI and OEM modes |
| SecureCRT | ||
| - with koi8font and kbd-hook | cyrcvt=linux | - |
| - with koi8font | cyrcvt=kwin | - |
| - with ANSI-font | cyrcvt=windows | - |
The best settings for Russian users on the console are:
setfont alt-8x16.psf.gz -m koi2al
loadkey ru-ms.map
export TVOPT=cyrcvt=linux,alt866
C++ type details
IDA can parse and handle simple C++ class declarations. It cannot parse templates and other complex constructs but simple standard cases can be parsed.
If a C++ class contains virtual functions, IDA will try to rebuild the virtual function table (VFT) for the class. The VFT will be linked to the class by the name: if the class is called “A”, the VFT type will be “A_vtbl”.
Let us consider the following class hierarchy:
  class A { virtual int f(); int data; };
  class B : public A { virtual int g(); };
IDA will create the following structures:
  struct __cppobj A {A_vtbl *__vftable;int data;}
  struct A_vtbl {int (*f)(A *__hidden this);}
  struct __cppobj B : A {}
  struct B_vtbl {int (*f)(A *__hidden this);
                 int (*g)(B *__hidden this);}
Please note that the VFT pointer in the class A has a special name: “__vftable”. This name allows IDA to recognize the pointer as a VFT pointer and treat it accordingly.
Another example of more complex class hierarchy:
  class base1 { virtual int b1(); int data; };
  class base2 { virtual int b2(); int data; };
  class der2 : public base2 { virtual int b2(); int data; };
  class derived : public base1, public der2 { virtual int d(); };
Compiling in 32-bit Visual Studio mode yields the following layout:
  class derived size(20):
        +---
   0    | +--- (base class base1)
   0    | | {vfptr}
   4    | | data
        | +---
   8    | +--- (base class der2)
   8    | | +--- (base class base2)
   8    | | | {vfptr}
  12    | | | data
        | | +---
  16    | | data
        | +---
        +---
IDA will generate the following types:
  struct __cppobj base1 {base1_vtbl *__vftable /*VFT*/;int data;};
  struct /*VFT*/ base1_vtbl {int (*b1)(base1 *__hidden this);};
  struct __cppobj base2 {base2_vtbl *__vftable /*VFT*/;int data;};
  struct /*VFT*/ base2_vtbl {int (*b2)(base2 *__hidden this);};
  struct __cppobj der2 : base2 {int data;};
  struct /*VFT*/ der2_vtbl {int (*b2)(der2 *__hidden this);};
  struct __cppobj derived : base1, der2 {};
  struct /*VFT*/ derived_vtbl {int (*b1)(base1 *__hidden this);
                               int (*d)(derived *__hidden this);};
The ‘derived’ class will use 2 VFTs:
  offset 0: derived_vtbl
  offset 8: der2_vtbl
IDA and Decompiler can use both VFTs and produce nice code for virtual calls.
Please note that the VFT layout will be different in g++ mode and IDA can handle it too. Therefore it is important to have the target compiler set correctly.
It is possible to build the class hierarchy manually. Just abide by the following rules:
- VFT pointer must have the “__vftable” name
- VFT type must follow the “CLASSNAME_vtbl” pattern
C++ classes are marked with “__cppobj” keyword, it influences the class layout. However, this keyword is not required for VFT types.
In the case of a multiple inheritance it is possible to override a virtual table for a secondary base class by declaring a type with the following name: “CLASSNAME_XXXX_vtbl” where XXXX is the offset to the virtual table inside the derived (CLASSNAME) class.
Example: if in the above example we add one more function
virtual int derived::b2();
then we need one more virtual table. Its name must be “derived_0008_vtbl”. Please note that our parser does not create such vtables, you have to do it manually.
Assembler level and C level types
In order to provide intuitive yet powerful interface to types IDA introduces two kinds of types:
- Assembler level types
- C level types
Assembler level types are the ones defined by the user using the Local Types view.
Since the user has to specify manually the member offset and other attributes, IDA considers the member offsets to be fixed for them and never shifts members of such types. If a member of struct becomes too big and does not fit the struct anymore, IDA will delete it.
The types defined in the Local types window are considered as C level types. For them IDA automatically calculates the member offsets and if necessary may shift members and change the total struct size.
The user may change the type level by simply editing the type from the appropriate window.
In the Local Types view:
- C level types are displayed using regular colors.
- Assembler level types are displayed in gray, as if they are disabled (but they are not).
Disassembler
Interactivity
Main Idea
IDA is an interactive disassembler, which means that the user takes active participation in the disassembly process. IDA is not an automatic analyzer of programs. IDA will give you hints about suspicious instructions, unsolved problems etc. It is your job to inform IDA how to proceed.
If you are using IDA for the very first time, here are some commands that you will find very useful:
- convert to instruction : the hotkey is C
- convert to data : the hotkey is D
All the changes that you made are saved to disk. When you run IDA again, all the information on the file being disassembled is read from the disk, so that you can resume your work.
For other commands please refer to the menu system and the help.
Background Analysis
IDA can analyze a program when it is not occupied performing an action you prompted. You disassemble a program together with IDA, but your requests have priority.
The state of background analysis is shown on the upper right-hand corner of the screen.
You can disable autoanalysis, but in this case some functions of IDA will produce strange results (e.g. if you try to convert data into instructions, IDA will NOT trace all the threads of control flow and the data will be converted into instructions only on the screen…)
See also analysis options.
Graph view
In the graph view, the current function is represented as a collection of nodes linked together with edges. Nodes represent basic blocks and edges represent code cross-references between them.
Only code items are visible in the graph view, data items are hidden. To display them, switch to text mode by pressing Space. The graph view is available for the instructions belonging to functions. IDA automatically switches to text mode if the current item cannot be displayed in graph mode. It also displays a warning, which we recommend to hide away as soon as you become familiar with the concept.
The Space key can be used to toggle between the graph and text views.
Please select one of the following topic to learn more about graphs:
- The current node
- Selections in graphs
- Customizing graph layout
- Zooming graphs
- Scrolling graphs
- Graph node groups
- Graph overview window
- Graph colors
- Graph options
- Various graph hints
The current node
There are two concepts: the current node and the selected nodes. The node with the keyboard cursor is considered as the current node. If the user clicks on the graph background, the keyboard cursor will disappear and there will be no current node. In the absence of the current node, IDA uses the last valid address for the user commands (like rename and similar commands). For example, if the user invokes the ‘rename’ command by pressing N and if there is no current node, IDA will still display the ‘rename’ dialog box for the last valid address.
Clicking on the node title will make the clicked node the current one. The keyboard cursor will be moved to the clicked node. Any selection of the disassembly text will be cancelled upon switching the current node.
The default color for the title of the current node is dark gray.
In addition to the obvious method of clicking with the mouse left-button to select the current node, IDA supports many other methods:
 - Clicking with the mouse wheel selects the clicked node and centers
   the clicked point in the window
 - Keyboard arrows can be used to move from one node to another. When
   the keyboard cursor reaches the node border and the user presses
   the arrow once more, IDA finds a node in the specified direction
   and makes it the current.
 - The Ctrl-Up key displays the list of nodes referring to the current
   node and allows jumping to them. The Ctrl-Down key does the same
   with the referenced nodes.
 - Pressing '5' on the keypad positions the keyboard cursor at
   the window center
 - Left-click on an edge makes one of its ends (source or destination)
   the current node. The node farthest from the click point is selected
 - Ctrl-click on an edge jumps to its destination
 - Alt-click on an edge jumps to its source
Clicking with the mouse on the node text (disassembly listing) has the usual meaning: IDA will move the keyboard cursor to the clicked location. It is also possible to select the disassembly listing within one node.
Selections in graphs
Many graph operations are applied to the selected nodes. The current node is considered to be part of the node selection for all operations.
The graph nodes can be selected using the mouse. To select many nodes at once, press and hold the Ctrl key during the mouse operation. The Alt key removes nodes from the current selection.
Internally, IDA keeps track of the selected nodes and edge layout points. Edge layout points are the points where edges are bent. If the current selection is moved in the graph, the selected edge layout points are moved too.
The default color for the title of the selected nodes is light gray. Other node titles are displayed with white color.
See also proximity view.
Customizing graph layout
Each node has a title bar with title buttons. The title bar can be used to displace the node. Displacing nodes or edges creates a custom layout. The custom layouts are automatically saved in the database. If there is a custom layout for the function, IDA never destroys it without your explicit permission. This behavior has its drawbacks: when the nodes are resized (because of added comments, for example), the old layout will be retained and the nodes could overlap. In this case, the user can ask IDA to redo the layout or manually move the overlapping nodes. To avoid displacing nodes inadvertently, turn on the lock graph layout option.
The user can also click on the edge layout points (edge bending points) and drag them. If two edge layout points are too close, one of them will be deleted. To create new edge layout points, use Shift-DoubleClick on the edge.
Zooming graphs
The graph can be zoomed in and out. There are several ways of zooming the graph:
 - Use Ctrl-Wheel. The current mouse position will be the zoom center
   point (i.e. this point will not move during the zoom operation)
 - Use the predefined 'Zoom 100%' and 'Fit window' commands. They are
   available from the right-click menu or by their shortcuts: '1' and
   'W' respectively. The current mouse position is the zoom center
   point for the 'zoom 100%' command.
 - Use Ctrl-KeypadPlus or Ctrl-KeypadMinus keys. The current keyboard
   cursor is the zoom center for these commands.
 - Use Ctrl-Shift-drag. This lets you draw a rectangle to which IDA
   will zoom.
There are two options linked to the graph zooming:
 - Auto fit graph to window: will fit the current graph to the window
   size. Default: off
 - Fit window max zoom level 100%: the 'fit window' command does not
   use zoom levels higher than 100%. Default: on
The zoom level is never greater than 1000% and less than 1%. IDA remembers the current zoom level for each location in the navigation history.
See also proximity view.
Scrolling graphs
The user can pan (shift) the graph by clicking with the left mouse button on the graph background and dragging it. In the rare case when there is no graph background visible on the screen, the Shift-click can be used to move the graph. This can happen on very high zoom levels, when the current node occupies the whole window.
The mouse wheel scrolls the graph vertically. If the Alt key is pressed, it will scroll the graph horizontally.
The Page Up and Page Down keys scroll the graph vertically. The keyboard arrows can scroll the graph if they reach the node border and cannot jump to another node in the specified direction.
Scrolling the graph does not change the keyboard cursor position. As soon as the graph is refreshed on the screen, IDA will scroll the graph so that the keyboard cursor becomes visible.
See also proximity view.
Graph node groups
Any number of nodes can be collapsed into a single synthetic node. Such a synthetic node contains a user-provided text instead of normal disassembly listing. The ‘group’ command is available from the right-click menu if there are selected nodes.
Even a single node can be used to create a group. This feature can be used to collapse huge nodes into something manageable or to hide a group that consists of one node.
After creating a group, IDA automatically refreshes the graph layout. If a custom layout was present, it is not applied to the reduced graph. However, the existing custom layout is not destroyed and will be re-used as soon as the user switches to the full graph by deleting the group or uncollapsing it.
The node groups can be nested: synthetic nodes can be used to create other groups. This feature allows reducing the graph into a single node. Each node can belong to only one group at a time.
Groups can be uncollapsed to display the original node content. The node frames of the current uncollapsed group (the one with the mouse pointer) are displayed with a special color. The default group frame color is yellow. This way, the existing uncollapsed groups can be visualized by hovering the mouse over the graph nodes.
There are also commands to collapse and uncollapse all groups in the graph. They are available from the right click menu.
To edit the contents of synthetic nodes, use the ‘set node text’ button on the node title. The ‘rename’ command can be used too.
IDA automatically remembers the graph groups and their state for each function.
Graph overview window
IDA has a small graph overview window. It displays the whole graph in the zoom out form and gives the user an idea about which part of the graph is visualized on the main window.
Clicking on the graph overview window visualizes different parts of the graph in the main window. It is also possible to click and drag the focus frame - the main window will be refreshed accordingly.
The graph overview window is visible only in the graph view node. As soon as another non-modal window gets focus, the graph overview is closed. It automatically opens when a graph view is activated.
The graph overview is displayed by default. To hide it, right click on the main toolbar background and select Navigation, Graph overview menu item.
The graph overview window can be resized to accommodate really huge graphs.
Graph colors
Graph edges can have several colors. In graph view:
 - Blue: a normal edge
 - Green: if the jump is taken (its condition is satisfied)
 - Red: if the jump is not taken
 - Blinking: when in the debugger, the edge that will be followed blinks
And, in proximity view:
 - Blue: Code cross-reference edge
 - Gray: Data cross-reference edge
IDA highlights the current mouse items. If the mouse is hovered over an edge, it is highlighted. If the mouse is hovered over a node, all adjacent edges are highlighted. To turn off the highlighting, specify the ‘current edge’ color as an undefined custom color.
The ‘highlighted edge’ and ‘foreign node’ colors are not used yet.
See also proximity view.
Graph options
Use graph view by default
IDA switches to graph mode for each 'jump' command.
Enable graph animation
        Animate the graph layout, movement, and group collapsing/uncollapsing.
        While animation takes time, it gives the user some idea what's going on.
Draw node shadows
        Display shadows for each graph node. Shadows are not displayed
        for really huge or ridiculously small nodes.
Auto fit graph into window
Zoom the graph so that it occupies the whole window.
Fit window max zoom level 100%
The 'fit window' command maximal zoom level is 100%.
Re-layout graph if nodes overlap
        IDA recomputes the graph layout if a node overlap is detected.
        The presence of a custom layout (if the user has displaced
        some graph nodes) effectively turns off this option.
Re-layout graph upon screen refresh
        IDA recomputes the graph layout at each screen refresh.
        Turning this option off accelerates IDA but then
        a manual layout might be required after some operations.
Truncate at the right margin
        All nodes at truncated at the right margin. The right margin
        is specified in the Options, General, Disassembly tab.
        This option narrows the graph but hides some information
        by truncating long lines.
Lock graph layout
        Locks the graph layout by ignoring attempts to displace
        nodes. This prevents the creation of custom layouts that might lead
        to ugly graph layouts when nodes change their sizes.
PROXIMITY VIEW
Show data references
Show data cross-referenced items in proximity view.
Hide library functions
        Do not show data or code cross-references to library functions,
        only show cross-referenced local functions.
Unlimited children recursion
        Recurse until there are no more callees (children) of the currently
        selected central node and all of his children.
Recurse into library functions
        Displays children data or code cross-references from library
        functions.
Max parents recursion
        Maximum recursion level for displaying parents of the currently
        selected central node. The value '0' disables parents recursion.
Max children recursion
        Maximum recursion level for displaying children of the currently
        selected central node. The value '0' means no maximum recursion
        level.
Max nodes per level
Maximum number of nodes to show per level of children and parents.
See also: right margin
Various graph hints
- The following actions can improve the speed of graph drawing:
 - Turn off animation
 - Turn off node shadows
 - Specify identical top and bottom background colors
 - Turn off 'relayout' options (might lead to stale graph contents)
 - Turn off the graph overview window
- Printing the graph: the ‘print’ command is available at the graph toolbar. The graph toolbar is visible by default but if you have saved a custom desktop configuration in the past, it will not be visible. To set it on, check the View, Toolbars, Graph view menu item.
- Working with huge graphs: do not forget about the node groups and use them to make the graph simpler.
Proximity view
Starting from IDA v6.2, the callgraph of a program can be displayed in a graph form.
In the proximity view, the current address, the callers and the callees are represented as a collection of nodes linked together with edges. Nodes represent functions and data references (global variables, strings, etc..) and edges represent code or data cross-references between them.
To open the proximity view press the ‘-’ key to zoom out and switch to the callgraph of the address under cursor.
Only the address names (function names or data labels) are displayed in the proximity view, but not the disassembly, nonetheless, hovering the mouse over a node will display brief disassembly listing in a resizable hint window. To see the complete disassembly listing switch to text or graph mode by pressing ‘+’ or Space respectively.
When disassembling new files, IDA will display a dialog offering to switch to proximity view when applicable. It is possible to turn off this dialog and not show it again.
In the proximity view there are 3 types of nodes: Function nodes, data nodes and auxiliar nodes. Function nodes are rectangular and they have a toolbar. Those nodes are used to display the callers or callees of the current central node (or any of his parents or children). Data nodes are rectangular nodes (without a toolbar) and they are used to display the data references (global variables, strings, etc…) to/from the current central node or any of his parents and children.
Please select one of the following topic to learn more about graphs:
- Selections in graphs
- Zooming graphs
- Scrolling graphs
- Graph overview window
- Graph colors
- Graph options
Highlighting identifiers
In the graphical version, IDA highlights the identifier under the cursor. For example, if the cursor is on the “EAX” register, then all occurrences of “EAX” will be displayed with the yellow background. This feature is meant to make the program analysis easier by highlighting the interesting parts of the disassembly. For example, if the user wants to see all references to “EAX”, he just clicks on any “EAX” on the screen and all of them will be highlighted.
The selection is made by pressing the Up, Down, Left, Right keys or by simply clicking on the identifier.
The selection is not changed by pressing the PageUp, PageDown, Home, End keys, using the scrollbar, or pressing the Alt-Up, Alt-Down, Ctrl-Up, Ctrl-Down keys.
The Alt-Up and Alt-Down keys perform a search of the currently selected identifier backward or forward respectively.
The Ctrl-Up and Ctrl-Down keys scroll the disassembly text.
IDA does not highlight the segment names at the line prefix because it is not very useful.
It is possible to turn off the highlight. The appropriate checkbox is in the Options → General… → Browser tab.
Navigation
Anchor
Some IDA commands such as selecting a portion of file to output or specifying a segment to move need an anchor.
To drop the anchor, you can either use the Alt-L key or the Shift-<arrow> combination, which is more convenient. You can also drop the anchor with the mouse by simply clicking and dragging it.
After you’ve dropped the anchor, you can navigate freely using arrows, etc. Any command that uses the anchor, raises it.
The anchored range is displayed with another color.
When you exit from IDA, the anchor value is lost.
How to Enter a Segment Value
You must enter a segment base value as a hexadecimal number or a segment name. IDA will warn you if you enter an invalid segment.
You may enter a segment register name too.
How to Enter a Number
You can enter any ‘C’ expression with constants. Long arithmetic will be used for calculations.
In these expressions, you can use all the names that you have created in your program.
How to Enter an Identifier
An identifier is a name which starts with a letter and contains only letters and digits. The list of allowed characters is specified in config file IDA.CFG. All names are case-sensitive.
Maximal length of a name is specified in the configuration file too:
MAX_NAME_LENGTH=120 // Maximal length of new names
Default is 120.
Some assemblers have a shorter name length limit, beware!
IDA will warn you if you enter an illegal name.
How to enter text
How to enter text
 In the text version of IDA, you can use the following keys:

 Enter          starts a new line
 Ctrl-Enter     finishes the input
 Esc            cancels the input
 F1             gives some help

                                        Shift-<arrow>  Select
 Ctrl-L         Search Again            Shift-Ins       Paste
 Ctrl-O         Indent Mode             Shift-Del       Cut
 Ctrl-T         Delete Word             Ctrl-Ins        Copy
 Ctrl-U         Undo                    Ctrl-Del        Clear
 Ctrl-Y         Delete Line             Ctrl-K B        Start Select
 Ctrl-Left      Word Left               Ctrl-K H        Hide Select
 Ctrl-Right     Word Right
 Ctrl-PgUp      Text Start              Ctrl-Q A        Replace
 Ctrl-PgDn      Text End                Ctrl-Q F        Search
                                        Ctrl-Q H        Delete Line Start
                                        Ctrl-Q Y        Delete Line End
Input containing only whitespaces is equal to an empty input.
Do not forget that you can also use the clipboard.
How to Enter an Address
You should enter an address as a hexadecimal number or a location name. When you enter the address in the hexadecimal format, you can omit the segment part of the address and the current segment will be used. Addresses beyond the program limits are invalid.
Also, you can enter a location name with a displacement:
name+5
And finally you can specify a relative address:
        +10             0x10 bytes further
        -5              5 bytes backwards
If the entered string cannot be recognized as a hexadecimal number or location name, IDA will try to interpret it as an expression using the current script interpreter. The default interpreter is IDC.
Special addresses: $ - current location (depends on the current assembler) Examples:
456 current segment, offset 0x456
5E current segment, offset 0x5E
3000:34 segment 0x3000, offset 0x34
ds:67 segment pointed by ds, offset 0x67
0:4000000 linear address
0x4000000 start a location with name ‘start’
Disassembly Gallery
Philips 51XA-G3
seg000:02E4
seg000:02E4 ; =============== S U B R O U T I N E =======================================
seg000:02E4
seg000:02E4
seg000:02E4 sub_2E4:                                ; CODE XREF: seg000:0316↓p
seg000:02E4                                         ; seg000:0344↓p
seg000:02E4                 cmp.b   R1H, #0
seg000:02E7                 bge     loc_2F6
seg000:02E9                 movs.w  R4, #0
seg000:02EB                 sub.w   R4, R0
seg000:02ED                 mov.w   R0, R4
seg000:02EF                 movs.w  R4, #0
seg000:02F1                 subb.w  R4, R1
seg000:02F3                 mov.w   R1, R4
seg000:02F5                 nop
seg000:02F6
seg000:02F6 loc_2F6:                                ; CODE XREF: sub_2E4+3↑j
seg000:02F6                 cmp.b   R3H, #0
seg000:02F9                 bge     locret_308
seg000:02FB                 movs.w  R4, #0
seg000:02FD                 sub.w   R4, R2
seg000:02FF                 mov.w   R2, R4
seg000:0301                 movs.w  R4, #0
seg000:0303                 subb.w  R4, R3
seg000:0305                 mov.w   R3, R4
seg000:0307                 nop
seg000:0308
seg000:0308 locret_308:                             ; CODE XREF: sub_2E4+15↑j
seg000:0308                 ret
seg000:0308 ; End of function sub_2E4
seg000:0308
seg000:030A ; ---------------------------------------------------------------------------
seg000:030A                 push.w  R4
seg000:030C                 push.w  R5
seg000:030E                 push.w  R6
{% file src=“../../.gitbook/assets/shot_51xa.png” %} Disassembly image {% endfile %}
6502 and 65C02 Disassembler
IDA is the most powerful existing 6502 disassembler. Companies such as Commodore, Atari and Apple have used the 6502 and 65c02 design. If you are looking for additional information or even less powerful disassemblers, we recommend www.6502.org, a very useful 6502 resource center.
Assembler code
seg000:0065 ; ---------------------------------------------------------------------------
seg000:0065                 CMP     $3E8
seg000:0068                 CMP     $3E8,X
seg000:006B                 CMP     $3E8,Y
seg000:006E                 CMP     0,X
seg000:0071                 CMP     $FF,X
seg000:0073                 CPX     #0
seg000:0075                 CPX     #$FF
seg000:0077                 CPX     byte_64
seg000:0079                 CPX     $3E8
seg000:007C                 CPY     #0
seg000:007E                 CPY     #$FF
seg000:0080                 CPY     byte_64
seg000:0082                 CPY     $3E8
seg000:0085                 DEC     byte_64
seg000:0087                 DEC     $3E8
seg000:008A                 DEC     $3E8,X
seg000:008D                 DEC     0,X
seg000:0090                 DEC     $FF,X
seg000:0092                 DEX
seg000:0093                 DEY
seg000:0094                 EOR     #0
seg000:0096                 EOR     #$FF
seg000:0098                 EOR     ($64),Y
seg000:009A                 EOR     ($64,X)
seg000:009C                 EOR     byte_64
seg000:009E                 EOR     $3E8
seg000:00A1                 EOR     $3E8,X
seg000:00A4                 EOR     $3E8,Y
seg000:00A7                 EOR     0,X
seg000:00AA                 EOR     $FF,X
seg000:00AC                 INC     byte_64
seg000:00AE                 INC     $3E8
seg000:00B1                 INC     $3E8,X
seg000:00B4                 INC     0,X
{% file src=“../../.gitbook/assets/shot_6502.png” %} Disassembly image {% endfile %}
6301, 6303, 6800, 6801 and 6803 Disassembler
IDA is the most powerful disassembler available for the 6803 microcontroller family.
Assembler code
RAM:0098                 fcb   3
RAM:0099                 fcb $E8 ; è
RAM:009A                 fcb $C8 ; È
RAM:009B                 fcb   0
RAM:009C ; ---------------------------------------------------------------------------
RAM:009C                 eorb    #$FF
RAM:009E                 eorb    byte_64
RAM:00A1                 eorb    0,x
RAM:00A3                 eorb    $FF,x
RAM:00A5                 eorb    byte_3E8
RAM:00A8                 ldaa    #0
RAM:00AA                 ldaa    #$FF
RAM:00AC                 ldaa    byte_64
RAM:00AF                 ldaa    0,x
RAM:00B1                 ldaa    $FF,x
RAM:00B3                 ldaa    byte_3E8
RAM:00B6                 ldab    #0
RAM:00B8                 ldab    #$FF
RAM:00BA                 ldab    byte_64
RAM:00BD                 ldab    0,x
RAM:00BF                 ldab    $FF,x
RAM:00C1                 ldab    byte_3E8
RAM:00C4                 oraa    #0
RAM:00C6                 oraa    #$FF
RAM:00C8                 oraa    byte_64
RAM:00CB                 oraa    0,x
RAM:00CD                 oraa    $FF,x
RAM:00CF                 oraa    byte_3E8
RAM:00D2                 orab    #0
RAM:00D4                 orab    #$FF
RAM:00D6                 orab    byte_64
RAM:00D9                 orab    0,x
RAM:00DB                 orab    $FF,x
RAM:00DD                 orab    byte_3E8
RAM:00E0                 staa    byte_64
{% file src=“../../.gitbook/assets/shot_6803.png” %} Disassembler image {% endfile %}
68040, Amiga
Assembler code
CODE:00010390 ; ===========================================================================
CODE:00010390
CODE:00010390 ; Segment type: Pure code
CODE:00010390 ; segment "CODE"
CODE:00010390
CODE:00010390 ; =============== S U B R O U T I N E =======================================
CODE:00010390
CODE:00010390 ; Attributes: noreturn bp-based frame
CODE:00010390
CODE:00010390 _main:                                  ; CODE XREF: startup+CA↑p
CODE:00010390                                         ; startup:domain↑p
CODE:00010390
CODE:00010390 var_4           = -4
CODE:00010390
CODE:00010390                 link    a6,#-4
CODE:00010394                 jsr     _Init
CODE:0001039A                 jsr     _InitTrace
CODE:000103A0
CODE:000103A0 loc_103A0:                              ; CODE XREF: _main+182↓j
CODE:000103A0                                         ; _main+18C↓j
CODE:000103A0                 jsr     _WaitToAnimate
CODE:000103A6                 jsr     _ClearControl
CODE:000103AC                 moveq   #2,d0
CODE:000103AE                 move.l  d0,-(sp)
CODE:000103B0                 jsr     sub_1E88C
CODE:000103B6                 addq.l  #4,sp
CODE:000103B8                 moveq   #4,d0
CODE:000103BA                 move.l  d0,-(sp)
CODE:000103BC                 jsr     sub_1E88C
CODE:000103C2                 addq.l  #4,sp
CODE:000103C4                 jsr     _PollJoy
CODE:000103CA                 jsr     _UserIn
CODE:000103D0                 tst.l   (dword_2052A).l
CODE:000103D6                 bne.s   loc_103EA
CODE:000103D8                 movea.l (_aniObj).l,a0
{% file src=“../../.gitbook/assets/shot_68040_amiga.png” %} Disassembly image {% endfile %}
6805 Disassembler
The 6805 microcontroller family is Motorola’s simplest and least-expensive family of microcontrollers. As usual there were many variations of the chips and the part numbers usually contain letter and digits, like 68HC05. IDA is the most powerful disassembler available for those microcontrollers.
68HC05B6, 68HC05B8, 68HC05B16, 68HC705B16, 68HC05B32, 68HC705B32, 68HC05BD5, 68HC05C8A, 68HC705C8A, 68HC05C9A, 68HC705C9A, 68HC705F32, 68HC05J1A, 68HC705J1A, ,68HC05J5A, 68HC705J5A, 68HC05JB3, 68HC705JB3, 68HC05JB4, 68HC705JB4, 68HC05JJ6, ,68HC705JJ7, 68HC05JP6, 68HC705JP7, 68HC05K3, 68HC705KJ1, 68HC05L16, 68HC705L16, ,68HC05L25, 68HC05LJ5, 68HC05P18A, 68HC05P4A, 68HC05P6, 68HC705P6A, 68HC05PV8A, ,68HC805PV8, 68HC05SR3, 68HC705SR3, 68HC05SU3A, 68HC05X4, 68HC705X4, 68HC05X16, ,68HC05X32, 68HC705X32.
Assembler code
RESERVED:01DC                 fcb $BF ; ¿
RESERVED:01DD                 fcb $64 ; d
RESERVED:01DE                 fcb $CF ; Ï
RESERVED:01DF                 fcb   3
RESERVED:01E0 ; ---------------------------------------------------------------------------
RESERVED:01E0                 eorb    $97,x
RESERVED:01E2                 sts     <byte_9D
RESERVED:01E4                 suba    #$81
RESERVED:01E6                 subd    #$8F98
RESERVED:01E9                 oraa    <byte_9C
RESERVED:01EB                 adca    <byte_9B
RESERVED:01ED                 lds     #$200E
RESERVED:01F0                 brn     loc_1FE
RESERVED:01F2                 bhi     loc_1FE
RESERVED:01F4                 bls     loc_1FE
RESERVED:01F6                 bcc     loc_1FE
RESERVED:01F8                 bcc     loc_1FE
RESERVED:01FA                 bcs     loc_1FE
RESERVED:01FC                 bcs     *+2
RESERVED:01FE
RESERVED:01FE loc_1FE:                                ; CODE XREF: RESERVED:01F0↑j
RESERVED:01FE                                         ; RESERVED:01F2↑j ...
RESERVED:01FE                 bne     loc_1FE
RESERVED:0200                 beq     loc_1FE
RESERVED:0202                 bvc     loc_1FE
RESERVED:0204                 bvs     loc_1FE
RESERVED:0206                 bpl     loc_1FE
RESERVED:0208                 bmi     loc_1FE
RESERVED:020A                 bge     loc_1FE
RESERVED:020C                 blt     loc_1FE
RESERVED:020E                 bgt     loc_1FE
RESERVED:0210                 ble     loc_1FE
RESERVED:0212                 jsr     $EA,x
RESERVED:0212 ; ---------------------------------------------------------------------------
RESERVED:0214                 fcb   0
6808 Disassembler
IDA is the most powerful disassembler available for the 6808 family of microcontrollers. Which include the following devices:
68HC08AB16A, 68HC908AB32, 68HC08AS32, 68HC08AS32A, 68HC908AS32A, 68HC908AS60, ,68HC908AS60A, 68HC08AZ32A, 68HC908AZ32A, 68HC08AZ60A, 68HC908AZ60A, 68HC08BD24, 68HC908BD48, ,68HC908EY16, 68HC908GP32, 68HC908GR4, 68HC908GR8, 68HC908GR8A, 68HC908GR16, 68HC908GT8, ,68HC908GT16, 68HC908GZ8, 68HC908GZ16, 68HC08JB1, 68HC908JB16, 68HC908JB8, 68HC08JB8, 68HC908JK1, ,68HC908JK3, 68HC08JK3, 68HC908JK8, 68HC08JK8, 68HC908JL3, 68HC08JL3, 68HC908JL8, 68HC08JL8, 68HC08JT8, 68HC08KH12, 68HC908KX2, 68HC908KX8, 68HC908LD64, 68HC908LJ12, 68HC908MR8, 68HC908MR16, 68HC908MR32, 68HC908QT1, 68HC908QT2, 68HC908QT4, 68HC908QY1, 68HC908QY2, 68HC908QY4, 68HC908RF2, ,8HC908RK2, 68HC908SR12, MC3PHAC, MC9S08GB32, MC9S08GB60, MC9S08GT32, MC9S08GT60.
Assembler code
EXTRA0_87:0000C1B5
EXTRA0_87:0000C1B5 ; =============== S U B R O U T I N E =======================================
EXTRA0_87:0000C1B5
EXTRA0_87:0000C1B5
EXTRA0_87:0000C1B5                 ; public App_OnReadValues
EXTRA0_87:0000C1B5 App_OnReadValues:                       ; CODE XREF: main+2A9↓P
EXTRA0_87:0000C1B5                 pshx
EXTRA0_87:0000C1B6                 pshh
EXTRA0_87:0000C1B7                 tax
EXTRA0_87:0000C1B8                 add     2, sp1
EXTRA0_87:0000C1BB                 sta     1, sp1
EXTRA0_87:0000C1BE                 cpx     #1
EXTRA0_87:0000C1C0                 txa
EXTRA0_87:0000C1C1                 bhi     loc_C1D2
EXTRA0_87:0000C1C3                 tsx
EXTRA0_87:0000C1C4                 ldx     , x
EXTRA0_87:0000C1C5                 cpx     #2
EXTRA0_87:0000C1C7                 bcs     loc_C1D2
EXTRA0_87:0000C1C9                 brset   DDRF6, _LEDC, loc_C1CE
EXTRA0_87:0000C1CC                 clrx
EXTRA0_87:0000C1CD                 skip2
EXTRA0_87:0000C1CE
EXTRA0_87:0000C1CE loc_C1CE:                               ; CODE XREF: App_OnReadValues+14↑j
EXTRA0_87:0000C1CE                 ldx     #1
EXTRA0_87:0000C1D0                 stx     byte_70
EXTRA0_87:0000C1D2
EXTRA0_87:0000C1D2 loc_C1D2:                               ; CODE XREF: App_OnReadValues+C↑j
EXTRA0_87:0000C1D2                                         ; App_OnReadValues+12↑j
EXTRA0_87:0000C1D2                 ldx     #$6F ; 'o'
EXTRA0_87:0000C1D4                 pshx
EXTRA0_87:0000C1D5                 tsx
EXTRA0_87:0000C1D6                 ldx     2, x1
EXTRA0_87:0000C1D8                 jsr     SSD_CopyParmsToAppBuffer
EXTRA0_87:0000C1DB                 ais     #3
EXTRA0_87:0000C1DD                 rts
EXTRA0_87:0000C1DD ; End of function App_OnReadValues
EXTRA0_87:0000C1DD
6809 OS9 Flex Disassembler
FLEX is the name of the Operating System for the Motorola 6800 and 6809. IDA can disassemble OS9 object and FLEX STX files and is probably the most powerful disassembler for that platform.
Assembler code
TEXT:54A5
TEXT:54A5 * =============== S U B R O U T I N E =======================================
TEXT:54A5
TEXT:54A5
TEXT:54A5 sub_54A5                                * CODE XREF: sub_4F06+78↑P
TEXT:54A5                                         * sub_5048+1CB↑P ...
TEXT:54A5                 pshs    dpr,y,u
TEXT:54A7                 ldy     7,s
TEXT:54AA                 ldx     ,y
TEXT:54AC                 ldd     9,s
TEXT:54AE                 aslb
TEXT:54AF                 leay    b,y
TEXT:54B1                 ldd     $B,s
TEXT:54B3                 pshs    a,b,x
TEXT:54B5                 tfr     b,a
TEXT:54B7                 ldu     ,y
TEXT:54B9                 beq     loc_54BD
TEXT:54BB                 jsr     ,u
TEXT:54BD
TEXT:54BD loc_54BD                                * CODE XREF: sub_54A5+14↑j
TEXT:54BD                 tfr     a,b
TEXT:54BF                 clra
TEXT:54C0                 leas    4,s
TEXT:54C2                 puls    pcr,u,y,dpr
TEXT:54C2 * End of function sub_54A5
TEXT:54C2
TEXT:54C4
TEXT:54C4 * =============== S U B R O U T I N E =======================================
TEXT:54C4
TEXT:54C4
TEXT:54C4 sub_54C4                                * CODE XREF: sub_4C67+63↑P
TEXT:54C4                                         * sub_4C67+87↑P ...
TEXT:54C4                 pshs    dpr,y,u
TEXT:54C6                 lda     $C,s
TEXT:54C8                 ldx     7,s
6809 Disassembler
FLEX is the name of the Operating System for the Motorola 6800 and 6809. IDA can disassemble OS9 object and FLEX STX files
Assembler code\
TEXT:102F                 bcs     loc_1065
TEXT:1031                 leax    ,u
TEXT:1033
TEXT:1033 loc_1033                                * CODE XREF: start+25↓j
TEXT:1033                 clr     ,x+
TEXT:1035                 subd    #1
TEXT:1038                 bhi     loc_1033
TEXT:103A                 stu     $80
TEXT:103C                 ldd     ,s++
TEXT:103E                 std     $B0
TEXT:1040                 ldd     ,s++
TEXT:1042                 leax    d,u
TEXT:1044                 stx     $82
TEXT:1046                 ldd     $B0
TEXT:1048                 leax    d,x
TEXT:104A                 stx     $B0
TEXT:104C                 ldx     $88
TEXT:104E                 OS9     F$All64 * '0'   * Allocate Process/Path Descriptor
TEXT:1051                 bcs     loc_1065
TEXT:1053                 stx     $88
TEXT:1055                 OS9     F$Ret64 * '1'   * Return Process/Path Descriptor
TEXT:1058                 leax    word_16A2,pc
TEXT:105C                 stx     $26
TEXT:105E                 leay    word_1067,pc
TEXT:1061                 OS9     F$SSvc * '2'    * Service Request Table Initialization
TEXT:1064                 rts
TEXT:1065 * ---------------------------------------------------------------------------
TEXT:1065
TEXT:1065 loc_1065                                * CODE XREF: start+1C↑j
TEXT:1065                                         * start+3E↑j
TEXT:1065                 jmp     $6B
TEXT:1065 * End of function start
TEXT:1065
TEXT:1065 * ---------------------------------------------------------------------------
TEXT:1067 word_1067       fdb $7F00               * DATA XREF: start+4B↑r
6811 Disassembler
The 68HC11 is a powerful 8-bit data, 16-bit address microcontroller from Motorola. IDA is, without any doubts, the most powerful 6811 disassembler. Here are a few part numbers of that huge family: 68HC11D0, 68HC11D3, 68HC711D3, 68HC11E0, 68HC11E1, 68HC11E9, 68HC11EA9, 68HC711E9, 68HC11E20, 68HC711E20, 68HC11F1, 68HC11K0, 68HC11K1, 68HC11K4, 68HC11KS1, 68HC11KS2, 68HC711KS2, 68HC11P1, 68HC11P2.
Assembler code\
RAM:00B4                 asl     $B4,y
RAM:00B7                 asl     $88,y
RAM:00BA
RAM:00BA loc_BA:                                 ; DATA XREF: RAM:loc_BA↓w
RAM:00BA                 asl     loc_BA
RAM:00BD                 asl     word_8888
RAM:00C0                 asra
RAM:00C1                 asrb
RAM:00C2                 asr     word_8888
RAM:00C5                 asr     word_8888
RAM:00C8                 asr     0,x
RAM:00CA                 asr     $CA,x
RAM:00CC                 asr     $88,x
RAM:00CE                 asr     0,y
RAM:00D1                 asr     $D1,y
RAM:00D4                 asr     $88,y
RAM:00D7
RAM:00D7 loc_D7:                                 ; DATA XREF: RAM:loc_D7↓w
RAM:00D7                 asr     loc_D7
RAM:00DA                 asr     word_8888
RAM:00DD                 bclr    $DD,x 0
RAM:00E0                 bclr    $E0,x $88 ; 'ˆ'
RAM:00E3                 bclr    $88,x $88 ; 'ˆ'
RAM:00E6                 bclr    $E6,y $88 ; 'ˆ'
RAM:00EA                 bclr    $88,y $88 ; 'ˆ'
RAM:00EE                 bita    #0
RAM:00F0
RAM:00F0 loc_F0:                                 ; DATA XREF: RAM:loc_F0↓r
RAM:00F0                 bita    <loc_F0
RAM:00F2                 bita    0,x
RAM:00F4                 bita    $F4,x
RAM:00F6                 bita    $88,x
RAM:00F8                 bita    0,y
RAM:00FB                 bita    $FB,y
RAM:00FB ; ---------------------------------------------------------------------------
68HC12 Disassembler
The 68HC12 is a Motorola microcontroller that has been widely used by the automotive industry. IDA is the most powerful disassembler available for the 68HC12 family and a car tuner’s favourite. Typical parts include the 68HC812A4, 68HC912B32, 68HC912BC32, 68HC12BC32, 68HC12BE32, 68HC12D60, 68HC912D60, 68HC912D60A, 68HC912D60C, 68HC912D60P, 68HC912DG128A, 68HC912DG128C, 68HC912DG128P, 68HC912DT128A, 68HC912DT128C, 68HC912DT128P and, in its automotive versions, 68HC912B32, 68HC912BC32, 68HC12BC32, 68HC12BE32, 68HC912D60A, 68HC912D60C, 68HC912D60P, 68HC12D60, 68HC912DG128A, 68HC912DG128C, 68HC912DG128P, 68HC912DT128A, 68HC912DT128C, 68HC912DT128P.
Assembler code
.text:00000042
.text:00000042 ; =============== S U B R O U T I N E =======================================
.text:00000042
.text:00000042
.text:00000042 L26:                                    ; CODE XREF: L26:L87↓p
.text:00000042                 addd    symbol141
.text:00000045
.text:00000045 L27:
.text:00000045                 addd    $76,x
.text:00000048
.text:00000048 L28:
.text:00000048                 anda    #$5A ; 'Z'
.text:0000004A
.text:0000004A L29:
.text:0000004A                 anda    Z46
.text:0000004C
.text:0000004C L30:
.text:0000004C                 anda    $63,x
.text:0000004F
.text:0000004F L31:
.text:0000004F                 anda    symbol51
.text:00000052
.text:00000052 L32:
.text:00000052                 anda    $9F,x
.text:00000055
.text:00000055 L33:
.text:00000055                 andb    #$C9 ; 'É'
.text:00000057
.text:00000057 L34:
.text:00000057                 andb    Z154
.text:00000059
.text:00000059 L35:
.text:00000059                 andb    $66,x
.text:0000005C
.text:0000005C L36:
.text:0000005C                 andb    symbol50
68HC16 Disassembler
The 68HC16 is a Motorola microcontroller that is used, among other things, in the automotive industry: IDA is the most powerful disassembler for the 68HC16Y1 , 68HC16Z1, 68HC16Z3 processors and is widely used by car tuner and race teams.
Assembler code
RESERVED:01BC                 fcb  $D
RESERVED:01BD                 fcb $7F ;
RESERVED:01BE                 fcb  $D
RESERVED:01BF                 fcb $80 ; €
RESERVED:01C0 ; ---------------------------------------------------------------------------
RESERVED:01C0                 sec
RESERVED:01C1                 stx     byte_E00
RESERVED:01C4                 cli
RESERVED:01C5                 nop
RESERVED:01C6                 cli
RESERVED:01C7                 clr     byte_E80
RESERVED:01CA                 cli
RESERVED:01CB                 stx     byte_F00
RESERVED:01CE                 sei
RESERVED:01CF                 nop
RESERVED:01D0                 sei
RESERVED:01D1                 clr     byte_F80
RESERVED:01D4                 sei
RESERVED:01D5                 stx     PORTA           ; Port A data
RESERVED:01D8                 sba
RESERVED:01D9                 nop
RESERVED:01DA                 sba
RESERVED:01DB                 clr     byte_1080
RESERVED:01DE                 sba
RESERVED:01DF                 stx     byte_1100
RESERVED:01E2                 cba
RESERVED:01E3                 nop
RESERVED:01E4                 cba
RESERVED:01E5                 clr     byte_1180
RESERVED:01E8                 cba
RESERVED:01E9                 stx     byte_1200
RESERVED:01EC                 brset   <byte_1 $12 loc_26F
RESERVED:01F0
RESERVED:01F0 loc_1F0:                                ; CODE XREF: RESERVED:loc_1F0↑j
RESERVED:01F0                 brset   <byte_80 $12 loc_1F0+3
68k Amiga Disassembler
IDA is the best disassembler for Amiga hunk files. The Motorola 68K family of processors is huge and very widely used. A few sample parts: MC68000, MC68010, MC68020, MC68030, MC68040, MC68330, MC68882, MC68851, MC68020EX, MC68302 Integrated Communication Processor, MC68306 68K/ColdFire, MC68331 68K/ColdFire, MC68332 68K/ColdFire, MC68336 68K/ColdFire, MC68340 68K/ColdFire, MC68360 Integrated Communication Processor, MC68F375 68K/ColdFire, MC68376 68K/ColdFire, etc….
Assembler code
CODE:00010190
CODE:00010190 ; =============== S U B R O U T I N E =======================================
CODE:00010190
CODE:00010190
CODE:00010190 waitmsg:                                ; CODE XREF: startup+DE↑p
CODE:00010190                 lea     $5C(a4),a0
CODE:00010194                 jsr     -$180(a6)
CODE:00010198                 lea     $5C(a4),a0
CODE:0001019C                 jsr     -$174(a6)
CODE:000101A0                 rts
CODE:000101A0 ; End of function waitmsg
CODE:000101A0
CODE:000101A2
CODE:000101A2 ; =============== S U B R O U T I N E =======================================
CODE:000101A2
CODE:000101A2
CODE:000101A2 openDOS:                                ; CODE XREF: startup:fromCLI↑p
CODE:000101A2                                         ; startup:fromWorkbench↑p
CODE:000101A2
CODE:000101A2 ; FUNCTION CHUNK AT CODE:00010176 SIZE 0000001A BYTES
CODE:000101A2
CODE:000101A2                 clr.l   (_DOSBase).l
CODE:000101A8                 lea     (DOSName).l,a1  ; "dos.library"
CODE:000101AE                 move.l  #$1E,d0
CODE:000101B4                 jsr     -$228(a6)
CODE:000101B8                 move.l  d0,(_DOSBase).l
CODE:000101BE                 beq.s   noDOS
CODE:000101C0                 rts
CODE:000101C0 ; End of function openDOS
CODE:000101C0
CODE:000101C0 ; ---------------------------------------------------------------------------
CODE:000101C2                 align 4
CODE:000101C2 ; end of 'CODE'
CODE:000101C2
DATA:000101D0 ; ===========================================================================
DATA:000101D0
DATA:000101D0 ; Segment type: Pure data
DATA:000101D0 ; segment "DATA"
DATA:000101D0 VerRev:         dc.l startup
68k Mac OS
IDA is the most powerful disassembler for Max OS 8 and Mac OS 9 PEF files.
The Motorola 68K family of processors is huge and very widely used. A few sample parts: MC68000, MC68010, MC68020, MC68030, MC68040, MC68330, MC68882, MC68851, MC68020EX, MC68302 Integrated Communication Processor, MC68306 68K/ColdFire, MC68331 68K/ColdFire, MC68332 68K/ColdFire, MC68336 68K/ColdFire, MC68340 68K/ColdFire, MC68360 Integrated Communication Processor, MC68F375 68K/ColdFire, MC68376 68K/ColdFire, etc.
Assembler code
seg000:40800530
seg000:40800530 ; =============== S U B R O U T I N E =======================================
seg000:40800530
seg000:40800530
seg000:40800530 sub_0_40800530:                         ; CODE XREF: sub_0_40800194+164↑p
seg000:40800530                 pea     -4(a5)
seg000:40800534                 _InitGraf               ; f
seg000:40800536                 pea     -$200(a6)
seg000:4080053A                 _OpenCPort              ; ort
seg000:4080053C                 movea.l (a5),a2
seg000:4080053E                 pea     -$6C(a2)
seg000:40800542                 _SetCursor              ; or
seg000:40800544                 lea     -$74(a2),a0
seg000:40800548                 move.l  a0,-(sp)
seg000:4080054A                 lea     ($9FA).w,a1
seg000:4080054E                 move.l  a1,-(sp)
seg000:40800550                 move.l  a1,-(sp)
seg000:40800552                 move.l  (a0)+,(a1)+
seg000:40800554                 move.l  (a0),(a1)
seg000:40800556                 move.l  #-$20003,-(sp)
seg000:4080055C                 _InsetRect              ; ct
seg000:4080055E                 move.l  #$30003,-(sp)
seg000:40800564                 _PenSize
seg000:40800566                 move.l  #$160016,-(sp)
seg000:4080056C                 _FrameRoundRect         ; undRect
seg000:4080056E                 _PenNormal              ; al
seg000:40800570                 move.l  #$100010,-(sp)
seg000:40800576                 pea     -$18(a2)
seg000:4080057A                 _FillRoundRect          ; ndRect
seg000:4080057C                 rts
seg000:4080057C ; End of function sub_0_40800530
seg000:4080057C
seg000:4080057C ; ---------------------------------------------------------------------------
seg000:4080057E                 align $10
seg000:40800580
seg000:40800580 ; =============== S U B R O U T I N E =======================================
seg000:40800580
seg000:40800580
seg000:40800580 sub_0_40800580:                         ; CODE XREF: sub_0_40800194+80↑p
seg000:40800580                 clr.w   -(sp)
68k Palm Pilot
IDA is the best disassembler for Palm Pilot programs. It supports all Palm OS versions and will even accept partially packed programs. The Palm Pilot uses a 68K processor.
The Motorola 68K family of processors is huge and very widely used. A few sample parts: MC68000, MC68010, MC68020, MC68030, MC68040, MC68330, MC68882, MC68851, MC68020EX, MC68302 Integrated Communication Processor, MC68306 68K/ColdFire, MC68331 68K/ColdFire, MC68332 68K/ColdFire, MC68336 68K/ColdFire, MC68340 68K/ColdFire, MC68360 Integrated Communication Processor, MC68F375 68K/ColdFire, MC68376 68K/ColdFire, etc.
Assembler code
code0001:00000204
code0001:00000204 ; =============== S U B R O U T I N E =======================================
code0001:00000204
code0001:00000204 ; Attributes: bp-based frame
code0001:00000204
code0001:00000204 proc            sub_204()               ; CODE XREF: sub_31E+A0↓p
code0001:00000204
code0001:00000204 var_68          = -$68
code0001:00000204 var_50          = -$50
code0001:00000204 arg_0           =  8
code0001:00000204 arg_8           =  $10
code0001:00000204 arg_A           =  $12
code0001:00000204
code0001:00000204                 link    a6,#-$50
code0001:00000208                 movem.l d3-d6/a2-a3,-(sp)
code0001:0000020C                 movea.l arg_0(a6),a3
code0001:00000210                 move.w  arg_8(a6),d0
code0001:00000214                 beq.s   loc_222
code0001:00000216                 addi.w  #-$8000,d0
code0001:0000021A                 clr.l   d4
code0001:0000021C                 move.w  d0,d4
code0001:0000021E                 bra     loc_224
code0001:00000222 ; ---------------------------------------------------------------------------
code0001:00000222
code0001:00000222 loc_222:                                ; CODE XREF: sub_204+10↑j
code0001:00000222                 moveq   #0,d4
code0001:00000224
code0001:00000224 loc_224:                                ; CODE XREF: sub_204+1A↑j
code0001:00000224                 move.w  d4,-(sp)
code0001:00000226                 move.l  #$636F6465,-(sp)
code0001:0000022C                 systrap DmGet1Resource()
code0001:00000230                 move.l  a0,d5
code0001:00000232                 addq.w  #6,sp
code0001:00000234                 bne.s   loc_272
code0001:00000236                 lea     aCouldNotLoadCo(pc),a1 ; "Could not load code segment #"
Unix COFF
IDA is the most powerful disassembler for 68K UNIX COFF Files. The Motorola 68K family of processors is huge and very widely used. A few sample parts: MC68000, MC68010, MC68020, MC68030, MC68040, MC68330, MC68882, MC68851, MC68020EX, MC68302 Integrated Communication Processor, MC68306 68K/ColdFire, MC68331 68K/ColdFire, MC68332 68K/ColdFire, MC68336 68K/ColdFire, MC68340 68K/ColdFire, MC68360 Integrated Communication Processor, MC68F375 68K/ColdFire, MC68376 68K/ColdFire, etc.
Assembler code
.text:000001AC
.text:000001AC ; =============== S U B R O U T I N E =======================================
.text:000001AC
.text:000001AC ; Attributes: bp-based frame
.text:000001AC
.text:000001AC                 global new_main
.text:000001AC new_main:                               ; CODE XREF: main+16↑p
.text:000001AC
.text:000001AC var_C           = -$C
.text:000001AC
.text:000001AC                 link    a6,#-$10
.text:000001B2                 movem.l 0,$10+var_C(sp)
.text:000001B8                 fmovem  0,$10+var_C.l(sp)
.text:000001C2
.text:000001C2 qwerty:                                 ; CODE XREF: new_main+96↓j
.text:000001C2                 pea     var_C+4(a6)
.text:000001C6                 pea     var_C+8(a6)
.text:000001CA                 move.l  #aLdLd,-(sp)    ; "%ld %ld"
.text:000001D0                 jsr     (scanf).l
.text:000001D6                 adda.w  #$C,sp
.text:000001DA                 tst.l   var_C+8(a6)
.text:000001DE                 bne.w   loc_200
.text:000001E2                 tst.l   var_C+4(a6)
.text:000001E6                 bne.w   loc_200
.text:000001EA                 move.l  (fignqm).l,d0
.text:000001F0                 add.l   (fignqn).l,d0
.text:000001F6                 add.l   (fignqr).l,d0
.text:000001FC                 bra.w   loc_246
.text:00000200 ; ---------------------------------------------------------------------------
.text:00000200
.text:00000200 loc_200:                                ; CODE XREF: new_main+32↑j
.text:00000200                                         ; new_main+3A↑j
.text:00000200                 move.l  var_C+4(a6),(sp)
.text:00000204                 move.l  var_C+8(a6),-(sp)
.text:00000208                 jsr     (b1).l
NEC 78k0 and 78k0s Processor
These NEC microcontrollers are available under many part numbers, which are all supported by the IDA Disassembler. IDA is the most powerful disassembler available for that line.
78K0/KB1
uPD78075B, uPD78078, uPD78078Y, uPD78070A, uPD78070AY, uPD780058, uPD780058Y, uPD780065, uPD780078, uPD780078Y, uPD780034AS, uPD780024AS uPD780034A, uPD780024A, uPD780034AY, uPD780024AY, uPD780988, uPD780208, uPD780232, uPD78044F, uPD780354, uPD780344, uPD780354Y, uPD780344Y, uPD780338, uPD780328, uPD780318, uPD780308, uPD780308Y, uPD78064B, uPD78064, uPD78064Y, uPD78098B, uPD780702Y, uPD780833Y, uPD780958, uPD780852, uPD780828B, uPD780101, uPD780102, uPD780103, uPD78F010
78K0S
uPD789046, uPD789026, uPD789074, uPD789088, uPD789062, uPD789052, uPD789177Y, uPD789167Y, uPD789177, uPD789167, uPD789134A, uPD789124A, uPD789114A, uPD789104A, uPD789842, uPD789417A, uPD789407A, uPD789456, uPD789446, uPD789436, uPD789426, uPD789316, uPD789306, uPD789467, uPD789327, uPD789835, uPD789830, uPD789479, uPD789489, uPD789800, uPD789862, uPD789861, uPD789860, uPD789850, uPD789871, uPD789881, uPD78F9026, uPD78F9046, uPD78F9076, uPD78F9116, uPD78F9136, uPD78F9177, uPD78F9306, uPD78F9316, uPD78F9328, uPD78F9418, uPDF78F9436, uPD78F9456, uPD78F9468, uPD78F9478, uPD78F9488, uPD78F9801, uPD78F9842, uPD78F9850.
Assembler code
ROM_:00B9                 set1    CY
ROM_:00BA                 set1    byte_FED3.00h
ROM_:00BC                 set1    byte_FED7.00h
ROM_:00BE                 set1    byte_FEDB.00h
ROM_:00C0                 set1    byte_FEDF.00h
ROM_:00C2                 set1    byte_FEDD.00h
ROM_:00C4                 callt   [word_54]
ROM_:00C5                 set1    CY
ROM_:00C6                 incw    AX
ROM_:00C7                 incw    DE
ROM_:00C8                 add     byte_FE8C, #90h
ROM_:00CB                 decw    DE
ROM_:00CC                 sub     byte_FE9C, #00h
ROM_:00CF                 movw    AX, #1202h
ROM_:00D2                 set1    CR00.00h        ; 16-bit timer capture/compare register 00
ROM_:00D4                 callt   [word_64]
ROM_:00D5                 set1    SIO30.00h       ; Serial I/O shift register 30
ROM_:00D7                 callt   [word_64]
ROM_:00D8                 set1    byte_FE2A.00h
ROM_:00DA                 callt   [word_64]
ROM_:00DB                 set1    byte_FE3A.00h
ROM_:00DD                 callt   [word_64]
ROM_:00DE                 set1    byte_FE4A.00h
ROM_:00E0                 callt   [word_64]
ROM_:00E1                 set1    byte_FE5A.00h
ROM_:00E3                 callt   [word_64]
ROM_:00E4                 set1    byte_FE6A.00h
ROM_:00E6                 callt   [word_64]
ROM_:00E7                 set1    byte_FE7A.00h
ROM_:00E9                 callt   [word_64]
ROM_:00EA                 set1    CR00.00h        ; 16-bit timer capture/compare register 00
ROM_:00EA ; ---------------------------------------------------------------------------
ROM_:00EC                 .db  15h
ROM_:00ED                 .db  0Ah
ROM_:00EE                 .db  1Ah
80196 Processor
IDA is probably the most powerful disassembler available for the INTEL 80196 line of micro-processors. IDA disassemble the Intel 80196, 80196NP and its variations.
Assembler code
INTMEM:007C                 db 0FFh ; ÿ
INTMEM:007D                 db 0FFh ; ÿ
INTMEM:007E                 db 0FFh ; ÿ
INTMEM:007F                 db 0FFh ; ÿ
INTMEM:0080 ; ---------------------------------------------------------------------------
INTMEM:0080                 skip    INTMEM_FF
INTMEM:0082                 clr     INTMEM_20
INTMEM:0084                 not     INTMEM_20
INTMEM:0086                 neg     INTMEM_20
INTMEM:0088                 xch     INTMEM_20, INTMEM_20
INTMEM:008B                 dec     INTMEM_20
INTMEM:008D                 ext     INTMEM_22
INTMEM:008F                 inc     INTMEM_20
INTMEM:0091                 shr     INTMEM_20, #8
INTMEM:0094                 shr     INTMEM_20, INTMEM_FF
INTMEM:0097                 shl     INTMEM_20, INTMEM_FF
INTMEM:009A                 shra    INTMEM_20, INTMEM_FF
INTMEM:009D                 xch     INTMEM_20, 55h[INTMEM_20]
INTMEM:00A1                 xch     INTMEM_20, 3030h[INTMEM_20]
INTMEM:00A6                 shrl    INTMEM_22, INTMEM_FF
INTMEM:00A9                 shll    INTMEM_22, INTMEM_FF
INTMEM:00AC                 shral   INTMEM_22, INTMEM_FF
INTMEM:00AF                 norml   INTMEM_22, INTMEM_FF
INTMEM:00B2                 clrb    INTMEM_FF
INTMEM:00B4                 notb    INTMEM_FF
INTMEM:00B6                 negb    INTMEM_FF
INTMEM:00B8                 xchb    INTMEM_FF, INTMEM_FF
INTMEM:00BB                 decb    INTMEM_FF
INTMEM:00BD                 extb    INTMEM_20
INTMEM:00BF                 incb    INTMEM_FF
INTMEM:00C1                 shrb    INTMEM_FF, INTMEM_FF
INTMEM:00C4                 shlb    INTMEM_FF, INTMEM_FF
INTMEM:00C7                 shrab   INTMEM_FF, INTMEM_FF
INTMEM:00CA                 xchb    INTMEM_FF, 55h[INTMEM_20]
INTMEM:00CE                 sjmp    INTMEM_D2
INTMEM:00CE ; ---------------------------------------------------------------------------
8051 Disassembler
Assembler code
code:0000019C                 .byte    0
code:0000019D                 .byte 0xFF ; ÿ
code:0000019E                 .byte 0xF5 ; õ
code:0000019F                 .byte 0xFF ; ÿ
code:000001A0 ; ---------------------------------------------------------------------------
code:000001A0                 mov     RESERVED00FF, R0 ; RESERVED
code:000001A2                 mov     RESERVED00FF, R1 ; RESERVED
code:000001A4                 mov     RESERVED00FF, R2 ; RESERVED
code:000001A6                 mov     RESERVED00FF, R3 ; RESERVED
code:000001A8                 mov     RESERVED00FF, R4 ; RESERVED
code:000001AA                 mov     RESERVED00FF, R5 ; RESERVED
code:000001AC                 mov     RESERVED00FF, R6 ; RESERVED
code:000001AE                 mov     RESERVED00FF, R7 ; RESERVED
code:000001B0                 mov     RESERVED00FF, RAM_0 ; RESERVED
code:000001B3                 mov     RESERVED00FF, RESERVED00FF ; RESERVED
code:000001B6                 mov     RESERVED00FF, @R0 ; RESERVED
code:000001B8                 mov     RESERVED00FF, @R1 ; RESERVED
code:000001BA                 mov     RESERVED00FF, #0 ; RESERVED
code:000001BD                 mov     RESERVED00FF, #0xFF ; RESERVED
code:000001C0                 mov     @R0, #0
code:000001C2                 mov     @R0, #0xFF
code:000001C4                 mov     @R0, RAM_0
code:000001C6                 mov     @R0, RESERVED00FF ; RESERVED
code:000001C8                 mov     @R0, A
code:000001C9                 mov     @R1, #0
code:000001CB                 mov     @R1, #0xFF
code:000001CD                 mov     @R1, RAM_0
code:000001CF                 mov     @R1, RESERVED00FF ; RESERVED
code:000001D1                 mov     @R1, A
code:000001D2                 mov     C, RAM_20.0
code:000001D4                 mov     C, P5.7         ; Port 5
code:000001D6                 mov     RAM_20.0, C
code:000001D8                 mov     P5.7, C         ; Port 5
code:000001DA                 mov     DPTR, #0xFF
code:000001DD                 mov     DPTR, #0xFF00
Analog Devices 218x.
Assembler code
ROM:0034 ; ---------------------------------------------------------------------------
ROM:0034
ROM:0034 loc_34:                                 ; CODE XREF: TIMER+CF↓j
ROM:0034                 ar = $37
ROM:0035                 dm(byte_1003F4F) = ar
ROM:0036                 jump loc_25C3
ROM:0037 ; ---------------------------------------------------------------------------
ROM:0037                 imask = $240
ROM:0038
ROM:0038 loc_38:                                 ; CODE XREF: TIMER+12↓j
ROM:0038                 ar = dm(byte_1003E33)
ROM:0039                 ar = ar - 1
ROM:003A                 if lt jump loc_38
ROM:003B                 imask = $250
ROM:003C
ROM:003C loc_3C:                                 ; CODE XREF: TIMER+16↓j
ROM:003C                 ar = dm(byte_1003E33)
ROM:003D                 ar = ar - 2
ROM:003E                 if lt jump loc_3C
ROM:003F                 imask = $269
ROM:0040
ROM:0040 loc_40:                                 ; CODE XREF: TIMER+1A↓j
ROM:0040                 ar = dm(byte_1003F12)
ROM:0041                 ar = ar + 0
ROM:0042                 if eq jump loc_40
ROM:0043                 jump loc_6E
ROM:0044 ; ---------------------------------------------------------------------------
ROM:0044
ROM:0044 loc_44:                                 ; CODE XREF: TIMER+2F↓j
ROM:0044                                         ; TIMER+38↓j ...
ROM:0044                 ena timer
ROM:0045                 ay0 = dm(byte_1002CD2)
ROM:0046                 ax0 = dm(byte_1002CD3)
ROM:0047                 ar = ay0 - ax0
ROM:0048                 if ge jump loc_4B
Alpha Processor – NT COFF
Assembler code
.text:0000000080900A90
.text:0000000080900A90 # =============== S U B R O U T I N E =======================================
.text:0000000080900A90
.text:0000000080900A90
.text:0000000080900A90 sub_80900A90:                           # CODE XREF: start+360↑p
.text:0000000080900A90                                         # start+3A4↑p ...
.text:0000000080900A90                 beq     $17, locret_80900B2C
.text:0000000080900A94                 subq    $17, 4, $20
.text:0000000080900A98                 ldq_u   $28, 0($18)
.text:0000000080900A9C                 addq    $17, $18, $27
.text:0000000080900AA0                 andnot  $16, 3, $19
.text:0000000080900AA4                 bge     $20, loc_80900B30
.text:0000000080900AA8                 ldq_u   $27, -1($27)
.text:0000000080900AAC                 and     $16, 3, $16
.text:0000000080900AB0                 ldl     $17, 0($19)
.text:0000000080900AB4                 addq    $20, $16, $20
.text:0000000080900AB8                 extql   $28, $18, $28
.text:0000000080900ABC                 bgt     $20, loc_80900AF0
.text:0000000080900AC0                 extqh   $27, $18, $27
.text:0000000080900AC4                 addq    $20, 4, $20
.text:0000000080900AC8                 or      $27, $28, $28
.text:0000000080900ACC                 insql   $28, $16, $28
.text:0000000080900AD0                 mskql   $17, $16, $18
.text:0000000080900AD4                 mskql   $28, $20, $28
.text:0000000080900AD8                 mskqh   $17, $20, $17
.text:0000000080900ADC                 or      $18, $28, $28
.text:0000000080900AE0                 or      $17, $28, $28
.text:0000000080900AE4                 stl     $28, 0($19)
.text:0000000080900AE8                 addq    $19, $20, $16
.text:0000000080900AEC                 ret     $31, ($26), 4
.text:0000000080900AF0 # ---------------------------------------------------------------------------
.text:0000000080900AF0
.text:0000000080900AF0 loc_80900AF0:                           # CODE XREF: sub_80900A90+2C↑j
.text:0000000080900AF0                 extqh   $27, $18, $27
.text:0000000080900AF4                 ldl     $18, 4($19)
Alpha Processor – Unix ELF
Assembler code
.text:0000000120001F30                 br      loc_120001FD0
.text:0000000120001F34 # ---------------------------------------------------------------------------
.text:0000000120001F34
.text:0000000120001F34 loc_120001F34:                          # CODE XREF: main+274↑j
.text:0000000120001F34                 addq    $sp, 0xB8, $1 # '¸'
.text:0000000120001F38                 ldq     $16, 0x220+stream($sp) # stream
.text:0000000120001F3C                 ldq     $17, ((off_120103268 - 0x12010B130) and 0xFFFF)($gp)# off_120103268 # format
.text:0000000120001F40                 mov     $1, $18
.text:0000000120001F44                 ldq     $27, ((fscanf_ptr - 0x12010B130) and 0xFFFF)($gp)# fscanf_ptr
.text:0000000120001F48                 jsr     $26, ($27), 0x1620# fscanf
.text:0000000120001F4C                 ldah    $gp, 0x11($26)
.text:0000000120001F50                 lda     $gp, -0x6E1C($gp)
.text:0000000120001F54                 # gp = 000000012010B130
.text:0000000120001F54                 mov     $0, $1
.text:0000000120001F58                 subq    $1, 1, $2
.text:0000000120001F5C                 bne     $2, loc_120001FAC
.text:0000000120001F60                 addq    $sp, 0xB8, $1 # '¸'
.text:0000000120001F64                 mov     $1, $16         # s1
.text:0000000120001F68                 ldq     $17, ((s2 - 0x12010B130) and 0xFFFF)($gp)# s2 # s2
.text:0000000120001F6C                 ldq     $27, ((strcmp_ptr - 0x12010B130) and 0xFFFF)($gp)# strcmp_ptr
.text:0000000120001F70                 jsr     $26, ($27), 0x16DC# strcmp
.text:0000000120001F74                 ldah    $gp, 0x11($26)
.text:0000000120001F78                 lda     $gp, -0x6E44($gp)
.text:0000000120001F7C                 # gp = 000000012010B130
.text:0000000120001F7C                 mov     $0, $1
.text:0000000120001F80                 addq    $1, 0, $2
.text:0000000120001F84                 bne     $2, loc_120001F94
.text:0000000120001F88                 ldq     $1, ((clockport_ptr - 0x12010B130) and 0xFFFF)($gp)# clockport_ptr
.text:0000000120001F8C                 lda     $2, 0x170($31)
.text:0000000120001F90                 stl     $2, 0($1)
.text:0000000120001F94
.text:0000000120001F94 loc_120001F94:                          # CODE XREF: main+2CC↑j
.text:0000000120001F94                 ldq     $16, 0x220+stream($sp) # stream
.text:0000000120001F98                 ldq     $27, ((fclose_ptr - 0x12010B130) and 0xFFFF)($gp)# fclose_ptr
.text:0000000120001F9C                 jsr     $26, ($27), 0x1698# fclose
Android ARM Executables (.elf)
Assembler code
.text:00008270
.text:00008270 ; =============== S U B R O U T I N E =======================================
.text:00008270
.text:00008270 ; Attributes: library function noreturn bp-based frame
.text:00008270
.text:00008270                 EXPORT _start
.text:00008270 _start                                  ; DATA XREF: LOAD:00008018↑o
.text:00008270
.text:00008270 structors       = -0x14
.text:00008270 var_8           = -8
.text:00008270
.text:00008270                 LDR     R12, =(_GLOBAL_OFFSET_TABLE_ - 0x828C)
.text:00008274                 PUSH    {R11,LR}
.text:00008278                 LDR     R3, =(__PREINIT_ARRAY___ptr - 0x9FEC)
.text:0000827C                 ADD     R11, SP, #4
.text:00008280                 SUB     SP, SP, #0x10
.text:00008284                 ADD     R12, PC, R12    ; _GLOBAL_OFFSET_TABLE_
.text:00008288                 LDR     R3, [R12,R3]    ; __PREINIT_ARRAY__
.text:0000828C                 STR     R3, [R11,#structors]
.text:00008290                 LDR     R3, =(__INIT_ARRAY___ptr - 0x9FEC)
.text:00008294                 ADD     R0, R11, #4     ; raw_args
.text:00008298                 LDR     R3, [R12,R3]    ; __INIT_ARRAY__
.text:0000829C                 STR     R3, [R11,#structors.init_array]
.text:000082A0                 LDR     R3, =(__FINI_ARRAY___ptr - 0x9FEC)
.text:000082A4                 MOV     R1, #0          ; onexit
.text:000082A8                 LDR     R3, [R12,R3]    ; __FINI_ARRAY__
.text:000082AC                 STR     R3, [R11,#structors.fini_array]
.text:000082B0                 LDR     R3, =(__CTOR_LIST___ptr - 0x9FEC)
.text:000082B4                 LDR     R3, [R12,R3]    ; __CTOR_LIST__
.text:000082B8                 STR     R3, [R11,#var_8]
.text:000082BC                 LDR     R3, =(main_ptr - 0x9FEC)
.text:000082C0                 LDR     R2, [R12,R3]    ; main ; slingshot
.text:000082C4                 SUB     R3, R11, #-structors ; structors
.text:000082C8                 BL      __libc_init
.text:000082CC ; ---------------------------------------------------------------------------
.text:000082CC                 SUB     SP, R11, #4
ARC Processor
Assembler code
.text:0000109C
.text:0000109C # =============== S U B R O U T I N E =======================================
.text:0000109C
.text:0000109C # Attributes: bp-based frame
.text:0000109C
.text:0000109C                 .global ArcMain
.text:0000109C ArcMain:                                # CODE XREF: main+C↑p
.text:0000109C
.text:0000109C arg_0           =  0
.text:0000109C arg_4           =  4
.text:0000109C
.text:0000109C                 st      blink, [sp,arg_4]
.text:000010A0                 st      fp, [sp,arg_0]
.text:000010A4                 mov     fp, sp
.text:000010A8                 sub     sp, sp, 0x10
.text:000010AC                 mov     r0, state_ls
.text:000010B4                 bl.d    Core_LocalClear
.text:000010B8                 mov     r1, 0x18
.text:000010BC                 mov     r2, _stack_start
.text:000010C4                 mov     r0, 0x12345678
.text:000010CC                 sub     r1, r1, r1
.text:000010D0                 mov     lp_count, 0x20 # ' '
.text:000010D4                 lp      loc_10E4
.text:000010D8                 add     r12, r2, r1
.text:000010DC                 st      r0, [r12]
.text:000010E0                 add     r1, r1, 4
.text:000010E4
.text:000010E4 loc_10E4:                               # CODE XREF: ArcMain+38↑j
.text:000010E4                 mov     r0, 0xFFFFFFFF
.text:000010E8                 sr      r0, [0x23] # '#'
.text:000010EC                 sr      0, COUNT # '!' # Enhanced Timer 0  Timer 0 Count value
.text:000010F4                 sr      2, CONTROL # '"' # Enhanced Timer 0  Timer 0 Control value
.text:000010FC                 bl      Platform_Initialize
.text:00001100                 bl      Core_Loop
.text:00001104                 ld      blink, [fp,arg_4]
ARM Processor EPOC App
Assembler code
.text:8012235E                 MOVS    R4, R5
.text:80122360                 ADDS    R4, #0x4C ; 'L'
.text:80122362
.text:80122362 loc_80122362                            ; CODE XREF: sub_8012234E+C4↓j
.text:80122362                 LDR     R4, [R4,#4]
.text:80122364                 CMP     R4, #0
.text:80122366                 BNE     loc_8012236C
.text:80122368                 LDR     R4, [R5,#0x3C]
.text:8012236A                 B       loc_801223FA
.text:8012236C ; ---------------------------------------------------------------------------
.text:8012236C
.text:8012236C loc_8012236C                            ; CODE XREF: sub_8012234E+18↑j
.text:8012236C                 LDR     R0, [R5,#0x3C]
.text:8012236E                 CMP     R0, R4
.text:80122370                 BLS     loc_8012237C
.text:80122372                 LDR     R0, [R4,#4]
.text:80122374                 CMP     R0, #0
.text:80122376                 BEQ     loc_8012238E
.text:80122378                 CMP     R0, R4
.text:8012237A                 BHI     loc_8012238E
.text:8012237C
.text:8012237C loc_8012237C                            ; CODE XREF: sub_8012234E+22↑j
.text:8012237C                 LDR     R0, [SP,#0x28+var_24]
.text:8012237E                 BLX     arm_euser_eka2_1417
.text:80122382                 MOVS    R2, R4
.text:80122384                 MOVS    R1, #4
.text:80122386                 LDR     R0, [SP,#0x28+var_18]
.text:80122388                 LDR     R7, [SP,#0x28+var_1C]
.text:8012238A                 MOVS    R3, #0
.text:8012238C                 B       loc_801223F2
.text:8012238E ; ---------------------------------------------------------------------------
.text:8012238E
.text:8012238E loc_8012238E                            ; CODE XREF: sub_8012234E+28↑j
.text:8012238E                                         ; sub_8012234E+2C↑j
.text:8012238E                 LDR     R7, [R4]
ARM Processor EPOC PE File
Assembler code
.text:100097D8                 ADD     R4, R4, #0x38 ; '8'
.text:100097DC                 MOV     R2, #0x18
.text:100097E0                 MOV     R1, R4
.text:100097E4                 MOV     R0, R5
.text:100097E8                 BL      Copy__10TBufCBase8RC10TBufCBase8i ; TBufCBase8::Copy(TBufCBase8 const &,int)
.text:100097EC                 LDR     R3, [R4,#0x1C]
.text:100097F0                 STR     R3, [R5,#0x1C]
.text:100097F4                 LDR     R3, [R4,#0x20]
.text:100097F8                 STR     R3, [R5,#0x20]
.text:100097FC                 LDR     R3, [R4,#0x24]
.text:10009800                 STR     R3, [R5,#0x24]
.text:10009804                 ADD     LR, R7, #0x1540
.text:10009808                 ADD     LR, LR, #0x30 ; '0'
.text:1000980C                 ADD     R12, SP, #0x50+var_C
.text:10009810                 LDM     R12!, {R0-R3}
.text:10009814                 STM     LR!, {R0-R3}
.text:10009818                 MOV     R1, #4
.text:1000981C                 ADD     R0, R7, #0x18
.text:10009820                 BL      Connect__3RFsi  ; RFs::Connect(int)
.text:10009824                 BL      LeaveIfError__4Useri ; User::LeaveIfError(int)
.text:10009828                 BL      Static__7CCoeEnv ; CCoeEnv::Static(void)
.text:1000982C                 MOV     R1, R5
.text:10009830                 BL      CreateScreenFontL__7CCoeEnvRC9TFontSpec ; CCoeEnv::CreateScreenFontL(TFontSpec const &)
.text:10009834                 LDR     R3, =0x158C
.text:10009838                 STR     R0, [R7,R3]
.text:1000983C                 MOV     R1, #0
.text:10009840                 MOV     R0, #0x18
.text:10009844                 BL      __nw__5CBaseUi6TLeave ; CBase::__nw(uint,TLeave)
.text:10009848                 SUBS    R4, R0, #0
.text:1000984C                 BEQ     loc_1000986C
.text:10009850                 MOV     R3, #0xA
.text:10009854                 MOV     R2, #0x10
.text:10009858                 LDR     R1, =NewL__8CBufFlati ; CBufFlat::NewL(int)
.text:1000985C                 MOV     R0, R4
.text:10009860                 BL      __13CArrayFixBasePFi_P8CBufBaseii
ARM Processor EPOC ROMFile
Assembler code
.text:50292274                 B       sub_5029254C
.text:50292274 ; ---------------------------------------------------------------------------
.text:50292278 off_50292278    DCD start               ; DATA XREF: start+3C↑r
.text:5029227C ; ---------------------------------------------------------------------------
.text:5029227C                 MOV     R1, R0
.text:50292280                 LDR     R0, =start
.text:50292284                 B       sub_50292558
.text:50292284 ; ---------------------------------------------------------------------------
.text:50292288 off_50292288    DCD start               ; DATA XREF: start+4C↑r
.text:5029228C ; ---------------------------------------------------------------------------
.text:5029228C                 LDR     R0, =start
.text:50292290                 B       sub_50292564
.text:50292290 ; ---------------------------------------------------------------------------
.text:50292294 off_50292294    DCD start               ; DATA XREF: start+58↑r
.text:50292298 ; ---------------------------------------------------------------------------
.text:50292298                 LDR     R0, =start
.text:5029229C                 B       sub_50292570
.text:5029229C ; ---------------------------------------------------------------------------
.text:502922A0 off_502922A0    DCD start               ; DATA XREF: start+64↑r
.text:502922A4 ; ---------------------------------------------------------------------------
.text:502922A4                 LDR     R0, =start
.text:502922A8                 B       sub_5029257C
.text:502922A8 ; ---------------------------------------------------------------------------
.text:502922AC off_502922AC    DCD start               ; DATA XREF: start+70↑r
.text:502922B0 ; ---------------------------------------------------------------------------
.text:502922B0                 LDR     R0, =start
.text:502922B4                 B       sub_50292588
.text:502922B4 ; ---------------------------------------------------------------------------
.text:502922B8 off_502922B8    DCD start               ; DATA XREF: start+7C↑r
.text:502922BC ; ---------------------------------------------------------------------------
.text:502922BC                 MOV     R1, R0
.text:502922C0                 LDR     R0, =start
.text:502922C4                 B       sub_50292594
.text:502922C4 ; ---------------------------------------------------------------------------
.text:502922C8 off_502922C8    DCD start               ; DATA XREF: start+8C↑r
EPOC SIS File Handler
Assembler code
.text:100001CC                 BL      Open__5RFileR3RFsRC6TDesC8Ui ; RFile::Open(RFs &,TDesC8 const &,uint)
.text:100001D0                 CMP     R0, #0
.text:100001D4                 BEQ     loc_100001E8
.text:100001D8                 MOV     R0, R10
.text:100001DC                 BL      Close__11RHandleBase ; RHandleBase::Close(void)
.text:100001E0
.text:100001E0 loc_100001E0                            ; CODE XREF: sub_1000014C+6C↑j
.text:100001E0                                         ; sub_1000014C+F8↓j
.text:100001E0                 MOV     R0, #0xFFFFFFFF
.text:100001E4                 B       loc_100007C4
.text:100001E8 ; ---------------------------------------------------------------------------
.text:100001E8
.text:100001E8 loc_100001E8                            ; CODE XREF: sub_1000014C+88↑j
.text:100001E8                 ADD     R5, R10, #0xC
.text:100001EC                 ADD     R1, R10, #0x124
.text:100001F0                 MOV     R0, R5
.text:100001F4                 BL      Modified__C5RFileR5TTime ; RFile::Modified(TTime &)
.text:100001F8                 MOV     R3, #0x18
.text:100001FC                 STR     R3, [SP,#0x94+var_24]
.text:10000200                 ADD     R2, SP, #0x94+var_24
.text:10000204                 MOV     R1, #1
.text:10000208                 MOV     R0, R5
.text:1000020C                 BL      Seek__C5RFile5TSeekRi ; RFile::Seek(TSeek,int &)
.text:10000210                 ADD     R4, SP, #0x94+var_30
.text:10000214                 MOV     R3, #4
.text:10000218                 MOV     R2, R3
.text:1000021C                 ADD     R1, R10, #0x1C
.text:10000220                 MOV     R0, R4
.text:10000224                 BL      __5TPtr8PUcii
.text:10000228                 MOV     R1, R4
.text:1000022C                 MOV     R0, R5
.text:10000230                 BL      Read__C5RFileR5TDes8 ; RFile::Read(TDes8 &)
.text:10000234                 LDR     R0, [R10,#0x1C]
.text:10000238                 BL      __builtin_vec_new
.text:1000023C                 STR     R0, [R10,#0x20]
ARM Processor iOS (iPhone): Unlock
Assembler code
__text:00002914                 STR     R3, [SP,#0x14+var_8]
__text:00002918                 MOV     R3, #0
__text:0000291C                 STRB    R3, [SP,#0x14+var_1]
__text:00002920                 MOV     R0, #0xE
__text:00002924                 BL      __keymgr_get_and_lock_processwide_ptr
__text:00002928                 MOV     R3, R0
__text:0000292C                 STR     R3, [SP,#0x14+var_C]
__text:00002930                 LDR     R3, [SP,#0x14+var_C]
__text:00002934                 CMP     R3, #0
__text:00002938                 BEQ     loc_296C
__text:0000293C                 LDR     R3, [SP,#0x14+var_C]
__text:00002940                 LDRB    R3, [R3,#2]
__text:00002944                 STRB    R3, [SP,#0x14+var_1]
__text:00002948                 LDR     R2, [SP,#0x14+var_C]
__text:0000294C                 MOV     R3, #1
__text:00002950                 STRB    R3, [R2,#2]
__text:00002954                 LDR     R3, [SP,#0x14+var_C]
__text:00002958                 LDR     R3, [R3,#4]
__text:0000295C                 STR     R3, [SP,#0x14+var_8]
__text:00002960                 MOV     R0, #0xE
__text:00002964                 LDR     R1, [SP,#0x14+var_C]
__text:00002968                 BL      __keymgr_set_and_unlock_processwide_ptr
__text:0000296C
__text:0000296C loc_296C                                ; CODE XREF: sub_28F8+40↑j
__text:0000296C                 LDR     R3, [SP,#0x14+var_10]
__text:00002970                 LDR     R3, [R3,#4]
__text:00002974                 CMP     R3, #0
__text:00002978                 BEQ     loc_2998
__text:0000297C                 LDR     R3, [SP,#0x14+var_10]
__text:00002980                 LDR     R2, [R3]
__text:00002984                 LDR     R3, [SP,#0x14+var_10]
__text:00002988                 LDR     R3, [R3,#8]
__text:0000298C                 MOV     R0, R3
__text:00002990                 BLX     R2
__text:00002994                 B       loc_29A4
ARM Processor iOS (iPhone): Objective-C metadata
Assembler code
__text:0000309C
__text:0000309C ; =============== S U B R O U T I N E =======================================
__text:0000309C
__text:0000309C ; Attributes: bp-based frame
__text:0000309C
__text:0000309C ; void __cdecl -[SMSApplication showNextMessage](SMSApplication *self, SEL)
__text:0000309C __SMSApplication_showNextMessage_       ; DATA XREF: __objc_const:000101B8↓o
__text:0000309C                 PUSH            {R4-R7,LR}
__text:0000309E                 ADD             R7, SP, #0xC
__text:000030A0                 PUSH.W          {R8}
__text:000030A4                 SUB             SP, SP, #8
__text:000030A6                 MOV             R4, R0
__text:000030A8                 MOV             R0, #(selRef_sharedConversationList - 0x30BC)
__text:000030B0                 MOV             R2, #(classRef_CKConversationList - 0x30BE)
__text:000030B8                 ADD             R0, PC  ; selRef_sharedConversationList
__text:000030BA                 ADD             R2, PC  ; classRef_CKConversationList
__text:000030BC                 LDR             R1, [R0] ; "sharedConversationList"
__text:000030BE                 LDR             R0, [R2] ; _OBJC_CLASS_$_CKConversationList ; id
__text:000030C0                 BLX             _objc_msgSend
__text:000030C4                 MOV             R1, #(selRef_activeConversations - 0x30D0)
__text:000030CC                 ADD             R1, PC  ; selRef_activeConversations
__text:000030CE                 LDR             R1, [R1] ; "activeConversations"
__text:000030D0                 BLX             _objc_msgSend
__text:000030D4                 MOV             R5, #(dword_11F80 - 0x30E8)
__text:000030DC                 MOV             R1, #(selRef_objectAtIndex_ - 0x30EA)
__text:000030E4                 ADD             R5, PC  ; dword_11F80
__text:000030E6                 ADD             R1, PC  ; selRef_objectAtIndex_
__text:000030E8                 LDR             R2, [R5]
__text:000030EA                 LDR             R1, [R1] ; "objectAtIndex:"
__text:000030EC                 BLX             _objc_msgSend
__text:000030F0                 MOV             R6, R0
__text:000030F2                 MOV             R0, #(off_1011C - 0x30FE)
__text:000030FA                 ADD             R0, PC  ; off_1011C
__text:000030FC                 LDR.W           R8, [R0] ; CKMessagesController *_messagesController;
__text:00003100                 MOV             R0, #(selRef_currentConversation - 0x310C)
ARM Processor iOS (iPhone): Objective-C Instance variables
Assembler code
__objc_const:000106C0                 __objc2_meth <sel__clearFailureBadge, aV804, \ ; -[SMSApplication _clearFailureBadge] ...
__objc_const:000106C0                               __SMSApplication__clearFailureBadge_+1>
__objc_const:000106CC                 __objc2_meth <sel__mediaDidFinishSaving, aV804, \ ; -[SMSApplication _mediaDidFinishSaving] ...
__objc_const:000106CC                               __SMSApplication__mediaDidFinishSaving_+1>
__objc_const:000106D8                 __objc2_meth <sel__mediaDidStartSaving, aV804, \ ; -[SMSApplication _mediaDidStartSaving] ...
__objc_const:000106D8                               __SMSApplication__mediaDidStartSaving_+1>
__objc_const:000106E4 _OBJC_INSTANCE_VARIABLES_SMSApplication __objc2_ivar_list <0x14, 0xF>
__objc_const:000106E4                                         ; DATA XREF: __objc_const:SMSApplication_$classData↑o
__objc_const:000106EC                 __objc2_ivar <_OBJC_IVAR_$_SMSApplication._waitToSendFinishLaunching, \ ; char _waitToSendFinishLaunching;
__objc_const:000106EC                               aWaittosendfini, aC, 0, 1>
__objc_const:00010700                 __objc2_ivar <_OBJC_IVAR_$_SMSApplication._isLocked, aIslocked_0, aC, \ ; char _isLocked;
__objc_const:00010700                               0, 1>
__objc_const:00010714                 __objc2_ivar <_OBJC_IVAR_$_SMSApplication._isSuspended, aIssuspended, \ ; char _isSuspended;
__objc_const:00010714                               aC, 0, 1>
__objc_const:00010728                 __objc2_ivar <_OBJC_IVAR_$_SMSApplication._hasEmail, aHasemail, aC, 0,\ ; char _hasEmail;
__objc_const:00010728                               1>
__objc_const:0001073C                 __objc2_ivar <_OBJC_IVAR_$_SMSApplication._window, aWindow_0, \ ; UIWindow *_window;
__objc_const:0001073C                               aUiwindow, 2, 4>
__objc_const:00010750                 __objc2_ivar <_OBJC_IVAR_$_SMSApplication._messagesController, \ ; CKMessagesController *_messagesController;
__objc_const:00010750                               aMessagescontro, aCkmessagescont_7, 2, 4>
__objc_const:00010764                 __objc2_ivar <_OBJC_IVAR_$_SMSApplication._smsService, aSmsservice, \ ; CKService *_smsService;
__objc_const:00010764                               aCkservice, 2, 4>
__objc_const:00010778                 __objc2_ivar <_OBJC_IVAR_$_SMSApplication._madridService, \ ; CKService *_madridService;
__objc_const:00010778                               aMadridservice, aCkservice, 2, 4>
__objc_const:0001078C                 __objc2_ivar <_OBJC_IVAR_$_SMSApplication._delaySuspendCount, \ ; int _delaySuspendCount;
__objc_const:0001078C                               aDelaysuspendco, aI, 2, 4>
__objc_const:000107A0                 __objc2_ivar <_OBJC_IVAR_$_SMSApplication._backgroundTask, \ ; unsigned int _backgroundTask;
__objc_const:000107A0                               aBackgroundtask, aI_0, 2, 4>
__objc_const:000107B4                 __objc2_ivar <_OBJC_IVAR_$_SMSApplication._madridRegistrationController,\ ; CNFRegWizardController *_madridRegistrationController;
__objc_const:000107B4                               aMadridregistra_2, aCnfregwizardco, 2, 4>
__objc_const:000107C8                 __objc2_ivar <_OBJC_IVAR_$_SMSApplication._defaultPng, aDefaultpng_0, \ ; NSString *_defaultPng;
__objc_const:000107C8                               aNsstring, 2, 4>
__objc_const:000107DC                 __objc2_ivar <_OBJC_IVAR_$_SMSApplication._suspendTimeStatusBarStyle, \ ; int _suspendTimeStatusBarStyle;
__objc_const:000107DC                               aSuspendtimesta, aI, 2, 4>
__objc_const:000107F0                 __objc2_ivar <_OBJC_IVAR_$_SMSApplication._deferredLoadURL, \ ; NSURL *_deferredLoadURL;
__objc_const:000107F0                               aDeferredloadur_0, aNsurl, 2, 4>
ARM Processor iOS (iPhone): Parameter Identification & Tracking (PIT)
Assembler code
__text:00002CAC
__text:00002CAC ; =============== S U B R O U T I N E =======================================
__text:00002CAC
__text:00002CAC ; Attributes: bp-based frame
__text:00002CAC
__text:00002CAC sub_2CAC                                ; CODE XREF: sub_12FF8+18↓p
__text:00002CAC                 LDR     R0, =off_52014
__text:00002CB0                 PUSH    {R4,R7,LR}
__text:00002CB4                 MOV     R1, #0          ; __c
__text:00002CB8                 LDR     R4, =dword_52DBC
__text:00002CBC                 LDR     R3, =unk_52DC4
__text:00002CC0                 ADD     R7, SP, #4
__text:00002CC4                 MOV     R2, #0xE7 ; 'ç' ; __len
__text:00002CC8                 LDR     R0, [R0]        ; unk_53620 ; __b
__text:00002CCC                 STR     R3, [R4]
__text:00002CD0                 BL      _memset
__text:00002CD4                 LDR     R3, =off_52018
__text:00002CD8                 MOV     R1, #0
__text:00002CDC                 LDR     R2, [R3]        ; byte_53610
__text:00002CE0                 MOV     R3, R2
__text:00002CE4                 STRB    R1, [R2,#(byte_53611 - 0x53610)]
__text:00002CE8                 STRB    R1, [R3],#1
__text:00002CEC                 LDR     R2, [R4]
__text:00002CF0                 ADD     R3, R3, #1
__text:00002CF4                 ADD     R0, R2, #0x84 ; '„'
__text:00002CF8                 STRB    R1, [R3],#1
__text:00002CFC                 STRB    R1, [R3],#1
__text:00002D00                 STRB    R1, [R3],#1
__text:00002D04                 STRB    R1, [R3],#1
__text:00002D08                 STRB    R1, [R3]
__text:00002D0C                 MOV     R3, R2
__text:00002D10
__text:00002D10 loc_2D10                                ; CODE XREF: sub_2CAC+70↓j
__text:00002D10                 STR     R1, [R3,#8]
__text:00002D14                 ADD     R3, R3, #4
ARM Processor iOS (iPhone): Start
Assembler code
__text:00002274
__text:00002274 ; =============== S U B R O U T I N E =======================================
__text:00002274
__text:00002274 ; Attributes: noreturn bp-based frame
__text:00002274
__text:00002274 sub_2274                                ; CODE XREF: start+14↑p
__text:00002274
__text:00002274 var_10          = -0x10
__text:00002274
__text:00002274                 PUSH    {R4-R7,LR}
__text:00002278                 ADD     R7, SP, #0xC
__text:0000227C                 SUB     SP, SP, #4
__text:00002280                 MOV     R6, R0
__text:00002284                 MOV     R5, R1
__text:00002288                 MOV     R4, R2
__text:0000228C                 LDR     R3, =(_NXArgc - 0x2298)
__text:00002290                 STR     R0, [PC,R3]     ; _NXArgc
__text:00002294                 LDR     R3, =(_NXArgv - 0x22A0)
__text:00002298                 STR     R1, [PC,R3]     ; _NXArgv
__text:0000229C                 LDR     R3, =(_environ - 0x22A8)
__text:000022A0                 STR     R2, [PC,R3]     ; _environ
__text:000022A4                 LDR     R3, =(_mach_init_routine_ptr - 0x22B0)
__text:000022A8                 LDR     R3, [PC,R3]     ; _mach_init_routine
__text:000022AC                 LDR     R3, [R3]
__text:000022B0                 CMP     R3, #0
__text:000022B4                 BLXNE   R3
__text:000022B8                 LDR     R3, =(__cthread_init_routine_ptr - 0x22C4)
__text:000022BC                 LDR     R3, [PC,R3]     ; __cthread_init_routine
__text:000022C0                 LDR     R3, [R3]
__text:000022C4                 CMP     R3, #0
__text:000022C8                 BLXNE   R3
__text:000022CC                 BL      ___keymgr_dwarf2_register_sections
__text:000022D0                 BL      sub_23C4
__text:000022D4                 LDR     R0, =(aDyldModTermFun - 0x22E0) ; "__dyld_mod_term_funcs"
__text:000022D8                 ADD     R0, PC, R0      ; "__dyld_mod_term_funcs"
ARM Processor iOS (iPhone): Switch statements
Assembler code
__text:00003B48                 STR     R3, [R4,#0xE8]
__text:00003B4C                 LDR     R3, [R4,#0x38]
__text:00003B50                 CMP     R3, #0x27       ; switch 40 cases
__text:00003B54                 LDRLS   PC, [PC,R3,LSL#2] ; switch jump
__text:00003B58                 B       def_3B54        ; jumptable 00003B54 default case, cases 2-6,8,11,12,15,16,20-22,27,32-38
__text:00003B58 ; ---------------------------------------------------------------------------
__text:00003B5C jpt_3B54        DCD loc_3C0C            ; jump table for switch statement
__text:00003B5C                 DCD loc_3C0C
__text:00003B5C                 DCD def_3B54
__text:00003B5C                 DCD def_3B54
__text:00003B5C                 DCD def_3B54
__text:00003B5C                 DCD def_3B54
__text:00003B5C                 DCD def_3B54
__text:00003B5C                 DCD loc_3C1C
__text:00003B5C                 DCD def_3B54
__text:00003B5C                 DCD loc_3C1C
__text:00003B5C                 DCD loc_3BFC
__text:00003B5C                 DCD def_3B54
__text:00003B5C                 DCD def_3B54
__text:00003B5C                 DCD loc_3C24
__text:00003B5C                 DCD loc_3C2C
__text:00003B5C                 DCD def_3B54
__text:00003B5C                 DCD def_3B54
__text:00003B5C                 DCD loc_3C14
__text:00003B5C                 DCD loc_3C2C
__text:00003B5C                 DCD loc_3C34
__text:00003B5C                 DCD def_3B54
__text:00003B5C                 DCD def_3B54
__text:00003B5C                 DCD def_3B54
__text:00003B5C                 DCD loc_3C14
__text:00003B5C                 DCD loc_3C2C
__text:00003B5C                 DCD loc_3C2C
__text:00003B5C                 DCD loc_3C2C
__text:00003B5C                 DCD def_3B54
__text:00003B5C                 DCD loc_3C3C
__text:00003B5C                 DCD loc_3C34
__text:00003B5C                 DCD loc_3C34
__text:00003B5C                 DCD loc_3C34
__text:00003B5C                 DCD def_3B54
__text:00003B5C                 DCD def_3B54
__text:00003B5C                 DCD def_3B54
__text:00003B5C                 DCD def_3B54
__text:00003B5C                 DCD def_3B54
__text:00003B5C                 DCD def_3B54
__text:00003B5C                 DCD def_3B54
__text:00003B5C                 DCD loc_3BFC
ARM Processor iOS (iPhone): C++ signatures
Assembler code
__text:00015E90                 BL      _readdir
__text:00015E94                 SUBS    R1, R0, #0
__text:00015E98                 BEQ     loc_15F2C
__text:00015E9C                 MOV     R3, #2
__text:00015EA0                 LDRB    R2, [R1,#7]
__text:00015EA4                 ADD     R0, SP, #0xA8+var_64
__text:00015EA8                 STR     R3, [SP,#0xA8+fctx.call_site]
__text:00015EAC                 ADD     R1, R1, #8
__text:00015EB0                 ADD     R3, SP, #0xA8+var_5D
__text:00015EB4                 BL      __ZNSsC1EPKcmRKSaIcE ; std::string::string(char const*,ulong,std::allocator<char> const&)
__text:00015EB8                 MOV     R3, #1
__text:00015EBC                 STR     R3, [SP,#0xA8+fctx.call_site]
__text:00015EC0                 ADD     R0, SP, #0xA8+var_64
__text:00015EC4                 LDR     R3, [SP,#0xA8+var_A4]
__text:00015EC8                 BLX     R3
__text:00015ECC                 CMP     R0, #0
__text:00015ED0                 BNE     loc_15F1C
__text:00015ED4                 MOV     R3, #0xFFFFFFFF
__text:00015ED8                 ADD     R0, SP, #0xA8+var_64 ; this
__text:00015EDC                 STR     R3, [SP,#0xA8+fctx.call_site]
__text:00015EE0                 BL      __ZNSsD2Ev      ; std::string::~string()
__text:00015EE4                 B       loc_15E84
__text:00015EE8 ; ---------------------------------------------------------------------------
__text:00015EE8 ;   cleanup() // owned by 15E64
__text:00015EE8                 LDR     R3, [SP,#0xA8+fctx.data]
__text:00015EEC                 STR     R3, [SP,#0xA8+lpuexcpt]
__text:00015EF0                 LDR     R3, [SP,#0xA8+fctx.call_site]
__text:00015EF4                 CMP     R3, #1
__text:00015EF8                 BEQ     loc_15F0C
__text:00015EFC                 MOV     R3, #0
__text:00015F00                 ADD     R0, SP, #0xA8+var_64 ; this
__text:00015F04                 STR     R3, [SP,#0xA8+fctx.call_site]
__text:00015F08                 BL      __ZNSsD2Ev      ; std::string::~string()
__text:00015F0C
__text:00015F0C loc_15F0C                               ; CODE XREF: sub_15E1C+DC↑j
__text:00015F0C                 MOV     R3, #0xFFFFFFFF
ARM Processor iOS (iPhone): Write
Assembler code
__text:00004424                 BHI     loc_440C
__text:00004428
__text:00004428 loc_4428                                ; CODE XREF: sub_43CC+24↑j
__text:00004428                                         ; sub_43CC+3C↑j
__text:00004428                 LDR     R3, =___stderrp_ptr
__text:0000442C                 LDR     R0, =aSynchronized ; "synchronized\n"
__text:00004430                 MOV     R1, #1          ; __size
__text:00004434                 LDR     R3, [R3]        ; ___stderrp
__text:00004438                 MOV     R2, #0xD        ; __nitems
__text:0000443C                 LDR     R3, [R3]        ; __stream
__text:00004440                 BL      _fwrite
__text:00004444                 MOV     R3, #0x12
__text:00004448
__text:00004448 loc_4448                                ; CODE XREF: sub_43CC+34↑j
__text:00004448                                         ; sub_43CC+4C↑j
__text:00004448                 STR     R3, [R4,#0x38]
__text:0000444C                 LDR     R3, [R4,#0xE4]
__text:00004450                 STR     R3, [R4,#0xE0]
__text:00004454                 MOV     R3, #9
__text:00004458                 STR     R3, [R4,#0xE4]
__text:0000445C                 LDR     R3, [R4,#0xEC]
__text:00004460                 STR     R3, [R4,#0xE8]
__text:00004464                 MOV     R3, #0
__text:00004468                 STR     R3, [R4,#0xEC]
__text:0000446C                 POP     {R4,R7,PC}
__text:0000446C ; End of function sub_43CC
__text:0000446C
__text:0000446C ; ---------------------------------------------------------------------------
__text:00004470 off_4470        DCD dword_52E70         ; DATA XREF: sub_43CC↑r
__text:00004474 off_4474        DCD ___stderrp_ptr      ; DATA XREF: sub_43CC:loc_4428↑r
__text:00004478 ; void *const _ptr
__text:00004478 __ptr           DCD aSynchronized       ; DATA XREF: sub_43CC+60↑r
__text:00004478                                         ; "synchronized\n"
__text:0000447C
__text:0000447C ; =============== S U B R O U T I N E =======================================
__text:0000447C
__text:0000447C
__text:0000447C sub_447C                                ; DATA XREF: sub_4820+47C↓o
__text:0000447C                                         ; __text:off_50A8↓o
__text:0000447C                 UXTB    R0, R0
ARM Processor: Linux ELF
Assembler code
.text:0000107E                 VLDR            D0, [SP,#0x5E8+var_450]
.text:00001082                 VMOV            R2, R3, D0
.text:00001086                 VLDR            D0, [SP,#0x5E8+var_448]
.text:0000108A                 VMOV            R0, R1, D0
.text:0000108E                 BL              __aeabi_ddiv
.text:00001092                 VMOV            D0, R0, R1
.text:00001096                 VSTR            D0, [SP,#0x5E8+var_440]
.text:0000109A                 VLDR            D0, [SP,#0x5E8+var_440]
.text:0000109E                 VMOV            R0, R1, D0
.text:000010A2                 BL              __aeabi_d2f
.text:000010A6                 LDR             R1, =Usart1_out_DATA
.text:000010A8                 STR             R0, [R1,#0x7C] ; `vtable for'__cxxabiv1::__si_class_type_info
.text:000010AA                 LDR.W           R0, [SP,#0x5E8+var_18]
.text:000010AE                 ADDW            R0, R0, #0xCC8
.text:000010B2                 ADD.W           R0, R0, #0x400
.text:000010B6                 VLDR            D0, [R0,#0x300]
.text:000010BA                 VSTR            D0, [SP,#0x5E8+var_450]
.text:000010BE                 VLDR            D0, [SP,#0x5E8+var_450]
.text:000010C2                 BL              __hardfp_sqrt
.text:000010C6                 VSTR            D0, [SP,#0x5E8+var_448]
.text:000010CA                 LDR             R0, =glv
.text:000010CC                 VLDR            D0, [R0,#0x48]
.text:000010D0                 VSTR            D0, [SP,#0x5E8+var_450]
.text:000010D4                 VLDR            D0, [SP,#0x5E8+var_450]
.text:000010D8                 VMOV            R2, R3, D0
.text:000010DC                 VLDR            D0, [SP,#0x5E8+var_448]
.text:000010E0                 VMOV            R0, R1, D0
.text:000010E4                 BL              __aeabi_ddiv
.text:000010E8                 VMOV            D0, R0, R1
.text:000010EC                 VSTR            D0, [SP,#0x5E8+var_440]
.text:000010F0                 VLDR            D0, [SP,#0x5E8+var_440]
.text:000010F4                 VMOV            R0, R1, D0
.text:000010F8                 BL              __aeabi_d2f
.text:000010FC                 LDR             R1, =Usart1_out_DATA
.text:000010FE                 STR.W           R0, [R1,#0x80]
ARM Processor: AOF SDK
Assembler code
C$$code:00000024                 ADD             R0, R0, #1
C$$code:00000028                 CMP             R0, #0xC8 ; 'È'
C$$code:0000002C                 BLT             loc_20
C$$code:00000030                 ADD             R1, R1, #1
C$$code:00000034                 CMP             R1, #0x12C
C$$code:00000038                 BLT             loc_10
C$$code:0000003C                 MOV             R3, #1
C$$code:00000040
C$$code:00000040 loc_40                                  ; CODE XREF: x$litpool$0+90↓j
C$$code:00000040                 MOV             R1, #0
C$$code:00000044
C$$code:00000044 loc_44                                  ; CODE XREF: x$litpool$0+84↓j
C$$code:00000044                 ADD             R12, R1, R1,LSL#3
C$$code:00000048                 ADD             R12, R12, R1,LSL#4
C$$code:0000004C                 ADD             R12, R2, R12,LSL#5
C$$code:00000050                 MOV             R0, #0
C$$code:00000054
C$$code:00000054 loc_54                                  ; CODE XREF: x$litpool$0+78↓j
C$$code:00000054                 LDR             LR, [R12,R0,LSL#2]
C$$code:00000058                 MUL             LR, R3, LR
C$$code:0000005C                 STR             LR, [R12,R0,LSL#2]
C$$code:00000060                 ADD             LR, R12, R0,LSL#2
C$$code:00000064                 LDR             LR, [LR,#0x10]
C$$code:00000068                 MUL             LR, R3, LR
C$$code:0000006C                 STR             LR, [R12,R0,LSL#2]
C$$code:00000070                 ADD             R0, R0, #5
C$$code:00000074                 CMP             R0, #0xC3 ; 'Ã'
C$$code:00000078                 BLT             loc_54
C$$code:0000007C                 ADD             R1, R1, #1
C$$code:00000080                 CMP             R1, #0x12C
C$$code:00000084                 BLT             loc_44
C$$code:00000088                 ADD             R3, R3, #1
C$$code:0000008C                 CMP             R3, #0x32 ; '2'
C$$code:00000090                 BLT             loc_40
C$$code:00000094                 MOV             R0, #0
ARM Processor: Windows CE COFF Format
Assembler code
.text:00000078                 MOVS            R3, R0
.text:0000007C                 BNE             loc_58
.text:00000080                 MOV             R0, #0x200
.text:00000084                 ADD             R0, SP, R0
.text:00000088                 BL              OutputDebugStringW
.text:0000008C                 CMP             R6, #0
.text:00000090                 MOV             R0, R6
.text:00000094                 MOVLE           R0, #0
.text:00000098                 ADD             SP, SP, #0x600
.text:0000009C                 LDMFD           SP, {R4-R6,SP,PC}
.text:0000009C ; ---------------------------------------------------------------------------
.text:000000A0 off_A0          DCD __imp_vsprintf      ; DATA XREF: DbgPrint:$M4755↑r
.text:000000A0 ; End of function DbgPrint
.text:000000A0
.text:000000A0 ; .text         ends
.text:000000A0
.pdata:000000A4 ; ===========================================================================
.pdata:000000A4
.pdata:000000A4 ; Segment type: Pure data
.pdata:000000A4                 AREA .pdata, DATA, READONLY
.pdata:000000A4                 ; ORG 0xA4
.pdata:000000A4 ; COMDAT (pick associative to section at 10)
.pdata:000000A4 $T4757          DCD DbgPrint            ; Function start
.pdata:000000A8                 DCD 0x40002504          ; Function end: A4, prolog end: 20, 32-bit: 1, has EH: 0
.pdata:000000A8 ; .pdata        ends
.pdata:000000A8
UNDEF:000000B0 ; ===========================================================================
UNDEF:000000B0
UNDEF:000000B0 ; Segment type: Externs
UNDEF:000000B0                 IMPORT OutputDebugStringW
UNDEF:000000B0                                         ; CODE XREF: DbgPrint+78↑p
UNDEF:000000B4                 IMPORT __imp_vsprintf   ; DATA XREF: DbgPrint:$M4755↑o
UNDEF:000000B4                                         ; DbgPrint:off_A0↑o
UNDEF:000000B4
UNDEF:000000B4                 END
ARM Processor: Windows CE PE Format
Assembler code
.text:1001577C
.text:1001577C ; =============== S U B R O U T I N E =======================================
.text:1001577C
.text:1001577C
.text:1001577C ; BOOL __stdcall DllEntryPoint(HINSTANCE hinstDLL, DWORD fdwReason, LPVOID lpReserved)
.text:1001577C                 EXPORT DllEntryPoint
.text:1001577C DllEntryPoint                           ; DATA XREF: .pdata:1001BB70↓o
.text:1001577C                 PUSH    {R4-R8,LR}
.text:10015780                 MOV     R7, R2
.text:10015784                 MOV     R6, R1
.text:10015788                 MOV     R8, R0
.text:1001578C                 LDR     R5, =dword_1001AD20
.text:10015790                 CMP     R6, #1
.text:10015794                 BNE     loc_100157BC
.text:10015798                 LDR     R3, [R5]
.text:1001579C                 CMP     R3, #0
.text:100157A0                 BEQ     loc_100157B8
.text:100157A4                 MOV     R1, #1
.text:100157A8                 MOV     LR, PC
.text:100157AC                 BX      R3
.text:100157B0                 MOVS    R4, R0
.text:100157B4                 BEQ     loc_10015804
.text:100157B8
.text:100157B8 loc_100157B8                            ; CODE XREF: DllEntryPoint+24↑j
.text:100157B8                 BL      sub_100155D8
.text:100157BC
.text:100157BC loc_100157BC                            ; CODE XREF: DllEntryPoint+18↑j
.text:100157BC                 MOV     R2, R7
.text:100157C0                 MOV     R1, R6
.text:100157C4                 MOV     R0, R8
.text:100157C8                 BL      sub_10003C18
.text:100157CC                 MOV     R4, R0
.text:100157D0                 CMP     R6, #0
.text:100157D4                 BNE     loc_10015804
.text:100157D8                 BL      sub_10015760
ATMEL AVR Disassembler
Assembler code
.text:0000003B
.text:0000003B ; =============== S U B R O U T I N E =======================================
.text:0000003B
.text:0000003B
.text:0000003B                 ; public qsort
.text:0000003B qsort:                                  ; CODE XREF: sub_41+1DE↓p
.text:0000003B                 ldi     r26, 0xA
.text:0000003C                 ldi     r27, 0
.text:0000003D                 ldi     r30, (sub_41 & 0xFF)
.text:0000003E                 ldi     r31, (sub_41 >> 8)
.text:0000003F                 jmp     __prologue_saves__
.text:0000003F ; End of function qsort
.text:0000003F
.text:00000041
.text:00000041 ; =============== S U B R O U T I N E =======================================
.text:00000041
.text:00000041
.text:00000041 sub_41:                                 ; DATA XREF: qsort+2↑o
.text:00000041                                         ; qsort+3↑o
.text:00000041                 movw    r4, r24
.text:00000042                 movw    r8, r22
.text:00000043                 movw    r6, r20
.text:00000044                 movw    r2, r18
.text:00000045                 std     Y+5, r20
.text:00000046                 std     Y+6, r7
.text:00000047                 clr     r18
.text:00000048                 clr     r19
.text:00000049                 sub     r18, r20
.text:0000004A                 sbc     r19, r21
.text:0000004B                 std     Y+8, r19
.text:0000004C                 std     Y+7, r18
.text:0000004D
.text:0000004D loc_4D:                                 ; CODE XREF: sub_41+1EB↓j
.text:0000004D                 ldi     r19, 7
.text:0000004E                 cp      r8, r19
C166 Processor
Assembler code
ROM:00005920
ROM:00005920 ; =============== S U B R O U T I N E =======================================
ROM:00005920
ROM:00005920
ROM:00005920 sub_5920:                               ; CODE XREF: ROM:00005A1A↓P
ROM:00005920                                         ; ROM:00005ADC↓P
ROM:00005920                 mov     r4, r8
ROM:00005922                 cmpb    rl4, #0
ROM:00005924                 jmpr    cc_NZ, loc_5932
ROM:00005926                 mov     r5, #4
ROM:00005928                 or      dword_18+4, ZEROS
ROM:0000592C                 or      dword_18+6, r5
ROM:00005930                 jmpr    cc_UC, loc_593E
ROM:00005932 ; ---------------------------------------------------------------------------
ROM:00005932
ROM:00005932 loc_5932:                               ; CODE XREF: sub_5920+4↑j
ROM:00005932                 mov     r5, #0FFFBh
ROM:00005936                 and     dword_18+4, ONES
ROM:0000593A                 and     dword_18+6, r5
ROM:0000593E
ROM:0000593E loc_593E:                               ; CODE XREF: sub_5920+10↑j
ROM:0000593E                 mov     r4, r9
ROM:00005940                 cmpb    rl4, #0
ROM:00005942                 jmpr    cc_NZ, loc_5950
ROM:00005944                 mov     r5, #8
ROM:00005946                 or      dword_18+4, ZEROS
ROM:0000594A                 or      dword_18+6, r5
ROM:0000594E                 jmpr    cc_UC, loc_595C
ROM:00005950 ; ---------------------------------------------------------------------------
ROM:00005950
ROM:00005950 loc_5950:                               ; CODE XREF: sub_5920+22↑j
ROM:00005950                 mov     r5, #0FFF7h
ROM:00005954                 and     dword_18+4, ONES
ROM:00005958                 and     dword_18+6, r5
ROM:0000595C
ROM:0000595C loc_595C:                               ; CODE XREF: sub_5920+2E↑j
ROM:0000595C                 mov     r4, dword_18+4
C166 Processor with ELF file
Assembler code
code_libc:00C00D9C ; ===========================================================================
code_libc:00C00D9C
code_libc:00C00D9C ; Segment type: Pure code
code_libc:00C00D9C code_libc       section CODE word public
code_libc:00C00D9C proccode_libc proc
code_libc:00C00D9C                 ; assume dpp0: 1 (page 0x4000)
code_libc:00C00D9C                 ; assume dpp1: 1 (page 0x4000)
code_libc:00C00D9C                 ; assume dpp2: 2 (page 0x8000)
code_libc:00C00D9C                 ; assume dpp3: 3 (page 0xC000)
code_libc:00C00D9C
code_libc:00C00D9C ; =============== S U B R O U T I N E =======================================
code_libc:00C00D9C
code_libc:00C00D9C
code_libc:00C00D9C _$cocofun_7:                            ; CODE XREF: _$cocofun_2+A↓J
code_libc:00C00D9C                                         ; _$cocofun_6_0+6↓J
code_libc:00C00D9C                 mov     r4, r0
code_libc:00C00D9E                 calls   0C0h, __emitchar
code_libc:00C00DA2                 mov     r11, #0
code_libc:00C00DA4                 cmp     r11, r8
code_libc:00C00DA6                 subc    r8, #0
code_libc:00C00DA8                 rets
code_libc:00C00DA8 ; End of function _$cocofun_7
code_libc:00C00DA8
code_libc:00C00DA8 proccode_libc endp
code_libc:00C00DA8 code_libc       ends
code_libc:00C00DA8
code_libc:00C00DAA ; ===========================================================================
code_libc:00C00DAA
code_libc:00C00DAA ; Segment type: Pure code
code_libc:00C00DAA code_libc       section CODE word public
code_libc:00C00DAA proccode_libc proc
code_libc:00C00DAA                 ; assume dpp0: 1 (page 0x4000)
code_libc:00C00DAA                 ; assume dpp1: 1 (page 0x4000)
code_libc:00C00DAA                 ; assume dpp2: 2 (page 0x8000)
code_libc:00C00DAA                 ; assume dpp3: 3 (page 0xC000)
code_libc:00C00DAA
code_libc:00C00DAA ; =============== S U B R O U T I N E =======================================
code_libc:00C00DAA
code_libc:00C00DAA
code_libc:00C00DAA _$cocofun_2:                            ; CODE XREF: code_libc:00C0050C↑P
code_libc:00C00DAA                                         ; code_libc:00C0055C↑P
code_libc:00C00DAA                 calls   0C0h, _$cocofun_6_0
Rockwell C39
Assembler code
ROM:E520
ROM:E520 ; =============== S U B R O U T I N E =======================================
ROM:E520
ROM:E520
ROM:E520 sub_E520:                               ; CODE XREF: JSB0__0+9↓j
ROM:E520                                         ; sub_E581↓p ...
ROM:E520                 STI     #0x70, 0x0018 ; 'p' ; Bank switch register 0000-1FFF (R/W)
ROM:E523                 STI     #0x71, 0x0019 ; 'q' ; Bank switch register 2000-3FFF (R/W)
ROM:E526                 STI     #0x72, 0x001A ; 'r' ; Bank switch register 4000-5FFF (R/W)
ROM:E529                 STI     #0x73, 0x001B ; 's' ; Bank switch register 6000-7FFF (R/W)
ROM:E52C                 RTS
ROM:E52C ; End of function sub_E520
ROM:E52C
ROM:E52D
ROM:E52D ; =============== S U B R O U T I N E =======================================
ROM:E52D
ROM:E52D
ROM:E52D sub_E52D:                               ; CODE XREF: sub_E5B8↓p
ROM:E52D                 STI     #0x74, 0x0018 ; 't' ; Bank switch register 0000-1FFF (R/W)
ROM:E530                 STI     #0x75, 0x0019 ; 'u' ; Bank switch register 2000-3FFF (R/W)
ROM:E533                 STI     #0x76, 0x001A ; 'v' ; Bank switch register 4000-5FFF (R/W)
ROM:E536                 RTS
ROM:E536 ; End of function sub_E52D
ROM:E536
ROM:E537
ROM:E537 ; =============== S U B R O U T I N E =======================================
ROM:E537
ROM:E537
ROM:E537 sub_E537:                               ; CODE XREF: sub_E5EF↓p
ROM:E537                 STI     #0x78, 0x0018 ; 'x' ; Bank switch register 0000-1FFF (R/W)
ROM:E53A                 STI     #0x79, 0x0019 ; 'y' ; Bank switch register 2000-3FFF (R/W)
ROM:E53D                 STI     #0x7A, 0x001A ; 'z' ; Bank switch register 4000-5FFF (R/W)
ROM:E540                 STI     #0x7B, 0x001B ; '{' ; Bank switch register 6000-7FFF (R/W)
ROM:E543                 RTS
ROM:E543 ; End of function sub_E537
ROM:E543
Microsoft .NET CLI Disassembler. VisualBasic library
Assembler code
conv.i8
    mul.ovf
    stloc.0
    ldarg.0
    ldfld    class [mscorlib]System.IO.FileStream Microsoft.VisualBasic.CompilerServices.VB6File::m_file
    ldloc.1
    ldloc.0
    callvirt instance void [mscorlib]System.IO.FileStream::Lock(int64, int64)
    ret
  }

  .method public hidebysig virtual instance void Unlock(int64 lStart, int64 lEnd)
  {
    .maxstack 3
    .locals init (int64 V0,
                  int64 V1)
    ldarg.1
    ldarg.2
    ble.s    loc_439
    ldstr    aArgumentInvali            // "Argument_InvalidValue1"
    ldstr    aStart                     // "Start"
    call     string Microsoft.VisualBasic.CompilerServices.Utils::GetResourceString(string ResourceKey, string Parm1)
    newobj   instance void [mscorlib]System.ArgumentException::.ctor(string)
    throw

loc_439:                                // CODE XREF: Microsoft.VisualBasic.CompilerServices.VB6RandomFile__Unlock+2↑j
    ldarg.1
    ldc.i8   1
    sub.ovf
    ldarg.0
    ldfld    int32 Microsoft.VisualBasic.CompilerServices.VB6File::m_lRecordLen
    conv.i8
    mul.ovf
    stloc.1
    ldarg.2
CR16
Assembler code
ROM:4B66                 .byte 0xCE ; Î
ROM:4B67                 .byte 0x15
ROM:4B68                 .byte 0xFE ; þ
ROM:4B69                 .byte 0x2E ; .
ROM:4B6A ; ---------------------------------------------------------------------------
ROM:4B6A                 bal     r6, sub_E8BA
ROM:4B6E                 movw    $0xEE36, r7
ROM:4B72                 movw    $0x25A8, r8
ROM:4B76                 movw    $0xEE4F, r9
ROM:4B7A                 movw    $0xEE4A, r10
ROM:4B7E                 movw    $0xEE4C, r11
ROM:4B82                 movw    $0xEE4D, r12
ROM:4B86                 movw    $0xEE4E, r13
ROM:4B8A                 loadb   0x00(r2), r0
ROM:4B8C                 cmpb    $0xFF98, r0
ROM:4B90                 bne     loc_4B98
ROM:4B92                 loadb   byte_EE49, r0
ROM:4B96                 storb   r0, 0x00(r2)
ROM:4B98
ROM:4B98 loc_4B98:                               ; CODE XREF: ROM:4B90↑j
ROM:4B98                 loadb   0x00(r2), r6
ROM:4B9A                 bal     r0, sub_E68A
ROM:4B9E                 addb    $-0x10, r0
ROM:4BA0                 mulw    $0x0B, r3
ROM:4BA2                 loadw   0x0002(r2), r4
ROM:4BA4                 loadb   0x04(r3), r9
ROM:4BA6                 mulw    $0xF2, r7
ROM:4BA8                 addb    $0x07, r4
ROM:4BAA                 loadb   0x09(r3), r1
ROM:4BAC                 mulw    $0x0F, r8
ROM:4BAE                 orw     $0x09, r4
ROM:4BB0                 loadb   0x0B(r3), r1
ROM:4BB2                 mulw    $0x04, r10
ROM:4BB4                 adduw   r5, r12
ROM:4BB6                 loadb   0x0D(r3), r1
Android Dalvik Executables (.dex)
Assembler code
CODE:000065D0 # Source file: AlarmReceiver.java
CODE:000065D0 public void com.android.alarmclock.AlarmReceiver.onReceive(
CODE:000065D0       android.content.Context p0,
CODE:000065D0       android.content.Intent p1)
CODE:000065D0 this = v11
CODE:000065D0 p0 = v12
CODE:000065D0 p1 = v13
CODE:000065D0                 const/4                         v2, -1
CODE:000065D2                 const/4                         v8, 0
CODE:000065D4                 const-class                     v10, <t: AlarmAlert>
CODE:000065D8                 const-string                    v9, aIntentExtraAla # "intent.extra.alarm"
CODE:000065DC                 .prologue_end
CODE:000065DC                 .line 45
CODE:000065DC                 const-string                    v0, aAlarmKilled # "alarm_killed"
CODE:000065E0                 +invoke-virtual-quick           {p1}, [0x12]
CODE:000065E6                 move-result-object              v1
CODE:000065E8                 +execute-inline                 {v0, v1}, [3]
CODE:000065EE                 move-result                     v0
CODE:000065F0                 if-eqz                          v0, loc_6618
CODE:000065F4                 const-string                    v0, aIntentExtraAla # "intent.extra.alarm"
CODE:000065F8                 +invoke-virtual-quick           {p1, v9}, [0x32]
CODE:000065FE                 move-result-object              v0
CODE:00006600                 check-cast                      v0, <t: Alarm>
CODE:00006604                 const-string                    v1, aAlarmKilledTim # "alarm_killed_timeout"
CODE:00006608                 +invoke-virtual-quick           {p1, v1, v2}, [0x2B]
CODE:0000660E                 move-result                     v1
CODE:00006610                 invoke-direct                   {this, p0, v0, v1}, <void AlarmReceiver.updateNotification(ref, ref, int) AlarmReceiver_updateNotification@VLLI>
CODE:00006616
CODE:00006616 locret:                                 # CODE XREF: AlarmReceiver_onReceive@VLL+6A↓j
CODE:00006616                                         # AlarmReceiver_onReceive@VLL+B4↓j ...
CODE:00006616                 .line 154
CODE:00006616                 return-void
CODE:00006618 # ---------------------------------------------------------------------------
CODE:00006618
CODE:00006618 loc_6618:                               # CODE XREF: AlarmReceiver_onReceive@VLL+20↑j
CODE:00006618                 .line 51
CODE:00006618                 const-string                    v0, aCancelSnooze # "cancel_snooze"
Microsoft .NET CLI Disassembler
The IDA disassembler can disassemble a portable executable (PE) file that contains Microsoft intermediate language (MSIL) code. The Common Language Infrastructure (CLI) is the ECMA standard that describes the core of the .NET Framework world.
Assembler code
.method private hidebysig instance void UpdateDocumentRelatedTools()
                                        // CODE XREF: Infragistics.Win.Printing.UltraPrintPreviewDialog__UltraPrintPreviewDialog_Load+F6↑p
                                        // Infragistics.Win.Printing.UltraPrintPreviewDialog__ultraPrintPreviewControl1_PropertyChanged+43↑p
  {
    .maxstack 2
    .locals init (bool V0,
                  bool V1)
    ldarg.0
    ldfld    class [Infragistics2.Win.Misc.v10.1]Infragistics.Win.Printing.UltraPrintPreviewControl Infragistics.Win.Printing.UltraPrintPreviewDialog::ultraPrintPreviewControl1
    callvirt instance class [System.Drawing]System.Drawing.Printing.PrintDocument [Infragistics2.Win.Misc.v10.1]Infragistics.Win.Printing.UltraPrintPreviewControl::get_Document()
    ldnull
    ceq
    ldc.i4.0
    ceq
    stloc.0
    ldloc.0
    brfalse.s loc_588C
    ldarg.0
    ldfld    class [Infragistics2.Win.Misc.v10.1]Infragistics.Win.Printing.UltraPrintPreviewControl Infragistics.Win.Printing.UltraPrintPreviewDialog::ultraPrintPreviewControl1
    callvirt instance class [System.Drawing]System.Drawing.Printing.PrintDocument [Infragistics2.Win.Misc.v10.1]Infragistics.Win.Printing.UltraPrintPreviewControl::get_Document()
    callvirt instance class [System.Drawing]System.Drawing.Printing.PrinterSettings [System.Drawing]System.Drawing.Printing.PrintDocument::get_PrinterSettings()
    callvirt instance bool [System.Drawing]System.Drawing.Printing.PrinterSettings::get_IsValid()
    br.s     loc_588D

loc_588C:                               // CODE XREF: Infragistics.Win.Printing.UltraPrintPreviewDialog__UpdateDocumentRelatedTools+13↑j
    ldc.i4.0

loc_588D:                               // CODE XREF: Infragistics.Win.Printing.UltraPrintPreviewDialog__UpdateDocumentRelatedTools+2A↑j
    stloc.1
    ldarg.0
    ldfld    class [Infragistics2.Win.UltraWinToolbars.v10.1]Infragistics.Win.UltraWinToolbars.UltraToolbarsManager Infragistics.Win.Printing.UltraPrintPreviewDialog::ultraToolbarsManager1
    callvirt instance class [Infragistics2.Win.UltraWinToolbars.v10.1]Infragistics.Win.UltraWinToolbars.RootToolsCollection [Infragistics2.Win.UltraWinToolbars.v10.1]Infragistics.Win.UltraWinToolbars.UltraToolbarsManager::get_Tools()
    ldstr    aPrint                     // "Print"
    callvirt instance class [Infragistics2.Win.UltraWinToolbars.v10.1]Infragistics.Win.UltraWinToolbars.ToolBase [Infragistics2.Win.UltraWinToolbars.v10.1]Infragistics.Win.UltraWinToolbars.ToolsCollectionBase::get_Item(string)
    callvirt instance class [Infragistics2.Win.UltraWinToolbars.v10.1]Infragistics.Win.UltraWinToolbars.SharedProps [Infragistics2.Win.UltraWinToolbars.v10.1]Infragistics.Win.UltraWinToolbars.ToolBase::get_SharedProps()
DSP56K
Assembler code
ROM:00000100
ROM:00000100 ; =============== S U B R O U T I N E =======================================
ROM:00000100
ROM:00000100
ROM:00000100                 global start
ROM:00000100 start:                                  ; CODE XREF: ROM:00000000↑j
ROM:00000100                                         ; start+3↓j ...
ROM:00000100                 clr     a
ROM:00000101                 move    r5,a
ROM:00000102                 tst     a
ROM:00000103                 jne     <start
ROM:00000104                 move    #$14,r5
ROM:00000105                 movec   #$13F,m6
ROM:00000107                 movec   #$13F,m4
ROM:00000109                 move    r2,r1
ROM:0000010A                 move    #$7000,r6
ROM:0000010C                 move    #$7400,r4
ROM:0000010E                 move    (r1)+n1
ROM:0000010F                 move    x:(r1)+,x0  y:(r6)+,y0
ROM:00000110                 do      #$140,ROM_115
ROM:00000112                 mpyr    y0,x0,a     x:(r1)+,x0    y:(r6)+,y0
ROM:00000113                 nop
ROM:00000114                 move    a,x:(r4)+
ROM:00000115
ROM:00000115 ROM_115:                                ; CODE XREF: start+10↑j
ROM:00000115                 movec   #$FFFF,m4
ROM:00000117                 movec   #$FFFF,m6
ROM:00000119                 move    #$72B0,r3
ROM:0000011B                 move    #$72A8,r4
ROM:0000011D                 move    #$72A0,r6
ROM:0000011F                 move    #$7156,r7
ROM:00000121                 do      #8,ROM_129
ROM:00000123                 jsr     ROM_12A
ROM:00000125                 nop
ROM:00000126                 nop
Fujitsu FR (.elf)
Assembler code
.text:00000114
.text:00000114 ; =============== S U B R O U T I N E =======================================
.text:00000114
.text:00000114 ; Attributes: bp-based frame
.text:00000114
.text:00000114                 .globl main
.text:00000114                 .type main, @function
.text:00000114 main:
.text:00000114
.text:00000114 var_4           = -4
.text:00000114
.text:00000114                 st      rp, @-r15
.text:00000116                 enter   #8
.text:00000118                 ldi:32  #0x170, r4
.text:0000011E                 ldi:32  #printf, r1
.text:00000124                 call    @r1
.text:00000126                 ldi:8   #1, r4
.text:00000128                 ldi:8   #2, r5
.text:0000012A                 ldi:8   #3, r6
.text:0000012C                 ldi:32  #plok1, r1
.text:00000132                 call    @r1
.text:00000134                 mov     r4, r2
.text:00000136                 ldi:8   #var_4, r1
.text:00000138                 extsb   r1
.text:0000013A                 addn    r14, r1
.text:0000013C                 st      r2, @r1
.text:0000013E                 ldi:8   #var_4, r1
.text:00000140                 extsb   r1
.text:00000142                 addn    r14, r1
.text:00000144                 ld      @r1, r4
.text:00000146                 ldi:32  #plok2, r1
.text:0000014C                 call    @r1
.text:0000014E                 ldi:8   #0x61, r4 ; 'a'
.text:00000150                 ldi:32  #plok3, r1
.text:00000156                 call    @r1
Gameboy
Assembler code
ROM:0ABF                 db  23h ; #
ROM:0AC0                 db  10h
ROM:0AC1                 db 0EEh ; î
ROM:0AC2                 db 0C9h ; É
ROM:0AC3 ; ---------------------------------------------------------------------------
ROM:0AC3                 ld      a, (4DA4h)
ROM:0AC6                 and     a
ROM:0AC7                 ret     nz
ROM:0AC8                 ld      ix, 4C00h
ROM:0ACC                 ld      iy, 4DC8h
ROM:0AD0                 ld      de, 100h
ROM:0AD3                 cp      (iy+0)
ROM:0AD6                 jp      nz, loc_BD2
ROM:0AD9                 ld      (iy+0), 0Eh
ROM:0ADD                 ld      a, (4DA6h)
ROM:0AE0                 and     a
ROM:0AE1                 jr      z, loc_AFE
ROM:0AE3                 ld      hl, (4DCBh)
ROM:0AE6                 and     a
ROM:0AE7                 sbc     hl, de
ROM:0AE9                 jr      nc, loc_AFE
ROM:0AEB                 ld      hl, 4EACh
ROM:0AEE                 set     7, (hl)
ROM:0AF0                 ld      a, 9
ROM:0AF2                 cp      (ix+0Bh)
ROM:0AF5                 jr      nz, loc_AFB
ROM:0AF7                 res     7, (hl)
ROM:0AF9                 ld      a, 9
ROM:0AFB
ROM:0AFB loc_AFB:                                ; CODE XREF: ROM:0AF5↑j
ROM:0AFB                 ld      (4C0Bh), a
ROM:0AFE
ROM:0AFE loc_AFE:                                ; CODE XREF: ROM:0AE1↑j
ROM:0AFE                                         ; ROM:0AE9↑j
ROM:0AFE                 ld      a, (4DA7h)
H8 300: COFF FILE Format
Assembler code
.text:00000164                 beq     _L6:8
.text:00000166                 mov.w   @(var_6:16,r6), r0
.text:0000016A                 mov.w   @(var_4:16,r6), r1
.text:0000016E                 mov.w   r3, @(var_2:16,r6)
.text:00000172                 jsr     ___negsf2:16
.text:00000176                 mov.w   r0, @(var_6:16,r6)
.text:0000017A                 mov.w   r1, @(var_4:16,r6)
.text:0000017E                 mov.w   @(var_2:16,r6), r3
.text:00000182
.text:00000182 _L6:                                    ; CODE XREF: ___adjust+64↑j
.text:00000182                 mov.w   r3, r3
.text:00000184                 bne     _L7:8
.text:00000186                 mov.w   @(var_6:16,r6), r0
.text:0000018A                 mov.w   @(var_4:16,r6), r1
.text:0000018E                 bra     _L11:8
.text:00000190 ; ---------------------------------------------------------------------------
.text:00000190
.text:00000190 _L7:                                    ; CODE XREF: ___adjust+84↑j
.text:00000190                 mov.w   r3, r3
.text:00000192                 bge     _L8:8
.text:00000194                 mov.w   r3, r0
.text:00000196                 not.b   r0l
.text:00000198                 not.b   r0h
.text:0000019A                 adds    #1, r0
.text:0000019C                 jsr     ___exp10:16
.text:000001A0                 push.w  r1
.text:000001A2                 push.w  r0
.text:000001A4                 mov.w   @(var_6:16,r6), r0
.text:000001A8                 mov.w   @(var_4:16,r6), r1
.text:000001AC                 jsr     ___divsf3:16
.text:000001B0                 bra     _L12:8
.text:000001B2 ; ---------------------------------------------------------------------------
.text:000001B2
.text:000001B2 _L8:                                    ; CODE XREF: ___adjust+92↑j
.text:000001B2                 mov.w   r3, r0
H8 300s: COFF FILE Format
Assembler code
.text:00000114                 ble     _L2:8
.text:00000116                 mov.w   #0x22, r2 ; '"'
.text:0000011A                 mov.w   r2, @er0
.text:0000011C                 mov.l   @___infinity:32, er0
.text:00000124                 mov.w   r3, r3
.text:00000126                 beq     _L11:8
.text:00000128                 jsr     ___negsf2:24
.text:0000012C                 bra     _L11:8
.text:0000012E ; ---------------------------------------------------------------------------
.text:0000012E
.text:0000012E _L2:                                    ; CODE XREF: ___adjust+14↑j
.text:0000012E                 cmp.w   #0xFECC, r4
.text:00000132                 bge     _L4:8
.text:00000134                 mov.w   #0x22, r2 ; '"'
.text:00000138                 mov.w   r2, @er0
.text:0000013A                 mov.l   @_LC0:16, er0
.text:00000140                 bra     _L11:8
.text:00000142 ; ---------------------------------------------------------------------------
.text:00000142
.text:00000142 _L4:                                    ; CODE XREF: ___adjust+32↑j
.text:00000142                 mov.l   @er1, er5
.text:00000146                 mov.w   r3, r3
.text:00000148                 beq     _L6:8
.text:0000014A                 mov.l   er5, er0
.text:0000014C                 jsr     ___negsf2:24
.text:00000150                 mov.l   er0, er5
.text:00000152
.text:00000152 _L6:                                    ; CODE XREF: ___adjust+48↑j
.text:00000152                 mov.w   r4, r4
.text:00000154                 bne     _L7:8
.text:00000156                 mov.l   er5, er0
.text:00000158                 bra     _L11:8
.text:0000015A ; ---------------------------------------------------------------------------
.text:0000015A
.text:0000015A _L7:                                    ; CODE XREF: ___adjust+54↑j
.text:0000015A                 mov.w   r4, r4
H8 500
Assembler code
ROM:1082
ROM:1082 ! =============== S U B R O U T I N E =======================================
ROM:1082
ROM:1082
ROM:1082 sub_1082: ! near
ROM:1082                 mov:g.w @(0xC:8,r3), r0
ROM:1085                 mov:g.w @(0xA:8,r3), r2
ROM:1088                 bra     loc_109D:8
ROM:108A ! ---------------------------------------------------------------------------
ROM:108A
ROM:108A loc_108A:                               ! CODE XREF: sub_1082:loc_109D↓j
ROM:108A                 mov:g.w @r0+, r4
ROM:108C                 mov:g.w @r0+, r1
ROM:108E                 shlr.w  r1
ROM:1090                 sub.w   #1:16, r1
ROM:1094
ROM:1094 loc_1094:                               ! CODE XREF: sub_1082+14↓j
ROM:1094                 clr.w   @r4+
ROM:1096                 scb/f   r1, loc_1094:8
ROM:1099                 sub.w   #1:16, r2
ROM:109D
ROM:109D loc_109D:                               ! CODE XREF: sub_1082+6↑j
ROM:109D                 bne     loc_108A:8
ROM:109F                 mov:g.w @(0x10:8,r3), r4
ROM:10A2
ROM:10A2 loc_10A2:                               ! CODE XREF: sub_1082+34↓j
ROM:10A2                 mov:g.w @r4+, r0
ROM:10A4                 beq     loc_10B8:8
ROM:10A6                 mov:g.w @r4+, r1
ROM:10A8
ROM:10A8 loc_10A8:                               ! CODE XREF: sub_1082+2C↓j
ROM:10A8                 mov:g.b @r4+, r2
ROM:10AA                 mov:g.b r2, @r1+
ROM:10AC                 add:q.w #-1, r0
ROM:10AE                 bne     loc_10A8:8
HPPA Risc Processor : HP-UX SOM
Assembler code
$CODE$:00004768
$CODE$:00004768 # =============== S U B R O U T I N E =======================================
$CODE$:00004768
$CODE$:00004768 # THUNK
$CODE$:00004768
$CODE$:00004768 # __int32 __fastcall sigblock(__int32 mask)
$CODE$:00004768 sigblock:                               # CODE XREF: sub_47C8+118C↓p
$CODE$:00004768                                         # DATA XREF: sigblock↓o ...
$CODE$:00004768
$CODE$:00004768 es_rp           =  0x18
$CODE$:00004768
$CODE$:00004768                 ldw             -0x2D0(%dp), %r21 # .sigblock
$CODE$:0000476C                 ldw             -0x2CC(%dp), %r19 # dword_40001614
$CODE$:00004770                 ldsid           (%r21), %r1
$CODE$:00004774                 mtsp            %r1, %sr0
$CODE$:00004778                 be              0(%sr0,%r21)
$CODE$:0000477C                 stw             %rp, -es_rp(%sp)
$CODE$:0000477C
$CODE$:0000477C # End of function sigblock
$CODE$:0000477C
$CODE$:00004780
$CODE$:00004780 # =============== S U B R O U T I N E =======================================
$CODE$:00004780
$CODE$:00004780 # THUNK
$CODE$:00004780
$CODE$:00004780 # __int32 __fastcall sigsetmask(__int32 mask)
$CODE$:00004780 sigsetmask:                             # CODE XREF: sub_47C8+1218↓p
$CODE$:00004780                                         # DATA XREF: sigsetmask↓o ...
$CODE$:00004780
$CODE$:00004780 es_rp           =  0x18
$CODE$:00004780
$CODE$:00004780                 ldw             -0x368(%dp), %r21 # .sigsetmask
$CODE$:00004784                 ldw             -0x364(%dp), %r19 # dword_4000157C
$CODE$:00004788                 ldsid           (%r21), %r1
$CODE$:0000478C                 mtsp            %r1, %sr0
i51
Assembler code
code:0000006B
code:0000006B ; =============== S U B R O U T I N E =======================================
code:0000006B
code:0000006B ; External interrupt 6
code:0000006B
code:0000006B                 ; public IEX6
code:0000006B IEX6:
code:0000006B                 mov     R7, A
code:0000006C                 addc    A, RAM_0
code:0000006E                 addc    A, RESERVED00FF ; RESERVED
code:00000070                 addc    A, @R0
code:00000071                 addc    A, @R1
code:00000072                 addc    A, R0
code:00000073                 addc    A, R1
code:00000074                 addc    A, R2
code:00000075                 addc    A, R3
code:00000076                 addc    A, R4
code:00000077                 addc    A, R5
code:00000078                 addc    A, R6
code:00000079                 addc    A, R7
code:0000007A                 ajmp    IEX2+2          ; External interrupt 2
code:0000007A ; End of function IEX6
code:0000007A
code:0000007A ; ---------------------------------------------------------------------------
code:0000007C                 .byte 0x54 ; T
code:0000007D                 .byte    0
code:0000007E                 .word 0x54FF
code:00000080                 .byte 0x55, 0, 0x55
code:00000083
code:00000083 ; =============== S U B R O U T I N E =======================================
code:00000083
code:00000083 ; Serial channel 1
code:00000083
code:00000083                 ; public RI1_TI1
code:00000083 RI1_TI1:
code:00000083                 mov     R7, A
i860
Assembler code
.text:000011C0
.text:000011C0 // =============== S U B R O U T I N E =======================================
.text:000011C0
.text:000011C0
.text:000011C0                 // public _main
.text:000011C0 _main:                                  // CODE XREF: __main+120↓p
.text:000011C0                 addu            -0x20, r2, r2
.text:000011C4                 st.l            0x11(r2), r3
.text:000011C8                 addu            0x10, r2, r3
.text:000011CC                 st.l            5(r3), r1
.text:000011D0                 orh             0, r0, r31
.text:000011D4                 call            _printf
.text:000011D8                 or              0xA000, r31, r16
.text:000011DC                 adds            0x10, r3, r31
.text:000011E0                 ld.l            4(r3), r1
.text:000011E4                 ld.l            0(r3), r3
.text:000011E8                 bri             r1
.text:000011EC                 shl             r0, r31, r2
.text:000011EC // End of function _main
.text:000011EC
.text:000011F0 // ---------------------------------------------------------------------------
.text:000011F0                 shl             r0, r0, r0
.text:000011F4                 shl             r0, r0, r0
.text:000011F8                 shl             r0, r0, r0
.text:000011FC                 shl             r0, r0, r0
.text:00001200
.text:00001200 // =============== S U B R O U T I N E =======================================
.text:00001200
.text:00001200
.text:00001200                 // public _fclose
.text:00001200 _fclose:                                // CODE XREF: ___cleanup+68↓p
.text:00001200                 addu            -0x50, r2, r2
.text:00001204                 st.l            1(r2), r1
.text:00001208                 st.l            0x39(r2), r4
.text:0000120C                 st.l            0x3D(r2), r5
Intel i960
Assembler code
.text:00000020
.text:00000020 # =============== S U B R O U T I N E =======================================
.text:00000020
.text:00000020 # Attributes: library function
.text:00000020
.text:00000020                 .global __Ldoprnt
.text:00000020 __Ldoprnt:
.text:00000020                 lda     0xB0(sp), sp
.text:00000024                 st      g8, 0xE0(fp)
.text:00000028                 st      g9, 0xE4(fp)
.text:0000002C                 st      g10, 0xE8(fp)
.text:00000030                 st      g11, 0xEC(fp)
.text:00000034                 mov     g0, r12
.text:00000038                 mov     g1, r7
.text:0000003C                 mov     g2, r6
.text:00000040                 mov     0, g1
.text:00000044
.text:00000044 loc_44:                                 # DATA XREF: __Ldoprnt+3C↓o
.text:00000044                 mov     5, g2
.text:00000048                 lda     0x40(fp), g0
.text:0000004C
.text:0000004C loc_4C:                                 # DATA XREF: __Ldoprnt:loc_3AC↓o
.text:0000004C                 mov     g3, r3
.text:00000050                 st      g14, 0xA0(fp)
.text:00000054                 call    _memset
.text:00000058                 mov     0, g1
.text:0000005C                 lda     loc_44, g2
.text:00000060                 lda     0x50(fp), g0
.text:00000064                 call    _memset
.text:00000068
.text:00000068 loc_68:                                 # DATA XREF: __Ldoprnt:loc_3D0↓o
.text:00000068                 ldib    (r12), g4
.text:0000006C
.text:0000006C loc_6C:                                 # DATA XREF: __Ldoprnt+348↓o
.text:0000006C                 mov     g14, g5
Intel IA-64 (Itanium)
Assembler code
.text:0000000000421100
.text:0000000000421100 // =============== S U B R O U T I N E =======================================
.text:0000000000421100
.text:0000000000421100
.text:0000000000421100 sub_421100:                             // CODE XREF: sub_41FF40+3C↑p
.text:0000000000421100                 alloc r37 = ar.pfs, 0, 9, 2, 0
.text:0000000000421106                 mov r39 = pr
.text:000000000042110C                 adds sp = -32, sp
.text:0000000000421110                 or r40 = gp, r0;;
.text:0000000000421116                 cmp4.eq p14, p15 = 2, r32
.text:000000000042111C                 mov r36 = b0;;
.text:0000000000421120                 ld8.nta r3 = [sp]
.text:0000000000421126                 mov.i r38 = ar.lc       // loop count register
.text:000000000042112C   (p14)          br.cond.dpnt.few loc_4211D0;;
.text:0000000000421130                 cmp4.eq p14, p15 = 1, r0
.text:0000000000421136                 cmp4.eq p13, p0 = 15, r32
.text:000000000042113C                 cmp4.eq p12, p0 = 21, r32;;
.text:0000000000421140                 cmp4.eq.or.andcm p14, p15 = 4, r32
.text:0000000000421146                 cmp4.eq.or.andcm p14, p15 = 8, r32
.text:000000000042114C                 cmp4.eq.or.andcm p14, p15 = 11, r32
.text:0000000000421150   (p14)          br.cond.dpnt.few loc_4211B0
.text:0000000000421156   (p13)          br.cond.dpnt.few loc_4211A0
.text:000000000042115C   (p12)          br.cond.dpnt.few loc_421190;;
.text:0000000000421160                 cmp4.eq p14, p15 = 22, r32
.text:0000000000421166                 nop.f 0
.text:000000000042116C   (p14)          br.cond.dpnt.few loc_421180;;
.text:0000000000421170                 mov r8 = -1
.text:0000000000421176                 nop.f 0
.text:000000000042117C                 br.few loc_421430;;
.text:0000000000421180 // ---------------------------------------------------------------------------
.text:0000000000421180
.text:0000000000421180 loc_421180:                             // CODE XREF: sub_421100+6C↑j
.text:0000000000421180                 addl r28 = -2086752, gp // unk_4308A0
.text:0000000000421186                 nop.f 0
.text:000000000042118C                 br.few loc_4211E0;;
Java Bytecode
Assembler code
// Segment type: Pure code
  public synchronized void reset()
  max_stack 4
  max_locals 2
  {
    invokestatic java.security.IdentityScope.getSystemScope()
                                               // CODE XREF: <init>+5↑P
    astore_1 // met004_slot001
    aload_1 // met004_slot001
    instanceof sun.security.provider.IdentityDatabase
    ifeq met004_47
    aload_0 // met004_slot000
    aload_1 // met004_slot001
    checkcast sun.security.provider.IdentityDatabase
    putfield scope
    aload_0 // met004_slot000
    new java.lang.StringBuffer
    dup
    ldc "installing "
    invokespecial java.lang.StringBuffer.<init>(java.lang.String)
    aload_1 // met004_slot001
    invokevirtual java.lang.StringBuffer.append(java.lang.Object)
    ldc " as the scope for signers."
    invokevirtual java.lang.StringBuffer.append(java.lang.String)
    invokevirtual java.lang.StringBuffer.toString()
    invokevirtual debug(java.lang.String)
    goto met004_53

met004_47:                                     // CODE XREF: reset+8↑j
    aload_0 // met004_slot000
    ldc "no signer scope found."
Angstrem KR 1878
Assembler code
CODE:000F
CODE:000F ; =============== S U B R O U T I N E =======================================
CODE:000F
CODE:000F
CODE:000F                 global EEPWr
CODE:000F EEPWr:
CODE:000F                 movl    %c1 PCtlA,#0
CODE:0010                 ldr     SR0,#8
CODE:0011 ; assume a = 8
CODE:0011                 ldr     SR1,#9
CODE:0012 ; assume b = 9
CODE:0012                 ldr     SR2,#$E
CODE:0013 ; assume c = $E
CODE:0013                 ldr     SR5,#$40
CODE:0014                 movl    %b1 byte_100049,#0
CODE:0015                 movl    %b4 byte_10004C,#0
CODE:0016                 jsr     sub_29F
CODE:0017                 ldr     SR6,#$82
CODE:0018                 ldr     SR7,#7
CODE:0019                 movl    %c0 byte_100070,#$A
CODE:001A
CODE:001A loc_1A:                                 ; CODE XREF: EEPWr+F↓j
CODE:001A                 mov     %b0 byte_100048,%d7
CODE:001B                 jsr     sub_25F
CODE:001C                 jsr     sub_29F
CODE:001D                 subl    %c0 byte_100070,#1
CODE:001E                 jnz     loc_1A
CODE:001F                 swap    %b0 byte_100048
CODE:0020                 cmpl    %c1 byte_100071,#1
CODE:0021                 jnz     loc_23
CODE:0022                 btg     %b0 byte_100048,#$80
CODE:0023
CODE:0023 loc_23:                                 ; CODE XREF: EEPWr+12↑j
CODE:0023                 mov     %c4 byte_100074,%b0 byte_100048
CODE:0024                 movl    %b0 byte_100048,#$90
Renesas/Hitachi M16C
Assembler code
program:000E023C
program:000E023C ; =============== S U B R O U T I N E =======================================
program:000E023C
program:000E023C ; Attributes: bp-based frame
program:000E023C
program:000E023C                 ; public $_pput
program:000E023C $_pput:
program:000E023C
program:000E023C var_2           = -2
program:000E023C
program:000E023C                 ENTER   #2
program:000E023F                 MOV.W   R1, var_2[FB]
program:000E0242                 MOV.B   p4, R0L         ; Port P4 register
program:000E0245                 MOV.B   #0, R0H
program:000E0246                 BTST    #4, R0
program:000E0249                 JEQ/Z   loc_E024F
program:000E024B                 MOV.W   #-1, R0
program:000E024D                 EXITD
program:000E024F ; ---------------------------------------------------------------------------
program:000E024F
program:000E024F loc_E024F:                              ; CODE XREF: $_pput+D↑j
program:000E024F                                         ; $_pput+1A↓j
program:000E024F                 MOV.B   p4, R0L         ; Port P4 register
program:000E0252                 MOV.B   #0, R0H
program:000E0253                 BTST    #5, R0
program:000E0256                 JEQ/Z   loc_E024F
program:000E0258                 MOV.B   var_2[FB], p5   ; Port P5 register
program:000E025D                 MOV.W   #0, var_2[FB]
program:000E0260
program:000E0260 loc_E0260:                              ; CODE XREF: $_pput+2F↓j
program:000E0260                 CMP.W   #0Ah, var_2[FB]
program:000E0265                 JGE     loc_E026D
program:000E0268                 ADD.W   #1, var_2[FB]
program:000E026B                 JMP.B   loc_E0260
program:000E026D ; ---------------------------------------------------------------------------
program:000E026D
program:000E026D loc_E026D:                              ; CODE XREF: $_pput+29↑j
program:000E026D                 MOV.B   #8, p4          ; Port P4 register
Renesas/Hitachi M32R
Assembler code
P:000000C0 ; ===========================================================================
P:000000C0
P:000000C0 ; Segment type: Pure code
P:000000C0 .section P
P:000000C0
P:000000C0 ; =============== S U B R O U T I N E =======================================
P:000000C0
P:000000C0
P:000000C0 sub_C0:
P:000000C0                 addi    sp, #-0x20 || nop
P:000000C4                 seth    R0, #0x3F80
P:000000C8                 or3     R0, R0, #0
P:000000CC                 st      R0, @(0x1C, sp)
P:000000D0                 seth    R0, #0x4000
P:000000D4                 or3     R0, R0, #0
P:000000D8                 st      R0, @(0x18, sp)
P:000000DC                 ld      R0, @(0x1C, sp)
P:000000E0                 ld      R1, @(0x18, sp)
P:000000E4                 fadd    R0, R0, R1
P:000000E8                 seth    R1, #0x4000
P:000000EC                 or3     R1, R1, #0
P:000000F0                 fdiv    R0, R0, R1
P:000000F4                 st      R0, @(0x14, sp)
P:000000F8                 ld      R0, @(0x14, sp)
P:000000FC                 ld      R1, @(0x18, sp)
P:00000100                 ld      R2, @(0x1C, sp)
P:00000104                 fmul    R1, R1, R2
P:00000108                 fsub    R0, R0, R1
P:0000010C                 st      R0, @(0x10, sp)
P:00000110                 ld      R0, @(0x10, sp)
P:00000114                 ftoi    R0, R0
P:00000118                 st      R0, @(0xC, sp)
P:0000011C                 ld      R0, @(0xC, sp)
P:00000120                 srai    R0, #2 || nop
P:00000124                 itof    R0, R0
M740
Assembler Code
seg000:81D8
seg000:81D8 ; =============== S U B R O U T I N E =======================================
seg000:81D8
seg000:81D8
seg000:81D8 sub_81D8:                               ; CODE XREF: seg000:8F8C↓p
seg000:81D8                 lda     3, X
seg000:81DA                 pha
seg000:81DB                 jsr     sub_815F
seg000:81DE                 jsr     sub_818C
seg000:81E1                 lda     $FB, X
seg000:81E3                 sta     0, X
seg000:81E5                 lda     $FC, X
seg000:81E7                 sta     1, X
seg000:81E9                 pla
seg000:81EA                 bpl     locret_81FD
seg000:81EC                 lda     0, X
seg000:81EE                 eor     #$FF
seg000:81F0                 clc
seg000:81F1                 adc     #1
seg000:81F3                 sta     0, X
seg000:81F5                 lda     1, X
seg000:81F7                 eor     #$FF
seg000:81F9                 adc     #0
seg000:81FB                 sta     1, X
seg000:81FD
seg000:81FD locret_81FD:                            ; CODE XREF: sub_81D8+12↑j
seg000:81FD                 rts
seg000:81FD ; End of function sub_81D8
seg000:81FD
seg000:81FE
seg000:81FE ; =============== S U B R O U T I N E =======================================
seg000:81FE
seg000:81FE
seg000:81FE sub_81FE:                               ; CODE XREF: seg000:8C2B↓p
seg000:81FE                                         ; sub_9D0C+1↓j
seg000:81FE                 lda     3, X
M7700
Assembler Code
seg000:00008051                 lda     A, word_815B
seg000:00008054                 pha
seg000:00008055                 pea     #0
seg000:00008058                 pea     #80h ; '€'
seg000:0000805B                 pea     #0
seg000:0000805E                 pea     #817Ch
seg000:00008061                 jsrl    sub_1800D
seg000:00008065                 lda     A, #6B7h
seg000:00008068                 tas
seg000:00008069                 lda     A, word_8151
seg000:0000806C                 pha
seg000:0000806D                 lda     A, word_814F
seg000:00008070                 pha
seg000:00008071                 pea     #1
seg000:00008074                 pea     #2010h
seg000:00008077                 jsrl    sub_1803F
seg000:0000807B                 lda     A, word_8155
seg000:0000807E                 pha
seg000:0000807F                 lda     A, word_8153
seg000:00008082                 pha
seg000:00008083                 pea     #1
seg000:00008086                 pea     #2014h
seg000:00008089                 jsrl    sub_1803F
seg000:0000808D                 lda     A, word_8165
seg000:00008090                 pha
seg000:00008091                 lda     A, word_8163
seg000:00008094                 pha
seg000:00008095                 pea     #1
seg000:00008098                 pea     #2000h
seg000:0000809B                 pea     #1
seg000:0000809E                 pea     #0AED5h
seg000:000080A1                 jsrl    sub_1800D
seg000:000080A5                 lda     A, word_8161
seg000:000080A8                 pha
seg000:000080A9                 lda     A, word_815F
M7900
Assembler code
ROM_:8000 ; ===========================================================================
ROM_:8000
ROM_:8000 ; Segment type: Pure data
ROM_:8000                 SEGMENT ROM_
ROM_:8000                 .org 8000h
ROM_:8000
ROM_:8000 ; =============== S U B R O U T I N E =======================================
ROM_:8000
ROM_:8000
ROM_:8000                 ; public __RESET
ROM_:8000 __RESET:                                ; DATA XREF: USER_VEC:FFFE↓o
ROM_:8000                 ldt     #2
ROM_:8003                 ldd     0,#0
ROM_:8007                 ldd     1,#1000h
ROM_:800B                 ldd     2,#2000h
ROM_:800F                 ldd     3,#3000h
ROM_:8013                 sem
ROM_:8014                 abs.b   A
ROM_:8015                 abs.b   B
ROM_:8017                 clm
ROM_:8018                 abs     A
ROM_:8019                 abs     B
ROM_:801B                 absd.d  E
ROM_:801D                 sem
ROM_:801E                 adc.b   A,#12h
ROM_:8021                 clm
ROM_:8022                 adc     A,#1234h
ROM_:8026                 adc     A,DP3:word_300F
ROM_:8029                 adc     A,DP3:word_300F,X
ROM_:802C                 adc     A,(DP3:word_3006)
ROM_:802F                 adc     A,(DP3:word_3006,X)
ROM_:8032                 adc     A,(DP3:word_3006),Y
ROM_:8035                 adc     A,L(DP3:tbyte_3009)
ROM_:8038                 adc     A,L(DP3:tbyte_3009),Y
ROM_:803B                 adc     A,12h,S
MIPS Processor : Nintendo N64
Assembler code
CODE:80148710                 lrv     $v13[0], 2($t5)
CODE:80148714
CODE:80148714 loc_80148714:                            # CODE XREF: CODE:80148840↓j
CODE:80148714                 addi    $s4, 9
CODE:80148718                 vmudn   $v30, $v3, $v23[0]
CODE:8014871C                 addi    $s5, 9
CODE:80148720                 vmadn   $v30, $v4, $v23[0]
CODE:80148724                 ldv     $v1[0], 0($s4)
CODE:80148728                 vmudn   $v29, $v5, $v23[0]
CODE:8014872C                 lbu     $at, 0($s5)
CODE:80148730                 vmadn   $v29, $v6, $v23[0]
CODE:80148734                 blez    $t6, loc_80148744
CODE:80148738                 andi    $a7, $at, 0xF
CODE:8014873C                 vmudm   $v30, $v22[8]
CODE:80148740                 vmudm   $v29, $v22[8]
CODE:80148744
CODE:80148744 loc_80148744:                            # CODE XREF: CODE:80148734↑j
CODE:80148744                 sll     $a7, 5
CODE:80148748                 vand    $v3, $v25, $v1[8]
CODE:8014874C                 add     $t5, $a7, $t7
CODE:80148750                 vand    $v4, $v24, $v1[9]
CODE:80148754                 vand    $v5, $v25, $v1[10]
CODE:80148758                 vand    $v6, $v24, $v1[11]
CODE:8014875C                 srl     $t6, $at, 4
CODE:80148760                 vmudh   $v2, $v21, $v27[14]
CODE:80148764                 li      $v0, 0xC
CODE:80148768                 vmadh   $v2, $v20, $v27[15]
CODE:8014876C                 sub     $t6, $v0, $t6
CODE:80148770                 vmadh   $v2, $v19, $v30[8]
CODE:80148774                 addi    $v0, $t6, -1
CODE:80148778                 vmadh   $v2, $v18, $v30[9]
CODE:8014877C                 li      $v1, 1
CODE:80148780                 vmadh   $v2, $v17, $v30[10]
CODE:80148784                 sll     $v1, 15
CODE:80148788                 vmadh   $v2, $v16, $v30[11]
MIPS R5900 Processor : Sony bin
Assembler code
.text:001A5498
.text:001A5498  # =============== S U B R O U T I N E =======================================
.text:001A5498
.text:001A5498
.text:001A5498                 .globl SysTimerGet
.text:001A5498 SysTimerGet:
.text:001A5498
.text:001A5498 var_s0          =  0
.text:001A5498
.text:001A5498                 addiu   $sp, -0x10
.text:001A549C                 lui     $a0, 0x41  # 'A'
.text:001A54A0                 sd      $ra, var_s0($sp)
.text:001A54A4                 li      $a0, sysTimerVarG
.text:001A54A8                 lui     $a1, 0x1000
.text:001A54AC                 lw      $v0, (dword_416244 - 0x416238)($a0)
.text:001A54B0                 lw      $v1, 0x10000000
.text:001A54B4                 lwu     $a2, (dword_416240 - 0x416238)($a0)
.text:001A54B8                 sll     $v0, 21
.text:001A54BC                 dsll32  $v0, 0
.text:001A54C0                 li      $a1, 0x3D86
.text:001A54C4                 daddu   $v1, $a2
.text:001A54C8                 dsrl32  $v0, 0
.text:001A54CC                 daddu   $v1, $v0
.text:001A54D0                 dsll    $a0, $v1, 5
.text:001A54D4                 dsubu   $a0, $v1
.text:001A54D8                 dsll    $a0, 2
.text:001A54DC                 daddu   $a0, $v1
.text:001A54E0                 jal     __divdi3
.text:001A54E4                 dsll    $a0, 3
.text:001A54E8                 ld      $ra, var_s0($sp)
.text:001A54EC                 dsll32  $v0, 0
.text:001A54F0                 dsra32  $v0, 0
.text:001A54F4                 jr      $ra
.text:001A54F8                 addiu   $sp, 0x10
.text:001A54F8  # End of function SysTimerGet
.text:001A54F8
.text:001A54F8  # ---------------------------------------------------------------------------
MIPS Processor : Sony ELF
Assembler code
.text:0000073C
.text:0000073C  # =============== S U B R O U T I N E =======================================
.text:0000073C
.text:0000073C
.text:0000073C sub_73C:                                 # CODE XREF: sub_0+154↑p
.text:0000073C                                          # DATA XREF: .rodata.sceResident:00003910↓o
.text:0000073C
.text:0000073C var_s0          =  0
.text:0000073C var_s4          =  4
.text:0000073C var_s8          =  8
.text:0000073C var_sC          =  0xC
.text:0000073C
.text:0000073C                 addiu   $sp, -0x10
.text:00000740                 sw      $s0, var_s0($sp)
.text:00000744                 lui     $v0, 0x8002
.text:00000748                 move    $s0, $a0
.text:0000074C                 sltiu   $a0, 0x43  # 'C'
.text:00000750                 sw      $s1, var_s4($sp)
.text:00000754                 ori     $v1, $v0, 0x65  # 'e'
.text:00000758                 move    $s1, $zero
.text:0000075C                 sw      $ra, var_sC($sp)
.text:00000760                 beqz    $a0, loc_7A8
.text:00000764                 sw      $s2, var_s8($sp)
.text:00000768                 jal     sub_3180
.text:0000076C                 nop
.text:00000770                 sll     $a5, $s0, 3
.text:00000774                 subu    $a4, $a5, $s0
.text:00000778                 lui     $a3, %hi(unk_3C14)
.text:0000077C                 sll     $a1, $a4, 3
.text:00000780                 addiu   $a2, $a3, %lo(unk_3C14)
.text:00000784                 addu    $a0, $a1, $a2
.text:00000788                 lw      $v1, 0($a0)
.text:0000078C                 bnez    $v1, loc_7C4
.text:00000790                 move    $s2, $v0
.text:00000794                 lui     $a6, 0x8002
MIPS Processor : Sony PSX
Assembler code
.text:00003E68
.text:00003E68  # =============== S U B R O U T I N E =======================================
.text:00003E68
.text:00003E68
.text:00003E68 sub_3E68:                                # CODE XREF: McGuiSave+64↓p
.text:00003E68                                          # McGuiLoad+64↓p
.text:00003E68
.text:00003E68 var_s0          =  0
.text:00003E68 var_s4          =  4
.text:00003E68 var_s8          =  8
.text:00003E68 var_sC          =  0xC
.text:00003E68 var_s10         =  0x10
.text:00003E68
.text:00003E68                 addiu   $sp, -0x28
.text:00003E6C                 lw      $a0, side
.text:00003E74                 li      $a1, 0x10
.text:00003E78                 sw      $s1, 0x10+var_s4($sp)
.text:00003E7C                 li      $s1, ot
.text:00003E84                 sw      $ra, 0x10+var_s10($sp)
.text:00003E88                 sw      $s3, 0x10+var_sC($sp)
.text:00003E8C                 sw      $s2, 0x10+var_s8($sp)
.text:00003E90                 sw      $s0, 0x10+var_s0($sp)
.text:00003E94                 sll     $a0, 6
.text:00003E98                 jal     ClearOTag
.text:00003E9C                 addu    $a0, $s1
.text:00003EA0                 li      $v1, (sDraw+0x17A)
.text:00003EA8                 lh      $v0, (aSsvabtransferF+6 - 0x282)($v1)  # "ransfer failed (%d)\n"
.text:00003EAC                 nop
.text:00003EB0                 blez    $v0, loc_3F7C
.text:00003EB4                 nop
.text:00003EB8                 move    $s0, $v1
.text:00003EBC                 li      $s3, disp
.text:00003EC4                 li      $s2, draw
.text:00003ECC
.text:00003ECC loc_3ECC:                                # CODE XREF: sub_3E68+10C↓j
.text:00003ECC                 lhu     $v0, 0($s0)
MIPS Processor : Unix COFF File Format
Assembler code
.text:00400838
.text:00400838 # =============== S U B R O U T I N E =======================================
.text:00400838
.text:00400838
.text:00400838 sub_400838: # CODE XREF: sub_400700+3C↑p
.text:00400838 # sub_400778+44↑p ...
.text:00400838
.text:00400838 var_s0 = 0
.text:00400838 var_s4 = 4
.text:00400838
.text:00400838 addiu $sp, -0x20
.text:0040083C sw $s0, 0x18+var_s0($sp)
.text:00400840 move $s0, $a0
.text:00400844 bnez $s0, loc_400894
.text:00400848 sw $ra, 0x18+var_s4($sp)
.text:0040084C la $t6, unk_10000A94
.text:00400850 li $t7, unk_10000455
.text:00400858 lui $s0, 0x1000
.text:0040085C sltu $at, $t6, $t7
.text:00400860 bnez $at, loc_40088C
.text:00400864 li $s0, unk_10000454
.text:00400868
.text:00400868 loc_400868: # CODE XREF: sub_400838+4C↓j
.text:00400868 beqz $s0, loc_400878
.text:0040086C nop
.text:00400870 jal sub_400838
.text:00400874 move $a0, $s0
.text:00400878
.text:00400878 loc_400878: # CODE XREF: sub_400838:loc_400868↑j
.text:00400878 la $t8, unk_10000A94
.text:0040087C addiu $s0, 0x10
.text:00400880 sltu $at, $s0, $t8
.text:00400884 bnez $at, loc_400868
.text:00400888 nop
.text:0040088C
.text:0040088C loc_40088C: # CODE XREF: sub_400838+28↑j
.text:0040088C b loc_400970
MIPS Processor : Unix ELF File Format
Assembler code
.text:5FFE29A8 li $s1, 1
.text:5FFE29AC
.text:5FFE29AC $L137: # CODE XREF: read_logfile(char const *)+138↑j
.text:5FFE29AC # read_logfile(char const *)+158↑j
.text:5FFE29AC beqz $s1, $L134
.text:5FFE29B0 nop
.text:5FFE29B4
.text:5FFE29B4 $Lb69: # Alternative name is 'LM268'
.text:5FFE29B4 addiu $v0, $fp, 0x750+var_428
.text:5FFE29B8 move $a0, $v0 # char *
.text:5FFE29BC jal get_time__FPCc # get_time(char const *)
.text:5FFE29C0 nop
.text:5FFE29C4 sw $v0, 0x750+var_110($fp)
.text:5FFE29C8 lw $v0, 0x750+var_110($fp)
.text:5FFE29CC nop
.text:5FFE29D0 bnez $v0, $L138
.text:5FFE29D4 nop
.text:5FFE29D8
.text:5FFE29D8 LM269:
.text:5FFE29D8 li $v0, $LC37 # "Illegal time"
.text:5FFE29E0 sw $v0, 0x750+var_11C($fp)
.text:5FFE29E4
.text:5FFE29E4 LM270:
.text:5FFE29E4 j $L139
.text:5FFE29E8 nop
.text:5FFE29EC # ---------------------------------------------------------------------------
.text:5FFE29EC
.text:5FFE29EC $L138: # CODE XREF: read_logfile(char const *)+188↑j
.text:5FFE29EC lw $v0, from_time # Alternative name is 'LM271'
.text:5FFE29F0 lw $v1, 0x750+var_110($fp)
.text:5FFE29F4 nop
.text:5FFE29F8 sltu $v0, $v1
.text:5FFE29FC bnez $v0, $L140
.text:5FFE2A00 nop
.text:5FFE2A04 j LM259
MIPS Processor: Windows CE PE File Format
Assembler code
.text:10001140 lw $a0, 0x58+var_18($sp)
.text:10001144 lw $a1, 0x58+var_14($sp)
.text:10001148 jal memcpy
.text:1000114C li $a2, 0x400
.text:10001150 lw $t7, ReleaseMutex
.text:10001158 lw $a0, 0x58+var_1C($sp)
.text:1000115C jalr $t7
.text:10001160 nop
.text:10001164 lw $t8, CloseHandle
.text:1000116C lw $a0, 0x58+var_1C($sp)
.text:10001170 jalr $t8
.text:10001174 nop
.text:10001178 jal LoadLibraryW
.text:1000117C lw $a0, 0x58+var_18($sp)
.text:10001180 beqz $v0, loc_100011D0
.text:10001184 move $a0, $v0
.text:10001188 lw $t9, GetProcAddressW
.text:10001190 li $a1, aCreatetranspor # "CreateTransport"
.text:10001198 jalr $t9
.text:1000119C nop
.text:100011A0 jalr $v0
.text:100011A4 nop
.text:100011A8 sw $v0, dword_100030C4
.text:100011B0 lw $t1, 0($v0)
.text:100011B4 lw $t0, 0x58+var_18($sp)
.text:100011B8 move $a0, $v0
.text:100011BC lw $t2, 4($t1)
.text:100011C0 addiu $a1, $t0, 0x20C
.text:100011C4 lw $a2, 0x208($t0)
.text:100011C8 jalr $t2
.text:100011CC nop
.text:100011D0
.text:100011D0 loc_100011D0: # CODE XREF: CreateStream+180↑j
.text:100011D0 jal UnmapViewOfFile
.text:100011D4 lw $a0, 0x58+var_18($sp)
MIPS Processor: Windows CE PE2 File Format
Assembler code
.text:10001088
.text:10001088 loc_10001088: # DATA XREF: .pdata:10004028↓o
.text:10001088 lw $t6, 8($s0)
.text:1000108C beqzl $t6, loc_100010F4
.text:10001090 li $v0, 1
.text:10001094 sw $zero, 8($s0)
.text:10001098 jal closesocket
.text:1000109C lw $a0, 4($s0)
.text:100010A0 lw $a0, 0x14($s0)
.text:100010A4 li $t7, 0xFFFFFFFF
.text:100010A8 sw $t7, 4($s0)
.text:100010AC beqz $a0, loc_100010CC
.text:100010B0 sw $zero, 8($s0)
.text:100010B4 lw $t8, 0x10($s0)
.text:100010B8 move $a1, $zero
.text:100010BC beql $t8, $a0, loc_100010D0
.text:100010C0 lw $a0, 0x10($s0)
.text:100010C4 jal VirtualFree
.text:100010C8 li $a2, 0xC000
.text:100010CC
.text:100010CC loc_100010CC: # CODE XREF: sub_10001078+34↑j
.text:100010CC lw $a0, 0x10($s0)
.text:100010D0
.text:100010D0 loc_100010D0: # CODE XREF: sub_10001078+44↑j
.text:100010D0 move $a1, $zero
.text:100010D4 jal VirtualFree
.text:100010D8 li $a2, 0xC000
.text:100010DC lw $v0, 0x1C($s0)
.text:100010E0 beqzl $v0, loc_100010F4
.text:100010E4 li $v0, 1
.text:100010E8 jal ??3@YAXPAX@Z # operator delete(void *)
.text:100010EC move $a0, $v0
.text:100010F0 li $v0, 1
.text:100010F4
.text:100010F4 loc_100010F4: # CODE XREF: sub_10001078+14↑j
.text:100010F4 # sub_10001078+68↑j
.text:100010F4 lw $s0, 0x18+var_s0($sp)
Panasonic MN102
Assembler code
IROM:00080008
IROM:00080008 ; =============== S U B R O U T I N E =======================================
IROM:00080008
IROM:00080008 ; IRQ Manager
IROM:00080008
IROM:00080008 ; public IRQMANAGER_
IROM:00080008 IRQMANAGER_:
IROM:00080008 ADD 0x000000E2, SP ; 'â'
IROM:0008000A MOVX D3, (0x00000008,SP)
IROM:0008000D MOV A0, (0x00000018,SP)
IROM:0008000F MOV MDR, D3
IROM:00080011 MOV D3, (0x0000001C,SP)
IROM:00080013 MOVX D0, (0x00000014,SP)
IROM:00080016 MOVX D1, (0x00000010,SP)
IROM:00080019 MOVX D2, (0x0000000C,SP)
IROM:0008001C MOV A1, (0x00000004,SP)
IROM:0008001E MOV A2, (0x00000000,SP)
IROM:00080020 MOV 0x00000001, D3
IROM:00080022 MOVB D3, (0x00000003,SP)
IROM:00080025 MOV SP, A2
IROM:00080027 MOV PSW, D3
IROM:00080029 MOV (IAGR), D0 ; Interrupt accept group number register
IROM:0008002C ADD off_80368, D0
IROM:00080031 MOV D0, A0
IROM:00080033 MOV (0x00000000,A0), A0
IROM:00080035 AND 0x0000EFFF, PSW
IROM:00080039 BTST 0x00002000, D3
IROM:0008003D BNE loc_80058
IROM:0008003F OR 0x00001000, PSW
IROM:00080043 MOV (tbyte_8000), A1
IROM:00080047 ADD 0x00000000, A1
IROM:00080049 BEQ loc_80054
IROM:0008004B MOV (tbyte_8000), A1
IROM:0008004F MOV SP, (0x00000008,A1)
IROM:00080051 MOV unk_8186, SP
Atmel OAK DSP
Assembler code
ROM:0020
ROM:0020 ; =============== S U B R O U T I N E =======================================
ROM:0020
ROM:0020 ; Attributes: bp-based frame
ROM:0020
ROM:0020 RESET_0: ; CODE XREF: RESET↑j
ROM:0020
ROM:0020 ; FUNCTION CHUNK AT ROM:00CB SIZE 00000001 BYTES
ROM:0020
ROM:0020 mov #$35F,sp
ROM:0022 mov #$D,st0
ROM:0024 mov #1,st1
ROM:0026 ; assume page = 1
ROM:0026 cntx s
ROM:0027 mov #1,st0
ROM:0029 mov #0,st1
ROM:002B ; assume page = 0
ROM:002B mov #$40,st2
ROM:002D cntx r
ROM:002E mov #$40,st2
ROM:0030 mov #0,cfgi
ROM:0032 mov #0,cfgj
ROM:0034 mov #$DD,a0
ROM:0036 brr loc_3E, eq
ROM:0037 mov #$C8DF,r0
ROM:0039 mov #$F955,r1
ROM:003B sub #1,a0
ROM:003C rep a0l
ROM:003D movp (r0)+1,(r1)+1
ROM:003E
ROM:003E loc_3E: ; CODE XREF: RESET_0+16↑j
ROM:003E call sub_91
ROM:0040 br loc_CB
ROM:0040 ; End of function RESET_0
ROM:0040
80×86 Architecture : DOS Extender
Assembler code
00003F20
00003F20 ; =============== S U B R O U T I N E =======================================
00003F20
00003F20
00003F20 public start
00003F20 start proc far
00003F20 call sub_1050
00003F25 or eax, eax
00003F27 jz loc_3F3E
00003F2D lea edx, large aDpmiServerInit ; "DPMI server initialization error -- out"...
00003F33 mov ah, 9
00003F35 int 21h ; DOS - PRINT STRING
00003F35 ; DS:DX -> string terminated by "$"
00003F37 xor eax, eax
00003F39 jmp locret_3F44
00003F3E ; ---------------------------------------------------------------------------
00003F3E
00003F3E loc_3F3E: ; CODE XREF: start+7↑j
00003F3E lea eax, large SetVectors
00003F44
00003F44 locret_3F44: ; CODE XREF: start+19↑j
00003F44 retf
00003F44 start endp
00003F44
00003F44 _text ends
00003F44
00003F44
00003F44 end start
80×86 Architecture : Watcom Runtime
Assembler code
0010600C jmp loc_105F29
00106011 ; ---------------------------------------------------------------------------
00106011
00106011 loc_106011: ; DATA XREF: .text:00105E2E↑o
00106011 mov edx, offset aNew ; "new"
00106016 jmp loc_105F29
0010601B ; ---------------------------------------------------------------------------
0010601B
0010601B loc_10601B: ; DATA XREF: .text:00105E66↑o
0010601B mov edx, offset aNew_0 ; "new []"
00106020 jmp loc_105F29
00106025 ; ---------------------------------------------------------------------------
00106025
00106025 loc_106025: ; DATA XREF: .text:00105E32↑o
00106025 mov edx, offset aDelete ; "delete"
0010602A jmp loc_105F29
0010602F ; ---------------------------------------------------------------------------
0010602F
0010602F loc_10602F: ; DATA XREF: .text:00105E62↑o
0010602F mov edx, offset aDelete_0 ; "delete []"
00106034 jmp loc_105F29
00106039 ; ---------------------------------------------------------------------------
00106039
00106039 loc_106039: ; DATA XREF: .text:00105E36↑o
00106039 movzx edx, byte_10D7FC
00106040 jmp loc_105EC9
00106045 ; ---------------------------------------------------------------------------
00106045
00106045 loc_106045: ; DATA XREF: .text:00105E56↑o
00106045 test byte ptr [ecx+34h], 8
00106049 jz short loc_106052
0010604B mov eax, ecx
0010604D call sub_105D68
00106052
00106052 loc_106052: ; CODE XREF: .text:00106049↑j
00106052 mov edx, offset asc_10D83F ; "::"
80×86 Architecture: Geos APP
Assembler code
seg003:0244 jmp ObjMessage ; Jump
seg003:0249 ; ---------------------------------------------------------------------------
seg003:0249
seg003:0249 loc_49_249: ; DATA XREF: seg001:0084↑o
seg003:0249 push ax
seg003:024A push cx
seg003:024B push dx
seg003:024C push bp
seg003:024D call ContactSIMNumber ; Call Procedure
seg003:0252 mov ax, 6181h
seg003:0255 cmp cx, dx ; Compare Two Operands
seg003:0257 jz short loc_49_25C ; Jump if Zero (ZF=1)
seg003:0259 mov ax, 6180h
seg003:025C
seg003:025C loc_49_25C: ; CODE XREF: seg003:0257↑j
seg003:025C push dx
seg003:025D mov bx, seg seg007
seg003:0260 mov si, 24h ; '$'
seg003:0263 mov di, 8000h
seg003:0266 mov dl, 2
seg003:0268 call ObjMessage ; Call Procedure
seg003:026D pop dx
seg003:026E mov ax, 6181h
seg003:0271 or dx, dx ; Logical Inclusive OR
seg003:0273 jz short loc_49_278 ; Jump if Zero (ZF=1)
seg003:0275 mov ax, 6180h
seg003:0278
seg003:0278 loc_49_278: ; CODE XREF: seg003:0273↑j
seg003:0278 push ax
seg003:0279 mov bx, seg seg007
seg003:027C mov si, 48h ; 'H'
seg003:027F mov di, 8000h
seg003:0282 mov dl, 2
seg003:0284 call ObjMessage ; Call Procedure
seg003:0289 pop ax
80×86 Architecture: Geos DRV
Assembler code
seg003:0A36 push si
seg003:0A37 push di
seg003:0A38 mov [bp+var_C], 0
seg003:0A3D mov [bp+fDocDir], 0
seg003:0A42 call FILEPUSHDIR ; void pascal FilePushDir(void) in file.h
seg003:0A47 test byte_9E, 1
seg003:0A4C jz short loc_410D
seg003:0A4E mov [bp+fDocDir], 8
seg003:0A53 push [bp+fDocDir] ; fDocDir
seg003:0A56 call FOAMSETDOCUMENTDIR ; void pascal FoamSetDocumentDir(FDocumentDir fDocDir) in foam.goh
seg003:0A5B jmp short loc_411A
seg003:0A5D ; ---------------------------------------------------------------------------
seg003:0A5D
seg003:0A5D loc_410D: ; CODE XREF: sub_40E0+1C↑j
seg003:0A5D mov [bp+var_C], 31h ; '1'
seg003:0A62 push [bp+var_C] ; sp
seg003:0A65 call FILESETSTANDARDPATH ; void pascal FileSetStandardPath(StandardPath sp) in file.h
seg003:0A6A
seg003:0A6A loc_411A: ; CODE XREF: sub_40E0+2B↑j
seg003:0A6A push 0
seg003:0A6C push 0C800h
seg003:0A6F call sub_5B83
seg003:0A74 mov [bp+var_16], ax
seg003:0A77 cmp [bp+var_16], 0
seg003:0A7B jz short loc_419E
seg003:0A7D test byte_9E, 1
seg003:0A82 jz short loc_4148
seg003:0A84 push word ptr [bp+name+2]
seg003:0A87 push word ptr [bp+name] ; name
seg003:0A8A call FILEDELETE ; word pascal FileDelete(const char *name) in file.h
seg003:0A8F les bx, [bp+name]
seg003:0A92 mov byte ptr es:[bx], 0
seg003:0A96 jmp short loc_4188
seg003:0A98 ; ---------------------------------------------------------------------------
seg003:0A98
seg003:0A98 loc_4148: ; CODE XREF: sub_40E0+52↑j
seg003:0A98 xor si, si
80×86 Architecture: Geos LIB
Assembler code
seg001:02BA call near ptr VisCheckIfVisGrown
seg001:02BD jnb short loc_C3B
seg001:02BF push di
seg001:02C0 push es
seg001:02C1 mov di, seg seg087
seg001:02C4 mov es, di
seg001:02C6 assume es:seg087
seg001:02C6 mov di, 1548h
seg001:02C9 call ObjIsObjectInClass
seg001:02CE pop es
seg001:02CF assume es:nothing
seg001:02CF pop di
seg001:02D0 jb short loc_C1A
seg001:02D2 call FatalError
seg001:02D7 mov ax, 31h ; '1'
seg001:02DA
seg001:02DA loc_C1A: ; CODE XREF: GenClass_24967+2F↑j
seg001:02DA mov di, [si]
seg001:02DC add di, [di+4]
seg001:02DF test byte ptr [di+9], 1
seg001:02E3 jz short loc_C3B
seg001:02E5 push cx
seg001:02E6 mov cx, 0FFFFh
seg001:02E9 push cs
seg001:02EA call near ptr GenClass_24967
seg001:02ED pop cx
seg001:02EE jb short loc_C38
seg001:02F0 call FatalError
seg001:02F5 mov ax, 31h ; '1'
seg001:02F8
seg001:02F8 loc_C38: ; CODE XREF: GenClass_24967+4D↑j
seg001:02F8 stc
seg001:02F9 jnz short loc_C60
seg001:02FB
seg001:02FB loc_C3B: ; CODE XREF: GenClass_24967+16↑j
seg001:02FB ; GenClass_24967+1C↑j ...
seg001:02FB mov ax, si
80×86 Architecture: GNU COFF Format
Assembler code
.text:00000178
.text:00000178 loc_178: ; CODE XREF: XDPSCreateStandardColormaps+53↑j
.text:00000178 test esi, esi
.text:0000017A jnz short loc_19C
.text:0000017C lea eax, [ebp+var_84]
.text:00000182 push eax
.text:00000183 push [ebp+arg_4]
.text:00000186 push [ebp+arg_0]
.text:00000189 call XGetWindowAttributes
.text:0000018E add esp, 0Ch
.text:00000191 test eax, eax
.text:00000193 jz loc_21C
.text:00000199 mov esi, [ebp+var_6C]
.text:0000019C
.text:0000019C loc_19C: ; CODE XREF: XDPSCreateStandardColormaps+57↑j
.text:0000019C ; XDPSCreateStandardColormaps+62↑j
.text:0000019C cmp dword ptr [edi], 0
.text:0000019F jnz short loc_1A7
.text:000001A1 cmp [ebp+arg_4], 0
.text:000001A5 jz short loc_21C
.text:000001A7
.text:000001A7 loc_1A7: ; CODE XREF: XDPSCreateStandardColormaps+87↑j
.text:000001A7 push [ebp+arg_0]
.text:000001AA call FindDpyRec
.text:000001AF mov large ds:75E4h, eax
.text:000001B4 add esp, 4
.text:000001B7 test eax, eax
.text:000001B9 jz loc_570
.text:000001BF push esi
.text:000001C0 call XVisualIDFromVisual
.text:000001C5 mov [ebp+var_24], eax
.text:000001C8 lea eax, [ebp+var_88]
.text:000001CE push eax
.text:000001CF lea eax, [ebp+var_28]
.text:000001D2 push eax
80×86 Architecture: OS/2 Linear Executable Format
Assembler code
cseg01:000102E1 lea eax, [ebp+var_44]
cseg01:000102E4 push 5
cseg01:000102E6 push eax
cseg01:000102E7 push esi
cseg01:000102E8 call WinFillRect
cseg01:000102ED add esp, 0Ch
cseg01:000102F0 mov [ebp+var_38], 0FAh ; 'ú'
cseg01:000102F7 mov [ebp+var_40], 0E9h ; 'é'
cseg01:000102FE lea eax, [ebp+var_84]
cseg01:00010304 push eax
cseg01:00010305 push 40h ; '@'
cseg01:00010307 push 2Bh ; '+'
cseg01:00010309 push 0
cseg01:0001030B push dword_20874
cseg01:00010311 call WinLoadString
cseg01:00010316 add esp, 14h
cseg01:00010319 lea eax, [ebp+var_84]
cseg01:0001031F lea edx, [ebp+var_44]
cseg01:00010322 push 100h
cseg01:00010327 push 0
cseg01:00010329 push 0FFFFFFFFh
cseg01:0001032B push edx
cseg01:0001032C push eax
cseg01:0001032D push 0FFFFFFFFh
cseg01:0001032F push esi
cseg01:00010330 call WinDrawText
cseg01:00010335 add esp, 1Ch
cseg01:00010338 push esi
cseg01:00010339 call WinEndPaint
cseg01:0001033E add esp, 4
cseg01:00010341 mov eax, 1
cseg01:00010346 pop esi
cseg01:00010347 pop edi
cseg01:00010348 pop ebx
cseg01:00010349 leave
80×86 Architecture: Netware NLM
Assembler code
.bss:000000CA
.bss:000000CA loc_CA: ; CODE XREF: nlm_start+33↑j
.bss:000000CA ; nlm_start+A1↑j ...
.bss:000000CA mov dword_E150, edi
.bss:000000D0 push 54524C41h
.bss:000000D5 push offset aAllocMemory ; "Alloc Memory"
.bss:000000DA push edi
.bss:000000DB call AllocateResourceTag
.bss:000000E0 mov dword_E018, eax
.bss:000000E5 push 544D4E43h
.bss:000000EA push offset aNonMovableMemo ; "Non Movable Memory"
.bss:000000EF push edi
.bss:000000F0 call AllocateResourceTag
.bss:000000F5 mov dword_E020, eax
.bss:000000FA push 53435250h
.bss:000000FF push offset aProcesses ; "Processes"
.bss:00000104 push edi
.bss:00000105 call AllocateResourceTag
.bss:0000010A mov dword_E15C, eax
.bss:0000010F push 4C4B5344h
.bss:00000114 push offset aDiskLocks ; "Disk Locks"
.bss:00000119 push edi
.bss:0000011A call AllocateResourceTag
.bss:0000011F mov dword_E01C, eax
.bss:00000124 push 4E524353h
.bss:00000129 push offset aScreens ; "Screens"
.bss:0000012E push edi
.bss:0000012F call AllocateResourceTag
.bss:00000134 add esp, 3Ch
.bss:00000137 mov dword_E158, eax
.bss:0000013C push 504D4553h
.bss:00000141 push offset aSemaphores ; "Semaphores"
.bss:00000146 push edi
.bss:00000147 call AllocateResourceTag
.bss:0000014C mov dword_E160, eax
80×86 Architecture: QNX Executable
Assembler code
cseg_01:0000A3A1 mov [ebp-8], edx
cseg_01:0000A3A4 mov edx, 0Eh
cseg_01:0000A3A9 call __setmagicvar_
cseg_01:0000A3AE mov eax, cs
cseg_01:0000A3B0 mov edx, 0Dh
cseg_01:0000A3B5 mov [ebp-8], ax
cseg_01:0000A3B9 lea eax, [ebp-8]
cseg_01:0000A3BC mov ebx, 0A34Ah
cseg_01:0000A3C1 call __setmagicvar_
cseg_01:0000A3C6 mov eax, 1
cseg_01:0000A3CB mov off_C304, ebx
cseg_01:0000A3D1 call __InitRtns
cseg_01:0000A3D6 mov eax, dword_C314
cseg_01:0000A3DB add eax, 3
cseg_01:0000A3DE and al, 0FCh
cseg_01:0000A3E0 xor edx, edx
cseg_01:0000A3E2 sub esp, eax
cseg_01:0000A3E4 mov ecx, esp
cseg_01:0000A3E6 mov ebx, dword_C314
cseg_01:0000A3EC mov eax, ecx
cseg_01:0000A3EE call memset_
cseg_01:0000A3F3 mov eax, ecx
cseg_01:0000A3F5 mov edx, [ebp-4]
cseg_01:0000A3F8 call __QNXInit_
cseg_01:0000A3FD mov ebx, esi
cseg_01:0000A3FF mov eax, 0FFh
cseg_01:0000A404 mov ecx, 2000h
cseg_01:0000A409 call __InitRtns
cseg_01:0000A40E mov dword_C318, ecx
cseg_01:0000A414 mov eax, edi
cseg_01:0000A416 push ds
cseg_01:0000A417 pop es
cseg_01:0000A418 assume es:dseg_01
cseg_01:0000A418 call sub_A010
cseg_01:0000A41D call exit_
80×86 Architecture: Watcom Runtime
Assembler code
cseg01:1044
cseg01:1044 ; =============== S U B R O U T I N E =======================================
cseg01:1044
cseg01:1044 ; Attributes: library function
cseg01:1044
cseg01:1044 __MemFree proc far ; CODE XREF: _ffree_+1A↓p
cseg01:1044 ; _nfree_+31↓p ...
cseg01:1044
cseg01:1044 ; FUNCTION CHUNK AT cseg01:1041 SIZE 00000003 BYTES
cseg01:1044
cseg01:1044 push si
cseg01:1045 push di
cseg01:1046 push cx
cseg01:1047 push ds
cseg01:1048 mov ds, dx
cseg01:104A or ax, ax
cseg01:104C jz short loc_1041
cseg01:104E mov si, ax
cseg01:1050 sub si, 2
cseg01:1053 mov ax, [si]
cseg01:1055 test al, 1
cseg01:1057 jz short loc_1041
cseg01:1059 and al, 0FEh
cseg01:105B mov di, si
cseg01:105D add di, ax
cseg01:105F test word ptr [di], 1
cseg01:1063 jnz short loc_1084
cseg01:1065 cmp di, [bx+6]
cseg01:1068 jnz short loc_106D
cseg01:106A mov [bx+6], si
cseg01:106D
cseg01:106D loc_106D: ; CODE XREF: __MemFree+24↑j
cseg01:106D add ax, [di]
cseg01:106F mov [si], ax
cseg01:1071 push bx
80×86 Architecture: Windows OMF
Assembler code
VIRDEF01:00000020 ; VIRDEF, segment _TEXT
VIRDEF01:00000020 ; NOTE: VIRDEF records cannot be represented in assembly!
VIRDEF01:00000020 ; ===========================================================================
VIRDEF01:00000020
VIRDEF01:00000020 ; Segment type: Pure code
VIRDEF01:00000020 VIRDEF01 segment dword public 'CODE' use32
VIRDEF01:00000020 assume cs:VIRDEF01
VIRDEF01:00000020 ;org 20h
VIRDEF01:00000020 assume es:nothing, ss:nothing, ds:DGROUP, fs:nothing, gs:nothing
VIRDEF01:00000020
VIRDEF01:00000020 ; =============== S U B R O U T I N E =======================================
VIRDEF01:00000020
VIRDEF01:00000020 ; Attributes: bp-based frame
VIRDEF01:00000020
VIRDEF01:00000020 public lread
VIRDEF01:00000020 lread proc near
VIRDEF01:00000020
VIRDEF01:00000020 arg_0 = dword ptr 8
VIRDEF01:00000020 arg_4 = dword ptr 0Ch
VIRDEF01:00000020 arg_8 = dword ptr 10h
VIRDEF01:00000020
VIRDEF01:00000020 push ebp
VIRDEF01:00000021 mov ebp, esp
VIRDEF01:00000023 push ebx
VIRDEF01:00000024 mov ebx, [ebp+arg_8]
VIRDEF01:00000027 push ebx
VIRDEF01:00000028 push [ebp+arg_4]
VIRDEF01:0000002B push [ebp+arg_0]
VIRDEF01:0000002E call qlread
VIRDEF01:00000033 cmp ebx, eax
VIRDEF01:00000035 jz short loc_10072
VIRDEF01:00000037 push offset aReadError ; "read error\n"
VIRDEF01:0000003C call @error$qpxce ; error(char *,...)
VIRDEF01:00000041 pop ecx
VIRDEF01:00000042
VIRDEF01:00000042 loc_10072: ; CODE XREF: lread+15↑j
VIRDEF01:00000042 pop ebx
80×86 Architecture: Windows Portable Executable Format
Assembler code
.text:00401236
.text:00401236 ; =============== S U B R O U T I N E =======================================
.text:00401236
.text:00401236 ; Attributes: bp-based frame
.text:00401236
.text:00401236 ; void __cdecl sub_401236()
.text:00401236 sub_401236 proc near ; DATA XREF: start+DB↑o
.text:00401236
.text:00401236 var_1C = dword ptr -1Ch
.text:00401236 ms_exc = CPPEH_RECORD ptr -18h
.text:00401236
.text:00401236 ; __unwind { // __SEH_prolog
.text:00401236 push 0Ch
.text:00401238 push offset stru_402078
.text:0040123D call __SEH_prolog
.text:00401242 mov [ebp+var_1C], offset unk_4020E0
.text:00401249
.text:00401249 loc_401249: ; CODE XREF: sub_401236+3C↓j
.text:00401249 cmp [ebp+var_1C], offset unk_4020E0
.text:00401250 jnb short loc_401274
.text:00401252 ; __try { // __except at loc_401267
.text:00401252 and [ebp+ms_exc.registration.TryLevel], 0
.text:00401256 mov eax, [ebp+var_1C]
.text:00401259 mov eax, [eax]
.text:0040125B test eax, eax
.text:0040125D jz short loc_40126A
.text:0040125F call eax
.text:00401261 jmp short loc_40126A
.text:00401263 ; ---------------------------------------------------------------------------
.text:00401263
.text:00401263 loc_401263: ; DATA XREF: .rdata:stru_402078↓o
.text:00401263 ; __except filter // owned by 401252
.text:00401263 xor eax, eax
.text:00401265 inc eax
.text:00401266 retn
80×86 Architecture: Windows Virtual Device Driver
Assembler code
ICOD:C001A45F
ICOD:C001A45F loc_C001A45F: ; CODE XREF: Locate_Byte_In_ROM+D↑j
ICOD:C001A45F xor esi, esi
ICOD:C001A461 mov edi, offset aSystemrombreak ; "SystemRomBreakPoint"
ICOD:C001A466 VMMCall Get_Profile_Boolean
ICOD:C001A46C test eax, eax
ICOD:C001A46E jz short loc_C001A495
ICOD:C001A470 mov al, 73h ; 's'
ICOD:C001A472 VMMCall Get_Debug_Options
ICOD:C001A478 jz short loc_C001A495
ICOD:C001A47A mov edi, 0FFFEFh
ICOD:C001A47F mov ecx, 3FF0h
ICOD:C001A484 mov eax, [esp+20h+var_4]
ICOD:C001A488 std
ICOD:C001A489 repne scasb
ICOD:C001A48B jnz short loc_C001A495
ICOD:C001A48D inc edi
ICOD:C001A48E mov [esp+20h+var_4], edi
ICOD:C001A492 clc
ICOD:C001A493 jmp short loc_C001A496
ICOD:C001A495 ; ---------------------------------------------------------------------------
ICOD:C001A495
ICOD:C001A495 loc_C001A495: ; CODE XREF: Locate_Byte_In_ROM+23↑j
ICOD:C001A495 ; Locate_Byte_In_ROM+2D↑j ...
ICOD:C001A495 stc
ICOD:C001A496
ICOD:C001A496 loc_C001A496: ; CODE XREF: Locate_Byte_In_ROM+48↑j
ICOD:C001A496 cld
ICOD:C001A497 popa
ICOD:C001A498 retn
ICOD:C001A498 Locate_Byte_In_ROM endp
ICOD:C001A498
ICOD:C001A499 ; ---------------------------------------------------------------------------
ICOD:C001A499
ICOD:C001A499 loc_C001A499: ; CODE XREF: start+756↓p
ICOD:C001A499 push ebx
80×86 Architecture : Windows 16 bits DLL
Assembler code
cseg07:039A add sp, 8
cseg07:039D
cseg07:039D loc_80E_39D: ; CODE XREF: @BMPCAPWN@0WMCREATE$QM8TMESSAGE+8D↑j
cseg07:039D les bx, [bp+arg_2]
cseg07:03A0 les bx, es:[bx+5Ch]
cseg07:03A4 push word ptr es:[bx+0Ah] ; HWND
cseg07:03A8 push ss
cseg07:03A9 lea ax, [bp+LPCSTR]
cseg07:03AC push ax ; LPSTR
cseg07:03AD mov ax, 50h ; 'P'
cseg07:03B0 push ax ; int
cseg07:03B1 call GETWINDOWTEXT
cseg07:03B6 les bx, [bp+arg_2]
cseg07:03B9 push word ptr es:[bx+0Ah] ; HWND
cseg07:03BD push ss
cseg07:03BE lea ax, [bp+LPCSTR]
cseg07:03C1 push ax ; LPCSTR
cseg07:03C2 call SETWINDOWTEXT
cseg07:03C7 push ss
cseg07:03C8 lea ax, [bp+var_12]
cseg07:03CB push ax
cseg07:03CC call sub_240_AEA
cseg07:03D1 add sp, 4
cseg07:03D4 les bx, [bp+arg_2]
cseg07:03D7 les bx, es:[bx+5Ch]
cseg07:03DB cmp word ptr es:[bx+0Ah], 0
cseg07:03E0 jz short loc_80E_3FA
cseg07:03E2 les bx, [bp+arg_2]
cseg07:03E5 les bx, es:[bx+5Ch]
cseg07:03E9 push word ptr es:[bx+0Ah]
cseg07:03ED push ss
cseg07:03EE lea ax, [bp+var_12]
cseg07:03F1 push ax
cseg07:03F2 nop
cseg07:03F3 push cs
X-Box Disassembler
Assembler code
.text:00402E61
.text:00402E61 loc_402E61: ; CODE XREF: sub_402DC4+8C↑j
.text:00402E61 ; sub_402DC4+98↑j
.text:00402E61 218 lea edi, [ebp+var_20C]
.text:00402E67 218 or ecx, 0FFFFFFFFh
.text:00402E6A 218 xor eax, eax
.text:00402E6C 218 mov esi, offset asc_401634 ; ")"
.text:00402E71 218 repne scasb
.text:00402E73 218 dec edi
.text:00402E74 218 movsw
.text:00402E76 218 jmp short loc_402E8E
.text:00402E78 ; ---------------------------------------------------------------------------
.text:00402E78
.text:00402E78 loc_402E78: ; CODE XREF: sub_402DC4+55↑j
.text:00402E78 218 push esi
.text:00402E79 21C push offset aS ; "%s"
.text:00402E7E
.text:00402E7E loc_402E7E: ; CODE XREF: sub_402DC4+31↑j
.text:00402E7E 220 lea eax, [ebp+var_20C]
.text:00402E84 220 push eax
.text:00402E85 224 call ds:sprintf
.text:00402E8B 224 add esp, 0Ch
.text:00402E8E
.text:00402E8E loc_402E8E: ; CODE XREF: sub_402DC4+B2↑j
.text:00402E8E 218 mov ecx, [ebp+var_4]
.text:00402E91 218 lea eax, [ebp+var_20C]
.text:00402E97 218 push eax ; const char *
.text:00402E98 21C call sub_402EA3
.text:00402E9D 218 pop edi
.text:00402E9E 214 pop esi
.text:00402E9F 210 leave
.text:00402EA0 000 retn 8
.text:00402EA0 sub_402DC4 endp
.text:00402EA0
.text:00402EA3
.text:00402EA3 ; =============== S U B R O U T I N E =======================================
.text:00402EA3
.text:00402EA3
.text:00402EA3 ; int __cdecl sub_402EA3(const char *)
.text:00402EA3 sub_402EA3 proc near ; CODE XREF: sub_402DC4+D4↑p
.text:00402EA3 ; sub_4030B2:loc_403381↓p
.text:00402EA3
.text:00402EA3 arg_0 = dword ptr 8
.text:00402EA3
.text:00402EA3 000 push esi
PDP 11 : SAV File
Assembler code
seg001:002556
seg001:002556 ; =============== S U B R O U T I N E =======================================
seg001:002556
seg001:002556
seg001:002556 .globl start
seg001:002556 start: ; DATA XREF: asect:000040↑o
seg001:002556
seg001:002556 ; FUNCTION CHUNK AT seg001:001016 SIZE 00000158 BYTES
seg001:002556 ; FUNCTION CHUNK AT seg001:002742 SIZE 00000014 BYTES
seg001:002556
seg001:002556 inc word_1012
seg001:002562 mov word_1012, word_2554
seg001:002570 call sub_2640
seg001:002574 mov #700, R0
seg001:002600 emt 351 ; .PRINT - Print String to Terminal
seg001:002602 mov #715, R0
seg001:002606 emt 351 ; .PRINT - Print String to Terminal
seg001:002610 jmp loc_1016
seg001:002614 ; ---------------------------------------------------------------------------
seg001:002614
seg001:002614 loc_2614: ; CODE XREF: start:loc_1542↑J
seg001:002614 mov word_1014, word_2554
seg001:002622 call sub_2640
seg001:002626 mov #702, R0
seg001:002632 emt 351 ; .PRINT - Print String to Terminal
seg001:002634 clr R0
seg001:002636 emt 350 ; .EXIT - Terminate Program
seg001:002636 ; End of function start
seg001:002636
seg001:002640
seg001:002640 ; =============== S U B R O U T I N E =======================================
seg001:002640
seg001:002640
seg001:002640 sub_2640: ; CODE XREF: start+12↑P
seg001:002640 ; start+44↑P
seg001:002640 mov #57, R1 ; '/'
PIC
Assembler code
CODE:0004
CODE:0004 ; =============== S U B R O U T I N E =======================================
CODE:0004
CODE:0004 ; Interrupt Vector
CODE:0004
CODE:0004 ; public ISR
CODE:0004 ISR:
CODE:0004 movlp 0
CODE:0005 btfss BANK0:INTCON, T0IF
CODE:0006 b loc_CODE_8
CODE:0007 b loc_CODE_9
CODE:0008 ; ---------------------------------------------------------------------------
CODE:0008
CODE:0008 loc_CODE_8: ; CODE XREF: ISR+2↑j
CODE:0008 b loc_CODE_1A
CODE:0009 ; ---------------------------------------------------------------------------
CODE:0009
CODE:0009 loc_CODE_9: ; CODE XREF: ISR+3↑j
CODE:0009 movlb 0
CODE:000A movfw byte_DATA_24
CODE:000B xorlw 3
CODE:000C bnz loc_CODE_F
CODE:000E b loc_CODE_10
CODE:000F ; ---------------------------------------------------------------------------
CODE:000F
CODE:000F loc_CODE_F: ; CODE XREF: ISR+8↑j
CODE:000F b loc_CODE_14
CODE:0010 ; ---------------------------------------------------------------------------
CODE:0010
CODE:0010 loc_CODE_10: ; CODE XREF: ISR+A↑j
CODE:0010 movlp 5
CODE:0011 ; assume pclath = 5
CODE:0011 call sub_CODE_516
CODE:0012 movlp 0
CODE:0013 ; assume pclath = 0
CODE:0013 b loc_CODE_14
PIC 12xx
Assembler code
CODE:0011 ; assume bank = 0
CODE:0011
CODE:0011 ; =============== S U B R O U T I N E =======================================
CODE:0011
CODE:0011
CODE:0011 sub_CODE_11: ; CODE XREF: RESET+189↓p
CODE:0011 comf BANK0:R9, w
CODE:0012 xorwf BANK0:R10, w
CODE:0013 xorwf BANK0:R11, w
CODE:0014 movwf BANK0:R15
CODE:0015 call sub_CODE_4
CODE:0016 movwf BANK0:R6
CODE:0017 btfsc BANK0:R5, 1
CODE:0018 swapf BANK0:R6, w
CODE:0019 xorwf BANK0:R15, f
CODE:001A comf BANK0:R12, w
CODE:001B xorwf BANK0:R13, w
CODE:001C xorwf BANK0:R14, w
CODE:001D movwf BANK0:R16
CODE:001E call sub_CODE_5
CODE:001F movwf BANK0:R6
CODE:0020 btfsc BANK0:R5, 0
CODE:0021 swapf BANK0:R6, w
CODE:0022 xorwf BANK0:R16, f
CODE:0023 retlw 0
CODE:0023 ; End of function sub_CODE_11
CODE:0023
CODE:0024
CODE:0024 ; =============== S U B R O U T I N E =======================================
CODE:0024
CODE:0024
CODE:0024 sub_CODE_24: ; CODE XREF: RESET+C2↓p
CODE:0024 ; RESET+D7↓p ...
CODE:0024 comf BANK0:R9, w
CODE:0025 xorlw 17
Power PC AIF ECOFF file Format
Assembler code
.text:00002054
.text:00002054 # =============== S U B R O U T I N E =======================================
.text:00002054
.text:00002054
.text:00002054 bpf_tap:
.text:00002054
.text:00002054 .set sender_sp, -0x50
.text:00002054 .set var_C, -0xC
.text:00002054 .set var_8, -8
.text:00002054 .set var_4, -4
.text:00002054 .set sender_lr, 8
.text:00002054
.text:00002054 stw r31, var_4(r1)
.text:00002058 lwz r31, 4(r3)
.text:0000205C mr r6, r5
.text:00002060 mflr r0
.text:00002064 cmpwi r31, 0
.text:00002068 lwz r3, 0x28(r31)
.text:0000206C stw r0, sender_lr(r1)
.text:00002070 stwu r1, sender_sp(r1)
.text:00002074 addi r0, r3, 1
.text:00002078 stw r5, 0x50+var_C(r1)
.text:0000207C lwz r3, 0x24(r31)
.text:00002080 stw r4, 0x50+var_8(r1)
.text:00002084 beq loc_20EC
.text:00002088 stw r0, 0x28(r31)
.text:0000208C
.text:0000208C loc_208C: # CODE XREF: bpf_tap+80↓j
.text:0000208C bl bpf_filter
.text:00002090 nop
.text:00002094 mr. r6, r3
.text:00002098 mr r3, r31
.text:0000209C lwz r4, 0x50+var_8(r1)
.text:000020A0 lwz r5, 0x50+var_C(r1)
.text:000020A4 lwz r7, off_4178 # off_40B4
Power PC Linux ELF
Assembler code
.text:01802348
.text:01802348 # =============== S U B R O U T I N E =======================================
.text:01802348
.text:01802348 # Attributes: noreturn
.text:01802348
.text:01802348 sub_1802348: # CODE XREF: sub_1802F9C:def_18030F4↓p
.text:01802348 # sub_1802F9C+2F4↓p
.text:01802348
.text:01802348 .set back_chain, -0x10
.text:01802348 .set var_8, -8
.text:01802348 .set var_4, -4
.text:01802348 .set sender_lr, 4
.text:01802348
.text:01802348 stwu r1, back_chain(r1)
.text:0180234C mflr r0
.text:01802350 stw r30, 0x10+var_8(r1)
.text:01802354 stw r31, 0x10+var_4(r1)
.text:01802358 stw r0, 0x10+sender_lr(r1)
.text:0180235C bl loc_1802360
.text:01802360
.text:01802360 loc_1802360: # DATA XREF: .text:off_1802344↑o
.text:01802360 mflr r30
.text:01802364 lwz r0, (off_1802344 - loc_1802360)(r30)
.text:01802368 add r30, r0, r30
.text:0180236C lwz r3, (off_185CF04 - 0x1864F00)(r30) # _IO_stderr_ # stream
.text:01802370 lwz r9, (off_185CF00 - 0x1864F00)(r30) # off_185DE7C
.text:01802374 lwz r4, (off_185CF08 - 0x1864F00)(r30) # "Usage: %s [-panyrcdfvstFSV] [-b superbl"...
.text:01802378 lwz r5, (off_185DE7C - 0x185DE7C)(r9) # "e2fsck"
.text:0180237C bl .fprintf
.text:01802380 li r3, 0x10 # status
.text:01802384 bl .exit
.text:01802384 # End of function sub_1802348
.text:01802384
.text:01802384 # ---------------------------------------------------------------------------
.text:01802388 off_1802388: .long off_185CF00+0x8000 - loc_18023B0
.text:01802388 # DATA XREF: sub_180238C+28↓r
Mac OS PEF File
Assembler code
seg000:00002BDC
seg000:00002BDC # =============== S U B R O U T I N E =======================================
seg000:00002BDC
seg000:00002BDC # Attributes: noreturn
seg000:00002BDC
seg000:00002BDC .globl .start
seg000:00002BDC .start: # DATA XREF: seg000:00003A60↓o
seg000:00002BDC # seg001:start↓o
seg000:00002BDC
seg000:00002BDC .set sender_sp, -0x450
seg000:00002BDC .set saved_toc, -0x43C
seg000:00002BDC .set var_20, -0x20
seg000:00002BDC .set var_C, -0xC
seg000:00002BDC .set var_8, -8
seg000:00002BDC .set var_4, -4
seg000:00002BDC .set sender_lr, 8
seg000:00002BDC
seg000:00002BDC mflr r0
seg000:00002BE0 stw r31, var_4(r1)
seg000:00002BE4 stw r30, var_8(r1)
seg000:00002BE8 stw r29, var_C(r1)
seg000:00002BEC stw r0, sender_lr(r1)
seg000:00002BF0 stwu r1, sender_sp(r1)
seg000:00002BF4 mr r29, r3
seg000:00002BF8 mr r30, r4
seg000:00002BFC mr r31, r5
seg000:00002C00 lwz r3, TC_argv_save # argv_save
seg000:00002C04 cmplwi r31, 0
seg000:00002C08 lwz r4, TC_environ # environ
seg000:00002C0C stw r30, 0(r3)
seg000:00002C10 stw r31, 0(r4)
seg000:00002C14 bne loc_2C20
seg000:00002C18 addi r0, r2, (off_3E44 - 0x3A70) # "NO_ENVIRON=true"
seg000:00002C1C stw r0, 0(r4)
seg000:00002C20
seg000:00002C20 loc_2C20: # CODE XREF: .start+38↑j
seg000:00002C20 li r3, 0
Mac OS X File
Assembler code
__text:000036F8
__text:000036F8 # =============== S U B R O U T I N E =======================================
__text:000036F8
__text:000036F8
__text:000036F8 sub_36F8: # CODE XREF: sub_3578:loc_3610↑p
__text:000036F8
__text:000036F8 .set sender_sp, -0x60
__text:000036F8 .set var_20, -0x20
__text:000036F8 .set var_4, -4
__text:000036F8 .set sender_lr, 8
__text:000036F8
__text:000036F8 mflr r0
__text:000036FC stw r31, var_4(r1)
__text:00003700 stw r0, sender_lr(r1)
__text:00003704 stwu r1, sender_sp(r1)
__text:00003708 bcl 20, 4*cr7+so, loc_370C
__text:0000370C
__text:0000370C loc_370C:
__text:0000370C mflr r31
__text:00003710 addis r3, r31, (aDyldMakeDelaye - loc_370C)@ha
__text:00003714 addi r3, r3, (aDyldMakeDelaye - loc_370C)@l # "__dyld_make_delayed_module_initializer_"...
__text:00003718 addi r4, r1, 0x60+var_20
__text:0000371C bl sub_3794
__text:00003720 lwz r12, 0x60+var_20(r1)
__text:00003724 mtctr r12
__text:00003728 bctrl
__text:0000372C lwz r0, 0x60+sender_lr(r1)
__text:00003730 addi r1, r1, 0x60
__text:00003734 mtlr r0
__text:00003738 lwz r31, var_4(r1)
__text:0000373C blr
__text:0000373C # End of function sub_36F8
__text:0000373C
__text:00003740
__text:00003740 # =============== S U B R O U T I N E =======================================
__text:00003740
__text:00003740
__text:00003740 sub_3740: # CODE XREF: sub_3578+24↑p
__text:00003740 lis r11, dword_140A0@ha
Windows NT PE File
Assembler code
.text:00011FE0
.text:00011FE0 # =============== S U B R O U T I N E =======================================
.text:00011FE0
.text:00011FE0
.text:00011FE0 sub_11FE0: # DATA XREF: .text:off_10464↑o
.text:00011FE0 # .pdata:00012B44↓o ...
.text:00011FE0
.text:00011FE0 .set sender_sp, -0xB0
.text:00011FE0 .set var_78, -0x78
.text:00011FE0 .set var_70, -0x70
.text:00011FE0 .set var_60, -0x60
.text:00011FE0 .set var_58, -0x58
.text:00011FE0 .set var_50, -0x50
.text:00011FE0 .set var_44, -0x44
.text:00011FE0 .set sender_lr, 8
.text:00011FE0
.text:00011FE0 # FUNCTION CHUNK AT .text:0001257C SIZE 000000B0 BYTES
.text:00011FE0 # FUNCTION CHUNK AT .text:00012834 SIZE 00000038 BYTES
.text:00011FE0
.text:00011FE0 stw r15, var_44(r1)
.text:00011FE4 mflr r15
.text:00011FE8 bl _save32gpr_16
.text:00011FEC mr r27, r3
.text:00011FF0 mr r23, r4
.text:00011FF4 stw r2, sender_lr(r1)
.text:00011FF8 stwu r1, sender_sp(r1)
.text:00011FFC
.text:00011FFC loc_11FFC: # DATA XREF: .pdata:00012B58↓o
.text:00011FFC lwz r10, 0x60(r23)
.text:00012000 lis r11, 7
.text:00012004 mr r21, r10
.text:00012008 lwz r9, 0xC(r21)
.text:0001200C ori r11, r11, 0x14 # 0x70014
.text:00012010 cmplw cr1, r9, r11
.text:00012014 lwz r24, 0x28(r27)
Hitachi SH-1 Processor
Assembler code
seg001:0A227704 cmp/eq #1, r0 ; Compare: Equal
seg001:0A227706 bf loc_A227718 ; Branch if False
seg001:0A227708 mov.l #h'210907D, r3 ; Move Immediate Long Data
seg001:0A22770A mov.b @r3, r2 ; Move Byte Data
seg001:0A22770C tst r2, r2 ; Test Logical
seg001:0A22770E bf loc_A227718 ; Branch if False
seg001:0A227710 mov.l #h'210907D, r1 ; Move Immediate Long Data
seg001:0A227712 mov.l #h'A23C5E0, r3 ; Move Immediate Long Data
seg001:0A227714 jsr @r3 ; sub_A23C5E0 ; Jump to Subroutine
seg001:0A227716 mov.b r10, @r1 ; Move Byte Data
seg001:0A227718
seg001:0A227718 loc_A227718: ; CODE XREF: sub_A227018+6EE↑j
seg001:0A227718 ; sub_A227018+6F6↑j
seg001:0A227718 mov r8, r0 ; Move Data
seg001:0A22771A mov.b @(9,r0), r0 ; Move Structure Byte Data
seg001:0A22771C tst #h'10, r0 ; Test Logical
seg001:0A22771E movt r0 ; Move T Bit
seg001:0A227720 add #-1, r0 ; Add binary
seg001:0A227722 neg r0, r0 ; Negate
seg001:0A227724 cmp/eq #1, r0 ; Compare: Equal
seg001:0A227726 bt loc_A22772C ; Branch if True
seg001:0A227728 bra loc_A2278AE ; Branch
seg001:0A22772A nop ; No Operation
seg001:0A22772C ; ---------------------------------------------------------------------------
seg001:0A22772C
seg001:0A22772C loc_A22772C: ; CODE XREF: sub_A227018+70E↑j
seg001:0A22772C mov r11, r0 ; Move Data
seg001:0A22772E mov.b @r0, r0 ; Move Byte Data
seg001:0A227730 tst #4, r0 ; Test Logical
seg001:0A227732 bt loc_A227740 ; Branch if True
seg001:0A227734 mov.l #h'21094BA, r1 ; Move Immediate Long Data
seg001:0A227736 mov.b @r1, r3 ; Move Byte Data
seg001:0A227738 mov.l #h'21094B5, r0 ; Move Immediate Long Data
seg001:0A22773A mov.b r3, @r0 ; Move Byte Data
seg001:0A22773C mov.l #h'21094B1, r2 ; Move Immediate Long Data
Hitachi SH-3 Processor : Windows CE COFF format
Assembler code
Hitachi SH-3 Processor : Windows CE PE format
Assembler code
.text:100011B4 ; Exported entry 1. CreateTransport
.text:100011B4
.text:100011B4 ; =============== S U B R O U T I N E =======================================
.text:100011B4
.text:100011B4
.text:100011B4 .export CreateTransport
.text:100011B4 CreateTransport: ; DATA XREF: .rdata:off_100021C8↓o
.text:100011B4 ; .pdata:10004028↓o
.text:100011B4 sts.l pr, @-r15
.text:100011B6 add #-h'10, r15
.text:100011B8 mov.l #??2@YAPAXI@Z, r0 ; operator new(uint)
.text:100011BA jsr @r0 ; ??2@YAPAXI@Z ; operator new(uint)
.text:100011BC mov #h'1C, r4
.text:100011BE mov r0, r4
.text:100011C0 tst r4, r4
.text:100011C2 bt loc_100011CC
.text:100011C4 bsr sub_10001190
.text:100011C6 nop
.text:100011C8 bra loc_100011CE
.text:100011CA mov r0, r4
.text:100011CC ; ---------------------------------------------------------------------------
.text:100011CC
.text:100011CC loc_100011CC: ; CODE XREF: CreateTransport+E↑j
.text:100011CC mov #0, r4
.text:100011CE
.text:100011CE loc_100011CE: ; CODE XREF: CreateTransport+14↑j
.text:100011CE mov r4, r0
.text:100011D0 add #h'10, r15
.text:100011D2 lds.l @r15+, pr
.text:100011D4 rts
.text:100011D6 nop
.text:100011D6 ; ---------------------------------------------------------------------------
.text:100011D8 off_100011D8: .data.l ??2@YAPAXI@Z ; DATA XREF: CreateTransport+4↑r
.text:100011D8 ; operator new(uint)
.text:100011DC off_100011DC: .data.l off_10002030 ; DATA XREF: sub_100011A8+4↑r
Hitachi SH-4 Processor : ELF File Format
Assembler code
LOAD:08041080
LOAD:08041080 ; =============== S U B R O U T I N E =======================================
LOAD:08041080
LOAD:08041080
LOAD:08041080 sub_8041080: ; CODE XREF: LOAD:08040F1A↑p
LOAD:08041080 ; DATA XREF: LOAD:08040F18↑o ...
LOAD:08041080 mov.l r8, @-r15
LOAD:08041082 mov.l r9, @-r15
LOAD:08041084 mov.l r10, @-r15
LOAD:08041086 mov.l r14, @-r15
LOAD:08041088 sts.l pr, @-r15
LOAD:0804108A mov r15, r14
LOAD:0804108C mov r4, r8
LOAD:0804108E mov r5, r10
LOAD:08041090 mov r6, r9
LOAD:08041092 mov #h'C, r4
LOAD:08041094 mov.l #malloc, r1
LOAD:08041096 jsr @r1 ; malloc
LOAD:08041098 nop
LOAD:0804109A tst r0, r0
LOAD:0804109C bf loc_80410A4
LOAD:0804109E mov #h'FFFFFFFF, r0
LOAD:080410A0 bra loc_80410F6
LOAD:080410A2 nop
LOAD:080410A4 ; ---------------------------------------------------------------------------
LOAD:080410A4
LOAD:080410A4 loc_80410A4: ; CODE XREF: sub_8041080+1C↑j
LOAD:080410A4 mov.l r10, @(4,r0)
LOAD:080410A6 mov.l r9, @(8,r0)
LOAD:080410A8 mov r8, r1
LOAD:080410AA add #h'40, r1 ; '@'
LOAD:080410AC mov.l @(h'34,r1), r1
LOAD:080410AE tst r1, r1
LOAD:080410B0 bt loc_80410B8
LOAD:080410B2 mov.l @(8,r1), r1
Hitachi SH-4 Processor : Windows CE PE File Format
Assembler code
.text:00011A10
.text:00011A10 ; =============== S U B R O U T I N E =======================================
.text:00011A10
.text:00011A10
.text:00011A10 sub_11A10: ; DATA XREF: sub_11A88+20↓o
.text:00011A10 ; sub_11A88:off_11B2C↓o ...
.text:00011A10 mov.l r8, @-r15
.text:00011A12 sts.l pr, @-r15
.text:00011A14 add #-h'10, r15
.text:00011A16 mov.l #h'C350, r1
.text:00011A18 add r1, r4
.text:00011A1A mov r4, r8
.text:00011A1C
.text:00011A1C loc_11A1C: ; CODE XREF: sub_11A10+24↓j
.text:00011A1C mov.l #_WaitForSingleObject, r0
.text:00011A1E mov r8, r5
.text:00011A20 mov.l #unk_1512C, r1
.text:00011A22 jsr @r0 ; _WaitForSingleObject
.text:00011A24 mov.l @r1, r4
.text:00011A26 mov r0, r4
.text:00011A28 mov.w #h'102, r1
.text:00011A2A cmp/eq r1, r4
.text:00011A2C bt loc_11A36
.text:00011A2E mov.l #unk_1513C, r1
.text:00011A30 mov.l @r1, r1
.text:00011A32 tst r1, r1
.text:00011A34 bf loc_11A1C
.text:00011A36
.text:00011A36 loc_11A36: ; CODE XREF: sub_11A10+1C↑j
.text:00011A36 mov.l #_EnterCriticalSection, r0
.text:00011A38 mov.l #unk_176A8, r4
.text:00011A3A jsr @r0 ; _EnterCriticalSection
.text:00011A3C nop
.text:00011A3E mov.l #unk_1513C, r1
.text:00011A40 mov.l @r1, r1
Super Nintendo Entertainement System (SNES)
Assembler code
.C0:0019 .A8
.C0:0019 .I16
.C0:0019 ; ds=0 B=0 e=0
.C0:0019
.C0:0019 ; =============== S U B R O U T I N E =======================================
.C0:0019
.C0:0019
.C0:0019 sub_C00019: ; CODE XREF: Emulation_mode_RESET+3↓J
.C0:0019
.C0:0019 ; FUNCTION CHUNK AT .C0:C62B SIZE 00000088 BYTES
.C0:0019
.C0:0019 SEI
.C0:001A CLC
.C0:001B XCE
.C0:001C SEP #$20 ; ' '
.C0:001E REP #$10
.C0:0020 LDX #$15FF
.C0:0023 TXS
.C0:0024 LDX #0
.C0:0027 PHX
.C0:0028 PLD
.C0:0029 TDC
.C0:002A PHA
.C0:002B PLB
.C0:002C LDA #1
.C0:002E STA MEMSEL ; Memory-2 Waitstate Control (0000000a a: 0 = 2.68 MHz, 1 = 3.58 MHz
.C0:0031 STZ MDMAEN ; Select General Purpose DMA Channel(s) and Start Transfer (abcdefgh a = Channel 7...h = Channel 0: 1 = Enable 0 = Disable
.C0:0034 STZ HDMAEN ; Select H-Blank DMA (H-DMA) Channel(s) (abcdefgh a = Channel 7 .. h = Channel 0: 1 = Enable 0 = Disable
.C0:0037 LDA #$8F
.C0:0039 STA INIDISP ; Display Control 1 (a000bbbb a: 0=screen on 1=screen off, b = brightness)
.C0:003C STZ NMITIMEN ; Interrupt Enable and Joypad Request (a0bc000d a = NMI b = V-Count c = H-Count d = Joypad)
.C0:003F JSR sub_C00525
.C0:0042 LDX #0
.C0:0045 STX D, word_7E0000
.C0:0047 LDX #$FFFF
SPARC Solaris COFF
Assembler code
.text:0000010C ! ---------------------------------------------------------------------------
.text:0000010C
.text:0000010C loc_10C: ! CODE XREF: disassemble+A0↑j
.text:0000010C ! DATA XREF: disassemble:jpt_E4↑o
.text:0000010C ld [%fp+var_18], %o0 ! jumptable 000000E4 case 0
.text:00000110 set 0x3FFFFF, %o1
.text:00000118 and %o0, %o1, %o0
.text:0000011C st %o0, [%fp+var_24]
.text:00000120 ld [%fp+var_18], %o0
.text:00000124 set 0x3FFFFF, %o1
.text:0000012C and %o0, %o1, %o0
.text:00000130 st %o0, [%fp+var_28]
.text:00000134 set aUnimp, %o0 ! "UNIMP"
.text:0000013C st %o0, [%fp+var_2C]
.text:00000140 ld [%fp+var_28], %o0
.text:00000144 call lookup
.text:00000148 nop
.text:0000014C mov %o0, %o2
.text:00000150 set aSS, %o0 ! "%s %s\n"
.text:00000158 ld [%fp+var_2C], %o1
.text:0000015C call printf
.text:00000160 nop
.text:00000164 ba loc_704
.text:00000168 nop
.text:0000016C ! ---------------------------------------------------------------------------
.text:0000016C
.text:0000016C loc_16C: ! CODE XREF: disassemble+A0↑j
.text:0000016C ! DATA XREF: disassemble:jpt_E4↑o
.text:0000016C set aSomeInst, %o0 ! jumptable 000000E4 cases 1,3,5
.text:00000174 call printf
.text:00000178 nop
.text:0000017C ba loc_704
.text:00000180 nop
.text:00000184 ! ---------------------------------------------------------------------------
.text:00000184
.text:00000184 loc_184: ! CODE XREF: disassemble+A0↑j
.text:00000184 ! DATA XREF: disassemble:jpt_E4↑o
.text:00000184 ld [%fp+var_18], %o1 ! jumptable 000000E4 case 2
SPARC Solaris ELF
Assembler code
.text:0001171C ! ===========================================================================
.text:0001171C
.text:0001171C ! Segment type: Pure code
.text:0001171C .text
.text:0001171C
.text:0001171C ! =============== S U B R O U T I N E =======================================
.text:0001171C
.text:0001171C
.text:0001171C .global _start
.text:0001171C _start: ! DATA XREF: LOAD:00010018↑o
.text:0001171C ! LOAD:00010628↑o ...
.text:0001171C
.text:0001171C arg_40 = 0x40
.text:0001171C arg_44 = 0x44
.text:0001171C
.text:0001171C mov 0, %fp ! Alternative name is '_ex_text0'
.text:00011720 ld [%sp+arg_40], %l0
.text:00011724 add %sp, arg_44, %l1
.text:00011728 sethi %hi(___Argv), %o1
.text:0001172C st %l1, [%o1+%lo(___Argv)]
.text:00011730 sll %l0, 2, %l2
.text:00011734 inc 4, %l2
.text:00011738 add %l1, %l2, %l2
.text:0001173C sethi %hi(environ), %l3
.text:00011740 st %l2, [%l3+%lo(environ)]
.text:00011744 set 0, %l5
.text:0001174C tst %l5
.text:00011750 be loc_117BC
.text:00011754 nop
.text:00011758 sll %l5, 2, %l6
.text:0001175C and %l6, 0x300, %l7
.text:00011760 and %l5, 0x3F, %l6
.text:00011764 bset %l6, %l7
.text:00011768 sll %l7, 22, %l5
.text:0001176C set __crt_scratch, %l4
SPARC Sun ELF
Assembler code
.text:000BA990 bl loc_BA968
.text:000BA994 mov %l5, %o0 ! uid
.text:000BA998
.text:000BA998 loc_BA998: ! CODE XREF: perform_flag_actions+2C↑j
.text:000BA998 ldsh [%i0], %l7
.text:000BA99C btst 1, %l7
.text:000BA9A0 be loc_BA9F8
.text:000BA9A4 mov 0x7F, %i2
.text:000BA9A8 call getgid
.text:000BA9AC nop
.text:000BA9B0 call setgid
.text:000BA9B4 nop
.text:000BA9B8 tst %o0
.text:000BA9BC bne loc_BA9EC
.text:000BA9C0 nop
.text:000BA9C4 call getuid
.text:000BA9C8 nop
.text:000BA9CC call setuid
.text:000BA9D0 nop
.text:000BA9D4 tst %o0
.text:000BA9D8 bne loc_BA9EC
.text:000BA9DC nop
.text:000BA9E0 ldsh [%i0], %l7
.text:000BA9E4 ba loc_BA9FC
.text:000BA9E8 btst 2, %l7
.text:000BA9EC ! ---------------------------------------------------------------------------
.text:000BA9EC
.text:000BA9EC loc_BA9EC: ! CODE XREF: perform_flag_actions+A4↑j
.text:000BA9EC ! perform_flag_actions+C0↑j
.text:000BA9EC call _private_exit
.text:000BA9F0 mov %i2, %o0 ! pid
.text:000BA9F4 ldsh [%i0], %l7
.text:000BA9F8
.text:000BA9F8 loc_BA9F8: ! CODE XREF: perform_flag_actions+88↑j
.text:000BA9F8 btst 2, %l7
SPARC Sun ELF SO
Assembler code
.text:00003978
.text:00003978 ! =============== S U B R O U T I N E =======================================
.text:00003978
.text:00003978 ! Attributes: bp-based frame
.text:00003978
.text:00003978 strnicmp: ! CODE XREF: DoTheReads+48↓p
.text:00003978 save %sp, -0x70, %sp ! Alternative name is 'gcc2_compiled.'
.text:0000397C ba loc_39B0
.text:00003980 inc -1, %i2
.text:00003984 ! ---------------------------------------------------------------------------
.text:00003984
.text:00003984 loc_3984: ! CODE XREF: strnicmp+3C↓j
.text:00003984 call _toupper
.text:00003988 inc %i0
.text:0000398C mov %o0, %l0
.text:00003990 ldsb [%i1], %o0 ! c
.text:00003994 call _toupper
.text:00003998 inc %i1
.text:0000399C cmp %l0, %o0
.text:000039A0 be loc_39B0
.text:000039A4 inc -1, %i2
.text:000039A8 ba locret_39C0
.text:000039AC mov 1, %i0
.text:000039B0 ! ---------------------------------------------------------------------------
.text:000039B0
.text:000039B0 loc_39B0: ! CODE XREF: strnicmp+4↑j
.text:000039B0 ! strnicmp+28↑j
.text:000039B0 cmp %i2, -1
.text:000039B4 bne,a loc_3984
.text:000039B8 ldsb [%i0], %o0
.text:000039BC mov 0, %i0
.text:000039C0
.text:000039C0 locret_39C0: ! CODE XREF: strnicmp+30↑j
.text:000039C0 ret
.text:000039C4 restore
.text:000039C4 ! End of function strnicmp
.text:000039C4
ST 20C4
Assembler code
ROM:26ECB
ROM:26ECB ; =============== S U B R O U T I N E =======================================
ROM:26ECB
ROM:26ECB
ROM:26ECB sub_26ECB:
ROM:26ECB
ROM:26ECB ; FUNCTION CHUNK AT ROM:18AD1 SIZE 00000003 BYTES
ROM:26ECB
ROM:26ECB xor
ROM:26ECD ldc 0
ROM:26ECE stl 2
ROM:26ECF ldc 0
ROM:26ED0 ldlp 2
ROM:26ED1 gajw
ROM:26ED3 ldlp 2
ROM:26ED4 ldc 43h ; 'C'
ROM:26ED6 ldl 1
ROM:26ED7 fcall loc_18A48
ROM:26EDB ldlp 2
ROM:26EDC dup
ROM:26EDD cj loc_26EE4
ROM:26EDE ldc 0
ROM:26EDF ldlp 2
ROM:26EE0 gajw
ROM:26EE2 j loc_26EF8
ROM:26EE4 ; ---------------------------------------------------------------------------
ROM:26EE4
ROM:26EE4 loc_26EE4: ; CODE XREF: sub_26ECB+12↑j
ROM:26EE4 ldlp 2
ROM:26EE5 ldc 2Eh ; '.'
ROM:26EE7 ldl 1
ROM:26EE8 fcall loc_18A48
ROM:26EEC ldlp 2
ROM:26EED dup
ROM:26EEE cj loc_26EF4
ST 7
Assembler code
seg000:1235 ; ---------------------------------------------------------------------------
seg000:1235 sub a, ($77,x)
seg000:1237 cp a, ($77,y)
seg000:123A sbc a, ($77,y)
seg000:123D cp y, ($77,y)
seg000:1240 and a, ($77,y)
seg000:1243 bcp a, ($77,y)
seg000:1246 ld a, ($77,y)
seg000:1249 ld ($77,y), a
seg000:124C xor a, ($77,y)
seg000:124F adc a, ($77,y)
seg000:1252 or a, ($77,y)
seg000:1255 add a, ($77,y)
seg000:1258 jp ($77,y)
seg000:125B ; ---------------------------------------------------------------------------
seg000:125B call ($77,y)
seg000:125E ld y, ($77,y)
seg000:1261 ld ($77,y), y
seg000:1264 sub a, (y)
seg000:1266 cp a, (y)
seg000:1268 sbc a, (y)
seg000:126A cp y, (y)
seg000:126C and a, (y)
seg000:126E bcp a, (y)
seg000:1270 ld a, (y)
seg000:1272 ld (y), a
seg000:1274 xor a, (y)
seg000:1276 adc a, (y)
seg000:1278 or a, (y)
seg000:127A add a, (y)
seg000:127C jp (y)
seg000:127E ; ---------------------------------------------------------------------------
seg000:127E call (y)
seg000:1280 ld y, (y)
seg000:1282 ld (y), y
ST 9
Assembler code
.init:00000107
.init:00000107 ; =============== S U B R O U T I N E =======================================
.init:00000107
.init:00000107
.init:00000107 .global ___Reset
.init:00000107 .desc ___Reset, near
.init:00000107 .proc ___Reset
.init:00000107 ___Reset:
.init:00000107 spp #0 ; Alternative name is '___Reset'
.init:00000107 ; __Reset
.init:00000109 ; Register page: 0
.init:00000109 ld R252, #0x40 ; '@' ; Wait Control Register
.init:0000010C ld R235, #0x20 ; ' ' ; Mode Register
.init:0000010F ld R230, #0x8F ; Central Interrupt Control Register
.init:00000112 srp #0x1A ; r0 -> R208, r1 -> R209, r2 -> R210, r3 -> R211, r4 -> R212, r5 -> R213, r6 -> R214, r7 -> R215,
.init:00000112 ; r8 -> R216, r9 -> R217, r10 -> R218, r11 -> R219, r12 -> R220, r13 -> R221, r14 -> R222, r15 -> R223
.init:00000114 ; Register window: (26, 26)
.init:00000114 sdm
.init:00000115 ldw RR238, #0x284 ; System Stack Pointer
.init:00000119 spp #0x15 ; Registers R240-R255 will now be referred to the page 21 of paged registers
.init:0000011B ; Register page: 21
.init:0000011B ld r0, #0x88 ; 'ˆ'
.init:0000011D or r0, r0
.init:0000011F jpeq loc_190
.init:00000122 ld R242, #0 ; Data Page Register 2
.init:00000125 ldw rr10, #0x28C
.init:00000129 or r10, #0x80 ; '€'
.init:0000012C
.init:0000012C loc_12C: ; CODE XREF: ___Reset:loc_190↓j
.init:0000012C ld r8, (rr10)+
.init:0000012F btjf r8.1, loc_149
.init:00000132 ld R240, (rr10)+ ; Data Page Register 0
.init:00000135 ldw rr0, (rr10)+
.init:00000138 ldw rr4, (rr10)+
.init:0000013B ld R241, (rr10)+ ; Data Page Register 1
Toshiba TLCS 900
Assembler code
IROM:00008100
IROM:00008100 ; =============== S U B R O U T I N E =======================================
IROM:00008100
IROM:00008100
IROM:00008100 ; public RESET_
IROM:00008100 RESET_: ; DATA XREF: IROM:00008000↑o
IROM:00008100 DEC 0x02, XSP
IROM:00008102 DI
IROM:00008104 LD (P3), 0x00 ; Port 3
IROM:00008107 LD (P3CR), 0xF4 ; 'ô' ; Port 3 Control
IROM:0000810A LD (P3FC), 0x00 ; Port 3 Function
IROM:0000810D LD (SYSCR0), 0xA0 ; ' ' ; System Clock Register 0
IROM:00008110 LD (SYSCR1), 0x00 ; System Clock Contol Register 1
IROM:00008113 LD (B0CS), 0x99 ; '™' ; Block 0 CS/WAIT Control Register
IROM:00008116 LD (B1CS), 0x9A ; 'š' ; Block 1 CS/WAIT Control Register
IROM:00008119 LD (B2CS), 0x8F ; Block 2 CS/WAIT Control Register
IROM:0000811C LD XSP, 0x0000087F
IROM:00008121 LD (WDMOD), 0x00 ; Watch Dog Timer Mode
IROM:00008124 LD (WDCR), 0xB1 ; '±' ; Watch Dog Control Register
IROM:00008127 LD XHL, 0x00000080 ; '€'
IROM:0000812C LD BC, 0x0800
IROM:0000812F LD A, 0x00
IROM:00008131
IROM:00008131 loc_8131: ; CODE XREF: RESET_+35↓j
IROM:00008131 LD (XHL), A
IROM:00008133 INC 0x01, HL
IROM:00008135 DJNZ BC, (loc_8131)
IROM:00008138 LD (P0), 0x00 ; Port 0
IROM:0000813B LD (P0CR), 0xFF ; Port 0 Control
IROM:0000813E LD (P1), 0x00 ; Port 1
IROM:00008141 LD (P1CR), 0xFF ; Port 1 Control
IROM:00008144 LD (P1FC), 0x00 ; Port 1 Function
IROM:00008147 LD (P2), 0x00 ; Port 2
IROM:0000814A LD (P2CR), 0xFF ; Port 2 Control
IROM:0000814D LD (P2FC), 0x00 ; Port 2 Function
TMS 320c2 COFF
Assembler code
cseg:0017
cseg:0017 ; =============== S U B R O U T I N E =======================================
cseg:0017
cseg:0017
cseg:0017 sub_cseg_17:
cseg:0017 banz unk_dseg_EDB, *-
cseg:0019 banz unk_dseg_EED, *+
cseg:001B bbnz unk_dseg_F9C
cseg:001D bbz unk_dseg_F55
cseg:001F bc unk_dseg_F18
cseg:0021 bgez unk_dseg_FD3
cseg:0023 bgz unk_dseg_F0C
cseg:0025 bioz unk_dseg_EED
cseg:0027 bit drr, 8 ; Data receive register
cseg:0028 bit *, 1
cseg:0029 bit *, 2
cseg:002A bit *, 3
cseg:002B bit *, 4
cseg:002C bit *, 5
cseg:002D bit *, 8
cseg:002E bitt drr ; Data receive register
cseg:002F bitt *
cseg:0030 blez unk_dseg_ED1
cseg:0032 rptk 2
cseg:0033 blkd byte_dseg_F400, *+
cseg:0035 rptk 2
cseg:0036 blkp byte_dseg_FD30, *+
cseg:0038 blz unk_dseg_F12
cseg:003A bnc unk_dseg_F55
cseg:003C bnv unk_dseg_FBE
cseg:003E bnz unk_dseg_F81, ar6
cseg:0040 bv unk_dseg_F15
cseg:0042 bz unk_dseg_F8B
cseg:0044 cala
cseg:0045 call unk_dseg_F27
TMS 320c5
Assembler code
cseg:0030
cseg:0030 ; =============== S U B R O U T I N E =======================================
cseg:0030
cseg:0030
cseg:0030 sub_cseg_30:
cseg:0030 bitt *br0+, ar7
cseg:0031 bldd #Reserved_0, byte_dseg_7F
cseg:0033 bldd #Reserved_0, *br0+, ar7
cseg:0035 bldd byte_dseg_7F, #Reserved_0
cseg:0037 bldd *br0+, #Reserved_0, ar7
cseg:0039 bldd bmar, byte_dseg_7F
cseg:003A bldd bmar, *br0+, ar7
cseg:003B bldd byte_dseg_7F, bmar
cseg:003C bldd *br0+, bmar, ar7
cseg:003D bldp byte_dseg_7F
cseg:003E bldp *br0+, ar7
cseg:003F blpd #start, byte_dseg_7F
cseg:0041 blpd #start, *br0+, ar7
cseg:0043 blpd bmar, byte_dseg_7F
cseg:0044 blpd bmar, *br0+, ar7
cseg:0045 bsar 16
cseg:0046 cala
cseg:0047 calad
cseg:0048 call start, *br0+, ar7
cseg:004A calld start, *br0+, ar7
cseg:004C cc start, geq,bio
cseg:004E ccd start, eq,bio
cseg:0050 clrc ovm
cseg:0051 clrc sxm
cseg:0052 clrc hm
cseg:0053 clrc tc
cseg:0054 clrc c
cseg:0055 clrc cnf
cseg:0056 clrc intm
cseg:0057 clrc xf
TMS 320c54
Assembler code
.text:0000003A call 11Ch
.text:0000003C calld 11Ch
.text:0000003E nop
.text:0000003F nop
.text:00000040 cc 11Ch, tc
.text:00000042 ccd 11Ch, aeq
.text:00000044 nop
.text:00000045 nop
.text:00000046 cmpl B, A
.text:00000047 cmpm *AR0+, #1
.text:00000049 cmpr lt, AR1
.text:0000004A cmps A, *AR2+
.text:0000004B dadd *AR3-, A, B
.text:0000004C dadst *AR4-, A
.text:0000004D delay *AR5+
.text:0000004E dld *AR6-, A
.text:0000004F drsub *AR7-, B
.text:00000050 dsadt *AR0-, A
.text:00000051 dst A, *AR1-
.text:00000052 dsub *AR2-, B
.text:00000053 dsubt *AR3-, A
.text:00000054 exp A
.text:00000055 firs *AR3+, *AR4+, 11Ch
.text:00000057 frame -80h
.text:00000058 idle 2
.text:00000059 intr 0Fh
.text:0000005A ld *AR0+, A
.text:0000005B ld *AR1+, TS, A
.text:0000005C ld *AR2+, 16, A
.text:0000005D ld *AR3+, 1, A
.text:0000005E ld *AR4+, 1, A
.text:0000005F ld #1, B
.text:00000060 ld #7FFFh, 1, A
.text:00000062 ld #7FFFh, 16, A
.text:00000064 ld A, ASM, B
TMS 320c6 COFF File Format
Assembler code
.text:00008FC0
.text:00008FC0 ; =============== S U B R O U T I N E =======================================
.text:00008FC0
.text:00008FC0
.text:00008FC0 _main: ; CODE XREF: start:loc_8EB8↑p
.text:00008FC0 B .S1 _printf
.text:00008FC4 NOP 2
.text:00008FC8
.text:00008FC8 MVK .S1 0FFFF9148h, A0
.text:00008FCC || STW .D2 B3, *B15--[3]
.text:00008FD0
.text:00008FD0 STW .D2 A10, *B15[2]
.text:00008FD4 || MVKH .S1 0, A0
.text:00008FD8 || MVK .S2 (loc_8FE8 & 0FFFFh), B3
.text:00008FDC || NOP
.text:00008FE0
.text:00008FE0 STW .D2 A0, *B15[1]
.text:00008FE4 || MVKH .S2 (loc_8FE8 >> 16), B3
.text:00008FE4 ; CALL _printf OCCURS
.text:00008FE8
.text:00008FE8 loc_8FE8: ; DATA XREF: _main+18↑o
.text:00008FE8 ; _main+24↑o
.text:00008FE8 ZERO .L1 A10
.text:00008FEC MV .L1 A10, A4
.text:00008FF0 LDW .D2 *B15[2], A10
.text:00008FF4 LDW .D2 *++B15[3], B3
.text:00008FF8 NOP 4
.text:00008FFC B .S2 B3
.text:00009000 NOP 5
.text:00009000 ; BRANCH OCCURS
.text:00009000 ; End of function _main
.text:00009000
.text:00009000 ; ---------------------------------------------------------------------------
.text:00009004 .align 20h
.text:00009020 ; [00000038 BYTES: COLLAPSED FUNCTION _strchr. PRESS CTRL-NUMPAD+ TO EXPAND]
TRICORE
Assembler code
PFLASH:800000EC
PFLASH:800000EC ; =============== S U B R O U T I N E =======================================
PFLASH:800000EC
PFLASH:800000EC
PFLASH:800000EC .global asm_clear_endinit
PFLASH:800000EC asm_clear_endinit: ; CODE XREF: _start+1C↑p
PFLASH:800000EC ld32.w d0, WDT_CON0 ; Watchdog Timer Control Register 0
PFLASH:800000F0 ld32.w d1, WDT_CON1 ; Watchdog Timer Control Register 1
PFLASH:800000F4 movh d2, #0
PFLASH:800000F8 addi d2, d2, #-0xFF
PFLASH:800000FC and16 d0, d2
PFLASH:800000FE or32 d0, d0, #0xF0 ; 'ð'
PFLASH:80000102 and32 d4, d1, #0xC
PFLASH:80000106 or16 d0, d4
PFLASH:80000108 st32.w WDT_CON0, d0 ; Watchdog Timer Control Register 0
PFLASH:8000010C movh d4, #0
PFLASH:80000110 addi d4, d4, #-0x10
PFLASH:80000114 and16 d0, d4
PFLASH:80000116 or32 d0, d0, #2
PFLASH:8000011A isync
PFLASH:8000011E st32.w WDT_CON0, d0 ; Watchdog Timer Control Register 0
PFLASH:80000122 ld32.w d0, WDT_CON0 ; Watchdog Timer Control Register 0
PFLASH:80000126 nop16
PFLASH:80000128 ji16 a11
PFLASH:80000128 ; End of function asm_clear_endinit
PFLASH:80000128
PFLASH:8000012A
PFLASH:8000012A ; =============== S U B R O U T I N E =======================================
PFLASH:8000012A
PFLASH:8000012A
PFLASH:8000012A .global _disable_wdt
PFLASH:8000012A _disable_wdt: ; CODE XREF: _start:__no_board_init↑p
PFLASH:8000012A movh d2, #0
PFLASH:8000012E addi d2, d2, #-0xFD
PFLASH:80000132 movh d5, #0
SunPlus unSP
Assembler code
ROM:41B3
ROM:41B3 ; =============== S U B R O U T I N E =======================================
ROM:41B3
ROM:41B3
ROM:41B3 sub_41B3:
ROM:41B3 sp = $27FF
ROM:41B5 r1 = $4000
ROM:41B7 r2 = [r1++]
ROM:41B8 jmp loc_41CA
ROM:41B9 ; ---------------------------------------------------------------------------
ROM:41B9
ROM:41B9 loc_41B9: ; CODE XREF: sub_41B3+18↓j
ROM:41B9 push r2, r2 to [sp]
ROM:41BA r3 = [r1++]
ROM:41BB r4 = [r1++]
ROM:41BC r4 = r4 lsl 4
ROM:41BD r4 = r4 lsl 4
ROM:41BE r4 = r4 lsl 2
ROM:41BF sr = r4
ROM:41C0 r4 = [r1++]
ROM:41C1 bp = [r1++]
ROM:41C2 jmp loc_41C6
ROM:41C3 ; ---------------------------------------------------------------------------
ROM:41C3
ROM:41C3 loc_41C3: ; CODE XREF: sub_41B3+14↓j
ROM:41C3 r2 = ds:[r4++]
ROM:41C4 [r3++] = r2
ROM:41C5 bp -= 1
ROM:41C6
ROM:41C6 loc_41C6: ; CODE XREF: sub_41B3+F↑j
ROM:41C6 cmp bp, 0
ROM:41C7 jne loc_41C3
ROM:41C8 pop r2, r2 from [sp]
ROM:41C9 r2 -= 1
ROM:41CA
ROM:41CA loc_41CA: ; CODE XREF: sub_41B3+5↑j
ROM:41CA cmp r2, 0
NEC V850
Assembler code
.text:000007A6
.text:000007A6 -- =============== S U B R O U T I N E =======================================
.text:000007A6
.text:000007A6
.text:000007A6 .globl _systeminit
.text:000007A6 _systeminit: -- CODE XREF: __start+7C↑p
.text:000007A6 prepare {lp}, 0
.text:000007AA mov 0x9F4, r6
.text:000007B0 mov -1, r7
.text:000007B2 jarl __rcopy, lp
.text:000007B6 di
.text:000007BA jarl _CG_ReadResetSource, lp
.text:000007BE jarl __startend, lp
.text:000007C2 jarl _TMP0_Init, lp
.text:000007C6 ei
.text:000007CA dispose 0, {lp}, [lp]
.text:000007CA -- End of function _systeminit
.text:000007CA
.text:000007CE
.text:000007CE -- =============== S U B R O U T I N E =======================================
.text:000007CE
.text:000007CE
.text:000007CE .globl _f1
.text:000007CE _f1: -- CODE XREF: _complex1+B6↓p
.text:000007CE ld.w -0x8000[gp], r10
.text:000007D2 add r6, r10
.text:000007D4 add 1, r10
.text:000007D6 jmp [lp]
.text:000007D6 -- End of function _f1
.text:000007D6
.text:000007D8
.text:000007D8 -- =============== S U B R O U T I N E =======================================
.text:000007D8
.text:000007D8
.text:000007D8 .globl _f2
.text:000007D8 _f2: -- CODE XREF: _complex1+B0↓p
.text:000007D8 ld.w -0x8000[gp], r10
Z180 COFF File Format
Assembler code
seg000:000E dec bc
seg000:000F inc c
seg000:0010
seg000:0010 loc_10: ; CODE XREF: seg000:010F↓p
seg000:0010 dec c
seg000:0011 ld c, 88h ; 'ˆ'
seg000:0013 rrca
seg000:0014 djnz sub_0
seg000:0016 djnz loc_1B
seg000:0018
seg000:0018 loc_18: ; CODE XREF: seg000:011C↓p
seg000:0018 ld de, 9876h
seg000:001B
seg000:001B loc_1B: ; CODE XREF: sub_0+16↑j
seg000:001B ld (de), a
seg000:001C inc de
seg000:001D inc d
seg000:001E dec d
seg000:001F
seg000:001F loc_1F: ; CODE XREF: seg000:0129↓p
seg000:001F ld d, 88h ; 'ˆ'
seg000:0021 rla
seg000:0022 jp loc_88
seg000:0025 ; ---------------------------------------------------------------------------
seg000:0025 add hl, de
seg000:0026 ld a, (de)
seg000:0027 dec de
seg000:0028
seg000:0028 loc_28: ; CODE XREF: seg000:0135↓p
seg000:0028 inc e
seg000:0029 dec e
seg000:002A ld e, 88h ; 'ˆ'
seg000:002C rra
seg000:002D jp nz, loc_88
seg000:0030
seg000:0030 loc_30: ; CODE XREF: seg000:0142↓p
seg000:0030 ld hl, 9876h
Z380 COFF File Format
Assembler code
seg000:001E inc d
seg000:001F dec d
seg000:0020
seg000:0020 loc_20: ; CODE XREF: seg000:062A↓p
seg000:0020 ld d, 12h
seg000:0022
seg000:0022 loc_22: ; CODE XREF: sub_0+23↓j
seg000:0022 rla
seg000:0023 jr loc_22
seg000:0023 ; End of function sub_0
seg000:0023
seg000:0025 ; ---------------------------------------------------------------------------
seg000:0025 add hl, de
seg000:0026 ld a, (de)
seg000:0027 dec de
seg000:0028
seg000:0028 ; =============== S U B R O U T I N E =======================================
seg000:0028
seg000:0028
seg000:0028 sub_28: ; CODE XREF: seg000:096A↓p
seg000:0028 dec de
seg000:0029 inc e
seg000:002A dec e
seg000:002B ld e, 12h
seg000:002D
seg000:002D loc_2D: ; CODE XREF: sub_28+6↓j
seg000:002D rra
seg000:002E jr nz, loc_2D
seg000:002E ; End of function sub_28
seg000:002E
seg000:0030
seg000:0030 ; =============== S U B R O U T I N E =======================================
seg000:0030
seg000:0030
seg000:0030 sub_30: ; CODE XREF: seg000:097D↓p
seg000:0030 ld hl, 1234h
Z8
Assembler code
code:0000000C
code:0000000C ; =============== S U B R O U T I N E =======================================
code:0000000C
code:0000000C
code:0000000C ; public start
code:0000000C start:
code:0000000C
code:0000000C ; FUNCTION CHUNK AT code:00000139 SIZE 00000016 BYTES
code:0000000C
code:0000000C ld p2m, #0 ; Port 2 mode register
code:0000000F ld p3m, #1 ; Port 3 mode register
code:00000012 ld p01m, #4 ; Ports 0-1 mode register
code:00000015 ld ipr, #1Ch ; Interrupt priority register
code:00000018 ld imr, #21h ; '!' ; Interrupt mask register
code:0000001B ld R4, #0Fh
code:0000001E ld R5, #0Fh
code:00000021 ld R6, #0Fh
code:00000024 srp #10h
code:00000026 .rp 10h
code:00000026
code:00000026 ; public Start
code:00000026 Start: ; Program control flags
code:00000026 clr flags
code:00000028 ld spl, #40h ; '@' ; Stack pointer low byte
code:0000002B clr irq ; Interrupt request register
code:0000002D ei
code:0000002E ld R32, #10h
code:00000031 ld R31, #0Fh
code:00000033
code:00000033 ; public zero
code:00000033 zero: ; CODE XREF: start+2B↓j
code:00000033 clr @R32
code:00000035 inc R32
code:00000037 djnz R31, zero
code:00000039 ld p2, #0FFh ; Port 2
Z80
Assembler code
ROM:02A0
ROM:02A0 ; =============== S U B R O U T I N E =======================================
ROM:02A0
ROM:02A0
ROM:02A0 sub_2A0:
ROM:02A0 ld a, 7Fh
ROM:02A2 in a, (0FEh)
ROM:02A4 rra
ROM:02A5 jr c, loc_2B2
ROM:02A7 ld a, 7Fh
ROM:02A9 in a, (0FEh)
ROM:02AB rra
ROM:02AC jr c, loc_2B2
ROM:02AE ld a, 14h
ROM:02B0 scf
ROM:02B1 ret
ROM:02B2 ; ---------------------------------------------------------------------------
ROM:02B2
ROM:02B2 loc_2B2: ; CODE XREF: sub_2A0+5↑j
ROM:02B2 ; sub_2A0+C↑j
ROM:02B2 or a
ROM:02B3 ret
ROM:02B3 ; End of function sub_2A0
ROM:02B3
ROM:02B3 ; ---------------------------------------------------------------------------
ROM:02B4 db 0
ROM:02B5 db 0
ROM:02B6 db 0
ROM:02B7 db 0
ROM:02B8 db 0
ROM:02B9 db 0
ROM:02BA db 0
ROM:02BB db 0
ROM:02BC db 0
ROM:02BD db 0
IDA supported processors
The list of supported processor/OS/file format combinations is so large that it is not easy to enumerate it. Please look at our gallery which contains disassembly samples across a wide number of processors.
IDA Pro supported processors
IIDA Pro supports the processors listed below. The source code of some processor modules is available in our free SDK.
IDA Pro supported processors
- web assembly (WASM)
- AMD K6-2 3D-Now! extensions
- 32-bit ARM Architecture versions from v3 to v8 including Thumb, Thumb-2, DSP instructions and NEON Advanced SIMD instructions.
- ARMv4 / ARMv4T: ARM7 cores (ARM7TDMI / ARM710T / ARM720T / ARM740T), ARM9 cores (ARM9TDMI / ARM920T / ARM922T / ARM940T)
- ARMv5 / ARMv5TE / ARMv5TEJ: ARM9 cores (ARM946E-S/ ARM966E-S/ ARM968E-S/ ARM926EJ-S/ ARM996HS), ARM10E (ARM1020E / ARM1022E / ARM1026EJ-S)
- ARMv6 / ARMv6T2 / ARMv6Z / ARMv6K: ARM11 cores (ARM1136J(F)-S / ARM1156T2(F)-S / ARM1176JZ(F)-S / ARM11 MPCore)
- ARMv6-M: Cortex-M0 / Cortex-M0+ / Cortex-M1 (e.g. NXP LPC800/LPC1xxx, Freescale Kinetis L and M series, STM32 F0 series etc.)
- ARMv7-M: Cortex-M3 (e.g. NXP LPC17xx/18xx/13xx, STM32 F1/F2/L1 series, TI Stellaris, Toshiba TX03 / TMPM3xx etc.)
- ARMv7E-M: Cortex-M4 (e.g. NXP LPC43xx, STM32 F3/F4 series, TI Stellaris LM4F, Freescale Kinetis K series and W series, Atmel AT91SAM4 etc.)
- ARMv7-R: Cortex-R4(F)/Cortex-R5/Cortex-R7 (e.g. TI TMS570LS etc.)
- ARMv7-A: Cortex-A5 / Cortex-A7 / Cortex-A8 / Cortex-A9 / Cortex-A12 / Cortex-A15 (e.g. TI Sitara, TI OMAP series, Samsung S5PC100 and Exynos, Nvidia Tegra, Freescale i.MX, Allwinner A-Series and many others)
- ARMv7 (custom): Apple A4/A5/A5X/A6/A6X (Swift microarchitecture, used in Apple’s iPhone/iPod/iPad/AppleTV), Qualcomm Snapdragon [Note: this list is incomplete; code for any ARM-compliant core can be disassembled]
- ARM64 Architecture (aka AArch64): *
- ARMv8-A: Cortex-A50/Cortex-A53/Cortex-A57 etc.
- ARMv8 (custom): Apple A7,A8 etc. (iPhone 5s and newer devices)
- ARC (Argonaut RISC Core), including ARCompact and ARCv2 (comes with source code)
- ATMEL AVR (comes with source code)
- DEC PDP-11(comes with source code)
- Fujitsu FR (comes with source code)
- Nintendo Entertainment System (NES) (6502)
- Nintendo Super Entertainment System (SNES) (65816, 65C816)
- Nintendo GameBoy (Z80, ARM7)
- Nintendo DS (ARM9, ARM11)
- Hitachi/Renesas H8/300, H8/300L, H8/300H, H8S/2000, H8S/2600, H8SX (comes with source code)H8/330, H8/322, H8/323, H8/325, H8/326-329, H8/336-338, H8/350, H8/3048F, H8/3202, H8/3212, H8/3214, H8/3216, H8/3217, H8/3256, H8/3257, H8/3292, H8/3294, H8/3296, H8/3297, H8/3315, H8/3318, H8/3334Y, H8/3336Y, H8/3337Y, H8/3337YF, H8/3394, H8/3396, H8/3397, H8/3534, H8/3434, H8/3434F, H8/3436, H8/3437, H8/3437F, H8/3522H8/3612, H8/3613, H8/3614, H8/3712, H8/3713, H8/3714, H8/3723, H8/3724, H8/3725, H8/3726, H8/3812, H8/3813, H8/3814, H8/3833-37, H8/3875, H8/3876, H8/3877, H8/3924, H8/3925, H8/3926, H8/3927, H8/3945-47H8/3002, H8/3040-3042, H8/3003, H8/3030-32, H8/3048, H8/3070, H8/3071, H8/3072H8S/2246, H8S/2245, H8S/2244, H8S/2243, H8S/2242, H8S/2241, H8S/2133, H8S/2144F, H8S/2357F, H8S/2143, H8S/2142F, H8S/2345F, H8S/2343, H8S/2341, H8S/2237, H8S/2235, H8S/2233, H8S/2227, H8S/2225, H8S/2223, H8S/2240, H8S/2242, H8S/2350, H8S/2352, H8S/2340, H8S/2355, H8S/2353, H8S/2351, H8S/2134F, H8S/2132FH8S/2655R, H8S/2653R, H8S/2655
- Hitachi H8/500 (comes with source code)
- Hitachi HD 6301, HD 6303, Hitachi HD 64180
- INTEL 8080
- INTEL 8085 (comes with source code)
- INTEL 80196 (comes with source code)
- INTEL 8051 (comes with source code)
- INTEL 860XR (comes with source code)
- INTEL 960 (comes with source code)
- INTEL 80×86 and 80×87 (Intel 8086/8088, 80186, 80286, 80386, 80486 and compatibles)
- INTEL Pentium/Celeron/Xeon, including SSE, SSE2, SSE3, SSE4, AVX, AVX2, AVX-512 and other extensions
- Java Virtual Machine (comes with source code)
- KR1878 (comes with source code)
- Microsoft .NET (Common Language Infrastructure bytecode)
- Mitsubishi MELPS740 or Renesas 740 (comes with source code)
- Hitachi/Renesas M16C family M16C/60, M16C/20, M16C/Tiny, R8C/Tiny, M16C/80, M32C/80, R32C/100
- MN102 (comes only with source code)
- MOS Technologies 6502, 65C02 (comes with source code)
- W65C816S aka 65C816 or 65816 (comes with source code)
- Motorola/Freescale 68K family: MC680xx, CPU32 (68330), MC6301
- Motorola 68xx series: MC6301, MC6303, MC6800, MC6801, MC6803, MC6805, MC6808, HCS08, MC6809, MC6811, \
- Motorola MC6812/MC68HC12/CPU12
- Freescale HCS12, HCS12X (including XGATE coprocessor)
- Motorola MC68HC16
- NSC CR16 (comes only with source code)
- NEC V850 series (including V850E1, V850E1F, V850ES, V850E2, V850E2M) (comes with source code)
- Renesas RH850 series (RH850G3K, RH850G3M, RH850G3KH, RH850G3MH) (comes with source code)
- EFI Byte Code (EBC) (comes with source code)
- SPU (Synergistic Processing Unit of the Cell BE) (comes with source code)
- MSP430, MSP430X (comes with source code)
- Microchip PIC 12XX, PIC 14XX, PIC 18XX, PIC 16XXX (comes with source code)
- Microchip 16-bit PIC series (PIC24, dsPIC: PIC24XX, PIC30XX, PIC33XX)
- Rockwell C39 (comes only with source code)
- Samsung SAM8 (comes with source code)
- SGS Thomson ST-7, and ST-20 (comes with source code)
- TLCS900 (comes only with source code)
- unSP from SunPlus
- Sony SPC700
- Philips XA series (51XA G3)(comes with source code)
- RISC-V
- Renesas RL78 series
- Intel xScale
- Z80, Zilog Z8, Zilog Z180, Zilog Z380 (comes with source code)
- IBM z/Architecture (S390, S390x)
- x64 architecture (aka Intel 64/IA-32e/EM64T/x86-64/AMD64)
- Analog Devices AD218x series (ADSP-2181, ADSP-2183, ADSP-2184(L/N), ADSP-2185(L/M/N), ADSP-2186(L/M/N), ADSP-2187(L/N), ADSP-2188M/N, ADSP-2189M/N)
- Dalvik (Android bytecode, DEX)
- DEC Alpha
- Motorola DSP563xx, DSP566xx, DSP561XX (comes with source code)
- TI TMS320C2X, TMS320C5X, TMS320C6X, TMS320C64X, TMS 320C54xx, TMS320C55xx, TMS320C3 (comes with source code)
- TI TMS320C27x/TMS320C28x
- Hewlett-Packard HP-PA aka PA-RISC (comes with source code)
- Hitachi/Renesas SuperH series. Unexhaustive list:
- SH-1 core, for example SH7020,SH7021, SH7032,SH7034;
- SH-2 core: SH7047, SH7049, SH7105, SH7107, SH7109 etc.;
- SH-2E core: SH7055, SH7058 etc.;
- SH-2A core: SH7201, SH7206, SH7211, SH7214
- SH2A-FPU core: SH7450, SH7263 etc.;
- SH3 core: SH7706, SH7709S;
- SH4 core: SH7091(Sega Dreamcast), SH7750;
- SH-4A core: SH7450, SH7451,SH7734, SH7785.
- Renesas RXv1, RXv2, RXv3 cores (RX100/RX200/RX600/RX700)
- IBM/Motorola PowerPC/POWER architecture, including Power ISA extensions:
- Book E (Embedded Controller Instructions)
- Freescale ISA extensions (isel etc.)
- SPE (Signal Processing Engine) instructions
- AltiVec (SIMD) instructions
- Hypervisor and virtualization instructions
- All instructions from the Power ISA 2.06 specification (Vector, Decimal Floating Point, Integer Multiply-Accumulate, VSX etc.)
- Cell BE (Broadband Engine) instructions (used in PlayStation 3)
- VLE (Variable Length Encoding) compressed instruction set
- Xenon (Xbox 360) instructions, including VMX128 extension
- Paired Single SIMD instructions (PowerPC 750CL/Gekko/Broadway/Espresso, used in Nintendo Wii and WiiU)
- Motorola/Freescale PowerPC-based cores and processors, including (but not limited to):
- MPC5xx series: MPC533 / MPC535 / MPC555 / MPC556 / MPC561 / MPC562 / MPC563 / MPC564 / MPC566 Note: code compression features of MPC534/MPC564/MPC556/MPC566 (Burst Buffer Controller) are currently not supported
- MPC8xx series (PowerQUICC): MPC821/MPC850/MPC860
- MPC8xxx series (PowerQUICC II, PowerQUICC II Pro, PowerQUICC III): MPC82xx / MPC83xx / MPC85xx / MPC87xx
- MPC5xxx series (Qorivva): MPC55xx, MPC56xx, MPC57xx
- Power PC 4xx, 6xx, 74xx, e200 (including e200z0 with VLE), e500 (including e500v1, e500v2 and e500mc), e600, e700, e5500, e6500 cores
- QorIQ series: P1, P2, P3, P4, P5 and T1, T2, T4 families
- Infineon Tricore: TC1xxx (AUDO, AUDO MAX), TC2xx, TC3xx, TC4x (AURIX, supported TriCore architecture up to v1.8)
- Intel IA-64 Architecture – Itanium.
- Motorola DSP 56K
- MIPS
- MIPS Mark I (R2000)
- MIPS Mark II (R3000)
- MIPS Mark III: (R4000, R4200, R4300, R4400, and R4600)
- MIPS Mark IV: R8000, R10000, R5900 (Playstation 2)
- MIPS32, MIPS32r2, MIPS32r3 and MIPS64, MIPS64r2, MIPS64r3
- Allegrex CPU (Playstation Portable – PSP), including VFPU instructions
- Cavium Octeon and Octeon2 (cnMIPS) ISA extensions
- MIPS16 (MIPS16e, MIPS16e2) Application Specific Extension
- microMIPS Application Specific Extension
- MIPS-MT, MIPS-3D, smartMIPS Application Specific Extensions
- Toshiba TX19/TX19A Family Application Specific Extension (MIPS16e+ aka MIPS16e-TX)
- Mitsubishi M32R (comes with source code)
- Mitsubishi M7700 (comes with source code)
- Mitsubishi M7900 (comes with source code)
- Nec 78K0 and Nec 78K0S (comes with source code)
- STMicroelectronics ST9+, ST-10 (comes with source code)
- SPARCII, ULTRASPARC
- Siemens C166 (flow)
- Tensilica Xtensa
- Fujitsu F2MC-16L, Fujitsu F2MC-LC (comes with source code)
IDA Home supported processors
IDA Home supported processors
IDA Home is available in 5 versions, each supporting one of the common processor families:
- x86/x64
- ARM/ARM64
- MIPS/MIPS64
- PowerPC/PPC64
- RISC-V/RV64
Debugger Modules
In IDA Pro all debugger modules are available.
Unsupported Processors
If your target processor is not included in the list above, you have two options:
- Ask us to add support for the processor sometime in the future: we welcome your feedback about which processors should be added to IDA Pro.
- Use our SDK and develop your own (free to all, but unsupported).
Supported file formats
IDA Pro can disassemble all popular file formats. The list contains some, but not all, of the file types handled by IDA Pro.
- MS DOS
- EXE File
- MS DOS COM File
- MS DOS Driver
- New Executable (NE)
- Linear Executable (LX)
- Linear Executable (LE)
- Portable Executable (PE) (x86, x64, ARM, etc)
- Windows CE PE (ARM, SH-3, SH-4, MIPS)
- Mach-O for OS X and iOS (x86, x64, ARM and PPC)
- Dalvik Executable (DEX)
- EPOC (Symbian OS executable)
- Windows Crash Dump (DMP)
- XBOX Executable (XBE)
- Intel Hex Object File
- MOS Technology Hex Object File
- Netware Loadable Module (NLM)
- Common Object File Format (COFF)
- Binary File
- Object Module Format (OMF)
- OMF library
- S-record format
- ZIP archive
- JAR archive
- Executable and Linkable Format (ELF)
- Watcom DOS32 Extender (W32RUN)
- Linux a.out (AOUT)
- PalmPilot program file
- AIX ar library (AIAFF)
- PEF (Mac OS or Be OS executable)
- QNX 16 and 32-bits
- Nintendo (N64)
- SNES ROM file (SMC)
- Motorola DSP56000 .LOD
- Sony Playstation PSX executable files,
- object (psyq) files
- library (psyq) files
Check out the list of supported processors and screenshots of many processor disassemblies in the gallery.
Windmp file loader
Windmp file loader
The Windmp loader module can load *.dmp files into IDA for static analysis.
For the Windmp loader to function properly, one needs to specify the path to MS Debugger Engine Library (dbgeng.dll). This option can be set in CFG\IDA.CFG under the DBGTOOLS key. If this value is not set then Windmp will try to detect the path.
Windmp can be used to load big dump files, however that will result in a huge database, therefore it is possible to manually load a given input file:
-
Load modules segments only: If used, Windmp will only load segments related to the loaded modules and skips all other memory segments.
-
Do not load symbol names: If the symbol path is configured properly, then Windmp will fetch and rename all known addresses; you can skip this step by not loading symbol names.
-
Skip segments greater than: It skips segments with a given size, resulting in faster loading speed. If this value is zero then this option will not be used.
In addition to static analysis it is possible to run the dump file under the WinDbg debugger module.
Bitfields
There is a special kind of enums: bitfields. A bitfield is an enum divided into bit groups. When you define a new symbolic constant in a bitfield, you need to specify the group to which the constant will belong to. By default, IDA proposes groups containing one bit each. If a group is not defined yet, it is automatically created when the first constant in the group is defined. For example:
name CONST1
value 0x1
mask 0x1
will define a constant named CONST1 with value 1 and will create a group containing only one bit. Another example. Let’s consider the following definitions:
#define OOF_SIGNMASK 0x0003
#define OOFS_IFSIGN 0x0000
#define OOFS_NOSIGN 0x0001
#define OOFS_NEEDSIGN 0x0002
#define OOF_SIGNED 0x0004
#define OOF_NUMBER 0x0008
#define OOF_WIDTHMASK 0x0030
#define OOFW_IMM 0x0000
#define OOFW_16 0x0010
#define OOFW_32 0x0020
#define OOFW_8 0x0030
#define OOF_ADDR 0x0040
#define OOF_OUTER 0x0080
#define OOF_ZSTROFF 0x0100
How do we describe this?
name value mask maskname
OOFS_IFSIGN 0x0000 0x0003 OOF_SIGNMASK
OOFS_NOSIGN 0x0001 0x0003 OOF_SIGNMASK
OOFS_NEEDSIGN 0x0002 0x0003 OOF_SIGNMASK
OOF_SIGNED 0x0004 0x0004
OOF_NUMBER 0x0008 0x0008
OOFW_IMM 0x0000 0x0030 OOF_WIDTHMASK
OOFW_16 0x0010 0x0030 OOF_WIDTHMASK
OOFW_32 0x0020 0x0030 OOF_WIDTHMASK
OOFW_8 0x0030 0x0030 OOF_WIDTHMASK
OOF_ADDR 0x0040 0x0040
OOF_OUTER 0x0080 0x0080
OOF_ZSTROFF 0x0100 0x0100
If a mask consists of more than one bit, it can have a name and a comment. A mask name can be set when a constant with the mask is being defined. IDA will display the mask names in a different color.
In order to use a bitfield in the program, just convert an instruction operand to enum. IDA will display the operand like this:
mov ax, 70h
will be replaced by
mov ax, OOFS_IFSIGN or OOFW_8 or OOF_ADDR
Bitfields Tutorial
In this tutorial, you will learn how to enhance disassembly output by using bitfields.
Suppose the source code looked like this:
// 'flags' parameter is combination of the following bits:
// (don't use OOF_SIGNMASK and OOF_WIDTHMASK, they are for the kernel)
#define OOF_SIGNMASK 0x0003 // sign output:
#define OOFS_IFSIGN 0x0000 // output sign if needed
#define OOFS_NOSIGN 0x0001 // should not out sign ()
#define OOFS_NEEDSIGN 0x0002 // always out sign (+-)
#define OOF_SIGNED 0x0004 // output as signed if
int m65_opflags(const op_t &x)
{
switch ( x.type )
{
case o_displ:
return OOF_ADDR|OOFS_NOSIGN|OOFW_16;
case o_near:
case o_mem:
return OOF_ADDR|OOF_NUMBER|OOFS_NOSIGN|OOFW_16|OOF_ZSTROFF;
default:
return 0;
}
}
We have a disassembly that looks like this:
Let’s improve it by using bitfields.
- We first define a bitfield type by going to the Local types window (menu Open subviews -> Local types). We press Ins to add a new enum and make it a bitfield. The name given to the bitfield does not matter much.
Note that Bitmask has been checked. Click OK.
- Then we edit the enum and update it using the C syntax tab as shown in the screenshot below.
Click OK.
The first bitfield mask is 3 (or 2 bits). The name of the mask is not used by IDA, it is intended as a memory helper. The enum definition becomes:
- We finally switch to the disassembly window. Through the Edit -> Operand types -> Enum member menu (or by pressing M on the second operand at addresses 0x130003E39 and 0x130003E40) we select the enum type we just defined and get this result…
That’s all folks!
Structures Tutorial
You can use IDA to interactively define and manipulate structures in the disassembly.
Sample program
Consider this simple sample C program:
#include <stdio.h>
struct client {
char code;
long id;
char name[32];
client *next;
};
void print_clients(client *ptr) {
while ( ptr != NULL ) {
printf("ID: %4ld Name: %-32s\n",ptr->id,ptr->name);
ptr = ptr->next;
}
}
Standard disassembly
Here is the disassembly with no structures defined, as IDA automatically generates it:
.text:0000000180011690 ; void __fastcall print_clients(client *ptr)
.text:0000000180011690 ?print_clients@@YAXPEAUclient@@@Z proc near
.text:0000000180011690 ; CODE XREF: print_clients(client *)↑j
.text:0000000180011690 ; DATA XREF: .pdata:000000018001E800↓o
.text:0000000180011690
.text:0000000180011690 ptr = qword ptr 10h
.text:0000000180011690
.text:0000000180011690 mov [rsp-8+ptr], rcx
.text:0000000180011695 push rbp
.text:0000000180011696 push rdi
.text:0000000180011697 sub rsp, 0E8h
.text:000000018001169E lea rbp, [rsp+20h]
.text:00000001800116A3 lea rcx, __57CB66E6_entry@cpp ; JMC_flag
.text:00000001800116AA call j___CheckForDebuggerJustMyCode
.text:00000001800116AA
.text:00000001800116AF
.text:00000001800116AF loc_1800116AF: ; CODE XREF: print_clients(client *)+5F↓j
.text:00000001800116AF cmp [rbp+0D0h+ptr], 0
.text:00000001800116B7 jz short loc_1800116F1
.text:00000001800116B7
.text:00000001800116B9 mov rax, [rbp+0D0h+ptr]
.text:00000001800116C0 add rax, 8
.text:00000001800116C4 mov r8, rax
.text:00000001800116C7 mov rax, [rbp+0D0h+ptr]
.text:00000001800116CE mov edx, [rax+4]
.text:00000001800116D1 lea rcx, _Format ; "ID: %4ld Name: %-32s\n"
.text:00000001800116D8 call j_printf
.text:00000001800116D8
.text:00000001800116DD mov rax, [rbp+0D0h+ptr]
.text:00000001800116E4 mov rax, [rax+28h]
.text:00000001800116E8 mov [rbp+0D0h+ptr], rax
.text:00000001800116EF jmp short loc_1800116AF
.text:00000001800116EF
.text:00000001800116F1 ; ---------------------------------------------------------------------------
.text:00000001800116F1
.text:00000001800116F1 loc_1800116F1: ; CODE XREF: print_clients(client *)+27↑j
.text:00000001800116F1 lea rsp, [rbp+0C8h]
.text:00000001800116F8 pop rdi
.text:00000001800116F9 pop rbp
.text:00000001800116FA retn
.text:00000001800116FA
.text:00000001800116FA ?print_clients@@YAXPEAUclient@@@Z endp
Defining structures
In order to use meaningful names instead of numbers, we open the local types window and press insert to define a new structure type. Structure members can be added with the D key for data and the A key for ASCII strings or by editing the structure (Alt-E) and adding members using the “C syntax” of the “Edit type” dialog box. When the first method is used, when we add new structure members, IDA automatically names them. You can change any member’s name by pressing N.
struct client
{
char code;
int id;
char name[32];
client *next;
};
Improved disassembly
Finally, the defined structure type can be used to specify the type of an instruction operand. (menu Edit|Operand types|Struct offset).
.text:0000000180011690 ; void __fastcall print_clients(client *ptr)
.text:0000000180011690 ?print_clients@@YAXPEAUclient@@@Z proc near
.text:0000000180011690 ; CODE XREF: print_clients(client *)↑j
.text:0000000180011690 ; DATA XREF: .pdata:000000018001E800↓o
.text:0000000180011690
.text:0000000180011690 ptr = qword ptr 10h
.text:0000000180011690
.text:0000000180011690 mov [rsp-8+ptr], rcx
.text:0000000180011695 push rbp
.text:0000000180011696 push rdi
.text:0000000180011697 sub rsp, 0E8h
.text:000000018001169E lea rbp, [rsp+20h]
.text:00000001800116A3 lea rcx, __57CB66E6_entry@cpp ; JMC_flag
.text:00000001800116AA call j___CheckForDebuggerJustMyCode
.text:00000001800116AA
.text:00000001800116AF
.text:00000001800116AF loc_1800116AF: ; CODE XREF: print_clients(client *)+5F↓j
.text:00000001800116AF cmp [rbp+0D0h+ptr], 0
.text:00000001800116B7 jz short loc_1800116F1
.text:00000001800116B7
.text:00000001800116B9 mov rax, [rbp+0D0h+ptr]
.text:00000001800116C0 add rax, 8
.text:00000001800116C4 mov r8, rax
.text:00000001800116C7 mov rax, [rbp+0D0h+ptr]
.text:00000001800116CE mov edx, [rax+client.id]
.text:00000001800116D1 lea rcx, _Format ; "ID: %4ld Name: %-32s\n"
.text:00000001800116D8 call j_printf
.text:00000001800116D8
.text:00000001800116DD mov rax, [rbp+0D0h+ptr]
.text:00000001800116E4 mov rax, [rax+client.next]
.text:00000001800116E8 mov [rbp+0D0h+ptr], rax
.text:00000001800116EF jmp short loc_1800116AF
.text:00000001800116EF
.text:00000001800116F1 ; ---------------------------------------------------------------------------
.text:00000001800116F1
.text:00000001800116F1 loc_1800116F1: ; CODE XREF: print_clients(client *)+27↑j
.text:00000001800116F1 lea rsp, [rbp+0C8h]
.text:00000001800116F8 pop rdi
.text:00000001800116F9 pop rbp
.text:00000001800116FA retn
.text:00000001800116FA
.text:00000001800116FA ?print_clients@@YAXPEAUclient@@@Z endp
Union Tutorial
Suppose the source text looked like this:
#include <stdlib.h>
union urecord_t
{
char c;
short s;
long l;
};
struct record_t
{
int type;
#define RTYPE_CHAR 0
#define RTYPE_SHORT 1
#define RTYPE_LONG 2
urecord_t u;
};
bool is_negative(record_t *r)
{
switch ( r->type )
{
case RTYPE_CHAR: return r->u.c < 0;
case RTYPE_SHORT: return r->u.s < 0;
case RTYPE_LONG: return r->u.l < 0;
}
abort();
}
We have a disassembly like this:

Let’s improve it with unions. First, let’s define an union type. For this we open the Local types view (menu View|Local types), press Ins to create an union.
We create the union using the “C syntax” tab of the “Add type” dialog:
Switching to the disassembly window, we apply the defined structure through the Edit|Operand types|Struct offset menu item and select the proper representation for the operand. In the union type case, it may be necessary to select the desired union member with the Edit|Structs|Select union member command. The final disassembly looks like this:
That’s all folks !
Variable Length Structures Tutorial
Suppose the source text looked like this:
struct node_t
{
long id;
char *name;
long nchild; // number of children
long child[]; // children
};
node_t n0 = { 0, "first", 2, { 1, 2 } };
node_t n1 = { 1, "second", 1, { 3 } };
node_t n2 = { 2, "third", 1, { 4 } };
node_t n3 = { 3, "fourth", 0, };
node_t n4 = { 4, "fifth", 0, };
Note that the length of the last field of the structure is not specified. In order to be able to create structures like this in a disassembly we must create a special kind of structure – a variable sized structure. A variable sized structure is created just as a normal structure is. The only difference is that the last member of the structure should be declared as an array with zero elements. (Just a reminder: arrays are declared with an * hotkey). Here is a sample variable sized structure definition:
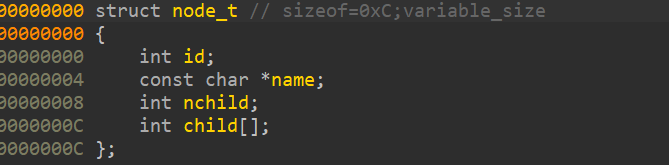
Now we may switch to the disassembly window. In order to apply the defined structure we use Edit -> Structs -> Struct var … or Alt+Q. But since the structure size cannot be calculated by IDA we need to specify the desired structure size by selecting an area to convert to a structure. Another way to specify the size of a structure would be to use * hotkey. In all cases, you need to tell IDA the exact size of a variable sized structure. The initial disassembly will evolve from this to this:
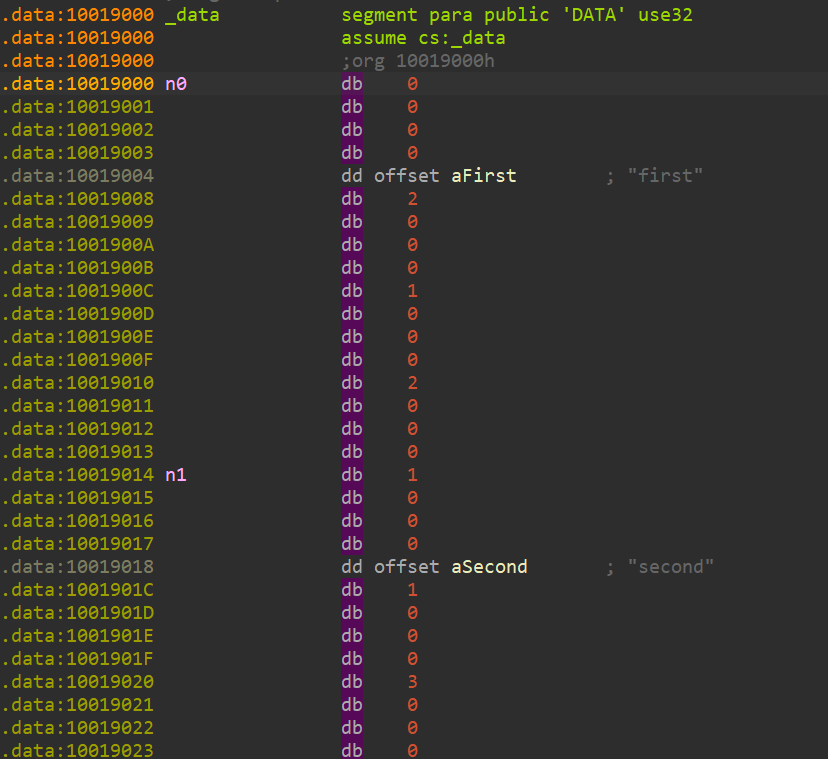
to this:
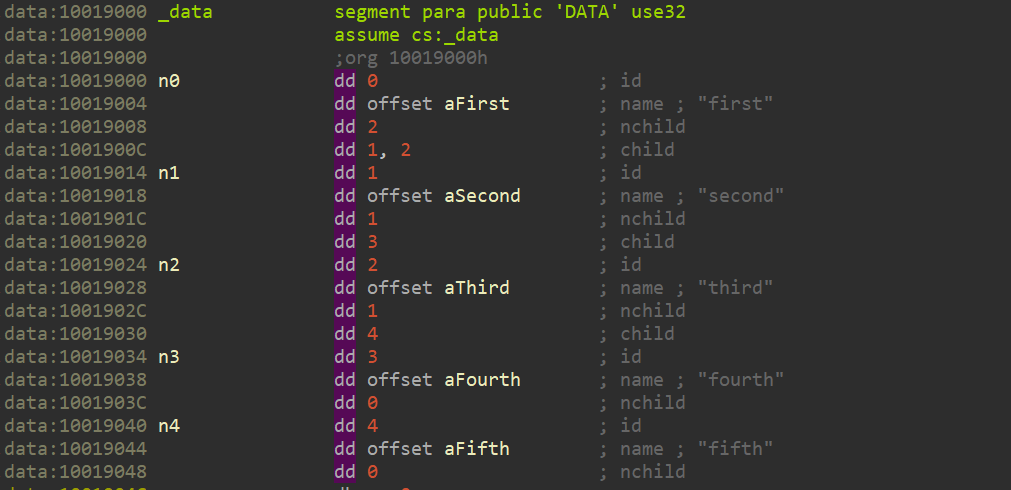
That’s all folks !
Data types, operands and constructs
Data and operands available in the disassembly aren’t always interpreted in the most suitable way: IDA’s interactivity allows you to change their type and representation. It even makes high level languages like constructs possible.
Have a look at our data structure tutorial.
{% file src=“datastruct-tutorial/datastruct.pdf” %} Download Data Structure tutorial {% endfile %}
Using IDA to deal with packed executables
Many malware authors attempt to obfuscate or protect their program by packing them. In these tutorials, we show how IDA can be made to handle such program.
- Learn how to tackle a difficult executable from the normal user interface.
- Learn how to use the “universal” PE unpacker plug-in (PDF) included in IDA 4.9
{% file src=“packed-executables/unpacking.pdf” %} Download a tutorial about PE unpacker plugin {% endfile %}
Using IDA debugger to unpack an “hostile” PE executable
Several days ago we received, from an IDA user, a small harmless executable (test00.zip; unpack twice with the password 123) that could not be debugged in IDA.
{% file src=“packed-executables/assets/test00.zip” %}
Breakpoints would not break and, the program would run out of control, as if the debugger was too slow to catch it. When we first loaded the program in IDA, it complained that it could not find the imports section. That type of situation is frequent with protected executables, packed worms etc….
The second remarkable thing is that the entry point jumping… nowhere. Addresses marked in red usually reflect a location that IDA can’t resolve.
This code employs attempts to prevent the disassembly and, as a result, the default load parameters are not appropriate. This type of obfuscated code demonstrates the problems inherent to the a one-click approach.
But what if we investigate a bit further, for example by loading the file in the manual mode? In this mode the user can specify which sections of the file should be loaded. To be on the safe side, let’s load all sections. Let’s uncheck the ‘make imports section’ checkbox to avoid the “missing imports” message. We have this:
Once we have answered the questions about each section of the file we will get this listing: much better!
Now that we got rid of the unresolved address, we can analyze the program. The first instruction of our executable is a jump, and it jumps to the program header: loc_400158. Hmmmm, the program header is not supposed to contain any code but this program abuses the conventions and jumps to it. An interesting side effect results of the fact that the program header is read only. That could explain why breakpoints can’t be put there.
Anyway, let’s see how the program works. We see that the program loads a pointer into ESI which gets immediately copied to EBX:
HEADER:00400158 mov esi, offset off_40601C
HEADER:0040015D mov ebx, esi
(Ctrl-O converted the hexadecimal number in the first instruction to a label expression)
Later the value of EBX is used to call a subroutine:
HEADER:00400169 call dword ptr [ebx]
Calls like this are frequent in the listing, so let’s find out the function and what it does. Apparently a pointer to the function is located here:
__u_____:0040601C off_40601C dd offset __ImageBase+130h
If we click on __ImageBase, what we’ll see is an array of dwords. IDA represented the program header as an array which is incorrect in our case. We undefine the array (hotkey U), go back to the pointer (hotkey Esc) and follow the pointer again. This time we will end up at the address 0x400130 which should contain a function. We are sure of that because the instruction at 0x400169 calls 0x400130 indirectly. We press P (create procedure or function) to tell IDA that there should be a function at the current address.While the function is now on screen, we only have half of it! It seems that the person who wrote that program wanted it to obfuscate it and separated the function into several pieces. IDA now knows how to deal with those fragmented functions and displays information about the other function parts on the screen:
But it has only references to other parts. It would be nice to have the whole function on one page. There is a special command to help us: the command to generate flow charts of functions in IDA, it’s hotkey is F12. This command is especially interesting for fragmented functions like ours because all pieces of the function will be on the screen:
It might be interesting to display the flow chart of the main function (very long function, keep scrolling!):
A quick glance at the flow chart reveals that there is only one exit from the function at its “ret” instruction (0x4001FA). We could put a breakpoint there and let the program run. Now, before we do that, let’s repeat that it is not a good idea to run untrusted code on your computer. It is much better to have a separate “sandbox” machine for such tests, for example using the remote debugging facilities IDA offers. Therefore, IDA displays a warning when a new file is going to be started under debugger: ignore at your own risk.
Since the breakpoint is located in the program header, and the program header is write protected by the system, we cannot use a plain software breakpoint. We have to use a hardware breakpoint: first press F2 to create a breakpoint, then right click and select “edit breakpoint” to change it to a hardware breakpoint on the “execution” event:
After having set the breakpoint, we start the debugger by pressing F9. When we reach the breakpoint, the program will be unpacked into the ‘MEW’ segment. We jump there and convert everything to code (the fastest way to do this is to press F7 at the breakpoint).
Now we have a very nice listing but with one major problem: it is ephemeral – as soon as we’ll stop the debugging session, the listing will disappear.
The reason is of course that the listing displays the memory content and that the memory will cease to exist when the process will die. It would be nice to be able to save the memory into the database and continue the analysis without the debugger. We will think about adding that feature into future versions of IDA, but meanwhile we’ll have to do it manually. By “manually” we do not mean to copy byte one by one on a paper, of course. We can use the built-in IDC language to achieve this.
There are two things to be saved because they will disappear when the debugger stops: the memory contents and the imported function names. The memory contents can be saved by using the following 4-line script:
auto fp, ea;
fp = fopen("bin", "wb");
for ( ea=0x401000; ea < 0x406000; ea++ )
fputc(Byte(ea), fp);
When the script has run, we will have a file named “bin” on the disk. It will contain the bytes from the “MEW” segment. As you can see, I hardcoded the hexadecimal addresses: after all, it is a disposable script intended to be run once.
We have to save the imported function names too. Look at the call at 0x401002, for example:
MEW:00401002 call sub_4012DC
If we want to know the name of the called function, we press Enter several times to follow the links and finally get the name:
kernel32.dll:77E7AD86
kernel32.dll:77E7AD86 kernel32_GetModuleHandleA: ; CODE XREF: sub_4012DCj
kernel32.dll:77E7AD86 ; DATA XREF: MEW:off_402000o
kernel32.dll:77E7AD86 cmp dword ptr [esp+4], 0
When we quit the debugger, the kernel32.dll segment will disappear from the listing along with all its names, instructions, functions, everything. We have to copy the function names before that:
auto ea, name;
for (ea = 0x401270; ea<0x4012e2; ea =ea+6 )
{
name = Name(Dword(Dfirst(ea))); /* get name */
name = substr(name, strstr(name, "_")+1, -1); /* drop the prefix */
MakeName(ea, name);
}
Now that we have run those scripts, we may stop the debugger (press Ctrl-F2) and copy back the memory contents. The “Load additional binary file” command in the File, Load menu is the way to go:
Please note that it is not necessary to create a segment, it already exists (clear the “create segments” flag). Also, the address is specified in paragraphs, i.e. it is shifted to the right by 4.
Load the file, press P at 0x401000 and voila, you have a nice listing:
The rest of the analysis is a pleasant and agreeable task left to the reader as…. you guessed it.
Decompiler
Prerequisites
The decompiler requires the latest version of IDA. While it may work with older versions (we try to ensure compatibility with a couple of previous versions), the best results are obtained with the latest version: first, IDA analyses files better; second, the decompiler can use additional available functionality.
The decompiler runs on MS Windows, Linux, and Mac OS X. It can decompile programs for other operating systems, provided they have been built using GCC/Clang/Visual Studio/Borland compilers.
IDA loads appropriate decompilers depending on the input file. If it cannot find any decompiler for the current input file, no decompilers will be loaded at all.
The GUI version of IDA is required for the interactive operation. For the text mode version, only the batch operation is supported.
Quick primer
Let’s start with a very short and simple function:
We decompile it with View, Open subviews, Pseudocode (hotkey F5):
While the generated C code makes sense, it is not pretty. There are many cast operations cluttering the text. The reason is that the decompiler does not perform the type recovery yet. Apparently, the a1 argument points to a structure but the decompiler missed it. Let us add some type information to the database and see what happens. For that we will open the Local Types window (Shift-F1) and add a new structure type:
After that, we switch back to the pseudocode window and specify the type of a1. We can do it by positioning the cursor on any occurrence of a1 and pressing Y:
When we press Enter, the decompilation output becomes much better:
But there is some room for improvement. We could rename the structure fields and specify their types. For example, field_6B1 seems to be used as a counter and field_6B5 is obviously a function pointer. We can do all this without switching windows now. Only the initial structure definition required the Local Types window. Here is how we specify the type of the function pointer field:
The final result looks like this:
Please note that there are no cast operations in the text and overall it looks much better than the initial version.
Exception handler
x64 MSVC C++ Exception Handler for the Decompiler
Hex-Rays’ support for exceptions in Microsoft Visual C++/x64
incorporates the C++ exception metadata for functions into their
decompilation, and presents the results to the user via built-in
constructs in the decompilation (try, catch, __wind,
__unwind). When the results cannot be presented entirely with
these constructs, they will be presented via helper calls in the
decompilation.
The documentation describes:
- Background behind C++ exception metadata. It is recommended that users read this first.
- Interactive operation via the GUI, configuration file, and keyboard shortcuts.
- A list of helper calls that may appear in the output.
- A note about the boundaries of
tryand__unwindregions. - Miscellaneous notes about the plugin.
BACKGROUND ON C++ EXCEPTIONS
TRY, CATCH, AND THROW
The C++ language provides the try scoped construct in which the
developer expects that an exception might occur. try blocks must be
followed by one or more scoped catch constructs for catching
exceptions that may occur within. catch blocks may use ... to
catch any exception. Alternatively, catch blocks may name the type
of an exception, such as std::bad_alloc. catch blocks with named
types may or may not also catch the exception object itself. For
example, catch(std::bad_alloc *v10) and catch(std::bad_alloc *) are both valid. The former can access the exception object through
variable v10, whereas the latter cannot access the exception object.
C++ provides the throw keyword for throwing an exception, as in
std::bad_alloc ba; throw ba;. This is represented in the output as
(for example) throw v10;. C++ also allows code to rethrow the
current exception via throw;. This is represented in the output as
throw;.
WIND AND UNWIND
Exception metadata in C++ binaries is split into two categories: try
and catch blocks, as discussed above, and so-called wind and
unwind blocks. C++ does not have wind and unwind keywords,
but the compiler creates these blocks implicitly. In most binaries, they
outnumber try and catch blocks by about 20 to 1.
Consider the following code, which may or may not throw an int as an
exception at three places:
void may_throw()
{
// Point -1
if ( rand() % 2 )
throw -1;
string s0 = "0";
// Point 0
if ( rand() % 2 )
throw 0;
string s1 = "1";
// Point 1
if ( rand() % 2 )
throw 1;
// Point 2
printf("%s %sn",
s0.c_str(),
s1.c_str());
// Implicit
// destruction
s1.~string();
s0.~string();
}
If an exception is thrown at point -1, the function exits early without executing any of its remaining code. As no objects have been created on the stack, nothing needs to be cleaned up before the function returns.
If an exception is thrown at point 0, the function exits early as
before. However, since string s0 has been created on the stack, it
needs to be destroyed before exiting the function. Similarly, if an
exception is thrown at point 1, both string s1 and string s0
must be destroyed.
These destructor calls would normally happen at the end of their
enclosing scope, i.e. the bottom of the function, where the compiler
inserts implicitly-generated destructor calls. However, since the
function does not have any try blocks, none of the function’s
remaining code will execute after the exception is thrown. Therefore,
the destructor calls at the bottom will not execute. If there were no
other mechanism for destructing s0 and/or s1, the result would
be memory leaks or other state management issues involving those
objects. Therefore, the C++ exception management runtime provides
another mechanism to invoke their destructors: wind blocks and their
corresponding unwind handlers.
wind blocks are effectively try blocks that are inserted
invisibly by the compiler. They begin immediately after constructing
some object, and end immediately before destructing that object. Their
unwind blocks play the role of catch handlers, calling the
destructor upon the object when exceptional control flow would otherwise
cause the destructor call to be skipped.
Microsoft Visual C++ effectively transforms the previous example as follows:
void may_throw_transformed()
{
if ( rand() % 2 )
throw -1;
string s0 = "0";
// Implicit try
__wind
{
if ( rand() % 2 )
throw 0;
string s1 = "1";
// Implicit try
__wind
{
if ( rand() % 2 )
throw 1;
printf("%s %sn",
s0.c_str(),
s1.c_str());
}
// Implicit catch
__unwind
{
s1.~string();
}
s1.~string();
}
// Implicit catch
__unwind
{
s0.~string();
}
s0.~string();
}
unwind blocks always re-throw the current exception, unlike
catch handlers, which may or may not re-throw it. Re-throwing the
exception ensures that prior wind blocks will have a chance to
execute. So, for example, if an exception is thrown at point 1, after
the unwind handler destroys string s1, re-throwing the exception
causes the unwind handler for point 0 to execute, thereby allowing it to
destroy string s0 before re-throwing the exception out of the
function.
STATE NUMBERS AND INSTRUCTION STATES
As we have discussed, the primary components of Microsoft Visual C++ x64
exception metadata are try blocks, catch handlers, wind
blocks, and unwind handlers. Generally speaking, these elements can
be nested within one another. For example, in C++ code, it is legal for
one try block to contain another, and a catch handler may
contain try blocks of its own. The same is true for wind and
unwind constructs: wind blocks may contain other wind blocks
(as in the previous example) or try blocks, and try and
catch blocks may contain wind blocks.
Exceptions must be processed in a particular sequence: namely, the most
nested handlers must be consulted first. For example, if a try block
contains another try block, any exceptions occurring within the
latter region must be processed by the innermost catch handlers
first. Only if none of the inner catch handlers can handle the
exception should the outer try block’s catch handlers be consulted.
Similarly, as in the previous example, unwind handlers must destruct
their corresponding objects before passing control to any previous
exception handlers (such as string s1’s unwind handler passing
control to string s0’s unwind handler).
Microsoft’s solution to ensure that exceptions are processed in the
proper sequence is simple. It assigns a “state number” to each
exception-handling construct. Each exception state has a “parent”
state number whose handler will be consulted if the current state’s
handler is unable to handle the exception. In the previous example, what
we called “point 0” is assigned the state number 0, while “point 1”
is assigned the state number 1. State 1 has a parent of 0. (State 0’s
parent is a dummy value, -1, that signifies that it has no parent.)
Since unwind handlers always re-throw exceptions, if state 1’s
unwind handler is ever invoked, the exception handling machinery
will always invoke state 0’s unwind handler afterwards. Because
state 0 has no parent, the exception machinery will re-throw the
exception out of the current function. This same machinery ensures that
the catch handlers for inner try blocks are consulted before outer
try blocks.
There is only one more piece to the puzzle: given that an exception
could occur anywhere, how does the exception machinery know which
exception handler should be consulted first? I.e., for every address
within a function with C++ exception metadata, what is the current
exception state? Microsoft C++/x64 binaries provide this information in
the IPtoStateMap metadata tables, which is an array of address
ranges and their corresponding state numbers.
GUI OPERATION
This support is fully automated and requires no user interaction. However, the user can customize the display of C++ exception metadata elements for the global database, as well as for individual functions.
GLOBAL SETTINGS
Under the Edit -> Other-> C++ exception display settings menu item,
the user can edit the default settings to control which exception
constructs are shown in the listing. These are saved persistently in the
database (i.e., the user’s choices are remembered after saving,
closing, and re-opening), and can also be adjusted on a per-function
basis (described later).
The settings on the dialog are as follows:
- Default output mode:
When the plugin is able to represent C++ exception constructs via nice constructs like
try,catch,__wind, and__unwindin the listings, these are called “structured” exception states. The plugin is not always able to represent exception metadata nicely, and may instead be forced to represent the metadata via helper calls in the listing (which are called “unstructured” states). As these can be messy and distracting, users may prefer not to see them by default. Alternatively, the user may prefer to see no exception metadata whatsoever, not even the structured ones. This setting allows the user to specify which types of metadata will be shown in the listing.
- Show wind states:
We discussed wind states and unwind handlers in the background material. Although these states can be very useful when reverse engineering C++ binaries (particularly when analyzing constructors), displaying them increases the amount of code in the listing, and sometimes the information they provide is more redundant than useful. Therefore, this checkbox allows the user to control whether they are shown by default.
- Inform user of hidden states:
The two settings just discussed can cause unstructured and/or wind states to be omitted from the default output. If this checkbox is enabled, then the plugin will inform the user of these omissions via messages at the top of the listing, such as this message indicating that one unstructured wind state was omitted:
// Hidden C++ exception states: #wind_helpers=1The contents of these messages depend upon the settings from above, and the facts about which states were hidden from display. If output of exception blocks is entirely disabled, the messages will not appear, even if this setting is enabled.
The following notes all assume that output is enabled.
If the settings indicated that unstructured states should be hidden, and there were hidden (unstructured)
trystates, the message will say something like#try_helpers=2.If the settings indicated that all
windstates should be hidden, then the message might say something like#wind=3to indicate the total number of hiddenwindstates.If the settings indicated that
windstates should be shown, but that unstructured states should be hidden, then the message might show something like#wind_helpers=1to indicate that one unstructuredwindstate was hidden.
There are three more elements on the settings dialog; most users should never have to use them. However, for completeness, we will describe them now.
- Warning behavior:
When internal warnings occur, they will either be printed to the output window at the bottom, or shown as a pop-up warning message box depending on this setting.
- Reset per-function settings:
The next section will discuss how the display settings described above can be customized on a per-function basis. This button allows the user to erase all such saved settings, such that all functions will use the global display settings the next time they are decompiled.
- Rebuild C++ metadata caches:
Before the plugin can show C++ exception metadata in the output, it must pre-process the metadata across the whole binary. Doing so crucially relies upon the ability to recognize the
__CxxFrameHandler3and/or__CxxFrameHandler4unwind handler functions when they are referenced by the binary’s unwind metadata. If the plugin fails to recognize one of these functions, then it will be unable to display C++ exception metadata for any function that uses the unrecognized unwind handler(s).If the user suspects that a failure like this has taken place – say, because they expect to see a
try/catchin the output and it is missing, and they have confirmed that the output was not simply hidden due to the display settings above – then this button may help them to diagnose and repair the issue. Pressing this button flushes the existing caches from the database and rebuilds them. It also prints output to tell the user which unwind handlers were recognized and which ones were not. The user can use these messages to confirm whether the function’s corresponding unwind handler was unrecognized. If it was not, the user can rename the unwind handler function to something that contains one of the two aforementioned names, and then rebuild the caches again.Note that users should generally not need to use this button, as the plugin tries several methods to recognize the unwind handlers (such as FLIRT signatures, recognizing import names, and looking at the destination of “thunk” functions with a single
jmpto a destination function). If the user sees any C++ exception metadata in the output, this almost always means that the recognition worked correctly. This button should only be used by experienced users as a last resort. Users are advised to save their database before pressing this button, and only proceed with the changes if renaming unwind handlers and rebuilding the cache addresses missing metadata in the output.
CONFIGURATION
The default options for the settings just described are controlled via
the %IDADIR%/cfg/eh34.cfg configuration file. Editing this file will
change the defaults for newly-created databases (but not affect existing
databases).
PER-FUNCTION SETTINGS
As just discussed, the user can control which C++ exception metadata is displayed in the output via the global menu item. Users can also customize these settings on a per-function basis (say, by enabling display of wind states for selected functions only), and they will be saved persistently in the database.
When a function has C++ exception metadata, one or more items will appear on Hex-Rays’ right click menu. The most general one is “C++ exception settings…”. Selecting this menu item will bring up a dialog that is similar to the global settings menu item with the following settings:
- Use global settings.
If the user previously changed the settings for the function, but wishes that the function be shown via the global settings in the future, they can select this item and press “OK”. This will delete the saved settings for the function, causing future decompilations to use the global settings.
- This function’s output mode:
This functions identically to “Default output mode” from the global settings dialog, but only affects the current function.
- Show wind states:
Again, identical to the global settings dialog item.
There is a button at the bottom, “Edit global settings”, which is
simply a shortcut to the same global settings dialog from the
Edit -> Other -> C++ exception display settings menu item.
The listing will automatically refresh if the user changes any settings.
Additionally, there are four other menu items that may or may not appear, depending upon the metadata present and whether the settings caused any metadata to be hidden. These menu items are shortcuts to editing the corresponding fields in the per-function settings dialog just discussed. They are:
- Show unstructured C++ states:
If the global or per-function default output setting was set to “Structured only”, and the function had unstructured states, this menu item will appear. Clicking it will enable display of unstructured states for the function and refresh the decompilation.
- Hide unstructured C++ states:
Similar to the above.
- Show wind states:
If the global or per-function “Show wind states” setting was disabled, and the function had wind states, this menu item will appear. Clicking it will enable display of wind states for the function and refresh the decompilation.
- Hide wind states:
Similar to the above.
KEYBOARD SHORTCUTS
The user can change (add, remove, or edit) the keyboard shortcuts for
the per-function settings right-click menu items from the
Edit -> Options -> Shortcuts dialog. The names of the corresponding
actions are:
| Title | Name |
|---|---|
| “Show unstructured C++ states” | eh34:enable_unstructured |
| “Hide unstructured C++ states” | eh34:disable_unstructured |
| “Show wind states” | eh34:enable_wind |
| “Hide wind states” | eh34:disable_wind |
| The global settings dialog | eh34:config_menu |
HELPER CALLS
Hex-Rays’ Microsoft C++ x64 exception support tries to hide low-level
details about exception state numbers as much as possible. However,
compiler optimizations can cause binaries to diverge from the original
source code. For example, inlined functions can produce goto
statements in the decompilation despite there being none in the source.
Optimizations can also cause C++ exception metadata to differ from the
original code. As a result, it is not always possible to represent
try, catch, wind, and unwind constructs as scoped regions that
hide the low-level details.
In these cases, Hex-Rays’ Microsoft C++ x64 exception support will
produce helper calls with informative names to indicate when exception
states are entered and exited, and to ensure that the user can see the
bodies of catch and unwind handlers in the output. The user can
hover their mouse over those calls to see their descriptions. They are
also catalogued below.
The following helper calls are used when exception states have multiple entrypoints, or multiple exits:
| Function name | Description |
|---|---|
__eh34_enter_wind_state(s1, s2) | switch state from parent state s1 to child wind state s2 |
__eh34_enter_try_state(s1, s2) | switch state from parent state s1 to child try state s2 |
__eh34_exit_wind_state(s1, s2) | switch state from child wind state s1 to parent state s2 |
__eh34_exit_try_state(s1, s2) | switch state from child try state s1 to parent state s2 |
The following helper calls are used when exception states had single
entry and exit points, but could not be represented via try or
__wind keywords:
| Function name | Description |
|---|---|
__eh34_wind(s1, s2) | switch state from parent state s1 to child state s2; a new c++ object that requires a dtr has been created |
__eh34_try(s1, s2) | switch state from parent state s1 to child state s2; mark beginning of a try block |
The following helper calls are used to display catch handlers for
exception states that could not be represented via the catch
keyword:
| Function name | Description |
|---|---|
__eh34_catch(s) | beginning of catch blocks at state s; s corresponds to the second argument of the matching try call (if present) |
__eh34_catch_type(s, "handler_address") | a catch statement for the type described at "handler_address" |
__eh34_catch_ellipsis(s) | catch all“ statement |
The following helper calls should be removed, but if you see them, they
signify the boundary of a catch handler:
| Function name | Description |
|---|---|
__eh34_try_continuation(s, i, ea) | end of catch handler i for state s, returning to address ea |
__eh34_caught_type(s, "handler_address") | a pairing call for __eh34_catch_type when catch handler has no continuation |
__eh34_caught_ellipsis(s) | “caught all”, paired with __eh34_catch_ellipsis when catch handler has no continuation |
The following helper calls are used to display unwind handlers for
exception states that could not be represented via the __unwind
keyword:
| Function name | Description |
|---|---|
__eh34_unwind(s) | destruct the c++ object created immediately before entering state s; s corresponds to the second argument of the matching wind call (if present) |
The following helper calls are used to signify that an unwind
handler has finished executing, and will transfer control to a parent
exception state (or outside of the function):
| Function name | Description |
|---|---|
__eh34_continue_unwinding(s1, s2) | after unwinding at child state s1, switch to parent state s2 and perform its unwind or catch action |
__eh34_propagate_exception_into_caller(s1, s2) | after unwinding at child state s1, switch to root state s2; this corresponds to the exception being propagated into the calling function |
The following helper call is used when the exception metadata did not
specify a function pointer for an unwind handler, which causes
program termination:
| Function name | Description |
|---|---|
__eh34_no_unwind_handler(s) | the state s did not have an unwind handler, which causes program termination in the event that an exception reaches it |
The following helper calls are used to signify that Hex-Rays was unable to display an exception handler in the decompilation:
| Function name | Description |
|---|---|
__eh34_unwind_handler_absent(s, ea) | could not inline unwind handler at ea for wind state s |
__eh34_catch_handler_absent(s, i, ea) | could not inline i’th catch handler at ea for try state s |
BOUNDARIES OF EXCEPTION REGIONS
From Microsoft Visual Studio versions 2005 (toolchain version 8.0) to 2017 Service Pack 2 (version 14.12), the compiler emitted detailed metadata that precisely defined the boundaries of all exception regions within C++ functions. This made binary files large, and not all of the metadata was strictly necessary for the runtime library to handle C++ exceptions correctly.
Starting from MSVC 2017 Service Pack 3 (version 14.13), the compiler
began applying optimizations to reduce the size of the C++ exception
metadata. An official Microsoft blog entry entitled:
“Making C++ Exception Handling Smaller on x64”
describes the first change as “dropping metadata for regions of code
that cannot throw and folding logically identical states”. (Version
14.23 later introduced the __CxxFrameHandler4 metadata format to
compress the metadata further.)
As a result of these changes, the C++ exception metadata in MSVC 14.13+ binaries is no longer fully precise. Exception states are frequently reported as beginning physically after where the source code would indicate. In order to produce usable output, Hex-Rays employs mathematical optimization algorithms to reconstruct more detailed C++ exception metadata configurations that can be displayed in a nicer format in the decompilation. These algorithms improve the listings by producing more structured regions and fewer helper calls in the output, but they introduce further imprecision as to the true starting and ending locations of exception regions when compared to the source code. They are an integral part of Hex-Rays C++/x64 Windows exception metadata support and cannot be disabled.
The takeaway is that, when processing MSVC 14.13+ binaries, Hex-Rays
C++/x64 Windows exception support frequently produces try and
__unwind blocks that begin and/or end earlier and/or later than
what the source code would indicate, were it available. This has
important consequences for vulnerability analysis.
For example, given accurate exception boundary information, the
destructor for a local object would ordinarily be situated after the end
of that object’s __wind and __unwind blocks, as in:
Object::Constructor(&v14);
__wind
{
// ...
}
__unwind
{
Object::Destructor(&v14);
}
// HERE: destructor after __wind region
Object::Destructor(&v14);
Yet, due to the imprecise boundary information, Hex-Rays might display
the destructor as being inside of the __wind block:
Object::Constructor(&v14);
__wind
{
// ...
// HERE: destructor inside of __wind region
Object::Destructor(&v14);
}
__unwind
{
Object::Destructor(&v14);
}
The latter output might indicate that v14’s destructor would be
called twice if its destructor were to throw an exception. However, this
indication is simply the result of imprecise exception region boundary
information. In short, users should be wary of diagnosing software bugs
or security issues based upon the positioning of statements nearby the
boundaries of try and __wind blocks. The example above
indicates something that might appear to be a bug in the code – a
destructor being called twice – but is in fact not one.
These considerations primarily apply when analyzing C++ binaries compiled with MSVC 14.13 or greater. They do not apply as much to binaries produced by MSVC 14.12 or earlier, when the compiler emitted fully precise information about exception regions.
Although Hex-Rays may improve its detection of exception region
boundaries in the future, because modern binaries lack the ground truth
of older binaries, the results will never be fully accurate. If the
imprecision is unacceptable to you, we recommend permanently disabling
C++ metadata display via the eh34.cfg file discussed previously.
MISCELLANEOUS
Hex-Rays’ support for exceptions in Microsoft Visual C++/x64 only works after auto-analysis has been completed. Users can explore the database and decompile functions as usual, but no C++ exception metadata will be shown. Users are advised to refresh any decompilation windows after auto-analysis has completed.
If users have enabled display of wind states, they may see empty
__wind or __unwind constructs in the output. Usually, this
does not indicate an error occurred; this usually means that the region
of the code corresponding the wind state was very small or contained
dead code, and Hex-Rays normal analysis and transformation made it
empty.
Starting in IDA 9.0, IDA’s auto-analysis preprocesses C++ exception
metadata differently than in previous versions. In particular, on
MSVC/x64 binaries, __unwind and catch handlers are created as
standalone functions, not as chunks of their parent function as in
earlier versions. This is required to display the exception metadata
correctly in the decompilation. For databases created with older
versions, the plugin will still show the outline of the exception
metadata, but the bodies of the __unwind and catch handlers
will be displayed via the helper calls
__eh34_unwind_handler_absent and
__eh34_catch_handler_absent, respectively. The plugin will also
print a warning at the top of the decompilation such as Absent C++ exception handlers: # catch=1 (pre-9.0 IDB) in these situations.
Re-creating the IDB with a newer version will solve those issues,
although users might still encounter absent handlers in new databases
(rarely, and under different circumstances).
Introduction to Decompilation vs. Disassembly
A decompiler represents executable binary files in a readable form. More precisely, it transforms binary code into text that software developers can read and modify. The software security industry relies on this transformation to analyze and validate programs. The analysis is performed on the binary code because the source code (the text form of the software) traditionally is not available, because it is considered a commercial secret.
Programs to transform binary code into text form have always existed. Simple one-to-one mapping of processor instruction codes into instruction mnemonics is performed by disassemblers. Many disassemblers are available on the market, both free and commercial. The most powerful disassembler is our own IDA Pro. It can handle binary code for a huge number of processors and has open architecture that allows developers to write add-on analytic modules.
Decompilers are different from disassemblers in one very important aspect. While both generate human readable text, decompilers generate much higher level text which is more concise and much easier to read.
Compared to low level assembly language, high level language representation has several advantages:
- It is consise.
- It is structured.
- It doesn’t require developers to know the assembly language.
- It recognizes and converts low level idioms into high level notions.
- It is less confusing and therefore easier to understand.
- It is less repetitive and less distracting.
- It uses data flow analysis.
Let’s consider these points in detail.
Usually the decompiler’s output is five to ten times shorter than the disassembler’s output. For example, a typical modern program contains from 400KB to 5MB of binary code. The disassembler’s output for such a program will include around 5-100MB of text, which can take anything from several weeks to several months to analyze completely. Analysts cannot spend this much time on a single program for economic reasons.
The decompiler’s output for a typical program will be from 400KB to 10MB. Although this is still a big volume to read and understand (about the size of a thick book), the time needed for analysis time is divided by 10 or more.
The second big difference is that the decompiler output is structured. Instead of a linear flow of instructions where each line is similar to all the others, the text is indented to make the program logic explicit. Control flow constructs such as conditional statements, loops, and switches are marked with the appropriate keywords.
The decompiler’s output is easier to understand than the disassembler’s output because it is high level. To be able to use a disassembler, an analyst must know the target processor’s assembly language. Mainstream programmers do not use assembly languages for everyday tasks, but virtually everyone uses high level languages today. Decompilers remove the gap between the typical programming languages and the output language. More analysts can use a decompiler than a disassembler.
Decompilers convert assembly level idioms into high-level abstractions. Some idioms can be quite long and time consuming to analyze. The following one line code
x = y / 2;
can be transformed by the compiler into a series of 20-30 processor instructions. It takes at least 15- 30 seconds for an experienced analyst to recognize the pattern and mentally replace it with the original line. If the code includes many such idioms, an analyst is forced to take notes and mark each pattern with its short representation. All this slows down the analysis tremendously. Decompilers remove this burden from the analysts.
The amount of assembler instructions to analyze is huge. They look very similar to each other and their patterns are very repetitive. Reading disassembler output is nothing like reading a captivating story. In a compiler generated program 95% of the code will be really boring to read and analyze. It is extremely easy for an analyst to confuse two similar looking snippets of code, and simply lose his way in the output. These two factors (the size and the boring nature of the text) lead to the following phenomenon: binary programs are never fully analyzed. Analysts try to locate suspicious parts by using some heuristics and some automation tools. Exceptions happen when the program is extremely small or an analyst devotes a disproportionally huge amount of time to the analysis. Decompilers alleviate both problems: their output is shorter and less repetitive. The output still contains some repetition, but it is manageable by a human being. Besides, this repetition can be addressed by automating the analysis.
Repetitive patterns in the binary code call for a solution. One obvious solution is to employ the computer to find patterns and somehow reduce them into something shorter and easier for human analysts to grasp. Some disassemblers (including IDA Pro) provide a means to automate analysis. However, the number of available analytical modules stays low, so repetitive code continues to be a problem. The main reason is that recognizing binary patterns is a surprisingly difficult task. Any “simple” action, including basic arithmetic operations such as addition and subtraction, can be represented in an endless number of ways in binary form. The compiler might use the addition operator for subtraction and vice versa. It can store constant numbers somewhere in its memory and load them when needed. It can use the fact that, after some operations, the register value can be proven to be a known constant, and just use the register without reinitializing it. The diversity of methods used explains the small number of available analytical modules.
The situation is different with a decompiler. Automation becomes much easier because the decompiler provides the analyst with high level notions. Many patterns are automatically recognized and replaced with abstract notions. The remaining patterns can be detected easily because of the formalisms the decompiler introduces. For example, the notions of function parameters and calling conventions are strictly formalized. Decompilers make it extremely easy to find the parameters of any function call, even if those parameters are initialized far away from the call instruction. With a disassembler, this is a daunting task, which requires handling each case individually.
Decompilers, in contrast with disassemblers, perform extensive data flow analysis on the input. This means that questions such as, “Where is the variable initialized?”“ and, “Is this variable used?” can be answered immediately, without doing any extensive search over the function. Analysts routinely pose and answer these questions, and having the answers immediately increases their productivity.
Side-by-side comparisons of disassembly and decompilation
Below you will find side-by-side comparisons of disassembly and decompilation outputs. The following examples are available:
The following examples are displayed on this page:
- Division by two
- Simple enough?
- Where’s my variable?
- Arithmetics is not a rocket science
- Sample window procedure
- Short-circuit evaluation
- Inlined string operations
Division by two
Just note the difference in size! While the disassemble output requires you not only to know that the compilers generate such convoluted code for signed divisions and modulo operations, but you will also have to spend your time recognizing the patterns. Needless to say, the decompiler makes things really simple.
{% tabs %} {% tab title=“Assembler code” %}
; =============== S U B R O U T I N E =======================================
; int __cdecl sub_4061C0(char *Str, char *Dest)
sub_4061C0 proc near ; CODE XREF: sub_4062F0+15p
; sub_4063D4+21p ...
Str = dword ptr 4
Dest = dword ptr 8
push esi
push offset aSmtp_ ; "smtp."
push [esp+8+Dest] ; Dest
call _strcpy
mov esi, [esp+0Ch+Str]
push esi ; Str
call _strlen
add esp, 0Ch
xor ecx, ecx
test eax, eax
jle short loc_4061ED
loc_4061E2: ; CODE XREF: sub_4061C0+2Bj
cmp byte ptr [ecx+esi], 40h
jz short loc_4061ED
inc ecx
cmp ecx, eax
jl short loc_4061E2
loc_4061ED: ; CODE XREF: sub_4061C0+20j
; sub_4061C0+26j
dec eax
cmp ecx, eax
jl short loc_4061F6
xor eax, eax
pop esi
retn
; ---------------------------------------------------------------------------
loc_4061F6: ; CODE XREF: sub_4061C0+30j
lea eax, [ecx+esi+1]
push eax ; Source
push [esp+8+Dest] ; Dest
call _strcat
pop ecx
pop ecx
push 1
pop eax
pop esi
retn
sub_4061C0 endp
{% endtab %}
{% tab title=“Pseudocode” %}
signed int __cdecl sub_4061C0(char *Str, char *Dest)
{
int len; // eax@1
int i; // ecx@1
char *str2; // esi@1
signed int result; // eax@5
strcpy(Dest, "smtp.");
str2 = Str;
len = strlen(Str);
for ( i = 0; i < len; ++i )
{
if ( str2[i] == 64 )
break;
}
if ( i < len - 1 )
{
strcat(Dest, &str2[i + 1]);
result = 1;
}
else
{
result = 0;
}
return result;
}
{% endtab %} {% endtabs %}
Simple enough?
Questions like
- What are the possible return values of the function?
- Does the function use any strings?
- What does the function do?
can be answered almost instantaneously looking at the decompiler output. Needless to say that it looks better because I renamed the local variables. In the disassembler, registers are renamed very rarely because it hides the register use and can lead to confusion.
{% tabs %} {% tab title=“Assembler code” %}
; =============== S U B R O U T I N E =======================================
; int __cdecl sub_4061C0(char *Str, char *Dest)
sub_4061C0 proc near ; CODE XREF: sub_4062F0+15p
; sub_4063D4+21p ...
Str = dword ptr 4
Dest = dword ptr 8
push esi
push offset aSmtp_ ; "smtp."
push [esp+8+Dest] ; Dest
call _strcpy
mov esi, [esp+0Ch+Str]
push esi ; Str
call _strlen
add esp, 0Ch
xor ecx, ecx
test eax, eax
jle short loc_4061ED
loc_4061E2: ; CODE XREF: sub_4061C0+2Bj
cmp byte ptr [ecx+esi], 40h
jz short loc_4061ED
inc ecx
cmp ecx, eax
jl short loc_4061E2
loc_4061ED: ; CODE XREF: sub_4061C0+20j
; sub_4061C0+26j
dec eax
cmp ecx, eax
jl short loc_4061F6
xor eax, eax
pop esi
retn
; ---------------------------------------------------------------------------
loc_4061F6: ; CODE XREF: sub_4061C0+30j
lea eax, [ecx+esi+1]
push eax ; Source
push [esp+8+Dest] ; Dest
call _strcat
pop ecx
pop ecx
push 1
pop eax
pop esi
retn
sub_4061C0 endp
{% endtab %}
{% tab title=“Pseudocode” %}
signed int __cdecl sub_4061C0(char *Str, char *Dest)
{
int len; // eax@1
int i; // ecx@1
char *str2; // esi@1
signed int result; // eax@5
strcpy(Dest, "smtp.");
str2 = Str;
len = strlen(Str);
for ( i = 0; i < len; ++i )
{
if ( str2[i] == 64 )
break;
}
if ( i < len - 1 )
{
strcat(Dest, &str2[i + 1]);
result = 1;
}
else
{
result = 0;
}
return result;
}
{% endtab %} {% endtabs %}
Where’s my variable?
IDA highlights the current identifier. This feature turns out to be much more useful with high level output. In this sample, I tried to trace how the retrieved function pointer is used by the function. In the disassembly output, many wrong eax occurrences are highlighted while the decompiler did exactly what I wanted.
{% tabs %}
{% tab title=“Assembler code” %}
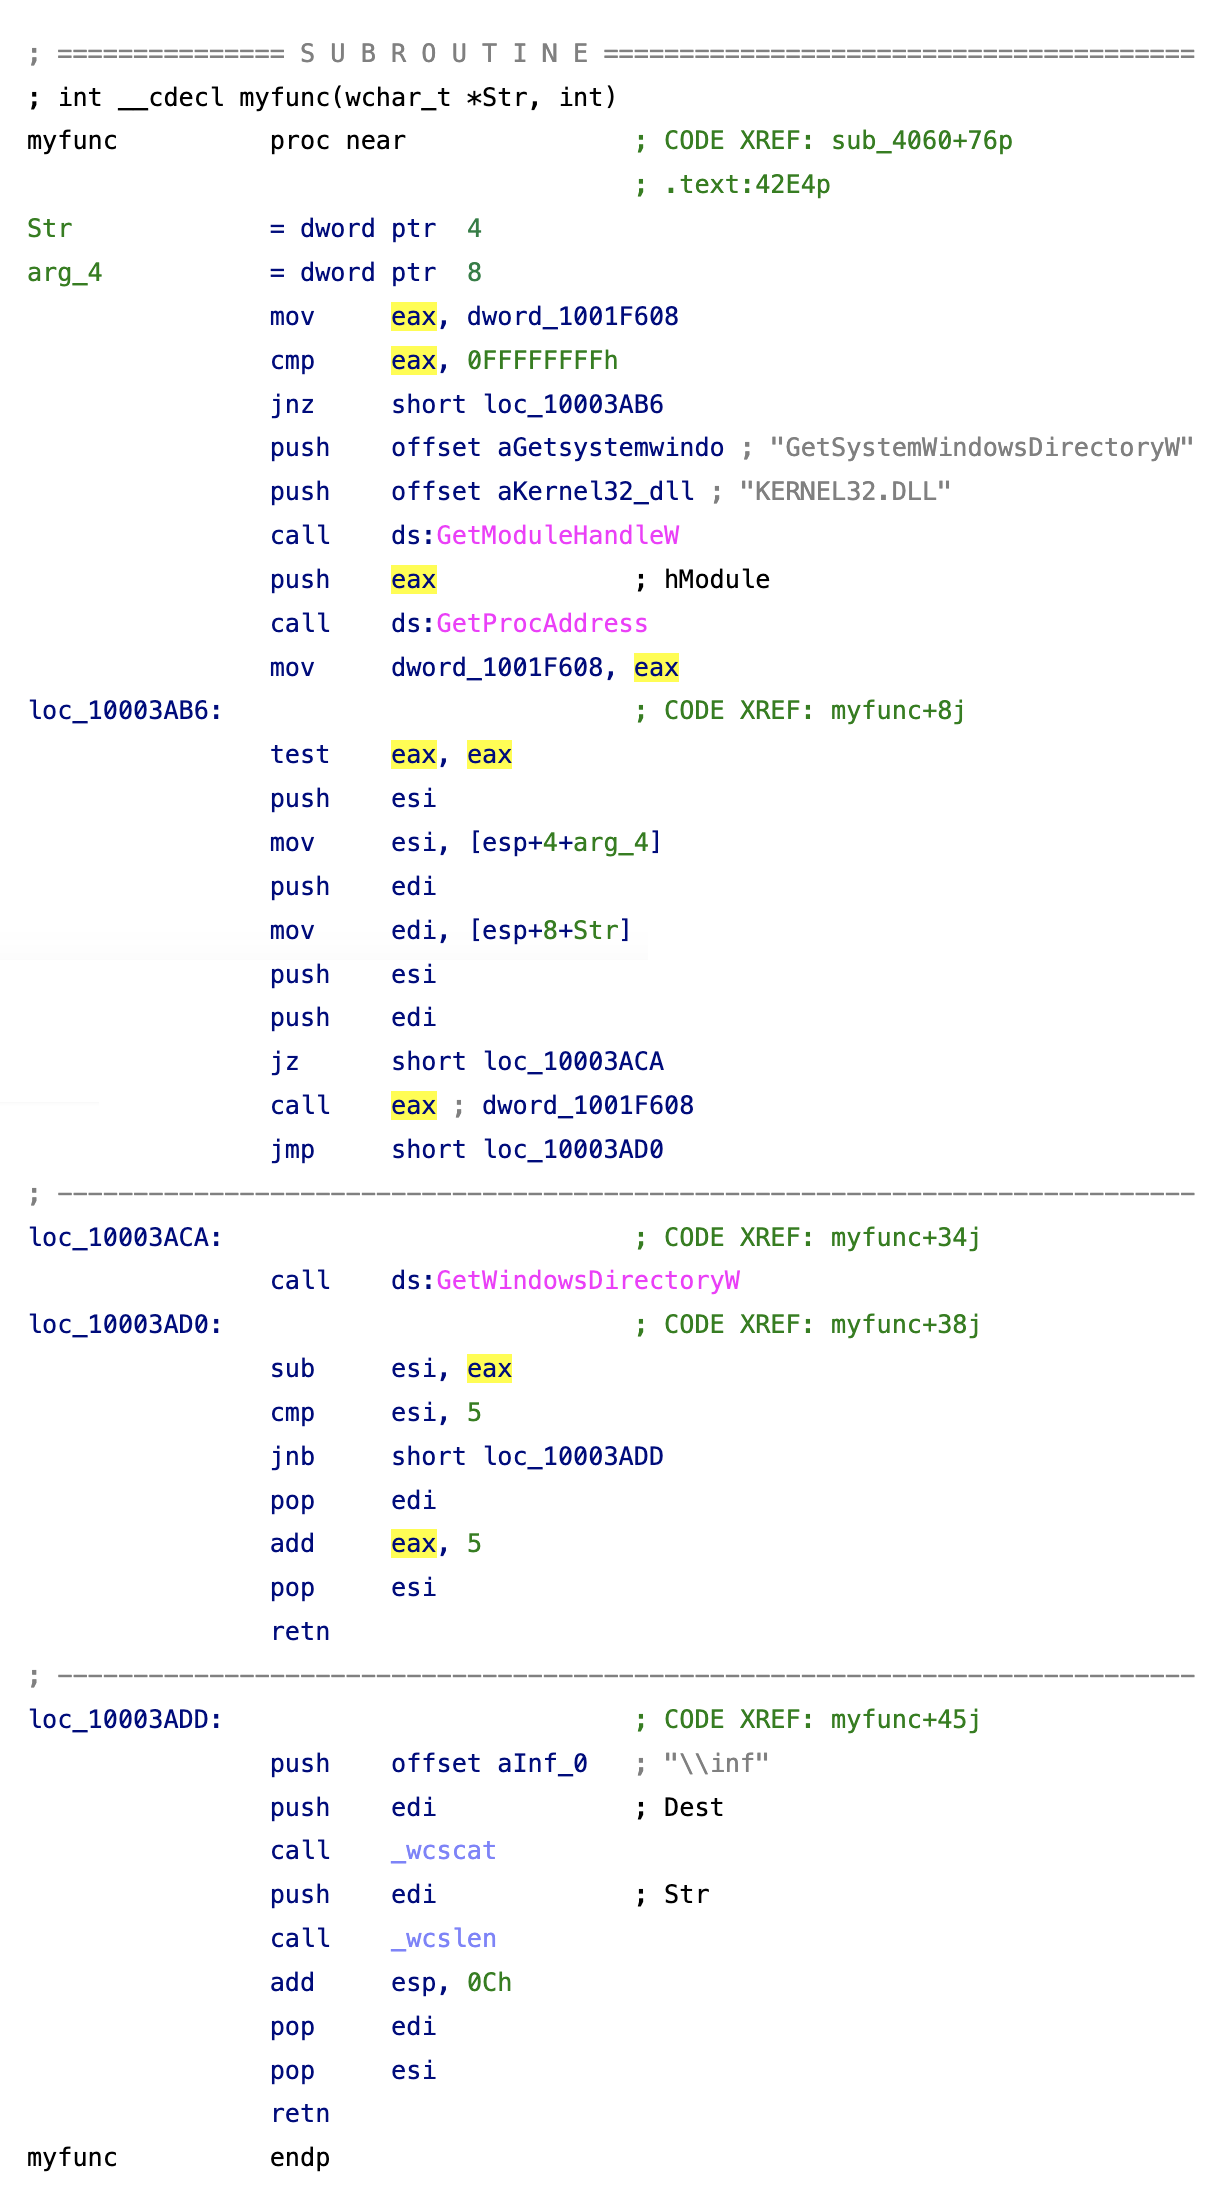 {% endtab %}
{% tab title=“Pseudocode” %}
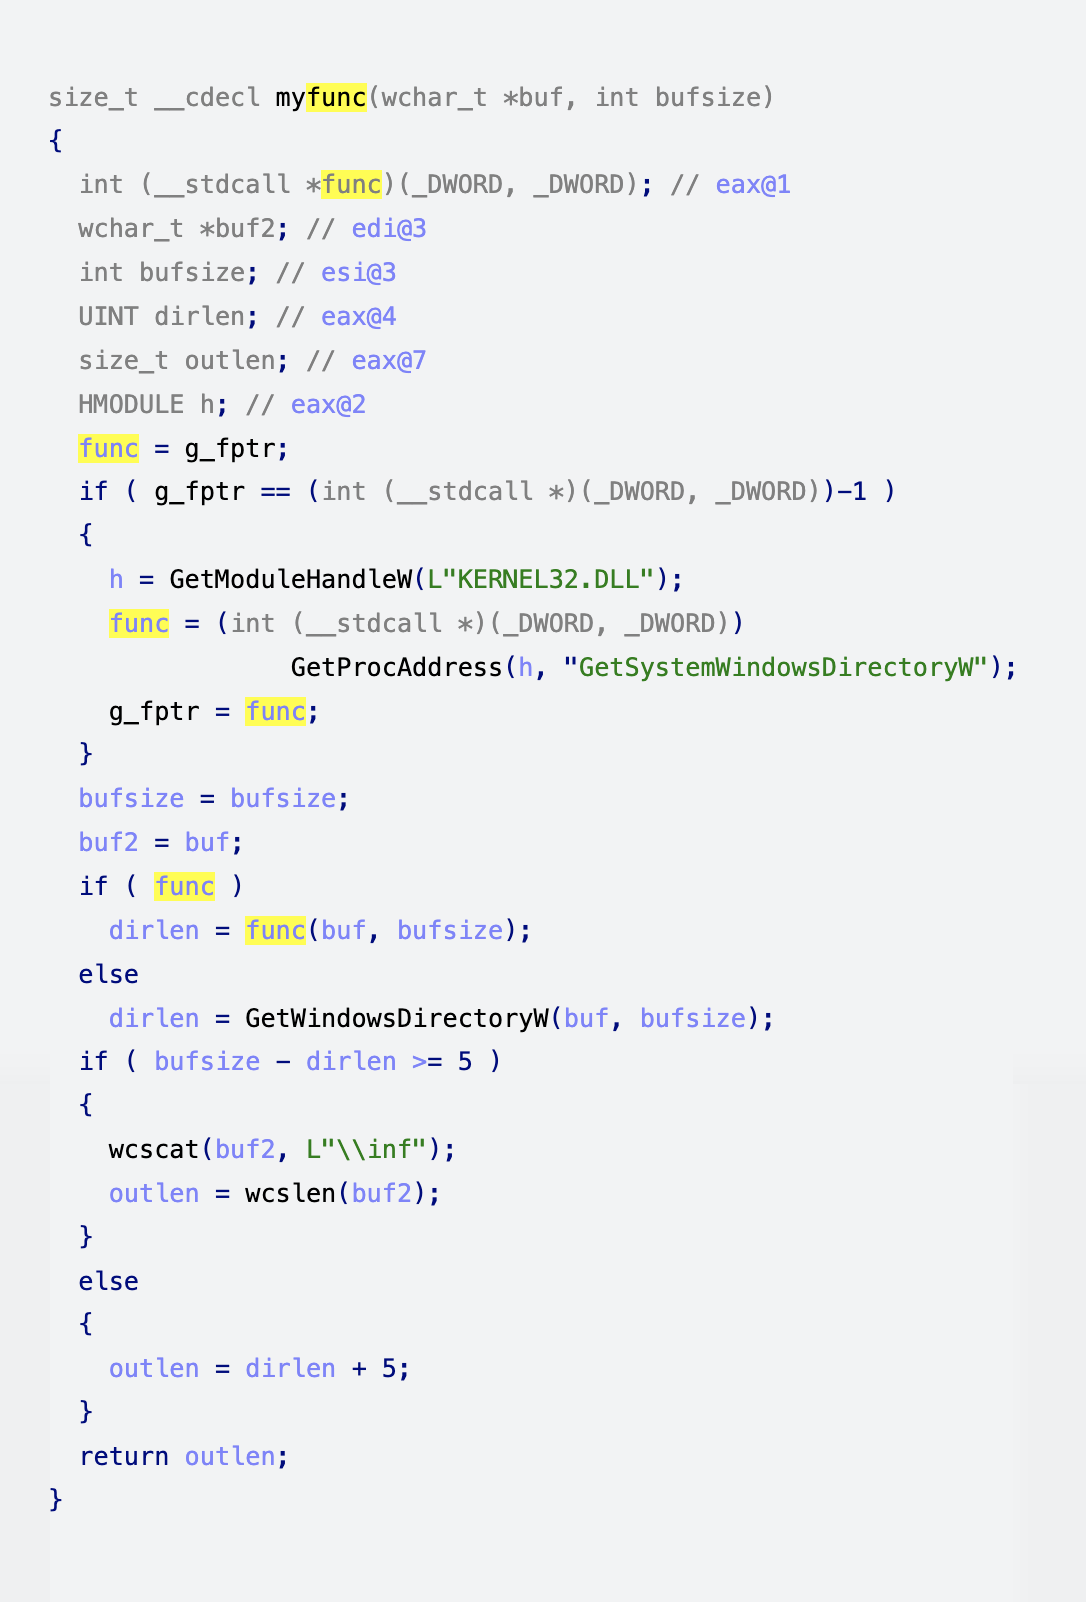 {% endtab %}
{% endtabs %}
{% endtab %}
{% endtabs %}
{% tabs %} {% tab title=“Assembler code” %}
; =============== S U B R O U T I N E =======================================
; int __cdecl myfunc(wchar_t *Str, int)
myfunc proc near ; CODE XREF: sub_4060+76p
; .text:42E4p
Str = dword ptr 4
arg_4 = dword ptr 8
mov eax, dword_1001F608
cmp eax, 0FFFFFFFFh
jnz short loc_10003AB6
push offset aGetsystemwindo ; "GetSystemWindowsDirectoryW"
push offset aKernel32_dll ; "KERNEL32.DLL"
call ds:GetModuleHandleW
push eax ; hModule
call ds:GetProcAddress
mov dword_1001F608, eax
loc_10003AB6: ; CODE XREF: myfunc+8j
test eax, eax
push esi
mov esi, [esp+4+arg_4]
push edi
mov edi, [esp+8+Str]
push esi
push edi
jz short loc_10003ACA
call eax ; dword_1001F608
jmp short loc_10003AD0
; ---------------------------------------------------------------------------
loc_10003ACA: ; CODE XREF: myfunc+34j
call ds:GetWindowsDirectoryW
loc_10003AD0: ; CODE XREF: myfunc+38j
sub esi, eax
cmp esi, 5
jnb short loc_10003ADD
pop edi
add eax, 5
pop esi
retn
; ---------------------------------------------------------------------------
loc_10003ADD: ; CODE XREF: myfunc+45j
push offset aInf_0 ; "\\inf"
push edi ; Dest
call _wcscat
push edi ; Str
call _wcslen
add esp, 0Ch
pop edi
pop esi
retn
myfunc endp
{% endtab %}
{% tab title=“Pseudocode” %}
size_t __cdecl myfunc(wchar_t *buf, int bufsize)
{
int (__stdcall *func)(_DWORD, _DWORD); // eax@1
wchar_t *buf2; // edi@3
int bufsize; // esi@3
UINT dirlen; // eax@4
size_t outlen; // eax@7
HMODULE h; // eax@2
func = g_fptr;
if ( g_fptr == (int (__stdcall *)(_DWORD, _DWORD))-1 )
{
h = GetModuleHandleW(L"KERNEL32.DLL");
func = (int (__stdcall *)(_DWORD, _DWORD))
GetProcAddress(h, "GetSystemWindowsDirectoryW");
g_fptr = func;
}
bufsize = bufsize;
buf2 = buf;
if ( func )
dirlen = func(buf, bufsize);
else
dirlen = GetWindowsDirectoryW(buf, bufsize);
if ( bufsize - dirlen >= 5 )
{
wcscat(buf2, L"\\inf");
outlen = wcslen(buf2);
}
else
{
outlen = dirlen + 5;
}
return outlen;
}
{% endtab %} {% endtabs %}
Arithmetics is not a rocket science
Arithmetics is not a rocket science but it is always better if someone handles it for you. You have more important things to focus on.
{% tabs %} {% tab title=“Assembler code” %}
; =============== S U B R O U T I N E =======================================
; Attributes: bp-based frame
; sgell(__int64, __int64)
public @sgell$qjj
@sgell$qjj proc near
arg_0 = dword ptr 8
arg_4 = dword ptr 0Ch
arg_8 = dword ptr 10h
arg_C = dword ptr 14h
push ebp
mov ebp, esp
mov eax, [ebp+arg_0]
mov edx, [ebp+arg_4]
cmp edx, [ebp+arg_C]
jnz short loc_10226
cmp eax, [ebp+arg_8]
setnb al
jmp short loc_10229
; ---------------------------------------------------------------------------
loc_10226: ; CODE XREF: sgell(__int64,__int64)+Cj
setnl al
loc_10229: ; CODE XREF: sgell(__int64,__int64)+14j
and eax, 1
pop ebp
retn
@sgell$qjj endp
{% endtab %}
{% tab title=“Pseudocode” %}
bool __cdecl sgell(__int64 a1, __int64 a2)
{
return a1 >= a2;
}
{% endtab %} {% endtabs %}
Sample window procedure
The decompiler recognized a switch statement and nicely represented the window procedure. Without this little help the user would have to calculate the message numbers herself. Nothing particularly difficult, just time consuming and boring. What if she makes a mistake?…
{% tabs %} {% tab title=“Assembler code” %}
; =============== S U B R O U T I N E =======================================
wndproc proc near ; DATA XREF: sub_4010E0+21o
Paint = tagPAINTSTRUCT ptr -0A4h
Buffer = byte ptr -64h
hWnd = dword ptr 4
Msg = dword ptr 8
wParam = dword ptr 0Ch
lParam = dword ptr 10h
mov ecx, hInstance
sub esp, 0A4h
lea eax, [esp+0A4h+Buffer]
push 64h ; nBufferMax
push eax ; lpBuffer
push 6Ah ; uID
push ecx ; hInstance
call ds:LoadStringA
mov ecx, [esp+0A4h+Msg]
mov eax, ecx
sub eax, 2
jz loc_4013E8
sub eax, 0Dh
jz loc_4013B2
sub eax, 102h
jz short loc_401336
mov edx, [esp+0A4h+lParam]
mov eax, [esp+0A4h+wParam]
push edx ; lParam
push eax ; wParam
push ecx ; Msg
mov ecx, [esp+0B0h+hWnd]
push ecx ; hWnd
call ds:DefWindowProcA
add esp, 0A4h
retn 10h
; ---------------------------------------------------------------------------
loc_401336: ; CODE XREF: wndproc+3Cj
mov ecx, [esp+0A4h+wParam]
mov eax, ecx
and eax, 0FFFFh
sub eax, 68h
jz short loc_40138A
dec eax
jz short loc_401371
mov edx, [esp+0A4h+lParam]
mov eax, [esp+0A4h+hWnd]
push edx ; lParam
push ecx ; wParam
push 111h ; Msg
push eax ; hWnd
call ds:DefWindowProcA
add esp, 0A4h
retn 10h
; ---------------------------------------------------------------------------
loc_401371: ; CODE XREF: wndproc+7Aj
mov ecx, [esp+0A4h+hWnd]
push ecx ; hWnd
call ds:DestroyWindow
xor eax, eax
add esp, 0A4h
retn 10h
; ---------------------------------------------------------------------------
loc_40138A: ; CODE XREF: wndproc+77j
mov edx, [esp+0A4h+hWnd]
mov eax, hInstance
push 0 ; dwInitParam
push offset DialogFunc ; lpDialogFunc
push edx ; hWndParent
push 67h ; lpTemplateName
push eax ; hInstance
call ds:DialogBoxParamA
xor eax, eax
add esp, 0A4h
retn 10h
; ---------------------------------------------------------------------------
loc_4013B2: ; CODE XREF: wndproc+31j
push esi
mov esi, [esp+0A8h+hWnd]
lea ecx, [esp+0A8h+Paint]
push ecx ; lpPaint
push esi ; hWnd
call ds:BeginPaint
push eax ; HDC
push esi ; hWnd
call my_paint
add esp, 8
lea edx, [esp+0A8h+Paint]
push edx ; lpPaint
push esi ; hWnd
call ds:EndPaint
pop esi
xor eax, eax
add esp, 0A4h
retn 10h
; ---------------------------------------------------------------------------
loc_4013E8: ; CODE XREF: wndproc+28j
push 0 ; nExitCode
call ds:PostQuitMessage
xor eax, eax
add esp, 0A4h
retn 10h
wndproc endp
{% endtab %}
{% tab title=“Pseudocode” %}
LRESULT __stdcall wndproc(HWND hWnd, UINT Msg, WPARAM wParam, LPARAM lParam)
{
LRESULT result; // eax@4
HWND h; // esi@10
HDC dc; // eax@10
CHAR Buffer; // [sp+40h] [bp-64h]@1
struct tagPAINTSTRUCT Paint; // [sp+0h] [bp-A4h]@10
LoadStringA(hInstance, 0x6Au, &Buffer, 100);
switch ( Msg )
{
case 2u:
PostQuitMessage(0);
result = 0;
break;
case 15u:
h = hWnd;
dc = BeginPaint(hWnd, &Paint);
my_paint(h, dc);
EndPaint(h, &Paint);
result = 0;
break;
case 273u:
if ( (_WORD)wParam == 104 )
{
DialogBoxParamA(hInstance, (LPCSTR)0x67, hWnd, DialogFunc, 0);
result = 0;
}
else
{
if ( (_WORD)wParam == 105 )
{
DestroyWindow(hWnd);
result = 0;
}
else
{
result = DefWindowProcA(hWnd, 0x111u, wParam, lParam);
}
}
break;
default:
result = DefWindowProcA(hWnd, Msg, wParam, lParam);
break;
}
return result;
}
{% endtab %} {% endtabs %}
Short-circuit evaluation
This is an excerpt from a big function to illustrate short-circuit evaluation. Complex things happen in long functions and it is very handy to have the decompiler to represent things in a human way. Please note how the code that was scattered over the address space is concisely displayed in two if statements.
{% tabs %} {% tab title=“Assembler code” %}
loc_804BCC7: ; CODE XREF: sub_804BB10+A42j
mov [esp+28h+var_24], offset aUnzip ; "unzip"
xor eax, eax
test esi, esi
setnz al
mov edx, 1
mov ds:dword_804FBAC, edx
lea eax, [eax+eax+1]
mov ds:dword_804F780, eax
mov eax, ds:dword_804FFD4
mov [esp+28h+var_28], eax
call _strstr
test eax, eax
jz loc_804C4F1
loc_804BCFF: ; CODE XREF: sub_804BB10+9F8j
mov eax, 2
mov ds:dword_804FBAC, eax
loc_804BD09: ; CODE XREF: sub_804BB10+9FEj
mov [esp+28h+var_24], offset aZ2cat ; "z2cat"
mov eax, ds:dword_804FFD4
mov [esp+28h+var_28], eax
call _strstr
test eax, eax
jz loc_804C495
loc_804BD26: ; CODE XREF: sub_804BB10+99Cj
; sub_804BB10+9B9j ...
mov eax, 2
mov ds:dword_804FBAC, eax
xor eax, eax
test esi, esi
setnz al
inc eax
mov ds:dword_804F780, eax
.............................. SKIP ............................
loc_804C495: ; CODE XREF: sub_804BB10+210j
mov [esp+28h+var_24], offset aZ2cat_0 ; "Z2CAT"
mov eax, ds:dword_804FFD4
mov [esp+28h+var_28], eax
call _strstr
test eax, eax
jnz loc_804BD26
mov [esp+28h+var_24], offset aZcat ; "zcat"
mov eax, ds:dword_804FFD4
mov [esp+28h+var_28], eax
call _strstr
test eax, eax
jnz loc_804BD26
mov [esp+28h+var_24], offset aZcat_0 ; "ZCAT"
mov eax, ds:dword_804FFD4
mov [esp+28h+var_28], eax
call _strstr
test eax, eax
jnz loc_804BD26
jmp loc_804BD3D
; ---------------------------------------------------------------------------
loc_804C4F1: ; CODE XREF: sub_804BB10+1E9j
mov [esp+28h+var_24], offset aUnzip_0 ; "UNZIP"
mov eax, ds:dword_804FFD4
mov [esp+28h+var_28], eax
call _strstr
test eax, eax
jnz loc_804BCFF
jmp loc_804BD09
{% endtab %}
{% tab title=“Pseudocode” %}
dword_804F780 = 2 * (v9 != 0) + 1;
if ( strstr(dword_804FFD4, "unzip") || strstr(dword_804FFD4, "UNZIP") )
dword_804FBAC = 2;
if ( strstr(dword_804FFD4, "z2cat")
|| strstr(dword_804FFD4, "Z2CAT")
|| strstr(dword_804FFD4, "zcat")
|| strstr(dword_804FFD4, "ZCAT") )
{
dword_804FBAC = 2;
dword_804F780 = (v9 != 0) + 1;
}
{% endtab %} {% endtabs %}
Inlined string operations
The decompiler tries to recognize frequently inlined string functions such as strcmp, strchr, strlen, etc. In this code snippet, calls to the strlen function has been recognized.
{% tabs %} {% tab title=“Assembler code” %}
mov eax, [esp+argc]
sub esp, 8
push ebx
push ebp
push esi
lea ecx, ds:0Ch[eax*4]
push edi
push ecx ; unsigned int
call ??2@YAPAXI@Z ; operator new(uint)
mov edx, [esp+1Ch+argv]
mov ebp, eax
or ecx, 0FFFFFFFFh
xor eax, eax
mov esi, [edx]
add esp, 4
mov edi, esi
repne scasb
not ecx
dec ecx
cmp ecx, 4
jl short loc_401064
cmp byte ptr [ecx+esi-4], '.'
jnz short loc_401064
mov al, [ecx+esi-3]
cmp al, 'e'
jz short loc_401047
cmp al, 'E'
jnz short loc_401064
loc_401047: ; CODE XREF: _main+41j
mov al, [ecx+esi-2]
cmp al, 'x'
jz short loc_401053
cmp al, 'X'
jnz short loc_401064
loc_401053: ; CODE XREF: _main+4Dj
mov al, [ecx+esi-1]
cmp al, 'e'
jz short loc_40105F
cmp al, 'E'
jnz short loc_401064
loc_40105F: ; CODE XREF: _main+59j
mov byte ptr [ecx+esi-4], 0
loc_401064: ; CODE XREF: _main+32j _main+39j ...
mov edi, esi
or ecx, 0FFFFFFFFh
xor eax, eax
repne scasb
not ecx
add ecx, 3
push ecx ; unsigned int
call ??2@YAPAXI@Z ; operator new(uint)
mov edx, eax
{% endtab %} {% endtabs %}
Comparisons of ARM disassembly and decompilation
Here are some side-by-side comparisons of disassembly and decompiler for ARM. Please maximize the window too see both columns simultaneously.
The following examples are displayed on this page:
- Simple case
- 64-bit arithmetics
- Conditional instructions
- Conditional instructions - 2
- Complex instructions
- Compiler helper functions
- Immediate constants
- Position independent code
Simple case
Let’s start with a very simple function. It accepts a pointer to a structure and zeroes out its first three fields. While the function logic is obvious by just looking at the decompiler output, the assembly listing has too much noise and requires studying it.
The decompiler saves your time and allows you to concentrate on more exciting aspects of reverse engineering.
{% tabs %} {% tab title=“Assembler code” %}
; struct_result *__fastcall sub_210DC(struct_result *result)
var_10 = -0x10
var_4 = -4
MOV R12, SP
STMFD SP!, {R0}
STMFD SP!, {R12,LR}
SUB SP, SP, #4
LDR R2, [SP,#0x10+var_4]
MOV R3, #0
STR R3, [R2]
LDR R3, [SP,#0x10+var_4]
ADD R2, R3, #4
MOV R3, #0
STR R3, [R2]
LDR R3, [SP,#0x10+var_4]
ADD R2, R3, #8
MOV R3, #0
STR R3, [R2]
LDR R3, [SP,#0x10+var_4]
STR R3, [SP,#0x10+var_10]
LDR R0, [SP,#0x10+var_10]
ADD SP, SP, #4
LDMFD SP, {SP,LR}
BX LR
; End of function sub_210DC
{% endtab %}
{% tab title=“Pseudocode” %}
struct_result *__fastcall sub_210DC(struct_result *result)
{
result->dword0 = 0;
result->dword4 = 0;
result->dword8 = 0;
return result;
}
{% endtab %} {% endtabs %}
64-bit arithmetics
Sorry for a long code snippet, ARM code tends to be longer compared to x86 code. This makes our comparison even more impressive: look at how concise is the decompiler output!
{% tabs %} {% tab title=“Assembler code” %}
; bool __cdecl uh_gt_uc()
EXPORT _uh_gt_uc__YA_NXZ
_uh_gt_uc__YA_NXZ ; DATA XREF: .pdata:$T7452o
var_2C = -0x2C
var_28 = -0x28
var_24 = -0x24
var_20 = -0x20
var_1C = -0x1C
var_18 = -0x18
var_14 = -0x14
var_10 = -0x10
var_C = -0xC
var_8 = -8
var_4 = -4
STR LR, [SP,#var_4]! ; $M7441
; $LN8@uh_gt_uc
SUB SP, SP, #0x28
$M7449
BL uh
STR R1, [SP,#0x2C+var_24]
STR R0, [SP,#0x2C+var_28]
BL uc
STRB R0, [SP,#0x2C+var_20]
LDRB R3, [SP,#0x2C+var_20]
STR R3, [SP,#0x2C+var_1C]
LDR R1, [SP,#0x2C+var_1C]
LDR R3, [SP,#0x2C+var_1C]
MOV R2, R3,ASR#31
LDR R3, [SP,#0x2C+var_28]
STR R3, [SP,#0x2C+var_18]
LDR R3, [SP,#0x2C+var_24]
STR R3, [SP,#0x2C+var_14]
LDR R3, [SP,#0x2C+var_18]
STR R3, [SP,#0x2C+var_10]
STR R1, [SP,#0x2C+var_C]
LDR R3, [SP,#0x2C+var_14]
CMP R3, R2
BCC $LN3_8
loc_6AC
BHI $LN5_0
loc_6B0
LDR R2, [SP,#0x2C+var_10]
LDR R3, [SP,#0x2C+var_C]
CMP R2, R3
BLS $LN3_8
$LN5_0
MOV R3, #1
STR R3, [SP,#0x2C+var_8]
B $LN4_8
; ---------------------------------------------------------------------------
$LN3_8
; uh_gt_uc(void)+68j
MOV R3, #0
STR R3, [SP,#0x2C+var_8]
$LN4_8
LDR R3, [SP,#0x2C+var_8]
AND R3, R3, #0xFF
STRB R3, [SP,#0x2C+var_2C]
LDRB R0, [SP,#0x2C+var_2C]
ADD SP, SP, #0x28
LDR PC, [SP+4+var_4],#4
; End of function uh_gt_uc(void)
{% endtab %}
{% tab title=“Pseudocode” %}
bool __fastcall uh_gt_uc()
{
unsigned __int64 v0; // ST04_8@1
v0 = uh();
return v0 > uc();
}
{% endtab %} {% endtabs %}
Conditional instructions
The ARM processor has conditional instructions that can shorten the code but require high attention from the reader. The case above is very simple, just note that there is a pair of instructions: MOVNE and LDREQSH. Only one of them will be executed at once. This is how simple if-then-else looks in ARM.
The pseudocode shows it much better and does not require any explanations.
A quiz question: did you notice that MOVNE loads zero to R0? (because I didn’t:)
Also note that in the disassembly listing we see var_8 but the location really used is var_A, which corresponds to v4.
{% tabs %} {% tab title=“Assembler code” %}
; int __cdecl ReadShort(void *, unsigned __int32 offset, int whence)
ReadShort
whence = -0x18
var_A = -0xA
var_8 = -8
STMFD SP!, {R4,LR}
SUB SP, SP, #0x10 ; whence
MOV R4, #0
ADD R3, SP, #0x18+var_8
STRH R4, [R3,#-2]!
STR R2, [SP,#0x18+whence] ; whence
MOV R2, R3 ; buffer
MOV R3, #2 ; len
BL ReadData
CMP R0, R4
MOVNE R0, R4
LDREQSH R0, [SP,#0x18+var_A]
ADD SP, SP, #0x10
LDMFD SP!, {R4,PC}
; End of function ReadShort
{% endtab %}
{% tab title=“Pseudocode” %}
int __cdecl ReadShort(void *a1, unsigned __int32 offset, int whence)
{
int result; // r0@2
__int16 v4; // [sp+Eh] [bp-Ah]@1
v4 = 0;
if ( ReadData(a1, offset, &v4, 2u, whence) )
result = 0;
else
result = v4;
return result;
}
{% endtab %} {% endtabs %}
Conditional instructions - 2
Look, the decompiler output is longer! This is a rare case when the pseudocode is longer than the disassembly listing, but it is a for a good cause: to keep it readable. There are so many conditional instructions here, it is very easy to misunderstand the dependencies. For example, did you notice that the first MOVEQ may use the condition codes set by CMP? The subtle detail is that CMPNE may be skipped and the condition codes set by CMP may reach MOVEQs.
The decompiler represented it perfectly well. I renamed some variables and set their types, but this was an easy task.
{% tabs %} {% tab title=“Assembler code” %}
; signed int __fastcall get_next_byte(entry_t *entry)
get_next_byte ; DATA XREF: sub_3BC+30o
;
LDR R2, [R0,#4]
CMP R2, #0
LDRNE R3, [R0]
LDRNEB R1, [R3],#1
CMPNE R1, #0
MOVEQ R1, #1
STREQ R1, [R0,#0xC]
MOVEQ R0, 0xFFFFFFFF
MOVEQ PC, LR
SUB R2, R2, #1
STR R2, [R0,#4]
STR R3, [R0]
MOV R0, R1
RET
; End of function get_next_byte
{% endtab %}
{% tab title=“Pseudocode” %}
signed int __fastcall get_next_byte(entry_t *entry)
{
signed int chr; // r1@0
unsigned __int8 *ptr; // r3@0
int count; // r2@1
char done; // zf@1
signed int result; // r0@4
count = entry->count;
done = count == 0;
if ( count )
{
ptr = entry->ptr + 1;
chr = *entry->ptr;
done = chr == 0;
}
if ( done )
{
entry->done = 1;
result = -1;
}
else
{
entry->count = count - 1;
entry->ptr = ptr;
result = chr;
}
return result;
}
{% endtab %} {% endtabs %}
Complex instructions
Conditional instructions are just part of the story. ARM is also famous for having a plethora of data movement instructions. They come with a set of possible suffixes that subtly change the meaning of the instruction. Take STMCSIA, for example. It is a STM instruction, but then you have to remember that CS means “carry set” and IA means “increment after”.
In short, the disassembly listing is like Chinese. The pseudocode is longer but requires much less time to understand.
{% tabs %} {% tab title=“Assembler code” %}
; void __fastcall sub_2A38(list_t *ptr, unsigned int a2)
sub_2A38 ; CODE XREF: sub_5C8+48p
; sub_648+5Cp ...
MOV R2, #0
STMFD SP!, {LR}
MOV R3, R2
MOV R12, R2
MOV LR, R2
SUBS R1, R1, #0x20
loc_2A50 ; CODE XREF: sub_2A38+24j
STMCSIA R0!, {R2,R3,R12,LR}
STMCSIA R0!, {R2,R3,R12,LR}
SUBCSS R1, R1, #0x20
BCS loc_2A50
MOVS R1, R1,LSL#28
STMCSIA R0!, {R2,R3,R12,LR}
STMMIIA R0!, {R2,R3}
LDMFD SP!, {LR}
MOVS R1, R1,LSL#2
STRCS R2, [R0],#4
MOVEQ PC, LR
STRMIH R2, [R0],#2
TST R1, #0x40000000
STRNEB R2, [R0],#1
RET
; End of function sub_2A38
{% endtab %}
{% tab title=“Pseudocode” %}
void __fastcall sub_2A38(list_t *ptr, unsigned int a2)
{
char copybig; // cf@1
unsigned int size; // r1@1
list_t *v4; // r0@3
int remains; // r1@4
int final; // r1@8
copybig = a2 >= 0x20;
size = a2 - 32;
do
{
if ( !copybig )
break;
ptr->dword0 = 0;
ptr->dword4 = 0;
ptr->dword8 = 0;
ptr->dwordC = 0;
v4 = ptr + 1;
v4->dword0 = 0;
v4->dword4 = 0;
v4->dword8 = 0;
v4->dwordC = 0;
ptr = v4 + 1;
copybig = size >= 0x20;
size -= 32;
}
while ( copybig );
remains = size << 28;
if ( copybig )
{
ptr->dword0 = 0;
ptr->dword4 = 0;
ptr->dword8 = 0;
ptr->dwordC = 0;
++ptr;
}
if ( remains < 0 )
{
ptr->dword0 = 0;
ptr->dword4 = 0;
ptr = (list_t *)((char *)ptr + 8);
}
final = 4 * remains;
if ( copybig )
{
ptr->dword0 = 0;
ptr = (list_t *)((char *)ptr + 4);
}
if ( final )
{
if ( final < 0 )
{
LOWORD(ptr->dword0) = 0;
ptr = (list_t *)((char *)ptr + 2);
}
if ( final & 0x40000000 )
LOBYTE(ptr->dword0) = 0;
}
}
{% endtab %} {% endtabs %}
Compiler helper functions
Sorry for another long code snippet. Just wanted to show you that the decompiler can handle compiler helper functions (like __divdi3) and handles 64-bit arithmetic quite well.
{% tabs %} {% tab title=“Assembler code” %}
EXPORT op_two64
op_two64 ; CODE XREF: refer_all+31Cp
; main+78p
anonymous_1 = -0x28
var_20 = -0x20
anonymous_0 = -0x18
var_10 = -0x10
arg_0 = 4
000 MOV R12, SP
000 STMFD SP!, {R4,R11,R12,LR,PC}
014 SUB R11, R12, #4
014 SUB SP, SP, #0x18
02C SUB R4, R11, #-var_10
02C STMDB R4, {R0,R1}
02C MOV R1, 0xFFFFFFF0
02C SUB R12, R11, #-var_10
02C ADD R1, R12, R1
02C STMIA R1, {R2,R3}
02C LDR R3, [R11,#arg_0]
02C CMP R3, #1
02C BNE loc_9C44
02C MOV R3, 0xFFFFFFF0
02C SUB R0, R11, #-var_10
02C ADD R3, R0, R3
02C SUB R4, R11, #-var_10
02C LDMDB R4, {R1,R2}
02C LDMIA R3, {R3,R4}
02C ADDS R3, R3, R1
02C ADC R4, R4, R2
02C SUB R12, R11, #-var_20
02C STMDB R12, {R3,R4}
02C B loc_9D04
; ---------------------------------------------------------------------------
loc_9C44 ; CODE XREF: op_two64+30j
02C LDR R3, [R11,#arg_0]
02C CMP R3, #2
02C BNE loc_9C7C
02C MOV R3, 0xFFFFFFF0
02C SUB R0, R11, #-var_10
02C ADD R3, R0, R3
02C SUB R4, R11, #-var_10
02C LDMDB R4, {R1,R2}
02C LDMIA R3, {R3,R4}
02C SUBS R3, R1, R3
02C SBC R4, R2, R4
02C SUB R12, R11, #-var_20
02C STMDB R12, {R3,R4}
02C B loc_9D04
; ---------------------------------------------------------------------------
loc_9C7C ; CODE XREF: op_two64+68j
02C LDR R3, [R11,#arg_0]
02C CMP R3, #3
02C BNE loc_9CB8
02C MOV R3, 0xFFFFFFF0
02C SUB R0, R11, #-var_10
02C ADD R3, R0, R3
02C SUB R2, R11, #-var_10
02C LDMDB R2, {R0,R1}
02C LDMIA R3, {R2,R3}
02C BL __muldi3
02C MOV R4, R1
02C MOV R3, R0
02C SUB R12, R11, #-var_20
02C STMDB R12, {R3,R4}
02C B loc_9D04
; ---------------------------------------------------------------------------
loc_9CB8 ; CODE XREF: op_two64+A0j
02C LDR R3, [R11,#arg_0]
02C CMP R3, #4
02C BNE loc_9CF4
02C MOV R3, 0xFFFFFFF0
02C SUB R0, R11, #-var_10
02C ADD R3, R0, R3
02C SUB R2, R11, #-var_10
02C LDMDB R2, {R0,R1}
02C LDMIA R3, {R2,R3}
02C BL __divdi3
02C MOV R4, R1
02C MOV R3, R0
02C SUB R12, R11, #-var_20
02C STMDB R12, {R3,R4}
02C B loc_9D04
; ---------------------------------------------------------------------------
loc_9CF4 ; CODE XREF: op_two64+DCj
02C MOV R3, 0xFFFFFFFF
02C MOV R2, 0xFFFFFFFF
02C SUB R4, R11, #-var_20
02C STMDB R4, {R2,R3}
loc_9D04 ; CODE XREF: op_two64+5Cj
; op_two64+94j ...
02C SUB R12, R11, #-var_20
02C LDMDB R12, {R0,R1}
02C SUB SP, R11, #0x10
014 LDMFD SP, {R4,R11,SP,PC}
; End of function op_two64
{% endtab %}
{% tab title=“Pseudocode” %}
signed __int64 __fastcall op_two64(signed __int64 a1, signed __int64 a2, int a3)
{
signed __int64 v4; // [sp+0h] [bp-28h]@2
switch ( a3 )
{
case 1:
v4 = a2 + a1;
break;
case 2:
v4 = a1 - a2;
break;
case 3:
v4 = a1 * a2;
break;
case 4:
v4 = a1 / a2;
break;
default:
v4 = -1LL;
break;
}
return v4;
}
{% endtab %} {% endtabs %}
Immediate constants
Since ARM instructions cannot have big immediate constants, sometimes they are loaded with two instructions. There are many 0xFA (250 decimal) constants in the disassembly listing, but all of them are shifted to the left by 2 before use. The decompiler saves you from these petty details.
Also a side: the decompiler can handle ARM mode as well as Thumb mode instructions. It just does not care about the instruction encoding because it is already handled by IDA.
{% tabs %} {% tab title=“Assembly code” %}
loc_110D6 ; CODE XREF: sub_10E38+43Cj
; sub_10E38+442j ...
LDR R1, =(tmin_ptr - 0x1CDB8)
LDR R2, =(tmax_ptr - 0x1CDB8)
LDR R0, =(aRttMinAvgMaxMd - 0x1CDB8)
LDR R6, [R7,R1]
LDR R5, [R7,R2]
MOVS R3, #0xFA
LDR R4, [R6]
LSLS R1, R3, #2
LDR R6, [R5]
ADDS R5, R7, R0 ; "rtt min/avg/max/mdev = %ld.%03ld/%lu.%0"...
MOVS R0, R4
BLX __aeabi_idiv
MOV R8, R0
MOVS R0, R4
MOVS R4, #0xFA
LSLS R1, R4, #2
BLX __aeabi_idivmod
LDR R3, =0
LDR R2, =0x3E8
MOVS R4, R1
LDR R0, [SP,#0x78+var_40]
LDR R1, [SP,#0x78+var_40+4]
BLX __aeabi_ldivmod
LDR R3, =0
LDR R2, =0x3E8
STR R0, [SP,#0x78+var_50]
STR R1, [SP,#0x78+var_4C]
LDR R0, [SP,#0x78+var_40]
LDR R1, [SP,#0x78+var_40+4]
BLX __aeabi_ldivmod
MOVS R1, #0xFA
MOVS R0, R6
LSLS R1, R1, #2
STR R2, [SP,#0x78+var_78]
BLX __aeabi_idiv
STR R0, [SP,#0x78+var_74]
MOVS R0, R6
MOVS R6, #0xFA
LSLS R1, R6, #2
BLX __aeabi_idivmod
MOVS R2, #0xFA
STR R1, [SP,#0x78+var_70]
LDR R0, [SP,#0x78+var_38]
LSLS R1, R2, #2
BLX __aeabi_idiv
MOVS R3, #0xFA
STR R0, [SP,#0x78+var_6C]
LSLS R1, R3, #2
LDR R0, [SP,#0x78+var_38]
BLX __aeabi_idivmod
MOVS R0, R5 ; format
STR R1, [SP,#0x78+var_68]
MOVS R2, R4
MOV R1, R8
LDR R3, [SP,#0x78+var_50]
BLX printf
{% endtab %}
{% tab title=“Pseudocode” %}
printf(
"rtt min/avg/max/mdev = %ld.%03ld/%lu.%03ld/%ld.%03ld/%ld.%03ld ms",
tmin / 1000,
tmin % 1000,
v27 / 1000,
v27 % 1000,
tmax / 1000,
tmax % 1000,
v28 / 1000,
v28 % 1000);
{% endtab %} {% endtabs %}
Position independent code
In some case the disassembly listing can be misleading, especially with PIC (position independent code). While the address of a constant string is loaded into R12, the code does not care about it. It is just how variable addresses are calculated in PIC-code (it is .got-someoffset). Such calculations are very frequent in shared objects and unfortunately IDA cannot handle all of them. But the decompiler did a great job of tracing R12.
{% tabs %} {% tab title=“Assembly code” %}
sub_65768 ; DATA XREF: .data:007E37A4o
var_18 = -0x18
var_14 = -0x14
var_10 = -0x10
arg_0 = 0
PUSH {LR}
LDR.W R12, =aResponsetype ; "responseType"
SUB SP, SP, #0x14
ADR.W LR, loc_65774
loc_65774 ; DATA XREF: sub_65768+8o
ADD R12, LR
LDR.W LR, [SP,#0x18+arg_0]
STR.W LR, [SP,#0x18+var_18]
MOV.W LR, #0x10
STR.W LR, [SP,#0x18+var_14]
LDR.W LR, =0xFFF0883C
ADD R12, LR
STR.W R12, [SP,#0x18+var_10]
BL sub_65378
ADD SP, SP, #0x14
POP {PC}
; End of function sub_65768
{% endtab %}
{% tab title=“Pseudocode” %}
int __fastcall sub_65768(int a1, int a2, int a3, int a4, int a5)
{
return sub_65378(a1, a2, a3, a4, a5, 16, (int)myarray);
}
{% endtab %} {% endtabs %}
Comparisons of PowerPC disassembly and decompilation
Here are some side-by-side comparisons of disassembly and decompiler for PowerPC. Please maximize the window too see both columns simultaneously.
The following examples are displayed on this page:
- Simple code
- Linear execution
- 64-bit comparison
- System calls
- Compiler helpers
- Floating point arithmetic
- Magic multiplication/division operations
- VLE code
- Interactive decompiler
Simple code
This simple function calculates the sum of the squares of the first N natural numbers. While the function logic is obvious by just looking at the decompiler output, the assembly listing has too much noise and requires studying it. The decompiler saves your time and allows you to concentrate on more exciting aspects of reverse engineering.
{% tabs %} {% tab title=“Assembler code” %}
f:
.set back_chain, -0x20
.set var_4, -4
stw r31, var_4(r1)
stwu r1, back_chain(r1)
mr r31, r1
stw r3, 0x14(r31)
mr r4, r3
cmpwi r3, 0
stw r4, 8(r31)
bgt loc_30
b loc_24
loc_24:
li r3, 0
stw r3, 0x18(r31)
b loc_88
loc_30:
li r3, 0
stw r3, 0x10(r31)
stw r3, 0xC(r31)
b loc_40
loc_40:
lwz r3, 0x14(r31)
lwz r4, 0xC(r31)
cmpw r4, r3
bge loc_7C
b loc_54
loc_54:
lwz r3, 0xC(r31)
mullw r3, r3, r3
lwz r4, 0x10(r31)
add r3, r4, r3
stw r3, 0x10(r31)
b loc_6C
loc_6C:
lwz r3, 0xC(r31)
addi r3, r3, 1
stw r3, 0xC(r31)
b loc_40
loc_7C:
lwz r3, 0x10(r31)
stw r3, 0x18(r31)
b loc_88
loc_88:
lwz r3, 0x18(r31)
addi r1, r1, 0x20
lwz r31, var_4(r1)
blr
# End of function f
{% endtab %}
{% tab title=“Pseudocode” %}
int __fastcall f(int a1)
{
int i; // [sp+Ch] [-14h]@3
int v3; // [sp+10h] [-10h]@3
if ( a1 )
return 0;
v3 = 0;
for ( i = 0; i < a1; ++i )
v3 += i * i;
return v3;
}
{% endtab %} {% endtabs %}
Linear execution
The PowerPC processor has a number of instructions which can be used to avoid branches (for example cntlzw). The decompiler restores the conditional logic and makes code easier to understand.
{% tabs %} {% tab title=“Assembler code” %}
# _DWORD c_eq_s(void)
.globl _Z6c_eq_sv
_Z6c_eq_sv:
.set back_chain, -0x10
.set var_8, -8
.set var_4, -4
.set sender_lr, 4
stwu r1, back_chain(r1)
mflr r0
stw r0, 0x10+sender_lr(r1)
stw r30, 0x10+var_8(r1)
stw r31, 0x10+var_4(r1)
mr r31, r1
bl c
mr r9, r3
extsh r30, r9
bl s
mr r9, r3
xor r9, r30, r9
cntlzw r9, r9
srwi r9, r9, 5
clrlwi r9, r9, 24
mr r3, r9
addi r11, r31, 0x10
lwz r0, 4(r11)
mtlr r0
lwz r30, -8(r11)
lwz r31, -4(r11)
mr r1, r11
blr
# End of function c_eq_s(void)
{% endtab %}
{% tab title=“Pseudocode” %}
bool c_eq_s(void)
{
int v0; // r30@1
v0 = c();
return v0 == s();
}
{% endtab %} {% endtabs %}
64-bit comparison
64-bit comparison usually involves several compare and branch instructions which do not improve the code readability.
{% tabs %} {% tab title=“Assembler code” %}
.globl i_ge_uh
i_ge_uh:
.set back_chain, -0x10
.set var_4, -4
stwu r1, back_chain(r1)
stw r31, 0x10+var_4(r1)
mr r31, r1
lis r9, i@ha
lwz r9, i@l(r9)
mr r8, r9
srawi r9, r9, 0x1F
mr r7, r9
lis r9, uh@ha
addi r9, r9, uh@l
lwz r10, (uh+4 - uh)(r9)
lwz r9, 0(r9)
cmplw cr7, r9, r7
bgt cr7, loc_7028
cmplw cr7, r9, r7
bne cr7, loc_7020
cmplw cr7, r10, r8
bgt cr7, loc_7028
loc_7020:
li r9, 1
b loc_702C
loc_7028:
li r9, 2
loc_702C:
mr r3, r9
addi r11, r31, 0x10
lwz r31, -4(r11)
mr r1, r11
blr
# End of function i_ge_uh
{% endtab %}
{% tab title=“Pseudocode” %}
signed int i_ge_uh()
{
signed int v0; // r9@2 7029 TYPED
if ( uh unsigned __int64)i )
v0 = 1;
else
v0 = 2;
return v0;
}
{% endtab %} {% endtabs %}
System calls
System call is always mysterious, but decompiler helps you with its name and arguments.
{% tabs %} {% tab title=“Assembler code” %}
mr r3, r26 # set
bl .sigfillset
li r0, 0xAE
li r3, 2
mr r4, r26
mr r5, r29
li r6, 8
sc
mfcr r0
lwz r5, (off_F9A704C - dword_F9A7130)(r30) # sub_F9920A4 # start_routine
mr r4, r31 # attr
mr r6, r28 # arg
addi r3, r1, 0x180+var_54 # newthread
bl .pthread_create
li r0, 0xAE
mr r26, r3
mr r4, r29
li r3, 2
li r5, 0
li r6, 8
sc
mfcr r0
mr r3, r31 # attr
bl .pthread_attr_destroy
{% endtab %}
{% tab title=“Pseudocode” %}
...
sigset_t v36; // [sp+8h] [-178h]@47 F992C04 TYPED
sigset_t v37; // [sp+88h] [-F8h]@47 F992BEC TYPED
pthread_attr_t v38; // [sp+108h] [-78h]@47 F992BC4 TYPED
__int16 v39; // [sp+12Ch] [-54h]@47 F992C1C
...
_sigfillset(&v37);
v29 = linux_syscall(__NR_rt_sigprocmask, 2, &v37, &v36);
v30 = _pthread_create((pthread_t *)&v39, &v38, (void *(*)(void *))0x93C10018, v11);
v31 = linux_syscall(__NR_rt_sigprocmask, 2, &v36, 0);
_pthread_attr_destroy(&v38);
{% endtab %} {% endtabs %}
Compiler helpers
Compiler sometime uses helpers and decompiler knows the meaning of the many helpers and uses it to simplify code.
{% tabs %} {% tab title=“Assembler code” %}
.globl lldiv # weak
lldiv:
.set back_chain, -0x30
.set var_18, -0x18
.set var_14, -0x14
.set var_10, -0x10
.set var_C, -0xC
.set var_8, -8
.set var_4, -4
.set sender_lr, 4
stwu r1, back_chain(r1)
mflr r0
stw r28, 0x30+var_10(r1)
mr r28, r5
stw r29, 0x30+var_C(r1)
mr r29, r6
stw r31, 0x30+var_4(r1)
mr r5, r7
mr r31, r3
mr r6, r8
mr r3, r28
mr r4, r29
stw r0, 0x30+sender_lr(r1)
stw r26, 0x30+var_18(r1)
mr r26, r7
stw r27, 0x30+var_14(r1)
mr r27, r8
stw r30, 0x30+var_8(r1)
bl __divdi3
stw r3, 0(r31)
mr r5, r26
stw r4, 4(r31)
mr r6, r27
mr r3, r28
mr r4, r29
bl __moddi3
lwz r0, 0x30+sender_lr(r1)
stw r3, 8(r31)
mr r3, r31
stw r4, 0xC(r31)
mtlr r0
lwz r26, 0x30+var_18(r1)
lwz r27, 0x30+var_14(r1)
lwz r28, 0x30+var_10(r1)
lwz r29, 0x30+var_C(r1)
lwz r30, 0x30+var_8(r1)
lwz r31, 0x30+var_4(r1)
addi r1, r1, 0x30
blr
# End of function lldiv
{% endtab %}
{% tab title=“Pseudocode” %}
__int64 *__fastcall lldiv(__int64 *result, int a2, __int64 a3, __int64 a4)
{
*result = a3 / a4;
result[1] = a3 % a4;
return result;
}
{% endtab %} {% endtabs %}
Floating point arithmetic
The PowerPC processor contains a number of complex floating point instructions which perform several operations at once. It is not easy to recover an expression from the assembler code but not for the decompiler.
{% tabs %} {% tab title=“Assembler code” %}
.globl _x2y2m1f
_x2y2m1f:
lis r9, unk_20@ha
lfs f0, unk_20@l(r9)
fsub f12, f1, f0
fadd f0, f1, f0
fmul f0, f12, f0
fmadd f1, f1, f2, f0
blr
# End of function _x2y2m1f
{% endtab %}
{% tab title=“Pseudocode” %}
double __fastcall x2y2m1f(double a1, double a2)
{
return a1 * ((a1 - 1.0) * (a1 + 1.0)) + a2;
}
{% endtab %} {% endtabs %}
Magic multiplication/division operations
Compilers can decompose a multiplication/division instruction into a sequence of cheaper instructions (additions, shifts, etc). This example demonstrates how the decompiler recognizes them and coagulates back to the original operation.
{% tabs %} {% tab title=“Assembler code” %}
# __int64 __fastcall int_u_mod_10()
.globl int_u_mod_10
int_u_mod_10:
.set back_chain, -0x20
.set var_C, -0xC
.set var_8, -8
.set var_4, -4
.set sender_lr, 4
stwu r1, back_chain(r1)
mflr r0
stw r0, 0x20+sender_lr(r1)
stw r29, 0x20+var_C(r1)
stw r30, 0x20+var_8(r1)
stw r31, 0x20+var_4(r1)
mr r31, r1
bl u
mr r10, r3
lis r9, -0x3334
ori r9, r9, 0xCCCD # 0xCCCCCCCD
mulhwu r9, r10, r9
srwi r9, r9, 3
mulli r9, r9, 0xA
subf r9, r9, r10
mr r30, r9
li r29, 0
mr r9, r29
mr r10, r30
mr r3, r9
mr r4, r10
addi r11, r31, 0x20
lwz r0, 4(r11)
mtlr r0
lwz r29, -0xC(r11)
lwz r30, -8(r11)
lwz r31, -4(r11)
mr r1, r11
blr
# End of function int_u_mod_10
{% endtab %}
{% tab title=“Pseudocode” %}
__int64 __fastcall int_u_mod_10()
{
return u() % 0xAu;
}
{% endtab %} {% endtabs %}
VLE code
This example demonstrates that the decompiler can handle VLE code without problems.
{% tabs %} {% tab title=“Assembler code” %}
sub_498E:
se_mr r6, r3
se_mr r7, r4
se_add r7, r6
se_subi r7, 1
se_li r5, 0
se_b loc_49A2
# ---------------------------------------------------------------------------
loc_499A:
se_lbz r4, 0(r6)
se_add r5, r4
se_extzh r5
se_addi r6, 1
loc_49A2:
se_cmpl r6, r7
se_ble loc_499A
se_mr r7, r5
se_mr r3, r7
se_blr
# End of function sub_498E
{% endtab %}
{% tab title=“Pseudocode” %}
int __fastcall sub_498E(unsigned __int8 *a1, int a2)
{
unsigned __int8 *v2; // r6@1 498F TYPED
int v3; // r5@1 4997
v2 = a1;
v3 = 0;
while ( v2 a1[a2 - 1] )
v3 = (unsigned __int16)(v3 + *v2++);
return v3;
}
{% endtab %} {% endtabs %}
Interactive decompiler
The pseudocode is not something static because the decompiler is interactive the same way as IDA. You can change variable types and names, change function prototypes, add comments and more. The example above presents the result after these modifications.
Surely the result is not ideal, and there is a lot of room for improvement, but we hope that you got the idea.
And you can compare the result with the original: http://lxr.free-electrons.com/source/fs/fat/namei_msdos.c#L224
{% tabs %} {% tab title=“Assembler code” %}
# int __fastcall msdos_add_entry(struct inode *_dir, const unsigned __int8 *name, int is_dir, int is_hid,
int cluster, struct timespec *_ts, struct fat_slot_info *_sinfo)
msdos_add_entry:
.set back_chain, -0x50
.set de, -0x48
.set date, -0x28
.set time, -0x26
.set var_14, -0x14
.set sender_lr, 4
mflr r0
stw r0, sender_lr(r1)
bl _mcount
stwu r1, back_chain(r1)
mflr r0
stmw r27, 0x50+var_14(r1)
stw r0, 0x50+sender_lr(r1)
subfic r5, r5, 0
mr. r30, r6
lwz r0, 0(r4)
subfe r10, r10, r10
mr r31, r3
lwz r11, 4(r4)
lwz r3, 0x1C(r3)
clrrwi r10, r10, 4
mr r29, r7
lhz r5, 8(r4)
addi r10, r10, 0x20
mr r28, r8
lbz r6, 0xA(r4)
mr r27, r9
lwz r3, 0x2B8(r3)
stw r0, 0x50+de(r1)
stw r11, 0x50+de.name+4(r1)
sth r5, 0x50+de.name+8(r1)
stb r6, 0x50+de.name+0xA(r1)
stb r10, 0x50+de.attr(r1)
beq loc_728
ori r10, r10, 2
li r9, 0
li r7, 0
addi r6, r1, 0x50+date
stb r10, 0x50+de.attr(r1)
addi r5, r1, 0x50+time
mr r4, r8
stb r9, 0x50+de.lcase(r1)
bl fat_time_unix2fat
lhz r9, 0x50+time(r1)
li r10, 0
sth r10, 0x50+de.adate(r1)
sth r9, 0x50+de.time(r1)
lhz r9, 0x50+date(r1)
sth r10, 0x50+de.cdate(r1)
sth r10, 0x50+de.ctime(r1)
stb r10, 0x50+de.ctime_cs(r1)
sth r9, 0x50+de.date(r1)
loc_698:
addi r10, r1, 0x50+de.start
srawi r9, r29, 0x10
sthbrx r29, r0, r10
addi r10, r1, 0x50+de.starthi
mr r6, r27
sthbrx r9, r0, r10
li r5, 1
li r9, 0
addi r4, r1, 0x50+de
mr r3, r31
stw r9, 0x50+de.size(r1)
bl fat_add_entries
mr. r30, r3
bne loc_710
lwz r10, 0(r28)
lwz r11, 4(r28)
stw r10, 0x48(r31)
stw r10, 0x50(r31)
stw r11, 0x4C(r31)
stw r11, 0x54(r31)
lwz r9, 0x1C(r31)
lwz r9, 0x34(r9)
andi. r10, r9, 0x90
bne loc_704
lwz r9, 0xC(r31)
andi. r10, r9, 0x41
beq loc_768
loc_704:
mr r3, r31 # struct inode *
li r30, 0
bl fat_sync_inode
loc_710:
mr r3, r30
lwz r0, 0x50+sender_lr(r1)
lmw r27, 0x50+var_14(r1)
addi r1, r1, 0x50
mtlr r0
blr
# ---------------------------------------------------------------------------
loc_728:
li r7, 0
addi r6, r1, 0x50+date
stb r30, 0x50+de.lcase(r1)
addi r5, r1, 0x50+time
mr r4, r8
bl fat_time_unix2fat
li r9, 0
sth r30, 0x50+de.adate(r1)
stb r9, 0x50+de.ctime_cs(r1)
lhz r9, 0x50+time(r1)
sth r30, 0x50+de.cdate(r1)
sth r9, 0x50+de.time(r1)
lhz r9, 0x50+date(r1)
sth r30, 0x50+de.ctime(r1)
sth r9, 0x50+de.date(r1)
b loc_698
# ---------------------------------------------------------------------------
loc_768:
mr r3, r31 # struct inode *
li r4, 7
bl __mark_inode_dirty
mr r3, r3
lwz r0, 0x50+sender_lr(r1)
lmw r27, 0x50+var_14(r1)
addi r1, r1, 0x50
mtlr r0
blr
# End of function msdos_add_entry
{% endtab %}
{% tab title=“Pseudocode” %}
int __fastcall msdos_add_entry(struct inode *dir, const unsigned __int8 *name, int is_dir, int is_hid,
int cluster, struct timespec *ts, struct fat_slot_info *sinfo)
{
__int16 zero; // r30@1 601
bool not_hidden; // cr34@1 601 TYPED
int v10; // r11@1 611
signed int v11; // r10@1 619 TYPED
__int16 v13; // r5@1 621
__u8 node_attrs; // r10@1 625 TYPED
__u8 v16; // r6@1 62D TYPED
struct msdos_sb_info *sbi; // r3@1 635 TYPED
int err; // r30@3 6C9 TYPED
__time_t sec; // r10@4 6D1 TYPED
__syscall_slong_t nsec; // r11@4 6D5 TYPED
struct msdos_dir_entry de; // [sp+8h] [-48h]@1 639 TYPED
__le16 date; // [sp+28h] [-28h]@2 670 TYPED
__le16 time; // [sp+2Ah] [-26h]@2 670 TYPED
zero = is_hid;
not_hidden = is_hid == 0;
v10 = *((_DWORD *)name + 1);
v11 = (unsigned int)is_dir <= 0 ? 0 : -16;
v13 = *((_WORD *)name + 4);
node_attrs = v11 + ATTR_ARCH; // ATTR_ARCH or ATTR_DIR
v16 = name[10];
sbi = (struct msdos_sb_info *)dir->i_sb->s_fs_info;
*(_DWORD *)&de.name[0] = *(_DWORD *)name; // memcpy(&de.name[0], name, 12);
*(_DWORD *)&de.name[4] = v10; // ...
*(_WORD *)&de.name[8] = v13; // ...
de.name[10] = v16;
de.attr = node_attrs;
if ( not_hidden )
{
de.lcase = zero; // = 0
fat_time_unix2fat(sbi, ts, &time, &date, 0);
de.adate = zero;
de.ctime_cs = 0;
de.cdate = zero;
de.time = time;
de.ctime = zero;
de.date = date;
}
else
{
de.attr = node_attrs | ATTR_HIDDEN;
de.lcase = 0;
fat_time_unix2fat(sbi, ts, &time, &date, 0);
de.adate = 0;
de.time = time;
de.cdate = 0;
de.ctime = 0;
de.ctime_cs = 0;
de.date = date;
}
de.start = _byteswap_ushort(cluster);
de.starthi = _byteswap_ushort(HIWORD(cluster));
de.size = 0;
err = fat_add_entries(dir, &de, 1, sinfo);
if ( err )
return err;
sec = ts->tv_sec;
nsec = ts->tv_nsec;
dir->i_mtime.tv_sec = ts->tv_sec;
dir->i_ctime.tv_sec = sec;
dir->i_mtime.tv_nsec = nsec;
dir->i_ctime.tv_nsec = nsec;
if ( dir->i_sb->s_flags & (MS_DIRSYNC|MS_SYNCHRONOUS) || dir->i_flags & (S_DIRSYNC|S_SYNC) )
{
err = 0;
fat_sync_inode(dir);
return err;
}
_mark_inode_dirty(dir);
return 0;
}
{% endtab %} {% endtabs %}
Comparisons of MIPS disassembly and decompilation
Here are some side-by-side comparisons of disassembly and decompiler for MIPS. Please maximize the window too see both columns simultaneously.
The following examples are displayed on this page:
- Simple code
- 64-bit comparison
- Magic divisions
- Hard cases with delay slots
- Little-endian MIPS
- MicroMIPS
- Floating-point operations
- Compiler helpers
Simple code
This is a very simple code to decompile and the output is perfect. The only minor obstacle are references through the global offset table but both IDA and the Decompiler handle them well. Please note the difference in the number of lines to read on the left and on the right.
{% tabs %} {% tab title=“Assembler code” %}
# void __fastcall free_argv(int argc, char **argv)
.globl _Z9free_argviPPc # weak
_Z9free_argviPPc: # CODE XREF: test_expand_argv(void)+264↑p
# test_expand_argv(void)+51C↑p ...
var_10 = -0x10
var_4 = -4
var_s0 = 0
var_s4 = 4
arg_0 = 8
arg_4 = 0xC
# __unwind {
addiu $sp, -0x28
sw $ra, 0x20+var_s4($sp)
sw $fp, 0x20+var_s0($sp)
move $fp, $sp
la $gp, _GLOBAL_OFFSET_TABLE_+0x7FF0
sw $gp, 0x20+var_10($sp)
sw $a0, 0x20+arg_0($fp)
sw $a1, 0x20+arg_4($fp)
lw $v0, 0x20+arg_4($fp)
beqz $v0, loc_17778
nop
sw $zero, 0x20+var_4($fp)
loc_1770C: # CODE XREF: free_argv(int,char **)+80↓j
lw $v1, 0x20+var_4($fp)
lw $v0, 0x20+arg_0($fp)
slt $v0, $v1, $v0
beqz $v0, loc_17760
nop
lw $v0, 0x20+var_4($fp)
sll $v0, 2
lw $v1, 0x20+arg_4($fp)
addu $v0, $v1, $v0
lw $v0, 0($v0)
move $a0, $v0
lw $v0, (qfree_ptr-0x7FF0 - _GLOBAL_OFFSET_TABLE_)($gp)
move $t9, $v0
jalr $t9 ; qfree
nop
lw $gp, 0x20+var_10($fp)
lw $v0, 0x20+var_4($fp)
addiu $v0, 1
sw $v0, 0x20+var_4($fp)
b loc_1770C
nop
# ---------------------------------------------------------------------------
loc_17760: # CODE XREF: free_argv(int,char **)+40↑j
lw $a0, 0x20+arg_4($fp)
lw $v0, (qfree_ptr-0x7FF0 - _GLOBAL_OFFSET_TABLE_)($gp)
move $t9, $v0
jalr $t9 ; qfree
nop
lw $gp, 0x20+var_10($fp)
loc_17778: # CODE XREF: free_argv(int,char **)+28↑j
nop
move $sp, $fp
lw $ra, 0x20+var_s4($sp)
lw $fp, 0x20+var_s0($sp)
addiu $sp, 0x28
jr $ra
nop
# } // starts at 176D8
{% endtab %}
{% tab title=“Pseudocode” %}
void __fastcall free_argv(int argc, char **argv)
{
int i; // [sp+1Ch] [+1Ch]
if ( argv )
{
for ( i = 0; i < argc; ++i )
qfree(argv[i]);
qfree(argv);
}
}
{% endtab %} {% endtabs %}
64-bit comparison
Sorry for another long assembler listing. It shows that for MIPS, as for other platforms, the decompiler can recognize 64-bit operations and collapse them into very readable constructs.
{% tabs %} {% tab title=“Assembler code” %}
# =============== S U B R O U T I N E =======================================
# Attributes: bp-based frame fpd=0x18
# _DWORD uh_eq_s(void)
.globl _Z7uh_eq_sv
_Z7uh_eq_sv: # DATA XREF: .eh_frame:000478E4↓o
var_s0 = 0
var_s4 = 4
var_s8 = 8
var_sC = 0xC
var_s10 = 0x10
var_s14 = 0x14
var_s18 = 0x18
var_s1C = 0x1C
# __unwind {
addiu $sp, -0x38
sw $ra, 0x18+var_s1C($sp)
sw $fp, 0x18+var_s18($sp)
sw $s5, 0x18+var_s14($sp)
sw $s4, 0x18+var_s10($sp)
sw $s3, 0x18+var_sC($sp)
sw $s2, 0x18+var_s8($sp)
sw $s1, 0x18+var_s4($sp)
sw $s0, 0x18+var_s0($sp)
move $fp, $sp
jal uh
nop
move $s5, $v1
move $s4, $v0
jal s
nop
move $s3, $v0
sra $v0, 31
move $s2, $v0
xor $s0, $s4, $s2
xor $s1, $s5, $s3
or $v0, $s0, $s1
sltiu $v0, 1
andi $v0, 0xFF
move $sp, $fp
lw $ra, 0x18+var_s1C($sp)
lw $fp, 0x18+var_s18($sp)
lw $s5, 0x18+var_s14($sp)
lw $s4, 0x18+var_s10($sp)
lw $s3, 0x18+var_sC($sp)
lw $s2, 0x18+var_s8($sp)
lw $s1, 0x18+var_s4($sp)
lw $s0, 0x18+var_s0($sp)
addiu $sp, 0x38
jr $ra
nop
# } // starts at 25C
{% endtab %}
{% tab title=“Pseudocode” %}
bool uh_eq_s(void)
{
unsigned __int64 v0; // $v1
v0 = uh();
return v0 == s();
}
{% endtab %} {% endtabs %}
Magic divisions
We recognize magic divisions for MIPS the same way as for other processors. Note that this listing has a non-trivial delay slot.
{% tabs %} {% tab title=“Assembler code” %}
.globl smod199
smod199: # DATA XREF: .eh_frame:0000875C↓o
# __unwind {
lui $v1, 0x5254
sra $v0, $a0, 31
li $v1, 0x5254E78F
mult $a0, $v1
mfhi $v1
sra $v1, 6
subu $v1, $v0
li $v0, 0xC7
mul $a1, $v1, $v0
jr $ra
subu $v0, $a0, $a1
# } // starts at 4F2C
{% endtab %}
{% tab title=“Pseudocode” %}
int __fastcall smod199(int a1)
{
return a1 % 199;
}
{% endtab %} {% endtabs %}
Hard cases with delay slots
The previous example was a piece of cake. This one shows a tougher nut to crack: there is a jump to a delay slot. A decent decompiler must handle these cases too and produce a correct output without misleading the user. This is what we do. (We spent quite long time inventing and testing various scenarios with delay slots).
{% tabs %} {% tab title=“Assembler code” %}
branch_to_b_dslot: # CODE XREF: branch_to_bal_dslot+14↓p
# DATA XREF: branch_likely_cond_move+10↓o
move $t2, $a0
addiu $t3, $t2, -0x18
bltz $t3, l1
li $a0, 1
sllv $a0, $t3
b l2
l1: # CODE XREF: branch_to_b_dslot+8↑j
li $t4, 0xFFFFFFC0
li $t3, 0x18
subu $t3, $t2
srav $a0, $t3
l2: # CODE XREF: branch_to_b_dslot+14↑j
jr $ra
addu $v0, $a0, $t4
# End of function branch_to_b_dslot
{% endtab %}
{% tab title=“Pseudocode” %}
int __fastcall branch_to_b_dslot(int a1)
{
int v1; // $a0
if ( a1 - 24 < 0 )
v1 = 1 >> (24 - a1);
else
v1 = 1 << (a1 - 24);
return v1 - 64;
}
{% endtab %} {% endtabs %}
Little-endian MIPS
We support both big-endian and little-endian code. Usually they look the same but there may be subtle differences in the assembler. The decompiler keeps track of the bits involved and produces human-readable code.
{% tabs %} {% tab title=“Little-endian” %}
.globl upd_d2
upd_d2:
lwl $v0, 5($a0)
lwr $v0, 2($a0)
addiu $v0, $v0, 1
swl $v0, 5($a0)
swr $v0, 2($a0)
jr $ra
lb $v0, 0($a0)
# End of function upd_d2
{% endtab %}
{% tab title=“Big-endian” %}
.globl upd_d2
upd_d2:
lwl $v0, 2($a0)
lwr $v0, 5($a0)
addiu $v0, $v0, 1
swl $v0, 2($a0)
swr $v0, 5($a0)
jr $ra
lb $v0, 0($a0)
# End of function upd_d2
{% endtab %}
{% tab title=“Pseudocode” %}
int __fastcall upd_d2(char *a1)
{
++*(_DWORD *)(a1 + 2);
return *a1;
}
{% endtab %} {% endtabs %}
MicroMIPS
MicroMIPS, as you have probably guessed, is supported too, with its special instructions and quirks.
{% tabs %} {% tab title=“Assembler code” %}
lwm16_sp:
var_10 = -0x10
addiu $sp, -0x10
swm $ra,$s0-$s2, 0x10+var_10($sp)
move $s0, $a0
move $s1, $a1
move $s2, $a2
addu $s0, $s1
addu $v0, $s0, $s2
lwm $ra,$s0-$s2, 0x10+var_10($sp)
jraddiusp 0x10
{% endtab %}
{% tab title=“Pseudocode” %}
__int64 __fastcall lwm16_sp(int a1, int a2, int a3)
{
return a1 + a2 + a3;
}
{% endtab %} {% endtabs %}
Floating-point operations
The MIPS processor contains a number of complex floating point instructions, which perform several operations at once. It is not easy to decipher the meaning of the assembler code but the pseudocode is the simplest possible.
{% tabs %} {% tab title=“Assembler code” %}
x2y2m1f:
lui $v0, %hi(dbl_50)
ldc1 $f1, dbl_50
sub.d $f0, $f12, $f1
add.d $f1, $f12, $f1
mul.d $f0, $f1
jr $ra
madd.d $f0, $f13, $f0, $f12
{% endtab %}
{% tab title=“Pseudocode” %}
double __fastcall x2y2m1f(double a1, double a2)
{
return a2 * ((a1 - 1.0) * (a1 + 1.0)) + a1;
}
{% endtab %} {% endtabs %}
Compiler helpers
A compiler sometime uses helpers; our decompiler knows the meaning of the many helpers and uses it to simplify code.
{% tabs %} {% tab title=“Assembler code” %}
mod4:
var_C = -0xC
var_s0 = 0
lui $gp, %hi(_GLOBAL_OFFSET_TABLE_+0x7FF0)
addiu $sp, -0x20
la $gp, _GLOBAL_OFFSET_TABLE_+0x7FF0
li $a3, 5
sw $ra, 0x1C+var_s0($sp)
sw $gp, 0x1C+var_C($sp)
lw $t9, (__moddi3_ptr-0x7FF0 - _GLOBAL_OFFSET_TABLE_)($gp)
jalr $t9 ; __moddi3
move $a2, $zero
lw $ra, 0x1C+var_s0($sp)
jr $ra
addiu $sp, 0x20
{% endtab %}
{% tab title=“Pseudocode” %}
__int64 __fastcall mod4(__int64 a1)
{
return a1 % 5;
}
{% endtab %} {% endtabs %}
Hex-Rays v7.4 vs. v7.3 Decompiler Comparison Page
Here are some side-by-side comparisons of decompilations for v7.3 and v7.4. Please maximize the window too see both columns simultaneously.
The following examples are displayed on this page:
- Better array detection
- Support for more floating-point helpers
- Automatic variable mapping
- Automatic symbolic names
- Simplified C++ names
- Improved handling of 64-bit arithmetics
- Better detection of 64-bit decrements
- More meaningful variable names
Better array detection
The text produced by v7.3 is not quite correct because the array at [ebp-128] was not recognized. Overall determining the array is a tough task but we can handle simple cases automatically now.
{% tabs %} {% tab title=“Pseudocode v7.4” %}
_BYTE v7[256]; // [sp+0h] [bp-128h]
__int64 v8; // [sp+120h] [bp-8h]
v8 = a2;
v4 = a2;
memcpy(v7, &v8, sizeof(v7));
memcpy(a1, v7, 0x100u);
{% endtab %}
{% tab title=“Pseudocode v7.3” %}
_QWORD *v5; // r4
int v7; // [sp+0h] [bp-128h]
__int64 v8; // [sp+120h] [bp-8h]
v8 = a2;
v4 = a2;
v5 = a1;
memcpy(&v7, &v8, 0x100u);
memcpy(v5, &v7, 0x100u);
{% endtab %} {% endtabs %}
Support for more floating-point helpers
On the left there is a mysterious call to _extendsfdf2. In fact this is a compiler helper function that just converts a single precision floating point value into a double precision value. However, we do not want to see this call as is. It is much better to translate it into the code that looks more like C. Besides, there is a special treatment for printf-like functions.
{% tabs %} {% tab title=“Pseudocode v7.4” %}
void __cdecl printf_float(float a)
{
printf("%f\n", a);
}
{% endtab %}
{% tab title=“Pseudocode v7.3” %}
void __cdecl printf_float(float a)
{
double v1; // r0
v1 = COERCE_DOUBLE(_extendsfdf2(LODWORD(a)));
printf("%f\n", v1);
}
{% endtab %} {% endtabs %}
Automatic variable mapping
In some cases we can easily prove that one variable can be mapped into another. The new version automatically creates a variable mapping in such cases. This makes the output shorter and easier to read. Needless to say that the user can revert the mapping if necessary.
{% tabs %} {% tab title=“Pseudocode v7.4” %}
__int64 sprintf_s(
char *__ptr64 const _Buffer,
const unsigned __int64 _BufferCount,
const char *__ptr64 const _Format,
...)
{
unsigned __int64 *v6; // x0
__int64 result; // x0
va_list va; // [xsp+38h] [xbp+38h]
va_start(va, _Format);
v6 = _local_stdio_printf_options();
return _stdio_common_vsprintf_s(*v6, _Buffer, _BufferCount, _Format, 0i64,
(char *__ptr64)va);
}
{% endtab %}
{% tab title=“Pseudocode v7.3” %}
__int64 sprintf_s(
char *__ptr64 const _Buffer,
const unsigned __int64 _BufferCount,
const char *__ptr64 const _Format,
...)
{
char *v3; // x21
unsigned __int64 v4; // x20
const char *v5; // x19
unsigned __int64 *v6; // x0
__int64 result; // x0
va_list va; // [xsp+38h] [xbp+38h]
va_start(va, _Format);
v3 = _Buffer;
v4 = _BufferCount;
v5 = _Format;
v6 = _local_stdio_printf_options();
return _stdio_common_vsprintf_s(*v6, v3, v4, v5, 0i64, (char *__ptr64)va);
}
{% endtab %} {% endtabs %}
Automatic symbolic names
The new version automatically applies symbolic constants when necessary. Less manual work.
{% tabs %} {% tab title=“Pseudocode v7.4” %}
if ( operation == ReadKeyNames )
return BaseDllReadVariableNames(v1, v2);
if ( operation != ReadSection )
{
if ( operation == WriteKeyValue || operation == DeleteKey )
return BaseDllWriteVariableValue(v1, v2, 0, 0);
if ( operation == WriteSection || operation == DeleteSection )
return BaseDllWriteApplicationVariables(v1, v2);
{% endtab %}
{% tab title=“Pseudocode v7.3” %}
if ( operation == 4 )
return BaseDllReadVariableNames(v1, v2);
if ( operation != 6 )
{
if ( operation == 2 || operation == 3 )
return BaseDllWriteVariableValue(v1, v2, 0, 0);
if ( operation == 7 || operation == 8 )
return BaseDllWriteApplicationVariables(v1, v2);
{% endtab %} {% endtabs %}
Simplified C++ names
This is not the longest C++ function name one may encounter but just compare the left and right sides. In fact the right side could even fit into one line easily, we just kept it multiline to be consistent. By the way, all names in IDA benefit from this simplification, not only the ones displayed by the decompiler. And it is configurable!
{% tabs %} {% tab title=“Pseudocode v7.4” %}
std::string *
__fastcall
std::_System_error::_Makestr(
std::string *result,
std::error_code _Errcode,
std::string _Message)
{% endtab %}
{% tab title=“Pseudocode v7.3” %}
std::basic_string<char,std::char_traits<char>,std::allocator<char> > *
__fastcall
std::_System_error::_Makestr(
std::basic_string<char,std::char_traits<char>,std::allocator<char> > *result,
std::error_code _Errcode,
std::basic_string<char,std::char_traits<char>,std::allocator<char> > _Message)
{% endtab %} {% endtabs %}
Improved handling of 64-bit arithmetics
The battle is long but we do not give up. More 64-bit patterns are recognized now.
{% tabs %} {% tab title=“Pseudocode v7.4” %}
return h() % 1024;
{% endtab %}
{% tab title=“Pseudocode v7.3” %}
v0 = h();
return (__int16)((((v0 ^ (SHIDWORD(v0) >> 31)) - (SHIDWORD(v0) >> 31)) & 0x3FF ^ (SHIDWORD(v0) >> 31))
- (SHIDWORD(v0) >> 31));
{% endtab %} {% endtabs %}
Better detection of 64-bit decrements
Yet another example of 64-bit arithmetics. The code on the left is correct but not useful at all. It can and should be converted into the simple equivalent text on the right.
{% tabs %} {% tab title=“Pseudocode v7.4” %}
return a1 - 1;
{% endtab %}
{% tab title=“Pseudocode v7.3” %}
v1 = a1 + 0xFFFFFFFFLL;
HIDWORD(v1) = ((unsigned __int64)(a1 + 0xFFFFFFFFLL) >> 32) - 1;
{% endtab %} {% endtabs %}
More meaningful variable names
Currently we support only GetProcAddress but we are sure that we will expand this feature in the future.\
{% tabs %} {% tab title=“Pseudocode v7.4” %}
MessageBoxA_0 = (int (__stdcall *)(HWND, LPCSTR, LPCSTR, UINT))
GetProcAddress(v4, "MessageBoxA");
if ( !MessageBoxA_0 )
return 0;
GetActiveWindow = (HWND (__stdcall *)())GetProcAddress(v5, "GetActiveWindow");
GetLastActivePopup = (HWND (__stdcall *)(HWND))GetProcAddress(v5, "GetLastActivePopup");
}
if ( GetActiveWindow )
{
v3 = GetActiveWindow();
if ( v3 )
{
if ( GetLastActivePopup )
v3 = GetLastActivePopup(v3);
}
}
return MessageBoxA_0(v3, a1, a2, a3);
{% endtab %}
{% tab title=“Pseudocode v7.3” %}
dword_12313BA8 = (int (__stdcall *)(_DWORD, _DWORD, _DWORD, _DWORD))
GetProcAddress(v4, "MessageBoxA");
if ( !dword_12313BA8 )
return 0;
dword_12313BAC = GetProcAddress(v5, "GetActiveWindow");
dword_12313BB0 = (int (__stdcall *)(_DWORD))GetProcAddress(v5, "GetLastActivePopup");
}
if ( dword_12313BAC )
{
v3 = dword_12313BAC();
if ( v3 )
{
if ( dword_12313BB0 )
v3 = dword_12313BB0(v3);
}
}
return dword_12313BA8(v3, a1, a2, a3);
{% endtab %} {% endtabs %}
Hex-Rays v7.3 vs. v7.2 Decompiler Comparison Page
Below you will find side-by-side comparisons of v7.2 and v7.3 decompilations. Please maximize the window too see both columns simultaneously.
The following examples are displayed on this page:
- More hexadecimal numbers in the output
- Support for variable size structures
- UTF-32 strings are printed inline
- Better argument detection for printf
- Better argument detection for scanf
- Resolved TEB references
- Better automatic selection of union fields
- Yet one more example of union fields
- Improved support for EABI helpers
- Improved local variable allocation
- Better recognition of string references
- Better handling of structures returned by value
- More while loops
- Shorter code
- Improved recognition of magic divisions
- Less gotos
- Division may generate an exception
- Order of variadic arguments
- Improved division recognition
NOTE: these are just some selected examples that can be illustrated as side-by-side differences. There are many other improvements and new features that are not mentioned on this page. We just got tired selecting them. Some of the improvements that did not do to this page:
- objc-related improvements
- value range analysis can eliminate more useless code
- better resolving of got-relative memory references
- too big shift amounts are converted to lower values (e.g. 33->1)
- more for-loops
- better handling of fragemented variables
- many other things…
More hexadecimal numbers in the output
When a constant looks nicer as a hexadecimal number, we print it as a hexadecimal number by default. Naturally, beauty is in the eye of the beholder, but the new beahavior will produce more readable code, and less frequently you will fell compelled to change the number representation. By the way, this tiny change is just one of numerious improvements that we keep adding in each release. Most of them go literally unnoticed. It is just this time we decided to talk about them
{% tabs %} {% tab title=“PSEUDOCODE V7.3” %}
bool __fastcall ge_100000001(__int64 a1)
{
return a1 >= 0x100000001LL;
}
{% endtab %}
{% tab title=“PSEUDOCODE V7.2” %}
bool __fastcall ge_100000001(__int64 a1)
{
return a1 >= 4294967297LL;
}
{% endtab %} {% endtabs %}
Support for variable size structures
EfiBootRecord points to a structure that has RecordExtents[0] as the last member. Such structures are considered as variable size structures in C/C++. Now we handle them nicely.
{% tabs %} {% tab title=“PSEUDOCODE V7.3” %}
BlockNumber = EfiBootRecord->RecordExtents[ExtentIndex64].BlockNumber;
BlockCount = EfiBootRecord->RecordExtents[ExtentIndex64].BlockCount;
{% endtab %}
{% tab title=“PSEUDOCODE V7.2” %}
BlockNumber = *(UINT64 *)((char *)&EfiBootRecord[1].BlockHeader.Checksum + ExtentIndex64);
BlockCount = *(UINT64 *)((char *)&EfiBootRecord[1].BlockHeader.ObjectOid + ExtentIndex64);
{% endtab %} {% endtabs %}
UTF-32 strings are printed inline
We were printing UTF-8 and other string types, UTF-32 was not supported yet. Now we print it with the ‘U’ prefix.
{% tabs %} {% tab title=“PSEUDOCODE V7.3” %}
v3 = std::operator<<<std::char_traits<char>>(&std::cout, U"This is U\"Hello\"
{% endtab %}
{% tab title=“PSEUDOCODE V7.2” %}
.rodata:0000000000000120 text "UTF-32LE", 'This is U"Hello"',0
...
v10 = std::ostream::operator<<(v9, aThisIsUHello_0);
{% endtab %} {% endtabs %}
Better argument detection for printf
The difference between these outputs is subtle but pleasant. The new version managed to determine the variable types based on the printf format string. While the old version ended up with int a2, int a3, the new version correctly determined them as one __int64 a2.
{% tabs %} {% tab title=“PSEUDOCODE V7.3” %}
int __fastcall ididi(int a1, __int64 a2, int a3, __int64 a4, int a5)
{
int varg_r0; // [sp+28h] [bp-10h]
__int64 varg_r2; // [sp+30h] [bp-8h]
varg_r0 = a1;
varg_r2 = a2;
my_print("d=%I64d\n", a2);
my_print("d1=%I64d\n", a4);
my_print("%d-%I64d-%d-%I64d-%d\n", varg_r0, varg_r2, a3, a4, a5);
return 0;
}
{% endtab %}
{% tab title=“PSEUDOCODE V7.2” %}
int __fastcall ididi(int a1, int a2, __int64 a3, int a4, __int64 a5, int a6)
{
int v6; // r1
char v8; // [sp+4h] [bp-34h]
int varg_r0; // [sp+28h] [bp-10h]
__int64 varg_r2; // [sp+30h] [bp-8h]
varg_r0 = a1;
varg_r2 = a3;
my_print("d=%I64d\n", a2, a3);
my_print("d1=%I64d\n", v6, a5);
my_print("%d-%I64d-%d-%I64d-%d\n", varg_r0, varg_r2, a4, v8, a5, a6);
return 0;
}
{% endtab %} {% endtabs %}
Better argument detection for scanf
A similar logic works for scanf-like functions. Please note that the old version was misdetecting the number of arguments. It was possible to correct the misdetected arguments using the Numpad-Minus hotkey but it is always better when there is less routine work on your shoulders, right?
{% tabs %} {% tab title=“PSEUDOCODE V7.3” %}
scanf("8: %d%i %x%o %s%s %C%c", &v12, &v7, &v3, &v4, &v2, &v9, &v8, &v13);
scanf("8: %[ a-z]%c %2c%c %2c%2c %[ a-z]%c", &v12, &v7, &v3, &v4, &v2, &v9, &v8, &v13);
{% endtab %}
{% tab title=“PSEUDOCODE V7.2” %}
scanf("8: %d%i %x%o %s%s %C%c", &v12, &v7, &v3, &v4, &v2, &v9, &v8, &v13, &v10, &v0, &v6, &v5, &v1, &v11);
scanf(
"8: %[ a-z]%c %2c%c %2c%2c %[ a-z]%c",
&v12,
&v7,
&v3,
&v4,
&v2,
&v9,
&v8,
&v13,
&v10,
&v0,
&v6,
&v5,
&v1,
&v11);
{% endtab %} {% endtabs %}
Resolved TEB references
While seasoned reversers know what is located at fs:0, it is still better to have it spelled out. Besides, the type of v15 is automatically detected as struct _EXCEPTION_REGISTRATION_RECORD *.
{% tabs %} {% tab title=“PSEUDOCODE V7.3” %}
v15 = NtCurrentTeb()->NtTib.ExceptionList;
{% endtab %}
{% tab title=“PSEUDOCODE V7.2” %}
v15 = __readfsdword(0);
{% endtab %} {% endtabs %}
Better automatic selection of union fields
Again, the user can specify the union field that should be used in the output (the hotkey is Alt-Y) but there are situations when it can be automatically determined based on the access type and size. The above example illustrates this point. JFYI, the type of entry is:
union __XmStringEntryRec
{
_XmStringEmptyHeader empty;
_XmStringOptSegHdrRec single;
_XmStringUnoptSegHdrRec unopt_single;
_XmStringArraySegHdrRec multiple;
};
struct __XmStringEmptyHeader
{
unsigned __int32 type : 2;
};
struct __XmStringOptSegHdrRec
{
unsigned __int32 type : 2;
unsigned __int32 text_type : 2;
unsigned __int32 tag_index : 3;
unsigned __int32 rend_begin : 1;
unsigned __int8 byte_count;
unsigned __int32 rend_end : 1;
unsigned __int32 rend_index : 4;
unsigned __int32 str_dir : 2;
unsigned __int32 flipped : 1;
unsigned __int32 tabs_before : 3;
unsigned __int32 permanent : 1;
unsigned __int32 soft_line_break : 1;
unsigned __int32 immediate : 1;
unsigned __int32 pad : 2;
};
While we can not handle bitfields yet, their presence does not prevent using other, regular fields, of the structure.
{% tabs %} {% tab title=“PSEUDOCODE V7.3” %}
if ( entry->single.byte_count )
{% endtab %}
{% tab title=“PSEUDOCODE V7.2” %}
if ( *((_BYTE *)&entry->empty + 1) )
{% endtab %} {% endtabs %}
Yet one more example of union fields
I could not resist the temptation to include one more example of automatic union selection. How beautiful the code on the right is!
{% tabs %} {% tab title=“PSEUDOCODE V7.3” %}
void __fastcall h_generic_calc_Perm32x8(V256 *res, V256 *argL, V256 *argR)
{
res->w32[0] = argL->w32[argR->w32[0] & 7];
res->w32[1] = argL->w32[argR->w32[1] & 7];
res->w32[2] = argL->w32[argR->w32[2] & 7];
res->w32[3] = argL->w32[argR->w32[3] & 7];
res->w32[4] = argL->w32[argR->w32[4] & 7];
res->w32[5] = argL->w32[argR->w32[5] & 7];
res->w32[6] = argL->w32[argR->w32[6] & 7];
res->w32[7] = argL->w32[argR->w32[7] & 7];
}
{% endtab %}
{% tab title=“PSEUDOCODE V7.2” %}
void __fastcall h_generic_calc_Perm32x8(V256 *res, V256 *argL, V256 *argR)
{
LODWORD(res->w64[0]) = *((_DWORD *)argL->w64 + (argR->w64[0] & 7));
HIDWORD(res->w64[0]) = *((_DWORD *)argL->w64 + (HIDWORD(argR->w64[0]) & 7));
LODWORD(res->w64[1]) = *((_DWORD *)argL->w64 + (argR->w64[1] & 7));
HIDWORD(res->w64[1]) = *((_DWORD *)argL->w64 + (HIDWORD(argR->w64[1]) & 7));
LODWORD(res->w64[2]) = *((_DWORD *)argL->w64 + (argR->w64[2] & 7));
HIDWORD(res->w64[2]) = *((_DWORD *)argL->w64 + (HIDWORD(argR->w64[2]) & 7));
LODWORD(res->w64[3]) = *((_DWORD *)argL->w64 + (argR->w64[3] & 7));
HIDWORD(res->w64[3]) = *((_DWORD *)argL->w64 + (HIDWORD(argR->w64[3]) & 7));
}
{% endtab %} {% endtabs %}
Improved support for EABI helpers
No comments needed, we hope. The new decompiler managed to fold constant expressions after replacing EABI helpers with corresponding operators.
{% tabs %} {% tab title=“PSEUDOCODE V7.3” %}
int __cdecl main(int argc, const char **argv, const char **envp)
{
printf("r = %d == 42\n", 42);
printf("r = %lld == 42\n", 42LL);
printf("ABORT %d\n", 0x40000001);
return 0;
}
{% endtab %}
{% tab title=“PSEUDOCODE V7.2” %}
void __fastcall h_generic_calc_Perm32x8(V256 *res, V256 *argL, V256 *argR)
{
LODWORD(res->w64[0]) = *((_DWORD *)argL->w64 + (argR->w64[0] & 7));
HIDWORD(res->w64[0]) = *((_DWORD *)argL->w64 + (HIDWORD(argR->w64[0]) & 7));
LODWORD(res->w64[1]) = *((_DWORD *)argL->w64 + (argR->w64[1] & 7));
HIDWORD(res->w64[1]) = *((_DWORD *)argL->w64 + (HIDWORD(argR->w64[1]) & 7));
LODWORD(res->w64[2]) = *((_DWORD *)argL->w64 + (argR->w64[2] & 7));
HIDWORD(res->w64[2]) = *((_DWORD *)argL->w64 + (HIDWORD(argR->w64[2]) & 7));
LODWORD(res->w64[3]) = *((_DWORD *)argL->w64 + (argR->w64[3] & 7));
HIDWORD(res->w64[3]) = *((_DWORD *)argL->w64 + (HIDWORD(argR->w64[3]) & 7));
}
{% endtab %} {% endtabs %}
Improved local variable allocation
Now it works better especially in complex cases.
{% tabs %} {% tab title=“PSEUDOCODE V7.3” %}
tbd
{% endtab %}
{% tab title=“PSEUDOCODE V7.2” %}
int __cdecl main(int argc, const char **argv, const char **envp)
{
int v3; // r0
int v4; // r0
int v5; // r0
int v6; // r0
int v7; // r0
__int64 v8; // r0
int v9; // r2
__int64 v11; // [sp+0h] [bp-14h]
int v12; // [sp+Ch] [bp-8h]
int v13; // [sp+Ch] [bp-8h]
v3 = _mulvsi3(7, 6, envp);
v4 = _negvsi2(v3);
v5 = _addvsi3(v4, 101);
v12 = _subvsi3(v5, 17);
printf("r = %d == 42\n", v12);
v11 = _mulvdi3(7, 0, 6, 0);
v6 = _negvdi2(v12, v12 >> 31);
v7 = _addvdi3(v6, v6 >> 31, 101, 0);
v8 = _subvdi3(v7, v7 >> 31, 17, 0);
printf("r = %lld == 42\n", HIDWORD(v8), v11);
v13 = _mulvsi3(0x7FFFFFFF, 0x3FFFFFFF, v9);
printf("ABORT %d\n", v13);
return 0;
}
{% endtab %} {% endtabs %}
Better recognition of string references
In this case too, the user could set the prototype of sub_1135FC as accepting a char * and this would be enough to reveal string references in the output, but the new decompiler can do it automatically.
{% tabs %} {% tab title=“PSEUDOCODE V7.3” %}
sub_1135FC(-266663568, "This is a long long long string");
if ( v2 > 0x48u )
{
sub_108998("Another str");
{% endtab %}
{% tab title=“PSEUDOCODE V7.2” %}
sub_1135FC(-266663568, 89351520);
if ( v2 > 0x48u )
{
sub_108998(89351556);
{% endtab %} {% endtabs %}
Better handling of structures returned by value
The code on the left had a very awkward sequence to copy a structure. The code on the right eliminates it as unnecessary and useless.
{% tabs %} {% tab title=“PSEUDOCODE V7.3” %}
_BYTE v1[12]; // rax
...
return *(mystruct *)v1;
}
{% endtab %}
{% tab title=“PSEUDOCODE V7.2” %}
_BYTE v1[12]; // ax
mystruct result; // 0:ax.11
...
*(_QWORD *)result.ca1 = *(_QWORD *)v1;
result.s1 = *(_WORD *)&v1[8];
result.c1 = v1[10];
return result;
}
{% endtab %} {% endtabs %}
More while loops
Do you care about this improvement? Probably you do not care because the difference is tiny. However, in additon to be simpler, the code on the right eliminated a temporary variable, v5. A tiny improvement, but an improvement it is.
{% tabs %} {% tab title=“PSEUDOCODE V7.3” %}
while ( *++v4 )
;
{% endtab %}
{% tab title=“PSEUDOCODE V7.2” %}
do
v5 = *++v4;
while ( v5 );
{% endtab %} {% endtabs %}
Shorter code
Another tiny improvement made the output considerably shorter. We like it!
{% tabs %} {% tab title=“PSEUDOCODE V7.3” %}
unsigned __int8 *__fastcall otp_memset(unsigned __int8 *pDest, unsigned __int8 val, int size)
{
unsigned __int8 *i; // r3
for ( i = pDest; (unsigned int)size-- >= 1; ++i )
*i = val;
return pDest;
}
{% endtab %}
{% tab title=“PSEUDOCODE V7.2” %}
unsigned __int8 *__fastcall otp_memset(unsigned __int8 *pDest, unsigned __int8 val, int size)
{
unsigned __int8 *i; // r3
_BOOL1 v4; // cf
for ( i = pDest; ; ++i )
{
v4 = (unsigned int)size-- >= 1;
if ( !v4 )
break;
*i = val;
}
return pDest;
}
}
{% endtab %} {% endtabs %}
Improved recognition of magic divisions
This is a very special case: a division that uses the rcr instruction. Our microcode does not have the opcode for it but we implemented the logic to handle some special cases, just so you do not waste your time trying to decipher the meaning of convoluted code (yes, rcr means code that is difficult to understand).
{% tabs %} {% tab title=“PSEUDOCODE V7.3” %}
unsigned __int64 __fastcall konst_mod251_shr3(unsigned __int64 a1)
{
return (a1 >> 3) % 0xFB;
}
{% endtab %}
{% tab title=“PSEUDOCODE V7.2” %}
__int64 __fastcall konst_mod251_shr3(unsigned __int64 a1)
{
unsigned __int64 v1; // rcx
v1 = a1 >> 3;
_RDX = v1 + ((v1 * (unsigned __int128)0x5197F7D73404147ui64) >> 64);
__asm { rcr rdx, 1 }
return v1 - 251 * (_RDX >> 7);
}
{% endtab %} {% endtabs %}
Less gotos
Well, we can not say that we produce less gotos in all cases, but there is some improvement for sure. Second, note that the return type got improved too: now it is immediately visible that the function returns a boolean (0/1) value.
{% tabs %} {% tab title=“PSEUDOCODE V7.3” %}
_BOOL8 __fastcall sub_0(__int64 a1, int *a2)
{
int v2; // eax
int v3; // eax
int v4; // eax
v2 = *a2;
if ( *a2 > 522 )
{
v4 = v2 - 4143;
return !v4 || v4 == 40950;
}
if ( v2 != 522 )
{
v3 = v2 - 71;
if ( v3 )
{
if ( (unsigned int)(v3 - 205) >= 2 )
return 0;
}
}
return 1;
}
{% endtab %}
{% tab title=“PSEUDOCODE V7.2” %}
__int64 __fastcall sub_0(__int64 a1, int *a2)
{
int v2; // eax
int v3; // eax
int v4; // eax
v2 = *a2;
if ( *a2 > 522 )
{
v4 = v2 - 4143;
if ( !v4 || v4 == 40950 )
goto LABEL_8;
LABEL_9:
return 0;
}
if ( v2 != 522 )
{
v3 = v2 - 71;
if ( v3 )
{
if ( (unsigned int)(v3 - 205) >= 2 )
goto LABEL_9;
}
}
LABEL_8:
return 1;
}
{% endtab %} {% endtabs %}
Division may generate an exception
What a surprise, the code on the right is longer and more complex! Indeed, it is so, and it is because now the decompiler is more careful with the division instructions. They potentially may generate the zero division exception and completely hiding them from the output may be misleading. If you prefer the old behaviour, turn off the division preserving in the configuration file.
{% tabs %} {% tab title=“PSEUDOCODE V7.3” %}
__int64 __fastcall sub_4008C0(int a1)
{
int v1; // ecx
int v2; // edx
int v4; // [rsp+0h] [rbp-4h]
v1 = 2;
if ( a1 > 2 )
{
do
{
nanosleep(&rmtp, &rqtp);
v2 = a1 % v1++;
v4 = 1 / v2;
}
while ( v1 != a1 );
}
return 0LL;
}
{% endtab %}
{% tab title=“PSEUDOCODE V7.2” %}
__int64 __fastcall sub_4008C0(int a1)
{
int v1; // ecx
v1 = 2;
if ( a1 > 2 )
{
do
{
nanosleep(&rmtp, &rqtp);
++v1;
}
while ( v1 != a1 );
}
return 0LL;
}
{% endtab %} {% endtabs %}
Order of variadic arguments
Do you notice the difference? If not, here is a hint: the order of arguments of sub_88 is different. The code on the right is more correct because the the format specifiers match the variable types. For example, %f matches float a. At the first sight the code on the left looks completely wrong but (surprise!) it works correctly on x64 machines. It is so because floating point and integer arguments are passed at different locations, so the relative order of floating/integer arguments in the call does not matter much. Nevertheless, the code on the right causes less confusion.
{% tabs %} {% tab title=“PSEUDOCODE V7.3” %}
int __cdecl func1(const float a, int b, void *c)
{
return sub_88("%f, %d, %p\n", a, (unsigned int)b, c);
}
{% endtab %}
{% tab title=“PSEUDOCODE V7.2” %}
int __cdecl func1(const float a, int b, void *c)
{
return sub_88("%f, %d, %p\n", (unsigned int)b, c, a);
}
{% endtab %} {% endtabs %}
Improved division recognition
This is a never ending battle, but we advance!
{% tabs %} {% tab title=“PSEUDOCODE V7.3” %}
int int_h_mod_m32ui64(void)
{
return h() % 32;
}
{% endtab %}
{% tab title=“PSEUDOCODE V7.2” %}
int int_h_mod_m32ui64(void)
{
__int64 v0; // r10
v0 = h();
return (abs64(v0) & 0x1F ^ (SHIDWORD(v0) >> 31)) - (SHIDWORD(v0) >> 31);
}
{% endtab %} {% endtabs %}
Hex-Rays v7.2 vs. v7.1 Decompiler Comparison Page
Below you will find side-by-side comparisons of v7.1 and v7.2 decompilations. Please maximize the window too see both columns simultaneously.
The following examples are displayed on this page:
- Magic divisions in 64-bit code
- More aggressive ‘if’ to ‘boolean’ folding
- Better type of ‘this’ argument
- Improved union field selection
- Improved recognition of ‘for’ loops
- Added support for shifted pointers
- Better recognition of inlined standard functions
- Improved application of pre-increment and pre-decrement
- Added support for RRX addressing mode in ARM
- Improved constant propagation in global memory
- Added support for Objective C blocks
- Improved recognition of 64-bit comparisons
- Merged common code in ‘if’ branches
- Added forced stack variables
- Added support for virtual calls
NOTE: these are just some selected examples that can be illustrated as side-by-side differences. There are many other improvements and new features that are not mentioned on this page.
Magic divisions in 64-bit code
In the past the Decompiler was able to recognize magic divisions in 32-bit code. We now support magic divisions in 64-bit code too.
{% tabs %} {% tab title=“PSEUDOCODE V7.2” %}
return 21600 * (t / 21600);
{% endtab %}
{% tab title=“PSEUDOCODE V7.1” %}
return 21600
* (((signed __int64)((unsigned __int128)(1749024623285053783LL
* (signed __int128)t) >> 64) >> 11) - (t >> 63));
{% endtab %} {% endtabs %}
More aggressive ‘if’ to ‘boolean’ folding
More aggressive folding of if_one_else_zero constructs; the output is much shorter and easier to grasp.
{% tabs %} {% tab title=“PSEUDOCODE V7.2” %}
return a1 << 28 != 0 && (a1 & (unsigned __int8)(a1 - 1)) == 0;
{% endtab %}
{% tab title=“PSEUDOCODE V7.1” %}
v1 = 1;
v2 = 1;
if ( !(a1 << 28) )
v2 = 0;
if ( !((unsigned __int8)a1 & (unsigned __int8)(a1 - 1)) )
v1 = 0;
return v2 && !v1;
{% endtab %} {% endtabs %}
Better type of ‘this’ argument
The decompiler tries to guess the type of the first argument of a constructor. This leads to improved listing.
{% tabs %} {% tab title=“PSEUDOCODE V7.2” %}
XImage *__fastcall XImage::setHotSpot(XImage *this, int a2, int a3)
{
LOWORD(this->height) = a2;
HIWORD(this->height) = a3;
return this;
}
{% endtab %}
{% tab title=“PSEUDOCODE V7.1” %}
int __fastcall XImage::setHotSpot(int this, int a2, int a3)
{
*(_WORD *)(this + 4) = a2;
*(_WORD *)(this + 6) = a3;
return this;
}
{% endtab %} {% endtabs %}
Improved union field selection
The decompiler has a better algorithm to find the correct union field. This reduces the number of casts in the output.
{% tabs %} {% tab title=“PSEUDOCODE V7.2” %}
float __fastcall ret4f(__n128 a1)
{
return a1.n128_f32[2];
}
{% endtab %}
{% tab title=“PSEUDOCODE V7.1” %}
float __fastcall ret4f(__n128 a1)
{
return *(float *)&a1.n128_u32[2];
}
{% endtab %} {% endtabs %}
Improved recognition of ‘for’ loops
We improved recognition of ‘for’ loops, they are shorter and much easier to understand.
{% tabs %} {% tab title=“PSEUDOCODE V7.2” %}
for ( i = 0; i < 16; ++i )
{
printf("%x", *(unsigned __int8 *)(i + v2) >> 4);
printf("%x", *(_BYTE *)(i + v2) & 0xF);
}
{% endtab %}
{% tab title=“PSEUDOCODE V7.1” %}
v3 = 0;
do
{
printf("%x", (unsigned int)*(unsigned __int8 *)(v3 + v2) >> 4);
printf("%x", *(_BYTE *)(v3++ + v2) & 0xF);
}
while ( v3 < 16 );
{% endtab %} {% endtabs %}
Added support for shifted pointers
Please note that the code on the left is completely illegible; the assembler code is probably easier to work with in this case.
However, the code on the right is very neat.
JFYI, below is the class hierarchy for this example:
struct __cppobj B1
{
B1_vtbl *__vftable /*VFT*/;
char d1[4];
};
struct __cppobj B2
{
B2_vtbl *__vftable /*VFT*/;
char d2[4];
};
struct __cppobj A : B1, B2
{
char d3[4];
};
Also please note that the source code had
A::a2(A *this)
but at the assembler level we have
A::a2(B2 *this)
Visual Studio plays such tricks.
{% tabs %} {% tab title=“PSEUDOCODE V7.2” %}
int __thiscall A::a2(B2 *__shifted(A,8) this)
{
printf("A::a2 %p\n", ADJ(this));
printf("A::d2 %p\n", ADJ(this)->d2);
return ADJ(this)->d3[0];
}
{% endtab %}
{% tab title=“PSEUDOCODE V7.1” %}
int __thiscall A::a2(B2 *this)
{
B2 *v1; // ST08_4
v1 = this;
printf("A::a2 %p\n", this - 1);
printf("A::d2 %p\n", (char *)v1 + 4);
return *((char *)v1 + 8);
}
{% endtab %} {% endtabs %}
Better recognition of inlined standard functions
Yes, the code on the left and on the right do the same. We prefer the right side, very much.
{% tabs %} {% tab title=“PSEUDOCODE V7.2” %}
if ( !memcmp(i + 10, "AMIBIOSC", 8u) )
return i + 10;
{% endtab %}
{% tab title=“PSEUDOCODE V7.1” %}
v2 = 0;
v3 = 1;
v4 = i + 10;
v5 = "AMIBIOSC";
v6 = 8;
do
{
if ( !v6 )
break;
v2 = *v4 < (const unsigned __int8)*v5;
v3 = *v4++ == *v5++;
--v6;
}
while ( v3 );
if ( (!v2 && !v3) == v2 )
return i + 10;
{% endtab %} {% endtabs %}
Improved application of pre-increment and pre-decrement
Minor stuff, one would say, and we’d completely agree. However, these minor details make reading the output a pleasure.
{% tabs %} {% tab title=“PSEUDOCODE V7.2” %}
v5 = *++v4;
result = --a4;
{% endtab %}
{% tab title=“PSEUDOCODE V7.1” %}
v5 = (v4++)[1];
result = a4-- - 1;
{% endtab %} {% endtabs %}
Added support for RRX addressing mode in ARM
This is a rare addressing mode that is nevertheless used by compilers. Now we support it nicely.
{% tabs %} {% tab title=“PSEUDOCODE V7.2” %}
__int64 __fastcall sar64(__int64 a1)
{
return a1 >> 1;
}
{% endtab %}
{% tab title=“PSEUDOCODE V7.1” %}
__int64 __fastcall sar64(__int64 a1)
{
__int64 result; // r0
SHIDWORD(a1) >>= 1;
__asm { MOV R0, R0,RRX }
return result;
}
{% endtab %} {% endtabs %}
Improved constant propagation in global memory
The new decompiler managed to disentangle the obfuscation code and convert it into a nice strcpy()
{% tabs %} {% tab title=“PSEUDOCODE V7.2” %}
strcpy((char *)&dword_1005DF9A, "basic_string");
{% endtab %}
{% tab title=“PSEUDOCODE V7.1” %}
dword_1005DF9A = 0xADB0A3A3;
dword_1005DF9E = 0xBCB499A6;
dword_1005DFA2 = 0xABA5A3BB;
LOBYTE(dword_1005DF9A) = 'b';
BYTE1(dword_1005DF9A) ^= 0xC2u;
HIWORD(dword_1005DF9A) = 'is';
LOBYTE(dword_1005DF9E) = 'c';
BYTE1(dword_1005DF9E) ^= 0xC6u;
HIWORD(dword_1005DF9E) = 'ts';
LOBYTE(dword_1005DFA2) = 'r';
BYTE1(dword_1005DFA2) ^= 0xCAu;
HIWORD(dword_1005DFA2) = 'gn';
byte_1005DFA6 = 0;
{% endtab %} {% endtabs %}
Added support for Objective C blocks
The new version knows about ObjC blocks and can represent them correctly in the output. See Edit, Other, Objective-C submenu in IDA, it contains the necessary actions to analyze the blocks.
{% tabs %} {% tab title=“PSEUDOCODE V7.2” %}
__int64 __fastcall sub_181450634(__int64 a1, __int64 a2, __int64 a3)
{
Block_layout_18145064C blk; // [xsp+0h] [xbp-30h]
blk.isa = _NSConcreteStackBlock;
*(_QWORD *)&blk.flags = 0x42000000LL;
blk.invoke = sub_181450694;
blk.descriptor = (Block_descriptor_1 *)&unk_1B0668958;
blk.lvar1 = *(_QWORD *)(a1 + 32);
blk.lvar2 = a3;
return sub_18144BD0C(a2, &blk);
}
{% endtab %}
{% tab title=“PSEUDOCODE V7.1” %}
__int64 __fastcall sub_181450634(__int64 a1, __int64 a2, __int64 a3)
{
void *(*v4)[32]; // [xsp+0h] [xbp-30h]
__int64 v5; // [xsp+8h] [xbp-28h]
__int64 (__fastcall *v6)(); // [xsp+10h] [xbp-20h]
void *v7; // [xsp+18h] [xbp-18h]
__int64 v8; // [xsp+20h] [xbp-10h]
__int64 v9; // [xsp+28h] [xbp-8h]
v4 = _NSConcreteStackBlock;
v5 = 1107296256LL;
v6 = sub_181450694;
v7 = &unk_1B0668958;
v8 = *(_QWORD *)(a1 + 32);
v9 = a3;
return sub_18144BD0C(a2, &v4);
}
{% endtab %} {% endtabs %}
Improved recognition of 64-bit comparisons
We continue to improve recognition of 64-bit arithmetics. While it is impossible to handle all cases, we do not give up.
{% tabs %} {% tab title=“PSEUDOCODE V7.2” %}
gettimeofday(&tv, 0);
v0 = 90 * (v3 / 1000 + 1000LL * *(_QWORD *)&tv);
if ( v0 < 0xFFFFFFFFFFFFFFFFLL )
stamp = 90 * (v3 / 1000 + 1000LL * *(_QWORD *)&tv);
{% endtab %}
{% tab title=“PSEUDOCODE V7.1” %}
gettimeofday(&tv, 0);
v0 = 1000LL * (unsigned int)tv.tv_usec;
HIDWORD(v0) = (unsigned __int64)(1000LL * *(_QWORD *)&tv) >> 32;
v1 = 90LL * (unsigned int)(v4 / 1000 + v0);
HIDWORD(v1) = (unsigned __int64)(90 * (v4 / 1000 + v0)) >> 32;
if ( HIDWORD(v1) < 0xFFFFFFFF || -1 == HIDWORD(v1) && (unsigned int)stamp > (unsigned int)v1 )
stamp = v1;
{% endtab %} {% endtabs %}
Merged common code in ‘if’ branches
Yet another optimization rule that lifts common code from ‘if’ branches. We made it even more aggressive.
{% tabs %} {% tab title=“PSEUDOCODE V7.2” %}
mywcscpy();
if ( a3 < 0 )
v4 = -a3;
{% endtab %}
{% tab title=“PSEUDOCODE V7.1” %}
if ( a3 >= 0 )
{
mywcscpy();
}
else
{
mywcscpy();
v4 = -a3;
}
{% endtab %} {% endtabs %}
Added forced stack variables
Sometimes compilers reuse the same stack slot for different purposes. Many our users asked us to add a feature to handle this situation. The new decompiler addresses this issue by adding a command to force creation of a new variable at the specified point. Currently we support only aliasable stack variables because this is the most common case.
In the sample above the slot of the p_data_format variable is reused. Initially it holds a pointer to an integer (data_format) and then it holds a simple integer (errcode). Previous versions of the decompiler could not handle this situation nicely and the output would necessarily have casts and quite difficult to read. The two different uses of the slot would be represented just by one variable. You can see it in the left listing.
The new version produces clean code and displays two variables. Naturally it happens after applying the force new variable command.
{% tabs %} {% tab title=“PSEUDOCODE V7.2” %}
data_format = *p_data_format;
if ( *p_data_format < 0 || data_format > 13 )
{
errcode = 2;
SetError(&this->status, &errcode, "format not one of accepted types");
}
{% endtab %}
{% tab title=“PSEUDOCODE V7.1” %}
data_format = *p_data_format;
if ( *p_data_format < 0 || data_format > 13 )
{
p_data_format = (int *)2;
SetError(&this->status, (errcode_t *)&p_data_format, "format not one of accepted types");
}
{% endtab %} {% endtabs %}
Added support for virtual calls
Well, these listings require no comments, the new version apparently wins!
{% tabs %} {% tab title=“PSEUDOCODE V7.2” %}
void __cdecl test3(D7 *a1)
{
a1->f1(&a1->A1);
a1->f2(&a1->D3);
a1->f3(&a1->D5);
a1->f4(&a1->A4);
a1->f5(a1);
a1->f6(a1);
a1->g0(&a1->D5);
a1->g5(&a1->D5);
a1->g7(a1);
if ( a1 )
a1->~D7(a1);
}
{% endtab %}
{% tab title=“PSEUDOCODE V7.1” %}
void __cdecl test3(D7 *a1)
{
(**((void (__cdecl ***)(char *))a1 + 12))((char *)a1 + 48);
(*(void (__cdecl **)(char *))(*((_DWORD *)a1 + 10) + 12))((char *)a1 + 40);
(**((void (__cdecl ***)(char *))a1 + 6))((char *)a1 + 24);
(**((void (__cdecl ***)(char *))a1 + 26))((char *)a1 + 104);
(**(void (__cdecl ***)(D7 *))a1)(a1);
(*(void (__cdecl **)(D7 *))(*(_DWORD *)a1 + 12))(a1);
(*(void (__cdecl **)(char *))(*((_DWORD *)a1 + 6) + 4))((char *)a1 + 24);
(*(void (__cdecl **)(char *))(*((_DWORD *)a1 + 6) + 16))((char *)a1 + 24);
(*(void (__cdecl **)(D7 *))(*(_DWORD *)a1 + 16))(a1);
if ( a1 )
(*(void (__cdecl **)(D7 *))(*(_DWORD *)a1 + 8))(a1);
}
{% endtab %} {% endtabs %}
Interactive operation
The decompiler adds the following commands to the menus:
- View, Open subviews, Pseudocode
- Jump, Jump to pseudocode
- File, Produce file, Create C file
- Edit, Comment, Add pseudocode comments
- Edit, Comment, Delete pseudocode comments
- Edit, Other, Toggle skippable instructions
- Edit, Other, Reset decompiler information
- Edit, Other, Decompile as call
- Help, Send database
- Help, Extract function
View, Open subviews, Pseudocode (hotkey F5)
This command decompiles the current function. If the decompilation is successful, it opens a new window titled “Pseudocode” and places the generated C text in this window.
The following commands can be used in the pseudocode window:
- Rename
- Set type
- Set number representation
- Edit indented comment
- Edit block comment
- Show all call decompilations
- Show all xref decompilations
- Hide/unhide statements
- Split/unsplit expression
- Force call type
- Set call type
- Add/del variadic arguments
- Del function argument
- Add/delete function return type
- Jump to cross reference
- Jump to cross reference globally
- Generate HTML file
- Mark/unmark as decompiled
- Copy to assembly
- Show/hide casts
If the current item is a local variable, additional items may appear in the context menu:
- Reset pointer type
- Convert to struct *
- Create new struct type
- Map to another variable
- Unmap variable(s)
- Split variable
- Unsplit variable
If the current item is a union field, an additional item may appear in the context menu:
If the current item is a parenthesis, bracket, or a curly brace, the following hotkey is available:
The user can also select text and copy it to the clipboard with the Ctrl-C combination.
If the current item is C statement keyword, an additional item may appear in the context menu:
The user can also select text and copy it to the clipboard with the Ctrl-C combination.
Pressing Enter on a function name will decompile it. Pressing Esc will return to the previously decompiled function. If there is no previously decompiled function, the pseudocode window will be closed.
Ctrl-Enter or Ctrl-double click on a function name will open a new pseudocode window for it.
Pressing F5 while staying in a pseudocode window will refresh its contents. Please note that the decompiler never refreshes pseudocode by itself because it can take really long.
The user can use the mouse right click or keyboard hotkeys to access the commands. Please check the command descriptions for the details.
Jump, Jump to pseudocode (hotkey Tab)
This command toggles between the disassembly view and pseudocode view. If there is no pseudocode window, a new window will be created.
Pressing Tab while staying in the pseudocode window will switch to the disassembly window. The Tab key can be used to toggle pseudocode and disassembly views.
See above the Open pseudocode command for more details.
File, Produce file, Create C file (hotkey Ctrl-F5)
This command decompiles the selected functions or the whole application. It will ask for the name of the output .c file.
If there is a selected area in the disassembly view, only the selected functions will be decompiled. Otherwise, the whole application will be decompiled.
When the whole application is decompiled, the following rules apply:
- the order of decompilation is determined by the decompiler. It will start with the leaf functions and will proceed in the postnumbering order in the call graph. This order makes sure that when we decompile a function, we will have all information about the called functions. Obviously, for recursive functions some information will be still missing.
- the library (light blue) functions will not be decompiled. By the way, this is a handy feature to exclude functions from the output.
- A decompilation failure will not stop the analysis but the internal errors will. The decompiler generates #error directives for failed functions.
Edit, Comments, Add pseudocode comments
This command decompiles the current function and copies the pseudocode to the disassembly listing in the form of anterior comments. If the current function already has a pseudocode window, its contents are used instead of decompiling the function anew.
This menu item performs exactly the same actions as the Copy to assembly command.
Edit, Comments, Delete pseudocode comments
This command deletes all anterior comments created by the previous command. Its name is a slight misnomer because it does not verify the comment origin. In fact, all anterior comments within the current function are deleted.
Edit, Other, Toggle skippable instructions
This command marks/unmarks instructions to be skipped by the decompiler. It is useful if some prolog/epilog instructions were missed by IDA. If such instructions were not detected and marked, the decompilation may fail (most frequently the call analysis will fail).
The decompiler skips the prolog, epilog, and switch instructions. It relies on IDA to mark these instructions. Sometimes IDA fails to mark them, and this command can be used to correct the situation.
If the command is applied to marked instructions, it will unmark them.
By default, the skipped instructions are not visualized. To make them visible, edit the IDA.CFG file and uncomment the following lines:
PROLOG_COLOR = 0xE0E0E0 // grey
EPILOG_COLOR = 0xE0FFE0 // light green
SWITCH_COLOR = 0xE0E0FF // pink
Edit, Other, Reset decompiler information
This command deletes decompiler information.
It can delete information about global objects (functions, static data, structure/enum types) and/or information local to the current function.
Use this command if you inadvertently made some change that made decompilation impossible.
It can also be used to reset other information types used by the decompiler. For example, the forced variadic arguments or split expression can be reset.
Edit, Other, Decompile as call
This commands configures a function call the current instruction should be replaced by in the pseudocode output.
Special names can be used to access operands of the current instructions: __OP1, __OP2, … for first, second, etc. operands. Each function argument having a name like that will be replaced in the call by the value of the corresponding operand of the instruction. Also if the function name has this format, a call to the location pointed by the corresponding operand will be generated. Other arguments and the return value will be placed into locations derived from the function prototype according to the current compiler, calling convention, argument and return types. You can use IDA-specific __usercall calling convention to specify arbitrary locations independently of platform and argument/return types (read IDA help pages about the user defined calling conventions for more info).
Examples
- We could ask to replace the following instruction:
out 2b, ax
by specifying the following prototype:void OUT(unsigned int8 __OP1, int16 __OP2)
which would lead to the following decompiler output:OUT(0x2b, v1);
where v1 is mapped to ax. - The following prototype:
int __usercall syscall@<R0;>(int code@<R12;>, void *a1@<R0;>, void *a2@<R1;>)
applied to the second instruction in the following piece of code:mov r12, #0x148svc 0x801
will generate the following pseudocode:v3 = syscall(328, v1, v2);
where v1, v2, v3 are mapped to R0, R1, R2 respectively.
Help, Send database
This command packs and sends the current database to our server. The user can specify his/her email and add notes about the error. This is the preferred way of filing bugreports because it is virtually impossible to do anything without a database. The database will also contain the internal state of the decompiler, which is necessary to reproduce the bug.
The database is sent in the compressed form to save the bandwidth. An encrypted connection (SSL) is used for the transfer.
Help, Extract function
This command deletes all code and data from the current idb extract the current function. It can be used to reduce the database size before sending a bug report. Please note that deleting information from the database may make the bug irreproducible, so please verify it after applying this command.
Rename
Hotkey: N
The rename command renames the current item. It can be applied to the following things:
- Function
- Local variable
- Global item (function or data)
- Structure field
- Statement label
Normally the item under the cursor will be renamed. If the command is applied to the very first line of the output text and the decompiler cannot determine the item under the cursor, the current function will be renamed.
See also: interactive operation
Set type
Hotkey: Y
The SetType command sets the type of the current item. It can be applied to the following things:
- Function
- Local variable
- Global item (function or data)
If the command is applied to the very first line of the output text, the decompiler will try to detect the current function argument. If the cursor is on an argument declaration, then the argument type will be modified. Otherwise, the current function type will be modified.
In all other cases the item under the cursor will be modified.
When modifying the prototype of the current function you may add or remove function arguments, change the return type, and change the calling convention. If you see that the decompiler wrongly created too many function arguments, you can remove them.
The item type must be specified as a C type declaration. All types defined in the loaded type libraries, all structures in the local types window, all enum definitions in the local types window can be used.
This is a very powerful command. It can change the output dramatically. Use it to remove cast operations from the output and to make it more readable. In some cases, you will need to define structure types in the local types window and only after that use them in the pseudocode window.
NOTE: since the arguments of indirect calls are collected before defining variables, specifying the type of the function pointer may not be enough. Please read this for more info.
Since variables and function types are essential, the decompiler uses colors to display them. By default, definite types (set by the user, for example) are displayed in blue while guessed types are displayed in gray. Please note that the guessed types may change if the circumstances change. For example, if the prototype of a called function is changed, the variable that holds its return value may change automatically, unless its type was set by the user.
This command does not rename the operated item, even if you specify the name in the declaration. Please use the rename command for that.
See also: interactive operation
Set number representation
Hotkeys:
- H - toggle between hexadecimal and decimal representations
- R - switch to character constant representation
- M - switch to enumeration (symbolic constant) representation
- _ - invert sign
- T - apply struct offset
This command allows the user to specify the desired form of a numeric constant. Please note that some constants have a fixed form and cannot be modified. This mainly includes constants generated by the decompiler on the fly.
The decompiler ties the number format information to the instruction that generated the constant. The instruction address and the operand number are used for that. If a constant, which was generated by a single instruction, is used in many different locations in the pseudocode, all these locations will be modified at once.
Using the ‘invert sign’ negates the constant and resets the enum/char flag if it was set.
When this command is applied the first time to a negative constant, the output will seemingly stay the same. However, the list of symbolic constants available to the M hotkey changes. For example, if the constant is ‘-2’, then before inverting the sign the symbolic constants corresponding to ‘-2’ are available. After inverting the sign the symbolic constants corresponding to ‘2’ are available.
The T hotkey applies the structure offset to the number. For positive numbers, it usually converts the number into offsetof() macro. For negative numbers, it usually converts the whole (var-num) expression into the CONTAINING_RECORD macro. By the way, the decompiler tries to use other hints to detect this macro. It checks if the number corresponds to a structure offset in the disassembly listing. For example, an expression like
v1 = (structype *)((char *)v2 - num);
can be converted into
v1 = CONTAINING_RECORD(v2, structype, fieldname);
where structype * is the type of v1 and offsetof(structype, fieldname) == num. Please note that v2 must be declared as a pointer to the corresponding structure field, otherwise the conversion may fail.
See also:
Edit indented comment
Hotkey: /
This command edits the indented comment for the current line or the current variable. It can be applied to the local variable definition area (at the top of the output) and to the function statement area (at the bottom of the output).
If applied to the local variable definition area, this command edits the comment for the current local variable. Otherwise the comment for the current line will be edited.
Please note that due to the highly dynamic nature of the output, the decompiler uses a rather complex coordinate system to attach comments. Some output lines will not have a coordinate in this system. You cannot edit comments for these lines. We will try to overcome this limitation in the future but it might take some time and currently we do not have a clear idea how to improve the existing coordinate system.
Each time the output text changes the decompiler will rearrange the entered comments so they are displayed close to their original locations. However, if the output changes too much, the decompiler could fail to display some comments. Such comments are called “orphan comments”. All orphan comments are printed at the very end of the output text.
You can cut and paste them to the correct locations or you can delete them with the “Delete orphan comments” command using the right-click menu.
The starting line position for indented comments can be configured by the user. Please check the COMMENT_INDENT parameter in the configuration file.
See also: Edit block comment | Interactive operation
Edit block comment
Hotkey: Ins
This command edits the block comment for the current line. The entered comment will be displayed before the current line.
Please note that due to the highly dynamic nature of the output, the decompiler uses a rather complex coordinate system to attach comments. Some output lines will not have a coordinate in this system. You cannot edit comments for these lines. Also, some lines have the same coordinate. In this case, the comment will be attached to the first line with the internal coordinate. We will try to overcome this limitation in the future but it might take some time and currently we do not have a clear idea how to improve the existing coordinate system.
Each time the output text changes the decompiler will rearrange the entered comments so they are displayed close to their original locations. However, if the output changes too much, the decompiler could fail to display some comments. Such comments are called “orphan comments”. All orphan comments are printed at the very end of the output text.
If applied to the function declaration line, this command edits the function comment. This comment is shared with IDA: it is the same as the function comment in IDA.
You can cut and paste them to the correct locations or you can delete them with the “Delete orphan comments” command using the right-click menu.
See also: Edit indented comment | Interactive operation
Hide/unhide C statements
Hotkeys
Keypad -
Hide current statement
Keypad +
Unhide current statement
This command collapses the current statement into one line. It can be applied to multiline statements (if, while, for, do, switch, blocks).
The hidden item can be uncollapsed using the unhide command.
See also: interactive operation
Split/unsplit expression
Hotkeys
None
Split current expression
None
Unsplit current expression
This command splits the current expression into multiple expressions. It is available only for int16, int32, or int64 assignments or expressions which were combiled by the decompiler (e.g. 64bit comparison on 32bit platform). Splitting an assignment breaks it into two assignments: one for the low part and one for the high part. Other expressions can be splitted into more than two expressions.
This command is useful if the decompiler erroneously combines multiple unrelated expressions into one. In some cases the types of the new variables should be explicitly specified to get a nice listing. For example:
__int64 v0;
v0 = 0ui64;
can be split into two assignments:
__int32 v0;
__int32 v1;
v0 = 0;
v1 = 0;
by right clicking on the 64-bit assignment operation (the ‘=’ sign) and selecting the ‘Split’ command.
The split expression can be unsplit using the unsplit command. Unsplitting removes all effects of the previous Split commands.
See also: interactive operation
Force call type
In some cases, especially for indirect calls, the decompiler cannot correctly detect call arguments. For a call like
push something
mov eax, [ecx]
call [eax+8]
it is very difficult to determine where are the input arguments. For example, it is unclear if ECX is used by the call or not.
However, the number of arguments and their types can become available at later stages of decompilation. For example, the decompiler may determine that ECX points to a class with a table of virtual functions. If the user specifies the vtable layout, the output may become similar to
((int (*__stdcall)(DWORD))ptr-vftable-somefunc)(v1);
If the user declares somefunc as a pointer to a function like this:
int __thiscall (*somefunc)(myclass *obj, int arg);
then the code is incorrect. The decompiler detected only one argument and missed the one in ECX.
The ‘force call type’ command instructs the decompiler not to perform the call argument analysis but just use the type of the call object. For the above example, the call will be transformed into something like
ptr-vftable-somefunc(obj, v1); // obj is in ECX
In other words, this command copies the call type from the call object to the call instruction. The call object may be any expression, the only requirement is that it must be a pointer to a function.
There is a more general command Set call type that allows the user to set any type for a call instruction.
NOTE: Behind the scenes the ‘force call’ command copies the desired type to the operand of the call instruction. To revert the effects of ‘force call’ or to fine tune the forced type please use the Edit, Operand type, Set operand type in the disassembly view while staying on the call instruction.
See also: interactive operation
Set call type
In some cases, especially for indirect calls, the decompiler cannot correctly detect call arguments. The ‘Set call type’ command sets the type of the function call at the current item without changing the prototype of the called function itself. So there is a difference between ‘Set call type’ and Set type commands. Let us assume that there is a call
v1 = off_5C6E4(a1);
and that the decompiler erroneously detected one argument whereas four arguments actually are present. If the user sets the new call type as
int (*)(int, int, int, int)
then the call will be transformed into
v1 = ((int (__cdecl *)(int, int, int, int))off_5C6E4)(a1, a2, a3, a4);
and the type of off_5C6E4 will remain unchanged. Note that in this case the user can revert the call to the previous state using the Force call type command.
The Set type command will have a different effect:
v1 = off_5C6E4(a1, a2, a3, a4);
It sets the new type for off_5C6E4 that will cause changes to all places where off_5C6E4 is called, including the current call.
This command also can be used to specify the __noreturn attribute of a call.
NOTE: Behind the scenes the ‘Set call type’ command, like Force call type, copies the entered type to the operand of the call instruction. Actually it is a shortcut to Edit, Operand type, Set operand type in the disassembly view while staying on the call instruction.
See also: interactive operation
Add/del variadic arguments
Hotkeys
Numpad+
Add variadic argument
Numpad-
Delete variadic argument
This command adds or removes an argument of a variadic call. It is impossible to detect the correct number of variadic arguments in all cases, and this command can be used to fix wrongly detected arguments. It is available only when the cursor is located on a call to a variadic function (like printf). The decompiler automatically detects the argument locations, the user can only increase or decrease their number.
This command is useful if the decompiler determines the number of arguments incorrectly. For example:
printf("This is a test call: %d\n");
apparently lacks an argument. Pressing Numpad+ modifies it:
printf("This is a test call: %d\n", v1);
If too many arguments are added to a variadic call, decompilation may fail. Three methods to correct this situation exist:
- undo the last action (hotkey Ctrl-Z)
- position the cursor on the wrongly modified call and press Numpad-
- or use Edit, Other, Reset decompiler information to reset the forced varidic argument counts.
See also: interactive operation
Del function argument
Hotkey: Shift-Del
This command removes an argument or the return type from a function prototype. It can be applied to the prototype of the current function as well as to any called function.
It is available only when the cursor is on a function argument or on the return type. As a result of this command, the function prototype is modified: the selected argument is removed from the argument list. If necessary, the calling convention is replaced by a new one.
Please note that other register arguments do not change their locations. This logic ensures that a stray argument in the argument list can be deleted with a keypress.
When applied to the function return type it will convert it to “void”.
This command is available starting from v7.5.
See also: interactive operation, Add/delete function return type.
Add/delete function return type
Hotkey: Ctrl-Shift-R
This command removes the return type from the function prototype. It is applied to the prototype of the current function.
It is available anywhere in the pseudocode window, regardless where exactly the cursor is positioned. This command is not visible in the context sensitive popup menu.
If applied to a function without the return type, it will add the previously removed return type to the function prototype.
This command is available starting from v7.5.
See also: interactive operation, Del function argument.
Jump to cross reference
This command opens the standard dialog box with the cross references to the current item. The user may select a cross reference and jump to it. If the cross-reference address belongs to a function, it will be decompiled. Otherwise, IDA will switch to the disassembly view.
For local variables, the following cross reference types are defined:
r Read
w Write
rw Read/Write
o Reference
It is also possible to jump to structure fields. All local references to a field of a structure type will be displayed.
If the item under the cursor is a label, a list of all references to the label will be displayed.
Finally, xrefs to statment types are possible too. For example, a list of all return statements of the current function can be obtained by pressing X on a return statment. All statements with keywords are supported.
See also: interactive operation
Jump to cross reference globally
This command decompiles all non-trivial functions in the database and looks for xrefs in them. Library and thunk functions are skipped. The decompilation results are cached in memory, so only the first invocation of this command is slow.
Cross references to the current item are looked up in the decompilation results. A list of such xrefs is formed and displayed on the screen. Currently the following item types are supported:
- a structure field
- a enumeration member (symbolic constant)
This action is also available (only by hotkey) in the local types view.
See also: interactive operation
Generate HTML file
This command generates an HTML file with the pseudocode of the current function. It is available from the popup menu if the mouse is clicked on the very first line of the pseudocode text.
This command also works on the selected area. The user can select the area that will be saved into HTML file. This is useful if only a small code snippet is needed to be saved instead of the entire function body.
See also: interactive operation
Mark/unmark as decompiled
This command marks the current function as decompiled. It is a convenient way to track decompiled functions. Feel free to use it any way you want.
Marking a function as decompiled will change its background color to the value specified by the MARK_BGCOLOR parameter in the configuration file. The background color will be used in the pseudocode window, in the disassembly listing, and in the function list.
See also: interactive operation
Copy to assembly
This command copies the pseudocode text to the disassembly window. It is available from the popup right-click menu.
Please note that only “meaningful” lines are copied. Lines containing curly braces, else/do keywords will be omitted.
The copied text is represented as anterior comments in the disassembly. Feel free edit them the way you want. The copied text is static and will not change if the pseudocode text changes.
See also: interactive operation
Show/hide casts
Hotkey: \
This command hides all cast operators from the output listing. Please note that the output may become more difficult to understand or even lose its meaning without cast operators. However, since in some cases it is desirable to temporarily hide them, we provide the end user with this command.
The initial display of cast operators can be configured by the user. Please check the HO_DISPLAY_CASTS bit in the HEXOPTIONS parameter in the configuration file.
See also: interactive operation
Reset pointer type
Hotkey: none
This command resets the type of the current local variable from a pointer type to an integer type. This is just a convenience command. Please use the set type command in order to specify arbitrary variable types.
See also: interactive operation
Convert to struct *
Hotkey: none
This convenience command allows the user to specify a pointer to structure type in a quick and efficient manner. The list of the local structure types will be displayed. The type of the current variable will be set as a pointer to the selected structure type.
This is just a convenience command. Please use the set type command in order to specify arbitrary variable types.
This command is available only when the decompiler is used with recent IDA versions.
See also: interactive operation
Create new struct type
Hotkey: none
This convenience command allows the user to convert the current local variable from a non-pointer type to a pointer to a newly created structure type. It is available from the context menu if the current variable is used a pointer in the pseudocode.
The decompiler scans the pseudocode for all references to the variable and tries to deduce the type of the pointed object. Then the deduced type is displayed on the screen and the user may modify it to his taste before accepting it. When the user clicks OK, the new type is created and the type of the variable is set as a pointer to the newly created type.
In simple cases (for example, when the variable is used as a simple character pointer), the decompiler does not display any dialog box but directly changes the variable type. In such cases, no new type will be created.
This is just a convenience command. Please use the set type command in order to specify arbitrary variable types.
This command is available only when the decompiler is used with recent IDA versions.
See also: interactive operation
Split variable
Hotkey: Shift-S
Sometimes a stack slot is used for two completely different purposes during the lifetime of a function. While for the unaliased part of the stack frame the decompiler can usually sort things out, it cannot do much for the aliased part of the stack frame. For the aliased part, it will create just one variable even if the corresponding stack slot is used for multiple different purposes. It happens so because the decompiler cannot prove that the variable is used for a different purpose, starting from a certain point.
The split variable command is designed to solve exactly this problem.
This command allows the user to force the decompiler to allocate a new variable starting from the current point. If the current expression is a local variable, all its subsequent occurrences will be replaced by a new variable up to the end of the function or the next split variable at the same stack slot. If the cursor does not point to a local variable, the decompiler will ask the user about the variable to replace.
In the current statement, only the write accesses to the variable will be replaced. In the subsequent statements, all occurrences of the variable will be replaced. We need this logic to handle the following situation:
func(var, &var);
where only the second occurrence of the variable should be replaced. Please note that in some cases it makes sense to click on the beginning of the line with the function call, rather than on the variable itself.
Please note that in the presence of loops in the control flow graph it is possible that even the occurrences before the current expression will be replaced by the new variable. If this is not desired, the user should split the variable somewhere else.
The very first and the very last occurrences of a variable cannot be used to split the variable because it is not useful.
The decompiler does not verify the validity of the new variable. A wrong variable allocation point may render the decompiler output incorrect.
Currently, only aliasable stack variables can be split.
A split variable can be deleted by right clicking on it and selecting ‘Unsplit variable’.
See also: interactive operation
Select union field
Hotkey: Alt-Y
This command allows the user to select the desired union field. In the presence of unions, the decompiler cannot always detect the correct union field.
The decompiler tries to reuse the union selection information from the disassembly listing. If there is no information in the disassembly listing, the decompiler uses an heuristic rule to choose the most probable union field based on the field types. However, it may easily fail in the presence of multiple union fields with the same type or when there is no information how the union field is used.
If both the above methods of selecting the union field fail, then this command can be used to specify the desired field. It is especially useful for analyzing device drivers (I/O request packets are represented with a long union), or COM+ code that uses VARIANT data types.
See also: interactive operation
Jump to paired paren
This command jumps to the matching parenthesis. It is available only when the cursor is positioned on a parenthesis, bracket, or curly brace.
The default hotkey is ‘%’.
See also: interactive operation
Collapse/uncollapse item
This command collapses the selected multiline C statement into one line. It can be applied to if, while, for, switch, do keywords. The collapsed item will be replaced by its keyword and “…”
It can also be applied to the local variable declarations. This can be useful if there are too many variables and they make the output too long. All variable declarations will be replaced by just one line:
// [COLLAPSED LOCAL DECLARATIONS. PRESS KEYPAD CTRL-"+" TO EXPAND]
See also: interactive operation
Map to another variable
Hotkey: =
This command allows the user to replace all occurrences of a variable by another variable. The decompiler will propose a list of variables that may replace the current variable. The list will include all variables that have exactly the same type as the current variable. Variables that are assigned to/from the current variable will be included too.
Please note that the decompiler does not verify the mapping. A wrong mapping may render the decompiler output incorrect.
The function arguments and the return value cannot be mapped to other variables. However, other variable can be mapped to them.
A mapping can be undone by right clicking on the target variable and using the ‘unmap variable’ command.
See also: interactive operation
Hex-Rays interactive operation: Show all call decompilations
Hotkey: none
This command will appear on the right-click menu when the cursor is
over a direct call, or when the cursor is over the function’s prototype.
When selected, it will prompt the user whether they would like to
decompile all functions that call the highlighted function. If the user
selects “Yes”, Hex-Rays will decompile those functions, extract the
decompilation for all calls to that location, and show the results in
a new window. The user can navigate through this window by
double-clicking (or pressing Enter) on any of the lines.
This command is available starting from v9.2.
See also: interactive operation, show all xref decompilations.
Hex-Rays interactive operation: Show all xref decompilations
Hotkey: none
This command will appear on the right-click menu when the cursor is over a global data item. (If the cursor is over a direct call, Show all call decompilations will appear instead.)
When selected, it will prompt the user whether they would like to
decompile all functions that reference the highlighted global variable.
If the user selects “Yes”, Hex-Rays will decompile those functions,
extract the decompilation nearby the reference to that global variable,
and show the results in a new window. The user can navigate through
this window by double-clicking (or pressing Enter) on any of the
lines.
The following cross reference types are defined:
r Read
w Write
rw Read/Write
o Reference
This command is available starting from v9.2.
See also: interactive operation, show all call decompilations.
Batch operation
The decompiler supports the batch mode operation with the text and GUI versions of IDA. All you need is to specify the -Ohexrays switch in the command line. The format of this switch is:
-Ohexrays:-option1:-option2...:outfile:func1:func2\...
The valid options are:
- -new decompile only if output file does not exist
- -nosave do not save the database (idb) file after decompilation
- -errs send problematic databases to hex-rays.com
- -lumina use Lumina server
- [email protected] your email (meaningful if -errs option is used)
The output file name can be prepended with + to append to it. If the specified file extension is invalid, .c will be used.
The functions to decompile can be specified by their addresses or names. The ALL keyword means all non-library non-trivial functions. For example:
idat -Ohexrays:-errs:[email protected]:outfile:ALL -A input
will decompile all nonlibrary non-trivial (having more than one instruction) functions to outfile.c. In the case of an error, the .idb file will be sent to hex-rays.com. The -A switch is necessary to avoid the initial dialog boxes.
Configuration
The decompiler has a configuration file. It is installed into the ‘cfg’ subdirectory of the IDA installation. The configuration file is named ‘hexrays.cfg’. It is a simple text file, which can be edited to your taste. Currently the following keywords are defined:
LOCTYPE_BGCOLOR
Background color of local type declarations. Currently this color is not used.
Default: default background of the disassembly view
VARDECL_BGCOLOR
Background color of local variable declarations. It is specified as a hexadecimal number 0xBBGGRR where BB is the blue component, GG is the green component, and RR is the red component. Color -1 means the default background color (usually white).
Default: default background of the disassembly view
FUNCBODY_BGCOLOR
Background color of the function body. It is specified the same way as VARDECL_BGCOLOR.
Default: default background of the disassembly view
MARK_BGCOLOR
Background color of the function if it is marked as decompiled. It is specified the same way as VARDECL_BGCOLOR.
Default: very light green
BLOCK_INDENT
Number of spaces to use for block indentations.
Default: 2
COMMENT_INDENT
The position to start indented comments.
Default: 48
RIGHT_MARGIN
As soon as the line length approaches this value, the decompiler will try to split it. However, it some cases the line may be longer.
Default: 120
MAX_NCOMMAS
In order to keep the expressions relatively simple, the decompiler limits the number of comma operators in an expression. If there are too many of them, the decompiler will add a goto statement and replace the expression with a block statement. For example, instead of
if ( cond || (x=*p,y=func(),x+y0) )
body;
we may end up with:
if ( cond )
goto LABEL;
x = *p;
y = func();
if ( x + y 0 )
LABEL:
body;
Default: 8
DEFAULT_RADIX
Specifies the default radix for numeric constants. Possible values: 0, 10, 16. Zero means “decimal for signed, hex for unsigned”.
Default: 0
MAX_FUNCSIZE
Specifies the maximal decompilable function size, in KBs. Only reachable basic blocks are taken into consideration.
Default: 64
OPT_VALRNG_SWITCH_NCASES
This option controls the ARM decompiler’s switch statement optimization that eliminates unreachable cases from the decompiler output.
The value specifies the maximum number of cases a switch statement can have before this optimization is skipped.
To disable this optimization entirely, set it to 0.
Default: 32
HEXOPTIONS
Combination of various analysis and display options:
HO_JUMPOUT_HELPERS
If enabled, the decompiler will handle out-of-function jumps by generating a call to the JUMPOUT() function. If disables, such functions will not be decompiled.
Default: enabled
HO_DISPLAY_CASTS
If enabled, the decompiler will display cast operators in the output listing.
Default: enabled
HO_HIDE_UNORDERED
If enabled, the decompiler will hide unordered floating point comparisons. If this option is turned off, unordered comparisons will be displayed as calls to a helper function: __UNORDERED__(a, b)
Default: enabled
HO_SSE_INTRINSICS
If enabled, the decompiler will generate intrinsic functions for SSE instructions that use XMM/MMX registers. If this option is turned off, these instructions will be displayed using inline assembly.
Default: enabled
HO_IGNORE_OVERLAPS
If enabled, the decompiler will produce output even if the local variable allocation has failed. In this case the output may be wrong and will contain some overlapped variables.
Default: enabled
HO_FAST_STRUCTURAL
If enabled, fast structural analysis will be used. It generates less number of nested if-statements but may occasionally produce some unnecessary gotos. It is much faster on huge functions.
HO_CONST_STRINGS
Only print string literals if they reside in read-only memory (e.g. .rodata segment). When off, all strings are printed as literals. You can override decompiler’s decision by adding ‘const’ or ‘volatile’ to the string variable’s type declaration.
HO_SIGNBIT_CHECKS
Convert signed comparisons of unsigned variables with zero into bit checks.
Before:
(signed int)x < 0
After:
(x & 0x80000000) != 0
For signed variables, perform the opposite conversion.
HO_UNMERGE_TAILS
Reverse effects of branch tail optimizations: reduce number of gotos by duplicating code
HO_KEEP_CURLIES
Keep curly braces for single-statement blocks
HO_DEL_ADDR_CMPS
Optimize away address comparisons.
Example:
&a < &b
will be replaced by 0 or 1.
This optimization works only for non-relocatable files.
HO_SHOW_CSTR_CASTS
Print casts from string literals to pointers to char/uchar. For example:
(unsigned __int8 *)"Hello"
HO_ESC_CLOSES_VIEW
Pressing Esc closes the pseudocode view
HO_SPOIL_FLAGREGS
Assume all functions spoil flag registers ZF,CF,SF,OF,PF (including functions with explicitly specified spoiled lists)
HO_KEEP_INDIRECT_READS**
Keep all indirect memory reads (even with unused results) so as not to lose possible invalid address access
HO_KEEP_EH_CODE
Keep exception related code (e.g. calls to _Unwind_SjLj_Register)
HO_SHOW_PAC_INSNS
Translate ARMv8.3 Pointer Authentication instructions into intrinsic function calls (otherwise ignore all PAC instructions)
HO_KEEP_POTENTIAL_DIV0
Preserve potential divisions by zero (if not set, all unused divisions will be deleted)
HO_MIPS_ADDSUB_TRAP
Generate the integer overflow trap call for ‘add’, ‘sub’, ‘neg’ insns
HO_MIPS_IGN_DIV0_TRAP
Ignore the division by zero trap generated by the compiler (only for MIPS)
HO_HONEST_READFLAGS
Consider __readflags as depending on cpu flags default: off, because the result is correct but awfully unreadable
HO_NON_FATAL_INTERR
Permit decompilation after an internal error (normally the decompiler does not permit new decompilations after an internal error in the current session)
HO_SINGLE_LINE_PROTO
Never use multiline function declarations, even for functions with a long argument list
HO_DECOMPILE_LIBFUNCS
Decompile library functions too (in batch mode)
HO_PROP_VOLATILE_LDX
Propagate ldx instructions without checking for volatile memory access
WARNINGS
Specifies the warning messages that should be displayed after decompilation. Please refer to hexrays.cfg file for the details.
Default: all warnings are on
CMPFUNCS
Specified list of function names that are considered “strcmp-like”. For them the decompiler will prefer to use comparison against zero like
strcmp(a, b) == 0
as a condition. Underscores, j_ prefixes and _NN suffixes will be ignored when comparing function names
MSVC Control Flow Guard names
CFGUARD_CHECK
Name of Control Flow Guard check function. Calls of this function will not be included into the pseudocode.
Default: “guard_check_icall_fptr”
CFGUARD_DISPATCH
Name of Control Flow Guard dispatch function. Each call of this function will be replaced by ‘call rax’ instruction when generating pseudocode.
Default: “guard_dispatch_icall_fptr”
Third party plugins
Below is the list of noteworthy public third-party plugins for the decompiler.
-
HexRaysCodeXplorer by Aleksandr Matrosov and Eugene Rodionov
Hex-Rays Decompiler plugin for better code navigation Here is the features list for first release:
- navigation through virtual function calls in Hex-Rays Decompiler window;
- automatic type reconstruction for C++ constructor object;
- useful interface for working with objects & classes;
-
A simple list of various IDA and Decompiler plugins
-
More to come…
Happy analysis!
Floating point support
The x86 decompiler supports floating point instructions. While everything works automatically, the following points are worth noting:
- The decompiler knows about all floating point types, including: float, double, long double, and _TBYTE (the extended floating format used by x86 FPU). We introduced _TBYTE because sizeof(long double) is often different from the size of _TBYTE. While sizeof(long double) can be configured in the compiler settings, the size of _TBYTE is always equal to 10 bytes.
- The decompiler performs FPU stack analysis, which is similar to the simplex method performed by IDA. If it fails, the decompiler represents FPU instructions using inline assembler statements. In this case the decompiler adds one more prefix column to the disassembly listing, next to the stack pointer values. This column shows the calculated state of the FPU stack and may help to determine where exactly the FPU stack tracing went wrong.
- Wrong prototypes of the called functions returning a value on the FPU stack may lead to a failure of the FPU stack analysis, leading to inline assembly as explain in the previous bullet point.
- The decompiler ignores all manipulations with the floating point control word. In practice this means that it may miss an unusual rounding mode.
- SSE floating point instructions are represented by intrinsic functions. Scalar SSE instructions are however directly mapped to floating point operations in pseudocode.
- Casts from integers types to floating point types and vice versa are always displayed in the listing, even if the output has the same meaning without them.
- Feel free to report all anomalies and problems with floating point support using the Send database command. This will help us to improve the decompiler and make it more robust. Thank you!
See also: Failures and troubleshooting
Support for intrinsic functions
The current release of the decompiler supports instrinsic functions. The instructions that cannot be directly mapped to high level languages very often can be represented by special intrinsic functions. All Microsoft and Intel simple instrinsic functions up to SSE4a are supported, with some exceptions. While everything works automatically, the following points are worth noting:
- SSE intrinsic functions require IDA v5.6 or higher. Older versions of IDA do not have the necessary functionality and register definitions.
- Some intrinsic functions work with XMM constant values (16 bytes long). Modern compiler do not accept 16-byte constants yet but the decompiler may generate them when needed.
- Sometimes it is better to represent SSE code using inline assembly rather than with intrinsic functions. If the decompiler detects SSE instructions in the current function, it adds a one more item to the popup menu. This item allows the user to enable or disable SSE intrinsic functions for the whole database. This setting is remembered in the database. It can also be modified in the configuration file for new databases.
- The decompiler knows about all MMX/XMM built-in types. If the current database does not define these types, they are automatically added to the local types as soon as a SSE instruction is decompiled.
- Scalar SSE instructions are never converted to intrinsic functions. Instead, they are directly mapped to floating point operations. This usually produces much better output, especially for Mac OS X binaries.
- The scalar SSE instructions that cannot be mapped into simple floating point operations (like sqrtss) are mapped into simple functions from math.h.
- The decompiler uses intrinsic function names as defined by Microsoft and Intel.
- The decompiler does not track the state of the x87 and mmx registers. It is assumed that the compiler generated code correctly handles transitions between x87 and mmx registers.
- Some intrinsic functions are not supported because of their prototype. For example, the __cpuid(int a[4], int b) function is not handled because it requires an array of 4 integers. We assume that most cpuid instructions will be used without any arrays, so adding such an intrinsic function will obscure things rather than to make the code more readable.
- Feel free to report all anomalies and problems with intrinsic functions using the Send database command. This will help us to improve the decompiler and make it more robust. Thank you!
See also: Failures and troubleshooting
Overlapped variables
In some cases the decompiler cannot produce nice output because the variable allocation fails. It happens because the input contains overlapped variables (or the decompiler mistakenly lumps together memory reads and writes). Overlapped variables are displayed in red so they conspicuously visible. Let us consider some typical situations.
There are read/write accesses that involve two or more variables
For example, consider the following output:
__int64 v1; // qax@2 OVERLAPPED
int v2; // ecx@2 OVERLAPPED
__int64 result; // qax@4
if ( *(_BYTE *)(a1 + 5) & 1 )
{
HIDWORD(v1) = *(_DWORD *)(a1 + 7);
v2 = *(_DWORD *)(a1 + 11);
}
else
{
HIDWORD(v1) = 0;
v2 = 0;
}
v1 = *(__int64 *)((char *)&v1 + 4); // ODD ASSIGNMENT!
The last assignment to v1 reads beyond v1 boundaries. In fact, it also reads v2. See the assembly code:
test byte ptr [eax+5], 1
jz short loc_409521
mov edx, [eax+7]
mov ecx, [eax+0Bh]
jmp short loc_409525
loc_409521:
xor edx, edx
xor ecx, ecx
loc_409525:
mov eax, edx
mov edx, ecx
Unfortunately, the decompiler cannot handle this case and reports overlapped variables.
There is an array function argument
Arrays cannot be passed to functions by value, so this will lead to a warning. Just get rid of such an array (embed it into a structure type, for example)
There are too many function arguments
The decompiler can handle up to 64 function arguments. It is very unlikely to encounter a function with a bigger number of arguments. If so, just embed some of them into a structure passed by value.
The corrective actions include:
- Check the stack variables and fix them if necessary. A wrongly variable can easily lead to a lvar allocation failure.
- Define a big structure that covers the entire stack frame or part of it. Such a big variable will essentially turn off variables lumping (if you are familiar with compiler jargon, the decompiler builds a web of lvars during lvar allocation and some web elements become too big, this is why variable allocation fails). Instead, all references will be done using the structure fields.
- Check the function argument area of the stack frame and fix any wrong variables. For example, this area should not containt any arrays (arrays cannot be passed by value in C). It is ok to pass structures by value, the decompiler accepts it.
gooMBA
description: Hands-Free Binary Deobfuscation with gooMBA
gooMBA
At Hex-Rays SA, we are constantly looking for ways to improve the usefulness of our state-of-the-art decompiler solution. We achieve this by monitoring for new trends in anti-reversing technology, keeping up with cutting-edge research, and brainstorming ways to innovate on existing solutions.
Today we are excited to introduce a new Hex-Rays decompiler feature, gooMBA, which should greatly simplify the workflow of reverse-engineers working with obfuscated binaries, especially those using Mixed Boolean-Arithmetic (MBA) expressions. Our solution combines algebraic and program synthesis techniques with heuristics for best-in-class performance, integrates directly into the Hex-Rays decompiler, and provides a bridge to an SMT-solver to prove the correctness of simplifications.
MBA Obfuscation Overview
What Is MBA?
A Mixed Boolean-Arithmetic (MBA) expression combines arithmetic (e.g. addition and multiplication) and boolean operations (e.g. bitwise OR, AND, XOR) into a single expression. These expressions are often made extremely complex in order to make it difficult for reverse-engineers to determine their true meaning.
For instance, here is an example of an MBA obfuscation found in a decompilation listing. Note the combination of bitshift, addition, subtraction, multiplication, XOR, OR, and comparison operators within one expression.
v1 = 715827883LL * (char)((((unsigned __int64)(-424194301LL * (a1 >> 4)) >> 35)+(-424194301LL * (a1 >> 4) < 0)) * a1);
v2 = (char)(((((((unsigned __int64)(-424194301LL * (a1 >> 4)) >> 35) + (-424194301LL * (a1 >> 4) < 0)) * a1 - 48 * ((v1 >> 35) + (v1 < 0))) ^ 0x28) + 111) | 0x33);
v3 = 818089009LL * (char)(((((((unsigned __int64)(-424194301LL * (a1 >> 4)) >> 35) + (-424194301LL * (a1 >> 4) < 0)) * a1 - 48 * ((v1 >> 35) + (v1 < 0))) ^ 0x28) + 111) | 0x33);
v4 = (4 * (v2 - 21 * ((v3 >> 34) + (v3 >> 63)))) & 0xF4 | 8;
return (v4 - ((v4 / 0x81) & 0x7F | ((v4 / 0x81) << 7))) ^ 0xE;
For reference, the above code always returns 0x89.
MBA is also used as a name for a semantics-preserving obfuscation technique, which replaces simple expressions found in the source program with much more complicated MBA expressions. MBA obfuscation is called semantics-preserving since it only changes the syntax of the expression, not the underlying semantics — the input/output behavior of the expression should remain the same before and after.
Why is MBA Reversing Difficult?
A decompiler can be thought of as a massive simplification engine — it reduces the mental load of the reverse engineer by transforming a complex binary program into a vastly simplified higher-level readable format. It partially achieves this through equivalences, special pattern-matching rules derived from mathematical properties such as the commutativity, distributivity, and identity. For instance, the following simplification can be performed by applying the distributive property and identity property.
2a + 3(a+0) = 5a
Both boolean functions and arithmetic functions on integers are very well studied, and there is an abundance of simplification techniques and algorithms developed for each. MBA obfuscators exploit the fact that many of these equivalences and techniques break down when the two function types are combined. For instance, we all know that integer multiplication distributes over addition, but note that the same does not hold over the bitwise XOR:
3·(2 ⊕ 1) = 3·3 = 9
(3 ⊕ 2)·(3⊕1) = 1·2 = 2
Advanced Computer Algebra Systems (CAS) such as Sage and Mathematica allow users to simplify arithmetic expressions, but their algorithms break down when we start introducing bitwise operations into our inputs.
Furthermore, although Satisfiability Modulo Theories (SMT) solvers such as z3 do often support both arithmetic and boolean operations on computer integers, they do not perform simplification — at least not for any human definition of “simplicity.” Rather, their only goal is to prove or disprove the input formula; as a result, they are useful in proving a simplification correct, but not in deriving the simplification to begin with.
MBA Obfuscation Techniques
The core idea behind MBA obfuscation is that a complex, but semantically equivalent, MBA expression can be substituted for simpler expressions in the source program. For instance, one technique that can be used for MBA generation is the repeated application of simple MBA identities, such as:
x+y=(x|y)+(x&y)
x+y=2(x|y)-(x⊕y)
x|y=(¬x|y)-¬x
x-y=x+¬y+1
Many of these identities are available in the classic book Hacker’s Delight, but there are an effectively unbounded number of them. For instance, Reichenwallner et al. easily generated 1,000 distinct MBA substitutions for x+y alone.
There are also many more sophisticated techniques that can be used for MBA generation, such as applying invertible functions and point functions. The number of invertible functions in computer integers is similarly unbounded. By simply choosing and applying any invertible function followed by its inverse, then applying rewriting rules to mix up the order of operations, an MBA generator can create extremely complex expressions effortlessly.
Effects of MBA Obfuscation
Besides the obvious effect of making decompilation listings longer and more complex for humans to understand, there are a few other effects which this form of obfuscation can have on the binary analysis process.
For instance, dataflow/taint analysis is a static analysis technique that can be used to automatically search for potentially exploitable parts of a program (such as an unsanitized dataflow from untrusted user input into a SQL query). MBA obfuscation can be used to complicate dataflow analysis, by introducing arbitrary unrelated variables into the MBA expression without modifying its semantics. It then becomes extremely difficult to deduce whether or not the newly introduced variable has an effect on the expression’s final value.
An extreme example of this false dataflow technique is known as opaque predicates, whose original expressions have no semantic data inflows (i.e. they are constant). In other words, they always evaluate to a constant, regardless of their (potentially many) inputs. These opaque predicates can then be used for branching, creating false connections in the control-flow graph in addition to the dataflow graph.
Prior Work
Over the years, many algorithms have been developed to simplify MBA expressions. These include pattern matching, algebraic methods, program synthesis, and machine learning methods.
Pattern Matching
Since one of the core techniques involved in MBA generation is the application of rewrite rules, it seems natural to simply match and apply the same rewrite rules in the reverse direction. Indeed, this is precisely what earlier tools such as SSPAM did.
There are several issues with pattern matching methods. Firstly, there are a massive number of possible rewrite rules, and proprietary binary obfuscators are unlikely to reveal what rules they use. In addition, at any given moment an expression might contain multiple subexpressions that each match a pattern, and the order in which we perform these simplifications matters! Performing one simplification might prevent a more optimal simplification from appearing down the line. If we were to attempt every possible ordering of optimizations, our search space quickly becomes exponential. As a result, we considered pure pattern-matching methods to be infeasible for our purposes of simplifying complex MBA expressions.
Algebraic Methods
Arybo is an example of an MBA simplifier that relies entirely on algebraic methods. It splits both inputs and outputs into their individual bits and simplifies each bit of the output individually. It’s clear that this method comes with some limitations. For a 64-bit expression, the program outputs 64 individual boolean functions, and it then becomes quite difficult for a human to combine these functions back into a single simplified expression. Notably, the built-in z3 bitvector simplifier also outputs a vector of boolean functions, since this representation is more useful for its main goal of proving whether or not a statement holds.
Other algebraic algorithms for solving MBA expressions which do not split the expression into individual bits also exist. For instance, MBA-Blast and MBA-Solver use a transformation between n-bit MBA expressions and 1-bit boolean expressions. For linear MBAs (which we will describe in more detail later), this transformation is well-behaved, and a lookup table can trivially be used to simplify the corresponding boolean expression.
SiMBA, another algorithm published by Denuvo researchers in 2022, uses a similar approach to MBA-Blast and MBA-Solver, but additionally makes the observation that the transformation to 1-bit boolean expressions is not necessary for correctness; rather, the authors prove that it is sufficient to simply limit the domains of all input variables to 0/1. As a result, their algorithm yields much better performance; however, it’s important to note that the algorithm still relies on the algebraic structure of linear MBA expressions, and as a result will not work on all MBA expressions found in the wild.
Program Synthesis
Program synthesis is the act of generating programs that provably fulfill some useful criteria. In the case of MBA-deobfuscation, our task is to generate simpler programs that are provably semantically equivalent to the provided obfuscated program. In short, two programs are considered semantically equivalent if they yield identical side effects and identical outputs on every possible set of inputs. For the MBA expressions we consider, the expressions have no side effects or branching, so we are just left with the requirement that the simplified expression must yield the same output for every possible set of inputs.
One core observation made by synthesis-based tools such as Syntia, QSynthesis, and msynth is that for many real-world programs, the underlying semantics are relatively simple. After all, it is much more common to calculate the sum of two numbers x+y, than the result of say, 4529*(x>>(y^(11-~x))). Thus, for the most part, we only need to consider synthesizing relatively simple programs. To be clear, this is still a massive number of programs, but it at least makes the problem tractable.
The main technique used by QSynth and msynth is an offline enumerate synthesis primitive guided by top-down breadth-first search. In simpler terms, these tools take advantage of precomputation, generating and storing a massive database of candidate expressions known as an oracle, searchable by their input/output behavior. Then, when asked to simplify a new expression, they analyze its input/output behavior and use it to perform a lookup in the oracle.
Essentially, the input/output behavior of any expression is summarized by running the candidate expression with various inputs (some random, some specially chosen like 0 or 0xffffffff), collecting the resulting outputs, and hashing them into a single number. We refer to this number as a fingerprint, and the oracle can be thought of as a multimap from fingerprints to expressions. The simplification is then performed by calculating the fingerprint of the expression to be simplified, then looking up the fingerprint in the oracle for simpler equivalent expressions.
Machine Learning
Tools such as Syntia and NeuReduce use machine learning and reinforcement learning techniques to search for semantically equivalent expressions on the spot. However, we found that Syntia’s success rate was quite low — only around 15% on linear MBA expressions, and NeuReduce appeared to only have been evaluated on linear MBA expressions (on which it reported a 75% success rate), which are already solvable 100% of the time through algebraic approaches such as MBA-Blast and SiMBA.
Goals for gooMBA
When designing gooMBA, we had the following goals in mind:
- Correctness — Obviously, a tool that outputs nonsense is useless, so we should strive to generate correct simplifications whenever feasible. When a true proof of correctness is infeasible, the tool should try to verify the results to a reasonable degree of certainty.
- Speed — The Hex-Rays decompiler is well-known in the industry for its speed. Likewise, the tool should strive for the highest performance possible. However, we are obviously willing to sacrifice a couple of seconds in machine-computation time if it means saving a human analyst hours of work.
- Integration — The decompiler plugin should be able to optionally disappear into the background. Ideally, the user should be able to forget that they are even analyzing an obfuscated program and focus only on the work at hand.
Our Approach
Since there is no single way to generate MBA expressions, we decided to incorporate multiple deobfuscation algorithms into our final design and leave room for more in the future. Our tool, gooMBA, can be split into the following parts: microcode tree walking, simplification engine, SMT proofs of correctness, and heuristics.
Below is a drawing of our overall approach:
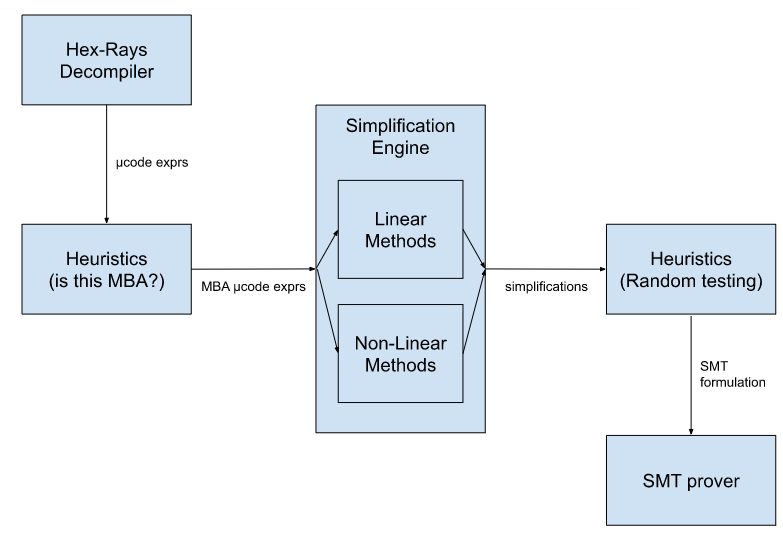
Since we found the SMT stage to be the most time-consuming, we run several hundred random test cases on candidate simplifications before attempting a proof.
Microcode Tree Walking
Before we can attempt simplification, we must first find potential MBA-obfuscated expressions in the binary. The Hex-Rays decompiler converts binaries into an intermediate form known as microcode, and continuously propagates variable values downward until a certain complexity limit is reached. Since MBA-expressions can be extremely complex (but notably, not so complex that they hinder performance), we increase the complexity limit when the MBA deobfuscator is invoked in order to maximize the complexity of expressions we can analyze. We then perform a simple tree-search through all expressions found in the program, starting with the most complex top-level expressions, and falling through to simpler subexpressions if they fail to simplify.
Simplification Engine
Our MBA simplification engine is split into three parts, each handling a subset of MBA expressions. We refer to these three parts as the Simple Linear Algorithm, Advanced Linear Algorithm, and the Synthesis Oracle Lookup.
We can think of each one of these three parts as a self-contained module: the obfuscated expression goes in one end, and a set of candidate expressions (each simpler than the obfuscated expression) comes out of the other end. At this stage, these expressions are simply guesses, and may or may not be correct.
One important thing to note is that all three of our subengines are considered black-box, i.e. they do not care about the syntactic characteristics of the expression being simplified, only its semantic properties — i.e. how the outputs change depending on the input values.
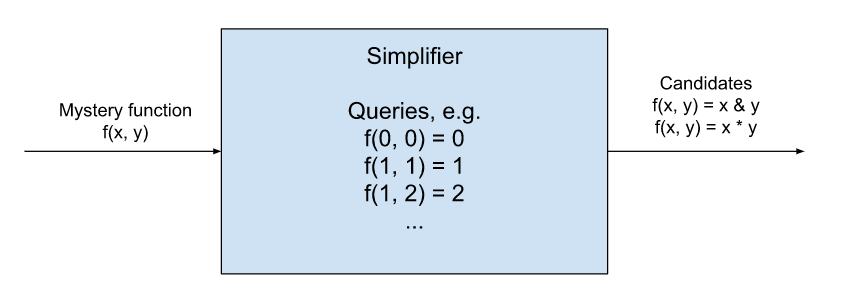
Simple Linear Algorithm
One of the fastest and easiest types of expressions we can simplify are those that reduce to a linear equation, i.e.
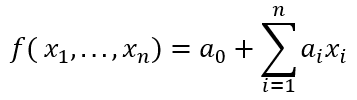
Note that constants fall under this category as well. We can simplify these easily by emulating the expression we are trying to simplify, first using zeroes for every input variable. This would tell us the value of a0. We can then emulate the instruction once again, this time using zeroes for every input variable except x1. Combined with the previously found value, this tells us the value of a1. We can repeat the process until we’ve obtained all the necessary coefficients. Note that the algorithm can also efficiently detect when a variable needs to be zero- or sign- extended; we can simply try the value -1 for each variable and see which of the zero- or sign-extended versions of the linear equation matches the output value. It can be shown in this case that both checks will succeed if and only if both sign- and zero-extension are semantically acceptable.
Advanced Linear Algorithm
Reichenwallner et al. showed that there is also a fast algorithm, namely SiMBA, to simplify linear MBA expressions, defined as those which can be written as a linear combination of bitwise expressions, i.e.

Where each ei(x1,...,xn)is a bitwise expression. For instance, 2*(x&y) is a linear MBA expression, but neither (x & 0x7) nor (x>>3) are linear MBA expressions, since neither (x & 0x7) nor (x >> 3) are bitwise or can be written as the linear combination of bitwise expressions.
Essentially, the algorithm works by deriving an equivalent representation consisting of linear combinations of only bitwise conjunctions, e.g. 4 + 2*x + 3*x + 5*(x&y). Without going into too much detail, we can recall that every boolean function has a single canonical full DNFform (i.e. it can be written as an OR of ANDs formula), which can then be easily translated into a linear combination of conjunctions. Therefore, every linear MBA expression can be written as a linear combination of conjunctions by simply applying the aforementioned transformation to each individual bitwise function, then combining terms.
Now, this linear combination of ANDs can be easily solved using a similar technique we described in the previous section, with the difference being that we must evaluate every possible combination of 0/1 value inputs, not just the inputs containing zero or one 1-values. Without going into too much detail, the coefficients can then be solved through a system of 2n linear equations of 2n variables, where each variable in the linear system represents one of the conjunctions of original variables, and each equation represents a possible 0/1 assignment to the original variables. We improve upon the algorithm proposed by Reichenwallner et al. by making further observations on the structure of the coefficients in the system and applying the forward substitution technique, yielding a simpler and faster solver.
Finally, Reichenwallner et al. apply an 8-step refinement procedure to find simpler representations, involving more bitwise operations than just conjunction. We found this refinement procedure reasonable and only applied a few tweaks in our implementation.
Synthesis Oracle Lookup
The algebraic engines are great for deriving constants when the expression’s semantics fulfill a certain structural quality, namely that they are equivalent to a linear combination of bitwise functions. However, we found that non-linear MBAs are also common in real-world binaries. In order to handle these cases, it is necessary to implement a more general algorithm that does not rely on algebraic properties of the input expression.
QSynth (2020, David, et al.) and later msynth (2021, Blazytko, et al.) both rely on a precomputed oracle which contains an indexed list of expressions generated through an enumerative search procedure. These expressions are searchable by what we refer to as fingerprints, which can intuitively be understood as a numeric representation of a function’s I/O behavior.
In order to generate a function fingerprint, we begin by generating test cases, which are assignments of possible inputs to the function. For instance, if we had three variables, a possible test case would be (x=100, y=0, z=-1). Then, we feed each one of these test cases into the function being analyzed; for instance, the expression "x - y + z" would yield the output value 99 for the previous test case. Finally, we collect all the outputs and hash them into a single number to get the fingerprint. Now we can look up the fingerprint in the oracle and find a function that is possibly semantically equivalent to the analyzed function.
Note that two functions that are indeed semantically equivalent will always yield the same fingerprints (since they will give the same outputs on the test cases). Therefore, if our oracle is exhaustive enough, it should be possible to find equivalences for many MBA-obfuscated expressions. A large precomputed oracle which can be used with goomba is available here: https://hex-rays.com/products/ida/support/freefiles/goomba-oracle.7z
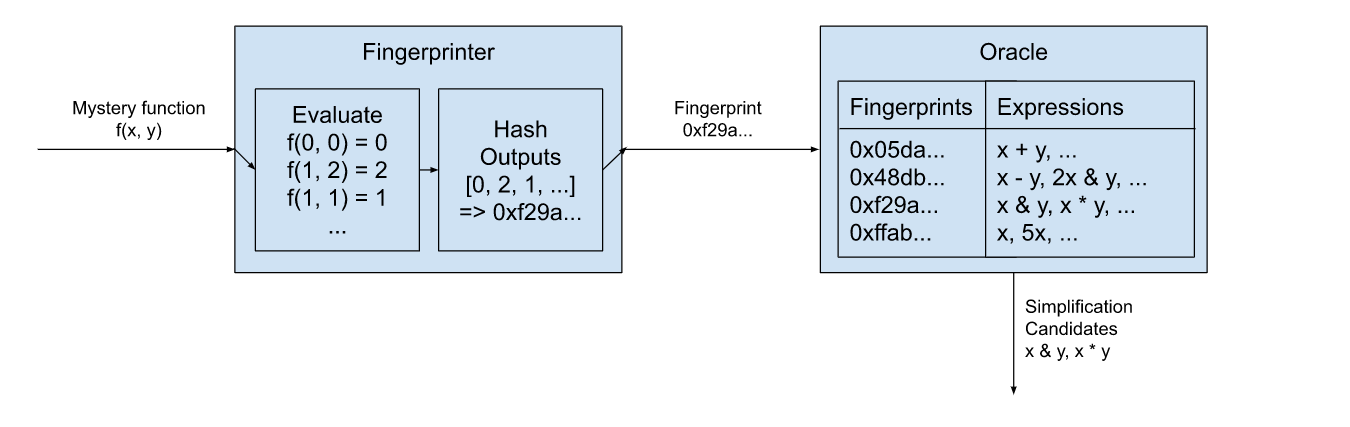
SMT Proofs of Correctness
In order to have full confidence in the correctness of our simplifications, we feed both the simplified and original expressions into a satisfiability modulo theories (SMT) solver. Without going into too much detail, we translate IDA’s internal intermediate representation into the SMT language, then confirm that there is no value assignment that causes the two expressions to differ. (In other words, a != b is UNSAT.) If the proof succeeds, then we have full faith that the substitution can be performed without changing the semantics of the decompilation. We use the z3 theorem prover provided by Microsoft Research for this purpose.
Heuristics
We found that invoking the SMT solver leads to unreliable performance, since the solver often times out or takes an unreasonable amount of time to prove equivalences. In order to avoid invoking the solver too often, we use heuristics at various points in our analysis. For instance, we detect whether an expression appears to be an MBA expression before trying to simplify it. In addition, every time before we invoke the SMT solver, we generate random test cases and emulate both the input and simplified expressions to ensure they return the same values. We found the latter heuristic to improve performance up to 1,000x in many cases.
Evaluation
We evaluated gooMBA on the dataset of linear MBA-obfuscated expressions on MBA-Solver’s GitHub repository, an assortment of real-world examples from VirusTotal that appeared to be MBA-obfuscated, and an MBA-obfuscated sample object file from Apple’s FairPlay DRM solution. In terms of correctness, we find what we expect — gooMBA, being a combination of multiple algorithms, is able to cover more cases than each algorithm individually.
In terms of performance, we find that gooMBA competes very favorably against state-of-the-art linear MBA solvers, and is able to simplify all of the 1,000 or so examples from MBA-Solver much faster than SiMBA. Note that the comparison is not strictly fair, since SiMBA accepts input expressions as a string, and gooMBA accepts them as decompilation IR; regardless, we claim that accepting decompilation IR leads to a superior user experience with less possibility for human error.
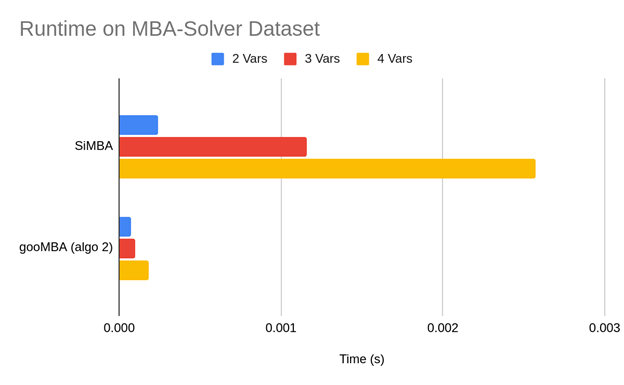
Compared to msynth, the difference is even more dramatic. On the mba_challenge file provided on msynth’s GitHub repo, we measured the runtime to take around 1.87s per expression. In contrast, our equivalent algorithm took just 0.0047s to run, with the z3 proof taking 0.1s.
Future Work
We have presented gooMBA, a deobfuscator that integrates directly into the Hex-Rays decompiler in IDA Pro. This is a meaningful usability trait, since competing tools are typically standalone and require inputting the expression manually or interpreting obtuse outputs. However, this feature also presents some difficulties. For instance, we do not yet perform any use-def analysis or variable propagation beyond what’s already performed by the decompiler. The plugin also currently operates in a purely non-interactive manner, and we believe that adding some interactivity (e.g. allowing the user to choose from a list of simplifications, runs proofs in the background, etc.) would greatly benefit usability.
Some potential areas of improvement for gooMBA are: sign extensions are not handled uniformly across all simplification strategies, point function analysis is limited, the simplification oracle is limited by necessity, and use-def analysis can be strengthened to extract expressions spread across basic blocks.
Finally, it’s important to note that MBA obfuscation and deobfuscation are constantly evolving. We based our algorithm choices and implementations on the most promising research on the cutting-edge, but acknowledge that more effective solutions may appear in the future. For instance, though we found that machine learning techniques for MBA-solving have historically underperformed competing methods, machine learning seems like a good candidate for NP-hard problems such as MBA simplification, and we are watching this space for new solutions.
References
- Blazytko, Tim, et al. “Syntia: Synthesizing the semantics of obfuscated code.” 26th USENIX Security Symposium (USENIX Security 17). 2017.
- Blazytko, Tim, et al. “msynth.” https://github.com/mrphrazer/msynth. 2021.
- David, Robin, Luigi Coniglio, and Mariano Ceccato. “Qsynth-a program synthesis based approach for binary code deobfuscation.” BAR 2020 Workshop. 2020.
- Feng, Weijie, et al. “Neureduce: Reducing mixed boolean-arithmetic expressions by recurrent neural network.” Findings of the Association for Computational Linguistics: EMNLP 2020. 2020.
- Liu, Binbin, et al. “MBA-Blast: Unveiling and Simplifying Mixed Boolean-Arithmetic Obfuscation.” 30th USENIX Security Symposium (USENIX Security 21). 2021.
- Quarkslab. “SSPAM: Symbolic Simplification with PAttern Matching.” https://github.com/quarkslab/sspam. 2016.
- Quarkslab. “Arybo.” https://github.com/quarkslab/arybo. 2016.
- Reichenwallner, Benjamin, and Peter Meerwald-Stadler. “Efficient Deobfuscation of Linear Mixed Boolean-Arithmetic Expressions.” Proceedings of the 2022 ACM Workshop on Research on offensive and defensive techniques in the context of Man At The End (MATE) attacks. 2022.
- Xu, Dongpeng, et al. “Boosting SMT solver performance on mixed-bitwise-arithmetic expressions.” Proceedings of the 42nd ACM SIGPLAN International Conference on Programming Language Design and Implementation. 2021.
Failures and troubleshooting
The following failure categories exist:
- a crash or access violation
- internal consistency check failure (interr)
- graceful failure to decompile a function
- incorrect output text
- inefficient/unclear/suboptimal output text
The current focus is on producing a correct output for any correct function. The decompiler should not crash, fail, or produce incorrect output for a valid input. Please file a bugreport if this happens.
The decompiler has an extensive set of internal checks and assertions. For example, it does not produce code which dereferences a “void*” pointer. On the other hand, the produced code is not supposed to be compilable and many compilers will complain about it. This is a deliberate choice of not making the output 100% compilable because the goal is not to recompile the code but to let humans analyze it faster.
The decompiler uses some C++ constructs in the output text. Their use is restricted to constructs which cannot be represented in C (the most notable example is passing structures to functions by value).
Internal errors
When the decompiler detects an internal inconsistency, it displays a message box with the error code. It also proposes you to send the database to the hex-rays.com server:
It is really difficult (almost impossible) to reproduce bugs without a sample database, so please send it to the server. To facilitate things, the decompiler saves its internal state to the database, which is really handy if the error occurs after hours and hours of decompilation.
It is impossible to decompile anything after an internal error. Please reload the database, or better, restart IDA.
Graceful failures
When the decompiler gracefully fails on a function, it will display one of the following messages. In general, there is no need to file a bugreport about a failure except if you see that the error message should not be displayed.
- cannot convert to microcode
- not enough memory
- invalid basic block
- positive sp value has been found
- prolog analysis failed
- switch analysis failed
- exception analysis failed
- stack frame is too big
- local variable allocation failed
- 16-bit functions are not supported
- call analysis failed
- function frame is wrong
- undefined or illegal type
- inconsistent database information
- wrong basic type sizes in compiler settings
- redecompilation has been required
- could not compute fpu stack states
- max recursion depth reached during lvar allocation
- variables would overlap
- partially initialized variable
- too complex function
- no license available
- only 32-bit functions can be decompiled for the current database
- only 64-bit functions can be decompiled for the current database
- already decompiling a function
- far memory model is supported only for pc
- special segments cannot be decompiled
- too big function
- bad input ranges
- current architecture is not supported
- bad instruction in the delay slot
Please read the Troubleshooting section about the possible actions.
cannot convert to microcode
This error means that the decompiler could not translate an instruction at the specified address into microcode. Please check the instruction and its length. If it looks like a regular instruction used in the compiler generated code and its length is correct, file a bugreport.
not enough memory
The error message is self-explanatory. While it should not happen very often, it still can be seen on functions with huge stacks. No need to report this bug. Hopefully the next version will handle functions with huge stack more efficiently.
Please restart IDA after this error message.
invalid basic block
This error means that at the specified address there is a basic block, which does not end properly. For example, it jumps out of the function, ends with a non-instruction, or simply contains garbage. If you can, try to correct the situation by modifying the function boundaries, creating instructions, or playing with function tails. Usually this error happens with malformed functions.
If the error happens because of a call, which does not return, marking the called function as “noret” will help. If the call is indirect, adding a cross reference to a “noret” function will help too.
If this error occurs on a database created by an old version of IDA, try to reanalyze the program before decompiling it. In general, it is better to use the latest version of IDA to create the databases for decompilation.
Unrecognized table jumps may lead to this failure too.
positive sp value has been found
The stack pointer at the specified address is higher than the initial stack pointer. Functions behaving so strangely cannot be decompiled. If you see that the stack pointer values are incorrect, modify them with the Alt-K (Edit, Functions, Change stack pointer) command in IDA.
prolog analysis failed
Analysis of the function prolog has failed. Currently there is not much you can do but you will not see this error very often. The decompiler will try to produce code with prolog instructions rather than stopping because of this failure.
switch analysis failed
The switch idiom (an indirect jump) at the specified address could not be analyzed. You may specify the switch idiom manually using Edit, Other, Specify switch idiom.
If this error occurs on a database created by an old version of IDA, try to delete the offending instruction and recreate it. Doing so will reanalyze it and might fix the error because newer versions of IDA handle switches much better than older versions.
exception analysis failed
This error message should not occur because the current version will happily decompile any function and just ignore any exception handlers and related code.
stack frame is too big
Since the stack analysis requires lots of memory, the decompiler will refuse to handle any function with the unaliased stack bigger than 1 MB.
local variable allocation failed
This error message means that the decompiler could not allocate local variables with the registers and stack locations. You will see this error message only if you have enabled HO_IGNORE_OVERLAPS in the configuration file. If overlapped variables are allowed in the output, they are displayed in red.
Please check the prototypes of all involved functions, including the current one. Variables types and definitions may cause this error too.
Updating the function stack frame and creating correct stack variables too may help solve the problem.
If you got this error after some manipulations with the function type or variable types, you may reset the information about the current function (Edit, Other, Reset decompiler information) and start afresh.
16-bit functions are not supported
The message text says it all. While the decompiler itself can be fine tuned to decompile 16-bit code, this is not a priority.
call analysis failed
This is the most painful error message but it is also something you can do something about. In short, this message means that the decompiler could not determine the calling convention and the call parameters. If this is a direct non-variadic call, you can fix it by specifying the callee type: just jump to the callee and hit Y to specify the type. For variadic functions too it is a good idea to specify the type, but the call analysis could still fail because the decompiler has to find out the actual number of arguments in the call. We would recommend to start by checking the stack pointer in the whole function. Get rid of any incorrect stack pointer values. Second, check the types of all called functions. If the type of a called function is wrong, it can interfere with other calls and lead to a failure. Here is a small example:
push eax
push edx
push eax
call f1
call f2
If f1 is defined as a __stdcall function of 3 arguments, and f2 is a function of 1 argument, the call analysis will fail because we need in total 4 arguments and only 3 arguments are pushed onto the stack.
If the error occurs on an indirect call, please specify the operand type (Set operand type… command; action SetOpType) of the call instruction. Also, adding an xref to a function of the desired type from the call instruction will work. The decompiler will use the type of the referenced function.
If all input types are correct and the stack pointer values are correct but the decompiler still fails, please file a bugreport.
function frame is wrong
This is a rare error message. It means that something is wrong with the function stack frame. The most probable cause is that the return address area is missing in the frame or the function farness (far/near) does not match it.
undefined or illegal type
This error can occur if a reference to a named type (a typedef) is made but the type is undefined. The most common case is when a type library (like vc6win.til) is unloaded. This may invalidate all references to all types defined in it.
This error also occurs when a type definition is illegal or incorrect. To fix an undefined ordinal type, open the local types windows (Shift-F1) and redefine the missing type.
inconsistent database information
Currently this error means that the function chunk information is incorrect. Try to redefine (delete and recreate) the function.
wrong basic type sizes in compiler settings
Some basic type sizes are incorrect. The decompiler requires that
- sizeof(int) == 4
- sizeof(enum) == 4
Please check the type sizes in the Options, Compiler dialog box and modify them if they are incorrect.
Also ensure that the correct memory model is selected: “near data, near code”.
Finally, the pointer size must be:
for 32-bit applications use “near 32bit, far 48bit”
for 64-bit applications use “64bit”.
redecompilation has been required
This is an internal error code and should not be visible to the end user. If it still gets displayed, please file a bugreport.
could not compute fpu stack states
The decompiler failed to trace the FPU stack pointer. Please check the called function types, this is the only thing available for the moment. We will introduce workarounds and corrective commands in the future. For more information about floating point support, please follow this link.
max recursion depth reached during lvar allocation
Please file a bugreport, normally this error message should not be displayed.
variables would overlap
This is a variant of the variable allocation failure error. You will see this error message only if you have enabled HO_IGNORE_OVERLAPS in the configuration file. If overlapped variables are allowed in the output, they are displayed in red.
partially initialized variable
A partially initialized variable has been detected. Wrong stack trace can induce this error, please check the stack pointer.
too complex function
The function is too big or too complex. Unfortunately there is nothing the user can do to avoid this error.
no license available
IDA could not locate your decompiler license.
only 32-bit functions can be decompiled for the current database
This error message will not currently be displayed.
only 64-bit functions can be decompiled for the current database
IDA64 can currently decompile only 64-bit functions. To decompile 32-bit functions please use IDA32.
already decompiling a function
An attempt to decompile a function while decompiling another function has been detected. Currently only one function can be decompiled at once.
far memory model is supported only for pc
Please check the data and code memory models in the Options, Compiler dialog. If necessary, reset them to ‘near’ models.
special segments cannot be decompiled
The current function belongs to a special segment (e.g. “extern” segment). Such segments do not contain any real code, they contain just pointers to imported functions. The function body is located in some other dynamic library. Therefore, there is nothing that we could decompile.
too big function
The current function is bigger than the maximal permitted size. The maximal permitted size is specified by the MAX_FUNCSIZE configuration parameter.
bad input ranges
The specified input ranges are wrong. The range vector cannot be empty. The first entry must point to an instruction. Ranges may not overlap. Ranges may not start or end in the middle of an item.
current architecture is not supported
The current processor bitness, endianness, or ABI settings in the compiler options are not acceptable. See the current ABI limitations here.
bad instruction in the delay slot
Branches and jumps are not allowed in a delay slot. Such instructions signal an exception and cannot be decompiled.
Troubleshooting
When the decompiler fails, please check the following things:
- the function boundaries. There should not be any wild branches jumping out of function to nowhere. The function should end properly, with a return instruction or a jump to the beginning of another function. If it ends after a call to a non-returning function, the callee must be marked as a non-returning function.
- the stack pointer values. Use the Options, General, Stack pointer command to display them in a column just after the addresses in the disassembly view. If the stack pointer value is incorrect at any location of the function, the decompilation may fail. To correct the stack pointer values, use the Edit, Functions, Change stack pointer command.
- the stack variables. Open the stack frame window with the Edit, Functions, Stack variables… command and verify that the definitions make sense. In some cases creating a big array or a structure variable may help.
- the function type. The calling convention, the numbers and the types of the arguments must be correct. If the function type is not specified, the decompiler will try to deduce it. In some rare cases, it will fail. If the function expects its input in non-standard registers or returns the result in a non-standard register, you will have to inform the decompiler about it. Currently it makes a good guess about the non-standard input locations but cannot handle non-standard return locations.
- the types of the called functions and referenced data items. A wrong type can wreak havoc very easily. Use the F hotkey to display the type of the current item in the message window. For functions, position the cursor on the beginning and hit F. If the type is incorrect, modify it with Edit, Functions, Set function type (the hotkey is Y). This command works not only for functions but also for data and structure members.
- If a type refers to an undefined type, the decompilation might fail.
- use a database created by the latest version of IDA.
In some cases the output may contain variables in red. It means that local variable allocation has failed. Please read the page about overlapped variables for the possible corrective methods.
The future versions will have more corrective commands but we have to understand what commands we need.
Bugreports
To be useful, the bugreport must contain enough information to reproduce the bug. The send database command is the preferred way of sending bugreports because it saves all relevant information to the database. Some bugs are impossible to reproduce without this command.
The database is sent in the compressed form to save the bandwidth. An SSL connection is used for the transfer.
If your database/input file is confidential and you cannot send it, try to find a similar file to illustrate the problem. Thank you.
We handle your databases confidentially (as always in the past).
FAQ
Currently the list is very short but it will grow with time.
- The output is excessively short for the input function…
- The following code <…\ does not look correct. Can this be fixed?
- I loaded an old database and the decompiler failed on every single function!
- The decompiler failed on a function. Should I file a bugreport?
- The decompiler output is not optimal. Can it be improved?
- Floating point instructions are displayed as assembly statements. Why?
- SSE instructions are displayed as assembly statements. Why?
The output is excessively short for the input function…
The output is excessively short for the input function. Some code which was present in the assembly form is not visible in the output.
This can happen if the decompiler decided that the result of these computations is not used (so-called dead code). The dead code is not included in the output.
One very common case of this is a function that returns the result in an unusual register, e.g. ECX. Please explicitly specify the function type and tell IDA the exact location of the return value. For example:
int __usercall myfunc<ecx>(void);
Read this section about the user defined calling conventions for more info.
Another quite common case is a function whose type has been guessed incorrectly by IDA or the decompiler. For example, if the guessed type is
int func(void);
but the correct function type is
int func(int x, int y, int z);
then all computations of the function arguments will be removed from the output. The remedy is very simple: tell IDA the correct function type and the argument computations will appear in the output.
In general, if the input information (function types) is incorrect, the output will be incorrect too. So please check them!
The following code […] does not look correct. Can this be fixed?
The following code
DllUnregisterServer proc near
CommandLine = byte ptr -274h
hObject = _PROCESS_INFORMATION ptr -6Ch
xor ebx, ebx
mov [ebp+CommandLine], bl
is being translated into:
char CommandLine; // [sp+0h] [bp-274h]@1
CommandLine = 0;
This does not look correct. Can this be fixed?
This happens because the decompiler does not perform the type recovery. To correct the output, modify the definition of CommandLine in IDA. For that, open the stack frame (Edit, Functions, Open stack frame), locate CommandLine and set its type to be an array (Edit, Functions, Set function type). The end result will be:
CommandLine[0] = 0;
I loaded an old database and the decompiler failed on every single function!**
Old databases do not contain some essential information. If you want to decompile them, first let IDA reanalyze the database (right click on the lower left corner of the main window and select Reanalyze). You will also need to recreate indirect (table) jump instructions, otherwise the switch idioms will not be recognized and decompilation of the functions containing them will fail.
The decompiler failed on a function. Should I file a bugreport?
In general, there is no need to file a bugreport if the decompiler gracefully fails. A failure is not necessarily a bug. Please read the graceful failures section to learn how to proceed.
The decompiler output is not optimal. Can it be improved?
Sure, it can be improved. However, given that many decompilation subproblems are still open, even simple things can take enormous time. Meanwhile we recommend you to use a text editor to modify the pseudocode.
Floating point instructions are displayed as assembly statements. Why?
Please read this page.
SSE instructions are displayed as assembly statements. Why?
Please read this page.
Limitations
The decompiler comes in 11 different flavors:
- x86 decompiler (32-bit code)
- x64 decompiler (64-bit code)
- ARM decompiler (32-bit code)
- ARM64 decompiler (64-bit code)
- PowerPC decompiler (32-bit code)
- PowerPC64 decompiler (64-bit code)
- MIPS decompiler (O32 and N32 ABI)
- MIPS64 decompiler (N64 ABI)
- RISC-V decompiler (32-bit code)
- RISC-V 64 decompiler (64-bit code)
- ARC Decompiler (32-bit code)
Currently the decompiler can handle compiler generated code. Manually crafted code may be decompiled too but the results are usually worse than for compiler code. Support for other processors will eventually be added (no deadlines are available, sorry).
Below are the most important limitations of our decompilers (all processors):
- exception handling is not supported (except msvc x64 c++ exceptions)
- type recovery is not performed
- global program analysis is not performed
- execution timings are not preserved
- memory access patterns are not preserved
Limitations specific to PPC:
- Vector/DFP/VSX/SPE instructions are not supported
Limitations specific to MIPS:
- O32, O64, N32, EABI32, P32(nanoMIPS) are supported
- only 32-bit FPR in O32,EABI32 and 64-bit FPR in N32,O64 are supported
Limitations specific to MIPS64:
- only N64 ABI is supported
- only 64-bit FPR are supported
Tips and tricks
First of all, read the troubleshooting page. It explains how to deal with most decompilation problems. Below is a mix of other useful information that did not fit into any other page:
- Volatile memory
- Constant memory
- FPU considerations
- Intrinsic functions
- Overlapped variables
- CONTAINING_RECORD macro
- Indirect calls
- more to come…
Volatile memory
Sometimes the decompiler can be overly aggressive and optimize references to volatile memory completely away. A typical situation like the following:
device_ready DCD ? ; VOLATILE!
MOV R0, =device_ready
LDR R1, [R0]
LOOP:
LDR R2, [R0]
SUB R2, R1
BEQ LOOP
can be decompiled into
while ( 1 )
;
because the decompiler assumes that a variable cannot change its value by itself and it can prove that r0 continues to point to the same location during the loop.
To prevent such optimization, we need to mark the variable as volatile. Currently the decompiler considers memory to be volatile if it belongs to a segment with one of the following names: IO, IOPORTS, PORTS, VOLATILE. The character case is not important.
Constant memory
Sometimes the decompiler does not optimize the code enough because it assumes that variables may change their values. For example, the following code:
LDR R1, =off_45934
MOV R2, #0
ADD R3, SP, #0x14+var_C
LDR R1, [R1]
LDR R1, [R1] ; int
BL _IOServiceOpen
can be decompiled into
IOServiceOpen(r0_1, *off_45934, 0)
but this code is much better:
IOServiceOpen(r0_1, mach_task_self, 0)
because
off_45934 DCD _mach_task_self
is a pointer that resides in constant memory and will never change its value.
The decompiler considers memory to be constant if one of the following conditions hold:
-
the segment has access permissions defined but the write permission is not in the list (to change the segment permissions use the “Edit, Segments, Edit Segment” menu item or the set_segm_attr built-in function)
-
the segment type is CODE
-
the segment name is one of the following (the list may change in the future): .text, .rdata, .got, .got.plt, .rodata, __text, __const, __const_coal, __cstring, __cfstring, __literal4, __literal8, __pointers, __nl_symbol_ptr, __la_symbol_ptr, __objc_catlist, __objc_classlist, __objc_classname, __objc_classrefs, __objc_const, __objc_data, __objc_imageinfo, __objc_ivar, __objc_methname, __objc_methtype, __objc_protolist, __objc_protorefs, __objc_selrefs, __objc_superrefs, __message_refs, __cls_refs, __inst_meth, __cat_inst_meth, __cat_cls_meth, __OBJC_RO
The decompiler tries to completely get rid of references to the following segments and replace them by constants: .got, .got.plt, __pointers, __nl_symbol_ptr, __la_symbol_ptr, __objc_ivar, __message_refs, __cls_refs
It is possible to override the constness of an individual item by specifying its type with the volatile or const modifiers.
CONTAINING_RECORD macro
The decompiler knows about the CONTAINING_RECORD macro and tries to use it in the output. However, in most cases it is impossible to create this macro automatically, because the information about the containing record is not available. The decompiler uses three sources of information to determine if CONTAINING_RECORD should be used:
-
If there is an assignment like this:
v1 = (structype *)((char *)v2 - num);it can be converted into
v1 = CONTAINING_RECORD(v2, structype, fieldname);by simply confirming the types of v1 and v2.
NOTE: the variables types must be specified explicitly. Even if the types are displayed as correct, the user should press Y followed by Enter to confirm the variable type. -
Struct offsets applied to numbers in the disassembly listing are used as a hint to create CONTAINING_RECORD. For example, applying structure offset to 0x41C in
sub eax, 41Chwill have the same effect as in the previous point. Please note that it makes sense to confirm the variable types as explained earlier.
-
Struct offsets applied to numbers in the decompiler output. For example, applying _DEVICE_INFO structure offset to -131 in the following code:
deviceInfo = (_DEVICE_INFO *)((char *)&thisEntry[-131] - 4);will convert it to:
deviceInfo = CONTAINING_RECORD(thisEntry, _DEVICE_INFO, ListEntry);Please note that it makes sense to confirm the variable types as explained earlier.
In most cases the CONTAING_RECORD macro can be replaced by a shorter and nicer expression if a shifted pointer used. In this case it is enough to declare the pointer as a shifted pointer and the decompiler will transform all expressions where it is used.
Indirect calls
Since the arguments of indirect calls are collected before defining variables, specifying the type of the variable that holds the function pointer may not be enough. The user have to specify the function type using other methods in this case. The following methods exist (in the order of preference):
-
For indirect calls of this form:
call ds:funcptrIf funcptr is initialized statically and points to a valid function, just ensure a correct function prototype. The decompiler will use it.
-
For indirect calls of this form:
call [reg+offset]If reg points to a structure with a member that is a function pointer, just convert the operand into a structure offset (hotkey T):
call [reg+mystruct.funcptr]and ensure that the type of mystruct::funcptr is a pointer to a function of the desired type.
-
Specify the type of the called function using Edit, Operand type, Set operand type. If the first two methods cannot be applied, this is the recommended method. The operand type has the highest priority, it is always used if present.
-
If the address of the called function is known, use Edit, Plugins, Change the callee address (hotkey Alt-F11). The decompiler will use the type of the specified callee. This method is available only for x86. For other processors adding a code cross reference from the call instruction to the callee will help.
Debugger
| Instant debugger |
| Remote debugging |
| Local debugging |
| Debugger tutorials |
Instant debugger
The -r command line switch is used to run the built-in debugger without creating a database in advance. The format is this switch is:
-rdebname{params}:pass@hostname:port+pid
The explanation of the fields:
debname Debugger name. Should contain the debugger
module name. Examples: win32, linux. This prefix
can be shortened or even completely
omitted if there is no ambiguity
params Optional parameter for the debugger module
The parameters from the appropriate configuration file
can be specified here, separated by semicolons.
pass Password for the remote debugger server
hostname Host name or address of the remote debugger server.
IPv6 addresses need to be enclosed in [].
port Port number to use to connect to the debugger server
pid PID of the process to attach
All fields except the first one are optional. Also, the pid field can be specified as ‘+’. IDA will display the process list to attach. See examples below for typical command lines:
ida -rwin32 file args
Run 'file' with command line 'args' in the local debugger
We have to specify the debugger name to avoid ambiguities.
ida -rwindbg+450
Attach to process 450 on the local machine using the windbg backend
ida -rl:hippy@mycom:4567+
Connect to the remote linux computer 'mycom' at port 4567 using the
password 'hippy' and display the list of processes running on it.
Allow the user to select a process and attach to it.
ida -rl@mycom /bin/ls e*
Run '/bin/ls' command on the 'mycom' computer using the remote
debugger server on Linux. Use an empty password and the
default port number. Pass "e*" as the parameter to /bin/ls.
ida -rl@mycom whobase.idb
Run '/usr/bin/who' command on the 'mycom' computer using the
remote linux debugger server. Use an empty password and the
default port number. IDA will extract the name of the
executable from the whobase.idb file in the local current
directory. If the database does not exist, then this command
will fail.
ida "-rwindbg{MODE=1}@com:port=\\.\pipe\com_1,baud=115200,pipe,reconnect+"
Attach using windbg in kernel mode. The connection string is
"com:port=\\.\pipe\com_1,baud=115200,pipe,reconnect". A mini database
will be created on the fly.
When the -r switch is used, IDA works with the databases in the following way:
- if a database corresponding to the input file exists and
the -c switch has not been specified, then IDA will use the
database during the debugging session
- otherwise, a temporary database will be created
Temporary databases contain only meta-information about the debugged process and not the memory contents. The user can make a memory snapshot any time before the process stops. If IDA detects that a command will cause the process to exit or detach IDA, it will propose to make a snapshot.
The rest of the command line is passed to the launched process.
In the case there is no input file (when attaching to an existing process, for example), then the temporary database is created in the standard temporary directory. For Windows, this directory is usually “Local Setting\Temp” in the user profile directory.
See also How to launch remote debugging
Remote debugging
1. Launch a remote IDA debugger server on the remote host. The remote server is started from the command line and accepts command line parameters. You can specify a password if you want to protect your debugger server from strangers. For example, to launch the server under MS Windows, you could enter:
win32_remote -Pmy_secret_password
2. Specify the remote debugger parameters in the Debugger, Process options. The file paths must be valid on the remote host. Do not forget to specify the same password as you have specified when launching the server. For example, to debug notepad.exe on the remote computer remote.host.com:
Application: c:\windows\notepad.exe
Input file: c:\windows\notepad.exe
Directory: c:\windows
Hostname: remote.host.com
Port: 23946
Password: my_secret_password
3. The rest of debugging is the same as with local debugging.
{% hint style=“info” %} The Linux debugger server can handle one debugger session at once. If you need to debug several applications simultaneously, launch several servers at different network ports. {% endhint %}
The following debugger servers are shipped with IDA
File name Target system Debugged programs
------------------ ------------------ ----------------------------
android_server32 ARM Android 32-bit ELF files
android_server AArch64 Android 64-bit ELF files
android_x64_server x86 Android 32-bit 32-bit ELF files
android_x86_server x86 Android 64-bit 64-bit ELF files
armlinux_server32 ARM Linux 32-bit ELF files
armlinux_server AArch64 Linux 64-bit ELF files
linux_server Linux 64-bit 64-bit ELF files
mac_server Mac OS X/macOS 11 64-bit Mach-O files (x64)
mac_server_arm ARM macOS 11 64-bit Mach-O files (arm64)
mac_server_arme ARM macOS 11 64-bit Mach-O files (arm64e)
win32_remote32.exe MS Windows 32-bit 32-bit PE files
win64_remote.exe MS Windows 64-bit 64-bit PE files
An appropriate server must be started on the remote computer before starting a debug session.
See also
- Debugger menu
- Debugger for Linux
- Debugger for macOS
- Debugger for Android native code
- Remote iOS debugger
Remote iOS Debugger
The Remote iOS Debugger allows for debugging iOS applications directly from IDA.
IDA’s iOS debugger acts as a client to Apple’s debugserver. So, you must ensure that the debugserver is already installed on your device for the debugger to work.
See:
- Debugging iOS Applications with IDA Pro
- Debugging iOS Applications using CoreDevice (iOS 17 and up) for detailed tutorials on getting started with iOS.
See also
Android debugger
Android debugger
The Android debugger has the following particularities and limitations:
- ARM32, AArch64, x86 and x64 Android native debugging is supported
- Both ARM and Thumb mode code is supported
- Multithreaded applications can be debugged. However, since the operating system does not report thread deaths, they are reported only when the debugger notices that the thread is missing (for example, because there is an error when we try to suspend it)
- Apparently Android reports applications that are currently executing a system call as executing "LDMFD SP!, {R4,R7}" before the syscall. Once the syscall completes, the next instruction is reached.
- Hardware breakpoints for ARM32 and AArch64 are not supported.
See also:
Dalvik debugger
Dalvik debugger
The Dalvik debugger is a plugin to debug Android applications written for the Dalvik Virtual Machine. It includes the source level debugging too.
Dalvik debugger specific options:
ADB executable
IDA needs to know where the 'adb' utility resides, and tries various
methods to locate it automatically. Usually IDA finds the path to adb,
but if it fails then we can define the ANDROID_SDK_HOME or the
ANDROID_HOME environment variable to point to the directory where the
Android SDK is installed to. Or set the path to 'adb' here.
Emulator/device serial number
If multiple emulator/device instances are running, you must specify
the target instance to connect to.
Package name
Set the package name for the application as specified in
AndroidManifest.xml. It is a mandatory option to start an application.
If you plan to use "Attach to process" debugger action then you may
leave this field empty.
Activity
If your want to start an application using the "Start process"
debugger action then you have to set this option too. Copy it from
AndroidManifest.xml. If you plan to use the "Attach to process"
debugger action then you may leave this field empty.
Command line arguments
Every object inside Dalvik VM has an ID. It is the 64-bit number.
If you want to see it in "Locals"/"Watches" windows then set this
checkbox.
Source-level debugging
In order to use source-level debugging you have to set paths to the
application source code files. Do it using "Options/Sources path"
menu item.
Our dalvik debugger presumes that the application sources reside
in the current (".") directory. If this is not the case, you can
map current directory (".") to the directory where the source files
are located.
List of special things about our Dalvik debugger:
- In Dalvik there is no stack and there is no SP register.
The only available register is IP.
- The method frame registers and slots (v0, v1, ...) are represented as
local variables in IDA.
We can see them in the Debugger/Debugger Windows/Locals window
- The stack trace is available from "Debugger/Windows/Stack trace"
- When the application is running, it may execute some system code.
If we break the execution by clicking on the "Cancel" button,
quite often we may find ourselves outside of the application,
in the system code. The value of the IP register is 0xFFFFFFFF in this
case, and stack trace shows only system calls and a lot of 0xFFFFFFFFs.
It means that IDA could not locate the current execution position inside
the application. We recommend to set more breakpoints inside the
application, resume the execution and interact with application by
clicking on its windows, selecting menu items, etc.
The same thing can occur when we step out the application or
step into the system code. In the last case we can use "Run until
return" debugger command to return to the application code.
Locals window
IDA considers the method frame registers, slots, and
variables (v0, v1, ...) as local variables.
To see their values we have to open the "Locals" window
from the "Debugger/Debugger windows/Locals" menu item.
If the information about the frame is available (the symbol table is
intact) then IDA shows the method arguments, the method local variables
with names and other non-named variables.
Otherwise some variable values will not be displayed because IDA
does not know their types. Variables without type information are
marked with "Bad type" in the "Locals" window.
To see the variable value in this case please use the "Watches" window.
Watches window
To open the "Watches" window please select the "Debugger/Windows/Watches"
menu item. In this window we can add any variable to watch its value.
Please note that we have to specify type of variable if it is not known.
Use C-style casts:
(Object*)v0
(String)v6
(char*)v17
(int)v7
We do not need to specify the real type of an object variable,
the "(Object*)" cast is enough. IDA can derive the real object type
itself.
ATTENTION! An incorrect type may cause the Dalvik VM to crash.
There is not much we can do about it. Our recommendation is to never
cast an integer variable to an object type, the Dalvik VM usually
crashes if we do that. But the integer cast "(int)" is safe in practice.
Keeping the above in the mind, do not leave the cast entries
in the "Watches" window for a long time. Delete them before any
executing instruction that may change the type of the watched variable
See also Debugger submenu.
Remote GDB Debugger
Remote GDB Debugger module allows for debugging code using the GDB remote serial protocol. For this, the debuggee must contain a so-called “GDB stub” that controls the execution and handles the remote protocol commands. There are many implementations of such stubs available with different capabilities. The module has been tested with the following GDB stubs: gdbserver: Windows (Cygwin), Linux (ARM, MIPS, PowerPC) VMWare: x86 (16/32 bit) QEMU: x86 (16/32 bit), ARM, MIPS, PowerPC OpenOCD: ARM It is quite possible that the module will work with other stubs. Note that only x86, ARM, MIPS and PowerPC processors are supported at the moment.
Some GDB stubs support so-called “monitor” commands. For example, VMWare stub can return extra info about system registers. Use the command line at the bottom of the main IDA window to send such commands. The output will be displayed in the message window. Hint: most stubs have a “help” command (if they support any commands at all).
The module also makes the following function available from IDC: string send_dbg_command(string command);
NOTE
When using instant debugging, you will need to tell IDA on which CPU the target is running. This is done in the Remote GDB Debugger options dialog, available via “Debugger specific options” button in the Process options dialog shown when you choose Remote GDB Debugger from the Run or Attach menu.
NOTE
Many GDB stubs do not report the address that triggered a hardware breakpoint. In this case, IDA will report a memory breakpoint hit as a generic TRAP signal. Examine the previous instruction to see if it referenced a memory location with breakpoint. When continuing from such a breakpoint, choose not to pass the signal to the program.
NOTE
IDA can be used together with a J-Link debug probe from SEGGER Microcontroller GmbH:
https://segger.com/jlink-debug-probes.html
See also
Remote GDB Debugger options
Max packet size
Maximum packet size supported by the GDB stub (in bytes).
Some stubs can crash on big packets, e.g. memory reads. IDA
will try to split such requests in smaller chunks so that
replies should fit in this size. You can enter -1 to
autodetect (in this case IDA will use the size of the
"g" packet reply as the max packet size).
Timeout
Default timeout in milliseconds for remote GDB stub responses.
Some targets can be slow to respond, so increase this value
when having problems, e.g. with disappearing memory bytes.
Run a program before starting debugging Check to enable external program options. Processor This option is only visible when starting debugger without a database. Use it to specify on which CPU the target is running. For some processors you can also specify the endianness. Software breakpoints at EIP+1
Most GDB stubs for x86 report software breakpoint hits with EIP one byte after
the breakpoint address. However, some emulators report the actual breakpoint
address. This option allows IDA to recognize such situations.
Recommendations: uncheck for QEMU, check for others.
Use CS:IP in real mode
When debugging real-mode (16-bit) code, the stub can send either
just 16 bits of IP register or the full EIP (CS<<4 + IP).
Enable this option in the former case.
Recommendations: check for QEMU, uncheck for others.
See also
Debugging with gdbserver
gdbserver is a GDB stub implemented as a separate program. It runs a program to be debugged or attaches to a process and then waits for commands. The remote GDB debugger module has been tested with gdbserver available with Cygwin and Linux.
To debug a specific program from the start, run the following command:
gdbserver localhost:23946 <program>
and then choose Debugger,Attach,<process running on target> in IDA.
To debug a running process:
gdbserver --multi localhost:23947
then choose Debugger,Attach,<enter PID to attach> in IDA and enter the PID of the process to attach to.
Another method of debugging a running process is:
gdbserver localhost:23947 --attach <PID>
then choose Debugger,Attach,<process running on target> in IDA.
To start a program from inside IDA, first launch the debugger server:
gdbserver --multi localhost:23947
Then use Debugger,Start process or Debugger,Run in IDA.
NOTE
The –multi option is only available in GDB 6.8 or higher.
Back to Remote GDB Debugger
Debugging with VMWare
VMWare Workstation 6.5 is recommended for debugging, though earlier versions may work too. Only 32-bit debugging is supported.
In order to enable debugging with GDB protocol, add the following lines to the .vmx file of the virtual machine:
debugStub.listen.guest32 = "TRUE"
debugStub.hideBreakpoints= "TRUE"
To debug the VM startup, use:
monitor.debugOnStartGuest32 = "TRUE"
Please note that the execution will start in the BIOS.
To accept connections from remote computers, the following line must be specified:
debugStub.listen.guest32.remote = "TRUE"
VMWare Workstation will listen on port 8832.
Tips:
Since the GDB server does not report the memory layout, it must be specified manually. For example, to debug BIOS startup code, create a 16-bit segment from F0000 to 10000 with base F000.
Use the GDB command line to get extra info about the registers. For example, use “r cr0” to see current value of the cr0 register or “r cs” to see the base, limit and other attributes of the CS selector in protected mode.
Back to Remote GDB Debugger
Debugging with OpenOCD
Make sure the following line is present in the .cfg file for your target:
gdb_port 3333
Edit the port number if necessary. Specify that port in the process options and use the Debugger, Attach command.
Tips: Use the GDB command line (see Output window) to send commands directly to OpenOCD interpreter.
Debugging with QEMU
Using the “Run external program” option it is easy to debug small ARM, MIPS or PowePC code snippets directly from inside IDA.
1) Download and install QEMU. Win32 builds can be downloaded from http://homepage3.nifty.com/takeda-toshiya/qemu/.
2) Edit cfg\gdb_arch.cfg file and change the “set QEMUPATH” line to point to the install directory of QEMU.
3) In Remote GDB Debugger options (Debugger|Debugger options, Set specific options), enable “Run a program before debugging”.
4) Click “Choose a configuration” and choose a predefined configuration. Choose “for snippets”, if mentioned.
5) If necessary, edit the command line or memory map.
6) Click OK, OK to confirm and close the options dialog.
7) In Debugger|Process options make sure that Hostname is set to “localhost” and port is non-zero.
8) Select the code range to emulate or at least the first instruction. Alternatively, you can rename the starting address “ENTRY” and end address as “EXIT”.
9) Choose Debugger|Run or press F9.
IDA will write the database into an ELF file (if %e was specified), start QEMU with the specified command line and connect to its GDB stub. It will set the SP and PC values so that the code can be stepped through.
NOTE: While it can be very useful, QEMU emulation has certain limitations: 1) the memory map is usually fixed at compile time. So if your program addresses intersect some of the system regions as specified by the memory map, IDA will refuse to start debugging. In that case, you can either rebase the program so that it fits into RAM regions or check other QEMU board configurations for a compatible memory layout.
2) the emulation starts at the system (kernel) level when there is no OS loaded. That means that system calls and imported functions will not work.
3) the hardware access will only work to the extent emulated by QEMU. If the code you are emulating does not match the chosen board configuration of QEMU, the code accessing the hardware most likely will not work properly, if at all.
See also:
External programs and GDB Debugger
The “Run a program before debugging” option in Remote GDB Debugger options allows to automatically run a program (such as a debugging server) when starting a debugging session. If you enable it, the following options become available:
Command line
Command line of the program to run. The following special symbols can be used:
%i: input file name from the Process options dialog %p: port number from the Process options dialog %e: file name of a temporary ELF file created from the database contents Initial SP
IDA will set the SP (or a similar register) after connecting to the server
Choose a configuration
Load one of the pre-defined configurations (command line, memory map and SP value)
described in the gdb_arch.cfg file.
Memory map
Edit the memory map for the external server. It will be used during debugging.
One use of these options is to debug small code snippets using the QEMU emulator.
See also
Debugging code snippets with QEMU
Using the “Run external program” option it is easy to debug small ARM, MIPS or PowePC code snippets directly from inside IDA.
1) Download and install QEMU. Win32 builds can be downloaded from http://homepage3.nifty.com/takeda-toshiya/qemu/.
2) Edit cfg\gdb_arch.cfg file and change the “set QEMUPATH” line to point to the install directory of QEMU.
3) In Remote GDB Debugger options (Debugger|Debugger options, Set specific options), enable “Run a program before debugging”.
4) Click “Choose a configuration” and choose a predefined configuration. Choose “for snippets”, if mentioned.
5) If necessary, edit the command line or memory map.
6) Click OK, OK to confirm and close the options dialog.
7) In Debugger|Process options make sure that Hostname is set to “localhost” and port is non-zero.
8) Select the code range to emulate or at least the first instruction. Alternatively, you can rename the starting address “ENTRY” and end address as “EXIT”.
9) Choose Debugger|Run or press F9.
IDA will write the database into an ELF file (if %e was specified), start QEMU with the specified command line and connect to its GDB stub. It will set the SP and PC values so that the code can be stepped through.
NOTE
While it can be very useful, QEMU emulation has certain limitations:
1) the memory map is usually fixed at compile time. So if your program addresses intersect some of the system regions as specified by the memory map, IDA will refuse to start debugging. In that case, you can either rebase the program so that it fits into RAM regions or check other QEMU board configurations for a compatible memory layout.
2) the emulation starts at the system (kernel) level when there is no OS loaded. That means that system calls and imported functions will not work.
3) the hardware access will only work to the extent emulated by QEMU. If the code you are emulating does not match the chosen board configuration of QEMU, the code accessing the hardware most likely will not work properly, if at all.
See also
PIN debugger
The PIN debugger is a remote debugger plugin used to record execution traces. It allows to record traces on Linux and Windows (x86 and x86_64) from any of the supported IDA platforms (Windows, Linux and MacOSX). Support for MacOSX targets is not yet available. Please see the section PIN support for MacOSX for more details on this subject.
To use the PIN debugger plugin the following steps must be carried out:
-
Download the appropriate version of PIN from http://www.pintool.org
-
- Configure the debugger specific options in Debugger Options, Set specific options. PIN debugger plugin has the following configuration options:
- PIN Binary Path: Full path to the pin binary.
- PIN Tool Path: Directory where the idadbg.so or .dll PIN tool resides.
- Tracing options:
- Instruction tracing: trace individual instructions
- Basic block tracing: trace basic blocks
- Function tracing: trace functions
- Recording of register values: record register values or not. If this option is disabled, only EIP/RIP will be recorded.
- PIN Tool options:
- Autolaunch pin for “localhost”: When this option is set and the host name specified in Debugger, Process Options is “localhost”, the PIN tool will be executed by IDA. Otherwise IDA expects the PIN tool to be already running and listening. Please refer to Connecting a remote PIN tool instance from IDA for more details.
- Debug mode: This flag allows one to see what’s happening in the PIN tool side. It prints out some debugging information.
- Extra-arguments: Additional command line arguments to be used when constructing the command line to launch PIN locally. The extra arguments can be added before the PIN tool specification (before ’-t /path/to/pin/tool) or after the PIN tool (after ‘-t /path/to/pin/tool’ but before ‘– application’). Please consult the section “Command Line Switches” of the Intel PIN manual for more details. Optionally you can launch PIN yourself and connect to it from IDA. See Connecting a remote PIN tool instance from IDA for more details.
Building the PIN tool
Building the PIN tool
Before using the PIN tracer the PIN tool module (distributed only in source code form) must be built as the Intel PIN license disallows redistributing PIN tools in binary form.
Please refer to the Debugging Linux/Windows Applications with PIN Tracer tutorial to learn how to build our PIN tool.
Connecting a remote PIN tool instance from IDA
For local debugging the PIN tool can be automatically launched by IDA. For remote debugging it must be launched manually, as in the following example:
$ /path/to/pin -t /path/to/idadbg/lib -p PORT -- APPLICATION [ARGUMENTS]
Where PORT is the port that the PIN tool will listen for incoming connections from IDA. APPLICATION is the target application to be traced and the optional parameter ARGUMENTS are the arguments to be passed to the target application. Please note that on Win64 it may be required to specify the path to specific x64 binary instead to the pin.bat batch file.
To attach to an already running process instead of starting a new one a command like the following one must be executed:
$ /path/to/pin -pid PID -t /full/path/to/idadbg/lib/with.extension -p PORT
Where PID is the pid of the running process to attach and PORT the port that the PIN tool will listen for incoming connections.
The hostname and port where the PIN tool is listening for incoming connections should be specified in IDA. See the Debugger, Process options dialog.
After successfully launching the PIN tool the IDA debugger can be launched by pressing F9 or selecting Debugger, Start Process.
PIN accepts the following optional environment variables and command line arguments:
- Environment variables:
IDAPIN_DEBUG: Set this environment variable to 1 or higher to print
debugging information.
- Command line arguments:
-p number: Port where the PIN tool will listen for incoming connections from IDA
-idadbg [0|1|2]: Same as the IDAPIN_DEBUG environment variable
PIN support for MacOSX
Recording traces on MacOSX target is not supported yet. Versions equal or prior to 2.12-55942 does not have support for the API PIN_SpawnInternalThread, which is needed by IDA to communicate with the PIN tool.
However, it’s possible to record traces from a Linux or Windows target using the MacOSX version of IDA.
Replayer debugger
The replayer debugger is a pseudo-debugger used to replay recorded traces.
The replayer debugger supports replaying traces recorded with any of the currently supported debuggers, ranging from local Linux or win32 debuggers to remote GDB targets. Currently supported targets include x86, x86_64, ARM, MIPS and PPC.
To use the replayer debugger you will need first to record a trace by enabling instruction tracing, function tracing or basic block tracing with another debugger. Then, after loading a recorded trace in the Tracing window, select the replay debugger from the debugger’s dropdown list and start the debugger normally as you would do with any other debugger.
One of the advantages of the replay debugger module over re-executing the debuggee is that in the replayer debugger it is possible to step not only forward, but also backwards, making it easier to analyze what happened during the execution of the recorded trace.
There are two types of traces that can be replayed: instruction level traces or partial traces. Instruction level traces are recorded by enabling instruction tracing and partial traces are recorded using either function tracing or basic block tracing. When a trace is recorded with instruction tracing enabled all register values are saved. With basic block or function level tracing only the instruction pointer is saved. Additionally, in basic block tracing the register values are also saved when the last instruction of a basic block is reached or a call in the middle of a basic block is about to be executed.
The replayer debugger module adds a new menu item: Debugger, Step Back command. It can be used to step back to the previous instruction when replaying a recorded trace.
Additional IDC functions provided by the replayer debugger
Bochs debugger
The Bochs debugger plugin uses the Bochs internal command line debugger. For more about the internal debugger: http://bochs.sourceforge.net/doc/docbook/user/internal-debugger.html
To use the Bochs debugger plugin, the following steps must be carried out:
-
Download and install Bochs v2.6.x from: http://bochs.sourceforge.net/getcurrent.html For Mac OS or Linux, please refer to the following guide: bochs_linux_primer
- Open or create an IDB file in IDA and select the Bochs debugger - Configure the debugger specific options in Debugger Options, Set specific options. One of three possible modes of operation can be selected: image, idb, or pe.
Because the debugger plugin uses the Bochs command line debugger, it has the following limitations:
- Breakpoints: the Bochs debugger has the limit of 10 physical, 10
virtual, and 10 linear breakpoints. Since IDA uses some breakpoints
for its own purposes, only 20 breakpoints can be set by the user
- Watchpoints: the Bochs debugger has the limit of 16 read and 16 write
watchpoints
- FPU registers, MMX, XMM, control, task and segment registers cannot be modified
There are ways to overcome some of the limitations mentioned above by downloading Bochs source code and modifying it. For example, the number of allowed breakpoints can be increased.
The Bochs debugger configuration dialog box has the following entries:
BOCHSRC
This is the path to the Bochs configuration file template. It contains
special variables prefixed with "$". These variables should not be
modified or changed by the user, as they are automatically filled by the
plugin. Other entries can be modified as needed.
Operation mode The user can choose between Disk Image, IDB and PE operation modes.
Delete image files upon session end
If enabled, IDA will automatically delete the Bochs disk images used for
the debugging session (this option only applies to IDB and PE operation modes).
If the plugin (in IDB operation mode) finds a previously created image, it verifies that it
corresponds to the database and uses it as is. Unchecking this option
for the IDB operation mode will speed up launching the debugger.
64-bit emulation
This options enables 64bit emulation. It is only present in the 64-bit version of IDA.
By default, the Bochs plugin will try to detect whether to choose 32 or 64-bit emulation.
Default configuration parameters are taken from ida\cfg\dbg_bochs.cfg.
The Bochs debugger module adds a new menu item: Debugger, Bochs Command. It can be used to send arbitrary commands to Bochs. The command output is displayed in the message window (there is also an IDC counterpart of this function, please refer to “startup.idc” file). This command is very useful but may interfere with IDA, especially if the user modifies breakpoints or resume execution outside IDA.
See also:
- Disk Image operation mode
- Bochs IDB operation mode
- Bochs PE operation mode
- Bochs plugin operation mode FAQ
Bochs Disk Image operation mode
The disk image operation mode is used to run Bochs with any Bochs disk image.
A simple way to get started is to launch IDA and disassemble the bochsrc file associated with your disk image. IDA will recognize bochsrc files, parse the contents, determine the associated disk image and create a new database containing the first sector of the disk image (usually the boot sector).
The database does not have to correspond to the disk image: it could in fact start as an empty database, then user could convert the needed segments to loader segments for later analysis. The following script can be used for that purpose:
attrs = get_segm_attr(desired__segment__start, SEGATTR_FLAGS);
attrs = (attrs & ~SFL_DEBUG) | SFL_LOADER;
set_segm_attr(desired__segment__start, SEGATTR_FLAGS, attrs);
If the disk image switches to protected mode with memory paging enabled, IDA will use the page table mapping to display segments. For 16-bit applications, IDA automatically creates a default DOS memory map (Interrupt vector table, Bios Data Area, User Memory and BIOS ROM). Also, the Bochs Debugger plugin will try to guess the debugger segment bitness, nonetheless the user can edit the bitness manually.
Moreover, the Bochs internal debugger provides the ability to add hardware like breakpoints, known as watchpoints, but the addresses must be physical addresses. In order to use the disk image operation mode in a more convenient way, the plugin will convert the virtual addresses to physical addresses (if page table information is present) before adding the hardware breakpoint. This mechanism will not always work, please check the FAQ for more information. For hardware breakpoint on execute, the plugin will use the selected address as-is and create a physical breakpoint.
The following parameters can be specified for the disk image operation mode:
- The bochsrc file which contains the configuration for the Bochs virtual machine in question.
The bochsrc file should be entered in:
Debugger -> Process Options -> Application (other fields are ignored)
- Use virtual breakpoints when protected mode is enabled:
This parameter is set in the Debugger Specific options.
It will allow the plugin to use "vb" command to create
virtual breakpoints (using cs:eip), instead of using the "lb" which
creates linear breakpoints (using only "eip"). It is useful when
debugging code where the "cs" segment selector base is not zero.
This is a small example on how to debug a given disk image:
1. Prepare the needed bochs virtual machine files (bochsrc, disk image, floppy image if needed, etc…)
2. Load the bochsrc file into IDA. IDA will automatically create a database.
(Step 2, is optional. It is possible to use a database of your choice, but remember to point its “Debugger->Process Options->Input file” to the bochsrc file)
3. Make sure the “Disk image” operation mode is selected (If Step 2 was used, then Disk image operation mode will be selected automatically)
4. Enable “Debugger Options->Suspend on debugging start”, and start debugging!
In the disk image operation mode, the Bochs debugger plugin does not handle or report exceptions, if they must be caught and handled, please put breakpoints in the IDT or IVT entries.
See also:
Bochs IDB operation mode
The IDB operation mode, as its name implies, takes the current database as the input and runs it under the Bochs debugger. This mode can be used to debug any x86 32 or 64-bit code. Please note that the code executes with privilege ring 3.
The following parameters can be specified in the IDB operation mode:
- Entry address: the address where the execution starts.
This parameter can be specified in three ways (listed in order of
precedence):
- by renaming the desired location as "ENTRY" (global name)
- by selecting an address range with the mouse or keyboard.
The selection start address is used as the entry point
- by positioning the cursor at a given position and running the
debugger
- Exit address (optional): the address where the execution ends.
This parameter can be specified in two ways:
- by renaming the desired location as "EXIT" (global name). Please note that
the emulation will stop at the item following the exit label.
- by selecting an address range with the mouse or keyboard
The selection end address is used as the exit point
If the exit address is not specified, the execution will continue until
an exception occurs. However, if the exit address is reached, the debugger
will ask the user if emulation should be continued or not.
- Startup stack size: number of KBs to allocate for the stack segment.
The stack segment is automatically created and named as "STACK".
It may also prove useful to enable the “Debugger Setup/Suspend on debugging start” so that IDA automatically suspends the process before executing the first instruction.
While debugging, exceptions may occur and are caught by IDA. Please note that these exceptions are raw machine exceptions. For example, instead of an access violation exception, a page fault exception is generated.
See also:
Bochs PE operation mode
The PE operation mode can be used to load PE files and debug them in a MS Windows like environment.
The current limitations include:
- Thread or process manipulation are not supported
- Limited support for PE+
- We provide implementations of a limited number of system calls. Feel
free to implement missing functions using IDC scripts or DLLs.
- LoadLibrary() will fail on unknown DLLs: the list of desired DLLs must
be specified before running the debugger in the startup.idc file
- Limited emulation environment: IDA does not emulate the complete MS Windows
operating system: it just provides the basic environment for a
32bit PE file to run (please check the features below). There are many
ways how the debugged program can detect that it runs in an emulated
environment.
PE executables feature list:
- SEH support: we try to mimic MS Windows as much as possible. For example, the ICEBP instruction is a privileged instruction, but Windows reports back a single step exception. Similarly, MS Windows does not distinguish between 0xCC and 0xCD 0x03, so when an exception occurs, it reports that the exception address is always one byte before the trap. So if it was an INT 0x3 (CD03), the exception address will point to the 0x03 (in the middle of the instruction).
- TLS callbacks: TLS callbacks are normally parsed by IDA and presented as entry points. They will be called by the debugger before jumping to the main entry point of the application. Turning on the “Debugger Setup/Suspend on debugging start” may be a good idea since it will make all this logic clearly visible.
- Emulation of NT structures: Some malware do not use GetProcAddress() or GetModuleHandle(). Instead, they try to parse the system structures and deduce these values. For this we also provide and build the basic structure of TIB, PEB, PEB_LDR_DATA, LDR_MODULE(s) and RTL_USER_PROCESS_PARAMETERS. Other structures can be built in the bochs_startup() function of the startup.idc file.
PE/PE+ executables feature list:
- Extensible API emulation: The user may provide an implementation of a any API function using scripts. The plugin supports IDC language by default, but if there are any other registered and active external languages, then external language will be used. Currently, the plugin ships with preconfigured IDC and Python scripts (please refer to startup.idc/startup.py).
It is also possible to take a copy of all the API and startup scripts and place them next to the database in question. This will tell the Bochs debugger plugin that these scripts are to be used with the current database directory. Such mechanism makes it possible to customize API/startup scripts for different databases.
In the following example, kernel32!GlobalAlloc is implemented via IDC like this:
(file name: api_kernel32.idc)
///func=GlobalAlloc entry=k32_GlobalAlloc purge=8
static k32_GlobalAlloc()
{
eax = BochsVirtAlloc(0, BochsGetParam(2), 1);
return 0;
}
///func=GlobalFree entry=k32_GlobalFree purge=4
static k32_GlobalFree()
{
eax = BochsVirtFree(BochsGetParam(1), 0);
return 0;
}
A simple MessageBoxA replacement can be:
(file name: api_user32.idc)
///func=MessageBoxA entry=messagebox purge=0x10
static messagebox()
{
auto param2; param2 = BochsGetParam(2);
msg("MessageBoxA has been called: %s\n",
get_strlit_contents(param2, -1, STRTYPE_C));
// Supply the return value
eax = 1;
// Continue execution
return 0;
}
To access the stack arguments passed to a given IDC function, please use the BochsGetParam() IDC function.
For a full reference on using IDC to implement API calls, please refer to ida\plugins\bochs\api_kernel32.idc file.
- Remap a DLL path (from the startup.idc script):
/// map /home/johndoe/sys_dlls/user32.dll=d:\winnt\system32\user32.dll
/// map /home/johndoe/sys_dlls/kernel32.dll=d:\winnt\system32\kernel32.dll
- Specify additional DLL search path (and optionally change the mapping):
/// map /home/johndoe/sys_dlls/=d:\winnt\system32
Or:
/// map c:\projects\windows_xpsp2_dlls\=c:\windows\system32
Or just as a search path without mapping:
/// map c:\program files\my program
You need to add the appropriate terminating slashes
- Redefine the environment variables: the environment variables can be redefined in startup.idc
/// env PATH=c:\windows\system32\;c:\programs /// env USERPROFILE=c:\Users\Guest
In Linux, if no environment variable is defined in the startup file then no environment strings will be present.
In Windows, we take the environment variables from the system if none were defined.
- Use native code: it is possible to write a custom Win32/64 DLL and map it into the process space.
Existing APIs can then be redirected to custom written functions. For example:
///func=GetProcAddress entry=bochsys.BxGetProcAddress
///func=ExitProcess entry=bochsys.BxExitProcess
///func=GetModuleFileNameA entry=bochsys.BxGetModuleFileNameA
///func=GetModuleHandleA entry=bochsys.BxGetModuleHandleA
Here we redirect some functions to bochsys.dll that modify the memory space of the application. Please note that bochsys.dll is a special module, IDA is aware of it. Custom functions are declared like this:
(file name: api_kernel32.idc)
///func=GetCommandLineA entry=mydll.GetCommandLineA purge=0
Then in startup.idc file, the following line must be added:
/// load mydll.dll
Custom DLLs are normal DLLs that can import functions from any other DLL. However, it is advisable that the custom DLL is kept small in size and simple, by not linking it to the runtime libraries.
- Helper IDC functions: a set of helper IDC functions are available when the debugger is active. For more information, please refer to “startup.idc”.
- Less demanding PE loader: Most PE files can be loaded and run, including system drivers, DLL and some PE files that cannot be run by the operating system.
- Dependency resolution: In the PE operation mode, the plugin will recursively load all DLLs referenced by the program. All DLLs that are not explicitly marked with “stub” in startup.idc will be loaded as is. It is important to “stub” all system DLLs for faster loading. The PE loader creates empty stubs for undefined functions in stubbed DLLs. For example, the following line defines a stub that will always return 0 for CreateFileA:
/// func=CreateFileA retval=0
Since CreateFileA is mentioned in the IDS files and IDA knows how many bytes it purges from the stack, there is no need to specify the “purge” value. For other functions that are not known to IDA, a full definition line would look like:
/// func=FuncName purge=N_bytes retval=VALUE
- Startup and Exit scripts: It is possible to assign IDC functions that run when the debugging session starts or is about to terminate (before the application continues from the PROCESS_EXITED event). In addition to running code at startup, the startup script serves a role in telling the PE loader which DLLs are to be mapped for the current debugging session. For example:
/// stub ntdll.dll
/// stub kernel32.dll
/// stub user32.dll
/// stub shell32.dll
/// stub shlwapi.dll
/// stub wininet.dll
These lines list the DLLs that will be used during the debugging session. IDA creates empty stubs for all functions from these DLLs. Non-trivial implementations of selected functions can be specified in api_xxxx.idc files, where xxxx is the module name.
API and startup scripts are searched first in the current directory and then in the ida/plugins/bochs directory.
- Memory allocation limit: The PE loader has a simple memory manager. It is used for the initial memory allocation at the loading stage and for dynamic memory allocation during the debugging session. No memory limits are applied at the loading stage: the loader will load all modules regardless of their size. However, when the debugging session starts, a limit applies on how much memory can be dynamically allocated. This limit is specified in the debugger specific options as “Max allocatable memory”. Memory allocation will fail once this limit is reached.
Some notes on bochsys.dll:
- BxIDACall: This exported function is used as a trap to suspend the code execution in Bochs and perform some actions in IDA. For example, when the target calls kernel32.VirtualAlloc, it is redirected to bochsys.BxVirtualAlloc, which calls BxIDACall, which triggers IDA:
kernel32.VirtualAlloc -> bochsys.BxVirtualAlloc -> BxIDACall -> IDA bochs plugin
A breakpoint can be set on this function to monitor all API calls that are handled by IDA.
- BxUndefinedApiCall: This exported function is executed when the application calls an unimplemented function. Setting a breakpoint on it will allow discovering unimplemented functions and eventually implementing them as IDC or DLL functions. It can also be used to determine when unpacking/decryption finishes (provided that all functions used by the unpacker have been defined).
See also:
Bochs debugger FAQ
General:
- How are breakpoints treated by IDA Bochs Plugin: Bochs debugger does not use breakpoints by inserting 0xCC at the given address. Instead, since it is an emulator, it constantly compares the current instruction pointer against the breakpoint list. Data breakpoints are supported by Bochs and are known as “watchpoints”. If the user creates hardware breakpoints, IDA will automatically create Bochs watchpoints.
- How to select the Bochs operation mode programmatically: using IDC: it is possible to use process_config_line() function to pass a key=value. For example, process_config_line(“DEFAULT_MODE=1”) will select the disk image operation mode. (Please refer to cfg\dbg_bochs.cfg for list of configurable options).
- When debugging, IDA undefines instructions: if the “Debugger options / Reconstruct stack” is checked and the stack pointer is in the same segment as the currently executing code, then IDA might undefine instructions. To solve this program, uncheck the reconstruct stack option.
- How to convert from physical to linear addresses and vice versa: Bochs internal debugger provides two useful commands for this: “info tab” and “page”.
Disk image operation mode:
- Data/Software breakpoints are not always triggered: During a debugging session, when a breakpoint is created while the protected mode/paging is enabled, the page table information is used to translate addresses and correctly create the breakpoint. When debugging session is started again, IDA cannot access translation tables to re-create the same breakpoint, thus the breakpoint will be created without any translation information (it will be treated as physical addresses) This is why those breakpoints are not triggered. As a workaround, we suggest disabling those breakpoints and re-enable them when paging is enabled. This problem can also arise when the “use virtual breakpoints” option is enabled.
IDB/PE operation mode:
- Cannot map VA: Sometimes, IDA may display a message stating that a given VA could not be mapped. This mainly happens because both IDB/PE operation modes use virtual addresses from 0x0 to 0x9000 and from 0xE0000000 to 0xFFFFFFFF internally. To solve the problem, please rebase the program to another area:
- IDB operation mode: use Edit, Segment, Rebase program
- PE operation mode: rebase the input file using a third party utility
PE operation mode:
- Dynamic DLL loading: sometimes, when running a program, the plugin may attempt to load a DLL that is not declared in the stub or load section of the startup script. In this case, please write down the name of the DLL, then add it to the startup script, and restart the debug session. It is possible to create a local copy, next to your database, of startup scripts so that these scripts will be used with this database only.
- Disk image loading slow: The disk image produced in the PE operation mode can be as big as 20MB. The reason for this slow loading is most probably because the plugin tries to load all referenced DLLs instead of stubbing them. To fix this, when the process starts, please take note of the loaded DLLs list (using IDA / Modules List) then add the desired module names in the startup.* / “stub” section. See also: Bochs debugger
Local debugging
| WinDbg Debugger |
| WinDbg: Time Travel Debugging |
| Linux debugger |
| Intel/ARM macOS debugger |
WinDbg Debugger
The WinDbg debugger plugin uses Microsoft’s Debugging Engine COM interfaces from the Debugging Tools package.
In order to use the WinDbg debugger plugin, please download the latest debugging tools from https://learn.microsoft.com/en-us/windows-hardware/drivers/debugger/debugger-download-tools.
The WinDbg debugger can be used to debug local programs as well as remote programs. This is controlled via the connection string in the “Process Option” dialog. If it is left blank, it means that a local debugging is in effect. Otherwise, a debug engine compatible connection string is expected. IDA will display an error message if the connection string could not be accepted: in that case, try using the same connection string with “cdb”, or “windbg” and see if it works.
Configuration options
Debugger-specific options can be changed from Debugger -> Debugger options -> Set specific options.
Windbg debugger plugin has the following configuration options:
- Debugging mode
- User mode - Check this option to debug MS Windows applications.
- Kernel mode debugging - Check this option when debugging the kernel.
- Non-Invasive user-mode process attach - Check this option to enable attaching to user-mode processes non-invasively.
- Kernel mode debugging with reconnect and initial break - Select this option
when debugging a kernel and when the connection string contains ‘reconnect’. This option
will assure that the debugger breaks as soon as possible after a reconnect.
- Output flags - These flags tell the debugging engine which kind of output
messages to display and which to omit.
ida.cfg options
WinDbg debugger plugin has the following options that can be configured in cfg/ida.cfg (in the installation folder):
- DBGTOOLS - This should be configured to point to the same
folder where Microsoft Debugging Tools are installed. The plugin will try to
guess where the tools are, but if it fails, a manual intervention will be required.
If this option is not set, then the plugin will try to use dbgeng.dll from
MS Windows system folder, while normal debug operations will work, extensions will not.
Features
Send commands to the debugger engine
After the debugging session is started, you can send commands to the debugger engine.
Use the “.” key to switch to the command line and start typing commands.
Please note that while it is possible to send any command to the engine, commands that change the execution status should not be used: go (“g”), step (“t”), step into (“p”), etc…
The WinDbg debugger module adds a new menu item: Debugger -> WinDbg command. It can be used to send arbitrary commands to the debugger engine. The command output is displayed in the output window.
Symbol information
If the symbol path is configured properly, then the debugger engine will fetch debug symbols from the appropriate location (symbol server, cache, etc.)
Example: if the following environment variable is set windbg will download the symbols from the specified paths:
_NT_SYMBOL_PATH=srv*c:\pdb\_cache*http://msdl.microsoft.com/download/symbols
Multi-processor support
Debugger Engine will create a virtual thread for each processor that it finds. Similarly, IDA will present these processors as threads.
Remote debugging support
It is possible to use the process server “dbgsrv.exe” to enable remote debugging. For example:
-
Run
dbgsrv -t tcp:port=PORT_NUM,server=HOST_NAME -
Verify that the server is correctly running by listing all process
servers on the given HOST_NAME:cdb -QR \\HOST_NAME -
Finally, run IDA and specify the following connection string:
tcp:port=PORT_NUM,server=HOST_NAME
Use WinDbg extensions
It is possible to use the extension commands that usually work with WinDbg. Make sure that the “Debugging Tools folder” setting is properly set so that this feature works.
Kernel debugging
It is possible to debug the kernel the same way as it is
done with WinDbg. Simply setup the target kernel and configure the WinDbg plugin by checking the “kernel mode debugging” option and by typing a correct connection string.
If the user detaches from a kernel session (using Debugger -> Detach from process), the debugged kernel will resume. However, if the user selects Debugger -> Terminate process,
the kernel will be suspended (it will wait until another client attaches to it).
Dump files support
It is possible to load into IDA dump files generated either manually (using the “.dump” command) or crash dumps generated from a crashed process or kernel. For reference, check the windmp file loader.
After the dump has been loaded, it is possible to run the debugger and investigate the crash by typing WinDbg commands into the command line window.
For example, one could check the call-stack or use any other WinDbg extension.
External breakpoints
It is possible to use the command line to create breakpoints that are not supported by IDA but are supported by the debugging engine. In such cases, any unknown (external) breakpoints will cause IDA to suspend execution when triggered.
API
Additional IDC functions provided by the WinDbg debugger
WinDbg: Time Travel Debugging
IDA supports WinDbg Time-Travel debugging. When used with a compatible version of WinDbg, you can load a .run file into IDA, similarly to a crash dump.
Installation
Only the standalone version of WinDbg supports Time Travel Debugging. The version of WinDbg from Debugging Tools for Windows can not be used to load TTD traces.
Downloading WinDbg
You can find the list of current ways to download WinDbg here: https://learn.microsoft.com/en-us/windows-hardware/drivers/debugger/
You can either install WinDbg onto your system or extract it manually.
Copying WinDbg files
WinDbg is an AppX package, and Windows by default forbids the execution of files in its installation folder. It is required to copy the files to another directory to use them with IDA.
You can find the installation directory for WinDbg by opening a PowerShell window and running:
Get-AppxPackage Microsoft.WinDbg | select InstallLocation
For example, for version 1.2410.110001.0 the path might be C:\Program Files\WindowsApps\Microsoft.WinDbg_1.2410.11001.0_x64__8wekyb3d8bbwe. In general, users do not have access to list the C:\Program Files\WindowsApps folder by default, however it is possible to navigate to the WinDbg subfolder directly by pasting the path into Explorer.
Please copy the amd64 subdirectory into a directory of your choice and update the DBGTOOLS path in ida.cfg to point to the copied folder. The folder pointed to by DBGTOOLS should contain a dbgeng.dll file.
Manually extracting WinDbg files
If you do not want to install WinDbg onto your system, you can instead download and extract it manually by doing the following:
- Download the .appinstaller file from https://aka.ms/windbg/download
- Open the .appinstaller file as xml in a text editor. Take the value of
Uri=on the line containing the<MainBundledefinition and download the file specified by it, e.g., from<MainBundle Name="Microsoft.WinDbg" Version="1.2410.11001.0" Publisher="CN=Microsoft Corporation, O=Microsoft Corporation, L=Redmond, S=Washington, C=US" Uri="https://windbg.download.prss.microsoft.com/dbazure/prod/1-2410-11001-0/windbg.msixbundle" />download thehttps://windbg.download.prss.microsoft.com/dbazure/prod/1-2410-11001-0/windbg.msixbundlefile. - Extract the
windbg_win-x64.msixfile from the downloaded .msixbundle (it is a zip file with a custom extension) - Extract the
amd64folder from thewindbg_win-x64.msixfile (it is a zip file with a custom extension)
Once you have followed these steps, update the DBGTOOLS path in ida.cfg to point to the copied folder. The folder pointed to by DBGTOOLS should contain a dbgeng.dll file.
Features
Time travel
The WinDbg time travel implementation uses a trace file that you later load. Unlike a crash dump you can still continue execution, however this works by navigating through a recorded instruction log. You cannot change registers or affect the program behavior.
Additional UI actions are available when loading a time travel log. You can use the UI to continue the execution both forwards and backwards by selecting either the normal “Continue” action, or the “Continue backwards” action. Additionally, the “Step into (backwards)”, “Step over (backwards)”, “Run to cursor (backwards)” actions become available, however they do not work with source-level debugging.
You can access these actions either using the toolbar or from the “Debugger” menu.
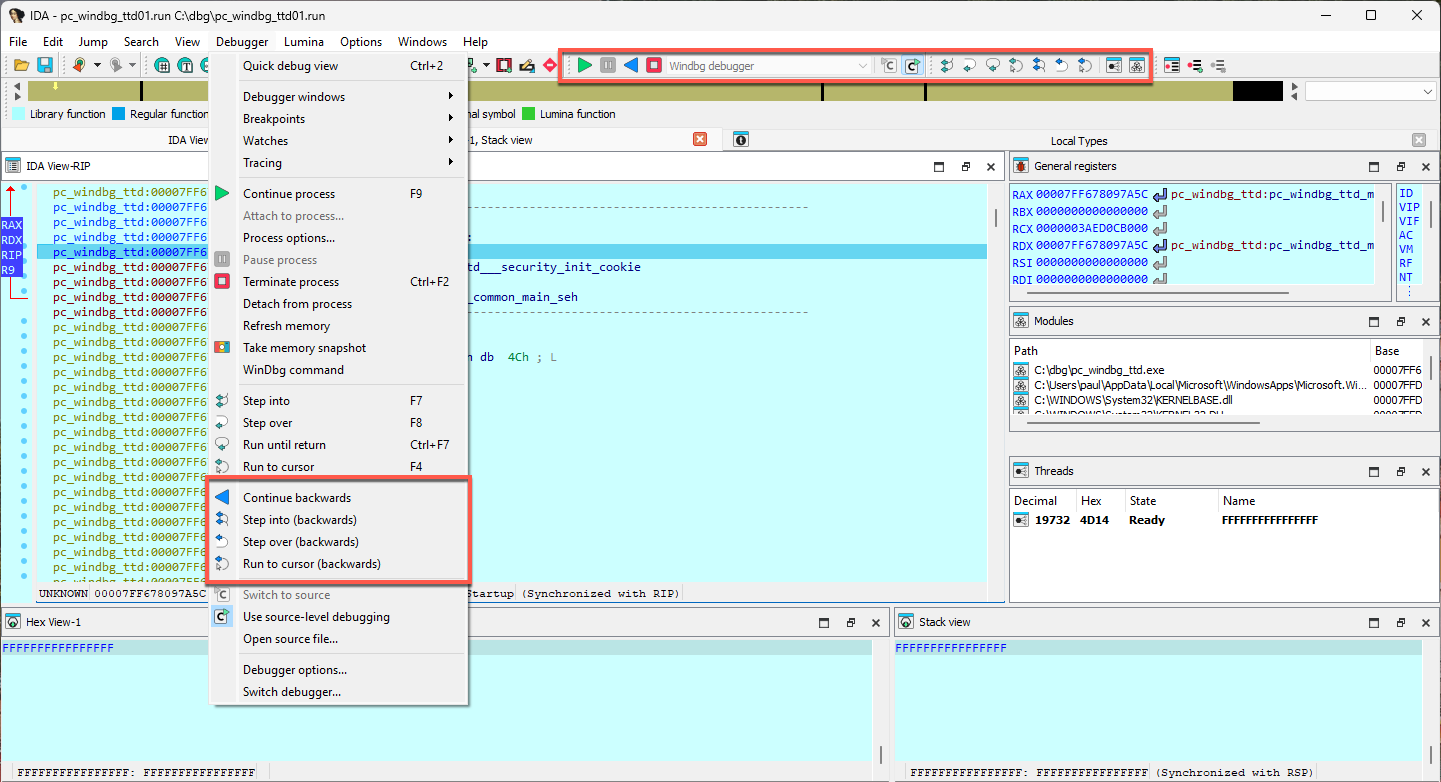
Commands
The !positions command can be used to show the current position in the trace.
The !tt command can be used to travel to a specific position in the trace that you have obtained before.
For more details, please see the Microsoft documentation page.
The dx command can be used to query information about the trace, such as memory writes or reads to a specific address. See this tutorial for how to use it.
Linux debugger
The Linux debugger has the following particularities and limitations:
- The debugger server can handle only one IDA client at a time
- By default, the 64-bit debugger will try to load “libunwind-x86_64.so.8” and “libunwind-ptrace.so.0” in order to help with stack recovery.
- ARMLinux: hardware breakpoints are not supported
- ARMLinux: The THUMB mode is not supported
Configuration options
Debugger-specific options can be changed from Debugger -> Debugger options -> Set specific options.
The linux debugger has the following configuration options:
-
Path to libunwind
- “libunwind-x64_64.so.8” (the default) - the debugger will try to load libunwind “libunwind-x86_64.so.8” + “libunwind-ptrace.so.0” pair using the regular ‘ld’ search path.
- “libunwind-x64_64.so” (note the lack of “.8” at the end) - like the default, except the debugger will look for “libunwind-x86_64.so” and “libunwind-ptrace.so” (this is particularly useful for working with libunwind “dev” packages)
- absolute path to “libunwind-x64_64.so.8” or “libunwind-x64_64.so” - the debugger will try to load libunwind only from the provided path.
- absolute path to “libunwind-x64_64.so[.8]” - the debugger will try to load the two libraries from there (the absolute path to “libunwind-ptrace.so[.0]” will be derived from that of “libunwind-x64_64.so[.8]”)
- left blank - don’t use libunwind to collect stack traces
By default this is set to libunwind-x86_64.so meaning the default path will be used to load libunwind-x86_64.so(.8) and libunwind-ptrace.so(.0). If an absolute path is provided, both libraries will be loaded from this path. If left empty, the call stack will be analyzed by IDA and not libunwind.
Related pages
See also:
Intel/ARM macOS debugger
On macOS, the suggested approach is to use Remote debugging with one of the mac_server* binaries that are shipped with IDA - even when debugging apps on your local machine.
Using a standalone debug server application makes it easier to get around the codesigning and debugging restrictions that are built into macOS. Note that this is also the approach used by lldb. Internally lldb uses a dedicated debugserver that implements the core debugger engine - so IDA does the same.
It is possible to use the Local Mac OS X Debugger in ida.app, but you must run IDA as root.
For a deeper dive into macOS debugging, see our tutorial.
See also
Debugger tutorials
Here you can find a comprehensive set of step-by-step tutorials categorized by different debugging types and platforms.
General introduction into debugging with IDA
- Overview of Linux debugging with IDA
- Overview of Windows debugging with IDA
- Debugging a Windows executable locally and remotely
- IDA scriptable debugger: Overview and scriptability
Local debugging tutorials
Windows local debugging:
Linux local debugging:
- Debugging Linux applications locally
- IDA Linux local debugging
- Using the Bochs debugger plugin in Linux
Remote debugging tutorials
- General remote debugging with IDA Pro
- Debugging Mac OSX Applications with IDA Pro
- Debugging iOS Applications with IDA Pro
- Debugging iOS >= 17 Applications via CoreDevice with IDA Pro
- Debugging a Windows executable remotely
- Debugging Windows Kernel with VMWare and IDA WinDbg plugin
- Debugging Linux Kernel under VMWare using IDA GDB debugger
PIN Tracer:
Other specialized debugging tutorials
Android/Dalvik debugging:
XNU debugging:
QEMU debugging:
Trace and replay debugger features:
Appcall mechanism:
Archived tutorials
Outdated tutorials that no longer apply have been moved to the archive.
Debugging Dalvik Programs
Last updated on September 27, 2023 — v0.3
Preface
Starting with version 6.6, IDA Pro can debug Android applications written for the Dalvik Virtual Machine. This includes source level debugging too. This tutorial explains how to set up and start a Dalvik debugging session.
Installing Android Studio
First of all we have to install the Android SDK from the official site Android Studio.
Environment Variables
IDA needs to know where the adb utility resides, and tries various methods to locate it automatically. Usually IDA finds the path to adb, but if it fails then we can define the ANDROID_SDK_HOME or the ANDROID_HOME environment variable to point to the directory where the Android SDK is installed to.
Android Device
Start the Android Emulator or connect to the Android device.
Information about preparing a physical device for development can be found at Using Hardware Devices.
Check that the device can be correctly detected by adb:
$ adb devices
List of devices attached
emulator-5554 device
Installing the App
IDA assumes that the debugged application is already installed on the Android emulator/device.
Please download:
{% file src=“MyFirstApp.apk.zip” %}
and
{% file src=“MyFirstApp.src.zip” %}
from our site. We will use this application in the tutorial.
We will use adb to install the application:
$ adb -s emulator-5554 install MyFirstApp.apk
Loading Application into IDA
IDA can handle both .apk app bundles, or just the contained .dex files storing the app’s bytecode. If we specify an .apk file, IDA can either extract one of the contained .dex files by loading it with the ZIP load option, or load all classes*.dex files when using the APK loader.
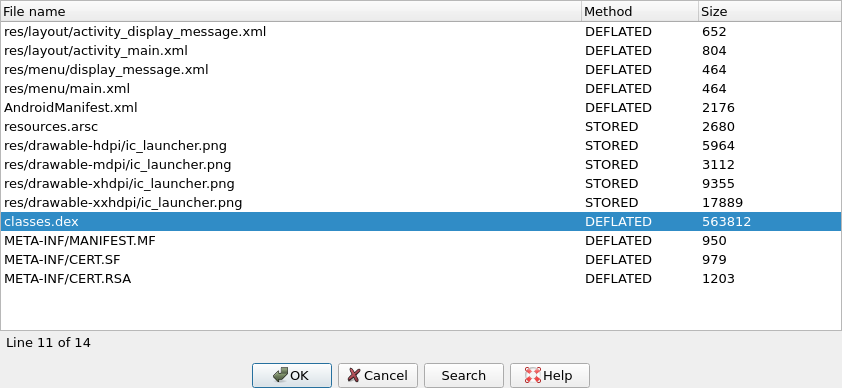
Dalvik Debugger Options
The main configuration of the dalvik debugger happens resides in “Debugger > Debugger Options > Set specific options”:
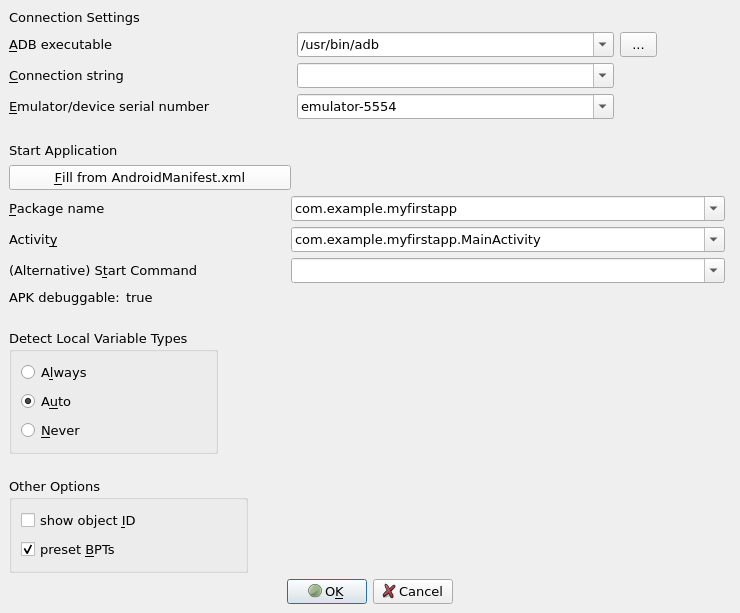
Connection Settings
ADB executable
As mentioned above IDA tries to locate the adb utility. If IDA failed to find it then we can set the path to adb here.
Connection string
Specifies the argument to the adb connect command. It is either empty (to let adb figure out a meaningful target) or a <host>[:<port>] combination to connect to a remote device somewhere on the network.
Emulator/device serial number
Serial number of an emulator or a device. Passed to adb``'s -s option. This option is useful if there are multiple potential target devices running. For the official Android emulator, it is typically emulator-5554.
Start Application
Fill from AndroidManifest.xml
Press button and point IDA to either the APK or the AndroidManifest.xml file of the mobile app. IDA then automatically fetches the package name and application start activity, as well as the debuggable flag from the specified file.
Package Name
Package name containing the activity to be launched by the debugger.
Activity
Start activity to be launched by the debugger.
Alternative Start Command
Usually IDA builds the start command from the package and activity name and launches the APK from the command line as follows:
am start -D -n '<package>/<activity>' -a android.intent.action.MAIN -c android.intent.category.LAUNCHER
If that does not match your desired debugging setup, you can enter an alternative start command here. Note that you have to provide package and activity as part of the startup command.
APK Debuggable
The value of the debuggable flag, as extracted from the AndroidManifest.xml or the APK. APKs that do not have the debuggable flag set (most do not) cannot be started on unpatched phones. Hence, while this value is false, IDA will display a (silencable) warning when starting a debugging session. To produce a debuggable APK that has the flag set to true, please revert to third-party tooling.
Detect Local Variable Types
This controls the behavior of IDA’s type guessing engine. “Always” and “Never” are pretty self-explanatory: The options force-enable or force-disable type guessing. “Auto” means that type guessing is disabled for Android APIs < 28 and enabled on APIs >= 28. If you work with very old (i.e. API 23 and lower) Android devices and experience crashes during debugging, set this option to “Never”. Note that when type guessing is disabled, IDA automatically assumes int for unknown variable types, which causes warnings on API 30 and above.
Local Variables with Type Guessing Deactivated

Local Variables with Type Guessing Activated
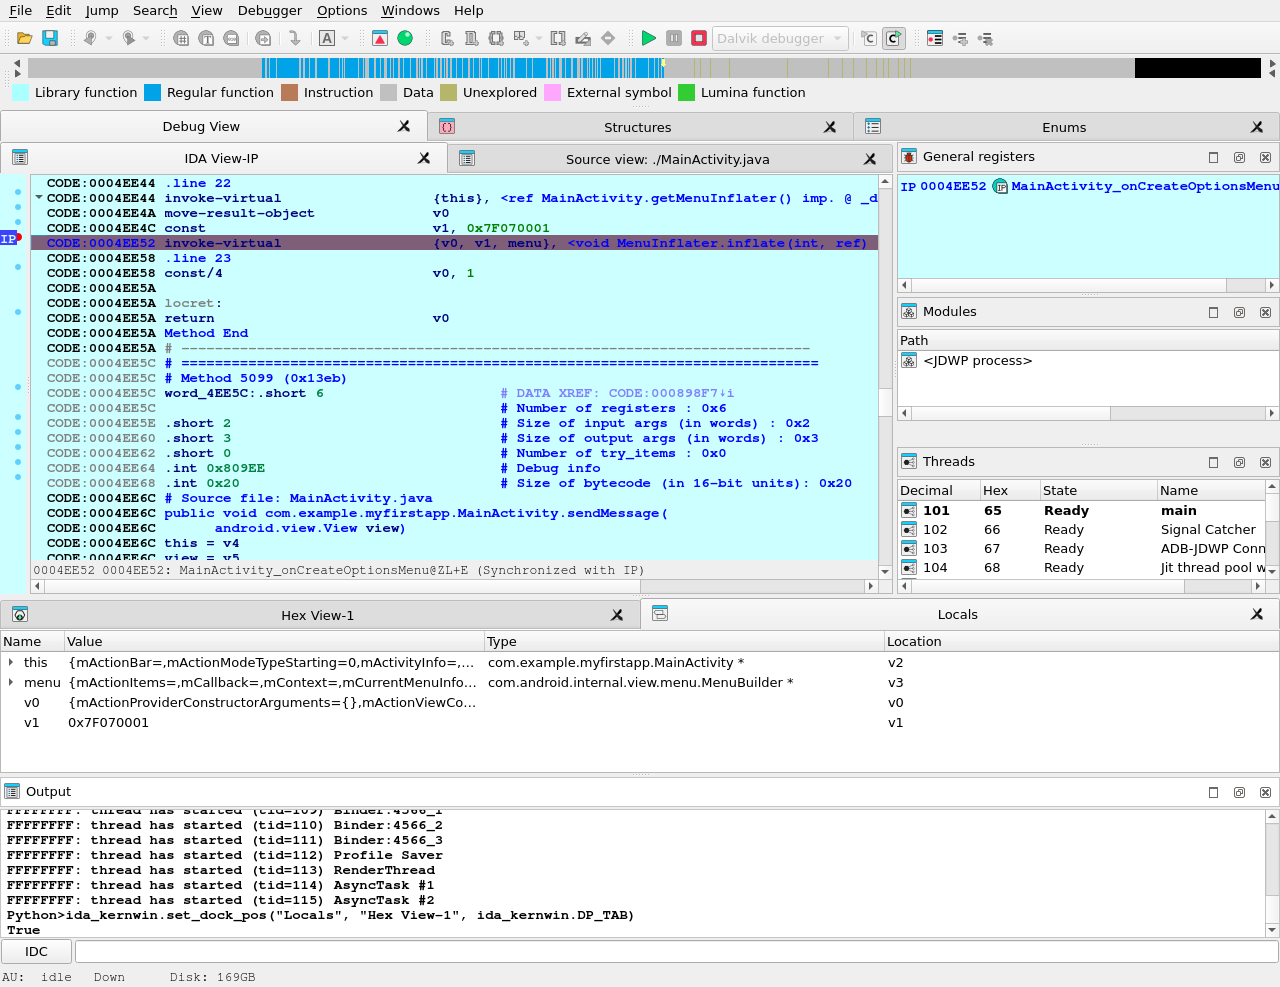
Other Options
Show object ID
If active, IDA shows the object ID assigned by the Java VM for composite (non-trivial) types in the local variables window.
Preset BPTs
If active, IDA sets breakpoints at the beginning of all (non-synthetic, non-empty) methods of the start activity class specified in the Activity field above.
Path to Sources
To use source-level debugging we have to set paths to the application source files. We can do it using the “Options > Sources path” menu item.
Our Dalvik debugger presumes that the application sources reside in the current (“.”) directory. If this is not the case, we can map current directory (“.”) to the directory where the source files are located.
Let us place the source files DisplayMessageActivity.java and MainActivity.java in the same directory as the MyFirstApp.apk package. This way we do not need any mapping.
Setting Breakpoints
Before launching the application it is reasonable to set a few breakpoints. We can rely on the decision made by IDA (see above the presetBPTs option) or set breakpoints ourselves. A good candidate is the onCreate method of the application’s main activity.
We can use the activity name and the method name onCreate to set a breakpoint:
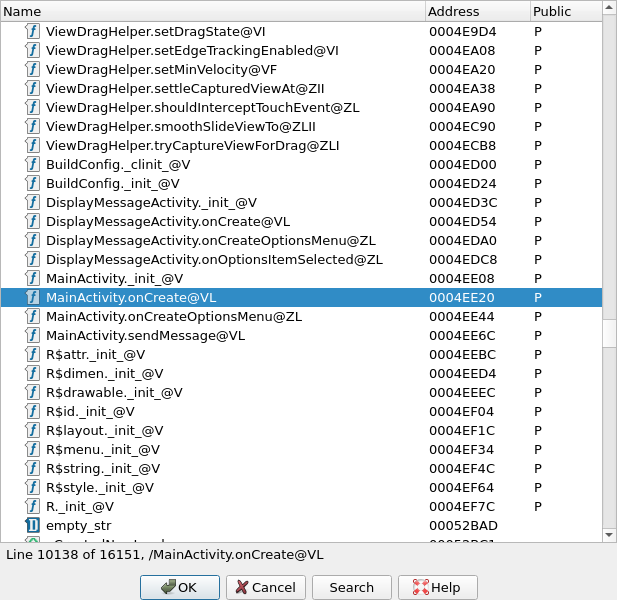
Naturally, we can set any other breakpoints any time. For example, we can do it later, when we suspend the application.
Starting the Debugger
At last we can start the debugger. Check that the Dalvik debugger backend is selected. Usually it should be done automatically by IDA:
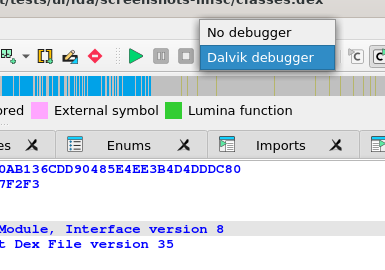
If the debugger backend is correct, we are ready to start a debugger session. There are two ways to do it:
- Launch a new copy of the application (Start process)
- Attach to a running process (Attach to process)
Launching the App
To start a new copy of the application just press <F9> or use the “Debugger > Start process” menu item. The Dalvik debugger will launch the application, wait until application is ready and open a debugger session to it.
We may wait for the execution to reach a breakpoint or press the “Cancel” button to suspend the application.
In our case let us wait until execution reach of onCreate method breakpoint.
Attaching to a Running App
Instead of launching a new process we could attach to a running process and debug it. For that we could have selected the “Debugger > Attach to process…” menu item. IDA will display a list of active processes.
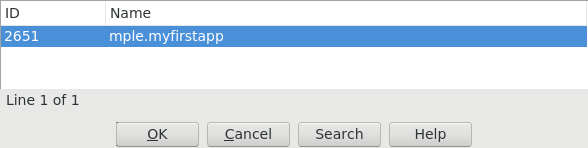
We just select the process we want to attach to.
Particularities of Dalvik Debugger
All traditional debug actions like Step into, Step over, Run until return and others can be used. If the application sources are accessible then IDA will automatically switch to the source-level debugging.
Below is the list of special things about our Dalvik debugger:
- In Dalvik there is no stack and there is no
SPregister. The only available register isIP. - The method frame registers and slots (
v0,v1, …) are represented as local variables in IDA. We can see them in the “Debugger > Debugger Windows > Locals” window (see below) - The stack trace is available from “Debugger > Debugger windows > Stack trace” (the hot key is <Ctrl-Alt-S>).
- When the application is running, it may execute some system code. If we break the execution by clicking on the “Cancel” button, quite often we may find ourselves outside of the application, in the system code. The value of the
IPregister is0xFFFFFFFFin this case, and stack trace shows only system calls and a lot of0xFFFFFFFF. It means that IDA could not locate the current execution position inside the application. We recommend to set more breakpoints inside the application, resume the execution and interact with application by clicking on its windows, selecting menu items, etc. The same thing can occur when we step out the application. - Use “Run until return” command to return to the source-level debugging if you occasionally step into a method and the value of the
IPregister becomes0xFFFFFFFF.
Locals Window
IDA considers the method frame registers, slots, and variables (v0, v1, …) as local variables. To see their values we have to open the “Locals” window from the “Debugger > Debugger windows > Locals” menu item.
At the moment the debugger stopped the execution at the breakpoint which we set on onCreate method.
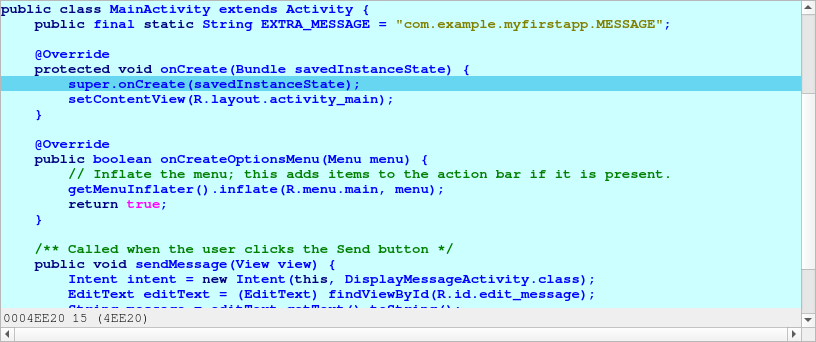
Perform “Step over” action (the hot key is <F8>) two times and open the “Locals” window, we will see something like the following:
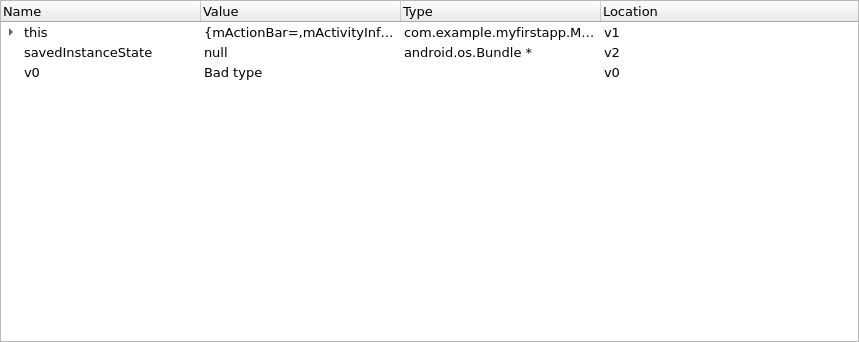
If information about the frame is available (the symbol table is intact) or type guessing is enabled then IDA shows the method arguments, the method local variables with names and other non-named variables. Otherwise some variable values will not be displayed because IDA does not know their types.
Variables without type information are marked with “Bad type” in the “Locals” window. To see the variable value in this case please use the “Watch view” window and query them with an explicit type (see below).
Watch View Window
To open the “Watch view” window select the “Debugger > Debugger windows > Watch view” menu item. In this window we can add any variable to watch its value.
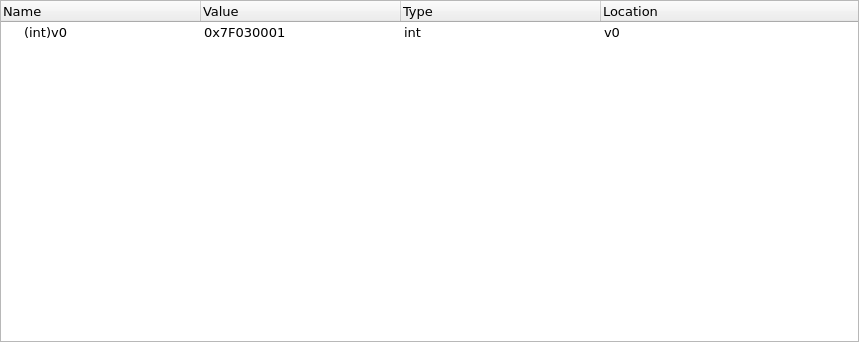
note that we have to specify type of variable if it is not known. Use C-style casts:
(Object*)v0(String)v6(char*)v17(int)v7
We do not need to specify the real type of an object variable, the “(Object*)” cast is enough. IDA can derive the real object type itself.
Attention! On Android API versions 23 and below an incorrect type may cause the Dalvik VM to crash. There is not much we can do about it. Our recommendation is to never cast an integer variable to an object type, the Dalvik VM usually crashes if we do that. But the integer cast “(int)” is safe in practice.
Keeping the above in the mind, do not leave the cast entries in the “Watch view” window for a long time. Delete them before any executing instruction that may change the type of the watched variable.
Overall we recommend to debug on a device that runs at least Android API 24.
Troubleshooting
- Check the path to
adbin the “Debugger specific options” - Check the package and activity names
- Check that the emulator is working and was registered as an
adbdevice. Try to restart theadbdaemon. - Check that the application was successfully installed on the emulator/device
- Check the output window of IDA for any errors or warnings
- Turn on more debug print in IDA with the
-z50000command line switch. - Android APIs 24 and 25 are known to return wrong instruction sizes during single stepping. Try migrating to a different Android API if you have trouble with single steps.
- IDA exposes a subset of the JDWP specification as IDC commands. (Usually the name from the specification prefixed with
JDWP_). - Android APIs 23 and below crash if type guessing is enabled. Remedy this by setting the
Detect Local Variable Typesoption toNeveror migrate to a newer Android API.
IDA Win32 Local Debugging
The IDA Debugger allows you to either start a new process (Run) or attach itself to an existing process (Attach)
Let’s select “Local Windows debugger”. What we get is a list of currently running processes to which we can attach with a simple click.

and here is the result once we are attached to the program.

IDA Linux Local Debugging
Debugging Linux Applications with IDA Pro, locally
Last updated on July 29, 2020 — v0.1
You may already know that IDA lets you debug an application from an already existing IDB, by selecting the debugger using the drop-down debugger list.
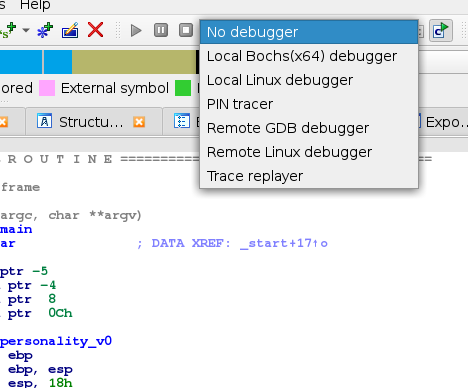
However, it is also possible to start IDA in a way that it will initially create an empty IDB, and then either:
- start a new process under its control
- attach to an existing process
Launch IDA with a fresh new process
To do so, you will have to launch IDA from the command line, like so:
ida -rlinux /bin/ls
IDA will then launch the /bin/ls program, and break at its entrypoint
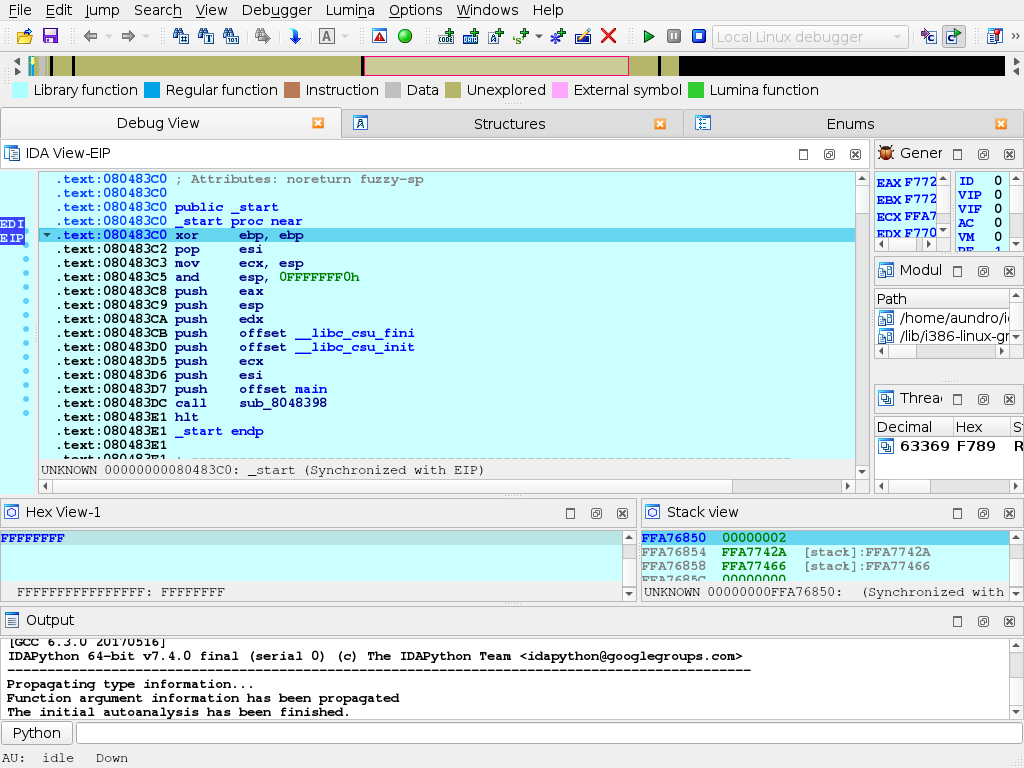
Attaching IDA to an existing process
For this example, we’ll launch, from a shell, a /usr/bin/yes process, and attach to.
Now, we’ll launch IDA so it offers a selection of processes to (and use quick filtering (Ctrl+F) to quickly find our process):
ida -rlinux+
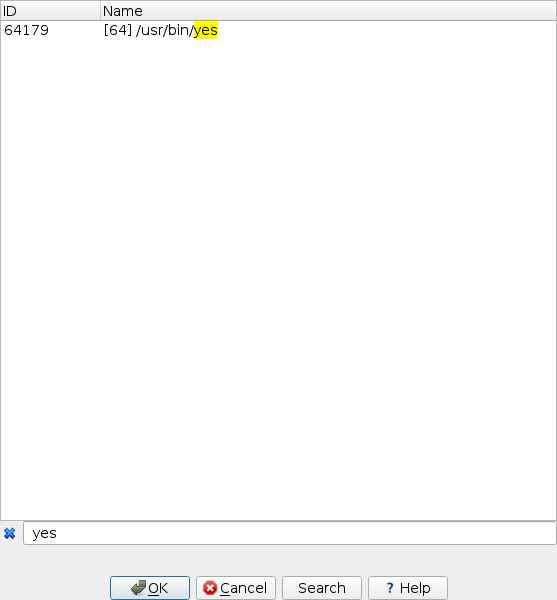
IDA will then attach to the selected process, and leave it suspended at the place it was when it was attached to:
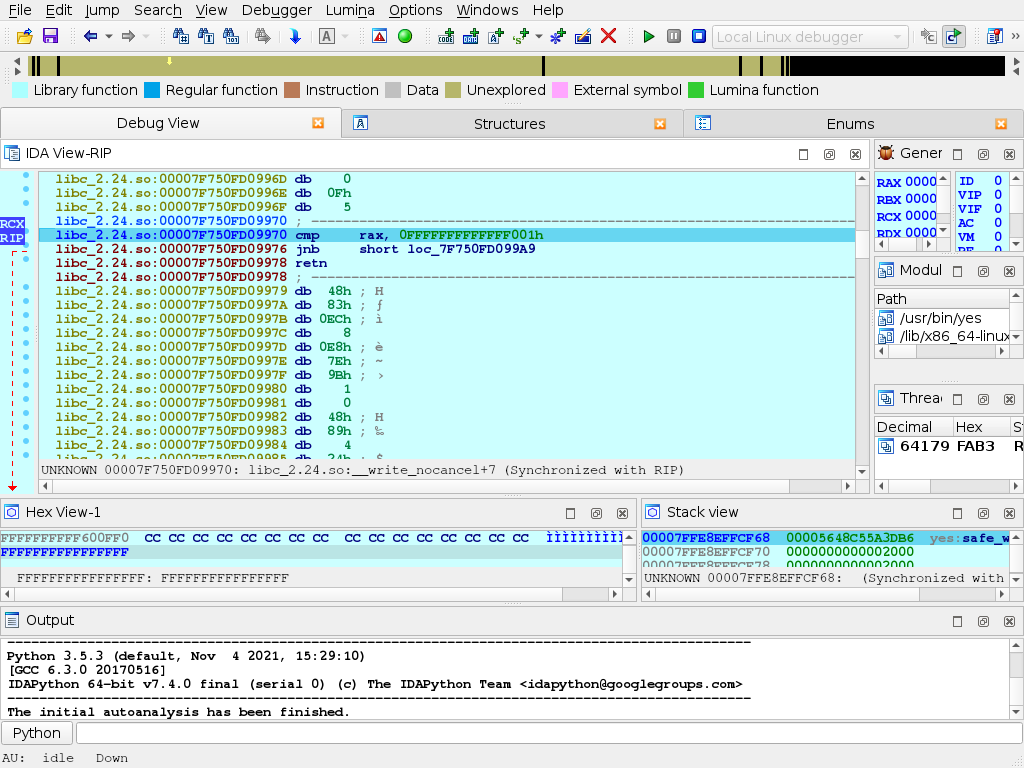
IDA Linux to Win64 Debugging
One of the fanciest options offered by the IDA 4.8 debugger is the debugging of Windows executables from a Linux machine. The 64 bits remote debugging server is started on the Windows64 machine.

and IDA for Linux is started with the following command line
idat [email protected]+
the command line switch specifies the debugger type (windows in this case), the machine name/IP (192.168.1.56) and the last + specifies that a list of running processes will be requested from the target machine. IDA will then display that list and you’ll be able to connect to processes on the Windows64 machine.
and here is the 64 bit program, ready to be debugged under Linux.

IDA Win32 to Linux Debugging
Connecting a Windows Debuging session to a Linux machine is essentially similar to a Windows to Windows connection. The Linux remote debugger server is started on the command line.

then connect to the Linux Machine by selecting the attach to remote Linux command. We can then select the process we want to debug and connect to it with a simple click.
we are now connected to the remote process running on the Linux machine.
Debugging Mac OSX Applications with IDA Pro
Debugging Mac OSX Applications with IDA Pro
Last updated on March 6, 2021 — v2.0
Overview
IDA Pro fully supports debugging native macOS applications.
Intel x86/64 debugging has been supported since IDA 5.6 (during OSX 10.5 Leopard), but due to IDA’s use of libc++ we can only officially support debugging on OSX 10.9 Mavericks and later. Apple Silicon arm64 debugging for macOS11 is also supported since IDA 7.6.
Note that this task is riddled with gotchas, and often times it demands precise workarounds that are not required for other platforms. In this tutorial we will purposefully throw ourselves into the various pitfalls of debugging on a Mac, in the hopes that learning things the hard way will ultimately lead to a smoother experience overall.
Begin by downloading samples:
{% file src=“samples.zip” %}
which contains the sample applications used in this writeup.
Codesigning & Permissions
It is important to note that a debugger running on macOS requires special permissions in order to function properly. This means that the debugger itself must be codesigned in such a way that MacOS allows it to inspect other processes.
The main IDA Pro application is not codesigned in this way. Later on we’ll discuss why.
To quickly demonstrate this, let’s open a binary in IDA Pro and try to debug it. In this example we’ll be debugging the helloworld app from samples.zip:
{% file src=“samples.zip” %}
on MacOSX 10.15 Catalina using IDA 7.5. Begin by loading the file in IDA:
$ alias ida64="/Applications/IDA\ Pro\ 7.5/ida64.app/Contents/MacOS/ida64"
$ ida64 helloworld
Now go to menu Debugger>Select debugger and select Local Mac OS X Debugger:

Immediately IDA should print a warning message to the Output window:
This program must either be codesigned or run as root to debug mac applications.
This is because IDA is aware that it is not codesigned, and is warning you that attempting to debug the target application will likely fail. Try launching the application with shortcut F9. You will likely get this error message:
Codesigning IDA Pro might resolve this issue, but we have purposefully decided not to do this. Doing so would require refactoring IDA’s internal plugin directory structure so that it abides by Apple’s bundle structure guidelines. This would potentially break existing plugins as well as third-party plugins written by users. We have no plans to inconvenience our users in such a way.
Also note that running IDA as root will allow you to use the Local Mac OS X Debugger without issue, but this is not advisable.
A much better option is to use IDA’s mac debug server - discussed in detail in the next section.
Using the Mac Debug Server
A good workaround for the debugging restrictions on macOS is to use IDA’s debug server - even when debugging local apps on your mac machine. The mac debug server is a standalone application that communicates with IDA Pro via IPC, so we can ship it pre-codesigned and ready for debugging right out of the box:
$ codesign -dvv /Applications/IDA\ Pro\ 7.5/idabin/dbgsrv/mac_server64
Executable=/Applications/IDA Pro 7.5/ida.app/Contents/MacOS/dbgsrv/mac_server64
Identifier=com.hexrays.mac_serverx64
Format=Mach-O thin (x86_64)
CodeDirectory v=20100 size=6090 flags=0x0(none) hashes=186+2 location=embedded
Signature size=9002
Authority=Developer ID Application: Hex-Rays SA (ZP7XF62S2M)
Authority=Developer ID Certification Authority
Authority=Apple Root CA
Timestamp=May 19, 2020 at 4:13:31 AM
Let’s try launching the server:
$ /Applications/IDA\ Pro\ 7.5/idabin/dbgsrv/mac_server64
IDA Mac OS X 64-bit remote debug server(MT) v7.5.26. Hex-Rays (c) 2004-2020
Listening on 0.0.0.0:23946...
Now go back to IDA and use menu Debugger>Switch debugger to switch to remote debugging:
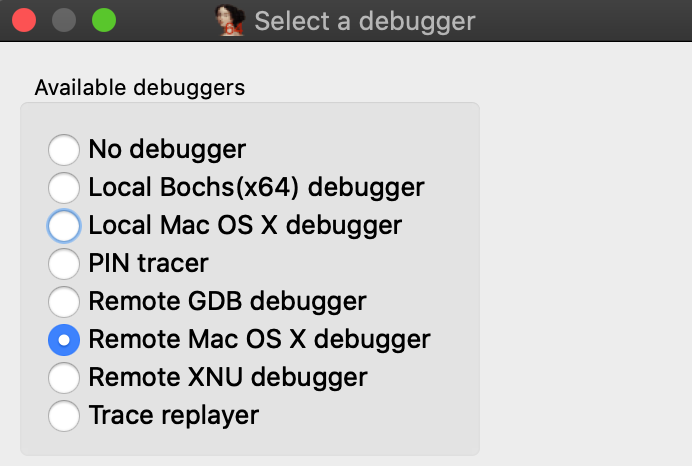
Now use Debugger>Process options to set the Hostname and Port fields to localhost and 23946.
(Note that the port number was printed by mac_server64 after launching it):
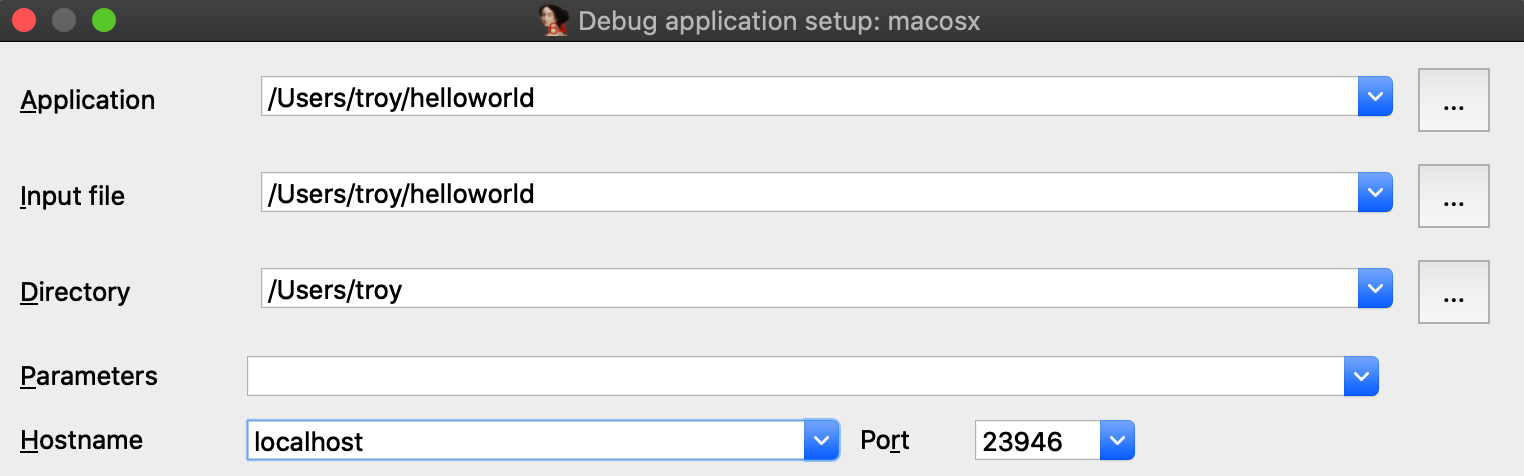
Also be sure to check the option Save network settings as default so IDA will remember this configuration.
Now go to _main in the helloworld disassembly, press F2 to set a breakpoint, then F9 to launch the process. Upon launching the debugger you might receive this prompt from the OS:
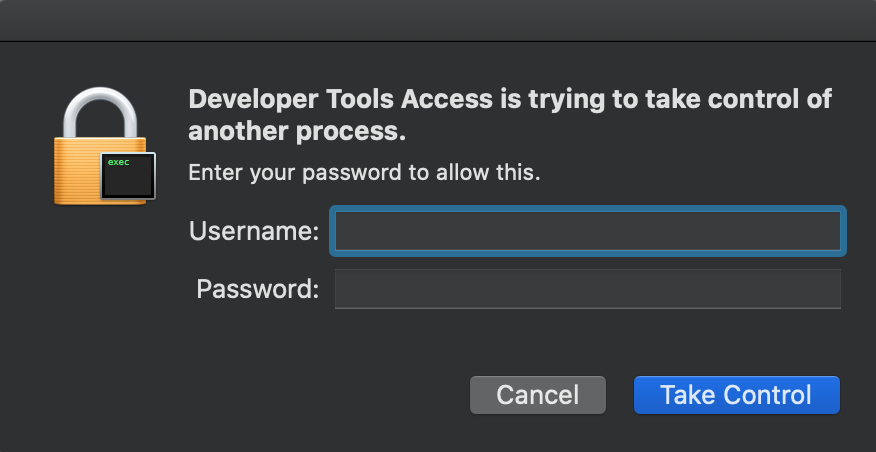
macOS is picky about debugging permissions, and despite the fact that mac_server is properly codesigned you still must explicitly grant it permission to take control of another process. Thankfully this only needs to be done once per login session, so macOS should shut up until the next time you log out (we discuss how to disable this prompt entirely in the Debugging Over SSH section below).
After providing your credentials the debugger should start up without issue:
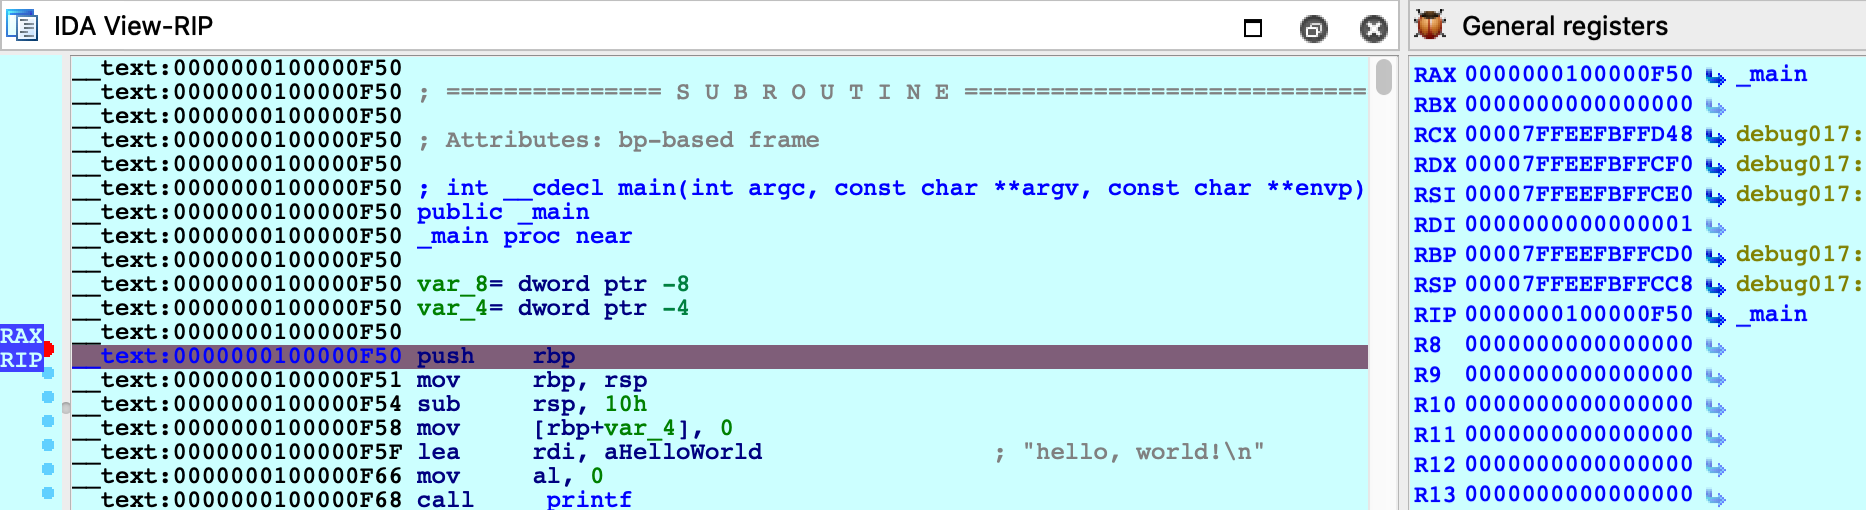
Using a Launch Agent
To simplify using the mac server, save the following XML as com.hexrays.mac_server64.plist in ~/Library/LaunchAgents/:
<?xml version="1.0" encoding="UTF-8"?>
<!DOCTYPE plist PUBLIC "-//Apple//DTD PLIST 1.0//EN" "http://www.apple.com/DTDs/PropertyList-1.0.dtd">
<plist version="1.0">
<dict>
<key>Label</key>
<string>com.hexrays.mac_server64</string>
<key>ProgramArguments</key>
<array>
<string>/Applications/IDA Pro 7.5/dbgsrv/mac_server64</string>
<string>-i</string>
<string>localhost</string>
</array>
<key>StandardOutPath</key>
<string>/tmp/mac_server64.log</string>
<key>StandardErrorPath</key>
<string>/tmp/mac_server64.log</string>
<key>KeepAlive</key>
<true/>
</dict>
</plist>
Now mac_server64 will be launched in the background whenever you log in. You can connect to it from IDA at any time using the Remote Mac OS X Debugger option. Hopefully this will make local debugging on macOS almost as easy as other platforms.
Debugging System Applications
There are some applications that macOS will refuse to allow IDA to debug.
For example, load /System/Applications/Calculator.app/Contents/MacOS/Calculator in IDA and try launching the debugger. You will likely get this error message:
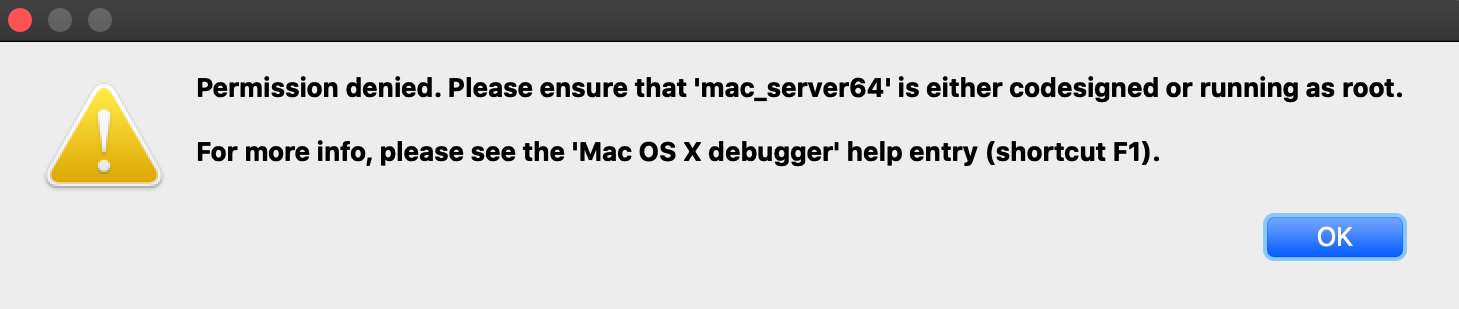
Despite the fact that mac_server64 is codesigned, it still failed to retrieve permission from the OS to debug the target app. This is because Calculator.app and all other apps in /System/Applications/ are protected by System Integrity Protection and they cannot be debugged until SIP is disabled. Note that the error message is a bit misleading because it implies that running mac_server64 as root will resolve the issue - it will not. Not even root can debug apps protected by SIP.
Disabling SIP allows IDA to debug applications like Calculator without issue:
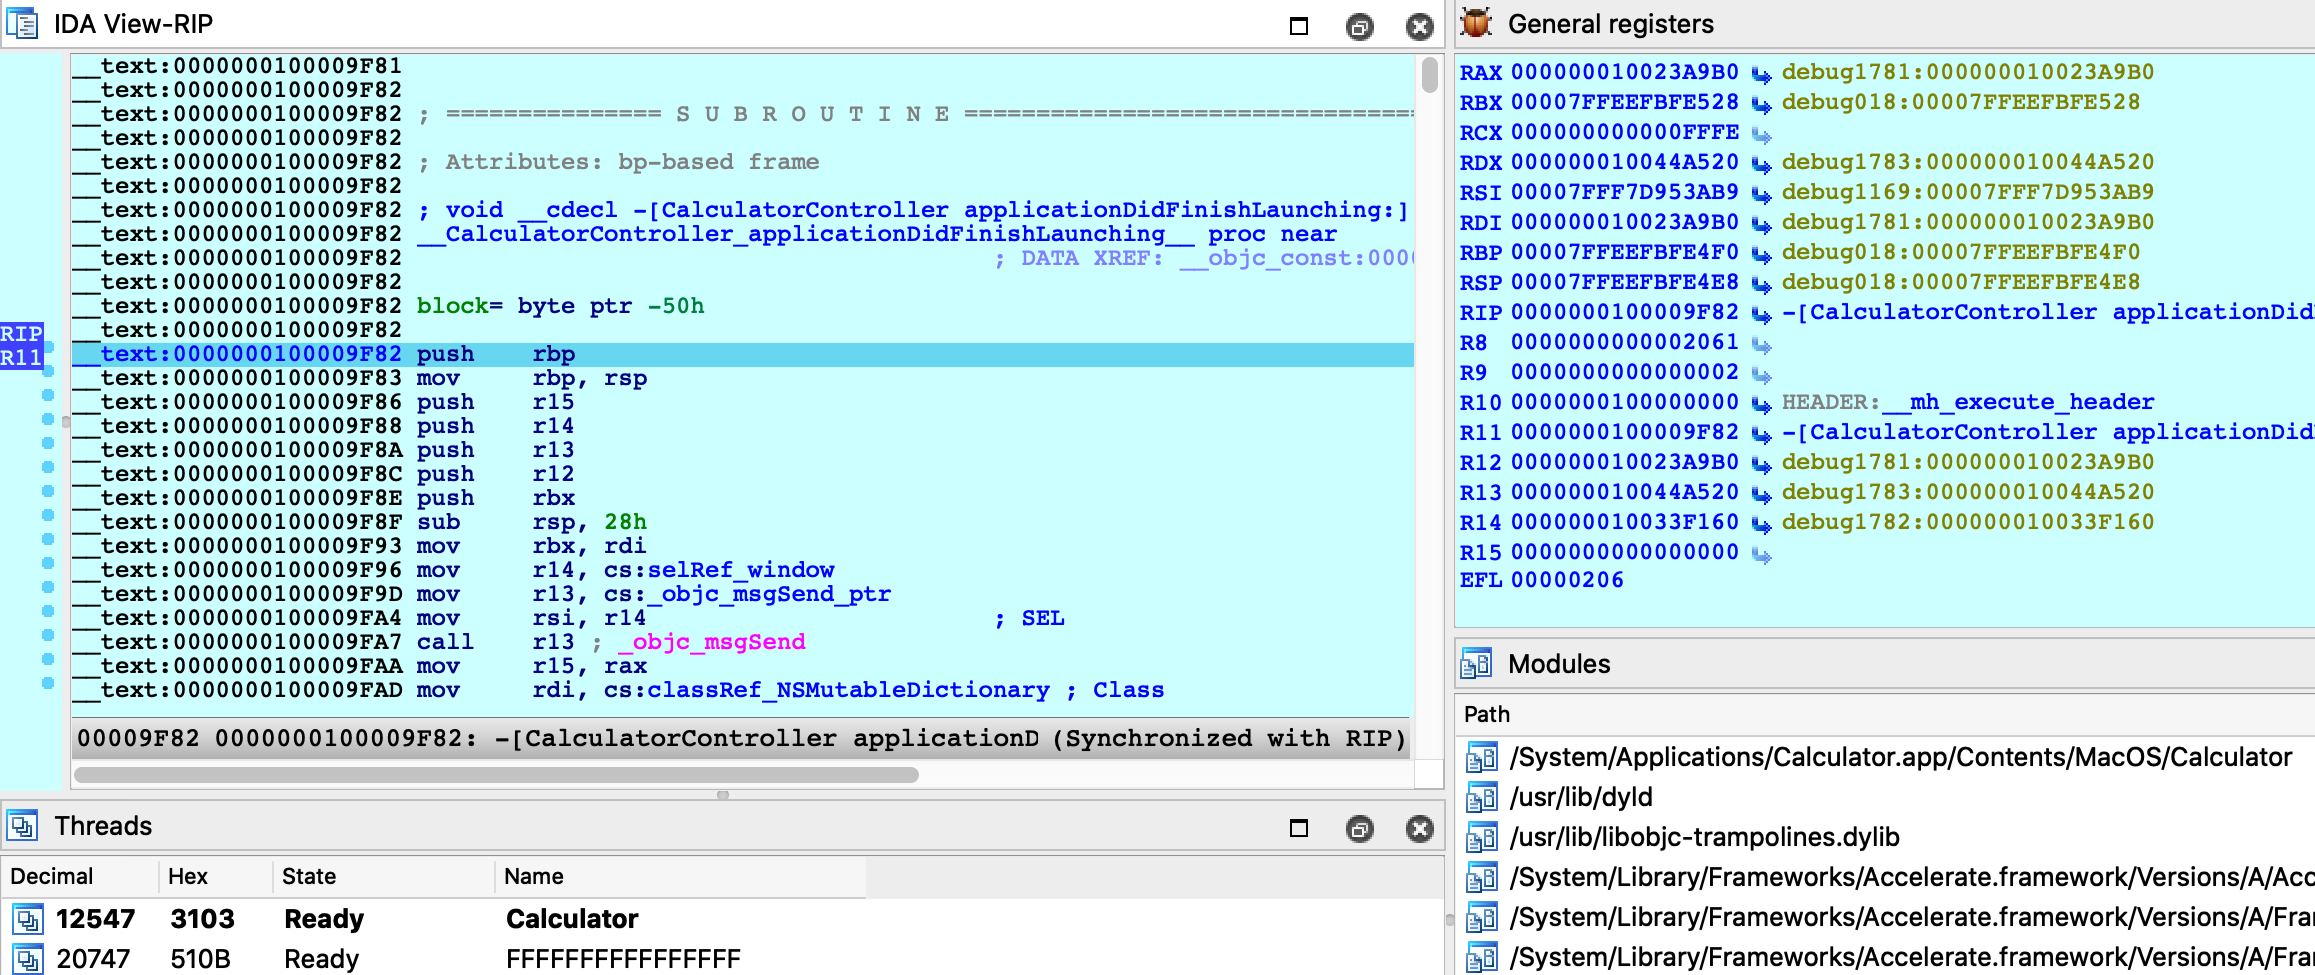
The effects of SIP are also apparent when attaching to an existing process. Try using menu Debugger>Attach to process, with SIP enabled there will likely only be a handful of apps that IDA can debug:
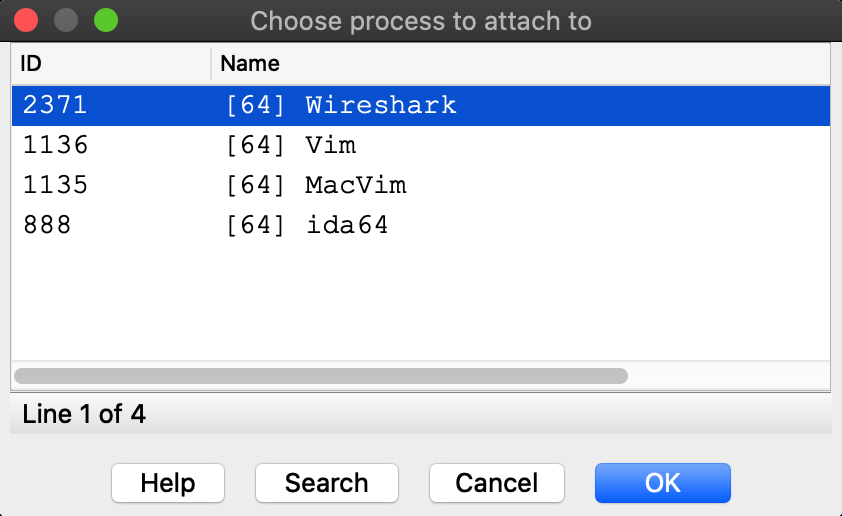
Disabling SIP makes all system apps available for attach:
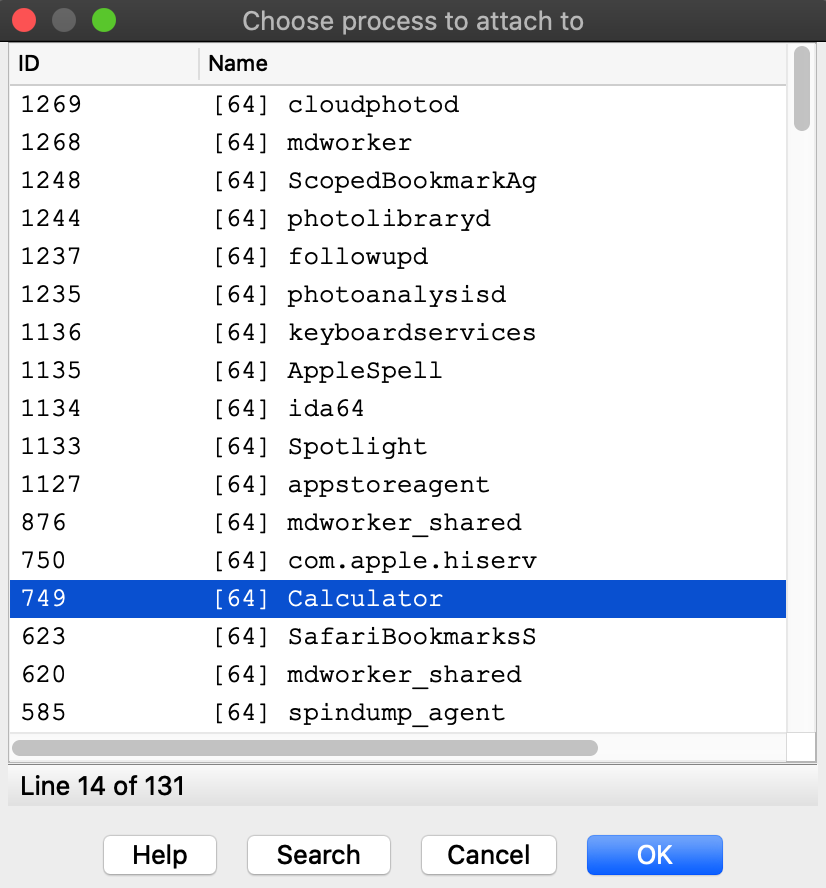
It is unfortunate that such drastic measures are required to inspect system processes running on your own machine, but this is the reality of MacOS. We advise that you only disable System Integrity Protection when absolutely necessary, or use a virtual machine that can be compromised with impunity.
Debugging System Libraries
With IDA you can debug any system library in /usr/lib/ or any framework in /System/Library/.
This functionality is fully supported, but surprisingly it is one of the hardest problems the mac debugger must handle. To demonstrate this, let’s try debugging the _getaddrinfo function in libsystem_info.dylib.
Consider the getaddrinfo application from samples.zip:
{% file src=“samples.zip” %}
#include <sys/types.h>
#include <sys/socket.h>
#include <netdb.h>
#include <netinet/in.h>
#include <arpa/inet.h>
#include <string.h>
#include <stdio.h>
int main(int argc, char **argv)
{
if ( argc != 2 )
{
fprintf(stderr, "usage: %s <hostname>\n", argv[0]);
return 1;
}
struct addrinfo hints;
memset(&hints, 0, sizeof(hints));
hints.ai_family = AF_INET;
hints.ai_flags |= AI_CANONNAME;
struct addrinfo *result;
int code = getaddrinfo(argv[1], NULL, &hints, &result);
if ( code != 0 )
{
fprintf(stderr, "failed: %d\n", code);
return 2;
}
struct sockaddr_in *addr_in = (struct sockaddr_in *)result->ai_addr;
char *ipstr = inet_ntoa(addr_in->sin_addr);
printf("IP address: %s\n", ipstr);
return 0;
}
Try testing it out with a few hostnames:
$ ./getaddrinfo localhost
IP address: 127.0.0.1
$ ./getaddrinfo hex-rays.com
IP address: 104.26.10.224
$ ./getaddrinfo foobar
failed: 8
Now load libsystem_info.dylib in IDA and set a breakpoint at _getaddrinfo:
$ ida64 -o/tmp/libsystem_info /usr/lib/system/libsystem_info.dylib
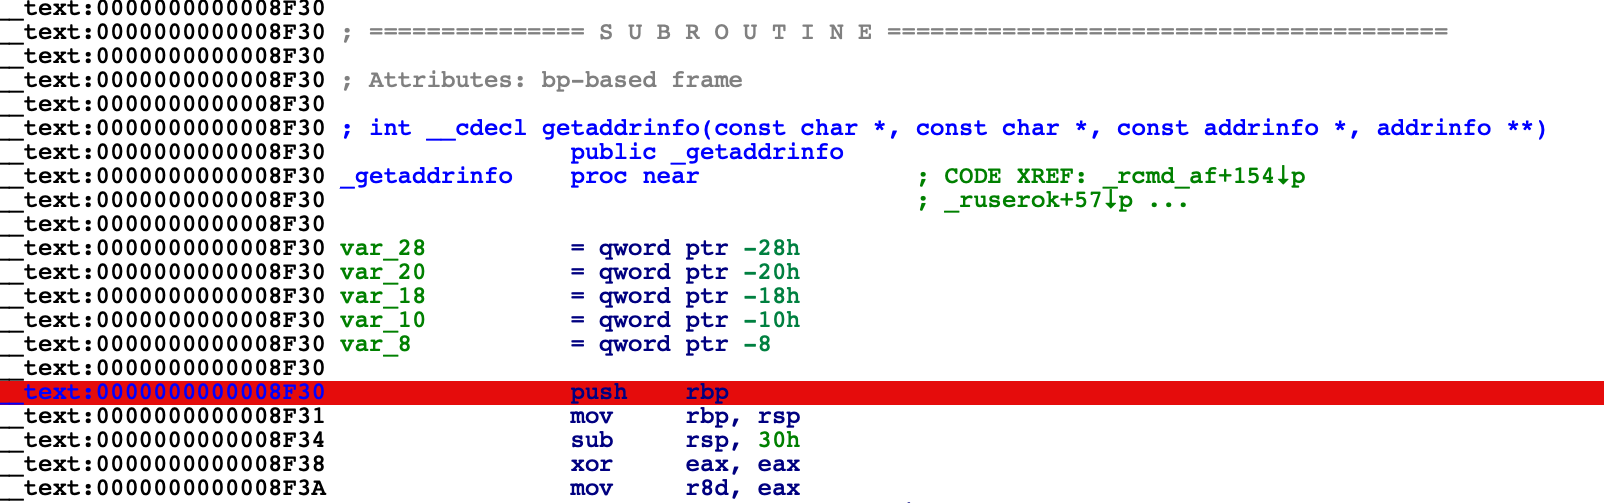
Choose Remote Mac OS X Debugger from the Debugger menu and under Debugger>Process options be sure to provide a hostname in the Parameters field. IDA will pass this argument to the executable when launching it:
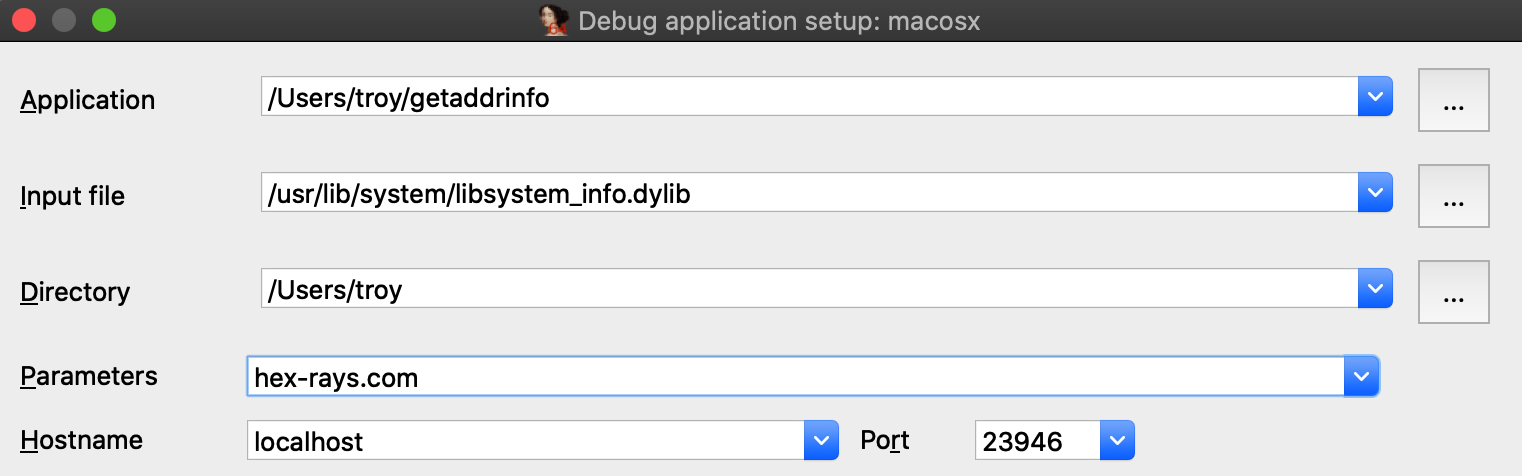
Before launching the process, use Ctrl+S to pull up the segment list for libsystem_info.dylib. Pay special attention to the __eh_frame and __nl_symbol_ptr segments. Note that they appear to be next to each other in memory:
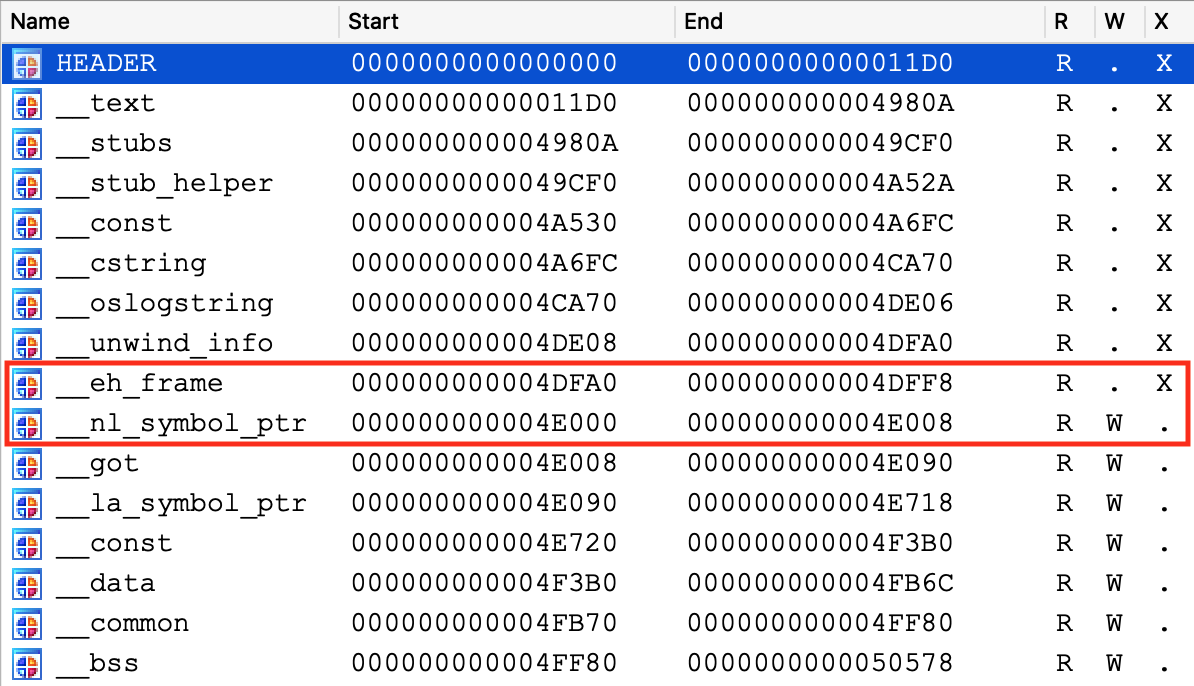
This will be important later.
Finally, use F9 to launch the debugger and wait for our breakpoint at _getaddrinfo to be hit. We can now start stepping through the logic:
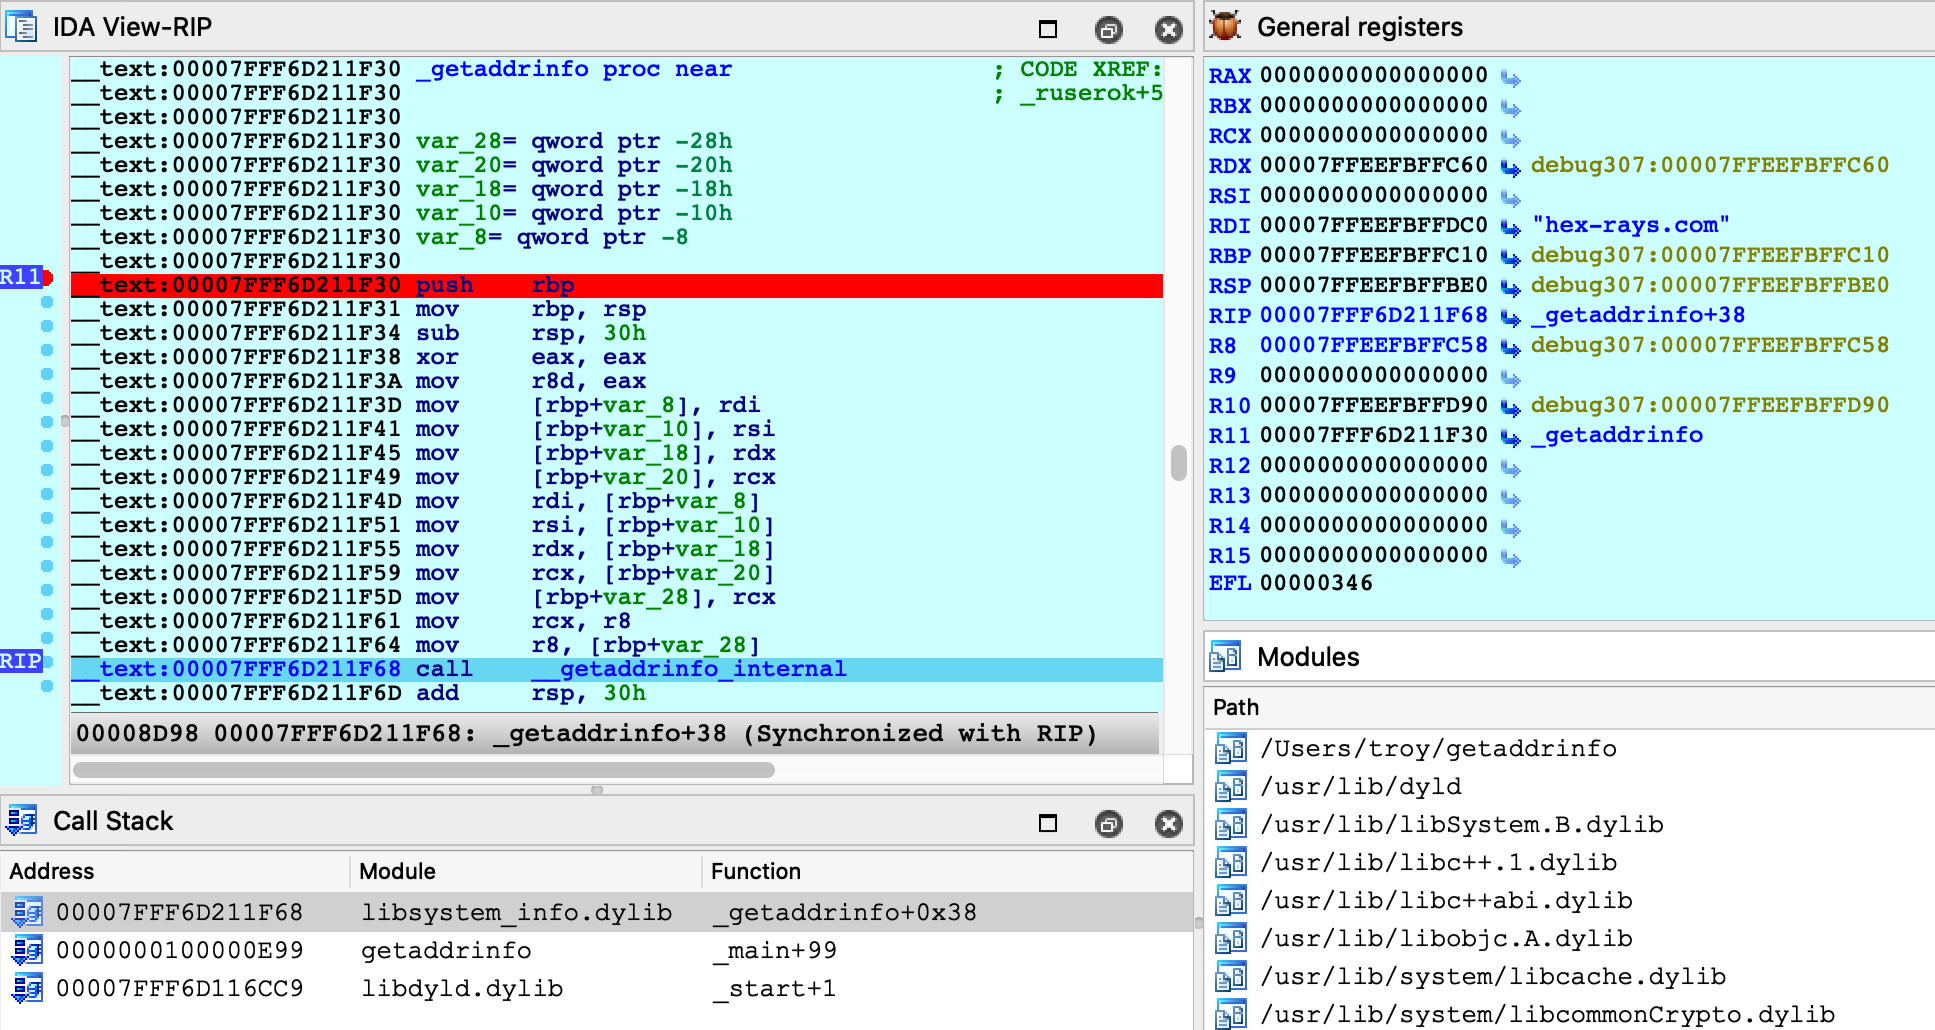
Everything appears to be working normally, but use Ctrl+S to pull up the segment information again. We can still see __eh_frame, but it looks like __nl_symbol_ptr has gone missing:
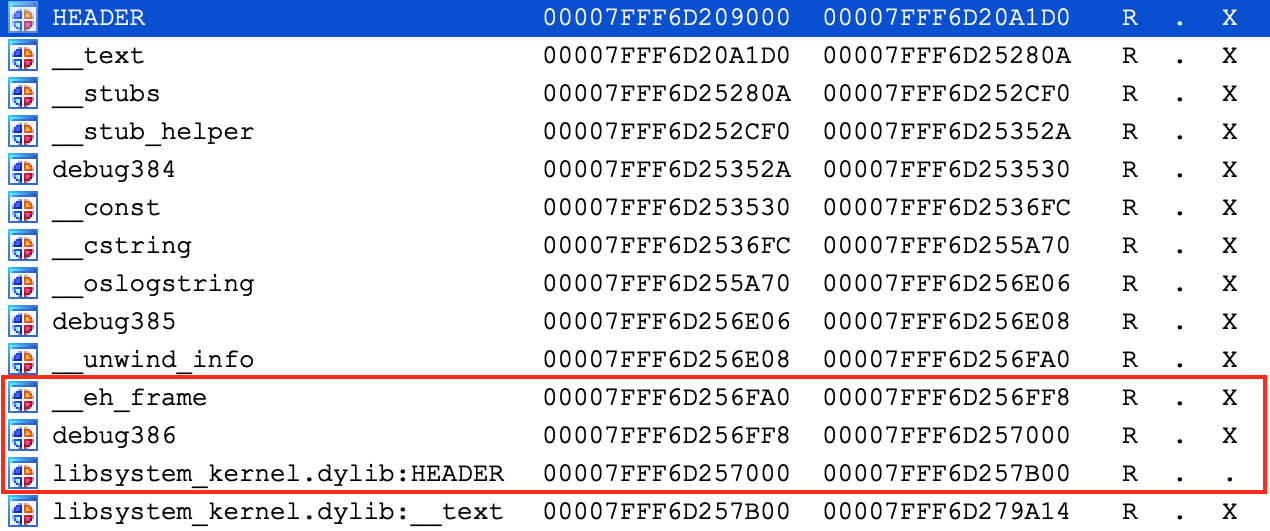
It is actually still present, but we find it at a much higher address:
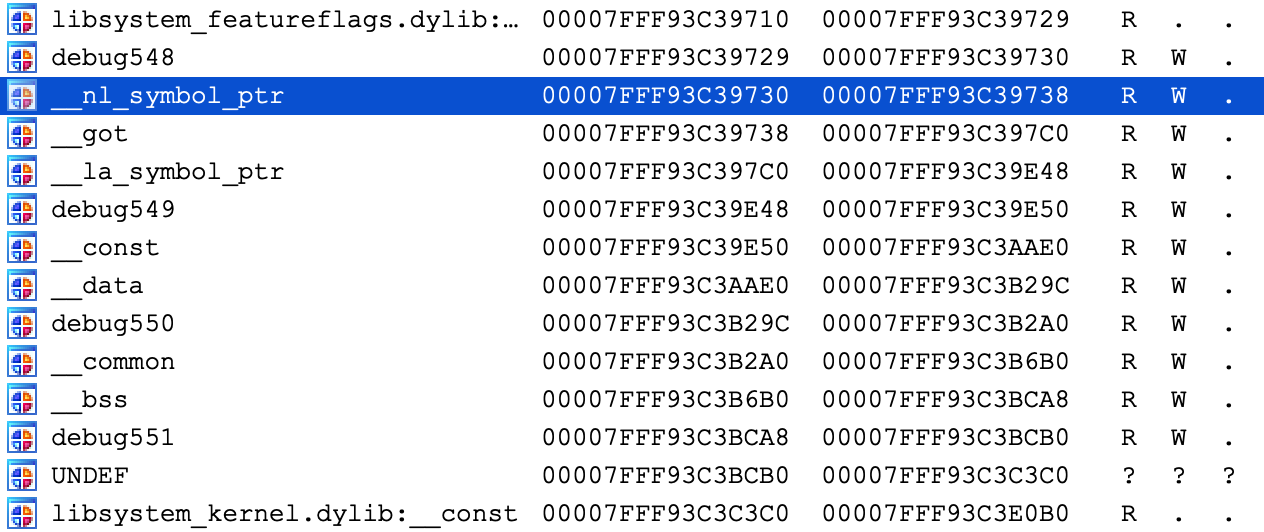
Recall that we opened the file directly from the filesystem (/usr/lib/system/libsystem_info.dylib). However this is actually not the file that macOS loaded into memory. The libsystem_info image in process memory was mapped in from the dyld_shared_cache, and the library’s segment mappings were modified before it was inserted into the cache.
IDA was able to detect this situation and adjust the database so that it matches the layout in process memory. This functionality is fully supported, but it is not trivial. Essentially the debugger must split your database in half, rebase all code segments to one address, then rebase all data segments to a completely different address.
It is worth noting there is another approach that achieves the same result, but without so much complexity.
Debugging Modules in dyld_shared_cache
As an alternative for the above example, note that you can load any module directly from a dyld_shared_cache file and debug it. For example, open the shared cache in IDA:
$ ida64 -o/tmp/libsystem_info2 /var/db/dyld/dyld_shared_cache_x86_64h
When prompted, select the “single module” option:
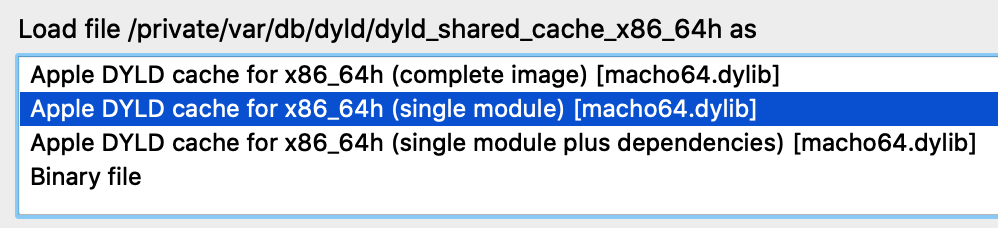
Then choose the libsystem_info module:
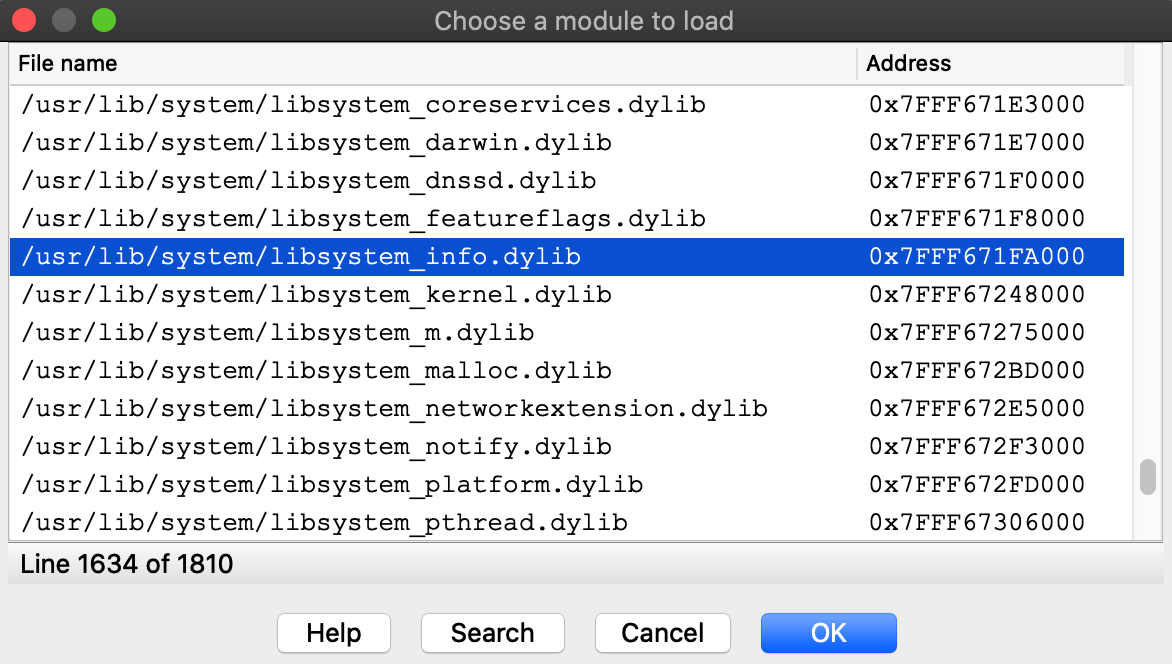
Select the Remote Mac OS X Debugger and for Debugger>Process options use the exact same options as before:
Now set a breakpoint at _getaddrinfo and launch the process with F9.
After launching the debugger you might see this warning:
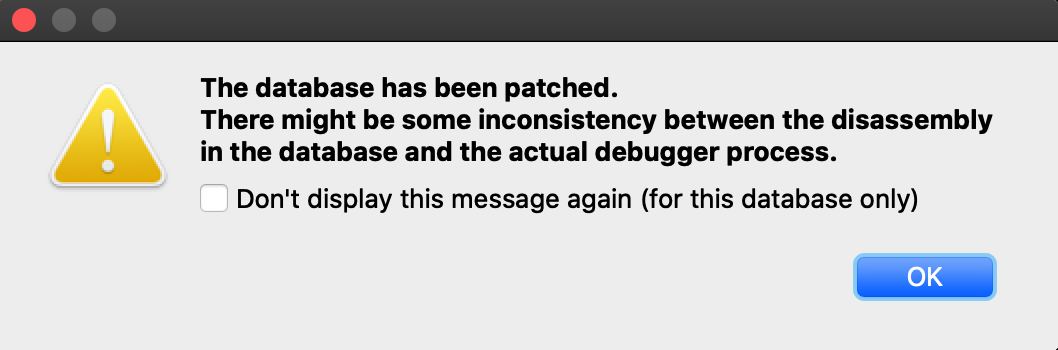
This is normal. Modules from the dyld_shared_cache will contain tagged pointers, and IDA patched the pointers when loading the file so that analysis would not be hindered by the tags. IDA is warning us that the patches might cause a discrepancy between the database and the process, but in this case we know it’s ok. Check Don’t display this message again and don’t worry about it.
Launching the process should work just like before, and we can start stepping through the function in the shared cache:

This time there was no special logic to map the database into process memory. Since we loaded the module directly from the cache, segment mappings already match what’s expected in the process. Thus only one rebasing operation was required (as apposed to the segment scattering discussed in the previous example).
Both techniques are perfectly viable and IDA goes out of its way to fully support both of them. In the end having multiple solutions to a complex problem is a good thing.
Debugging Objective-C Applications
When debugging macOS applications it is easy to get lost in some obscure Objective-C framework. IDA’s mac debugger provides tools to make debugging Objective-C code a bit less painful.
Consider the bluetooth application from samples.zip:
{% file src=“samples.zip” %}
#import <IOBluetooth/IOBluetooth.h>
int main(void)
{
NSArray *devices = [IOBluetoothDevice pairedDevices];
int count = [devices count];
for ( int i = 0; i < count; i++ )
{
IOBluetoothDevice *device = [devices objectAtIndex:i];
NSLog(@"%@:\n", [device name]);
NSLog(@" paired: %d\n", [device isPaired]);
NSLog(@" connected: %d\n", [device isConnected]);
}
return 0;
}
The app will print all devices that have been paired with your host via Bluetooth. Try running it:
$ ./bluetooth
2020-05-22 16:27:14.443 bluetooth[17025:15645888] Magic Keyboard:
2020-05-22 16:27:14.443 bluetooth[17025:15645888] paired: 1
2020-05-22 16:27:14.443 bluetooth[17025:15645888] connected: 1
2020-05-22 16:27:14.443 bluetooth[17025:15645888] Apple Magic Mouse:
2020-05-22 16:27:14.443 bluetooth[17025:15645888] paired: 1
2020-05-22 16:27:14.443 bluetooth[17025:15645888] connected: 1
2020-05-22 16:27:14.443 bluetooth[17025:15645888] iPhone SE:
2020-05-22 16:27:14.443 bluetooth[17025:15645888] paired: 0
2020-05-22 16:27:14.443 bluetooth[17025:15645888] connected: 0
Let’s try debugging this app. First consider the call to method +[IOBluetoothDevice pairedDevices]:

If we execute a regular instruction step with F7, IDA will step into the _objc_msgSend function in libobjc.A.dylib, which is probably not what we want here. Instead use shortcut Shift+O. IDA will automatically detect the address of the Objective-C method that is being invoked and break at it:

This module appears to be Objective-C heavy, so it might be a good idea to extract Objective-C type info from the module using right click -> Load debug symbols in the Modules window:
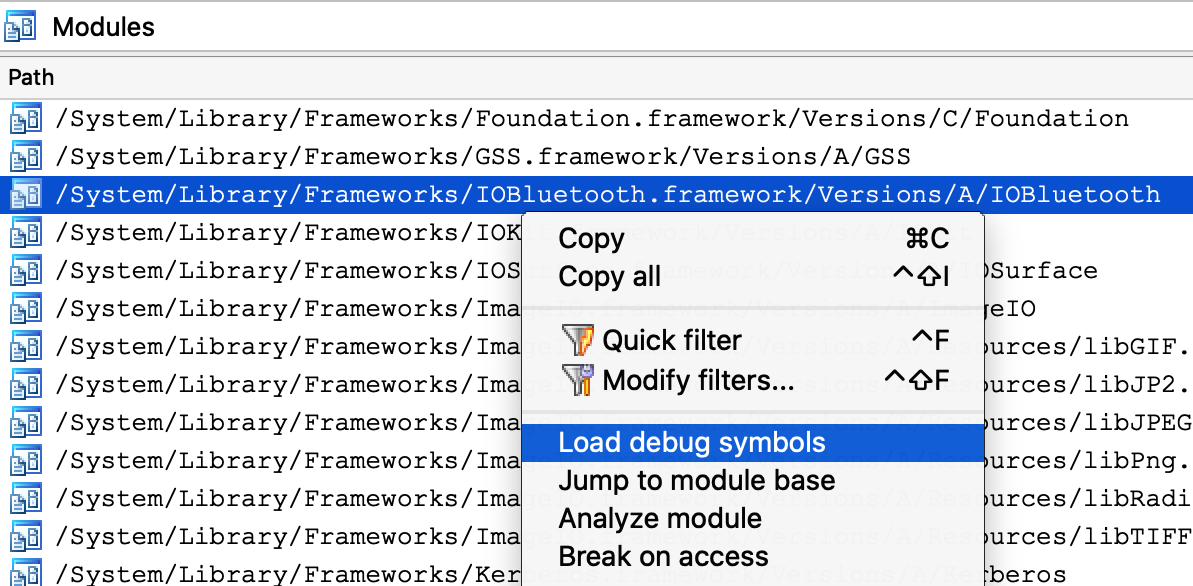
This operation will extract any Objective-C types encoded in the module, which should give us some nice prototypes for the methods we’re stepping in:

Let’s continue to another method call - but this time the code invokes a stub for _objc_msgSend that IDA has not analyzed yet, so its name has not been properly resolved:

In this case Shift+O should still work:
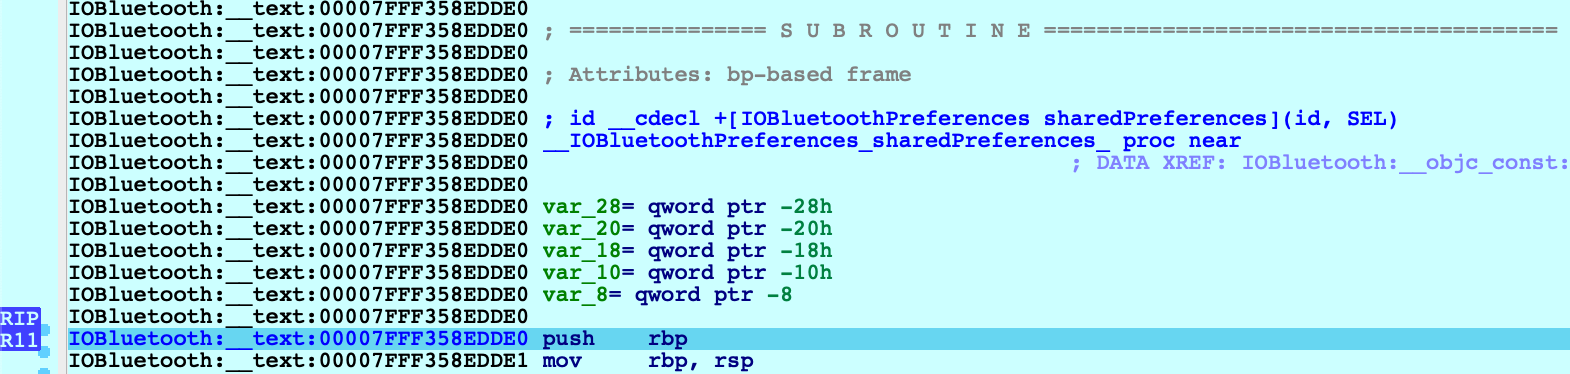
Shift+O is purposefully flexible so that it can be invoked at any point before a direct or indirect call to _objc_msgSend. It will simply intercept execution at the function in libobjc.A.dylib and use the arguments to calculate the target method address.
However, you must be careful. If you use this action in a process that does not call _objc_msgSend, you will lose control of the process. It is best to only use it when you’re certain the code is compiled from Objective-C and an _objc_msgSend call is imminent.
Decompiling Objective-C at Runtime
The Objective-C runtime analysis performed by Load debug symbols will also improve decompilation.
Consider the method -[IOBluetoothDevice isConnected]:
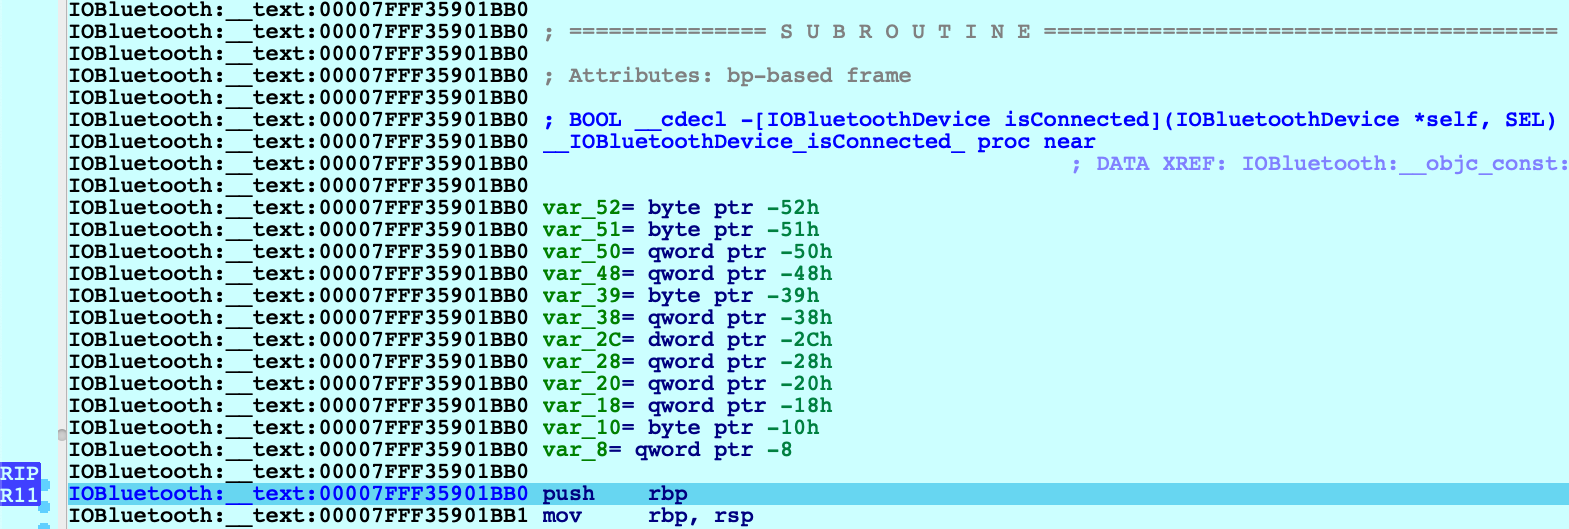
Before we start stepping through this method we might want to peek at the pseudocode to get a sense of how it works. Note that the Objective-C analysis created local types for the IOBluetoothDevice class, as well as many other classes:
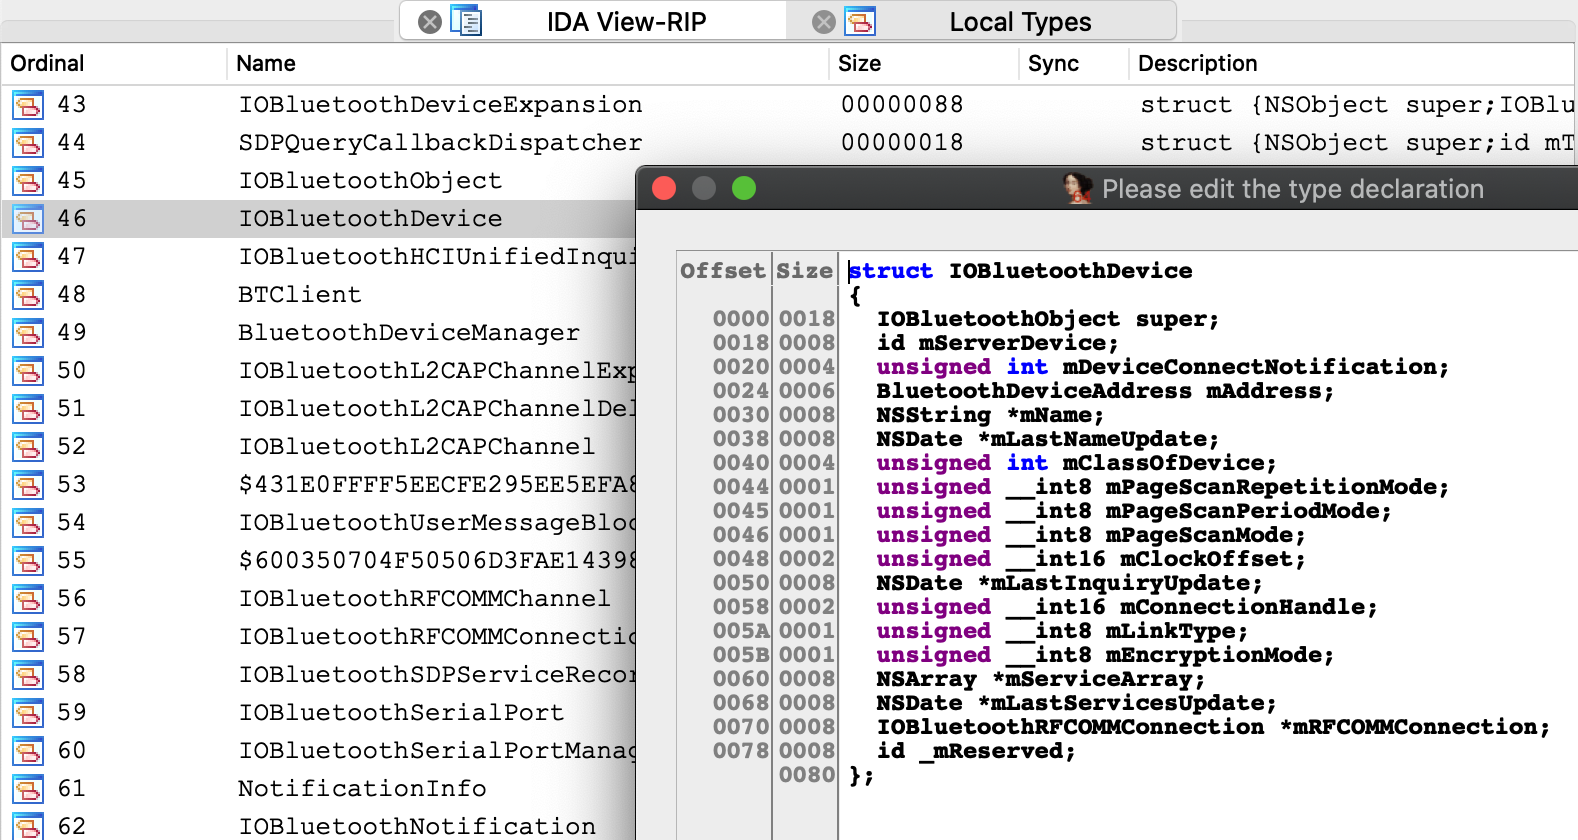
This type info results in some sensible pseudocode:
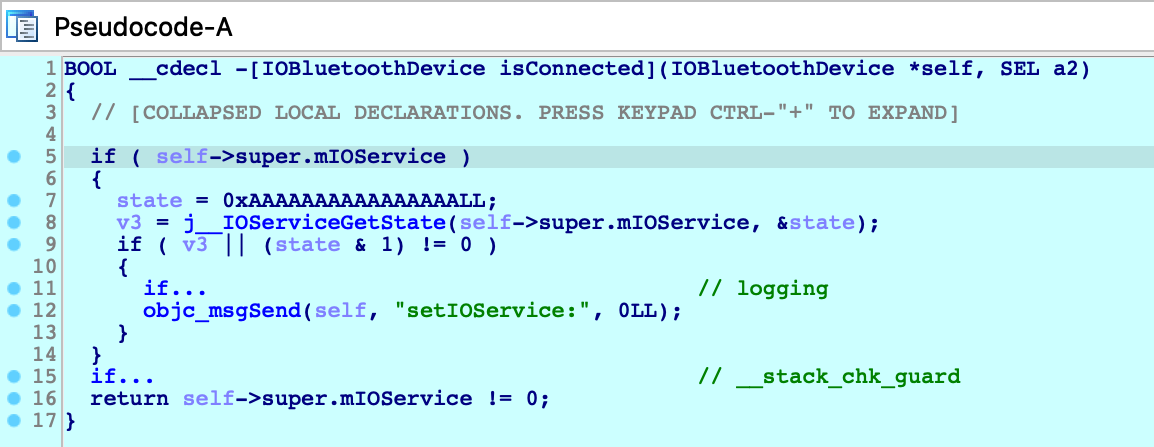
We knew nothing about this method going in - but it’s immediately clear that device connectivity is determined by the state of an io_service_t handle in the IOBluetoothObject superclass, and we’re well on our way.
Debugging Over SSH
In this section we will discuss how to remotely debug an app on a mac machine using only an SSH connection. Naturally, this task introduces some unique complications.
To start, copy the mac_server binaries and the bluetooth app from samples.zip:
{% file src=“samples.zip” %}
to the target machine:
$ scp <IDA install dir>/dbgsrv/mac_server* user@remote:
$ scp bluetooth user@remote:
Now ssh to the target machine and launch the mac_server:
$ ssh user@remote
user@remote:~$ ./mac_server64
IDA Mac OS X 64-bit remote debug server(MT) v7.5.26. Hex-Rays (c) 2004-2020
Listening on 0.0.0.0:23946...
Now open the bluetooth binary on the machine with your IDA installation, select Remote Mac OS X Debugger from the debugger menu, and for Debugger>Process options set the debugging parameters. Be sure to replace <remote user> and <remote ip> with the username and ip address of the target machine:
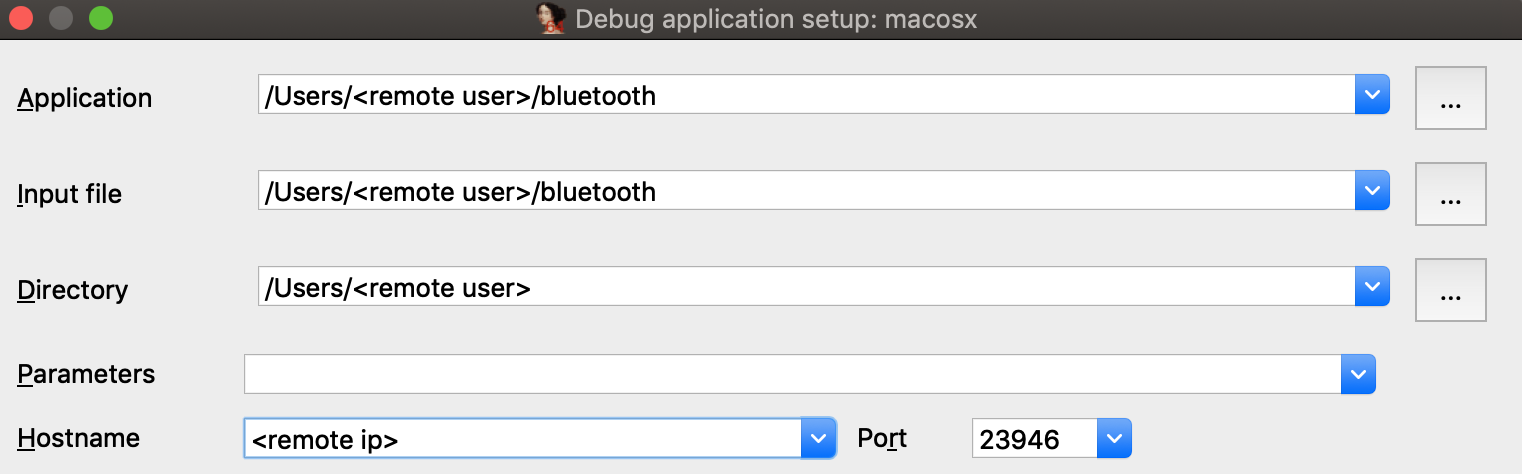
Try launching the debugger with F9. You might get the following error message:
This happened because debugging requires manual authentication from the user for every login session (via the Take Control prompt discussed under Using the Mac Debug Server, above).
But since we’re logged into the mac via SSH, the OS has no way of prompting you with the authentication window and thus debugging permissions are refused.
Note that mac_server64 might have printed this workaround:
WARNING: The debugger could not acquire the necessary permissions from the OS to
debug mac applications. You will likely have to specify the proper credentials at
process start. To avoid this, you can set the MAC_DEBMOD_USER and MAC_DEBMOD_PASS
environment variables.
But this is an extreme measure. As an absolute last resort you can launch the mac_server with your credentials in the environment variables, which should take care of authentication without requiring any interaction with the OS. However there is a more secure workaround.
In your SSH session, terminate the mac_server process and run the following command:
$ security authorizationdb read system.privilege.taskport > taskport.plist
Edit taskport.plist and change the authenticate-user option to false:
<key>authenticate-user</key>
<false/>
Then apply the changes:
$ sudo security authorizationdb write system.privilege.taskport < taskport.plist
This will completely disable the debugging authentication prompt (even across reboots), which should allow you to use the debug server over SSH without macOS bothering you about permissions.
Dealing With Slow Connections
When debugging over SSH you might experience some slowdowns. For example you might see this dialog appear for several seconds when starting the debugger:
During this operation IDA is fetching function names from the symbol tables for all dylibs that have been loaded in the target process. It is a critical task (after all we want our stack traces to look nice), but it is made complicated by the sheer volume of dylibs loaded in a typical macOS process due to the dyld_shared_cache. This results in several megabytes of raw symbol names that mac_server must transmit over the wire every time the debugger is launched.
We can fix this by using the same trick that IDA’s Remote iOS Debugger uses to speed up debugging - by extracting symbol files from the dyld cache and parsing them locally. Start by downloading the ios_deploy utility from our download center, and copy it to the remote mac:
$ scp ios_deploy user@remote:
Then SSH to the remote mac and run it:
$ ./ios_deploy symbols -c /var/db/dyld/dyld_shared_cache_x86_64h -d mac_symbols
Extracting symbols from /var/db/dyld/dyld_shared_cache_x86_64h => mac_symbols
Extracting symbol file: 1813/1813
mac_symbols: done
$ zip -r mac_symbols.zip mac_symbols
Copy mac_symbols.zip from the remote machine to your host machine and unzip it. Then open Debugger>Debugger options>Set specific options and set the Symbol path field:

Now try launching the debugger again, it should start up much faster.
Also keep the following in mind:
- Use /var/db/dyld/dyld_shared_cache_i386 if debugging 32-bit apps
- You must perform this operation after every macOS update. Updating the OS will update the dyld_shared_cache, which invalidates the extracted symbol files.
- The ios_deploy utility simply invokes dyld_shared_cache_extract_dylibs_progress from the dsc_extractor.bundle library in Xcode. If you don’t want to use ios_deploy there are likely other third-party tools that do something similar.
Debugging arm64 Applications on Apple Silicon
IDA 7.6 introduced the ARM Mac Debugger, which can debug any application that runs natively on Apple Silicon.
On Apple Silicon, the same rules apply (see Codesigning & Permissions above). The Local ARM Mac Debugger can only be used when run as root, so it is better to use the Remote ARM Mac Debugger with the debug server (mac_server_arm64), which can debug any arm64 app out of the box (see Using the Mac Debug Server).
We have included arm64 versions of the sample binaries used in the previous examples. We encourage you to go back and try them. They should work just as well on Apple Silicon.
Debugging arm64e System Applications
Similar to Intel Macs, IDA cannot debug system apps on Apple Silicon until System Integrity Protection is disabled.
But here macOS introduces another complication. All system apps shipped with macOS are built for arm64e - and thus have pointer authentication enabled. This is interesting because ptruath-enabled processes are treated much differently within the XNU kernel. All register values that typically contain pointers (PC, LR, SP, and FP) will be signed and authenticated by PAC.
Thus, if a debugger wants to modify the register state of an arm64e process, it must know how to properly sign the register values. Only arm64e applications are allowed to do this (canonically, at least).
You may have noticed that IDA 7.6 ships with two versions of the arm64 debug server:
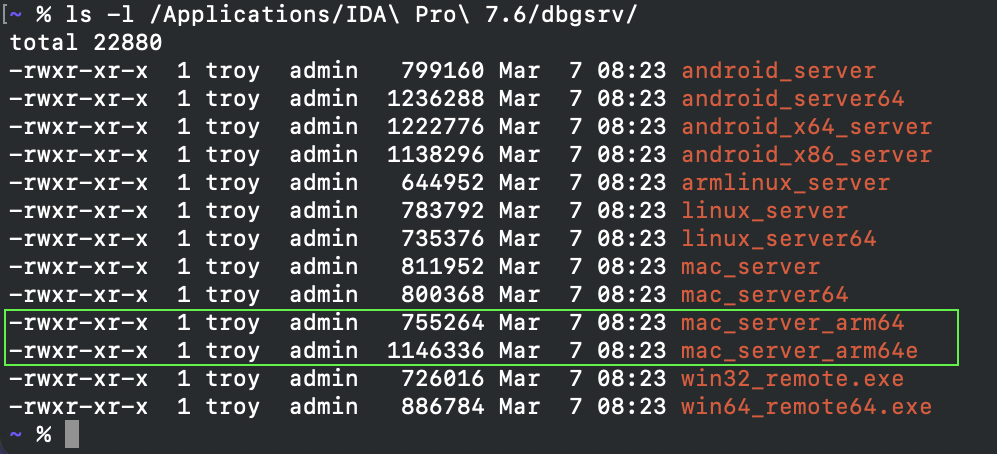
mac_server_arm64e is built specifically for the arm64e architecture, and thus will be able to properly inspect other arm64e processes. We might want to try running this version right away, but by default macOS will refuse to run any third-party software built for arm64e:

According to Apple, this is because the arm64e ABI is not stable enough to be used generically. In order to run third-party arm64e binaries you must enable the following boot arg:
$ sudo nvram boot-args=-arm64e_preview_abi
After rebooting you can finally run mac_server_arm64e:

This allows you to debug any system application (e.g. /System/Applications/Calculator.app) without issue:
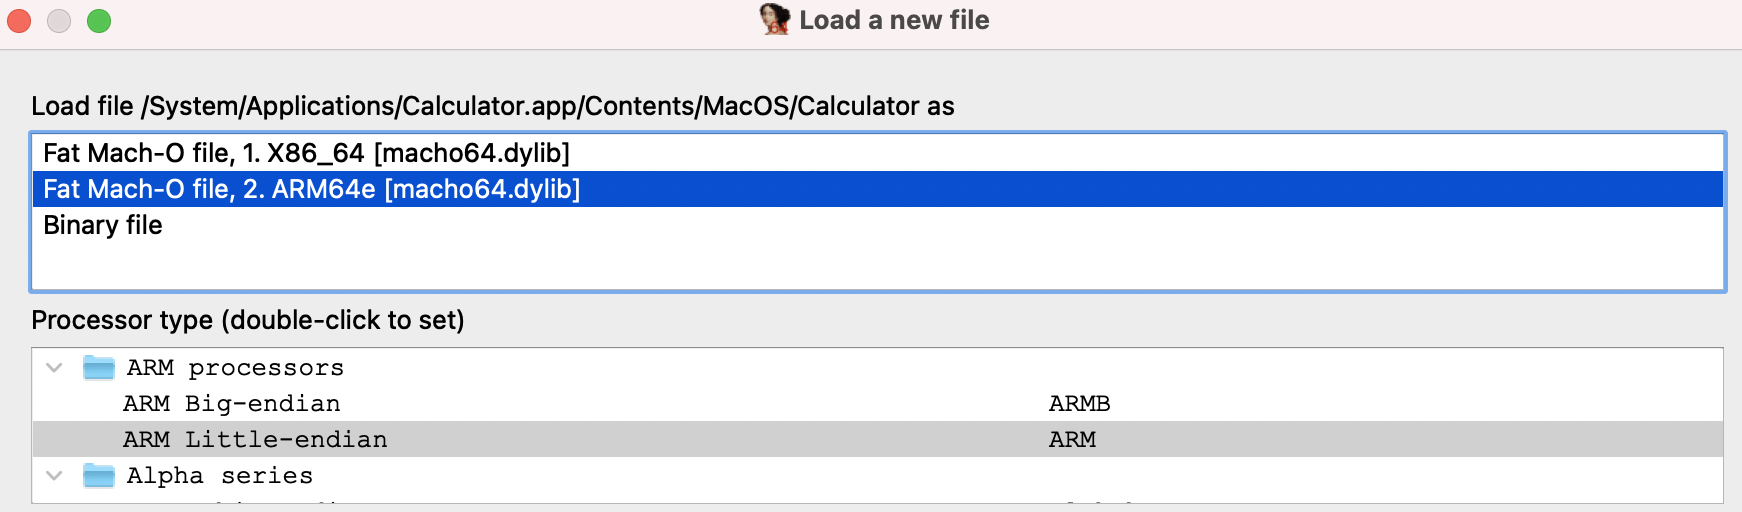
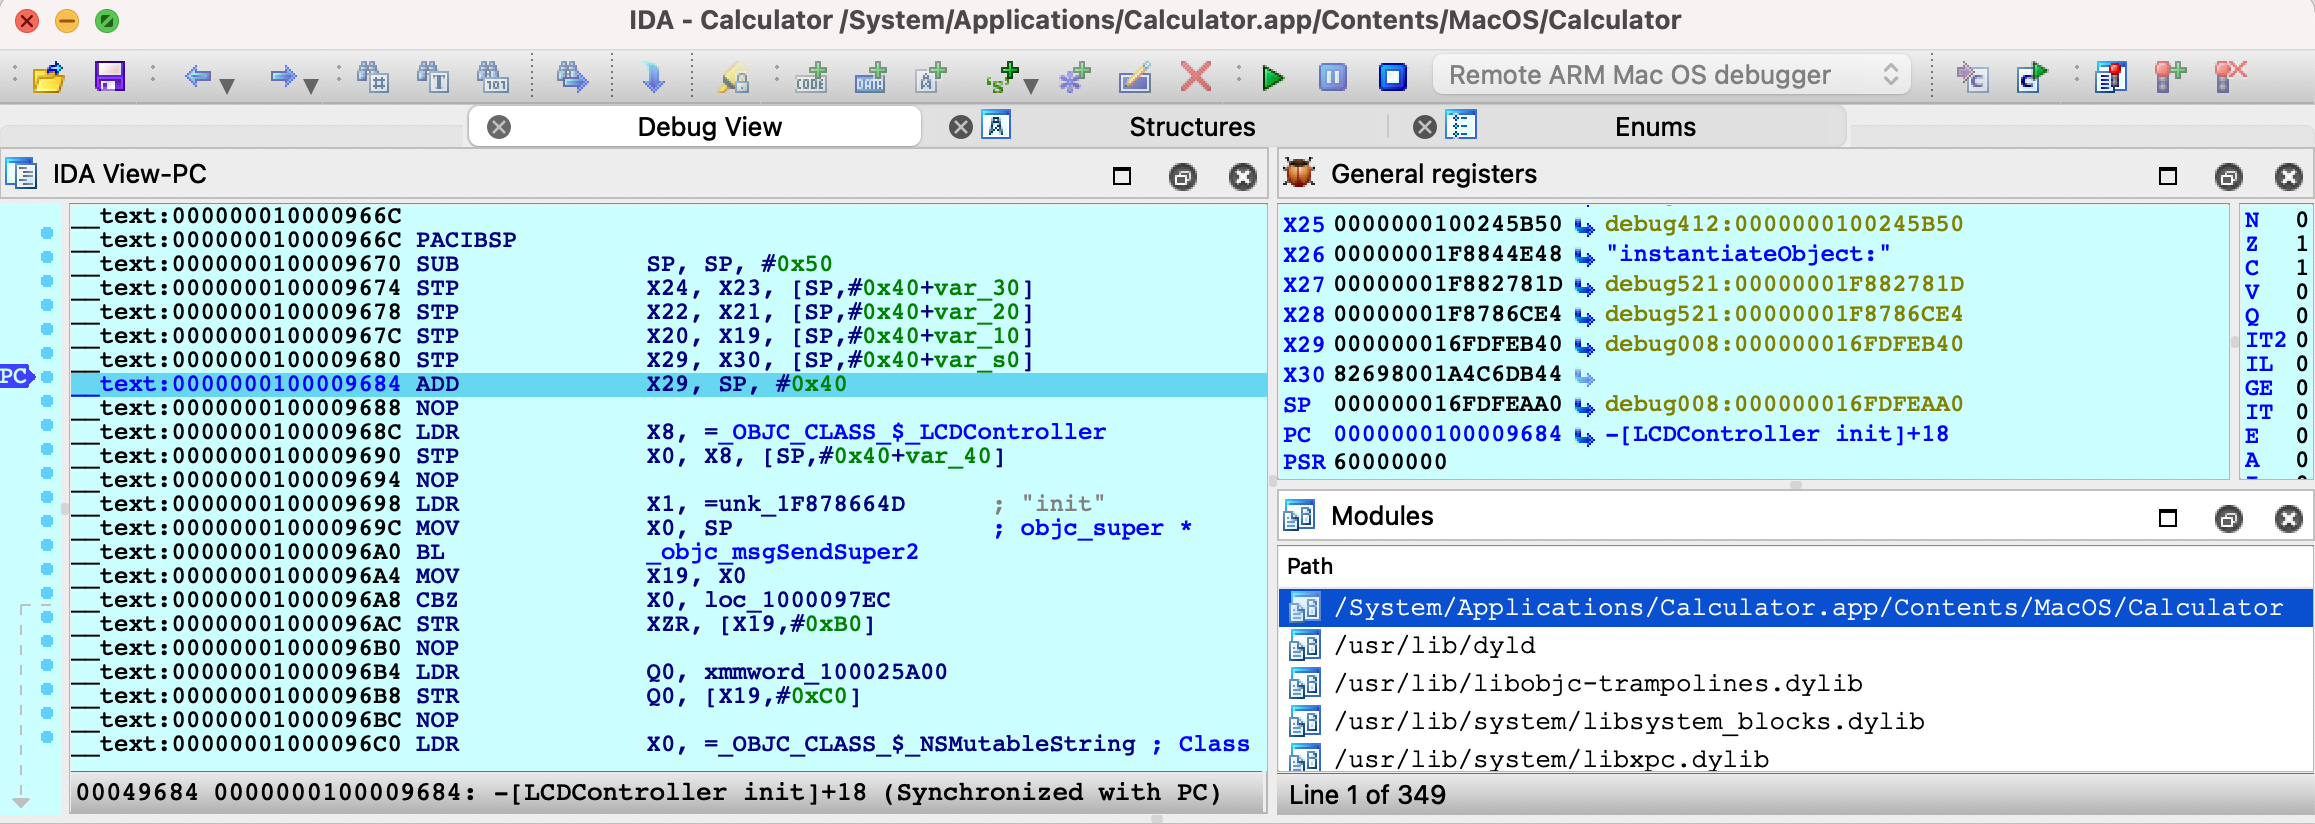
Also note that the arm64e ABI limitation means you cannot use the Local ARM Mac Debugger to debug system arm64e apps, since IDA itself is not built for arm64e. It is likely that Apple will break the arm64e ABI in the future and IDA might cease to work. We want to avoid this scenario entirely.
Using the Remote ARM Mac Debugger with mac_server_arm64e is a nice workaround. It guarantees ida.app will continue to work normally regardless of any breakages in the arm64e ABI, and we can easily ship new arm64e builds of the server to anybody who needs it.
Apple Silicon: TL;DR
To summarize:
- Use mac_server_arm64 if you’re debugging third-party arm64 apps that aren’t protected by SIP
- Use mac_server_arm64e if you’re feeling frisky and want to debug macOS system internals. You must disable SIP and enable nvram boot-args=-arm64e_preview_abi, then you can debug any app you want (arm64/arm64e apps, system/non-system apps, shouldn’t matter).
Support
If you have any questions about this writeup or encounter any issues with the debugger itself in your environment, don’t hesitate to contact our support.
Our Mac support team has years of experience keeping the debugger functional through rapid changes in the Apple developer ecosystem. It is likely that we can resolve your issue quickly.
Debugging iOS Applications using CoreDevice (iOS 17 and up)
This guide shows a walkthrough of how one can use IDA Pro to debug an app installed using Xcode on a device running iOS 17 or iOS 18. The pre-debugging setup is specific to non-jailbroken devices running iOS 18 with a macOS host but the steps in IDA can be reused for most iOS/iPadOS targets (jailbroken, Corellium) with a different platform as the host. The iOS debugger is available with all platforms IDA supports though due to Apple’s iOS tools being available on macs only, the workflow is easier on macOS.
Tested on macOS 15.0 (24A335) using Xcode 16.0 (16A242) with an iPhone 11 running iOS 18.0 (22A3354).
1. Installing an app on a non-jailbroken device
Since it’s the simplest way to install an app onto an iOS device, we’ll be using Xcode to quickly build and install a sample app onto our target device.
Create an iOS Game app by choosing the appropriate template:
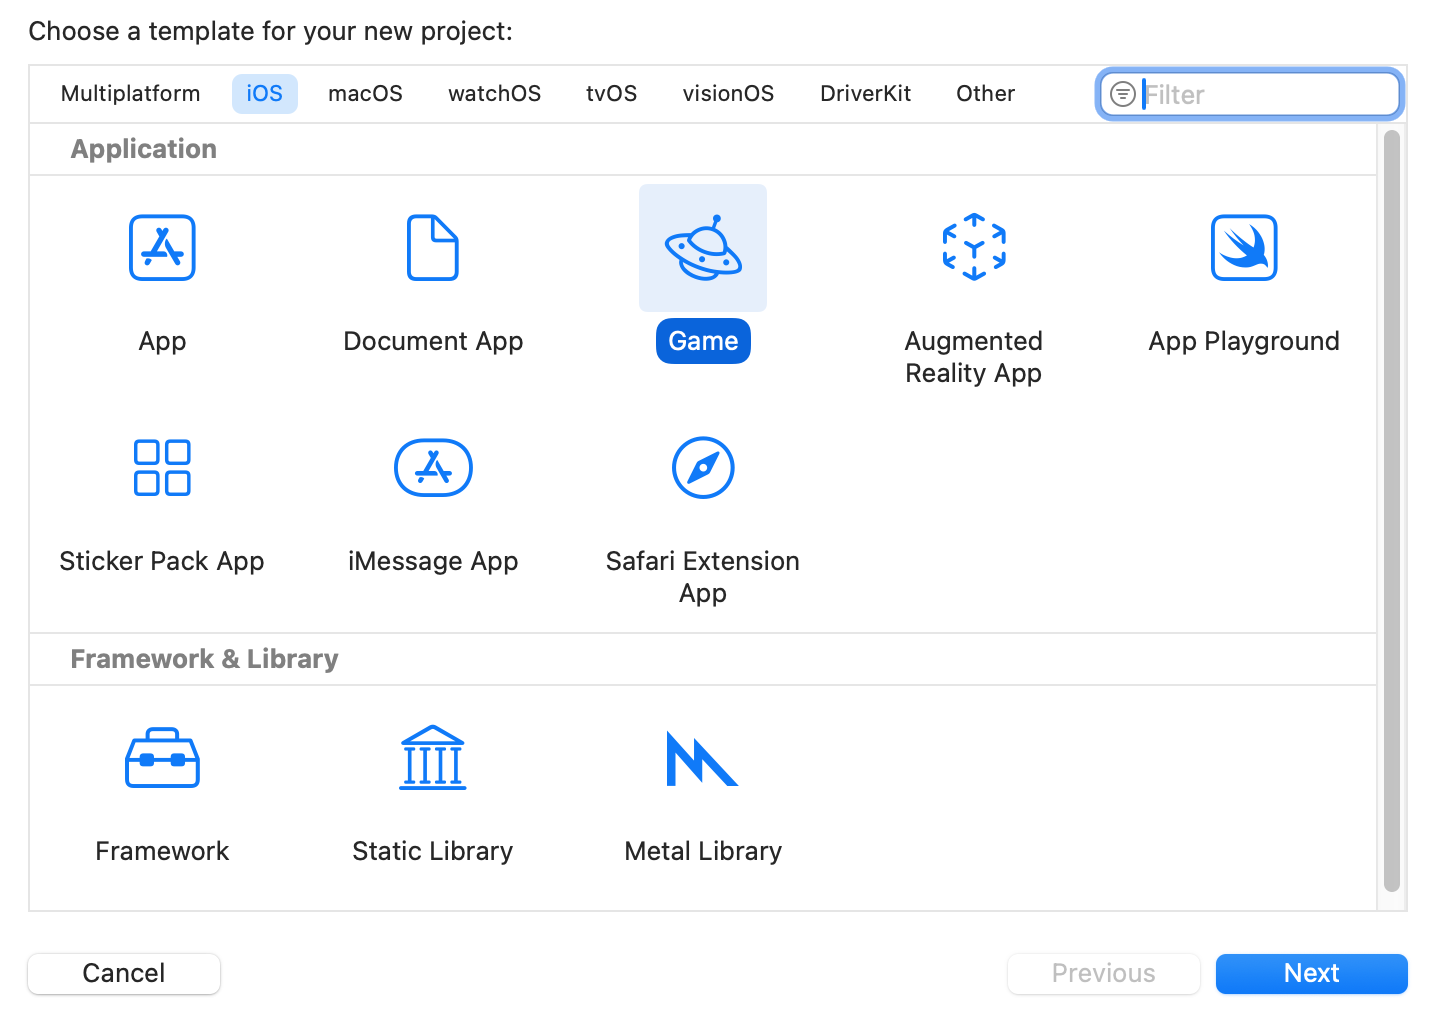
Enter a Product name, make note of the resulting Bundle Identifier. For the scope of this guide, the rest of the project options aren’t relevant.
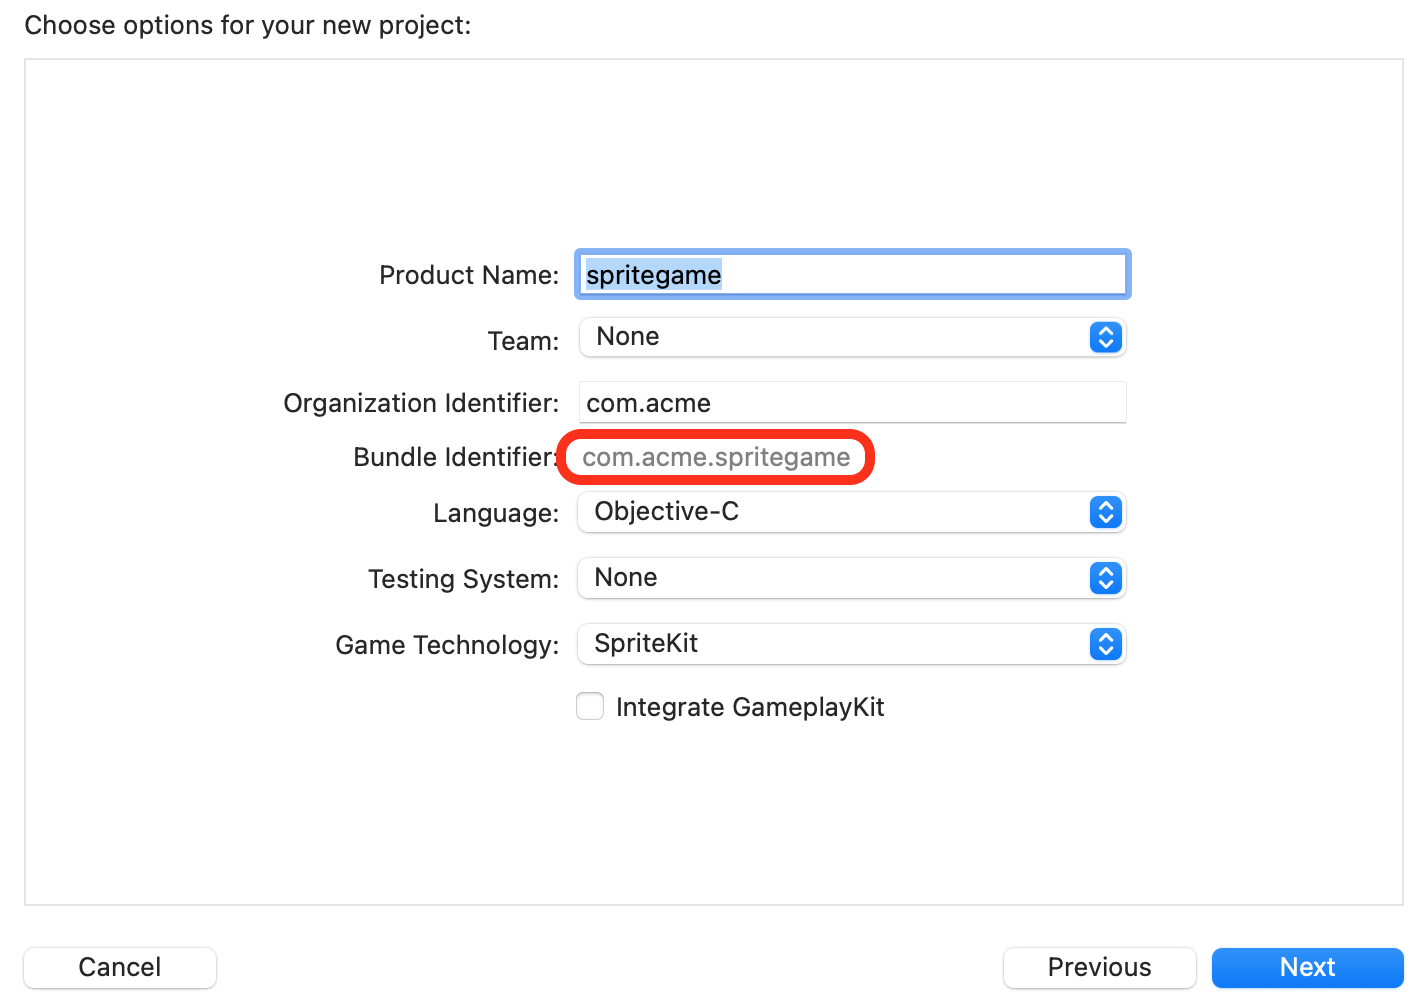
In the main Xcode window, ensure that the appropriate target device (Run Destinations) is selected.

If the device hasn’t been paired, a warning may appear requesting you to accept the “Trust” prompt on the device to pair with the host. If the device hasn’t been used for development recently, Xcode will install a Developer Disk Image to enable development services. It will also copy and extract the shared cache symbols to the host (in ~/Library/Developer/Xcode/iOS DeviceSupport/<device_and_os_version>/).
If you try to Run (clicking on the “play” icon or using CMD-R) the app, an error may appear prompting you to select a development team. Xcode requires that a developer certificate is selected for the signing of the application.

The developer team can be selected via the Signing & Capabilities editor.
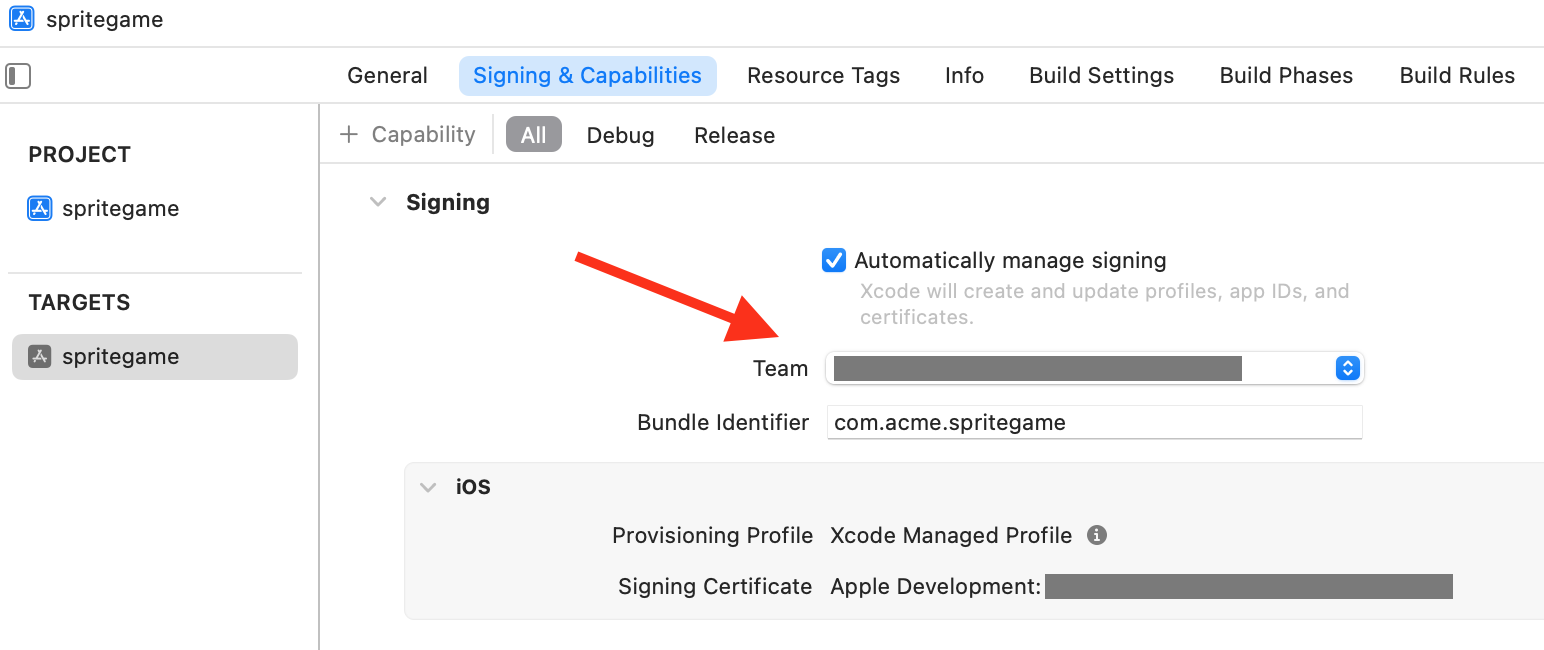
Now that a developer certificate was selected for the app, it must also be trusted on the device. If you attempt to Run the app, another warning should appear prompting you to trust the certificate on the device. (Please follow those instructions to trust that certificate)
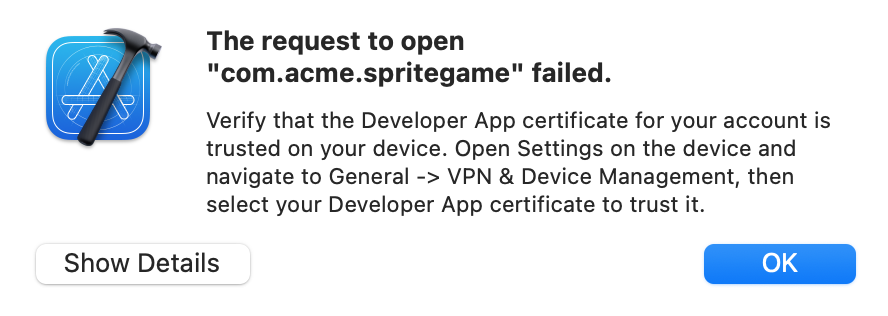
Finally, Run the app and ensure that it starts properly on the target device.
![]()
2. Setting up the debug environment, launching the app
Debugging an application on an iPhone is enabled by the debugserver that will attach to the application’s process. The debugserver communicates with clients using (an extended version of) the GDB protocol. IDA comes with an iOS debugger that can “talk” that same protocol. The techniques necessary to prepare the debugging environment on an iPhone have evolved over time (and will likely keep evolving) but fundamentally the goal is always to establish a connection with a debugserver.
The device communication stack was revamped with iOS 17. Devices expose a series of remote services (through remoted which is visible via Bonjour). One of those services is a debugproxy which is… a proxy to the debugserver. debugproxy is a secure service, it is not available to any client. To gain access to secure services, a trusted tunnel must be setup (requires the device to be paired with the host), between the host and the device (the service to set up the tunnel is itself available via remoted).
One of the primary frameworks used for these communications is CoreDevice, with it Apple also provides devicectl which is a very convenient utility that can be used to automate certain tasks to control devices. We will use devicectl to perform certain tasks such as launching an application on the device. Unfortunately devicectl doesn’t provide a direct interface to setup a trusted tunnel and retrieve ports of services exposed through it. It is however possible to reuse some commands of devicectl to create a tunnel and keep it open. In addition, the ports of services are written to system logs after the tunnel is set up so we can recover them with a few tricks.
To make commands provided below immediately usable, we’ll define two helper environment variables. The device name is the same as the one that was used for the target device in Xcode, it can also be found using xcrun devicectl list devices. The bundle identifier is the identifier of the application we’d like to debug
export DEVICE_NAME="red_iphone11"
export BUNDLE_ID="com.acme.spritegame"
Trigger the creation of a trusted tunnel
To request the creation of the trusted tunnel, the devicectl device notification observe command was selected because it can keep the tunnel open for an arbitrary amount of time (controlled using the timeout). Here the name for the Darwin notification (‘foobar’) to observe is one that will presumably never be posted. The timeout (3000[s]) was chosen to be long enough for a debugging session.
Retrieve the details of the debugproxy service (provided through the trusted tunnel) from the system logs. The command below will filter for the specific log messages we’re looking for (ipv6 address of device through tunnel and port of debugproxy service). In short log show (see log(1)) will show messages from the system logs; --last 5m will limit the search to the past 5 minutes (the tunnel should have been created when the previous command was started so 5 minutes ought to be enough); The messages we’re looking for are “Info” messages so --info is necessary; --predicate is used for message filters.
log show --last 5m --info --predicate '((eventMessage CONTAINS "Adding remote service") && (eventMessage CONTAINS "debugproxy")) || (eventMessage CONTAINS "Tunnel established - interface")' --style compact
NOTE: if no log messages match the filter, it is recommended to force the recreation of the tunnel
- kill the
remotepairingddaemon:sudo pkill -9 remotepairingd- retry previous two steps
Some applications can keep the tunnel open, examples: Xcode, Console and Safari. It is preferable to close them before creating the tunnel. If multiple sets of messages match the filter (with different connection details), only the last one should be considered (previous connections would likely be stale).
2024-09-23 10:04:31.396 Df remotepairingd[1067:8211ab] [com.apple.dt.remotepairing:remotepairingd] device-138 (00008030-000D3988119A802E): Tunnel established - interface: utun5, local fd57:8329:afda::2-> remote fd57:8329:afda::1
2024-09-23 10:04:31.422 I remoted[342:81eff3] [com.apple.RemoteServiceDiscovery:remoted] coredevice-15> Adding remote service "com.apple.internal.dt.remote.debugproxy": {
Properties => {
Features => [<capacity = 1>
0: com.apple.coredevice.feature.debugserverproxy
]
ServiceVersion => 1
UsesRemoteXPC => true
}
Entitlement => com.apple.private.CoreDevice.canDebugApplicationsOnDevice
Port => 49350
}
The relevant pieces of information in the messages are:
remote fd57:8329:afda::1 in the first message and Port => 49350 in the second message.
TIP: There are some really good third party tools out there such as DoronZ’s pymobiledevice3 that reimplement the necessary machinery to create a trusted tunnel and make services available.
Launch the app (--start-stopped will make it wait at the process entry point)
xcrun devicectl device process launch -d $DEVICE_NAME --start-stopped $BUNDLE_ID
Retrieve the PID of the process.
xcrun devicectl device info processes -d $DEVICE_NAME | grep $(awk '{print A[split($1, A, "\.")]}' <<< $BUNDLE_ID)
820 /private/var/containers/Bundle/Application/4629EEFD-0AD5-4B3C-B773-FD7D643BC376/spritegame.app/spritegame
We have now created a trusted tunnel, found the connection details necessary for the debugproxy, launched an app and fetched its PID.
3. Debugging in IDA
Open the application executable (typically located in ~/Library/Developer/Xcode/DerivedData/<project_id>/Build/Products/Debug-iphoneos/<appname>.app/<appname>, the path to the build folder can also be retrieved via Xcode Product>Copy Build Folder Path) in IDA.
Open the Debugger>Process options.. dialog.
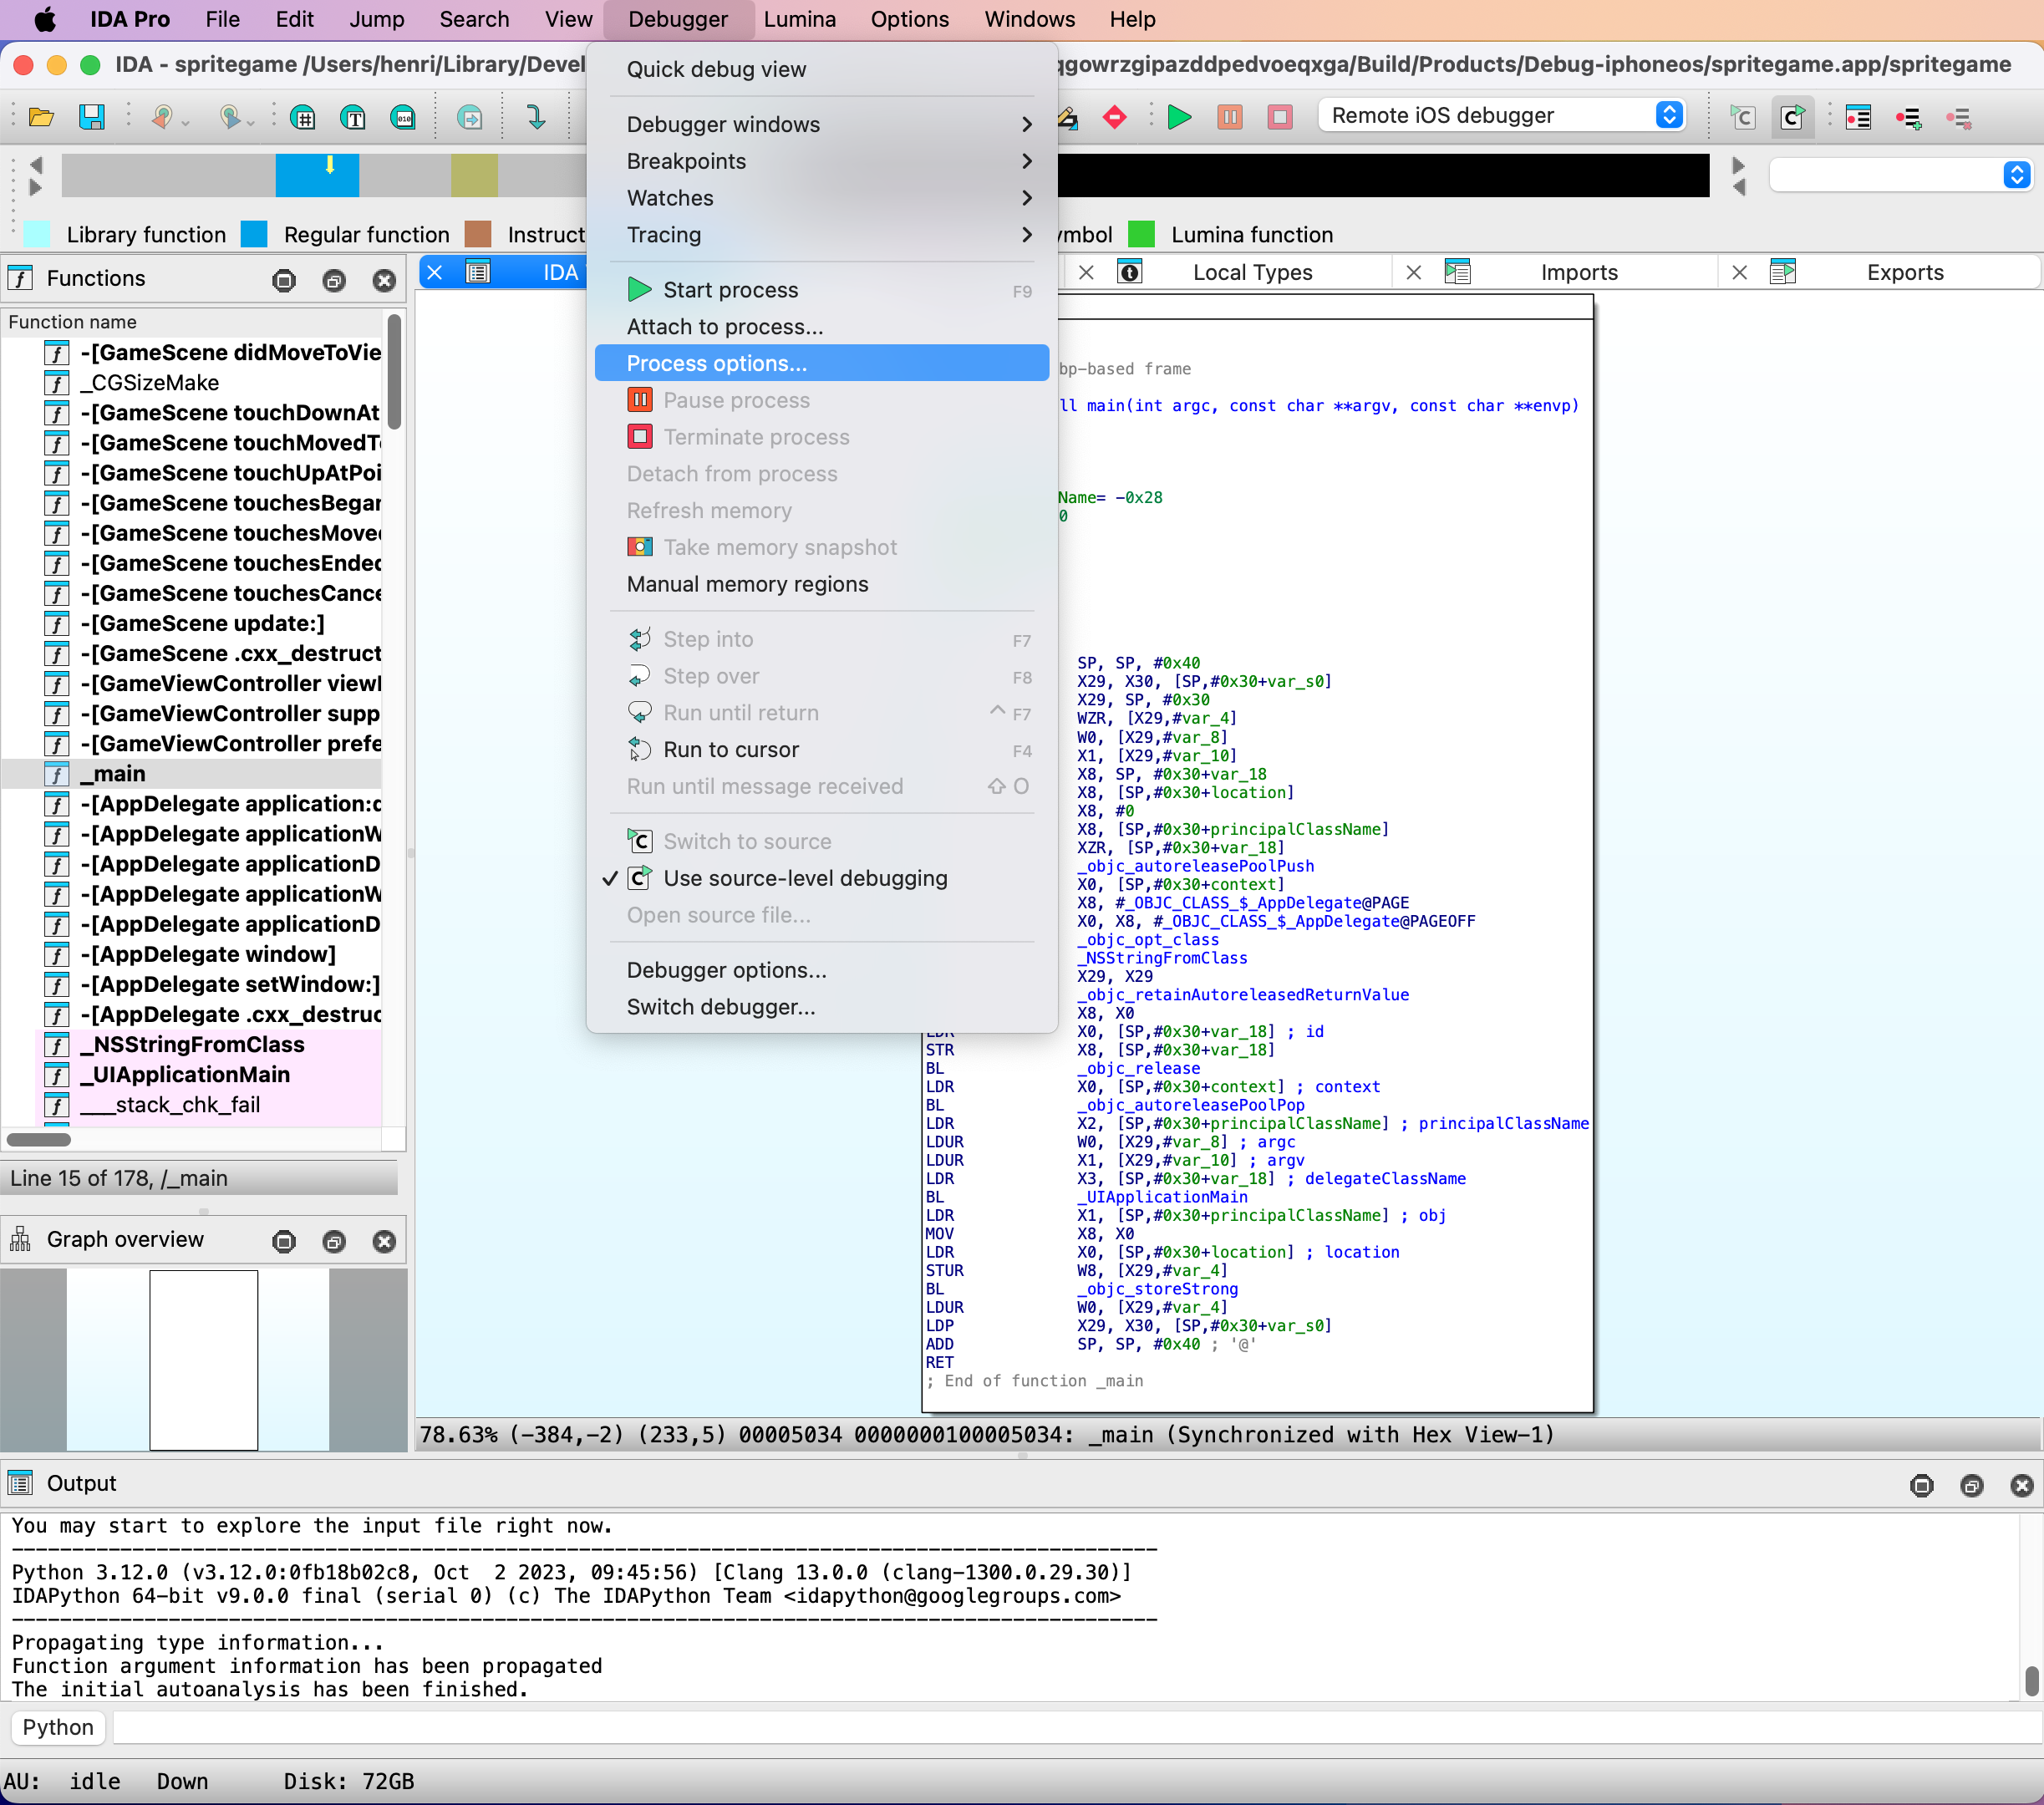
Fill-in the Hostname (address) and Port of the debugproxy. Please use the ones retrieved from the system logs earlier.
The Application and Parameters fields can safely be ignored since we’ll be attaching to a process. For this example the input file is the main executable for the application, as such the Input file field doesn’t need to be modified.
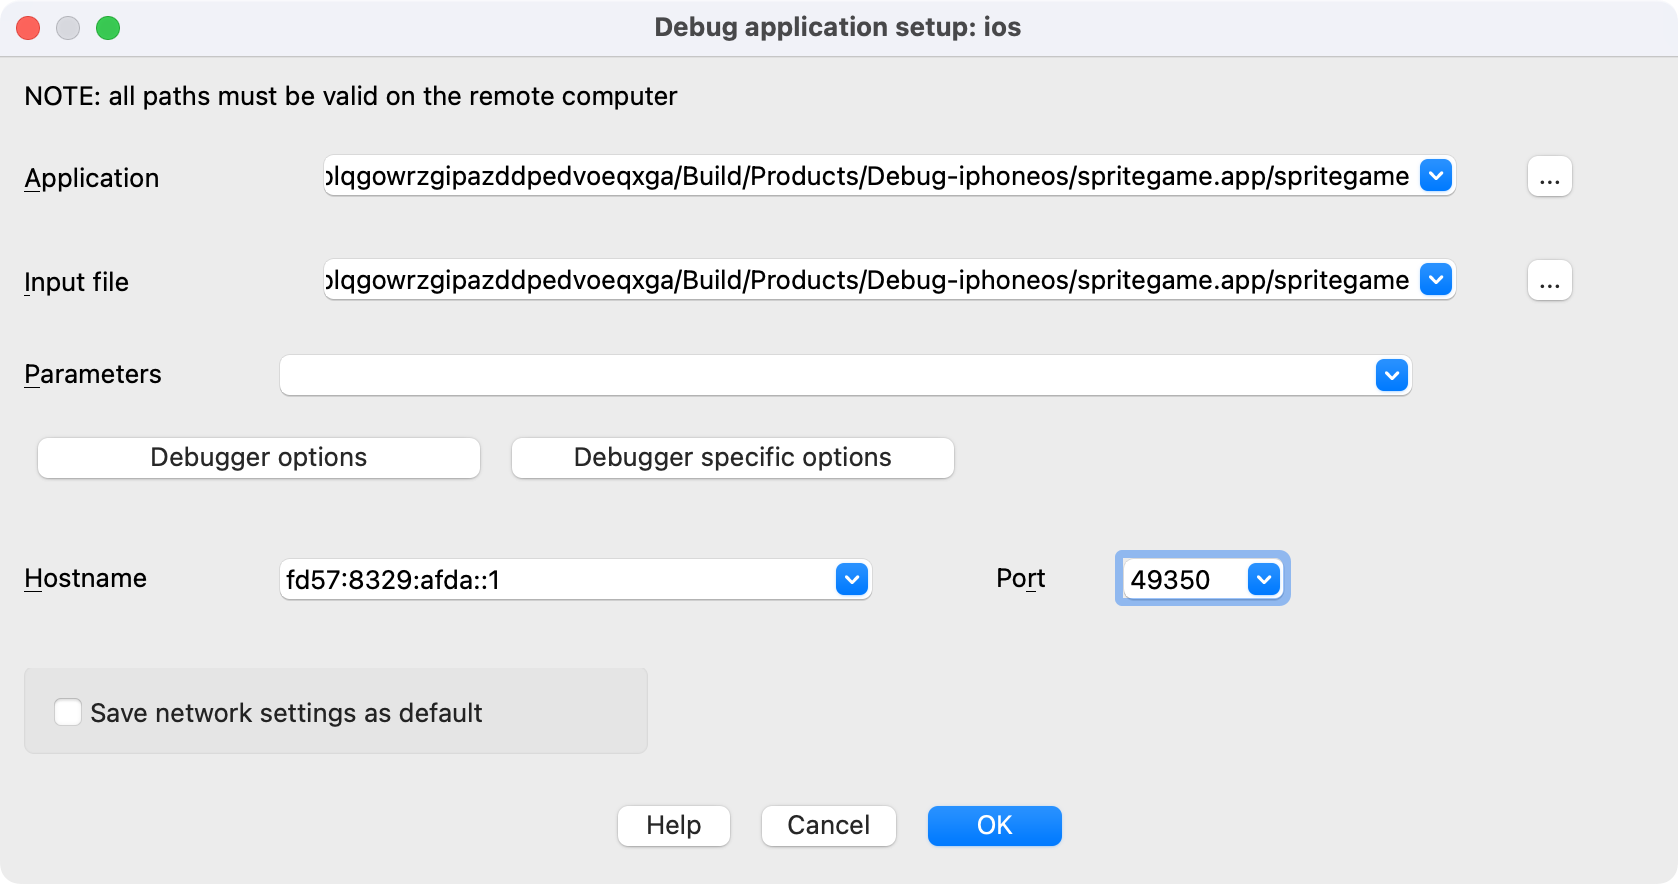
Open the Debugger specific options.
IDA can speed up the loading of shared cache symbols if they have been copied and extracted to the host machine, it is highly recommended to provide the Symbol path (normally ~/Library/Developer/Xcode/iOS DeviceSupport/<device_and_os_version>/Symbols). Launch debugserver automatically should be disabled as it is used to communicate with devices using the MobileDevice framework (no longer a viable option as of iOS 17). Accept this dialog.
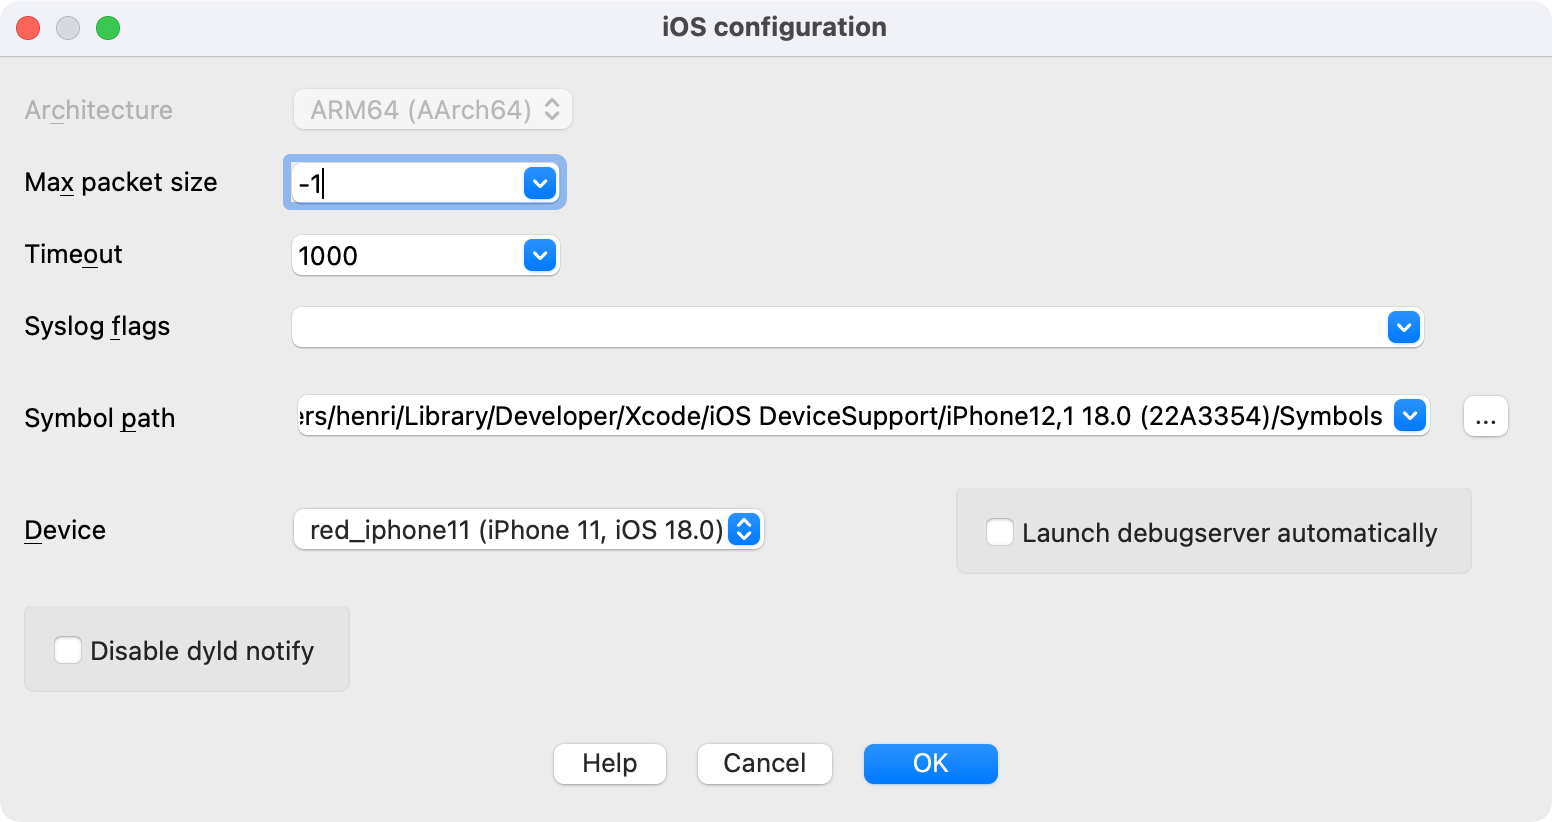
Optionally, open the Debugger options and enable Suspend on debugging start. The Debugger setup dialog can then be closed as well as the Debug application setup dialog.
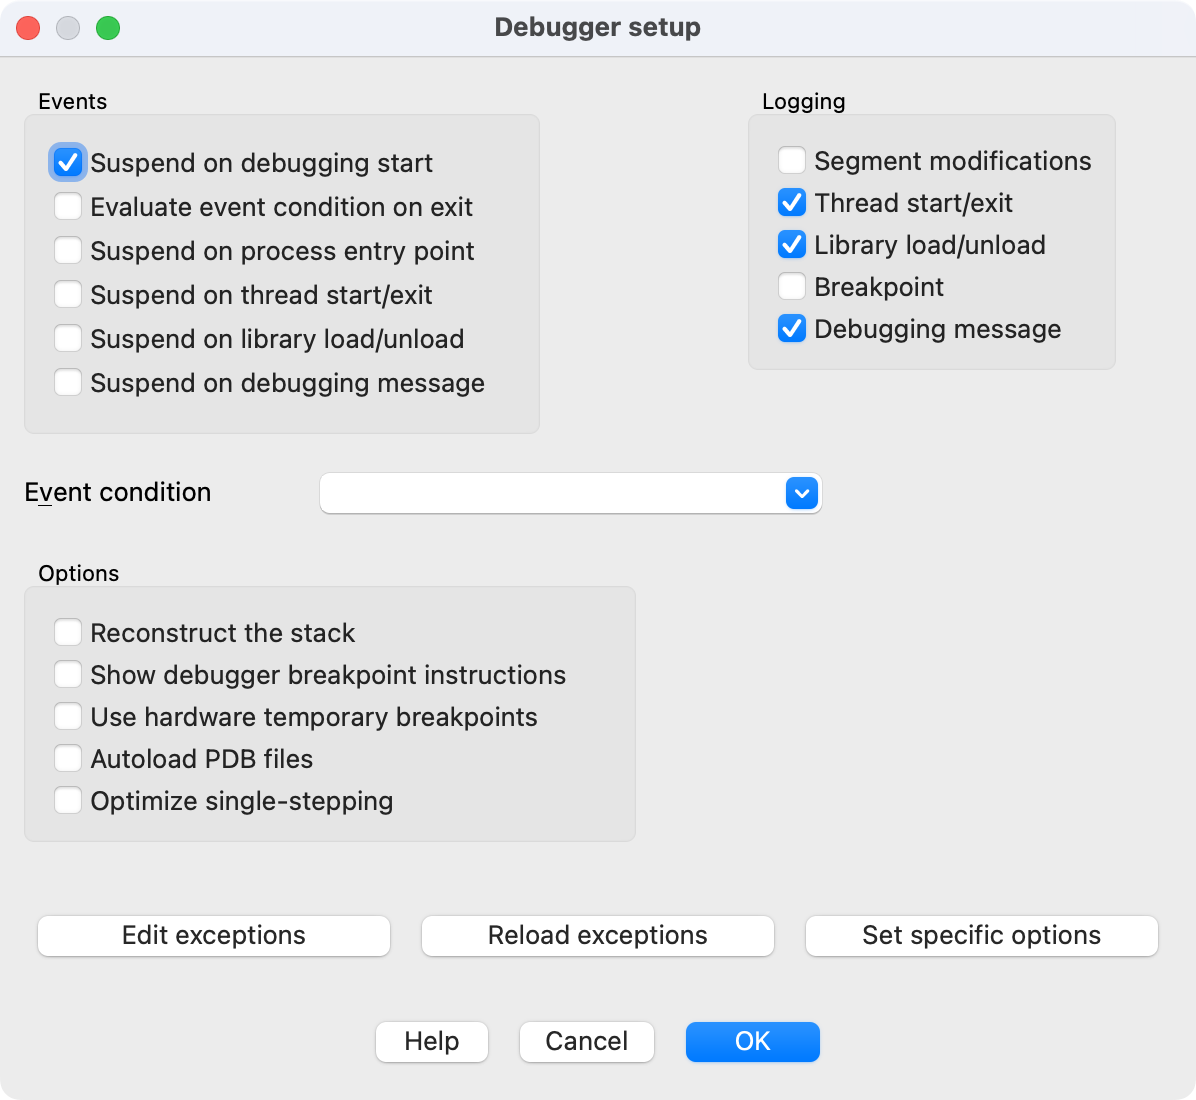
Now that the necessary connection details have been given to IDA, we can attach to the target process.
Open Debugger>Attach to process… We will provide the PID manually so accept this dialog.
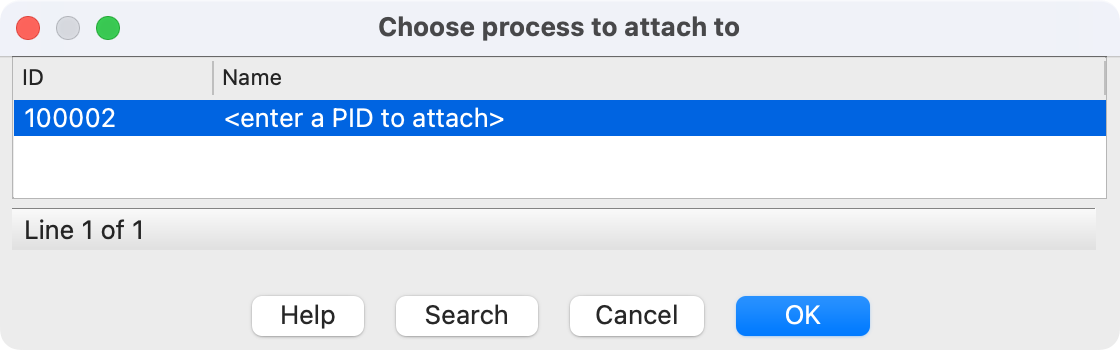
Enter the PID of the target process retrieved earlier using devicectl and accept this dialog.
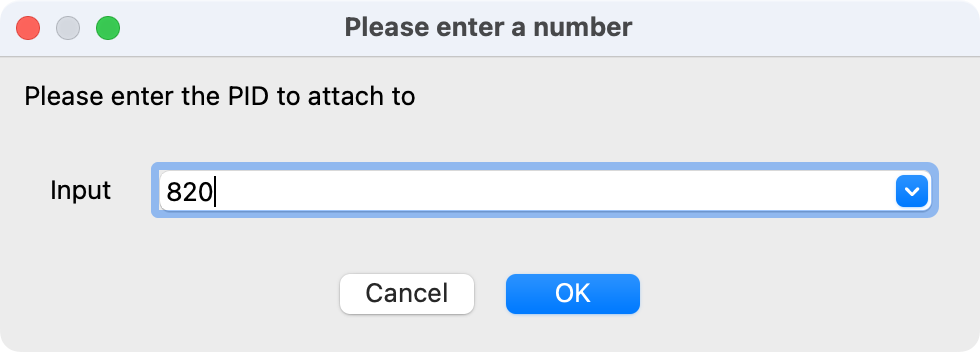
Profit! The Debugging session should start.
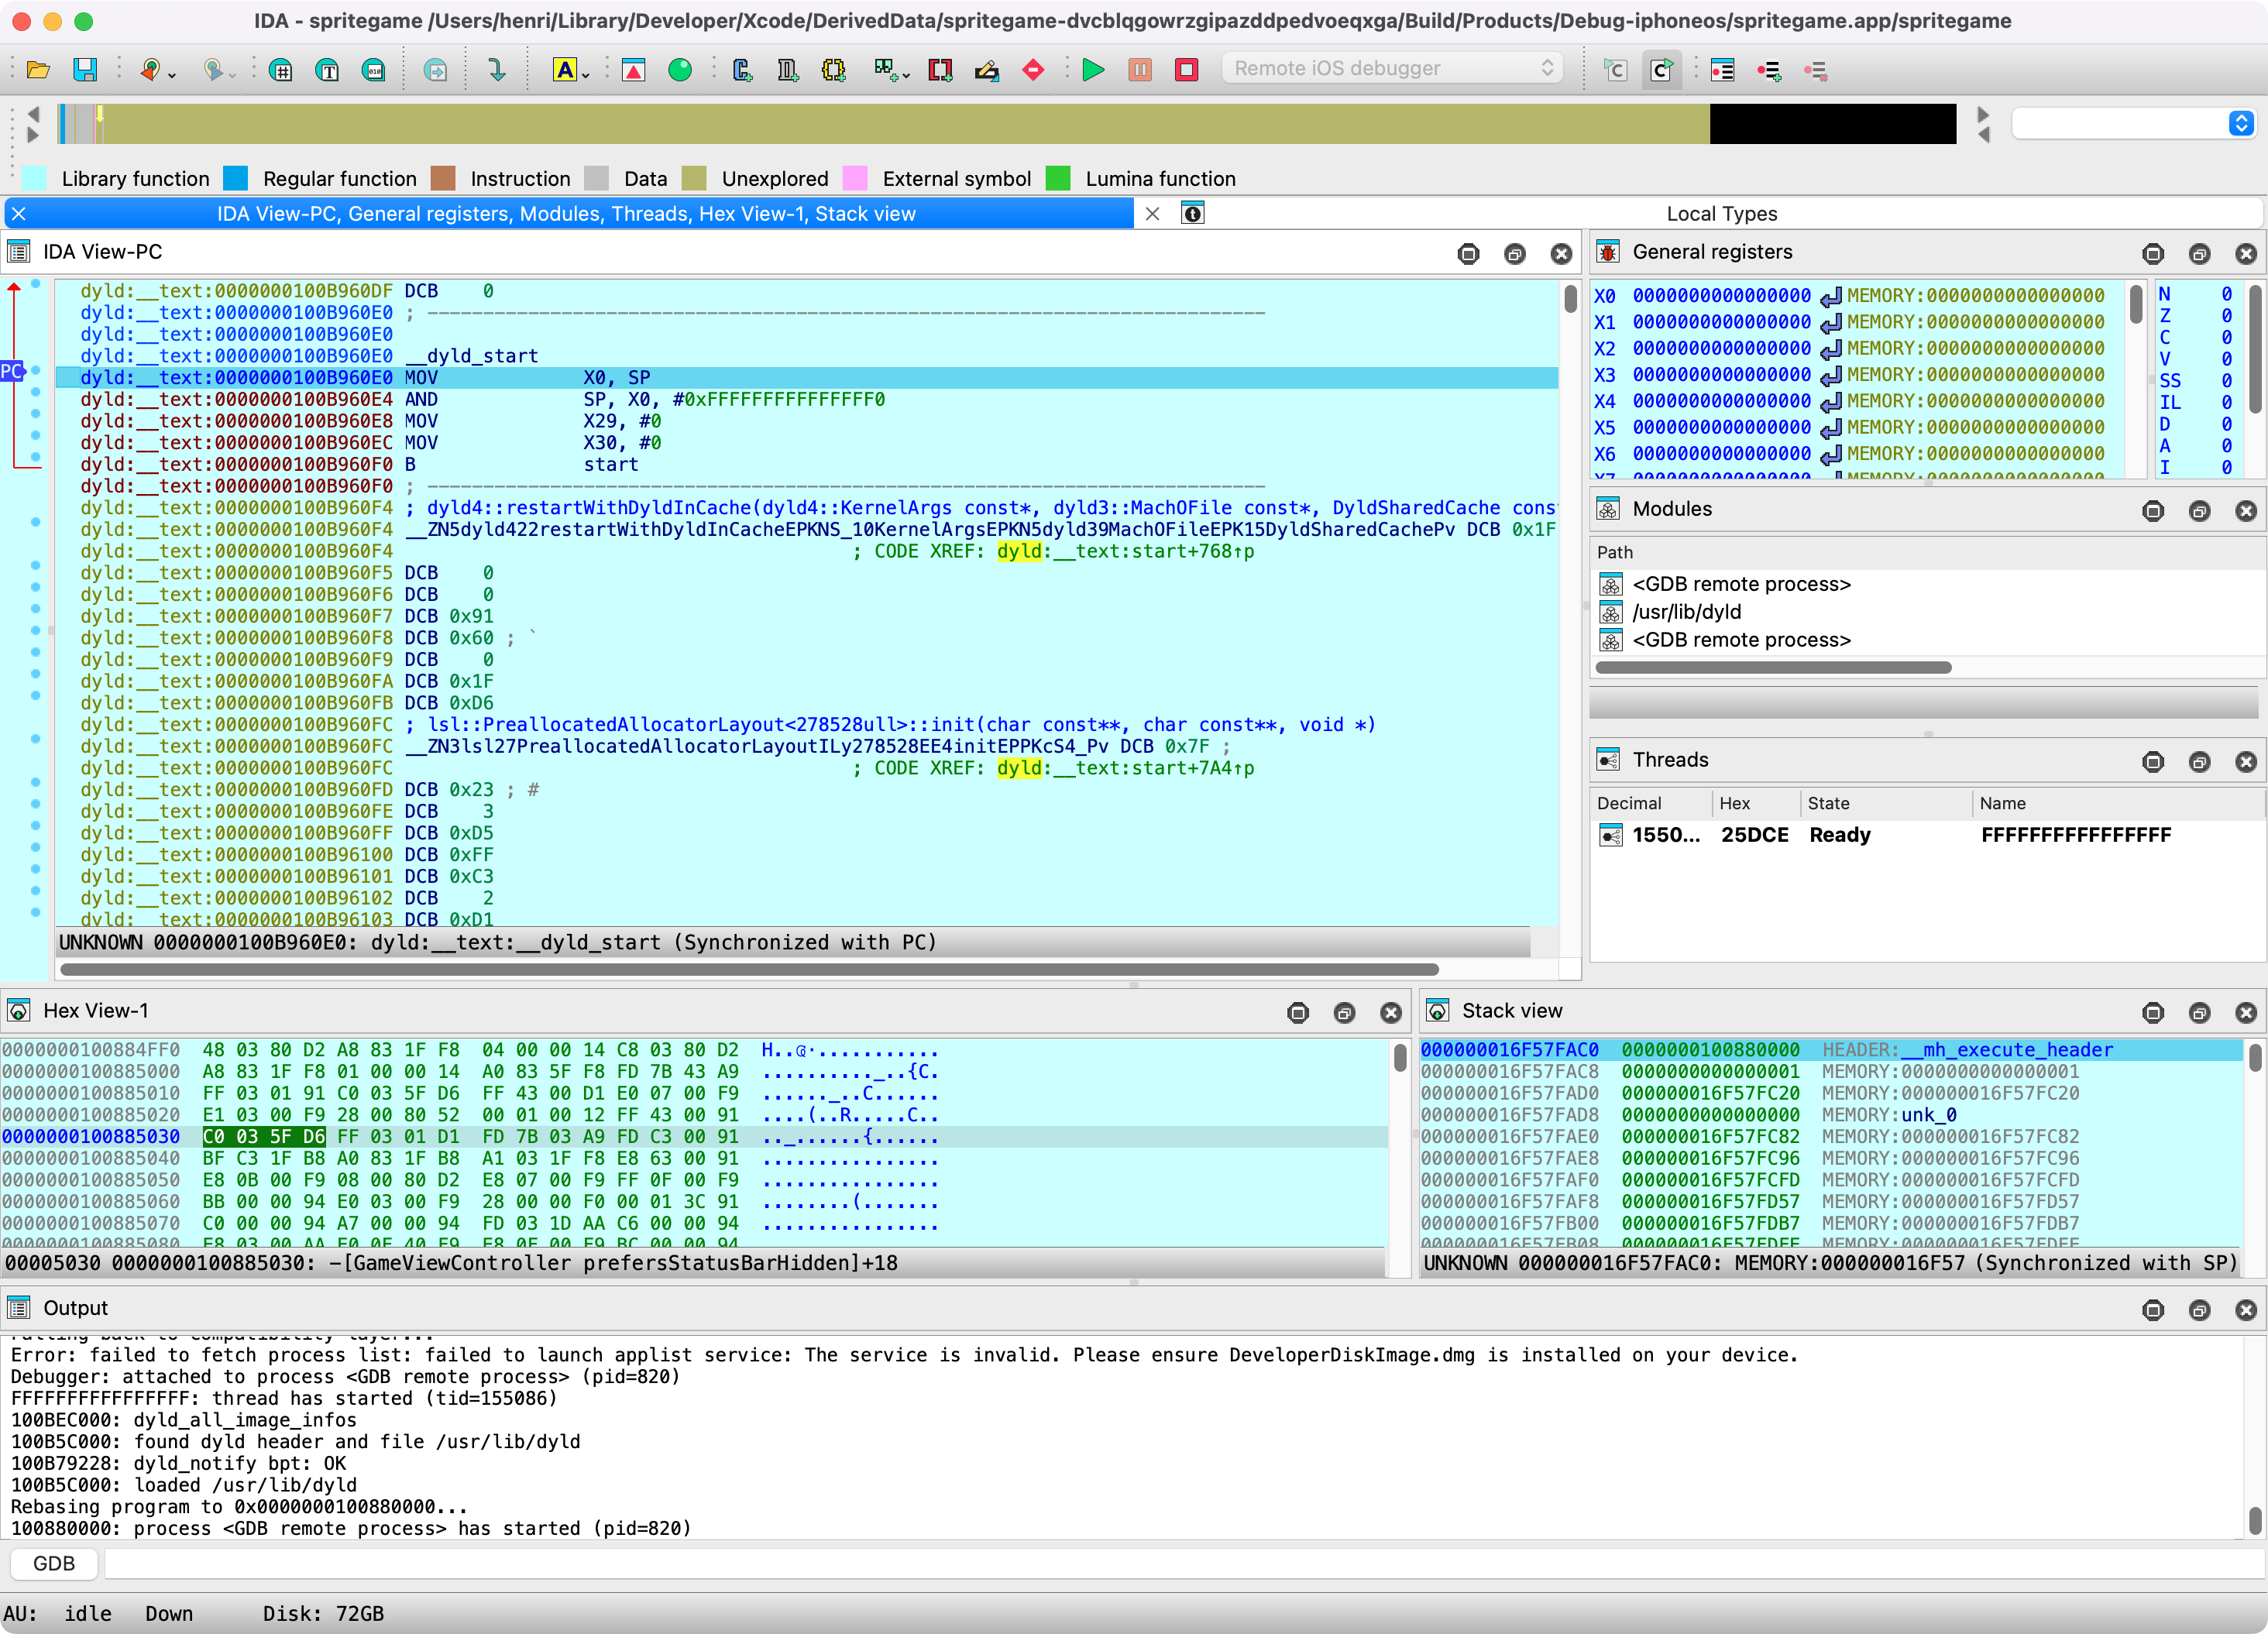
Debugging iOS Applications with IDA Pro
Copyright 2020 Hex-Rays SA
Overview
This tutorial discusses optimal strategies for debugging native iOS applications with IDA Pro.
IDA Pro supports remote debugging on any iOS version since iOS 9 (including iPadOS). Debugging is generally device agnostic so it shouldn’t matter which hardware you’re using as long as it’s running iOS. The debugger itself can be used on any desktop platform that IDA supports (Mac/Windows/Linux), although using the debugger on Mac makes more features available.
Note that IDA supports debugging on both jailbroken and non-jailbroken devices. Each environment provides its own unique challenges and advantages, and we will discuss both in detail in this writeup.
Getting Started
The quickest way to get started with iOS debugging is to use Xcode to install a sample app on your device, then switch to IDA to debug it.
In this example we’ll be using an iPhone SE 2 with iOS 13.4 (non-jailbroken) while using IDA 7.5 SP1 on OSX 10.15 Catalina. Start by launching Xcode and use menu File>New>Project… to create a new project from one of the iOS templates, any of them will work:
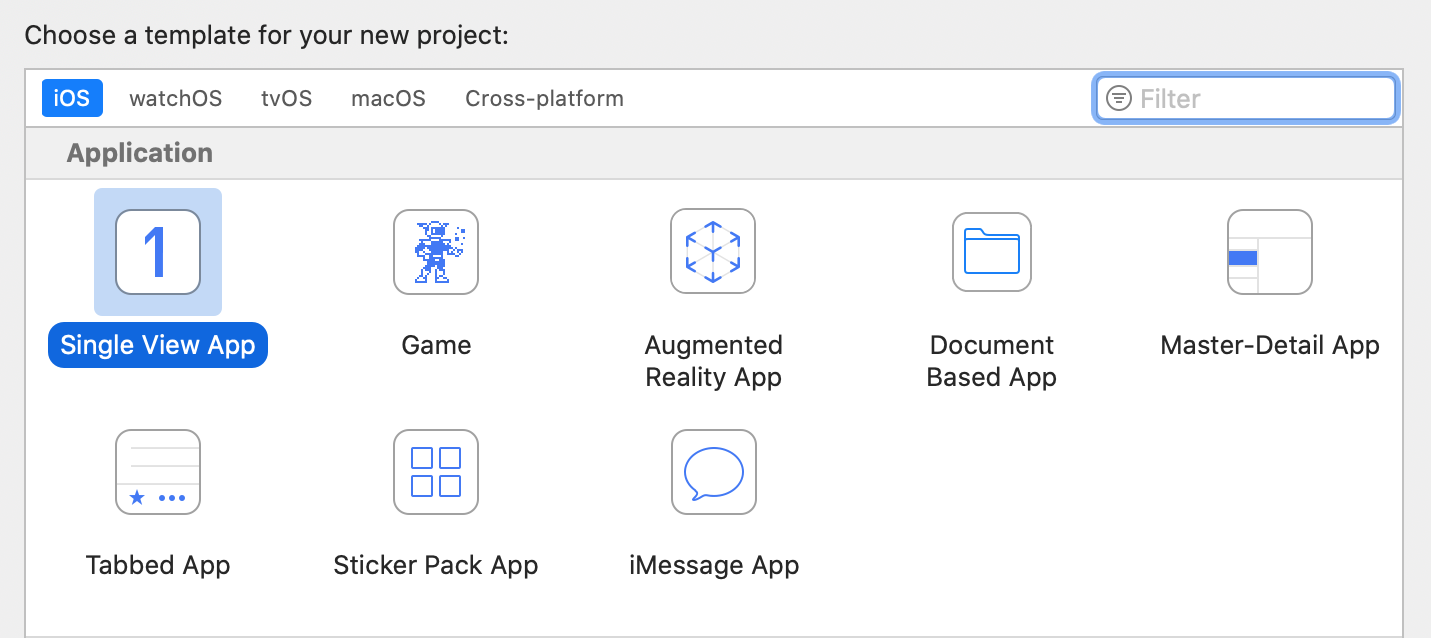
After selecting a template, set the following project options:

Note the bundle identifier primer.idatest, it will be important later. For the Team option choose the team associated with your iOS Developer account, and click OK. Before building be sure to set the target device in the top left of the Xcode window:

Now launch the build in Xcode. If it succeeds then Xcode will install the app on your device automatically.
Preparing a Debugging Environment
Now that we have a test app installed on our device, let’s prepare to debug it. First we must ensure that the iOS debugserver is installed on the device. Since our device is not jailbroken, this is not such a trivial task. By default iOS restricts all remote access to the device, and such operations are managed by special MacOS Frameworks.
Fortunately Hex-Rays provides a solution. Download the ios_deploy utility from our download center. This is a command-line support utility that can perform critical tasks on iOS devices without requiring a jailbreak. Try running it with the listen phase. If ios_deploy can detect your device it will print a message:
$ ios_deploy listen
Device connected:
- name: iPhone SE 2
- model: iPhone SE 2
- ios ver: 13.4
- build: 17E8255
- arch: arm64e
- id: XXXXXXXX-XXXXXXXXXXXXXXXX
Use the mount phase to install DeveloperDiskImage.dmg, which contains the debugserver:
$ export DEVELOPER=/Applications/Xcode.app/Contents/Developer
$ export DEVTOOLS=$DEVELOPER/Platforms/iPhoneOS.platform/DeviceSupport
$ ios_deploy mount -d $DEVTOOLS/13.4/DeveloperDiskImage.dmg
The device itself is now ready for debugging. Now let’s switch to IDA and start configuring the debugger. Load the idatest binary in IDA, Xcode likely put it somewhere in its DerivedData directory:
$ alias ida64="/Applications/IDA\ Pro\ 7.5\ sp1/ida64.app/Contents/MacOS/ida64"
$ export XCDATA=~/Library/Developer/Xcode/DerivedData
$ ida64 $XCDATA/idatest/Build/Products/Debug-iphoneos/idatest.app/idatest
Then go to menu Debugger>Select debugger… and select Remote iOS Debugger:
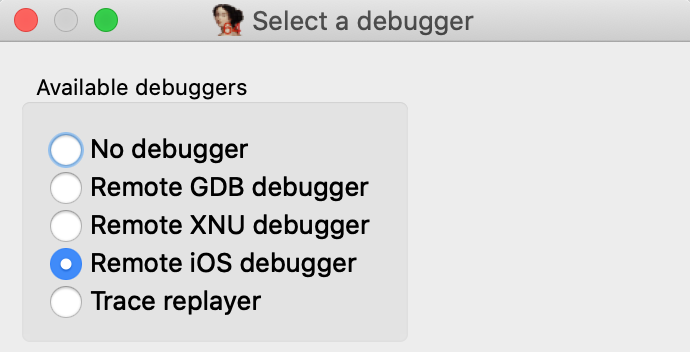
When debugging a binary remotely, IDA must know the full path to the executable on the target device. This is another task that iOS makes surprisingly difficult. Details of the filesystem are not advertised, so we must use ios_deploy to retrieve the executable path. Use the path phase with the app’s bundle ID:
$ ios_deploy path -b primer.idatest
/private/var/containers/Bundle/Application/<UUID>/idatest.app/idatest
Use this path for the fields in Debugger>Process options… 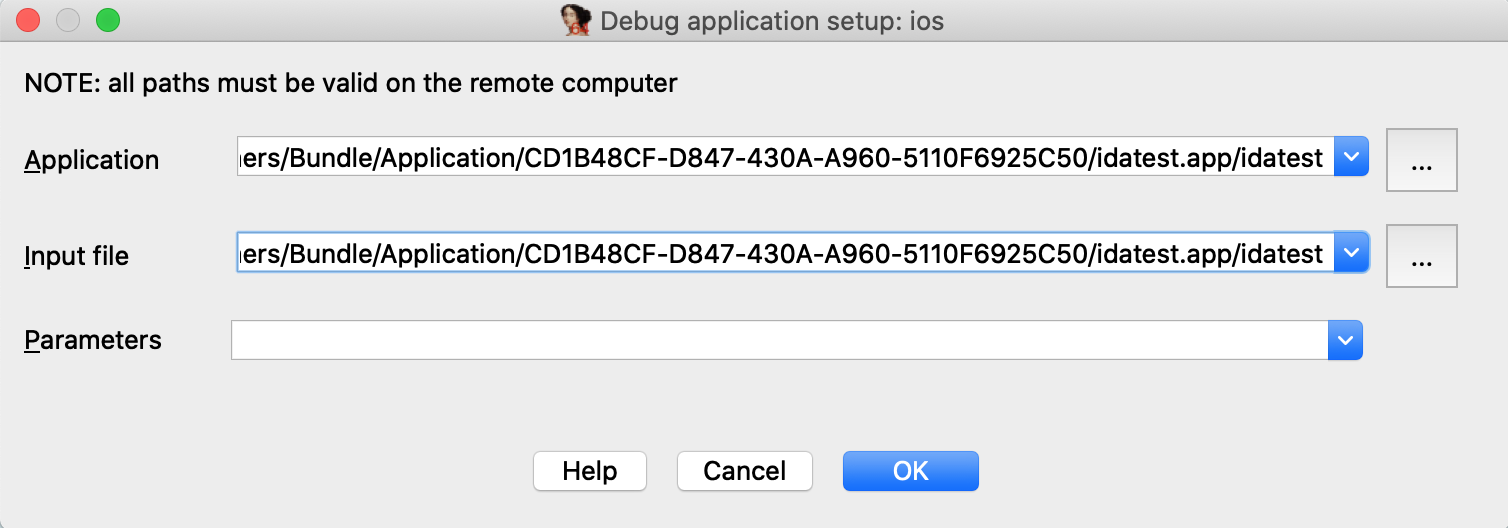
NOTE: the path contains a hex string representing the application’s 16-byte UUID. This id is regenerated every time you reinstall the app, so you must update the path in IDA whenever the app is updated on the device.
Now go to Debugger>Debugger options>Set specific options… and ensure the following fields are set:
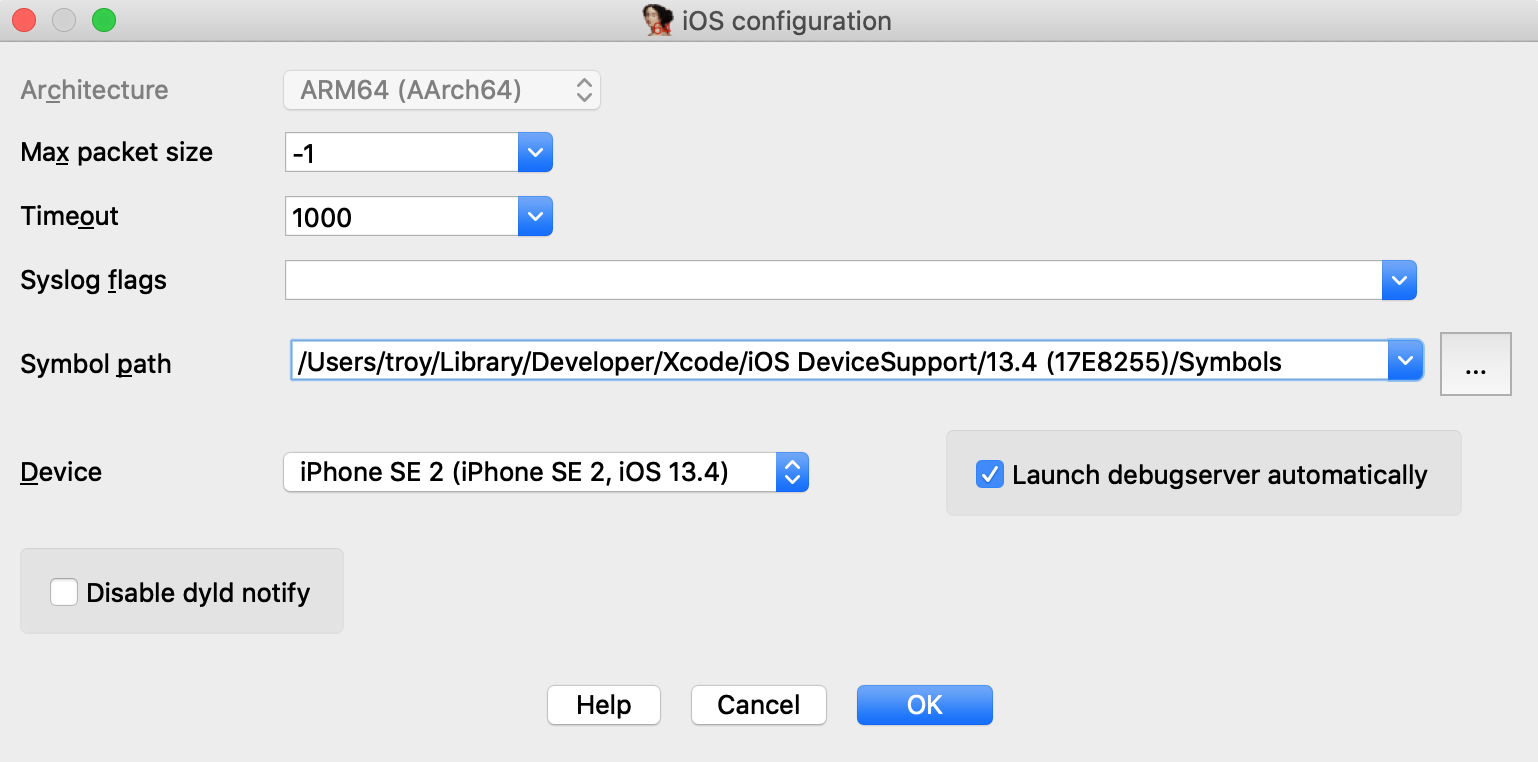
Make special note of the Symbol path option. This directory contains symbol files extracted from your device. Both IDA and Xcode use these files to load symbol tables for system libraries during debugging (instead of reading the tables in process memory), which will dramatically speed up debugging.
Xcode likely already created this directory when it first connected to your device, but if not you can always use ios_deploy to create it yourself:
$ ios_deploy symbols
Downloading /usr/lib/dyld
Downloading 0.69 MB of 0.69 MB
Downloading /System/Library/Caches/com.apple.dyld/dyld_shared_cache_arm64e
Downloading 1648.38 MB of 1648.38 MB
Extracting symbol file: 1866/1866
/Users/troy/Library/Developer/Xcode/iOS DeviceSupport/13.4 (17E8255)/Symbols: done
Also ensure that the Launch debugserver automatically option is checked. This is required for non-jailbroken devices since we have no way to launch the server manually. This option instructs IDA to establish a connection to the debugserver itself via the MacOS Frameworks, which will happen automatically at debugging start.
Lastly, Xcode might have launched the test application after installing it. Use the proclist phase to retreive the app’s pid and terminate it with the kill phase:
$ ios_deploy proclist -n idatest
32250
$ ios_deploy kill -p 32250
Finally we are ready to launch the debugger. Go to main in IDA’s disassembly view, use F2 to set a breakpoint, then F9 to launch the process, and wait for the process to hit our breakpoint:
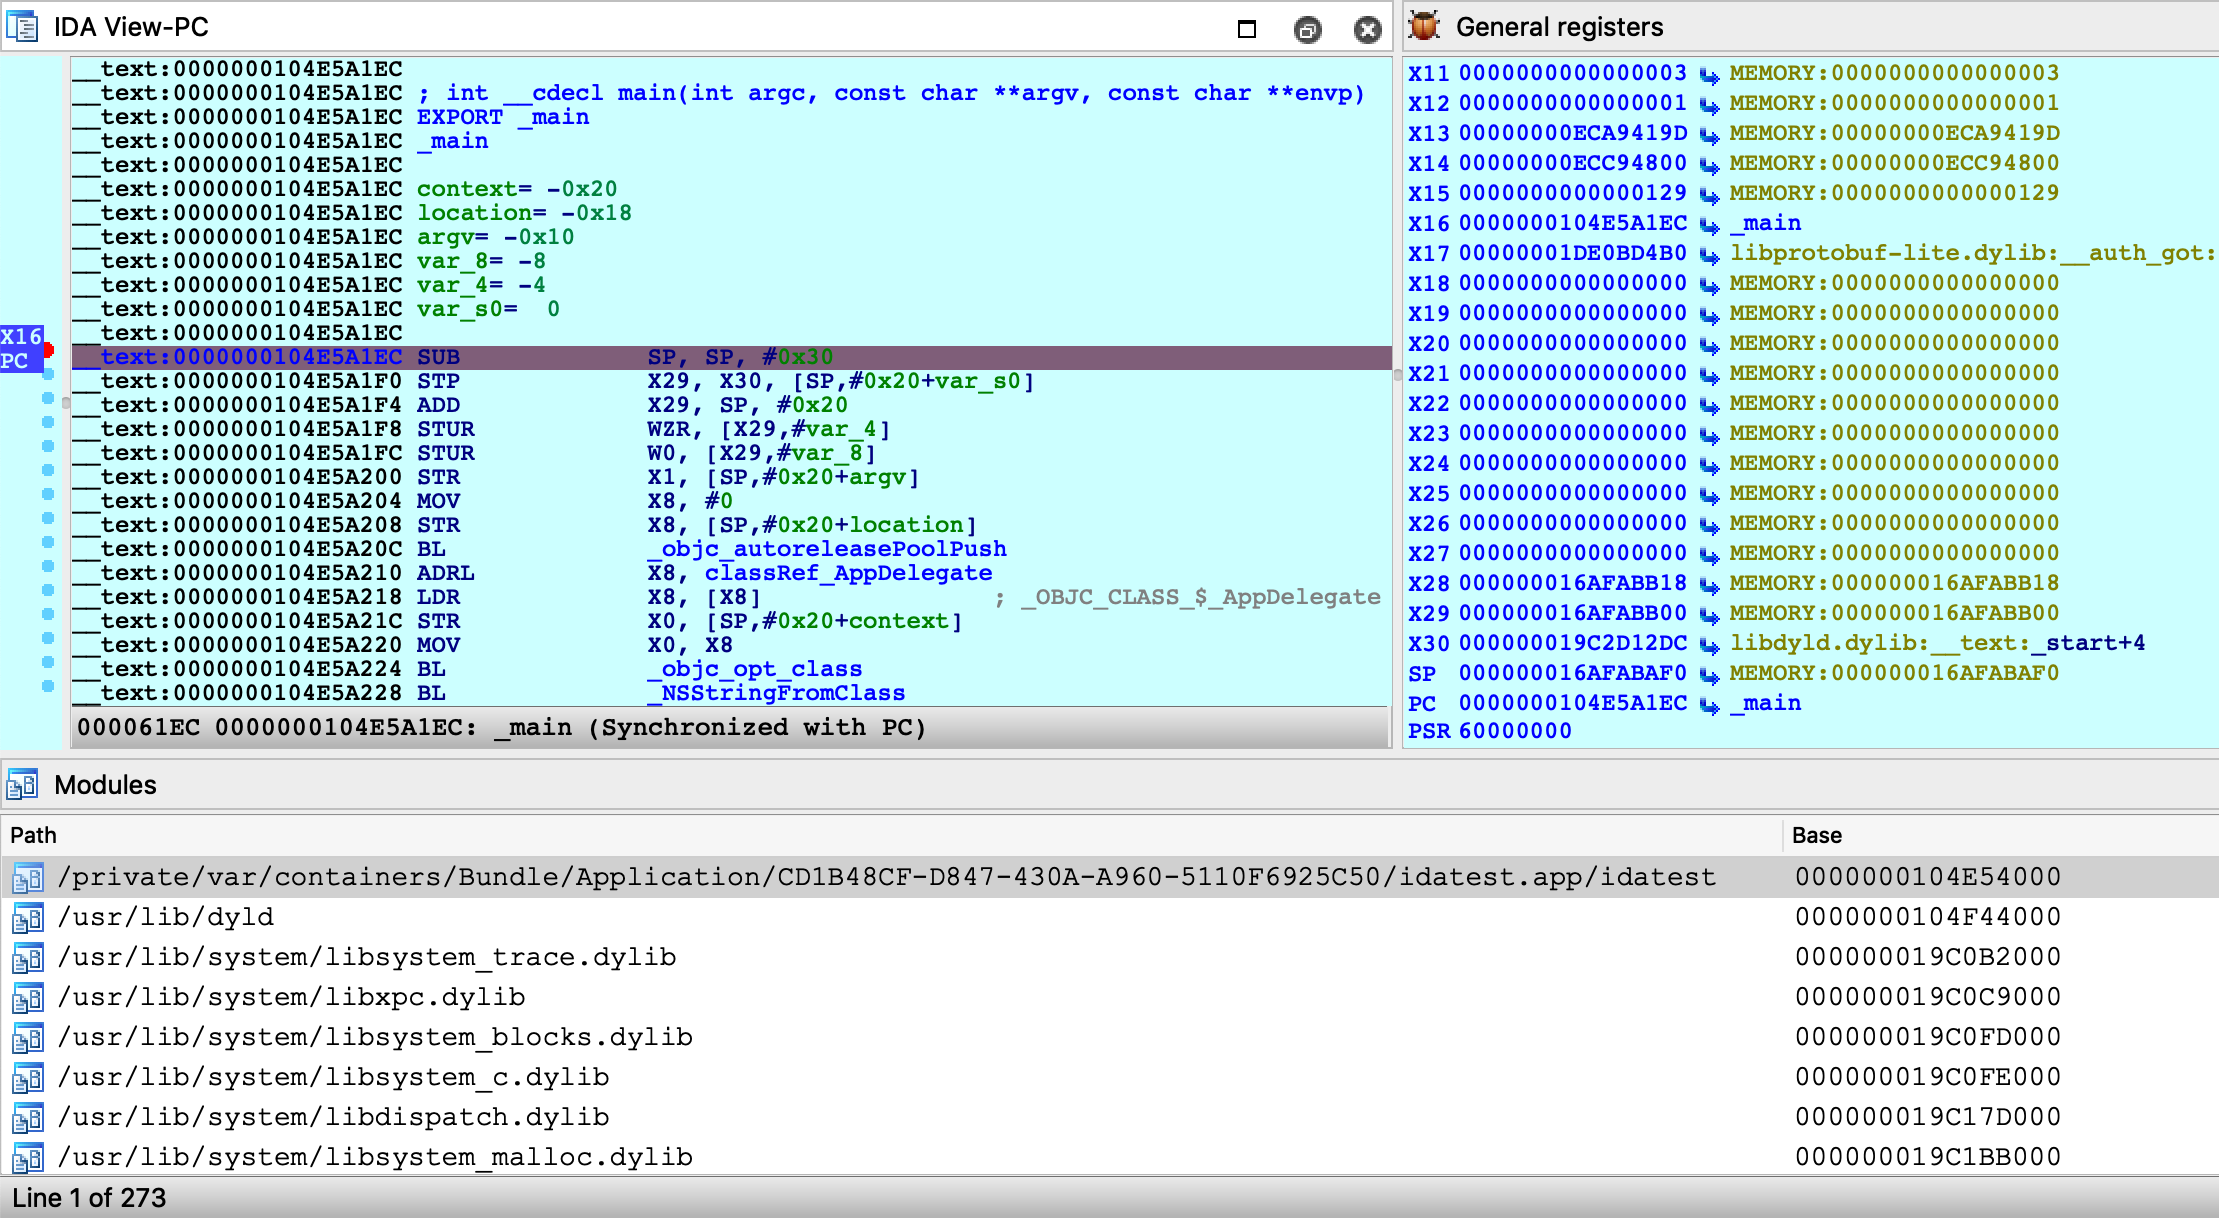
You are free to single step, inspect registers, and read/write memory just like any other IDA debugger.
Source Level Debugging
You can also use IDA to debug the source code of your iOS application. Let’s rebuild the idatest application with the DWARF with dSYM File build setting:

Since the app is reinstalled, the executable path will change. We’ll need to update the remote path in IDA:
$ ios_deploy path -b primer.idatest

Be sure to enable Debugger>Use source-level debugging, then launch the process. At runtime IDA will be able to load the DWARF source information:
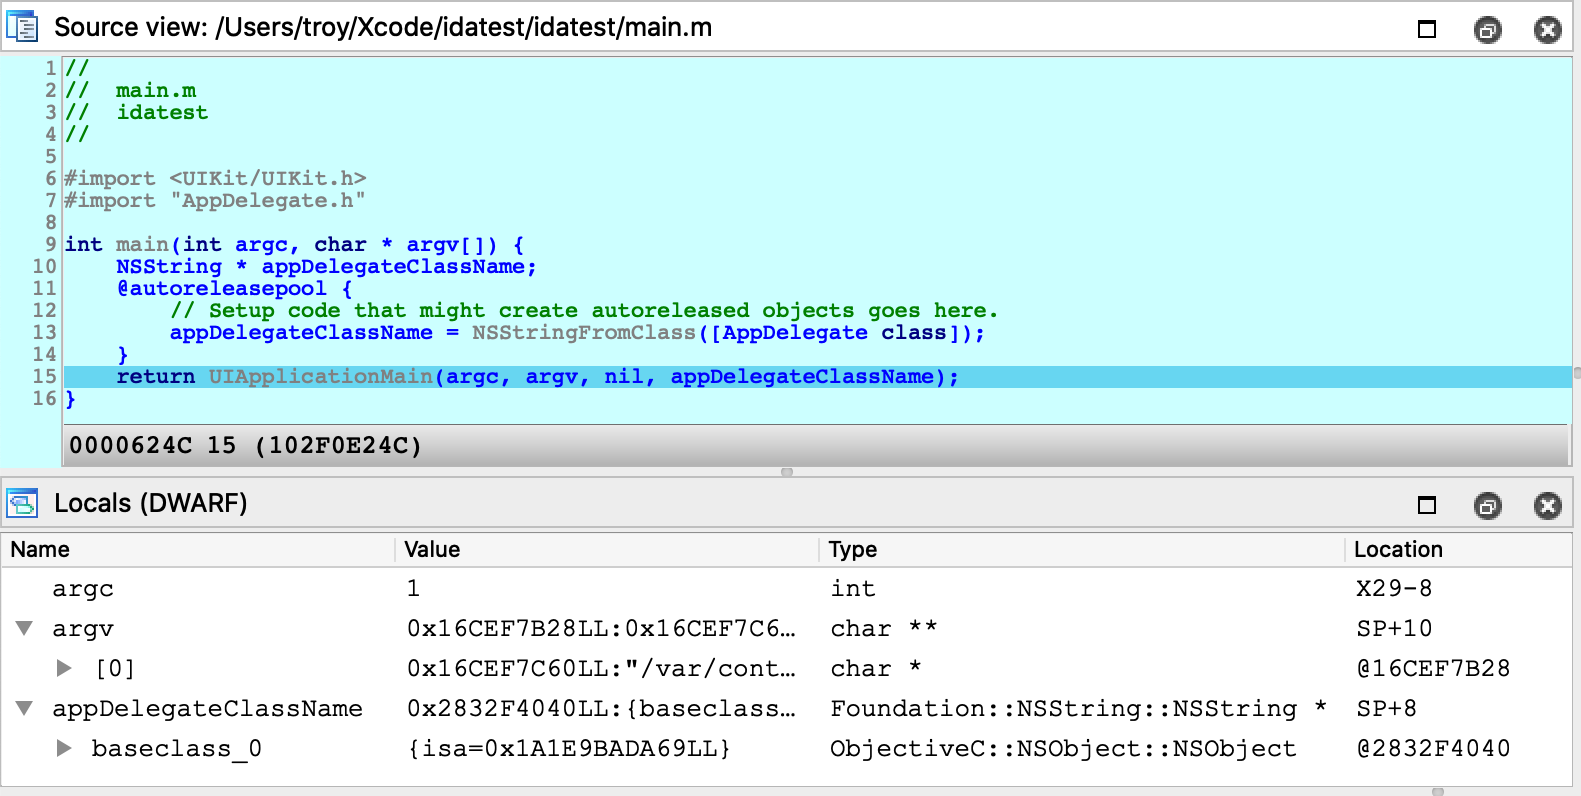
Note that the debugserver does not provide DWARF information to IDA - instead IDA looks for dSYM bundles in the vicinity of the idb on your local filesystem. Thus if you want IDA to load DWARF info for a given module, both the module binary and its matching dSYM must be in the same directory as the idb, or in the idb’s parent directory.
For example, in the case of the idatest build:
$ tree
.
├── idatest.app
│ ├── idatest
│ └── idatest.i64
└── idatest.app.dSYM
└── Contents
└── Resources
└── DWARF
└── idatest
IDA was able to find the idatest binary next to idatest.i64, as well as the dSYM bundle next to the parent app directory.
If IDA can’t find DWARF info on your filesystem for whatever reason, try launching IDA with the command-line option -z440010, which will enable much more verbose logging related to source-level debugging:
Looking for Mach-O file "idatest.app/idatest.dSYM/Contents/Resources/DWARF/idatest"
File "idatest.app/idatest.dSYM/Contents/Resources/DWARF/idatest" exists? -> No.
Looking for Mach-O file "idatest.app.dSYM/Contents/Resources/DWARF/idatest"
File "idatest.app.dSYM/Contents/Resources/DWARF/idatest" exists? -> Yes.
Looking for cpu=16777228:0, uuid=7a09f307-7503-3c0d-a182-ab552c1bf182.
Candidate: cpu=16777228:0, uuid=7a09f307-7503-3c0d-a182-ab552c1bf182.
Found, with architecture #0
DWARF: Found DWARF file "idatest.app.dSYM/Contents/Resources/DWARF/idatest"
Debugging DYLD
IDA can also be used to debug binaries that are not user applications. For example, dyld.
The ability to debug dyld is a nice advantage because it allows us to observe critical changes in the latest versions of iOS (especially regarding the shared cache) before a jailbreak is even available. We document this functionality here in the hopes it will be useful to others as well.
In this example we’ll be using IDA to discover how dyld uses ARMv8.3 Pointer Authentication to perform secure symbol bindings. Start by loading the dyld binary in IDA. It is usually found here:
~/Library/Developer/Xcode/iOS DeviceSupport/13.4 (17E8255)/Symbols/usr/lib/dyld
The target application will be a trivial helloworld program:
#include <stdio.h>
int main(void)
{
puts("hello, world!\n");
return 0;
}
Compile and install this app on your device, then set the following fields in Debugger>Process options…
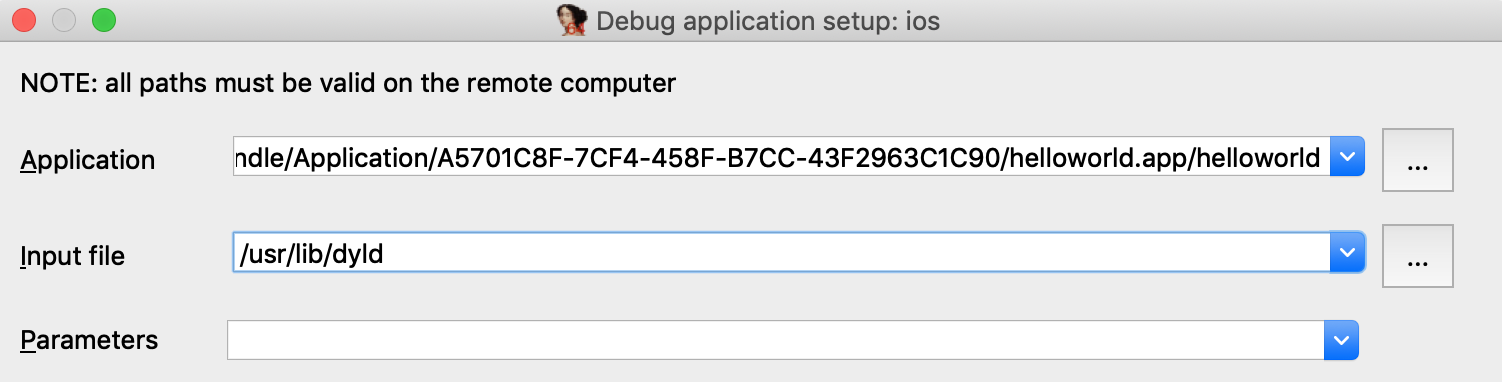
Under Debugger>Debugger options, enable Suspend on debugging start. This will instruct IDA to suspend the process at dyld’s entry point, before it has begun binding symbols. Now launch the process with F9 - immediately the process will be suspended at __dyld_start:
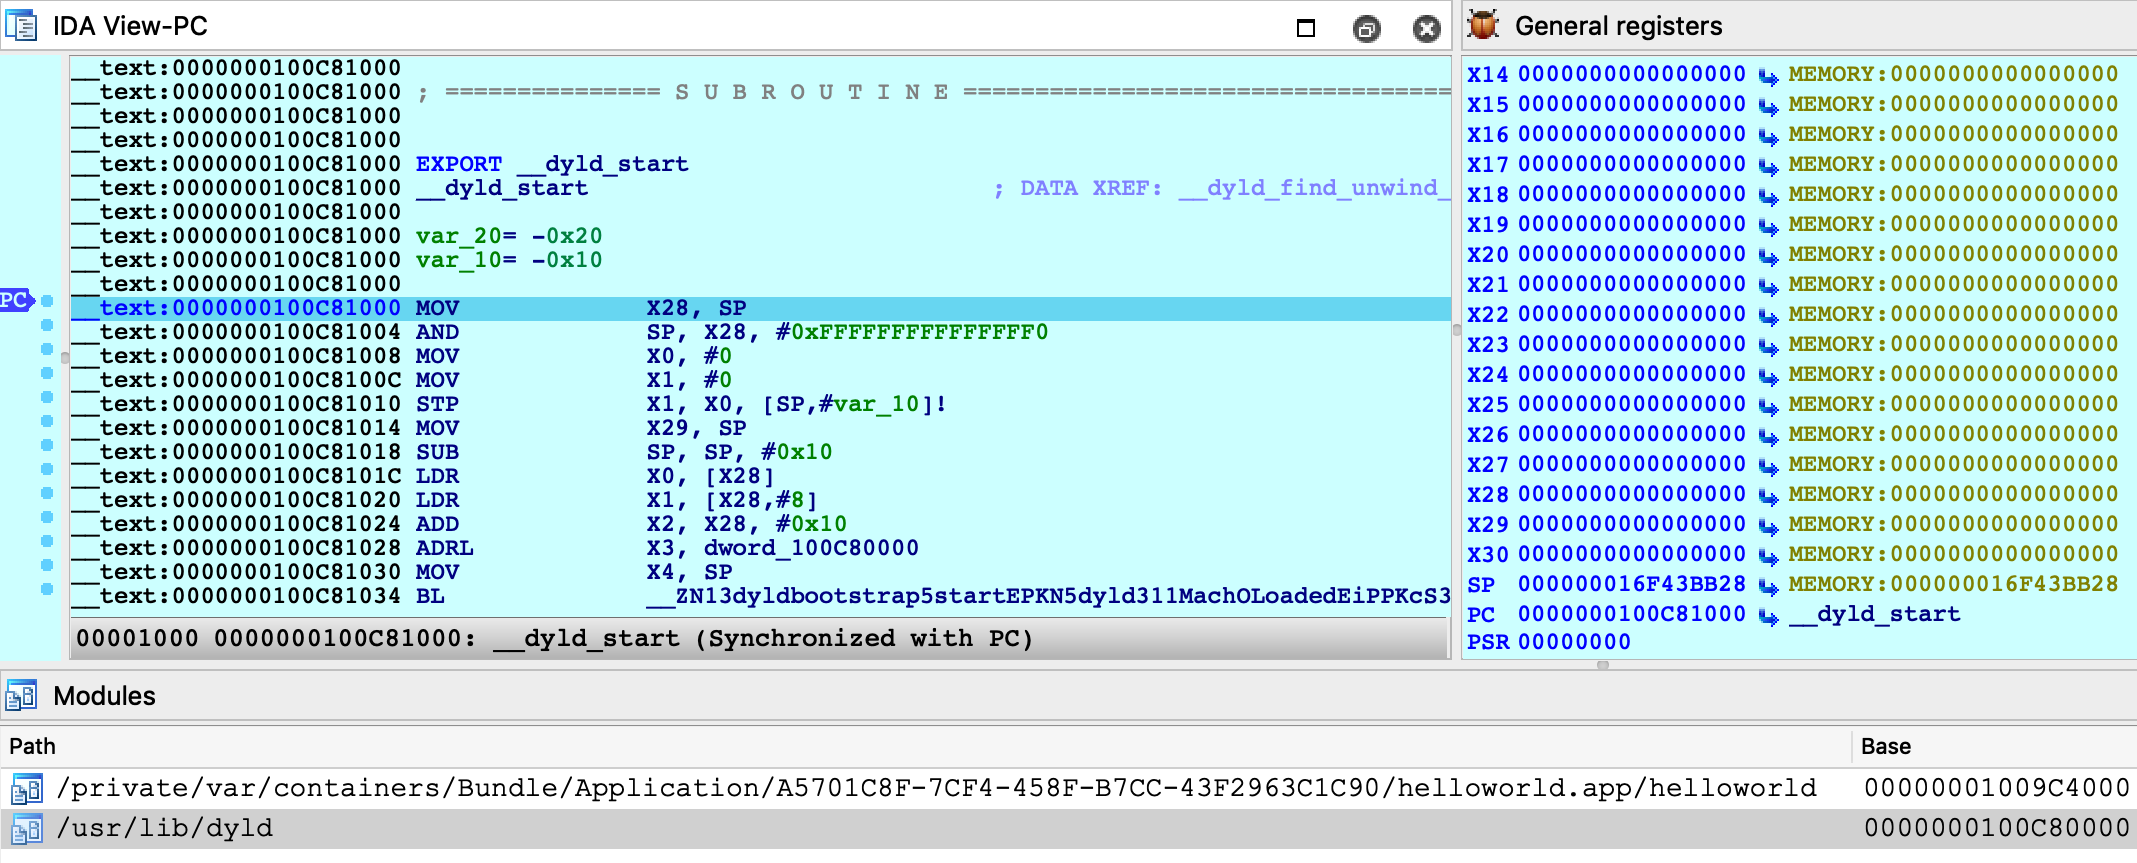
Double-click on the helloworld module to bring up its symbol list and go to the _main function:
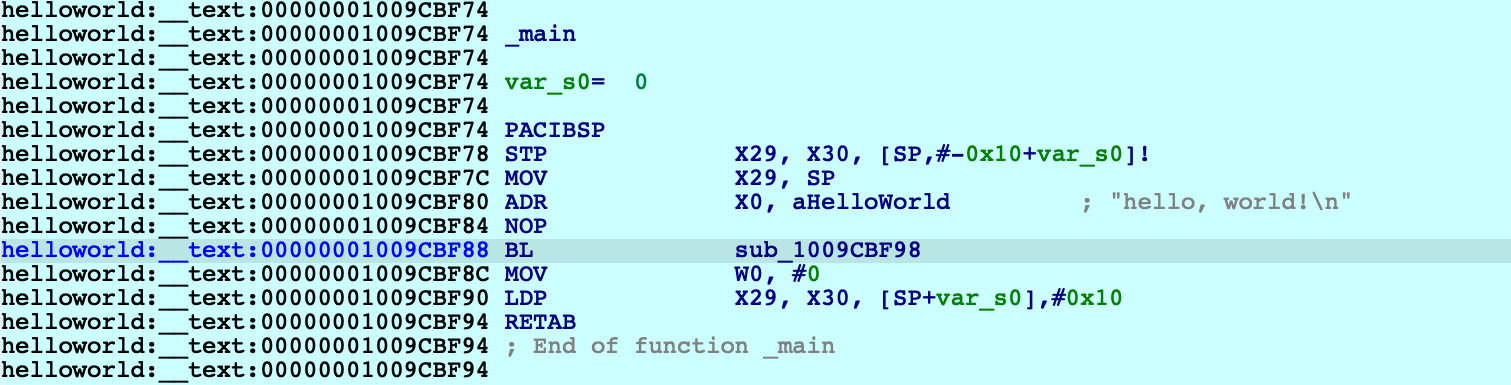
Note that function sub_1009CBF98 is the stub for puts:

The stub reads a value from off_109CC000, then performs a branch with pointer authentication. We can assume that at some point, dyld will fill off_109CC000 with an authenticated pointer to puts. Let’s use IDA to quickly track down this logic in dyld.
The iOS debugger supports watchpoints. Now would be a good time to use one:
ida_dbg.add_bpt(0x1009CC000, 8, BPT_WRITE)
Resume the process and wait for dyld to trigger our watchpoint:
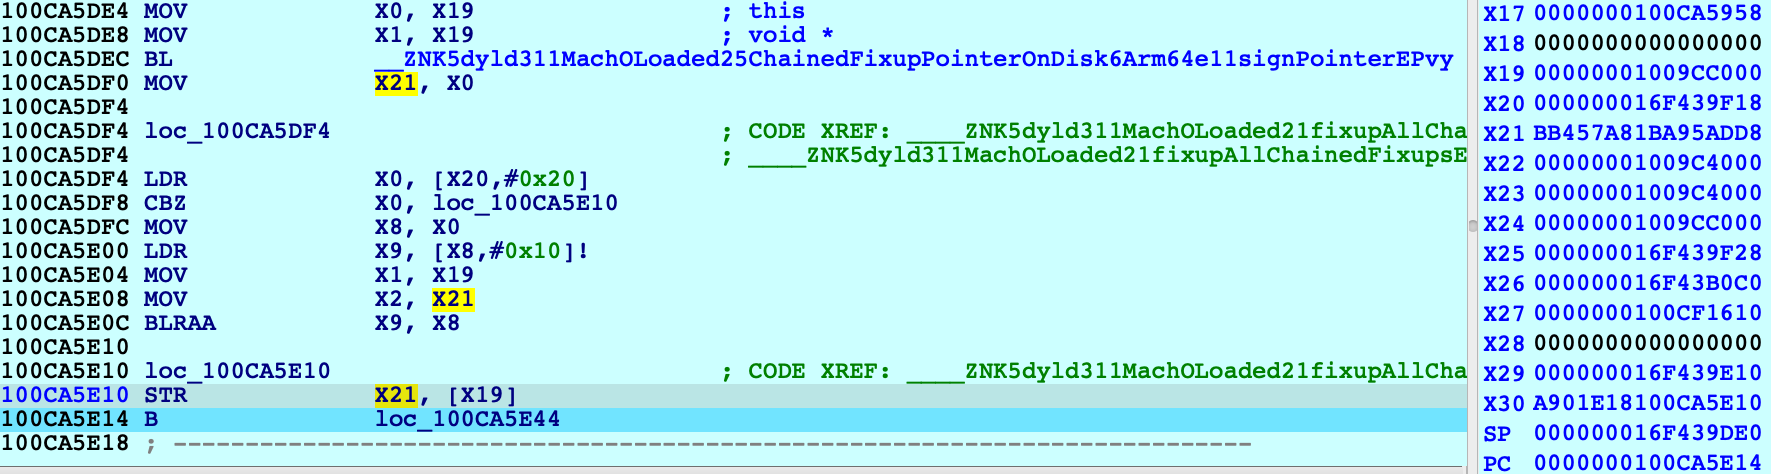
The instruction STR X21 [X19] triggered the watchpoint, and note the value in X21 (BB457A81BA95ADD8) which is the authenticated pointer to puts. Where did this value come from? We can see that X21 was previously set with MOV X21, X0 after a call to this function:
dyld3::MachOLoaded::ChainedFixupPointerOnDisk::Arm64e::signPointer
It seems like we’re on the right track. Also note that IDA was able to extract a nice stack trace despite dyld’s heavy use of PAC instructions to authenticate return addresses on the stack:
Address Module Function
100CA5E14 dyld ____ZNK5dyld311MachOLoaded21fixupAllChainedFixups_block_invoke
100CA5EEC dyld dyld3::MachOLoaded::walkChain
100CA5BF0 dyld dyld3::MachOLoaded::forEachFixupInAllChains
100CA5B50 dyld dyld3::MachOLoaded::fixupAllChainedFixups
100CA2210 dyld ____ZN5dyld36Loader18applyFixupsToImage_block_invoke.68
100CB0218 dyld dyld3::MachOAnalyzer::withChainStarts
100CA2004 dyld ____ZN5dyld36Loader18applyFixupsToImage_block_invoke_3
100CB3314 dyld dyld3::closure::Image::forEachFixup
100CA15EC dyld dyld3::Loader::applyFixupsToImage
100CA0A00 dyld dyld3::Loader::mapAndFixupAllImages
100C88784 dyld dyld::launchWithClosure
100C86BE0 dyld dyld::_main
100C81228 dyld dyldbootstrap::start
100C81034 dyld __dyld_start
This leads us to the following logic in the dyld-733.6 source:
// authenticated bind
newValue = (void*)(bindTargets[fixupLoc->arm64e.bind.ordinal]);
if (newValue != 0)
newValue = (void*)fixupLoc->arm64e.signPointer(fixupLoc, newValue);
Here, fixupLoc (off_109CC00) and newValue (address of puts) are passed as the loc and target arguments for Arm64e::signPointer:
uint64_t discriminator = authBind.diversity;
if ( authBind.addrDiv )
discriminator = __builtin_ptrauth_blend_discriminator(loc, discriminator);
switch ( authBind.key ) {
case 0: // IA
return __builtin_ptrauth_sign_unauthenticated(target, 0, discriminator);
case 1: // IB
return __builtin_ptrauth_sign_unauthenticated(target, 1, discriminator);
case 2: // DA
return __builtin_ptrauth_sign_unauthenticated(target, 2, discriminator);
case 3: // DB
return __builtin_ptrauth_sign_unauthenticated(target, 3, discriminator);
}
Thus, the pointer to puts is signed using its destination address in helloworld:__auth_got as salt for the signing operation. This is quite clever because the salt value is subject to ASLR and therefore cannot be guessed, but at this point the executable has already been loaded into memory – so it won’t change by the time the pointer is verified in the stub.
To see this in action, use F4 to run to the BRAA instruction in the stub and note the values of the operands:


The branch will use the operands to verify that the target address has not been modified after it was originally calculated by dyld. Since we haven’t done anything malicious, one more single step should take us right to puts:
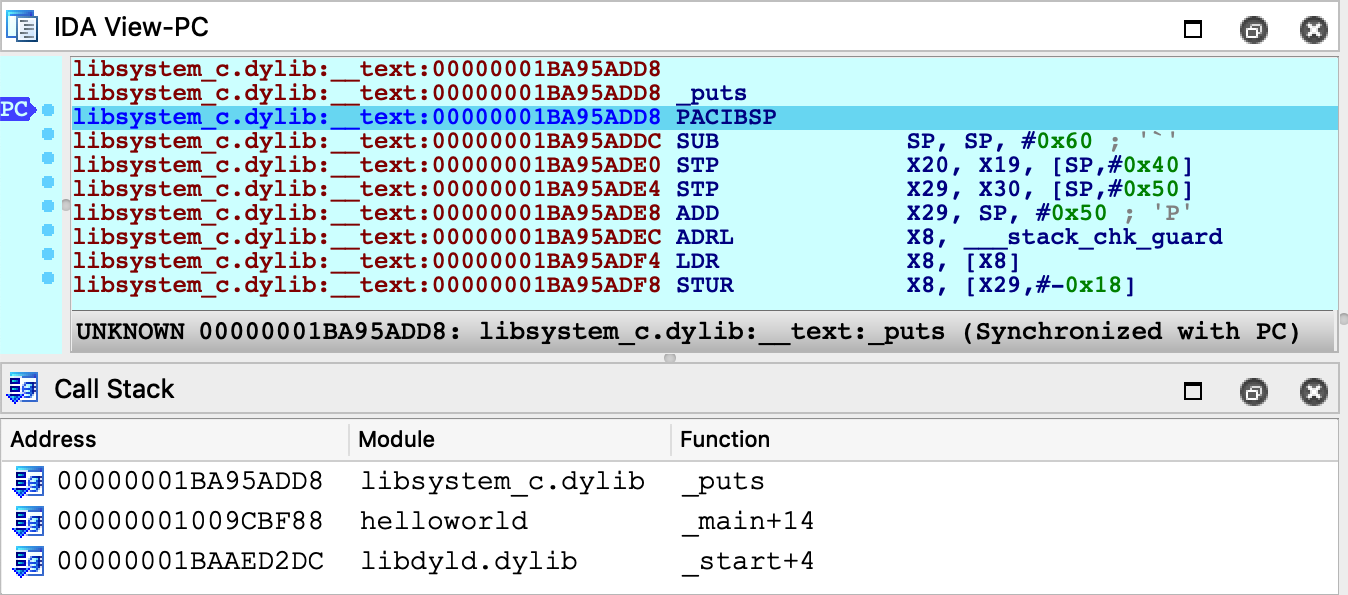
Just for fun, let’s rewind the process back to the start of the stub:
IDC>PC = 0x1009CBF98
Then overwrite the authenticated pointer to puts with a raw pointer to printf:
ida_bytes.put_qword(0x1009CC000, ida_name.get_name_ea(BADADDR, "_printf"))
Now when we step through the stub, the BRAA instruction should detect that the authenticated pointer has been modified, and it will purposefully crash the application by setting PC to an invalid address:
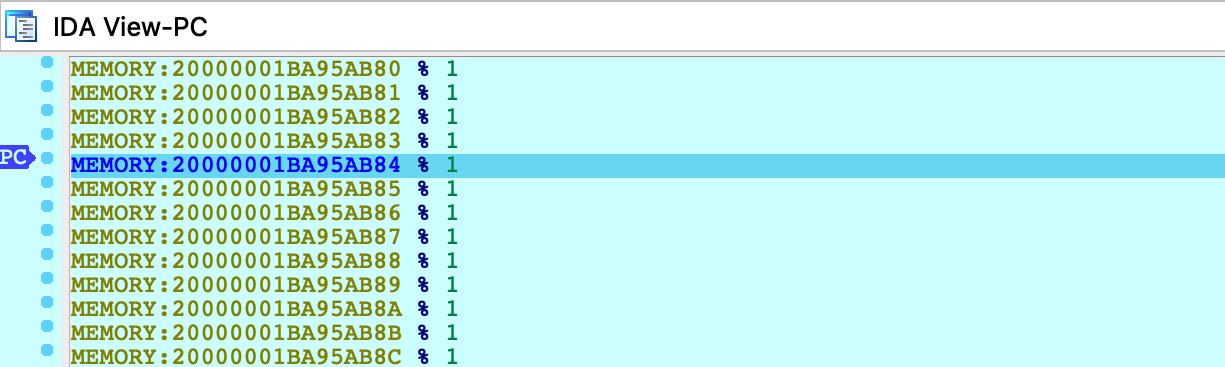
Any attempt to resume execution will inevitably fail:

It seems we now have an understanding of secure symbol bindings in dyld. Fascinating!
Debugging the DYLD Shared Cache
This section discusses how to optimally debug system libraries in a dyld_shared_cache.
NOTE: full support for dyld_shared_cache debugging requires IDA 7.5 SP1
Debugging iOS system libraries is a challenge because the code is only available in the dyld cache. IDA allows you to load a library directly from the cache, but this has its own complications. A single module typically requires loading several other modules before the analysis becomes useful. Fortunately IDA is aware of these annoyances and allows you to debug such code with minimal effort.
To start, consider the following sample application that uses the CryptoTokenKit framework:
#import <CryptoTokenKit/CryptoTokenKit.h>
int main(void)
{
TKTokenWatcher *watcher = [[TKTokenWatcher alloc] init];
NSArray *tokens = [watcher tokenIDs];
for ( int i = 0; i < [tokens count]; i++ )
printf("%s\n", [[tokens objectAtIndex:i] UTF8String]);
return 0;
}
Assume this program has been compiled and installed on the device as ctk.app.
Instead of debugging the test application, let’s try debugging the CryptoTokenKit framework itself - focusing specifically on the -[TKTokenWatcher init] method.
Initial Analysis
First we’ll need access to the dyldcache that contains the CryptoTokenKit framework. The best way to obtain the cache is to extract it from the ipsw package for your device/iOS version. This ensures that you are working with the original untouched cache that was installed on your device.
When opening the cache in IDA, choose the load option Apple DYLD cache for arm64e (single module) and select the CryptoTokenKit module:

Wait for IDA to finish the initial analysis of CryptoTokenKit. Immediately we might notice that the analysis suffers because of references to unloaded code. Most notably many Objective-C methods are missing a prototype, which is unusual:

However this is expected. Modern dyld caches store all Objective-C class names and method selectors inside the libobjc module. Objective-C analysis is practically useless without these strings, so we must load the libobjc module to access them. Since a vast majority of modules depend on libobjc in such a way, it is a good idea to automate this in a script.
For a quick fix, save the following idapython code as init.py:
# improve functions with branches to unloaded code
idaapi.cvar.inf.af &= ~AF_ANORET
def dscu_load_module(module):
node = idaapi.netnode()
node.create("$ dscu")
node.supset(2, module)
load_and_run_plugin("dscu", 1)
# load libobjc, then analyze objc types
dscu_load_module("/usr/lib/libobjc.A.dylib")
load_and_run_plugin("objc", 1)
Then reopen the cache with:
$ ida64 -Sinit.py -Oobjc:+l dyld_shared_cache_arm64e
This will tell IDA to load libobjc immediately after the database is created, then perform the Objective-C analysis once all critical info is in the database. This should make the initial analysis acceptable in most cases. In the case of CryptoTokenKit, we see that the Objective-C prototypes are now correct:

Now let’s go to the -[TKTokenWatcher init] method invoked by the ctk application:

If we right-click on the unmapped address 0x1B271C01C, IDA provides two options in the context menu:

In this case the better option is Load ProVideo:__auth_stubs, which loads only the stubs from the module and properly resolves the names:

This is a common pattern in the latest arm64e dyldcaches, and it is quite convenient for us. Loading a handful of __auth_stubs sections is enough to resolve most of the calls in CryptoTokenKit, which gives us some nice analysis for -[TKTokenWatcher init] and its helper method:

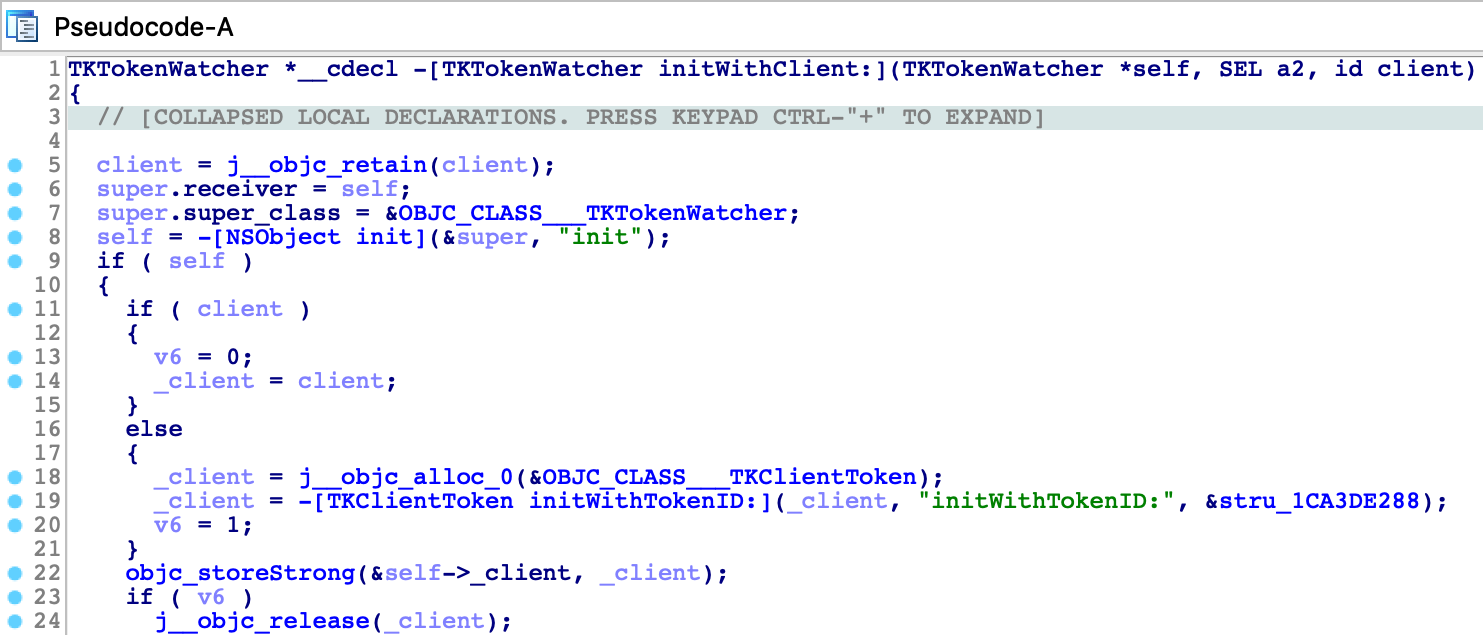
Debugger Configuration
Now that the static analysis is on par with a typical iOS binary, let’s combine it with dynamic analysis. We can debug this database by setting the following options in Debugger>Process options:
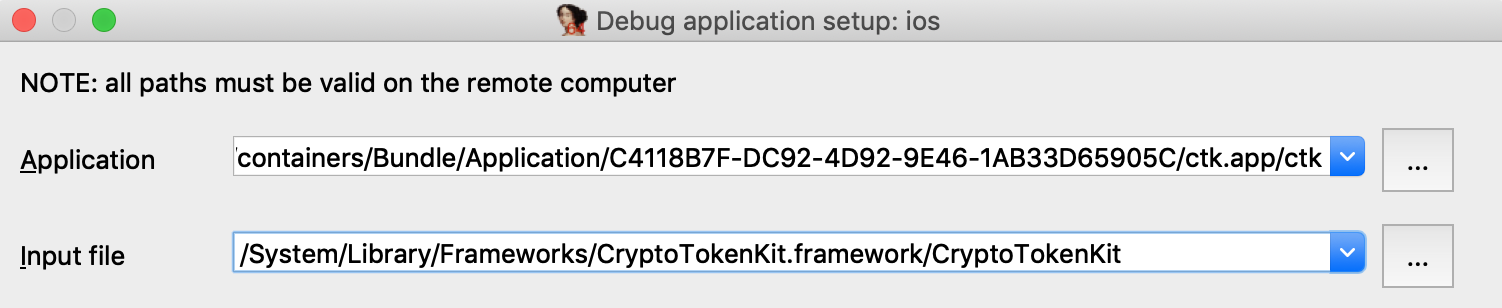
Here we set the Input file field to the full path of the CryptoTokenKit module. This allows IDA to easily detect the dyldcache slide at runtime. When CryptoTokenKit is loaded into the process, IDA will compare its runtime load address to the imagebase in the current idb, then rebase the database accordingly.
By default the imagebase in the idb corresponds to the first module that was loaded:
IDC>msg("%a", get_imagebase())
CryptoTokenKit:HEADER:00000001B8181000
Thus, it is easiest to set Input file to the module corresponding to the default imagebase.
Note however that we could also use this configuration:
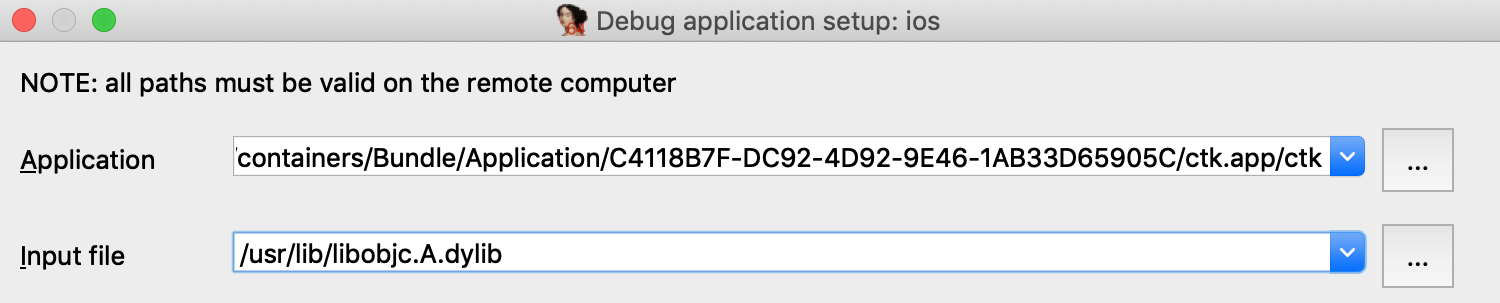
Provided that we update the imagebase in the idb to the base of the libobjc module:
ida_nalt.set_imagebase(ida_segment.get_segm_by_name("libobjc.A:HEADER").start_ea)
This will result in the same dyld slide and should work just as well, because the the imagebase and the Input file field both correspond to the same module. This is something to keep in mind when debugging dyldcache idbs that contain multiple libraries.
Now let’s try launching the debugger. Set a breakpoint at -[TKTokenWatcher initWithClient:], use F9 to launch the process, then wait for our breakpoint to be hit:
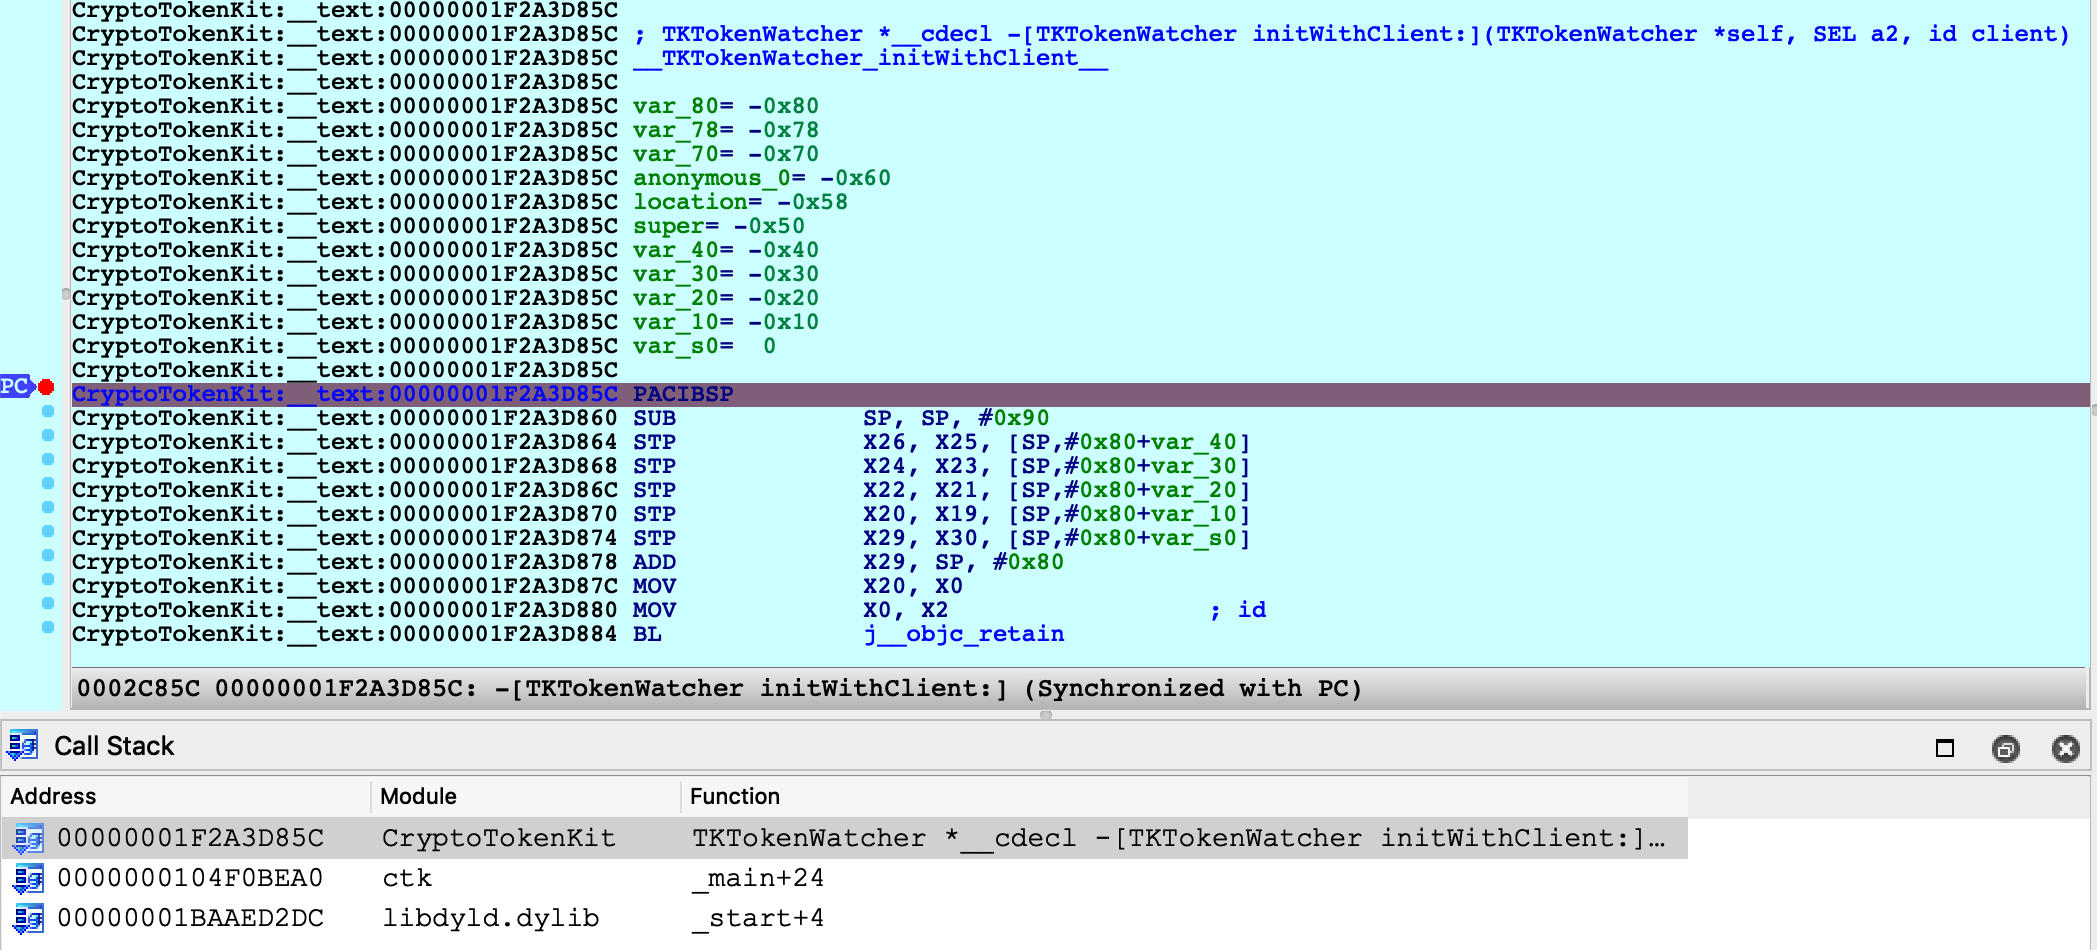
IDA was able to map our database (including CryptoTokenKit, libobjc, and the satellite __auth_stubs sections) into process memory. We can single step, resume, inspect registers, and perform any other operation that is typical of an IDA debugging session.
Further Analysis
Note that after terminating the debugging session you can continue to load new modules from the cache. If a dyld slide has been applied to the database, new modules will be correctly loaded into the rebased address space. This did not work in previous versions of IDA.
For example, after a debugging session we might notice some more unresolved calls:

IDA is aware that the address space has shifted, and it will load the new code at the correct address:

You are free to load new modules and relaunch debugging sessions indefinitely.
Debugging System Applications
The previous examples used custom applications to demonstrate IDA’s debugging capabilities. In this case IDA can utilize the debugserver included in Apple’s iOS developer tools, but there are situations in which this server is not sufficient for our needs.
The debugserver will refuse to debug any application that we didn’t build ourselves. To demonstrate this, try launching IDA with an empty database and use Debugger>Attach>Remote iOS Debugger to attach to one of the system daemons:
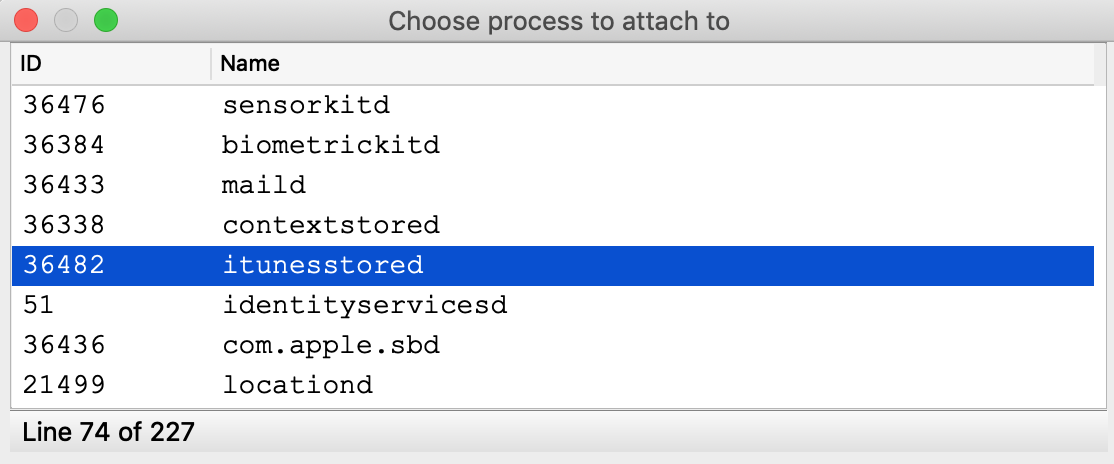
You will likely get this error message:

It is possible to install a custom version of the debugserver that can debug system processes, but this requires a jailbroken device. We document the necessary steps and IDA configuration here. The device used in this example is an iPhone 8 with iOS 13.2.2, jailbroken with checkra1n 0.10.1.
Patching the debugserver
First we must obtain a copy of the debugserver binary from the DeveloperDiskImage.dmg:
$ export DEVELOPER=/Applications/Xcode.app/Contents/Developer
$ export DEVTOOLS=$DEVELOPER/Platforms/iPhoneOS.platform/DeviceSupport
$ hdiutil mount $DEVTOOLS/13.2/DeveloperDiskImage.dmg
$ cp /Volumes/DeveloperDiskImage/usr/bin/debugserver .
Now save the following xml as entitlements.plist:
<?xml version="1.0" encoding="UTF-8"?>
<!DOCTYPE plist PUBLIC "-//Apple//DTD PLIST 1.0//EN" "http://www.apple.com/DTDs/ PropertyList-1.0.dtd">
<plist version="1.0">
<dict>
<key>task_for_pid-allow</key> <true/>
<key>get-task-allow</key> <true/>
<key>platform-application</key> <true/>
<key>com.apple.springboard.debugapplications</key> <true/>
<key>run-unsigned-code</key> <true/>
<key>com.apple.system-task-ports</key> <true/>
</dict>
</plist>
Then use ldid to codesign the server:
$ ldid -Sentitlements.plist debugserver
This will grant the debugserver permission to debug any application, including system apps. Now we can copy the server to the device and run it:
$ scp debugserver root@iphone-8:/usr/bin/
$ ssh root@iphone-8
iPhone-8:~ root# /usr/bin/debugserver 192.168.1.7:1234
debugserver-@(#)PROGRAM:LLDB PROJECT:lldb-900.3.98 for arm64.
Listening to port 1234 for a connection from 192.168.1.7...
Note that we specified 192.168.1.7 which is the IP of the host machine used in this example. Be sure to replace this with the IP of your host so that the server will accept incoming connections from IDA.
IDA Configuration
To enable debugging with the patched debugserver, set the following options in dbg_ios.cfg:
// don't launch the debugserver. we did it manually
AUTOLAUNCH = NO
// your device's UUID. this is used when fetching the remote process list
DEVICE_ID = "";
// debugging symbols extracted by Xcode
SYMBOL_PATH = "~/Library/Developer/Xcode/iOS DeviceSupport/13.2.2 (17B102)/Symbols";
We’re now ready to open a binary in IDA and debug it. Copy the itunesstored binary from your device, it is typically found here:
/System/Library/PrivateFrameworks/iTunesStore.framework/Support/itunesstored
After loading the binary use Debugger>Select debugger and choose Remote iOS Debugger, then under Debugger>Process options set the following fields:
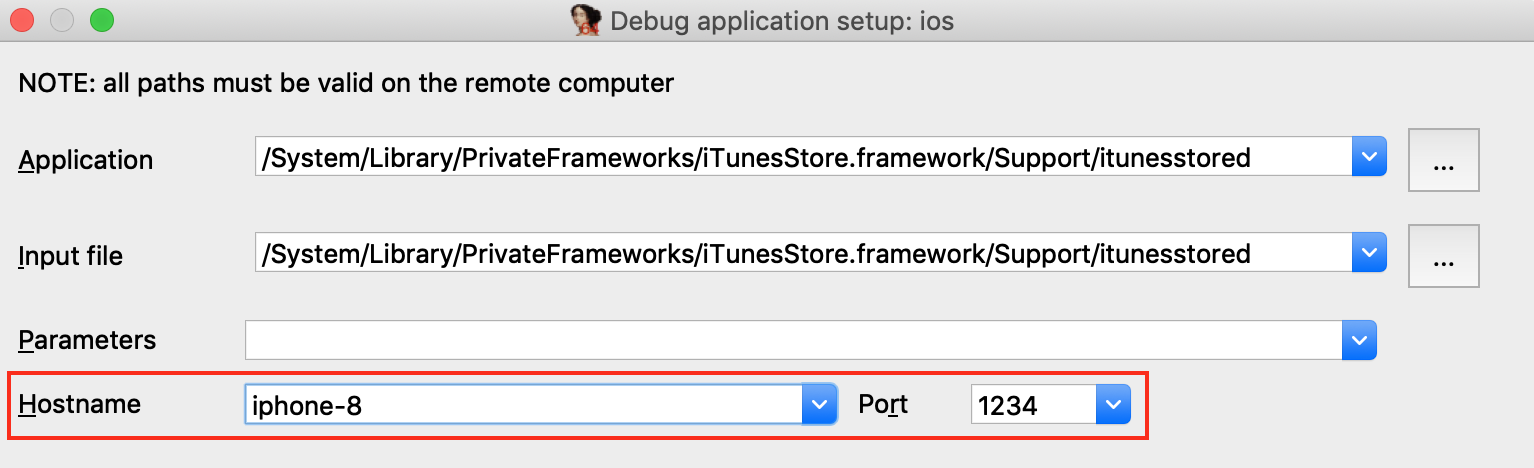
Since we set AUTOLAUNCH = NO, IDA now provides the Hostname and Port fields so we can specify how to connect to our patched debugserver instance.
Now use Debugger>Attach to process and choose itunesstored from the process list. Since we have modified the debugserver it should agree to debug the target process, allowing IDA to create a typically robust debugging environment:
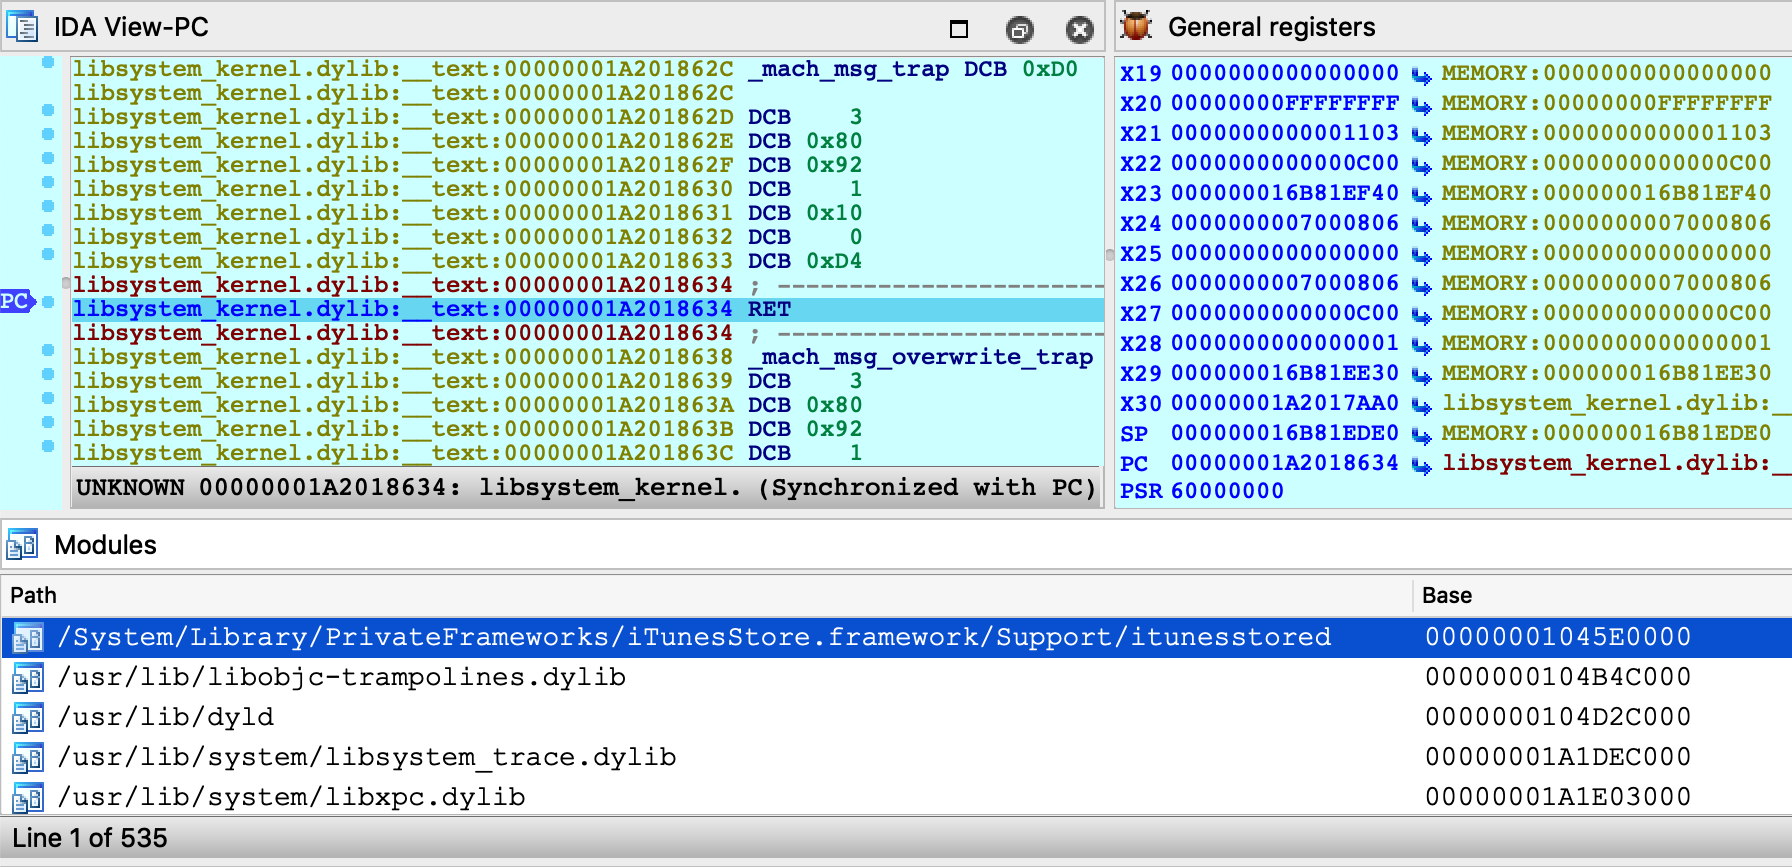 \
\
Note that although we’re not using the debugserver from DeveloperDiskImage.dmg, IDA still depends on other developer tools to query the process list. We discuss how to install the DeveloperDiskImage in the Getting Started section above, but for a quick workaround you can always just specify the PID manually:
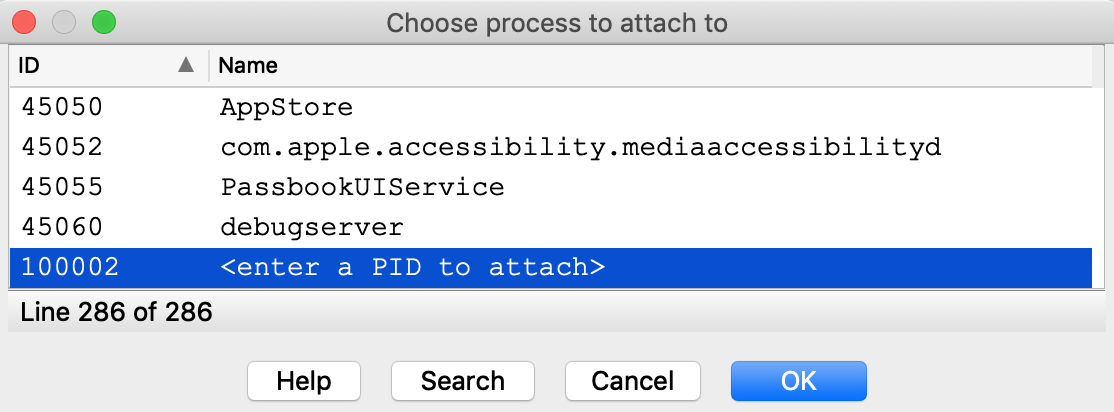
Now that we’ve successfully attached to a system process, let’s do something interesting with it. Consider the method -[PurchaseOperation initWithPurchase:]. This logic seems to be invoked when a transaction is performed in the AppStore. Set a breakpoint at this method, then open the AppStore on your device and try downloading an app (it can be any app, even a free one).
Immediately our breakpoint is hit, and we can start unwinding the logic that brought us here:
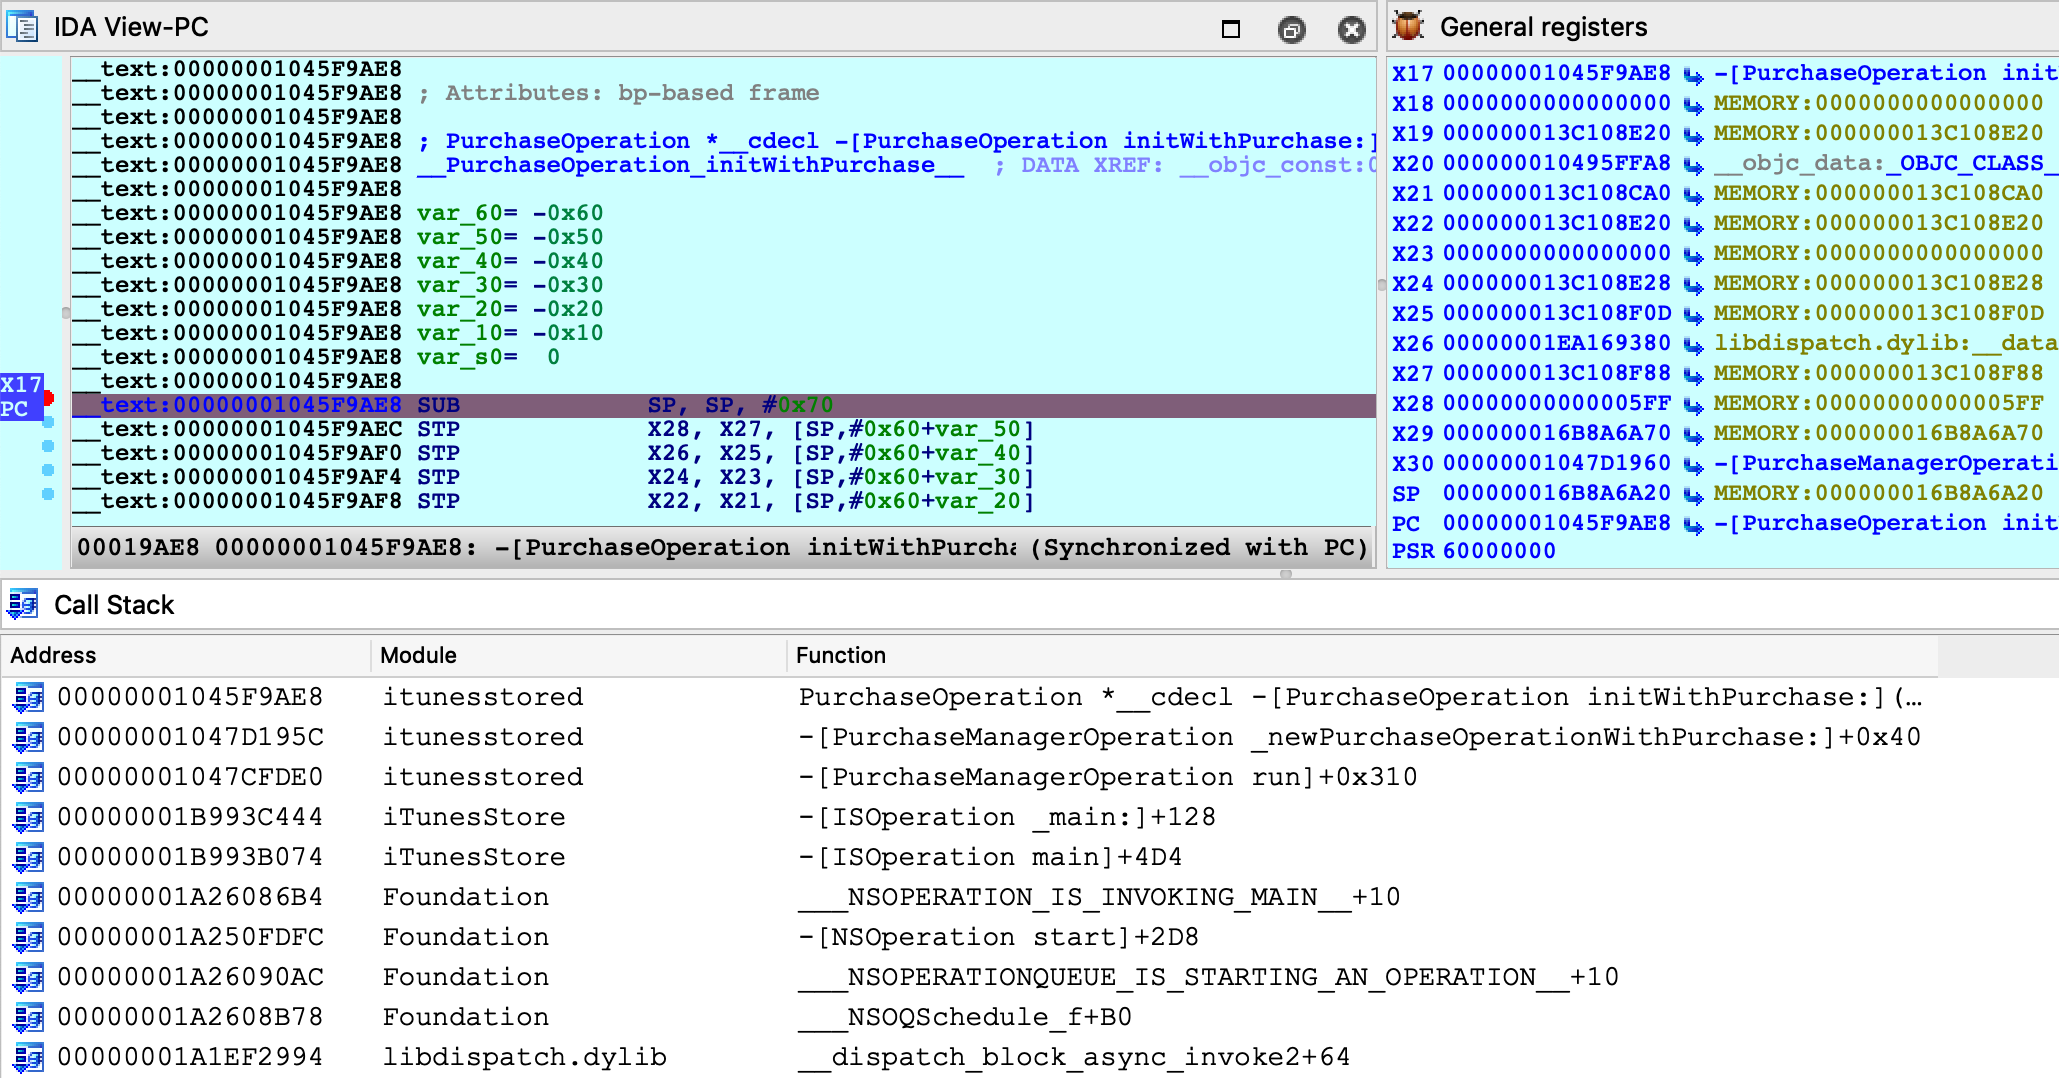
Stepping through this function, we see many Objective-C method call sites:

Instead of using F7 to step into the _objc_msgSend function, we can use shortcut Shift-O to take us directly to the Objective-C method that is being invoked:

We discuss the Shift-O action in detail in our mac debugger primer, but it is worth demonstrating that this action works just as well in arm64/iOS environments.
It seems that we’re well on our way to reverse-engineering transactions in the AppStore. The remaining work is left as an exercise for the reader :)
Conclusion
Hopefully by now we’ve shown that IDA’s iOS Debugger is quite versatile. It can play by Apple’s rules when debugging on a non-jailbroken device, and it can also be configured to use an enhanced debugserver when a jailbreak is available.
Also keep in mind that all previous examples in this writeup should work equally well with the patched debugserver. We encourage you to go back and try them.
\
Troubleshooting
IDA uses the Remote GDB Protocol to communicate with the iOS debugserver. Thus, the best way to diagnose possible issues is to log the packets transmitted between IDA and the server. You can do this by running IDA with the -z10000 command-line option:
$ ida64 -z10000 -L/tmp/ida.log
Often times these packets contain messages or error codes that provide clues to the issue.
For more enhanced troubleshooting, you can also enable logging on the server side. Go to Debugger>Debugger options>Set specific options and set the Syslog flags field:
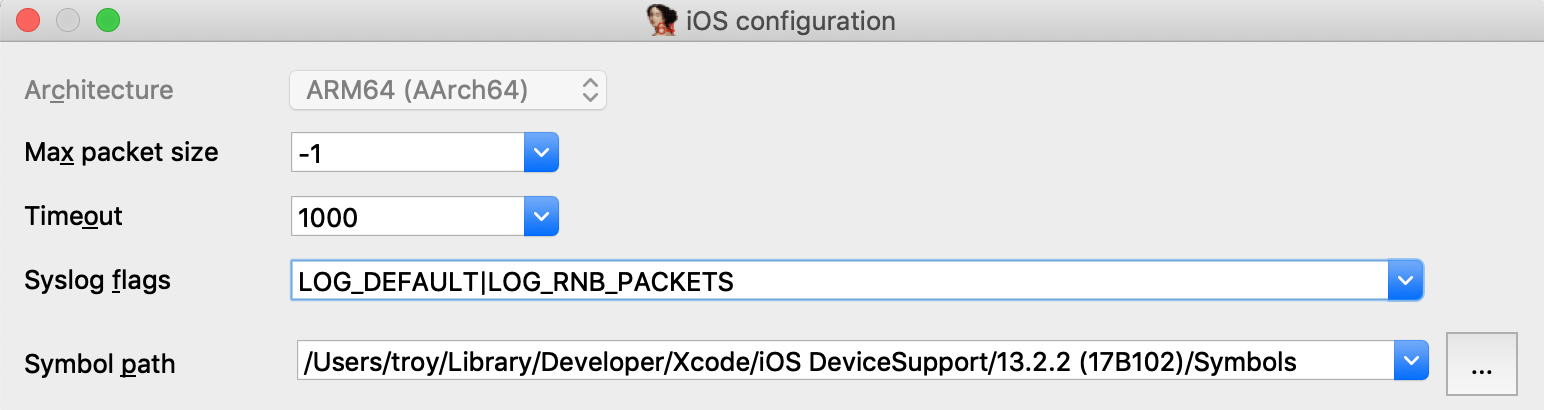
This will instruct the debugserver to log details about the debugging session to the iOS system log (all valid flags are documented under the SYSLOG_FLAGS option in dbg_ios.cfg).
Start collecting the iOS system log with:
$ ios_deploy syslog -f /tmp/sys.log
Then launch the debugger. Now both the client (/tmp/ida.log) and the server (/tmp/sys.log) will log important events in the debugger session, which will often times reveal the issue.`
Notes
This tutorial replaces the old iOS debugging tutorial, which is available here.
IDA Linux Local Debugging
You may either start a local debugging session on a new process or start a local debugging session and attach it to an existing process. Both options are accessible through the command line.
ida -rlinux MY_PROGRAM
will start the program, create a temporary database that allows the user to work with the target at once.
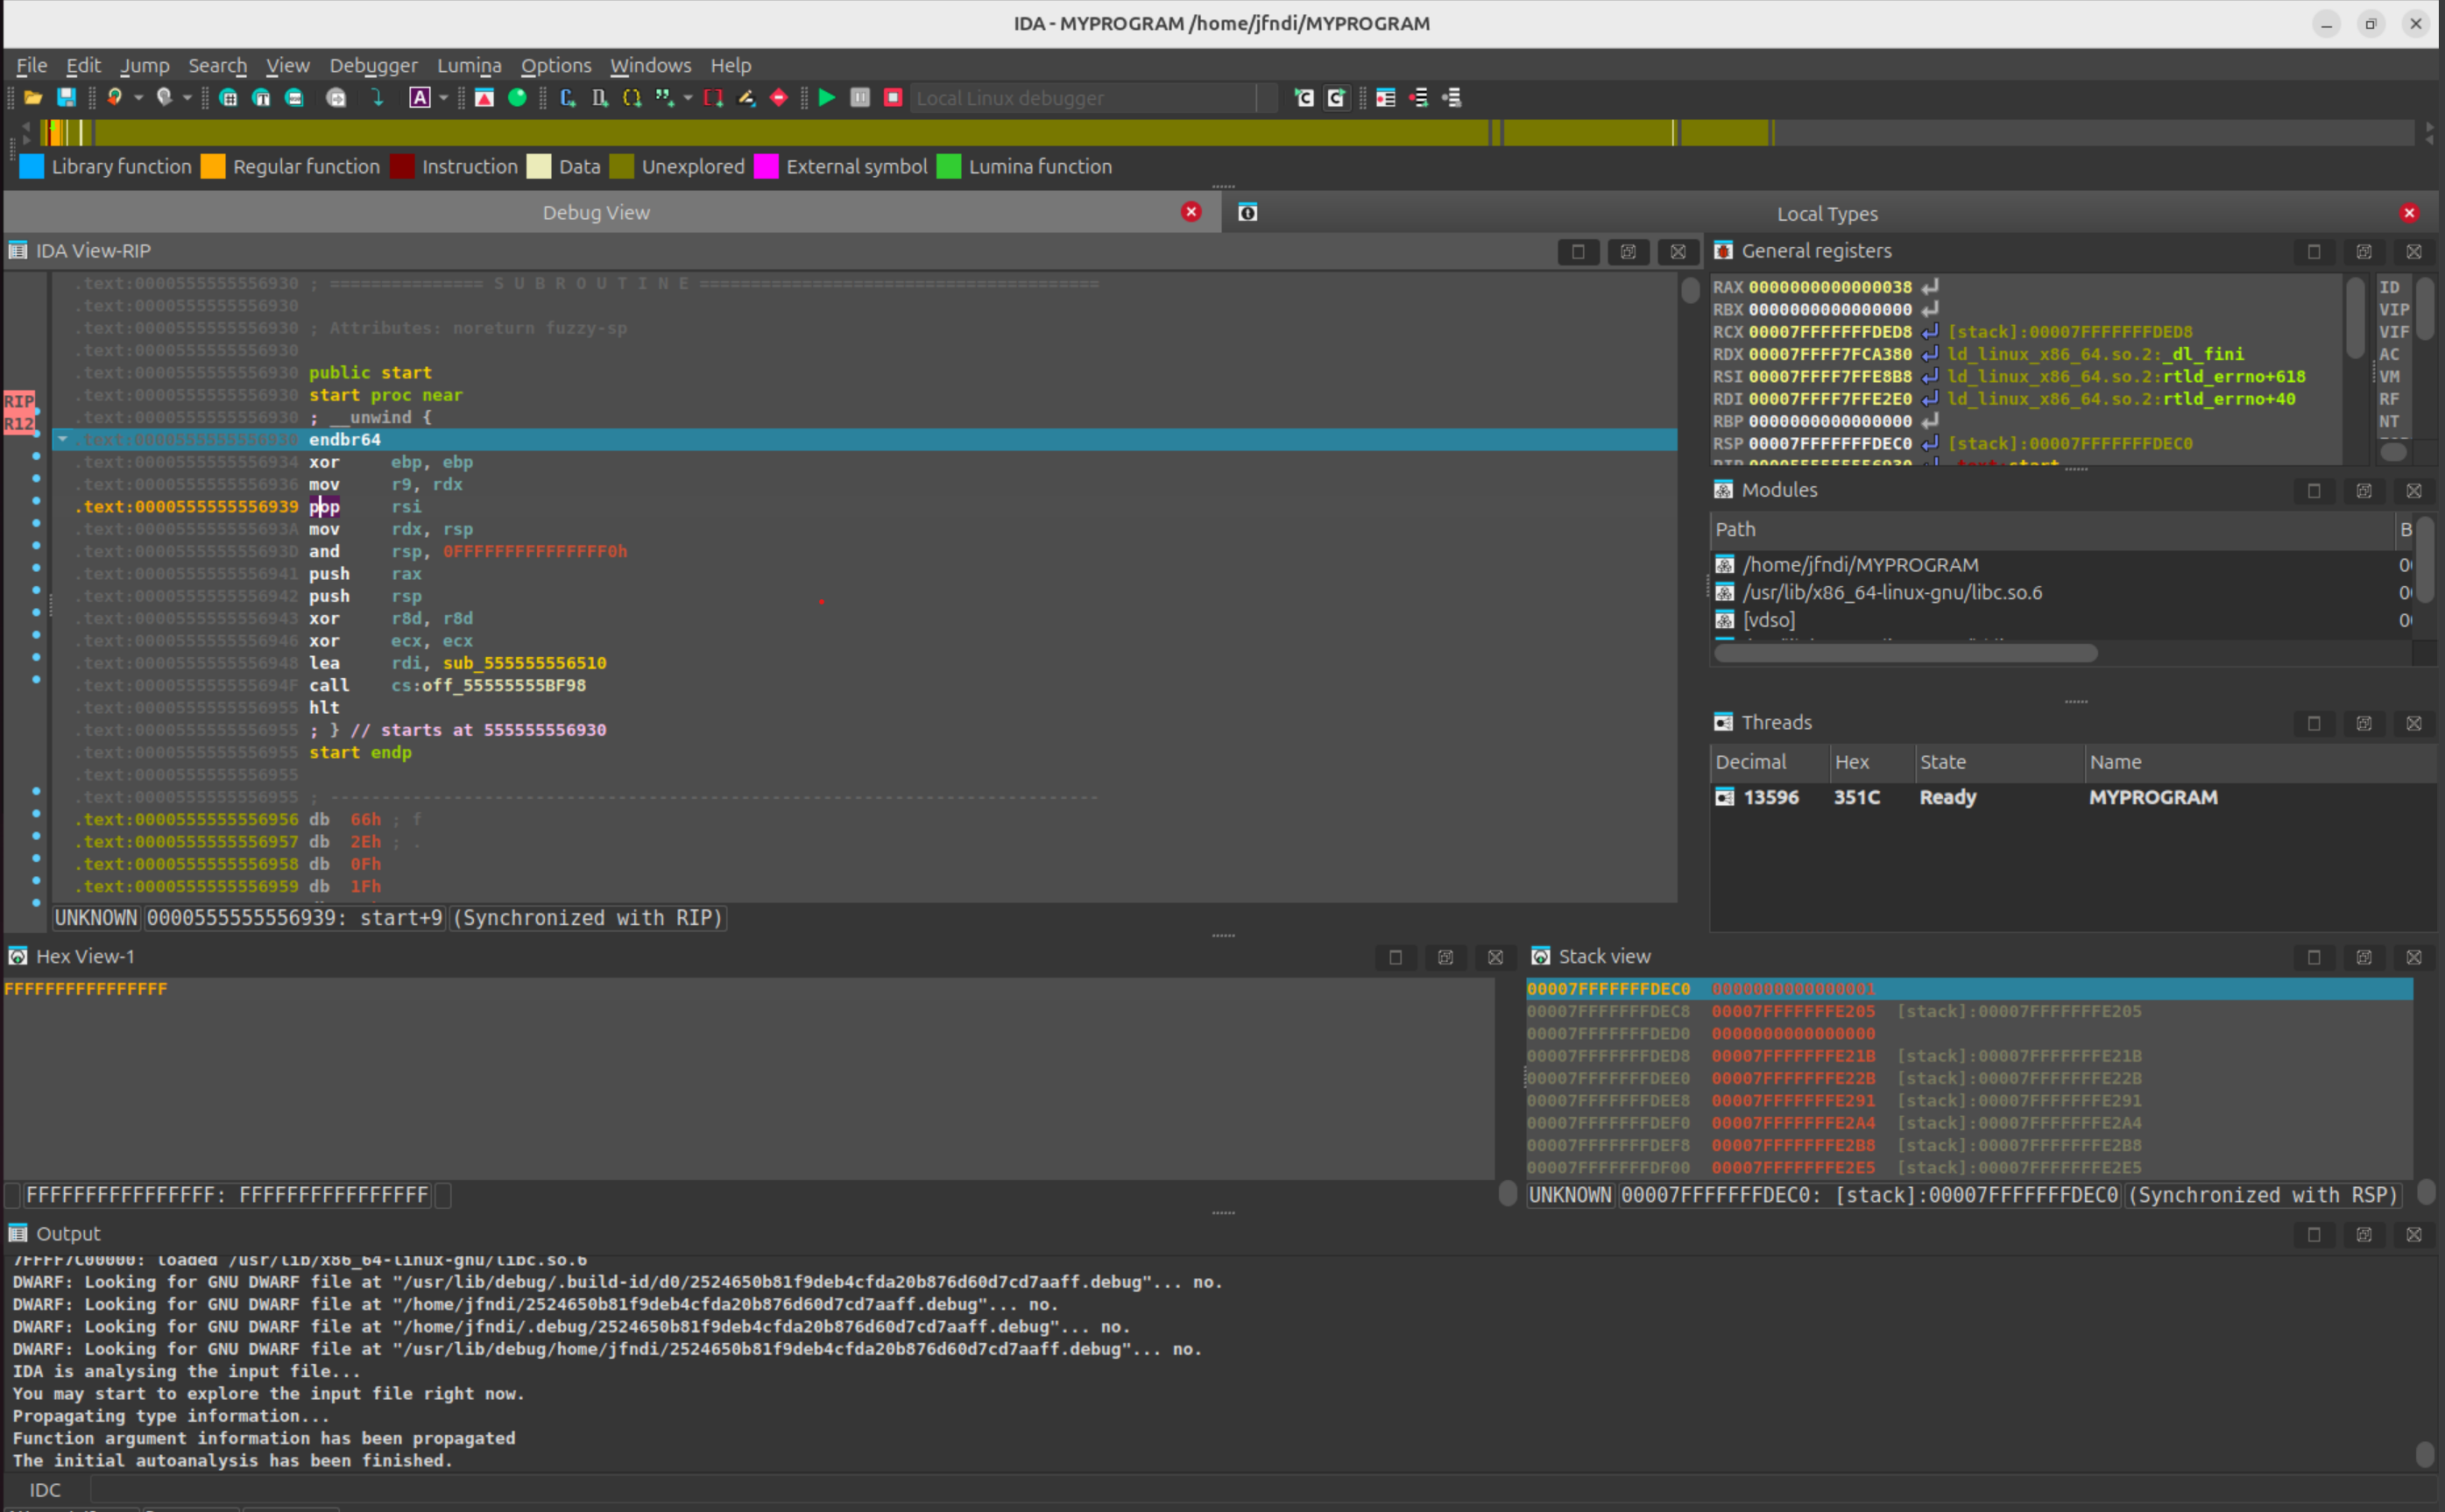
The command
ida -rlinux+
will offer you a choice of running processes to connect to.
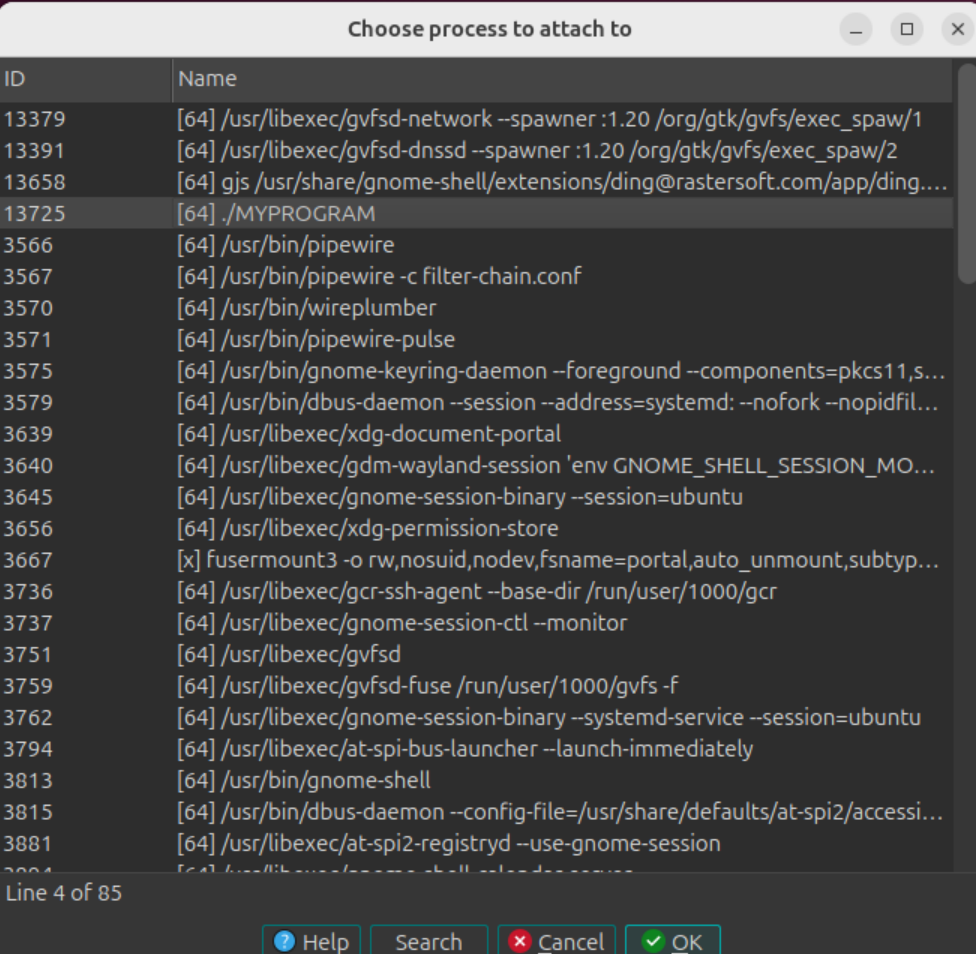
and we can proceed with our local Linux debugging session.
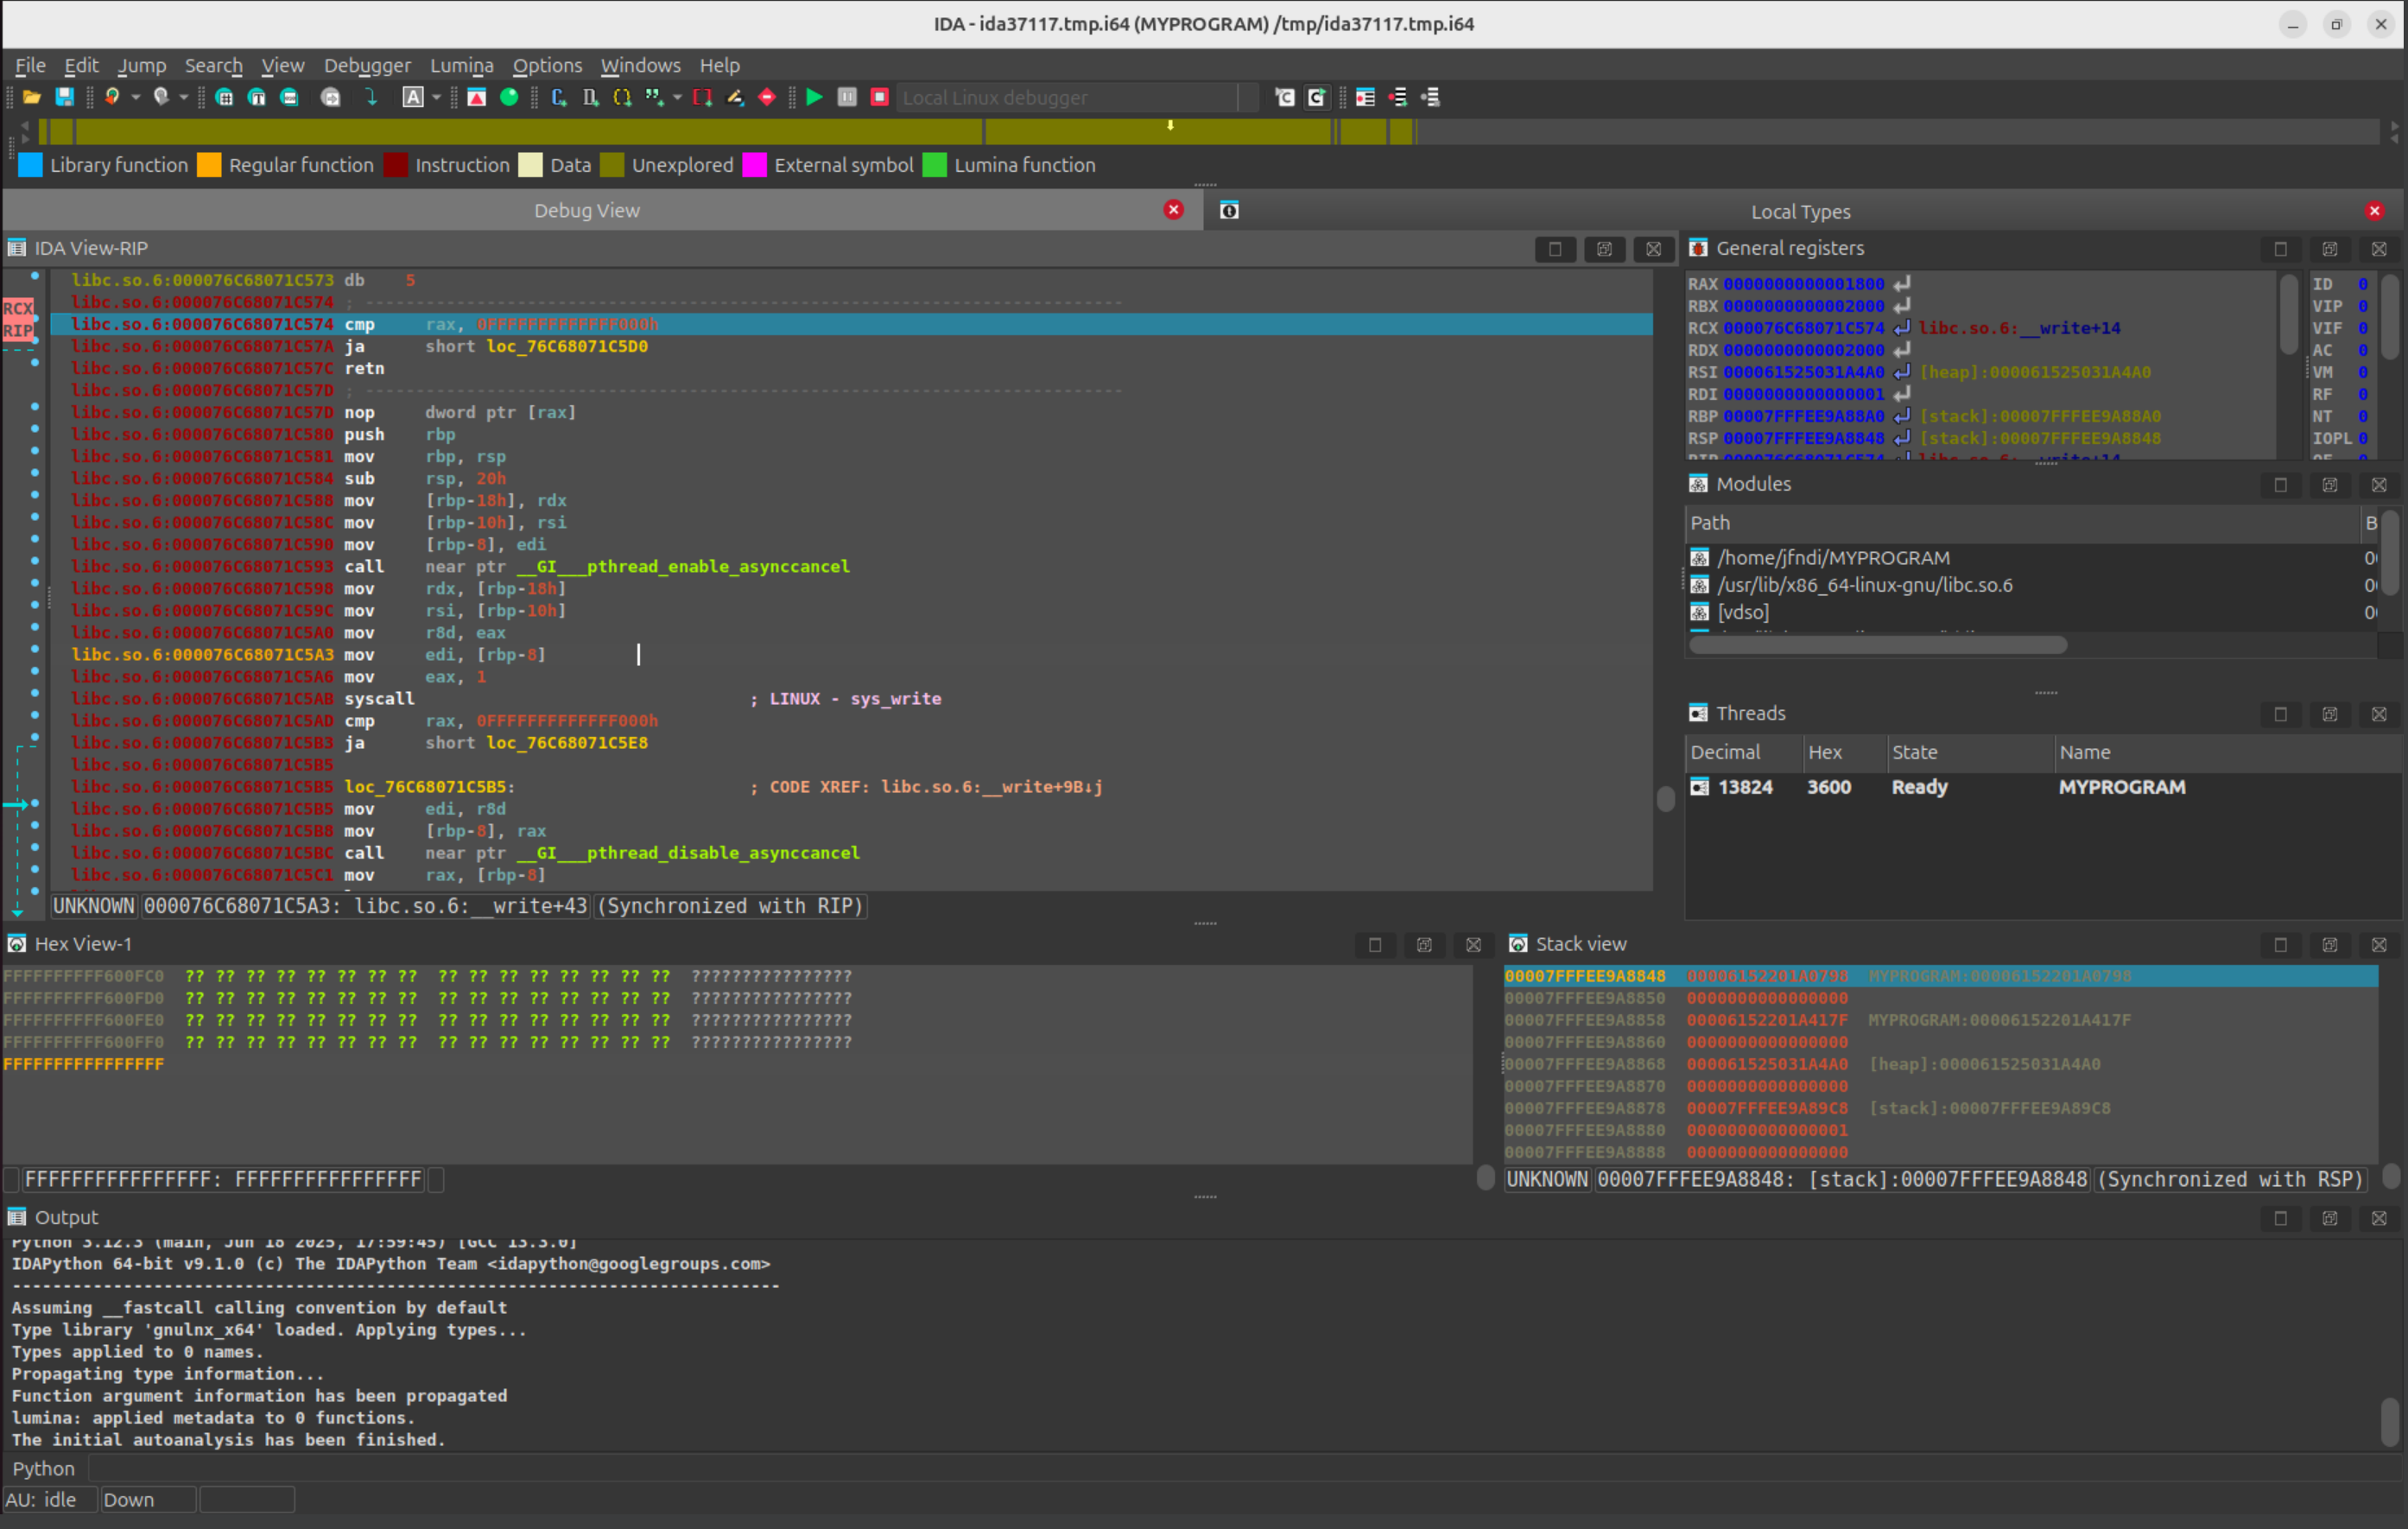
Debugging Linux/Windows Applications with PIN Tracer module
Introduction
The PIN tracer is a remote debugger plugin used to record execution traces. It allows to record traces on Linux and Windows (x86 and x86_64) from any of the supported IDA platforms (Windows, Linux and MacOSX). Support for MacOSX targets is not yet available.
{% hint style=“info” %}
IDA PIN Tool Sources:
The PIN tool for the latest versions of IDA can be found in the Download Center of My Hex-Rays portal, under SDK and Utilities.
For older versions of IDA, refer to the direct links.
{% endhint %}
PIN support for MacOSX
Recording traces on MacOSX target is not supported yet.
However, it’s possible to record traces from a Linux or Windows target using the MacOSX version of IDA.
Building the PIN tool
Before using the PIN tracer the PIN tool module (distributed only in source code form) must be built as the Intel PIN license disallows redistributing PIN tools in binary form.
First, download PIN, and unpack it on your hard drive.
the PIN tools are a little sensitive to spaces in paths. Therefore, we recommend unpacking in a no-space path. E.g., “C:\pin”, but not “C:\Program Files (x86)\.
The building process of the PIN tool is different for Windows and Linux.
Building on Windows
- Install Visual Studio. It is possible to build the PIN tool with the Express version of Visual Studio for C++.
- Download the IDA pintool sources from:
- Download Center of My Hex-Rays portal (for the latest IDA versions).
- https://hex-rays.com/hubfs/freefile/idapin76.zip (*) for older IDA versions.
- pintool 6.9 and higher should be built with PIN version 3.0 and higher, for earlier versions of pintool you should use PIN build 65163.
- Unpack the .zip file into
/path/to/pin/source/tools/ - Open
/path/to/pin/source/tools/idapin/IDADBG.slnin Visual Studio, select the correct build configuration (either Win32 or x64) and build the solution.
Alternatively you can use GNU make:
- Install GNU make as a part of cygwin or MinGW package
- Unpack the .zip file into
/path/to/pin/source/tools/ - Prepare Visual Studio environment (e.g.,
%VCINSTALLDIR%\Auxiliary\Build\vcvars32.batfor 32-bit pintool or%VCINSTALLDIR%\Auxiliary\Build\vcvars64.batfor 64-bit one) cd /path/to/pin/source/tools/idapinmake
Building on Linux
- Install GCC 3.4 or later
- Download the IDA pintool sources from:
- Download Center of My Hex-Rays portal (for the latest IDA versions).
- https://hex-rays.com/hubfs/freefile/idapin76.zip (*) for older IDA versions.
- Unpack the .zip file into /path/to/pin/source/tools/
- Open a console, and do the following (only for versions of PIN prior to 3.0):
cd /path/to/pin/ia32/runtimeln -s libelf.so.0.8.13 libelf.socd /path/to/pin/intel64/runtimeln -s libelf.so.0.8.13 libelf.socd /path/to/pin/source/tools/Utilsls testGccVersion 2>/dev/null || ln -s ../testGccVersion testGccVersion
cd /path/to/pin/source/tools/idapin
$ make TARGET=ia32
for building the x86 version, or
$ make TARGET=intel64
for the x64 version.
URL Schema
(*) Where ‘$(IDAMAJMIN)’ is the IDA version major/minor. E.g., for IDA 7.6, the final URL would be: https://hex-rays.com/hubfs/freefile/idapin76.zip
NOTE: These URL links are intended for older versions of the PIN tool. To download the PIN tool for the latest versions of IDA, please visit the Download Center in My Hex-Rays portal.
Pintool 6.9 and higher are compatible with versions 6.5-6.8 of IDA so currently you can use them.
Start process
Once the PIN tool module is built we can use it in IDA. Open a binary in IDA and wait for the initial analysis to finish. When it’s done select the PIN tracer module from the debuggers drop down list or via Debugger > Select debugger:

After selecting the PIN tracer module select the menu Debugger > Debugger options > Set specific options. The following new dialog will be displayed:
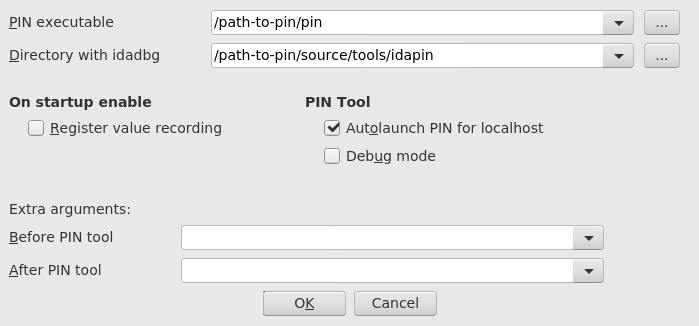
In this dialog at least the following options are mandatory:
- PIN executable: This is the full path to the PIN binary (including the “pin.exe” or “pin” file name). In some versions “pin.sh” may exist – in this case you should use it.
- Directory with idadbg: This is the directory where the idadbg.so or idadbg.dll PIN tool resides. Please note that only the directory must be specified.
Fill the form with the correct paths and press OK in this dialog and enable option Autolaunch PIN for localhost.
We can interact with the PIN tracer like with any other debugger module: add breakpoints and step into or step over functions by pressing F7 or F8 alternatively.
Now we put a breakpoint in the very first instruction of function main

and launch the debugger by pressing the F9 key or by clicking the Start button in the debugger toolbar.
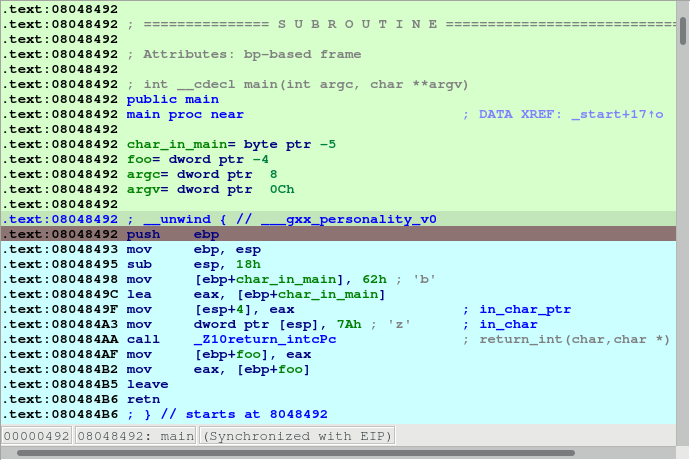
Make several steps by pressing F8. We can see all the instructions that were executed changed their color:
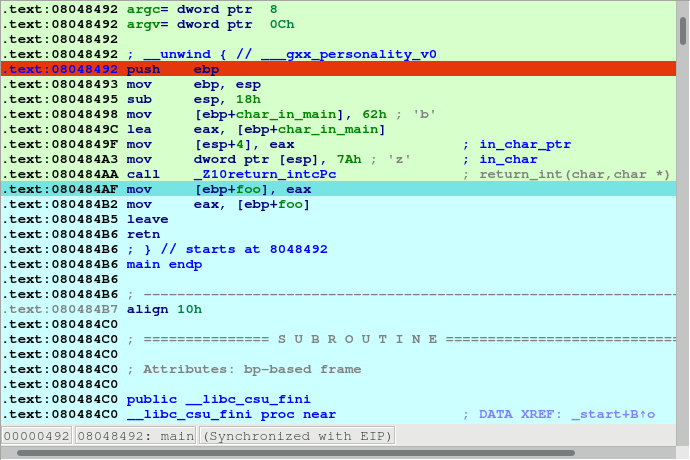
Now let the application run and finish by pressing F9 again. After a while the process will terminate and IDA will display a dialog telling us that is reading the recorded trace. Once IDA reads the trace the debugger will stop and the instructions executed will be highlighted (like with the built-in tracing engine) as in the following picture:
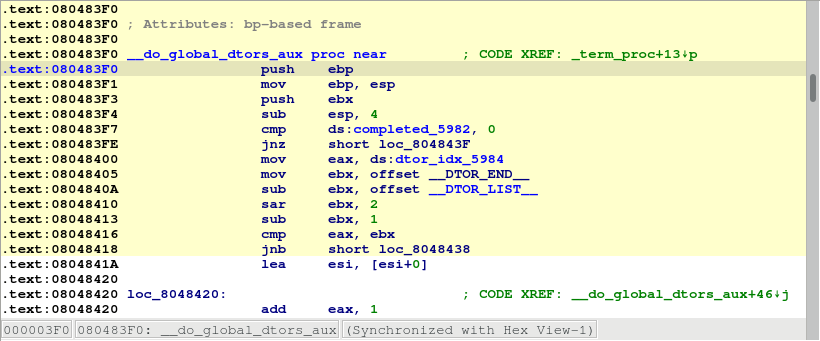
We can see in the graph view mode the complete path the application took in some specific function by switching to the graph view, pressing space bar and then pressing “w” to zoom out:
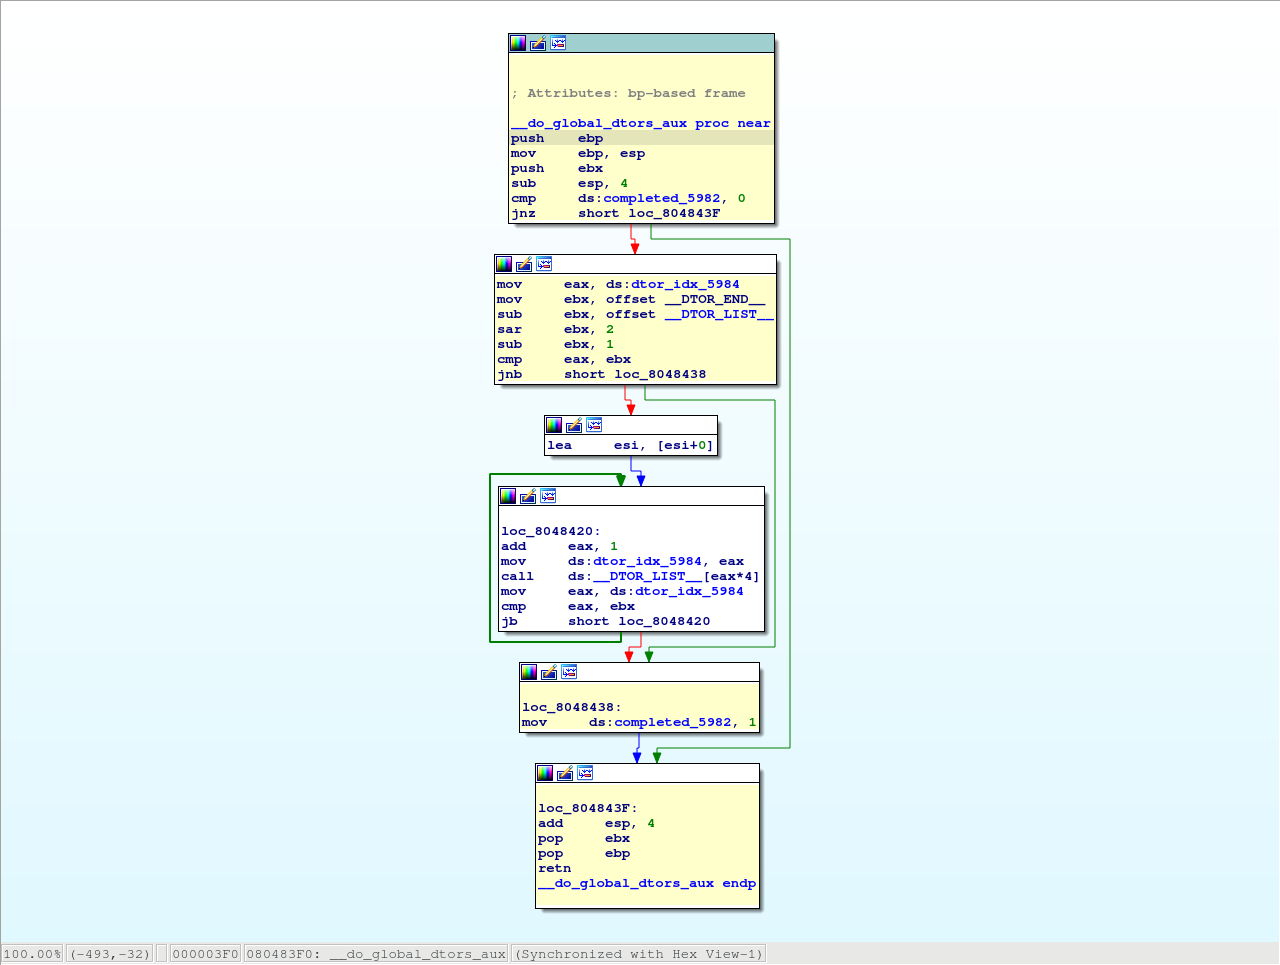
Attach to an existing process
Instead of launching a new process we could attach to a running process and debug it. For that we could have selected the “Debugger > Attach to process…” menu item. IDA will display a list of active processes.
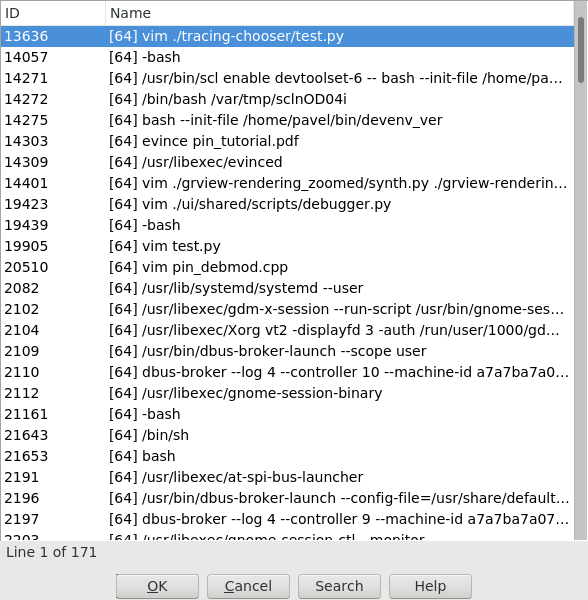
We just select the process we want to attach to. IDA will then attach to the selected process, and leave it suspended at the place it was when it was attached to:
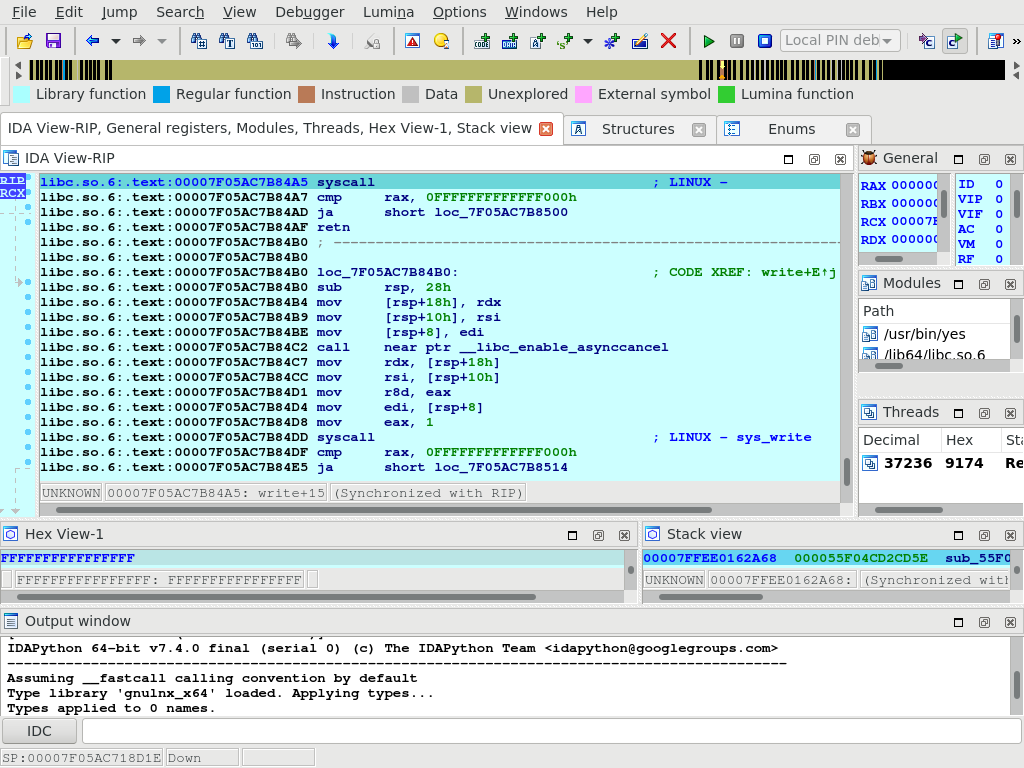
Remote debugging
In case of remote debugging you can run IDA and PIN backend on different platforms.
Starting the remote PIN backend
The first thing to do, is to start the PIN debugging backend on the target machine. Command line depends of bitness of the target application.
$ <path-to-pin> -t <path-to-pintool> -p <port> -- <application> <application-options>
For example, a 64-bit application ls would be started for debugging by the following comand:
$ /usr/local/pin/pin \
-t /usr/local/pin/source/tools/idapin/obj-intel64/idadbg64.so \
-p 23947 -- \
/bin/ls
whereas a 32-bit one hello32 as follows:
/usr/local/pin/pin \
-t /usr/local/pin/source/tools/idapin/obj-ia32/idadbg.so \
-p 23947 -- \
./hello32
there is a more complicated way to start an application regardless bitness:
/usr/local/pin/pin \
-t64 /usr/local/pin/source/tools/idapin/obj-intel64/idadbg64.so \
-t /usr/local/pin/source/tools/idapin/obj-ia32/idadbg.so \
-p 23947 -- \
/usr/bin/ls
Also you can attach to already running programs:
$ <path-to-pin> -pid <pid-to-attach> -t <path-to-pintool> -p <port> --
For example:

Connecting IDA to the backend
The next step is to select PIN tracer module in IDA via Debugger > Select debugger and switch IDA to remote PIN backend. For this you should disable option Autolaunch PIN for localhost in the PIN options dialod (Debugger > Debugger options > Set specific options):
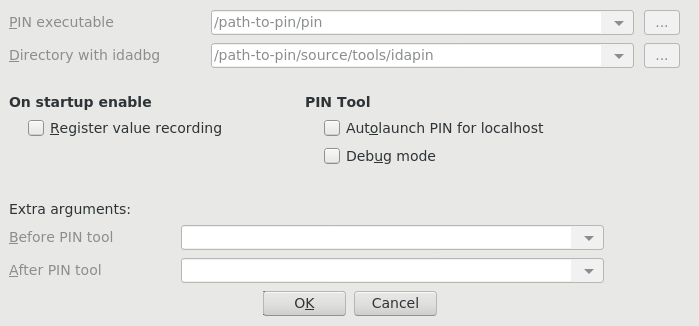
and then tell IDA about the backend endpoint, through the menu action Debugger > Process options…
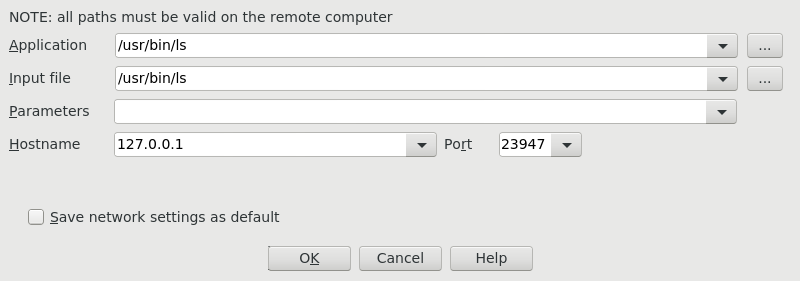
Once IDA knows what host to contact (and on what port), debugging an application remotely behaves exactly the same way as if you were debugging it locally.
Debugging Windows Applications with IDA Bochs Plugin
Check the tutorial about debuggind Windows apps with IDA Bochs: {% file src=“bochs_tut.pdf” %}
Debugging Windows Applications with IDA WinDbg Plugin
Quick overview:
The Windbg debugger plugin is an IDA Pro debugger plugin that uses Microsoft’s debugging engine (dbgeng) that is used by Windbg, Cdb or Kd.
To get started, you need to install the latest Debugging Tools from Microsoft website: https://msdn.microsoft.com/en-us/windows/hardware/hh852365
or from the Windows SDK / DDK package.
Please make sure you should install the x86 version of the debugging tools which is used by both IDA Pro and IDA Pro 64. The x64 version will NOT work.
After installing the debugging tools, make sure you select « Debugger / Switch Debugger » and select the WinDbg debugger.
Also make sure you specify the correct settings in the “Debugger specific options” dialog:
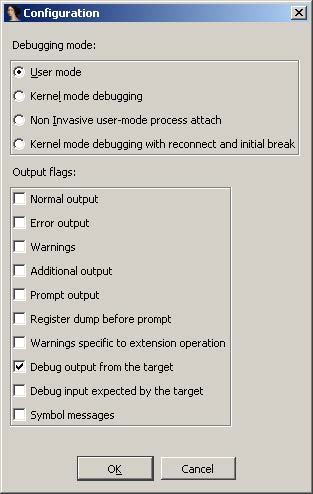
-
User mode: Select this mode for user mode application debugging (default mode)
-
Kernel mode: Select this mode to attach to a live kernel.
-
Non Invasive debugging: Select this mode to attach to a process non-invasively
-
Output flags: These flags tell the debugging engine which kind of output messages to display and which to omit
-
Kernel mode debugging with reconnect and initial break: Select this option when debugging a kernel and when the connection string contains ‘reconnect’. This option will assure that the debugger breaks as soon as possible after a reconnect.
To make these settings permanent, please edit the IDA\cfg\dbg_windbg.cfg file.
**
To specify the debugging tools folde**r you may add to the PATH environment variable the location of Windbg.exe or edit %IDA%\cfg\ida.cfg and change the value of the DBGTOOLS key.After the debugger is properly configured, edit the process options and leave the connection string value empty because we intend to debug a local user-mode application.
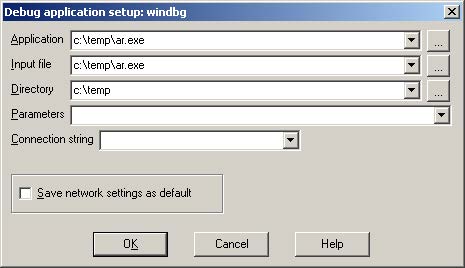
Now hit F9 to start debugging:
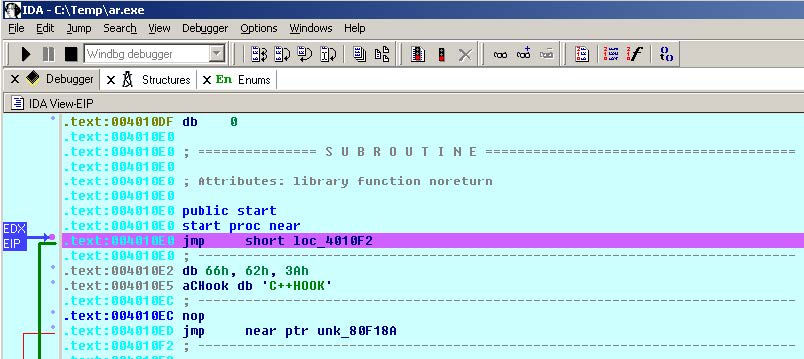
The Windbg plugin is very similar to IDA Pro’s Win32 debugger plugin, nonetheless by using the former, one can benefit from the command line facilities and the extensions that ship with the debugging tools.
For example, one can type “!chain” to see the registered Windbg extensions:
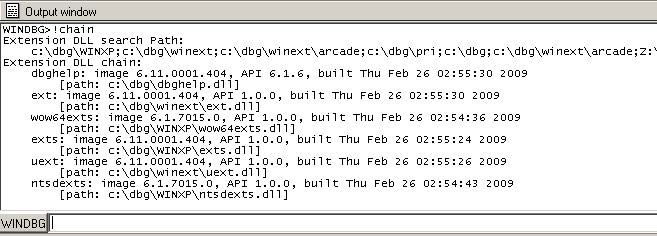
“!gle” is another command to get the last error value of a given Win32 API call.
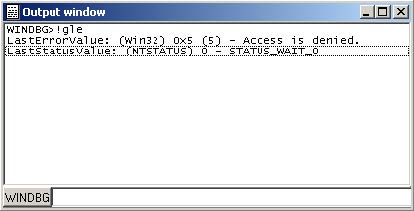
Another benefit of using the Windbg debugger plugin is the use of symbolic information.
Normally, if the debugging symbols path is not set, then the module window will only show the exported names. For example kernel32.dll displays 1359 names:
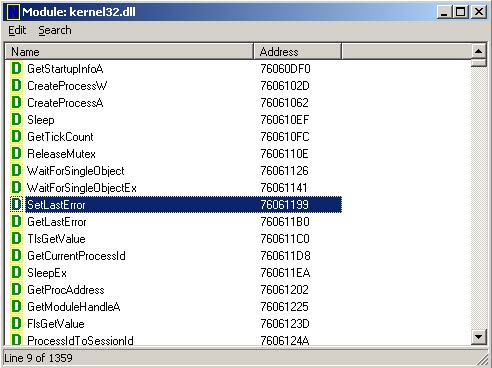
Let us configure a symbol source by adding this environment variable before running IDA:
set _NT_SYMBOL_PATH=srv*C:\Temp\pdb*http://msdl.microsoft.com/download/symbols
It is also possible to set the symbol path directly while debugging:
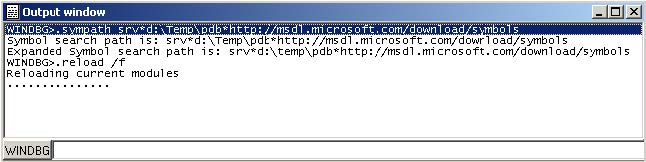
and then typing “.reload /f” to reload the symbols.
Now we try again and notice that more symbol names are retrieved from kernel32.dll:
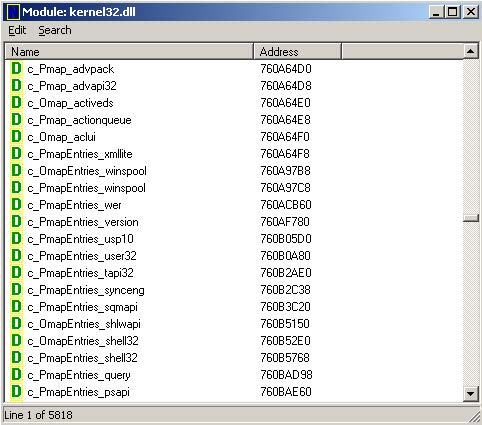
Now we have 5818 symbols instead!
It is also possible to use the “x” command to quickly search for symbols:
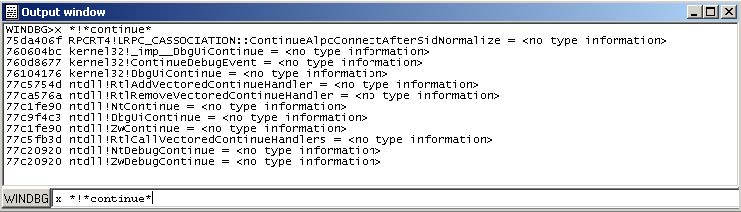
(Looking for any symbol in any module that contains the word “continue”)
Debugging a remote process
We have seen how to debug a local user mode program, now let us see how to debug a remote process.
First let us assume that “pcA” is the target machine (where we will run the debugger server and the debugged program) and “pcB” is the machine where IDA Pro and the debugging tools are installed.
To start a remote process:
- On “pcA”, type:
- dbgsrv -t tcp:port=5000
(change the port number as needed)
- On “pcB”, setup IDA Pro and Windbg debugger plugin:
- “Application/Input file”: these should contain a path to the debuggee residing in “pcA”
- Connection string: tcp:port=5000,server=pcA
Now run the program and debug it remotely.
To attach to a remote process, use the same steps to setup “pcA” and use the same connection string when attaching to the process.
More about connection strings and different protocols (other than TCP/IP) can be found in “debugger.chm” in the debugging tools folder.
Debugging the kernel with VMWare
We will now demonstrate how to debug the kernel through a virtual machine.
In this example we will be using VMWare 6.5 and Windows XP SP3.
Configuring the virtual machine:
Run the VM and then edit “c:\boot.ini” file and add one more entry (see in bold):
[operating systems]
multi(0)disk(0)rdisk(0)partition(1)\WINDOWS=“Microsoft Windows XP Professional” /noexecute=optin /fastdetect multi(0)disk(0)rdisk(0)partition(1)\WINDOWS=“Local debug” /noexecute=optin /fastdetect /debug /debugport=com1 /baudrate=115200
For MS Windows Vista please see: http://msdn.microsoft.com/en-us/library/ms791527.aspxp
Actually the last line is just a copy of the first line but we added the “/debug” switch and some configuration values.
Now shutdown the virtual machine and edit its hardware settings and add a new serial port with option “use named pipes”:
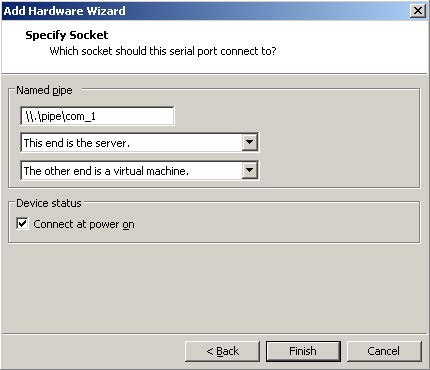
Press “Finish” and start the VM. At the boot prompt, select “Local debug” from the boot menu:
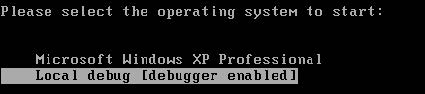
Configuring Windbg debugger plugin:
Now run IDA Pro and select Debugger / Attach / Windbg
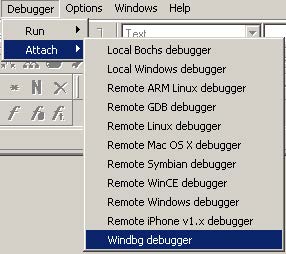
Then configure it to use “Kernel mode” debugging and use the following connection string:
com:port=\.\pipe\com_1,baud=115200,pipe
It is possible to use the ‘reconnect’ keyword in the connection string:
com:port=\.\pipe\com_1,baud=115200,pipe,reconnect
Also make sure the appropriate option is selected from the debugger specific options.
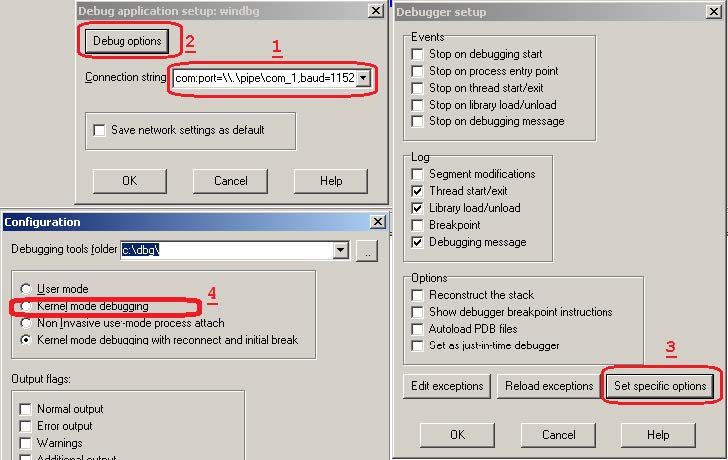
Please note that the connection string (in step 1) refers to the named pipe we set up in the previous steps.
Finally, press OK to attach and start debugging.
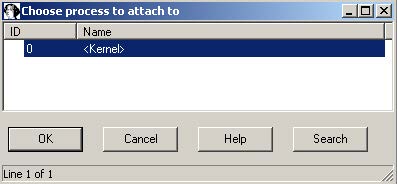
When IDA attaches successfully, it will display something like this:

If you do not see named labels then try checking your debugging symbols settings.
Note: In kernel mode IDA Pro will display one entry in the threads window for each processor.
For example a two processor configuration yields:

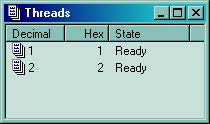
This screenshot shows how we are debugging the kernel and changing the disassembly listing (renaming stack variables, or using structure offsets):
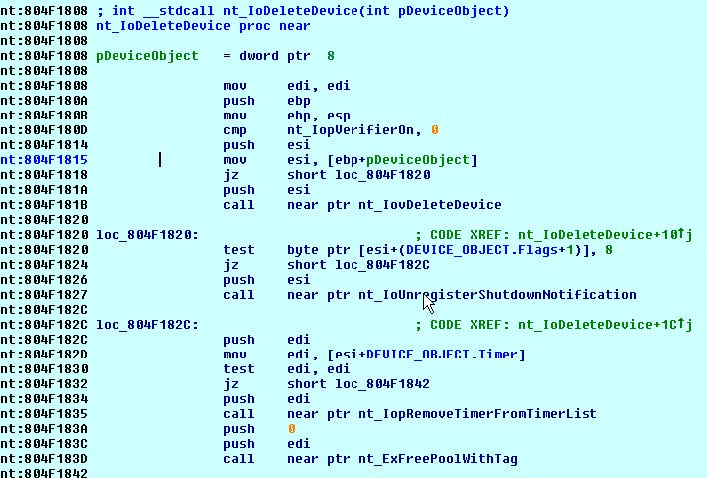
At the end you can detach from the kernel and resume it or detach from the kernel and keep it suspended.
To detach and resume, simply select the “Debugger / Detach”, however to detach and keep the kernel suspended select “Debugger / Terminate Process”.
Debugging the kernel through kdsrv.exe
In some cases, when debugging a 64bit kernel using a 1394 cable then 64bit drivers are needed, thus dbgeng (32bits) will not work. To workaround this problem we need to run the kernel debugger server from the x64 debugging tools folder and connect to it:
- Go to “Debugging Tools (x64)” installation
- Run kdsrv.exe (change the port number/transport appropriately):
- kdsrv -t tcp:port=6000
- Now run ida64 and specify the following connection string (change the transport value appropriately):
- kdsrv:server=@{tcp:port=6000,server=127.0.0.1},trans=@{com:port=\.\pipe\com_3,baud=115200,pipe}
Using the Bochs debugger plugin in Linux
Introduction
This guide illustrates how to configure the Bochs debugger plugin under Linux/MacOS. Downloading and compiling Bochs Please download the Bochs source code tarball and extract it.
tar zxf bochs-2.5.1.tar.gz
Run the ‘configure’ script (it is possible to pass other switches) and make sure that the switches marked in bold are present:
./configure --enable-sb16 --enable-ne2000 --enable-all-optimizations \ --enable-cpu-level=6 --enable-x86-64 --enable-pci \ --enable-clgd54xx --enable-usb --enable-usb-ohci \ --enable-show-ips --with-all-libs \ --enable-debugger --disable-readline
Note: under MacOS Lion 10.7.3 use the following switches:
./configure --enable-cpu-level=6 --with-nogui --enable-debugger --enable-disasm --enable-x86-debugger --enable-x86-64 --disable-readline --enable-all-optimizations --enable-sb16 --enable-ne2000 --enable-pci --enable-acpi --enable-clgd54xx --enable-usb --enable-usb-ohci --enable-show-ips
For a complete installation guide please check: http://bochs.sourceforge.net/doc/docbook/user/compiling.html. Now run “make” and “make install”. Then type “whereis bochs” to get something like:
lallous@ubuntu:~/dev/bochs-2.5.1$ whereis bochsbochs: /usr/local/bin/bochs /usr/local/lib/bochs
Configuring IDA and the Bochs debugger plugin
Opening a database and selecting the Bochs debugger
After installing Bochs, run IDA Pro and open a Windows PE file and select ‘Debugger -> switch debugger’ and select “Local Bochs Debugger”:
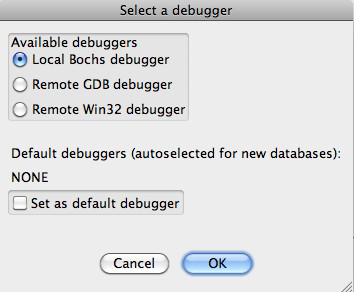
If a PE file was loaded, then the Bochs debugger plugin will operate in “PE mode”:
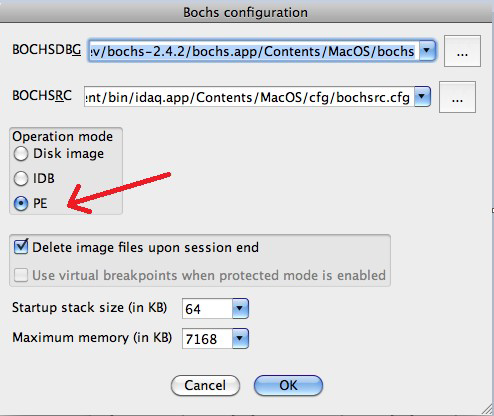
In case the other two modes (IDB or Disk Image mode) are used then there is no need to specify any additional configurations options, otherwise please continue reading this guide. Before launching the debugger with F9, the Bochs debugger plugin needs to know where to find the MS Windows DLLs and which environment variables to use. Attempting to run the debugger without configuring it may result in errors like this:
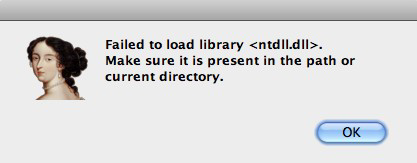
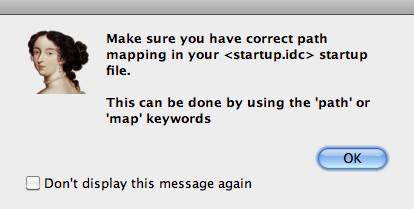
Here is a basic list of DLLs that are needed by most programs:
- advapi32.dll
- comctl32.dll
- comdlg32.dll
- gdi32.dll
- kernel32.dll
- msvcrt.dll
- mswsock.dll
- ntdll.dll
- ntoskrnl.exe
- shell32.dll
- shlwapi.dll
- urlmon.dll
- user32.dll
- wininet.dll
- ws2_32.dll
- wsock32.dll
Let us create a directory in $HOME/bochs_windir/ and place those DLLs there. Specifying the Windows DLL path and environment variables using the startup file The startup file is a script file found in idadir\plugins\bochs directory. If IDC was the currently active language then startup.idc is used, otherwise startup.ext (where ext is the extension used by the currently selected extlang). In this tutorial we will be working with IDC, so we will edit the startup.idc file. (Please note that changes to this file will affect all databases. For local changes (database specific configuration) take a copy of the startup script file and place it in the same directory as the database then modify it). It is possible to specify a path map for a complete directory, for example:
/// path /home/lallous/bochs_windir/=c:\windows\system32
This line means that /home/lallous/bochs_windir/* will be visible to the debugged program as c:\windows\system32* (for example /home/lallous/bochs_windir/ntdll.dll will be visible as c:\windows\system32\ntdll.dll)
If all DLLs referenced by the program are in the bochs_windir directory, then running the process again should work:
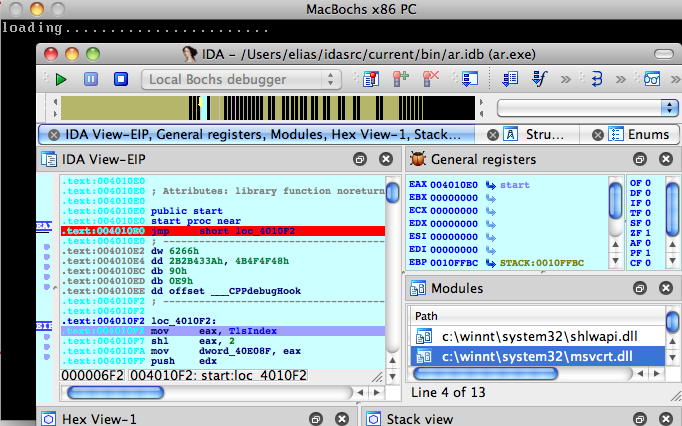
(Bochs has already started and IDA switched to debugging mode.) There are two things that should be configured. Press “.” to switch to the output window (or use the Debugger / Modules list window to inspect the modules list):
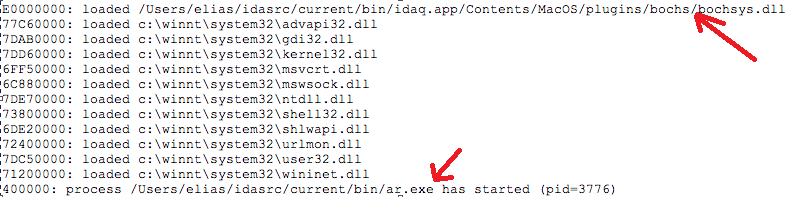
1. The path to bochsys.dll is still not properly mapped. In our case, we need to add the following line to the startup file:
```
/// map /Users/elias/idasrc/current/bin/idaq.app/Contents/MacOS/plugins/bochs/bochsys.dll=c:\windows\system32\bochsys.dll
```
(As opposed to the path keyword that maps complete directories, the map keyword to map individual files).
To hide the presence of bochsys.dll, simply map it to another name:
```
/// map /Users/elias/idasrc/current/bin/idaq.app/Contents/MacOS/plugins/bochs/bochsys.dll=c:\windows\system32\kvm.dll
```
6. The executable's path: we also need to add a map for the executable itself or a path entry for the whole folder:
```
/// path /Users/elias/idasrc/current/bin/=c:\malware
```
Now, after we run the program again we should get a more correct module list:
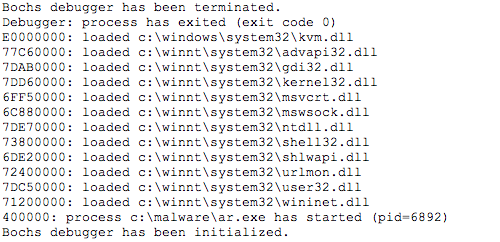
It is equally important to specify some environment variables. We will use the env keyword to define all the environment variables:
/// env PATH=c:\windows;c:\tools/// env USERPROFILE=C:\Users\Guest
Specifying the Windows DLL path and environment variables using environment variables An alternative way of configuring the DLLs path and environment variables is to use the IDABXPATHMAP and the IDABXENVMAP environment variables. To specify the path map, export the following environment variable:
$ export IDABXPATHMAP=/home/lallous/bochs_windir/=c:/windows/system32;\ /home/lallous/dev/idaadv/plugins/bochs/=c:/windows/system32;\ /home/lallous/temp=c:/malware
(Please note that the forward slash (/) will be replaced with a backslash automatically by the plugin) Similarly, specify the environment variables with the IDABXENVMAP environment variable:
$ export IDABXENVMAP="USERPROFILE=c:/Users/Guest++PATH=c:/windows;c:\tools"
(Please note that we used the ++ to separate between multiple variables)
In case you require to do specific changes (per database) to the startup file then please take a copy of it and place it in the same directory as the database. Refer to the help IDA Pro help file for more information.
Debugging Windows Kernel with VMWare and IDA WinDbg Plugin
Debugging the Windows Kernel with VMWare and IDA WinDbg Plugin
We will now demonstrate how to debug the kernel through a virtual machine.
In this example we will be using VMware Workstation 15 Player and Windows 7.
It is highly recommended to read the article Windows driver debugging with WinDbg and VMWare
Configuring the virtual machine
Run the VM and use the bcedit command1 to configure the boot menu as stated in the article.
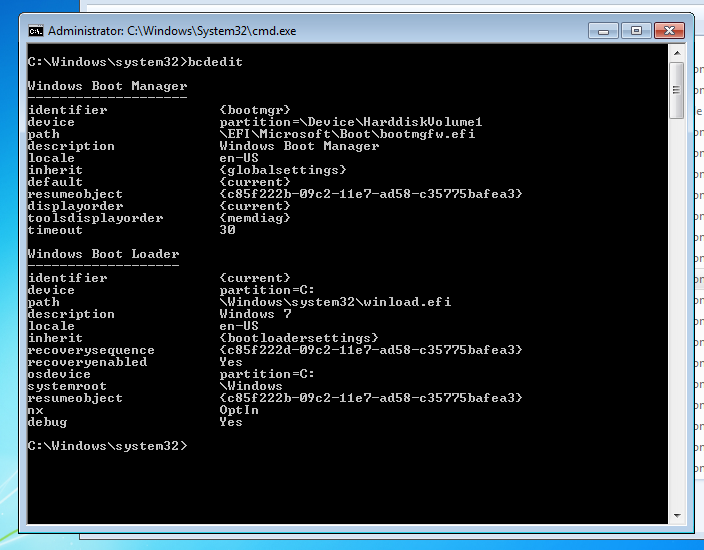
Edit the VM hardware settings and add a new serial port with option use named pipe:
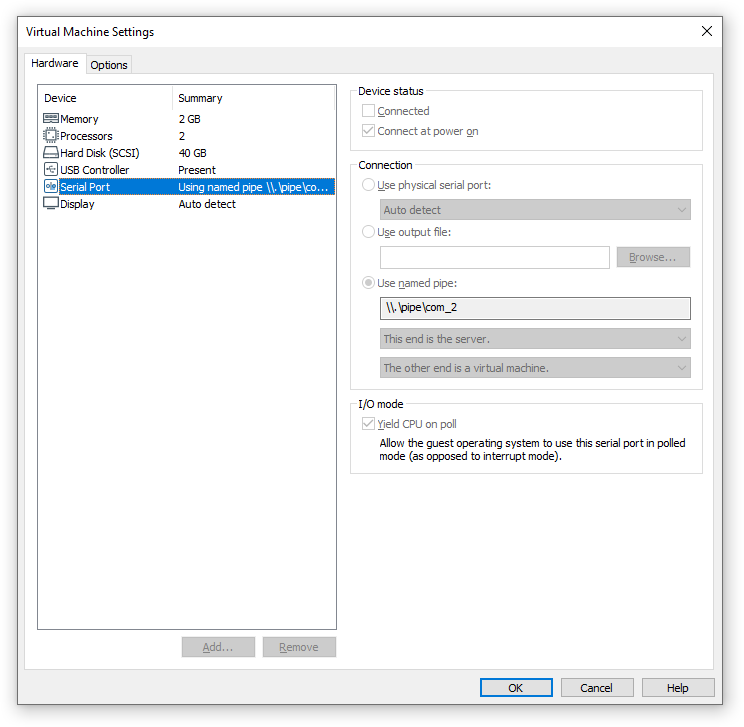
Restart the VM to debug. At the boot prompt, select the menu item containing [debugger enabled] from the boot menu.
Configuring Windbg debugger plugin
The connection string com:port=\\.\pipe\com_2,baud=115200,pipe,reconnect for Windbg plugin should refer to the named pipe we set up in the previous steps.
Starting the debugger step by step
Start IDA Pro with an empty database:
> ida64 -t sample.i64
Select the Windbg debugger using “Debugger > Select debugger”:
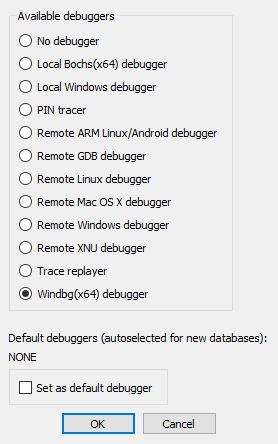
Then configure it to use “Kernel mode debugging” debugging in the “Debugger specific options” dialog:
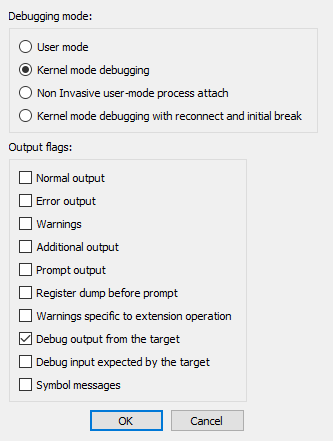
After the debugger is properly configured, edit the process options and set the connection string:
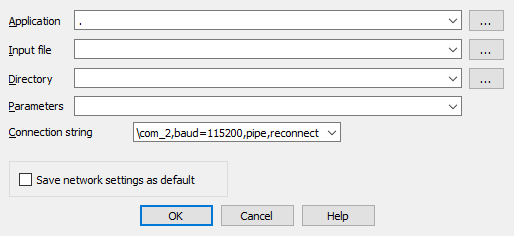
Finally, start debugging using “Debugger > Attach to process”:
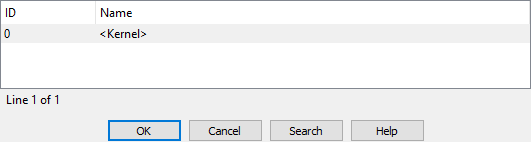
IDA Pro may display a wait box “Refreshing module list” for some time. Then it will display something like this:
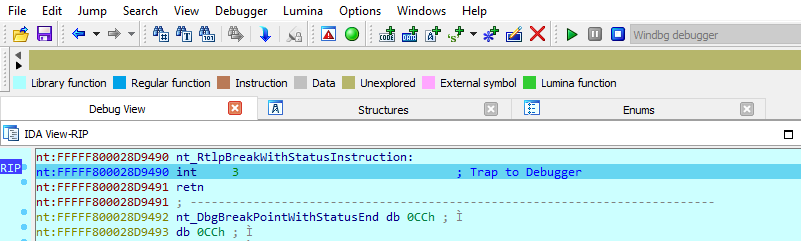
Starting the debugger using a command line option
The simplest way to start WinDbg Plugin is to run IDA Pro with the following option:
> ida64 -rwindbg{MODE=1}@com:port=\\.\pipe\com_2,baud=115200,pipe,reconnect+0 sample.i64
{MODE=1}means “Kernel mode”+0means the “<Kernel>” process
Debugging
In kernel mode IDA Pro will display one entry in the threads window for each processor.
For example a two processor configuration2 yields:

This screenshot shows how we are debugging the kernel and changing the disassembly listing (renaming stack variables, or using structure offsets):
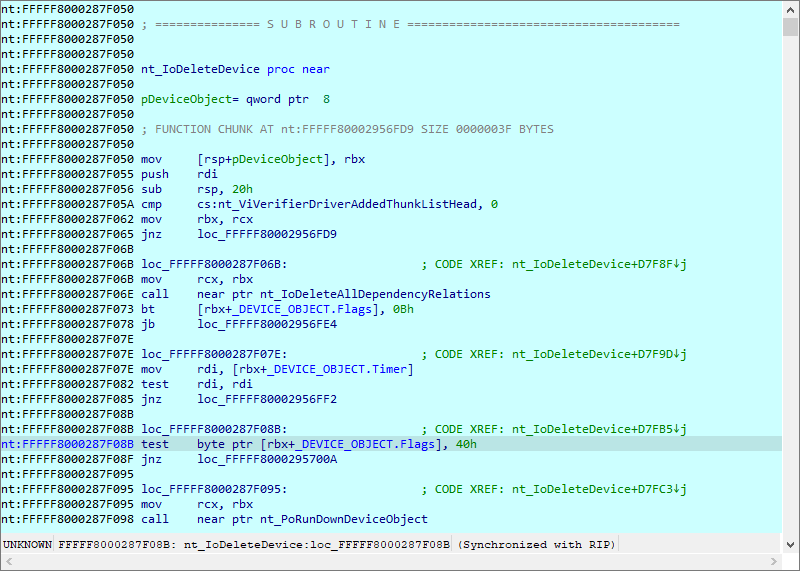
At the end you can detach from the kernel and resume it or detach from the kernel and keep it suspended.
To detach and resume, simply select the “Debugger > Detach from process”, however to detach and keep the kernel suspended select “Debugger > Terminate Process”.
Debugging the kernel through kdsrv.exe
In some cases, when debugging a 64bit kernel using a 1394 cable then 64bit drivers are needed, thus dbgeng (32bits) will not work. To workaround this problem we need to run the kernel debugger server from the x64 debugging tools folder and connect to it:
- Go to “Debugging Tools (x64)” installation
- Run kdsrv.exe (change the port number/transport appropriately):
kdsrv -t tcp:port=6000
- Now run ida64 and specify the following connection string (change the transport value appropriately):
kdsrv:server=@{tcp:port=6000,server=127.0.0.1},trans=@{com:port=\\.\pipe\com_3,baud=115200,pipe}
Debugging Linux Kernel under VMWare using IDA GDB debugger
Current versions of VMWare Workstation include a GDB stub for remote debugging of the virtual machines running inside it. In version 5.4, IDA includes a debugger module which supports the remote GDB protocol. This document describes how to use it with VMWare. As an example, we’ll debug a Linux kernel.
Debugging a Linux kernel
Let’s assume that you already have a VM with Linux installed. Before starting the debugging, we will copy symbols for the kernel for easier navigation later. Copy either /proc/kallsyms or /boot/Sytem.map* file from the VM to host.
Now edit the VM’s .vmx file to enable GDB debugger stub:
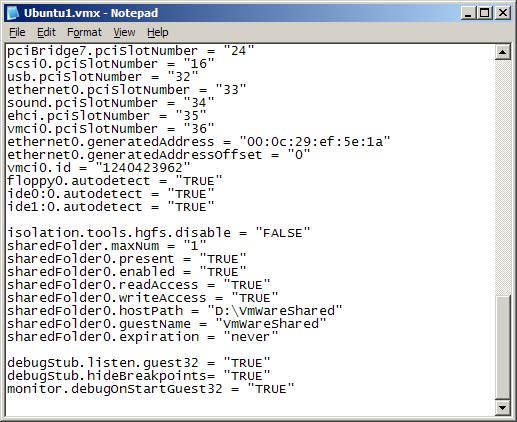
Add these lines to the file:
debugStub.listen.guest32 = “TRUE”
debugStub.hideBreakpoints= “TRUE”
monitor.debugOnStartGuest32 = “TRUE”
Save the file.
In VMWare, click “Power on this virtual machine” or click the green Play button on the toolbar.

A black screen is displayed since VMWare is waiting for a debugger to connect.
Start IDA.
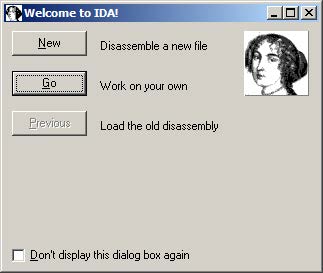
If you get the welcome dialog, choose “Go”.
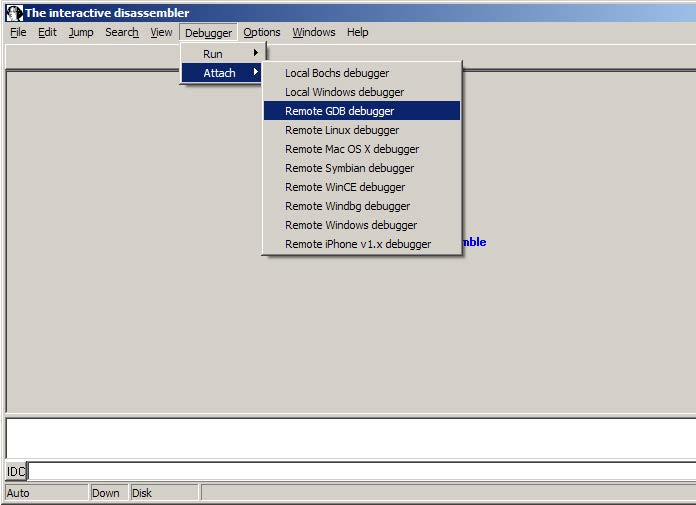
Choose Debugger | Attach | Remote GDB debugger.
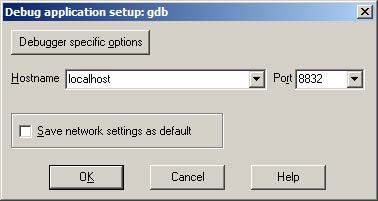
Enter “localhost” for hostname and 8832 for the port number.
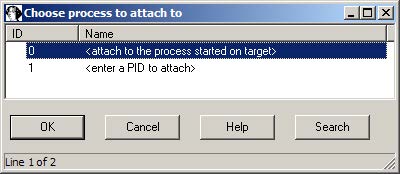
Choose <attach to the process started on target> and click OK.
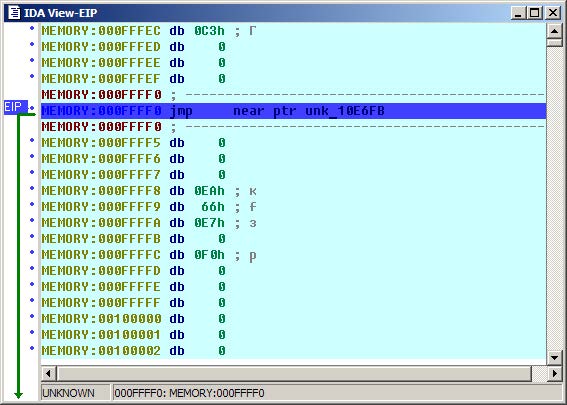
We land in the BIOS, but since we’re not interested in debugging it, we can skip directly to the kernel. Inspect the kallsyms or System.map file you downloaded from the guest and search for the start_kernel symbol:

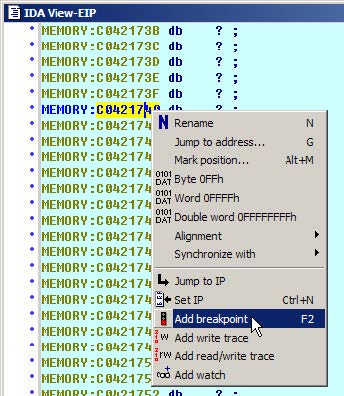
Copy the address, and navigate to it in IDA (Jump | Jump to addres… or just “g”).
Press F2 or choose “Add breakpoint” from the context menu.
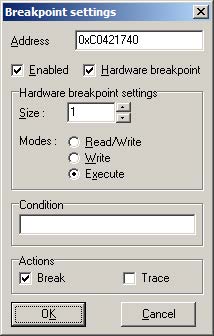
Check “Hardware breakpoint” and select “Execute” in “Modes”. Click OK.
Press F9. You will see loading messages and then the execution will stop at the entrypoint.
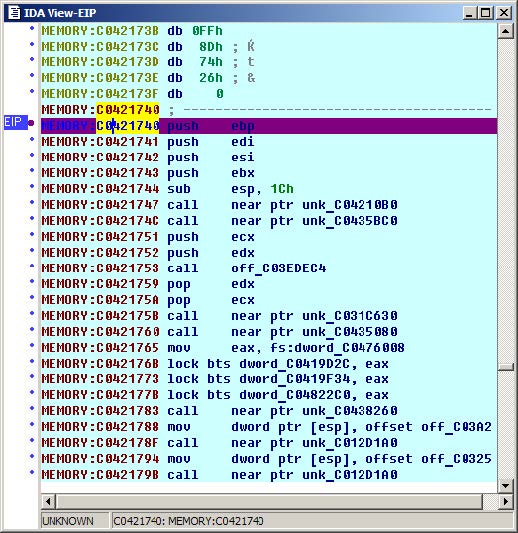
Adding symbols
Symbols are very useful during debugging, and we can use the kallsyms or System.map file to add them to IDA. Go to File | Python command… and paste the following short script (don’t forget to edit the file path):
ksyms = open(r“D:\kallsyms“) # path to the kallsyms/map file
&#xNAN;for line in ksyms:
&#xNAN;if line[9]==‘A’: continue # skip absolute symbols
&#xNAN;addr = int(line[:8], 16)
&#xNAN;name = line[11:-1]
&#xNAN;if name[-1]==‘]’: continue # skip module symbols
&#xNAN;idaapi.set_debug_name(addr, name)
&#xNAN;MakeNameEx(addr, name, SN_NOWARN)
&#xNAN;Message(”%08X: %s\n“%(addr, name))
Click OK and wait a bit until it finishes. After that you should see the symbols in the disassembly and name list:
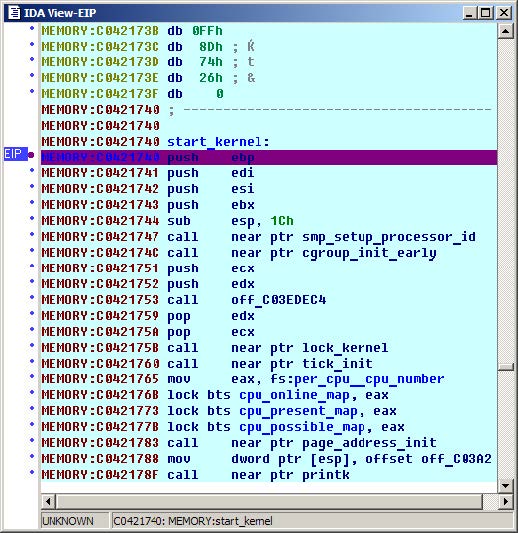
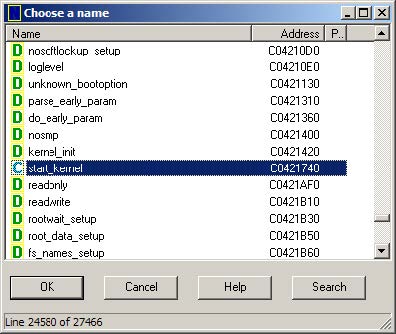
Happy debugging!
Copyright 2009 Hex-Rays SA
Windows Debugger Hub
Since version 4.3, IDA offers a PE Windows debugger in addition to its Windows disassembler. The Windows debugger in IDA combines the power of static disassembly to dynamic debugging to allow its users to debug unknown binaries at a level close to source code. A Linux version of the debugger is also available, there is some more information about it here here
The Windows Debugger in IDA:
- is able to debug any file supported by the Windows DBG interface, including true 64 bits files.
- can benefit from all the features of the Windows Disassembler, including interactivity, scripting and plugins.
- offer local debugging of Windows executables.
- can connect to other Windows machines running our remote debugging server and debug Windows executables.
- can connect to our Linux remote debugging server and allows you to debug Linux executables from a familiar Windows environment.
Below: the Windows Debugger working locally.
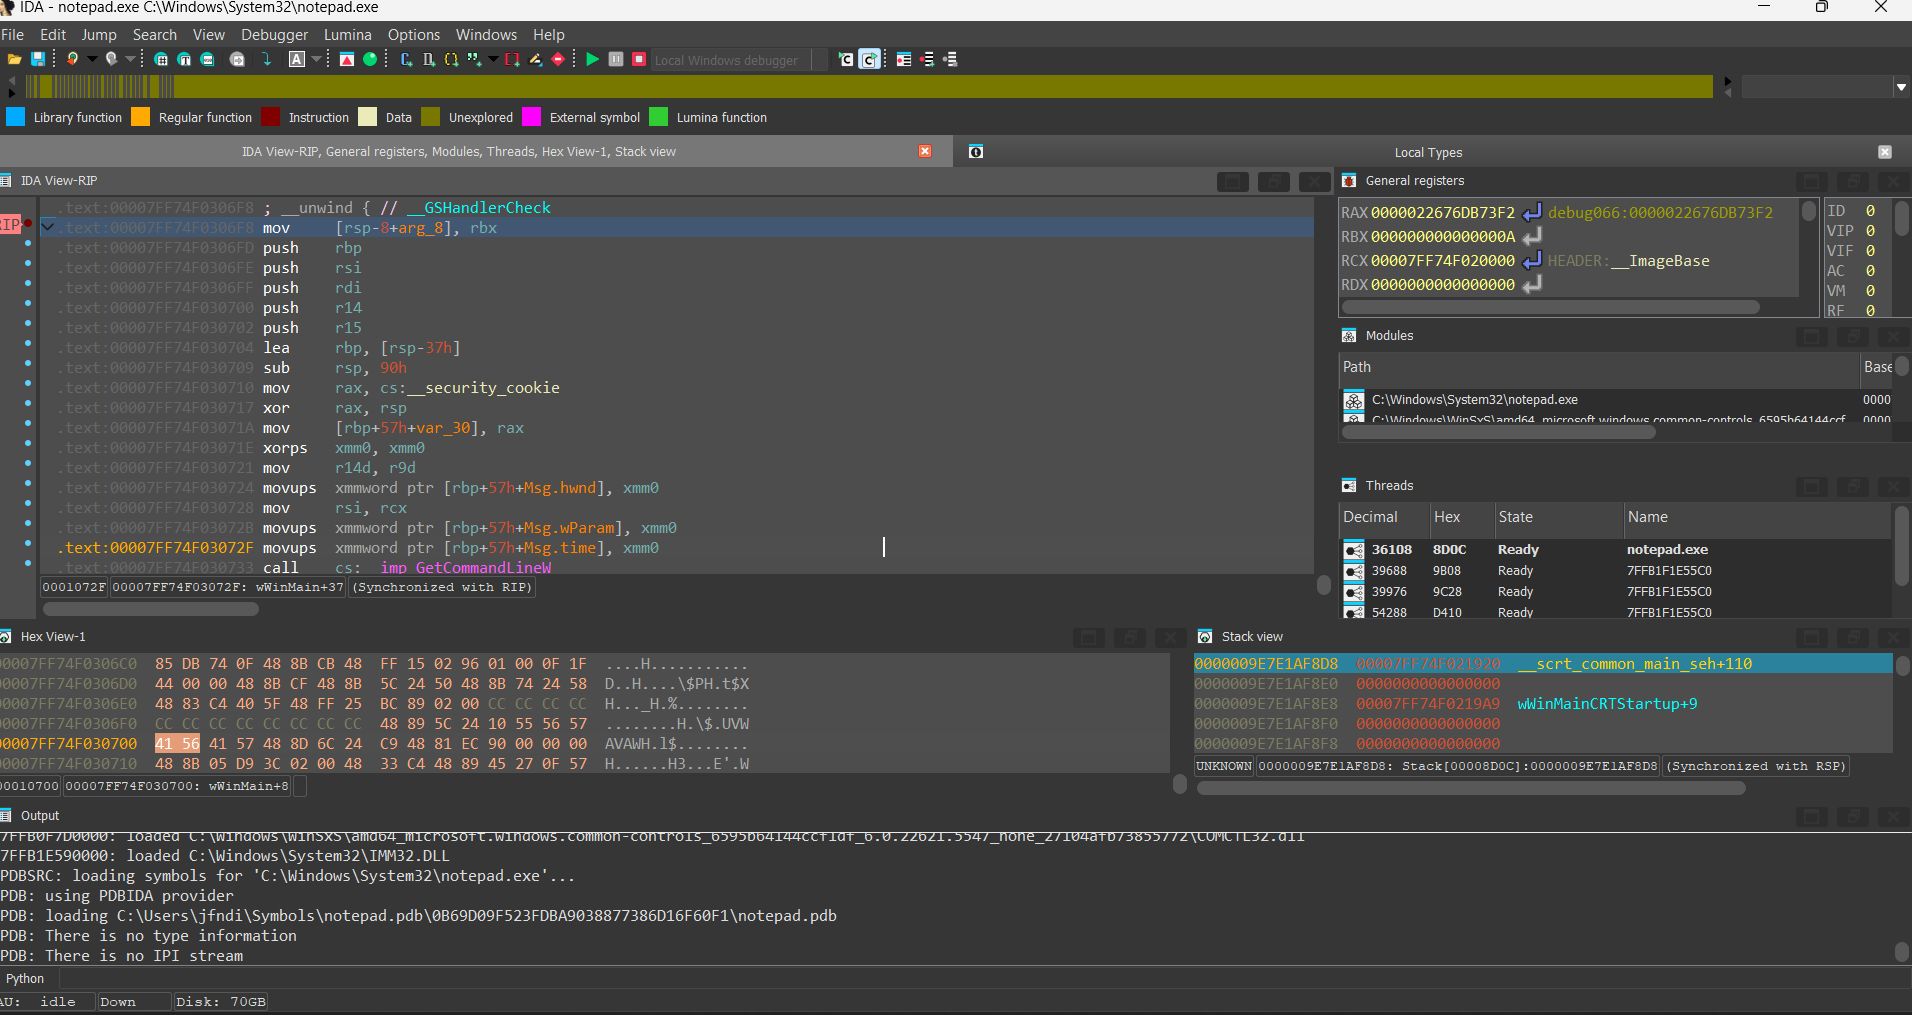
Below: the Windows Debugger about to debug a remote Linux binary.
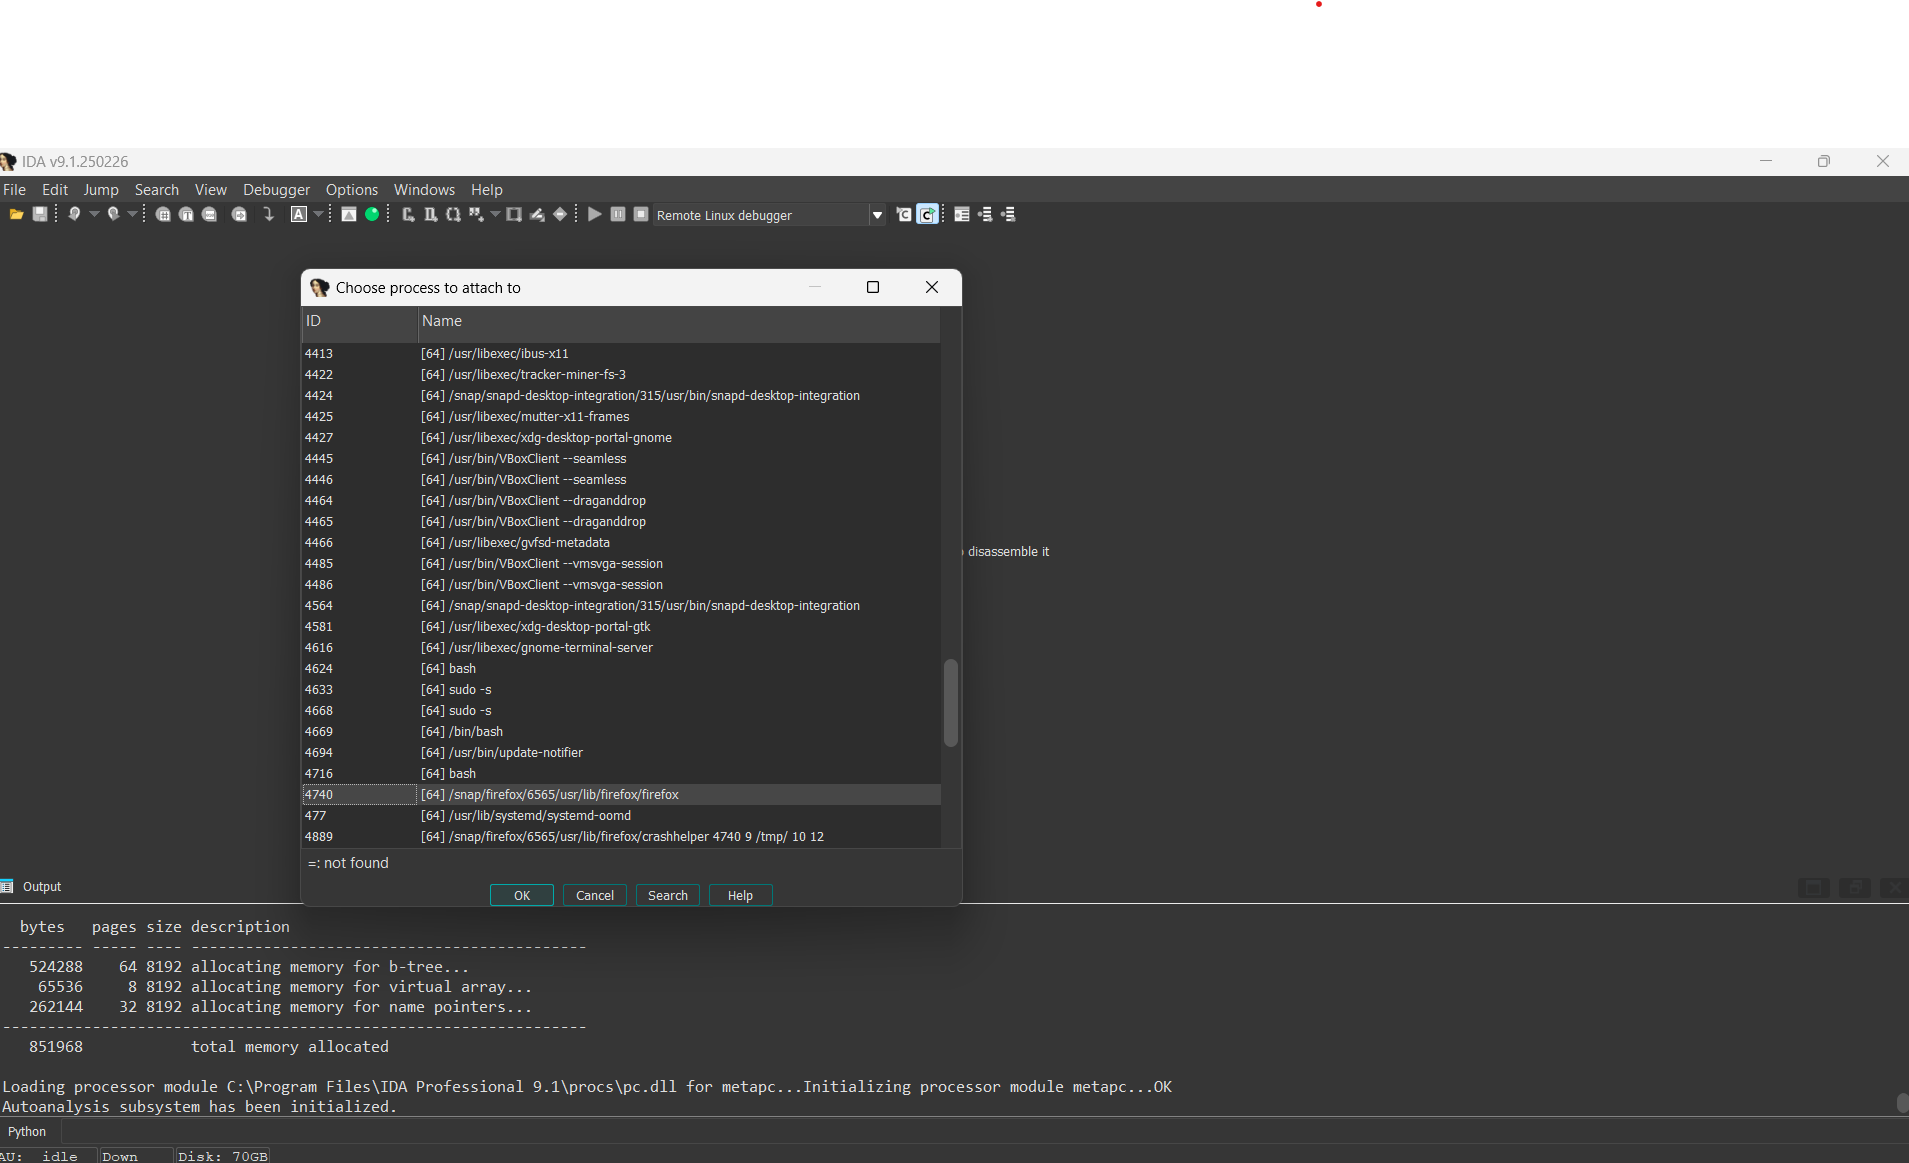
A typical use of the remote Windows debugger would be the analysis of a hostile Linux binary or a hostile Windows binary on a safe and clean machine. The IDA Windows debugger brings unprecedented flexibility and security to the virus analyst. Another typical use of the remote Windows debugger would be Linux debugging in a comfortable, well-known GUI.
Here are a few links to the IDA Windows Debugger on our site:
- multiple possible connections
- the debugger
- remote debugging
- tracing with the IDA Windows debugger.
- analysis of an obfuscated piece of hostile code
IDA: Linux Debugger
Since version 4.7, IDA offers a console Linux debugger and a console Linux disassembler (since version 5.1 IDA also offers a Mac OS X debugger and disassembler). The Linux version of IDA brings the power of combined disassembly and debugging to the Linux world.
The Linux version of IDA:
- is able to disassemble any file supported by the Windows version.
- supports all the features of the Windows console version, including interactivity, scripting and plugins.
- offer local debugging of Linux executables.
- can connect to Windows machines running our debugging server and debug Windows executables.
- remote debugging server that allows you to debug Linux programs from another Linux machine, or even a Windows one.
Below: the Linux Debugger working locally.
Below: the Windows Debugger about to debug a remote Linux binary.
Below: the Windows Debugger in a remote debugging session.
A typical use of the remote linux debugger would be the safe analysis of an hostile Windows binary: the Linux debugger, for example, brings unprecedented flexibility and security to the virus analyst. A typical use of the remote Windows debugger would be Linux debugging in a comfortable, well known GUI.
The IDA debugger, disassembler and remote debuggers are not sold separately but are included in the normal IDA distribution.
Debugging a Windows executable locally and remotely
Debugging a Windows executable locally and remotely
Last updated on September 01, 2020 - v0.2
This short tutorial introduces the main functionality of the IDA Debugger on Windows. IDA supports debugging of various binaries on various platforms, locally and remotely, but in this tutorial we will focus on debugging regular applications running on Windows.
Let’s see how the debugger can be used to locally debug a simple buggy C console program compiled under Windows.
Please use sample.exe.idb from samples.zip:
{% file src=“samples.zip” %}
to follow this tutorial.
The buggy program
This program computes averages of a set of values (1, 2, 3, 4 and 5). Those values are stored in two arrays: one containing 8 bit values, the other containing 32-bit values.
#include <stdio.h>
char char_average(char array[], int count)
{
int i;
char average;
average = 0;
for (i = 0; i < count; i++)
average += array[i];
average /= count;
return average;
}
int int_average(int array[], int count)
{
int i, average;
average = 0;
for (i = 0; i < count; i++)
average += array[i];
average /= count;
return average;
}
void main(void)
{
char chars[] = { 1, 2, 3, 4, 5 };
int integers[] = { 1, 2, 3, 4, 5 };
printf("chars[] - average = %d\n",
char_average(chars, sizeof(chars)));
printf("integers[] - average = %d\n",
int_average(integers, sizeof(integers)));
}
Running this program gives us the following results:
>sample.exe
chars[] - average = 3
integers[] - average = -65498543
Obviously, the computed average on the integer array is wrong. Let us use the IDA debugger to understand the origin of this error.
Loading the file
The debugger is completely integrated into IDA: to debug, we usually load the executable into IDA and create a database. We can disassemble the file interactively, and all the information which he will have added to the disassembly will be available during debugging. If the disassembled file is recognized as debuggable, the Debugger menu automatically appears in main window:

Since IDA has many debugger backends, we have to select the desired backend. We will use Local Windows debugger in our tutorial:
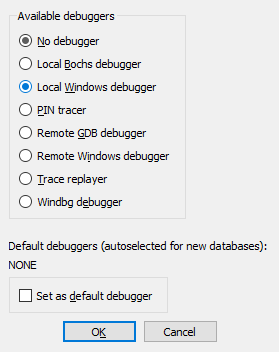
Instruction breakpoints
Once we located our int_average() function in the disassembly (it is at 0x40104A), we can add a breakpoint at its entry point, by selecting the Add breakpoint command in the popup menu, or by pressing the F2 key:
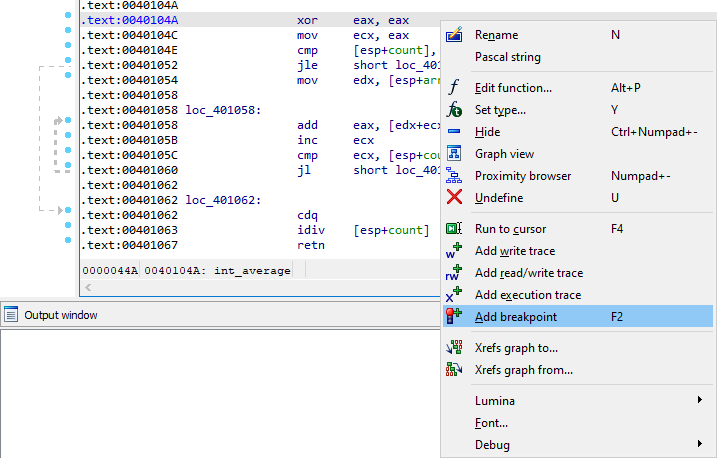
Program execution
Now we can start the execution. We can launch the debugger by pressing the F9 key or by clicking the Start button in the debugger toolbar. IDA displays a big warning message before really starting the debugger:
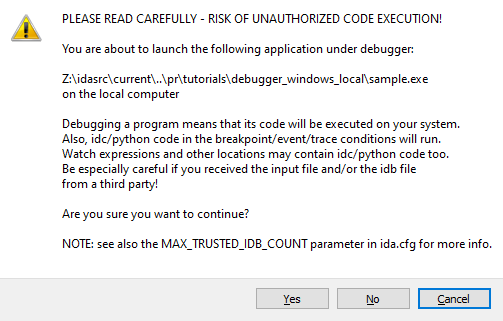
Indeed, running untrusted binaries on your computer may compromise it, so you should never run them. Since in our tutorial we are playing with a toy sample, it is okay, we can accept him. However, please consider using remote debugging for untrusted binaries.
Once we accept it, the program runs until it reaches our breakpoint:
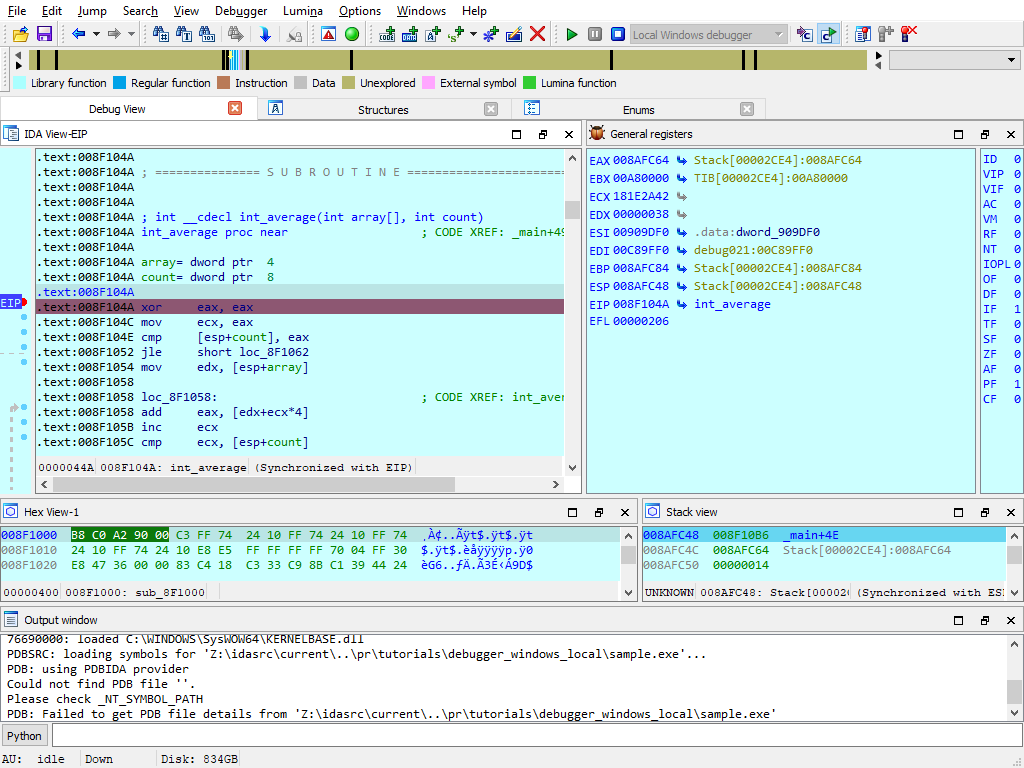
Address evaluation
By analyzing the disassembled code, we can now locate the loop which computes the sum of the values, and stores the result in EAX. The [edx+ecx*4] operand clearly shows us that EDX points to the array and ECX is used as an index in it. Thus, this operand will successively point to each integer from the integers array:

Step by step and jump targets
Let us advance step by step in the loop, by clicking on the adequate button in the debugger toolbar or by pressing the F8 key. If necessary, IDA draws a green arrow to show us the target of a jump instruction:
The bug uncovered
Now, let’s have a look at value of [esp+count]. The ECX register (our index in the array) is compared to this register at each iteration: so, we can conclude that it is used as a counter in the loop. But, we also observe that it contains a rather strange number of elements: 14h (= 20). Remember that our original array contains only 5 elements! It seems we just found the source of our problem…
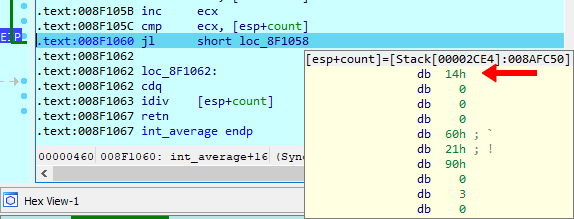
Hardware breakpoints
To be sure, let us add a hardware breakpoint, just behind the last value of our integers array (in fact, on the first value of the chars array). If we reach this breakpoint during the loop, it will indeed prove that we read integers outside our array. For that jump to EDX, which points to the array, by clicking on a small arrow in the CPU register view:
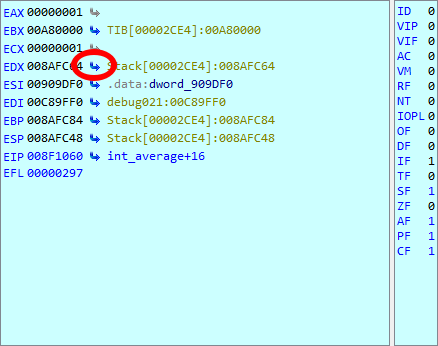
IDA displays a sequence of bytes, so we need to create an array. Do the following:
- press Alt-D, D to create a doubleword
- press * and specify the size of 5 elements
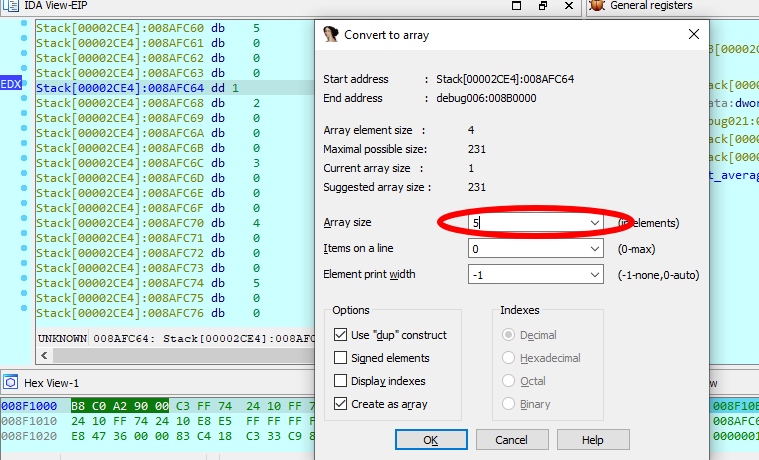
Let us add a hardware breakpoint with a size of 4 bytes (the size of an integer) in Read/Write mode immediately after our array. Please note that the cursor is located after the array we created:
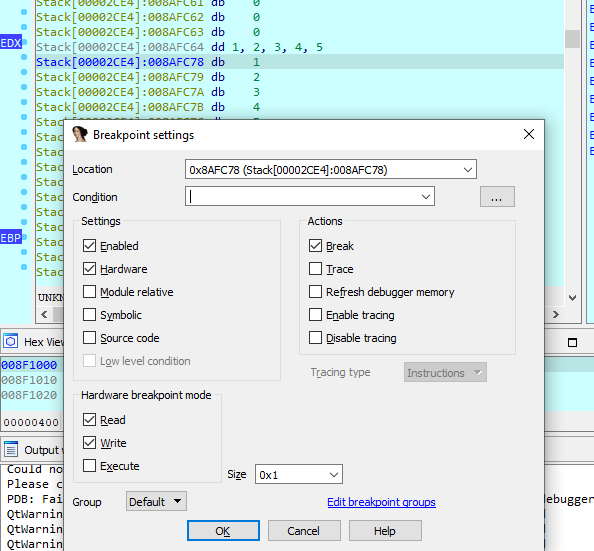
As foreseen, if we continue the execution, the hardware breakpoint detects a read access to the first byte of the chars array.
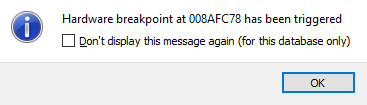
Please note that EIP points to the instruction following the one which caused the hardware breakpoint! It is in fact rather logical: to cause the hardware breakpoint, the preceding instruction has been fully executed, so EIP now points to the next one.

Caller’s mistake
By looking at the disassembly, we see that the value stored in [esp+count] comes from the count argument of our int_average() function. Let us try to understand why the caller gives us such a strange argument: if we go the call of int_average(), we easily locate the push 14h instruction, passing an erroneous count value to our function.

Now, by looking closer at the C source code, we understand our error: we used the sizeof() operator, which returns the number of bytes in the array, rather than returning the number of items in it! As, for the chars array, the number of bytes was equal to the number of items, we didn’t notice the error…
Debugging a remote process
Our debuggers support debugging processes running on a remote computer. We just need to set up a remote debugging session and then we can debug the same way as in local debugging. Let us consider the following three simple steps.
Starting the remote server
Regardless of the platform where IDA itself runs (be it Windows, Mac, or Linux), we need to launch a remote debugger server on the computer where the remotely debugged application will run.
For Windows, we have two different debugger servers:
- for 32-bit programs, use win32_remote.exe
- for 64-bit programs, use win64_remote64.exe
So, we copy the relevant debugger server to the remote computer and launch it:

If the debugger server is accessible by others, it is a good idea to use a password for the connection (the -P command line option).
Once this is done, we can return to the local computer, where we will run IDA, and configure it.
Configuring IDA to connect to the remote server
We have to select the Remote Windows debugger:
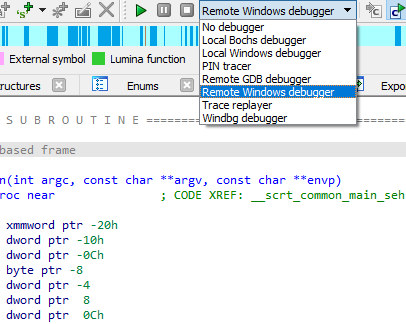
and specify the correct values in the Debugger > Process options dialog:
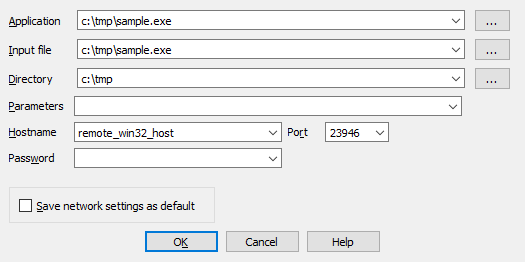
Please note that the Application, Input file, and Directory must be correct on the remote computer. We may eventully specify command line arguments for the application in the Parameters field.
If you have specified a password when launching the remote debugger server, you must specify it in the Password field.
Starting a debug session
Once we have configured IDA, the rest is the same as with local debugging: press F9 to start a debugging session.
Attaching to a running process
In some cases we cannot launch the debugged process ourselves. Instead, we need to attach to an existing process. This is possible and very easy to do: just select Debugger > Attach to process from the menu and select the desired process.
Other features
IDA debugger gives you access to the entire process memory, allowing you to use all powerful features: you can create structure variables in memory, draw graphs, create breakpoints in DLLs, define and decompile functions, etc. It is even possible to single step in the pseudocode window, if you have the decompiler installed!
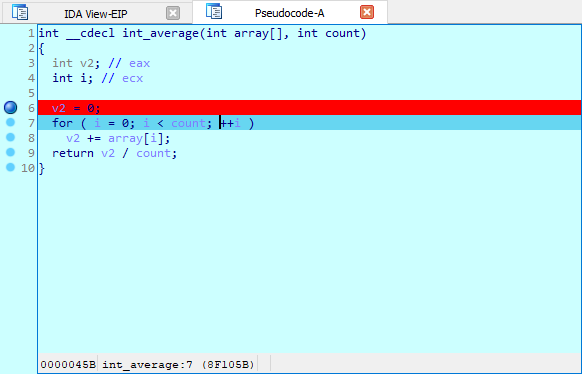
The way the debugger reacts to exceptions is fully configurable by the user. The user can select various Actions to be performed when the breakpoint is hit. An IDC or Python can be executed upon hitting a breakpoint:
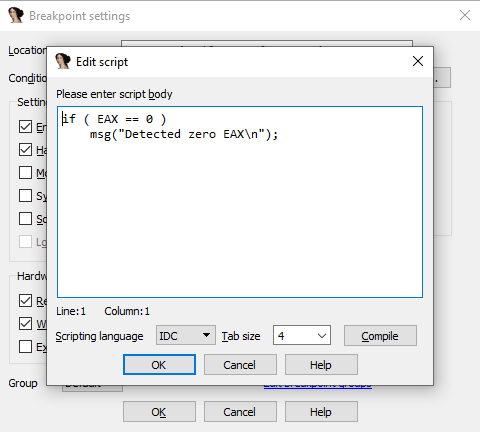
We invite you to play with the debugger and discover its many unique and powerful features!
Debugging the XNU Kernel with IDA Pro
Copyright 2019 Hex-Rays SA
Purpose
IDA 7.3 introduces the Remote XNU Debugger. It is designed to communicate with the GDB stub included with popular virtualization tools, namely VMWare Fusion (for OSX) and Corellium (for iOS). The debugger allows you to observe the Darwin kernel as it is running, while at the same time utilising the full power of IDA’s analysis capabilities. It works equally well on Mac, Windows, and Linux.
This writeup is intended to quickly get you familiar with debugger, as well as offer some hints to make the experience as smooth as possible.
Debugging OSX with VMWare
To get started with debugging OSX, we will perform a simple experiment. This is the same experiment outlined in this great writeup by GeoSn0w, but we will be performing the equivalent in IDA - which we hope you’ll find is much simpler.
Begin with the following setup:
-
create an OSX virtual machine with VMWare Fusion. in this example the virtual machine is OSX 10.13.6, but the experiment should work with any recent OSX version.
-
open Terminal in the VM and enable some basic XNU debugging options:
$ sudo nvram boot-args="slide=0 debug=0x100 keepsyms=1" -
shut down the VM and add the following line to the .vmx file:
debugStub.listen.guest64 = "TRUE" -
power on the virtual machine, open Terminal, and run this command:
$ uname -v Darwin Kernel Version 17.7.0 ... root:xnu-4570.71.17~1/RELEASE_X86_64Let’s use IDA to modify this version string.
Launch IDA, and when prompted with the window IDA: Quick start, choose Go to start with an empty database. Then go to menu Debugger>Attach>Remote XNU Debugger and set the following options:
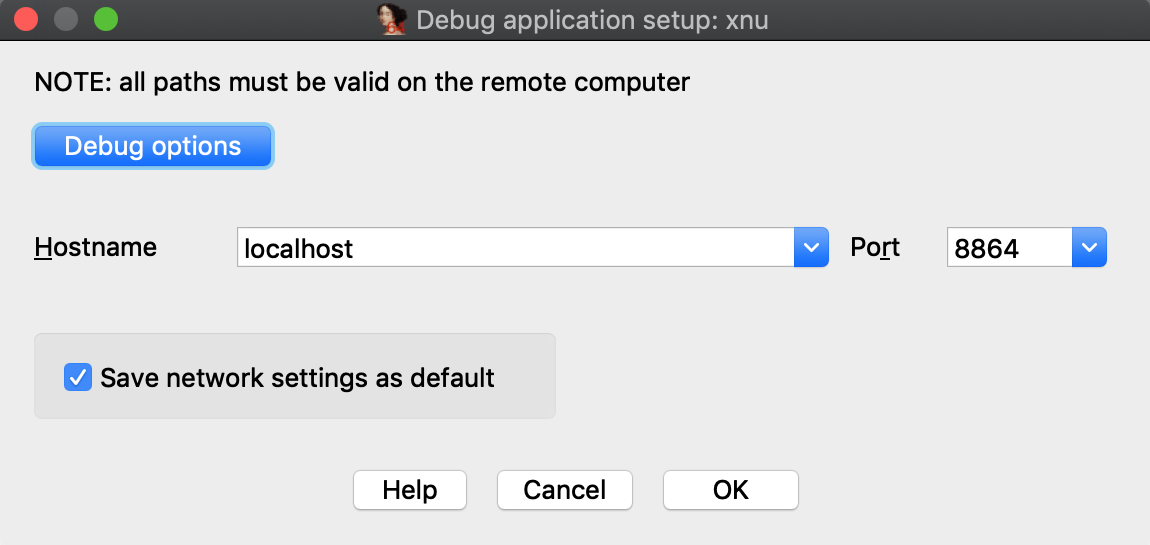
Click OK, then select <attach to the process started on target>, and wait for IDA to attach. This step might take a few seconds (later we’ll discuss how to speed things up). Once attached, the target is usually suspended in machine_idle:
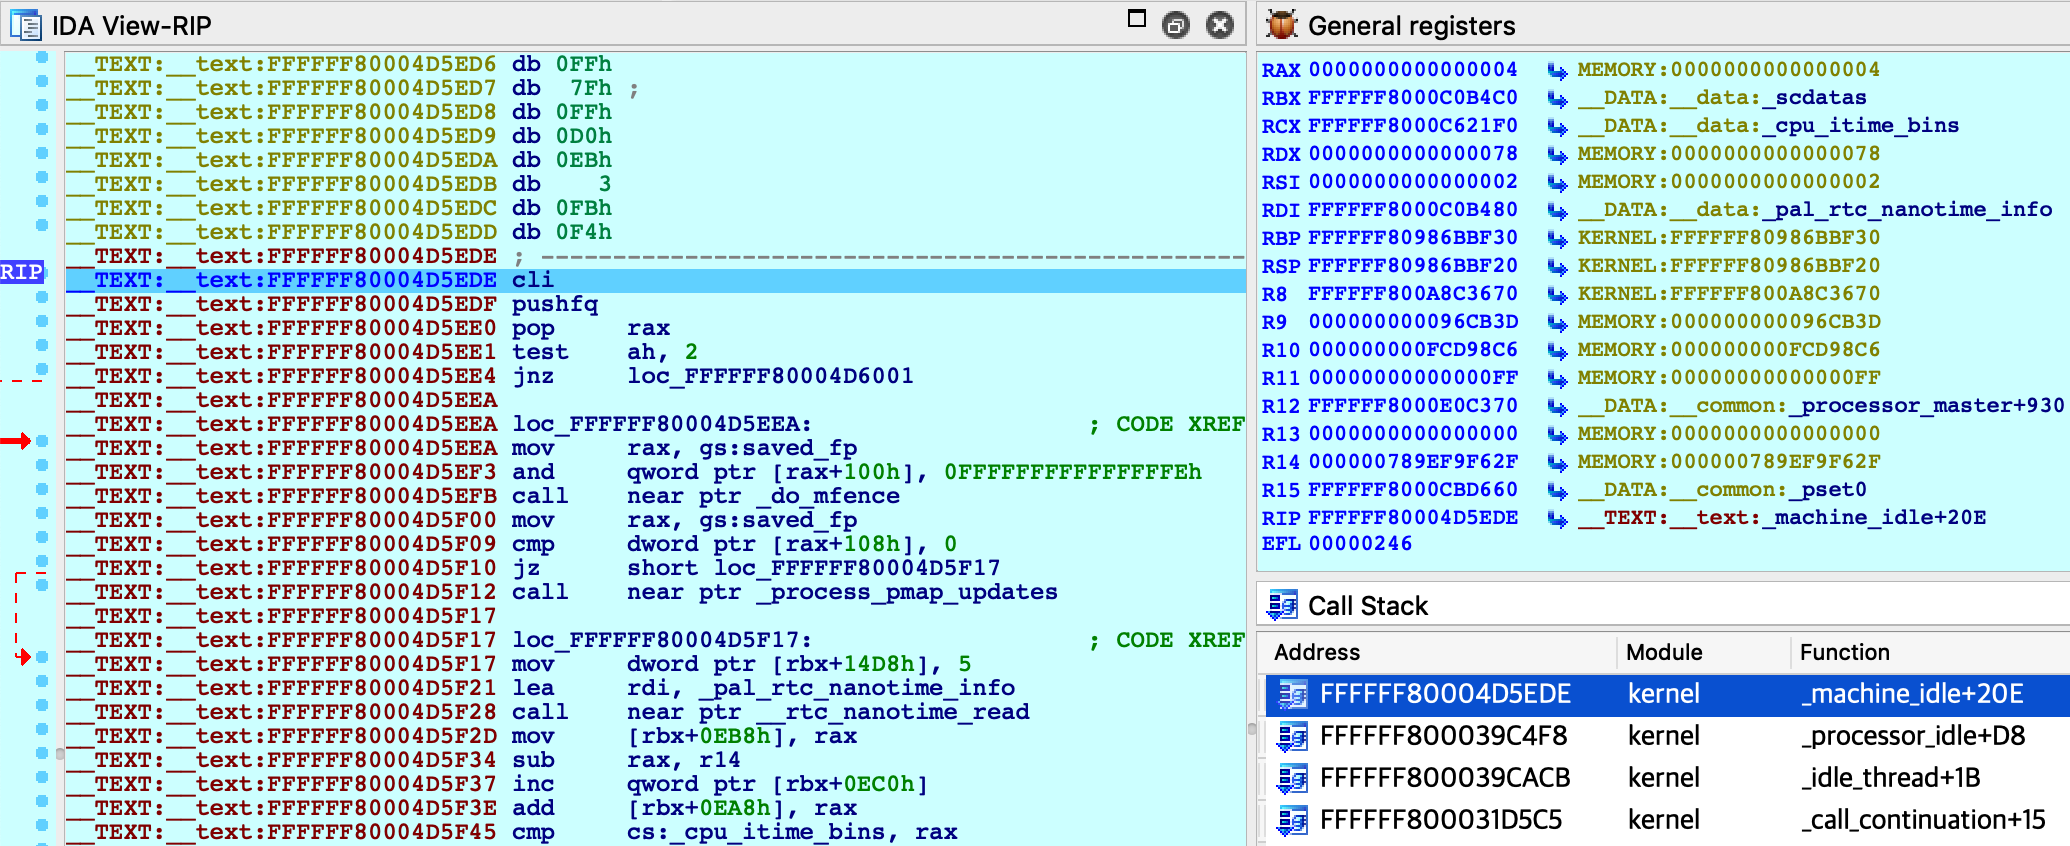
IDA should have printed the message FFFFFF8000200000: process kernel has started, meaning it successfully detected the kernel image in memory. Now let’s find the version string. Conveniently, the string appears in the kernel’s symbol table, so we can simply use shortcut G and enter the name _version to jump right to it:
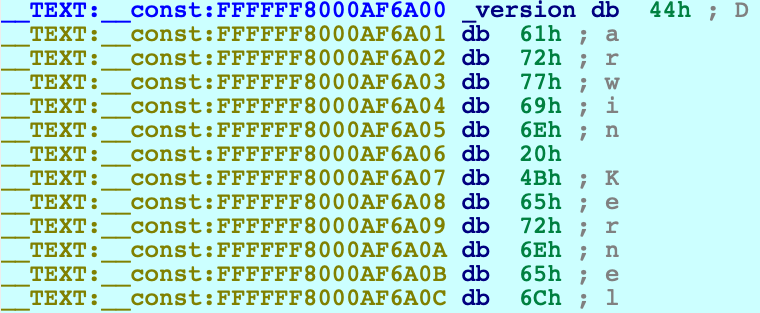
Use IDAPython to overwrite the bytes at this address:
idaapi.dbg_write_memory(0xFFFFFF8000AF6A00, "IDAPRO")
Resume the process and allow the VM to run freely. Go back to Terminal in the VM and run the same command as before:
$ uname -v
IDAPRO Kernel Version 17.7.0 ... root:xnu-4570.71.17~1/RELEASE_X86_64
The output should look almost the same, except Darwin has been replaced with IDAPRO. So, we have modified kernel memory without breaking anything! You can continue to explore memory, set breakpoints, pause and resume the OS as you desire.
Using the KDK
If you have installed a Kernel Development Kit from Apple, you can set KDK_PATH in dbg_xnu.cfg to enable DWARF debugging:
KDK_PATH = "/Library/Developer/KDKs/KDK_10.13.6_17G4015.kdk";
Even if there is no KDK available for your OSX version, you can still utilise the KDK_PATH option in IDA to speed up debugging. For example, in the experiment above we could have done the following:
-
make your own KDK directory:
$ mkdir ~/MyKDK -
copy the kernelcache from your VM:
$ scp user@vm:/System/Library/PrelinkedKernels/prelinkedkernel ~/MyKDK -
decompress the kernelcache:
$ kextcache -c ~/MyKDK/prelinkedkernel -uncompressed -
set KDK_PATH in dbg_xnu.cfg:
KDK_PATH = "~/MyKDK";
Now whenever IDA needs to extract information from the kernel or kexts, it will parse the kernelcache file on disk instead of parsing the images in memory. This should be noticeably faster.
Debugging a Development Kernel
Our next goal is to use the KDK to create a rich database that can be used to debug XNU in greater detail. In this example we will debug the development kernel included in the Apple KDK. Let’s open this file in IDA:
$ export KDK=/Library/Developer/KDKs/KDK_10.13.6_17G4015.kdk
$ export KERNELS=$KDK/System/Library/Kernels
$ ida64 -okernel.i64 $KERNELS/kernel.development
Wait for IDA to load the DWARF info and complete the autoanalysis. This may take a few minutes, but we only need to do it once.
While we wait, we can prepare the virtual machine to use the development kernel instead of the release kernel that is shipped with OSX (Note: System Integrity Protection must now be disabled in the VM). Open Terminal in the VM and run the following commands:
-
copy the development kernel from the KDK:
$ sudo scp user@host:"\$KERNELS/kernel.development" /System/Library/Kernels/ -
reconstruct the kernelcache:
$ sudo kextcache -i / -
reboot:
$ sudo shutdown -r now -
after rebooting, check that the development kernel was properly installed:
$ uname -v ... root:xnu-4570.71.17~1/DEVELOPMENT_X86_64
The VM is now ready for debugging.
IDA Configuration
Return to IDA and use Debugger>Select debugger to select Remote XNU Debugger. Then open Debugger>Process options and set the following fields:
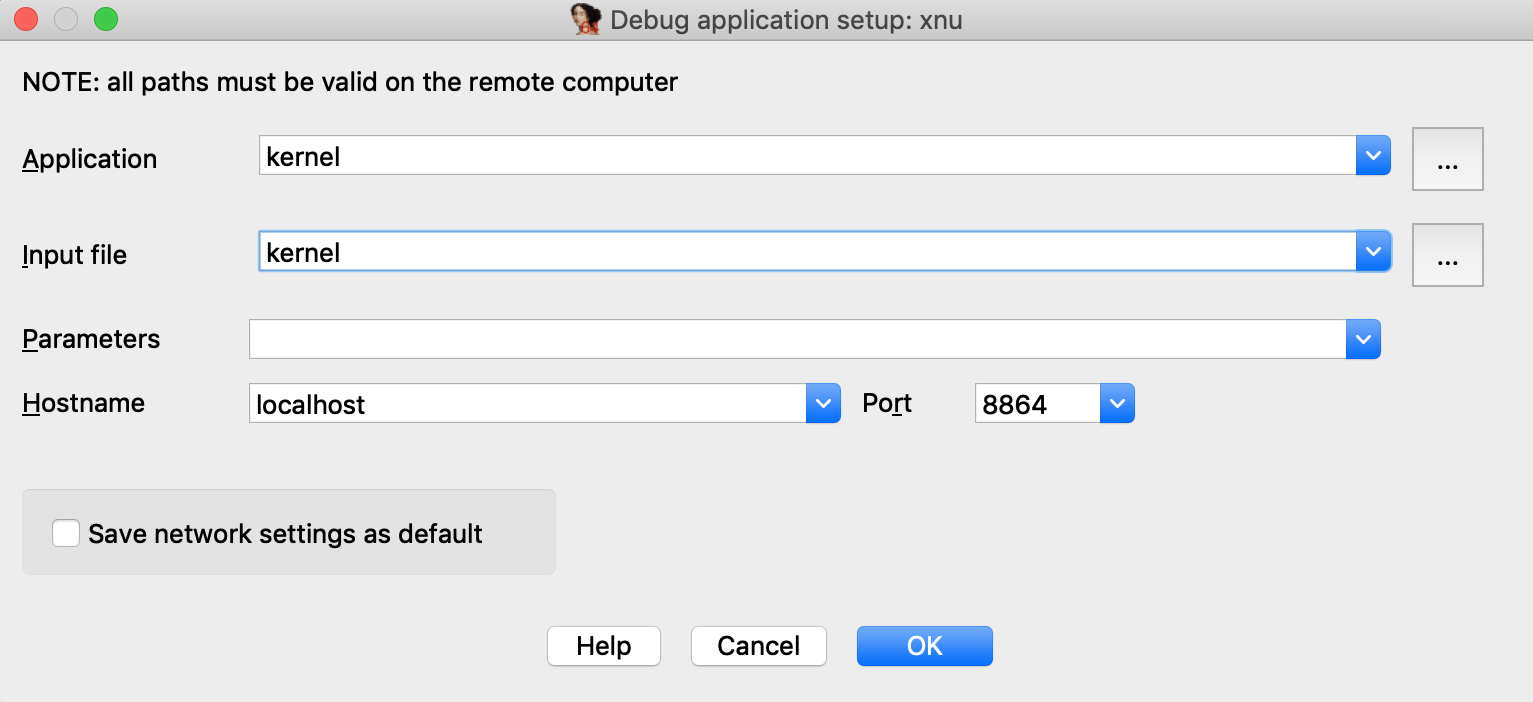
Now go to Debugger>Debugger options>Set specific options and make sure the KDK path field is set:
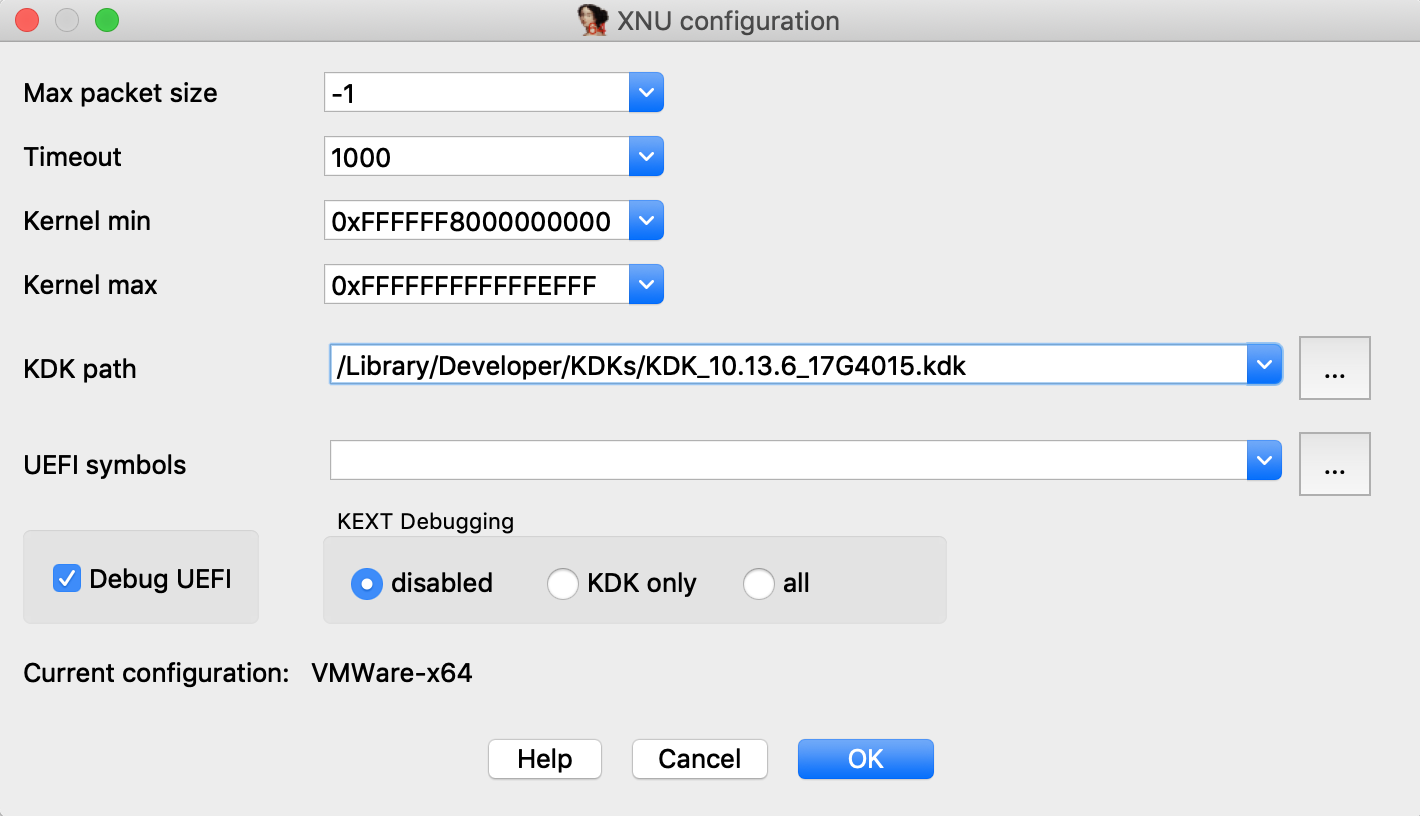
You can ignore the other options for now, and press OK.
Assembly-Level Debugging + DWARF
IDA supports source-level debugging for the XNU Kernel. However for demonstration purposes we will focus on assembly-level debugging, while taking advantage of source-level DWARF information like local variables. This is a bit more stable, and is still quite useful.
Before attaching the debugger, open Options>Source paths… and un-check the checkbox:

Then click Apply. This will prevent IDA from complaining when it can’t find a source file.
Finally, select Debugger>Attach to process>attach to the process started on target. After attaching, jump to function dofileread, and use F2 to set a breakpoint. Resume the debugger and and wait for the breakpoint to be hit (typically it will be hit right away, if not try simply running a terminal command in the guest). Once XNU hits our breakpoint, open Debugger>Debugger windows>Locals:
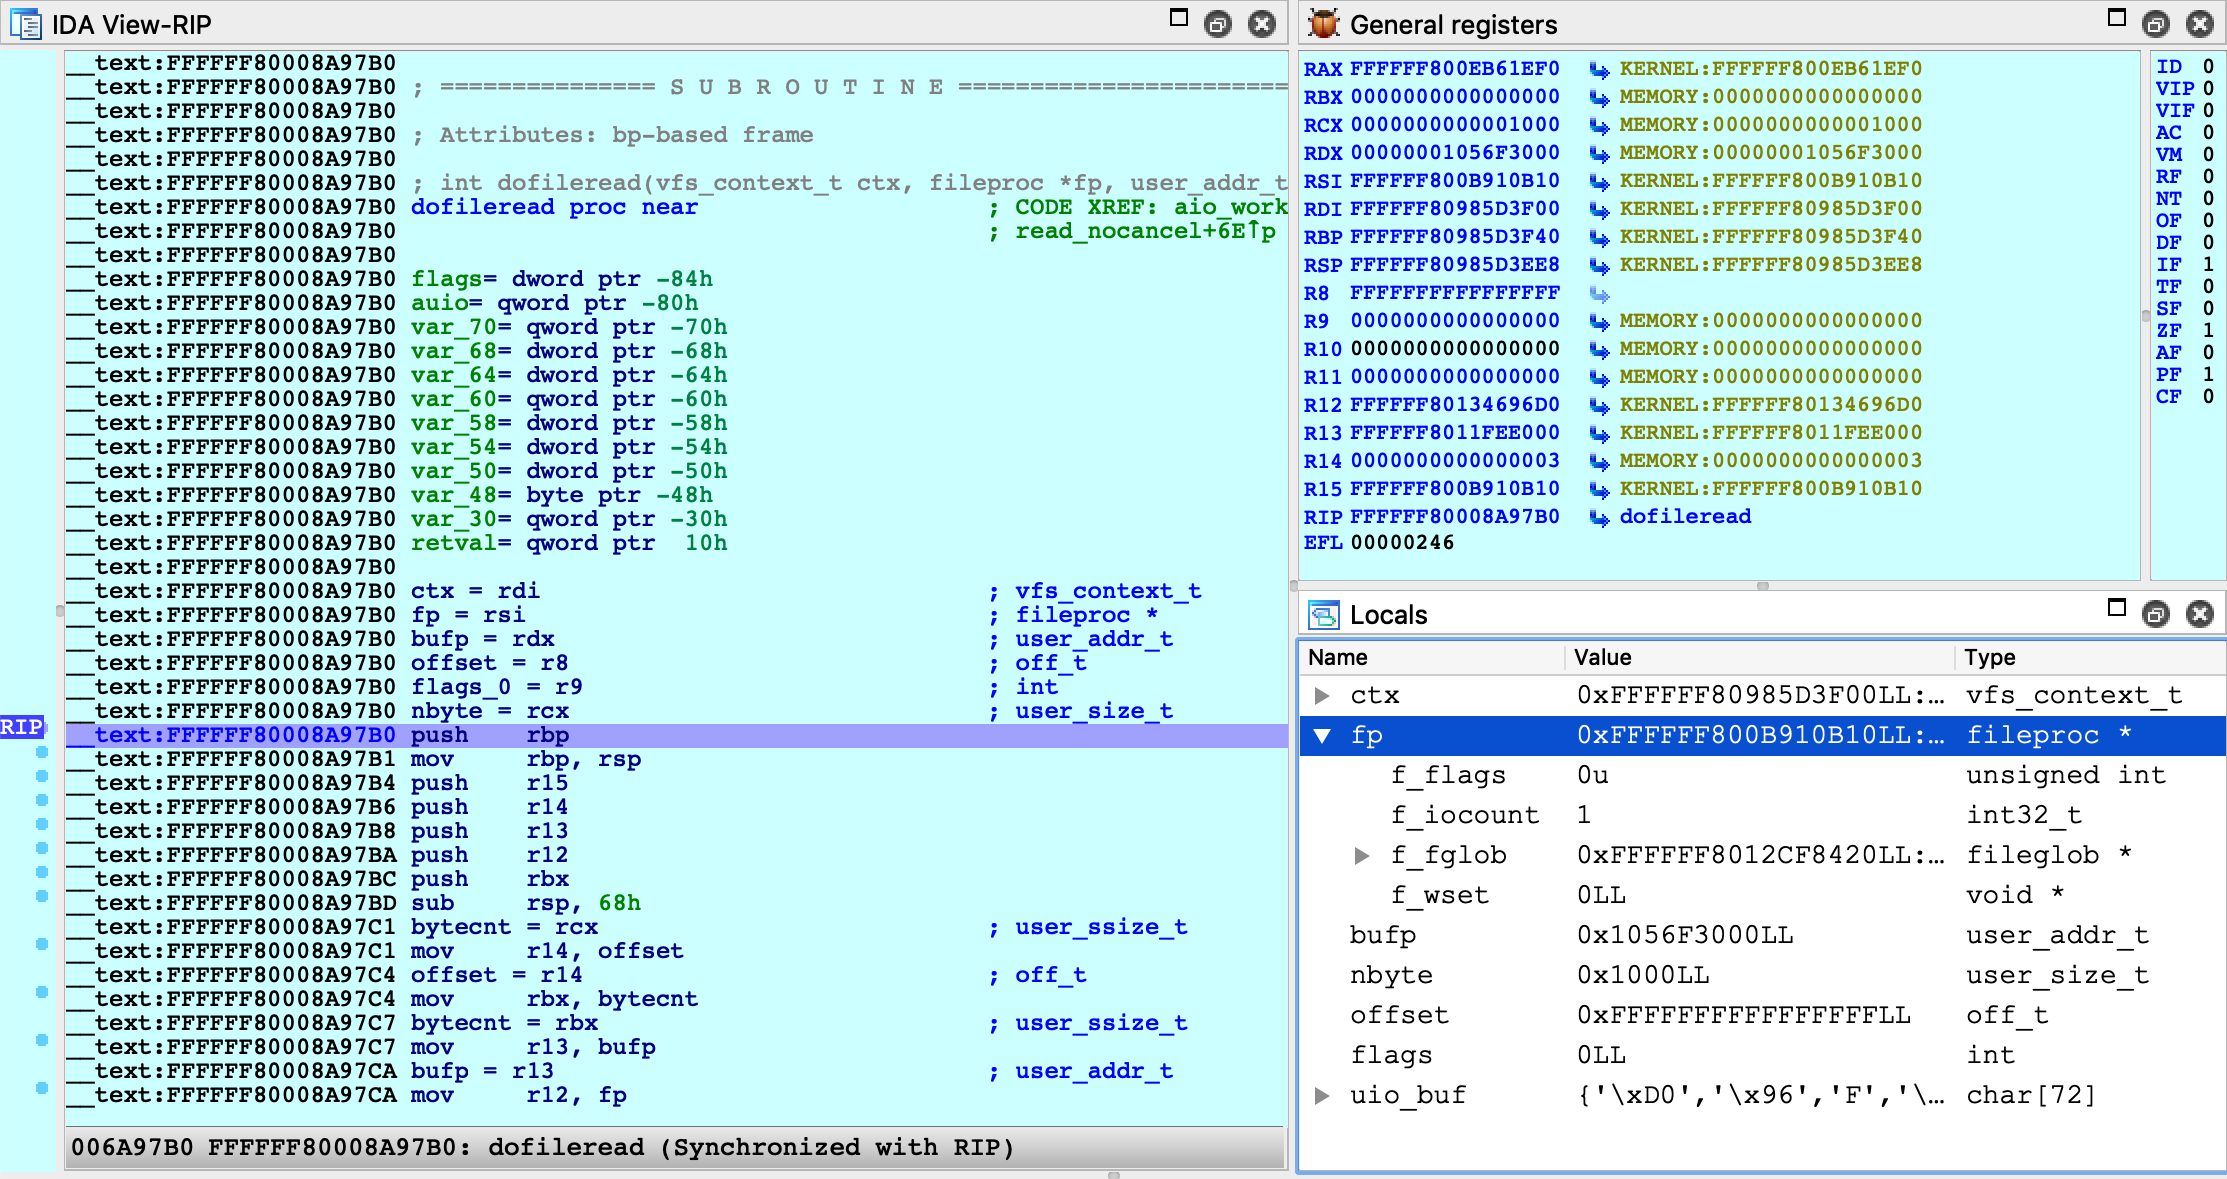
We can now perform detailed instruction-level debugging with the assistance of DWARF. You can continue to single step, set breakpoints, and inspect or modify local variables just like any other IDA debugger.
KEXT Debugging
IDA also supports debugging kext binaries. To demonstrate this, we will debug IONetworkingFamily, a submodule of IOKit that is typically shipped with the KDK. Begin by opening the binary in IDA:
$ export KEXTS=$KDK/System/Library/Extensions
$ ida64 -onet.i64 $KEXTS/IONetworkingFamily.kext/Contents/MacOS/IONetworkingFamily
Select Remote XNU Debugger from the debugger menu. Then in Debugger>Process options, set:
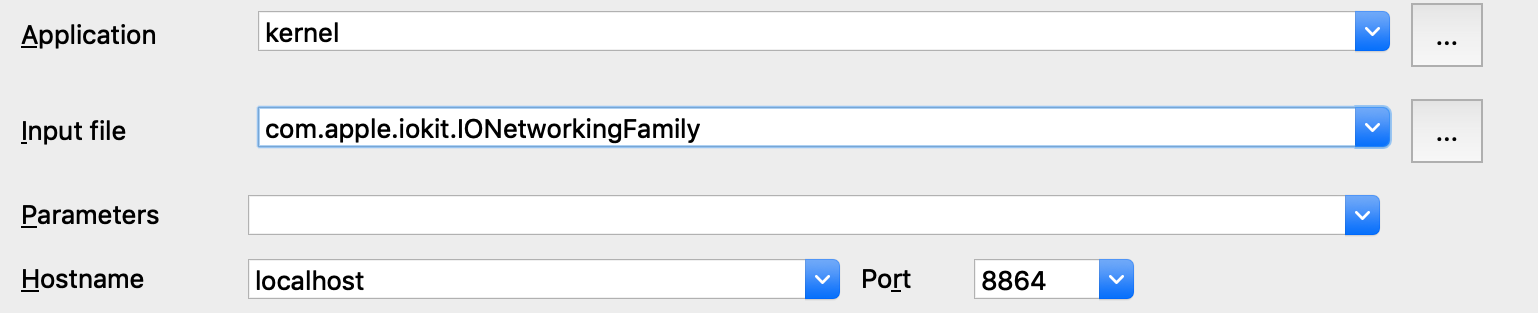
Note that we provide the bundle ID of the kext (com.apple.iokit.IONetworkingFamily) as the Input file field. This allows the debugger to easily identify the target kext at runtime.
Also note that loading all kexts in kernel memory can be a slow operation, which is why it is disabled by default. Open Debugger>Debugger options>Set specific options and ensure the KDK path field is set, then set the KEXT Debugging option to KDK only:
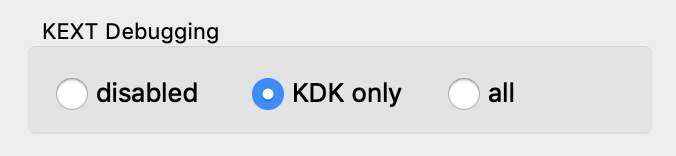
This tells the debugger to only load kexts that are present in the KDK. Since the KDK binaries are on the local filesystem, IDA can parse the kexts in a negligible amount of time - which is ideal since we’re really only interested in IONetworkingFamily.
Now power on your VM and allow it to boot up. Once it is running idle, attach the debugger. Immediately IDA should detect the kernel and all relevant kexts in memory, including IONetworkingFamily:
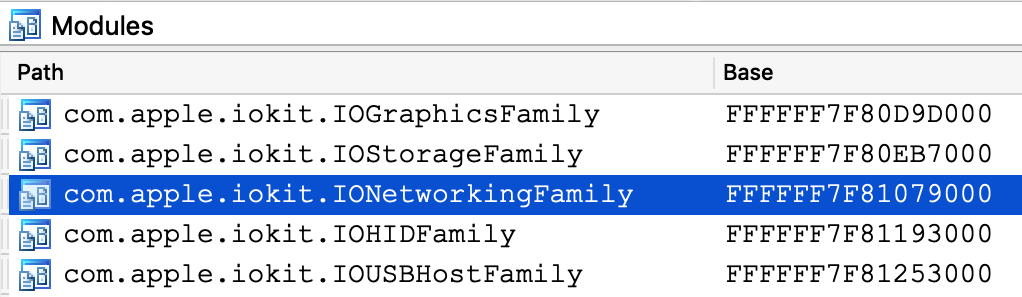
Double-click to bring up the debug names for this module, and search for IONetworkInterface::if_ioctl:

Now set a breakpoint at this function and resume the OS. Typically the breakpoint will be hit right away, but if it isn’t try performing an action that requires a network interface (for instance, performing a google search). Once execution breaks in the kext we can use the database to debug it in detail:
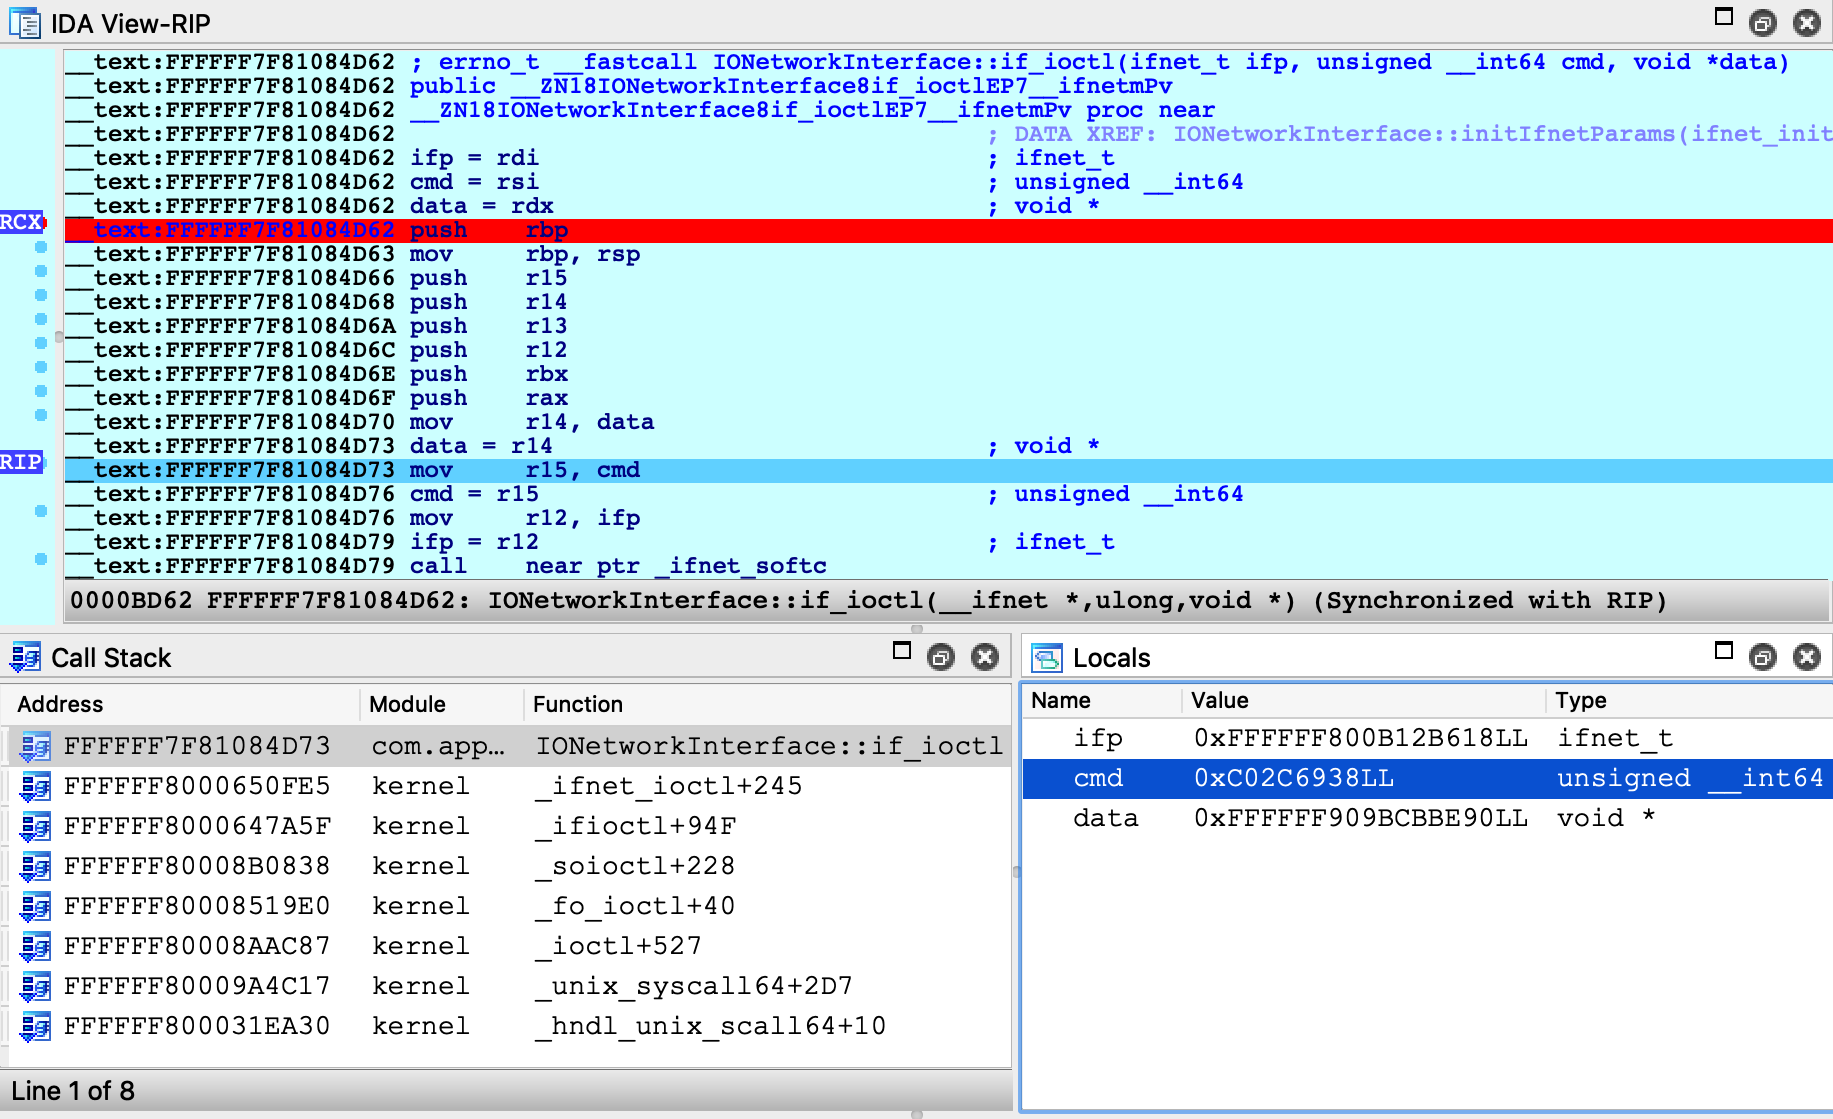
Debugging a Prelinked Kernelcache
For simplicity, all of the examples up until now have dealt with a subset of the kernel, but it is also possible to load a complete prelinked kernelcache in IDA and debug it. Naturally, we have some suggestions for this.
Extending the KDK
If you’re interested in debugging the entire prelinked kernel, the biggest concern is speed. IDA must create a detailed and accurate depiction of kernel memory, which could contain hundreds of kext modules. If we’re not careful, this can be slow.
Fortunately there is an easy solution. Try the following:
-
create a writable copy of Apple’s KDK:
$ cp -r /Library/Developer/KDKs/KDK_10.13.6_17G4015.kdk ~/MyKDK -
copy the kernelcache from your VM to the new KDK:
$ scp user@vm:/System/Library/PrelinkedKernels/prelinkedkernel ~/MyKDK -
decompress the kernelcache:
$ kextcache -c ~/MyKDK/prelinkedkernel -uncompressed
Now IDA can use both the KDK and the kernelcache to extract debugging information for almost any kext at runtime. This should be fast.
Loading the Kernelcache
When loading a kernelcache, IDA now offers more load options:

In this example we want to load everything, so choose the kernel + all kexts option and wait for IDA to load all the subfiles and finish the autoanalysis. This will take a while but there’s no way around it, it’s a lot of code.
IMPORTANT NOTE: Try to avoid saving the IDA database file in the KDK directory. It is important to keep irrelevant files out of the KDK since they might slow down IDA’s KDK parsing algorithm.
Now we might want to improve the static analysis by loading DWARF info from the KDK. In IDA 7.3 the dwarf plugin supports batch-loading all DWARF info from a KDK into a kernelcache database. Currently this feature must be invoked manually, so we have provided this script to make it easier.
Copy kdk_utils.py to the plugins directory of your IDA installation. This plugin will create a new menu Edit>Other>KDK utils, with two new menu actions:
- Load KDK: This action will automatically detect all matching DWARF files in a given KDK, then apply the DWARF info to the subfiles in the database (including the kernel itself).
- Load DWARF for a prelinked KEXT: This action is useful if you have DWARF info for a prelinked kext that is not included in Apple’s KDK. For a given DWARF file, the action will find a matching kext in the database and apply the DWARF info to this subfile.
Try opening Edit>Other>KDK utils>Load KDK and provide the KDK path:

Wait for IDA to scan the KDK for matching DWARF files and load them. This operation can also take a while, but it’s worth it for all the extra structures, prototypes, and names that are added to the database. In the end we have a very detailed database that we are ready to use for debugging.
Now open Debugger>Process options and set the following options:
Then open Debugger>Debugger options>Set specific options and set the following fields:
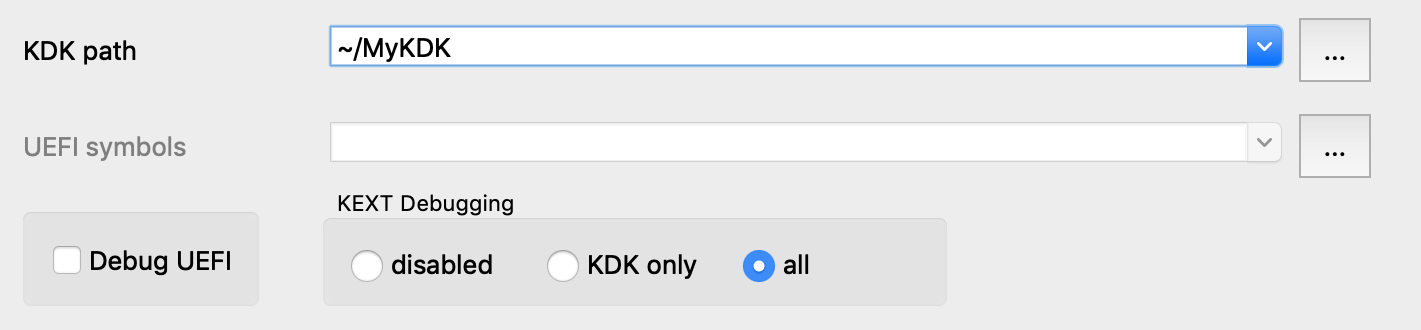
Note that we set the KEXT Debugging option to all. This tells the debugger to detect every kext that has been loaded into memory and add it to the Modules list, including any non-prelinked kexts (there are likely only a handful of them, so it doesn’t hurt).
Finally, power on the VM and attach to it with Debugger>Attach to process>attach to the process started on target. IDA should be able to quickly generate modules for the kernel and all loaded kexts:

You are now free to explore the entire running kernel! Try performing any of the previous demos in this writeup. They should work about the same, but now they are all possible with one single database.
Kernel ASLR + Rebasing
It is worth noting that rebasing has been heavily improved in IDA 7.3. Even large databases like the one we just created can now be rebased in just a few seconds. Previous IDA versions would take quite a bit longer. Thus, IDA should be able to quickly handle kernel ASLR, even when working with prelinked kernelcaches.
Debugging the OSX Kernel Entry Point
In this example we demonstrate how to gain control of the OS as early as possible. This task requires very specific steps, and we document them here. Before we begin, we must make an important note about a limitation in VMWare’s GDB stub.
Physical Memory
Currently VMWare’s 64-bit GDB stub does not allow us to debug the kernel entry point in physical memory. According to VMWare’s support team, the correct approach is to use the 32-bit stub to debug the first few instructions of the kernel, then switch to a separate debugger connected to the 64-bit stub once the kernel switches to 64-bit addressing.
Since IDA’s XNU debugger does not support 32-bit debugging, this approach is not really feasible (and it’s not very practical anyway).
Workaround
Rather than add support for the 32-bit stub just to handle a few instructions, the official approach in IDA is to break at the first function executed in virtual memory (i386_init). This allows us to gain control of the OS while it is still in the early stages of initialization, which should be enough for most use cases.
Here’s how you can do it:
-
Disable ALSR for the kernel. Open Terminal in the VM and run the following command:
sudo nvram boot-args="slide=0"Then power off the VM.
-
Add this line to the .vmx file:
debugStub.hideBreakpoints = "TRUE"This ensures that hardware breakpoints are enabled in the GDB stub. For most versions of VMWare, TRUE is the default value, but it’s better to be safe.
-
Also add this line to the .vmx file:
monitor.debugOnStartGuest64 = "TRUE"This will tell VMWare to suspend the OS before it boots.
-
Power on the VM. It will remain suspended until we attach the debugger.
-
Load a kernel binary in IDA, and set the following XNU debugger options:
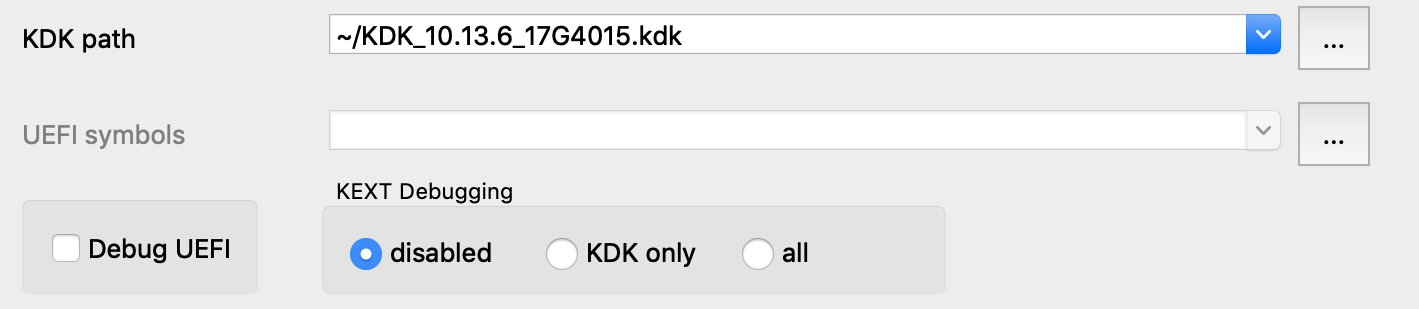
Note that we un-checked the Debug UEFI option. This option is explained in detail in the UEFI Debugging section, but for now just ensure it is disabled. This will prevent IDA from doing any unnecessary work.
-
Attach the debugger. The VM will be suspended in the firmware before the boot sequence has begun:

-
Now jump to the function _i386_init and set a hardware breakpoint at this location:
idaapi.add_bpt(here(), 1, BPT_EXEC)We must use a hardware breakpoint because the kernel has not been loaded and the address is not yet valid. This is why steps 1 and 2 were important. It ensures the stub can set a breakpoint at a deterministic address, without trying to write to memory.
-
Resume the OS, and wait for our breakpoint to be hit:

IDA should detect that execution has reached the kernel and load the kernel module on-the-fly. You can now continue to debug the kernel normally.
UEFI Debugging
It is possible to debug the EFI firmware of a VMWare Fusion guest. This gives us the unique opportunity to debug the OSX bootloader. Here’s how it can be easily done in IDA:
First copy the bootloader executable from your VM:
$ scp user@vm:/System/Library/CoreServices/boot.efi .
Now shut down the VM and add this line to the .vmx file:
monitor.debugOnStartGuest64 = "TRUE"
Load the boot.efi binary in IDA, open Debugger>Debugger options, check Suspend on library load/unload, and set Event condition to:
get_event_id() == LIB_LOADED && get_event_module_name() == "boot"
This will suspend the OS just before the bootloader entry point is invoked. Note: For some older versions of OSX, the bootloader will be named “boot.sys”. You can check the name under the .debug section of the executable.
Now select Remote XNU Debugger from the Debugger menu, and set the following fields in Debugger>Process options:
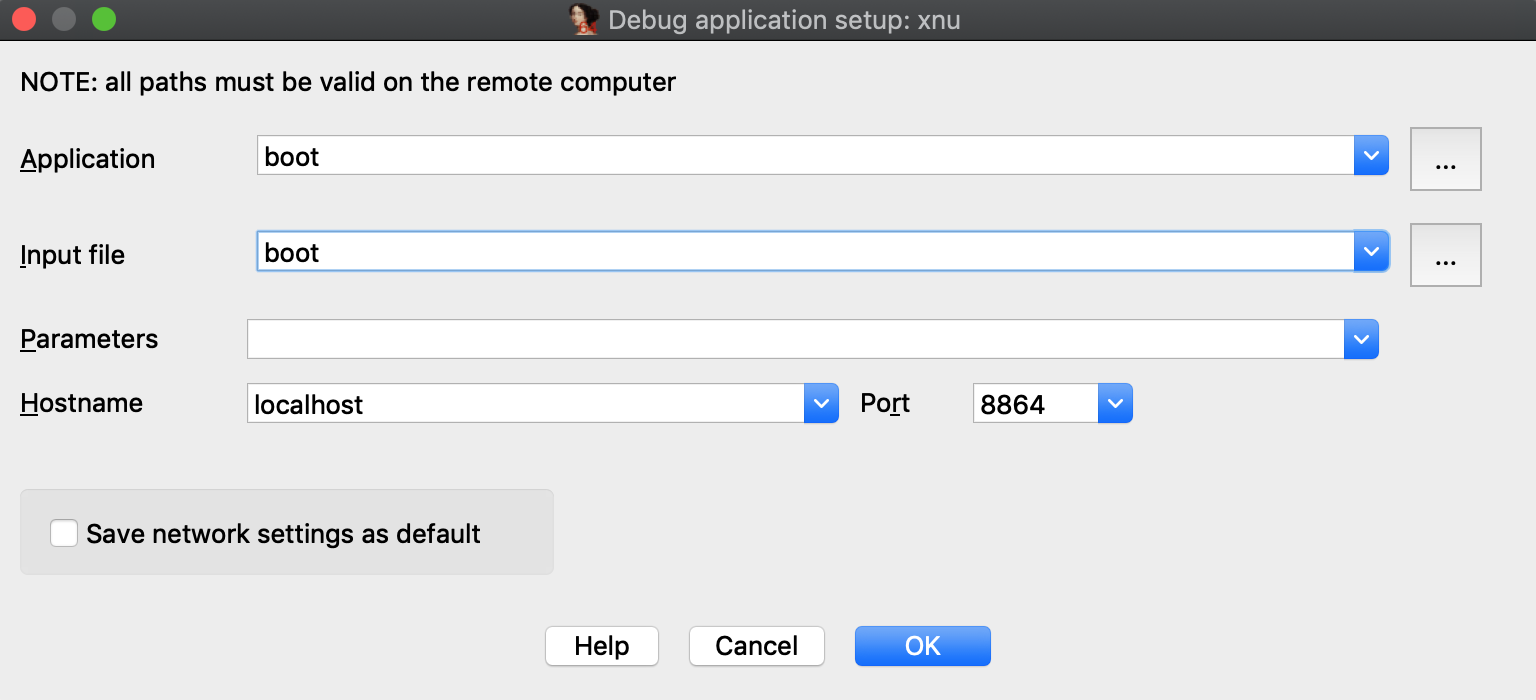
We’re now ready to start debugging the bootloader. Power on the VM (note that the VM is unresponsive since it is suspended), and attach to it with Debugger>Attach to process. After attaching IDA will try to detect the EFI_BOOT_SERVICES table. You should see the debugger print something like this to the console:
7FFD7430: EFI_BOOT_SERVICES
Now resume the process. You should see many UEFI drivers being loaded, until eventually boot.efi is loaded and IDA suspends the process:
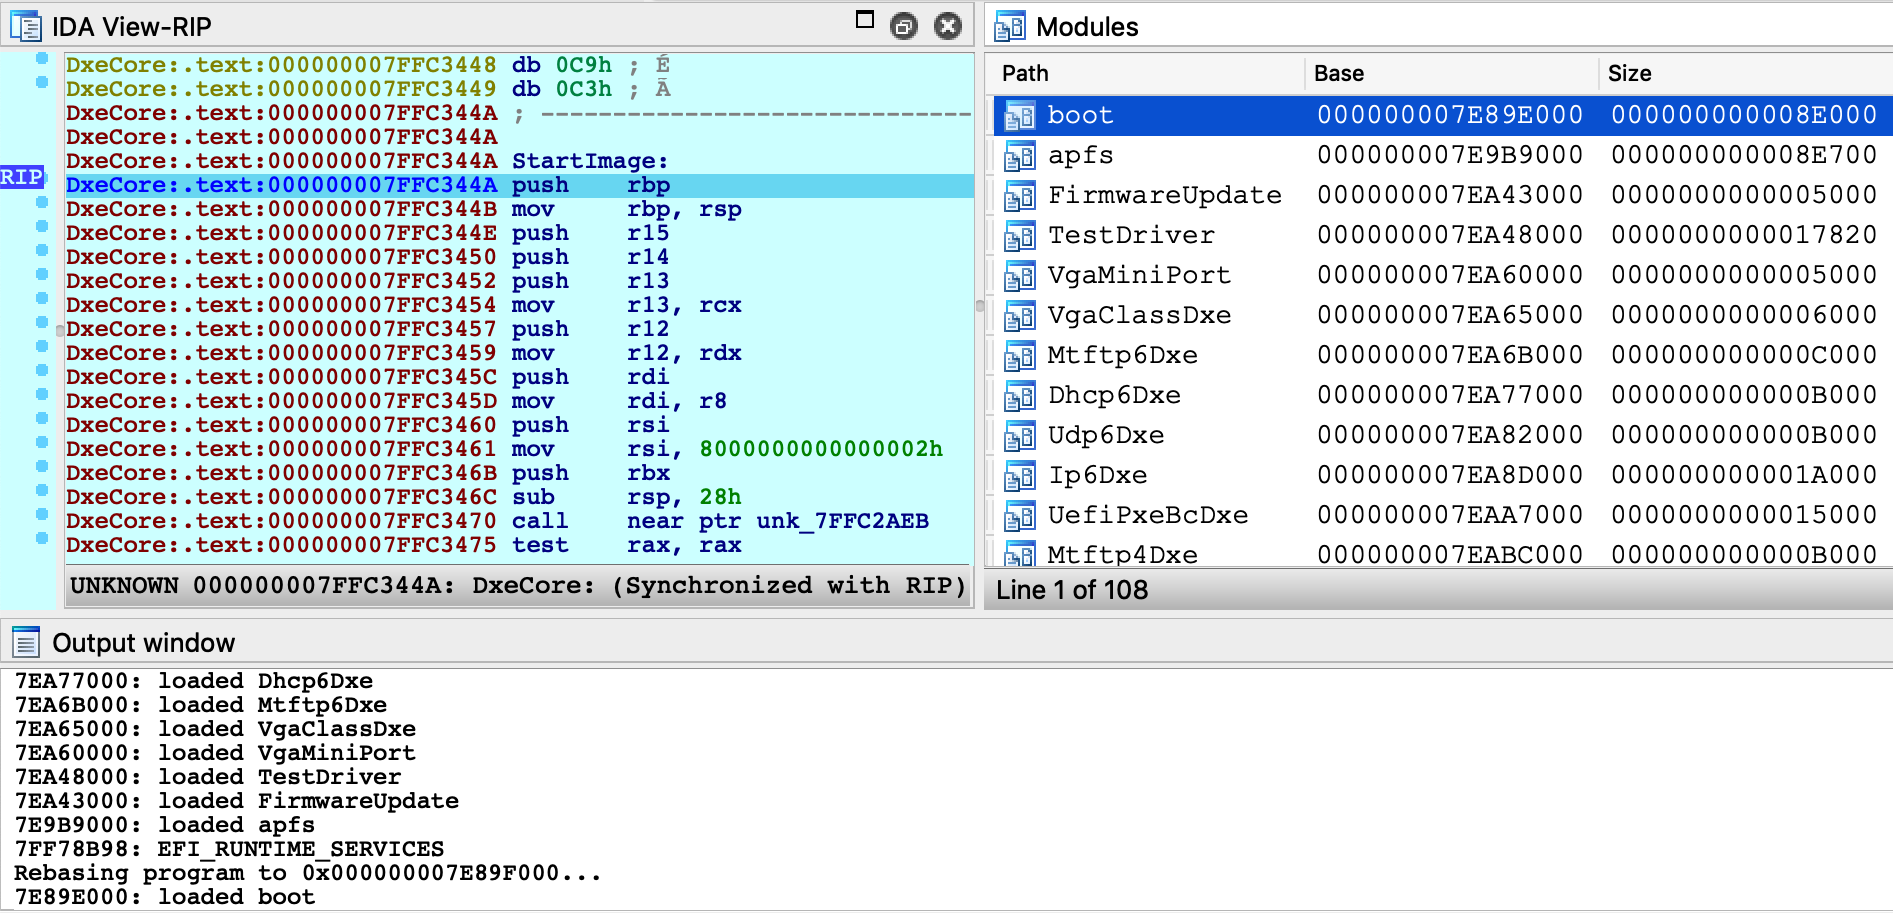
At this point, the bootloader entry point function is about to be invoked. Jump to _ModuleEntryPoint in boot.efi and press F4. We can now step through boot.efi:
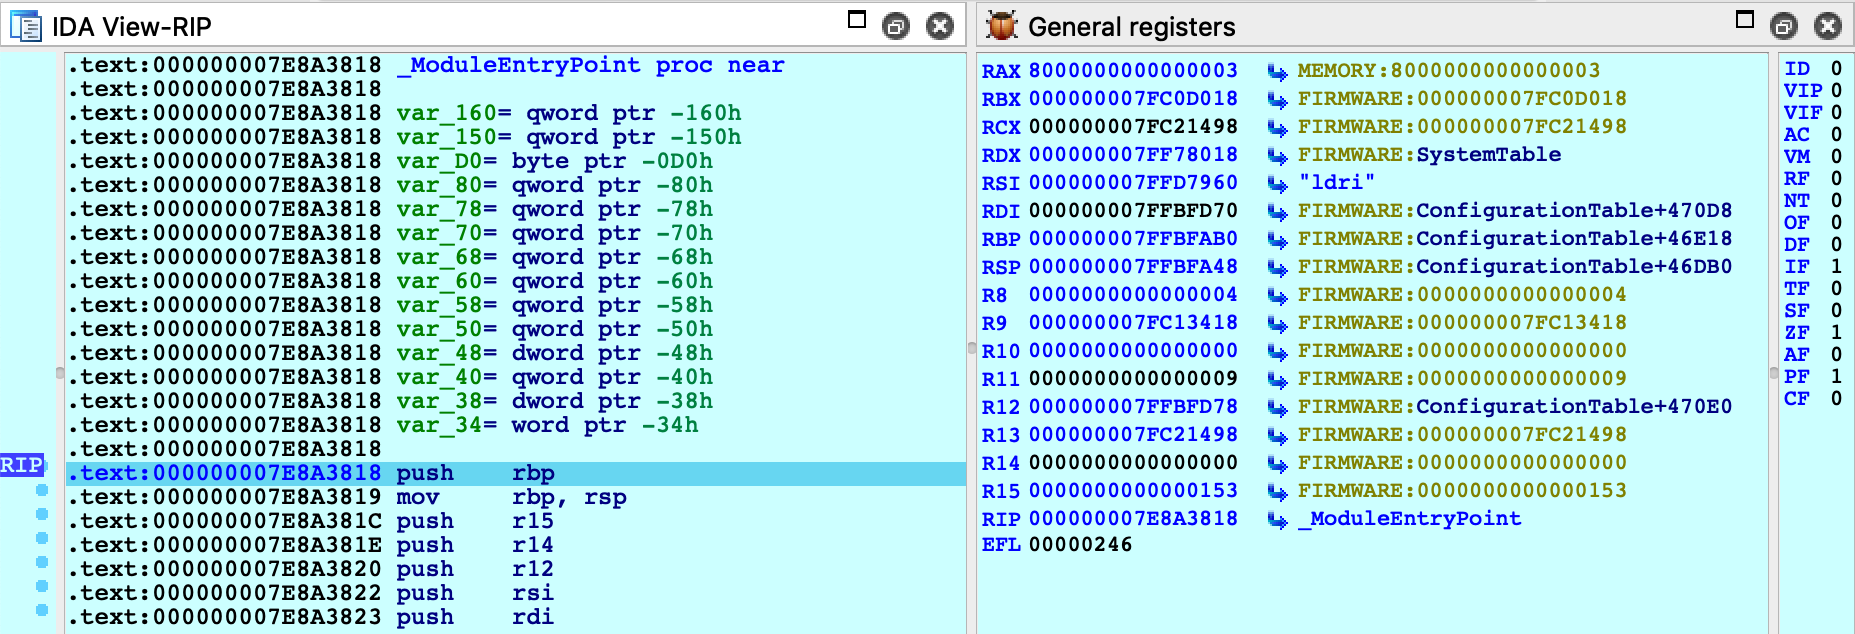
GetMemoryMap
To facilitate UEFI debugging, IDA provides an IDC helper function: xnu_get_efi_memory_map. This function will invoke EFI_BOOT_SERVICES.GetMemoryMap in the guest OS and return an array of EFI_MEMORY_DESCRIPTOR objects:
IDC>extern map;
IDC>map = xnu_get_efi_memory_map();
IDC>map.size
35. 23h 43o
IDC>map[4]
object
Attribute: 0xFi64
NumberOfPages: 0x30B6i64
PhysicalStart: 0x200000i64
Type: "EfiLoaderData"
VirtualStart: 0x0i64
IDC>map[27]
object
Attribute: 0x800000000000000Fi64
NumberOfPages: 0x20i64
PhysicalStart: 0x7FF09000i64
Type: "EfiRuntimeServicesCode"
VirtualStart: 0x0i64
This function can be invoked at any point during firmware debugging.
UEFI Debugging + DWARF
If you build your own EFI apps or drivers on OSX, you can use IDA to debug the source code.
In this example we will debug a sample EFI application. On OSX the convention is to build EFI apps in the Mach-O format, then convert the file to PE .efi with the mtoc utility. In this example, assume we have an EFI build on our OSX virtual machine that contains the following files in the ~/TestApp directory:
- TestApp.efi - the EFI application that will be run
- TestApp.dll - the original Mach-O binary
- TestApp.dll.dSYM - DWARF info for the app
- TestApp.c - source code for the app
Here’s how we can debug this application in IDA:
-
On your host machine, create a directory that will mirror the directory on the VM:
mkdir ~/TestApp -
Copy the efi, macho, dSYM, and c files from your VM:
scp -r vmuser@vm:TestApp/TestApp.* ~/TestApp -
Open the TestApp.efi binary in IDA, and wait for IDA to analyze it.
Note that you can improve the disassembly by loading the DWARF file from TestApp.dll.dSYM. You can do this with Edit>Plugins>Load DWARF file, or you can load it programatically from IDAPython:
path = "~/TestApp/TestApp.dll.dSYM/Contents/Resources/DWARF/TestApp.dll" node = idaapi.netnode() node.create("$ dwarf_params") node.supset(1, os.path.expanduser(path)) idaapi.load_and_run_plugin("dwarf", 3) -
Select Remote XNU Debugger from the debugger menu, and set the following fields in Debugger>Process options:

-
In Debugger>Debugger options, enable Suspend on library load/unload and set the Event condition field to:
get_event_id() == LIB_LOADED && get_event_module_name() == "TestApp" -
In Debugger>Debugger options>Set specific options, set the following fields:

Note that we must enable the Debug UEFI option, and set the UEFI symbols option so the debugger can find DWARF info for the EFI app at runtime.
-
If the usernames on the host and VM are different, we will need a source path mapping:
idaapi.add_path_mapping("/Users/vmuser/TestApp", "/Users/hostuser/TestApp") -
Reboot the VM and enter the EFI Shell
-
Attach the debugger. After attaching IDA will detect the firmware images that have already been loaded:
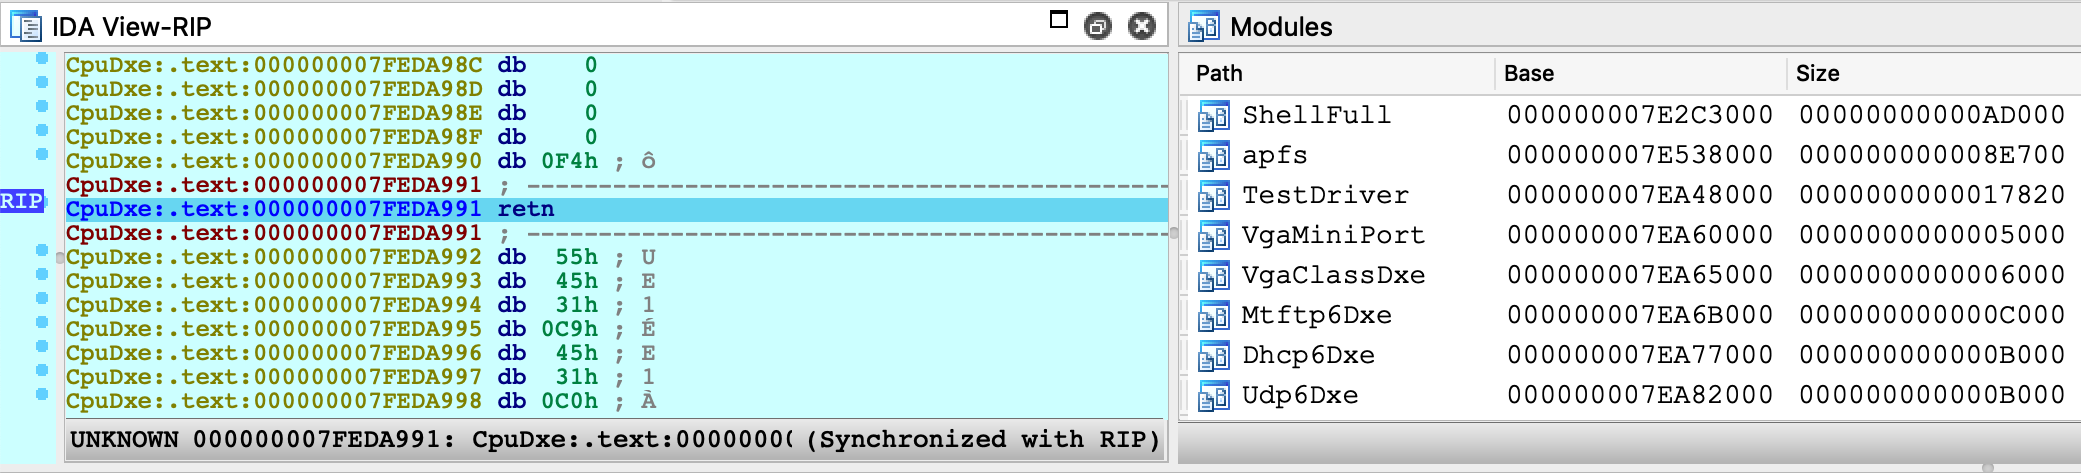
-
Resume the OS and launch TestApp from the EFI Shell prompt:
Shell>fs1:\Users\vmuser\TestApp\TestApp.efiAt this point IDA will detect that the target app has been loaded, and suspend the process just before the entry point of TestApp.efi (because of step 5).
-
Now we can set a breakpoint somewhere in TestApp.efi and resume the OS. The debugger will be able to load source file and local variable information from TestApp.dll.dSYM:
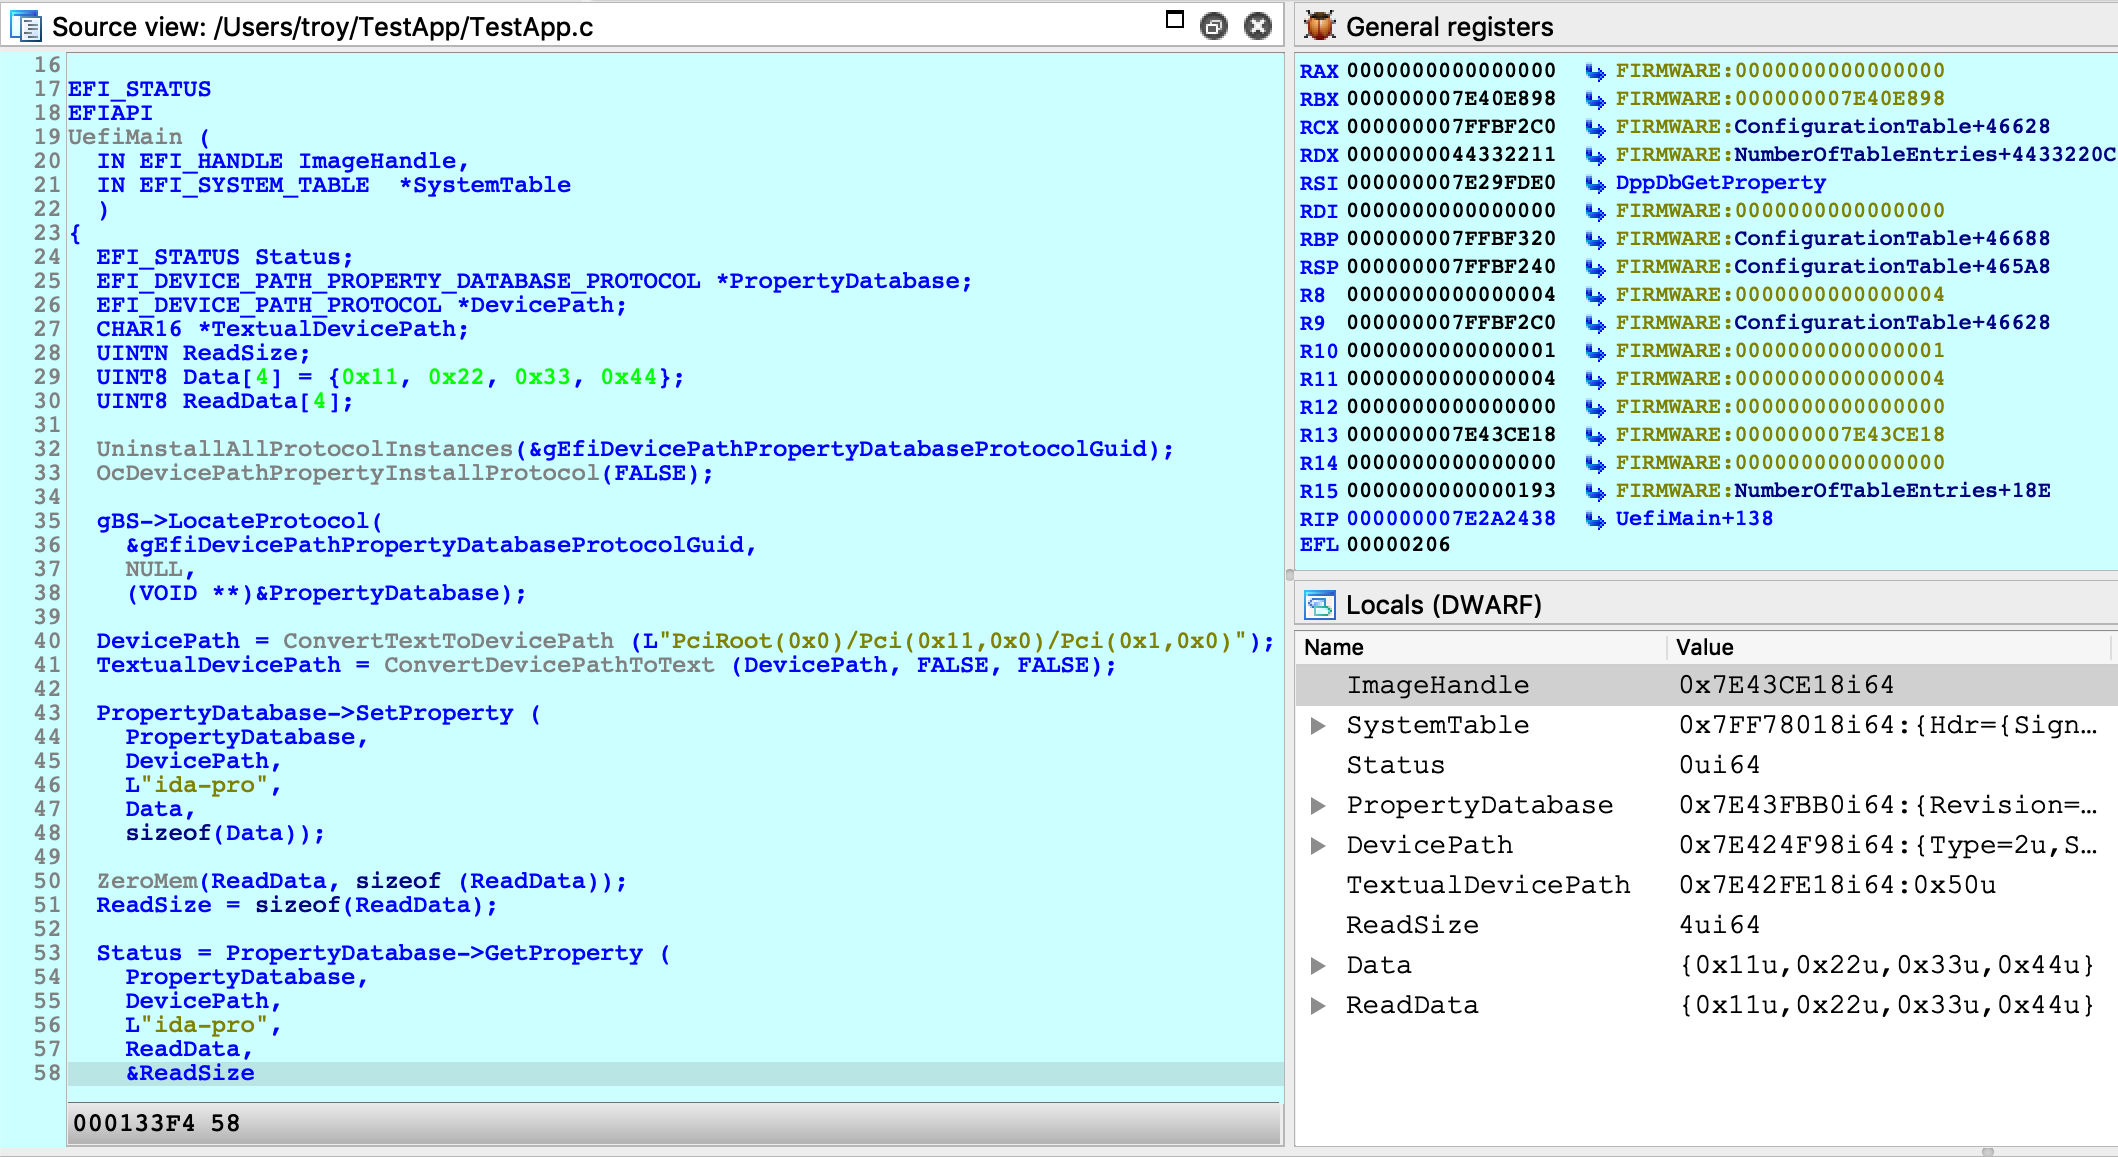
IMPORTANT NOTE: You must wait until TestApp has been loaded into memory before setting any breakpoints. If you add a breakpoint in the database before attaching the debugger, IDA might not set the breakpoint at the correct address. This is a limitation in IDA that we must work around for now.
Debugging iOS with Corellium
IDA can also debug the iOS kernel, provided you have access to a virtual iOS device from Corellium.
To get started with debugging iOS, we will perform a simple experiment to patch kernel memory. The device used in this example is a virtual iPhone XS with iOS 12.1.4, but it should work with any model or iOS version that Corellium supports. Begin by powering on your device and allow it to boot up. In the Corellium UI, look for the line labeled SSH under Advanced options:

Ensure you can connect to the device by running this command over ssh:
$ ssh [email protected] uname -v
Darwin Kernel Version 18.2.0 ... root:xnu-4903.242.2~1/RELEASE_ARM64_T8020
We will use IDA to patch this version string.
Now launch IDA, and when prompted with the window IDA: Quick start, choose Go to start with an empty database and open Debugger>Attach>Remote XNU Debugger. In the Corellium UI, find the hostname:port used by the kernel GDB stub. It should be specified in the line labeled kernel gdb:

And set the Hostname and Port fields in IDA’s application setup window:
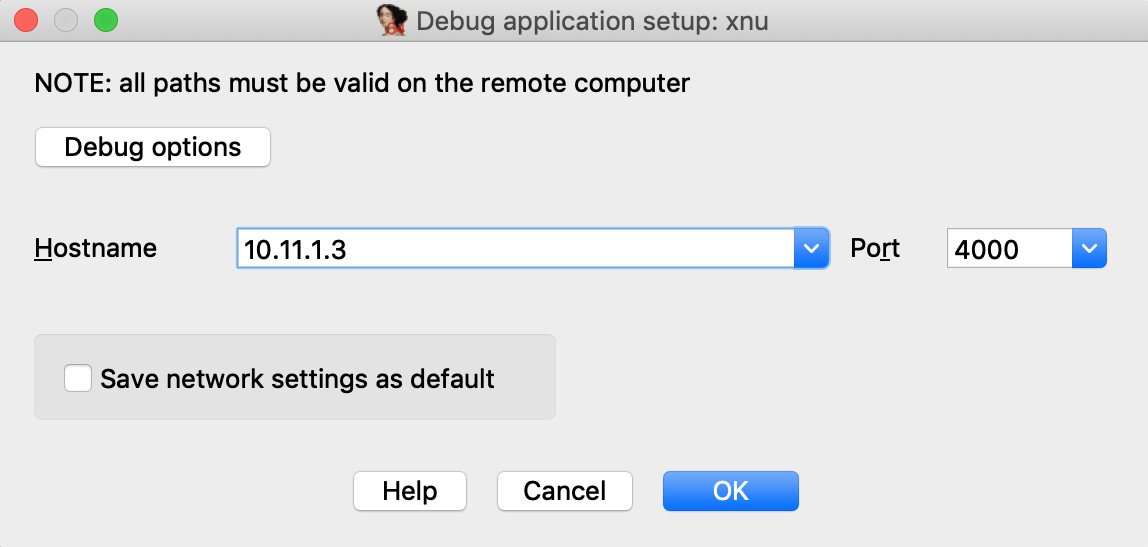
Now click on Debug options>Set specific options, and for the Configuration dropdown menu, be sure to select Corellium-ARM64:

You can ignore the other config options for now, and click OK.
Click OK again, and wait for IDA to establish a connection to Corellium’s GDB stub (this may take a few seconds). Then select <attach to the process started on target> and wait for IDA to attach. This might take several seconds (we will address this later), but for now simply wait for IDA to perform the initial setup.
If IDA could detect the kernel, it should appear in the Modules list:

and the kernel version will be printed to the console:
FFFFFFF007029FD7: detected Darwin Kernel Version 18.2.0 ...
Navigate to this address and use IDAPython to overwrite the string:
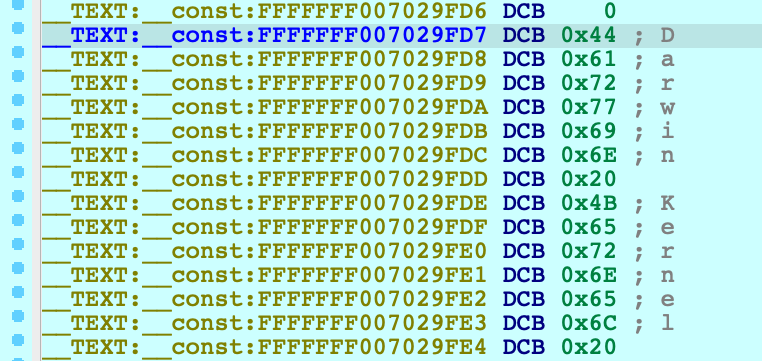
idaapi.dbg_write_memory(0xFFFFFFF007029FD7, "IDAPRO")
Resume the OS, and try running the same command as before:
$ ssh [email protected] uname -v
IDAPRO Kernel Version 18.2.0 ... root:xnu-4903.242.2~1/RELEASE_ARM64_T8020
If we could successfully write to kernel memory, IDAPRO should appear in the output.
Creating a KDK for iOS
Typically a Kernel Development Kit is not available for iOS devices, but we can still utilise the KDK_PATH option in IDA to achieve faster debugging. In the example above, the initial attach can be slow because IDA must parse the kernel image in memory (which can be especially slow if the kernel has a symbol table).
Here’s how you can speed things up:
-
create the KDK directory:
$ mkdir ~/iPhoneKDK -
copy the kernelcache from the virtual device:
$ scp root@ip:/System/Library/Caches/com.apple.kernelcaches/kernelcache /tmp -
uncompress the kernelcache with lzssdec:
$ lzssdec -o OFF < /tmp/kernelcache > ~/iPhoneKDK/kernelcache -
set KDK_PATH in dbg_xnu.cfg:
KDK_PATH = "~/iPhoneKDK";
Now whenever the debugger must extract information from the kernel, it will parse the local file on disk. This should be noticeably faster, especially if the device is hosted by Corellium’s web service.
Debugging the iOS Kernel Entry Point
Corellium allows us to debug the first few instructions of kernel initialization. This can be very useful if we want to gain control of the OS as early as possible. In the Corellium UI, power on your device with the Start device paused option:

Now start IDA with an empty database and attach to the suspended VM:

From the XNU source, this is likely the _start symbol in osfmk/arm64/start.s, which simply branches to start_first_cpu. After stepping over this branch:
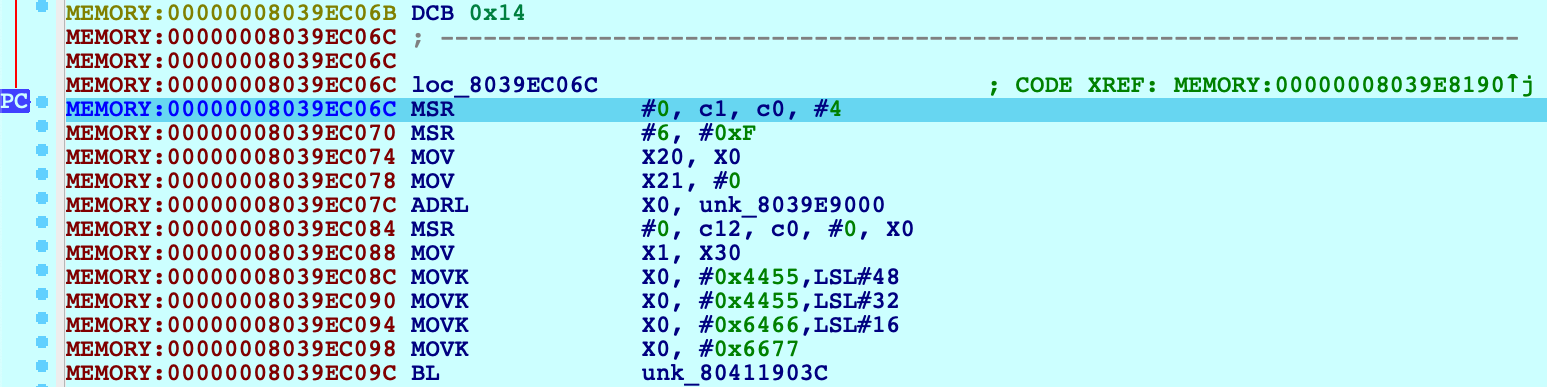
Press shortcut P to analyze start_first_cpu. This is where the kernel performs its initial setup (note that the value in X0 is a pointer to the boot_args structure). This function is interesting because it is responsible for switching the kernel to 64-bit virtual addressing. Typically the switch happens when this function sets X30 to a virtual address, then performs a RET:
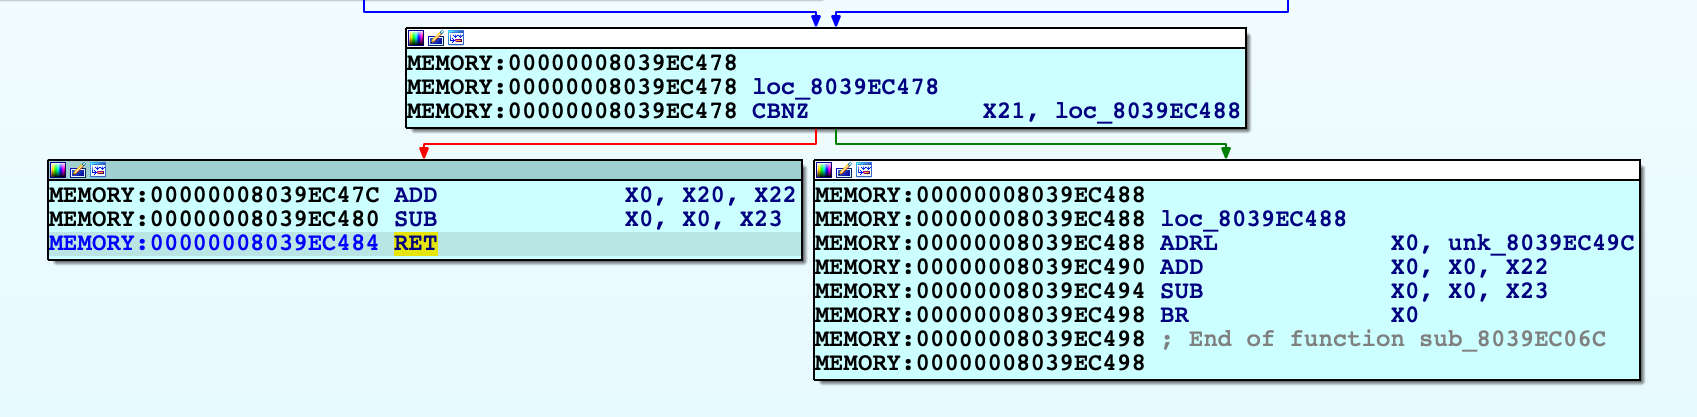
Use F4 to run to this RET instruction. In this example X30 will now point to virtual address 0xFFFFFFF007B84474. After single stepping once more, we end up in arm_init in virtual memory:
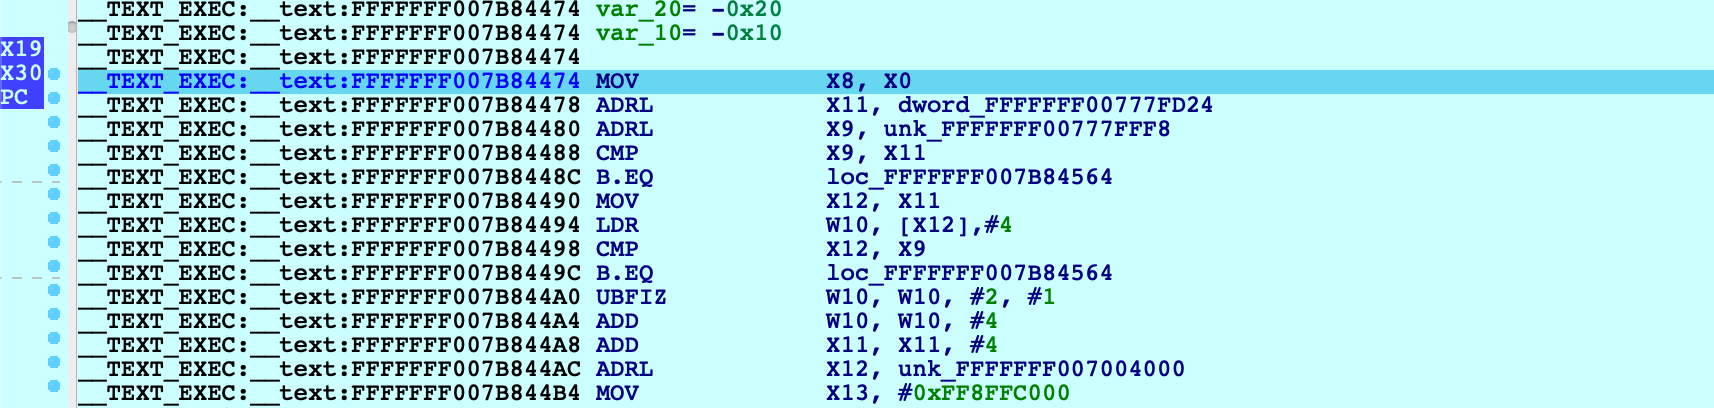
After this single step, IDA detected that execution reached the kernel’s virtual address space and automatically initialized the debugging environment. In this case a message will be printed to the console:
FFFFFFF007004000: process kernel has started
This signifies that IDA successfully detected the kernel base and created a new module in the Modules list. If the kernel has a symbol table, debug names will be available. Also note that PC now points inside the segment __TEXT_EXEC:__text instead of MEMORY, because the debugger parsed the kernel’s load commands to generate proper debug segments.
Now that we know the address of arm_init, we can streamline this task:
-
power on the device with Start device paused
-
attach to the paused VM
-
set a hardware breakpoint at arm_init:
idaapi.add_bpt(0xFFFFFFF007B84474, 1, BPT_EXEC) -
resume, and wait for the breakpoint to be hit
This gives us a quick way to break at the first instruction executed in virtual memory. You can continue debugging iOS as normal.
Known Issues and Limitations
Here is a list of known shortcomings in the XNU Debugger. Eventually we will address all of them, but it is unlikely we will resolve all of them by the next release. If any of the following topics are important to you, please let us know by sending an email to [email protected]. Issues with vocal support from our users are automatically prioritised.
iBoot debugging
Debugging the iOS firmware/bootloader is not yet supported. An On-Premise Corellium box is required for this functionality, so we will only implement it if there is significant demand.
32-bit XNU
The XNU Debugger does not support debugging 32-bit XNU. Since pure 32-bit OSes are quite outdated it is unlikely we will support them unless there is exceptional demand.
KDP
The XNU Debugger relies on the Remote GDB Protocol, and currently Apple’s Kernel Debugging Protocol (KDP) is not supported. It is possible to add KDP support to IDA in the future.
Remote debugging with IDA Pro
Remote debugging is the process of debugging code running on one networked computer from another networked computer:
- The computer running the IDA Pro interface will be called the “debugger client”.
- The computer running the application to debug will be called the “debugger server”.
Remote debugging will be particularly useful in the following cases:
- To debug virus/trojans/malwares : in this way, the debugger client will be as isolated as possible from the compromised computer.
- To debug applications encountering a problem on one computer which is not duplicated on other computers.
- To debug distributed applications.
- To always debug from your main workstation, so you won’t have to duplicate IDA configuration, documentation and various debugging related resources everywhere.
- In the future, to debug applications on more operating systems and architectures.
This small tutorial will present how to setup and use remote debugging in practice.
The remote IDA debugger server
In order to allow the IDA client to communicate with the debugger server over the network, we must first start a small server which will handle all low-level execution and debugger operations.
Debugger servers
The IDA distribution ships with the following debugger servers:
- For Windows: win32_remote32 (x86), win64_remote.exe (x64)
- For Linux: linux_server32 (x86), linux_server (x64), armlinux_server32 (ARM), armlinux_server (ARM64)
- For Android: android_x86_server, android_x64_server, android_server32 (ARM), android_server (ARM64)
- For Mac: mac_server (x64), mac_server_arm (ARM64), mac_server_arme (ARM64e)
With these, we can:
- Locally debug applications and shared libraries from the IDA graphical and text versions.
- Remotely debug applications and shared libraries from the IDA graphical and text versions.
So let’s first copy the small x64 Windows debugger server file to our debugger server.
This server accepts various command line arguments:
C:\> win64_remote -?
IDA Windows 64-bit remote debug server(MT) v9.0.30. Hex-Rays (c) 2004-2024
Usage: win64_remote [options]
-p ... (--port-number ...) Port number
-i ... (--ip-address ...) IP address to bind to (default to any)
-c ... (--certchain-file ...) TLS certificate chain file
-k ... (--privkey-file ...) TLS private key file
-v (--verbose) Verbose mode
-t (--no-tls) Use plain, unencrypted TCP connections
-P ... (--password ...) Password
-k (--on-broken-connection-keep-session) Keep debugger session alive when connection breaks
-K (--on-stop-kill-process) Kill debuggee when closing session
Let’s start it by specifying a password, to avoid unauthorized connections:
C:\>win64_remote -Pmypassword
IDA Windows 64-bit remote debug server(MT) v9.0.30. Hex-Rays (c) 2004-2024
2024-11-04 03:20:51 Listening on 0.0.0.0:23946 (my ip 172.20.156.1)...
Note that the remote debugger server can only handle one debugger session at a time. If you need to debug several applications simultaneously on the same host, launch several servers on different network ports by using the -p switch.
Setting up the debugger client.
First, we copy the executable we want to debug from the debugger server (Windows or Linux) to the debugger client (Windows or Linux). We can then load this file into IDA, as usual. To setup remote debugging, we select the ‘Process options…’ menu item in the Debugger menu:
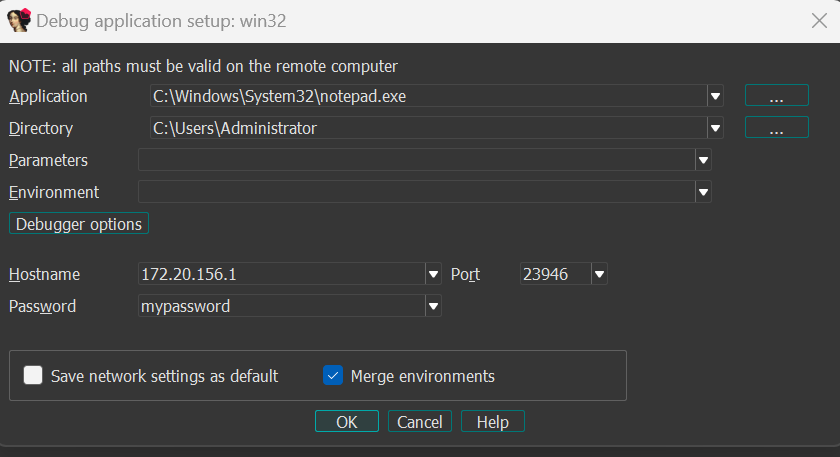
Specify the Application and Directory paths. Note that these file paths should be valid on the remote debugger server. Also do not forget to enter the host name or IP address of the debugger server: remote debugging will only be enabled if these settings are specified ! You also might have to open the TCP port in the remote machine firewall. Finally, we enter the password we chose for the remote IDA debugger server.
Starting remote debugging.
Both debugger server and debugger client are now ready to start a remote debugging session. In fact, you can now use all debugger related commands as you would with the local Windows PE debugger or local Linux debugger! For example,we can run the process until RIP reaches the application entry point, by jumping to this entry point then pressing the F4 key:
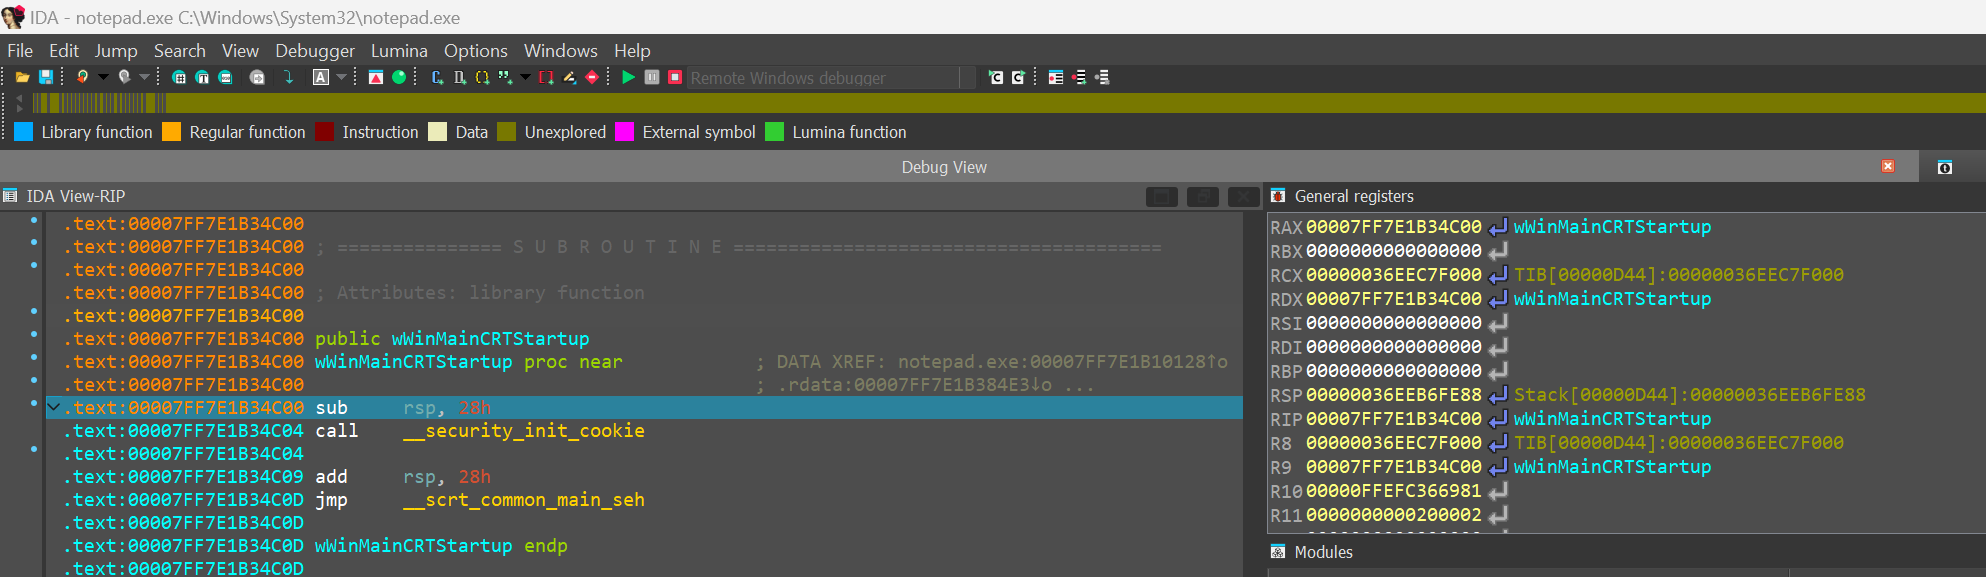
If we now directly terminate the process (by pressing CTRL-F2) and look at win64_remote’s output (on the debugger server), we indeed properly observe it accepted then closed our network connection:
C:\\> .\win64_remote.exe -Pmypassword
IDA Windows 64-bit remote debug server(MT) v9.0.30. Hex-Rays (c) 2004-2024
2024-11-04 03:20:51 Listening on 0.0.0.0:23946 (my ip 172.20.156.1)...
2024-11-04 03:29:26 [1] Accepting connection from 172.20.144.1...
2024-11-04 03:37:56 [1] Closing connection from 172.20.144.1...
Attaching to a running process.
Another interesting possibility is to attach to an already running process on the remote computer. If you click on the ‘Attach to process…’ command from the Debugger menu, IDA will display a listing of all remote running processes, you can then filter to choose the one you want to attach to (notepad.exe in this case):
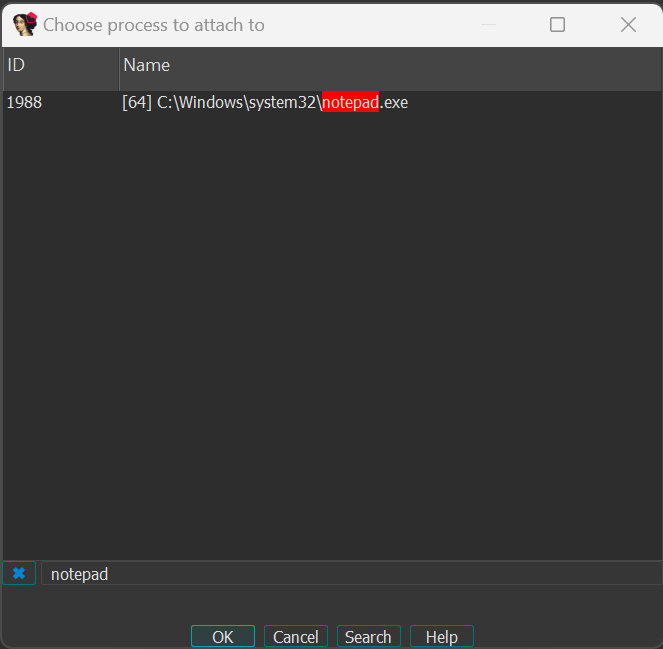
Double clicking on a process from the list will automatically suspend the process and attach to it, allowing you to debug it without starting it manually.
Detaching from the debugged process.
Finally, if the debugger server is running Windows XP, Windows Server 2003 or Linux, you can also detach from a process you were currently debugging, simply by using the ‘Detach from process’ command in the Debugger menu:
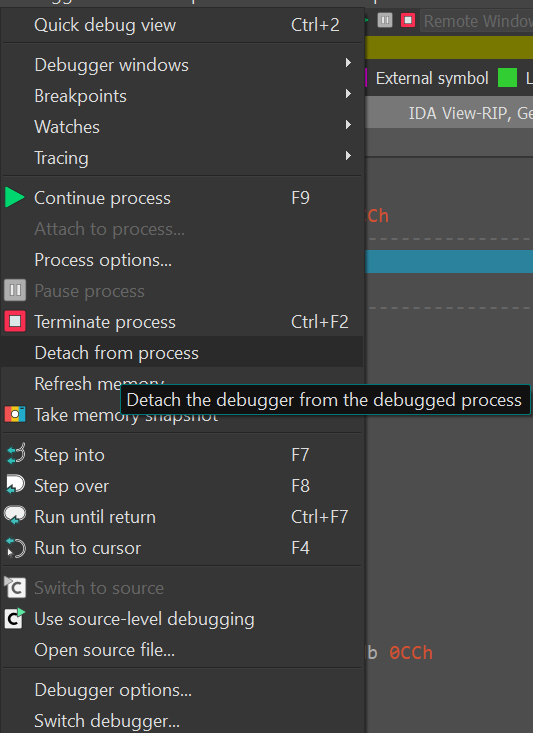
On Windows, please note that IDA can also attach to Windows services running either locally or remotely. In particular, the ‘Detach from process’ command will be especially useful if you previously attached to a Windows service: it will allow you to stop the debugger without terminating a critical Windows service on the debugger server!
IDA Scriptable Debugger: overview
Debugging facilities in IDA 4.9 and 4.9 SP
Since we enhanced the usability of IDA remote debugging options, many possibilities are now open. Explore the graph below to discover some of the possible connections.
- instant debugging, no need to wait for the analysis to be complete to start a debug session.
- easy connection to both local and remote processes.
- support for 64 bits systems and new connection possibilities.
- WindowCE remote debugging
click on the links below to explore some of the remote debugging features.
IDA Scriptable Debugger: scriptability
Since 2003 IDA offers a debugger that complements the static analysis nicely. In many cases, one just can’t beat dynamic analysis. The IDA Debugger now supports 32-bit and 64-bit MS Windows executablesMS Windows, Linux, Mac OS X both locally and remotely. However, because the debugger API requires the mastery of our SDK and uses an event based model, it has proved quite difficult to use for some of our users.
- because the API uses an event based model makes it hard to program a linear sequence of actions in a natural way. The user is forced to install an event handler and to implement a finite state machine that implements the core logic of his plugin. While this may, in many ways, be a more powerful approach, this is probably too complex for more mundane tasks.
- because the API is only available at the plugin level, the simplest debugger actions requires writing a plugin which is a much bigger investment of time and efforts than writing a small IDC script.
IDA 5.2 will address both issues. The old event based model will remain available, but a simpler linear model will become available thanks to the function get_debugger_event(). This function pauses the execution of the plugin (or the script) until a new debugger event happens. The user can specify if she is interested only in the events that suspend the process or in all events. A timeout can also be confifured, after which the execution will continue if no event arose.
The new function allows us to drop the event based model (except in the cases when it is superior to linear logic) and write IDC scripts to control the debugger. For example, to launch the debugger, run to a specific location, print some data and single step twice, the following lines will suffice:
AppBpt(some_address);
StartDebugger("","",""); // start debugger with default params
GetDebuggerEvent(WFNE_SUSP, -1); // ... and wait for bpt
Message ("Stopped at %a, event code is %x\n", GetEventEA(), GetEventId());
StepInto(); // request a single step
GetDebuggerEvent(WFNE_SUSP, -1); // ... and wait for app to execute
StepInto(); // request a single step
GetDebuggerEvent(WFNE_SUSP, -1); // ... and wait for app to execute
In IDA 5.1 this would have required a event handler and a small finite state automata, for a total more than 200 lines of code. Please note that, in the above example, the error handling code is omitted for clarity. In real life, you might want to check for unexpected conditions like an exception happening after StepInto().
To illustrate how easier it is to write scripts with the new approach, we rewrote the core functionality of the UUNP unpacker plugin. The original program requires about 600 lines of code and has a rather complex logic. The new script only requires 100 lines of code (almost half of them being comments and empty lines). More importantly, the script is easy to understand and modify for your needs.
This is a reimplementation of the uunp universal unpacker in IDC. It illustrates the use of the new debugger functions in IDA v5.2
#include <idc.idc>
//--------------------------------------------------------------------------
static main()
{
auto ea, bptea, tea1, tea2, code, minea, maxea;
auto r_esp, r_eip, caller, funcname;
// Calculate the target IP range. It is the first segment.
// As soon as the EIP register points to this range, we assume that
// the unpacker has finished its work.
tea1 = FirstSeg();
tea2 = SegEnd(tea1);
// Calculate the current module boundaries. Any calls to GetProcAddress
// outside of these boundaries will be ignored.
minea = MinEA();
maxea = MaxEA();
// Launch the debugger and run until the entry point
if ( !RunTo(BeginEA()) )
return Failed(-1);
// Wait for the process to stop at the entry point
code = GetDebuggerEvent(WFNE_SUSP, -1);
if ( code <= 0 )
return Failed(code);
// Set a breakpoint at GetProcAddress
bptea = LocByName("kernel32_GetProcAddress");
if ( bptea == BADADDR )
return Warning("Could not locate GetProcAddress");
AddBpt(bptea);
while ( 1 )
{
// resume the execution and wait until the unpacker calls GetProcAddress
code = GetDebuggerEvent(WFNE_SUSP|WFNE_CONT, -1);
if ( code <= 0 )
return Failed(code);
// check the caller, it must be from our module
r_esp = GetRegValue("ESP");
caller = Dword(r_esp);
if ( caller < minea || caller >= maxea )
continue;
// if the function name passed to GetProcAddress is not in the
// ignore-list, then switch to the trace mode
funcname = GetString(Dword(r_esp+8), -1, ASCSTR_C);
// ignore some api calls because they might be used by the unpacker
if ( funcname == "VirtualAlloc" )
continue;
if ( funcname == "VirtualFree" )
continue;
// A call to GetProcAddress() probably means that the program has been
// unpacked in the memory and now is setting up its import table
break;
}
// trace the program in the single step mode until we jump to
// the area with the original entry point.
DelBpt(bptea);
EnableTracing(TRACE_STEP, 1);
for ( code = GetDebuggerEvent(WFNE_ANY|WFNE_CONT, -1); // resume
code > 0;
code = GetDebuggerEvent(WFNE_ANY, -1) )
{
r_eip = GetEventEa();
if ( r_eip >= tea1 && r_eip < tea2 )
break;
}
if ( code <= 0 )
return Failed(code);
// as soon as the current ip belongs OEP area, suspend the execution and
// inform the user
PauseProcess();
code = GetDebuggerEvent(WFNE_SUSP, -1);
if ( code <= 0 )
return Failed(code);
EnableTracing(TRACE_STEP, 0);
// Clean up the disassembly so it looks nicer
MakeUnknown(tea1, tea2-tea1, DOUNK_EXPAND|DOUNK_DELNAMES);
MakeCode(r_eip);
AutoMark2(tea1, tea2, AU_USED);
AutoMark2(tea1, tea2, AU_FINAL);
TakeMemorySnapshot(1);
MakeName(r_eip, "real_start");
Warning("Successfully traced to the completion of the unpacker code\n"
"Please rebuild the import table using renimp.idc\n"
"before stopping the debugger");
}
//--------------------------------------------------------------------------
// Print an failure message
static Failed(code)
{
Warning("Failed to unpack the file, sorry (code %d)", code);
return 0;
}
Debugging code snippets with QEMU debugger (a la IDA Bochs debugger)
Introduction
IDA Pro 5.6 has a new feature: automatic running of the QEMU emulator. It can be used to debug small code snippets directly from the database. In this tutorial we will show how to dynamically run code that can be difficult to analyze statically.
Target
As an example we will use shellcode from the article “Alphanumeric RISC ARM Shellcode” in Phrack 66. It is self-modifying and because of alphanumeric limitation can be quite hard to undestand. So we will use the debugging feature to decode it.
The sample code is at the bottom of the article but here it is repeated:
80AR80AR80AR80AR80AR80AR80AR80AR80AR80AR80AR80AR80AR80AR80AR80AR80AR80AR
80AR80AR80AR80AR80AR80AR80AR80AR80AR00OB00OR00SU00SE9PSB9PSR0pMB80SBcACP
daDPqAGYyPDReaOPeaFPeaFPeaFPeaFPeaFPeaFPd0FU803R9pCRPP7R0P5BcPFE6PCBePFE
BP3BlP5RYPFUVP3RAP5RWPFUXpFUx0GRcaFPaP7RAP5BIPFE8p4B0PMRGA5X9pWRAAAO8P4B
gaOP000QxFd0i8QCa129ATQC61BTQC0119OBQCA169OCQCa02800271execme22727
Copy this text to a new text file, remove all line breaks (i.e. make it a single long line) and save. Then load it into IDA.
Loading binary files into IDA
IDA displays the following dialog when it doesn’t recognize the file format (as in this case):
Since we know that the code is for ARM processor, choose ARM in the “Processor type” dropdown and click Set. Then click OK. The following dialog appears:

When you analyze a real firmware dumped from address 0, these settings are good. However, since our shellcode is not address-dependent, we can choose any address. For example, enter 0x10000 in “ROM start address” and “Loading address” fields.
IDA doesn’t know anything about this file so it didn’t create any code. Press C to start disassembly.
Configuring QEMU
Before starting debug session, we need to set up automatic running of QEMU.
- Download a recent version of QEMU with ARM support (e.g. from http://homepage3.nifty.com/takeda-toshiya/qemu/index.html). If qemu-system-arm.exe is in a subdirectory, move it next to qemu.exe and all DLLs.
Note: if you’re running Windows 7 or Vista, it’s recommended to use QEMU 0.11 or 0.10.50 (“Snapshot” on Takeda Toshiya’s page), as the older versions listen for GDB connections only over IPv6 and IDA can’t connect to it. - Edit cfg/gdb_arch.cfg and change “set QEMUPATH” line to point to the directory where you unpacked QEMU. Change “set QEMUFLAGS” if you’re using an older version.
- In IDA, go to Debug-Debugger options…, Set specific options.
- Enable “Run a program before starting debugging”.
- Click “Choose a configuration”. Choose Versatile or Integrator board. The command line and Initial SP fields will be filled in.
- Memory map will be filled from the config file too. You can edit it by clicking the “Memory map” button, or from the Debugger-Manual memory regions menu item. See below for more details
Now on every start of debugging session QEMU will be started automatically.
Executing the code
By default, initial execution point is the entry point of the database. If you want to execute some other part of it, there are two ways:
- Select the code range that you want to execute, or
- Rename starting point ENTRY and ending point EXIT (convention similar to Bochs debugger)
In our case we do want to start at the entry point so we don’t need to do anything. If you press F9 now, IDA will write the database contents to an ELF file (database.elfimg) and start QEMU, passing the ELF file name as the “kernel” parameter. QEMU will load it, and stop at the initial point.
Now you can step through the code and inspect what it does. Most of the instructions “just work”, however, there is a syscall at 0x0010118:
ROM:00010118 SVCMI 0x414141
Since the QEMU configuration we use is “bare metal”, without any operating system, this syscall won’t be handled. So we need to skip it.
- Navigate to 010118 and press F4 (Run to cursor). Notice that the code was changed (patched by preceding instructions):
- Right-click next line (0001011C) and choose Set IP.
- Press F7 three times. Once you’re on BXPL R6 line, IDA will detect the mode switch and add a change point to Thumb code:
- Go to 01012C and press U (Undefine).
- Press Alt-G (Change Segment Register Value) and set value of T to 1. The erroneous CODE32 will disappear.
- Go back to 00010128 and press C (Make code). Nice Thumb code will appear:
- In Thumb code, there is another syscall at 00010152. If you trace or run until it, you can see that R7 becomes 0xB (sys_execve) and R0 points to 00010156.
Hint: if the code you’re investigating has many syscalls and you don’t want to handle them one by one, put a breakpoint at the address 0000000C (ARM’s vector for syscalls). Return address will be in LR.
Saving results to database
If you want to keep the modified code or data for later analysis, you’ll need to copy it to the database. For that:
- Edit segment attributes (Alt-S) and make sure that segments with the data you need have the “Loader segment” attribute set.
- Choose Debugger-Take memory snapshot and answer “Loader segments”.
- Now you can stop the debugging and inspect the new data.
Note: this will update your database with the new data and discard the old. Repeated execution probably will not be correct.
Happy debugging!
Please send any comments or questions to [email protected]
Trace Replayer and managing traces
Using Trace Replayer Debugger and Managing Traces in IDA
Copyright 2014 Hex-Rays SA
Introduction
Quick Overview
The trace replayer is an IDA pseudo debugger plugin that appeared first in IDA 6.3. This plugin can replay execution traces recorded with any debugger backend in IDA, such as local Win32 or Linux debuggers, WinDbg, remote GDB debugger, etc…
Following this tutorial
This tutorial was created using the Linux version of IDA and a Linux binary as target. However, it can be followed on any supported platform (MS Windows, Mac OS X and Linux) by setting up remote debugging. Please refer to the debugger section of the docs for more information regarding remote debugging.
Supplied files
Among with the tutorial the following files are also provided at http://www.hex-rays.com/products/ida/support/tutorials/replayer/ida-replayer-tutorial.tar.gz
| File name | SHA1 | Description |
| intoverflow.c | 6424d3100e3ab1dd3fceae53c7d925364cea75c5 | Program’s source code. |
| intoverflow.elf | 69a0889b7c09ec5c293702b3b50f55995a1a2daa | Linux ELF32 program. |
| no_args.trc | 773837c2b212b4416c8ac0249859208fd30e2209 | IDA binary trace file version 1 |
| second_run.trc | 4e0a5effa34f805cc50fe40bc0e19b78ad1bb7c4 | IDA binary trace file version 1 |
| crash.trc | f0ee851b298d7709e327d8eee81657cf0beae69b | IDA binary trace file version 1 |
Replaying and managing traces
Recording traces
Before using the trace replayer plugin we will need to record an execution trace of a program. We will use the following toy vulnerable program as an example:
#include <stdio.h>
#include <stdlib.h>
#include <string.h>
int foo(char *arg, int size)
{
char *buf;
if ( strlen(arg) > size )
{
printf("Too big!\n");
return 1;
}
buf = malloc(size);
strcpy(buf, arg);
printf("Buffer is %s\n", buf);
free(buf);
return 0;
}
int main(int argc, char **argv)
{
if ( argc != 3 )
{
printf("Invalid number of arguments!\n");
return 2;
}
return foo(argv[1], atoi(argv[2]));
}
Please compile this sample program (in this example, we used GCC compiler for Linux) or use the supplied ELF binary, open the binary in IDA and wait until the initial analysis completes. When done, select a suitable debugger from the drop down list (“Local Linux debugger”, or “Remote Linux debugger” if you’re following this tutorial from another platform):
We have two ways of telling IDA to record a trace:
- Break on process entry point and manually enable tracing at this point.
- Or put a trace breakpoint at the very first instruction of the program.
In the case we prefer the first approach we will need to click on the menu “Debugger → Debugger Options” and then mark the check box “Stop on process entry point” as shown bellow:
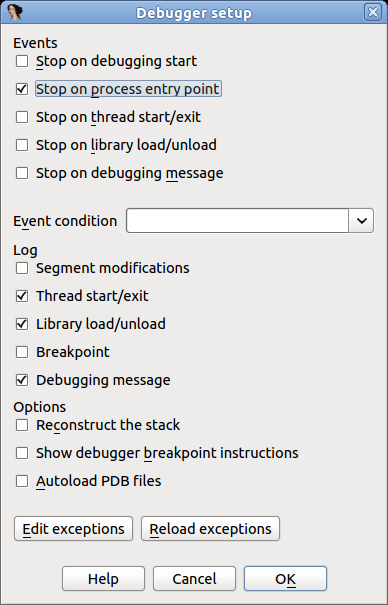
After checking this option press OK and run the program pressing F9. When the entry point is reached, we can select from the menu “Debugger → Tracing” one of the following three options:
- Instruction tracing: All instructions executed will be recorded.
- Function tracing: Only function calls and returns will be recorded.
- Basic block tracing: Similar to instruction tracing but, instead of single stepping instruction by instruction, IDA will set temporary breakpoints in the end of every known basic block, as well as on function calls.
For this example we will select “Instruction tracing”. Check this option and let the program continue by pressing F9. The program will resume execution and finish quickly. Now, we have a recorded trace! To see it, select “Debugger → Tracing → Trace Window”. A new tab will open with a content similar to the following:
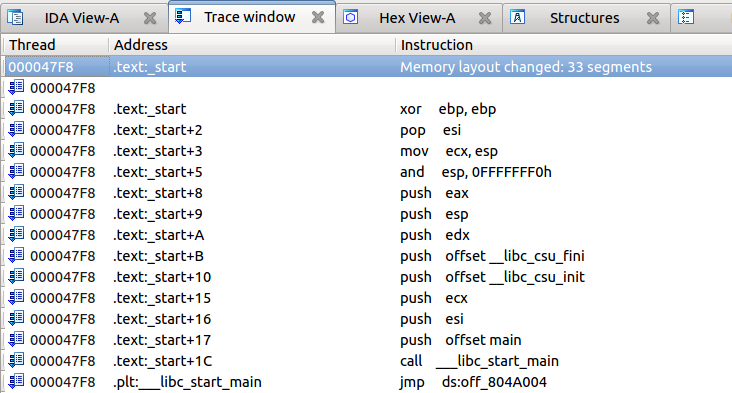
As previously stated, there are two ways to record traces: enabling it manually, or using an “Enable tracing” breakpoint. To set such a breakpoint we will go to the program’s entry point (Ctrl+E) and put a breakpoint (F2) in the very first instruction. Then right click on the new breakpoint and select “Edit breakpoint”. In the dialog check the option “Enable tracing” and then select the desired “Tracing type” (for this example, we’ll use “Instructions”):
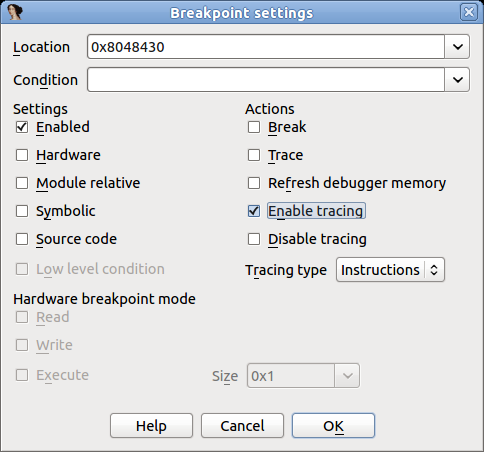
Remove the “Stop on process entry point” option we set in the prior example and press F9 to run the program.
This way is more convenient than the first because the tracing is turned on automatically and does not need manual intervention.
Working with traces
Now we have a new recorded trace, no matter which method we used. What can we do with it? First, we can check which instructions were executed, as they are highlighted in the disassembly, like in the screenshot bellow:
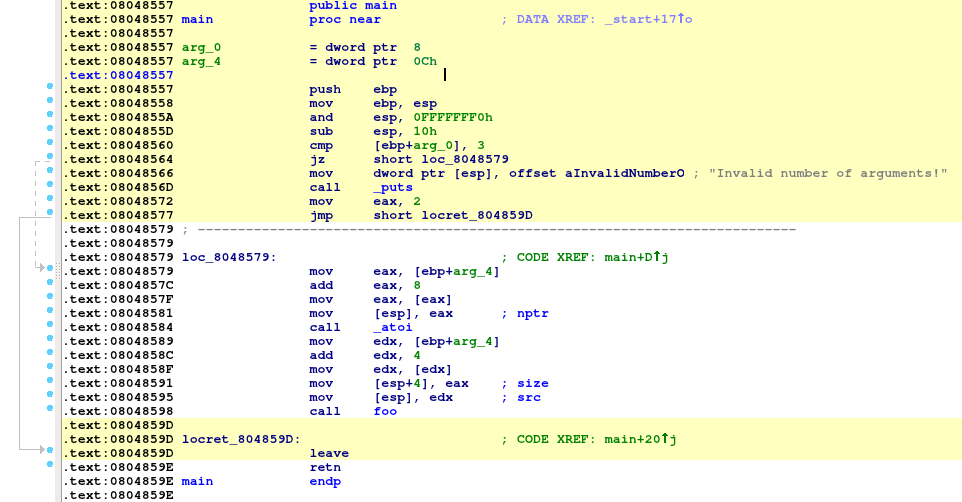
(the highlight color can be changed in “Debugger → Tracing → Tracing Options”)
Highlighting makes it clear which instructions have been executed.
We can also check what functions have been executed (instead of instructions) by opening the “Trace Window” via “Debugger → Tracing → Trace Window”, right clicking on the list and then selecting “Show trace call graph”:
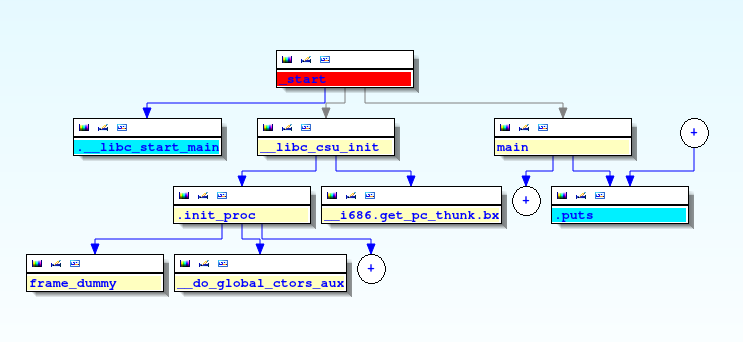
Now let’s inspect the register values in order to understand why the check at 0x0848566 doesn’t pass. Please select “Debugger → Switch debugger” and in the dialog box click on the “Trace replayer” radio button:
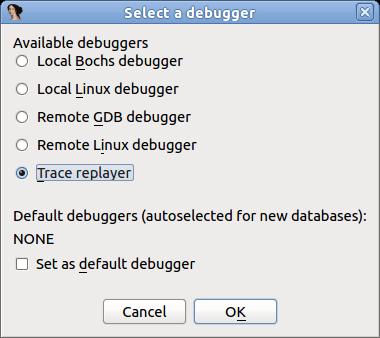
Click OK and press F4 in the first instruction of the “main” function.
The trace replayer will suspend execution at the “main” function and display the register values that were recorded when the program was executed:
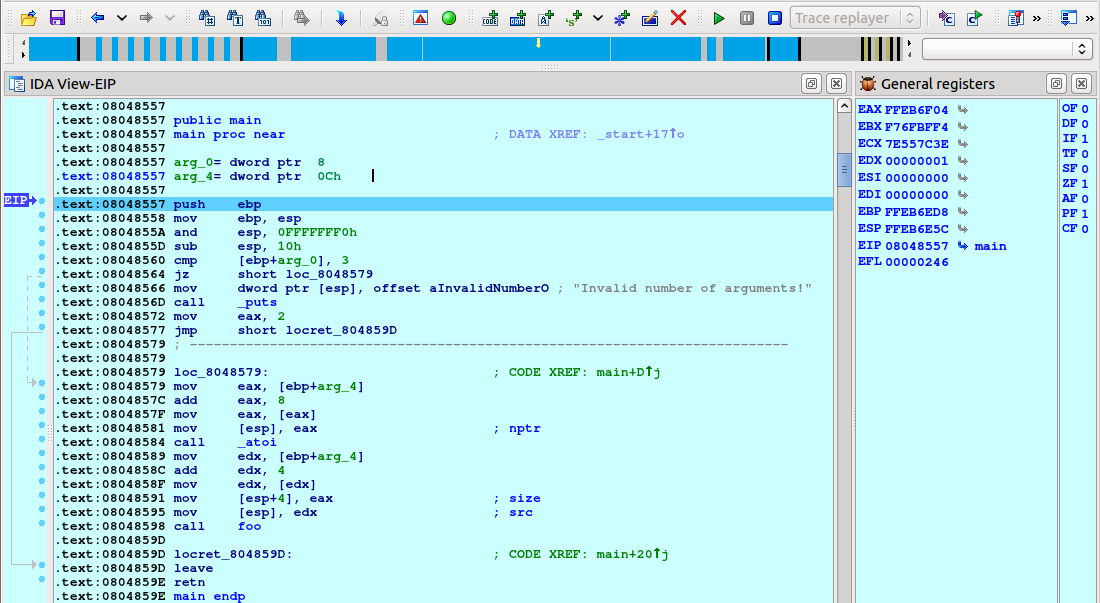
We can single step by pressing F7, as usual. Let us keep pressing F7 until the “jz” instruction is reached:
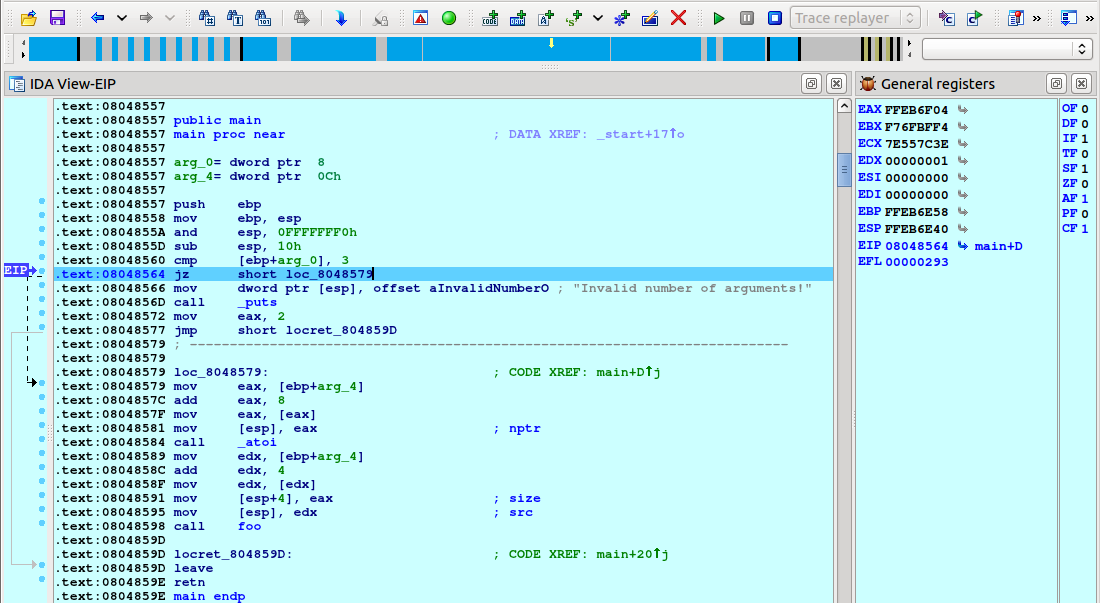
The comparison “cmp [ebp+arg_0], 3” was not successful (ZF=0) so the check does not pass. We need to give to the program two arguments to pass this check and record a new trace.
Loading an overlay and viewing differences in flow
Before doing another run, let’s save the first trace to a file. Select “Debugger → Tracing → Trace Window”, right click in the middle of the newly opened tab, and select “Save trace” from the popup menu:
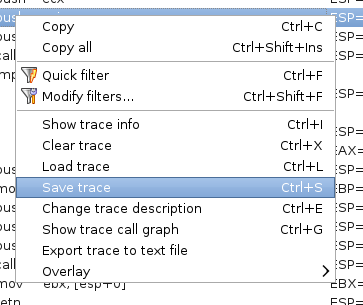
Then save the file:
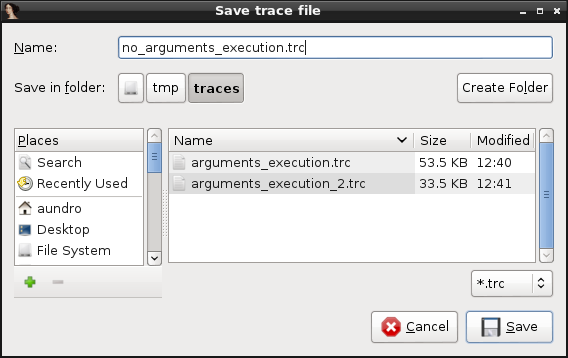
You will also be offered a chance to give the trace a description:

Now let’s record a new trace but this time we will pass two command line arguments to the program. Select “Debugger → Process Options” and set “AAAA 4” as the arguments:
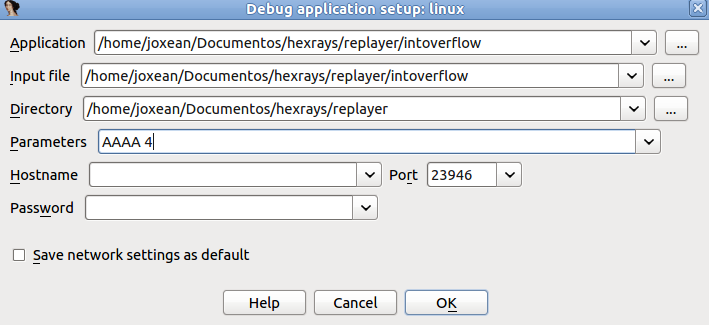
Close the dialog, revert to the “Local Linux debugger”, and press F9. A new trace will be recorded. If we check the “main” function we will see that different instructions have been executed this time:
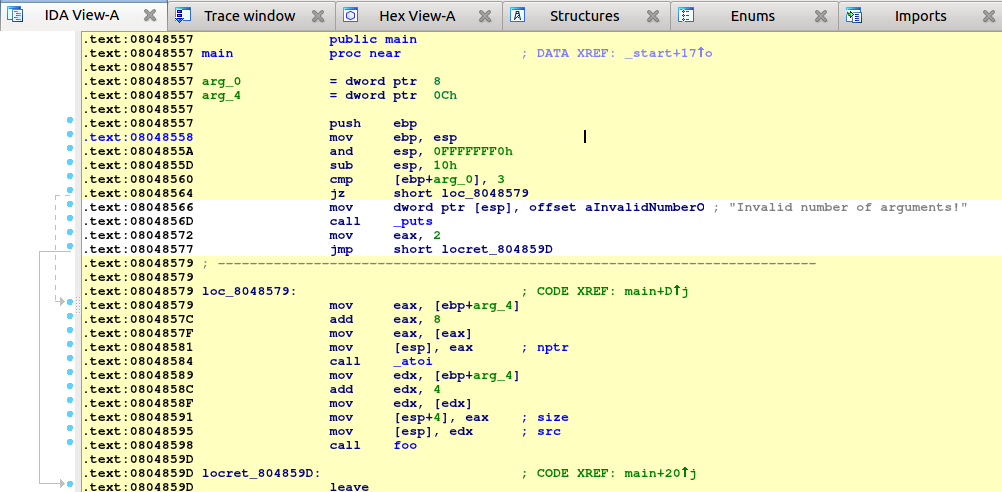
Let’s check which instructions are different between the first and the second run.
First, we will need to load the previous trace as “overlay”:
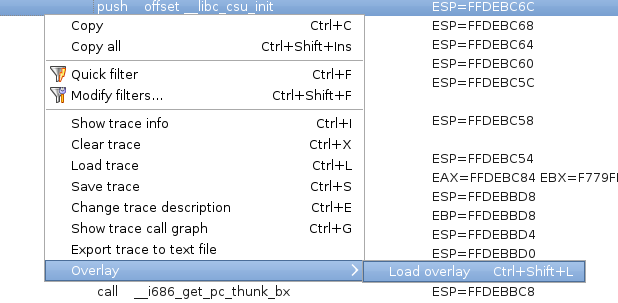
Select the trace we saved:

Note that we have now other options in the ‘Overlay’ submenu, now that there is an overlay present:
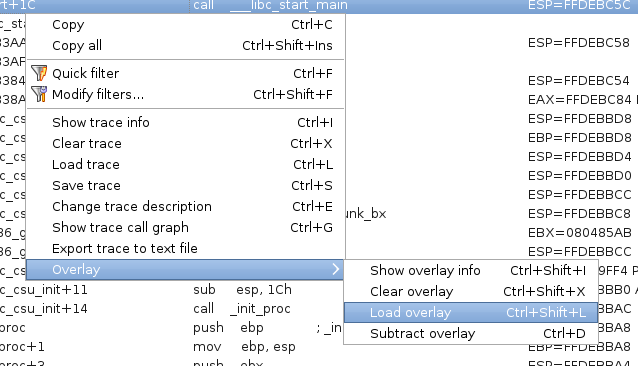
Now go back to the disassembly view and check how the disassembly code is highlighted in three different colors:
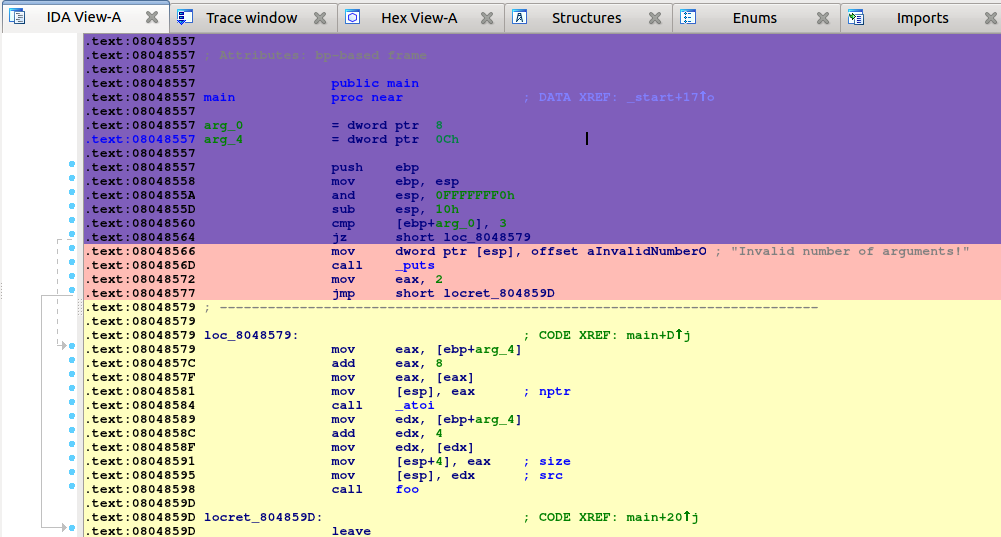
The code highlighted in yellow is the code executed in the current trace (the one listed in the “Trace Window”). The pink code was executed only in the overlay trace. And the code in purple is the code common to both traces. We can immediately see that there is some new code that have been executed, like the calls to atoi and foo.
Let’s go to the “foo” function and see what happened here:
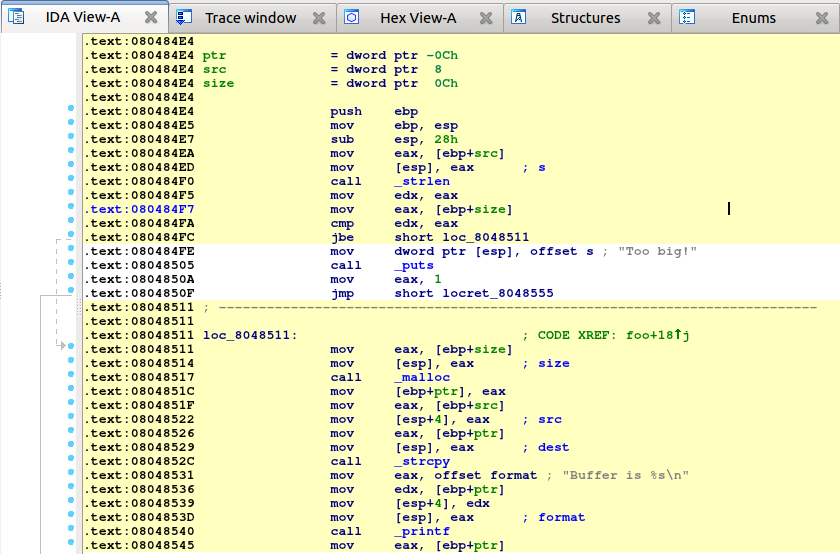
The code in yellow tells us that the check for the size at 0x800484FC passed and the calls to malloc, strcpy and printf were executed. Let’s save this trace for later analysis and comparison with the future runs. As before, go to the trace window, right click on the list and select “Save trace”. Set the trace’s description to ‘Correct execution’.
It’s time to record another trace with different arguments to see what happens. For this new execution, we will longer command line arguments (eight “A” characters instead of four). Let’s change the arguments in “Debugger → Process Options”, switch back to the “Local Linux debugger”, and run it. We have a new trace. Let’s compare it against the previously recorded one. As we did before, go to the “Trace Window”, right click on the list, select “Overlay”, then “Load overlay”, and select the trace with description “Correct execution”.
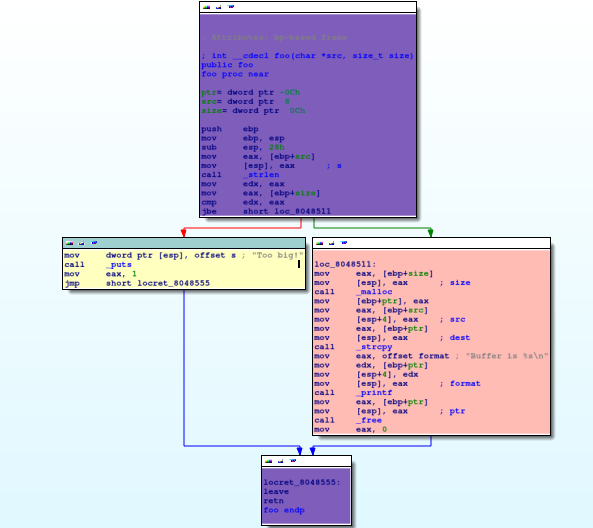
As we see, the code that alerts us the about a too big string was executed (it’s highlighted in yellow). Let’s save this recorded trace with the “String too big” description. Now we will record one more trace but this time we will use the number “-1” as the second command line argument.
Change the arguments in “Debugger → Process Options” as shown bellow:
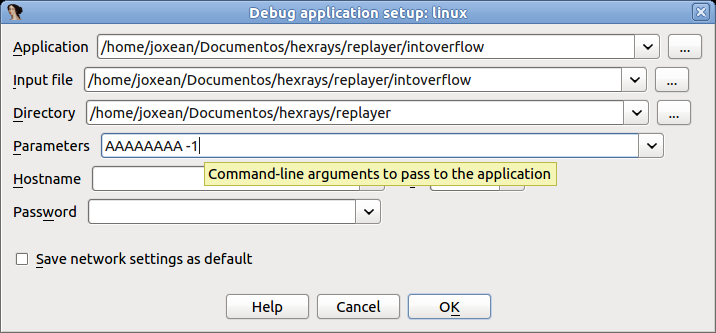
Then switch back again, to the “Local Linux debugger” (or to “Remote Linux debugger” if needed) and run it by pressing F9. The process will crash somewhere in the call to strcpy:

Stop the debugger and save this trace (let’s call it “Crash”). Then diff this trace against the “Correct execution” trace.
We will see the following in the disassembly view:
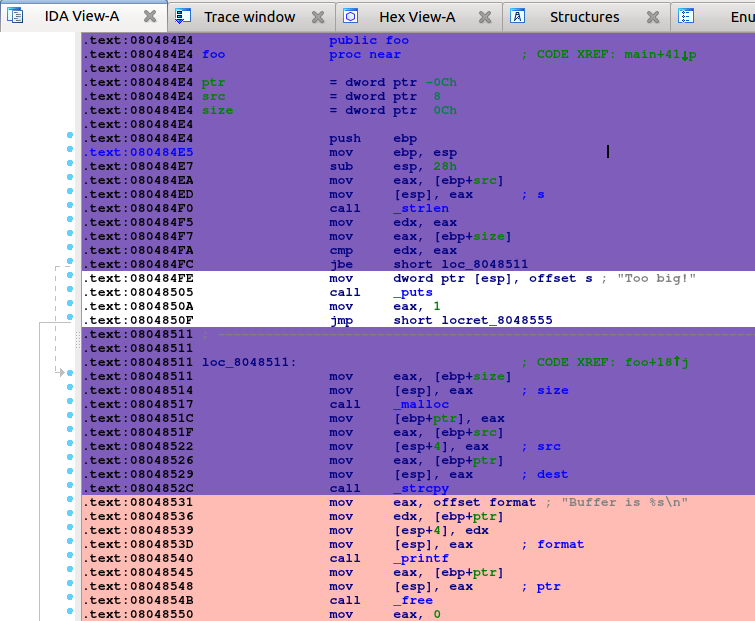
As we see, pretty much the same code as in the previous run was executed until the call to strcpy. It’s time to replay this last execution and see what happened.
Diffing traces
When both a “main trace” and an “overlay trace” are present, the context menu item “Overlay → Subtract overlay” becomes available.
This allows one to subtract the list of events (e.g., instructions) that are present in the overlay, from the main trace:
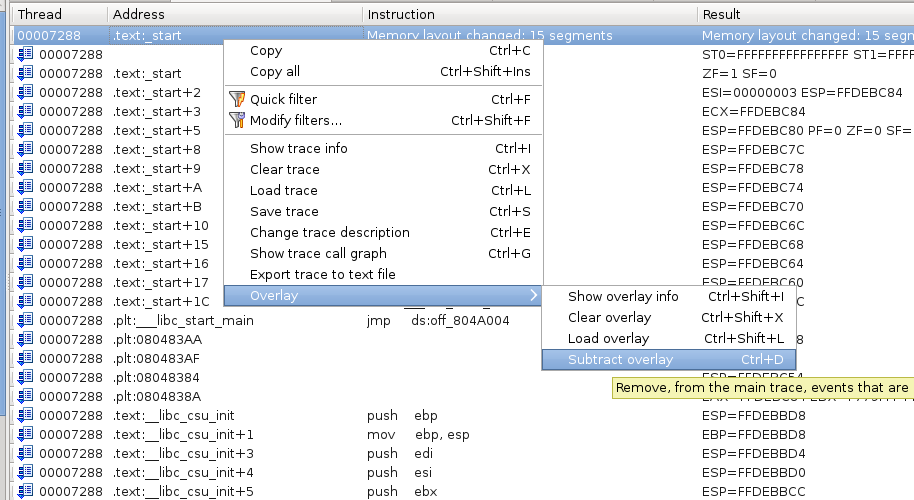
Will give the following results:
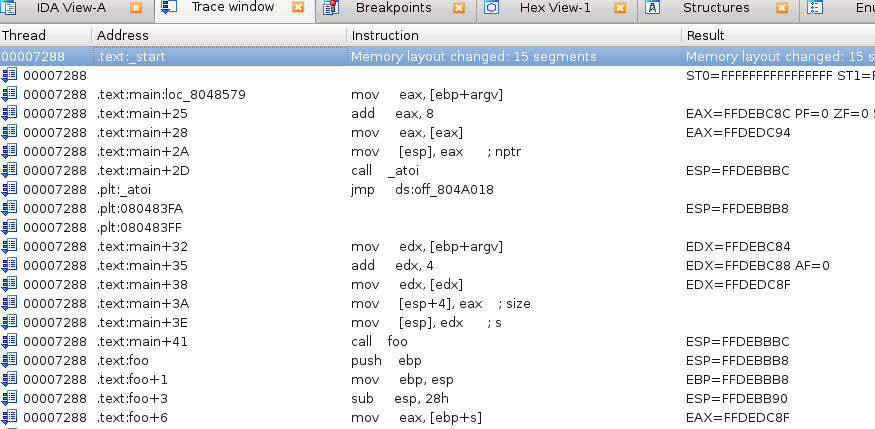
As you can see, many events that were present in both the overlay & the main trace have been removed. Only those that were only present in the main trace remain.
Reverting the diff
The diffing operation is reversible:
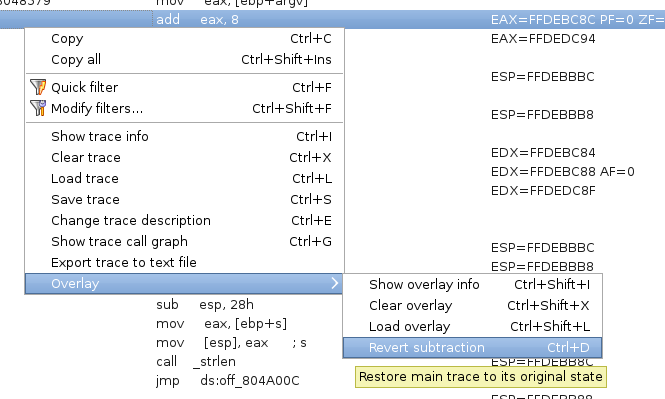
This will restore the main trace as it were, before the contents of the overlay were removed from it.
Replaying traces
We know that the program is crashing somewhere in the call to strcpy but we don’t know why the check at 0x080484FC passes since -1 is smaller than the size of the string (8 bytes). Let’s put a breakpoint at the call to strlen at 0x080484F0, switch to the “Trace replayer” debugger, and “run” the program by pressing F9. Please note that we do not really run the program, we are merely replaying a previously recorded trace.
The debugger will stop at the strlen call:
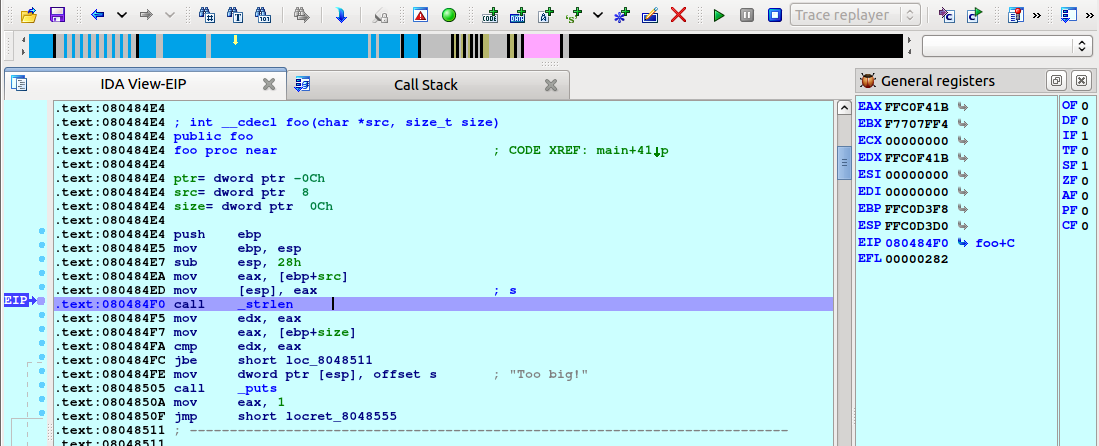
In the trace replayer we can use all usual debugging commands like “run to cursor” (F4), “single step” (F7), or “step over” (F8). Let’s press F8 to step over the strlen call and check the result:
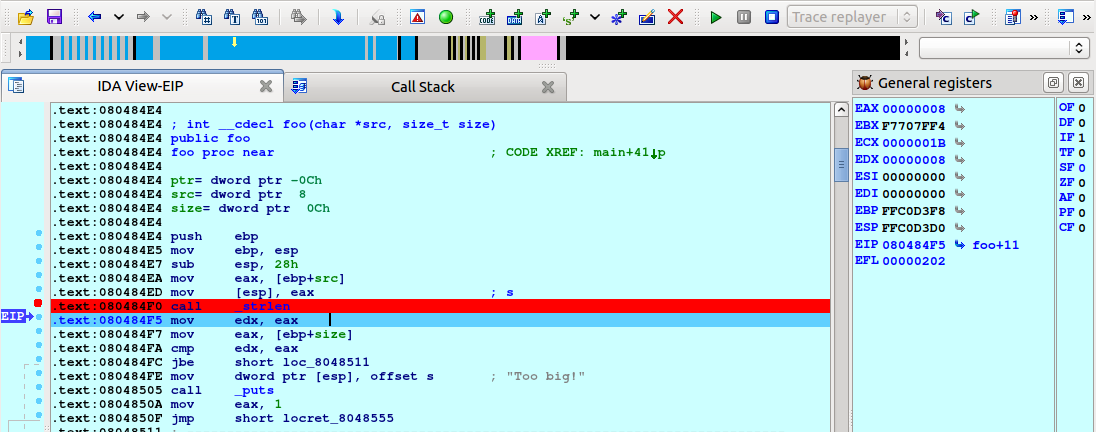
It returns 8 as expected. Now move to the address 0x080484FC and press F4 or right click on this address, select “Set IP”, and press F7 (we need to inform the replayer plugin that we changed the current execution instruction in order to refresh all the register values). The difference between “Run to” (F4) and “Set IP” is that “Run to” will replay all events happened until that point but “Set IP” will directly move to the nearest trace event happened at this address (if it’s in the recorded trace, of course).
Regardless of how we moved to this point IDA will display the following:
As we see, the jump was taken because CF was set to 1 in the previous instruction (“cmp edx, eax”). Let’s step back to this instruction to see what values were compared. Select “Debugger → Step back” from the menu:
The flags are reset to 0 and we can see that EAX (0xFFFFFFFF) and EDX (8) are compared. Press F7 to step one instruction again and you will notice CF changes to 1. The instruction JBE performs an unsigned comparison between 8 and 0xFFFFFFFF and, as 8 <= 0xFFFFFFFF, the check passes. We just discovered the cause of the bug.
Let’s continue analyzing it a bit more. Scroll down until the call to malloc at 0x08048517, right click, choose “Set IP”, and press F7 (or simply press F4). As we see, the argument given to malloc is 0xFFFFFFFF (4 GB).
Press F8 to step over the function call:
Obviously, malloc can not allocate so much memory and returns NULL. However, the program does not check for this possibility and tries to copy the contents of the given buffer to the address 0, resulting in a crash.
Summary
In this tutorial we showed you the basics of trace management and the trace replayer module in IDA. We hope you enjoy this new feature. Happy debugging!
Using IDA Pro’s tracing features
Check the tutorial about tracing with IDA:
{% file src=“tracing.pdf” %}
Appcall
IDA Pro - Appcall user guide
Copyright 2023 Hex-Rays SA
Introduction
Appcall is a mechanism to call functions under a debugger session in the context of the debugged program using IDA’s CLI (Command Line Interpreter) or from a script.
Such a mechanism can be used for seamless blackbox function calling and use, fuzzing, process instrumentation, DLL injection, testing or extending applications.
Appcall mechanism highly depends on the type information of the called function. For that reason, it is necessary to have a correct function prototype before doing an Appcall, otherwise different or incorrect results may be returned.
In a nutshell, Appcall works by first hijacking the current thread’s stack (please do switch threads explicitly if you want to Appcall in a different context), then pushing the arguments, and then temporarily adjusting the instruction pointer to the beginning of the called function. After the function returns (or an exception occurs), the original stack, instruction pointer, and other registers are restored, and the result is returned to the caller.
Please note that while most of the examples in this document are illustrated using a Windows user mode application, Appcall is not limited to Windows and can be used with any platform supported by IDA debuggers.
Quick start
Let’s start explaining the basic concepts of Appcall using the IDC CLI. Let’s imagine we have the following printf() in the disassembly somewhere:
.text:00000001400015C0 ; __int64 printf(const char *, ...)
.text:00000001400015C0 _printf proc near
.text:00000001400015C0
.text:00000001400015C0
.text:00000001400015C0 arg_0 = qword ptr 8
.text:00000001400015C0 arg_8 = qword ptr 10h
.text:00000001400015C0 arg_10 = qword ptr 18h
.text:00000001400015C0 arg_18 = qword ptr 20h
.text:00000001400015C0
.text:00000001400015C0 mov [rsp+arg_0], rcx
.text:00000001400015C5 mov [rsp+arg_8], rdx
.text:00000001400015CA mov [rsp+arg_10], r8
.text:00000001400015CF mov [rsp+arg_18], r9
...
It can be called by simply typing the following in the IDC CLI (press “.” to jump to the CLI):
_printf("hello world\n");
As you noticed, we invoked an Appcall by simply treating _printf as if it was a built-in IDC function. If the application had a console window, then you should see the message printed in it.
If you have a function with a mangled name or with characters that cannot be used as an identifier name in the IDC language, such as “_my_func@8”, then you can use the LocByName function to get its address given its name, then using the address variable (which is callable) we issue the Appcall:
auto myfunc = LocByName("_my_func@8");
myfunc("hello", "world");
Or simply directly as:
LocByName("_my_func@8")("hello", "world");
Using AppCall with IDC
Apart from calling Appcall naturally as shown in the previous section, it is possible to call it explicitly using the dbg_appcall function:
// Call application function
// ea - address to call
// type - type of the function to call. can be specified as:
// - declaration string. example: "int func(void);"
// - typeinfo object. example: get_tinfo(ea)
// - zero: the type will be retrieved from the idb
// ... - arguments of the function to call
// Returns: the result of the function call
// If the call fails because of an access violation or other exception,
// a runtime error will be generated (it can be caught with try/catch)
// In fact there is rarely any need to call this function explicitly.
// IDC tries to resolve any unknown function name using the application labels
// and in the case of success, will call the function. For example:
// _printf("hello\n")
// will call the application function _printf provided that there is
// no IDC function with the same name.
anyvalue dbg_appcall(ea, type, ...);
The Appcall IDC function requires you to pass a function address, function type information (various forms are accepted) and the parameters (if any):
auto msgbox;
msgbox = LocByName("__imp_MessageBoxA");
// Pass "0" for the type to deduce it from the database
dbg_appcall(msgbox, 0, 0, "Hello world", "Info", 0);
We’ve seen so far how to call a function if it already has type information, now suppose we have a function that does not:
user32.dll:00007FFF3AD730F0 user32_FindWindowA proc near
user32.dll:00007FFF3AD730F0 mov r9, rdx
user32.dll:00007FFF3AD730F3 mov r8, rcx
user32.dll:00007FFF3AD730F6 xor edx, edx
user32.dll:00007FFF3AD730F8 xor ecx, ecx
user32.dll:00007FFF3AD730FA jmp sub_7FFF3ADC326C
user32.dll:00007FFF3AD730FA user32_FindWindowA endp
Before calling this function with dbg_appcall we have two options:
- Pass the prototype as a string
- Or, parse the prototype separately and pass the returned type info object.
This is how we can do it using the first option:
auto window_handle;
window_handle = dbg_appcall(
LocByName("user32_FindWindowA"),
"long __stdcall FindWindow(const char *cls, const char *wndname)",
0,
"Calculator");
msg("handle=%d\n", window_handle);
As for the second option, we can use parse_decl() first, then proceed as usual:
auto window_handle, tif;
tif = parse_decl("long __stdcall FindWindow(const char *cls, const char *wndname)", 0);
window_handle = dbg_appcall(
LocByName("user32_FindWindowA"),
tif,
0,
"Calculator");
msg("handle=%d\n", window_handle);
Note that we used parse_decl() function to construct a typeinfo object that we can pass to dbg_appcall.
It is possible to permanently set the prototype of a function programmatically using apply_type():
auto tif;
tif = parse_decl("long __stdcall FindWindow(const char *cls, const char *wndname)", 0);
apply_type(
LocByName("user32_FindWindowA"),
tif);
In the following sections, we are going to cover different scenarios such as calling by reference, working with buffers and complex structures, etc.
Passing arguments by reference
To pass function arguments by reference, it suffices to use the & symbol as in the C language.
- For example to call this function:
void ref1(int *a)
{
if (a == NULL)
return;
int o = *a;
int n = o + 1;
*a = n;
printf("called with %d and returning %d\n", o, n);
}
We can use this code from IDC:
auto a = 5;
msg("a=%d", a);
ref1(&a);
msg(", after the call=%d\n", a);
- To call a C function that takes a string buffer and modifies it:
/* C code */
int ref2(char *buf)
{
if (buf == NULL)
return -1;
printf("called with: %s\n", buf);
char *p = buf + strlen(buf);
*p++ = '.';
*p = '\0';
printf("returned with: %s\n", buf);
int n=0;
for (;p!=buf;p--)
n += *p;
return n;
}
We need to create a buffer and pass it by reference to the function:
auto s = strfill('\x00', 20); // create a buffer of 20 characters
s[0:5] = "hello"; // initialize the buffer
ref2(&s); // call the function and pass the string by reference
// check if the string has a dot appended to it
if (s[5] != ".")
{
msg("not dot\n");
}
else
{
msg("dot\n");
}
__usercall calling convention
It is possible to Appcall functions with non standard calling conventions, such as routines written in assembler that expect parameters in various registers and so on. One way is to use the __usercall calling convention.
Consider this function:
/* C code */
// eax = esi - edi
int __declspec(naked) asm1()
{
__asm
{
mov eax, esi
sub eax, edi
ret
}
}
And from IDC:
auto x = dbg_appcall(
LocByName("asm1"),
"int __usercall asm1@<eax>(int a@<edi>, int b@<esi>);",
1,
5);
msg("result = %d\n", x);
Variadic functions
In C:
int va_altsum(int n1, ...)
{
va_list va;
va_start(va, n1);
int r = n1;
int alt = 1;
while ( (n1 = va_arg(va, int)) != 0 )
{
r += n1*alt;
alt *= -1;
}
va_end(va);
return r;
}
And in IDC:
auto result = va_altsum(5, 4, 2, 1, 6, 9, 0);
Calling functions that might cause exceptions
Exceptions may occur during an Appcall. To capture them, use the try/catch mechanism:
auto e;
try
{
dbg_appcall(some_func_addr, func_type, args...);
// Or equally:
// some_func_name(arg1, arg2, ...);
}
catch (e)
{
// Exception occured .....
}
The exception object “e” will be populated with the following fields:
- description: description text generated by the debugger module while it was executing the Appcall
- file: The name of the file where the exception happened.
- func: The IDC function name where the exception happened.
- line: The line number in the script
- qerrno: The internal code of last error occurred
For example, one could get something like this:
description: "Appcall: The instruction at 0x401012 referenced memory at 0x0. The memory could not be written"
file: ""
func: "___idcexec0"
line: 4. 4h 4o
qerrno: 92. 5Ch 134o
In some cases, the exception object will contain more information.
Functions that accept or return structures
Appcall mechanism also works with functions that accept or return structure types. Consider this C code:
#pragma pack(push, 1)
struct UserRecord
{
int id;
char name[50];
struct UserRecord* next;
};
#pragma pack(pop)
// Function to create a new record
UserRecord *makeRecord(char name[], int id)
{
UserRecord* newRecord = (UserRecord*)malloc(sizeof(UserRecord));
strcpy(newRecord->name, name);
newRecord->id = id;
newRecord->next = NULL;
return newRecord;
}
void printRecord(UserRecord* record)
{
printf("Id: %d ; Name: %s\n", record->id, record->name);
}
// Function to list all student records in the linked list
void listRecords(UserRecord* head)
{
if (head == NULL)
{
printf("No records found.\n");
return;
}
printf("Records:\n"
"--------\n");
while (head != NULL)
{
printRecord(head);
head = head->next;
}
}
We can create a couple of records and link them up together:
auto rec1, rec2, rec3;
// Create records
rec1 = makeRecord("user1", 1);
rec2 = makeRecord("user2", 2);
rec3 = makeRecord("user3", 3);
// Link them up
rec1.next = rec2;
rec2.next = rec3;
// Display them
listRecords(rec1);
Because we issued an Appcall, when listRecords is called, we expect to see the following output in the console:
Records:
--------
Id: 1 ; Name: user1
Id: 2 ; Name: user2
Id: 3 ; Name: user3
We can then access the fields naturally (even the linked objects). We can verify that if we just dump the first record through the IDC CLI (or just by calling IDC’s print function):
IDC>rec1
object
id: 1. 1h 1o
name: "user1\x00"
next: object
id: 2. 2h 2o
name: "user2\x00"
next: object
id: 3. 3h 3o
name: "user3\x00"
next: 0x0i64
Notice how when rec1 is dumped, its next field is automatically followed and properly displayed. The same happens for rec2 and rec3.
We can also directly access the fields of the structure from IDC and have those changes reflected in the debugee’s memory:
rec1.id = 11;
rec1.name = "hey user1";
rec1.next.name = "hey user2";
rec1.next.id = 21;
rec1.next.next.name = "hey user3";
rec1.next.next.id = 31;
// Display them
listRecords(rec1);
Notable observations:
- Objects are always passed by reference (no need to use the &)
- Objects are created on the stack
- Objects are untyped
- Missing object fields are automatically created by IDA and filled with zero
Calling an API that receives a structure and its size
Let us take another example where we call the GetVersionExA API function:
kernel32.dll:00007FFF3A0F9240 kernel32_GetVersionExA proc near
kernel32.dll:00007FFF3A0F9240 jmp cs:off_7FFF3A1645E0
kernel32.dll:00007FFF3A0F9240 kernel32_GetVersionExA endp
This API requires one of its input fields to be initialized to the size of the structure. Therefore, we need to initialize the structure correctly before passing it to the API to be further populated therein:
// Create an empty object
auto ver = object();
// We need to initialize the size of the structure
ver.dwOSVersionInfoSize = sizeof("OSVERSIONINFO");
// This is the only field we need to have initialized, the other fields will be created by IDA and filled with zeroes
// Now issue the Appcall:
GetVersionExA(ver);
msg("%d.%d (%d)\n", ver.dwMajorVersion, ver.dwMinorVersion, ver.dwBuildNumber);
Now if we dump the ver object contents we observe something like this:
IDC>print(ver);
object
dwBuildNumber: 9200. 23F0h 21760o
dwMajorVersion: 6. 6h 6o
dwMinorVersion: 2. 2h 2o
dwOSVersionInfoSize: 148. 94h 224o
dwPlatformId: 2. 2h 2o
szCSDVersion: "\x00\x00\x00\x00\x00\x00...."
Working with opaque types
Opaque types like FILE, HWND, HANDLE, HINSTANCE, HKEY, etc. are not meant to be used as structures by themselves but like pointers.
Let us take for example the FILE structure that is used with fopen(); its underlying structure looks like this (implementation details might change):
00000000 FILE struc ; (sizeof=0x18, standard type)
00000000 curp dd ?
00000004 buffer dd ?
00000008 level dd ?
0000000C bsize dd ?
00000010 istemp dw ?
00000012 flags dw ?
00000014 hold dw ?
00000016 fd db ?
00000017 token db ?
00000018 FILE ends
And the fopen() function prototype is:
msvcrt.dll:00007FFF39F1B7B0 ; FILE *__cdecl fopen(const char *FileName, const char *Mode)
msvcrt.dll:00007FFF39F1B7B0 fopen proc near
msvcrt.dll:00007FFF39F1B7B0 mov r8d, 40h ; '@'
msvcrt.dll:00007FFF39F1B7B6 jmp msvcrt__fsopen
msvcrt.dll:00007FFF39F1B7B6 fopen endp
Let us see how we can get a “FILE *”“ and use it as an opaque type and issue an fclose() call properly:
auto fp;
fp = fopen("c:\\temp\\x.cpp", "r");
print(fp);
fclose(fp.__at__);
Nothing special about the fopen/fclose Appcalls except that we see the __at__ attribute showing up although it does not belong to the FILE structure definition.
This is a special attribute that IDA inserts into all objects, and it contains the memory address from which IDA retrieved the object attribute values. We can use the __at__ to retrieve the C pointer of a given IDC object.
Previously, we omitted the __at__ field from displaying when we dumped objects output, but in reality this is what one expects to see as part of the objects attributes used in Appcalls. Let’s create a user record again:
auto rec;
rec1 = makeRecord("user1", 13);
rec2 = makeRecord("user2", 14);
rec1.next = rec2;
print(rec1);
..and observe the output:
object
__at__: 5252736. 502680h 24023200o
id: 13. Dh 15o
name: "user1\x00..."
next: object
__at__: 5252848. 5026F0h 24023360o
id: 14. Eh 16o
name: "user2\x00..."
next: 0x0i64
Please note that it is possible to pass as integer (which is a pointer) to a function that expects a pointer to a structure.
FindFirst/FindNext APIs example
In this example, we call the APIs directly without permanently setting their prototype first.
static main()
{
auto fd, h, n, ok;
fd = object(); // create an object
h = dbg_appcall(
LocByName("kernel32_FindFirstFileA"),
"HANDLE __stdcall FindFirstFileA(LPCSTR lpFileName, LPWIN32_FIND_DATAA lpFindFileData);",
"c:\\windows\\*.exe",
fd);
if (h == -1) // INVALID_HANDLE_VALUE
{
msg("No files found!\n");
return -1;
}
for (n=1;;n++)
{
msg("Found: %s\n", fd.cFileName);
ok = dbg_appcall(
LocByName("kernel32_FindNextFileA"),
"BOOL __stdcall FindNextFileA(HANDLE hFindFile, LPWIN32_FIND_DATAA lpFindFileData);",
h,
fd);
if ( (n > 5) || (ok == 0) )
break;
}
dbg_appcall(
LocByName("kernel32_FindClose"),
"BOOL __stdcall FindClose(HANDLE hFindFile);",
h);
return n;
}
Using LoadLibrary/GetProcAddress
In this example, we are going to initialize the APIs by setting up their prototypes correctly so we can use them later conveniently.
extern getmodulehandle, getprocaddr, findwindow, loadlib;
static init_api()
{
loadlib = LocByName("kernel32_LoadLibraryA");
getmodulehandle = LocByName("kernel32_GetModuleHandleA");
getprocaddr = LocByName("kernel32_GetProcAddress");
if (loadlib == BADADDR || getmodulehandle == BADADDR || getprocaddr == BADADDR)
return "Failed to locate required APIs";
// Let us permanently set the prototypes of these functions
apply_type(loadlib, "HMODULE __stdcall loadlib(LPCSTR lpModuleName);");
apply_type(getmodulehandle, "HMODULE __stdcall gmh(LPCSTR lpModuleName);");
apply_type(getprocaddr, "FARPROC __stdcall gpa(HMODULE hModule, LPCSTR lpProcName);");
// Resolve address of FindWindow api
auto t = getmodulehandle("user32.dll");
if (t == 0)
{
t = loadlib("user32.dll");
if (t == 0)
return "User32 is not loaded!";
}
findwindow = getprocaddr(t, "FindWindowA");
if (findwindow == 0)
return "FindWindowA API not found!";
// Set type
apply_type(findwindow, "HWND __stdcall FindWindowA(LPCSTR lpClassName, LPCSTR lpWindowName);");
return "ok";
}
static main()
{
auto ok = init_api();
if (ok != "ok")
{
msg("Failed to initialize: %s", ok);
return -1;
}
auto hwnd = dbg_appcall(findwindow, 0, 0, "Calculator");
if (hwnd == 0)
{
msg("Failed to locate the Calculator window!\n");
return -1;
}
msg("Calculator hwnd=%x\n", hwnd);
return 0;
}
Retrieving application’s command line
extern getcommandline;
static main()
{
getcommandline = LocByName("kernel32_GetCommandLineA");
if (getcommandline == BADADDR)
{
msg("Failed to resolve GetCommandLineA API address!\n");
return -1;
}
apply_type(getcommandline, "const char *__stdcall GetCommandLineA();");
msg("This application's command line:<\n%s\n>\n", getcommandline());
return 0;
}
Specifying Appcall options
Appcall can be configured with set_appcall_options() and passing one or more options:
- APPCALL_MANUAL: Only set up the appcall, do not run it (you should call
cleanup_appcall()when finished). Please Refer to the “Manual Appcall” section for more information. - APPCALL_DEBEV: If this bit is set, exceptions during appcall will generate IDC exceptions with full information about the exception. Please refer to the “Capturing exception debug events” section for more information.
It is possible to retrieve the Appcall options, change them and then restore them back. To retrieve the options use the get_appcall_options().
Please note that the Appcall options are saved in the database so if you set it once it will retain its value as you save and load the database.
Manual Appcall
So far, we’ve seen how to issue an Appcall and capture the result from the script, but what if we only want to setup the environment and manually step through a function?
This can be achieved with manual Appcall. The manual Appcall mechanism can be used to save the current execution context, execute another function in another context and then pop back the previous context and continue debugging from that point.
Let us directly illustrate manual Appcall with a real life scenario:
- You are debugging your application
- You discover a buggy function (foo()) that misbehaves when called with certain arguments: foo(0xdeadbeef)
- Instead of waiting until the application calls foo() with the desired arguments that can cause foo() to misbehave, you can manually call foo() with the desired arguments and then trace the function from its beginning.
- Finally, one calls
cleanup_appcall()to restore the execution context
To illustrate, let us take the ref1 function (from the previous example above) and call it with an invalid pointer:
-
Set manual Appcall mode:
set_appcall_options(APPCALL_MANUAL); -
Call the function with an invalid pointer:
ref1(6);
Directly after doing that, IDA will switch to the function and from that point on we can debug:
.text:0000000140001050 ; void __stdcall ref1(int *a)
.text:0000000140001050 ref1 proc near
.text:0000000140001050 test rcx, rcx ; << RIP starts here
.text:0000000140001053 jz short locret_14000106A
.text:0000000140001055 mov edx, [rcx]
.text:0000000140001057 lea r8d, [rdx+1]
.text:000000014000105B mov [rcx], r8d
.text:000000014000105E lea rcx, aCalledWithDAnd ; "called with %d and returning %d\n"
.text:0000000140001065 jmp _printf
.text:000000014000106A locret_14000106A:
.text:000000014000106A retn
.text:000000014000106A ref1 endp
Now you are ready to single step that function with all its arguments properly set up for you. When you are done, you can return to the previous context by calling cleanup_appcall().
Initiating multiple manual Appcalls
It is possible to initiate multiple manual Appcalls. If manual Appcall is enabled, then issuing an Appcall from an another Appcall will push the current context and switch to the new Appcall context. cleanup_appcall() will pop the contexts one by one (LIFO style).
Such technique is useful if you happen to be tracing a function then you want to debug another function and then resume back from where you were!
Manual Appcalls are not designed to be called from a script (because they don’t finish), nonetheless if you use them from a script:
auto i;
printf("Loop started\n"); // appcall 1
for (i=0;i<10;i++)
{
msg("i=%d\n", i);
}
printf("Loop finished\n"); // appcall 2
We observe the following:
- First Appcall will be initiated
- The script will loop and display the values of i in IDA’s output window
- Another Appcall will be initiated
- The script finishes. None of the two Appcalls actually took place
- The execution context will be setup for tracing the last issued Appcall
- After this Appcall is finished, we observe “Loop finished”
- We issue
cleanup_appcalland notice that the execution context is back to printf but this time it will print “Loop started” - Finally when we call again
cleanup_appcallwe resume our initial execution context
Capturing exception debug events
We previously illustrated that we can capture exceptions that occur during an Appcall, but that is not enough if we want to learn more about the nature of the exception from the operating system point of view.
It would be better if we could somehow get the last debug_event_t that occured inside the debugger module. This is possible if we use the APPCALL_DEBEV option. Let us repeat the previous example but with the APPCALL_DEBEV option enabled:
auto e;
try
{
set_appcall_options(APPCALL_DEBEV); // Enable debug event capturing
ref1(6);
}
catch (e)
{
// Exception occured ..... this time "e" is populated with debug_event_t fields (check idd.hpp)
}
And in this case, if we dump the exception object’s contents, we get these attributes:
Unhandled exception: object
can_cont: 1. 1h 1o
code: 3221225477. C0000005h 30000000005o
ea: 4198442. 40102Ah 20010052o
eid: 64. 40h 100o
file: ""
func: "___idcexec0"
handled: 1. 1h 1o
info: "The instruction at 0x40102A referenced memory at 0x6. The memory could not be read"
line: 2. 2h 2o
pc: 11. Bh 13o
pid: 40128. 9CC0h 116300o
ref: 6. 6h 6o
tid: 36044. 8CCCh 106314o
Appcall related functions
There are some functions that can be used while working with Appcalls.
parse_decl/get_tinfo/sizeof
The get_tinfo() function is used to retrieve the typeinfo string associated with a given address.
/// Get type information of function/variable as 'typeinfo' object
/// ea - the address of the object
/// type_name - name of a named type
/// returns: typeinfo object, 0 - failed
/// The typeinfo object has one mandatory attribute: typid
typeinfo get_tinfo(long ea);
typeinfo get_tinfo(string type_name);
The parse_decl() function is used to construct a typeinfo string from a type string. We already used it to construct a typeinfo string and passed it to dbg_appcall().
/// Parse one type declaration
/// input - a C declaration
/// flags - combination of PT_... constants or 0
/// PT_FILE should not be specified in flags (it is ignored)
/// returns: typeinfo object or num 0
typeinfo parse_decl(string input, long flags);
And finally, given a typeinfo string, one can use the sizeof() function to calculate the size of a type:
/// Calculate the size of a type
/// type - type to calculate the size of
/// can be specified as a typeinfo object (e.g. the result of get_tinfo())
/// or a string with C declaration (e.g. "int")
/// returns: size of the type or -1 if error
long sizeof(typeinfo type);
Accessing enum members as constants
In IDC, it is possible to access all the defined enumerations as if they were IDC constants:
00000001 ; enum MACRO_PAGE (standard) (bitfield)
00000001 PAGE_NOACCESS = 1
00000002 PAGE_READONLY = 2
00000004 PAGE_READWRITE = 4
00000008 PAGE_WRITECOPY = 8
00000010 PAGE_EXECUTE = 10h
00000020 PAGE_EXECUTE_READ = 20h
00000040 PAGE_EXECUTE_READWRITE = 40h
Then one can type:
msg("PAGE_EXECUTE_READWRITE=%x\n", PAGE_EXECUTE_READWRITE);
This syntax makes it even more convenient to use enumerations when calling APIs via Appcall.
Storing/Retrieving typed elements
It is possible to store/retrieve (aka serialize/deserialize) objects to/from the database (or the debugee’s memory). To illustrate, let us consider the following memory contents:
0001000C dd 1003219h
00010010 dw 0FFEEh
00010012 dw 0FFEEh
00010014 dd 1
And we know that this maps to a given type:
struct X
{
unsigned long a;
unsigned short b, c;
unsigned long d;
};
To retrieve (deserialize) the memory contents into a nice IDC object, we can use the object.retrieve() function:
/// Retrieve a C structure from the idb or a buffer and convert it into an object
/// typeinfo - description of the C structure. Can be specified
/// as a declaration string or result of \ref get_tinfo() or
/// similar functions
/// src - address (ea) to retrieve the C structure from
/// OR a string buffer previously packed with the store method
/// flags - combination of \ref object_store[PIO_...] bits
void object.retrieve(typeinfo, src, flags);
Here is an example:
// Create the typeinfo string
auto t = parse_decl("struct X { unsigned long a; unsigned short b, c; unsigned long d;};", 0);
// Create a dummy object
auto o = object();
// Retrieve the contents into the object:
o.retrieve(t, 0x1000C, 0);
And now if we dump the contents of o:
IDC>print(o);
object
__at__: 65548. 1000Ch 200014o 00000000000000010000000000001100b
a: 16790041. 1003219h 100031031o 00000001000000000011001000011001b
b: 65518. FFEEh 177756o 00000000000000001111111111101110b
c: 65518. FFEEh 177756o 00000000000000001111111111101110b
d: 1. 1h 1o 00000000000000000000000000000001b
and again we notice the __at__ which holds the address of the retrieved object.
To store (serialize) the object back into memory, we can use the object.store() function:
/// Convert the object into a C structure and store it into the idb or a buffer
/// typeinfo - description of the C structure. Can be specified
/// as a declaration string or result of \ref get_tinfo() or
/// similar functions
/// dest - address (ea) to store the C structure
/// OR a reference to a destination string
/// flags - combination of PIO_.. bits
void object.store(typeinfo, dest, flags);
Here’s an example continuing from the previous one:
o.a++; // modify the field
o.d = 6; // modify another field
o.store(t, o.__at__, 0);
And finally to verify, we go to the memory address:
0001000C dd 100321Ah
00010010 dw 0FFEEh
00010012 dw 0FFEEh
00010014 dd 6
Using Appcall with IDAPython
The Appcall concept remains the same between IDC and Python, nonetheless Appcall/Python has a different syntax (using references, unicode strings, etc.)
The Appcall mechanism is provided by ida_idd module (also via idaapi) through the Appcall variable. To issue an Appcall using Python:
from idaapi import Appcall
Appcall.printf("Hello world!\n");
One can take a reference to an Appcall:
printf = Appcall.printf
# ...later...
printf("Hello world!\n");
- In case you have a function with a mangled name or with characters that cannot be used as an identifier name in the Python language, then use the following syntax:
findclose = Appcall["__imp__FindClose@4"]
getlasterror = Appcall["__imp__GetLastError@0"]
setcurdir = Appcall["__imp__SetCurrentDirectoryA@4"]
- In case you want to redefine the prototype of a given function, then use the
Appcall.proto(func_name or func_ea, prototype_string)syntax as such:
# pass an address or name and Appcall.proto() will resolve it
loadlib = Appcall.proto("__imp__LoadLibraryA@4", "int (__stdcall *LoadLibraryA)(const char *lpLibFileName);")
# Pass an EA instead of a name
freelib = Appcall.proto(LocByName("__imp__FreeLibrary@4"), "int (__stdcall *FreeLibrary)(int hLibModule);")
- To pass unicode strings you need to use the Appcall.unicode() function:
getmodulehandlew = Appcall.proto("__imp__GetModuleHandleW@4", "int (__stdcall *GetModuleHandleW)(LPCWSTR lpModuleName);")
hmod = getmodulehandlew(Appcall.unicode("kernel32.dll"))
- To pass int64 values to a function you need to use the
Appcall.int64()function:
/* C code */
int64 op_two64(int64 a, int64 b, int op)
{
if (op == 1)
return a + b;
else if (op == 2)
return a - b;
else if (op == 3)
return a * b;
else if (op == 4)
return a / b;
else
return -1;
}
Python Appcall code:
r = Appcall.op_two64(Appcall.int64(1), Appcall.int64(2), 1)
print("result=", r.value)
If the returned value is also an int64, then you can use the int64.value to unwrap and retrieve the value.
- To define a prototype and then later assign an address so you can issue an Appcall:
# Create a typed object (no address is associated yet)
virtualalloc = Appcall.typedobj("int __stdcall VirtualAlloc(int lpAddress, SIZE_T dwSize, DWORD flAllocationType, DWORD flProtect);")
# Later we have an address, so we pass it:
virtualalloc.ea = idc.get_name_ea(0, "kernel32_VirtualAlloc")
# Now we can Appcall:
ptr = virtualalloc(0, Appcall.Consts.MEM_COMMIT, 0x1000, Appcall.Consts.PAGE_EXECUTE_READWRITE)
print("ptr=%x" % ptr)
Things to note:
- We used the Appcall.Consts syntax to access enumerations (similar to what we did in IDC)
- If you replicate this specific example, a new memory page will be allocated. You need to refresh the debugger memory layout (with
idaapi.refresh_debugger_memory()) to access it
Passing arguments by reference
- To pass function arguments by reference, one has to use the
Appcall.byref():
# Create a byref object holding the number 5
i = Appcall.byref(5)
# Call the function
Appcall.ref1(i)
# Retrieve the value
print("Called the function:", i.value)
- To call a C function that takes a string buffer and modifies it, we need to use the
Appcall.buffer(initial_value, [size])function to create a buffer:
buf = Appcall.buffer("test", 100)
Appcall.ref2(buf)
print(buf.cstr())
- Another real life example is when we want to call the GetCurrentDirectory() API:
# Take a reference
getcurdir = Appcall.proto("kernel32_GetCurrentDirectoryA", "DWORD __stdcall GetCurrentDirectoryA(DWORD nBufferLength, LPSTR lpBuffer);")
# make a buffer
buf = Appcall.byref("\x00" * 260)
# get current directory
n = getcurdir(260, buf)
print("curdir=%s" % buf.cstr())
- To pass int64 values by reference:
int64_t ref4(int64_t *a)
{
if (a == NULL)
{
printf("No number passed!");
return -1;
}
int64_t old = *a;
printf("Entered with %" PRId64 "\n", *a);
(*a)++;
return old;
}
We use the following Python code:
# Create an int64 value
i = Appcall.int64(5)
# create a reference to it
v = Appcall.byref(i)
# appcall
old_val = Appcall.ref4(v)
print(f"Called with {old_val.value}, computed {i.value}")
- To call a C function that takes an array of integers or an array of a given type:
/* C code */
int ref3(int *arr, int sz)
{
if (arr == NULL)
return 0;
int sum = 0;
for (int i=0;i<sz;i++)
sum += arr[i];
return sum;
}
First we need to use the Appcall.array() function to create an array type, then we use the array_object.pack() function to encode the Python values into a buffer:
# create an array type
arr = Appcall.array("int")
# Create a test list
L = [x for x in range(1, 10)]
# Pack the list
p_list = arr.pack(L)
# appcall to compute the total
c_total = Appcall.ref3(p_list, len(L))
# internally compute the total
total = sum(L)
if total != c_total:
print("Appcall failed!")
else:
print(f"Total computed using Appcall is {total}")
Functions that accept or return structures
Like in IDC, we can create objects and pass them with at least two methods.
The first method involves using the Appcall.obj() function that takes an arbitrary number of keyword args that will be used to create an object with the arguments as attributes. The second method is by using a dictionary.
# Via dictionary
rec1 = {"id": 1, "name": "user1"}
# Via Appcall.obj
rec2 = Appcall.obj(id=2, name="user2")
Appcall.printRecord(rec1)
Appcall.printRecord(rec2)
And finally, if you happen to have your own object instance then just pass your object. The IDAPython object to IDC object conversion routine will skip attributes starting and ending with “__”.
FindFirst/FindNext example
# For simplicity, let's alias the Appcall
a = idaapi.Appcall
getcurdir = a.proto(
"kernel32_GetCurrentDirectoryA",
"DWORD __stdcall GetCurrentDirectoryA(DWORD nBufferLength, LPSTR lpBuffer);")
getwindir = a.proto(
"kernel32_GetWindowsDirectoryA",
"UINT __stdcall GetWindowsDirectoryA(LPSTR lpBuffer, UINT uSize);")
setcurdir = a.proto(
"kernel32_SetCurrentDirectoryA",
"BOOL __stdcall SetCurrentDirectoryA(LPCSTR lpPathName);")
findfirst = a.proto(
"kernel32_FindFirstFileA",
"HANDLE __stdcall FindFirstFileA(LPCSTR lpFileName, LPWIN32_FIND_DATAA lpFindFileData);")
findnext = a.proto(
"kernel32_FindNextFileA",
"BOOL __stdcall FindNextFileA(HANDLE hFindFile, LPWIN32_FIND_DATAA lpFindFileData);")
findclose = a.proto(
"kernel32_FindClose",
"BOOL __stdcall FindClose(HANDLE hFindFile);")
def test():
# create a buffer
savedpath = a.byref("\x00" * 260)
# get current directory
n = getcurdir(250, savedpath)
out = []
out.append("curdir=%s" % savedpath.value[0:n])
# get windir
windir = a.buffer(size=260) # create a buffer using helper function
n = getwindir(windir, windir.size)
if n == 0:
print("could not get current directory")
return False
windir = windir.value[:n]
out.append("windir=%s" % windir)
# change to windows folder
setcurdir(windir)
# initiate find
fd = a.obj()
h = findfirst("*.exe", fd)
if h == -1:
print("no *.exe files found!")
return False
found = False
while True:
fn = a.cstr(fd.cFileName)
if "regedit" in fn:
found = True
out.append("fn=%s<" % fn)
fd = a.obj() # reset the FD object
ok = findnext(h, fd)
if not ok:
break
#
findclose(h)
# restore cur dir
setcurdir(savedpath.value)
# verify
t = a.buffer(size=260)
n = getcurdir(t.size, t)
if t.cstr() != savedpath.cstr():
print("could not restore cur dir")
return False
out.append("curdir=%s<" % t.cstr())
print("all done!")
for l in out:
print(l)
if found:
print("regedit was found!")
else:
print("regedit was not found!")
return found
test()
Using GetProcAddress
a = idaapi.Appcall
loadlib = a.proto("kernel32_LoadLibraryA", "HMODULE __stdcall LoadLibraryA(const char *lpLibFileName);")
getprocaddr = a.proto("kernel32_GetProcAddress", "FARPROC __stdcall GetProcAddress(HMODULE hModule, LPCSTR lpProcName);")
freelib = a.proto("kernel32_FreeLibrary", "BOOL __stdcall FreeLibrary(HMODULE hLibModule);")
def test_gpa():
h = loadlib("user32.dll")
if idaapi.inf_is_64bit():
h = h.value
if h == 0:
print("failed to load library!")
return False
p = getprocaddr(h, "FindWindowA")
if idaapi.inf_is_64bit():
p = p.value
if p == 0:
print("failed to gpa!")
return -2
findwin = a.proto(p, "HWND FindWindow(LPCTSTR lpClassName, LPCTSTR lpWindowName);")
hwnd = findwin(0, "Calculator")
freelib(h)
if idaapi.inf_is_64bit():
hwnd = hwnd.value
print("%x: ok!->hwnd=%x" % (p, hwnd))
return 1
test_gpa()
Please note that we used the idaapi.inf_is_64bit() method to properly unwrap integer values that depends on the bitness of the binary.
Setting the Appcall options
In Python, the Appcall options can be set global or locally per Appcall.
- To set the global Appcall setting:
old_options = Appcall.set_appcall_options(Appcall.APPCALL_MANUAL)
- To set the Appcall setting per Appcall:
# take a reference to printf
printf = Appcall._printf
# change the setting for this Appcall
printf.options = Appcall.APPCALL_DEBEV
printf("Hello world!\n")
Similarly, retrieving the Appcall options is done by either calling Appcall.get_appcall_options() or by reading the options attribute (for example: printf.options)
To cleanup after a manual Appcall use Appcall.cleanup_appcall().
Calling functions that can cause exceptions
An Appcall that generates an exception while executing in the current thread will throw a Python Exception object. This is inline with the IDC behavior we described above.
- Let us try when the Appcall options does not include the
APPCALL_DEBEVflag:
try:
idaapi.Appcall.cause_crash()
except Exception as e:
print("Got an exception!")
This approach is useful if you want to know whether the Appcall passes or crashes.
Now if we want more details about the exception, then we use the APPCALL_DEBEV flag, which will cause an OSError exception to be raised and have its args[0] populated with the last debug_event_t:
cause_crash = idaapi.Appcall.cause_crash
cause_crash.options = idaapi.APPCALL_DEBEV
try:
cause_crash()
except OSError as e:
debug_event = e.args[0]
print(f"Exception: tid={debug_event.tid} ea={debug_event.ea:x}")
except Exception as e:
print("Unknown exception!")
If the Appcall caused a crash, then the debug_event variable will be populated with the last debug_event_t structure inside the OSError exception handler.
Appcall related functions in Python
Storing/Retrieving objects
Storing/Retrieving objects is also supported in Python:
- Using the IDA SDK (through the idaapi Python module)
- Using Appcall helper functions
In this example we show how to:
- Unpack the DOS header at address 0x140000000 and verify the fields
- Unpack a string and see if it is unpacked correctly
Let’s start with the IDA SDK helper functions first:
# Struct unpacking
def test_unpack_struct():
name, tp, flds = idc.parse_decl("IMAGE_DOS_HEADER;", 0)
ok, obj = idaapi.unpack_object_from_idb(idaapi.get_idati(), tp, flds, 0x140000000, 0)
return obj.e_magic == 23117 and obj.e_cblp == 144
# Raw unpacking
def test_unpack_raw():
# Parse the type into a type name, typestring and fields
name, tp, flds = idc.parse_decl("struct abc_t { int a, b;};", 0)
# Unpack from a byte vector (bv) (aka string)
ok, obj = idaapi.unpack_object_from_bv(
idaapi.get_idati(),
tp,
flds,
b"\x01\x00\x00\x00\x02\x00\x00\x00",
0)
return obj.a == 1 and obj.b == 2
print("test_unpack_struct() passed:", test_unpack_struct())
print("test_unpack_raw() passed:", test_unpack_raw())
Now to accomplish similar result using Appcall helper functions:
# Struct unpacking with Appcall
def test_unpack_struct():
tp = idaapi.Appcall.typedobj("IMAGE_DOS_HEADER;")
ok, obj = tp.retrieve(0x140000000)
return ok and obj.e_magic == 23117 and obj.e_cblp == 144
# Raw unpacking with Appcall
def test_unpack_raw():
global tp
# Parse the type into a type name, typestring and fields
tp = idaapi.Appcall.typedobj("struct abc_t { int a, b;};")
ok, obj = tp.retrieve(b"\x01\x00\x00\x00\x02\x00\x00\x00")
return obj.a == 1 and obj.b == 2
print("test_unpack_struct() passed:", test_unpack_struct())
print("test_unpack_raw() passed:", test_unpack_raw())
When it comes to storing, instead of using the Appcall’s typedobj.retrieve(), we can use the typedobj.store() function:
# Packs/Unpacks a structure to the database using appcall facilities
def test_pack_idb(ea):
print("%x: ..." % ea)
tp = a.typedobj("struct { int a, b; char x[4];};")
o = a.obj(a=16, b=17,x="abcd")
return tp.store(o, ea) == 0
ea = idc.here() # some writable area
if test_pack_idb(ea):
print("cool!")
idaapi.refresh_debugger_memory()
Accessing enum members as constants
Like in IDC, to access the enums, one can use the Appcall.Consts object:
print("PAGE_EXECUTE_READWRITE=%x" % Appcall.Consts.PAGE_EXECUTE_READWRITE)
If the constant was not defined then an attribute error exception will be thrown. To prevent that, use the Appcall.valueof() method instead, which lets you provide a default value in case a constant was absent:
print("PAGE_EXECUTE_READWRITE=%x" % Appcall.valueof("PAGE_EXECUTE_READWRITE", 0x40))
Please send your comments or questions to [email protected]
Creating Signatures
| FLIRT |
| Makesig |
FLIRT
FLIRT stands for Fast Library Identification and Recognition Technology. This technology allows IDA to recognize standard library functions generated by supported compilers and greatly improves the usability and readability of generated disassemblies. Of course, FLIRT can be combined with IDA’s usual interactivity to further improve the analysis. See this Pascal and this Delphi example as well.
Automatic Unretouched Disassembly
With signatures applied (Borland Visual Component Library)
IDA F.L.I.R.T. Technology: In-Depth
The Goal
One major stumbling block in the disassembly of programs written in modern high level languages is the time required to isolate library functions. This time may be considered lost because it does not bring us new knowledge : it is only a mandatory step that allows further analysis of the program and its meaningful algorithms. Unfortunately, this process has to be repeated for each and every new disassembly.
Sometimes, the knowledge of the class of a library function can considerably ease the analysis of a program. This knowledge might be extremely helpful in discarding useless information. For example, a C++ function that works with streams usually has nothing to do with the main algorithm of a program.
It is interesting to note that every high level language program uses a great number of standard library functions, sometimes even up to 95% of all the functions called are standard functions. For one well known compiler, the “Hello, world!” program contains:
library functions - 58
function main() - 1
Of course, this is an artificial example but our analysis has shown that real life programs contain, on average, 50% of library functions. This is why the user of a disassembler is forced to waste more than half of his time isolating those library functions. The analysis of an unknown program resembles the resolution of a gigantic crossword puzzle : the more letters we know, the easier it is to guess the next word. During a disassembly, more comments and meaningful names in a function means a faster understanding of its purpose. Widespread use of standard libraries such as OWL, MFC and others increase even more the contribution of the standard functions in the target program.
A middle sized program for Win32, written in C++, using modern technologies (e.g., AppExpert or a similar wizard) calls anything from 1000 to 2500 library functions.
To assist IDA users we attempted to create an algorithm to recognize the standard library functions. We wanted to achieve a practical, usable result and therefore accepted some limitations
-
we only consider programs written in C/C++
-
we do not attempt to achieve perfect function recognition : this is theoretically impossible. Moreover the recognition of some functions may lead to undesirable consequences. For example, the recognition of the following function
push bp mov bp, sp xor ax, ax pop bp retwould lead to many misidentifications. It is worth noting that in modern C++ libraries one can find a lot of functions that are absolutely identical byte-to-byte but have different names.
-
we only recognize and identify functions located in the code segment, we ignore the data segment.
-
when a function has been sucessfully identified, we assign it a name and an eventual comment. We do not aim to provide information about the function arguments or about the behaviour of the function.
and we imposed the following constraints upon ourselves
- we try to avoid false positives completely. We consider that a false positive (a function wrongly identified) is worse than a false negative (a function not identified). Ideally, there should be no false positive at all.
- the recognition of the functions must require a minimum of processor and memory resources.
- because of the polyvalent architecture of IDA – it supports tens of very different processors – the identification algorithm must be platform-independent, i.e. it must work with the programs compiled for any processor.
- the main() function should be identified and properly labelled as the library’ startup-code is of no interest.
The Difficulties
Memory usage
The main obstacle to recognition and identification is the sheer quantity of functions and the size of the memory they occupy. If we evaluate the size of the memory occupied by all _versions_ of all libraries produced by all compiler _vendors_ for memory _models_, we easily fall into the tens of gigabytes range.
Matters get even worse if we try to take OWL, MFC, MFC and similar libraries into account. The storage needed is huge. At this time, personal computers’ users can’t afford to set aside hundreds of Megabytes of disk space for a simple utility disassembler. Therefore, we had to find an algorithm that diminishes the size of the information needed to recognize standard library functions. Of course, the number of functions that should be recognized dictates the need for an efficient recognition algorithm : a simple brute force search is not an option.
Variability
An additional difficulty arises from the presence of _variant_ bytes in the program. Some bytes are corrected (fixed up) at load time, others become constants at link time, but most of the variant bytes originate from references to external names. In that case the compiler does not know the addresses of the called functions and leaves these bytes equal to zeroes. This so called “fixup information” is usually written to a table in the output file (sometimes called “relocation table” or “relocation information”). The example below
B8 0000s mov ax, seg _OVRGROUP_
9A 00000000se call _farmalloc
26: 3B 1E 0000e cmp bx, word ptr es:__ovrbuffer
contains variant bytes. The linker will try to resolve external references, replacing zeroes with the addresses of called functions, but some bytes will stay untouched : references to dynamic libraries or bytes containing absolute address in the program. These references can be resolved only at load time by the system loader. It will try to resolve all external references and replace zeroes with absolute addresses. When the system loader cannot resolve an external referenceI, as it is the case when the program refers to an unknown DLL, the program will simply not run.
Optimizations introduced by some linkers will also complicate the matter because constant bytes will sometim es be changed. For example:
0000: 9A........ call far ptr xxx
is replaced by
0000: 90 nop
0001: 0E push cs
0002: E8.... call near ptr xxx
The program will execute as usual, but the replacement introduced by the linker effectively prohibits byte-to-byte comparison with a function template. The presence of variant bytes in a program makes the use of simple checksums for recognition impossible. If functions did not contain variant bytes, the CRC of the first N Bytes would be enough to identify and select a group of functions in a hash table. The use of such tables would greatly decrease the size of the information required for identification : the name of a function, its length and checksum would suffice.
We have already mentionned the fact that the recognition of all standard library functions was not possible or even desirable. One additional proof is the fact that some identical functions do exactly the same thing but are called in a different manner. For example, the functions strcmp() and fstrcmp() are identical in large memory models.
We face a dilemna here : we do not want to discard these functions from the recgnition process since they are not trivial and their labelling would help the user but, we are unable to distinguish them.
And there is more : consider this
call xxx
ret
or
jmp xxx
At first sight, these pieces of code are not interesting. The problem is that they are present, sometimes in significant number, in standard libraries. The libraries for the Borland C++ v1.5 OS/2 compiler contains 20 calls of this type, in important functions such as read(), write(), etc.
Plain comparison of these functions yields nothing. The only way to distinguish those functions is to discover what other function they call. Generally, all short functions (consisting merely of 2-3 instructions) are difficult to recognize and the probability of wrong recognition is very high. However not recognizing them is undesirable, as it can lead to cascade failures : if we do not recognize the function tolower(), we may fail to recognize strlwr() which refers to tolower().
Copyright
Finally, there is an obvious copyright problem: standard libraries may simply not be distributed with a disassembler.
The idea
To address those issues, we created a database of all the functions from all libraries we wanted to recognize. IDA now checks, at each byte of the program being disassembled, whether this byte can mark the start of a standard library function.
The information required by the recognition algorithm is kept in a signature file. Each function is represented by a pattern. Patterns are first 32 bytes of a function where all variant bytes are marked.
For example:
558BEC0EFF7604..........59595DC3558BEC0EFF7604..........59595DC3 _registerbgidriver
558BEC1E078A66048A460E8B5E108B4E0AD1E9D1E980E1C0024E0C8A6E0A8A76 _biosdisk
558BEC1EB41AC55604CD211F5DC3.................................... _setdta
558BEC1EB42FCD210653B41A8B5606CD21B44E8B4E088B5604CD219C5993B41A _findfirst
where variant bytes are displayed as “..” Several functions start with the same byte sequence. Therefore a tree structure seems particularly well suited to the storage of those functions :
558BEC
0EFF7604..........59595DC3558BEC0EFF7604..........59595DC3 _registerbgidriver
1E
078A66048A460E8B5E108B4E0AD1E9D1E980E1C0024E0C8A6E0A8A76 _biosdisk
B4
1AC55604CD211F5DC3 _setdta
2FCD210653B41A8B5606CD21B44E8B4E088B5604CD219C5993B41A _findfirst
Sequences of bytes are kept in the nodes of the tree. In this example, the root of the tree contains the sequence “558BEC”, three subtrees stem from the root, respectively starting with bytes 0E, 1E, B4. The subtree starting with B4 gives birth to two subtrees. Each subtree ends with leaves . The information about the function is kept in that (only the name is visible in the above example).
The tree data structure simultaneously achieves two goals :
- Memory requirements are decreased since we store bytes common to several functions in tree nodes. This saving is, of course, proportional to the number of functions starting with the same bytes.
- It is well suited to fast fast pattern matching. The number of comparisons required to match a specific location within a program to all functions in a signature file grows logarithmically with the number of functions.
It would not be very wise to take a decision based on the first 32 bytes of a function alone. As already suggested, modern real-world libraries contain several functions starting with the same bytes:
558BEC
56
1E
B8....8ED8
33C050FF7608FF7606..........83C406
8BF083FEFF
0. _chmod (20 5F33)
1. _access (18 9A62)
When two functions have the same first 32 bytes, they are stored in the same leaf of the tree. To resolve that situation, we calculate the CRC16 of the bytes starting from position 33 until till the first variant byte. The CRC is stored in the signature file. The number of bytes used to calculate that CRC also needs to be saved, as it differs from function to function. In the above example, the CRC16 is calculated on 20 bytes for the _chmod (bytes 33..52) function and 18 _access function.
There is, of course, a possibility that the first variant byte will be at the 33d position. The length of the sequence of bytes used to calculate the CRC16 is then equal to zero. In practice, this happens rarely and this algorithm gives very low number of false recognitions.
Sometimes functions have the same initial 32-byte pattern and the same CRC16, as in the example below
05B8FFFFEB278A4606B4008BD8B8....8EC0
0. _tolower (03 41CB) (000C:00)
1. _toupper (03 41CB) (000C:FF)
We are unlucky: only 3 bytes were used to calculate the CRC16 and they were the same for both functions. In this case we will try to find a position at which all functions in a leaf have different bytes. (in our example this position is 32+3+000C)
But even this method does not allow to recognize all functions. Here is another example:
... (partial tree is shown here)
0D8A049850E8....83C402880446803C0075EE8BC7:
0. _strupr (04 D19F) (REF 0011: _toupper)
1. _strlwr (04 D19F) (REF 0011: _tolower)
These functions are identical at non-variant bytes and differ only by the functions they call. In this example the only way to distinguish functions is to examine the name referenced from the instruction at offset 11.
The last method has a disadvantage: proper recognition of functions _strupr() and _strlwr() depends on the recognition of functions _toupper() and _tolower(). It means that in the case of failure because of the absence of reference to _toupper() or _tolower() we should defer recognition and repeat it later, after finding _tolower() or _toupper(). This has an impact on the general design of the algorithm : we need a second pass to resolve those deferred recognitions. Luckily, subsequent passes are only applied to a few locations in the program.
Finally, one can find functions that are identical in non-variant bytes, refer to the same names but are called differently. Those functions have the same implementation but different names. Surprisingly, this is a frequent situation in standard libraries, especially in C++ libraries.
We call this situation a _collision_ which occurs when functions attached to a leaf cannot be distinguished from each other by using the described methods. A classical example is:
558BEC1EB441C55606CD211F720433C0EB0450E8....5DCB................
0. _remove (00 0000)
1. _unlink (00 0000)
or
8BDC36834702FAE9....8BDC36834702F6E9............................
0. @iostream@$vsn (00 0000)
1. @iostream_withassign@$vsn (00 0000)
Artificial Intelligence is the only way to resolve those cases. Since our goal was efficiency and speed, we decided to leave artificial intelligence for the future developments of the algorithm.
The Implementation
In IDA version 3.6, the practical implementation of the algorithm matches the above description almost perfectly. We have limited ourselves to the C and C++ language but it will be, without doubt, possible to write pre-processors for other libraries in the future.
A separate signature file is provided for each compiler. This segregation decreases the probability of cross-compiler identification collisions. A special signature file, called startup signature file is applied to the entry point of the disassembled program to determine the generating compiler. Once it has been identified, we know which signature file should be used for the rest of the disassembly. Our algorithm successfully discerns the startup modules of most popular compilers on the market.
Since we store all functions’ signatures for one compiler in one signature file, it is not necessary to discriminate the memory models (small,compact, medium, large, huge) of the libraries and/or versions of the compilers.
We use special startup-signatures for every format of disassembled file. The signature exe.sig is used for programs running under MS DOS, lx.sig or ne.sig – for OS/2, etc.
To decrease a probability of false recognition of short functions, we must absolutely remember any reference to an external name if such a reference exists. It may decrease, to some degree, the probability of the recognition of the function in general but we believe that such an approach is justified. It is better not to recognize than to recognize wrongly. Short functions (shorter than 4 bytes) that do no contain references to external names are not used in the creation of a signature file and no attempt is made to recognize such functions.
The functions from <ctype.h> are short and refer to the array of types of the symbols, therefore we decided to consider the references to this array as an exception : we calculate the CRC16 of the array of the types of the symbols and store it in the signature file.
Without artificial intelligence, the collisions are solved by natural intelligence. The human creator of a signature file chooses the functions to include and to discard from the signature file. This choice is very easy and is practically implemented by the edition of a text file.
The patterns of the functions are not stored in a signature file under their original form (i.e., they do not look like the example figures). In place of the patterns, we store the arrays of bits determining the changing bytes and the values of the individual bytes are stored. Therefore the signature file contains no byte from the original libraries, except for the names of the functions. The creation of a signature file involves in 2 stages: the preprocessing of the libraries and the creation of a signature file. In the first stage the program ‘parselib’ is used. It preprocesses *.obj and *.lib files to produce a pattern-file. The pattern-file contains the patterns of the functions, their names, their CRC16 and all other information necessary to create the signature file. At the second stage the ‘sigmake’ program builds the signature file from the pattern-file.
This division into 2 stages allows sigmake utility to be independent of the format of the input file. Therefore it will be possible to write other preprocessors for files differing from *.obj and *.lib in future.
We decided to compress (using the InfoZip algorithm) the created signature files to decrease the disk space necessary for their storage.
For the sake of user’s convenience we attempted to recognize the main() function as often as it was possible. The algorithm for identifying this function differs from compiler to compiler and from program to program. (DOS/OS2/Windows/GUI/Console…).
This algorithm is written, as a text string, in a signature file. Unfortunately we have not yet been able to automate the creation of this algorithm.
The Results
As it turns out the signature files compress well; they may be compressed by a factor bigger than 2. The reason of this compressibility is that about 95% of a signature file are function names. (Example: the signature file for MFC 2.x was 2.5MB before compression, 700Kb after. It contains 33634 function names; an average of 21 bytes is stored per function. Generally, the ratio of the size of a library size to the size of a signature file varies from 100 to 500.
The percentage of properly recognized functions is very high. Our algorithm recognized all but one function of the “Hello World” program. The unrecognized function consists of only one instruction:
jmp off_1234
We were especially pleased with the fact that there was no false recognition. However it does not mean that they will not occur in the future. It should be noted that the algorithm only works with functions.
Data is sometimes located in the code segment and therefore we need to mark some names as “data names”, not as “function names”. It is not easy to examine all names in a modern large library and mark all data names.
The implementation of these data names is planned, some time in the future.
Generate FLIRT signature file
Action name: makesig:create_signature
This command generate a FLIRT signature file. A function is eligible when then name don’t start with “sub_”.
File: Pathname for the signature file
Library name: identifier, shown in the description of Signature
Collect functions
- All: Generate signature for all functions in the idb that are eligible
- Selected: Generate a signature only for the selection in Functions
Collisions
- Ignore: don't add collision FLIRT signature
will delete the Exclusion file if it exists
- Deal with manually: if there is collisions, a window will open to manage
the collisions
Two or three files are generated:
- Signature file: The output file
- Pattern file: Filename is Signature filename with extension replaced
with "pat"
- Exclusion File: Filename with extension replaced by "exc"
Only present if you want to deal with collision and there
is any.
The last two files can be deleted once the signature file is generated.
Supported Compilers
Supported C Compilers
- Aztec C v3.20d
- Borland C++ for OS/2 v1.0, v1.5, v2.0
- Borland Turbo C v2.0, v2.01
- Borland Turbo C++ v1.01
- Borland C++ v2.0, v3.1, v4.0, v4.5, v5.0, v5.01
- Borland C++ Builder v1.0
- Borland C++ Builder v3.0
- EMX (GCC) for OS/2 v0.9b
- IBM C Set v2.00, v2.10
- IBM Visual Age C++ v3.0 OS/2
- Lattice C v3.30
- Metaware High C for OS/2
- Microsoft C v5.0, v6.0, v7.0 Microsoft Quick C v1.0, v2.01
- Microsoft Visual C++ v1.0, v1.5, v2.0, v4.0, v4.1, v5 and v6
- NDP C v4.2
- Optima v1.0
- Symantec C++ v6.0, 6.1, 7.2
- Texas Instruments C Compiler for TMS320C6
- Visual Age C++ v3.0
- Visual Age C++ v3.5
- Watcom C++ v9.01d, v9.5, v10.0,
- v10.0b, v10.5, v10.6
- Watcom for QNX
- Zortech C v1.0, v3.1
- Microsoft Visual C++ v7, 8 (Microsoft.NET)
- Microsoft 64-bit Visual C++ AMD64
- Microsoft Visual C++ for Windows CE v3-4.2 on ARM
- Borland C++ Build v1-6
- GNU C compilers on various platforms
Supported Pascal Compilers
- Borland Turbo Pascal 5, 5.5, 6, 7, Borland Turbo Pascal for Windows
- Borland Delphi 1, Delphi 2, Delphi 3, Delphi 4, Delphi 5
Supported Fortran Compilers
- MS Fortran PowerStation 4.0
Supported Libraries
- Microsoft Foundation Classes
- Borland 5.0x MFC adaptation, Borland Visual Component Library
- CTask
- SDK CAB Library
- Vireo Libraries Borland Edition and MicroSoft Edition
- Object Toolkit Pro
- Windows CE libraries
- Keil runtime libraries for C166
- C runtime library for I960
- C runtime for TMS320C6
- Borland 6.0x Visual Component Library
How does it work ?
Have a look at the Flirt technical paper!
Turbo Pascal
(FLIRT libraries thanks to Nick Pisanov)
Turbo Pascal Program
FLIRT-Enhanced Disassembly
Note: this result is totally automatic, including the comments.

Delphi
Thanks to Peter Sawatzki who kindly generated the FLIRT sig files. He also donated Delphi 4/5 files.
Delphi 3 Program
FLIRT-Enhanced Disassembly
Note : this result is totally automatic, including the comments.
Makesig
Built-in Makesig plugin is a tool for generating FLIRT signatures from a current database.
{% hint style=“info” %} The content here was a part of the blog article {% endhint %}
How to make signatures from working database?
- Export the patterns from the database into a
.sigfile; - Re-import the
.siginto the target database.
Example
Let’s see how that would work in a real scenario. Imagine working on a long-term reversing project with frequent new versions. With the makesig plugin, we can migrate the carefully curated list of functions that we already reverse-engineered and exported as a signature file, into the current binary (given that compiler flags didn’t change too much between releases). Let’s say we identified an interesting function In the older release (source) binary and wanted to port that information to the newer binary:
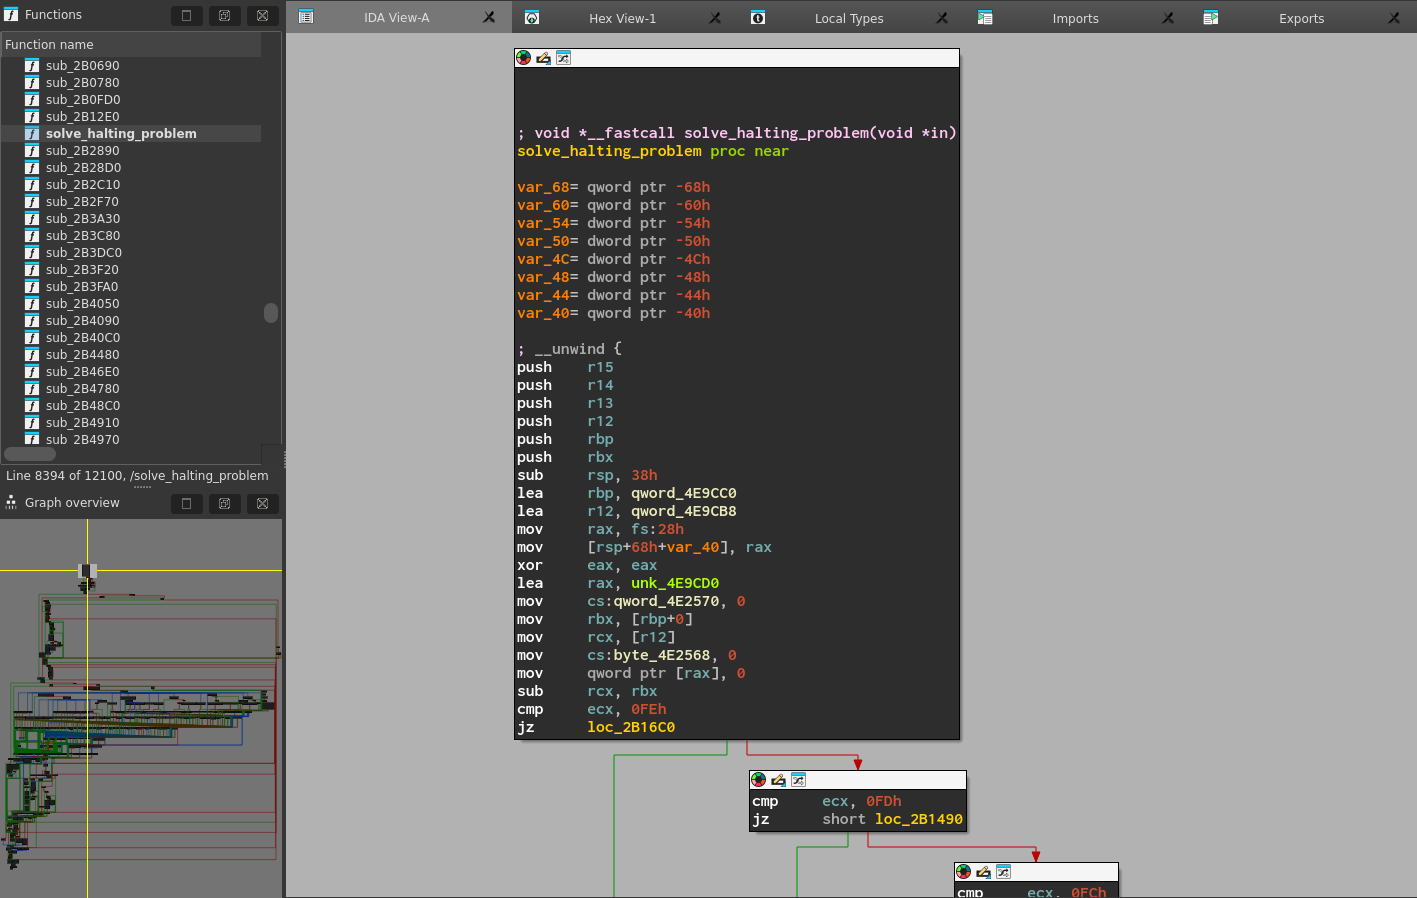
We can export a signature file for this function via menu item File -> Produce File -> Create SIG file…
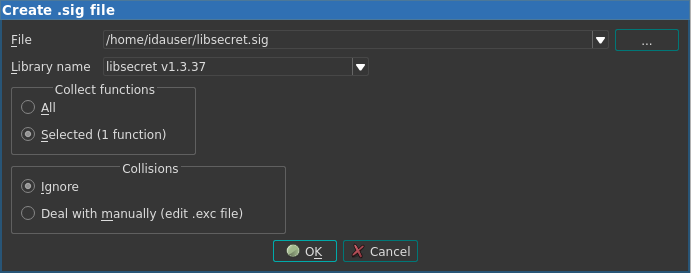
Then, in the new binary file, we can import this signature file in the Signatures window:
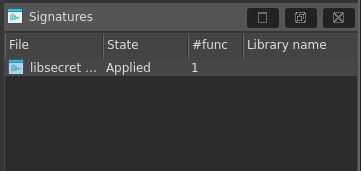
As we can see, IDA applies the signature and reports that it found a match in the new database! And indeed, we can find the function, labeled as a library function, because its function name came from the signature file:
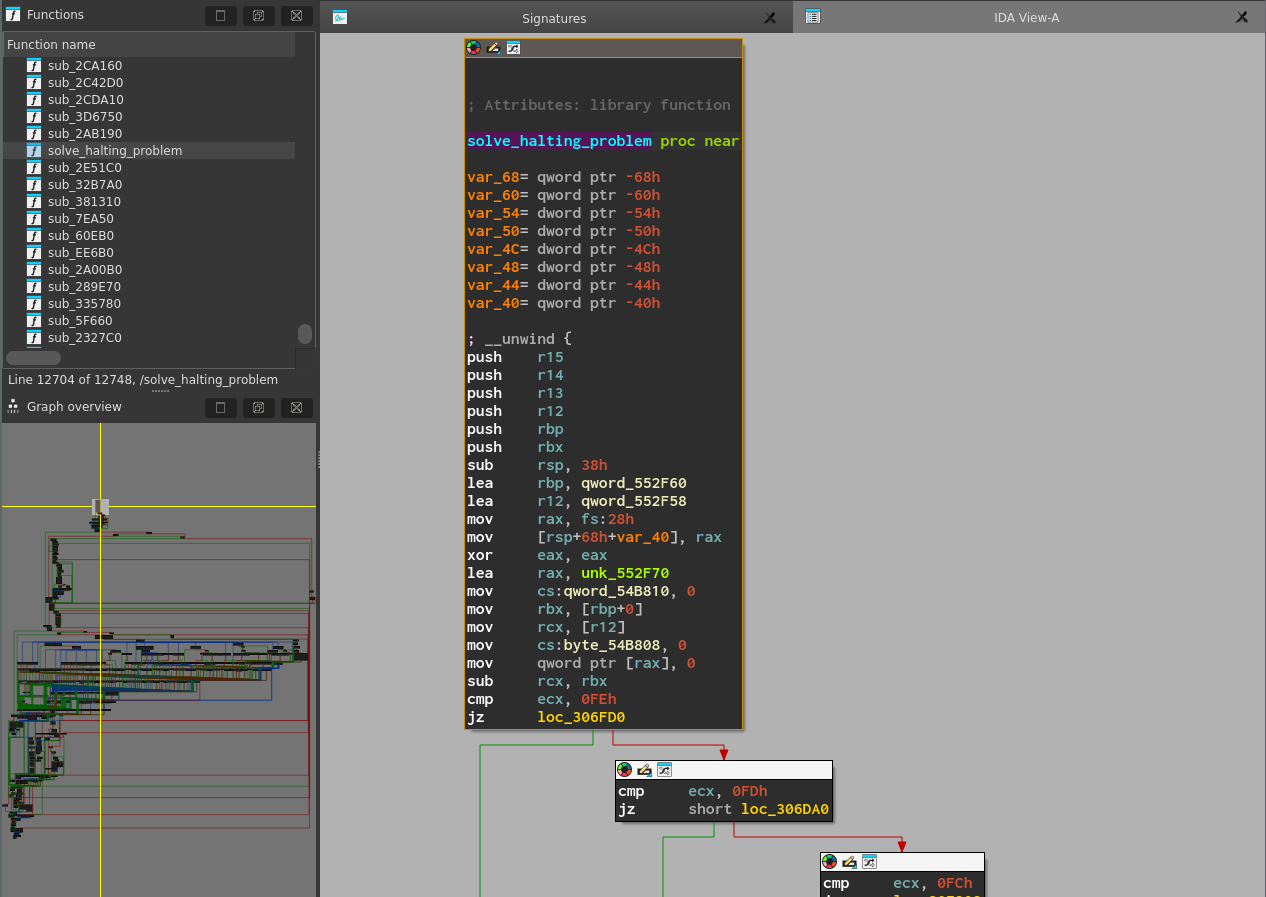
Working with Types
IDA type system fundamentals
The IDA type system is based on C-like constructs such as:
- Structures: Aggregate data types that group multiple members.
- Unions: Allow overlapping the same memory with different data types.
- Enums: Provide named integer constants.
IDA ships with type libraries out-of-the-box, but you can define custom types in the Local Types window.
Type definitions sources
- Built-in or custom type libraries(.til files)
- Custom types
- Debug information (e.g., PDB or DWARF)
Type libraries
IDA ships with type libraries for popular platforms and operating systems. They provide predefined data types that can be used in your analysis. You can view a list of currently loaded type libraries in the Type Libraries window (View → Open subviews → Type Libraries, or Shift+F11)
Load additional type libraries
- Go to the Type Libraries window. Right-click on the libraries list and select Load type library…, or press the Ins key.
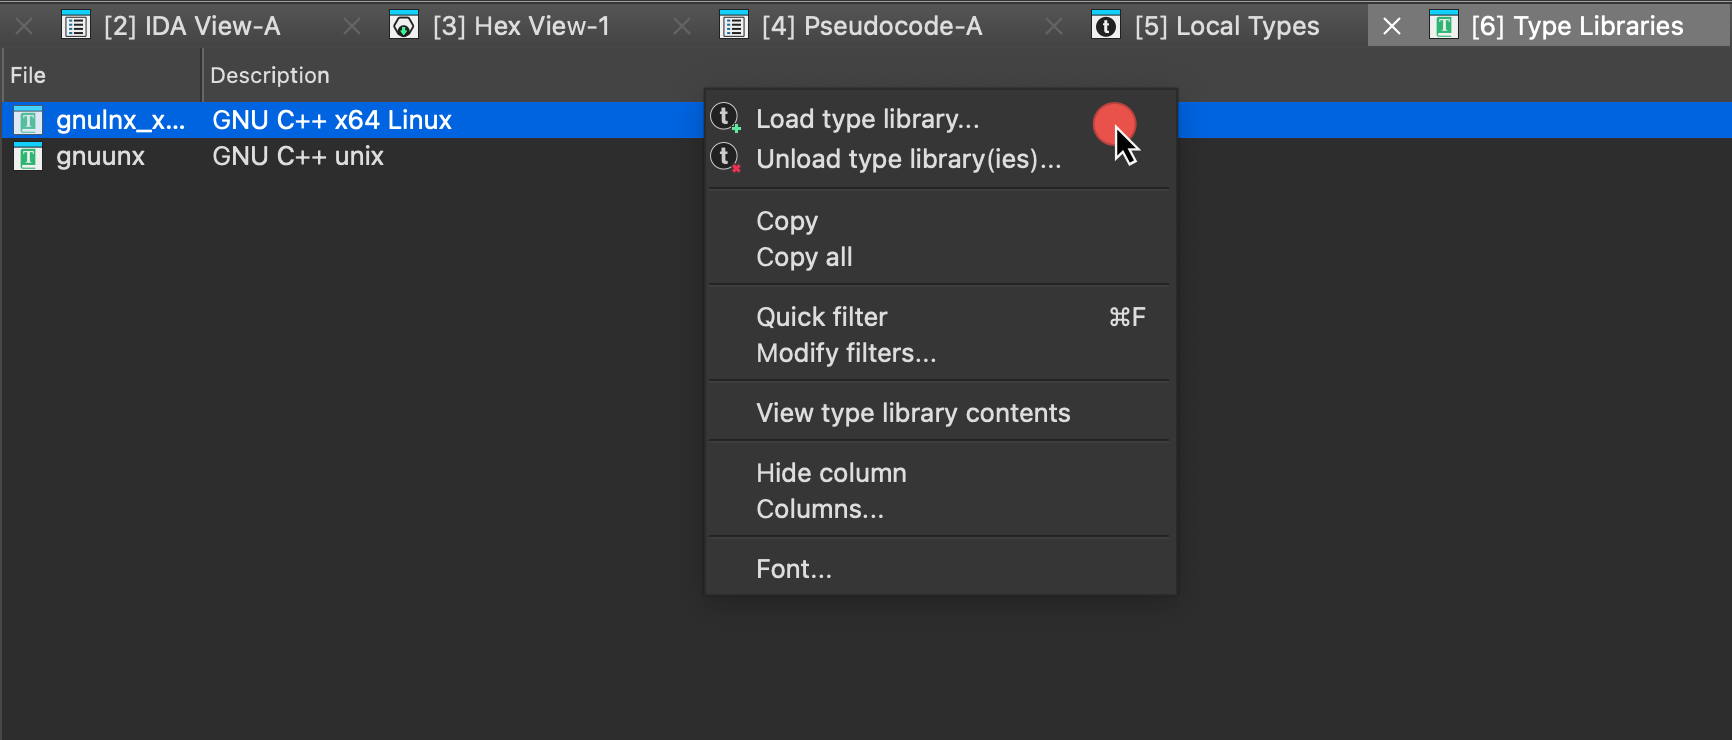
- Select the type library from the list and click OK.
Once loaded, type library definitions are accessible throughout IDA, including the Local Types window.
{% hint style=“info” %} Relation between Local Types and Type Libraries: In IDA, Local Types are custom or imported type definitions specific to your current project, while Type Libraries provide pre-defined types for common platforms and architectures. Types in the Type Libraries, once referenced, are copied into the IDB and appear under the Local Types window. {% endhint %}
See also:
- Check TILIB tutorial for creating custom type libraries
Type management essentials: Local Types view
The Local Types view provides a centralized hub for managing and customizing type definitions directly within the IDA UI. To access this view, navigate to View → Open subviews → Local Types or press Shift+F1 keys.
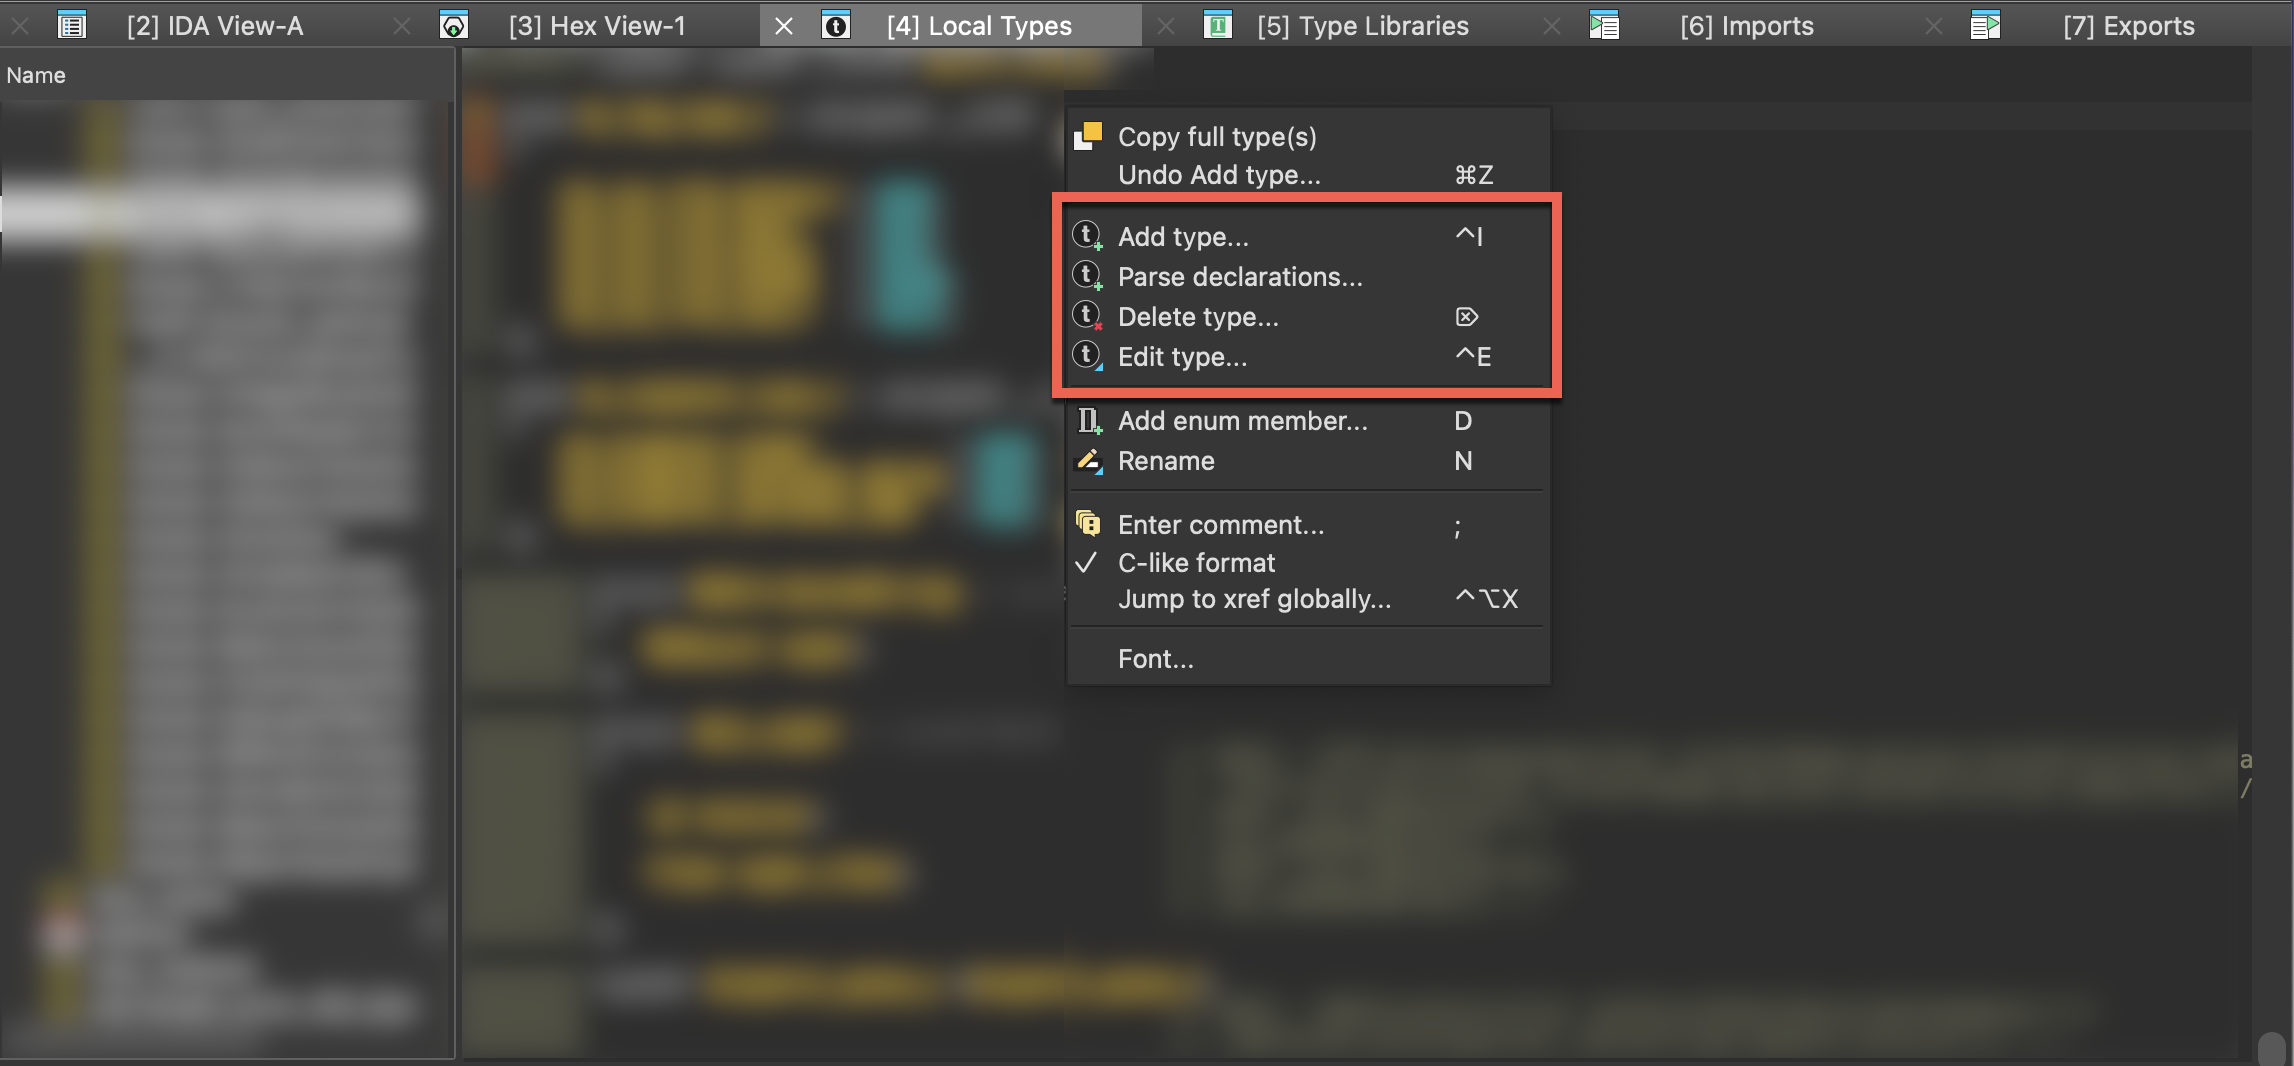
In the Local Types window, you can:
- Add a single type (structure, union, and enumeration), including importing types from loaded type libraries
- Create multiple types at once by parsing declarations
- Modify existing types
- Delete existing types
- Copy full type(s) definition to clipboard
Add new types
In the Add type dialog, you can create a custom structure, union, and enumeration, or import them from loaded libraries. To add a new type:
- press the Ins key
- right-click on the types list and select Add type… from the context menu
- go to Edit → Add type….
Create a structure (struct)
- Open the Add type dialog and in the Struct tab configure the structure settings:
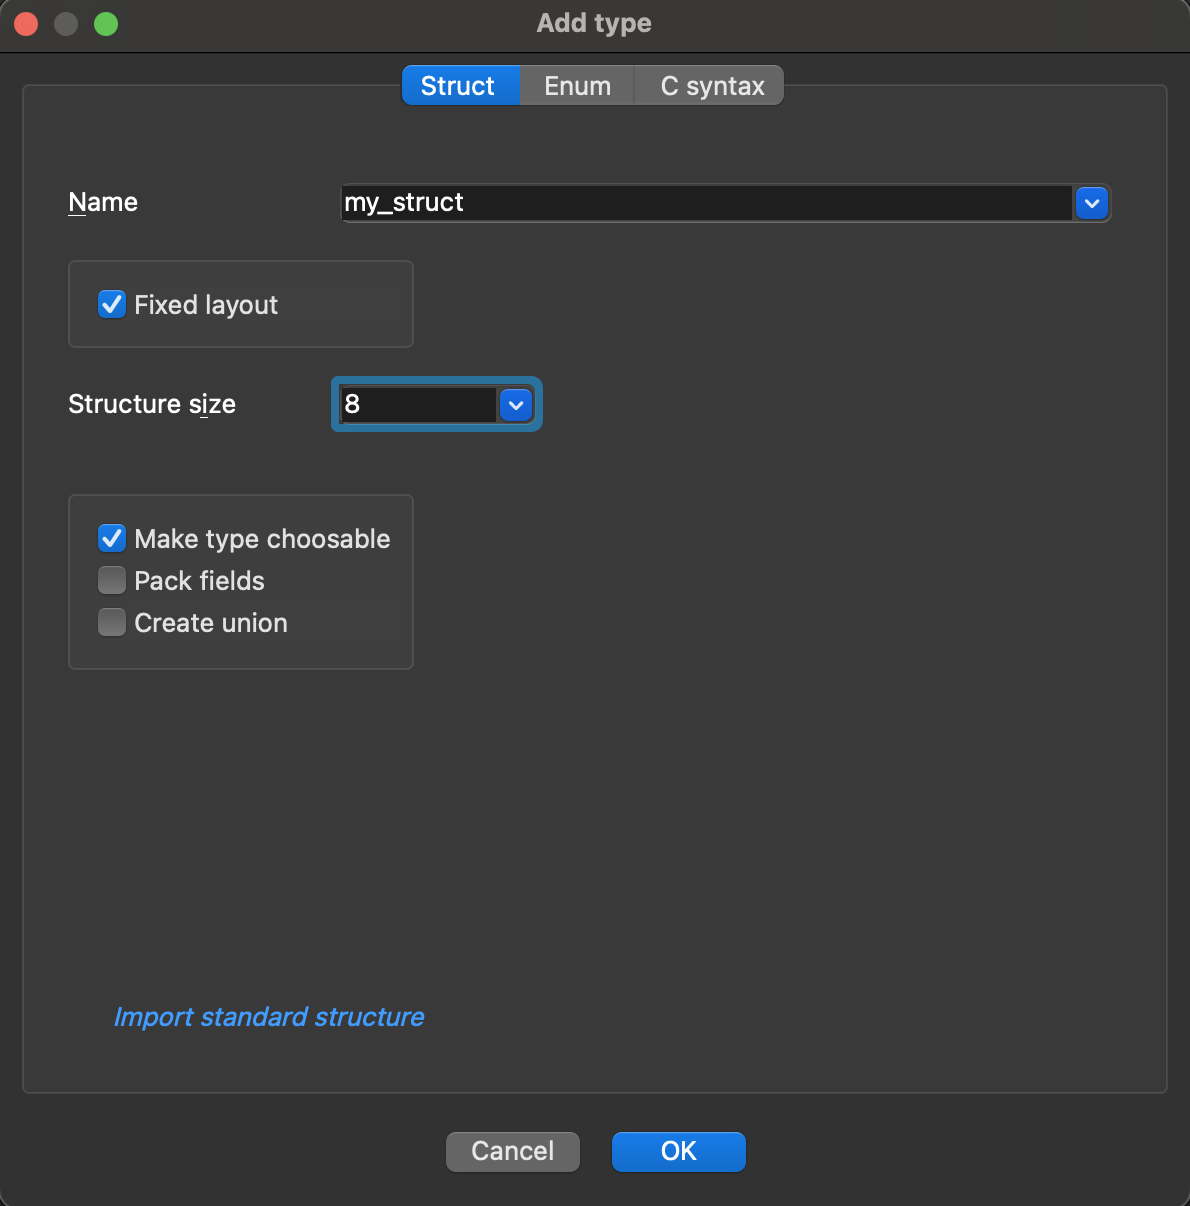
Understanding structure options:
-
Name: the unique name of your struct.
-
Fixed layout (default: enabled) When checked:
- It locks the struct size and members. It prevents accidentally changing the struct size, for example, if the user moves members around while modifying another type. Fixed layout ensures the structure layout remains stable unless explicitly modified. Note: You can still add a field to a fixed structure.
- You need to specify the Structure size in bytes.
-
Make type choosable (default: enabled) When checked:
- It includes this struct in the type listing.
-
Pack fields (default: disabled) When checked:
- It packs the fields of the struct (removes padding) and saves memory.
-
Tuple (default: disabled) When checked:
- Creates tuple, a special kind of struct.
-
Create union (Leave unchecked for structures)
- Only check it when creating a union instead of a struct.
- Click OK.
As an alternative, you can create or edit structures via free-text editor.
Create a tuple
{% hint style=“info” %} Tuples are dedicated for Golang functions that return multiple values. Unlike a function with single return value (e.g., a struct), which is returned entirely in registers or entirely on the stack, tuple fields are handled separately: some may be returned in registers, others on the stack. {% endhint %}
- Open the Add type dialog and in the Struct tab configure the tuple settings:
- specify the unique name of your tuple, and
- check the Tuple checkbox.
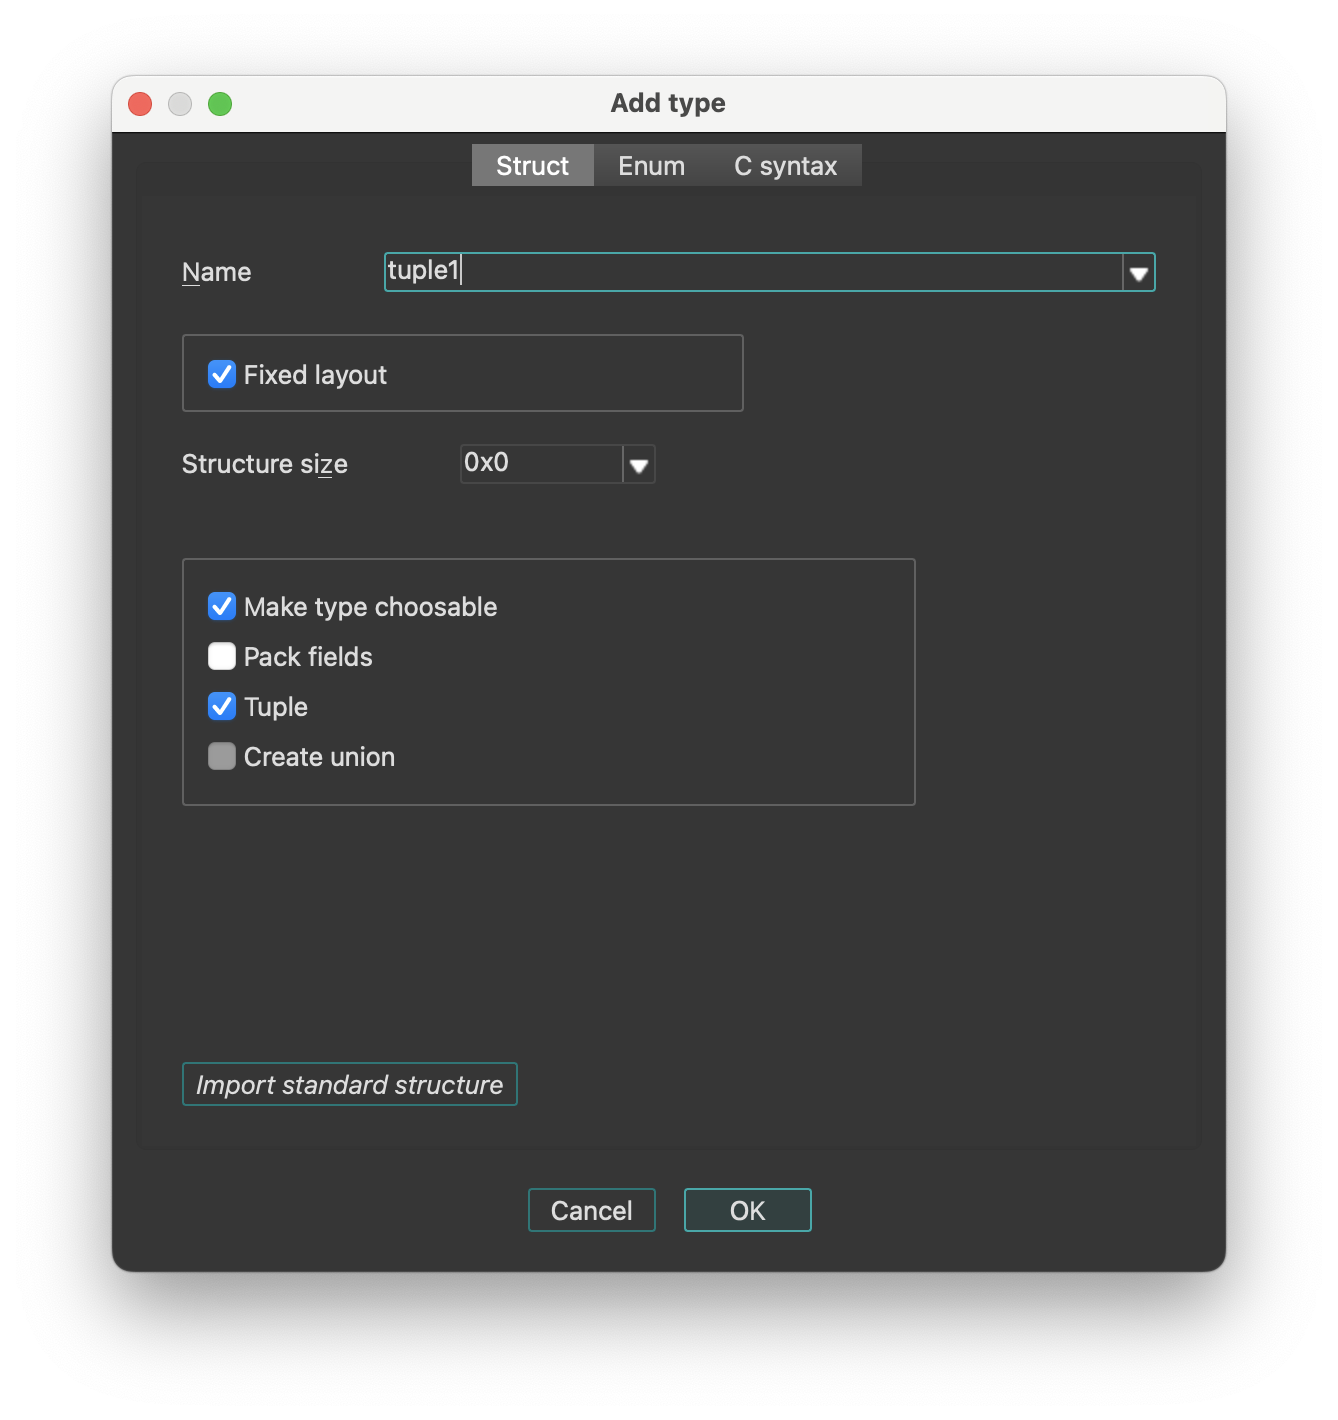
- Click OK.
{% hint style=“info” %} Two tuples with the same field types are considered equal, regardless of the field names. {% endhint %}
Create a union
{% hint style=“info” %} A union is de facto a type of a struct. Creating and editing unions follow the same principles as working with structs. {% endhint %}
- Open the Add type dialog and in the Struct tab configure the union settings:
- specify the unique name of your union, and
- check the Create union checkbox.
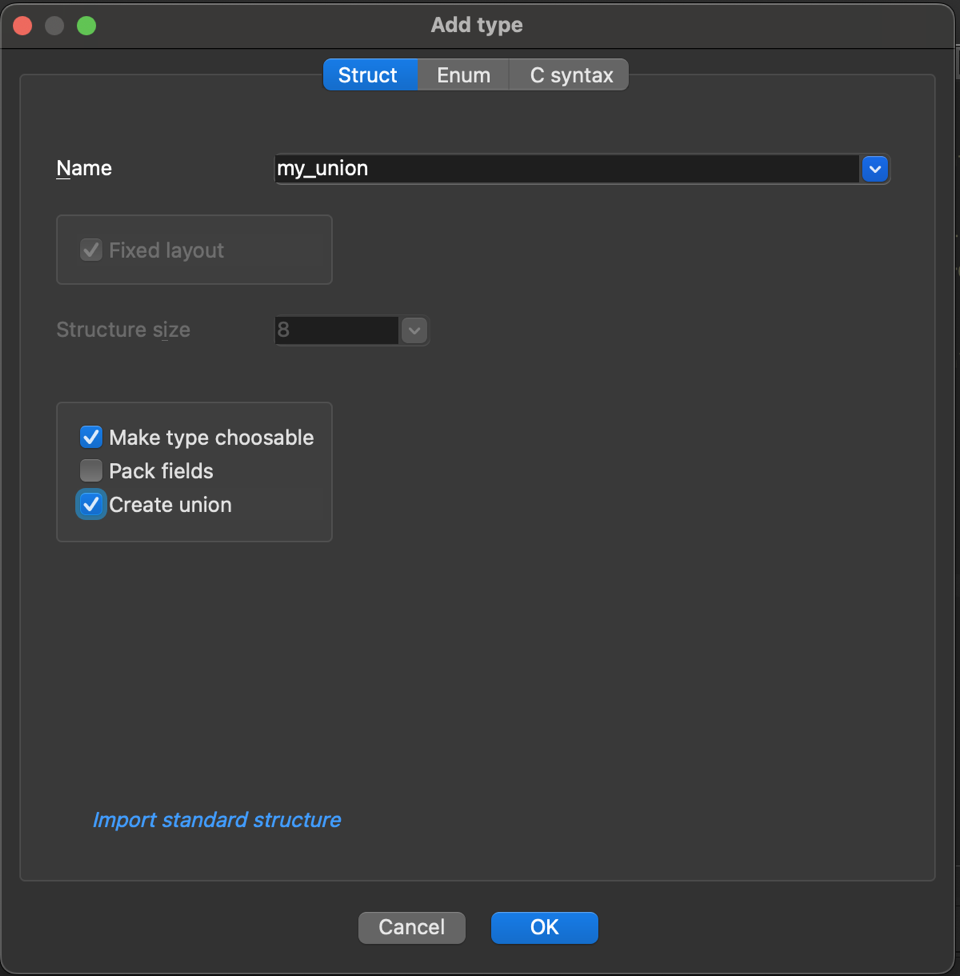
{% hint style=“info” %} When you choose to create a union, the fixed layout option will no longer be available. If you would like to turn a union to a fixed layout structure, first change “union” to “struct” in the C syntax tab, and then edit the struct. {% endhint %}
- Click OK.
Create an enumeration (enum)
- Open the Add type dialog and in the Enum tab configure the enum settings:
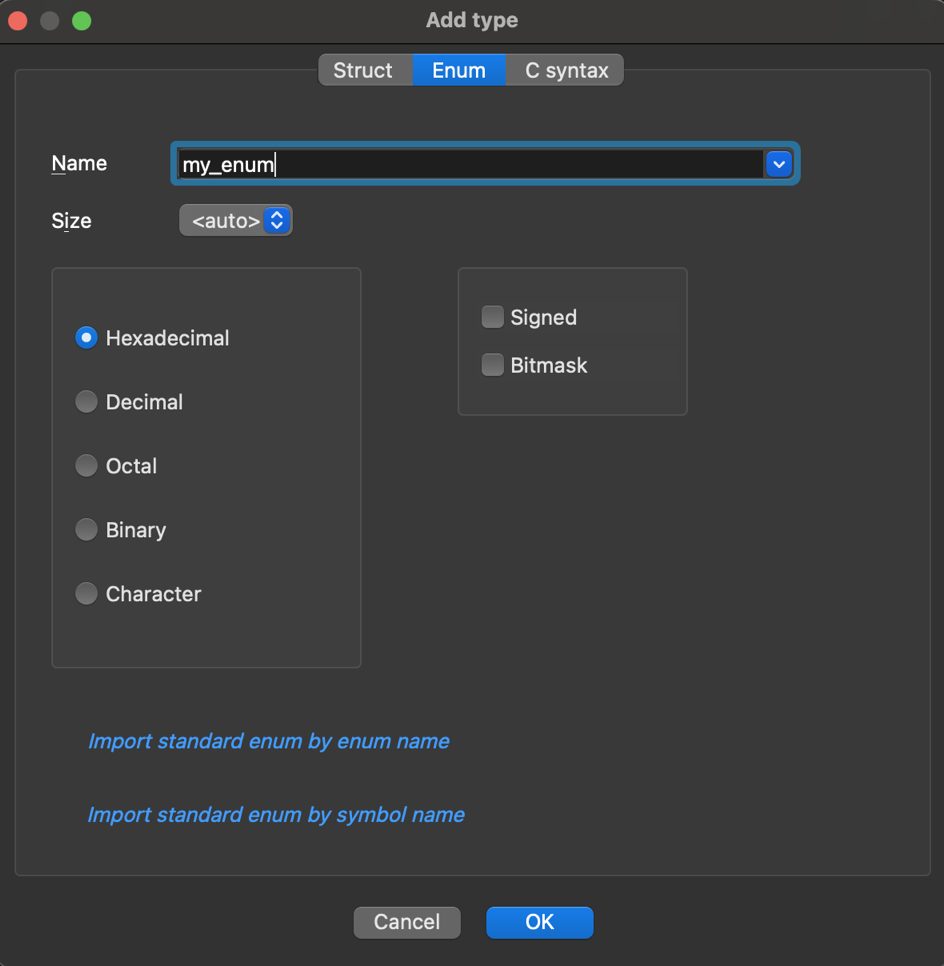
Understanding enum options:
-
Name: specify the unique name of your enum
-
Size: (default: auto)
- It determines how much memory the enum values will occupy
- You can select from dropdown the number of bytes (1, 2, 4, or 8 bytes)
- The auto option lets the compiler decide based on values
-
Number representation: defines how enum values are displayed in IDA
- Select the format for enum members from the available options: Hexadecimal, Decimal, Octal, Binary or Character (ASCII/Unicode)
-
Signed: (default: disabled)
- It determines if enum values can be negative
-
Bitmask: (default: disabled) When checked:
- It makes the enum a bitfield, and allows the representation of multiple flags in a single value using bitwise operations (e.g., OR, AND)
- Click OK.
As an alternative, you can create or edit enums via free-text editor.
Modify existing types
To modify an existing type:
- press Ctrl+E or
- right-click on the list of existing types and select Edit type… from the context menu.
Managing structure fields
Basic operations for managing struct fields are available in the context menu (from Local Types view) or via Edit menu:
| Command | Hotkey | Description |
|---|---|---|
| Rename | N | Rename field |
| Insert gap… | - | Expand the current structure by inserting undefined bytes at the cursor location. Note: the cursor must not be at the end. To define a member at the end of the structure, just use data definition commands. |
| Remove gap… | - | Shrink the current structure by deleting undefined bytes at the cursor location. The cursor must be positioned on an undefined byte. IDA will prompt the dialog to specify the number of bytes to delete. |
| Duplicate a structure type | - | Create a copy of the structure |
Commands for converting structure fields to different data types:
| Command | Hotkey | Description |
|---|---|---|
| Data | D | Convert to basic data type |
| String | A | Convert to string literal |
| Array | * | Convert to array |
Managing enum members
Basic operations for managing enum members are available in the context menu (from Local Types view) or via Edit menu:
| Command | Hotkey | Description |
|---|---|---|
| Add enum member… | D | Create a new symbolic constant in the enum. You have to specify its name and value in the new dialog. You cannot define more than 256 constants with the same value in an enum. If the current enum is a bitfield, you need to specify the bitmask. To learn about bitmasks, read about bitfields. |
| Edit enum member… | Ctrl + N | Modify existing enum member name or value. To rename an enum type name, you can also use the Rename option from the context menu. |
| Delete member “member_name” | U | Remove enum member and all associated data, including comments. |
Modifying field types
- In the Local Types view: right-click on a field and use the Field type submenu to modify member types
- In the Disassembly/IDA View: use commands from the Edit|Operand types… submenu
Delete existing types
To delete an existing type:
- press Del or
- right-click on the list of existing types and select Delete type… from the context menu.
{% hint style=“info” %} Deleting a type will remove all references to it from the database. If you recreate the type later, references will not be restored automatically and must be manually reassigned. {% endhint %}
Copy full type(s) definition to clipboard
To copy the entire C-style definition of the type:
- In the Local Types view, right-click on the type you want to copy and select Copy full type(s) from the context menu
- The complete definition, including all nested types and dependencies, will be copied to your clipboard.
Adding and editing types via free-text editor
The Struct/Enum tabs are perfect for learning IDA type system and creating simple, single types. However, for more complex tasks—such as copying types from existing source code or defining multiple related types simultaneously—the text editor offers greater efficiency and flexibility.
Add a type using C syntax tab
- In the Local Types view, open the Add type dialog.
- Go to the C syntax tab and enter a new type declaration.
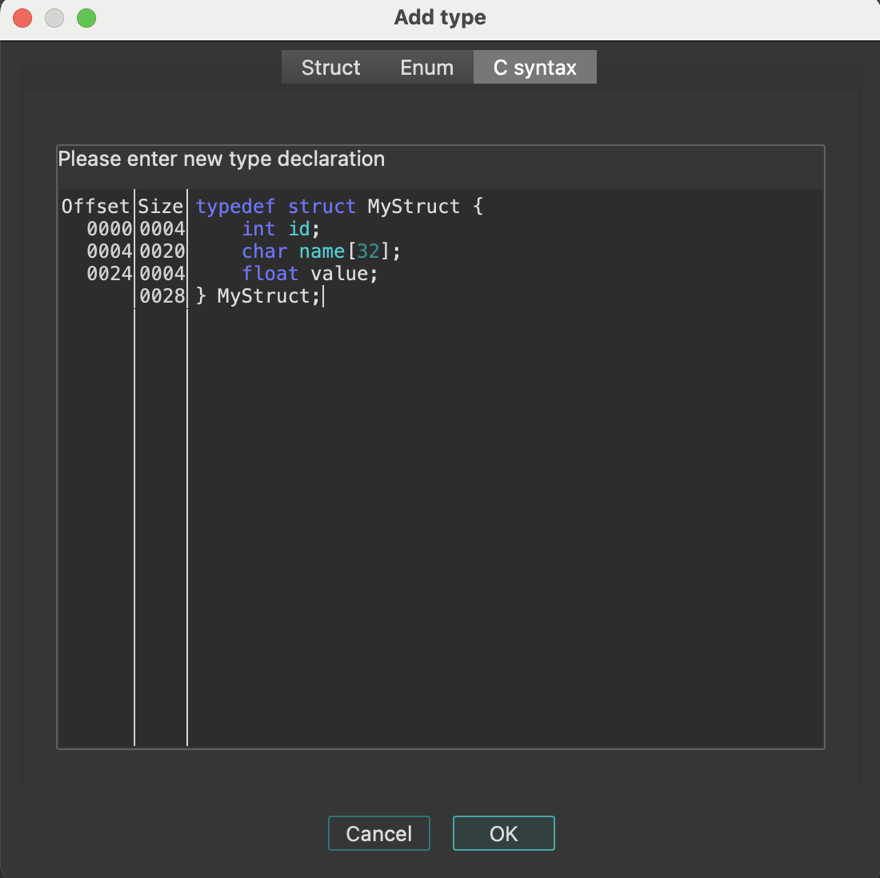
Edit a type using C syntax tab
- In the Local Types view, right-click on the existing type and select Edit type… from the context menu.
- Go to the C syntax tab and modify the type.
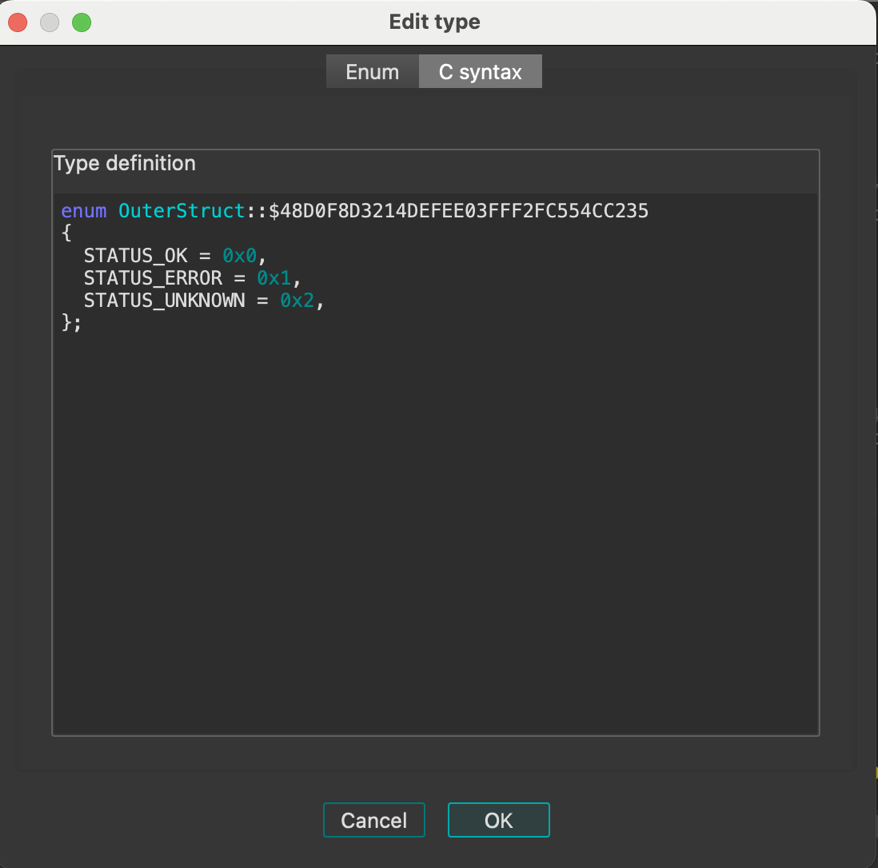
Create multiple type definitions at once
The Parse declarations… option allows you to input and process many type definitions at once, enabling batch creation of multiple types.
- Right-click on the types list in the Local Types view and select Parse declarations… from the context menu.
- In the Parse declarations… dialog, enter the type definitions using C syntax and click OK to add them to the Local Types.
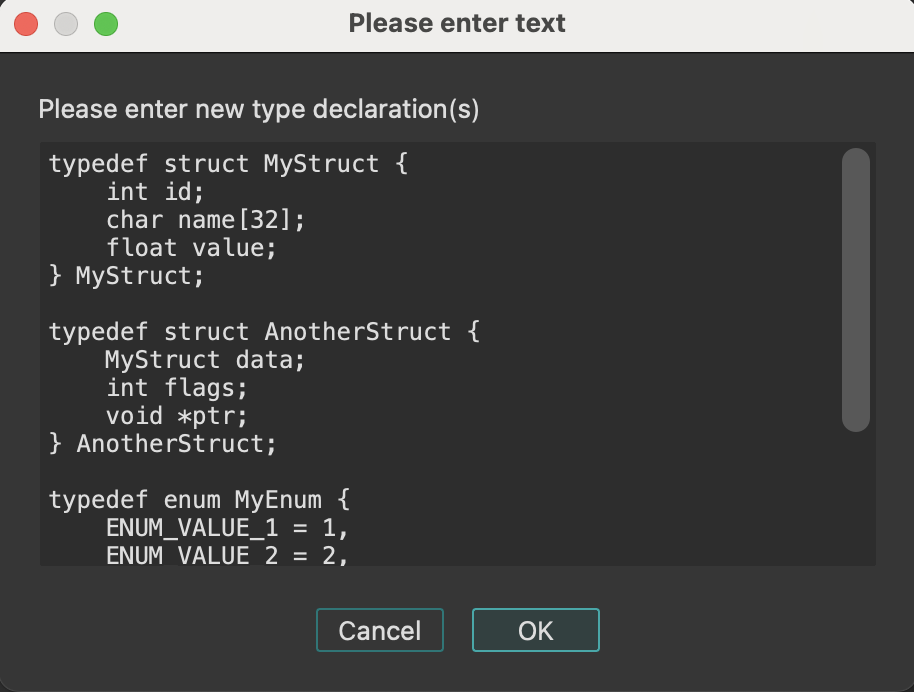
Importing types
Import types from loaded type libraries
Before you start importing types from type libraries, ensure that your desired library is already loaded in the Type Libraries window.
Import standard structures
If you want to import an existing standard structure:
-
Open the Add type dialog and in the Struct tab, click Import standard structure.
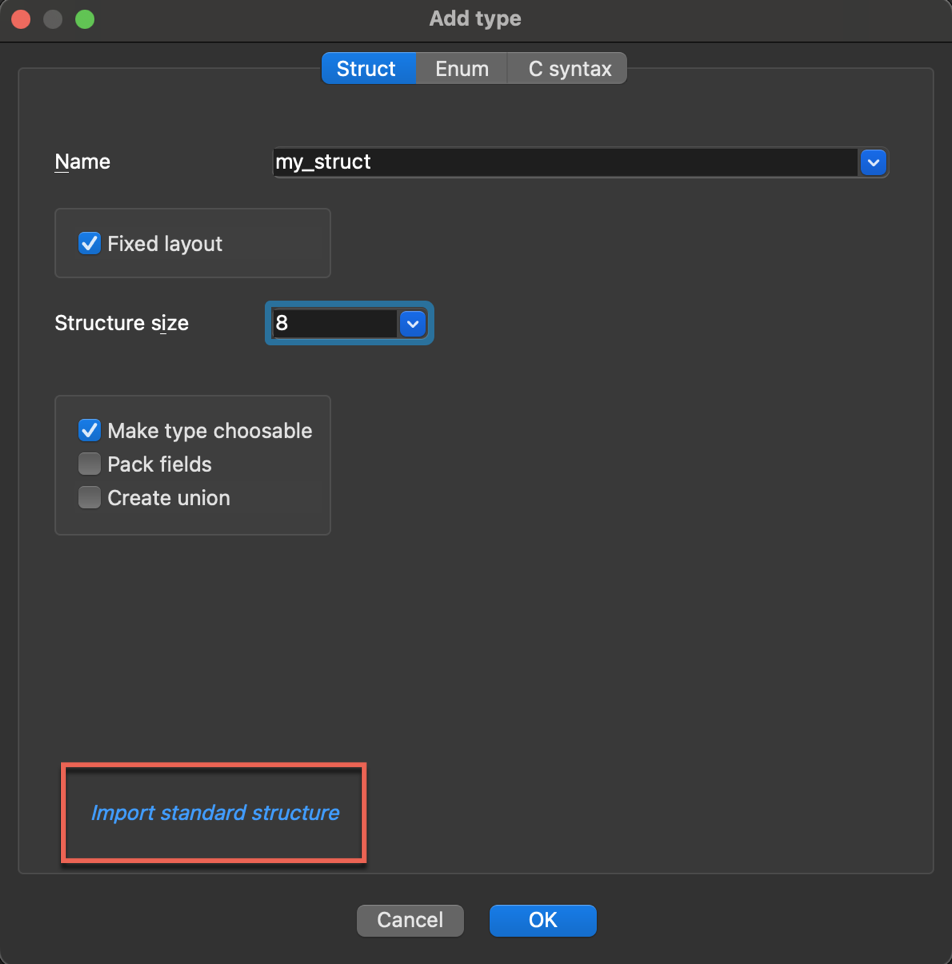
-
In the new dialog, browse and select the structure from the list of all corresponding types in the loaded libraries, then click OK to import it.
Import standard enums
If you want to import an existing standard enum from the type library:
- Open the Add type dialog and in the Enum tab, click:
- Import standard enum by enum name (1), or
- Import standard enum by symbol name (2) (useful when you know the member names but not the enum name).
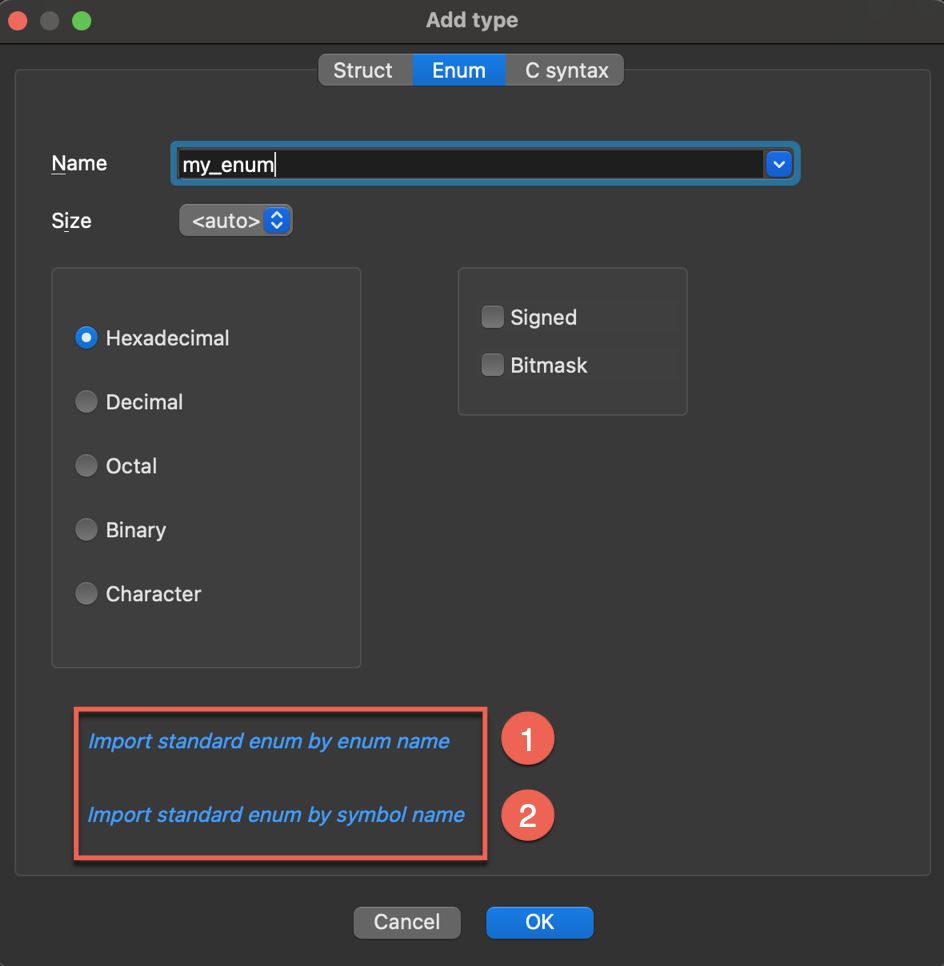
- In the new dialog, browse and select the enum from the list of all corresponding types in the loaded libraries, then click OK to import it.
Import type definitions from C/C++ header files
Header files can be parsed by three different parsers:
- legacy parser, that supports basic C,
- old_clang, which deals with complex C/C++/Objective-C source code (previous parser based on clang),
- clang - new parser introduced in IDA 9.2 (based on LLVM), supporting C/C++
You can select source parser in Options → Compiler…:

To import type definitions from header files:
- Navigate to Files → Load file → Parse C header file…
- Select your header file and click OK to import it. You should see a notification about a successful compilation. When you import a header file, all the type definitions from that file are added to your Local Types.
How can I download IDACLang?
IDAClang is a standalone command line tool to produce type libraries, that you can get from My Hex-Rays download center.
Note that we plan to drop support for IDAClang in future versions.
See also:
Import debug information
IDA supports debugging information formats such as PDB and DWARF. If your input file includes debugging information with types data, IDA will automatically import the types while loading the file.
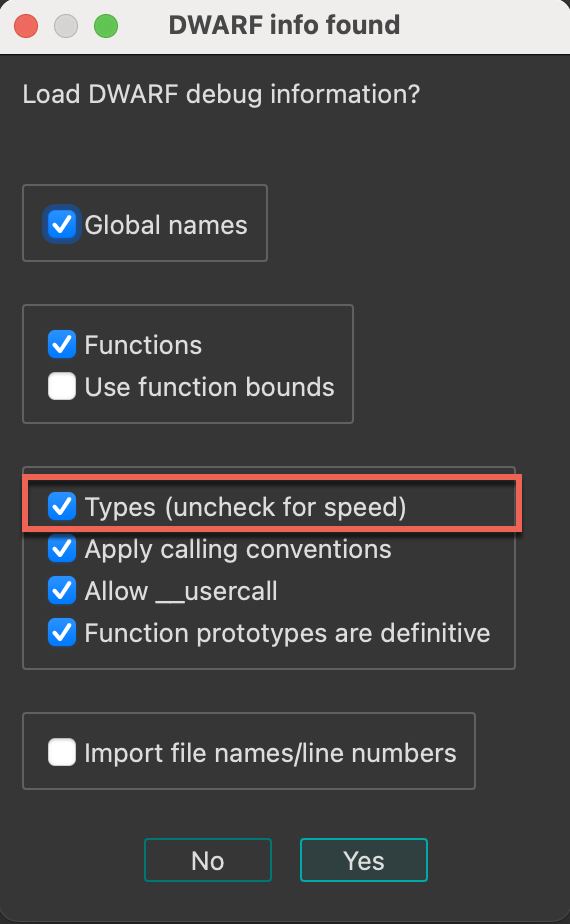
The imported types will be displayed in the Local Types window, organized under the corresponding folder (either dwarf or pdb).
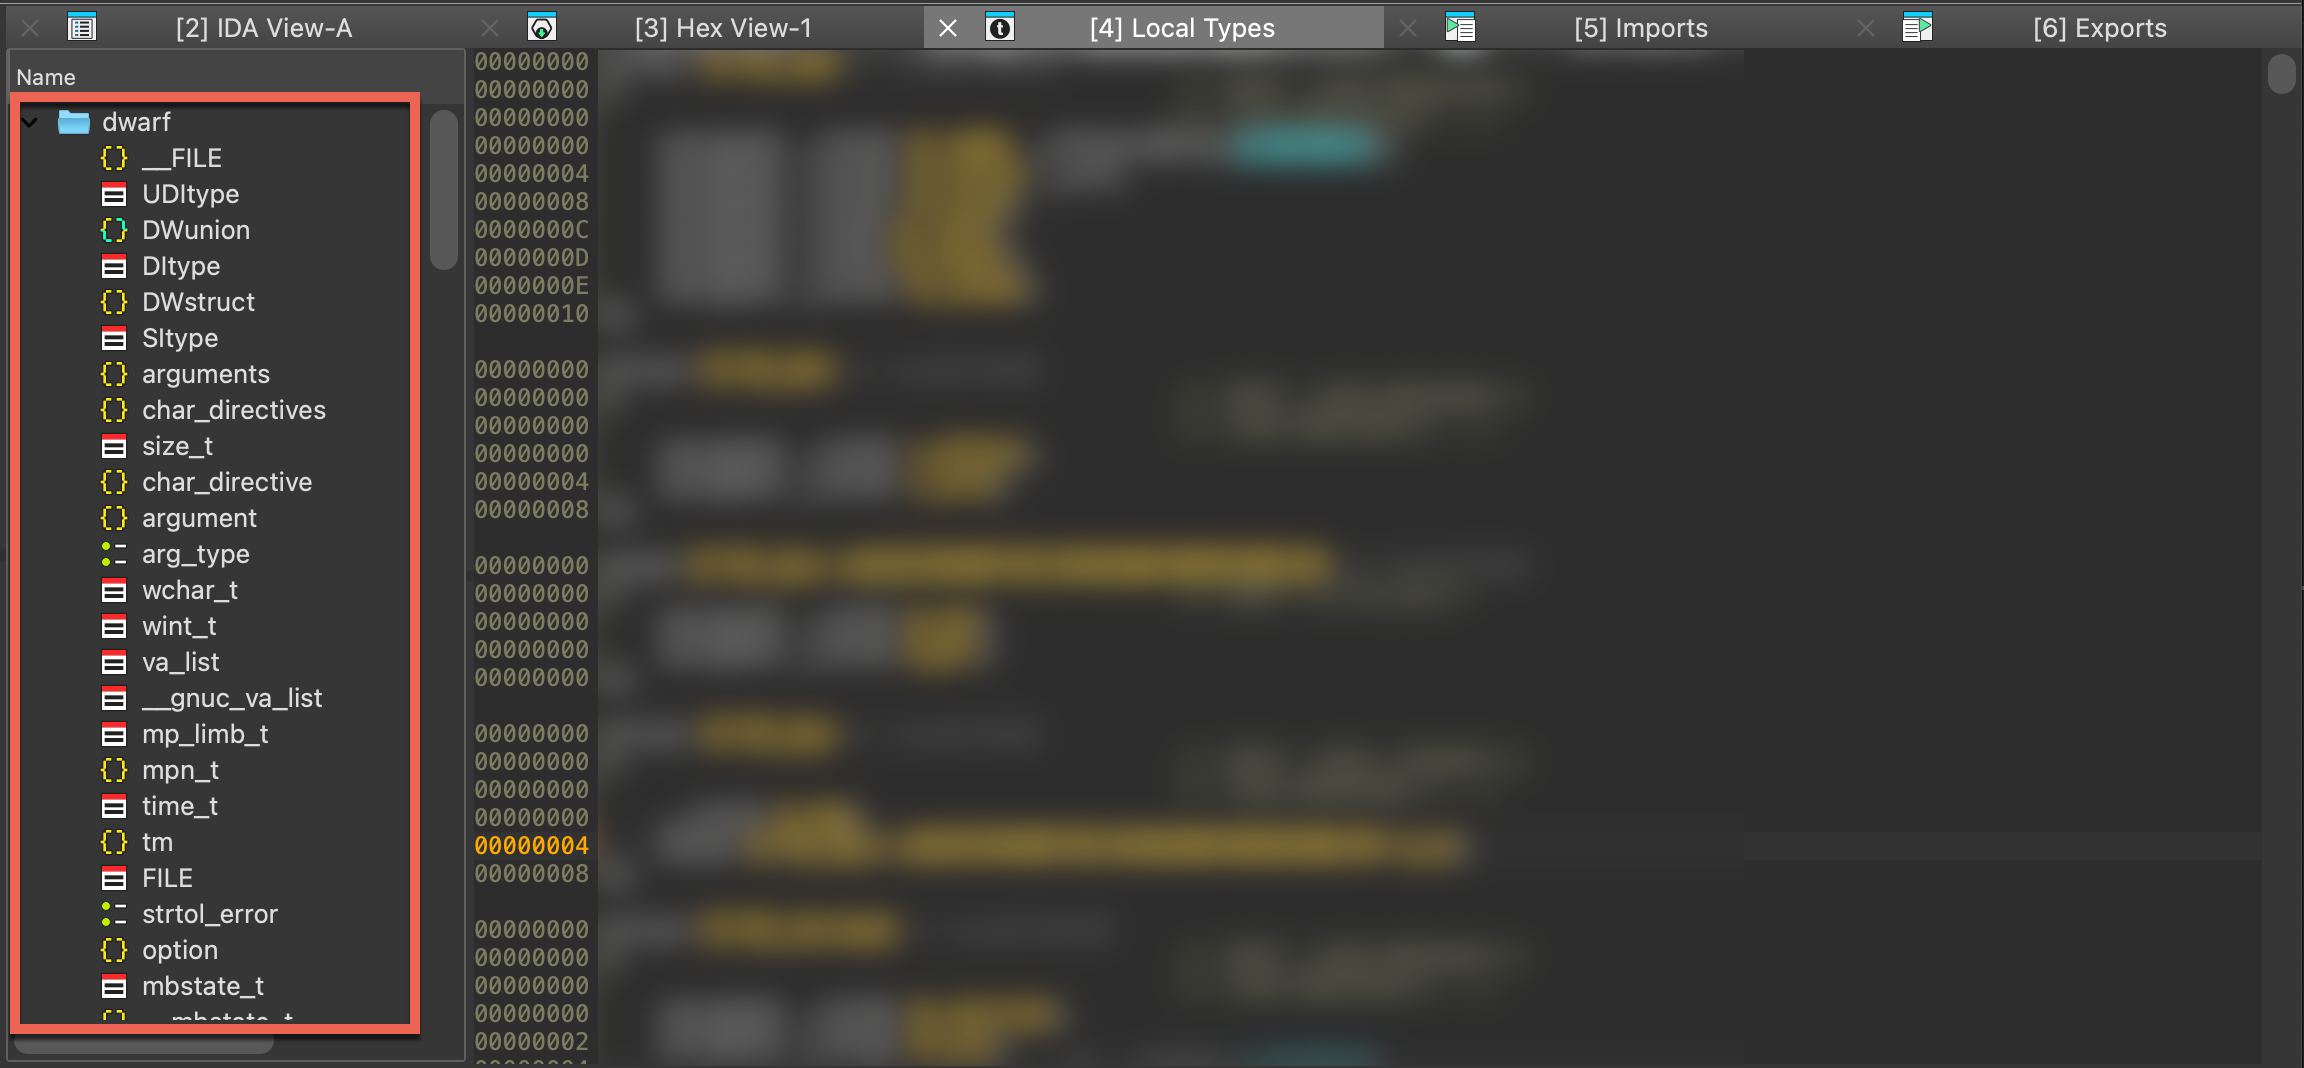
Working with types programmatically
In addition to the manual approach through IDA’s graphical interface, types can be created, modified, and managed programmatically using our APIs. This, among others, allows for the automation of type-related tasks or the creation of complex data structures, making it particularly useful for handling large sets of types or performing repetitive operations.
See also:
- Check IDAPython examples dedicated to working with types
Creating Type Libraries
Using the IDAClang plugin for IDA Pro
Overview
The IDAClang plugin integrates the clang compiler frontend into IDA itself. This allows IDA to parse type information from complex C/C++/Objective-C source code and import it directly into an IDA database.
Libclang
IDAClang utilizes a specialized build of libclang - the opensource C API for the clang compiler. This custom library is also shipped with IDA alongside the plugin itself, so you do not need to worry about it. The plugin will find and load libclang automatically.
Our build of libclang is from Clang v13.0, so it can handle any Objective-C syntax and anything from C++20 and earlier.
Motivation
IDAClang was introduced as a more robust alternative to IDA’s built-in source code parser. The built-in parser can handle simple C source code, but naturally it struggles to handle complex C++ and Objective-C syntax. IDAClang solves this problem by outsourcing all the heavy lifting to a third-party library that can handle the ugly parsing operations. The plugin needs only to parse the abstract syntax tree generated by clang.
As a result, IDAClang should be much more flexible. You can even feed it complete .cpp source files. The plugin will extract whatever useful type information it can find, and ignore the rest.
VTables
One big advantage of using libclang is that we can take advantage of clang’s internal C++ VTable management. For example, when IDAClang parses a C++ class that looks like this:
class C
{
virtual void func(void);
};
The following types will be generated in the database:
struct __cppobj C
{
C_vtbl *__vftable /*VFT*/;
};
struct /*VFT*/ C_vtbl
{
void (__cdecl *func)(C *this);
};
To create the C_vtbl type, IDAClang traverses clang’s internal VTableLayout data structure. This data structure is the same mechanism that the clang compiler uses during the actual code generation. Thus, we can be very confident that IDAClang is producing correct vtable types - even in much more complex situations. After all, clang knows what it’s doing in this regard.
Moreover, when using IDAClang to generate a type library (see Building Type Libraries with IDAClang below), the plugin will take advantage of clang’s name mangling to populate the symbol table:
SYMBOLS
FFFFFFFF 00000000 void __cdecl _ZN1C4funcEv(C *this);
00000018 00000000 C_vtbl_layout _ZTV1C;
TYPES
struct C_vtbl_layout
{
__int64 thisOffset;
void *rtti;
void (__cdecl *func)(C *this);
};
Here IDAClang created symbols for the C::func member function, as well as the mangled VTable symbol for the C class.
Templates
Another notable advantage of using libclang is it allows us to gracefully handle C++ templates.
For example, consider the following template declarations:
template <typename T, typename V> struct S
{
T x;
V y;
};
typedef S<int, void *> instance_t;
When clang parses the instance_t declaration, internally it will generate a structure that represents the specialized template S<int, void *>. The IDAClang plugin will then use this internal representation to generate a valid type for S<int, void *> in IDA’s type system:
struct S<int, void *>
{
int x;
void *y;
};
typedef S<int, void *> instance_t;
The type with name S<int, void *> represents the fully resolved structure, with all template arguments replaced. This all happens automatically, and it is especially useful in more complex situations - such as template classes containing virtual methods that depend on template parameters, resulting in specialized VTables.
The IDAClang UI
Enabling the IDAClang Parser
To provide support for third-party parsers, IDA now has a new Source parser field in the Options>Compiler dialog:
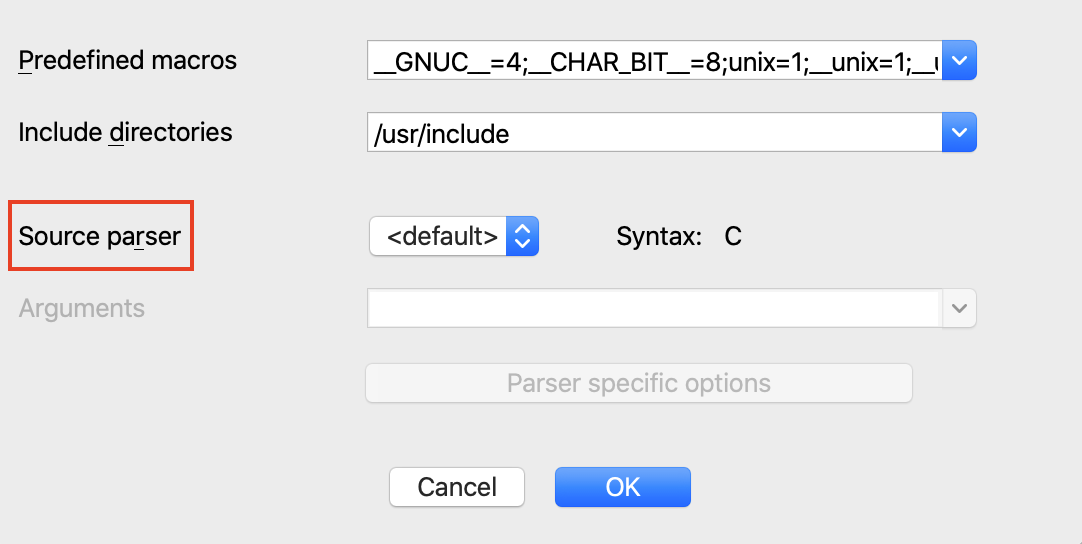
To enable the IDAClang parser, select the clang parser from the dropdown menu:

As a quick sanity check, try saving the following declaration in a file called test.h:
typedef int myint_t;
Parse the file using menu File>Load file>Parse C header file. IDA should print this to the output window:
/private/tmp/test.h: successfully compiled
The type should now be present in the Local Types view:
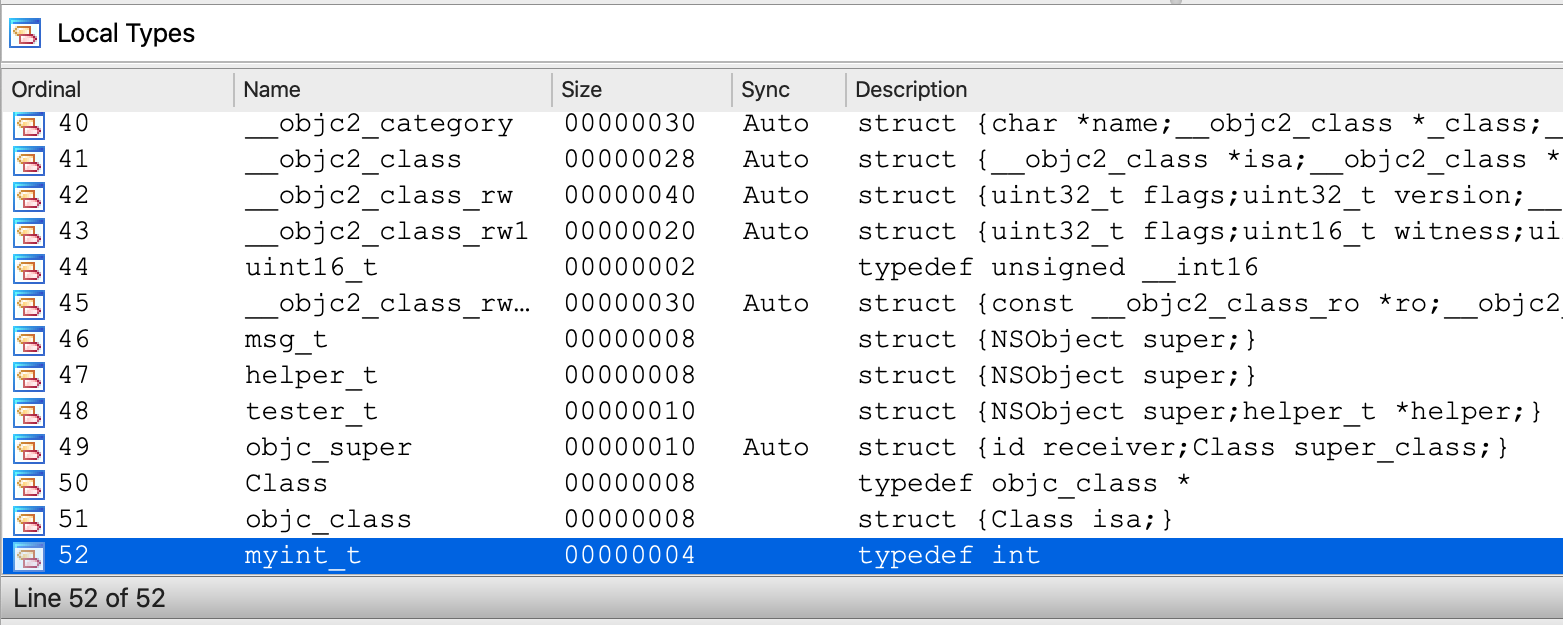
Configuring IDAClang
Of course, IDAClang is capable of parsing source code that is much more complex. Often times this requires more detailed configuration of the parser invocations.
To support this, the Compiler>Options dialog provides the Arguments field:

In this field you can provide any argument you would typically provide to the clang compiler when invoking it from the command line. For example:

One of the more important clang arguments is the -target option, which specifies the target architecture and platform. This allows clang to properly configure itself to parse macOS/Windows/Linux system headers. Clang calls this the target “triple” because it is often given in the form of:
-target <arch>-<vendor>-<platform>
Some examples:
-target arm64-apple-darwin
-target x86_64-pc-win32
-target i386-pc-linux
The various combinations of supported targets is documented in more detail here.
Note that in the simple test.h example above, we did not specify a target platform. In this case clang will assume that the target platform is the same as the host machine IDA is currently running on. You can print the exact target used by clang by opening Options>Compiler>Parser specific options and enable the following option:
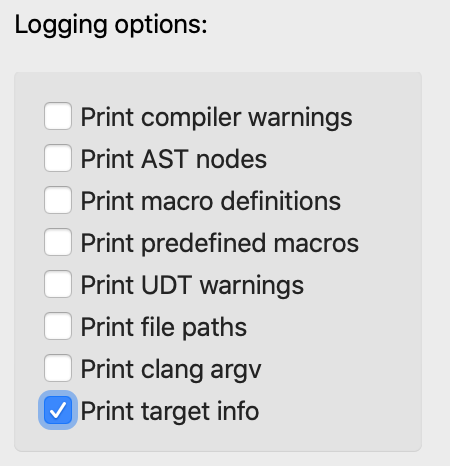
Now when we use IDAClang to parse the test.h file, it will print a message:
IDACLANG: triple: x86_64-apple-macosx10.15.0
Which would be the typical output when IDA is running on macOS. On Windows the default will look something like:
IDACLANG: triple: x86_64-pc-windows-msvc19.29.30137
And on Linux:
IDACLANG: triple: x86_64-unknown-linux-gnu
Such is the default behavior within libclang, but clang supports a wide variety of platforms and architectures. You can almost always specify a target that will match the input binary in the current database.
Example Files Package
You can download all the examples referenced in this tutorial from here:
{% file src=“assets/examples.zip” %}
STL Example
Now let’s try invoking IDAClang on some more real-world source code.
In this example, assume we are analyzing an x64 binary that makes heavy use of the C++ Standard Template Library. Then assume that at some point we want to create a structure that looks like this:
#include <string>
#include <vector>
#include <map>
#include <set>
struct stl_example_t
{
std::string str;
std::vector<int> vec;
std::map<std::string, int> map;
std::set<char> set;
};
This is the contents of stl/stl_example.h from examples.zip. IDA’s default parser cannot handle such complex C++ syntax, so IDAClang is our only hope of importing this type. The precise configuration of IDAClang will vary between platforms, so we’ll demonstrate them all separately.
To parse stl_example.h on macOS, we’ll have to point IDAClang to the macOS SDK as well as the STL system headers:
-target x86_64-apple-darwin
-x c++
-isysroot /Applications/Xcode.app/Contents/Developer/Platforms/MacOSX.platform/Developer/SDKs/MacOSX.sdk
-I/Applications/Xcode.app/Contents/Developer/Toolchains/XcodeDefault.xctoolchain/usr/include/c++/v1
-I/Applications/Xcode.app/Contents/Developer/Toolchains/XcodeDefault.xctoolchain/usr/lib/clang/11.0.3/include
Copy the text above into the Options>Compiler>Arguments field.
Note that we point IDAClang to the macOS SDK with the -isysroot option and use the -I option to allow IDAClang to find the proper system headers in the Xcode toolchain. Be wary of the last option (ending with usr/lib/clang/11.0.3/include). This path contains the clang version number, so it might be different on your machine. Also make special note of the -x c++ option. This is used to inform libclang that the input source will not be plain C, which is the default syntax for .h files in libclang.
Now we can use File>Load file>Parse C header file to parse stl_example.h. This will generate a useful type for stl_example_t in our database:
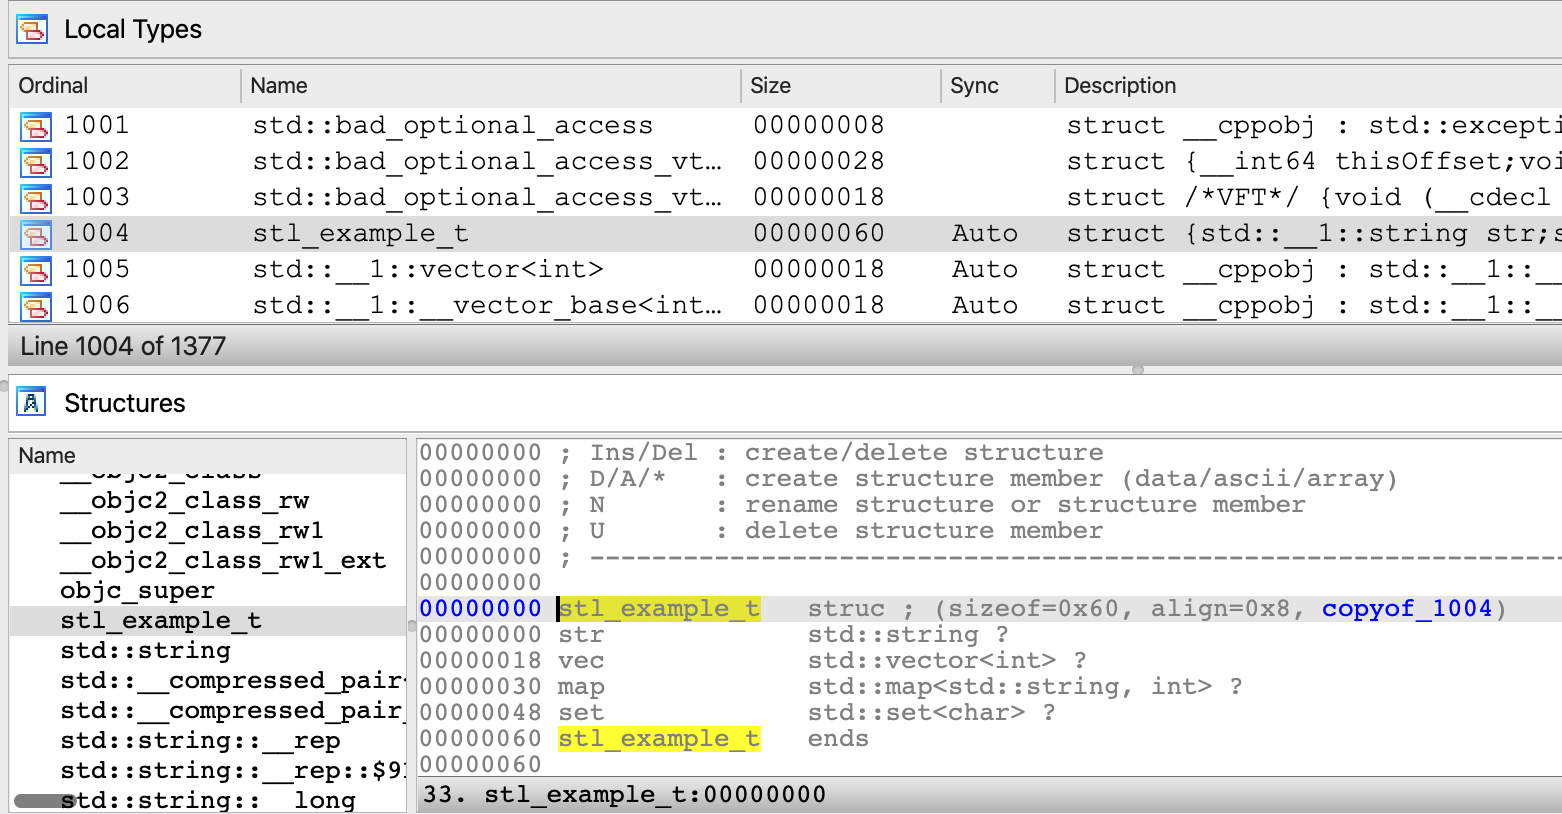
On Windows the configuration is a bit different. If you’re using Visual Studio, libclang is normally able to detect common header paths automatically.
Thus you will likely only need to specify the following arguments in Options>Compiler>Arguments:
-target x86_64-pc-win32 -x c++
Ideally this will be enough to parse stl_example.h and generate some useful type info:

If for whatever reason the heuristics within libclang fail to find the headers on your system, it is very easy to specify the header paths manually. Simply open a Visual Studio x64 Command Prompt and run the following command:
echo %INCLUDE%
This will print a semicolon-separated list of the header paths used on your system:
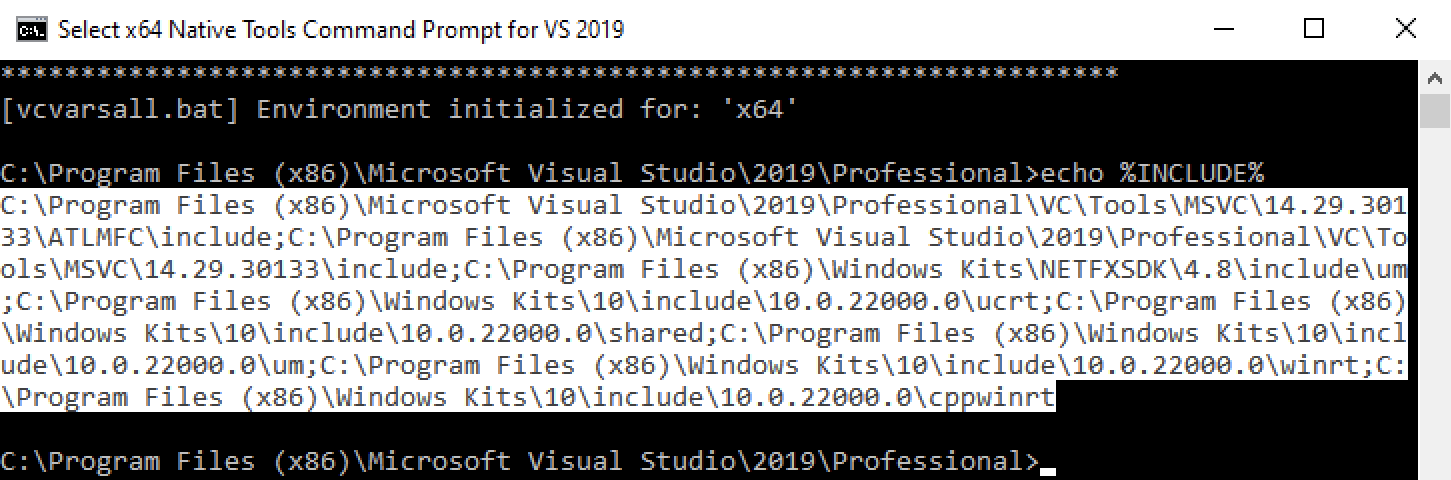
This list can be copied directly into the Options>Compiler>Include directories field in IDA. IDAClang will automatically process this list and pass the header paths to clang upon invocation of the parser. This is likely enough to handle most Windows-based source code.
On Linux you can determine the header paths used your system by running the following command:
cpp -v
This will print something like:
#include <...> search starts here:
/usr/lib/gcc/x86_64-linux-gnu/6/include
/usr/local/include
/usr/lib/gcc/x86_64-linux-gnu/6/include-fixed
/usr/include/x86_64-linux-gnu
/usr/include
You can then use these arguments in the Options>Compiler>Arguments field in IDA:
-target x86_64-pc-linux-gnu
-x c++
-I/usr/lib/gcc/x86_64-linux-gnu/6/include
-I/usr/local/include
-I/usr/lib/gcc/x86_64-linux-gnu/6/include-fixed
-I/usr/include/x86_64-linux-gnu
-I/usr/include
Then use File>Load file>Parse C header file to parse stl_example.h.
Invoking IDAClang from IDAPython
Like any good IDA feature, IDAClang can also be invoked from an IDAPython script.
IDA 7.7 introduced the ida_srclang module to provide simple support for invoking third-party parsers from IDAPython. Use the following IDAPython commands for an overview of this new module:
import ida_srclang
? ida_srclang
? ida_srclang.parse_decls_with_parser
? ida_srclang.set_parser_argv
The function ida_srclang.parse_decls_with_parser can notably be used to parse source code snippets:
Python>? ida_srclang.parse_decls_with_parser
Help on function parse_decls_with_parser in module ida_srclang:
parse_decls_with_parser(*args) -> 'int'
Parse type declarations using the parser with the specified name
@param parser_name: (C++: const char *) name of the target parser
@param til: (C++: til_t *) type library to store the types
@param input: (C++: const char *) input source. can be a file path or decl string
@param is_path: (C++: bool) true if input parameter is a path to a source file, false if the
input is an in-memory source snippet
@retval -1: no parser was found with the given name
@retval else: the number of errors encountered in the input source
If the is_path argument is False, this function will assume the input argument is a string that represents a source code snippet. Otherwise it will be considered a path to a source file on disk. Also note the til parameter, which will often times be None. This ensures the parsed types are imported directly into the current database.
Examples
IMPORANT NOTE: when libclang parses in-memory strings, it makes no assumptions about the expected syntax. Thus, you must specify the -x option to tell clang which syntax to expect before invoking the parser. Here are the the known syntax directives:
-x c
-x c++
-x objective-c
-x objective-c++
For example, this is how you would use ida_srclang to parse a simple C source string with IDAClang:
import ida_srclang
# tell clang the expected syntax
ida_srclang.set_parser_argv("clang", "-x c")
# parse a type string
ida_srclang.parse_decls_with_parser("clang", None, "typedef int myint_t;", False)
STL Example Revisited
We can also handle the same STL example discussed previously, but this time parse stl_example_t as a source snippet:
import ida_srclang
clang_argv = [
"-target x86_64-apple-darwin",
"-x c++",
"-isysroot /Applications/Xcode.app/Contents/Developer/Platforms/MacOSX.platform/Developer/SDKs/MacOSX.sdk",
"-I/Applications/Xcode.app/Contents/Developer/Toolchains/XcodeDefault.xctoolchain/usr/include/c++/v1",
"-I/Applications/Xcode.app/Contents/Developer/Toolchains/XcodeDefault.xctoolchain/usr/lib/clang/11.0.3/include",
]
ida_srclang.set_parser_argv("clang", " ".join(clang_argv))
decl = """
#include <string>
#include <vector>
#include <map>
#include <set>
struct stl_example_t
{
std::string str;
std::vector<int> vec;
std::map<std::string, int> map;
std::set<char> set;
};
"""
ida_srclang.parse_decls_with_parser("clang", None, decl, False)
This should produce an identical result as before when we used File>Load file>Parse C header file for stl_example.h.
Boost Example
In this example we will show how IDAClang can be used in batch mode to improve the analysis of a binary compiled from Boost headers. The experiment will be performed on Debian Linux with gcc 6.3.0.
Consider the following source files from the boost/ directory in examples.zip:
- chat_server.cpp
- chat_message.hpp
These sources were taken directly from the Boost 1.77 examples, and we’ll use them to compile a test binary. Begin by downloading the Boost 1.77.0 headers, then compile the chat_server application:
g++ -I boost_1_77_0 -std=c++11 -o chat_server.elf chat_server.cpp -lpthread
Since Boost is a template library, it will generate a bloated binary that contains thousands of instantiated template functions. Thus, IDA’s initial analysis of chat_server.elf will likely not be very pretty. How can IDAClang help us with this? Consider boost/chat_server.py from examples.zip:
import sys
import ida_pro
import ida_auto
import ida_srclang
clang_argv = {
"-target x86_64-pc-linux",
"-x c++",
"-std=c++11",
"-I./boost_1_77_0",
# NOTE: include paths were copied from the output of `cpp -v`. they might differ on your machine.
"-I/usr/lib/gcc/x86_64-linux-gnu/6/include",
"-I/usr/local/include",
"-I/usr/lib/gcc/x86_64-linux-gnu/6/include-fixed",
"-I/usr/include/x86_64-linux-gnu",
"-I/usr/include",
}
# invoke the clang parser
ida_srclang.set_parser_argv("clang", " ".join(clang_argv))
ida_srclang.parse_decls_with_parser("clang", None, "./chat_server.cpp", True)
# analyze the input file
ida_auto.auto_mark_range(0, BADADDR, AU_FINAL)
ida_auto.auto_wait()
# save and exit
ida_pro.qexit(0)
This script will configure IDAClang to parse the chat_server.cpp source file and extract any type information it finds, then analyze the input with the imported type info, and saves the resulting database in chat_server.i64. You can run the script like this:
idat64 -c -A -Schat_server.py -Oidaclang:t -ochat_server.i64 -Lchat_server.log chat_server.elf
You may have noticed this option:
-Oidaclang:t
This option is passed to the IDAClang plugin and it enables CLANG_APPLY_TINFO (see idaclang.cfg for more info).
Now let’s open the resulting database chat_server.i64 in IDA, and try decompiling some functions. Immediately we see that the analysis does benefit from the imported type info. For example chat_session::do_write seems somewhat intelligible after some minor simplifications:
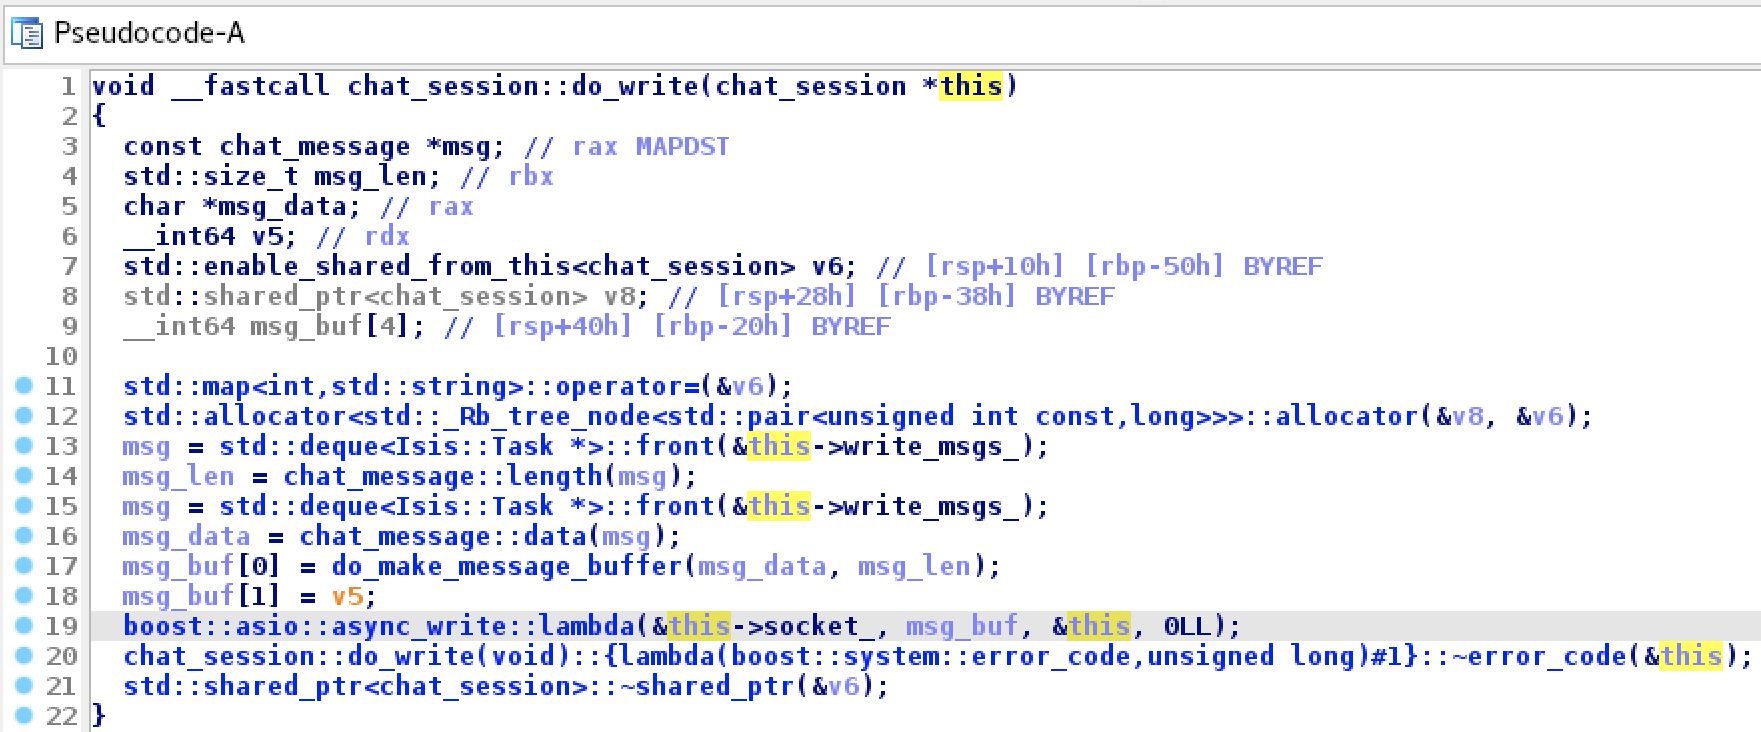
Since IDAClang parsed the chat_session class, we now have a correct prototype for chat_session:do_write, as well as a valid chat_session structure. Note that references to chat_session.write_msgs_ (std::deque<chat_message>) and chat_session.socket (boost::asio::ip::tcp::socket) were correctly resolved.
Granted, this is not the most realistic example. It’s not often we have access to the full source code of the target binary, but hopefully this shows that whenever any relevant source code is available, IDAClang can take full advantage.
Building Type Libraries with IDAClang
The IDAClang plugin is useful for enriching your database with complex type information, but often times the imported types are relevant to more than just one database. In this section we discuss how you can use IDAClang to generate rich, generic type libraries for IDA Pro.
Hex-Rays also provides a command-line version of IDAClang(which you can download from our Customer Portal), specifically designed for building custom Type Information Libraries (TILs) that can be loaded into any IDA database.
After downloading the idaclang binary, copy it to the idabin/ directory of your IDA installation (next to the libclang dll).
For an overview of idaclang’s functionality, run:
idaclang -h
For a quick demonstration, save the following source in a file named test.h:
class C
{
virtual void func(void);
};
You can compile this header into a type library by invoking idaclang the same way you would typically invoke the clang compiler from the command line:
idaclang -x c++ -target x86_64-pc-linux test.h
This will generate a file called test.til that contains all types that were parsed in test.h. Try dumping the TIL with the tilib utility.
tilib -l /tmp/test.til
TYPE INFORMATION LIBRARY CONTENTS
Description:
Flags : 0107 compressed macro_table_present extended_sizeof_info sizeof_long_double
Base tils :
Compiler : GNU C++
sizeof(near*) = 8 sizeof(far*) = 8 near code, near data, cdecl
default_align = 0 sizeof(bool) = 1 sizeof(long) = 8 sizeof(llong) = 8
sizeof(enum) = 4 sizeof(int) = 4 sizeof(short) = 2
sizeof(long double) = 16
SYMBOLS
FFFFFFFF 00000000 void __cdecl ZN1C4funcEv(C *__hidden this);
00000018 00000000 C_vtbl_layout ZTV1C;
TYPES
00000008 struct __cppobj C {C_vtbl *__vftable /*VFT*/;};
00000008 struct /*VFT*/ C_vtbl {void (__cdecl *func)(C *__hidden this);};
00000018 struct C_vtbl_layout {__int64 thisOffset;void *rtti;void (__cdecl *func)(C *__hidden this);};
MACROS
Total 2 symbols, 3 types, 0 macros
The tool also provides extra arguments to configure the til generation. They are given the –idaclang- prefix so they can be easily separated from the clang arguments. For example:
idaclang --idaclang-tilname /tmp/test2.til -x c++ -target x86_64-pc-linux test.h
This will create the library at /tmp/test2.til, instead of the default location.
Now let’s try building some type libraries from real-world code. The examples in this section will demonstrate the power of IDAClang by creating TILs from many different opensource C++ projects. They cover a large variety of platforms, architectures, and codebases, so it is best to unify the build system using makefiles.
At the top level of examples.zip there should be a makefile named idaclang.mak:
IDACLANG_ARGS += --idaclang-log-all
IDACLANG_ARGS += --idaclang-tilname $(TIL_NAME)
IDACLANG_ARGS += --idaclang-tildesc $(TIL_DESC)
CLANG_ARGV += -ferror-limit=50
all: $(TIL_NAME)
.PHONY: all $(TIL_NAME) clean
$(TIL_NAME): $(TIL_NAME).til
$(TIL_NAME).til: $(TIL_NAME).mak $(INPUT_FILE)
idaclang $(IDACLANG_ARGS) $(CLANG_ARGV) $(INPUT_FILE) > $(TIL_NAME).log
tilib64 -ls $(TIL_NAME).til > $(TIL_NAME).til.txt
clean:
rm -rf *.til *.txt *.log
This makefile defines a simple rule for building a TIL using the idaclang command-line utility. It will be used extensively in the following examples.
IDASDK
Hex-Rays publishes an SDK for developing custom IDA plugins, which is comprised mostly of C++ header files. Thus, it is a perfect use case for IDAClang. In this example we will build a type library for IDA itself, using IDA SDK, which the latest version you can download from Customer Portal.
After downloading idasdk.zip, unzip it into the idasdk subdirectory of examples.zip.
To build this TIL we only need to create a single header file that includes all headers from the IDA SDK, and then parse this file with idaclang. See examples/idasdk/idasdk.h, which contains include directives for all files in idasdk77/include (they happen to be in alphabetical order, but the order shouldn’t matter much):
#include <auto.hpp>
#include <bitrange.hpp>
#include <bytes.hpp>
// ... etc
#include <typeinf.hpp>
#include <ua.hpp>
#include <xref.hpp>
The IDAClang configuration required to parse idasdk.h is highly platform-dependent, so we provide separate makefiles for each of IDA’s supported platforms.
To demonstrate how we might build idasdk.h on MacOSX, see examples/idasdk/idasdk_mac_x64.mak:
TIL_NAME = idasdk_mac_x64
TIL_DESC = "IDA SDK headers for MacOSX"
INPUT_FILE = idasdk.h
SDK = /Applications/Xcode.app/Contents/Developer/Platforms/MacOSX.platform/Developer/SDKs/MacOSX10.15.sdk
TOOLCHAIN = /Applications/Xcode.app/Contents/Developer/Toolchains/XcodeDefault.xctoolchain
CLANG_ARGV = -target x86_64-apple-darwin \
-x objective-c++ \
-isysroot $(SDK) \
-I$(TOOLCHAIN)/usr/include/c++/v1 \
-I$(TOOLCHAIN)/usr/lib/clang/11.0.3/include \
-I./idasdk77/include/ \
-D__MAC__ \
-D__EA64__ \
-Wno-nullability-completeness
include ../idaclang.mak
You can build the TIL with:
make -f idasdk_mac_x64.mak
This will generate a type library named idasdk_mac_x64.til, along with a dump of the til contents in idasdk_mac_x64.til.txt. In the text dump we might notice some familiar types:
00000010 struct __cppobj range_t
{
ea_t start_ea;
ea_t end_ea;
};
// 0. 0000 0008 effalign(8) fda=0 bits=0000 range_t.start_ea ea_t;
// 1. 0008 0008 effalign(8) fda=0 bits=0000 range_t.end_ea ea_t;
// 0010 effalign(8) sda=0 bits=0080 range_t struct packalign=0
00000050 struct __cppobj memory_info_t : range_t
{
qstring name;
qstring sclass;
ea_t sbase;
uchar bitness;
uchar perm;
};
// 0. 0000 0010 effalign(8) fda=0 bits=0020 memory_info_t.range_t range_t;
// 1. 0010 0018 effalign(8) fda=0 bits=0000 memory_info_t.name qstring;
// 2. 0028 0018 effalign(8) fda=0 bits=0000 memory_info_t.sclass qstring;
// 3. 0040 0008 effalign(8) fda=0 bits=0000 memory_info_t.sbase ea_t;
// 4. 0048 0001 effalign(1) fda=0 bits=0000 memory_info_t.bitness uchar;
// 5. 0049 0001 effalign(1) fda=0 bits=0000 memory_info_t.perm uchar;
// 004A unpadded_size
// 0050 effalign(8) sda=0 bits=0080 memory_info_t struct packalign=0
It’s worth building a separate til for both x64 and arm64 macOS. IDA’s source code is not very architecture dependent, but many system headers might be. So it’s best to be as precise as possible.
To build this TIL on macOS12 for Apple Silicon, the approach is very similar:
TIL_NAME = idasdk_mac_arm64
TIL_DESC = "IDA SDK headers for arm64 macOS 12"
INPUT_FILE = idasdk.h
SDK = /Applications/Xcode.app/Contents/Developer/Platforms/MacOSX.platform/Developer/SDKs/MacOSX12.0.sdk
TOOLCHAIN = /Applications/Xcode.app/Contents/Developer/Toolchains/XcodeDefault.xctoolchain
CLANG_ARGV = -target arm64-apple-darwin \
-x objective-c++ \
-isysroot $(SDK) \
-I$(TOOLCHAIN)/usr/lib/clang/13.0.0/include \
-I./idasdk77/include/ \
-D__MAC__ \
-D__EA64__ \
-D__ARM__ \
-Wno-nullability-completeness
include ../idaclang.mak
Note that we did not provide the path to the C++ STL headers like we did in idasdk_mac_x64.mak. On macOS12 the C++ headers are shipped within MacOSX12.0.sdk, so there is no need to explicitly tell idaclang where to find them.
To parse idasdk.h on Windows, use examples/idasdk/idasdk_win.mak:
TIL_NAME = idasdk_win
TIL_DESC = "IDA SDK headers for x64 Windows"
INPUT_FILE = idasdk.h
CLANG_ARGV = -target x86_64-pc-win32 \
-x c++ \
-I./idasdk77/include \
-D__NT__ \
-D__EA64__ \
-Wno-nullability-completeness
include ../idaclang.mak
Normally we do not need to specify any include paths, since idaclang can find the Visual Studio headers automatically. If it can’t, you can always explicitly provide include paths with the -I option.
Building idasdk.h on Linux is also fairly straightforward. See idasdk_linux.mak:
TIL_NAME = idasdk_linux
TIL_DESC = "IDA SDK headers for x64 linux"
INPUT_FILE = idasdk.h
GCC_VERSION = $(shell expr `gcc -dumpversion | cut -f1 -d.`)
CLANG_ARGV = -target x86_64-pc-linux \
-x c++ \
-I/usr/lib/gcc/x86_64-linux-gnu/$(GCC_VERSION)/include \
-I/usr/local/include \
-I/usr/lib/gcc/x86_64-linux-gnu/$(GCC_VERSION)/include-fixed \
-I/usr/include/x86_64-linux-gnu \
-I/usr/include \
-I./idasdk77/include/ \
-D__LINUX__ \
-D__EA64__ \
-Wno-nullability-completeness
include ../idaclang.mak
You can also include the decompiler types from the hexrays SDK in the type library for your version of idasdk. Simply copy hexrays.hpp from hexrays_sdk/ in your IDA installation to idasdkXX/include/, then add this line to idasdk.h:
#include <hexrays.hpp>
Then rebuild the TIL. It will likely yield some useful decompiler types:
00000050 struct __cppobj minsn_t
{
mcode_t opcode;
int iprops;
minsn_t *next;
minsn_t *prev;
ea_t ea;
mop_t l;
mop_t r;
mop_t d;
};
// 0. 0000 0004 effalign(4) fda=0 bits=0000 minsn_t.opcode mcode_t;
// 1. 0004 0004 effalign(4) fda=0 bits=0000 minsn_t.iprops int;
// 2. 0008 0008 effalign(8) fda=0 bits=0000 minsn_t.next minsn_t *;
// 3. 0010 0008 effalign(8) fda=0 bits=0000 minsn_t.prev minsn_t *;
// 4. 0018 0008 effalign(8) fda=0 bits=0000 minsn_t.ea ea_t;
// 5. 0020 0010 effalign(8) fda=0 bits=0000 minsn_t.l mop_t;
// 6. 0030 0010 effalign(8) fda=0 bits=0000 minsn_t.r mop_t;
// 7. 0040 0010 effalign(8) fda=0 bits=0000 minsn_t.d mop_t;
// 0050 effalign(8) sda=0 bits=0080 minsn_t struct packalign=0
00000028 struct __cppobj minsn_visitor_t : op_parent_info_t
{
minsn_visitor_t_vtbl *__vftable /*VFT*/;
};
// 0. 0000 0008 effalign(8) fda=0 bits=0100 minsn_visitor_t.__vftable minsn_visitor_t_vtbl *;
// 1. 0008 0020 effalign(8) fda=0 bits=0020 minsn_visitor_t.op_parent_info_t op_parent_info_t;
// 0028 effalign(8) sda=0 bits=0080 minsn_visitor_t struct packalign=0
Qt
In this example we will build a type library for the Qt Opensource UI Framework. The example uses Qt 5.15.2, but theoretically it can work for any Qt version. We assume you already have a Qt installation present on your system (See the QTDIR variable in the following makefiles).
Let’s start by creating a file that includes as many Qt headers as we can. Qt makes this easy because they ship “umbrella” headers for the various sub-frameworks, which take care of including most of the critical Qt header files.
See examples/qt/qt.h from examples.zip:
#include <QtCore>
#include <QtGui>
#include <QtWidgets>
#include <QtPrintSupport>
#include <QtNetwork>
#include <QtConcurrent>
#include <QtDBus>
#include <QtDesigner>
#include <QtDesignerComponents>
#include <QtHelp>
#include <QtOpenGL>
#include <QtSql>
#include <QtTest>
#include <QtUiPlugin>
#include <QtXml>
This will be more than enough to get started.
To build qt.h on macOS, consider examples/qt/qt_mac.mak:
TIL_NAME = qt_mac
TIL_DESC = "Qt 5.15.2 headers for x64 macOS"
INPUT_FILE = qt.h
QTDIR = /Users/Shared/Qt/5.15.2-x64
SDK = /Applications/Xcode.app/Contents/Developer/Platforms/MacOSX.platform/Developer/SDKs/MacOSX10.15.sdk
TOOLCHAIN = /Applications/Xcode.app/Contents/Developer/Toolchains/XcodeDefault.xctoolchain/
CLANG_ARGV = -target x86_64-apple-darwin \
-x objective-c++ \
-isysroot $(SDK) \
-I$(TOOLCHAIN)/usr/include/c++/v1 \
-I$(TOOLCHAIN)/usr/lib/clang/11.0.3/include \
-F$(QTDIR)/lib/ \
-I$(QTDIR)/lib/QtCore.framework/Headers \
-I$(QTDIR)/lib/QtGui.framework/Headers \
-I$(QTDIR)/lib/QtWidgets.framework/Headers \
-I$(QTDIR)/lib/QtPrintSupport.framework/Headers \
-I$(QTDIR)/lib/QtNetwork.framework/Headers \
-I$(QTDIR)/lib/QtCLucene.framework/Headers \
-I$(QTDIR)/lib/QtConcurrent.framework/Headers \
-I$(QTDIR)/lib/QtDBus.framework/Headers \
-I$(QTDIR)/lib/QtDesigner.framework/Headers \
-I$(QTDIR)/lib/QtDesignerComponents.framework/Headers \
-I$(QTDIR)/lib/QtHelp.framework/Headers \
-I$(QTDIR)/lib/QtOpenGL.framework/Headers \
-I$(QTDIR)/lib/QtSql.framework/Headers \
-I$(QTDIR)/lib/QtTest.framework/Headers \
-I$(QTDIR)/lib/QtUiPlugin.framework/Headers \
-I$(QTDIR)/lib/QtXml.framework/Headers
include ../idaclang.mak
For the Qt build we must explicitly add the Headers/ directory for each Qt framework to the include paths. Also pay special attention to the -F$(QTDIR)/lib/ option. This option is specific to macOS and informs libclang that the given directory contains .framework bundles. This is necessary for some include directives to be resolved correctly, e.g.:
#include <QtCore/QtCoreDepends>
Now we can build the TIL with:
make -f qt_mac.mak
We might want to check qt_mac.til.txt to see if some core Qt types were correctly added to the TIL:
00000010 struct __cppobj QObject
{
QObject_vtbl *__vftable /*VFT*/;
QScopedPointer<QObjectData> d_ptr;
};
// 0. 0000 0008 effalign(8) fda=0 bits=0100 QObject.__vftable QObject_vtbl *;
// 1. 0008 0008 effalign(8) fda=0 bits=0000 QObject.d_ptr QScopedPointer<QObjectData>;
// 0010 effalign(8) sda=0 bits=0080 QObject struct packalign=0
00000030 struct __cppobj QWidget : QObject, QPaintDevice
{
QWidgetData *data;
};
// 0. 0000 0010 effalign(8) fda=0 bits=0020 QWidget.QObject QObject;
// 1. 0010 0018 effalign(8) fda=0 bits=0020 QWidget.QPaintDevice QPaintDevice;
// 2. 0028 0008 effalign(8) fda=0 bits=0000 QWidget.data QWidgetData *;
// 0030 effalign(8) sda=0 bits=0080 QWidget struct packalign=0
To build the Qt type library on Windows, use examples/qt/qt_win.mak:
TIL_NAME = qt_win
TIL_DESC = "Qt 5.15.2 headers for x64 Windows"
INPUT_FILE = qt.h
QTDIR = C:\Qt\5.15.2-x64
CLANG_ARGV = -target x86_64-pc-win32 \
-x c++ \
-I"$(QTDIR)\include" \
-I"$(QTDIR)\include\QtCore" \
-I"$(QTDIR)\include\QtGui" \
-I"$(QTDIR)\include\QtWidgets" \
-I"$(QTDIR)\include\QtPrintSupport" \
-I"$(QTDIR)\include\QtNetwork" \
-I"$(QTDIR)\include\QtConcurrent" \
-I"$(QTDIR)\include\QtDBus" \
-I"$(QTDIR)\include\QtDesigner" \
-I"$(QTDIR)\include\QtDesignerComponents" \
-I"$(QTDIR)\include\QtHelp" \
-I"$(QTDIR)\include\QtOpenGL" \
-I"$(QTDIR)\include\QtSql" \
-I"$(QTDIR)\include\QtTest" \
-I"$(QTDIR)\include\QtUiPlugin" \
-I"$(QTDIR)\include\QtXml"
include ../idaclang.mak
And on Linux, use examples/qt/qt_linux.mak:
TIL_NAME = qt_linux
TIL_DESC = "Qt 5.15.2 headers for x64 Linux"
INPUT_FILE = qt.h
QTDIR = /usr/local/Qt/5.15.2-x64
GCC_VERSION = $(shell expr `gcc -dumpversion | cut -f1 -d.`)
CLANG_ARGV = -target x86_64-pc-linux \
-x c++ \
-I/usr/lib/gcc/x86_64-linux-gnu/$(GCC_VERSION)/include \
-I/usr/local/include \
-I/usr/lib/gcc/x86_64-linux-gnu/$(GCC_VERSION)/include-fixed \
-I/usr/include/x86_64-linux-gnu \
-I/usr/include \
-I$(QTDIR)/include \
-I$(QTDIR)/include/QtCore \
-I$(QTDIR)/include/QtGui \
-I$(QTDIR)/include/QtWidgets \
-I$(QTDIR)/include/QtPrintSupport \
-I$(QTDIR)/include/QtNetwork \
-I$(QTDIR)/include/QtConcurrent \
-I$(QTDIR)/include/QtDBus \
-I$(QTDIR)/include/QtDesigner \
-I$(QTDIR)/include/QtDesignerComponents \
-I$(QTDIR)/include/QtHelp \
-I$(QTDIR)/include/QtOpenGL \
-I$(QTDIR)/include/QtSql \
-I$(QTDIR)/include/QtTest \
-I$(QTDIR)/include/QtUiPlugin \
-I$(QTDIR)/include/QtXml
include ../idaclang.mak
Linux Kernel
This section demonstrates how to build a type library from the Linux Kernel headers.
First you must ensure that you have the kernel headers installed on your system:
apt-get install linux-headers-`uname -r`
As well as the tools necessary to build against them:
apt-get install build-essential
The tricky part about building a TIL for the Linux kernel is configuring the correct include paths. The kernel header directory structure is not consistent between different distros, so there is no one configuration that works on all machines. We’ve found that the easiest way to discover the correct kernel header paths on your system is to build a trivial Linux kernel module, then copy the paths used within the kernel build system.
Consider examples/linux/lkm_example/lkm_example.c from examples.zip:
#include <linux/init.h>
#include <linux/module.h>
#include <linux/kernel.h>
MODULE_LICENSE("GPL");
MODULE_AUTHOR("Robert W. Oliver II");
MODULE_DESCRIPTION("A simple example Linux module.");
MODULE_VERSION("0.01");
static int __init lkm_example_init(void)
{
printk(KERN_INFO "Hello, world!\n");
return 0;
}
static void __exit lkm_example_exit(void)
{
printk(KERN_INFO "Goodbye, world\n");
}
module_init(lkm_example_init);
module_exit(lkm_example_exit);
This is a simple kernel module taken from this tutorial. It can be built with:
cd lkm_example/
make
After building, you may notice that the kernel build system added many hidden files to the build directory. One of them being .lkm_example.o.cmd. This file contains the gcc command used to compile the kernel module source file. It will contain many important compiler switches that we will need to copy over to idaclang, including the proper include paths:
-I./arch/x86/include -I./arch/x86/include/generated -I./include -I./arch/x86/include/uapi
These paths are relative to the directory:
/usr/src/linux-headers-$(uname -r)
We will need to copy them to idaclang as absolute paths. For example, consider examples/linux/linux_kernel_5_11.mak:
TIL_NAME = linux_kernel_5_11
TIL_DESC = "Linux kernel headers for 5.11.0-41-generic (Ubuntu 20.04)"
INPUT_FILE = linux.h
KERNEL_HEADERS = /usr/src/linux-headers-5.11.0-41-generic
CLANG_ARGV = -target x86_64-pc-linux-gnu \
-nostdinc \
-isystem /usr/lib/gcc/x86_64-linux-gnu/9/include \
-I$(KERNEL_HEADERS)/arch/x86/include \
-I$(KERNEL_HEADERS)/arch/x86/include/generated \
-I$(KERNEL_HEADERS)/include \
-I$(KERNEL_HEADERS)/arch/x86/include/uapi \
-I$(KERNEL_HEADERS)/arch/x86/include/generated/uapi \
-I$(KERNEL_HEADERS)/include/uapi \
-I$(KERNEL_HEADERS)/include/generated/uapi \
-include $(KERNEL_HEADERS)/include/linux/compiler_types.h \
-D__KERNEL__ \
-O2 \
-mfentry \
-DCC_USING_FENTRY \
-Wno-gnu-variable-sized-type-not-at-end
include ../idaclang.mak
This is a makefile we used to successfully generate a Linux kernel TIL on Ubuntu 20.04. The input file linux.h contains include directives for a few interesting kernel header files:
#include <linux/kconfig.h>
#include <linux/init.h>
#include <linux/module.h>
#include <linux/kernel.h>
#include <linux/acpi.h>
#include <linux/fs.h>
#include <linux/efi.h>
#include <linux/bpf.h>
#include <linux/usb.h>
#include <linux/kmod.h>
#include <linux/device.h>
#include <linux/blkdev.h>
It is not an exhaustive list. You can easily make the TIL more robust by adding more headers to linux.h, but for demonstration purposes this is enough to get the ball rolling.
Inspecting the dump of the til we can see some important kernel types have already been added:
struct kobject
{
const char *name;
list_head entry;
kobject *parent;
kset *kset;
kobj_type *ktype;
kernfs_node *sd;
kref kref;
unsigned __int32 state_initialized : 1;
unsigned __int32 state_in_sysfs : 1;
unsigned __int32 state_add_uevent_sent : 1;
unsigned __int32 state_remove_uevent_sent : 1;
unsigned __int32 uevent_suppress : 1;
};
struct kset
{
list_head list;
spinlock_t list_lock;
kobject kobj;
const kset_uevent_ops *uevent_ops;
};
On Debian Linux the configuration is slightly different. The kernel header package tends to be split across multiple root directories. We must let idaclang know about both of them. See examples/linux/linux_kernel_4_9.mak:
TIL_NAME = linux_kernel_4_9
TIL_DESC = "Linux kernel headers for 4.9.0-16-amd64 (Debian 9.13)"
INPUT_FILE = linux.h
KERNEL_HEADERS1 = /usr/src/linux-headers-4.9.0-16-common
KERNEL_HEADERS2 = /usr/src/linux-headers-4.9.0-16-amd64
CLANG_ARGV = -target x86_64-pc-linux-gnu \
-nostdinc \
-isystem /usr/lib/gcc/x86_64-linux-gnu/6/include \
-I$(KERNEL_HEADERS1)/arch/x86/include \
-I$(KERNEL_HEADERS1)/include \
-I$(KERNEL_HEADERS1)/arch/x86/include/uapi \
-I$(KERNEL_HEADERS1)/include/uapi \
-I$(KERNEL_HEADERS2)/arch/x86/include/generated/uapi \
-I$(KERNEL_HEADERS2)/arch/x86/include/generated \
-I$(KERNEL_HEADERS2)/include \
-I$(KERNEL_HEADERS2)/include/generated/uapi \
-D__KERNEL__ \
-O2 \
-mfentry \
-DCC_USING_FENTRY \
-Wno-gnu-variable-sized-type-not-at-end
include ../idaclang.mak
We used this makefile to generate a Linux kernel TIL on Debian 9.13. It should produce almost the same result as the Ubuntu example discussed above.
XNU Kernel
The XNU kernel for macOS and iOS relies heavily on C++ object-oriented development via the IOKit framework. The goal of this section is to create a type library for the XNU kernel, focusing specifically on the C++ type information in the IOKit headers.
Apple publishes the kernel SDK via Kernel.framework in the macOS SDK:
MacOSX12.0.sdk/System/Library/Frameworks/Kernel.framework
The IOKit C++ headers are usually present at:
MacOSX12.0.sdk/System/Library/Frameworks/Kernel.framework/Headers/IOKit
See examples/xnu/xnu.h in examples.zip, which includes some of the important header files from the IOKit/ directory. We’ll use this file to generate our type library.
Now consider examples/xnu/xnu_x64.mak:
TIL_NAME = xnu_x64
TIL_DESC = "Darwin Kernel Headers for x64 macOS"
INPUT_FILE = xnu.h
SDK = /Applications/Xcode.app/Contents/Developer/Platforms/MacOSX.platform/Developer/SDKs/MacOSX12.0.sdk
CLANG_ARGV = -target x86_64-apple-macos12.0 \
-x c++ \
-isysroot $(SDK) \
-I$(SDK)/System/Library/Frameworks/Kernel.framework/Headers \
-nostdinc \
-std=gnu++1z \
-stdlib=libc++ \
-mkernel \
-DKERNEL \
-DAPPLE \
-DNeXT
include ../idaclang.mak
We can use this makefile to generate an XNU TIL:
make -f xnu_x64.mak
Now let’s have a look at the OSMetaClassBase class in the text dump xnu_x64.til.txt:
00000008 struct __cppobj OSMetaClassBase
{
OSMetaClassBase_vtbl *__vftable /*VFT*/;
};
// 0. 0000 0008 effalign(8) fda=0 bits=0100 OSMetaClassBase.__vftable OSMetaClassBase_vtbl *;
// 0008 effalign(8) sda=0 bits=0080 OSMetaClassBase struct packalign=0
More specifically the OSMetaClassBase_vtbl type, which has some peculiar members at the end of it:
00000088 struct /*VFT*/ OSMetaClassBase_vtbl
{
...
void (__cdecl *_RESERVEDOSMetaClassBase4)(OSMetaClassBase *__hidden this);
void (__cdecl *_RESERVEDOSMetaClassBase5)(OSMetaClassBase *__hidden this);
void (__cdecl *_RESERVEDOSMetaClassBase6)(OSMetaClassBase *__hidden this);
void (__cdecl *_RESERVEDOSMetaClassBase7)(OSMetaClassBase *__hidden this);
}
Apple added several dummy virtual methods to this class so that they can add new methods without breaking binary compatibility. This is a common paradigm in the XNU kernel source, but we must be very careful with it. From the original source code in OSMetaClass.h, we can see that it is heavily platform dependent:
#if APPLE_KEXT_VTABLE_PADDING
// Virtual Padding
#if defined(__arm64__) || defined(__arm__)
virtual void _RESERVEDOSMetaClassBase0();
virtual void _RESERVEDOSMetaClassBase1();
virtual void _RESERVEDOSMetaClassBase2();
virtual void _RESERVEDOSMetaClassBase3();
#endif /* defined(__arm64__) || defined(__arm__) */
virtual void _RESERVEDOSMetaClassBase4();
virtual void _RESERVEDOSMetaClassBase5();
virtual void _RESERVEDOSMetaClassBase6();
virtual void _RESERVEDOSMetaClassBase7();
#endif /* APPLE_KEXT_VTABLE_PADDING */
Note that the APPLE_KEXT_VTABLE_PADDING macro is not defined for iOS builds. The iOS kernel does not pad its vtables in order to conserve memory, so these extra vtable members will only be present for macOS builds. Moreover, from the above source we can see that arm64 macOS uses more vtable padding than on x64.
Why is this a big deal? Because almost every single important C++ class in IOKit inherits from OSMetaClassBase. Thus if the vtable type for OSMetaClassBase is not 100% correct, all of our vtable types will be useless. We have no choice but to build separate TILs for each of x64 macOS, arm64 macOS, and iOS, to ensure that we’re working with precise vtables.
See examples/xnu/xnu_m1.mak, which builds the XNU TIL for arm64 macOS:
TIL_NAME = xnu_m1
TIL_DESC = "Darwin Kernel Headers for arm64 macOS"
INPUT_FILE = xnu.h
SDK = /Applications/Xcode.app/Contents/Developer/Platforms/MacOSX.platform/Developer/SDKs/MacOSX12.0.sdk
CLANG_ARGV = -target arm64e-apple-macos12.0 \
-x c++ \
-isysroot $(SDK) \
-I$(SDK)/System/Library/Frameworks/Kernel.framework/Headers \
-nostdinc \
-std=gnu++1z \
-stdlib=libc++ \
-mkernel \
-DKERNEL \
-DAPPLE \
-DNeXT
include ../idaclang.mak
From the text dump we can see that OSMetaClassBase_vtbl is a bit larger, as expected:
000000A8 struct /*VFT*/ OSMetaClassBase_vtbl
{
...
void (__cdecl *_RESERVEDOSMetaClassBase0)(OSMetaClassBase *__hidden this);
void (__cdecl *_RESERVEDOSMetaClassBase1)(OSMetaClassBase *__hidden this);
void (__cdecl *_RESERVEDOSMetaClassBase2)(OSMetaClassBase *__hidden this);
void (__cdecl *_RESERVEDOSMetaClassBase3)(OSMetaClassBase *__hidden this);
void (__cdecl *_RESERVEDOSMetaClassBase4)(OSMetaClassBase *__hidden this);
void (__cdecl *_RESERVEDOSMetaClassBase5)(OSMetaClassBase *__hidden this);
void (__cdecl *_RESERVEDOSMetaClassBase6)(OSMetaClassBase *__hidden this);
void (__cdecl *_RESERVEDOSMetaClassBase7)(OSMetaClassBase *__hidden this);
}
To build the TIL for iOS, use xnu_ios.mak:
TIL_NAME = xnu_ios
TIL_DESC = "Darwin Kernel Headers for arm64e iOS"
INPUT_FILE = xnu.h
SDK = /Applications/Xcode.app/Contents/Developer/Platforms/MacOSX.platform/Developer/SDKs/MacOSX12.0.sdk
CLANG_ARGV = -target arm64e-apple-ios15-macabi \
-x c++ \
-isysroot $(SDK) \
-I$(SDK)/System/Library/Frameworks/Kernel.framework/Headers \
-nostdinc \
-std=gnu++1z \
-stdlib=libc++ \
-mkernel \
-DKERNEL \
-DAPPLE \
-DNeXT
include ../idaclang.mak
Which yields smaller vtables without any padding, as expected:
00000068 struct /*VFT*/ OSMetaClassBase_vtbl
Hopefully this section demonstrates how easy it is to get in trouble when building type libraries from C++ source, and how the precision of idaclang can help deal with it.
MFC
The makefile examples/mfc/mfc.mak from examples.zip demonstrates how to build a type library for the Microsoft Foundation Class Library (MFC) on Windows:
TIL_NAME = mfc
TIL_DESC = "Microsoft Foundation Class library for x86"
INPUT_FILE = mfc.h
CLANG_ARGV = -x c++ -target i386-pc-win32
include ../idaclang.mak
This makefile instructs idaclang to parse examples/mfc/mfc.h, which contains some essential MFC headers:
#include <afxwin.h> // MFC core and standard components
#include <afxext.h> // MFC extensions
#include <afxdisp.h> // MFC OLE automation classes
#include <afxcmn.h> // MFC support for Windows Common Controls
#include <atlbase.h>
#include <atlcom.h>
This is enough to generate a solid type library for MFC. You can build it with:
make -f mfc.mak
From the dump of the til in mfc.til.txt, it appears some essential types are successfully created:
00000004 #pragma pack(push, 8)
struct __cppobj CObject
{
CObject_vtbl *__vftable /*VFT*/;
};
#pragma pack(pop)
// 0. 0000 0004 effalign(4) fda=0 bits=0100 CObject.__vftable CObject_vtbl *;
// 0004 effalign(4) sda=0 bits=0080 CObject struct packalign=4
00000014 #pragma pack(push, 8)
struct __cppobj CFile : CObject
{
HANDLE m_hFile;
BOOL m_bCloseOnDelete;
CString m_strFileName;
ATL::CAtlTransactionManager *m_pTM;
};
#pragma pack(pop)
// 0. 0000 0004 effalign(4) fda=0 bits=0020 CFile.CObject CObject;
// 1. 0004 0004 effalign(4) fda=0 bits=0000 CFile.m_hFile HANDLE;
// 2. 0008 0004 effalign(4) fda=0 bits=0000 CFile.m_bCloseOnDelete BOOL;
// 3. 000C 0004 effalign(4) fda=0 bits=0000 CFile.m_strFileName CString;
// 4. 0010 0004 effalign(4) fda=0 bits=0000 CFile.m_pTM ATL::CAtlTransactionManager *;
// 0014 effalign(4) sda=0 bits=0080 CFile struct packalign=4
There are many more headers that could be included in the build, so don’t hesitate to add more headers to mfc.h if you think they might contain relevant types.
macOS/iOS SDK
One advantage of using libclang is that we can parse the complex Objective-C syntax used in macOS and iOS Frameworks. Thus we can create type libraries from Apple’s SDKs without much issue.
See examples/macsdk/macos12_sdk.mak in examples.zip, which creates a TIL from the macOS12 SDK:
TIL_NAME = macos12_sdk
TIL_DESC = "MacOSX12.0.sdk headers for x64"
INPUT_FILE = macos12_sdk.h
SDK = /Applications/Xcode.app/Contents/Developer/Platforms/MacOSX.platform/Developer/SDKs/MacOSX12.0.sdk
TOOLCHAIN = /Applications/Xcode.app/Contents/Developer/Toolchains/XcodeDefault.xctoolchain
CLANG_ARGV = -target x86_64-apple-darwin \
-x objective-c++ \
-isysroot $(SDK) \
-I$(TOOLCHAIN)/usr/lib/clang/13.0.0/include
include ../idaclang.mak
The input file used here is examples/macsdk/macos12_sdk.h, which simply includes the umbrella header from every Framework present in the SDK:
#include <CoreFoundation/CoreFoundation.h>
#include <CoreServices/CoreServices.h>
#include <CoreText/CoreText.h>
// ... etc
#include <WidgetKit/WidgetKit.h>
#include <SystemExtensions/SystemExtensions.h>
#include <Virtualization/Virtualization.h>
The Frameworks that have an umbrella header can be easily identified by their module.modulemap file. For example:
$ cat MacOSX12.0.sdk/System/Library/Frameworks/Network.framework/Modules/module.modulemap
framework module Network [system] [extern_c] {
umbrella header "Network.h"
export *
}
Some Frameworks don’t have an umbrella header and they were left out, but this still gives us plenty of useful type info. From macos12_sdk.til.txt we can see that many Objective-C types were successfully parsed:
00000030 struct NSCalendarDate
{
NSDate super;
NSUInteger refCount;
NSTimeInterval _timeIntervalSinceReferenceDate;
NSTimeZone *_timeZone;
NSString *_formatString;
void *_reserved;
};
// 0. 0000 0008 effalign(8) fda=0 bits=0000 NSCalendarDate.super NSDate;
// 1. 0008 0008 effalign(8) fda=0 bits=0000 NSCalendarDate.refCount NSUInteger;
// 2. 0010 0008 effalign(8) fda=0 bits=0000 NSCalendarDate._timeIntervalSinceReferenceDate NSTimeInterval;
// 3. 0018 0008 effalign(8) fda=0 bits=0000 NSCalendarDate._timeZone NSTimeZone *;
// 4. 0020 0008 effalign(8) fda=0 bits=0000 NSCalendarDate._formatString NSString *;
// 5. 0028 0008 effalign(8) fda=0 bits=0000 NSCalendarDate._reserved void *;
// 0030 effalign(8) sda=0 bits=0000 NSCalendarDate struct packalign=0
Also the prototypes for many Objective-C methods were added to the symbol table:
NWHostEndpoint *__cdecl +[NWHostEndpoint endpointWithHostname:port:](id, SEL, NSString *hostname, NSString *port);
Having such detailed and accurate prototypes for Objective-C Frameworks is particularly useful when analyzing dyld_shared_cache files. The type information parsed in the source headers is much more detailed than the Objective-C type information embedded in the module binaries.
Note that you can build the same TIL for Apple Silicon by simply changing the -target argument to:
-target arm64-apple-darwin
Building a TIL for the iPhoneOS.sdk is just as easy. See ios15_sdk.mak and ios15_sdk.h:
TIL_NAME = ios15_sdk
TIL_DESC = "iPhoneOS15.0.sdk headers for arm64"
INPUT_FILE = ios15_sdk.h
SDK = /Applications/Xcode.app/Contents/Developer/Platforms/iPhoneOS.platform/Developer/SDKs/iPhoneOS15.0.sdk
TOOLCHAIN = /Applications/Xcode.app/Contents/Developer/Toolchains/XcodeDefault.xctoolchain
CLANG_ARGV = -target arm64-apple-darwin \
-x objective-c++ \
-isysroot $(SDK) \
-I$(TOOLCHAIN)/usr/lib/clang/13.0.0/include
include ../idaclang.mak
TILIB
TILIB is a utility to create custom type libraries for IDA Pro. Since IDA 9.1, TILIB is shipped with IDA, in the tools folder within the main IDA installation directory.
This small utility creates type library (til) files for IDA Pro. Its functionality overlaps with “Parse C header file…” from IDA Pro. However, this utility is easier to use and provides more control over the output. Also, it can handle the preprocessor symbols, while the built-in command ignores them.
The utility takes a C header file and extracts all type information from it. The extracted type information is stored in an internal format as a type library file. Type library files can be loaded and used in IDA Pro by opening the Type Library Window and pressing Insert.
TILIB support only C header files. C++ files (classes, templates, etc) are not supported, but some popular C++ keywords are recognized and properly handled. For example, TILIB knows about the inline keyword and properly skips the definition of the inline function.
Installation
- Just copy the tilib executable file into the IDA Pro directory.
If you prefer to keep it in another directory, you will need to specify the location of the ida.hlp file using the NLSPATH variable:
set NLSPATH=c:\program files\ida
Please note that you do not need to define this variable if you just copy the tilib executable file to the IDA Pro directory.
Usage
If started without parameters, the utility displays a short explanation. Below are some command line samples.
Parse a header file and create a new type library:
tilib -c -hinput_header_file output_til_file
-cmeans to create a new type library-hdenotes the name of the input file to read
If you need to parse multiple files into one type library, you may create a text file with #include directives and specify it as the input.
TILIB can handle input files for Visual Studio, Borland, GCC out of the box. Please check the configuration files for them in the archive (*.cfg).
If you need to fine-tune TILIB for another compiler (or unusual compiler settings), feel free to copy the provided configuration files and modify them.
TILIB is not very good at error handling and some error messages may be quite
unhelpful (e.g. syntax error). To alleviate this problem, use the -z switch.
If this switch is specified, TILIB will create a .i file with the preprocessed
contents. All recognized type names are prepended with @, like this: @my_type_name.
In some urgent cases, the -e switch may be used to ignore any parsing errors.
Please note that the problematic type definitions will be skipped in this mode.
This switch may be used together with the -R switch to allow type redeclarations.
If your input file uses another header file (e.g. windows.h), you may opt to use
the vc6win.til file instead of parsing it again. For that, just use the -b switch
and specify vc6win.til as the base til. TILIB will load the contents of the
specified file into the memory and parse the input file. All definitions from
windows.h, including the preprocessor definitions, will be avaible:
tilib -c -hinput_header_file -bbase_til_file output_til_file
TILIB can also be used to list the contents of a til file:
tilib -l input_til_file
If the -c switch is not specified, TILIB uses the specified til file as the input
and as the output file. This mode allows you to modify existing til files.
How to create preprocessor macro enums?
TILIB can also convert selected preprocessor macros into enums. If the input file has lines like the following:
#define MY_SYMBOL_ONE 1
#define MY_SYMBOL_TWO 2
#define MY_SYMBOL_THREE 3
they can be converted to enum and used in IDA Pro. This is a three step process.
At the first step, we create a .mac file (note the -M switch):
tilib -c -Moutput_mac_file -hinput_header_file output_til_file
The second step is to edit the generated MAC file: to remove undesired macro definitions and regroup macros if necessary. Macro group names start at the beginning of a line, symbol definitions are indented:
MY_SYMBOL
MY_SYMBOL_ONE 1
MY_SYMBOL_TWO 2
MY_SYMBOL_THREE 3
Feel free to edit the macro file to your taste.
It is also possible to describe the changes to the macro group names and rerun TILIB to regenerate the macro file. There are two ways to describe the changes:
-
Through the -g[nb]X:Y command-line options. If the regex X matches the macro name (n) or the macro body (b), the group is set to Y. For example:
tilib -gnFOO_:ERRORS -gbERR:ERRORS -c -Moutput_mac_file -hinput_header_file output_til_filewith this header file:
#define ERR(x) x #define FOO_OK 0 #define FOO_BAD 1 #define BAR_BAD ERR(-1)produces this macro file:
ERRORS FOO_OK 0 FOO_BAD 1 BAR_BAD -1Using an empty regex will prevent the group from being created (useful when you want to leave a group name available from a base til).
-
Adding a tilib-specific #pragma to the header files:
#pragma tilib-group ERRNO // all macros before resetting tilib-group will be added to the ERRNO group #include <errno.h> #pragma tilib-group -
The third and last step is to specify the macro file as the input for TILIB:
tilib -c -minput_mac_file -hinput_header_file output_til_file
The generated til file will have all normal type definitions and all macro definitions from the .mac file.
List of supported keywords
Below is the list of supported keywords. If your header files happen to have an unsupported keyword, you take one of the following actions:
- edit the input files and remove the unsupported keywords
- use #define to replace or hide the unsupported keywords
- use the -D command line switch for the same purpose
__cdecl do goto return protected __ptr32
__pascal if long signed __unaligned __ptr64
__stdcall _es cpp_this sizeof __userpurge __restrict
__fastcall _cs void static _BYTE __hidden
__thiscall _ss break struct _WORD __array_ptr
__usercall _ds catch switch _DWORD __struct_ptr
__export asm class default _QWORD __return_ptr
__import for const mutable _OWORD
__thread int float private _TBYTE
__declspec new short typedef _UNKNOWN
__far try throw virtual _BOOL1
__near auto union continue _BOOL2
__huge bool while register _BOOL4
__int8 case double template __spoils
__int16 char extern unsigned __attribute__
__int32 else friend volatile __pure
__int64 enum inline interrupt __noreturn
__int128 flat public namespace __cppobj
What’s next?
Learn more about TILIB utility and check Igor’s tip of the week about creating custom libraries.
Configuration
Configuration files
The configuration files are searched first in %IDADIR%\cfg, then in %IDAUSR%\cfg.
See documentation about the IDAUSR environment variable.
In the configuration files, you can use C,C++ style comments and include files. If no file is found, IDA uses default values. IDA uses the following configuration files:
- IDA.CFG - general config file
- IDAGUI.CFG - graphics mode interface config file
- IDAPYTHON.CFG - configuration file for IDAPython
{% hint style=“info” %}
The IDA text UI and its configuration file (IDATUI.CFG) were removed starting with IDA 9.2.
{% endhint %}
Command line switches
IDA recognizes the following command line switches:
| Switch | Effect |
|---|---|
-a | disable auto analysis. (-a- enables it) |
-A | autonomous mode. IDA will not display dialog boxes. Designed to be used together with -S switch. |
-b#### | loading address, a hexadecimal number, in paragraphs (a paragraph is 16 bytes) |
-B | batch mode. IDA will generate .IDB and .ASM files automatically |
-c | disassemble a new file (delete the old database) |
-C#### | set compiler in format name:abi |
-ddirective | A configuration directive which must be processed at the first pass. Example: -dVPAGESIZE=8192 |
-Ddirective | A configuration directive which must be processed at the second pass. |
-f | disable FPP instructions (IBM PC only) |
-h | help screen -i#### program entry point (hex) |
-I# | set IDA as just-in-time debugger (0 to disable and 1 to enable) |
-L#### | name of the log file |
-M | disable mouse (text only) |
-O#### | options to pass to plugins. This switch is not available in the IDA Home edition. |
-o#### | specify the output database (implies -c) |
-p#### | processor type |
-P+ | compress database (create zipped idb) |
-P | pack database (create unzipped idb) |
-P- | do not pack database (not recommended, see the Abort command) |
-r### | immediately run the built-in debugger format of this switch is explained here |
-R | load MS Windows exe file resources |
-S### | Execute a script file when the database is opened |
-T### | interpret the input file as the specified file type The file type is specified as a prefix of a file type visible in the ‘load file’ dialog box To specify archive member put it after the colon char, for example: |
-TZIP: | classes.dex You can specify any nested paths: |
-T| <ftype>[:<member>{:<ftype>:<member>}[:<ftype>]] IDA does not display the “Load file” dialog in this case | |
-t | create an empty database. |
-W### | specify MS Windows directory |
-x | do not create segmentation (used in pair with Dump database command) this switch affects EXE and COM format files only. |
-z | turn on debugging |
-? | this screen (works for the text version) |
? | this screen (works for the text version) |
-h | this screen (works for the text version) |
-H | this screen (works for the text version) |
--help | this screen (works for the text version) |
Debugging flags
The following bitfield can be used with the -z directive:
00000001 drefs
00000002 offsets
00000004 flirt
00000008 idp module
00000010 ldr module
00000020 plugin module
00000040 ids files
00000080 config file
00000100 check heap
00000200 licensing
00000400 demangler
00000800 queue
00001000 rollback
00002000 already data or code
00004000 type system
00008000 show all notifications
00010000 debugger
00020000 [dbg\_appcall](1572.md)
00040000 source-level debugger
00080000 accessibility
00100000 network
00200000 full stack analysis (simplex method)
00400000 handling of debug info (e.g. pdb, dwarf)
00800000 lumin
Batch mode
It is possible to run IDA in so-called “batch mode”, using the following the -B switch:
ida -B input-file
which is equivalent to:
ida -c -A -Sanalysis.idc input-file
(For more information, please see the analysis.idc file in the IDC subdirectory.)
A couple notes:
- regular plugins are not automatically loaded in batch mode because the
analysis.idcfile quits and the kernel has no chance to load them. - Although the GUI version of IDA is perfectly of running batch scripts, we recommend using the “idalib” Python module for this task as it uses fewer system resources.
Executing a script
The script file extension (.idc, .py) is used to determine which interpreter will be used to run the script.
It is possible to pass command line arguments after the script name. For example: -S"myscript.py argument1 \\"argument 2\\" argument3"
The passed parameters are stored in the “ARGV” global IDC variable, which means:
- For IDC scripts:
- Use
ARGV.countto determine the number of arguments. - The first argument,
ARGV[0], contains the script name.
- Use
- For Python scripts:
- you can import the
idccompatibility layer (import idc), and then - access the
idc.ARGVarray
- you can import the
NOTE: The -S switch is not available in the IDA Home edition.
UI/Fonts/Themes
Coming soon!
Shortcuts
This doc provide a quick references to common default shortcuts to streamline your workflow in IDA. You can configure and customize shortcuts via Options → Shortcuts….
Navigation
| Action | Shortcut |
|---|---|
| Jump to Operand | Enter |
| Jump in a New Window | Alt+Enter |
| Jump to Previous Position | Esc |
| Jump to Next Position | Ctrl+Enter |
| Jump to Address | G |
| Jump by Name | Ctrl+L |
| Jump to Function | Ctrl+P |
| Open Cross-References Window | X |
| View Pseudocode | Tab |
| Jump to Segment | Ctrl+S |
| Jump to Segment Register | Ctrl+G |
| Jump to Problem | Q |
| Jump to Entry Point | Ctrl+E |
Bookmarks
| Action | Shortcut |
|---|---|
| Mark Position | Alt+M |
| Jump to Bookmark | Ctrl+M |
| Open Bookmarks Window | Ctrl+Shift+M |
Search
| Action | Shortcut |
|---|---|
| Search Text | Alt+T |
| Search Next Text | Ctrl+T |
| Search Sequence of Bytes | Alt+B |
| Search Immediate Value | Alt+I |
| Search Next Immediate Value | Ctrl+I |
| Search Next Code | Alt+C |
| Search Next Data | Ctrl+D |
Debugging
| Action | Shortcut |
|---|---|
| Add Breakpoint | F2 |
| Start Process | F9 |
| Terminate Process | Ctrl+F2 |
| Step Into | F7 |
| Step Over | F8 |
| Run Until Return | Ctrl+F7 |
| Breakpoint List | Ctrl+Alt+B |
| View Stack Trace | Ctrl+Alt+S |
Operands
| Action | Shortcut |
|---|---|
| Change to Hexadecimal | Q |
| Change to Decimal | H |
| Change to Binary | B |
| Change to Character | R |
| Change Enum Member | Ctrl+O |
| Change to Offset (data segment) | O |
| Change to Offset (in any segment) | Alt+R |
| Change to Offset (user-defined) | Ctrl+R |
| Select Union Member | T |
| Change to Stack Variable | K |
| Bitwise Negate | ~ |
| Change Sign | _ |
Function Management
| Action | Shortcut |
|---|---|
| Create Function | P |
| Edit Function | Alt+P |
| Set Function End | E |
| Edit Stack Variables | Ctrl+K |
| Set Type | Y |
| Open Stack Variables Window | Ctrl+K |
Annotate
| Action | Shortcut |
|---|---|
| Annotate (Rename) | N |
| Enter Repeatable Comment | ; |
| Enter Comment | : |
| Insert Line Before | Ins |
| Insert Line After | Shift+Ins |
| Enter Anterior Lines | Alt+Q |
| Enter Posterior Lines | Alt+A |
Open Subviews
| Subview | Shortcut |
|---|---|
| Local Types | Shift+F1 |
| Functions | Shift+F3 |
| Names | Shift+F4 |
| Signatures | Shift+F5 |
| Segments | Shift+F7 |
| Segment Registers | Shift+F8 |
| Structures | Shift+F9 |
| Type Libraries | Shift+F11 |
| Strings | Shift+F12 |
Miscellaneous
| Action | Shortcut |
|---|---|
| Undo | Ctrl+Z |
| Redo | Ctrl+Shift+Z |
| Begin Selection | Alt+L |
| Open Calculator | ? |
| Save | Ctrl+S |
| Exit | Alt+X |
Get the handy shortcuts cheatsheet
You can download the cheatsheet here: {% file src=“assets/ida_cheatsheet.pdf” %}
Customizing IDA
IDA offers a MDI tabbed interface. Here are a few tips to customize it.
{% file src=“assets/customize.pdf” %}
CSS-based styling Tutorial
Before IDA 7.3
IDA used to store colors in the registry:
HKEY_CURRENT_USER\Software\Hex-Rays\IDAon Windows,~/.idapro/ida.regon Linux & Mac OSX.
This was somewhat inconvenient because color values were stored in binary format, and hard to move from computer to computer.
In addition, this only lets users style a small subset of the widgets that compose IDA, which can be insufficient.
IDA 7.3: CSS-based styling
Since we had to introduce yet another set of new colors in 7.3, we took the opportunity to moved away from the registry-stored, binary-only approach, to a CSS-based approach.
This gives us the following advantages:
- CSS is a well-known format
- CSS is human-readable
- Qt understands CSS out-of-the-box (parts of it, at least)
- Using CSS will therefore let us style not only the custom IDA widgets, but all widgets
This last point is important, because many users have been asking for the ability to style IDA more thoroughly, rather than just styling a few custom widgets (such as the disassembly views, navigation band, …)
How IDA 7.3 CSS-based styling works
IDA 7.3 ships with 2 themes by default:
- default
- dark
Those themes are located in $IDA_INSTALL/themes/:
aundro@flatiron:~/IDA-7.3$ tree themes/
themes/
├── _base
│ └── theme.css
├── dark
│ ├── icons
│ │ ├── expand.png
│ │ └── spacer.png
│ └── theme.css
└── default
└── theme.css
4 directories, 5 files
aundro@flatiron:~/IDA-7.3$
Notice that, in addition to dark and default directories, you can also spot an additional _base directory.
The _base theme holds all the CSS directives that are required for IDA to work correctly, and therefore it must be “imported” by other themes (using the IDA-specific @importtheme directive) before any other styling directives are declared.
For example, here are the first 3 lines of $IDA_RELEASE/themes/dark/theme.css:
aundro@flatiron:~/IDA-7.3$ head -n 3 themes/default/theme.css
@importtheme "_base";
aundro@flatiron:~/IDA-7.3$
What happens when colors are modified through the “Colors” dialog?
When you change colors in the ‘Colors’ dialog, IDA will not modify the files that are present in $IDA_INSTALL/themes/.
Instead, IDA will create a file in IDA’s user directory, holding what we will refer to as “user overrides”.
Let’s assume the user:
- switched to the
darktheme, - modified the
Instructiontext color to red. - clicked ‘OK’
IDA will then have created the file:
~/.idapro/themes/dark/user.css%APPDATA%\Hex-Rays\IDA Pro\themes\dark\user.csson Windows
with the following contents:
aundro@flatiron:~/.idapro$ tree themes
themes
└── dark
└── user.css
1 directory, 1 file
aundro@flatiron:~/.idapro$
aundro@flatiron:~/.idapro$ cat themes/dark/user.css
/* NOTE: This is an autogenerated file; please do not edit. */
CustomIDAMemo
{
qproperty-line-fg-insn: red;
}
aundro@flatiron:~/.idapro$
In other words, the themes that are shipped with IDA are never modified, but instead a “user override” file is created, that will contain whatever customization the user made to the theme.
Importing/Exporting themes customization
IDA 7.3 removed the Import/Export feature from its Colors dialog, because an equivalent is already automatically present in the form of those “user overrides” files, which can be found in:
%APPDATA%\Hex-Rays\IDA Pro\themes\*\user.csson Windows,~/.idapro/themes/*/user.csson Linux and Mac OSX.
In order to re-use customizations across different computers, it is enough to just copy those user.css file(s).
Debugging style sheets lookup
In case IDA misbehaves, and appears to ignore some styling directives, it’s possible to launch IDA with the following command-line flag to debug themes loading: ida -z1000000
In IDA’s Output window, you should spot something along the lines of this:
Themes: Trying file "/home/aundro/IDA-7.3/themes/dark/theme.css" ... found.
Themes: Trying file "/home/aundro/.idapro/themes/dark/theme.css" ... not found.
Themes: Found @importtheme (/home/aundro/IDA-7.3/themes/dark/theme.css:6)
Themes: Trying file "/home/aundro/IDA-7.3/themes/_base/theme.css" ... found.
Themes: Trying file "/home/aundro/.idapro/themes/_base/theme.css" ... not found.
Themes: Trying file "/home/aundro/IDA-7.3/themes/dark/user.css" ... not found.
Themes: Trying file "/home/aundro/.idapro/themes/dark/user.css" ... found.
First of all, IDA tries to load the desired (dark) theme contents (that corresponds to the first 5 lines):
- IDA looked for
$IDA_INSTALL/themes/dark/theme.css, and found it - IDA also looked for
~/.idapro/themes/dark/theme.css! (we’ll discuss this in the following chapter) - IDA spotted that the
darktheme imports the_basetheme, and loaded contents from that one as well.
Then, IDA tries to load user overrides for the dark theme (corresponds to the 2 final lines):
- IDA looked for
$IDA_INSTALL/themes/dark/user.css, but didn’t find it (this is, in fact, pretty much unnecessary, since user overrides should never be in IDA’s installation directory. We’ll eventually get rid of this.) - IDA looked for in
~/.idapro/themes/dark/user.css, and found it.
Adding themes
As was mentioned in the previous chapter, IDA also looks for themes contents in IDA’s user directory:
%APPDATA%\Hex-Rays\IDA Pro\themeson Windows,~/.idapro/themeson Linux & Mac OSX
That means it’s possible to add your own themes there, without having to modify the (possibly read-only) $IDA_INSTALL directory.
In addition, putting additional themes in IDA’s user directory means that new version of IDA will be able to pick them up automatically.
Example new theme
Let’s say you want to create a new theme, called blue.
You should therefore create the following CSS file:
~/.idapro/themes/blue/theme.css
…in which you can override anything you want, after importing the _base theme.
For example:
aundro@flatiron:~/.idapro$ cat themes/blue/theme.css
@importtheme "_base";
QWidget
{
background-color: lightblue;
}
CustomIDAMemo
{
qproperty-line-fg-regular-comment: red;
[...snipped...]
}
aundro@flatiron:~/.idapro$
You can then ship that ~/.idapro/themes/blue/theme.css file to other users, and any personal modifications they make to it, will be stored in ~/.idapro/themes/blue/user.css, leaving your original blue theme untouched.
What can be styled, and how?
Conceptually, IDA’s CSS styling can be “split” into 2 categories:
- Core Qt widgets styling
- IDA custom widgets styling
1) Core Qt widgets styling
In order to know what, and how to style Qt widgets, the best is to have a look at the references:
2) IDA custom widgets styling
IDA’s main stylable custom widgets have the following class names:
- CustomIDAMemo
- TextArrows
- MainMsgList
- TCpuRegs
- navband_t
You can find the entire set of properties supported by those, by looking at the contents of:
$IDA_INSTALL/themes/_base/theme.css$IDA_INSTALL/themes/default/theme.css
A note about the “.clr” file format
In order to re-use color schemes with IDA < 7.3, users had to export, and then import them using .clr files.
It’s worth pointing out that colors in those files, are in the form "BBGGRR", while CSS expects "#RRGGBB", so you will need to pay attention to that when porting colors from a .clr file.
Alternatively, you can use the following script, which might help get most of the job done.
{% file src=“../.gitbook/assets/port_clr72_to_css.py” %} Download a script {% endfile %}
A note about the dark theme
Note that even though IDA ships with a ‘dark’ theme, the version of Qt we use still doesn’t support OS-induced theme switches, and therefore IDA won’t automatically switch to it; the user will still have to change it manually.
Restrictions
Qt is mostly stylable using CSS, but it has a few restrictions:
- Styling of URLs in
QLabelinstances is not supported (see this question) - In tabular views (e.g., the
Functions windowwidget), we added the ability to highlight the portions of text that match the “quick filter” query (which can be opened usingCtrl+F). Unfortunately, the code we added to do that, will simply not be called for items in those views to which CSS directives apply. This is the case for e.g., “selected” items, in thedarkmode. We will try and solve this in the future, but currently don’t have a fix.
Teams
Diffing and Merging Databases with IDA Teams
Overview
IDA 8.0 introduces IDA Teams - a mechanism that provides revision control for your IDA database files. Perhaps the most essential feature of this new product is the ability to natively diff and merge databases using IDA, allowing multiple reverse engineers to manage work on the same IDA database.
This document discusses in detail the steps involved when diffing and merging IDA databases.
Before continuing, you might want to take a quick look at the tutorial for HVUI, the GUI client for IDA Teams’ revision control functionality. It will be referenced multiple times in this document, although here we will focus specifically on the merging functionality.
Inspecting changes
After having done some reverse-engineering work on an IDA database, it is possible to view those changes in a special mode in IDA: right-click, and choose the diff action:

Here a new instance of IDA will be launched in a special “diff” mode:
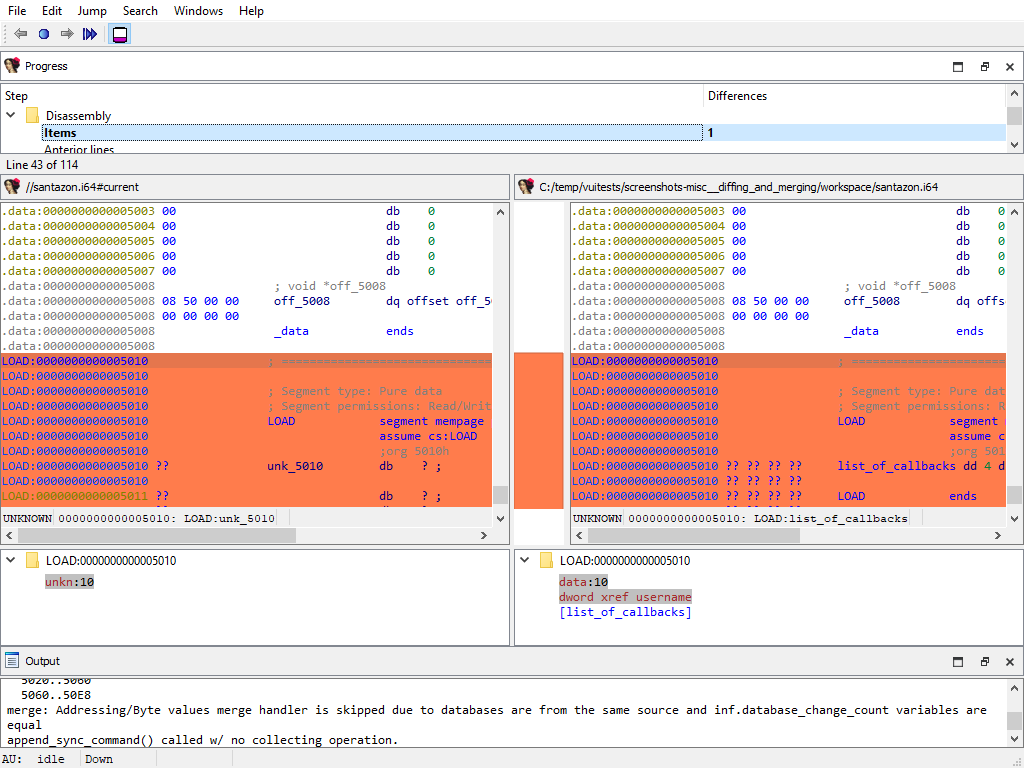
IDA’s diff mode
This new IDA mode lets the user compare two databases, in a traditional “diff” fashion: essentially a two-panel window, showing the unmodified file on the left and the version with your changes on the right.
The “Progress” widget

Represents the current step in the diff process.
The left panel

Shows the “untouched” version of the database (i.e., the one without your changes)
The right panel
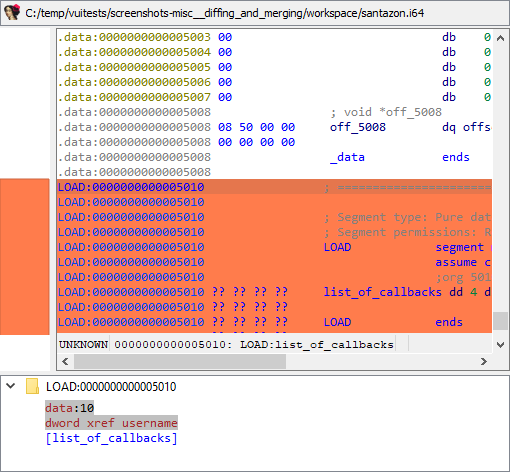
Shows your version of the database (i.e., featuring your changes)
Diff region details

Notice how both panels have a little area at the bottom, that is labeled “Details”.
Details are available on certain steps of the diffing process, and provide additional information about the change that is currently displayed.
The “diffing” toolbar

The actions in the toolbar are:
Using actions in the toolbar, you can now iterate through the differences between the two databases, with each change shown in context as if viewed through a normal IDA window.
The ability to view changes in context was a major factor in the decision to use IDA itself as the diffing/merging tool for IDA Teams.
Diff mode IDA’s toolbar actions
Previous chunk
Move to the previous change
Center chunk
Re-center the panels to show the current chunk (useful if you navigated around to get more context)
Next chunk
Move to the next change
Proceed to the next step
Move to the next step in the diffing process.
Toggle ‘Details’
Toggle the visibility of the “Details” widgets in the various panels (note that some steps do not provide details, so even if the “Details” are requested, they might not be currently visible.)
Terminology
It is important to note the difference between the terms “diff” and “merge”.
This document will sometimes use the two terms interchangeably. This is because to IDA, a diff is just a specialized merge. Both diffing and merging are handled by IDA’s “merge mode”, which involves up to 3 databases, one of which can be modified to contain the result of the merge.
A diff is simply a merge operation that involves only 2 databases, neither of which are modified.
This is why often times you will see the term “merge” used in the context of a diff. In this case “merge” is referring to IDA’s “merge mode”, rather than the process of merging multiple databases together into a combined database.
Using IDA as a diffing tool
We must stress the fact that performing a merge between two IDA databases is quite different than performing a merge between, say, two text files. A change in a chunk of text file will not have an impact over another chunk.
IDA databases are not so simple. A change in one place in an idb will often have an impact on another place. For example, if a structure mystruct changed between two databases, it will have an impact not only on the name of the structure, but on cross-references to structure members, function prototypes, etc.
This is why IDA’s merge mode is split into a strict series of “steps”:

Within a single step it is possible to go forward & backward between different chunks. But because of possible inter-dependencies between steps, it is not possible to move backwards between steps, you can only go forward:

Since IDA’s diff mode is just a variation of its merge mode, diffing databases is also subject to this sequential application of steps in order to view certain bits of information. That is why, in some steps (e.g., the “Disassembly/Items”) IDA might not report some changes that were performed at another level.
For instance, if a user marked a function as noret, the listings that will be shown in “Disassembly/Items” step, will not advertise that there was a change at that place (even though the "Attributes: noreturn" is visible in the left-hand listing), only the changes to the instructions (and data, …) are visible in the current step:

The change will, however, be visible at a later step (i.e., “Functions/Registry”):

The changes applied during the “diff” process are only temporary. Exiting IDA (at any moment) will not alter the files being compared.
Merging concurrent modifications (conflicts)
As with any collaborative tool, it may happen that two coworkers work on the same dataset (e.g., IDA database), and make modifications to the same areas, resulting in “conflicts”. Conflicts must be “resolved” prior to committing.

To do that, right-click and pick one of the “resolve” options:

IDA Teams provides the following merge strategies.
Interactive merging
If the option that was chosen (e.g., Interactive merge mode) requires user interaction due to conflicts, IDA will show in 3-pane “merge” mode.
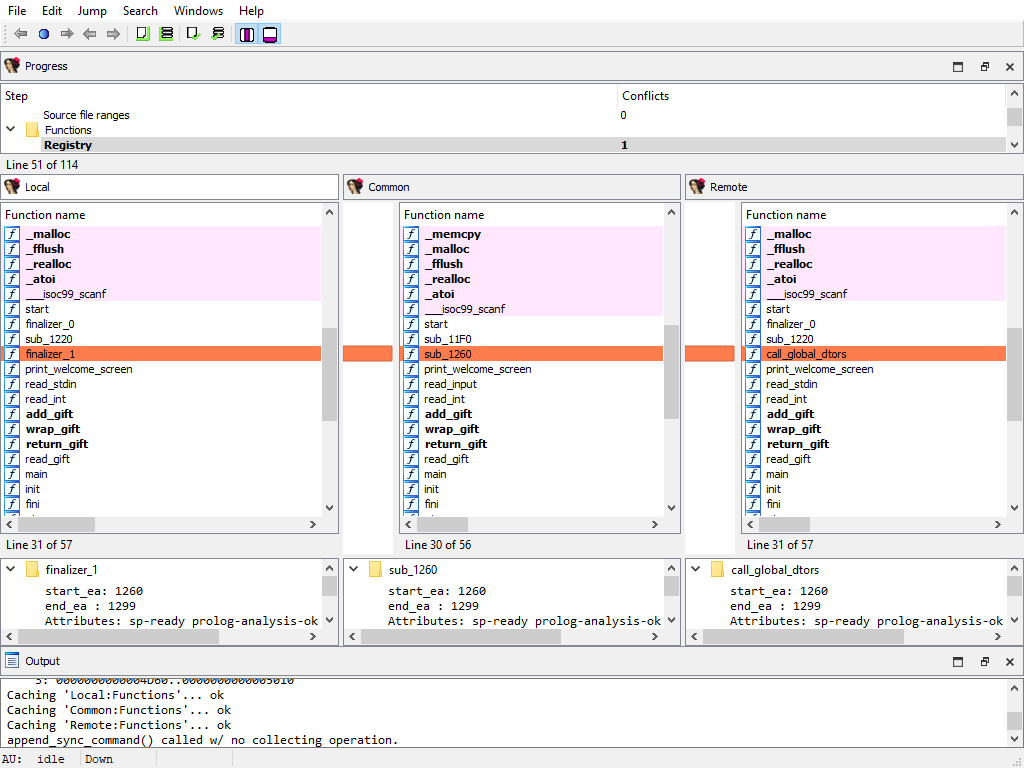
When a conflict is encountered, you’ll have the ability to pick, for all conflicts, which change should be kept (yours, or the other). Every time you pick a change (and thus resolve a conflict), IDA will proceed with the merging, applying all the non-conflicting changes it can, until the next conflict - if any. When all conflicts are resolved, you can leave IDA, and the new resulting file is ready to be submitted.
Appendix A
Merge Steps
This section provides a detailed overview of the steps involved in the merge process. The list of predefined merge steps is defined in merge.hpp of the IDASDK:
enum merge_kind_t
{
MERGE_KIND_NETNODE, ///< netnode (no merging, to be used in idbunits)
MERGE_KIND_AUTOQ, ///< auto queues
MERGE_KIND_INF, ///< merge the inf variable (global settings)
MERGE_KIND_ENCODINGS, ///< merge encodings
MERGE_KIND_ENCODINGS2, ///< merge default encodings
MERGE_KIND_SCRIPTS2, ///< merge scripts common info
MERGE_KIND_SCRIPTS, ///< merge scripts
MERGE_KIND_CUSTDATA, ///< merge custom data type and formats
MERGE_KIND_STRUCTS, ///< merge structs (globally: add/delete structs entirely)
MERGE_KIND_STRMEM, ///< merge struct members
MERGE_KIND_ENUMS, ///< merge enums
MERGE_KIND_TILS, ///< merge type libraries
MERGE_KIND_TINFO, ///< merge tinfo
MERGE_KIND_UDTMEM, ///< merge UDT members (local types)
MERGE_KIND_SELECTORS, ///< merge selectors
MERGE_KIND_STT, ///< merge flag storage types
MERGE_KIND_SEGMENTS, ///< merge segments
MERGE_KIND_SEGGRPS, ///< merge segment groups
MERGE_KIND_SEGREGS, ///< merge segment registers
MERGE_KIND_ORPHANS, ///< merge orphan bytes
MERGE_KIND_BYTEVAL, ///< merge byte values
MERGE_KIND_FIXUPS, ///< merge fixups
MERGE_KIND_MAPPING, ///< merge manual memory mapping
MERGE_KIND_EXPORTS, ///< merge exports
MERGE_KIND_IMPORTS, ///< merge imports
MERGE_KIND_PATCHES, ///< merge patched bytes
MERGE_KIND_FLAGS, ///< merge flags_t
MERGE_KIND_EXTRACMT, ///< merge extra next or prev lines
MERGE_KIND_AFLAGS_EA, ///< merge aflags for mapped EA
MERGE_KIND_IGNOREMICRO, ///< IM ("$ ignore micro") flags
MERGE_KIND_HIDDENRANGES, ///< merge hidden ranges
MERGE_KIND_SOURCEFILES, ///< merge source files ranges
MERGE_KIND_FUNC, ///< merge func info
MERGE_KIND_FRAMEMGR, ///< merge frames (globally: add/delete frames entirely)
MERGE_KIND_FRAME, ///< merge function frame info (frame members)
MERGE_KIND_STKPNTS, ///< merge SP change points
MERGE_KIND_FLOWS, ///< merge flows
MERGE_KIND_CREFS, ///< merge crefs
MERGE_KIND_DREFS, ///< merge drefs
MERGE_KIND_BPTS, ///< merge breakpoints
MERGE_KIND_WATCHPOINTS, ///< merge watchpoints
MERGE_KIND_BOOKMARKS, ///< merge bookmarks
MERGE_KIND_TRYBLKS, ///< merge try blocks
MERGE_KIND_DIRTREE, ///< merge std dirtrees
MERGE_KIND_VFTABLES, ///< merge vftables
MERGE_KIND_SIGNATURES, ///< signatures
MERGE_KIND_PROBLEMS, ///< problems
MERGE_KIND_UI, ///< UI
MERGE_KIND_NOTEPAD, ///< notepad
MERGE_KIND_LOADER, ///< loader data
MERGE_KIND_DEBUGGER, ///< debugger data
MERGE_KIND_LAST, ///< last predefined merge handler type.
///< please note that there can be more merge handler types,
///< registered by plugins and processor modules.
};
The list of merge steps is not final. If for example there is a conflict in structure members then the new merge phase to resolve this conflict will be created. The same is hold for UDT, functions, frames and so on. In other words in general case the exact number of merge steps is undefined and depends on the databases.
Each item in a merge step is assigned to a difference position named diffpos. It may be an EA (effective address), enum id, structure member offset, artificial index and so on. In other words, a diffpos is a way of addressing something in the database.
Every merge step starts with the calculation of differences and conflicts between items at the corresponding difference positions. As the result there is a list of diffpos with differences or conflicts. The diffpos`s without differences are not included in the list. Adjacent `diffpos`s are combined into a difference range called `diffrange.
The merging process operates on a difference range diffrange. For one diffrange, a single merge policy can be selected.
Global settings/Database attributes
Merging of global database attributes. These attributes are mainly stored in the idainfo structure. This phase has two subphases:
- Global settings/Database attributes/Graph mode
- Global settings/Database attributes/Text mode
The “Detail” pane is absent.
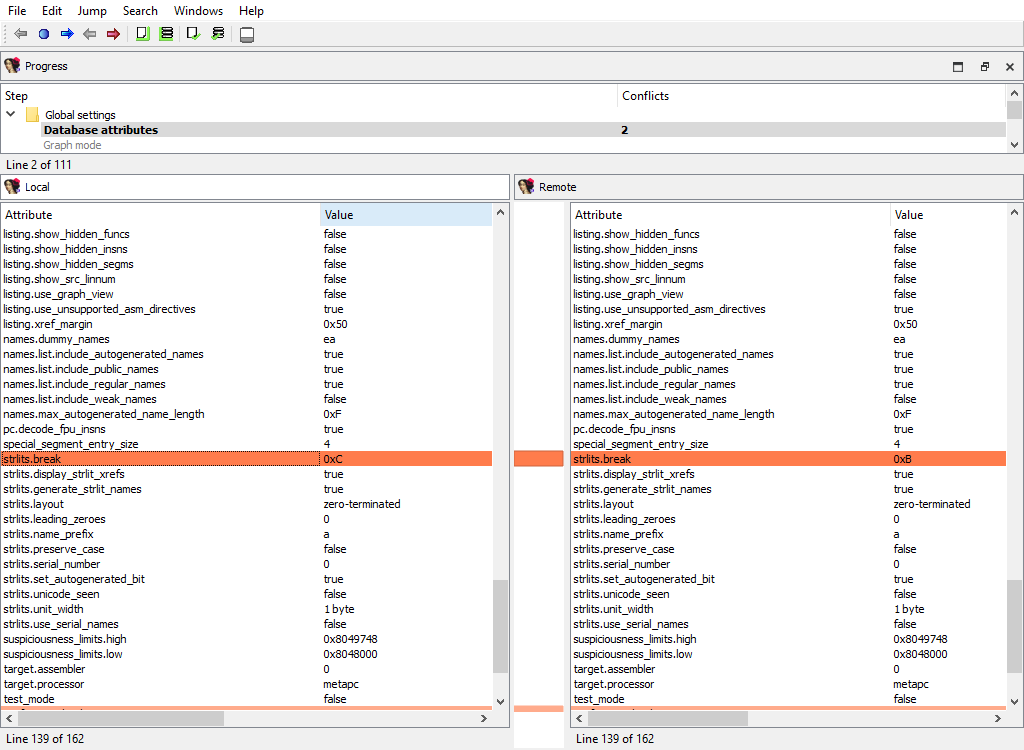
Global settings/Processor specific
Merging of global processor options. Usually these options are stored in the idpflags netnode.
The “Detail” pane is absent.
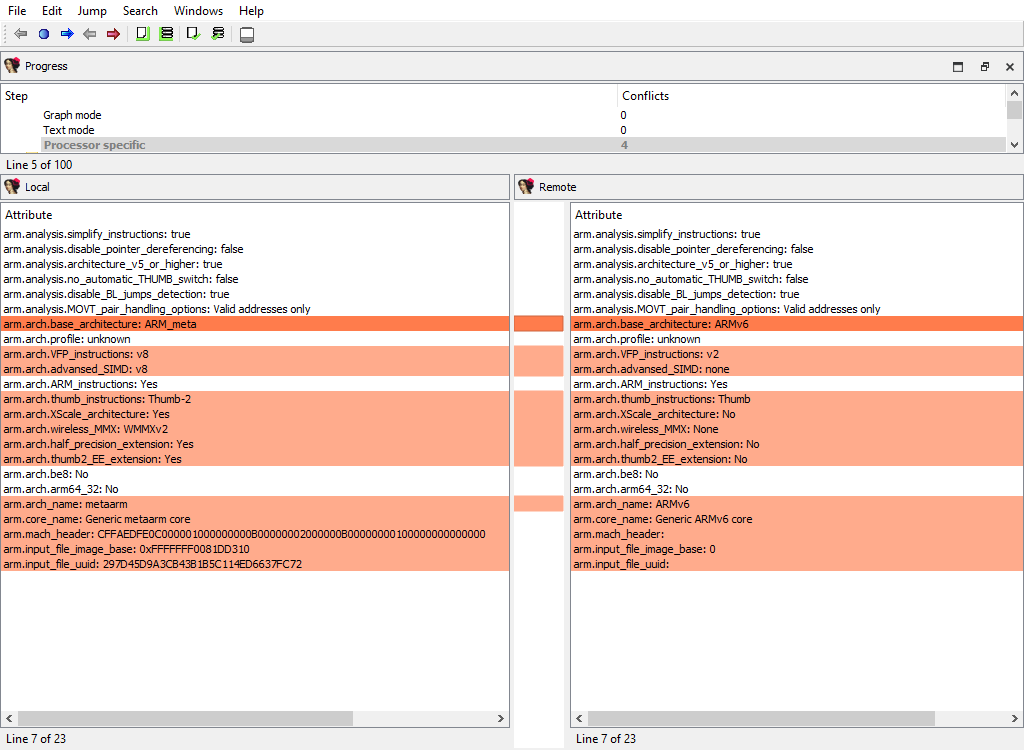
Encodings/Registry
Merging of registered string literal encodings. These encodings are used to properly display string literal in the disassembly listing.
The “Detail” pane is absent.

Encodings/Settings
Merging of default string encodings: what string encoding among the registered ones are considered as the default ones.
The “Detail” pane is absent.
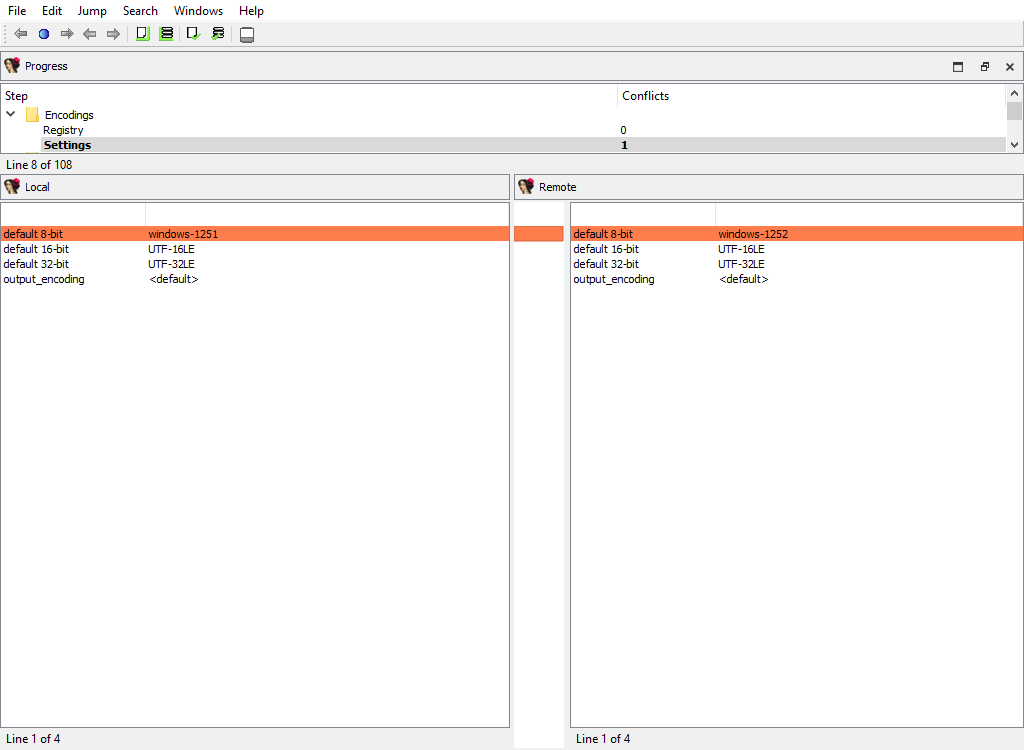
Scripts/Registry
Merging of embedded script snippets.
When merging of embedded script snippets, the script name/language is displayed, and the “Detail” pane contains the script source with the highlighted differences:

Scripts/Settings
Merging of the default snippet and tabulation size.
The “Detail” pane is absent.
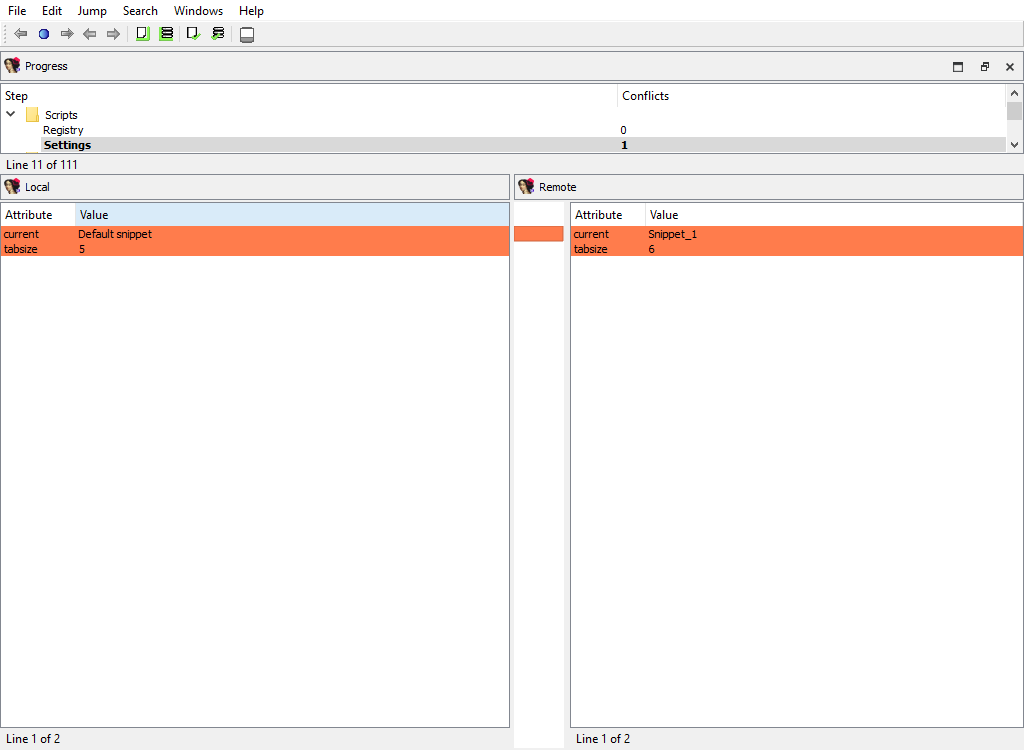
Custom data/Types and Custom data/Formats
Merging of the registered custom data types and formats.
The “Detail” pane is absent.
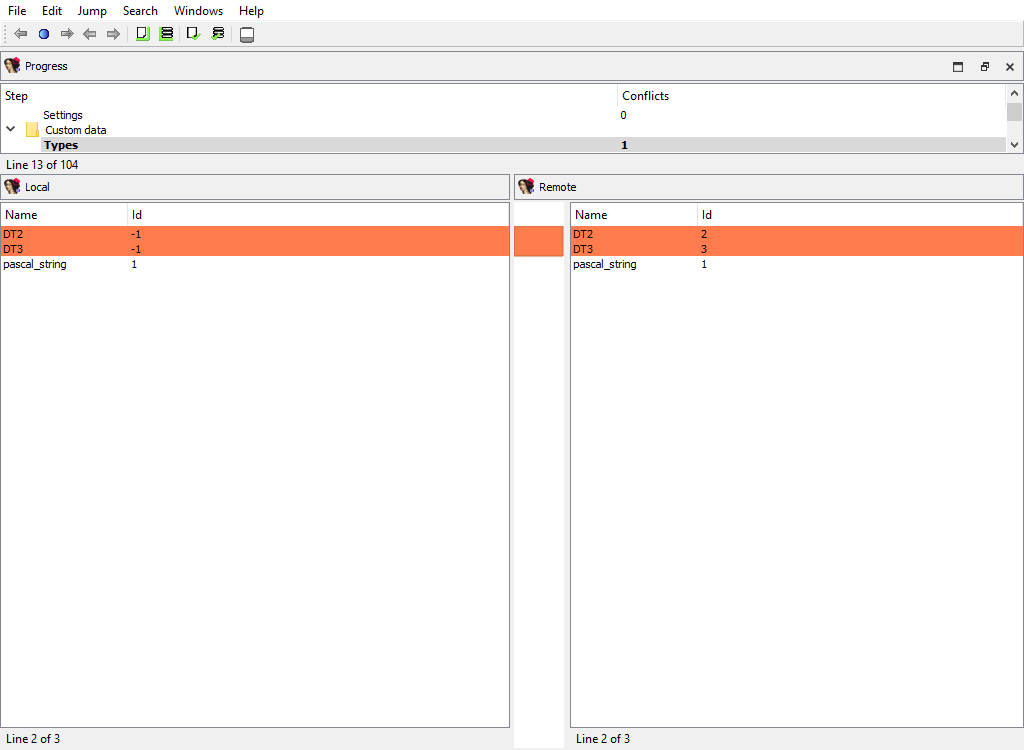
Types/Enums
Merging of assembler level enums (enum_t). Ghost enums are skipped in this phase, they will be merged when handling local types.
To calculate diffpos, IDA Teams matches enum members by name and maps all enums with common member names into one diffpos.
An example of enum merging:
local_idb
;--------------------------
; enum enum_1, mappedto_1
A = 0
B = 1
remote_idb
;--------------------------
; enum enum_1, mappedto_1
A = 0
;--------------------------
; enum enum_2, mappedto_2
B = 1
In both idbs, enum constant “B” is present. However, in the remote idb “B” has a different parent enum, “enum_2”. Therefore enum_1 in the local idb corresponds to enum_1 and enum_2 in the remote idb. The user can select either enum_1 from the local idb or enum_1 and enum_2 from the remote idb.
In other words, IDA will display both enum_1 and enum_2 in the Remote pane, indicating that the difference between the Local and Remote databases corresponds to two separate enums, but they are treated as a single difference location. The “Detail” pane will display the full enum definitions, with the differences highlighted:
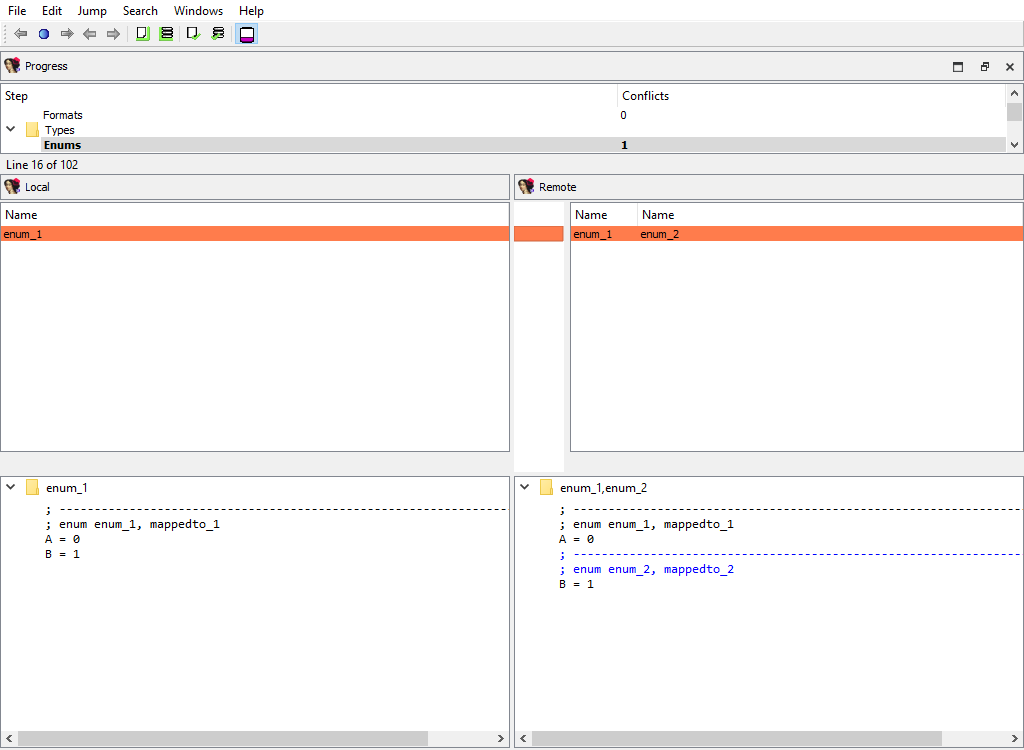
Types/Structs
Merging of assembler level structures (struc_t).
To calculate diffpos, IDA Teams matches structs by the following attributes, in this order:
- the structure name
- the structure
tidand size
If we fail to match a structure, then it will stay unmatched. Such an unmatched structure will have it own diffpos, allowing the user to copy it to the other idb or to delete it altogether.
This merge phase deals with the entire structure types and their attributes. Entire structure types may be added or deleted, and/or conflicts in the structure attributes are resolved.
If members of matched structures (at the same diffpos) differ, the conflict will be resolved later, during the Types/Struct members/… merge phase.
In the UI, IDA will display the list of structure names, with the “Detail” pane showing the structure attributes:
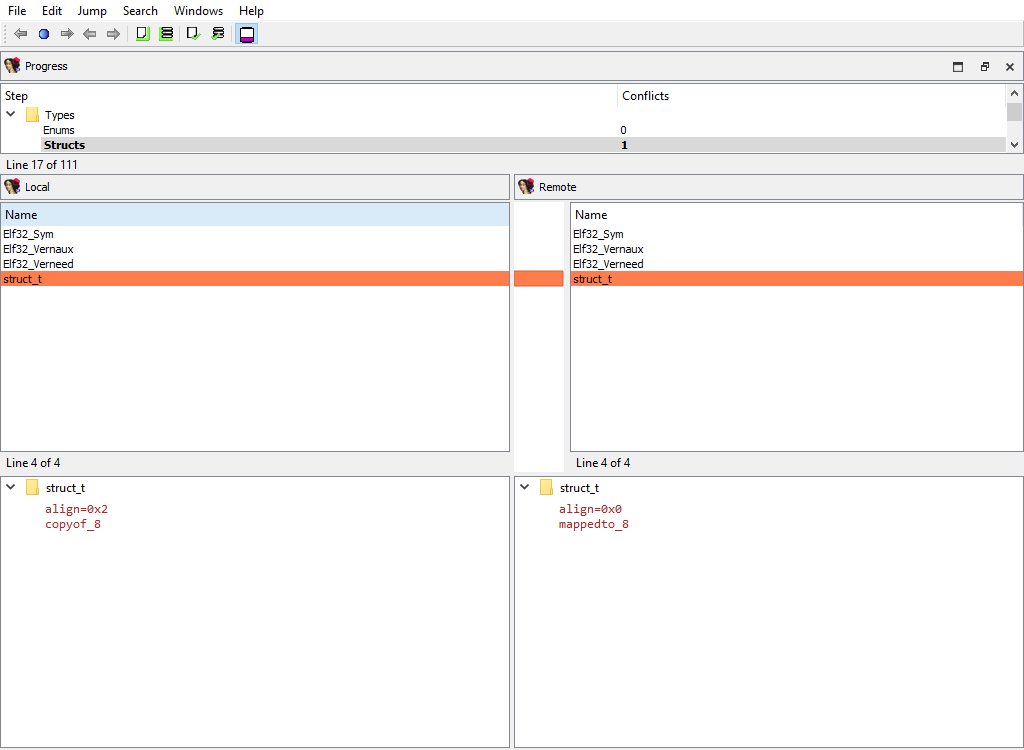
Types/Type libraries
Merging of the loaded type libraries.
This merge phase uses the standard “Type libraries” widget.
The “Detail” pane is absent.

Types/Local types
Merging of local types.
To calculate diffpos, IDA Teams matches local types by the following attributes, in this order:
- the type name
- the ordinal number and base type
If we fail to match a type, then it will stay unmatched. Such an unmatched type will have it own diffpos, allowing the user to copy it to the other idb or to delete it altogether.
This merge phase deals with entire types and their attributes. Entire local types may be added or deleted, and/or conflicts in their attributes are resolved. Differences in type members (e.g., struct members) will be resolved in a separate phase: Types/Local type members
This merge phase uses the standard “Local types” widget. The “Detail” pane displays the type definition and its attributes.

Types/Struct members/… and Types/Local type members/…
For example:
- Types/Struct members/struct_t
- Types/Local type members/struct conflict_t
These merge phases merges the conflicting members of a structure or a local type.
The “Detail” pane displays full information about the current member along with its attributes.
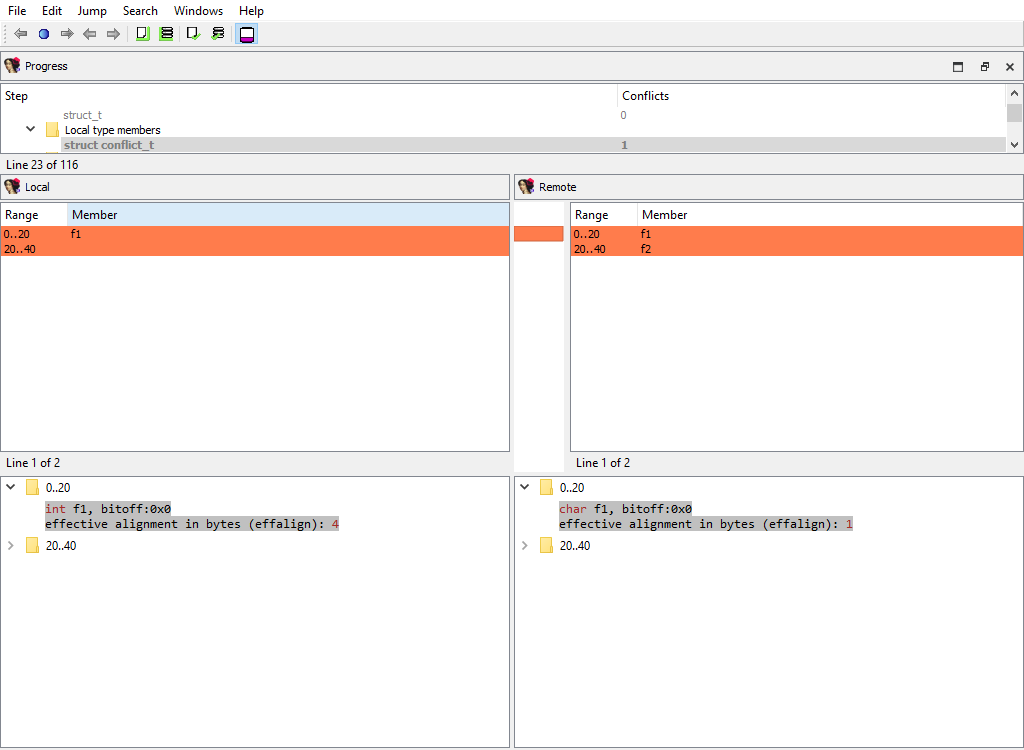
Types/Ghost struct comments
Ghost structs may have comments attached to them.
This merge phase handles these comments:
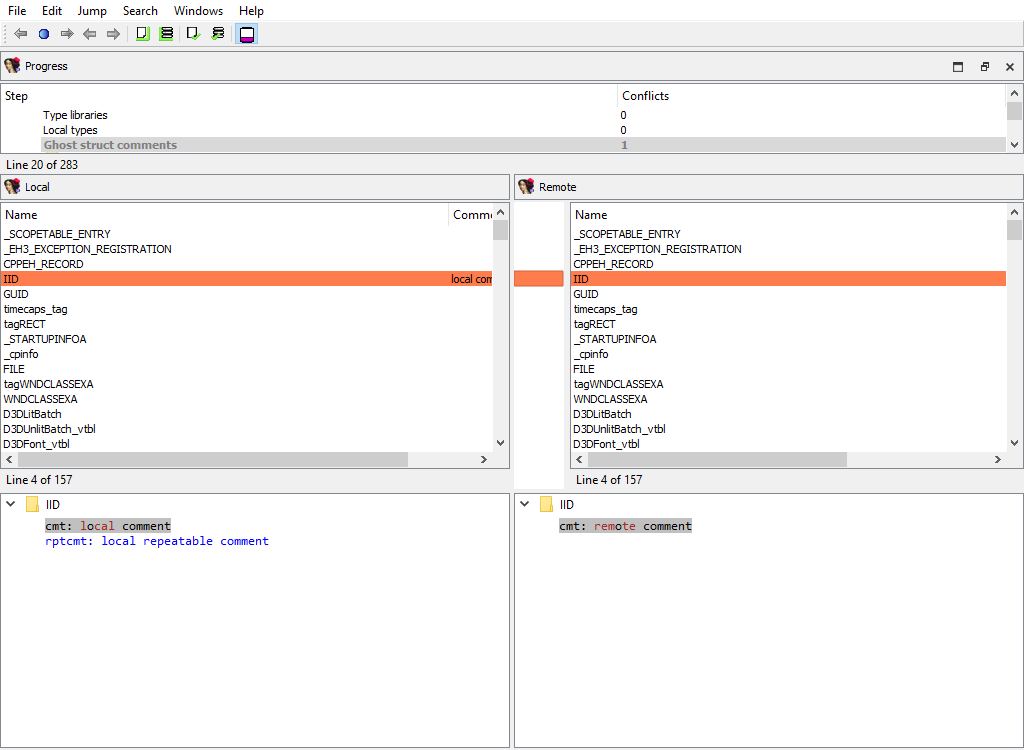
We need a separate phase for these comments in order not to lose them during merging because by default ghost types are considered secondary to the corresponding non-ghost type. Normally during merge ghost types may be overwritten. However, local types cannot have comments at all. This is why ghost structure comments, if created, are valuable.
Types/Struct members comments/…
Similarly to comments attached to entire structures, each structure member may have a comment.
The same logic applies to ghost struct member comments:
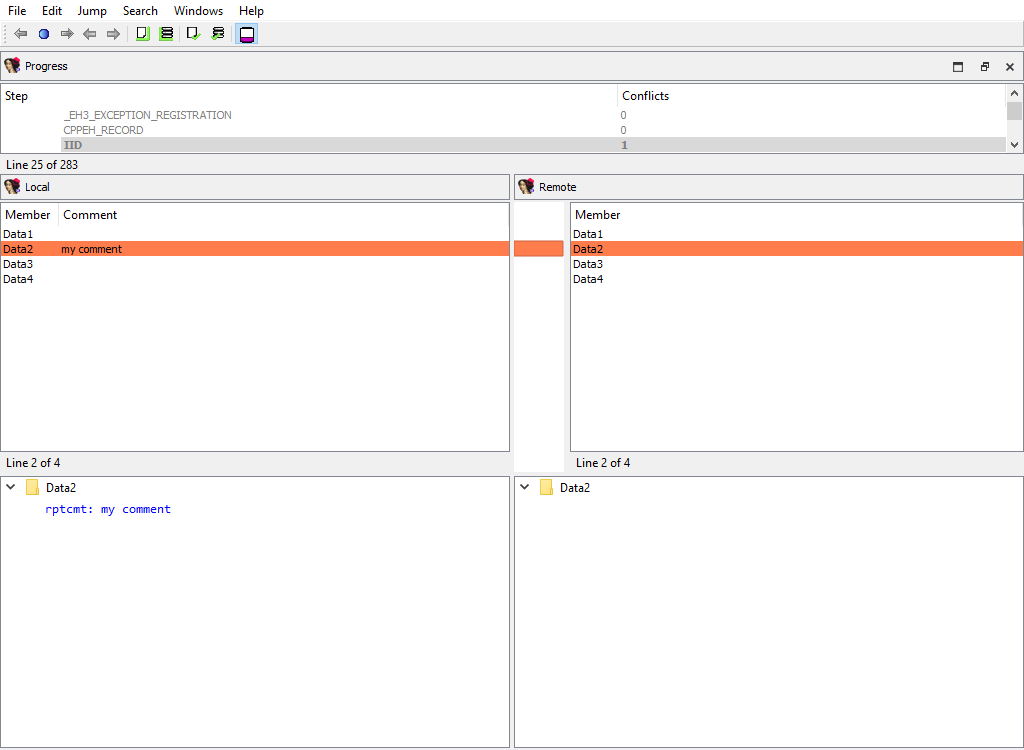
Addressing/Selectors
Merging of selectors.
This merge phase uses the standard widget “Selectors”.
The “Detail” pane is absent.
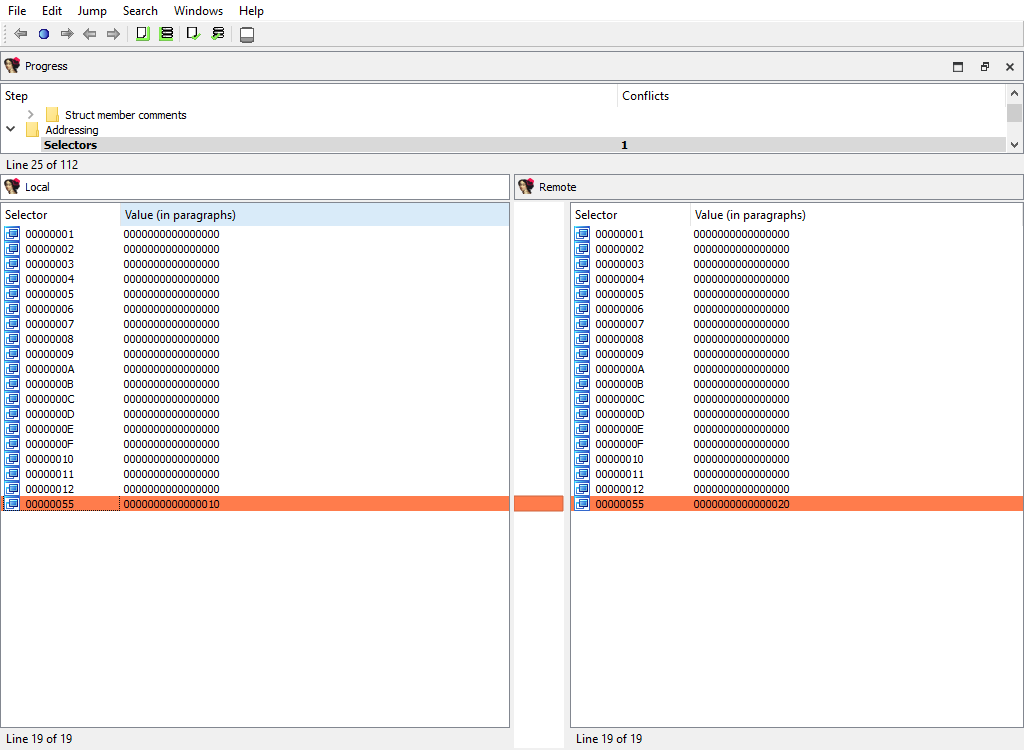
Addressing/Storage types
IDA Pro allocates so-called flags for each program address. These flags describe how to display the corresponding bytes in the disassembly listing: as instruction or data.
There are two different storage methods for flags: virtual array (VA) and sparse storage (MM). The virtual array method is the default one, it allocates 32 bits for each program address. However, for huge segments this method is not efficient and may lead to unnecessarily huge databases. Therefore for huge segments IDA Pro uses sparse storage.
This merge phase handles the defined program ranges and their storage types.
The “Detail” pane is absent.
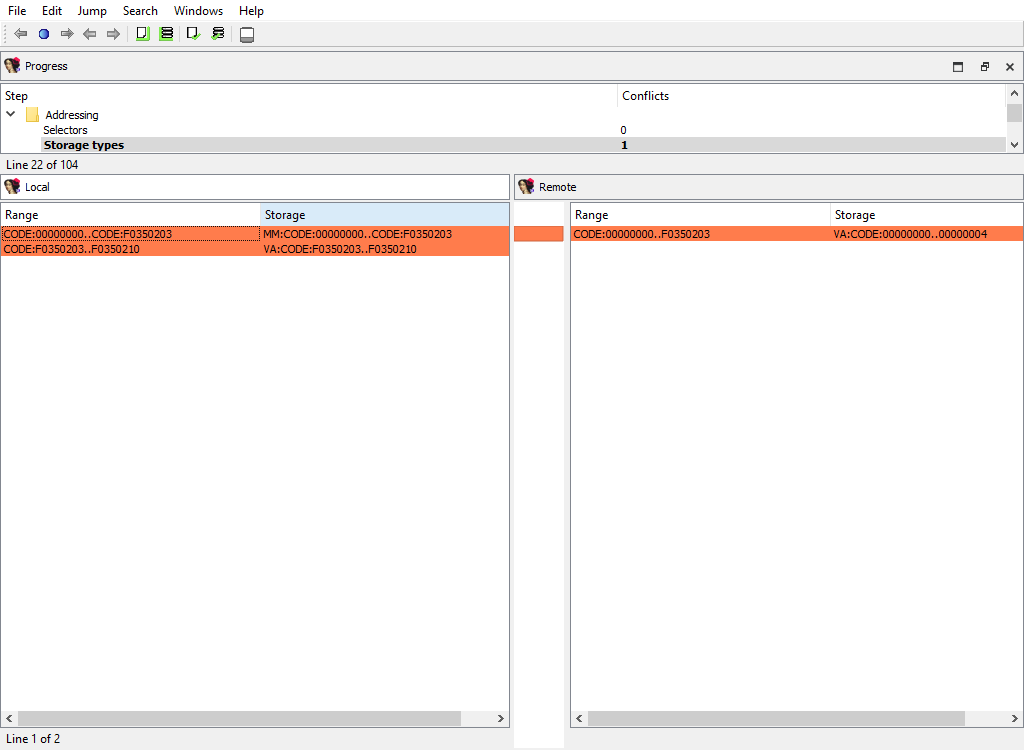
Addressing/Segmentation
This merge phase handles the program segmentation.
When merging segments, IDA combines them into non-overlapping groups. Each group will have its own diffpos. For example, the following segmentations:
local_idb
seg000:00000000
...
seg000:00000020
...
remote_idb
seg000:00000000
...
seg001:00000010
...
seg001:00000020
will result in a single diffpos:
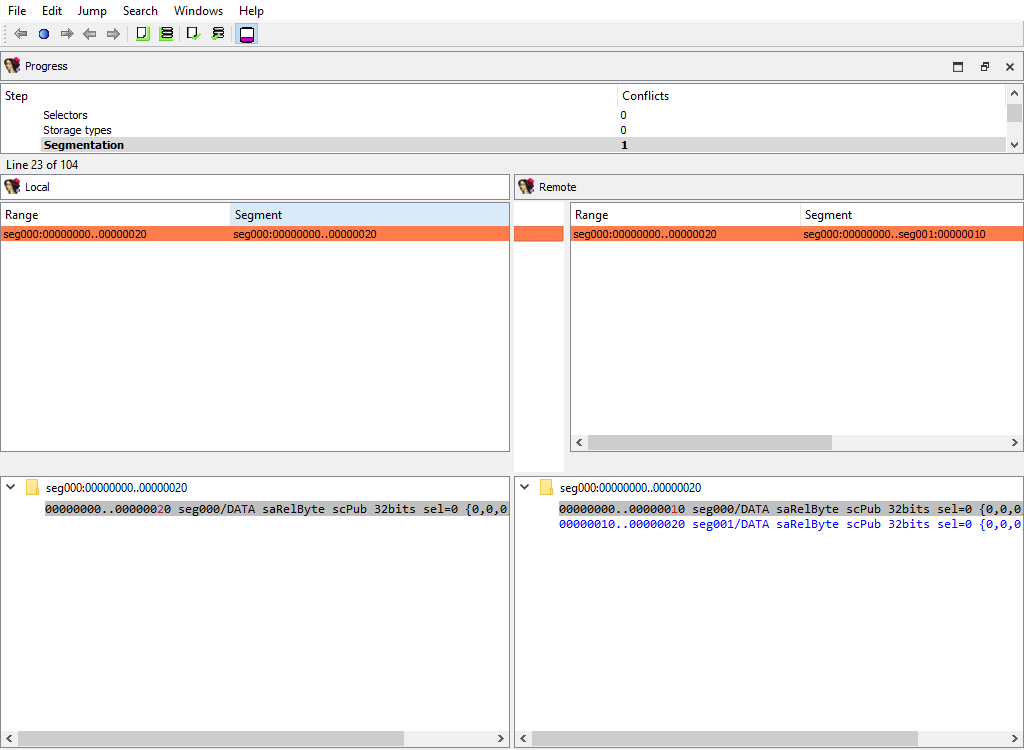
The “Detail” pane displays segments in the combined group with their attributes.
When merging segment, IDA tries to move the segment boundaries in a way that preserves the segment contents. If it fails to do so, the conflicting segments are deleted and new ones are created.
Addressing/Segment groups
Merging of segment groups. Segment groups are used only in OMF files. They correspond to the group keyword in assembler.
The “Detail” pane is absent.
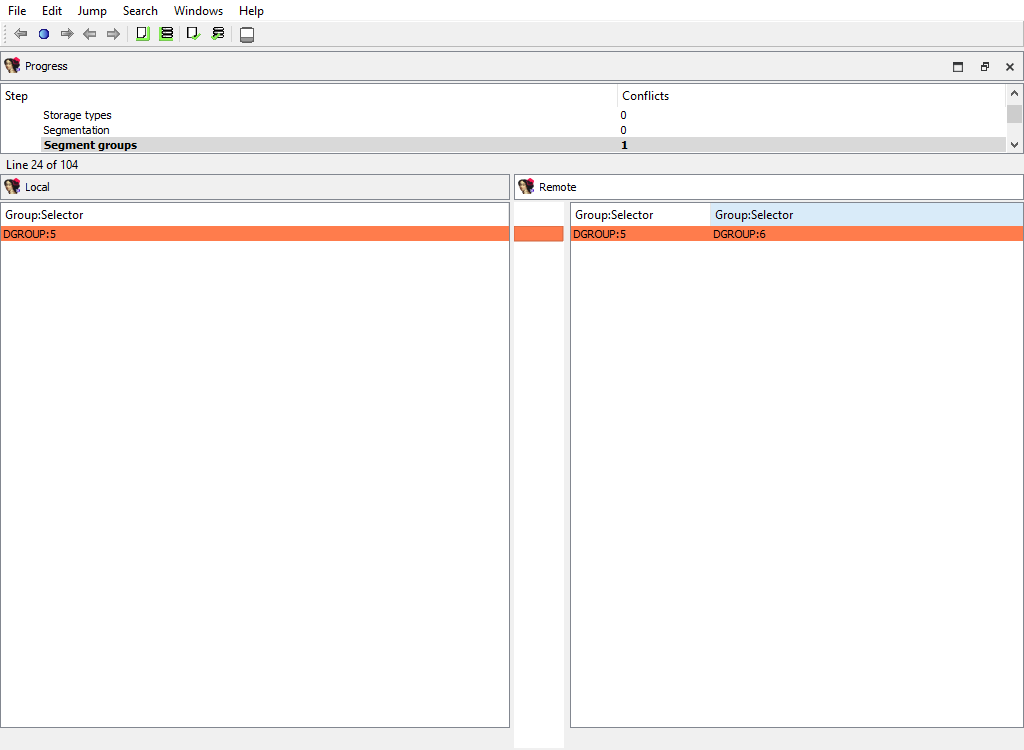
Addressing/Segment register/…
Some processor have so-called segment registers. IDA Pro knows about them and can remember their value (one value per address range).
For example, the x86 processor has ds, ss, and many other registers. IDA Pro can remember that, say, ds has the value of 1000 at the range 401000..402000.
This merge phase handles segment registers. For each register, a separate merge phase is created. It contains address ranges: inside each address range the value of the segment register stays the same.
To prepare diffpos, IDA Teams combines segment register ranges into non-overlapping ranges. diffpos is a range number.
The “Detail” pane displays segment register ranges in diffpos with the value and the suffix that denotes the range type (u-user defined, a-automatically inherited from the previous range)

Addressing/Orphan bytes
The database may have bytes that do not belong to any segment.
To prepare diffpos, IDA Teams groups orphan bytes in the databases into nonintersecting ranges. diffpos is a range number.
The “Detail” pane is absent.
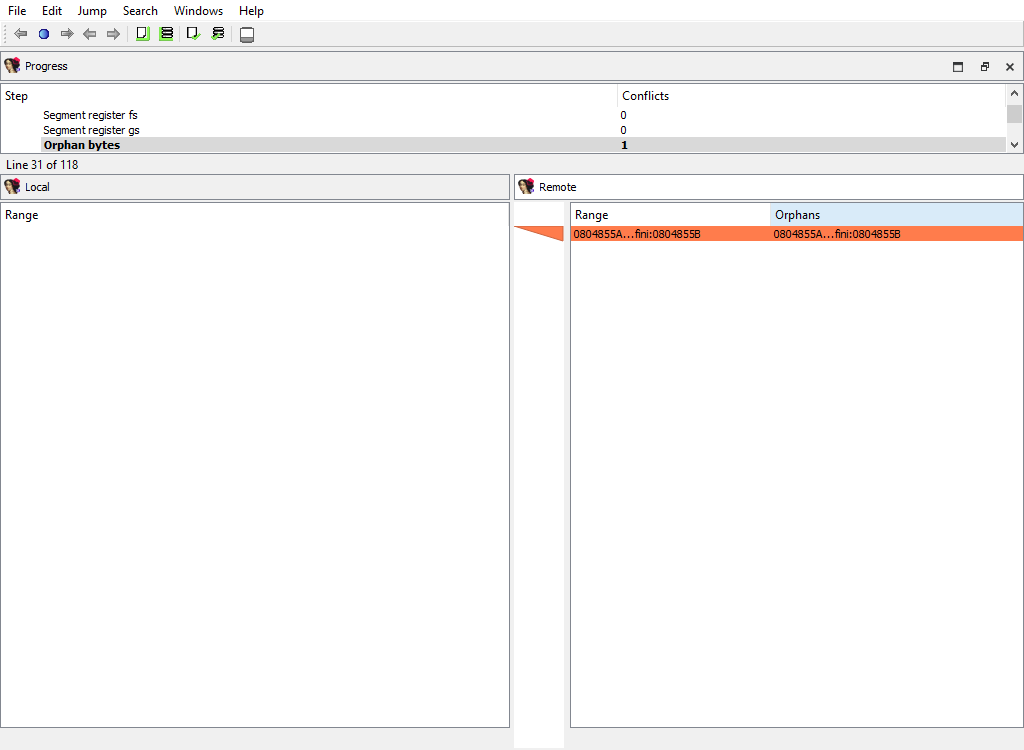
Addressing/Patched
Merging of the patched bytes.
The “Detail” pane is absent.
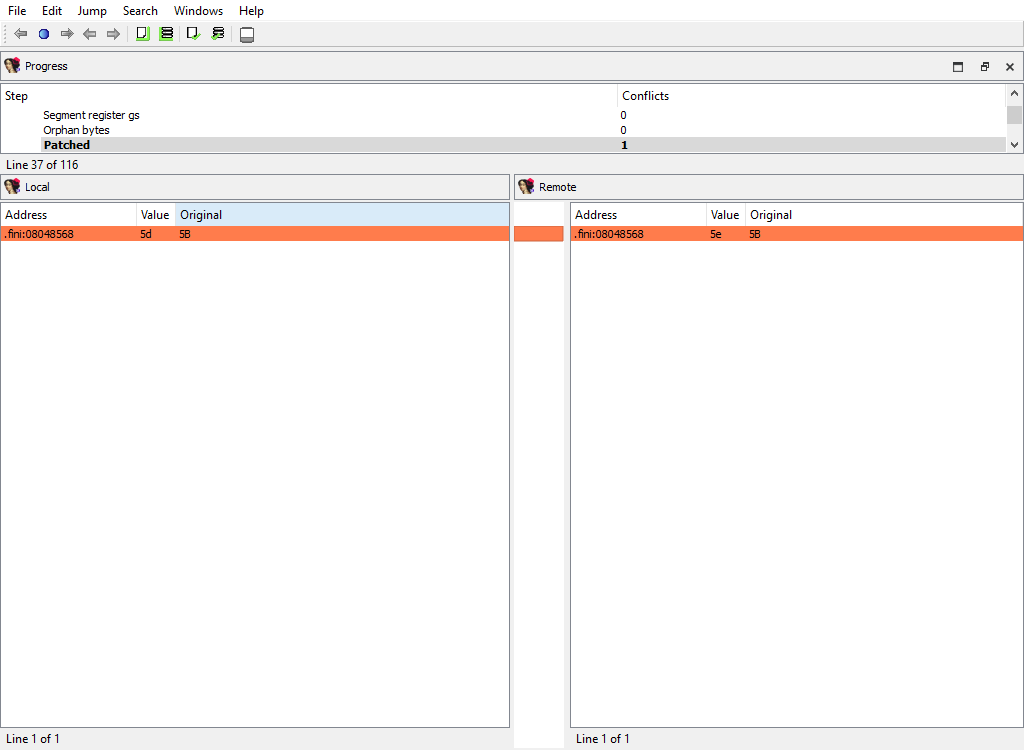
Addressing/Byte values
Byte values in segments may differ even for non-patched addresses, for example if a snapshot of the process memory was taken during a debugger session.
IDA Teams combines the sequential bytes in one diffpos.
This merge phase uses the standard “IDA-View” widget.
The “Detail” pane displays the conflicting byte values.
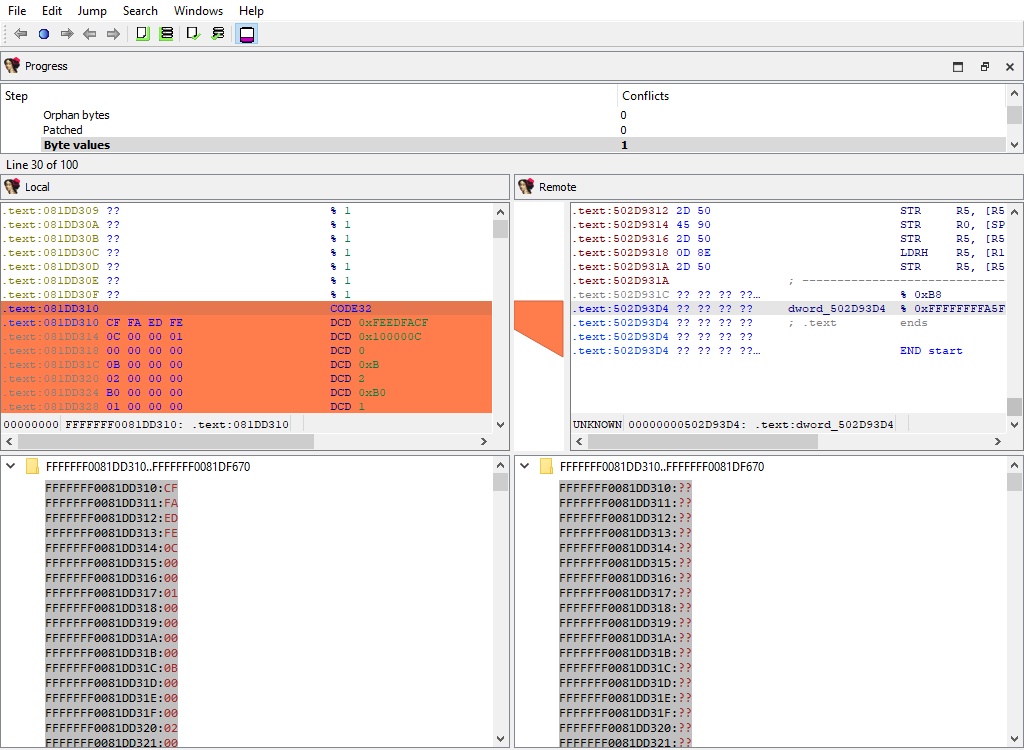
Addressing/Fixups
Merging of fixup records.
The “Detail” pane is absent.

Addressing/Manual memory mapping
Merging of memory mappings.
The “Detail” pane is absent.
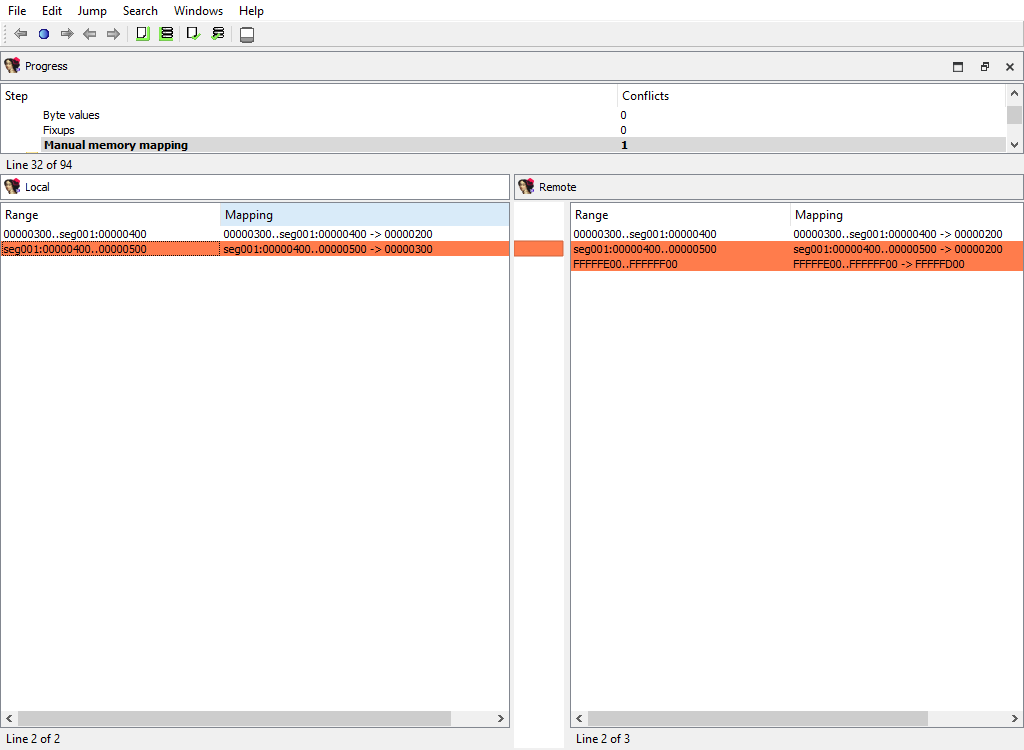
Symbols/Exports
Merging of exported symbols.
Merge phase uses the standard “Exports” widget.
The “Detail” pane is absent.
Symbols/Imports
Merging of imported symbols.
Merge phase uses the standard “Imports” widget.
The “Detail” pane is absent.
Disassembly/Items
When merging, IDA Teams compares disassembly items (instructions and data). IDA Teams compares disassembly items by length, flags, opinfo, name, comment, and netnode information (NALT_* and NSUP_* flags).
This merge step uses the standard “IDA-View” widget so that items can be viewed in their context. For example:
Comments/Anterior lines and Comments/Posterior lines
Merging of extra comments.
This merge phase uses the standard “IDA-View” widget.
The “Detail” pane displays comment content.
Disassembly/EA additional flags
Merging of additional flags aflags_t.
Each disassembly item may have additional flags that further describe it.
This merge phase uses the standard “IDA-View” widget.
The “Detail” pane displays additional flags.
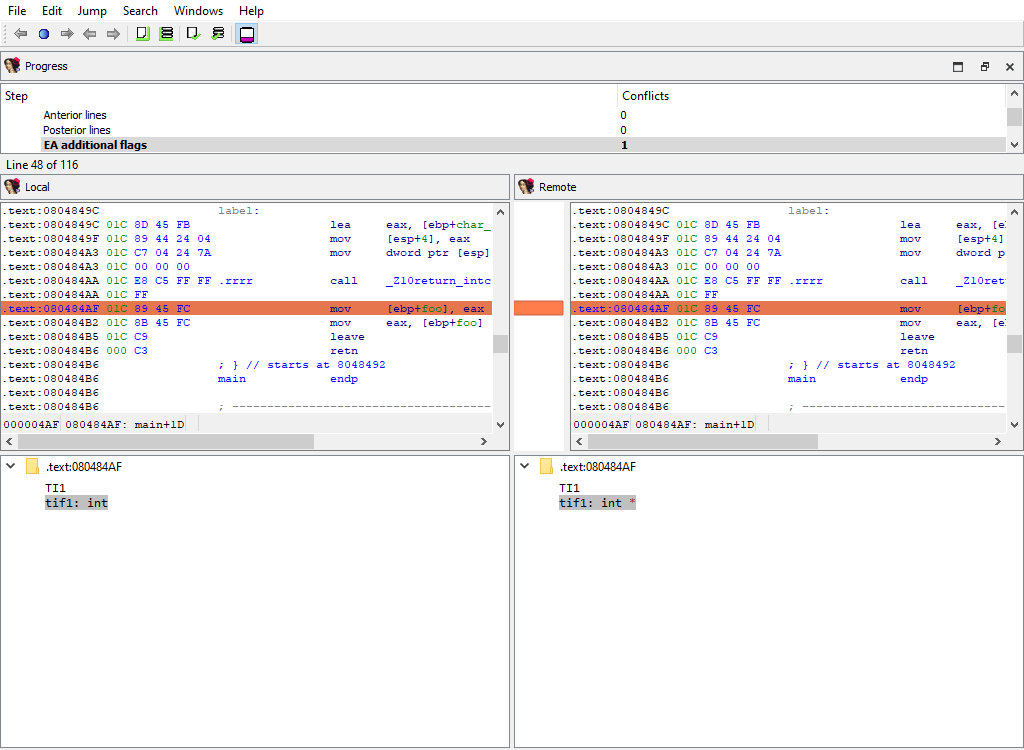
Disasembly/Hidden ranges
To prepare diffpos, IDA Teams groups hidden ranges into nonintersecting ranges. diffpos is a range number.
The “Detail” pane displays the hidden range description.
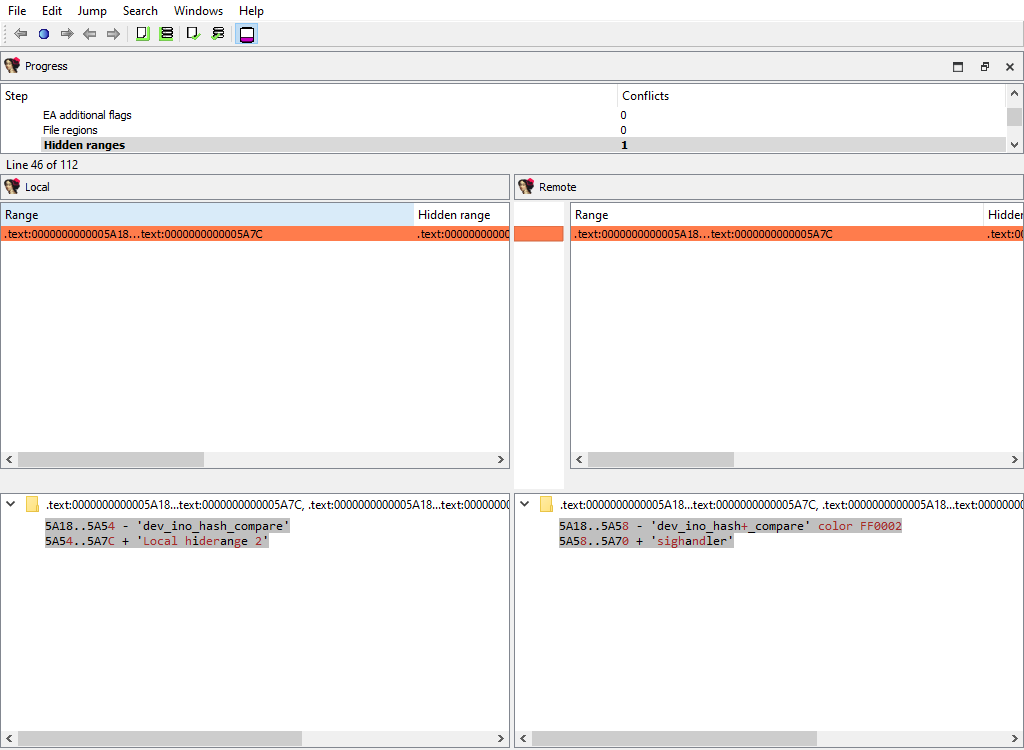
Disassembly/Source file ranges
To prepare diffpos, IDA Teams groups source file ranges into nonintersecting ranges. diffpos is a range number.
The “Detail” pane displays source file definition.

Functions/Registry
Function definitions (func_t) are merged using the standard “Functions” widget, while the “Detail” pane displays function attributes:
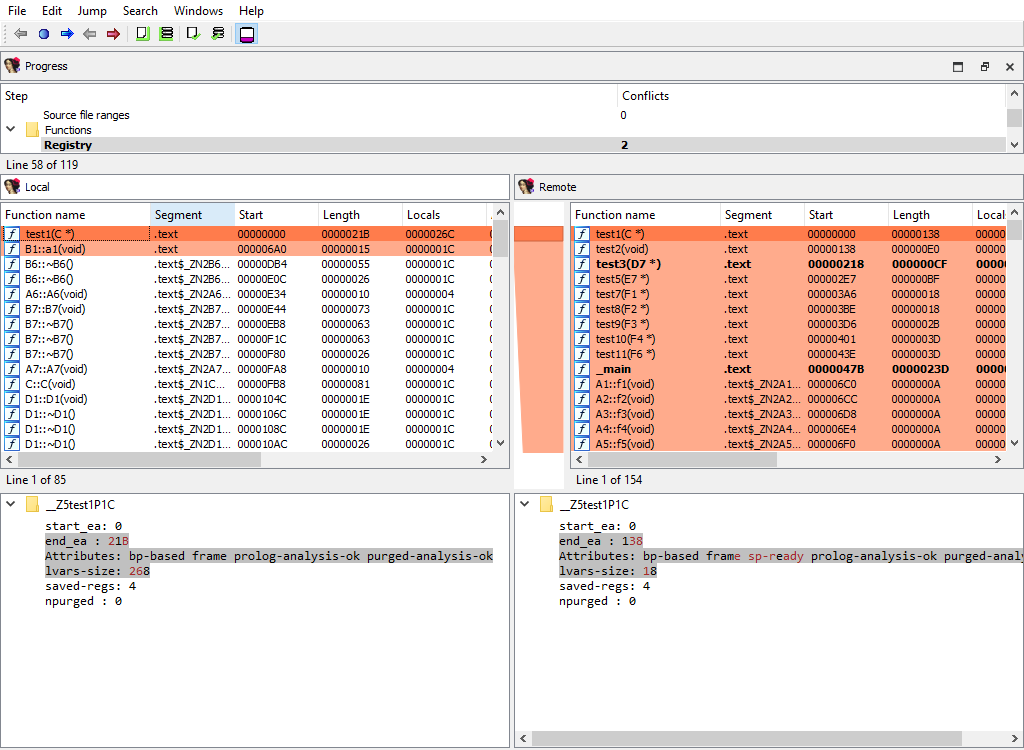
Functions/IM flags
Merging of instruction kinds.
To simplify decompilation, IDA has the notion of the instruction kind:
- PROLOG instruction
- EPILOG instruction
- SWITCH instruction
This merge phase uses the standard “IDA-View” widget.
The “Detail” pane displays instruction kind.
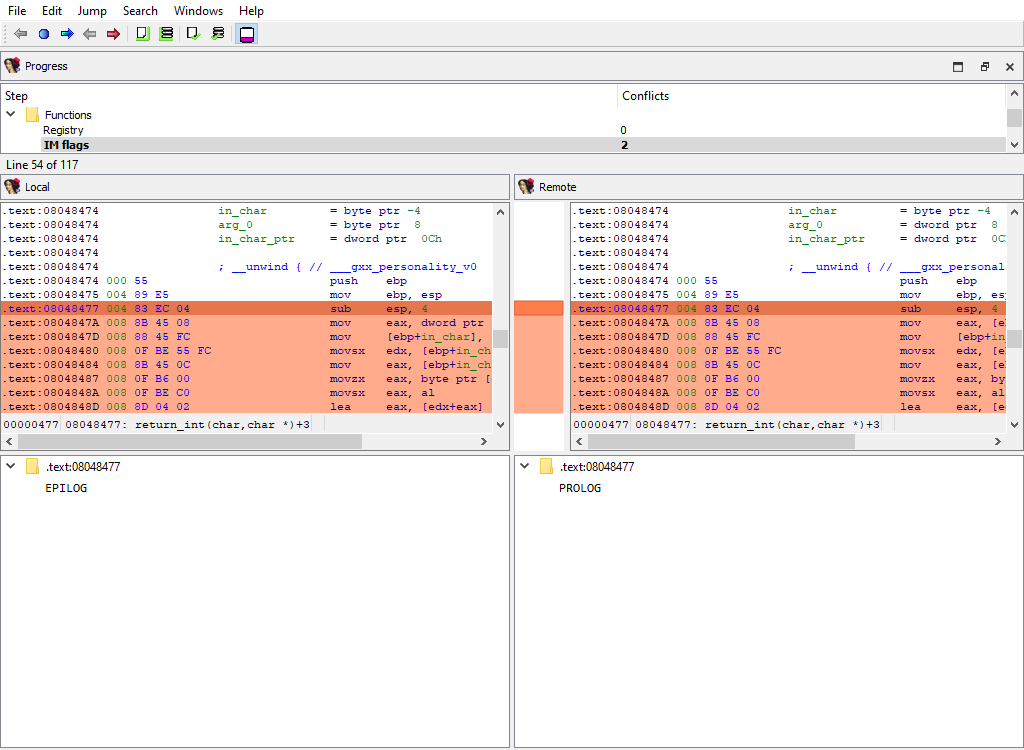
Functions/Frames (global)
This merge phase deals with the entire function frames. Function frame may be added or deleted.
If members of the matched function frame differ, the conflict will be resolved later during the Functions/Frame/… merge phase. Each differing frame will be assigned its own merge step.
The “Detail” pane is absent.
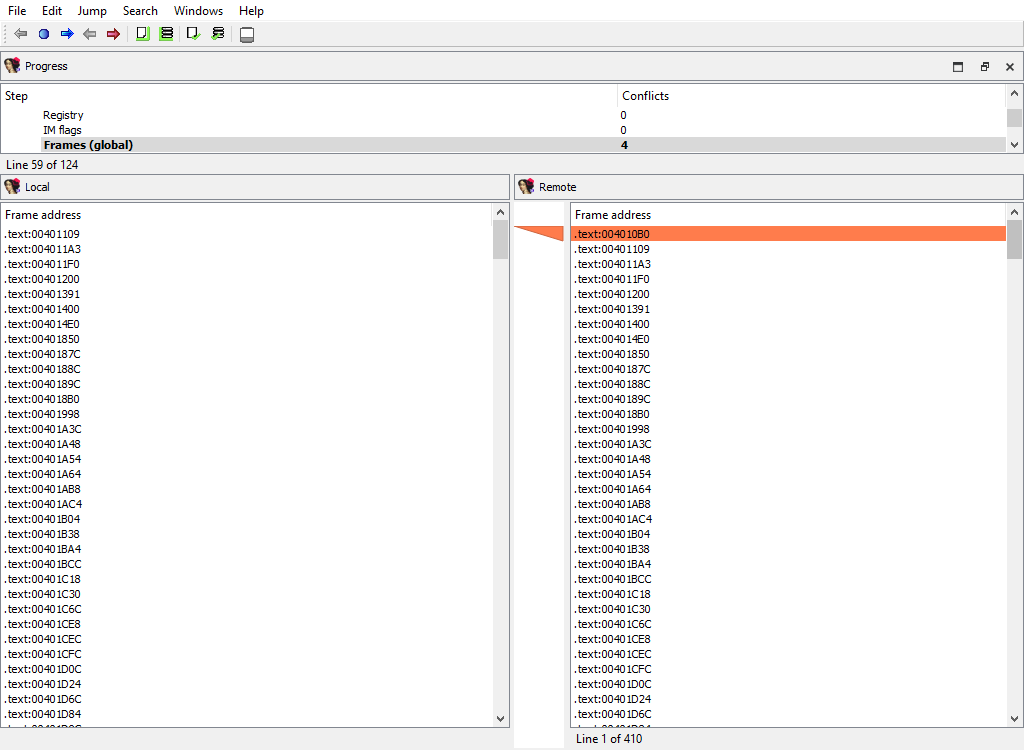
Functions/Frame
Merging of function frame details.
A separate phase is created for each function. For example:
- Functions/Frames/sub_401200 at 401200
- Functions/Frames/_main at 4014E0
Every of these phases merges the conflicting members of the function frame.
The “Detail” pane displays the detailed information about the current function frame member.
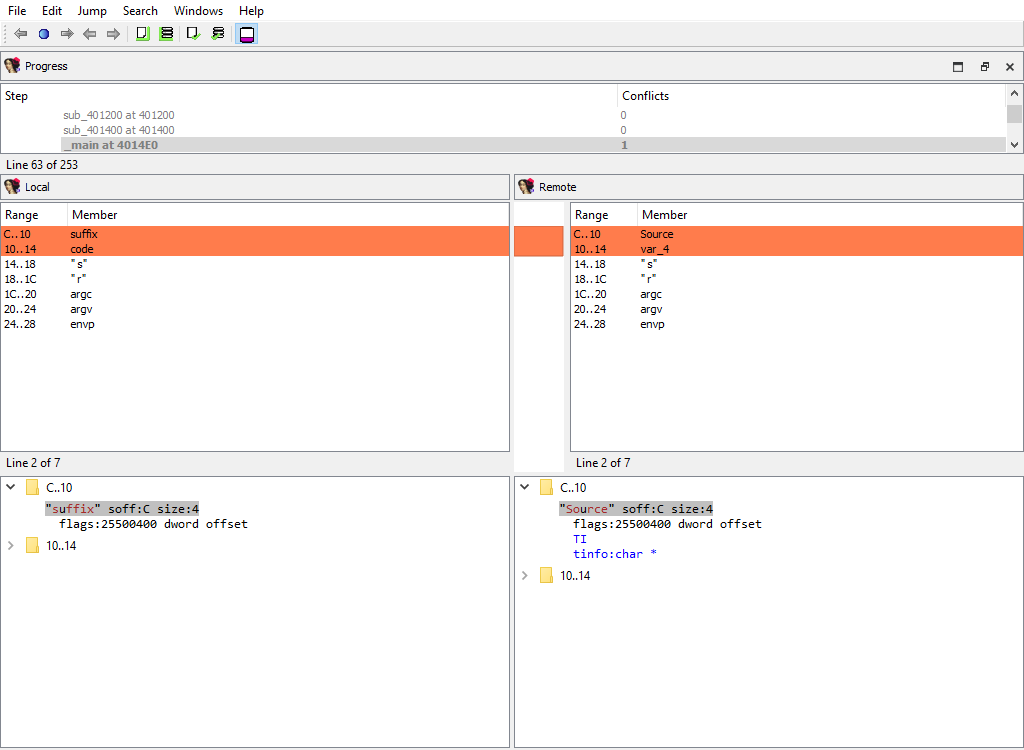
Functions/SP change points
Merging of function SP change points.
This merge phase uses the standard “IDA-View” widget.
The “Detail” pane displays the SP change point details.
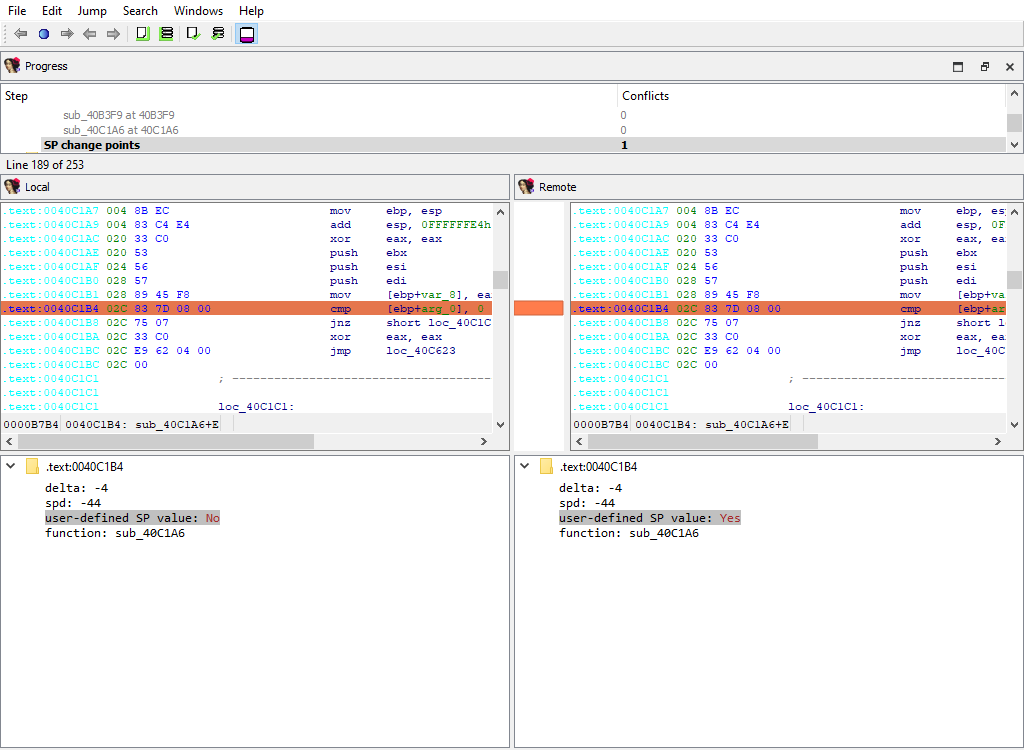
Cross-references/Flow
Merging of regular execution flow from the previous instruction. IDA stores cross-references that correspond to regular execution flow in a special format, different from other cross-reference types.
This merge phase uses the standard “IDA-View” widget.
The “Detail” pane is absent.
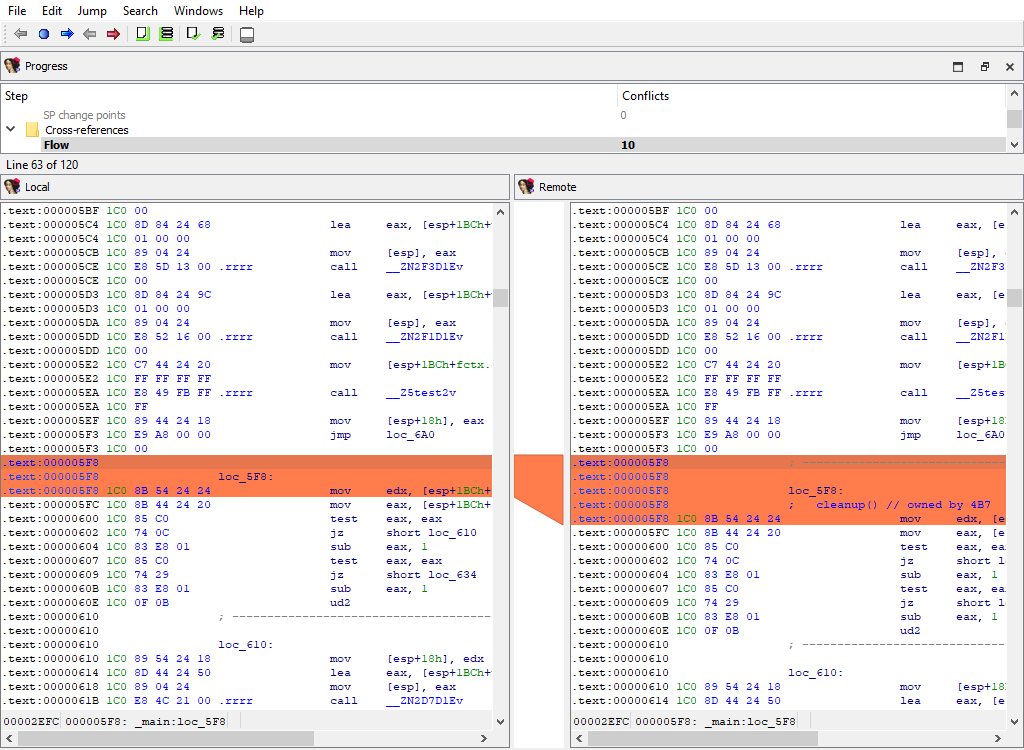
Cross-references/Code
Merging of code cross-references.
This merge phase uses the standard “IDA-View” widget.
The “Detail” pane displays code references to address (diffpos).
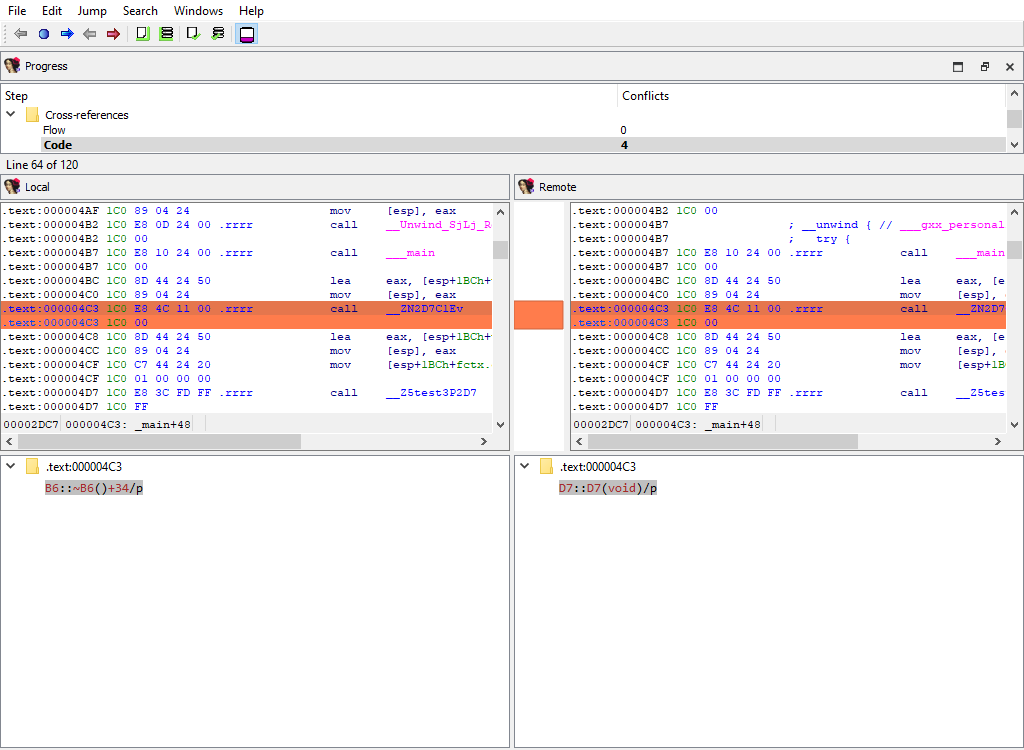
Cross-references/Data
Merging of data cross-references.
This merge phase uses the standard “IDA-View” widget.
The “Detail” pane displays data references to address (diffpos).
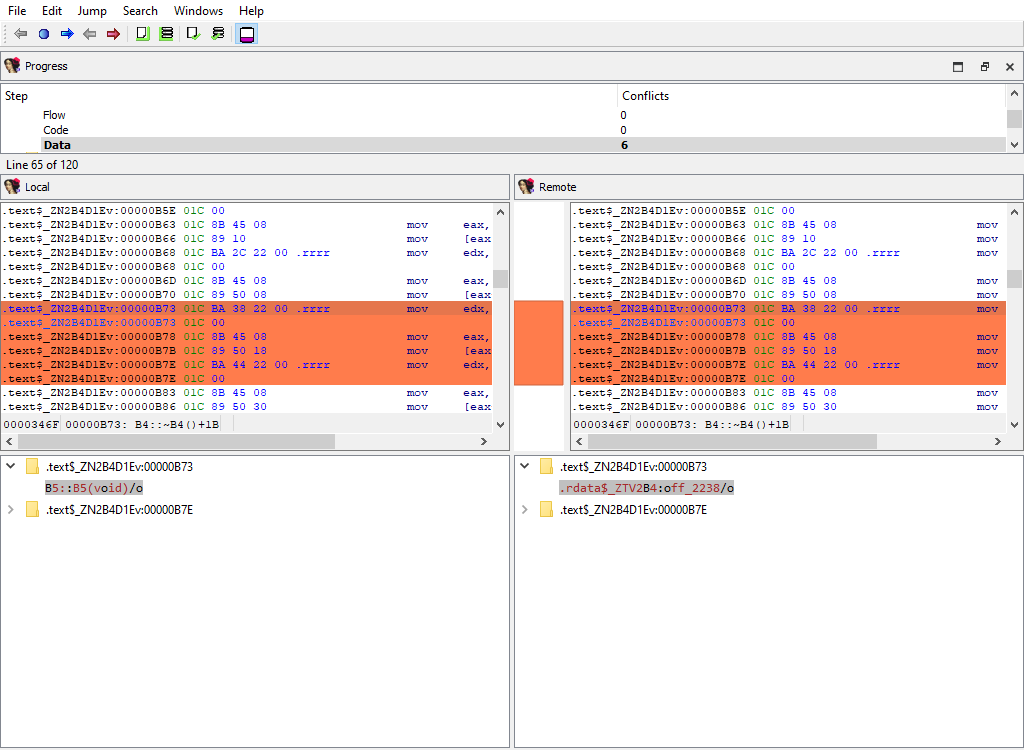
Marked positions/…
The following merge phases exist:
- Marked positions/structplace_t
- Marked positions/enumplace_t
- Marked position/idaplace_t
They deal with merging of bookmarks for:
- structures
- enums
- addresses
The “Detail” pane is absent.
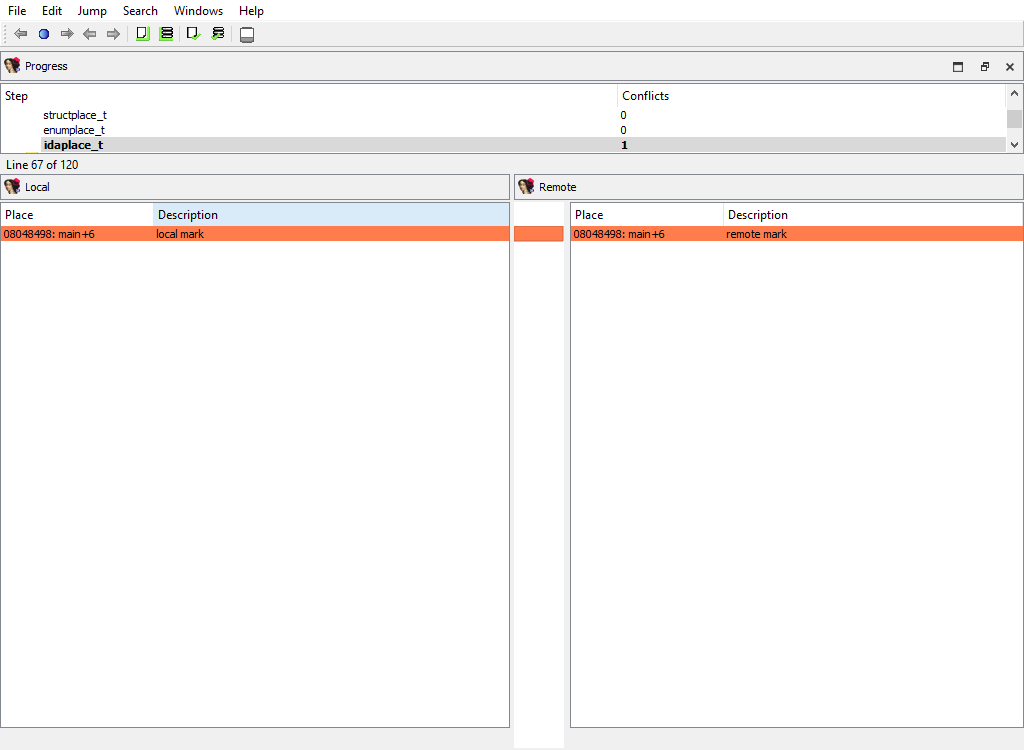
Debug/Breakpoints/…
The following merge phases exist:
- Breakpoints/Absolute bpts
- Breakpoints/Relative bpts
- Breakpoints/Symbolic bpts
- Breakpoints/Source level bpts
They deal with merging of various debugger breakpoints.
The “Detail” pane is absent.
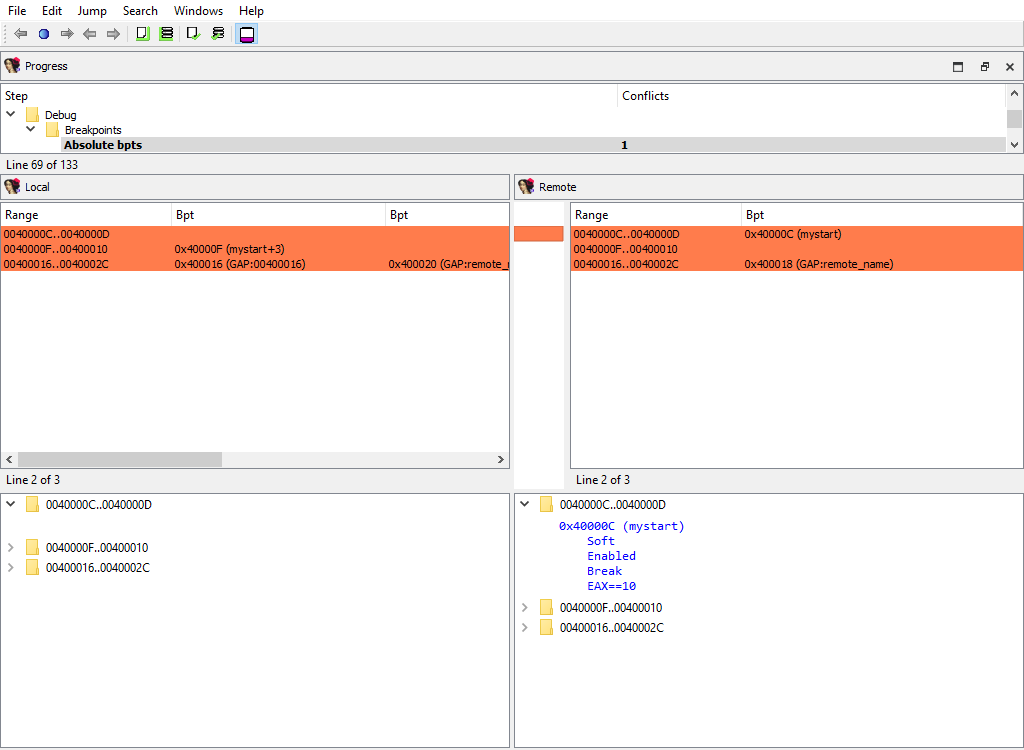
Debug/Watchpoints
Merging of watch points.
The “Detail” pane is absent.
Dirtree/$ dirtree/…
The following merge phases exist:
- Dirtree/$ dirtree/tinfos
- Dirtree/$ dirtree/structs
- Dirtree/$ dirtree/enums
- Dirtree/$ dirtree/funcs
- Dirtree/$ dirtree/names
- Dirtree/$ dirtree/imports
- Dirtree/$ dirtree/bookmarks_idaplace_t
- Dirtree/$ dirtree/bookmarks_structplace_t
- Dirtree/$ dirtree/bookmarks_enumplace_t
- Dirtree/$ dirtree/bpts
They deal with merging of the standard dirtrees.
The “Detail” pane is absent.
Misc/Try blocks
Merging of try and catch block info.
The “Detail” pane describes try block.
Misc/Virtual function tables
Merging of virtual function tables.
The “Detail” pane is absent.
Misc/Notepad
Merging of database notepads. Each line of text is a diffpos.
The “Detail” pane is absent.
Processor specific/…
Each processor plugin creates its own merge steps to handle the processor plugin’s specific data.
For example, the PC processor module adds the following merge steps:
- Processor specific/Analyze ea for a possible offset
- Processor specific/Frame pointer info
- Processor specific/Pushinfo
- Processor specific/VXD info 2
- Processor specific/Callee EA|AH value
- …
Plugins/Decompiler/…
Merging of the decompiler data starts with the global configuration parameters from hexrays.cfg:

To handle decompilation of specific functions, IDA stores the decompilation data in a database netnode named Hexrays node.
The merge step Plugins/Decompiler/Hexrays nodes adds or deletes netnodes, indicating which functions have or haven’t been decompiled in each databases:
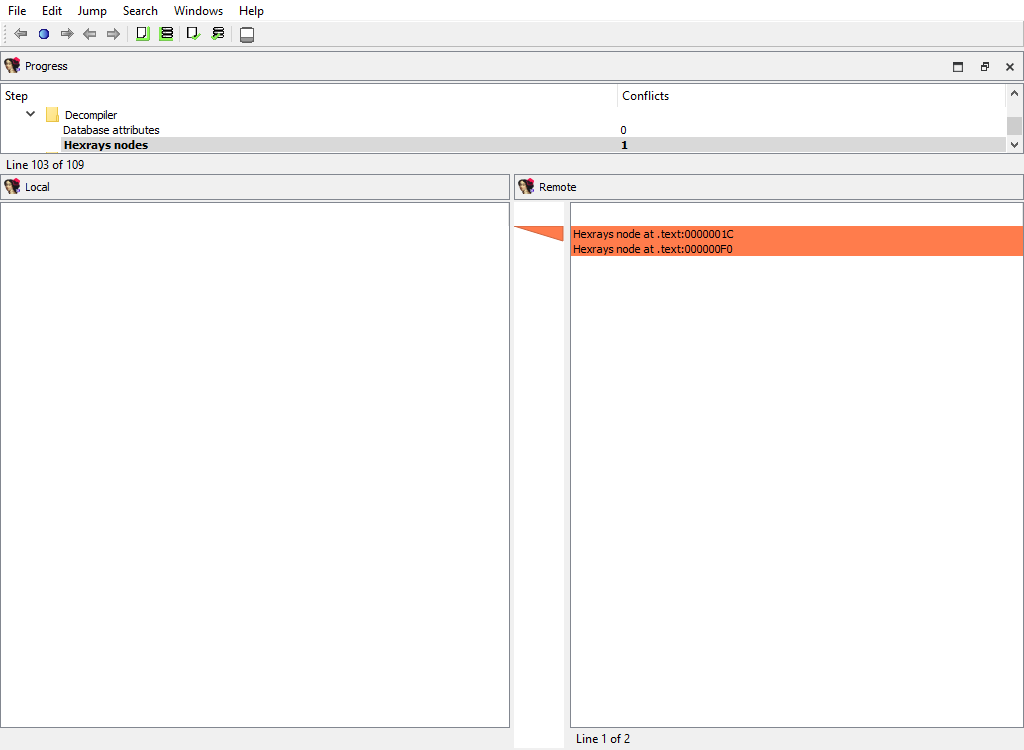
The decompilation data for matching functions is compared using the following attributes:
- Plugins/Decompiler/…/Numforms
- Plugins/Decompiler/…/mflags
- Plugins/Decompiler/…/User-defined funcargs
- Plugins/Decompiler/…/User-defined variable mapping
- Plugins/Decompiler/…/User-defined lvar info
- Plugins/Decompiler/…/lvar settings
- Plugins/Decompiler/…/IFLAGS
- Plugins/Decompiler/…/User labels
- Plugins/Decompiler/…/User unions
- Plugins/Decompiler/…/User comments
- Plugins/Decompiler/…/User-defined call
If there is a difference, each comparison criteria will be assigned its own merge step. Each step will use the standard “Pseudocode” widget so that differences can be viewed in-context with the full pseudocode:
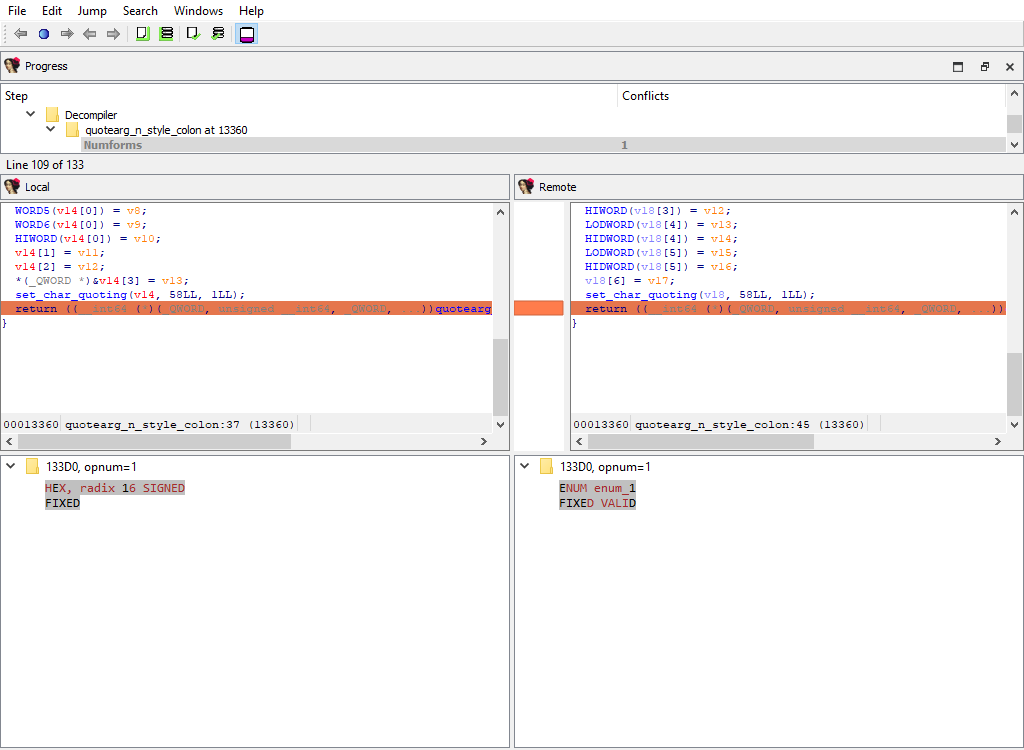
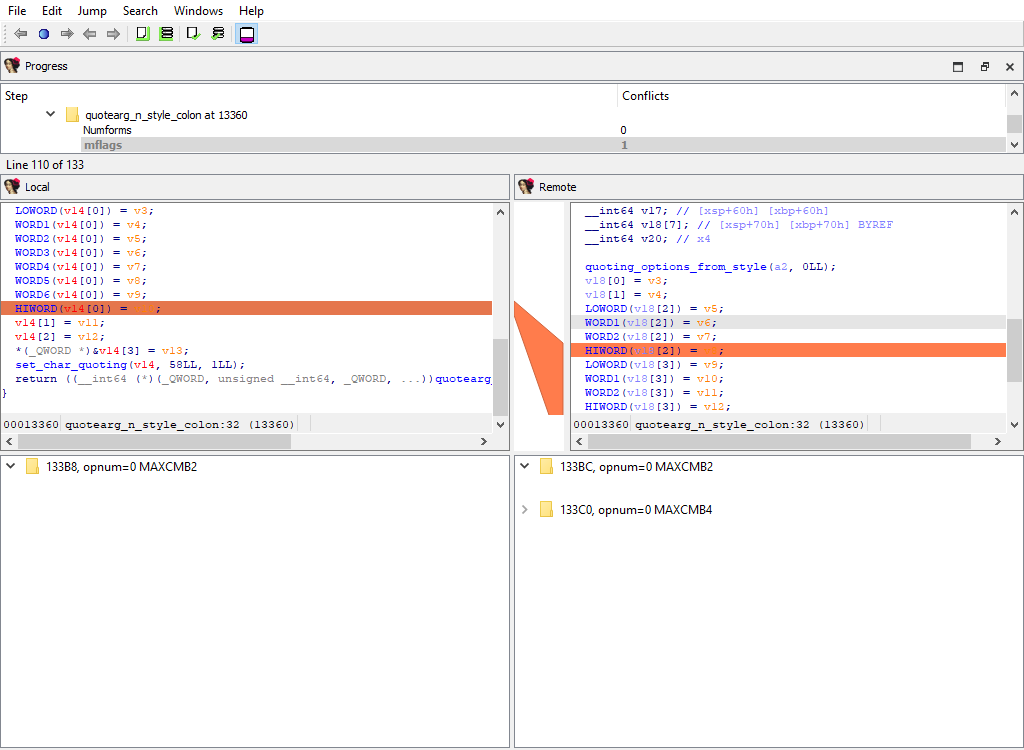
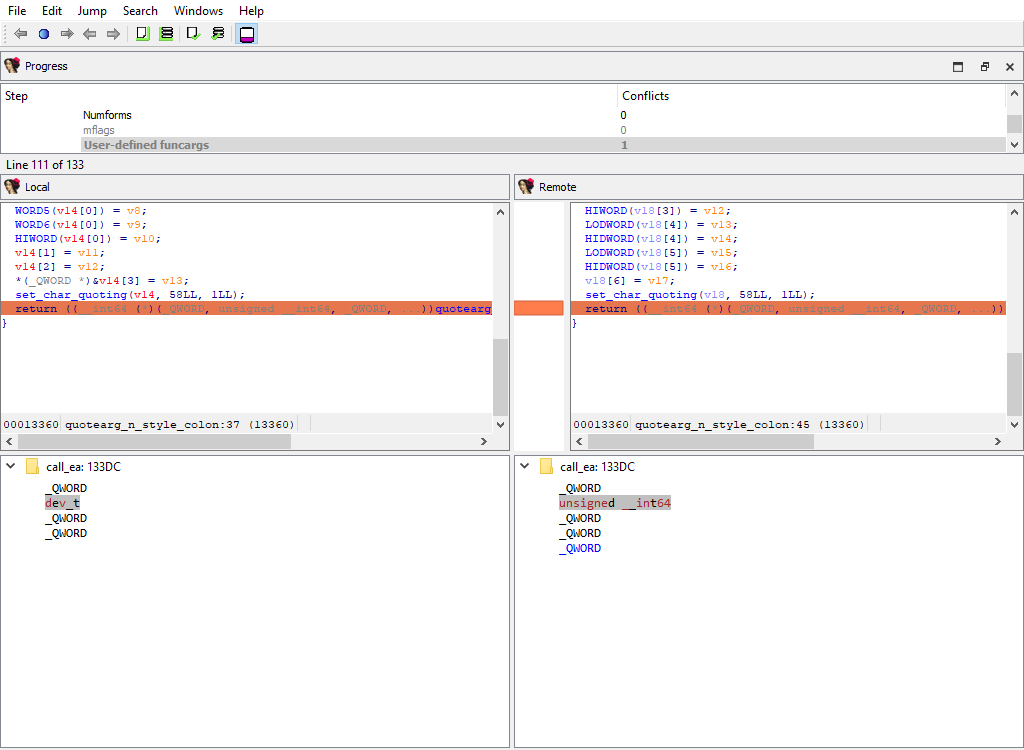
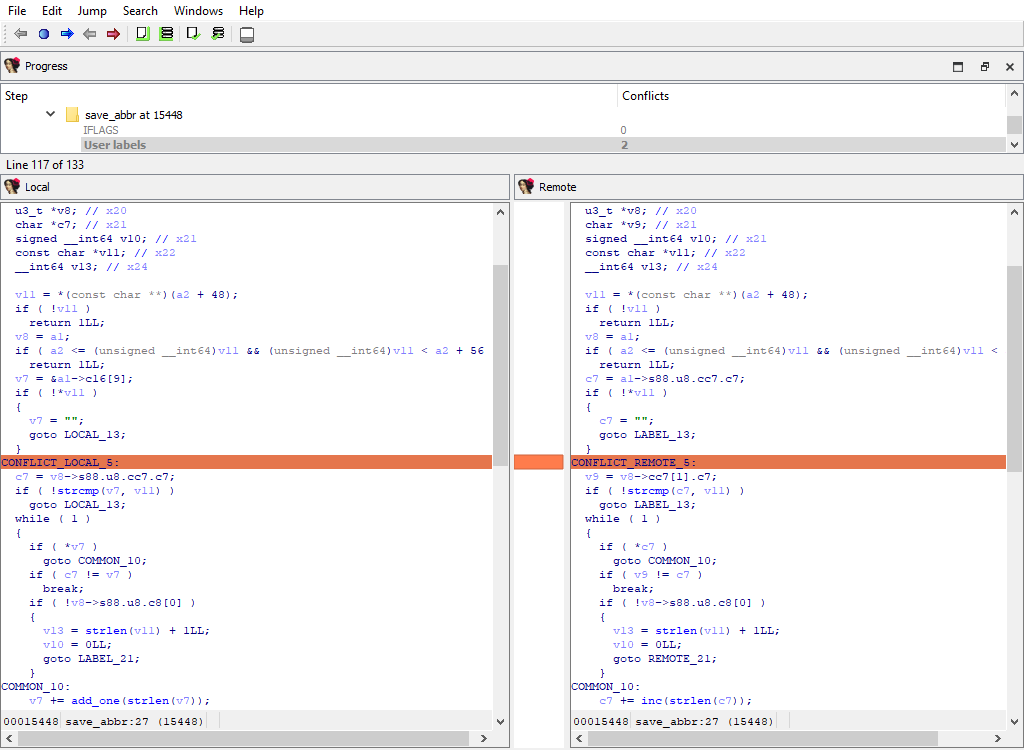

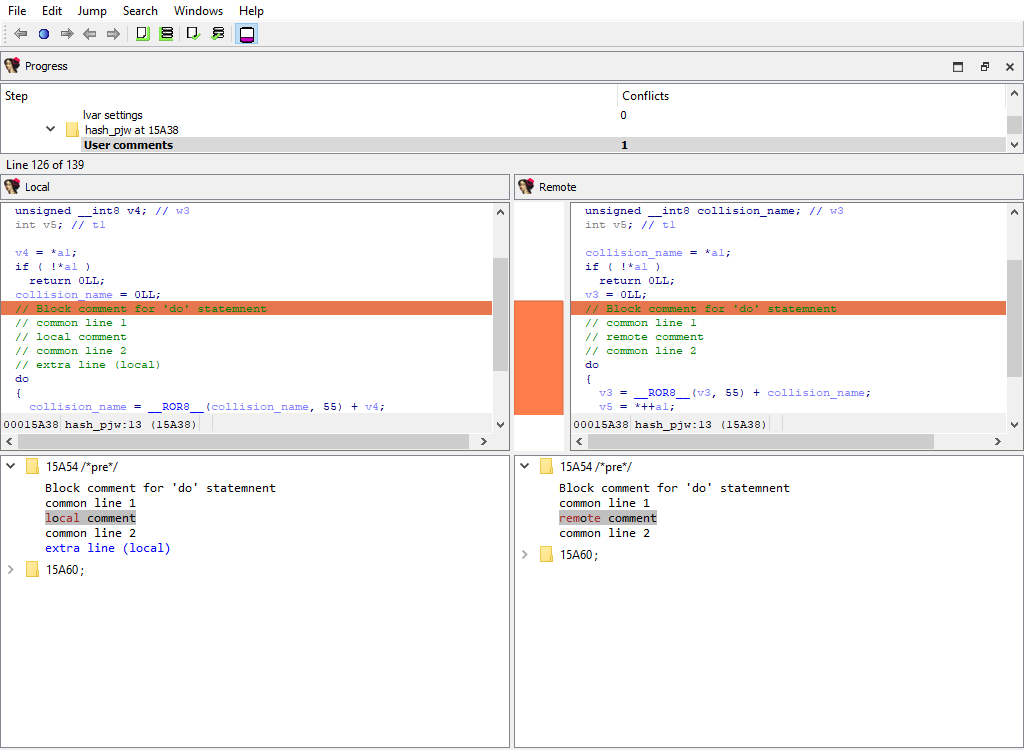
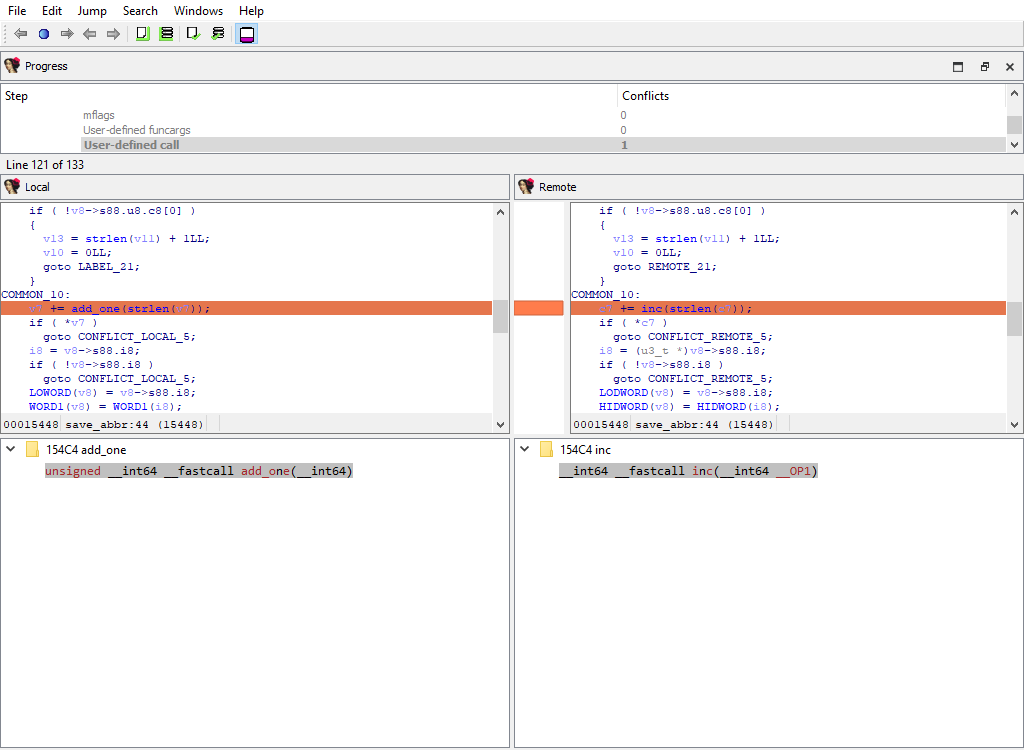
Loader data merge phases
The file loader that was used to create the database may have stored some data in the database that is specific to the loader itself.
There are merge phases for each loader, for example:
- Loader/PE file/…
- Loader/NE file/…
- Loader/ELF file/…
- Loader/TLS/…
- Loader/ARM segment flags/…
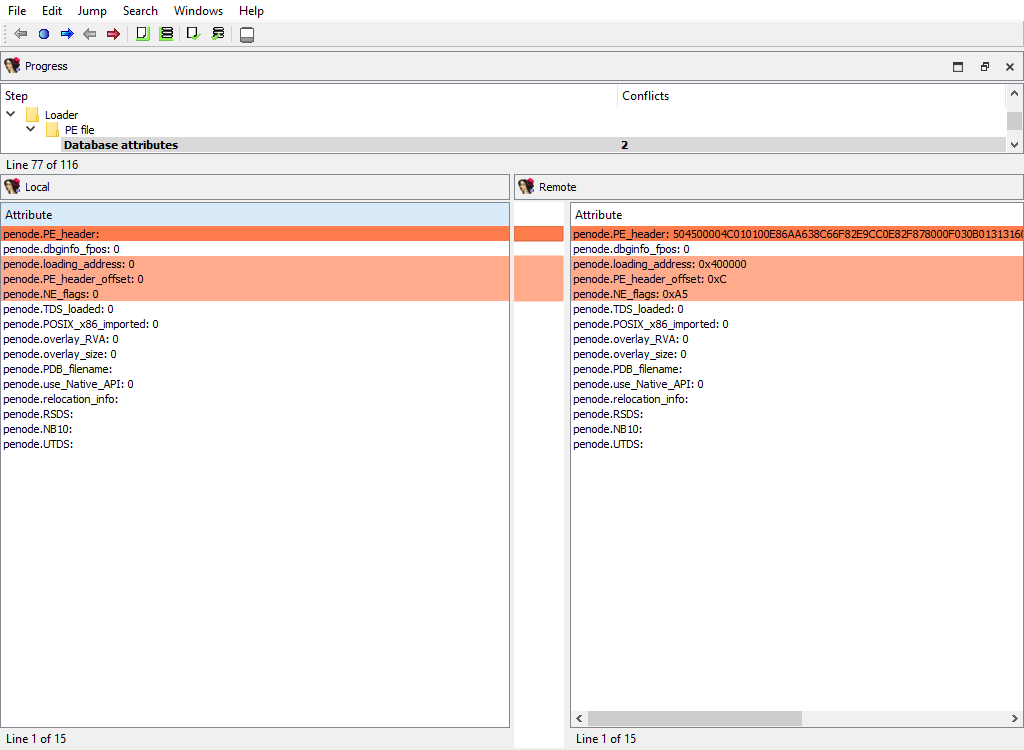
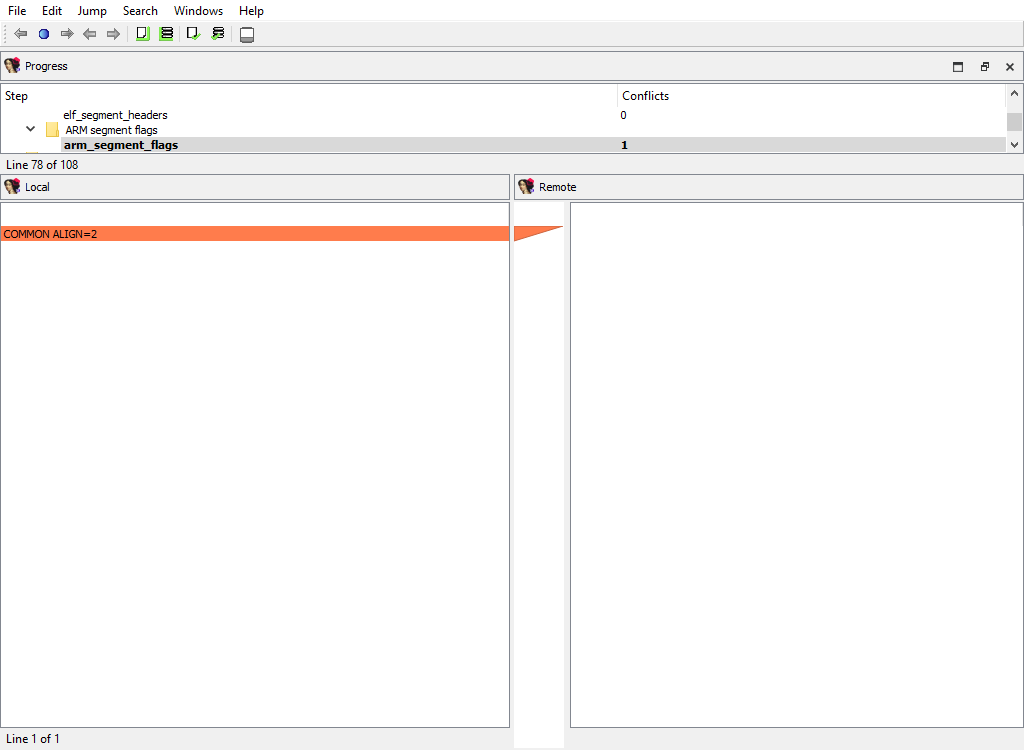
Debugger data merge phases
To handle the differences in debugger data the following merge steps may be created:
- Debugger/pin
- Debugger/gdb
- Debugger/xnu
- Debugger/ios
- Debugger/bochs
- Debugger/windbg
- Debugger/rmac_arm
- Debugger/lmac_arm
- Debugger/rmac
- Debugger/lmac
As can be deduced by their names, they handle debugger-specific data in the database.

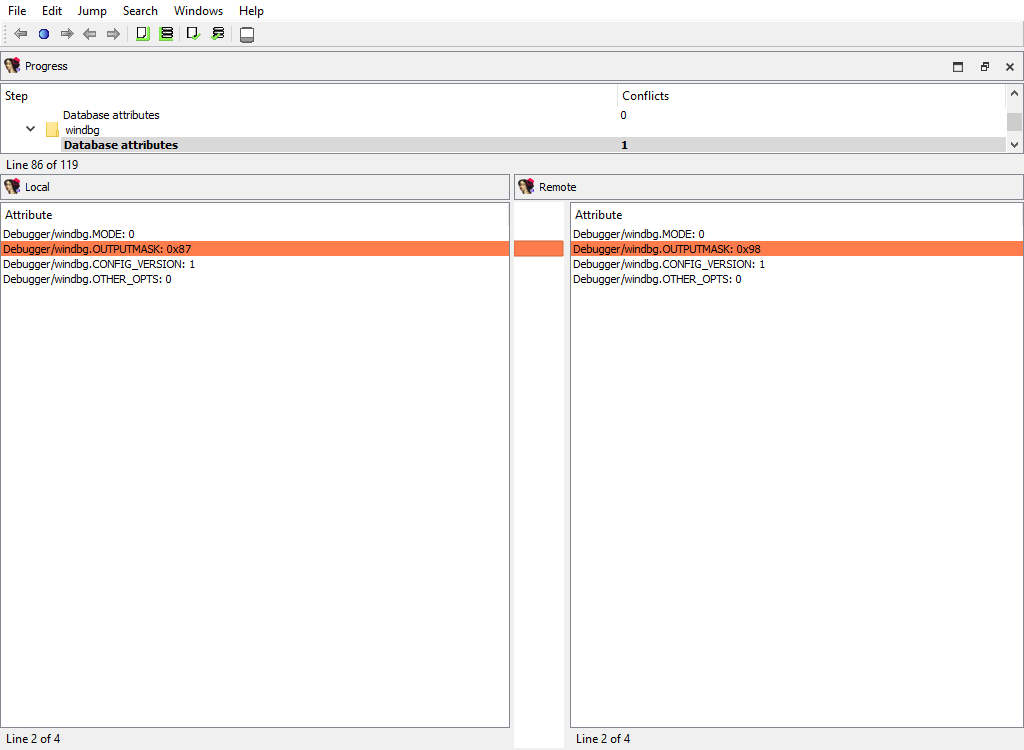
Other plugins merge phases
There are a number of IDA plugins that need to merge their data.
For example:
- Plugins/PDB
- Plugins/golang
- Plugins/EH_PARSE
- Plugins/Callgraph
- Plugins/swift
Any third party plugin may add merge phases using the IDA SDK. We provide sample plugins that illustrate how to add support for merging into third party plugins.

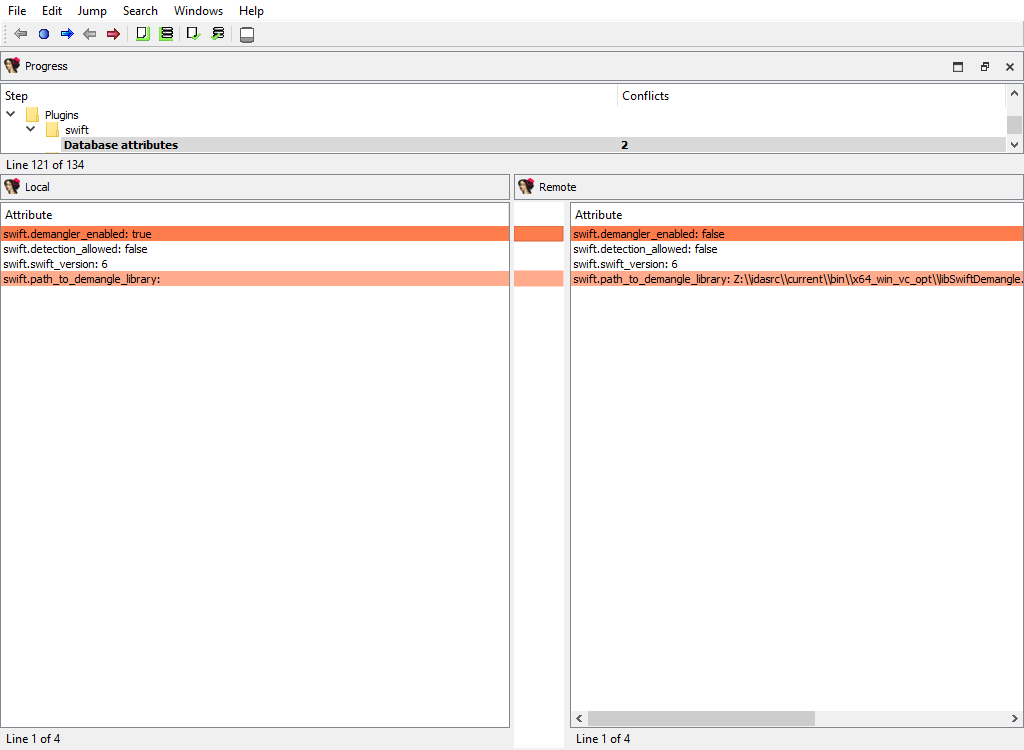
Appendix B
Using IDASDK to add merge functionality to plugin
Overview
Any plugin that stores its data in the database must implement the logic for merging its data. For that, the plugin must provide the description of its data and ask the kernel to create merge handlers based on these descriptions.
The kernel will use the created handlers to perform merging and to display merged data to the users. The plugin can implement callback functions to modify some aspects of merging, if necessary.
The plugin may have two kinds of data with permanent storage:
- Data that applies to entire database (e.g. the options). To describe this data, the
idbattr_info_ttype is used. - Data that is tied to a particular address. To describe this data, the
merge_node_info_ttype is used.
The kernel will notify the plugin using the processor_t::ev_create_merge_handlers event. On receiving it, the plugin should create the merge handlers, usually by calling the create_merge_handlers() function.
Plugin
The IDA SDK provides several sample plugins to demonstrate how to add merge functionality to third party plugins:
- mex1/
- mex2/
- mex3/
- mex4/
The sample plugin without the merge functionality consists of two files:
- mex.hpp
- mex_impl.cpp
It is a regular implementation of a plugin that stores some data in the database. Please check the source files for more info.
We demonstrate several approaches to add the merge functionality. They are implemented in different directories mex1/, mex2/, and so on.
The MEX_N macros that are defined in makefile are used to parameterize the plugin implementation, so that all plugin examples may be used simultaneously.
You may check the merge results for the plugins in one session of IDA Teams. Naturally, you should prepare databases by running plugins before launching of IDA Teams session.
Merge functionality
The merge functionality is implemented in the merge.cpp file. It contains create_merge_handlers(), which is responsible for the creation of the merge handlers.
Variants:
mex1/
Merge values are stored in netnodes. The kernel will read the values directly from netnodes, merge them, and write back. No further actions are required from the plugin. If the data is stored in a simple way using altvals or supvals, this simple approach is recommended.
mex2/
Merge values are stored in variables (in the memory). For more complex data that is not stored in a simple way in netnodes, (for example, data that uses database blobs), the previous approach cannot be used. This example shows how to merge the data that is stored in variables, like fields of the plugin context structure. The plugin provides the field descriptions to the kernel, which will use them to merge the data in the memory. After merging, the plugin must save the merged data to the database.
mex3/
Uses mex1 example and illustrates how to improve the UI look.
mex4/
Merge data that is stored in a netnode blob. Usually blob data is displayed as a sequence of hexadecimal digits in a merge chooser column. We show how to display blob contents in detail pane.
Resolving conflicts in a file
When a user needs to commit changes made to a file, but that same file has received other modifications (likely from other users) in the meantime, it is necessary to first “merge” the two sets of modifications together.
When the two sets of modifications do not overlap, merging is trivial - at least conceptually. But when they do overlap, they produce conflict(s).
Since IDA Teams focuses on collaboration over IDA database files, the rest of this section will focus on the different strategies that are available for resolving conflicts among those.
IDA Teams comes with multiple strategies to help in conflict resolution of IDA database files:
- Auto-resolve (if no conflicts)
- Auto-resolve, prefer local
- Auto-resolve, prefer remote
- Interactive merge mode
- Use local, discard remote
- Use remote, discard local
Auto-resolve (if no conflicts)
Launch IDA in a non-interactive batch mode, attempting to perform all merging automatically.
If any conflict is discovered, bail out of the merge process, and don’t modify the local database.
Auto-resolve, prefer local
Launch IDA in a non-interactive batch mode, attempting to perform all merging automatically.
If a conflict is discovered, assume that the “local” change (i.e., the current user’s change) is the correct one, and apply that.
Once all merging is done and conflicts are resolved, write those to the local database and exit IDA
Auto-resolve, prefer remote
Launch IDA in a non-interactive batch mode, attempting to perform all merging automatically.
If a conflict is discovered, assume that the “remote” change (i.e., the change made by another user) is the correct one, and apply that.
Once all merging is done and conflicts are resolved, write those to the local database and exit IDA
Interactive merge mode
Manual merge mode.
This will launch IDA in an interactive, 3-pane mode, allowing the user to decide how to resolve each conflict.
Once all merging is done and conflicts are resolved, exit IDA and write the changes to the local database.
Use local, discard remote
Select the local database, ignoring all changes in the remote database.
No IDA process is run.
Use remote, discard local
Select the remote database, ignoring all changes in the local database.
No IDA process is run.
hv command reference manual
hv credentials
In order to connect to the vault server, hv must at least have:
- a username
- a password
- a hostname
For example:
$ hv -hhexvault.acme.com:65433 -uadmin -psecret users
LastActive Adm Login Email
---------- --- ------------ ------------
2022-06-27 * admin
2022-06-22 alice Alice <[email protected]>
Never bob Bob <[email protected]>
...
There are 3 ways to specify credentials (in decreasing order of priority):
- providing them as command-line arguments (as in the example above)
- storing them in environment variables
- storing them in the registry+keychain (recommended)
All credentials, including usernames, are case-senstive, meaning that “Joe” and “joe” would be different users.
Command line
Passing credentials on the command line will always take precedence over environment variables and registry+keychain.
-uUSERNAME | specify username |
-pPASSWORD | specify password |
-hHOST | specify host (server:port) (if port is omitted, defaults to 65433) |
-sSITENAME | specify site |
--set | remember credentials. This option doesn’t require the credentials to be passed through the command line, credentials passed through environment variables will work as well |
Environment variables
Credentials can also be passed through environment variables. They will take precedence over those possibly found in the registry+keychain.
VAULT_HOST | the server host name |
VAULT_PORT | the server port |
VAULT_USER | the username to connect to the server |
VAULT_PASS | the user’s password |
VAULT_SITE | the site to use (most commands need a site to operate) |
Registry + keychain
Unless environment variables or command-line arguments are provided, hv will look for credentials in the registry (and the OS’s keychain for passwords.)
Credentials can be stored in the registry (and keychain) like so:
alice@alice_PC$ hv --set -ualice -palice -hvaultserver -salice_on_alicepc
The user, host (and optional site) will be persisted in the registry, while the password will be saved to the OS’s keychain.
For this operation to succeed, at least a user and host must be provided
In order to keep the various commands’ syntax as clear as possible, we will assume that the user has stored credentials (in either the registry+keychain or environment variables) for the rest of this manual.
Best practices
We recommend persisting credentials using the registry+keychain method.
Once that is done, commands will become cleaner:
>./hv info
Hex-Rays Vault Server v1
Vault time: 2022-04-14 15:36:29, up since 2022-04-14 15:17:25
...
if you login to the server using hvui and save the login information, it will end up in the the registry+keychain method, and thus hv will then be able to use that information as well.
Path formats
Local paths refer to a file on the host file system.
Vault paths refer to a file mapped on the vault. They can start with // to refer to the root of the vault.
Some vault paths can optionally specify the revision of the path.
Special symbols were created to access specific revisions:
^ | last revision available on the vault |
= | current revision, that is synced on the site |
* | all revisions |
Special file revision symbols
subdir/ | means all files in all subdirectories |
subdir | means all files in all subdirectories (same as subdir/) |
subdir/* | means all files in the directory |
Directories and wildcards
Examples
Get the first revision of a file:
$ hv sync //malware/Ransomware.WannaCry/41aa.exe.i64#1
ok synced //malware/Ransomware.WannaCry/41aa.exe.i64#1 (838724 bytes)
ok sync completed
Sync to the last version of a file:
$ hv sync malware/Ransomware.WannaCry/41aa.exe.i64#^
ok synced //malware/Ransomware.WannaCry/41aa.exe.i64#3 (846916 bytes)
ok sync completed
Force sync to the current revision (we must specify -f to force a file transfer):
$ hv sync -f malware/Ransomware.WannaCry/41aa.exe.i64#=
ok synced //malware/Ransomware.WannaCry/41aa.exe.i64#2 (846916 bytes)
ok sync completed
Display md5 checksums of all revisions of a file:
$ hv md5 malware/Ransomware.WannaCry/41aa.exe.i64#*
ok 8F464140FA3DA4A20B03166F2E80325B //malware/Ransomware.WannaCry/41aa.exe.i64#1
ok E0F7B984151FEF497985F375C64FA5C7 //malware/Ransomware.WannaCry/41aa.exe.i64#2
ok 5C3B88306CF0D93DC35FFD67A710AE3B //malware/Ransomware.WannaCry/41aa.exe.i64#3
List Hex-Rays Vault server’s toplevel directory contents:
$ hv dir //
2022-06-02 10:29:30 140267 CL29/edit //malware/cppobj_virtcall.i64#9
2022-06-14 16:44:19 2173541 CL36/edit //iOS/dyld_ios16.i64#3
Plan to add a file to the vault:
$ hv add /path/to/local_rootdir/enable.png
ok added '//enabled.png'
Plan to add a directory:
$ hv add /path/to/local_rootdir/REsearch
ok added '//REsearch/vm2vm.dat'
ok added '//REsearch/vm2vm.exe'
ok added '//REsearch/vm2vm.i64'
Plan to delete a file:
$ hv del /path/to/local_rootdir/REsearch/*.dat
ok checked out '//REsearch/vm2vm.dat' for 'del' (worklist 1)
Show worklist to which files were added:
$ hv worklist show
WL 1 add //REsearch/vm2vm.exe#0
WL 1 add //REsearch/vm2vm.i64#0
WL 1 edit //cppobj_virtcall.i64#9
WL 1 add //enabled.png#0
It is safe to interrupt a command using Ctrl-C. The file transfers in action will be gracefully terminated, so that no partially received files will be left on the disk. However, the requests that were delivered to the server will still be carried out up to the completion. For example, if the user asked to check out thousands of files for editing, this will be performed even if the user presses Ctrl-C after invoking the command.
If the command syntax specifies ellipsis (…), it means that multiple path patterns can be specified. The path patterns can be specified using local paths or vault paths, which start with a double slash (//).
Commands
Sites
Commands in this section manipulate sites.
A user must be using a site in order for most commands to work correctly.
site add
site add [-u USER] SITENAME ROOTDIR [HOST]
Creates a new site.
The specified user will be the owner of the new site. If the user is not specified, the current user will own the site. Only the site owner can use a site.
Only admins can create sites for other users.
To use a site, it must be specified as described in the credentials section.
-u USER | The user (owner) of the new site, must be an existing username. Defaults to the current user. Admins can specify a different user. |
SITENAME | The name of the site that will be created, it must be unique (no site can already exist with that name). It must not exceed 64 characters, and it must be composed of alphanumerics or underscore or dash. The first character cannot be a digit or a dash. |
ROOTDIR | The absolute path to the directory that will hold the vault files. |
HOST | The computer from which the site can be used. It can be specified as an empty string. In this case the server will let the site to be used by any computer. However, since it is a safety feature that prevents from inadvertently using a site from a wrong computer, we do not recommend to specify it as an empty string. When creating a site for the current user, the host defaults to the current computer. |
Examples:
# Example: Create a new site:
alice@alice_PC$ hv site add alicepc /home/alice/vault_site
# Example: Ensure that is exists:
alice@alice_PC$ hv sites
Site name User Host Last Used Rootdir
--------- ----- -------- ---------- ------------
alicepc alice alice_PC Never /home/alice/vault_site
# Example: Remember the new site in the registry:
alice@alice_PC$ hv --set -salicepc
Information has been saved into the registry.
# Example: The new site is used in all future commands:
alice@alice_PC$ hv info |grep site
Client site: alicepc
site del
site del [-f] SITENAME
Deletes a site.
If -f was passed and the site has some pending worklists, they will be deleted.
This is not a reversible operation, so we recommend caution.
Only admins can delete sites that belong to other users.
-f | Force the deletion even if the site still has worklists. |
SITENAME | Name of the site to delete. |
Example:
# Example: Delete the site, forcing deletion of the site's worklists
alice@alice_PC$ hv site del alice_old_laptop
'alice_old_laptop' not empty
alice@alice_PC$ hv site del -f alice_old_laptop
site edit
site edit [-u USER] SITENAME ROOTDIR [HOST]
Edits an existing site’s details, such as the rootdir and the host it is bound to.
Admins can reassign a site to a new user or edit sites of other users.
-u USER | The new user (owner) of the site, can only be different than the previous owner if the current user is admin. |
SITENAME | The name of the site that will be edited. It must exist and be owned by the current user, unless if the current user is admin. |
ROOTDIR | The new absolute path to the directory that will hold the site files. |
HOST | The new hostname that will be used for the site. It can be omitted if no changes are desired. |
Examples:
# Example: Change the root directory of a site:
alice@alice_PC$ hv site edit alicepc /home/alice/vault
# Example: Transfer ownership of site "local_on_shared_machine" to Bob:
alice@alice_PC$ hv site edit -u bob local_on_shared_machine /home/shared/projects re.acme.com
sites
sites [SITENAME]
Lists all sites.
Show a list of sites, and their associated information.
SITENAME | Name of the site to show. |
Example:
alice@alice_PC$ hv sites
Site name User Host Last Used Rootdir Cur
---------- ------ ---------- ---------- ---------------------- ---
alicepc alice alice_PC 2022-06-22 /home/alice/vault_site *
joe_laptop joe ThinkPad14 2022-05-30 c:/work/vault
chrispc chris chris_PC Never W:/vault
Site filters
filt get
filt get [-s SITENAME]
Displays the filter table associated with the site.
Only admins can see filter tables of other users.
-s SITENAME | The sitename whose filter table should be displayed. If omitted, defaults to the current site. |
Examples:
# Example: Show the default (i.e., empty) filter table
alice@alice_PC$ hv filt get
##### If the site filters were not set yet, the following info will be displayed:
alice@alice_PC$ hv filt get
##### By default all vault files are visible.
##### The admin can set up permissions to deny access
##### to some files. The user too can set up filter
##### patterns to make some files invisible. For that,
##### each site has a user-controlled filter table.
#####
##### The below table controls vault file visibility.
##### The table is scanned from the beginning to the end.
##### Lines starting with '!' hide the matching files.
##### Other lines make the matching files visible.
##### If the first line starts with '!', all files are
##### visible by default. Otherwise, all files are
##### invisible by default.
# Example: !*.mov will hide all *.mov files.
# Example: Set site filters from the standard input:
alice@alice_PC$ hv filt set
/work/research/
<Ctrl-D>
# Example: Verify the new filters:
alice@alice_PC$ hv filt get
/work/research/
##### The files outside of /work/research/ are not visible anymore
filt set
filt set [-s SITENAME] [@file]
Sets the filter table associated to the site, either interactively or from @file.
Information about the format of site filters can be retrieved by issuing the filt get command.
Only admins can modify filter tables of other users.
-s SITENAME | The sitename whose filter table should be set. If omitted, defaults to current site. |
@file | File containing the new table. |
Examples:
# Example: Make everything in the current site hidden, but `.bak` files
alice@alice_PC$ echo *.bak | hv filt set
# Example: Set site filters, from a file
alice@alice_PC$ cat @tablefile
*.idb
*.exe
alice@alice_PC$ hv filt set -s site1 @tablefile
File manipulation
add
add [-s] [-w WORKLIST_ID] PATH_PATTERN…
Adds new file(s) to a worklist.
Issuing this command will not upload the file(s) to the server right away: the new file name(s) will be placed into a worklist, which then needs to be committed to the server. Once a worklist is committed, its files will be available to other users.
The specified file(s) are not required to exist, it is possible to add a file that does not exist yet.
The files must be inside the site’s rootdir.
The files will be filtered using hvignore rules.
-s | Silent mode; do not output any messages. |
-w WORKLIST_ID | The id of the worklist that the file(s) will be added to. If omitted, defaults to worklist 1. |
| PATH_PATTERN… | Local path to file(s) to add to the vault. |
Examples:
alice@alice_PC$ hv add new.idb
ok added '//new.idb'
# Example: add files to worklist 2
alice@alice_PC$ hv add -w 2 cuda_demo_suite/*
ok added '//cuda_demo_suite/bandwidthTest'
ok added '//cuda_demo_suite/busGrind'
ok added '//cuda_demo_suite/deviceQuery'
ok added '//cuda_demo_suite/nbody'
ok added '//cuda_demo_suite/nbody_data_files/nbody_galaxy_20K.bin'
ok added '//cuda_demo_suite/oceanFFT'
ok added '//cuda_demo_suite/oceanFFT_data_files/ocean.frag'
ok added '//cuda_demo_suite/oceanFFT_data_files/ocean.vert'
ok added '//cuda_demo_suite/oceanFFT_data_files/ref_slopeShading.bin'
ok added '//cuda_demo_suite/oceanFFT_data_files/ref_spatialDomain.bin'
ok added '//cuda_demo_suite/randomFog'
ok added '//cuda_demo_suite/randomFog_data_files/ref_randomFog.bin'
ok added '//cuda_demo_suite/vectorAdd'
copy
copy [-s] [-w WORKLIST_ID] SRC_PATH DST_PATH
Makes a copy of vault file(s).
This command creates a copy of the original file at the requested destination, and place the new file into a worklist. Once the worklist is committed, the new file will be visible to other users.
NOTE: The source file will be downloaded from the server to the new file. If the source file was modified locally, those modifications won’t be part of the copy. This implies that if a file has just been added to the {hrvsrv} but not committed yet, it can’t be copied because it does not exist on the server yet.
-s | Silent mode; do not output any messages. |
-w WORKLIST_ID | The id of the worklist that the files will be added to. If omitted, defaults to worklist 1. |
| SRC_PATH | The source path. |
| DST_PATH | The destination path. |
Examples:
# Example: Copy `newfile` into the `rust_samples` subdirectory. The worklist #2 will hold the change.
alice@alice_PC$ hv copy -w 2 newfile rust_samples/newfile
ok copied '//newfile#1' to '//rust_samples/newfile'
# Example: Copy an entire subdirectory (note the trailing slash at the destination):
alice@alice_PC$ hv copy source_subdir/ destination/subdir/
ok copied '//source_subdir/aaa/sample.idb#1' to '//destination/subdir/aaa/sample.idb'
ok copied '//source_subdir/common.idb#1' to '//destination/subdir/common.idb'
# Example: Copy a subdirectory without recursion:
alice@alice_PC$ hv copy source_subdir/* destination/subdir/
ok copied '//source_subdir/common.idb#1' to '//destination/subdir/common.idb'
# Example: Copy a file that was just added but not yet committed, it will fail:
alice@alice_PC$ hv add test.text
ok added '//test.text'
alice@alice_PC$ hv copy test.text test.text.copy
no matching files for '//test.text'
move
move [-s] [-w WORKLIST_ID] SRC_PATH DST_PATH
Opens tracked file(s) for moving/renaming.
This is similar to performing a copy, followed by a del: the new file will be checked out for copy while the original file will be checked out for deletion.
-s | Silent mode; do not output any messages. |
-w WORKLIST_ID | The id of the worklist that the file(s) will be added to. If omitted, defaults to the worklist 1. |
| SRC_PATH | The source path. |
| DST_PATH | The destination path. |
Example:
alice@alice_PC$ hv move //VxWorks/CP05x/info.txt //VxWorks/CP05x/info.md
ok moved '//VxWorks/CP05x/info.txt#1' to '//VxWorks/CP05x/info.md'
alice@alice_PC$ hv wk show 1
WL 1 copy //VxWorks/CP05x/info.md#0
WL 1 del //VxWorks/CP05x/info.txt#1
alice@alice_PC$ hv edit //VxWorks/CP05x/info.txt
file '//VxWorks/CP05x/info.txt' is already checked out
del
del [-s] [-w WORKLIST_ID] PATH_PATTERN…
Opens tracked file(s) for deletion, adding them to a worklist.
Once the worklist is committed, the file(s) won’t be tracked anymore by the {hrvsrv}, and will be removed from the local filesystem.
NOTE: That this does not remove all revisions of the file on the server: that is the role of the purge command.
-s | Silent mode; do not output any messages. |
-w WORKLIST_ID | The id of the worklist that the file(s) will be added to. If omitted, defaults to worklist 1. |
| PATH_PATTERN… | Vault path of file(s) to delete. |
Example:
alice@alice_PC$ ls /path/to/site_rootdir/cat
/path/to/site_rootdir/cat
alice@alice_PC$ hv del -w2 cat
ok checked out '//cat' for 'del' (worklist 2)
alice@alice_PC$ ls /path/to/site_rootdir/cat
/path/to/site_rootdir/cat
alice@alice_PC$ hv commit 2 "Deleted 'cat'"
ok commit #39 completed
alice@alice_PC$ ls /path/to/site_rootdir/cat
ls: cannot access '/path/to/site/rootdir/cat': No such file or directory
edit
edit [-s] [-w WORKLIST_ID] PATH_PATTERN…
Opens tracked file(s) for edit, adding them to a worklist.
This command is used to instruct the {hrvsrv} that we will be working on files, so that it knows what revision of the file(s) that work will be based on and so later diff or resolve commands can work correctly.
-s | Silent mode; do not output any messages. |
-w WORKLIST_ID | The id of the worklist that the file(s) will be added to. If omitted, defaults to worklist 1. |
| PATH_PATTERN… | Vault path of file(s) to checkout for edit. |
Example:
alice@alice_PC$ hv edit cat.i64
ok checked out '//cat.i64' for 'edit' (worklist 1)
(...do some work...)
alice@alice_PC$ hv commit 1 "Analyzed 'main' function"
ok commit #12 completed
scan
scan [-a] [-e] [-d] [-s] [PATH_PATTERN…]
Reconciles the contents of the current directory (or the one(s) provided) on the local filesystem, with those of the corresponding path(s) on the server.
This command will recursively look for:
- new files (if
-ais provided) - deleted files (if
-dis provided) - modified files (if
-eis provided)
If any is found will create a new worklist and, add those for addition/deletion/modification.
This command is particularly useful if the user didn’t have access to the server at a time it was necessary (e.g., to issue an edit command, while flying across the Atlantic.) Users can still get work done in such cases, and once they gain access to the server again, issue a scan to commit the changes.
NOTE: The -e option causes the scan command to compute
checksums of the local files, in order to compare them against those
known to the server, in order to spot modifications.
NOTE: If no options were given, defaults to -e -d.
The files found by the scan command will be filtered by hvignore.
-a | Checkout for add files that are present only on the client side. |
-e | Checkout for edit files that are present on both the vault and the client side but differ. |
-d | Checkout for delete files that are present only on the server side. |
-s | Silent mode; do not output any messages. |
| PATH_PATTERN… | Local path of file(s) to scan, if omitted defaults to current directory. |
Example:
alice@alice_PC$ hv scan -a -e -d //
added worklist 3
checked out '//afile' for 'del' (worklist 3)
checked out '//Win32.Emotet/29D6161522C7F7F21B35401907C702BDDB05ED47.bin.i64' for 'edit' (worklist 3)
Working with worklists
worklists
worklists [WORKLIST_ID] [USER]
Lists information about worklists.
Show a (possibly filtered) list of pending worklists, and their metadata:
- the timestamp of when they were last changed
- the number of files they contain
- the owner
- the site
- their description
See also worklist show
WORKLIST_ID | Restrict to the provided worklist, defaults to showing all worklists. |
USER | Restrict to user USER, defaults to the current user. |
Example:
alice@alice_PC$ hv worklists
WL 4 2022-06-27 17:24:51 2 files; $USER@$ALICE_SITE More work on L30DS2 firmware
Manipulating a worklist
The following worklist commands will also work with the shorter wk alias.
worklist add
worklist add DESCRIPTION
Creates a new worklist, with the provided description.
The worklist will initially be empty, and assigned a free ID.
Files can be associated to that new worklist when they are marked for addition, deletion, or edition.
DESCRIPTION | The description of the new worklist. |
Example:
alice@alice_PC$ hv worklist add "Working on the 'TMutexLocker' vtable"
added worklist 3
alice@alice_PC$ hv edit -w 3 //cppobj*
ok checked out '//cppobj_virtcall.i64' for 'edit' (worklist 3)
alice@alice_PC$ hv worklist add "vm2vm: WIP"
added worklist 4
alice@alice_PC$ hv edit -w 4 //REsearch/*
ok checked out '//REsearch/vm2vm.exe' for 'edit' (worklist 4)
ok checked out '//REsearch/vm2vm.i64' for 'edit' (worklist 4)
worklist show
worklist show [-s SITE] [-u USER] [WORKLIST_ID]
Lists worklist contents.
Show a list of files opened for editing, addition or deletion, and their associated worklist(s).
-s SITE | Restrict to site SITE. If omitted, defaults to the current site. |
-u USER | Restrict to user USER. If omitted, defaults to the current user. |
WORKLIST_ID | Restrict to the provided worklist, defaults to showing all worklists. |
Examples:
alice@alice_PC$ hv worklist show 3
WL 3 edit //cppobj_virtcall.i64#9
alice@alice_PC$ hv worklist show 4
WL 4 edit //REsearch/vm2vm.exe#1
WL 4 edit //REsearch/vm2vm.i64#1
alice@alice_PC$ hv worklist show
WL 4 edit //REsearch/vm2vm.exe#1
WL 4 edit //REsearch/vm2vm.i64#1
WL 3 edit //cppobj_virtcall.i64#9
# Example: Show the worklist contents of another user
alice@alice_PC$ hv worklist show -u ted
WL 4 edit //malware/unk_2022#1/6 SITE=ted_laptop
WL 2 copy //docs/onboarding.md#0 SITE=TEDPC
WL 1 del //ida64.i64#6 SITE=TEDPC
worklist edit
worklist edit WORKLIST_ID DESCRIPTION
Edits a worklist description.
WORKLIST_ID | The worklist to modify. |
DESCRIPTION | The new description for the worklist. |
Example:
# Example: change description of worklist 4
alice@alice_PC$ hv worklist edit 4 "vm2vm: resolved all offsets in 'main' function"
worklist del
worklist del WORKLIST_ID
Deletes a worklist.
This command will only succeed if the worklist is currently empty.
WORKLIST_ID | The worklist to delete. |
Example:
alice@alice_PC$ hv worklist del 3
worklist 3 is not empty
alice@alice_PC$ hv revert //cppobj*
ok reverted //cppobj_virtcall.i64
alice@alice_PC$ hv worklist del 3
Committing a worklist to the server
commit
commit [-f] [-s] WORKLIST_ID [DESCRIPTION]
Commits files to the vault (push).
This command uploads files from the local computer to the vault.
After a successful commit, the modifications made to the files contained in the worklist will be made available for other users.
A commit may fail if another user uploaded another revision of the changed files meanwhile. In this case resolve is necessary to merge the changes.
If the worklist does not yet have a proper description, the DESCRIPTION is mandatory.
-f | Force commit of unchanged files. |
-s | Silent mode; do not output any messages. |
WORKLIST_ID | The id of the worklist to commit to the vault. |
DESCRIPTION | A description for the commit. |
Example:
alice@alice_PC$ hv commit 1
worklist 1 has empty description
alice@alice_PC$ hv commit 1 "more samples"
ok accepted //newfile#1 (5 bytes)
ok commit #2 completed
Syncing files, resolving & reverting
sync
sync [-f] [-p] [-s] [@COMMIT_ID] [PATH_PATTERN[=REVISION]…]
Downloads the requested revisions of the files from the server, and stores them on the local filesystem.
NOTE: If no paths are provided, all files from the server will be retrieved.
Requires that a site to be currently selected.
-f | Force sync. This will force a download of the files, even when the server thinks the client has the desired revision. This is a dangerous operation: any modification made to local files will be lost. |
-p | The server will perform sync without really transferring files. This options is useful if the local files are already in sync but the server has stale info about them. |
-s | Silent mode; do not output any messages. |
@COMMIT_ID | Sync to state right after COMMIT_ID was committed, cannot be used with =REVISION. |
| PATH_PATTERN[=REVISION]… | Vault path of file(s) to sync, if path is omitted, defaults to current directory, if no revision is specified, defaults to last revision available on vault (#^). |
Examples:
# Example: Sync all
alice@alice_PC$ hv sync
# Example: Sync only the specified subtree
alice@alice_PC$ hv sync -f //work/ds1_10
# Example: Sync a file to specific revision
alice@alice_PC$ hv sync //malware/Trojan.Shylock.Skype/D57D.i64#1
ok synced //malware/Trojan.Shylock.Skype/D57D.i64#1 (4374263 bytes)
ok sync completed
resolve
resolve METHOD PATH_PATTERN
Resolves conflicts in a file, using the specified strategy.
After the strategy is successfully applied and the local file has incorporated both the “local” and “remote” changes, it will be ready to be committed.
METHOD | One of “auto”, “lmerge”, “rmerge”, “manual”, “local” or “remote”. |
| PATH_PATTERN | Vault path of file(s) to resolve. |
Example:
alice@alice_PC$ hv resolve lmerge depot/file1.txt
revert
revert [-a] [-p] [-s] PATH_PATTERN…
Reverts opened files to their current revisions.
-a | Revert only unchanged files. |
-p | The server will revert the files without transferring files. |
-s | Silent mode; do not output any messages. This options is useful if the local files are already in sync but the server has stale info about them. |
| PATH_PATTERN… | Vault path of file(s) to revert. |
Example:
alice@alice_PC$ hv revert -a //
ok reverted //Win32.Emotet/29D6161522C7F7F21B35401907C702BDDB05ED47.bin
ok reverted //Win32.Emotet/29D6161522C7F7F21B35401907C702BDDB05ED47.bin.asm
ok reverted //Win32.Emotet/29D6161522C7F7F21B35401907C702BDDB05ED47.bin.log
migrate
migrate [-s] PATH_PATTERN… WORKLIST_ID
Moves opened files between worklists.
-s | Silent Mode; do not output any messages. |
| PATH_PATTERN… | Vault path of file(s) to move. |
WORKLIST_ID | The id of the worklist to move the files to, the worklist must already exist. |
Example:
alice@alice_PC$ hv migrate afile subdir/for/fred/interfaces 3
ok migrated //afile#1 to worklist 3
ok migrated //subdir/for/fred/interfaces#0 to worklist 3
Various information
files
files [-d] [-s] [PATH_PATTERN_OR_SUBSTRING[=REVISION]…]
Displays the list of the files present in the vault.
The command will collect files from the vault (that match the selection) and display for each file:
- the file path
- the revision
- the file size if it hasn’t been deleted
- the last commit id
- the last action
-d | Include deleted files. |
-s | Search for substring instead of using a path. |
| PATH_PATTERN_OR_SUBSTRING[=REVISION]… | Vault path of file(s) to include in search or substring to search for if -s. If revision is not specified, defaults to current revision (#=). If no path is specified, defaults to the root directory of the vault. |
Examples:
alice@alice_PC$ hv files -d //malware/Ransomware.WannaCry
//malware/Ransomware.WannaCry/ed01ebfbc9eb5bbea545af4d01bf5f1071661840480439c6e5babe8e080e41aa.exe#1 (size 3514368 CL1/add)
//malware/Ransomware.WannaCry/ed01ebfbc9eb5bbea545af4d01bf5f1071661840480439c6e5babe8e080e41aa.exe.asm#2 (CL2/del)
//malware/Ransomware.WannaCry/ed01ebfbc9eb5bbea545af4d01bf5f1071661840480439c6e5babe8e080e41aa.exe.i64#1 (size 838724 CL1/add)
//malware/Ransomware.WannaCry/ed01ebfbc9eb5bbea545af4d01bf5f1071661840480439c6e5babe8e080e41aa.exe.log#2 (CL2/del)
alice@alice_PC$ hv files -s i64
//malware/EquationGroup.GrayFish/GrayFish_9B1CA66AAB784DC5F1DFE635D8F8A904.i64#1 (size 2929035 CL1/add)
//malware/Ransomware.WannaCry/ed01ebfbc9eb5bbea545af4d01bf5f1071661840480439c6e5babe8e080e41aa.exe.i64#1 (size 838724 CL1/add)
//malware/Trojan.Ransom.Petya/eefa052da01c3faa1d1f516ddfefa8ceb8a5185bb9b5368142ffdf839aea4506.i64#1 (size 4535045 CL1/add)
//malware/Trojan.Shylock.Skype/Shylock-skype_8FBEB78B06985C3188562E2F1B82D57D.i64#1 (size 4374263 CL1/add)
//malware/Win32.Emotet/29D6161522C7F7F21B35401907C702BDDB05ED47.bin.i64#1 (size 319858 CL1/add)
dir
dir [-d] [-s] [-u] PATH_PATTERN_OR_SUBSTRING…
Displays vault directory listing (current revisions).
For each file entry the command will display:
- the timestamp of when the file was committed
- the file size
- the commit id
- the type of action that was executed on the file in the commit
- the path
- the current revision on disk
- an extra label if the file is unsynced
Directories will be displayed as: <subdir> PATH
-d | Include deleted files. |
-s | Path patterns are simple substrings. |
-u | Include unsynced files. |
| PATH_PATTERN_OR_SUBSTRING… | Vault path of file(s) to include in search or substring to search for if -s. |
Examples:
alice@alice_PC$ hv dir -u -d //
1970-02-04 01:52:08 573440 CL1/add //malware/EquationGroup.GrayFish/A904#1
2022-06-29 11:30:10 0 CL2/del //malware/EquationGroup.GrayFish/A904.asm#0/2 UNSYNCED
1970-02-04 01:52:08 2929035 CL1/add //malware/EquationGroup.GrayFish/A904.i64#1
2022-06-29 11:30:10 0 CL2/del //malware/EquationGroup.GrayFish/A904.log#0/2 UNSYNCED
1970-02-04 01:52:08 3514368 CL1/add //malware/Ransomware.WannaCry/41aa.exe#1
2022-06-29 11:30:10 0 CL2/del //malware/Ransomware.WannaCry/41aa.exe.asm#0/2 UNSYNCED
2022-06-29 13:52:57 846916 CL3/edit //malware/Ransomware.WannaCry/41aa.exe.i64#2/3 UNSYNCED
alice@alice_PC$ hv dir "//*"
<subdir> //malware
show
Writes the contents of a file on the vault to the command line.
| PATH_PATTERN[=REVISION] | Vault path to file(s) to display. If no revision is specified, defaults to current revision (#=). If the file revision denotes a deleted revision of the file, the contents will not be displayed. |
Example:
alice@alice_PC$ hv show patterns/ubuntu-libgcc-10.pat
415729CE415641554D89C54154554C89CD5389D34881EC280100004C8BBC2470 FF 15C2 14AD :0000 add_and_round.constprop.0 010000F30F6F842470010000C7442474000000004C8B842480010000C7442478000000000F294424504C8B742458F30F6F8C24800100004C897C2428488B9424
415729CE415641554D89C54154554C89CD5389D34881EC280100004C8BBC2470 FF 90F7 14A0 :0000 add_and_round.constprop.0 010000F30F6F842470010000C7442474000000004C8B842480010000C7442478000000000F294424504C8B742458F30F6F8C24800100004C897C2428488B9424
415729CE415641554D89C54154554C89CD5389D34881EC380100004C8BBC2480 FF 2016 157D :0000 add_and_round.constprop.0 0100004C8B842490010000C784248400000000000000F30F6F842480010000F30F6F8C2490010000C7842488000000000000004C897C2438488B842470010000
415741564155415455534881EC780100004889542410488B9424B80100004889 FF 26D7 8168 :0000 bid128_ext_fma 4C24184C8BB424B001000048B9DDBADDBADDBADDBA4889742408488B8424C801000048..................48893C244C89F34C8B9C24C001000048898C24C0
415741564155415455534881EC780100004889542410488B9424B80100004889 FF D77A 80B0 :0000 bid128_ext_fma 4C24184C8BB424B001000048B9DDBADDBADDBADDBA4889742408488B8424C801000048..................48893C244C89F34C8B9C24C001000048898C24C0
...
diff
diff PATH[=REVISION] PATH_OR_REV[=REVISION]
Compares two databases, will launch IDA in diff mode.
Only IDA databases (.i64, .idb) can be diffed with this command.
If revisions of databases requested for comparison are currently not in the site,
they will be downloaded to a temporary directory and will be deleted when IDA exits.
On unix the temporary directory can be specified with $TMPDIR.
| PATH[=REVISION] | Database 1. |
| PATH_OR_REV[=REVISION] | Database 2. If no path is specified, it will default to the path of Database 1. If no revision is specified, it will default to the current revision (#=). |
Examples:
# Example: with `interfaces.i64` opened for edit and changed, this will open IDA and show the differences with the current revision on vault
alice@alice_PC$ hv diff interfaces.i64
alice@alice_PC$ hv changes interfaces.i64
CM 9 2022-06-30 23:55:33 edit alice@alicepc interfaces.i64: deobfuscated some string
CM 8 2022-06-28 23:30:17 edit john@johnpc interfaces.i64: annotated areas to inves
CM 1 1970-02-04 01:52:08 add john@johnpc added samples
alice@alice_PC$ hv diff interfaces.i64 "#2"
md5
Prints the md5 checksum of a file on the vault.
| PATH_PATTERN[=REVISION] | Vault path of file(s) to process, if no revision is specified, defaults to the current revision (#=). |
Example:
alice@alice_PC$ hv md5 Win32.Emotet/29D6161522C7F7F21B35401907C702BDDB05ED47.bin
ok D243C0B2DBA37565CE3601AD78A73E07 //Win32.Emotet/29D6161522C7F7F21B35401907C702BDDB05ED47.bin#1
info
info
Displays info about the vault and current session.
Example:
alice@alice_PC$ hv info
Hex-Rays Vault Server v1
Vault time: 2022-06-29 00:13:55, up since 2022-06-28 09:40:53
License user : Johnny Appleseed
License email: [email protected]
License: IDAULTTL; 10 users out of 30; expires on 2023-10-13
MAC address: 7F:A7:B3:C1:8D:79
Vault directory: /opt/hexvault/files
Client name: john *ADMIN*
Client site: johnpc
Client host: johnpc (127.0.0.1)
Client root: /home/john/vault
Login time : 2022-06-29 00:13:55
Last active: 2022-06-29 00:13:55
changes
changes [-s SITENAME] [-u USERNAME] [-c MIN_COMMIT] [-C MAX_COMMIT] [-m MAX_REPORTED_ENTRIES] [-d MIN_DATE] [-D MAX_DATE] [-l] [PATH_PATTERN…]
Displays list of commits that affect a path.
List can be refined using options.
For each commit the following info will be displayed:
- the commit id
- the timestamp of the commit
- if only one file was changed, the action that was done to it (e.g.
edit) - the user who sent the commit
- the site from which the commit was sent
- a description of the commit, truncated to 40 chars unless if
-lis enabled
[horizontal]
TIP:: This command is also available under the alias commits.
-s SITENAME | Restrict to commits from SITENAME. |
-u USERNAME | Restrict to commits from USERNAME. |
-c MIN_COMMIT | Restrict to commits after commit: MIN_COMMIT. |
-C MAX_COMMIT | Restrict to commits prior to commit: MAX_COMMIT. |
-m MAX_REPORTED_ENTRIES | Limit number of reported commits to: MAX_REPORTED_ENTRIES. |
-d MIN_DATE | Restrict to commits after MIN_DATE using format YYYY-MM-DD. |
-D MAX_DATE | Restrict to commits prior to MAX_DATE using format YYYY-MM-DD. |
-l | Display long (>40 characters) commit descriptions. |
| PATH_PATTERN… | Filter commits by vault paths. If omitted, defaults to all files. |
Examples:
# Example: find all commits made by john
alice@alice_PC$ hv changes -u john
CM 109 2022-04-05 17:09:18 john@johnpc reverted commit 85
CM 108 2022-04-05 17:00:02 john@johnpc added more malware samples
CM 107 2022-04-05 16:37:02 john@johnpc WannaCry: annotated a few funcs
CM 106 2022-04-05 16:35:57 john@johnpc removed unused files
# Example: show last 2 commits on a file with full descriptions
alice@alice_PC$ hv changes -m 2 -l //iOS/dyld_ios16.i64
Commit 42 2022-06-14 16:44:19 edit gregm@gregpc
iOS: dyld iOS 16 WIP
annotated more struct members
Commit 35 2022-06-14 00:35:43 edit gregm@gregpc
iOS: RE of ios16 split cache loading
discovered some structures and their members
users
users
Shows users.
Example:
alice@alice_PC$ hv users
LastActive Adm Login RealName/Email Notes
---------- --- ------- ---------------------- -----
2022-07-27 * admin
2022-09-16 alice Alice <[email protected]>
Never bob Bob <[email protected]>
groups
groups
Displays all the existing groups and their users.
Example:
alice@alice_PC$ hv groups
malware: alice michael matt sarah jason
audit: stephen ilse
interns: russ
group show
group show GROUP_NAME
Displays the list of users in a group.
GROUP_NAME | A group name. |
Example:
alice@alice_PC$ hv group show "malware"
malware: alice michael matt sarah jason
user show
user show USERNAME
Displays the full details of a specific user.
The following details will be displayed:
- the timestamp of when the user was last active
- the username, with a
*next to it if the user has admin privileges - the license id of the user
- the full name of the user
- the email address of the user
- notes about the user
USERNAME | The username of the user to display. |
Example:
alice@alice_PC$ hv user show johndoe
2022-06-27 johndoe 99-9999-9999-99 John doe <[email protected]> NOTES
commit show
commit show COMMIT_ID
Displays the contents of a commit.
This will list all of the files that were changed by the commit.
For each file the following details will be displayed:
- the action that was performed on it in the commit
- the path
- the revision
- if it’s unsynced, an extra label will be displayed
- the size of the file
COMMIT_ID | The id of the commit to display. |
Example:
alice@alice_PC$ hv commit show 5
add //cat.i64#1 (size 503909)
Misc.
passwd
passwd PASS [USER]
Sets a new password for a user.
PASS | The new password. |
USER | The username whose password should be changed. Only admins can change other users’ passwords. If omitted, defaults to the current user. |
Examples:
alice@alice_PC$ hv passwd newpw
alice@alice_PC$ hv passwd newpw user1
commit edit
commit edit COMMIT_ID DESCRIPTION
Edits a commit description.
Regular users may modify only their own commits. Admins may modify any commit.
COMMIT_ID | The id of the commit to amend. |
DESCRIPTION | New description of the commit. |
Example:
alice@alice_PC$ hv commit edit 42 "removed unused file, it had been wrongfully added with commit #39"
licenses
licenses
Shows active licenses
Example:
alice@alice_PC$ hv licenses
Vault licenses:
99-9999-9999-99 IDAULTTW: used 2 out of 10 seat(s)
Expires: 2023-04-15
Online users: john@johnpc (99.999.99.99): 1 IDA instance(s)
borrow
borrow PRODUCT END_DATE
Borrow a license
A borrowed license can be used offline but other users will not have access to it.
A borrowed license can be returned to the vault using return. If not returned earlier, it will automatically be returned to the vault at the expiration time.
PRODUCT | The product code or license id. |
END_DATE | YYYY-MM-DD - exact date, +Nd - N days since now, +Nw - N weeks since now. DD-MON-YYYY can be used to specify an exact date too. |
Example:
alice@alice_PC$ hv borrow IDAULTTW 2022-07-31
License IDAULTTW 99-9999-9999-99 has been borrowed until 2022-07-31 00:00:00
alice@alice_PC$ hv borrow IDAULTTL +6d
License IDAULTTL 99-9999-9999-99 has been borrowed until 2022-07-31 13:53:23
return
return PRODUCT
Return a borrowed license
A returned license becomes available to other vault users.
PRODUCT | The product code or license id. |
Example:
alice@alice_PC$ hv return IDAULTTW
Licence 99-9999-9999-99 has been returned
gc
gc [-r] [-s] MAX_SIZE PATH_PATTERN…
Deletes old files from the vault cache on the client.
This command examines the contents of the .vault subdirectory in the specified directories and deletes old files from them, so that the total size of files does not exceed MAX_SIZE. MAX_SIZE can be specified as a plain number of bytes or using the k,M,G suffixes to denote KBs, MBs, GBs. The default value is 1GB.
If -r is specified, all subdirectories of the current directory will be
processed.
-r | Recursive |
-s | Silent mode; do not output any messages. |
MAX_SIZE | max size of the cache. |
| PATH_PATTERN… | Local directories to process |
Example:
alice@alice_PC$ hv gc 3G /mydir
deleted /mydir/.vault/B52C6B8E8039752CE8BC6793816EB490: 120M freed, still 4.19G used
deleted /mydir/.vault/C693254A5A370F609CC86A1F31CE5B84: 149M freed, still 4.05G used
deleted /mydir/.vault/90CFB553818B2C44DE25759C0D14C811: 670M freed, still 3.39G used
deleted /mydir/.vault/E8652439192CD33E8D4417C468AFFA49: 213M freed, still 3.18G used
deleted /mydir/.vault/D0F3CF8A94A646E6EBBB15BD54847B31: 404M freed, still 2.79G used
Administrative commands
These commands require that the user executing them has admin privileges.
Managing users
user add
user add USERNAME REALNAME EMAIL IS_ADMIN NOTES
Adds a user.
USERNAME | The username of the user. |
REALNAME | The full name of the user. |
EMAIL | The email address of the user. |
IS_ADMIN | Should be 1 if the user is admin, otherwise 0. |
NOTES | Extra notes about the user. |
Example:
alice@alice_PC$ hv user add johndoe "John Doe" [email protected] 0 "NOTES"
user edit
user edit USERNAME REALNAME EMAIL IS_ADMIN NOTES
Edits a user definition.
USERNAME | The username of the user to modify. |
REALNAME | The full name of the user. |
EMAIL | The email address of the user. |
IS_ADMIN | Should be 1 if the user is admin, otherwise 0. |
NOTES | Extra notes about the user. |
Example:
alice@alice_PC$ hv user edit johndoe "John Doe" [email protected] 0 "NOTES"
user del
user del [-b] [-f] USERNAME
Deletes a user.
Cuation: deleting a user with borrowed licenses will make the borrowed licenses unavailable until their expiration date.
-b | Force deletion even if the user has borrowed licenses. |
-f | Force deletion even if the user has checked out files. |
USERNAME | The name of the user to delete from the vault. |
Example:
alice@alice_PC$ hv user del -f johndoe
Managing groups
group add
group add GROUP_NAME
Adds a new group.
An empty group with the specified name is created.
GROUP_NAME | the name of the new group. |
Example:
alice@alice_PC$ hv group add my_group
group edit
group edit GROUP_NAME USER ADD_OR_DELETE
Edits a group by adding or deleting users.
GROUP_NAME | the name of the group. |
USER | the name of the user. |
ADD_OR_DELETE | add or delete the specified user from the group, 0 is delete, 1 is add. |
Example:
alice@alice_PC$ hv group edit "my_group" "user1" 1
alice@alice_PC$ hv group edit "my_group" "user1" 0
group del
group del GROUP_NAME
Deletes a group.
GROUP_NAME | the name of the group to delete. |
Example:
alice@alice_PC$ hv group del my_group
Managing permissions
perm get
perm get
Displays permission table.
The current permission table is printed to the standard output.
Example:
alice@alice_PC$ hv perm get
##### The permission for each vault file is determined as the result of applying
##### all matching lines, from the beginning of the permission table to the end.
##### An empty permission table grants all access to everyone.
##### A non-empty permission table starts by denying all access to everyone.
grant user fred write //subdir-for-fred/
deny group remote list //local-secret
grant group analysts write //subdir/for/idbs/
grant user * read //subdir/for/idbs/
perm set
perm set [@FILE]
Sets new permissions table from STDIN or from file.
The installed permission table becomes active immediately.
We recommend using perm check to ensure that the new permission table works correctly.
@FILE | The file from which to set the new permissions table. |
Example:
alice@alice_PC$ hv perm set <perms.txt
perm check
perm check USERNAME PATH_PATTERN
Checks permissions for a user.
The list of files that are visible to the user is printed, along with the permissions that the user has. The read access is denoted by ‘r’ and the write access is denoted by ‘w’.
USERNAME | The USERNAME of the user whose permissions that will be tested. |
| PATH_PATTERN | Vault path of file(s) that will be tested. |
Example:
alice@alice_PC$ hv perm check fred
rw //subdir-for-fred/afile
rw //subdir-for-fred/anotherfile
r- //subdir/for/idbs/interfaces.i64
alice@alice_PC$ hv perm check fred //local-secret
Others
sessions
sessions
Displays the sessions info.
For each session on the vault, the following info will be displayed:
- the site
- the user
- the hostname
- the timestamp of the login time
- the timestamp of the last activity
- “ADM” if the user has admin privileges
- “*” for the session executing the command
Example:
alice@alice_PC$ hv sessions
gregpc gregm GREGPC-554HW LOGIN=2022-07-04 LAST=2022-07-04 ADM *
lindapc linda lindasmac LOGIN=2022-07-02 LAST=2022-07-04
purge
purge [-s] [-y] PATH_PATTERN…
Purges file(s) from the Vault server, permanently deleting it and all of its history.
The path patterns must be specified using full paths, starting with //
-s | Silent mode; do not output any messages. |
-y | Really purge the files, without this parameter the command does a dry-run. |
| PATH_PATTERN… | Vault path of file(s) to purge from the vault. |
Example:
alice@alice_PC$ hv purge -s -y //work/ds1_10 //work/more_work
Concepts
What is a “site”?
A site represents a mapping of the server files to the local filesystem. Normally each computer has a site associated with it. A site has the following attributes:
- A site name
- A host name
- The path to a folder on the filesystem (a.k.a., “root directory”)
- Path filters (optional)
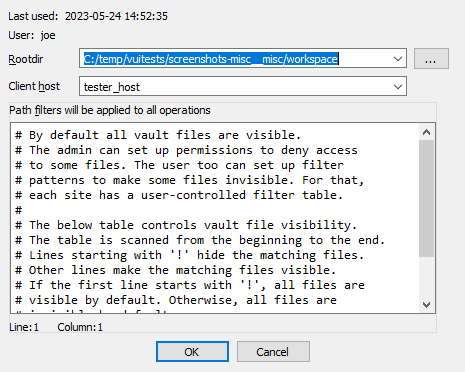
Root directory
The root directory is the essential attribute of a site. It denotes where all files from the vault server will be mapped to the local disk. Everything inside the root directory can potentially be uploaded to the vault server and shared with other team members.
The vault server cannot manage files located outside the root directory. However, this limitation is straightforward to overcome: create a symbolic link (or, on Windows, a junction point) from the root directory to the directory of your choice. This will make the target of the symbolic link visible as part of the root directory.
The vault server keeps track of each site’s state: what files have been downloaded to the local disk, what files have been checked out for editing, etc. This simplifies the housekeeping tasks, especially for big repositories with millions of files. Even for them, downloading the latest files or reconciling the local disk with the server, are almost instantaneous.
The host name is a security feature that prevents from using a site on a wrong computer. Since the server keeps track of the files downloaded to each site, using a wrong site may lead to an inconsistent mapping between the server and local disk. However, if the user does not want this protection, it is possible to erase the host name in the site definition.
Sites can be edited from the “Sites” view.
Path filters
By default all server files are visible, but for servers that manage gigabytes of data this can be problematic: it may be undesirable for users to download all files to their local computer.
Site filters provide a mechanism that lets users restrict the set of files their IDA Teams client works with. Users who want to work on some specific projects can set a filter that restricts the visibility only to selected subdirectories.
Each site has its own filters, that con be modified at any time. Filters do not directly affect any files on the local disk, or on the server: they are strictly about visibility.
WARNING: Site filters are meant simplify a user’s life by letting them focus on specific projects. Since they can be modified by users, they should not be considered a security measure: that would be the role of the permissions system, which can only be managed by vault_server administrators.
NOTE: The purpose of site filters is to create a subset of the full set of files provided by the server. Site filters don’t directly affect what locally-available files (i.e., present in the site’s rootdir, but not tracked by the server) are visible by IDA Teams clients.
There is another mechanism to specify what files should not be added to the vault.
See .hvignore for more info.
Examples
An empty filter
$ cat empty_filter.txt
$
Hide all files, except those in malware/
$ cat only_malware.txt
malware/
$
Show all files, except those from the pentesting team
$ cat hide_pentest.txt
!pentesting/
$
Show all files but those from the pentesting team, except their produced documents
$ cat hide_pentest_but_docs.txt
!pentesting/
pentesting/research_docs/
$
Resolving conflicts in a file
When a user needs to commit changes made to a file, but that same file has received other modifications (likely from other users) in the meantime, it is necessary to first “merge” the two sets of modifications together.
When the two sets of modifications do not overlap, merging is trivial
- at least conceptually. But when they do overlap, they produce conflict(s).
Since IDA Teams focuses on collaboration over IDA database files, the rest of this section will focus on the different strategies that are available for resolving conflicts among those.
IDA Teams comes with multiple strategies to help in conflict resolution of IDA database files:
Auto-resolve (if no conflicts)
Launch IDA in a non-interactive batch mode, attempting to perform all merging automatically.
If any conflict is discovered, bail out of the merge process, and don’t modify the local database.
Auto-resolve, prefer local
Launch IDA in a non-interactive batch mode, attempting to perform all merging automatically.
If a conflict is discovered, assume that the “local” change (i.e., the current user’s change) is the correct one, and apply that.
Once all merging is done and conflicts are resolved, write those to the local database and exit IDA
Auto-resolve, prefer remote
Launch IDA in a non-interactive batch mode, attempting to perform all merging automatically.
If a conflict is discovered, assume that the “remote” change (i.e., the change made by another user) is the correct one, and apply that.
Once all merging is done and conflicts are resolved, write those to the local database and exit IDA
Interactive merge mode
Manual merge mode.
This will launch IDA in an interactive, 3-pane mode, allowing the user to decide how to resolve each conflict.
Once all merging is done and conflicts are resolved, exit IDA and write the changes to the local database.
Use local, discard remote
Select the local database, ignoring all changes in the remote database.
No IDA process is run.
Use remote, discard local
Select the remote database, ignoring all changes in the local database.
No IDA process is run.
hvignore (and .hvignore) files
IDA Teams comes with a mechanism that lets users specify what files should be ignored when adding files from their local machines to the vault_server.
The main hvignore file (path/to/install-dir/hvignore)
In IDA Teams’ install directory, you will find the “main”
hvignore file, that is pre-populated with a list of files that you
would typically not want to add to the vault_server, such as .bak backup
files and unpacked IDA database files: .id0, .nam, etc…
The syntax for hvignore is very close to that of .gitignore
files.
Additional .hvignore files
In addition to that file, you can have .hvignore file (notice the
. - dot) placed in your site’s directory structure.
When found, those files’ contents will be appended to the main file’s contents.
The registry
On Microsoft Windows, IDA Teams will store certain bits of information in the registry (host name, user name, site name.)
On macOS and Linux, it will use a pseudo-registry file, located at
$HOME/.idapro/hvui.reg.
Passwords storage in the OS’s keychain
While hosts, user names & site names are persisted to the registry, passwords are stored securely in the operating system’s keychain.
- On Windows, the Windows Credential Store is used (therefore requiring Windows 7 or newer)
- On macOS, the macOS Keychain is used
- On Linux, the “Secret service” is used (through
libsecret-1)
Managing permissions on a vault
The vault_server includes a way to restrict the access of users and groups to the data stored in the vault_server.
The permission file is a text file that contains the permission table. The file consists of lines that grant or deny access to certain path patterns in the vault. The syntax for an entry is the following:
grant/deny group/user NAME PERMISSION VAULT_PATH_PATTERN
Possible PERMISSION values are: list, read and write.
read includes list, write includes read (and thus also includes list).
Example of a permission file:
# deny everything to everyone. no need to specify it explicitly,
# it is the default for a non-empty permission table:
# deny user * list //*
deny user * list //secret/ # nobody can see //secret. this line is superfluous
# because everything is denied by default.
grant user hughes write //secret/ # but hughes can write to secret and its subdirs
grant user john read //secret/ # and john can read the entire directory.
deny user * list //secret/supersecret # supersecret is not visible to anyone
grant user hughes write //secret/supersecret # but hughes can modify it (john cannot)
grant user * write //local_files/ # everyone can work with 'local_files'
deny group remote list //local_files/ # except that the 'remote' group cannot see 'local_files'
An empty permission table means that no permissions are enforced rendering all files accessible by everyone. As soon as a non-empty permission table is specified, all access is denied to everyone by default.
Path patterns may refer to (yet) unexisting files. Users and groups too may refer to unexisting users and groups.
The order of the permission file is important as the last lines will take precedence over the preceding lines (if there are conflicts).
Admins are not affected by the permission table, they are granted all access.
To install a new permission table, use perm set.
The current permissions can be retrieved using perm get.
Hex-Rays Vault’s visual client user manual
About this manual
This user guide provides information about HVUI, the Hex-Rays Vault visual client.
HVUI is provided in addition to the command-line client, HV.
This manual assumes that the reader has an understanding of the IDA Teams general concepts.
NOTE: Although Hex-Rays Vault will host any file you want, its primary use-case is to allow users to keep a history, and allow collaborative work on, IDA databases (i.e., .idb and .i64 files.) Throughout this manual, we will be using the terms “idbs” and “files” interchangeably.
Getting started
In order to function, HVUI will need to connect to a Hex-Rays Vault server.
This guide assumes that such a server is running, accessible, and an account is available:
| Connection attributes | |
|---|---|
| Host | vaultserver |
| Port | 65433 |
| User name | joe |
| User password | secret |
Starting HVUI
The first time the user starts the application, credentials will need to be input:
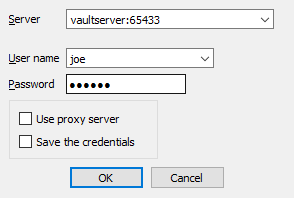
NOTE: Checking the checkbox at the bottom of the form, will cause HVUI to store credentials in the registry, password(s) will be stored in the OS’s keychain.
If this is the first time a login is performed from this machine, the user will have to specify a directory where files will be locally stored:
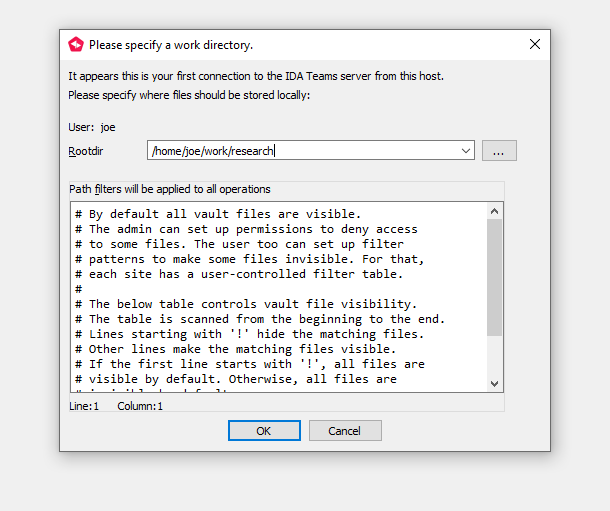
This will a site (that is, a mapping of the server files on the local disk) for use on this computer.
After accepting the dialog, you will be presented with the main view:
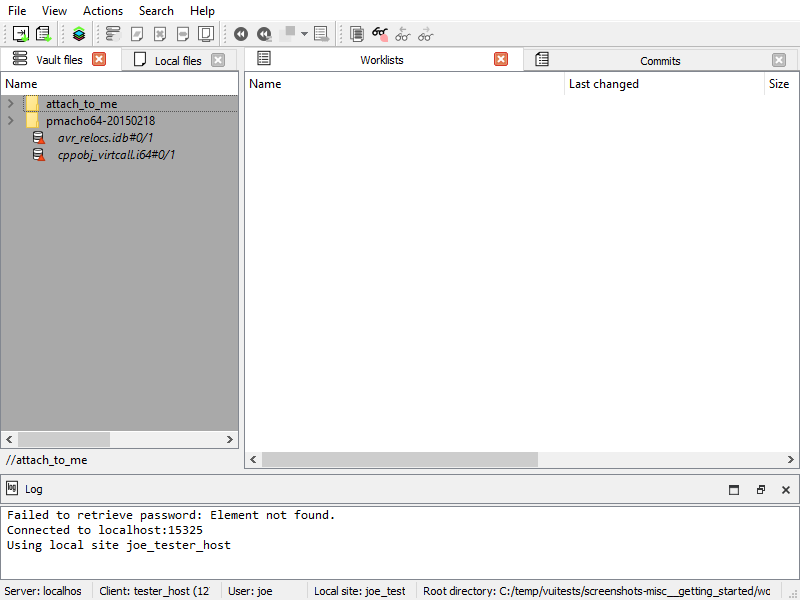
Getting the latest revision
The widget now shows what files are available.
Notice the #0/1 suffixes: it means we currently have revision
number 0 (i.e., no revision at all) of those files.
Let’s sync those files to their latest revision, from the server:
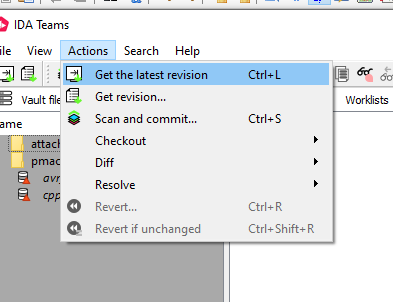
And the files are now up-to-date:
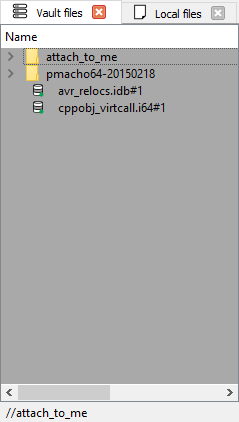
Working with files
In the previous chapter, we have introduced the notion of “syncing to the latest revision”.
This chapter will go a bit further, and introduce the most common, day-to-day operations users will want to perform on their files.
What are worklists, and commits?
Any work done in HVUI will involve worklists, and commits.
Worklist
A worklist holds files that have been
- modified,
- marked for addition or
- deletion,
- …
Those modifications are local to the user’s site. They will only be made available for everyone after the user commits the worklist.
Commit
Once a worklist is committed, it becomes a commit, and makes its modifications available for everyone.
In comparison to a worklist, a commit holds “published” modifications, and any user syncing to that commit will benefit from those.
Let’s look at a concrete example illustrating worklists and commits: adding a file to the Hex-Rays Vault!
Adding files to the vault
From the “Local files” widget, I can add a file that is not yet present in the Hex-Rays Vault server:
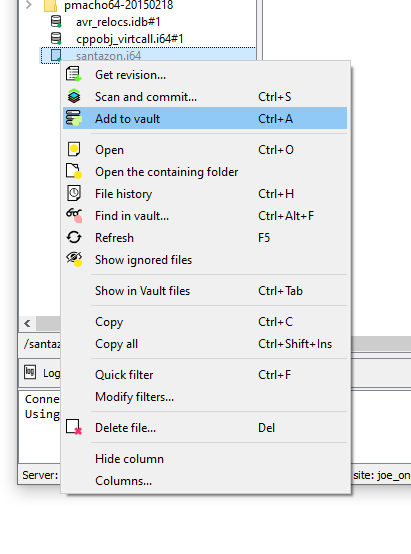
That file will now be added to the current worklist (one will be created if needed):
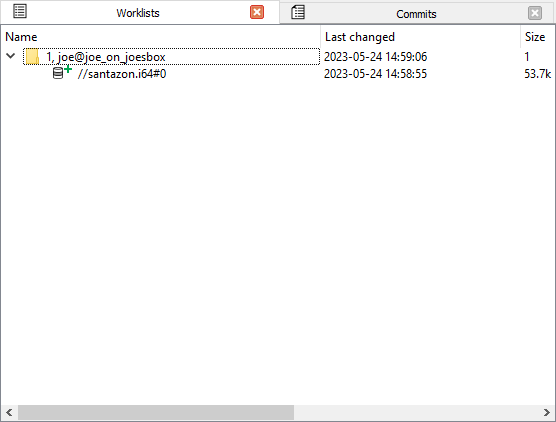
For this new file to become available for everyone, the user will need to “commit” the worklist:
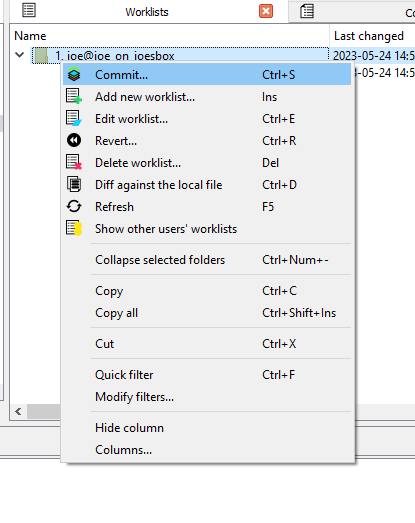
Once the worklist is committed, it becomes a commit, and the modifications are then available for everyone:
TIP: Notice how our commit isn’t the first one in the system: another user submitted a commit before us — it’s that commit that added the files we’ve seen in the getting-started portion of this guide.
Modifying files
When working on a file, a user must first check it out for modification:
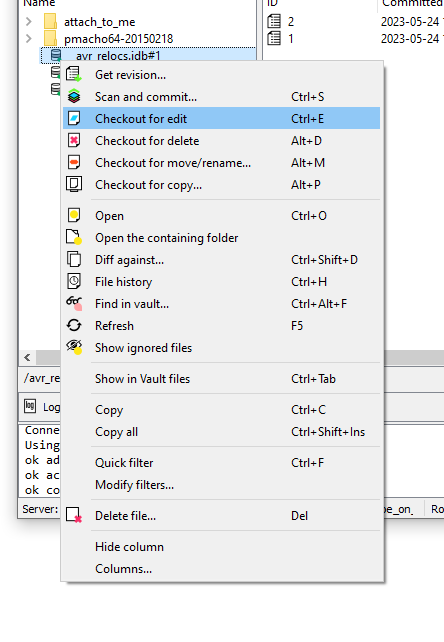
Just like with the adding, the file will now show in a worklist:

…and just like with the adding, whatever modification you make to the file, will only be visible to coworkers after committing that worklist.
Committing
Files that have been checked out (e.g. for modification) or opened for adding will go into a worklist until they are committed, which then turns the worklist into a commit. A worklist can be committed to make its changes available to other users: right-click, commit
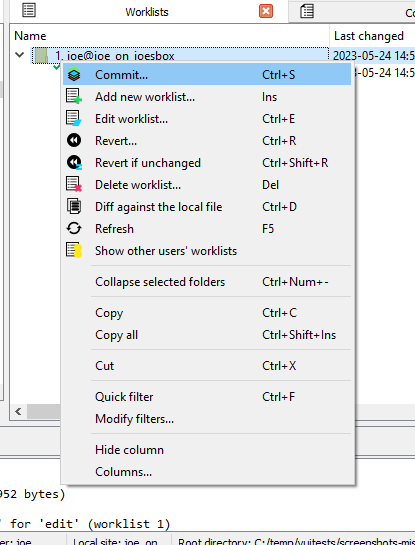
The worklist becomes a commit:
…and the worklist is gone:

Synchronizing files
To fetch the latest set of the changes (changes/additions/deletions), use “Get latest revision”.
Viewing the history of a file
To get an overview of all of the changes made to a file: right-click, File history
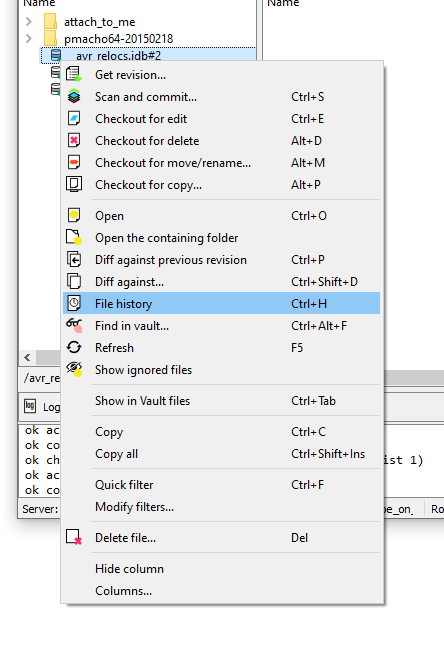
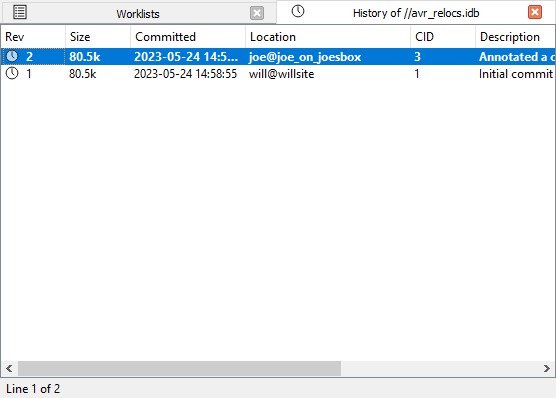
From the “History of …” widget, you can view any revision of a file.
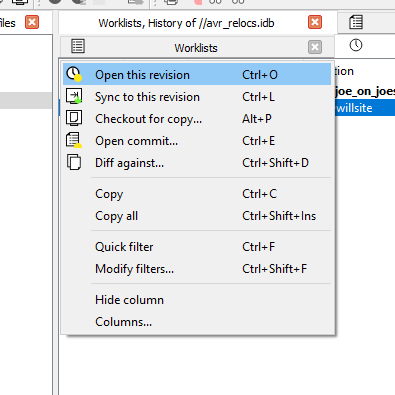
It’s also possible to synchronize files to older revisions, from this widget.
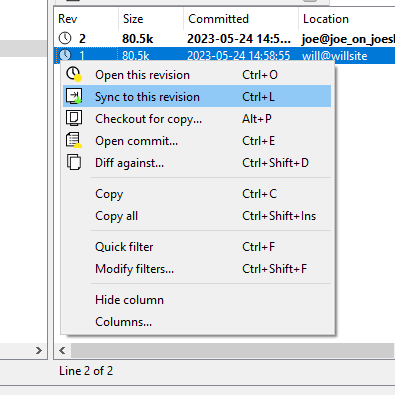
When asked to do that, HVUI will retrieve that older revision of the file from the server. This is what will now be present on your filesystem.
Notice how the file now shows as ‘outdated’:
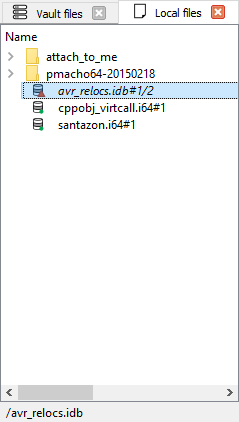
Opening files
On many widgets, it’s possible to view/open a file. If the file extension has a corresponding association it will be used to open the file.
File associations
Out-of-the-box, HVUI associates .i64 files with IDA.
In addition to that, it provides a default “fallback” "*" association that will cause matching files to be opened in IDA.
Users can specify their file extension associations via a form available from the View menu.
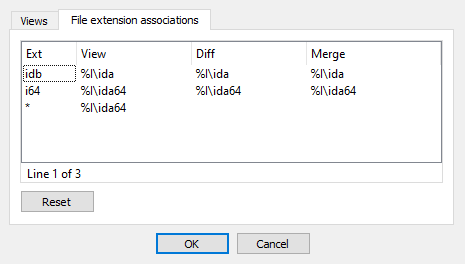
Deleting files
Files can be removed from the server (if they have become unnecessary for example): right-click, delete.
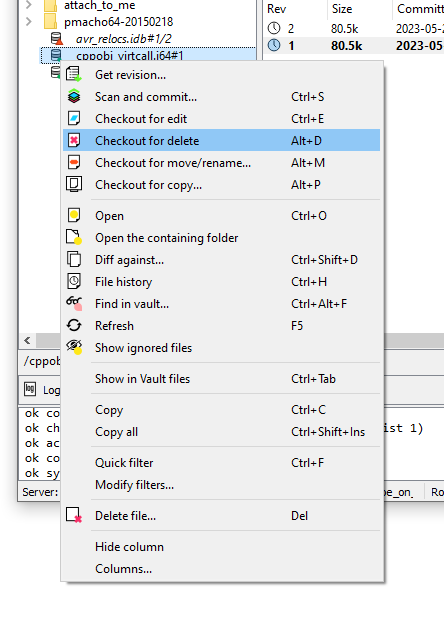
Just like other file actions, the change (deletion) needs to be committed for its effects to be visible on the server.
Reverting changes to files
To revert unwanted changes to a file: right-click, Revert
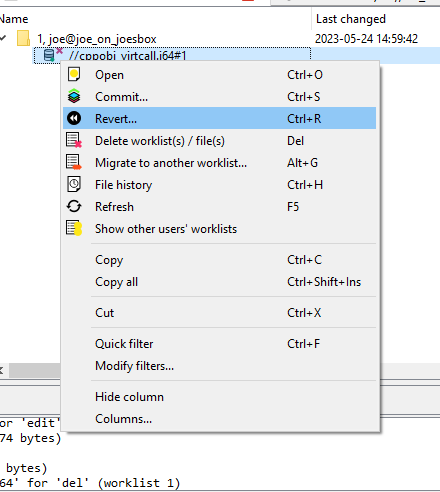
It is also possible to use “Revert if unchanged” to only revert files that were checked out without actual changes. This is especially useful when used on a selection of files or a directory.
Renaming and Moving Files or Folders
One may wish to rename and/or move around files/folders in their workspace, for that “Checkout for move/rename…” can be used.


Copying Files or Folders
{hvui_app} provides an action to copy files or directories easily. Use “Checkout for copy…”.
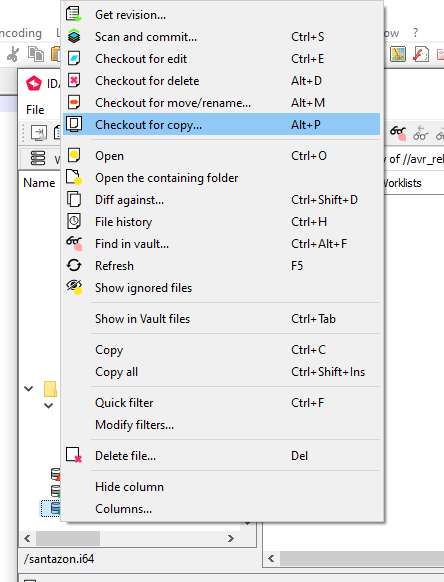

Finding a file in the vault
When a vault contains a lot of files, manually searching for a file in the directory tree becomes inefficient. To help you locate files easily, you can use the Find in vault… action.
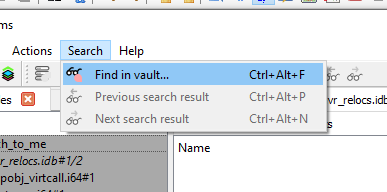

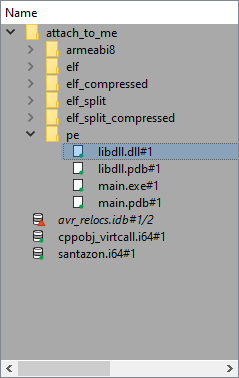
You can navigate between the search results by using Next search result and Previous search result, located next to Find in vault… both in the toolbar, and in the “Search” menu.
Font styles
As you may have noticed by now, files are shown with different font styles in different circumstances.
A gray font denotes a file that is not in the vault. It has been added or renamed and not yet commited.
A bold font means that this file is being worked on, or has been changed.
An italic font means that it’s not the latest version of this file.
Some combinations are possible, for example a file being resolved (not latest version and being worked on) will have a bold and italic font style. The combination gray (not in vault) and italic (not latest version) is for example not possible.
Inspecting changes
After having done some reverse-engineering work on an IDA database, it is possible to view those changes in a special mode in IDA: right-click, and choose the diff action:
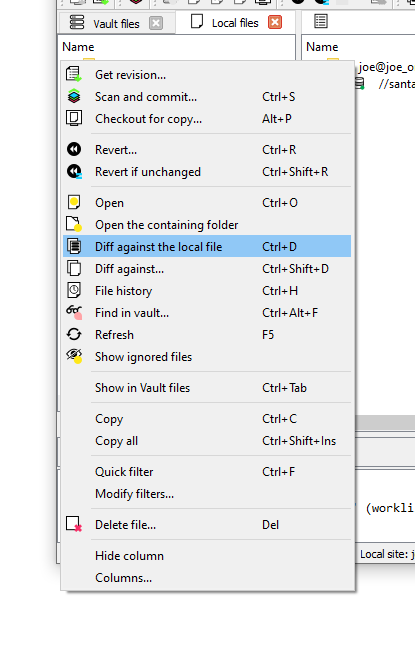
Here a new instance of IDA will be launched in a special “diff” mode:

IDA’s diff mode
This new IDA mode lets the user compare two databases, in a traditional “diff” fashion: essentially a two-panel window, showing the unmodified file on the left and the version with your changes on the right.
The “Progress” widget

Represents the current step in the diff process.
The left panel
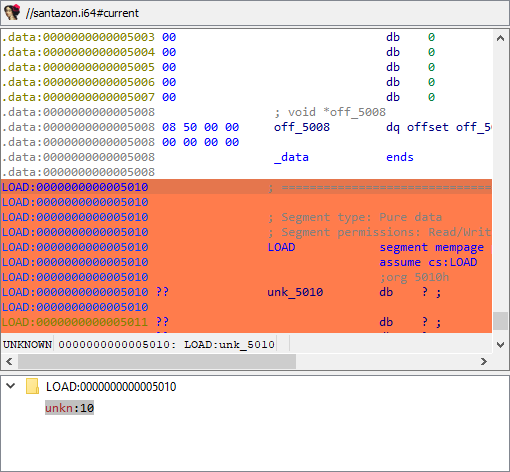
Shows the “untouched” version of the database (i.e., the one without your changes)
The right panel

Shows your version of the database (i.e., featuring your changes)
Diff region details

Notice how both panels have a little area at the bottom, that is labeled “Details”.
Details are available on certain steps of the diffing process, and provide additional information about the change that is currently displayed.
The “diffing” toolbar

The actions in the toolbar are:
- Previous chunk
- Center chunk
- Next chunk
- Proceed to the next step
- Toggle ‘Details’
Using actions in the toolbar, you can now iterate through the differences between the two databases, with each change shown in context as if viewed through a normal IDA window.
The ability to view changes in context was a major factor in the decision to use IDA itself as the diffing/merging tool for IDA Teams.
Diff mode IDA’s toolbar actions
Previous chunk
Move to the previous change
Center chunk
Re-center the panels to show the current chunk (useful if you navigated around to get more context)
Next chunk
Move to the next change
Proceed to the next step
Move to the next step in the diffing process.
Toggle ‘Details’
Toggle the visibility of the “Details” widgets in the various panels (note that some steps do not provide details, so even if the “Details” are requested, they might not be currently visible.)
Terminology
It is important to note the difference between the terms “diff” and “merge”.
This document will sometimes use the two terms interchangeably. This is because to IDA, a diff is just a specialized merge. Both diffing and merging are handled by IDA’s “merge mode”, which involves up to 3 databases, one of which can be modified to contain the result of the merge.
A diff is simply a merge operation that involves only 2 databases, neither of which are modified.
This is why often times you will see the term “merge” used in the context of a diff. In this case “merge” is referring to IDA’s “merge mode”, rather than the process of merging multiple databases together into a combined database.
Using IDA as a diffing tool
We must stress the fact that performing a merge between two IDA databases is quite different than performing a merge between, say, two text files. A change in a chunk of text file will not have an impact over another chunk.
IDA databases are not so simple. A change in one place in an idb will
often have an impact on another place. For example, if a structure
mystruct changed between two databases, it will have an impact not
only on the name of the structure, but on cross-references to
structure members, function prototypes, etc.
This is why IDA’s merge mode is split into a strict series of “steps”:

Within a single step it is possible to go forward & backward between different chunks. But because of possible inter-dependencies between steps, it is not possible to move backwards between steps, you can only go forward:
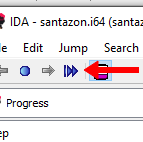
Since IDA’s diff mode is just a variation of its merge mode, diffing databases is also subject to this sequential application of steps in order to view certain bits of information. That is why, in some steps (e.g., the “Disassembly/Items”) IDA might not report some changes that were performed at another level.
For instance, if a user marked a function as noret, the listings
that will be shown in “Disassembly/Items” step, will not advertise
that there was a change at that place (even though the "Attributes: noreturn" is visible in the left-hand listing), only the changes to
the instructions (and data, …) are visible in the current step:
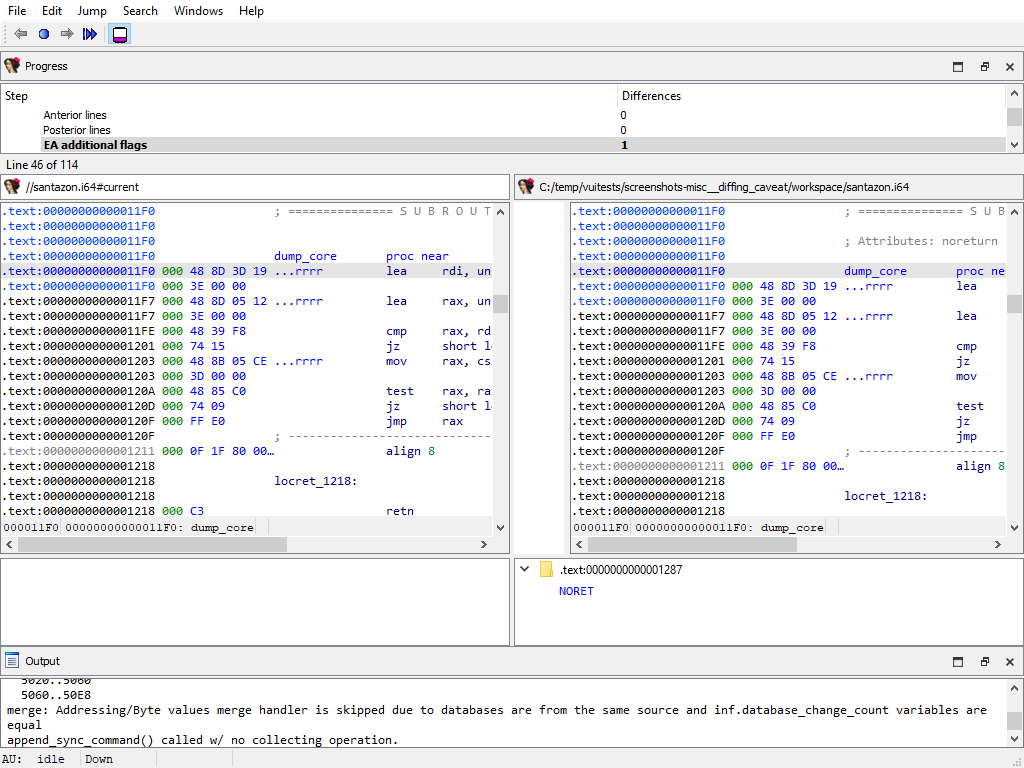
The change will, however, be visible at a later step (i.e., “Functions/Registry”):
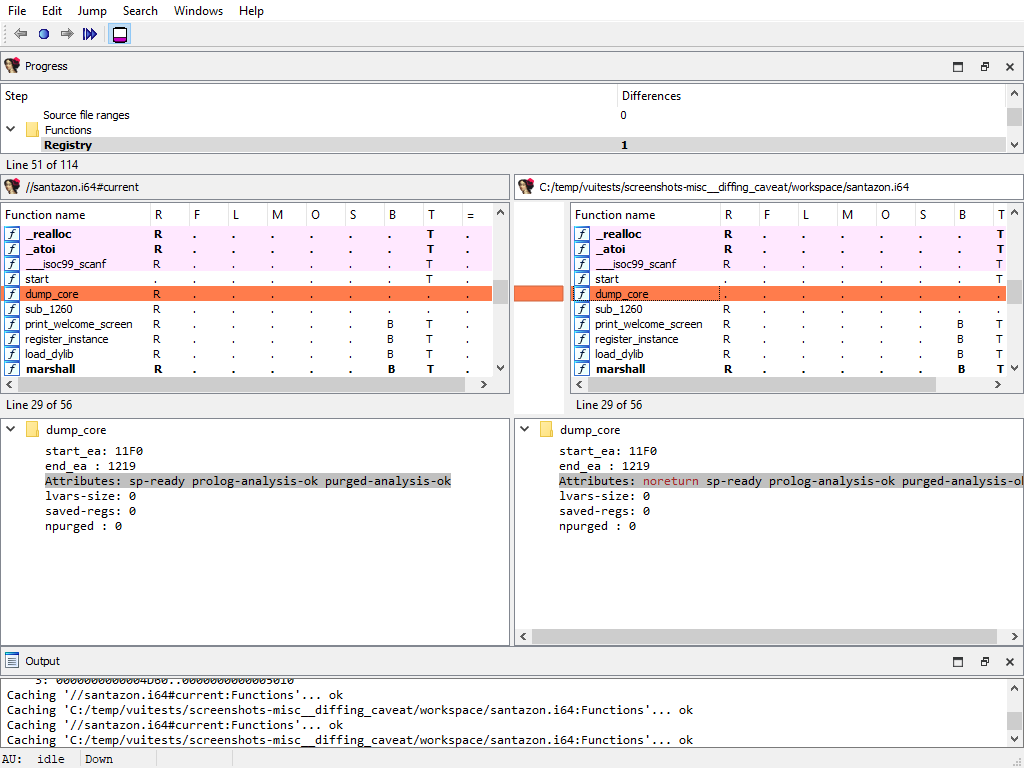
NOTE: The changes applied during the “diff” process are only temporary. Exiting IDA (at any moment) will not alter the files being compared.
Merging concurrent modifications (conflicts)
As with any collaborative tool, it may happen that two coworkers work on the same dataset (e.g., IDA database), and make modifications to the same areas, resulting in “conflicts”. Conflicts must be “resolved” prior to committing.
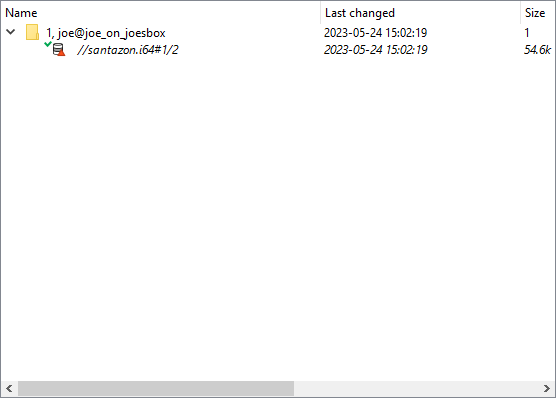
To do that, right-click and pick one of the “resolve” options:
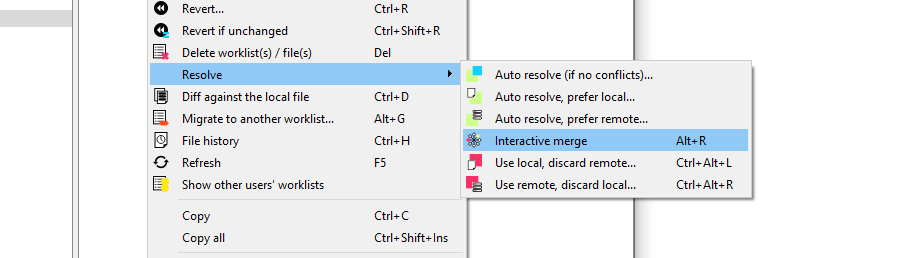
IDA Teams provides the following merge strategies.
Interactive merging
If the option that was chosen (e.g., Interactive merge mode) requires user interaction due to conflicts, IDA will show in 3-pane “merge” mode.

When a conflict is encountered, you’ll have the ability to pick, for all conflicts, which change should be kept (yours, or the other). Every time you pick a change (and thus resolve a conflict), IDA will proceed with the merging, applying all the non-conflicting changes it can, until the next conflict - if any. When all conflicts are resolved, you can leave IDA, and the new resulting file is ready to be submitted.
General concepts
Collaboration in the reverse-engineering field
Over the years, a trend has been emerging in the field of reverse-engineering: a need to enable collaboration between different (teams of) individuals and share their work with one another.
In order to achieve that, different groups of people have come up with different strategies, the most common ones being:
- “live” propagation of changes from one IDA session, to other sessions (this requires all IDA instances are either directly connected, or talk to a server, at all time)
- extracting some of the important bits of work done on an
.idb, and applying those to another one – in fact, we at Hex-Rays have also been providing a tool that enables this type of workflow: the lumina server.
While those solutions have interesting properties, they also typically suffer from significant drawbacks as well:
- they might require a live connection at all times in order to work,
- there is no way to make sure many supposedly-synced IDA sessions are indeed working with exactly the same data,
- the information that’s extracted isn’t complete enough,
- …
So we took a step back and looked at how things are done in other places, and in particular in the field of software engineering, where collaboration over a piece of software is typically achieved by using revision control.
That is why one of the key features of IDA Teams, is software engineering-inspired revision control, applied to reverse-engineering.
NOTE: Plans for IDA Teams span well beyond just revision control, but this was our first, significant milestone.
Revision control for reverse-engineering projects
The general concepts behind IDA Teams revision control, are essentially the same as those behind many other revision control systems, and uses a client-server architecture.
- On the server-side, we will find a new component: the vault server
- On the client side, we will find that an IDA Teams installation now install a few additional binaries: a pair of clients to connect to the server
The vault_server
The server, called vault_server, maintains a ledger of operations that were
performed on the files that it hosts: modifications, added files, deleted files,
…
It should be made available to all members of a team destined to work on common projects.
The server comes with its own installer, and an “admin guide” explaining how to tune the installation & perform common tasks.
The clients
On the client-side, IDA Teams will consist of an IDA installer, to be installed on each user’s computer.
In addition to the regular IDA binaries, that new installer will also place two clients to connect to the vault_server:
hv: a command-line interface clienthvui: a visual client
Users interact with the server using those tools, which lets them get a good view over who contributed what, and offer functionality for organizing their work in the most efficient way possible.
Online vs Offline
Users have all the freedom to organize their work the way they see fit: they don’t have to be connected at all times, and will only need to be able to connect to the server when it is time to publish their changes so they are available for others to benefit from.
Resolving conflicts in a file
When a user needs to commit changes made to a file, but that same file has received other modifications (likely from other users) in the meantime, it is necessary to first “merge” the two sets of modifications together.
When the two sets of modifications do not overlap, merging is trivial
- at least conceptually. But when they do overlap, they produce conflict(s).
Since IDA Teams focuses on collaboration over IDA database files, the rest of this section will focus on the different strategies that are available for resolving conflicts among those.
IDA Teams comes with multiple strategies to help in conflict resolution of IDA database files:
Auto-resolve (if no conflicts)
Launch IDA in a non-interactive batch mode, attempting to perform all merging automatically.
If any conflict is discovered, bail out of the merge process, and don’t modify the local database.
Auto-resolve, prefer local
Launch IDA in a non-interactive batch mode, attempting to perform all merging automatically.
If a conflict is discovered, assume that the “local” change (i.e., the current user’s change) is the correct one, and apply that.
Once all merging is done and conflicts are resolved, write those to the local database and exit IDA
Auto-resolve, prefer remote
Launch IDA in a non-interactive batch mode, attempting to perform all merging automatically.
If a conflict is discovered, assume that the “remote” change (i.e., the change made by another user) is the correct one, and apply that.
Once all merging is done and conflicts are resolved, write those to the local database and exit IDA
Interactive merge mode
Manual merge mode.
This will launch IDA in an interactive, 3-pane mode, allowing the user to decide how to resolve each conflict.
Once all merging is done and conflicts are resolved, exit IDA and write the changes to the local database.
Use local, discard remote
Select the local database, ignoring all changes in the remote database.
No IDA process is run.
Use remote, discard local
Select the remote database, ignoring all changes in the local database.
No IDA process is run.
What is a “site”?
A site represents a mapping of the server files to the local filesystem. Normally each computer has a site associated with it. A site has the following attributes:
- A site name
- A host name
- The path to a folder on the filesystem (a.k.a., “root directory”)
- Path filters (optional)
Root directory
The root directory is the essential attribute of a site. It denotes where all files from the vault server will be mapped to the local disk. Everything inside the root directory can potentially be uploaded to the vault server and shared with other team members.
The vault server cannot manage files located outside the root directory. However, this limitation is straightforward to overcome: create a symbolic link (or, on Windows, a junction point) from the root directory to the directory of your choice. This will make the target of the symbolic link visible as part of the root directory.
The vault server keeps track of each site’s state: what files have been downloaded to the local disk, what files have been checked out for editing, etc. This simplifies the housekeeping tasks, especially for big repositories with millions of files. Even for them, downloading the latest files or reconciling the local disk with the server, are almost instantaneous.
The host name is a security feature that prevents from using a site on a wrong computer. Since the server keeps track of the files downloaded to each site, using a wrong site may lead to an inconsistent mapping between the server and local disk. However, if the user does not want this protection, it is possible to erase the host name in the site definition.
Sites can be edited from the “Sites” view.
Path filters
By default all server files are visible, but for servers that manage gigabytes of data this can be problematic: it may be undesirable for users to download all files to their local computer.
Site filters provide a mechanism that lets users restrict the set of files their IDA Teams client works with. Users who want to work on some specific projects can set a filter that restricts the visibility only to selected subdirectories.
Each site has its own filters, that con be modified at any time. Filters do not directly affect any files on the local disk, or on the server: they are strictly about visibility.
WARNING: Site filters are meant simplify a user’s life by letting them focus on specific projects. Since they can be modified by users, they should not be considered a security measure: that would be the role of the permissions system, which can only be managed by vault_server administrators.
NOTE: The purpose of site filters is to create a subset of the full set of files provided by the server. Site filters don’t directly affect what locally-available files (i.e., present in the site’s rootdir, but not tracked by the server) are visible by IDA Teams clients.
There is another mechanism to specify what files should not be added to the vault.
See .hvignore for more info.
Examples
An empty filter
$ cat empty_filter.txt
$
Hide all files, except those in malware/
$ cat only_malware.txt
malware/
$
Show all files, except those from the pentesting team
$ cat hide_pentest.txt
!pentesting/
$
Show all files but those from the pentesting team, except their produced documents
$ cat hide_pentest_but_docs.txt
!pentesting/
pentesting/research_docs/
$
hvignore (and .hvignore) files
IDA Teams comes with a mechanism that lets users specify what files should be ignored when adding files from their local machines to the vault_server.
The main hvignore file (path/to/install-dir/hvignore)
In IDA Teams’ install directory, you will find the “main”
hvignore file, that is pre-populated with a list of files that you
would typically not want to add to the vault_server, such as .bak backup
files and unpacked IDA database files: .id0, .nam, etc…
The syntax for hvignore is very close to that of .gitignore
files.
Additional .hvignore files
In addition to that file, you can have .hvignore file (notice the
. - dot) placed in your site’s directory structure.
When found, those files’ contents will be appended to the main file’s contents.
The registry
On Microsoft Windows, IDA Teams will store certain bits of information in the registry (host name, user name, site name.)
On macOS and Linux, it will use a pseudo-registry file, located at
$HOME/.idapro/hvui.reg.
Passwords storage in the OS’s keychain
While hosts, user names & site names are persisted to the registry, passwords are stored securely in the operating system’s keychain.
- On Windows, the Windows Credential Store is used (therefore requiring Windows 7 or newer)
- On macOS, the macOS Keychain is used
- On Linux, the “Secret service” is used (through
libsecret-1)
Managing permissions on a vault
The vault_server includes a way to restrict the access of users and groups to the data stored in the vault_server.
The permission file is a text file that contains the permission table. The file consists of lines that grant or deny access to certain path patterns in the vault. The syntax for an entry is the following:
grant/deny group/user NAME PERMISSION VAULT_PATH_PATTERN
Possible PERMISSION values are: list, read and write. read includes
list, write includes read (and thus also includes list).
Example of a permission file:
# deny everything to everyone. no need to specify it explicitly,
# it is the default for a non-empty permission table:
# deny user * list //*
deny user * list //secret/ # nobody can see //secret. this line is superfluous
# because everything is denied by default.
grant user hughes write //secret/ # but hughes can write to secret and its subdirs
grant user john read //secret/ # and john can read the entire directory.
deny user * list //secret/supersecret # supersecret is not visible to anyone
grant user hughes write //secret/supersecret # but hughes can modify it (john cannot)
grant user * write //local_files/ # everyone can work with 'local_files'
deny group remote list //local_files/ # except that the 'remote' group cannot see 'local_files'
An empty permission table means that no permissions are enforced rendering all files accessible by everyone. As soon as a non-empty permission table is specified, all access is denied to everyone by default.
Path patterns may refer to (yet) unexisting files. Users and groups too may refer to unexisting users and groups.
The order of the permission file is important as the last lines will take precedence over the preceding lines (if there are conflicts).
Admins are not affected by the permission table, they are granted all access.
To install a new permission table, use perm set.
The current permissions can be retrieved using perm get.
Tour of hvui’s widgets
Vault files
The “Vault files” widget represents the data that’s available on the server.
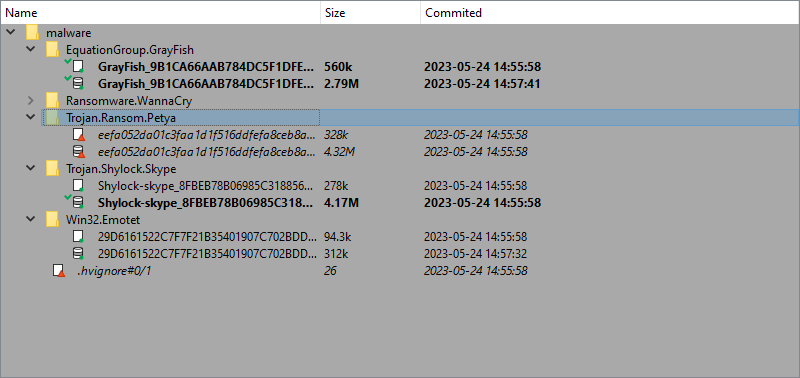
Since its contents can be very similar to what is shown in the “Local files” (depending on whether user’s site is using site filters or not), it has been given differentiating background color, in the hope of not confusing it with that other widget.
Actions
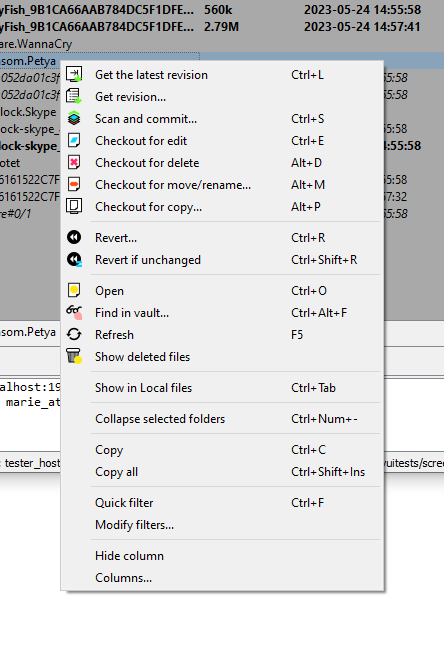
- Get the latest revision
- Scan and commit
- Checkout for edit
- Add to vault
- Checkout for delete
- Checkout for move/rename…
- Checkout for copy…
- Revert…
- Revert if unchanged
- Open
- Auto resolve (if no conflicts)…
- Auto resolve, prefer local…
- Auto resolve, prefer remote…
- Interactive merge
- Use local, discard remote…
- Use remote, discard local…
- Diff against the local file
- Diff against previous revision
- File history
- Find in vault…
- Next search result
- Previous search result
- Refresh
- Show deleted files
- Show in Vault files/Show in Local files
Local files
The “Local files” widget represents the data that’s available on the local disk.
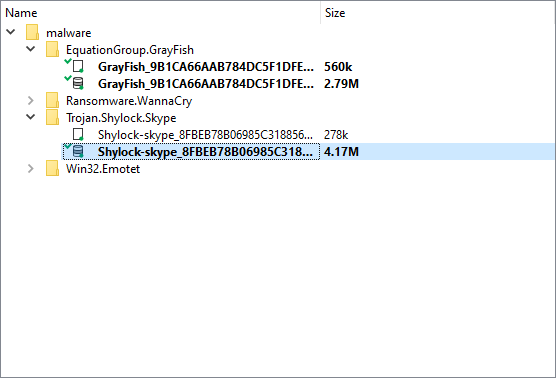
The root of the tree starts at the site’s workdir.
Note that this widget honors the hvignore
file that’s placed in the installation directory next to hvui, and also any
.hvignore file found in the directory structure.
Actions
- Get the latest revision
- Scan and commit
- Checkout for edit
- Add to vault
- Checkout for delete
- Checkout for move/rename…
- Checkout for copy…
- Revert…
- Revert if unchanged
- Open
- Open the containing folder // local only
- Auto resolve (if no conflicts)…
- Auto resolve, prefer local…
- Auto resolve, prefer remote…
- Interactive merge
- Use local, discard remote…
- Use remote, discard local…
- Diff against the local file
- Diff against previous revision
- File history
- Find in vault…
- Next search result
- Previous search result
- Refresh
- Show deleted files
- Show in Vault files/Show in Local files
Worklists
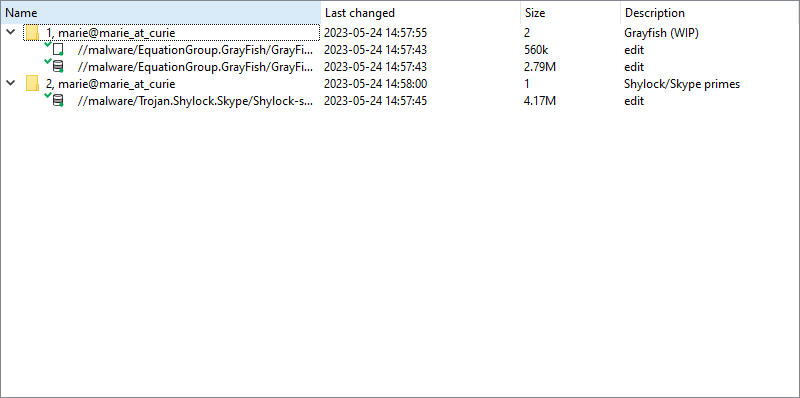
The “Worklists” widget groups all the modifications that are still pending (and are thus not yet visible to other users)
Those changes are grouped by “Worklist” (i.e., topic). A typical worklist will hold files that are related, and will be made available to all once a worklist is committed.
It is possible to move file(s) from a worklist to another, by “drag & drop”’ing them, “cut & paste”’ing them, or using the Migrate to another worklist… action.
By default, this widget will only show the current user’s worklists, but can be made to show everyone’s worklists, in read-only mode: the current user will still only be able to modify (or commit) his/her own worklists.
Actions
- Open
- Commit…
- Add new worklist…
- Edit worklist…
- Revert…
- Revert if unchanged
- Delete worklist…
- View worklist…
- Auto resolve (if no conflicts)…
- Auto resolve, prefer local…
- Auto resolve, prefer remote…
- Interactive merge
- Use local, discard remote…
- Use remote, discard local…
- Diff against the local file
- Migrate to another worklist…
- File history
- Refresh
- Show other users’ worklists
Commits
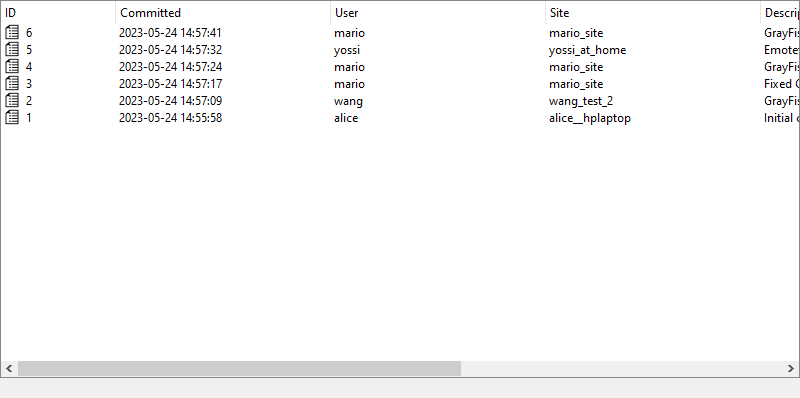
The “commits” widget shows a list of previous commits made to the server, in a concise and condensed way.
It is possible to request a detailed view for any entry in that list.
NOTE: The amount of entries displayed by this widget can be configured through the “Options” dialog.
Actions
Commit
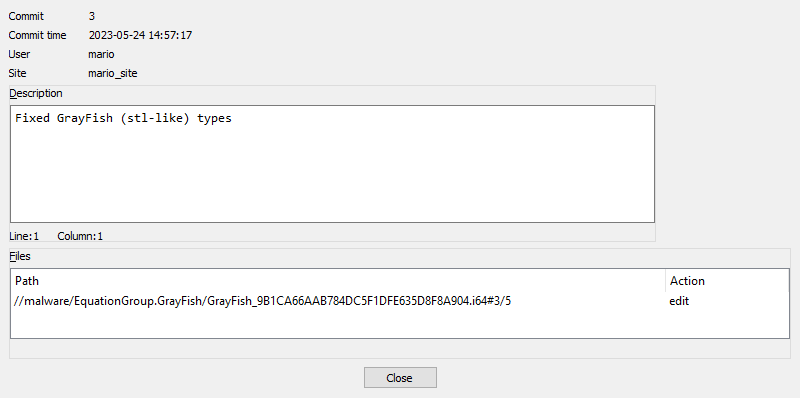
Using the “commits” widget, it is possible to inspect what changes were previously submitted to the vault in a particular commit.
Actions
- Open this revision
- Sync to this revision
- Diff against previous revision
- Checkout for copy…
- File history
Sites
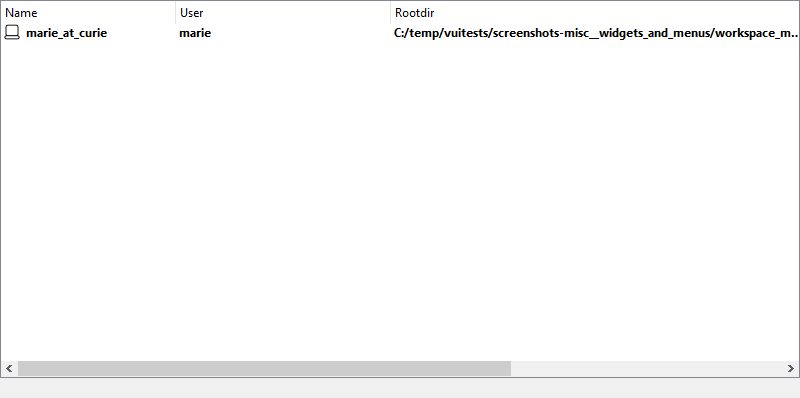
The “Sites” widget provides the ability for a user (or an admin) to administrate users’ sites.
Non-admin users will only be able to modify their own site(s), while an admin will have the ability to do so for all users’ sites.
If you find yourself using more than one site on any specific machine, you will likely have to resort to the Use this site… to switch between them.
Actions
Users
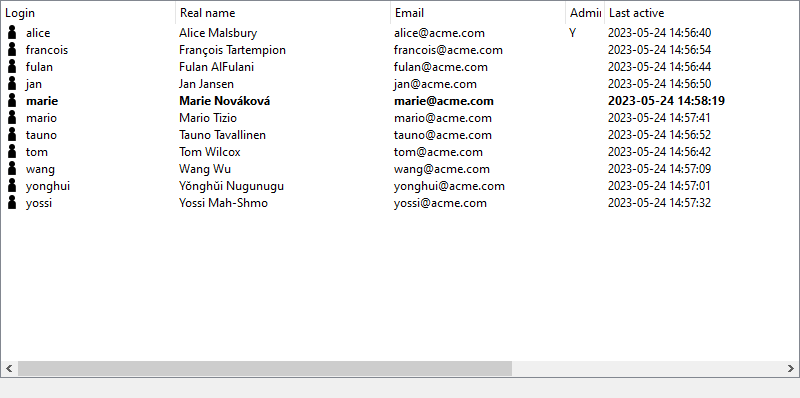
The “Users” widget lists all knows users of the Hex-Rays Vault server.
Non-admin users have the possibility to change their password.
Users with administrator rights will, in addition, be able to add, remove, modify users - and modify anyone’s password.
Actions
Log window

The logging area is helpful in providing feedback about different types of events:
- Details of successful operations
- Connection state (logins, logout’s, network issues, …)
- …other various bits of information that the program deems relevant for the user to know
Actions
The logging area provides typical text-manipulating functions (copying, searching, …) as well as the ability to turn timestamps on/off.
File history
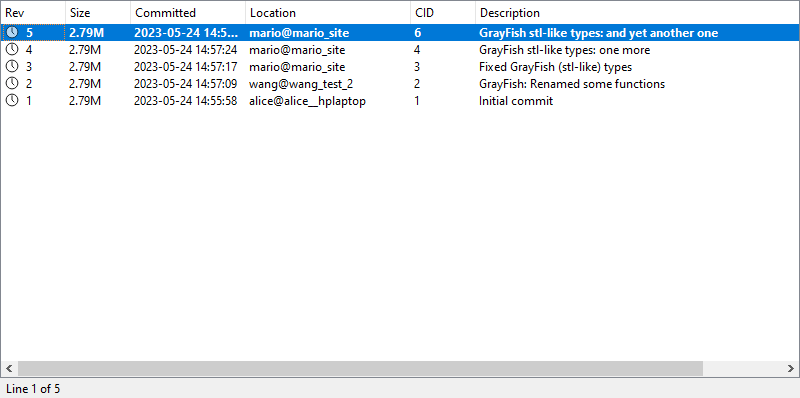
The “File history” widget shows all changes ever commited to a single file.
Actions
- Open this revision
- Sync to this revision
- Checkout for copy…
- Details… (on “Commits” widget)
- Diff against previous revision
- Diff against…
User interface actions
The following is a list of actions, available in hvui. Note that most actions are “contextualized” in the sense that they require certain conditions to be met, in order to work:
- the widget being operated on,
- whether or not a selection is available,
- the state of the selected file(s),
- …
All actions are available from the toplevel menubar’s submenus. Those whose operating conditions are not met, will appear disabled.
NOTE: Contrary to the toplevel menubar’s submenus, context menus (AKA: popup menus, right-click menus, …) will not feature actions that are disabled. Those menus are created on-the-fly, and it’s best not to pollute them with unnecessary noise.
Get the latest revision
Sync the selected file(s) (or the entire server contents), to the latest revision.
This effectively updates all local copies of the files, except for those that are currently opened for edition, addition or deletion: those will be left untouched in order to not risk losing user modifications made to them.
Commit…
Prompts the user for a commit description, and submits the files that are part of the current worklist, to the server.
Once successfully committed, a worklist will disappear and a new entry will be added to the list of commits.
Committed changes (modifications, additions and deletions) are available for all users that can access those files.
Scan and commit
Scan the selected files/folders (or the entire root directory), and create a worklist with all changes that were found: files that have been added, removed, modified, …
Unless you explicitly tell it not to (by checking the “Do not show this dialog anymore” checkbox), this action will first offer the possibility to refine what exactly the scan should be looking for:
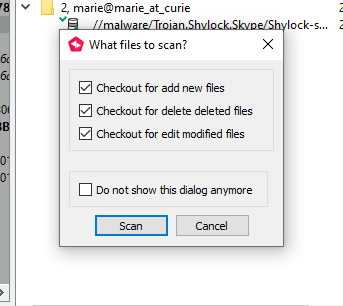
Spotting new or deleted files is fairly straightforward, but when it comes to
existing files, hvui will also perform a md5 checksum comparison.
If differences are found, hvui will prepare a new worklist with those.
This is especially useful if one had to work on some files while no connection to the server was available (e.g., on a plane).
The files found will be filtered by hvignore.
Details… (on “Commits” widget)
Opens a detailed view of the commit details, including a list of the files that were modified:
Sync to this revision
Retrieve the specified revision from the server, and replace the local file with it.
Diff against previous revision
For each selected file, perform a diff of the selected file, against its previous revision.
NOTE: If a file is opened and has been modified, those yet-unsubmitted modifications will not be part of the diff: only those between the two recorded revisions, will be visible.
Diff against…
A more powerful version of diff, that lets the user pick for each “side” of the diff:
- either the current revision, any revision number, or to the local file on disk
- the path to the file (it is therefore possible to diff entirely unrelated files together)
Checkout for edit
Informs the server that we will be working on those files in the near future.
They will be added to the worklist number 1 (which will be created if it doesn’t exist), and will turn bold, to draw attention to them.
Add to vault
Informs the server that we wish to add the selected file(s) to the list of files managed by the server.
They will be added to the worklist number 1 (which will be created if it doesn’t exist), and will turn bold, to draw attention to them.
The files selected will be filtered by hvignore.
Checkout for delete
Informs the server that we wish to delete the selected file(s) from the list of files managed by the server.
They will be added to the worklist number 1 (which will be created if it doesn’t exist), and will turn bold, to draw attention to them.
Checkout for move/rename…
For each selected file (or directory), prompt the user for a new name to rename to.
This is the equivalent of executing , followed by .
Checkout for copy…
For each selected file or directory, prompt the user for a new name to create a copy into.
The copied files will be added to the worklist number 1 (which will be created if it doesn’t exist).
Open this revision
For each selected file, launch the associated application.
NOTE: The file is retrieved from the server, and downloaded into a temporary location. It is cleaned after the application exits.
File history
For each selected file, open a widget showing the list of modifications that were made to the file.
Revert…
Reverts the selection - that is: remove from the worklist(s), and restore the current revision from the server.
NOTE: This action will lose all changes made to the selected file(s), and thus will first prompt for confirmation.
Revert if unchanged
A “safe” version of , that will first verify if files have been modified, before reverting them.
Files that have not been modified, will be reverted. Those that have been, will remain untouched.
Since this is a safe operation (in the sense that no data can be lost), this action will not ask for confirmation.
Open
For each entry in the selection, launch the associated “View” application.
If no association is present for a specific file extension (or if the file does
not have an extension), the default * association will be used.
Open the containing folder
For each folder in the selection, asks the OS to open a file browser at the corresponding place.
What file browser is opened, depends on the OS’s settings.
Resolve actions
hvui comes with many strategies to resolve files:
- Auto resolve (if no conflicts)…
- Auto resolve, prefer local…
- Auto resolve, prefer remote…
- Interactive merge
- Use local, discard remote…
- Use remote, discard local…
However, hvui only knows how to handle a successful merge operation when IDA is
used. Consequently, only the last 2 operations will be available for
non-.idb/.i64 files.
Resolve actions prolog
The first thing that happens is that the last revision of the file is retrieved from the server (and stored in a temporary location).
Then (for all but and ) IDA will be launched in a special mode, and with different set of parameters that depend on the exact nature of the operation.
Auto resolve (if no conflicts)…
Perform the “resolve actions” prolog, then launch IDA non-interactively: IDA will attempt merging the changes made to the local file with those that were made to the last revision of the file, and succeed if no conflicting changes were found.
This is a safe operation in the sense that, should there be any conflict, it will not touch the local file.
Auto resolve, prefer local…
Perform the “resolve actions” prolog, then launch IDA non-interactively: IDA will merge the changes made to the local file with those that were made to the last revision of the file. Each time a conflict is found, automatically pick the local change.
Auto resolve, prefer remote…
Perform the “resolve actions” prolog, then launch IDA non-interactively: IDA will merge the changes made to the local file with those that were made to the last revision of the file. Each time a conflict is found, automatically pick the other change.
Interactive merge
Perform the “resolve actions” prolog, then launch IDA interactively: the user will be presented with a 3-panel IDA instance, where it will be possible to manually pick either the local, or the remote change, for each conflict.
Once the user is done and exits IDA saving the resulting database, the file will be considered resolved.
Use local, discard remote…
Perform the “resolve actions” prolog, then just consider that our local version of the file is the correct one.
Use remote, discard local…
Perform the “resolve actions” prolog, then replace the local version of the file with the other one.
Diff against the local file
Retrieve the specified file(s) from the server (and store them in a temporary location), then launch the associated “Diff” application to compare them against their local versions.
Find in vault…
Prompt the user for a pattern/substring to be looking for, and queries the server.
If a match is found, it will be selected in the vault files widget. It is then possible to move forward/backward in the search results.
Next search result
Move forward in the result set of a find operation.
Previous search result
Move backward in the result set of a find operation.
Refresh
Clears the local caches of all the data that was retrieved from the local filesystem & the Hex-Rays Vault server, and force a refresh of all widgets.
Show in Vault files/Show in Local files
Find the corresponding selection in the other view, select it, and give focus to that view.
This is helpful to navigate between vault files and local files.
Show deleted files
Toggle the visibility of files that have been deleted.
When a file is deleted in revision #N, its revisions up to #N-1 are still
kept on the server (but not visible by default.)
This offers the opportunity to view (and possibly resurrect) such deleted files.
Add new site…
Create a new site.
While logged in as a non-administrator, you won’t have the choice but to associate the site to the current user. However, when logged in as an administrator, it is necessary to provide the user’s name as well.
Edit site…
Offers the ability to modify the following properties of a site:
- Its root directory
- The client’s host
- Optional site filters
Delete site…
Delete the selected site (after prompting for confirmation.)
Naturally, deleting a site will also delete the worklists that were associated with that site. The commits that were made from that site will not be deleted.
Use this site…
Have hvui switch to the selected site.
This can be useful if you have more than one site on your machine.
Switching to a site requires that the client host matches that of the current machine, and that the site belongs to the user who’s currently logged-in.
Add new user…
Prompts the administrator for various bits of information about the user: login, real name, license ID, password, … and registers that information on the server.
Edit user…
Lets an administrator change all information about a particular user, with the exception of their login (immutable) and password (use the dedicated action to do that.)
Delete user…
Asks the administrator for confirmation, then deletes the user from the server.
Deleting a user also deletes the worklists that belonged to the user. The commits made by that user won’t be impacted.
Set password…
Prompts for a new password (and its confirmation), and applies the changes on the server.
Add new worklist…
Prompts the user for a brief worklist description (which can remain empty at this point), and create a new, empty worklist.
Edit worklist…
Shows worklist details, and offers to edit its description.
This action can only be performed on worklists that belong to the current user.
View worklist…
Shows other users’ worklists details, in read-only mode.
Delete worklist…
Prompts for confirmation, and deletes the worklist.
All modifications (including additions & deletions of files), will be abandoned/reverted.
Migrate to another worklist…
Lets the user pick another one of his pending worklists (or, alternatively, create a new one), then moves the files to that worklist.
Show other users’ worklists
Toggle between the two following states:
- show this user’s worklists on this site,
- show all worklists (from all users, and on all sites)
Miscellaneous information
Simplified site creation on first connection
In order to do any meaningful work in hvui, a user must be using a site.
To make it easier to get started using hvui, the first time a user connects to the Hex-Rays Vault server, the application will propose a a simplified site creation dialog, that will query only the “root directory”.
The rest of the site attributes will be guessed (or generated):
- the host name will be retrieved automatically from the system
- the user name is known since the user just logged in
- the site name will be generated from the
user name+host name
It is of course still possible to alter that site later, through the “Sites” widget.
Technical information
HVUI stores certain bits of information in the registry:
- On Windows, this will be located under
\HKEY_CURRENT_USER\Software\Hex-Rays\HVUI - On Unix systems, HVUI will use a file-backed registry, located at
$HOME/.idapro/hvui.reg
Teams
lc command reference manual
Introduction
The lc executable provides a command-line interface to interact with a Lumina server and its contents.
NOTE: virtually all the commands described in this document, require administrator rights; “regular” users will typically not have the necessary privileges.
Command-line options
-h, –host HOSTNAME[:PORT]
Lumina host name and port (if port is omitted, it defaults to 443)
-u USERNAME
specify username
-p PASSWORD
specify password
-v, –verbose
verbose output
In order to connect to a Lumina server, lc must at least be provided with a hostname and a valid user-password pair.
In order to keep the various commands’ syntax as clear as possible, we will omit the login options from commands for the rest of this manual.
Other options exists, specific to each lc command (see Commands).
Commands
The following commands are accepted by lc:
Operating with metadata
Commands in this section let users view metadata stored in the Lumina server and their history.
hist show
hist show [OPTION]
Queries history of changes for function(s).
The following informations will be displayed for each change:
- The ID of the change
- The timestamp of the change
- The ID of the push that contains the change
- The name of the function at that change (+
(*)if it has been modified past this change) - optional: The username of the user that pushed this change
- optional: The name of the license associated with the push for this change
- optional: The email of the license associated with the push for this change
- optional: The ID of the license associated with the push for this change
- optional: The ID of the function
- optional: The effective address (EA) of the function in the input file for the change
- optional: The hash of the function
- optional: The path of the idb file where the change came from
- optional: The hash of the file where the change came from
- optional: The path of the file where the change came from
TIP: Wildcards can be used to facilitate the usage of options that take strings as input. See the appendix.
Options:
| Short form | Long form | Description |
|---|---|---|
-a | --additional-fields LIST | Comma-delimited list of additional info to display (username, license_name, license_email, license_id, func_id, func_ea, calcrel_hash, idb_path, input_hash, input_path, all) |
-d | --details | Show details (diff-like) for each change |
None | --chronological | Display entries in chronological order (defaults to reverse-chronological). |
-m | --max-entries NUMBER | maximum number of entries to fetch (defaults to 100) |
-l | --license-id LICENSE | license ID (XX-XXXX-XXXX-XX format) to operate on |
-r | --history-id-range RANGE | history ID range(s) to operate on (start0..end0 [...]) |
-t | --time-range RANGE | time range to operate on (start..end) see the appendix |
-i | --idb IDB | IDB name(s) to operate on |
-f | --input FILE | input file(s) to operate on |
-u | --username USERNAME | username(s) to operate on |
-n | --func NAME | function name(s) to operate on |
-h | --input-hash HASH | input file hash(es) to operate on |
-p | --pushes-id-range RANGE | Pushes ID range(s) to operate on (start0..end0 [...]) |
-c | --calcrel-hash HASH | function hash(es) to operate on |
None | --last-change | Select only the last change for a function (which speeds up execution) |
Examples:
# Example: List the last 8 changes ("-m 8" specifies the number of changes to show; the default order is reverse-chronological)
alice@alice_PC$ lc hist show -m 8
Change Time Push Func name
------ ------------------- ---- ---------------------------
507 2022-09-15 14:48:18 5 math_things
506 2022-09-15 14:48:17 4 calc_things (*)
505 2022-09-15 14:48:17 4 start
504 2022-09-15 14:48:16 3 keygen_window_dialog_proc_a
503 2022-09-15 14:48:16 3 display_keygen_window
502 2022-09-15 14:48:15 2 fstat
501 2022-09-15 14:48:15 2 __umoddi3
500 2022-09-15 14:48:15 2 __udivdi3
# Shown 8 results (more are available...)
# Example: List changes from id 9 up to (but excluding) id 14
alice@alice_PC$ lc hist show -r9..14
Change Time Push Func name
------ ------------------- ---- ---------------------
13 2022-09-15 14:48:05 2 AllocateBucketGroup
12 2022-09-15 14:48:05 2 addr_map_find
11 2022-09-15 14:48:05 2 addr_map_insert
10 2022-09-15 14:48:05 2 addr_map_compare_func
9 2022-09-15 14:48:05 2 addr_map_free_func
# Shown 5 results
# Example: List changes using multiple ranges (9..14,505..515; in this case, there were no changes after 507 in the database)
alice@alice_PC$ lc hist show -r9..14,505..515
Change Time Push Func name
------ ------------------- ---- ---------------------
507 2022-09-15 14:48:18 5 math_things
506 2022-09-15 14:48:17 4 calc_things (*)
505 2022-09-15 14:48:17 4 start
13 2022-09-15 14:48:05 2 AllocateBucketGroup
12 2022-09-15 14:48:05 2 addr_map_find
11 2022-09-15 14:48:05 2 addr_map_insert
10 2022-09-15 14:48:05 2 addr_map_compare_func
9 2022-09-15 14:48:05 2 addr_map_free_func
# Shown 8 results
# Example: Find changes from a specific idb file ("-i"), showing the function hash and ea ("-a" adds additional columns to the output)
alice@alice_PC$ lc hist show -i C:\malware\apts\pc_keygenme_3.pe.idb -a calcrel_hash,func_ea
Change Time Push Func name Func EA Func hash
------ ------------------- ---- --------------------------- ------- --------------------------------
504 2022-09-15 14:48:16 3 keygen_window_dialog_proc_a 4011e2 420A0485EDB7C6774E1822953FB785D4
503 2022-09-15 14:48:16 3 display_keygen_window 401099 ACA673D198FBC0DF24C20A15FF7F25CE
# Shown 2 results
# Example: Show the first 4 changes ("-m4") with their input file(s) (in "--chronological" order; "-a" adds an additional column)
alice@alice_PC$ lc hist show --chronological -m 4 -a input_path
Change Time Push Func name Input path
------ ------------------- ---- --------------------- ------------------------------------
1 2022-09-15 14:47:44 1 .init_proc /home/alice/work/pc_dwarf_arrays.elf
2 2022-09-15 14:47:44 1 _start /home/alice/work/pc_dwarf_arrays.elf
3 2022-09-15 14:47:44 1 __do_global_dtors_aux /home/alice/work/pc_dwarf_arrays.elf
4 2022-09-15 14:47:44 1 frame_dummy /home/alice/work/pc_dwarf_arrays.elf
# Shown 4 results (more are available...)
# Example: Show the last change by a user ("-u" indicates the user, "-m1" means show 1 change only, "-a" adds an additional column)
alice@alice_PC$ lc hist show -ubob -m1 -a username
Change Time Push Func name Username
------ ------------------- ---- --------- --------
502 2022-09-15 14:48:15 2 fstat bob
# Shown 1 results (more are available...)
# Example: Show up to 4 changes ("-m4") between two dates ("-t" indicates a range of "YYYY-MM-DD" dates)
alice@alice_PC$ lc hist show -m4 -t2022-09-02..2022-12-03
Change Time Push Func name
------ ------------------- ---- ---------------------------
507 2022-09-15 14:48:18 5 math_things
506 2022-09-15 14:48:17 4 calc_things (*)
505 2022-09-15 14:48:17 4 start
504 2022-09-15 14:48:16 3 keygen_window_dialog_proc_a
# Shown 4 results (more are available...)
# Example: Show up to 4 changes ("-m4") between two "now"-relative dates ("-t", from 2 weeks ago to 5 minutes ago) ("-a" adds an additional column)
alice@alice_PC$ lc hist show -m4 -t-2w..-5M -a func_id
Change Time Push Func name Func ID
------ ------------------- ---- --------------------------- -------
507 2022-09-15 14:48:18 5 math_things 506
506 2022-09-15 14:48:17 4 calc_things (*) 506
505 2022-09-15 14:48:17 4 start 505
504 2022-09-15 14:48:16 3 keygen_window_dialog_proc_a 504
# Shown 4 results (more are available...)
# Example: Show up to 4 changes ("-m4") between two "now"-relative dates ("-t", from 2 weeks ago to 5 minutes ago) ("-a" adds an additional column), only select the last change for each function
alice@alice_PC$ lc hist show -m4 -t-2w..-5M -a func_id --last-change
Change Time Push Func name Func ID
------ ------------------- ---- --------------------------- -------
507 2022-09-15 14:48:18 5 math_things 506
505 2022-09-15 14:48:17 4 start 505
504 2022-09-15 14:48:16 3 keygen_window_dialog_proc_a 504
503 2022-09-15 14:48:16 3 display_keygen_window 503
# Shown 4 results (more are available...)
# Example: Show up to 4 changes ("-m4"), occurring after a "now"-relative date ("-t", from 6 hours ago up to now)
alice@alice_PC$ lc hist show -m4 -t-6H
Change Time Push Func name
------ ------------------- ---- ---------------------------
507 2022-09-15 14:48:18 5 math_things
506 2022-09-15 14:48:17 4 calc_things (*)
505 2022-09-15 14:48:17 4 start
504 2022-09-15 14:48:16 3 keygen_window_dialog_proc_a
# Shown 4 results (more are available...)
# Example: Show changes about a specific function name ("-n")
alice@alice_PC$ lc hist show -n print_relocinfo
Change Time Push Func name
------ ------------------- ---- ---------------
175 2022-09-15 14:48:08 2 print_relocinfo
# Shown 1 results
# Example: Show changes about a function name ("-n") searched by wildcard ("like:...")
alice@alice_PC$ lc hist show -n "like:%reloc%info%"
Change Time Push Func name
------ ------------------- ---- --------------------------
179 2022-09-15 14:48:08 2 print_reloc_information_32
178 2022-09-15 14:48:08 2 print_reloc_information_64
177 2022-09-15 14:48:08 2 print_relocinfo_32
176 2022-09-15 14:48:08 2 print_relocinfo_64
175 2022-09-15 14:48:08 2 print_relocinfo
# Shown 5 results
# Example: Show metadata details ("--details") in changes for a function ("-n"); this particular change added a new function
alice@alice_PC$ lc hist show -n is_location_form --details
Change Time Push Func name
------ ------------------- ---- ----------------
126 2022-09-15 14:48:07 2 is_location_form
>> Score
>> - 0
>> + 1445
>> Name
>> - None
>> + is_location_form
>> Prototype
>> -
>> + 0C303D08626F6F6C65616E0207
>> Member @ 0x8
>> .type
>> - None
>> + 07
>> .cmt
>> - None
>> +
>> .rptcmt
>> - None
>> +
>> Insn operands @ 0+0x3
>> - [<no ops repr>]
>> + [op0=0xb, op1=0x0, op2=0x0, op3=0x0, op4=0x0, op5=0x0, op6=0x0, op7=0x0]
>> Insn operands @ 0+0x9
>> - [<no ops repr>]
>> + [op0=0xb, op1=0x0, op2=0x0, op3=0x0, op4=0x0, op5=0x0, op6=0x0, op7=0x0]
>> Insn operands @ 0+0xf
>> - [<no ops repr>]
>> + [op0=0xb, op1=0x0, op2=0x0, op3=0x0, op4=0x0, op5=0x0, op6=0x0, op7=0x0]
>> Insn operands @ 0+0x15
>> - [<no ops repr>]
>> + [op0=0xb, op1=0x0, op2=0x0, op3=0x0, op4=0x0, op5=0x0, op6=0x0, op7=0x0]
>> Insn operands @ 0+0x1b
>> - [<no ops repr>]
>> + [op0=0xb, op1=0x0, op2=0x0, op3=0x0, op4=0x0, op5=0x0, op6=0x0, op7=0x0]
>> Insn operands @ 0+0x21
>> - [<no ops repr>]
>> + [op0=0xb, op1=0x0, op2=0x0, op3=0x0, op4=0x0, op5=0x0, op6=0x0, op7=0x0]
>> Insn operands @ 0+0x27
>> - [<no ops repr>]
>> + [op0=0xb, op1=0x0, op2=0x0, op3=0x0, op4=0x0, op5=0x0, op6=0x0, op7=0x0]
# Shown 1 results
hist pushes
hist pushes [OPTION]
Shows pushes to the Lumina server.
Options:
| Short form | Long form | Description |
|---|---|---|
-a | --additional-fields LIST | Comma-delimited list of additional info to display (license_name, license_email, license_id, all) |
-t | --time-range TIMESTAMP | timestamp |
-u | --username USERNAME | username(s) to operate on |
-l | --license-id LICENSE | license ID (XX-XXXX-XXXX-XX format) to operate on |
-m | --max-entries NUMBER | maximum number of entries to operate on (defaults to 100) |
None | --chronological | Display entries in chronological order (defaults to reverse-chronological). |
Examples:
alice@alice_PC$ lc hist pushes
Push ID Time User name IDB path
------- ------------------- --------- ----------------------------------------
5 2022-09-15 14:48:18 alice /home/alice/work/pc_math_b_64.elf.i64
4 2022-09-15 14:48:17 alice /home/alice/work/pc_math_a_64.elf.i64
3 2022-09-15 14:48:16 damian C:\malware\apts\pc_keygenme_3.pe.idb
2 2022-09-15 14:48:05 bob /Users/bob/idbs/pc_dwarfdump.elf.idb
1 2022-09-15 14:47:44 alice /home/alice/work/pc_dwarf_arrays.elf.idb
# Shown 5 results
# Example: List all pushes from a specific license ID
alice@alice_PC$ lc hist pushes -l BB-0B0B-AC8E-01 -a license_email
Push ID Time User name License email IDB path
------- ------------------- --------- ------------- ------------------------------------
2 2022-09-15 14:48:05 bob [email protected] /Users/bob/idbs/pc_dwarfdump.elf.idb
# Shown 1 results
# Example: List all pushes from licenses with IDs matching a pattern ("-a" adds an additional column)
alice@alice_PC$ lc hist pushes -l like:AA-% -a license_id
Push ID Time User name License ID IDB path
------- ------------------- --------- --------------- ----------------------------------------
5 2022-09-15 14:48:18 alice AA-A11C-AC8E-01 /home/alice/work/pc_math_b_64.elf.i64
4 2022-09-15 14:48:17 alice AA-A11C-AC8E-01 /home/alice/work/pc_math_a_64.elf.i64
1 2022-09-15 14:47:44 alice AA-A11C-AC8E-01 /home/alice/work/pc_dwarf_arrays.elf.idb
# Shown 3 results
# Example: Show the first push
alice@alice_PC$ lc hist pushes --chronological -m 1
Push ID Time User name IDB path
------- ------------------- --------- ----------------------------------------
1 2022-09-15 14:47:44 alice /home/alice/work/pc_dwarf_arrays.elf.idb
# Shown 1 results (more are available...)
# Example: List all pushes between two timestamps
alice@alice_PC$ lc hist pushes -t"2022-09-07 10:20:00..2022-12-31"
Push ID Time User name IDB path
------- ------------------- --------- ----------------------------------------
5 2022-09-15 14:48:18 alice /home/alice/work/pc_math_b_64.elf.i64
4 2022-09-15 14:48:17 alice /home/alice/work/pc_math_a_64.elf.i64
3 2022-09-15 14:48:16 damian C:\malware\apts\pc_keygenme_3.pe.idb
2 2022-09-15 14:48:05 bob /Users/bob/idbs/pc_dwarfdump.elf.idb
1 2022-09-15 14:47:44 alice /home/alice/work/pc_dwarf_arrays.elf.idb
# Shown 5 results
# Example: List all pushes from two users ("-a" adds an additional column)
alice@alice_PC$ lc hist pushes -u"bob damian" -a"license_name license_id"
Push ID Time User name License name License ID IDB path
------- ------------------- --------- ------------ --------------- ------------------------------------
3 2022-09-15 14:48:16 damian Damian DD-DA81-A000-01 C:\malware\apts\pc_keygenme_3.pe.idb
2 2022-09-15 14:48:05 bob Bob BB-0B0B-AC8E-01 /Users/bob/idbs/pc_dwarfdump.elf.idb
# Shown 2 results
hist del
hist del [OPTION]
Deletes history and metadata for functions.
Options:
| Short form | Long form | Description |
|---|---|---|
-s | --silent | Do not ask for confirmation before deleting history |
-l | --license-id LICENSE | license ID (XX-XXXX-XXXX-XX format) to operate on |
-r | --history-id-range RANGE | history ID range(s) to operate on (start0..end0 [...]) |
-t | --time-range RANGE | time range to operate on (start..end) see the appendix |
-i | --idb IDB | IDB name(s) to operate on |
-f | --input FILE | input file(s) to operate on |
-u | --username USERNAME | username(s) to operate on |
-n | --func NAME | function name(s) to operate on |
-h | --input-hash HASH | input file hash(es) to operate on |
-p | --pushes-id-range RANGE | Pushes ID range(s) to operate on (start0..end0 [...]) |
-c | --calcrel-hash HASH | function hash(es) to operate on |
None | --last-change | Select only the last change for a function (which speeds up execution) |
Examples:
# Example: Display the last 10 changes, with their input file(s) and function ID(s)
alice@alice_PC$ show -m10 -a input_path
Change Time Push Func name Func ID Input path
------ ------------------- ---- --------------------------- ------- ---------------------------------
507 2022-09-15 14:48:18 5 math_things 506 /home/alice/work/pc_math_b_64.elf
506 2022-09-15 14:48:17 4 calc_things (*) 506 /home/alice/work/pc_math_a_64.elf
505 2022-09-15 14:48:17 4 start 505 /home/alice/work/pc_math_a_64.elf
504 2022-09-15 14:48:16 3 keygen_window_dialog_proc_a 504 C:\malware\apts\pc_keygenme_3.pe
503 2022-09-15 14:48:16 3 display_keygen_window 503 C:\malware\apts\pc_keygenme_3.pe
502 2022-09-15 14:48:15 2 fstat 502 /Users/bob/idbs/pc_dwarfdump.elf
501 2022-09-15 14:48:15 2 __umoddi3 501 /Users/bob/idbs/pc_dwarfdump.elf
500 2022-09-15 14:48:15 2 __udivdi3 500 /Users/bob/idbs/pc_dwarfdump.elf
499 2022-09-15 14:48:14 2 dwarf_get_ADDR_name 499 /Users/bob/idbs/pc_dwarfdump.elf
498 2022-09-15 14:48:14 2 dwarf_get_FRAME_name 498 /Users/bob/idbs/pc_dwarfdump.elf
# Shown 10 results (more are available...)
# Example: Delete all changes for functions matching a pattern
alice@alice_PC$ lc hist del -s -n like:%dwarf%
267 entries deleted from history
alice@alice_PC$ hist show -m10 -a input_path,func_id
Change Time Push Func name Func ID Input path
------ ------------------- ---- --------------------------- ------- ---------------------------------
507 2022-09-15 14:48:18 5 math_things 506 /home/alice/work/pc_math_b_64.elf
506 2022-09-15 14:48:17 4 calc_things (*) 506 /home/alice/work/pc_math_a_64.elf
505 2022-09-15 14:48:17 4 start 505 /home/alice/work/pc_math_a_64.elf
504 2022-09-15 14:48:16 3 keygen_window_dialog_proc_a 504 C:\malware\apts\pc_keygenme_3.pe
503 2022-09-15 14:48:16 3 display_keygen_window 503 C:\malware\apts\pc_keygenme_3.pe
502 2022-09-15 14:48:15 2 fstat 502 /Users/bob/idbs/pc_dwarfdump.elf
501 2022-09-15 14:48:15 2 __umoddi3 501 /Users/bob/idbs/pc_dwarfdump.elf
500 2022-09-15 14:48:15 2 __udivdi3 500 /Users/bob/idbs/pc_dwarfdump.elf
474 2022-09-15 14:48:14 2 free_macro_stack 474 /Users/bob/idbs/pc_dwarfdump.elf
468 2022-09-15 14:48:14 2 print_line_detail 468 /Users/bob/idbs/pc_dwarfdump.elf
# Shown 10 results (more are available...)
# Example: Delete all changes stemming from a specific file
alice@alice_PC$ lc hist del -s -f/Users/bob/idbs/pc_dwarfdump.elf
228 entries deleted from history
# Example: List the changes from pushes 1 to 5 (not included), showing their input file(s)
alice@alice_PC$ lc show -p1..5 -a input_path
Change Time Push Func name Input path
------ ------------------- ---- --------------------------- ------------------------------------
506 2022-09-15 14:48:17 4 math_things /home/alice/work/pc_math_a_64.elf
505 2022-09-15 14:48:17 4 start /home/alice/work/pc_math_a_64.elf
504 2022-09-15 14:48:16 3 keygen_window_dialog_proc_a C:\malware\apts\pc_keygenme_3.pe
503 2022-09-15 14:48:16 3 display_keygen_window C:\malware\apts\pc_keygenme_3.pe
7 2022-09-15 14:47:44 1 __do_global_ctors_aux /home/alice/work/pc_dwarf_arrays.elf
6 2022-09-15 14:47:44 1 __libc_csu_init /home/alice/work/pc_dwarf_arrays.elf
5 2022-09-15 14:47:44 1 main /home/alice/work/pc_dwarf_arrays.elf
4 2022-09-15 14:47:44 1 frame_dummy /home/alice/work/pc_dwarf_arrays.elf
3 2022-09-15 14:47:44 1 __do_global_dtors_aux /home/alice/work/pc_dwarf_arrays.elf
2 2022-09-15 14:47:44 1 _start /home/alice/work/pc_dwarf_arrays.elf
1 2022-09-15 14:47:44 1 .init_proc /home/alice/work/pc_dwarf_arrays.elf
# Shown 11 results
# Example: Delete one single change
alice@alice_PC$ lc hist del -s -r505..506
1 entries deleted from history
# Example: Delete all the changes from push 1
alice@alice_PC$ lc hist del -s -p 1..2
7 entries deleted from history
alice@alice_PC$ hist show -a username
Change Time Push Func name Username
------ ------------------- ---- --------------------------- --------
507 2022-09-15 14:48:18 5 math_things alice
506 2022-09-15 14:48:17 4 calc_things (*) alice
504 2022-09-15 14:48:16 3 keygen_window_dialog_proc_a damian
503 2022-09-15 14:48:16 3 display_keygen_window damian
# Shown 4 results
# Example: Delete all changes by a user
alice@alice_PC$ lc hist del -s -udamian
2 entries deleted from history
alice@alice_PC$ hist show -a func_id
Change Time Push Func name Func ID
------ ------------------- ---- --------------- -------
507 2022-09-15 14:48:18 5 math_things 506
506 2022-09-15 14:48:17 4 calc_things (*) 506
# Shown 2 results
# Example: Delete the last change for a function
alice@alice_PC$ lc hist del -s --func math_things --last-change
1 entries deleted from history
alice@alice_PC$ hist show -a func_id
Change Time Push Func name Func ID
------ ------------------- ---- ----------- -------
506 2022-09-15 14:48:17 4 calc_things 506
# Shown 1 results
# Example: Delete all remaining changes for a function by name
alice@alice_PC$ lc hist del -s --func calc_things
1 entries deleted from history
alice@alice_PC$ hist show
# Shown 0 results
Various information
info
info
Shows lumina connection information.
Example:
alice@alice_PC$ lc info
Hex-Rays Lumina Server v8.0
Lumina time: 2022-08-29 10:13:37, up since 2022-08-21 21:00:05
MAC address: FF:32:67:FF:D3:00
Client name: alice *ADMIN*
Client host: 127.0.0.1
users
users
Shows users.
Example:
alice@alice_PC$ lc users
LastActive Adm Login License User name Email
---------- --- ------ --------------- --------------------------- ------------------
2022-08-29 * bob XX-XXXX-XXXX-XX bob [email protected]
2022-08-29 * alice XX-XXXX-XXXX-XX alice [email protected]
2022-08-27 damian XX-XXXX-XXXX-XX damian [email protected]
stats
stats [OPTION]
Shows the numbers of functions, pushes, history records, IDBs and input files stored in the Lumina server database.
Options:
| Short form | Long form | Description |
|---|---|---|
-u | --username USERNAME | username(s) to operate on |
Examples:
alice@alice_PC$ lc stats
Consolidated statistics from lumina_server:
Number of functions: 4
Number of pushes: 5
Number of history records: 6
Number of IDBs: 3
Number of input files: 3
---------------------------------------------
# Example: Retrieve the statistics for a list of users
alice@alice_PC$ lc stats -ualice,bob,russ
Statistics for alice:
Number of functions: 2
Number of pushes: 3
Number of history records: 4
Number of IDBs: 1
Number of input files: 1
---------------------------------------------
Statistics for bob:
Number of functions: 1
Number of pushes: 1
Number of history records: 1
Number of IDBs: 1
Number of input files: 1
---------------------------------------------
Administrative commands
These commands require that the user executing them has admin privileges.
Managing users
User management will depend whether the Lumina server is configured to work with its own set of users, or delegating user management to the Teams server.
In the latter case, you should use the hv command-line tool to administer the Teams server.
Locally managing users
The following commands allow the administrator to manipulate users known to the Lumina server (provided of course the Lumina server doesn’t delegate users management to the Teams server)
user add
user add USERNAME EMAIL IS_ADMIN LICENSE_ID
Adds a user.
The passwd command must be used after creating a user; otherwise the new user will not be able to login to the Lumina server and use it.
USERNAME | The username of the user. |
EMAIL | The email address of the user. |
IS_ADMIN | Should be 1 if the user is admin, otherwise 0. |
LICENSE_ID | The license of the user. |
Example:
alice@alice_PC$ lc user add damiank [email protected] 0 XX-XXXX-XXXX-XX
user edit
user edit USERNAME EMAIL IS_ADMIN LICENSE_ID
Edits a user definition.
USERNAME | The username of the user to modify. |
EMAIL | The email address of the user. |
IS_ADMIN | Should be 1 if the user is admin, otherwise 0. |
LICENSE_ID | The license of the user. |
Example:
# Example: For the given username, set the email, admin flag and license ID
alice@alice_PC$ lc user edit damiank [email protected] 0 XX-XXXX-XXXX-XX
user del
user del USERNAME EMAIL LICENSE_ID
Deletes a user.
USERNAME | The name of the user to delete. |
EMAIL | The email address of the user. |
LICENSE_ID | The license of the user. |
Example:
alice@alice_PC$ lc user del damiank [email protected] XX-XXXX-XXXX-XX
passwd
passwd PASS USER
Modifies the password for a user.
PASS | The new password. |
USER | The username whose password should be changed Only admins can change other users’ passwords. |
Example:
alice@alice_PC$ lc passwd secret_password john
Managing sessions
session list
session list
Lists the current connections to the Lumina server. For each connection, the currently executed query (if any) is shown. For each connection, the currently executed query (if any) is shown.
Example:
alice@alice_PC$ lc session list
id=1642 peer="127.0.0.1", user="...", license="...", e-mail="...", established="2022-08-16 17:13:21"
current_query="INSERT INTO pushes (fk_idb, fk_user) VALUES (?, ?)" (0msec)
session kill
session kill ID
Kills an existing connection to the Lumina server.
ID | The connection to kill, as shown by the <<cmd_session-list>> command |
Example:
alice@alice_PC$ lc session list
id=1 peer="127.0.0.1", user="...", license="...", e-mail="...", established="2022-09-20 16:47:07" current_query="" (0msec)
alice@alice_PC$ lc session kill 1
Connection killed
alice@alice_PC$ lc session list
No connections.
Concepts
What is the Lumina server
The Lumina server is a “functions metadata” repository.
It is a place where IDA users can push, and pull such metadata, to ease their reverse-engineering work: metadata can be extracted from existing projects, and re-applied effortlessly to new projects, thereby reducing (sometimes dramatically) the amount of time needed to analyze binaries.
Functions metadata
The Lumina server associates “function metadata” to functions, by means of a (md5) hash of those functions: whenever it wants to push information to, or pull information from the server, IDA will first have to compute hashes of the functions it wants to retrieve metadata for, and send those hashes to the Lumina server.
Similarly, when IDA pushes information to the Lumina server, it will first compute hashes for the corresponding functions, extract the metadata corresponding to those from the .idb file, and send those hash+metadata pairs to the server.
Metadata contents
Metadata about functions can include:
- function name
- function address
- function size
- function prototype
- function [repeatable] comments
- instruction-specific [repeatable] comments
- anterior/posterior (i.e., “extra”) comments
- user-defined “stack points” in the function’s frame
- the function frame description and stack variables
- instructions operands representations
Pushing & overriding metadata
When a user pushes metadata about a function whose md5 hash isn’t present in the database, the Lumina server will simply create a new record for it.
However, when a user pushes metadata about a function whose md5 hash (and associated metadata) is already present in the database, the Lumina server will attempt to “score” the quality of the old metadata and the quality of the new metadata. If the score of the new metadata is higher, the new function metadata will override the previous one.
{% hint style=“info” %}
When a user asks IDA to push all functions to the Lumina server, IDA will automatically skip some functions: those that still have a “dummy” name (e.g., sub_XXXX), or that are below a certain size threshold (i.e., 32 bytes) will be ignored.
{% endhint %}
Metadata history
The Lumina server retains a history of the metadata associated to functions. Using the lc utility, it is possible to dig into that history, and view changes (detailed diffs, too.)
File contents
It’s worth pointing out that when pushing metadata to the Lumina server, IDA will not push the binary file itself. Only the following metadata about the file itself will be sent:
- the name of the input file
- the name of the IDB file
- a
md5hash of the input file
The Lumina server cannot therefore be used as a backup/repository for binary files & IDBs (that is the role of the vault_server)
Commands
String patterns
Options that take strings as inputs can be enhanced through wildcards. The following wildcards are available:
%
represents zero, one or multiple characters.
_
represents one character.
To use wildcards in a string, it must be prefixed with like: e.g. -n like:%main%.
Timerange formats
For timeranges, the following syntaxes are supported:
<ts>..<ts>(from timestamp to (but not including) timestamp)<ts>(only one timestamp)
Where <ts> can be of the form:
yyyy-mm-dd HH:MM:SS: e.g.,2022-09-12 11:38:22yyyy-mm-dd: e.g.,2020-03-12+|-<count><unit>: this is a “now-relative” timestamp, where<unit>must be one ofw,d,H,M,Sfor weeks, days, hours, minutes or seconds respectively. E.g.,-4d,+5w,-8H,+1H, …
when using the <ts> syntax (i.e., only 1 timestamp is provided, not an actual range), the final range will be either “from now to <ts>”, or “from <ts> to now”, depending on whether <ts> is before, or after, the present time.
Speed of retrieving changes
Although it may seem like a simple operation, lc hist show is
actually a very demanding one: by default it will have to fetch
bits of information from multiple tables (e.g., in order to provide
information about which change was superseded by a later one.)
This can be significantly sped up through the use of --last-change:
this option lets the server issue a much simpler query, resulting in
significantly reduced processing time.
Plugins
IDA’s capabilities can be significantly extended through programmable plugins. These plugins can automate routine tasks, for example, enhance the analysis of hostile code or add a specific functionality to our disassembler.
Plugins can be developed using:
- C++ using the IDA SDK, or
- Python via the IDAPython API.
Key capabilities:
- Integration with hotkeys: plugins can be linked to specific hotkeys or menu items for quick access
- Access to the IDB: they have full access to the IDA database, allowing them to examine or modify the program or use Input/Output functions.
Where to find plugins
Development resources
- Examples included with IDA C++ SDK: Our SDK contains +60 sample plugins, including decompiler plugins (you can find them all inside the SDK directory, in the
pluginsfolder), as well as source code to processor modules, loaders, and header files. You can download the latest version of IDA SDK fromHexRaysSA/ida-sdkrepository on GitHub.
Built-in plugins
- Plugins shipped with your IDA instance: Explore the
pluginsdirectory in your IDA installation folder for plugins shipped out-of-the-box. You can run them through Edit -> Plugins submenu or via hotkeys.- Explore plugin docs: Learn more about built-in plugins through dedicated tutorials
Community plugins
- Hex-Rays plugins repository: To access a vast collection of community-developed plugins, visit plugins.hex-rays.com.
HCLI & Plugin Manager
- You can easily search for, install, and upgrade plugins using the Plugin Manager. During installation, HCLI automatically places plugins in the correct locations, installs required Python dependencies, and handles additional setup tasks.
Creating your own plugins
Getting started: Domain API
If you’re new to IDA and plugin development, the high-level Domain API is the best place to begin. It provides a broad coverage for common tasks and simplifies scripting, helping you get up and running quickly.
General Domain API Documentation Resources
| Getting Started | https://ida-domain.docs.hex-rays.com/getting_started/ | ||
| Examples | https://ida-domain.docs.hex-rays.com/examples/ | ||
| Reference | https://ida-domain.docs.hex-rays.com/usage/ |
| Create plugins with C++ | how-to-create-a-plugin.md | ||
| Create plugins with IDAPython | how-to-create-a-plugin.md |
Automating Plugin Development with HCLI and GitHub Action
Use HCLI - the Hex-Rays Command Line Interface to automate your plugin development workflow. Set up a CI workflow for your plugins using the HCLI IDA GitHub Action to download and install IDA Pro automatically and test your plugin across different environments.
What you can achieve:
- Cross-platform testing: Test your plugins on Linux, Windows, and macOS
- Multi-version compatibility: Validate against different IDA Pro versions
- All dependencies handled: No need for separate Python or uv setup
What’s next?
Configure how plugins are loaded with plugins.cfg
The plugin modules reside in the plugins subdirectory of IDA. IDA is able to find and load all the plugins from this directory automatically. However, you can write a configuration file and tell IDA how to load plugins.
To do so, you need to modify the plugins.cfg file in the plugins subdirectory, as described below.
The plugins.cfg file is needed to customize the plugins, including:
- appearance of the plugin in the menu
- the hotkey used to call the plugin
- the optional argument passed to the plugin
The format of the plugins.cfg file is simple:
-
Empty lines and lines starting with ‘;’ are comment lines
-
Other lines must have the following structure and fields:
menu_name filename hotkey arg flagsExample:
Undefine undef Alt-U 0
| Fields | Description |
|---|---|
menu_name | A visible name of the plugin. This name will be used in the Edit → Plugins menu. Underscore symbols will be replaced by spaces here. |
filename | The plugin file name. If the filename doesn’t include the file extension or the directory, IDA will add them. Default extensions: - Windows: .dll- Linux: .so- macOS: .dylibNote: Plugins compiled with support for 64-bit address space use a 64 suffix before the extension (e.g., pdb64.dll). |
hotkey | A hotkey to activate the plugin |
arg | An optional integer argument which will be passed to the run() function of the plugin |
flags | Optional flags. The following values are available: - DEBUG: Debugger plugin- WIN: Enable plugin for MS Windows- MAC: Enable plugin for Mac- LINUX: Enable plugin for Linux- GUI: Plugin can only be used with GUI version of IDA- SILENT: Silently skip nonexisting plugin |
Share your plugin with Hex-Rays community
Make your plugin compatible with Plugin Manager to improve its discoverability and provide users with seamless installation and management.
Plugin options
Plugin options
The -O command line switch allows the user to pass options to the plugins. A plugin which uses options should call the get_plugin_options() function to get them.
Since there may be many plugins written by independent programmers, each options will have a prefix -O in front of the plugin name.
For example, a plugin named "decomp" should expect its parameters to be in the following format:
-Odecomp:option1:option2:option3
In this case, get_plugin_options("decomp") will return the "option1:option2:option3" part of the options string.
If there are several -O options in the command line, they will be concatenated with ':' between them.
List of plugins recognizing '-O' switch
This switch is not available in the IDA Home edition.
Plugins Shipped with IDA
IDA is natively shipped with repository of pre-installed plugins, that are inside plugins directory in your IDA installation folder. Some of these plugins provide essential features such as debugging or decompiler capabilities. These internal plugins are integrated into the IDA environment and cannot be accessed or executed in the same manner as standard built-in plugins.
Accessing built-in plugins
Built-in plugins can be accessed through:
- Menu entries under Edit → Plugins
- Keyboard shortcuts assigned to specific plugins
- Specialized submenus
Plugin tutorials
Although some of the built-in plugins are quite simple and straightforward in their functionality, the following guides provide detailed instructions for using more advanced plugins:
- Borland RTTI descriptors
- dscu
- DWARF
- eh34 for C++ exception handling
- Golang
- gooMBA
- IDAClang
- IDAFeeds
- Makesig
- Objective-C analysis
- Patfind
- picture_search
- Rust
- Swift
Swift plugin
Demangling
The swift plugin uses libSwiftDemangle to demangle Swift names. Note that IDA already had a built-in swift demangler, but it was becoming difficult to maintain. In the long-term we hope to fully deprecate IDA’s custom swift demangler in favor of libSwiftDemangle.
However, the new approach still hasn’t been fully integrated into IDA, so there may be times when IDA’s old swift demangler produces more desirable results.
‘cfg/swift.cfg’ file presents all the options
‘-Oswift’ command line switches can be used to enable or disable some plugin options.
List of options
- <demangler_path> : use specific libSwiftDemangle library
- -d : use the built-in IDA swift demangler (legacy)
- +d : use libSwiftDemangle swift demangler
- -m : don't present metadata in nice way
- +m : present metadata in nice way
- -e : don't import enumeration types
- +e : import enumeration types
- -s : don't import structure types
- +s : import structure types
- -v : don't set variable type based on mangled names
- +v : set variable type based on mangled names
- -f : don't set function prototype based on mangled names
- +f : set function prototype based on mangled names
- -g : don't group functions in folders corresponding to modules
- +g : group functions in folders corresponding to modules
Examples
-Oswift:-g
Do not group functions into folders.
-Oswift:/tmp/libSwiftDemangle_custom.dylib
Golang plugin
Golang binaries are by default statically linked and full of metadata therefore a lot can be gained from annotating a Golang binary’s contents using recovered metadata.
Detection
The golang plugin’s analysis only happens by default if the input file is detected as a Golang file. There are multiple mechanisms in place to detect that:
- if a Golang startup signature matches the entry point (PC-only)
- if the Golang plugin detects a Golang-specific segment name
- if the elf loader finds a "Go" note in the input file
- on PE files: if certain Golang symbol names or a Go build id signature is found
Analysis
The metadata parsed by the golang plugin falls under two main categories:
- function information (e.g. name, package, range) retrieved from the pclntab
- type information (e.g. name, package, layout, size) retrieved from the typelinks table
The package paths of functions and types are used to create folders. This analysis will occur upon `ev_newfile` (when a new file has been loaded) if Golang has been detected.
Actions
`golang:detect_and_parse` (Edit>Other)
This action is useful to force a full search of the binary for Golang metadata. It will first attempt to parse a pclntab at the current address, if this is unsuccessful it will perform a full search of the binary for the pclntab’s signature and parse it if found. In addition, it will also attempt to locate and parse the type information.
Calling Conventions
Golang has its own calling convention(s), denoted in IDA as `__golang`. In fact, Golang has two different calling conventions: a stack-based CC (abi0) and a newer register-based CC (abiinternal). The version of Golang and thus which calling convention to use will be automatically inferred from metadata structures; It is also controllable through the `force_regabi` command line option.
List of `-Ogolang` options
Command line options take precedence over config file options.
force try to force the analysis
(no detection step needed)
off disable the plugin
no_rtypes do not import any types
rname_len2 force the reflect type name format to go1.17
and later (varint encoding: 1-10 bytes)
rname_len1 force the reflect type name format to before
go1.17 (2 bytes)
import_lnnums recover file names & line numbers from pclntab
no_func_end_from_pcval_tabs do not derive a function's end from pclntab
metadata
force_regabi[=on|=off] override calling convention version
`=off`: will force the stack-based CC
`=on`/no value: will force
the register-based CC
See cfg/golang.cfg for available configuration options.
Examples
forcing analysis and register-based calling convention
-Ogolang:force:force_regabi
disabling the plugin
-Ogolang:off
Rust plugin
The binaries produced by the Rust compiler have some peculiarities which make them difficult to analyze, such as:
- non-standard calling conventions
- non-terminated string literals
- unusual name mangling scheme
By default, Rust plugin is enabled if one of the following condition is true
- one address is named 'rust_begin_unwind'
- the string 'rustc-' can be found somewhere in the program
If the segment '.rodata' exists, the search is limited to this segment
String literal analysis
Rust plugin walks to all addresses in segment with name ending in “__const”, “.rodata” or “.rdata” and creates string literals on xref
- on dref, the string literal is set up to the next dref
- on cref, Rust tries to retrieve length from nearby instructions
Arm, Risc-V and pc proc module benefit from this
To force the string literal detection:
idaapi.load_and_run_plugin("rust", 1)
Demangling name
Rust plugin also offers the possibility to configure a demangler library for rust. By default the plugin will use the librustdemangle library that is shipped with IDA. You can disable this feature in ‘Edit>Plugin>Rust language helper’ or specify another library to use.
See cfg/rust.cfg for the possible options
List of ‘-Orust’ options
- on : enable rust plugin for this session of IDA
- off : disable rust plugin for this session of IDA
Example
-Orust:off
This disable the plugin for this session of IDA.
picture_search
picture_search is a plugin that allows you to search for, and inspect pictures that are embedded in the binary.
The key feature of the plugin is the "Search for pictures" action, available in the "Search" menu, that will scan the entire binary (or the selection if there is one) for so-called "magic" numbers of well-known image types (PNG, JPEG, ...), and present the results in a tabular fashion:
[Address] |[Format]
.noptrdata:0000000000511620|GIF89a
.noptrdata:00000000005133E0|PNG
.noptrdata:0000000000517460|JPEG
.noptrdata:000000000051ADA0|BMP
Note: at this point, pictures have not been decoded yet; the plugin has merely spotted what looks like the start of pictures. Decoding will only happen when triggering any of the following actions.
Double-clicking any row of that list will show the picture directly in IDA. Opening the context menu will reveal even more possibilities: open the picture in the OS's default viewer, save it, jump to its start address...
In addition to this very handy scanning feature, the plugin will add the "Open picture" action to the disassembly listing's context menu when the current position happens to be near data that matches the well-known image types' magic numbers.
Objective-C Analysis Plugin
The objc plugin performs Objective-C specific analysis on the database.
For an overview of what the plugin can do, see the menu options in Edit>Other>Objective-C, or the config options in objc.cfg.
Type Information
The bulk of the plugin’s work is done at file load time, when it will parse all Objective-C type information embedded in the binary, and use this to create tinfo_t structures for all known classes and construct prototypes for all known methods.
This analysis can be invoked manually at any time with:
Edit>Other>Objective-C>Reload Objective-C info
Or:
idaapi.load_and_run_plugin("objc", 1)
You can also disable objc analysis at load time with command line option:
-Oobjc:+l
Or check the “Lazy mode” option in:
Edit>Other>Objective-C>Objective-C Options...
Decompilation
The plugin will also perform Objective-C analysis during decompilation.
When a function is decompiled, the plugin will analyze any calls to objc_msgSend, and use the arguments to determine if objc_msgSend will ultimately invoke one of the methods in the current database.
If such a situation is detected, the plugin will replace the call to objc_msgSend with a call to the target method, and add an xref to the method. This is done in the hopes that continued use of the decompiler will improve call graphs for Objective-C binaries.
If the target method has type information, then the return type can be used to refine the types of local variables in the pseudocode, which in turn could lead to more method calls being detected, and so on.
You can disable objc analysis in the pseudocode with command line option:
-Oobjc:-h
Or uncheck the “Enable decompiler plugin for Objective-C” option in:
Edit>Other>Objective-C>Objective-C Options...
Debugging
objc also provides tools for dynamic analysis.
During debugging, you can analyze objc info for a specific library by right-clicking in the Modules window and selecting “Load debug info”.
This operation can also be performed programmatically with:
n = idaapi.netnode()
n.create("$ objc")
n.supset(1, "/module/path", 'R')
idaapi.load_and_run_plugin("objc", 3)
If you prefer that objc does not perform analysis during “Load debug info”, (say if DWARF information is available for a module and you prefer that), you can disable this functionality with command line option:
-Oobjc:-s
Or by unchecking the “Enable SIP for Objective-C” option in:
Edit>Other>Objective-C>Objective-C Options...
Step Into Message
The plugin also implements a “step into” debugger action for Objective-C.
If you use this action before a call to objc_msgSend, objc will try to calculate the address of method that is being invoked, and break at the method address rather than step into the objc_msgSend function itself.
You can perform this action with shortcut:
Shift+O
Or via the menu option:
Debugger>Run until message received
Or programmatically with:
idaapi.load_and_run_plugin("objc", 2)
This action can be very useful, but you must be careful. When invoked, the action will automatically run to the address of objc_msgSend, analyze its arguments, then continue to the target method.
If there is no subsequent call to objc_msgSend in the program, you will lose control of the process. It is best to use this action only when you are sure that IP is in the vicinity of an objc_msgSend call.
NSConcreteStackBlock
The objc plugin can also be used to analyze Apple binaries that make heavy use of blocks: https://clang.llvm.org/docs/Block-ABI-Apple.html
The analysis involves identifying NSConcreteStackBlock instances on the stack, and creating a specialized Block_layout structure to apply to the function’s stack frame.
The end result transforms the following sequence of statements:
loc_BF60: Block_layout_BF60 v1;
v1 = _NSConcreteStackBlock; v1.isa = _NSConcreteStackBlock;
v2 = 0x...; v1.flags = 0x...;
v3 = 0; v1.reserved = 0;
v4 = __block_invoke; => v1.invoke = __block_invoke;
v5 = &__block_descriptor_tmp; v1.descriptor = &__block_descriptor_tmp;
v6 = ... v1.lvar1 = ...
v7 = ... v1.lvar2 = ...
... ...
func(&v1); func(&v1);
Already this cleans up the analysis quite a lot, but more importantly this new Block_layout_BF60 structure will be applied to the prototype of __block_invoke, which can heavily improve the pseudocode.
Block analysis can be performed on the database with:
Edit>Other>Objective-C>Analyze stack-allocated blocks (entire database)
Or programmatically with:
idaapi.load_and_run_plugin("objc", 5)
You can also perform block analysis on a specific function:
Edit>Other>Objective-C>Analyze stack-allocated blocks (current function)
Or with shortcut:
Ctrl+Shift+S
Or programmatically:
n = idaapi.netnode()
n.create("$ objc")
n.altset(1, 0xBF60, 'R') # the address can be any address within the function
idaapi.load_and_run_plugin("objc", 5)
These actions work in both the disassembly and pseudocode windows, but note that you must refresh the pseudocode with F5 for the changes to take full effect.
Also, please note that this feature makes use of the microcode in the hexrays SDK, so you must have the decompiler in order to use it.
NSConcreteGlobalBlock
Global blocks (i.e. blocks that don’t make use of local variables) are much easier to analyze, and simply involve identifying references to NSConcreteGlobalBlock in the __const segment.
Global blocks are analyzed automatically at load time, but the analysis can be performed manually at any time with:
Edit>Other>Objective-C>Re-analyze global block functions
Or:
idaapi.load_and_run_plugin("objc", 4)
Command Line
Here’s a summary of the command-line arguments that can be passed to objc:
objc features can be enabled or disabled using ‘+’ or ‘-’, followed by one of the following characters:
v: verbose mode
s: source info provider
h: hexrays decompiler analysis
l: lazy mode
For example, -Oobjc:+v:+l:-s will enable verbose and lazy mode, and will disable the objc SIP.
See also
DYLD Shared Cache Utils
This plugin (nicknamed “dscu” for brevity) is essentially just an extension of the Mach-O loader. It allows you to manually load modules from a dyldcache that were not loaded when first opening the cache in IDA (the plugin is only activated after using the “single module” option for a dyldcache).
For a quick overview of the dscu functionality, see menu File>Load file>DYLD Shared Cache Utils.
Loading Modules
There are a few ways to manually load a module from the cache:
1) Use File>Load file>DYLD Shared Cache Utils>Load module… and choose which module to load
2) Right-click on an unmapped address in the disassembly, and select ‘Load module <module name>’
3) Programatically:
n = idaapi.netnode()
n.create("$ dscu")
n.supset(2, "/usr/lib/libobjc.A.dylib")
idaapi.load_and_run_plugin("dscu", 1)
Loading Sections
dscu also allows you to load a subset of a given module.
Any section from any of the dyldcache’s submodules can be loaded individually. This is especially useful when analyzing Objective-C code, since often times it is convenient to only load Objective-C info from a given module without loading all of its code.
For example, if you see a pointer to a selector string that has not been loaded:
ADRP X8, #0x1AECFF7F9@PAGE
ADD X1, X8, #0x1AECFF7F9@PAGEOFF ; SEL
MOV X0, X21 ; id
BL _objc_msgSend_0
Right-click on “0x1AECFF7F9” and dscu will provide you with two options:
Load UIKitCore:__objc_methname
Load UIKitCore
The UIKitCore module is huge, so perhaps you don’t want to load the entire thing, but still want to clean up the disassembly. If you choose “Load UIKitCore:__objc_methname”, dscu will load only these selector strings into the database:
ADRP X8, #sel_alloc@PAGE ; "alloc"
ADD X1, X8, #sel_alloc@PAGEOFF ; SEL
MOV X0, X21 ; id
BL _objc_msgSend_0
This operation is much faster, and still provides a lot of benefit to the analysis.
Sections can also be loaded via:
File>Load file>DYLD Shared Cache Utils>Load section...
or programmatically with:
node = idaapi.netnode()
node.create("$ dscu")
node.altset(3, 0x1AECFF7F9) # address can be any address in the section
idaapi.load_and_run_plugin("dscu", 2)
See also
Borland RTTI descriptors plugin
Borland RTTI descriptors plugin
This plugin allows you to create/delete/view Borland RTTI descriptors.
These descriptors appear in programs written on BCC++ or Borland C++ Builder or Borland Delphi.
The plugin is available for 32 bits binaries for PE or OMF format.
Dialog box
- List RTTI descriptors : Displays the list of recognized RTTI
descriptors. IDA automatically recognizes
most descriptors. The list will include only
the descriptors specified by the 'RTTI type'
radiobuttons. You can also delete any
descriptor from list.
- List RTTI problems : Displays the list of problematic RTTI
descriptors. The list will include only the
descriptors specified by the 'RTTI type'
radiobuttons. You can also delete any
descriptor from list.
- Delete list of descriptors : Delete the whole list of RTTI descriptors.
- Delete list of problems : Delete the whole list of problematic RTTI
descriptors.
- Create C++ descriptor : Manually invoke creation of a C++ descriptor
at the current cursor location.
- Create Pascal descriptor : Manually invoke creation of a Pascal
descriptor at the current cursor location.
- Create Pascal or C++ descriptor : Manually invoke creation of a Pascal or
C++ descriptor at the current cursor
location. This action tries to create a
Pascal descriptor. If it fails, then it
tries to create a C++ descriptor.
- RTTI type radiobutton group : Controls which descriptors will appear in
the displayed lists.
Options are :
* Include C++
* Include Pascal
* Include both
- Create recursive : If this option is set, then IDA tries to create
descriptors recursively: if a created descriptor
refers to another unknown descriptor, then it will be
created and so on.
Configuration
DWARF plugin
DWARF plugin
The DWARF plugin will search for DWARF-encoded debug information either in the input file, or a “companion” file (using a strategy similar to that of GDB), when some is found, will extract the following:
- type information
- function names, prototypes, local variables
- global variables names & types
In addition, the DWARF plugin provides source-level debugging.
Dialog box
Global name : create global names based on DWARF informations
Functions : Create functions based on DWARF informations
Use function bounds : Uses DWARF to determine functions boundaries
Types (uncheck for speed) : Create types, needed for Apply calling
convention or Function prototype are definitive
Apply calling convention : DWARF will try and guess the calling convention
instead of using platform default calling
convention. Needed for Allow __usercall
Allow __usercall : If DWARF detects __usercall, allow to use it. If
not allowed, the default calling convention for
the platform will be used
Function prototypes are definitive: Decompiler will not try to change the
prototype if set. Use this with caution
Import file names/line numbers: Import all information
‘cfg/dwarf.cfg’ file presents in details all the options
List of ‘-Odwarf’ options
- off : disable the plugin for the current session
- import_lnnums=1 : import file name and line number into idb
Patfind plugin
Patfind plugin
Patfind plugin makes it possible to automatically find functions in binary files.
It relies on bit pattern definitions for typical function starts and function ends.
Those bit patterns are defined in XML files, based on Ghidra’s function patterns format. A collection of bit pattern files is provided for the commonly used CPU architectures.
It is possible to add new architectures by simply adding a new XML file, just like the other XML files.
It’s also possible to add, remove or change existing patterns for better matching.
Configuration
‘cfg/patfind.cfg’ file presents all the options
The config file also contains the documentation on how to use or change the XML pattern files.
If desired, new XML files can be added to the ‘cfg/ghidra_patterns/’ directory.
‘-Opatfind’ command line switches can be used to select the type of run differently for this session of IDA.
List of options
autorun=0 : don't automatically search for bit pattern
autorun=1 : search for bit pattern only on binary like files
autorun=2 : search for bit pattern on any input file
Examples
-Opatfind:autorun=0
IDA Feeds
IDA Feeds
{% hint style=“info” %}
Version Availability
This feature is available only in IDA Pro, as it depends on idalib for full functionality. {% endhint %}
Starting with IDA 9.0, we introduced IDA Feeds (aka FLIRT Signature Manager), the tool designed to ease the application of new signatures through updatable libraries (known as IDA FLIRT Signature Bundles), shipped alongside other IDA plugins out-of-the-box. You can run IDA Feeds directly through the IDA Pro UI by navigating to Edit → Plugins → IDA Feeds. All related IDA Feeds files are located in the plugins/ida_feeds directory within your IDA installation folder.
What is IDA Feeds?
IDA Feeds helps you identify which signatures to apply when analyzing binary files, especially when you don’t know which static libraries were linked to them. Rather than manually applying signatures, IDA Feeds automatically scans and applies many signatures in seconds. Just open the signature folder, allow IDA to scan and find the possible matches, and then bulk apply the suggested signatures.
IDA Feeds uses the FLIRT Signature Bundles, which are going to be regularly updated and released to keep you up to date with the newest recognizable signatures.
Besides managing FLIRT signatures, IDA Feeds can generate Rust signatures on demand.
IDA Feeds configuration and setup
You can download the latest IDA FLIRT Signature Bundle from our Download Center in My Hex-Rays portal under SDK and utilities.
Although IDA Feeds plugin basic options works out-of-the-box, to experience it full functionality, you may need to install some dependencies.
Requirements and dependencies
- idalib configured properly (check idalib installation and activation steps) if you want to use fully functional IDA Feeds plugin (including parallel probing and generating Rust signatures) or run IDA Feeds as a standalone app
- RPyc 5.x for parallel probing
- Rust installed, if you want to generate Rust signatures
- Path to flair Correctly settled in the config.json file inside your
ida_feedsfolder
Check readme file inside ida_feeds folder for detailed info.
Installing requirements/dependencies (optional)
Install requirements for Python modules in the interpreter that IDA is using or from within your virtual environment (venv).
- Navigate to the
plugin/ida_feedsfolder within the IDA Pro installation directory and install the requirements.
python3 -m pip install -r requirements.txt
- Create symbolic link (optional)
Linux & OSX
ln -s $(pwd) $HOME/.idapro/plugins/ida_feeds
Windows
mklink /D "%APPDATA%\Hex-Rays\IDA Pro\plugins\ida_feeds" "%cd%"
How to use IDA Feeds plugin?
- Go to the Edit -> Plugins -> IDA Feeds. IDA Feeds will open in a new IDA Feeds subview.
- In the Signature Tools window, click Open signatures folder and select the folder with the downloaded FLIRT signature bundle (1), or leave the preloaded signatures already provided with your IDA instance.
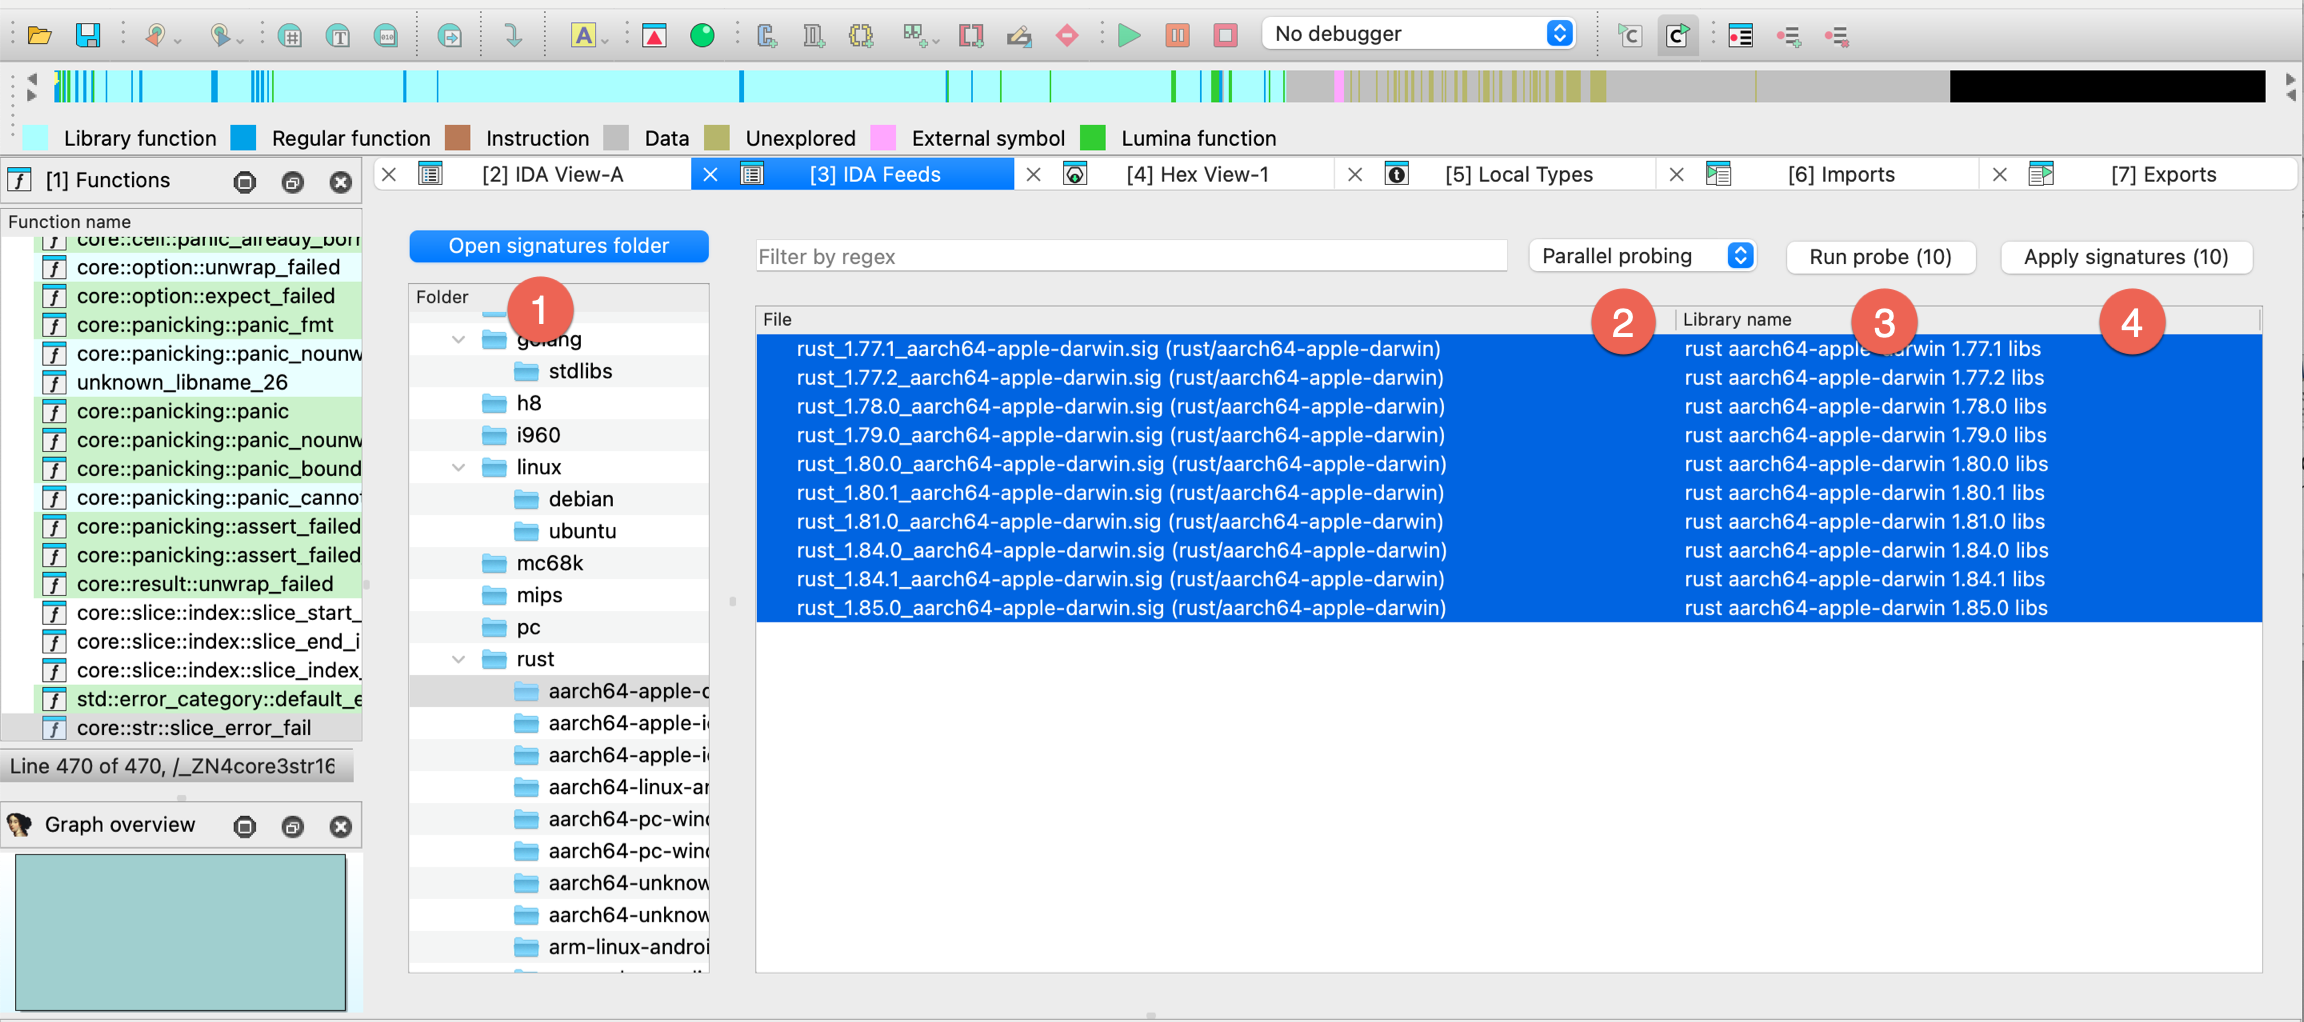
- Select chosen signature files, pick the type of probing from the dropdown menu: Parallel probing or Sequential probing (2), and then click Run probe (3) to match functions in the binary against a specific selected signature file(s).
{% hint style=“info” %}
Parallel vs Sequential Probing
Parallel probing runs multiple probing processes on the copies of IDB, and although is faster, it’s also more resource intensive. It requires idalib, idapro module and RPyC 5.x to work. Parallel type is available only when all prerequisites and dependencies are correctly installed. If any are missing, you can still use Sequential probing as a slower alternative. {% endhint %}
- Check the results and click Apply signatures to bulk apply (4) correct matches to selected signatures.
Creating Rust signatures
Dependencies
- idalib with idapro module installed
- Correctly settled a path to flair in the config.json file inside your
ida_feedsfolder
- Go to the Edit -> Plugins -> IDA Feeds. In the IDA Feeds subview, navigate to the folder tree view (Signatures panel) on the left and find FLIRT for Rust libraries at the bottom of the view.
- Click Create and apply signature.
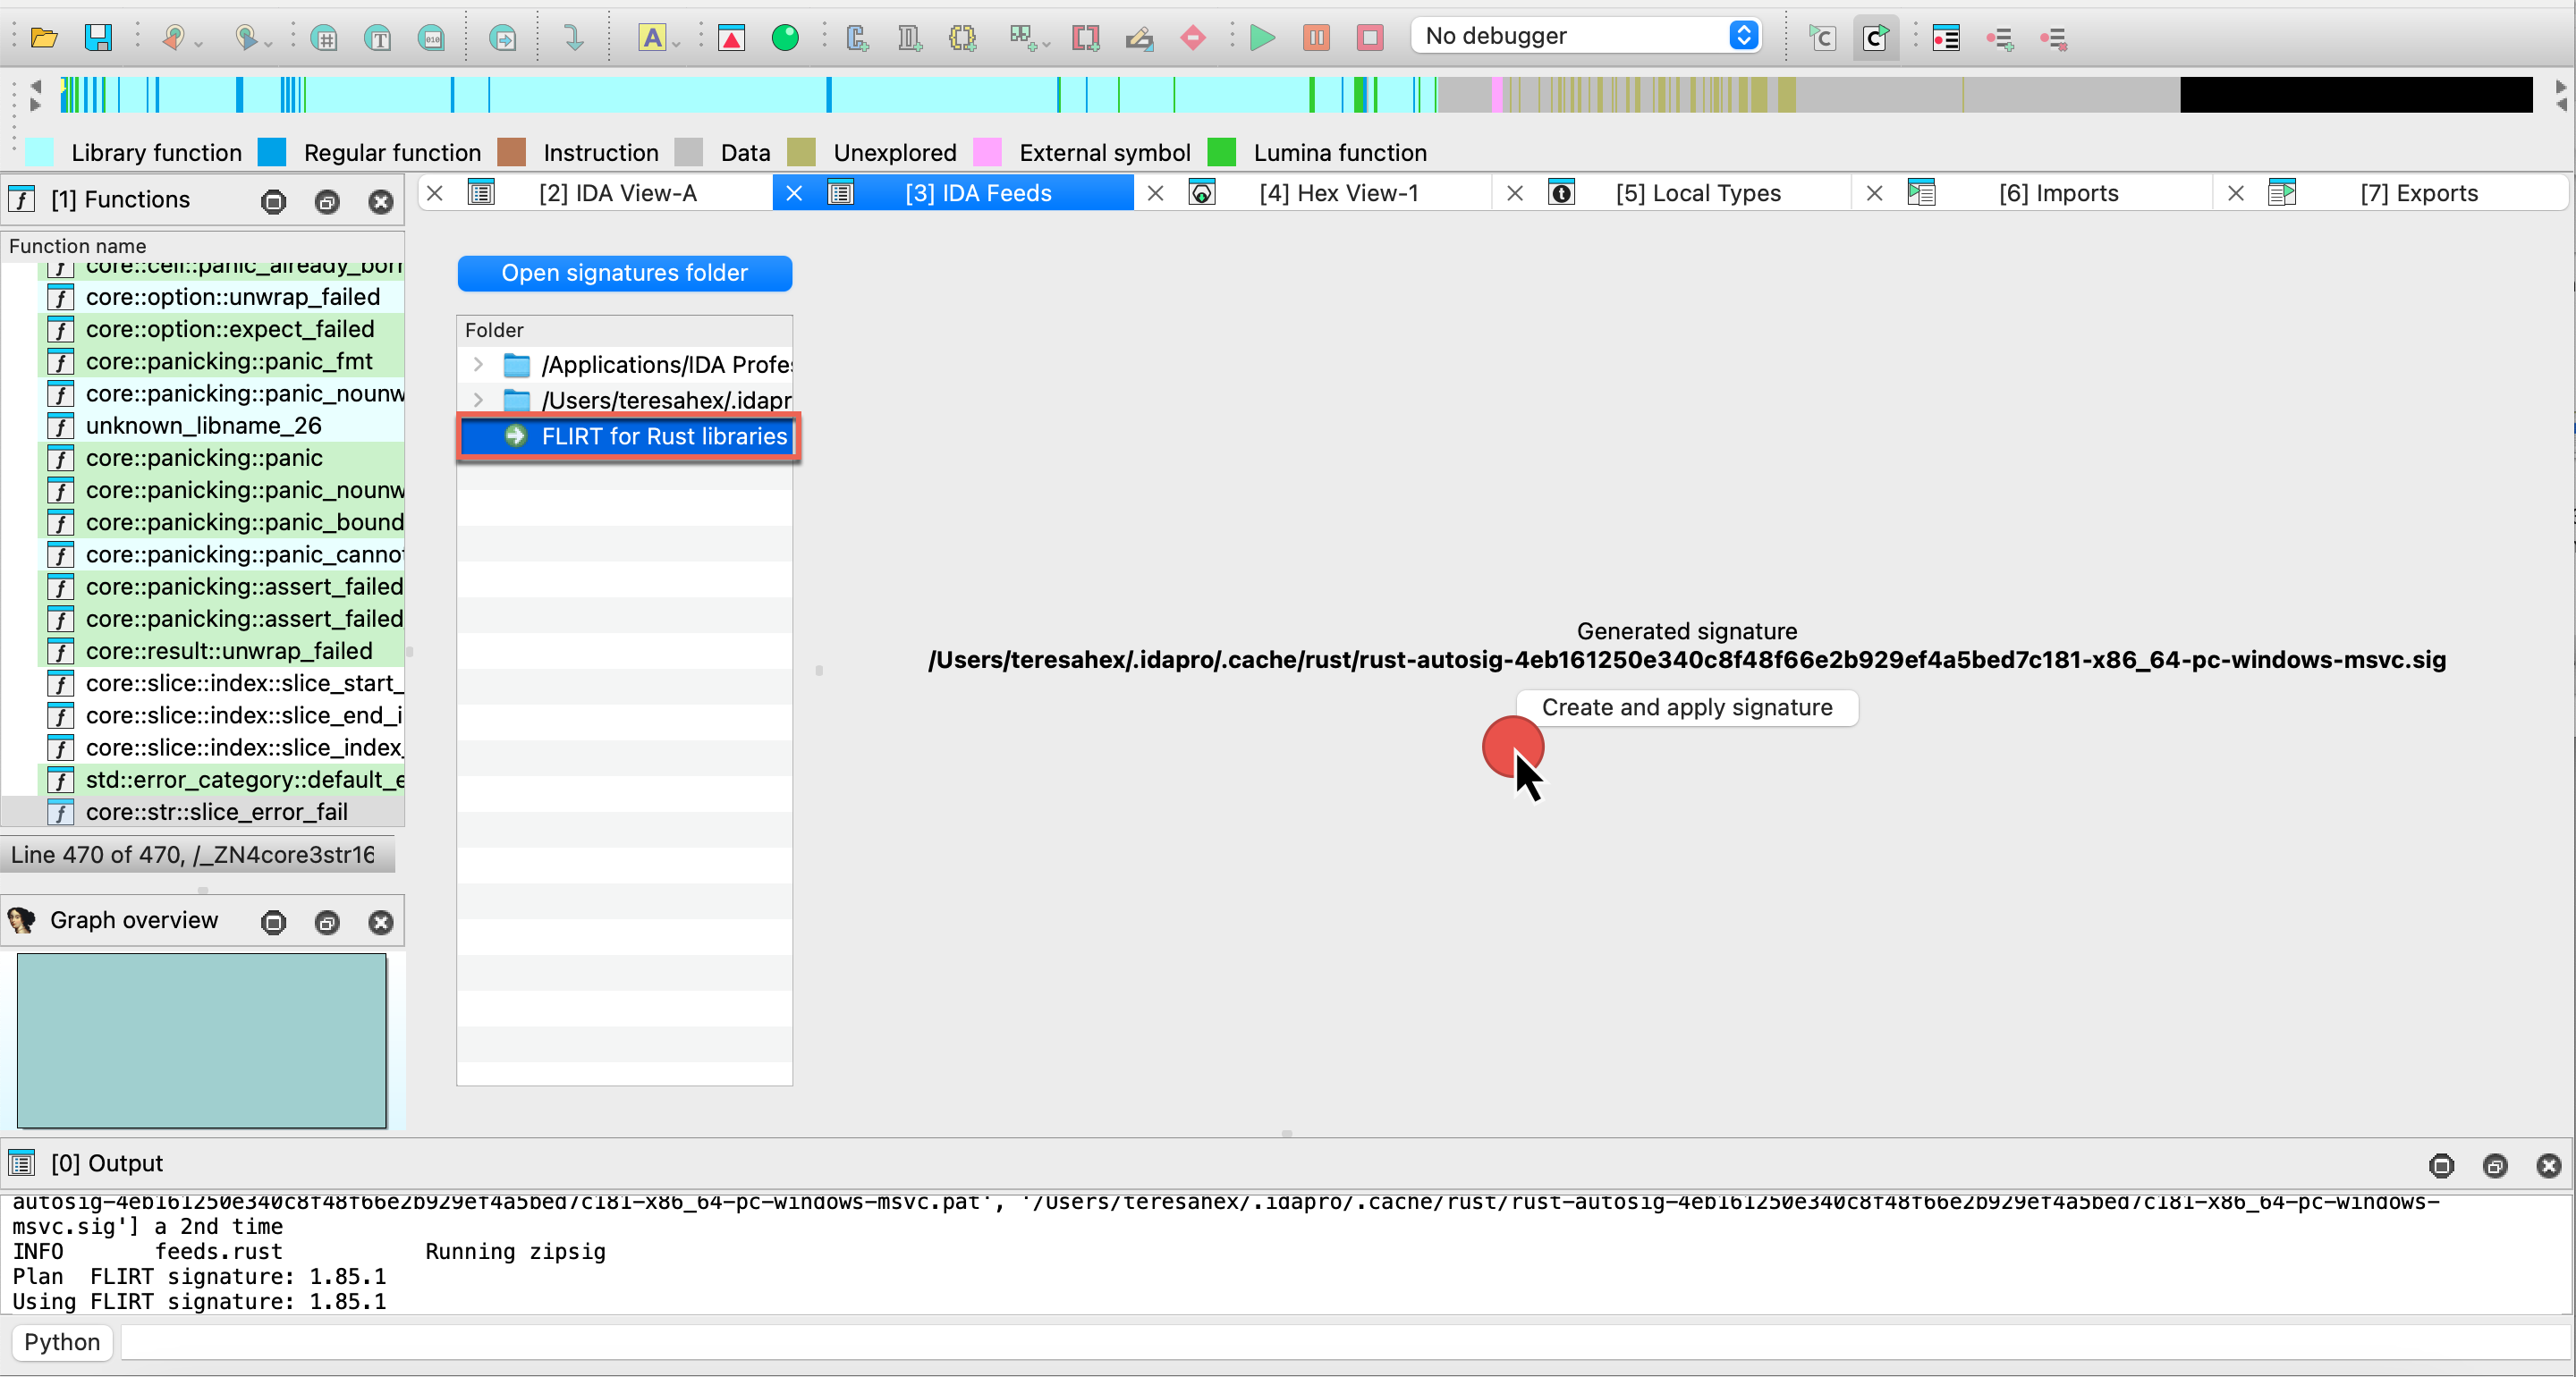
- After generation:
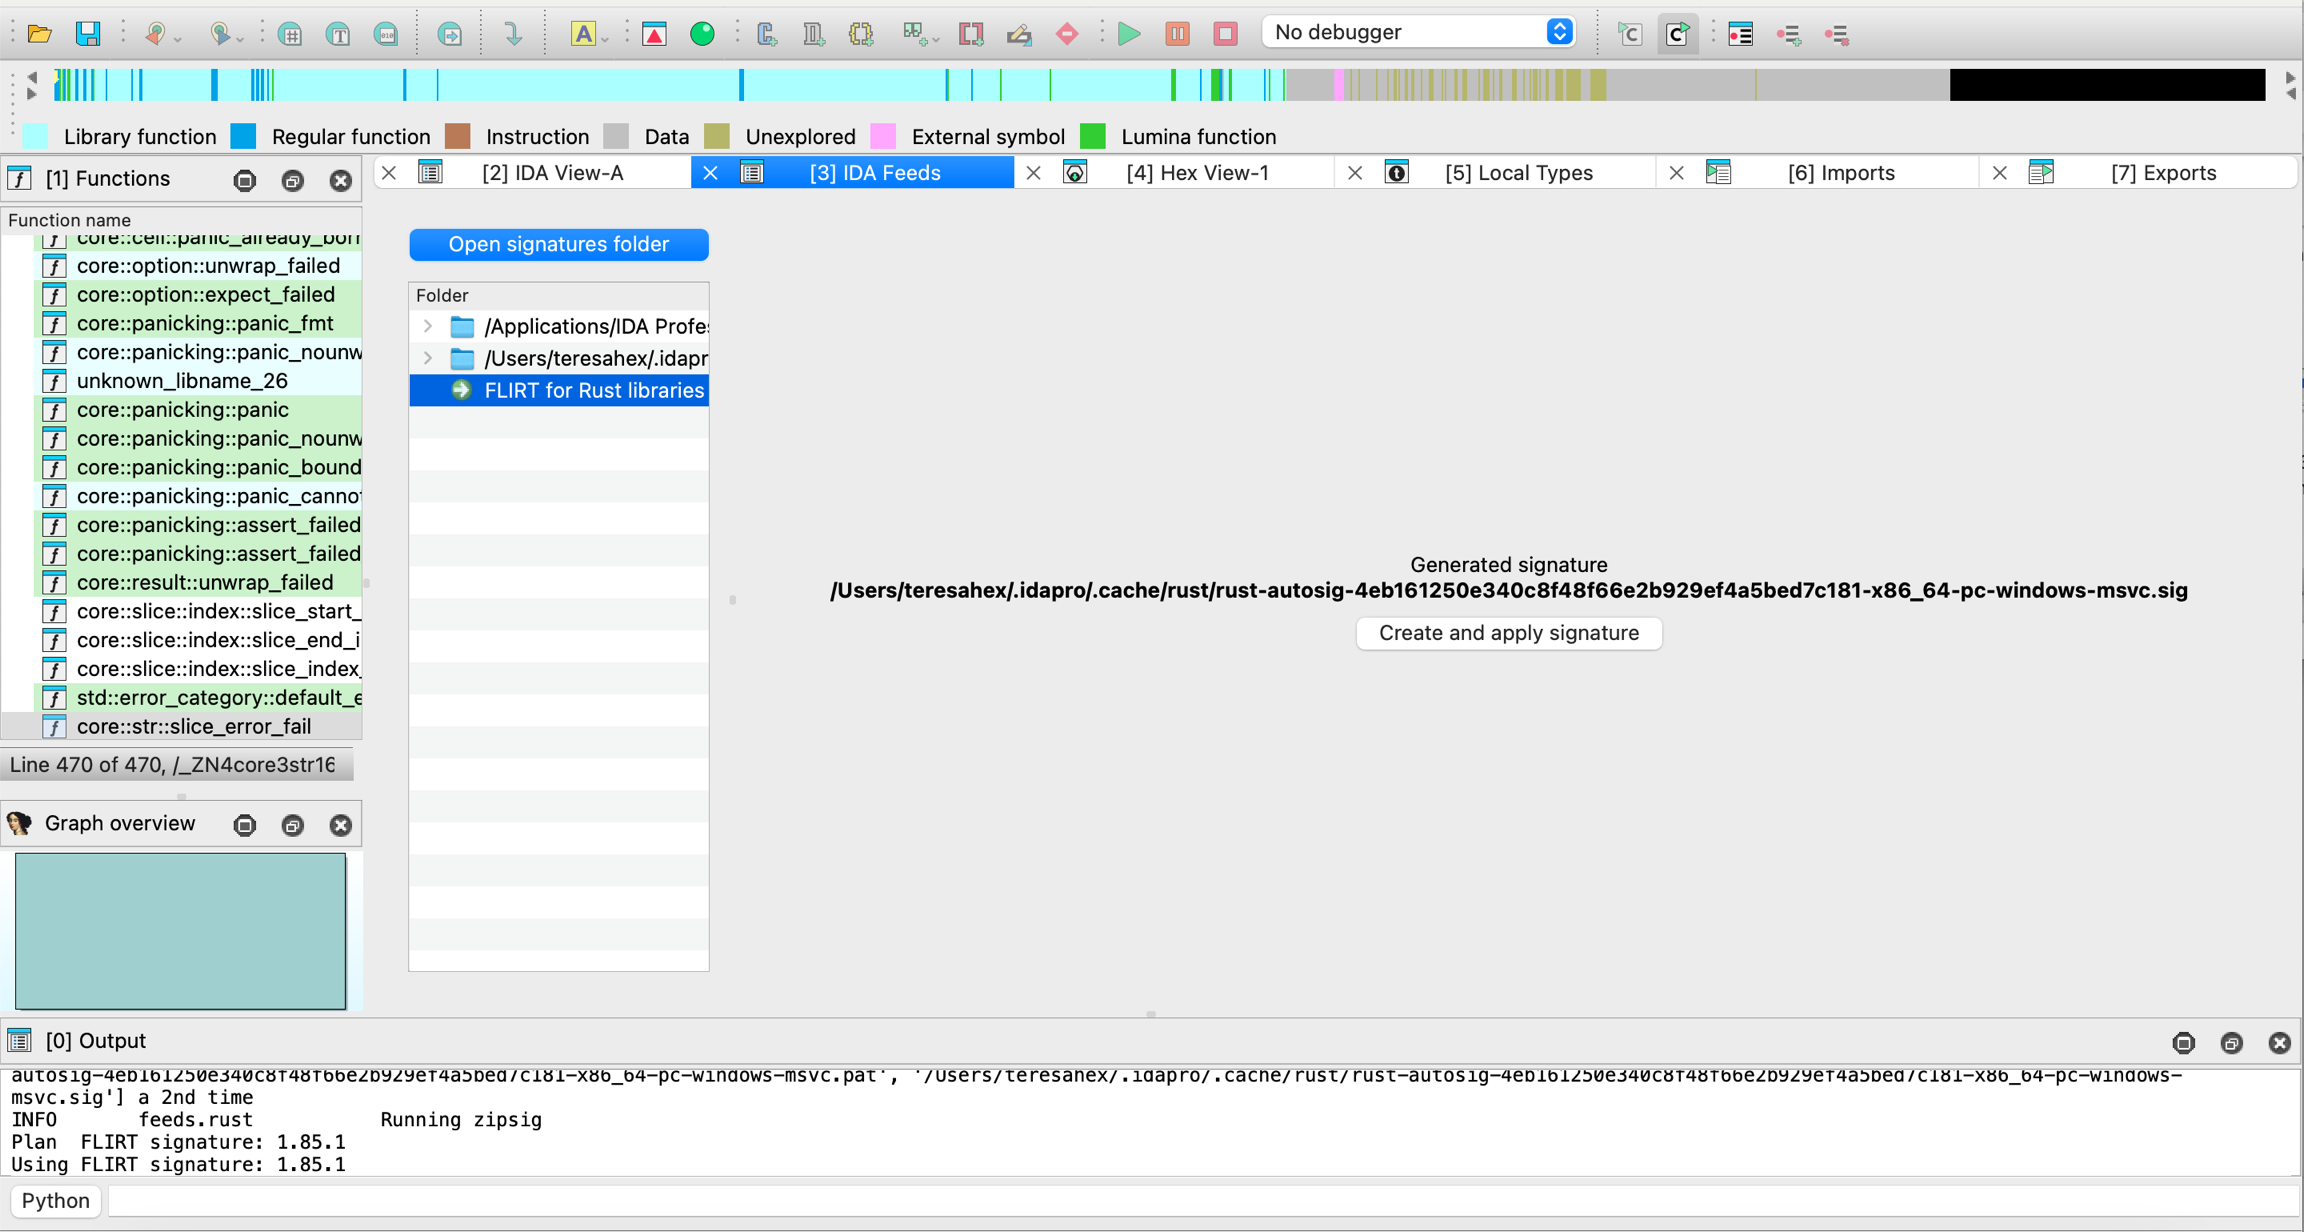
you can find the .sig file in your .idapro/cache/rust folder.
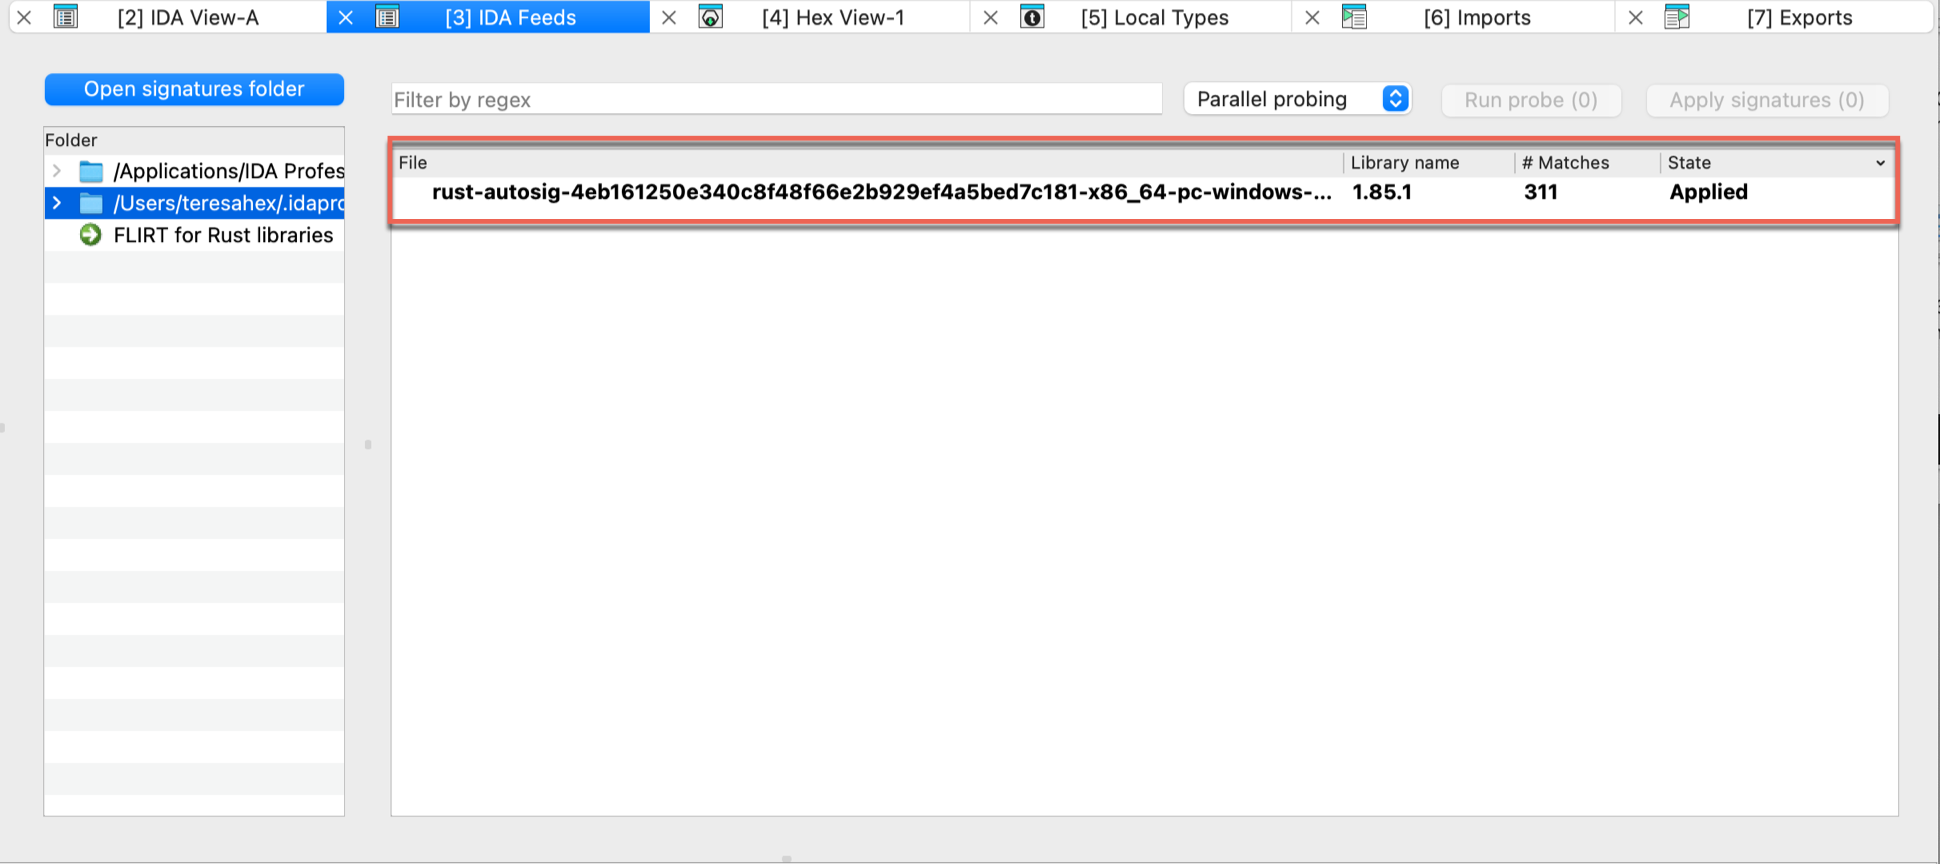
FAQ
Signature bundles versus standard IDA sig files
- Q: What’s the difference between signatures shipped with IDA installer (in the
sigfolder) and FLIRT signatures bundle?
IDA comes with a set of standard FLIRT signatures, which you can find in the sig folder in the IDA installation directory.
The signature bundles for IDA FEEDS (downloadable from My Hex-Rays portal) provide additional signatures to improve function recognition for various libraries and frameworks. What’s more, these bundles are available with additional metadata files that may enhance your analysis.
- Q: Should I place the additional signatures, like these from the FLIRT signature bundles, always in the
sigfolder?
It’s up to you whether to keep some signatures separate or store them in the sig folder inside IDA installation directory.
Placing them in the sig folder makes them available globally for all IDBs opened in IDA and pre-loaded whenever you run the IDA Feeds plugin. It can be convenient if you usually work with the same set of libraries, but it can clutter the space if you don’t need all signatures handy all the time.
Signature bundles types
- Q: What is the difference between signature bundle with metadata and the one without?
The signature bundle with metadata contains a txt file for each signature (.sig file) that explains in details what is inside that particular signature (listing libraries and versions). If this information is useful for your analysis, opting for bundles with metadata can be beneficial. However, if you don’t require these details for your regular reverse engineering tasks, you may prefer a more lightweight bundle without metadata.
Troubleshooting
Creating Rust signatures is unavailable
Check the rust compiler version
Your binary/executable may be compiled with a rust compiler that is not known by IDA Feeds, meaning that it is not included in the rust-git-tags.json file in ida-feeds folder. Before you proceed, verify that the rust compiler version is present in rust-git-tags.json.
Debugging other issues
When you encounter unexpected errors, set IDA_FEEDS_LOG_LEVEL environment variable to DEBUG, and then restart IDA and try again to obtain additional information from the Output Window.
FLIRT Signature Bundle
With FLIRT Signature Bundle, designed to be used with IDA Feeds (aka FLIRT Signature Manager), you can analyze thousands of signatures and bulk apply them to your binary.
The bundle contains signatures for modern languages like Golang and Rust, as well as updates for classic compilers. The latest version of the FLIRT Signature Bundle can be downloaded from My Hex-Rays portal under SDK and utilities.
Flirt Signature Bundles will be regularly updated and released independently whenever there is a new compiler, language, or library release.
Released versions
FLIRT Signature Bundle 9.1
The packages are updated with the latest language versions.
FLIRT Signature Bundle 9.0sp1
Since 9.0SP1, alongside standard bundles, we have released FLIRT Signature Bundles with metadata. The packages are updated with the latest language versions.
2024/09/12 FLIRT Signature Bundle 9.0
Packages
Golang
- Versions: stable versions from 1.10.0 to 1.23
- Operating Systems: Linux, Windows, MacOS
- Architectures: arm64 (Windows, Linux, MacOS), arm (Windows, Linux, MacOS), x86 (Windows, Linux) , x86-64 (Windows, Linux)
C/C++
- Windows (MSVC):
- Architectures: arm, arm64, i386, amd64
- Packages: ATL, CTL, MFC, Windows SDK 10, Windows SDK 11
- Linux:
- Distribution: Ubuntu & Debian
- Architectures: i386, amd64, arm64, armhf, armel, arm, s390x, mips64el, mipsel, mips, ppc64el
- Packages: libc6, libselinux1, libpcre2, libidn2, libssl, zlib1g, lib32z1, libunistring, libcurl4-gnutls, libcurl4-nss, libcurl4-openssl, libnghttp2, libidn2, librtmp, libssh, libssh-gcrypt, libpsl, libldap, libzstd, libbrotli, libgnutls28, nettle, libgmp, comerr, libsasl2, libbrotli, libtasn1-6, libkeyutils, libffi, uuid, libprotobuf, heimdal-multidev, musl, libplib, libsdl1.2-bundle (libsdl-console, libsdl-sge, libsdl1.2, libsdl-ocaml, libsdl-image1.2, libsdl-kitchensink, libsdl-mixer1.2, libsdl-net1.2, libsdl-sound1.2, libsdl-ttf2.0, libsdl1.2-compat, libsdl-gfx1.2, libsdl-pango), libsdl2-bundle (libsdl2, libsdl2-gfx, libsdl2-image, libsdl2-mixer, libsdl2-net, libsdl2-ttf)
Rust
- Versions 1.77 to 1.81
- Architectures: arm64, arm, x86, x86-64
- Operating Systems: Linux, Windows, MacOS
- Compilers: GCC, LLVM, MSVC
Publishing your plugins
{% hint style=“success” %}
Introducing IDA Plugin Manager - Goodbye Manual Submissions
With the introduction of HCLI and the IDA Plugin Manager, we’ve built a new ecosystem for discovering, installing, and managing IDA plugins — all distributed through a central index in the IDA Plugin Repository. The plugins.hex-rays.com remains available for browsing and showcasing plugins, but the previous manual submission process via the My Hex-Rays portal has been retired. {% endhint %}
Make Your Plugin Compatible with HCLI & Plugin Manager
The key points to make your IDA plugin available via IDA Plugin Manager are:
- Update/create
ida-plugin.json - Package your plugin into a ZIP archive
- Publish releases on GitHub
Refer to the HCLI Plugin Manager Publication Guide for detailed steps, examples and process description.
Plugin Manager & HCLI Basic Documentation Resources
New to HCLI or the Plugin Manager? Start here to get up and running quickly. These resources are perfect for IDA users who want to browse, install, and manage plugins efficiently.
| Getting Started with HCLI | https://hcli.docs.hex-rays.com/getting-started/installation/ | ||
| Plugin Manager Overview | https://hcli.docs.hex-rays.com/user-guide/plugin-manager/ |
Plugin Development Documentation Resources
Are you a plugin author looking to make your plugin compatible with HCLI and the Plugin Manager? Explore these detailed guides to learn how to prepare, package, and publish your plugin in the new ecosystem.
| Repository Architecture | https://hcli.docs.hex-rays.com/reference/plugin-repository-architecture/ | ||
| Plugin Packaging Format | https://hcli.docs.hex-rays.com/reference/plugin-packaging-and-format/ | ||
| Publishing Your Plugin | https://hcli.docs.hex-rays.com/reference/packaging-your-existing-plugin/ |
Pre-submission checklist
Before publishing your plugin to the IDA Plugin Repository, make sure it’s fully compatible with HCLI and the Plugin Manager - read the testing guide.
Define plugin metadata with ida-plugin.json
{% hint style=“info” %}
Updated fields
We’ve added new required and optional fields to ensure compatibility with HCLI and IDA Plugin Manager. See the details and examples here. {% endhint %}
The ida-plugin.json it’s essential to ensure your plugin will be available in the IDA Plugin Repository and discoverable through Plugin Manager.
To work properly, the ida-plugin.json file must contain at the very least the IDAMetadataDescriptorVersion field as well as a plugin object containing the fields described below.
Example of the minimal ida-plugin.json file:
{
"IDAMetadataDescriptorVersion": 1,
"plugin": {
"name": "plugin1",
"version": "1.0.0",
"entryPoint": "plugin1.py",
"urls": {
"repository": "https://github.com/your-org/your-plugin"
},
"authors": [{
"name": "John Smith",
"email": "[email protected]"
}]
}
}
Check further examples in the HCLI Plugin Manager Docs.
Required Fields Description
| Field | Description |
|---|---|
.plugin.name | The name will be used to identify the plugin and also generate a namespace name for it if necessary (e.g., an IDAPython plugin). The namespace name is generated by converting all non alphanumeric characters of the plugin name to underscores (_) and prepending __plugins__ to it. For example “my plugin” would become __plugins__my_plugin. |
.plugin.entryPoint | The filename of the “main” file for the plugin. It should be stored in the same directory as its ida-plugin.json file. If the entryPoint has no file extension, IDA will assume it is a native plugin and append the appropriate file extension for dynamic shared objects for the host platform (.dll, .so, .dylib). For IDAPython plugins, this should typically be a .py file (e.g., my-first-plugin.py). |
.plugin.version | Specify the version of your plugin. It must follow the x.y.z format (e.g., 1.0.0). |
.plugin.description | Summarize your plugin functionality. |
.plugin.urls.repository | Link to your plugin’s public GitHub repository |
plugin.authors and/or plugin.maintainers | - At least one must be provided. Each entry requires name and email. |
Optional Fields Description
| Field | Description |
|---|---|
plugin.description | Summarize your plugin functionality. |
plugin.idaVersions | Declare which versions of IDA your plugin supports. You can specify a single version (e.g., 9.0) or a version range (e.g., >=9.0) using the semantic versioning scheme. |
plugin.platforms | Supported platforms. Defaults to all if not specified. Values: windows-x86_64, linux-x86_64, macos-x86_64, macos-aarch64 |
plugin.license | SPDX license identifier (e.g., “MIT”, “GPL-3.0”, “Apache-2.0”) |
plugin.logoPath | Include an image to visually represent your plugin on its page at plugins.hex-rays.com. This should be a relative path to an image file within your plugin’s repository. The recommended aspect ratio for the image is 16:9. |
plugin.categories | Select at least one category to improve your plugin’s discoverability: disassembly-and-processor-modules, file-parsers-and-loaders, decompilation, debugging-and-tracing, deobfuscation, collaboration-and-productivity, integration-with-third-parties-interoperability,api-scripting-and-automation, ui-ux-and-visualization, malware-analysis, vulnerability-research-and-exploit-development, other |
plugin.keywords | Search terms to improve discoverability. |
plugin.pythonDependencies | PyPI packages to install (e.g., ["requests>=2.28.0", "package-name"]). |
plugin.settings | Configuration options as a list of descriptors of settings. |
FAQ
Make your plugin HCLI and Plugin Manager ready - check out our FAQ for guidance and practical tips.
Migrating PyQt5 Code to PySide6
Starting from version 9.2, IDA has moved from Qt5 to Qt6. For more details, see the IDA 9.2 Release Notes
PyQt5 vs PySide6
- Different module names;
from PyQt5 import QtWidgetswill no longer work in PySide6. - Differences in Qt libraries themselves
As a result, some existing user scripts may require adjustments. That’s why we prepare PyQt5 shims to ease your transition.
PyQt5 Shims
We have introduced a compatibility layer, called “PyQt5 shims, to support a smooth transition for existing scripts relying on PyQt5.
These shims:
- provide
PyQt5.*Python modules - behind the scenes, re-route calls to PySide6 (Qt6) and perform additional handling to ensure compatibility
The goal is to let your existing PyQt5-based code continue running as it should.
{% hint style=“info” %} Although these shims aim to ease the transition, please note that they have limitations. We recommend porting existing code to PySide6, or using an abstraction layer such as QtPy. {% endhint %}
Enabling/Disabling the Shims
On the first attempt to import PyQt5 (either directly or through a plugin), IDA will display a popup dialog asking whether to enable/disable PyQt5 shims.
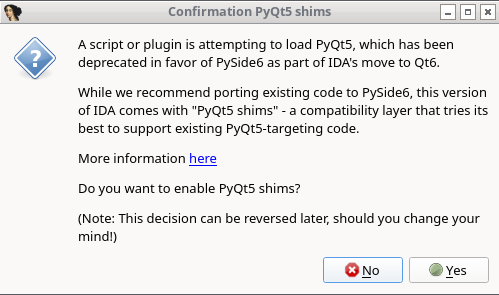
No manual editing is required - simply respond to the prompt.
Your choice will be saved in the configuration file:
- Windows:
%APPDATA%\Hex-Rays\IDA Pro\cfg\idapython.cfg - Linux/macOS:
~/.idapro/cfg/idapython.cfg
The paths depend on IDAUSR.
After making a choice, IDA will:
- Print a message in the Output Window
- Inform you of the updated configuration path
- Remember your choice and not prompt you again
Changing the Shims Preferences
You can edit cfg/idapython.cfg at any time to change the configuration.
To enable PyQt5 shims:
#if __IDAVER__ >= 920
IDAPYTHON_USE_PYQT5_SHIM = 1
#endif
To disable PyQt5 shims:
#if __IDAVER__ >= 920
IDAPYTHON_USE_PYQT5_SHIM = 0
#endif
{% hint style=“info” %}
The #if __IDAVER__ >= 920 directive ensures that the configuration is ignored by older versions of IDA.
However, this is unnecessary if you update idapython.cfg directly within the IDA installation directory.
{% endhint %}
Additional Resources
- Qt5 to Qt6 porting guide - Qt
- Migrate PyQt5 to PySide2 - GeeksForGeeks
- Porting from PySide2 to PySide6 - Qt for Python
- QtPy - Github
Known Limitations
-
QRegExp:
PyQt5.QtCore.QRegExpis deprecated in Qt6- There has already been a replacement -
PyQt5.QtCore.QRegularExpression QRegExpandQRegularExpressionare incompatible. They differ in methods and the pattern syntax. See Qt porting guide for more details.
-
QFontDatabase:
PyQt5.QtGui.QFontDatabaseandPySide6.QtGui.QFontDatabasediffer in the declaration of static methods and in derived methods available onQFontDatabaseinstances- It is marked as deprecated in Qt6
Helper Tools
Helper tools, also known as utilities, are small programs designed to enhance your IDA functionality. Since IDA 9.1, most of these utilities are shipped alongside IDA and included with the IDA installation.
Built-in tools
You can find these tools in the tools folder inside the main IDA installation directory:
- Flair: allows to add your own compiler libraries to the FLIRT engine
- IDAClang: a command line version of IDAClang plugin
- idsutils: helps create/maintain IDS files from DLLs
- loadint: creates your own disassembler comment databases
- Tilib: creates type libraries (til files) for IDA
idat tools
In addition to the tools listed above, IDA includes utilities used by idat, such as TVision.
Additional tools in the Download Center
The IDA PIN tool is available for download in the My Hex-Rays Portal.
Additionally, the Download Center provides utilities for older IDA versions (prior to 9.1).
How to use these tools?
For detailed usage instructions and tips, refer to the README files located in each tool’s folder.
idalib
IDA as a library (idalib) allows you to use the C++ and IDA Python APIs outside IDA as standalone applications. That way, IDA’s engine is used inside your app, which simplifies development with the IDA APIs, which can be done now from your IDE of choice.
Prerequisites
- IDA Pro 9.0 or newer installed and running
Installation for C++
To use the ida library from the C++, please refer to the idalib.hpp header file shipped with C++ SDK where you will find the relevant information.
Installation for Python
To use the ida library Python module, you need to install and configure idapro package by following these steps:
Install ida library Python module
- Navigate to the
idalib/pythonfolder within the IDA Pro installation directory - Run the command:
pip install .
{% hint style=“info” %} When setting up idalib to work with IDA Feeds and your virtual environment (venv), make sure to run the above command from within your activated venv. {% endhint %}
Setting up the ida library Python module
Run the Activation Script
-
You need to inform the
idaproPython module of your IDA Pro installation. To do this, run thepy-activate-idalib.pyscript located in your IDA Pro installation folder, or inside theidalib/pythonfolder (depends on the system version you use):python /path/to/IDA/installation/py-activate-idalib.py [-d /path/to/active/IDA/installation]If the
-doption is omitted, the script will automatically select the IDA installation folder from which it was executed.
Using the ida library Python module
Import idapro in your script
- Make sure to import the
idapropackage as the first import in your Python script- After importing, you can utilize the existing ida Python APIs
Example script
For a reference on how to use the ida module, check the idalib/examples folder in your IDA Pro installation directory or look at the sample script provided below.
#!/usr/bin/env python3
import argparse
import os
import json
import idapro
from pathlib import Path
import ida_segment
import ida_idaapi
import ida_funcs
import ida_idp
import ida_auto
import ida_undo
class sig_hooks_t(ida_idp.IDB_Hooks):
def __init__(self):
ida_idp.IDB_Hooks.__init__(self)
self.matched_funcs = set()
def func_added(self, pfn):
self.matched_funcs.add(pfn.start_ea)
def func_deleted(self, func_ea):
try:
self.matched_funcs.remove(func_ea)
except:
pass
def func_updated(self, pfn):
self.matched_funcs.add(pfn.start_ea)
def idasgn_loaded(self, sig_name):
return print(f"Sig {sig_name} loaded")
def dump_matches(self):
for fea in self.matched_funcs:
print(f"Matched function {ida_funcs.get_func_name(fea)}")
### List the segments for the loaded binary
def list_segments():
nb_items = ida_segment.get_segm_qty()
print("Segments number:", nb_items)
for i in range(0, nb_items):
seg_src = ida_segment.getnseg(i)
print(str(i+1) + ".")
print("\tname:", ida_segment.get_segm_name(seg_src))
print("\tstart_address:", hex(seg_src.start_ea))
print("\tend_address", hex(seg_src.end_ea))
print("\tis_data_segment:", ida_segment.get_segm_class(seg_src) == ida_segment.SEG_DATA)
print("\tbitness:", seg_src.bitness)
print("\tpermissions:", seg_src.perm, "\n")
### Just call an existing python script
def run_script(script_file_name:str):
if not os.path.isfile(script_file_name):
print(f"The specified script file {script_file_name} is not a valid python script")
return
ida_idaapi.IDAPython_ExecScript(script_file_name, globals())
### Apply provided sig file name
def apply_sig_file(database_file_name:str, sig_file_name:str, sig_res_file:str):
if not os.path.isfile(sig_file_name):
print(f"The specified value {sig_file_name} is not a valid file name")
return
root, extension = os.path.splitext(sig_file_name)
if extension != ".sig":
print(f"The specified value {sig_file_name} is not a valid sig file")
return
# Install hook on IDB to collect matches
sig_hook = sig_hooks_t()
sig_hook.hook()
# Start apply process and wait for it
ida_funcs.plan_to_apply_idasgn(sig_file_name)
ida_auto.auto_wait()
matches_no = 0
for index in range(0, ida_funcs.get_idasgn_qty()):
fname, _, fmatches = ida_funcs.get_idasgn_desc_with_matches(index)
if fname in sig_file_name:
matches_no = fmatches
break
matches = {
"total_matches": matches_no,
"matched_functions": []
}
for fea in sig_hook.matched_funcs:
matches['matched_functions'].append({ "func_name": ida_funcs.get_func_name(fea), "start_ea": hex(fea) })
with open(sig_res_file, 'w') as jsonfile:
json.dump(matches, jsonfile, indent=2)
print(f"Total matches {matches_no} while applying {sig_file_name} on {database_file_name}, saved results to {sig_res_file}")
### Internal string to bool converter used for command line arguments
def str_to_bool(value:str):
if isinstance(value, bool):
return value
if value.lower() in {'false', 'f', '0', 'no', 'n'}:
return False
elif value.lower() in {'true', 't', '1', 'yes', 'y'}:
return True
raise ValueError(f'{value} is not a valid boolean value')
# Parse input arguments
parser=argparse.ArgumentParser(description="IDA Python Library Demo")
parser.add_argument("-f", "--file", help="File to be analyzed with IDA", type=str, required=True)
parser.add_argument("-l", "--list-segments", help="List segmentes", type=str_to_bool, nargs='?', const=True, default=False)
parser.add_argument("-s", "--script-file-name", help="Execute an existing python script file", type=str, required=False)
parser.add_argument("-g", "--sig-file-name", help="Provide a signature file to be applied, requires also -o", type=str, required=False)
parser.add_argument("-o", "--sig-res-file", help="Signature file applying result json file, works only together with -g", type=str, required=False)
parser.add_argument("-p", "--persist-changes", help="Persist database changes", type=str_to_bool, nargs='?', const=True, default=True)
args=parser.parse_args()
if (args.sig_file_name is not None and args.sig_res_file is None) or (args.sig_file_name is None and args.sig_res_file is not None):
print("error: '-g/--sig-file-name' and '-o/--sig-res-file' arguments must be specified together or none of them.\n")
parser.print_help()
exit(-1)
# Run auto analysis on the input file
print(f"Opening database {args.file}...")
idapro.open_database(args.file, True)
# Create an undo point
if ida_undo.create_undo_point(b"Initial state, auto analysis"):
print(f"Successfully created an undo point...")
else:
print(f"Failed to created an undo point...")
# List segments if required so
if args.list_segments:
print("Listing segments...")
list_segments()
# Run a script if one provided
if args.script_file_name is not None:
print(f"Running script {args.script_file_name}...")
run_script(script_file_name=args.script_file_name)
# Apply signature file if one provided
if args.sig_file_name is not None:
print(f"Applying sig file {args.sig_file_name}...")
apply_sig_file(database_file_name=args.file, sig_file_name=args.sig_file_name, sig_res_file=args.sig_res_file)
# Revert any changes if specified so
if not args.persist_changes:
if ida_undo.perform_undo():
print(f"Successfully reverted database changes...")
else:
print(f"Failed to revert database changes...")
# Let the idb in a consistent state, explicitly terminate the database
print("Closing database...")
idapro.close_database()
print("Done, thanks for using IDA!")
Third-Party Licenses
Apache License for Ghidra
Apache License for LLVM
Common Public License Version 1.0
APPLE PUBLIC SOURCE LICENSE
PCRE2 LICENCE
GNU Lesser General Public License v2.1 for libiberty
Floating licenses
Introduction to IDA floating licenses
Floating licenses allow organizations with multiple IDA users to install IDA across many different machines while limiting the number of concurrent IDA active sessions. One floating license (or one floating license seat, if multiple seats are available) permits one concurrent use of IDA Pro. The licenses are managed by a Hex-Rays license server.
{% hint style=“info” %} To use floating licenses, IDA needs to maintain a permanent connection to your organization’s license server, but you can borrow licenses to work offline. {% endhint %}
Users don’t need to store license files locally on their machines while using floating licenses.
Core concepts
One server, different IDA licenses
You can have several IDA Pro licenses available on the same license server, each with a different set of decompilers assigned.
You can switch between those licenses depending on your needs (e.g. the architecture of the file you’re working on).
Seats and seat allocation
A “seat” represents an active session of IDA for the user+machine pair.
If your IDA Pro license has 3 seats available, it means that up to 3 different users or machines can run IDA at the same time.
When you open IDA, the License Manager displays all available licenses and their number of seats.
One seat is taken (checked out) from the pool when you start working with a file in IDA.
When you close IDA, the seat is released back to the pool for others to use.
{% hint style=“info” %} When you run multiple instances of IDA on the same computer, only one seat is used up from the license pool on the server. {% endhint %}
License check-out
Checking out the license allows the user to work with IDA (maintaining an active IDA session), while keeping a connection to the license server. IDA Pro checks out a license when launched and returns it when closed.
License borrowing
Borrowing allows the user to check out the license for a fixed period and work offline (without connection to the license server). At the end of the borrow period, the license is released automatically by the server and returned to the common license pool.
Activation, installation and setup
What steps are required to enable floating licenses?
Admin level:
- Activate your license server license and your IDA instance at My Hex-Rays Portal. Download your license files locally, as well as the server installer -> check Licensing Guide
- Install and set up your license server -> see Admin Guide.
- Install IDA Pro on your workstations -> read how to install IDA
- Provide your users with a license server hostname
User level:
- Run IDA on your machine and check out one of the available license to start working
How to check out a license?
- Connect to the network where your license server is available and run IDA.
- Navigate to Help -> License manager.
- In the License manager dialog, select the option Use floating license server and then type the license server hostname provided by your administrator. Click Connect (1).
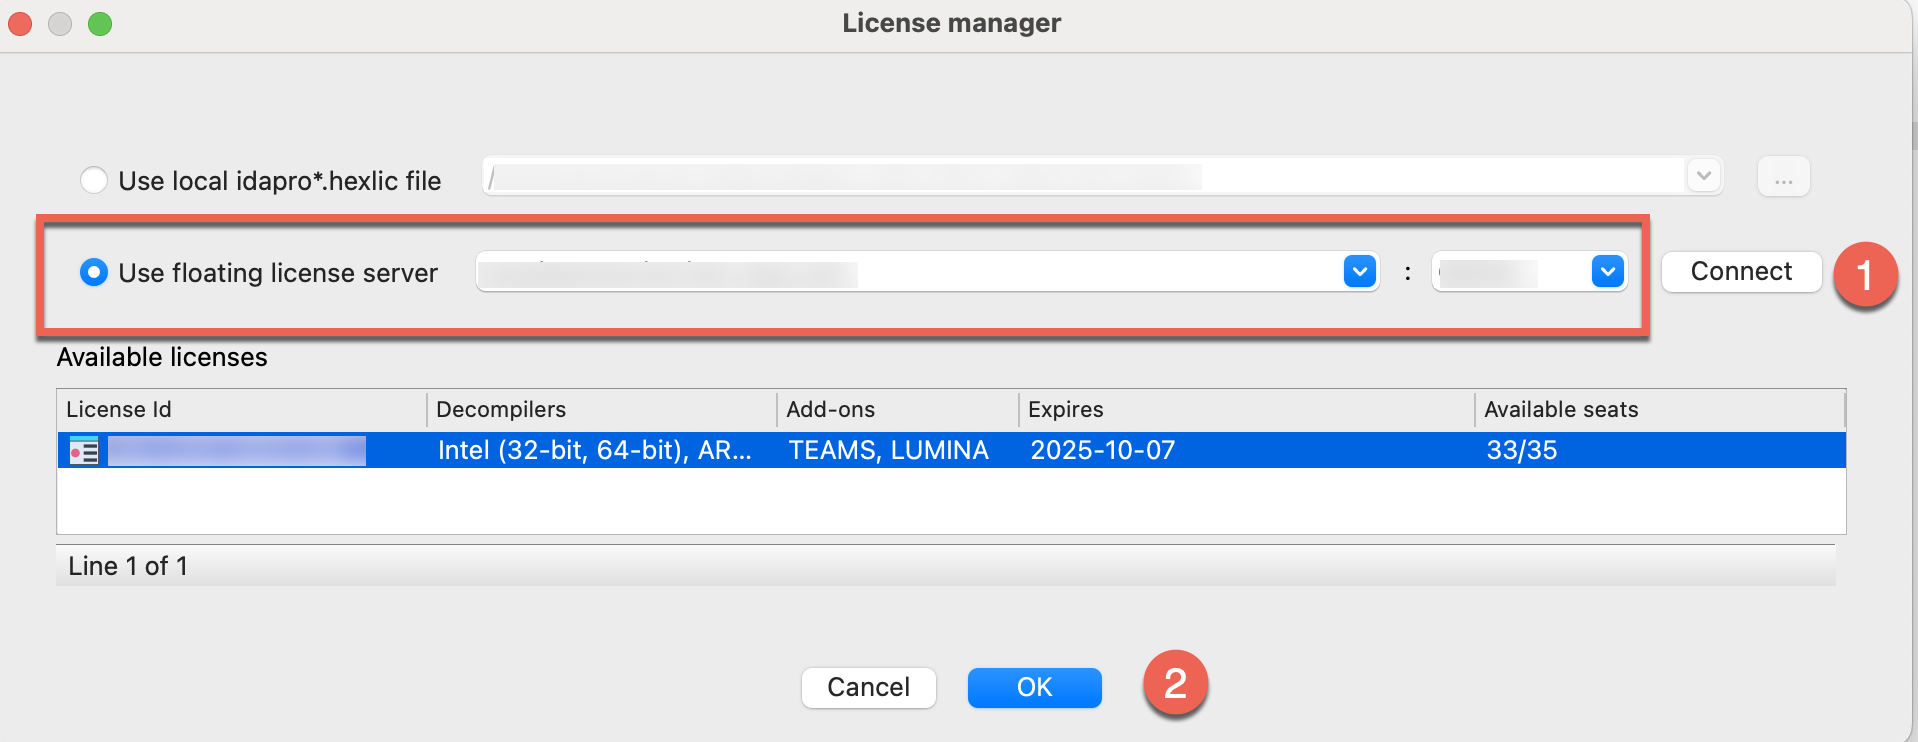
- Check out one of the licenses: select a license visible under the available licenses list and click OK (2). You can continue working with IDA now.
- When you exit IDA, the license will be automatically checked in (returned to the server) and becomes free to use for another user/session.
Offline usage and license borrowing
Floating licenses can function in air-gapped environments, as long as the license server is placed inside that isolated network.
This setup is ideal for users working on-site in a specific physical location. For offsite use, you must borrow a license in advance to access it offline or in a different, remote location.
How to borrow a license?
Borrow a license to temporarily “check it out” and use IDA without connection to the license server for a fixed period of time.
If your selected IDA license has multiple seats available, borrowing the license temporarily check-out only one of the available seats.
- Connect workstation to the network with your license server. Run IDA and go to Help -> License manager.
- In the License manager dialog, right click on the selected license to open a context menu and click Borrow license….
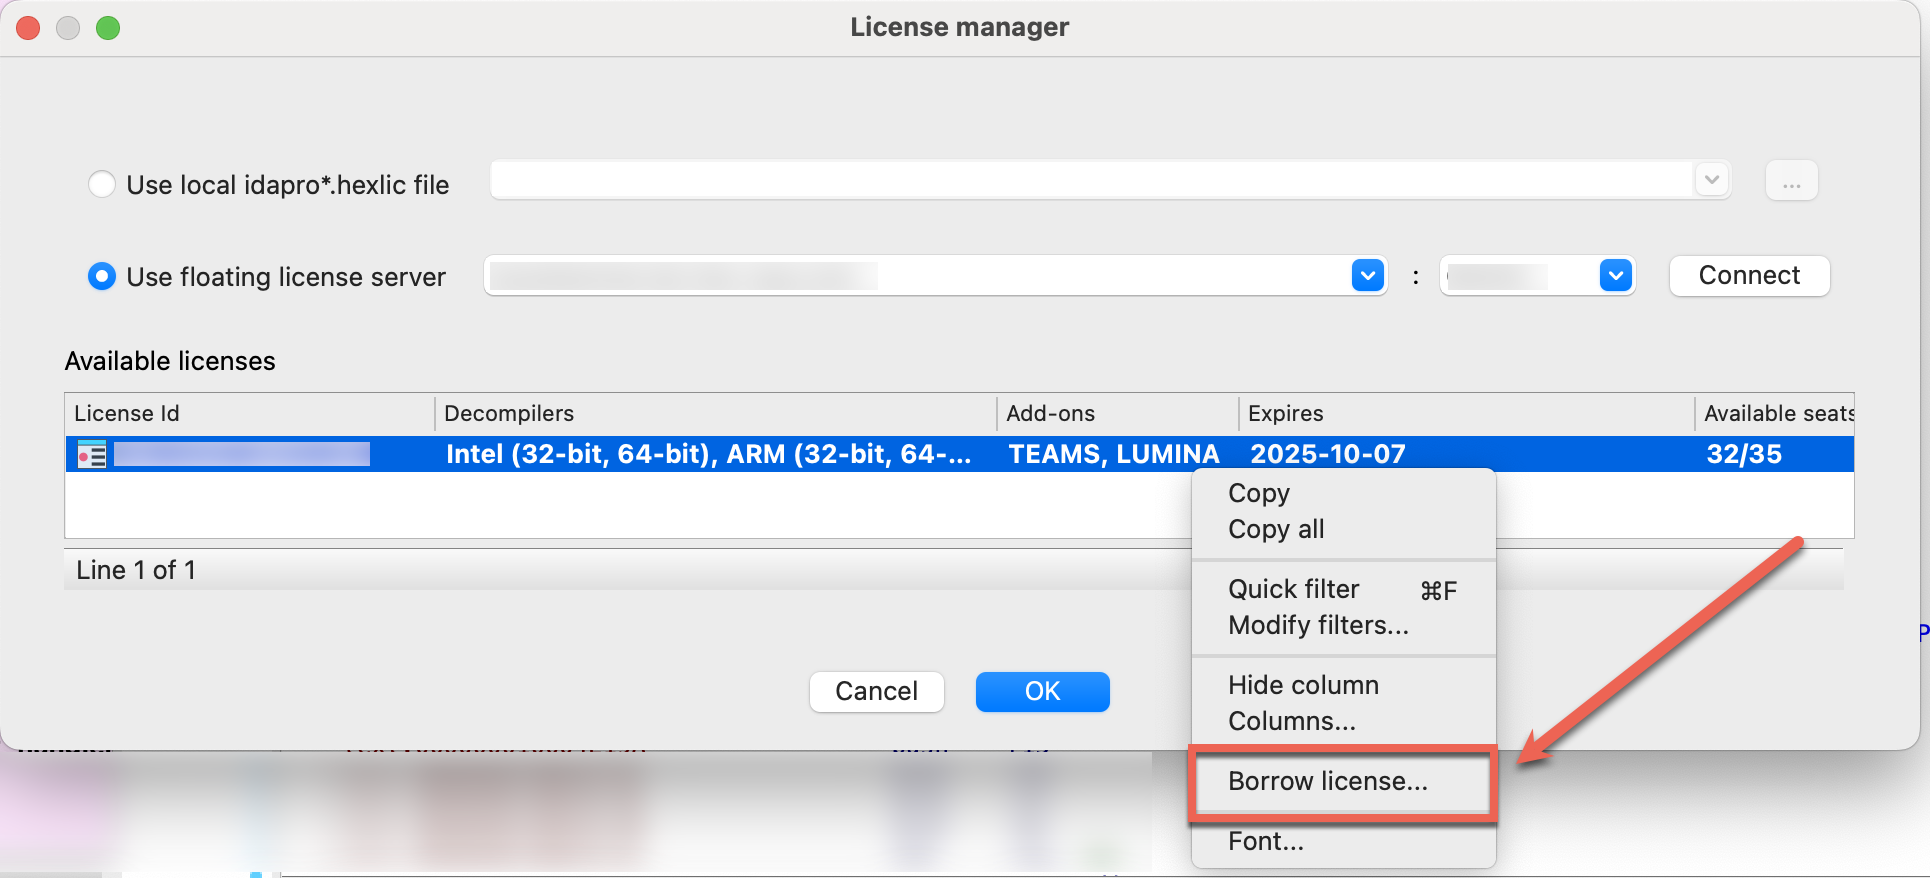
- In the Borrow or return a license dialog, specify the borrow period end date and click OK.
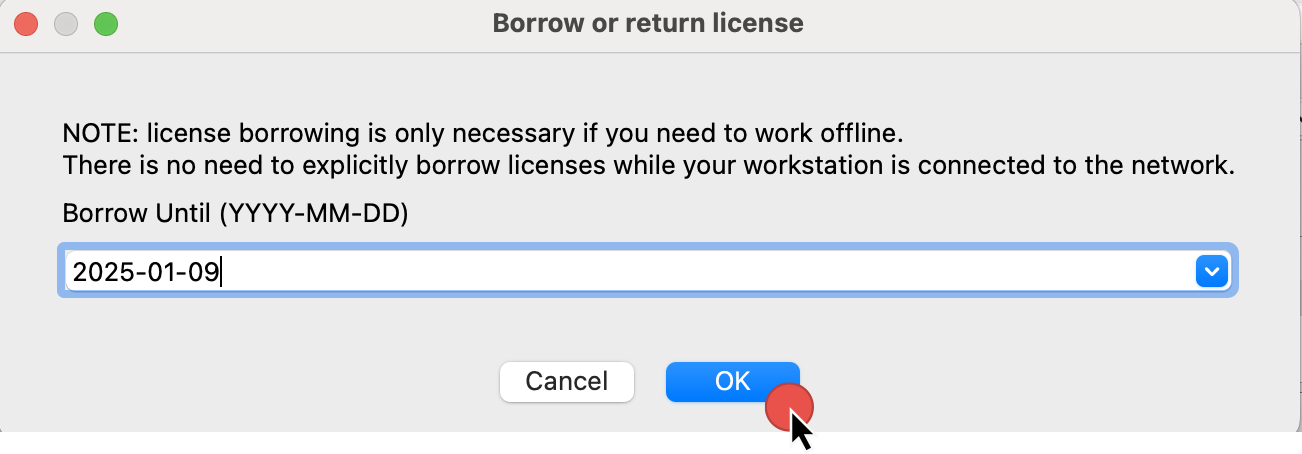 \
\
- You should see the confirmation dialog that the license was successfully borrowed, as well as info in the Output window.
 \
\
- Right now, you can disconnect with the server and work offline.
Once borrowed, the license remain checked out. That means it stays unavailable for others until the end of the borrow period or explicit manual return.
Returning a borrowed license early
Normally, there is no need to return the borrowed license explicitly as it will be returned to the server pool automatically at the end of the borrow period.
However, you can return a borrowed license earlier than its declared end date to free it up for other users.
- Reconnect to the network with your license server.
- Go to Help -> License manager.
- In the License manager dialog, right-click on the selected license to open a context menu and click Return license.

- In the Output window, you should see the notification about successfully returned IDA license.
You can seamlessly continue your work after returning a borrowed license, as it will automatically be checked out for online use from the server in the background.
Key notes:
- Borrowing reduces the number of available floating license seats.
- After the borrowing period ends, the license automatically returns to the server.
- Be mindful of the borrowing duration, as it locks that license/seat for the entire period, even if you no longer need it.
- You can return the license manually before the fixed period but only while connected to the network with the license server.
FAQ
How can I know who’s occupying the seats?
If all seats are occupied, regular users cannot directly see who is using them. To get details about active users, your administrator can use the lsadm tool shipped with the server.
Developer Guide
Welcome to the Hex-Rays Developer Guide, where you can learn how to enhance IDA’s capabilities and extend its features.
Whether you’re new to IDA development or an experienced reverse engineer, our tools and documentation are designed to help you extend IDA’s capabilities to match your needs.
Beginner Development Path
Domain API
Our beginner-friendly Domain API is designed for faster scripting and offers an easy entry point, perfect for those who value simplicity over complexity.
| Getting Started | https://ida-domain.docs.hex-rays.com/getting_started/ | |||
| Examples | https://ida-domain.docs.hex-rays.com/examples/ | |||
| Reference | https://ida-domain.docs.hex-rays.com/usage/ |
| Start using C++ SDK | C++ | c++ | ||
| Start using IDAPython SDK | Python | IDAPython |
C++ and IDAPython SDK Reference Documentation
Refer to our detailed C++ and IDAPython SDK documentation for a complete overview of available modules and functions.
| C++ reference | https://cpp.docs.hex-rays.com | ||
| IDAPython reference | https://python.docs.hex-rays.com/ |
Domain API
A beginner-friendly, open-source Domain API that simplifies scripting and plugin development, making it approachable like never before — in a Pythonic way.
{% hint style=“success” %}
v0.1.0 Released
This initial release focuses on core reversing concepts and provides a foundation for future evolution and collaboration with the community. {% endhint %}
General Documentation Resources
| Getting Started | https://ida-domain.docs.hex-rays.com/getting_started/ | ||
| Examples | https://ida-domain.docs.hex-rays.com/examples/ | ||
| Reference | https://ida-domain.docs.hex-rays.com/usage/ |
Additional Resources
| PyPI Package | https://pypi.org/project/ida-domain/ | ||
| Source Code on GitHub | https://github.com/HexRaysSA/ida-domain |
Is the Domain API Right for You?
Just getting started with IDA?
Great! The Domain API was specifically designed to flatten the learning curve. We made this high-level Domain API more Pythonic, easy to install and simpler to learn so you can start scripting and building IDA plugins without getting overwhelmed by complexity.
As an open-source project designed to complement IDAPython SDK, it benefits from a faster release cycle driven by community feedback.
Experienced with C++ or/and IDAPython SDK?
If you’re a seasoned reverser familiar with C++ and/or IDAPython SDK usage, there’s no need to change your workflow or adopt “another” API. The Domain API is not intended to replace the existing C++ and IDAPython SDK. It offers a high-level alternative for those who prefer it.
Need low-level control?
If you need full control, stick with IDAPython or the C++ SDK. The high-level Domain API prioritizes ease of use and community-driven evolution over complete coverage from day one. It will continue to evolve rapidly and expand over time.
Benefits of using Domain API
- Clean and Pythonic design. The Domain API is built on top of the existing IDAPython SDK, providing a higher-level Domain Model for interacting with IDA.
- Domain-focused design. Developed by reverse engineers for reverse engineers, matching how they think about binary analysis.
- Community-driven updates, versioned independently. Open-source from the start and developed outside of official IDA release cycles, enabling flexible evolution.
Scripting and Development with the Domain API
Is it possible to develop plugins with the Domain API?
Yes. You can dive right away into plugin development with the Domain API, that has been built on top of the IDAPython SDK. For everything that needs more low-level control, you can use it alongside the IDAPython SDK. They are fully compatible with each other.
Is the Domain API Equivalent to the IDAPython SDK?
The Domain API currently provides coverage for common tasks such as function manipulation, type management, cross-references handling, and more. For a full overview of available capabilities, see the Domain API Reference. As an open-source project, built with an independent release cycle, the Domain API is designed to evolve quickly. You can expect frequent updates that expand its functionality and have a chance to shape the future of its evolution.
If you need access to features not yet available through the Domain API, you can combine the IDAPython alongside your Domain API snippets.
Feedback and contributions
The Domain API has been open source from the start. We welcome not only contributions, but also your honest feedback — from early impressions to insights that help shape its growth toward maturity.
{% hint style=“info” %}
How to contribute? | Visit the Domain API GitHub Repository
Spotted a bug or want to propose a change to the Domain API? Here’s how to get involved:
- Read the Contribution Guidelines to understand the process
- To report bugs or unexpected behavior, open an Issue on GitHub
- To propose changes, submit a Pull Request (PR) with your improvements {% endhint %}
{% hint style=“info” %}
How to share your feedback?
We welcome your early insights, feature requests, and ideas for possible use cases of the Domain API. Join the conversation in our community forum. {% endhint %}
FAQ
Do I need to update my existing plugins or scripts?
No. You do not need to port your plugins nor update them. The Domain API doesn’t affect existing plugins or scripts in any way. If you are familiar and feel completely confident in developing with IDAPython or C++, you can continue to do so without changing your habits or workflow.
Is the Domain API a replacement for IDAPython SDK?
No. The Domain API is not going to replace the IDAPython SDK, but complement it. The high-level Domain API serves as an entry point for developing scripts and plugins in IDA, particularly for newcomers looking for an accessible Pythonic interface.
Getting Started
Reference
Examples
C++ SDK
Our IDA SDK exposes API in the form of C++ libraries and header files, allowing you to create custom processor modules and plugins, automate tasks, or integrate new features directly into IDA. Our IDA API is defined and organized by the contents of the header files, that you can browse in our IDA C++ SDK Reference.
Resources
| IDA C++ SDK Reference | https://cpp.docs.hex-rays.com/ | ||
| IDA SDK Source Code on GitHub | https://github.com/HexRaysSA/ida-sdk |
Typical use cases
With IDA SDK, you can develop loaders for unsupported binary formats or custom processors modules to disassemble and analyze non-standard files. What’s more, you can write plugins to perform complex, automated tasks and more, allowing you to go far beyong the basic IDC scripting.
What to check next?
| C++ SDK Getting Started | Explore this guide to introduce yourself to the core capabilities of IDA SDK. | c++-sdk-getting-started.md | |
| C++ SDK Examples | Try complex examples that show the full power and and flexibility of our SDK. | c++-sdk-examples.md | |
| C++ SDK Reference | Check in-depth overview of header files with extensive description of data structures and functions. | https://cpp.docs.hex-rays.com/ | |
| Writing Plugins in C++ | Learn the best practices for creating plugins with IDA SDK | how-to-create-a-plugin.md |
SDK Porting Guide
Check out our Porting Guide, which is prepared to help you migrate and adapt your existing modules and plugins from IDA 8.x to IDA 9.0.
Getting started with C++ SDK
Intro
The IDA C++ SDK provides set of tools to interact with IDA Pro’s disassembler, allowing you to navigate, analyze, and manipulate various elements such as functions, instructions, and data. This guide is designed to accelerate your learning curve with the IDA C++ SDK and kickstart your development journey, assuming you are already familiar with IDA Pro and its basic usage.
Our IDA SDK is open source and available on GitHub.
How This Guide is Structured
First, check Basics for core concepts and commonly used variables. Next, explore our Code Snippets to see examples of commonly used functions. Once you’re comfortable with these, you can delve into more complex Examples that showcase advanced usage of the SDK.
C++ SDK Installation
Download the latest version of the SDK directly from IDA SDK GitHub and follow the setup instructions provided in the README.
Basics
Common Types and Constants
One of the most extensivly used type is ea_t, commonly used to represent an effective address (EA) within a binary.
Common header files and namespaces
The IDA C++ SDK is organized into header files containing various classes and functions. Below is a short description of commonly used IDA SDK header files:
-
pro.h: This is the first header included in the IDA project. It defines the most common types, functions, and data. It also contains compiler- and platform-related definitions. -
ida.hpp: In this file the ‘inf’ structure is defined: it keeps all parameters of the disassembled file. -
idp.hpp: The ‘main’ header file for IDP modules. Contains definition of the interface to IDP modules. The interface consists of 2 structures: processor_t - description of processor
asm_t - description of assembler
Each IDP has one processor_t and several asm_t structures. -
loader.hpp: Definitions of IDP, LDR, and PLUGIN module interfaces. This file also contains:- functions to load files into the database
- functions to generate output files
- high level functions to work with the database (open, save, close)
-
ua.hpp: Functions that deal with the disassembling of program instructions. Disassembly of an instruction is made in three steps:- analysis
- emulation
- conversion to text
-
kernwin.hpp: Defines the interface between the kernel and the UI. Some string processing functions are also kept in this header. -
idd.hpp: Debugger plugin API for debugger module writers. Contains definition of the interface to IDD modules. -
bytes.hpp: Functions and definitions used to describe and manipulate each byte of the disassembled program. Information about the byte includes associated features (comments, names, references, etc), data types (dword, qword, string literal, etc), instruction operands, status (mapped, loaded, patched, etc), among others. -
netnode.hpp: Functions that provide the lowest level public interface to the database. Modules can use this to keep some private information in the database. A description of the concept is available in the header file itself. -
allins.hpp: List of instructions available from all processor modules. -
auto.hpp: Auto-analysis related functions. -
compress.hpp: Data compression functions. -
config.hpp: Functions that deal with configuration options and files. -
dbg.hpp: Contains functions to control the debugging of a process. -
diskio.hpp: File I/O functions for IDA. You should not use standard C file I/O functions in modules. Use functions from this header, pro.h, and fpro.h instead. -
entry.hpp: Functions that deal with entry points to the program being disassembled. -
enum.hpp: Enumeration type management (assembly level types). -
err.h: Thread safe functions that deal with error codes. -
expr.hpp: Functions that deal with C-like expressions, external languages, and the built-in IDC language. -
fixup.hpp: Functions that deal with fixup (relocation) information. -
fpro.h: System independent counterparts of file I/O functions. These functions do check errors but never exit even if an error occurs. They return extended error code in qerrno variable. NOTE: You must use these functions instead of the C standard I/O functions. -
frame.hpp: Routines to manipulate function stack frames, stack variables, register variables and local labels. -
funcs.hpp: Routines for working with functions within the disassembled program. This file also contains routines for working with library signatures (e.g. FLIRT). -
gdl.hpp: Low level graph drawing operations. -
graph.hpp: Graph view management. -
help.h: Help subsystem. This subsystem is not used in IDP files. We put it just in case. -
ieee.h: IEEE floating point functions. -
intel.hpp: Header file from the IBM PC module. For information only. It will not compile because it contains references to internal files! -
lex.hpp: Tools for parsing C-like input. -
lines.hpp: High level functions that deal with the generation of the disassembled text lines. -
nalt.hpp: Definitions of various information kept in netnodes. These functions should not be used directly since they are very low level. -
moves.hpp: Functions and classes related to location history. -
name.hpp: Functions that deal with names (setting, deleting, getting, validating, etc). -
offset.hpp: Functions that deal with offsets. -
problems.hpp: Functions that deal with the list of problems. -
prodir.h: Low level functions to find files in the file system. It is better to use enumerate_files2() from diskio.hpp. -
pronet.h: Network related functions. -
range.hpp: Contains the definition of the ‘range_t’ class. This is a base class used by many parts of IDA, such as the ‘segment_t’ and ‘segreg_range_t’ (segment register) classes. -
registry.hpp: Registry related functions. IDA uses the registry to store global configuration options that must persist after IDA has been closed. -
segment.hpp: Functions that deal with program segmentation. -
segregs.hpp: Functions that deal with the segment registers. If your processor doesn’t use segment registers, then you don’t need this file. -
strlist.hpp: Functions that deal with the strings list. -
struct.hpp: Structure type management (assembly level types). -
typeinf.hpp: Describes the type information records in IDA. -
xref.hpp: Functions that deal with cross-references.
{% hint style=“info” %} All functions usable in the modules are marked by the “ida_export” keyword. {% endhint %}
Here are the most common namespaces to start with:
idc: This namespace provides access to IDC scripting functions via C++ SDK. It is often used for common tasks like setting comments or modifying bytes.
idati: This namespace is used for interacting with type information, such as function signatures and type definitions.
idaapi: This namespace contains core classes and functions for interacting with IDA’s API, including functions for handling UI elements, plugins, and database access.
idamisc: This namespace includes utility functions for various tasks, such as working with the address space and disassembly.
Code Snippets
Here are common functions and examples grouped by topics:
Part 1: Addresses and Names
Get the Current Address
ea_t ea = get_screen_ea(); // Get the current address
printf("Current address: %llx\n", ea);
Jump to the address
jumpto(0x401000); // Jump to address 0x401000
Get the Minimum and Maximum Address in IDB
ea_t min_ea = get_inf_attr(INF_MIN_EA);
ea_t max_ea = get_inf_attr(INF_MAX_EA);
List All Instruction Addresses
for (ea_t ea = get_segm_by_name("CODE"); ea != BADADDR; ea = get_next_head(ea, badaddr)) {
printf("Instruction address: %llx\n", ea);
}
Get the Name Associated with a Given Address
const char* name = get_name(0x100000da0);
printf("Name: %s\n", name);
Get the Address Associated with a Given Name
ea_t address = get_name_ea(0, "_main");
printf("Address: %llx\n", address);
Part 2: Reading and Writing Data
Reading Bytes and Words
u8 byte_value = get_byte(0x401000); // Read a byte at address 0x401000
u16 word_value = get_word(0x401002); // Read a word (2 bytes) at address 0x401002
u32 dword_value = get_dword(0x401004); // Read a double word (4 bytes) at address 0x401004
printf("Byte: %x, Word: %x, Dword: %x\n", byte_value, word_value, dword_value);
Writing Bytes and Words
patch_byte(0x401000, 0x90); // Write a byte (0x90) at address 0x401000
patch_word(0x401002, 0x9090); // Write a word (0x9090) at address 0x401002
patch_dword(0x401004, 0x90909090); // Write a double word (0x90909090) at address 0x401004
Part 3: Comments
Add a Regular or Repeatable Comment
set_cmt(0x401000, "This is a comment", false); // Add a regular comment at address 0x401000
set_cmt(0x401000, "This is a repeatable comment", true); // Add a repeatable comment at address 0x401000
Get a Regular Comment
const char* comment = get_cmt(0x401000, false); // Get a regular comment at address 0x401000
printf("Comment: %s\n", comment);
Part 4: Segments
Get a Segment Name
const char* seg_name = get_segm_name(ea);
printf("Segment name: %s\n", seg_name);
Iterate Through All Segments
for (seg_t* seg = get_first_seg(); seg != nullptr; seg = get_next_seg(seg)) {
printf("Segment name: %s\n", get_segm_name(seg->start_ea));
}
Part 5: Functions
Create and Delete Function
add_func(0x401000, 0x401050); // Create a function starting at 0x401000 and ending at 0x401050
del_func(0x401000); // Delete the function at 0x401000
Get the Name of the Function
const char* func_name = get_func_name(0x401000);
printf("Function name: %s\n", func_name);
Iterate Through All Functions
for (func_t* func = get_first_func(); func != nullptr; func = get_next_func(func)) {
printf("Function address: %llx, name: %s\n", func->start_ea, get_func_name(func->start_ea));
}
Part 6: Navigating Cross-References (Xrefs)
List Cross-References to an Address
for (xref_t* xref = get_first_xref_to(0x401000); xref != nullptr; xref = get_next_xref_to(xref)) {
printf("Xref to 0x401000 from %llx\n", xref->from);
}
List Cross-References from an Address
for (xref_t* xref = get_first_xref_from(0x401000); xref != nullptr; xref = get_next_xref_from(xref)) {
printf("Xref from 0x401000 to %llx\n", xref->to);
}
Part 7: UI
Set Background Color of a Function
set_color(0x401000, CIC_FUNC, 0x007fff); // Set background color for the function starting at address 0x401000
Display a Custom Dialog
msg("This is a custom message dialog. Good luck with learning the IDA C++ SDK!\n");
Complex Script Examples
If you’re comfortable with the basics, explore advanced examples included in the SDK itself. These examples often leverage multiple modules to accomplish more sophisticated tasks.
What’s Next?
Explore our tutorial on how to create your first custom plugin in IDA using C++.
Reference
Using the Decompiler SDK: Decompiler Plug-In
Below is the full source code of a sample plugin. It performs a quite useful transformation of the pseudocode: replaces zeroes in pointer contexts with NULLs. A NULL immediately conveys the idea that the current expression is pointer-related. This is especially useful for unknown function arguments.
The plugin is fully automatic. It hooks to the decompiler events and waits for the pseudocode to be ready. At that moment it takes control and modifies the ctree.
The conversion is performed by the convert_zeroes() function. It visits all expressions of the ctree and checks for pointer contexts. If a expression has a pointer type, then the make_null_if_zero() function is called for it. This function checks if the expression is a zero constant and converts it if necessary.
The plugin can be turned on or off by its menu item in the Plugins submenu.
The code is short and straightforward. Use it as a template for your plugins.
\
/*
* Hex-Rays Decompiler project
* Copyright (c) 2007-2019 by Hex-Rays, [email protected]
* ALL RIGHTS RESERVED.
*
* Sample plugin for Hex-Rays Decompiler.
* It automatically replaces zeroes in pointer contexts with NULLs.
* For example, expression like
*
* funcptr = 0;
*
* will be displayed as
*
* funcptr = NULL;
*
* Due to highly dynamic nature of the decompier output, we must
* use the decompiler events to accomplish the task. The plugin will
* wait for the ctree structure to be ready in the memory and will
* replace zeroes in pointer contexts with NULLs.
*
*/
#include <hexrays.hpp>
// Hex-Rays API pointer
hexdsp_t *hexdsp = NULL;
static bool inited = false;
static const char nodename[] = “$ hexrays NULLs”;
static const char null_type[] = “MACRO_NULL”;
//————————————————————————–
// Is the plugin enabled?
// The user can disable it. The plugin will save the on/off switch in the
// current database.
static bool is_enabled(void)
{
netnode n(nodename); // use a netnode to save the state
return n.altval(0) == 0; // if the long value is positive, then disabled
}
//————————————————————————–
// If the expression is zero, convert it to NULL
static void make_null_if_zero(cexpr_t *e)
{
if ( e->is_zero_const() && !e->type.is_ptr() )
{ // this is plain zero, convert it
number_format_t &nf = e->n->nf;
nf.flags = enum_flag();
nf.serial = 0;
nf.type_name = null_type;
e->type = tinfo_t::get_stock(STI_PVOID);
}
}
//————————————————————————–
// Convert zeroes of the ctree to NULLs
static void convert_zeroes(cfunc_t *cfunc)
{
// To represent NULLs, we will use the MACRO_NULL enumeration
// Normally it is present in the loaded tils but let’s verify it
if ( !get_named_type(NULL, null_type, NTF_TYPE) )
{
msg(“%s type is missing, cannot convert zeroes to NULLs\n”, null_type);
return;
}
// We derive a helper class from ctree_visitor_t
// The ctree_visitor_t is a base class to derive
// ctree walker classes.
// You have to redefine some virtual functions
// to do the real job. Here we redefine visit_expr() since we want
// to examine and modify expressions.
struct ida_local zero_converter_t : public ctree_visitor_t
{
zero_converter_t(void) : ctree_visitor_t(CV_FAST) {}
int idaapi visit_expr(cexpr_t *e)
{
// verify if the current expression has pointer expressions
// we handle the following patterns:
// A. ptr = 0;
// B. func(0); where argument is a pointer
// C. ptr op 0 where op is a comparison
switch ( e->op )
{
case cot_asg: // A
if ( e->x->type.is_ptr() )
make_null_if_zero(e->y);
break;
case cot_call: // B
{
carglist_t &args = *e->a;
for ( int i=0; i < args.size(); i++ ) // check all arguments
{
carg_t &a = args[i];
if ( a.formal_type.is_ptr_or_array() )
make_null_if_zero(&a);
}
}
break;
case cot_eq: // C
case cot_ne:
case cot_sge:
case cot_uge:
case cot_sle:
case cot_ule:
case cot_sgt:
case cot_ugt:
case cot_slt:
case cot_ult:
// check both sides for zeroes
if ( e->y->type.is_ptr() )
make_null_if_zero(e->x);
if ( e->x->type.is_ptr() )
make_null_if_zero(e->y);
break;
default:
break;
}
return 0; // continue walking the tree
}
};
zero_converter_t zc;
// walk the whole function body
zc.apply_to(&cfunc->body, NULL);
}
//————————————————————————–
// This callback will detect when the ctree is ready to be displayed
// and call convert_zeroes() to create NULLs
static ssize_t idaapi callback(void *, hexrays_event_t event, va_list va)
{
if ( event == hxe_maturity )
{
cfunc_t *cfunc = va_arg(va, cfunc_t*);
ctree_maturity_t mat = va_argi(va, ctree_maturity_t);
if ( mat == CMAT_FINAL ) // ctree is ready, time to convert zeroes to NULLs
convert_zeroes(cfunc);
}
return 0;
}
//————————————————————————–
// Initialize the plugin.
int idaapi init(void)
{
if ( !init_hexrays_plugin() )
return PLUGIN_SKIP; // no decompiler
if ( is_enabled() ) // null plugin is enabled?
{
install_hexrays_callback(callback, NULL);
const char *hxver = get_hexrays_version();
msg(“Hex-rays version %s has been detected, %s ready to use\n”, hxver, PLUGIN.wanted_name);
}
inited = true;
return PLUGIN_KEEP;
}
//————————————————————————–
void idaapi term(void)
{
if ( inited )
{
// clean up
remove_hexrays_callback(callback, NULL);
term_hexrays_plugin();
}
}
//————————————————————————–
bool idaapi run(size_t)
{
// since all real work is done in the callbacks, use the main plugin entry
// to turn it on and off.
// display a message explaining the purpose of the plugin:
int code = askbuttons(
“~E~nable”,
“~D~isable”,
“~C~lose”,
–1,
“AUTOHIDE NONE\n”
“Sample plugin for Hex-Rays decompiler.\n”
“\n”
“This plugin is fully automatic.\n”
“It detects zeroes in pointer contexts and converts them into NULLs.\n”
“\n”
“The current state of the plugin is: %s\n”,
is_enabled() ? “ENABLED” : “DISABLED”);
switch ( code )
{
case –1: // close
break;
case 0: // disable
case 1: // enable
netnode n;
n.create(nodename);
n.altset(0, code == 0);
if ( code )
install_hexrays_callback(callback, NULL);
else
remove_hexrays_callback(callback, NULL);
info(“The %s plugin has been %s.”, PLUGIN.wanted_name, code ? “ENABLED” : “DISABLED”);
break;
}
return true;
}
//————————————————————————–
static char comment[] = “Sample2 plugin for Hex-Rays decompiler”;
//————————————————————————–
//
// PLUGIN DESCRIPTION BLOCK
//
//————————————————————————–
plugin_t PLUGIN =
{
IDP_INTERFACE_VERSION,
0, // plugin flags
init, // initialize
term, // terminate. this pointer may be NULL.
run, // invoke plugin
comment, // long comment about the plugin
// it could appear in the status line
// or as a hint
“”, // multiline help about the plugin
“Hex-Rays NULL converter”, // the preferred short name of the plugin
“” // the preferred hotkey to run the plugin
};
Examples
{% hint style=“info” %} This page is currently a stub. We’re working on additional examples tailored for beginners, so expect more samples soon. {% endhint %}
The IDA SDK, that can be accessed directly from our GitHub repository, provides sample code in addition to necessary libraries and headers. These exemplary plugins, processor modules, or file loaders are designed to help you create your own plugins, modules, and more.
Where can I find all the examples?
The IDA SDK is shipped with plenty of samples (including, for example, sample processor modules or loaders) and exemplary plugins that you can find in the IDA SDK GitHub repository. To kickstart your journey with the IDA SDK, we encourage you to check out the included samples, compile them, and run them.
Sample plugins
The plugins folder contains sample plugins written in C++. Usually, the subfolders contains at minimum the cpp file(s) and a makefile.
Below, we present only a selection of samples to familiarize yourself with the possibilities of the C++ SDK. All of these samples and their corresponding makefiles can be found in your plugins folder inside the SDK directory.
hello
Simple hello word plugin ideal to get started with IDA SDK.
#include <ida.hpp>
#include <idp.hpp>
#include <loader.hpp>
#include <kernwin.hpp>
//--------------------------------------------------------------------------
struct plugin_ctx_t : public plugmod_t
{
virtual bool idaapi run(size_t) override;
};
//--------------------------------------------------------------------------
bool idaapi plugin_ctx_t::run(size_t)
{
msg("Hello, world! (cpp)\n");
return true;
}
//--------------------------------------------------------------------------
static plugmod_t *idaapi init()
{
return new plugin_ctx_t;
}
//--------------------------------------------------------------------------
plugin_t PLUGIN =
{
IDP_INTERFACE_VERSION,
PLUGIN_UNL // Unload the plugin immediately after calling 'run'
| PLUGIN_MULTI, // The plugin can work with multiple idbs in parallel
init, // initialize
nullptr,
nullptr,
nullptr, // long comment about the plugin
nullptr, // multiline help about the plugin
"Hello, world", // the preferred short name of the plugin
nullptr, // the preferred hotkey to run the plugin
};
vcsample
Sample plugin, ideal to get familiar with plugins structure.
/*
* This is a sample plugin module
*
* It can be compiled by any of the supported compilers:
*
* - Visual C++
* - GCC
*
*/
#include <ida.hpp>
#include <idp.hpp>
#include <expr.hpp>
#include <bytes.hpp>
#include <loader.hpp>
#include <kernwin.hpp>
//#define INSTALL_SAMPLE_CALLBACK
//#define HAS_USER_DEFINED_PREFIX
//--------------------------------------------------------------------------
//lint -e754 struct member not referenced
struct plugin_data_t : public plugmod_t, public event_listener_t
{
ea_t old_ea = BADADDR;
int old_lnnum = -1;
virtual ssize_t idaapi on_event(ssize_t event_id, va_list) override;
virtual bool idaapi run(size_t arg) override;
idaapi ~plugin_data_t();
};
//--------------------------------------------------------------------------
// Example of a user-defined IDC function in C++
//#define DEFINE_IDC_FUNC
#ifdef DEFINE_IDC_FUNC
static error_t idaapi myfunc5(idc_value_t *argv, idc_value_t *res)
{
msg("myfunc is called with arg0=%x and arg1=%s\n", argv[0].num, argv[1].c_str());
res->num = 5; // let's return 5
return eOk;
}
static const char myfunc5_args[] = { VT_LONG, VT_STR, 0 };
static const ext_idcfunc_t myfunc5_desc =
{
{ "MyFunc5", myfunc5, myfunc5_args, nullptr, 0, 0 }
};
#endif // DEFINE_IDC_FUNC
//--------------------------------------------------------------------------
// This callback is called for UI notification events
ssize_t idaapi plugin_data_t::on_event(ssize_t event_id, va_list)
{
if ( event_id != ui_msg // avoid recursion
&& event_id != ui_refreshmarked ) // ignore uninteresting events
{
msg("ui_callback %" FMT_ZS "\n", event_id);
}
return 0; // 0 means "continue processing the event"
// otherwise the event is considered as processed
}
//--------------------------------------------------------------------------
// A sample how to generate user-defined line prefixes
#ifdef HAS_USER_DEFINED_PREFIX
static const int prefix_width = 8;
struct sample_prefix_t : public user_defined_prefix_t
{
plugin_data_t *pd;
sample_prefix_t(plugin_data_t *d) :
user_defined_prefix_t(prefix_width, d), pd(d) {}
virtual void idaapi get_user_defined_prefix(
qstring *out,
ea_t ea,
const insn_t & /*insn*/,
int lnnum,
int indent,
const char *line) override
{
out->qclear(); // empty prefix by default
// We want to display the prefix only the lines which
// contain the instruction itself
if ( indent != -1 ) // a directive
return;
if ( line[0] == '\0' ) // empty line
return;
if ( tag_advance(line,1)[-1] == ash.cmnt[0] ) // comment line...
return;
// We don't want the prefix to be printed again for other lines of the
// same instruction/data. For that we remember the line number
// and compare it before generating the prefix
if ( pd->old_ea == ea && pd->old_lnnum == lnnum )
return;
// Ok, seems that we found an instruction line.
// Let's display the size of the current item as the user-defined prefix
asize_t our_size = get_item_size(ea);
// We don't bother about the width of the prefix
// because it will be padded with spaces by the kernel
out->sprnt(" %" FMT_64 "d", our_size);
// Remember the address and line number we produced the line prefix for:
pd->old_ea = ea;
pd->old_lnnum = lnnum;
}
};
#endif // HAS_USER_DEFINED_PREFIX
//--------------------------------------------------------------------------
static plugmod_t *idaapi init()
{
if ( inf_get_filetype() == f_ELF )
return nullptr; // we do not want to work with this idb
plugin_data_t *pd = new plugin_data_t;
// notifications
#ifdef INSTALL_SAMPLE_CALLBACK
hook_event_listener(HT_UI, pd, pd);
#endif // INSTALL_SAMPLE_CALLBACK
// user-defined prefix. will be automatically uninstalled by the kernel
// when our plugin gets unloaded.
#ifdef HAS_USER_DEFINED_PREFIX
new sample_prefix_t(pd);
#endif // HAS_USER_DEFINED_PREFIX
// custom IDC function
#ifdef DEFINE_IDC_FUNC
add_idc_func(myfunc5_desc);
#endif // DEFINE_IDC_FUNC
// an example how to retrieve plugin options
const char *options = get_plugin_options("vcsample");
if ( options != nullptr )
warning("command line options: %s", options);
return pd;
}
//--------------------------------------------------------------------------
plugin_data_t::~plugin_data_t()
{
#ifdef DEFINE_IDC_FUNC
del_idc_func(myfunc5_desc.name);
#endif
}
//--------------------------------------------------------------------------
bool idaapi plugin_data_t::run(size_t arg)
{
warning("vcsample plugin has been called with arg %" FMT_Z, arg);
// msg("just fyi: the current screen address is: %a\n", get_screen_ea());
return true;
}
//--------------------------------------------------------------------------
static const char comment[] = "This is a sample plugin. It does nothing useful";
static const char help[] =
"A sample plugin module\n"
"\n"
"This module shows you how to create plugin modules.\n"
"\n"
"It does nothing useful - just prints a message that is was called\n"
"and shows the current address.\n";
//--------------------------------------------------------------------------
// This is the preferred name of the plugin module in the menu system
// The preferred name may be overridden in plugins.cfg file
static const char wanted_name[] = "Sample plugin";
// This is the preferred hotkey for the plugin module
// The preferred hotkey may be overridden in plugins.cfg file
static const char wanted_hotkey[] = "";
//--------------------------------------------------------------------------
//
// PLUGIN DESCRIPTION BLOCK
//
//--------------------------------------------------------------------------
plugin_t PLUGIN =
{
IDP_INTERFACE_VERSION,
PLUGIN_MULTI, // plugin flags
init, // initialize
nullptr, // terminate. this pointer may be nullptr.
nullptr, // invoke plugin
comment, // long comment about the plugin
// it could appear in the status line
// or as a hint
help, // multiline help about the plugin
wanted_name, // the preferred short name of the plugin
wanted_hotkey // the preferred hotkey to run the plugin
};
calle
Sample plugin that allows the user to change the address of the called function.
/*
* Change the callee address for constructions like
*
* call esi ; LocalFree
*
*/
#include <ida.hpp>
#include <idp.hpp>
#include <loader.hpp>
#include <kernwin.hpp>
#include <bytes.hpp>
#include <auto.hpp>
#include <segregs.hpp>
#define T 20
struct callee_vars_t : public plugmod_t
{
processor_t &ph;
callee_vars_t(processor_t &_ph) : ph(_ph) {}
virtual bool idaapi run(size_t arg) override;
};
//--------------------------------------------------------------------------
static plugmod_t *idaapi init()
{
processor_t &ph = PH;
if ( ph.id != PLFM_386 && ph.id != PLFM_MIPS && ph.id != PLFM_ARM )
return nullptr; // only for x86, MIPS and ARM
return new callee_vars_t(ph);
}
//--------------------------------------------------------------------------
static const char comment[] = "Change the callee address";
static const char help[] =
"This plugin allows the user to change the address of the called function\n"
"in constructs like\n"
"\n"
" call esi\n"
"\n"
"You can enter a function name instead of its address\n";
//--------------------------------------------------------------------------
static const char *const form =
"HELP\n"
"%s\n"
"ENDHELP\n"
"Enter the callee address\n"
"\n"
" <~C~allee:$::40:::>\n"
"\n"
"\n";
bool idaapi callee_vars_t::run(size_t)
{
const char *nname;
if ( ph.id == PLFM_MIPS )
nname = "$ mips";
else if ( ph.id == PLFM_ARM )
nname = " $arm";
else
nname = "$ vmm functions";
netnode n(nname);
ea_t ea = get_screen_ea(); // get current address
if ( !is_code(get_flags(ea)) )
return false; // not an instruction
// get the callee address from the database
ea_t callee = node2ea(n.altval_ea(ea)-1);
// remove thumb bit for arm
if ( ph.id == PLFM_ARM )
callee &= ~1;
char buf[MAXSTR];
qsnprintf(buf, sizeof(buf), form, help);
if ( ask_form(buf, &callee) )
{
if ( callee == BADADDR )
{
n.altdel_ea(ea);
}
else
{
if ( ph.id == PLFM_ARM && (callee & 1) == 0 )
{
// if we're calling a thumb function, set bit 0
sel_t tbit = get_sreg(callee, T);
if ( tbit != 0 && tbit != BADSEL )
callee |= 1;
}
// save the new address
n.altset_ea(ea, ea2node(callee)+1);
}
gen_idb_event(idb_event::callee_addr_changed, ea, callee);
plan_ea(ea); // reanalyze the current instruction
}
return true;
}
//--------------------------------------------------------------------------
static const char wanted_name[] = "Change the callee address";
static const char wanted_hotkey[] = "Alt-F11";
//--------------------------------------------------------------------------
//
// PLUGIN DESCRIPTION BLOCK
//
//--------------------------------------------------------------------------
plugin_t PLUGIN =
{
IDP_INTERFACE_VERSION,
PLUGIN_MULTI, // plugin flags
init, // initialize
nullptr, // terminate. this pointer may be nullptr.
nullptr, // invoke plugin
comment, // long comment about the plugin
// it could appear in the status line
// or as a hint
help, // multiline help about the plugin
wanted_name, // the preferred short name of the plugin
wanted_hotkey // the preferred hotkey to run the plugin
};
choose
Sample plugin module that demonstrates the use of the choose() function.
/*
* This is a sample plugin module
*
* It demonstrates the use of the choose() function
*
*/
#include <ida.hpp>
#include <idp.hpp>
#include <loader.hpp>
#include <bytes.hpp>
#include <kernwin.hpp>
struct plugin_ctx_t : public plugmod_t
{
virtual bool idaapi run(size_t arg) override;
};
//--------------------------------------------------------------------------
static plugmod_t *idaapi init()
{
return new plugin_ctx_t;
}
//-------------------------------------------------------------------------
// non-modal call instruction chooser
struct calls_chooser_t : public chooser_t
{
protected:
static const int widths_[];
static const char *const header_[];
public:
// remember the call instruction addresses in this qvector
eavec_t list;
// this object must be allocated using `new`
calls_chooser_t(const char *title, bool ok, func_item_iterator_t *fii);
// function that is used to decide whether a new chooser should be opened
// or we can use the existing one.
// The contents of the window are completely determined by its title
virtual const void *get_obj_id(size_t *len) const override
{
*len = strlen(title);
return title;
}
// function that returns number of lines in the list
virtual size_t idaapi get_count() const override { return list.size(); }
// function that generates the list line
virtual void idaapi get_row(
qstrvec_t *cols,
int *icon_,
chooser_item_attrs_t *attrs,
size_t n) const override;
// function that is called when the user hits Enter
virtual cbret_t idaapi enter(size_t n) override
{
if ( n < list.size() )
jumpto(list[n]);
return cbret_t(); // nothing changed
}
protected:
void build_list(bool ok, func_item_iterator_t *fii)
{
insn_t insn;
while ( ok )
{
ea_t ea = fii->current();
if ( decode_insn(&insn, ea) > 0 && is_call_insn(insn) ) // a call instruction is found
list.push_back(ea);
ok = fii->next_code();
}
}
};
// column widths
const int calls_chooser_t::widths_[] =
{
CHCOL_HEX | 8, // Address
32, // Instruction
};
// column headers
const char *const calls_chooser_t::header_[] =
{
"Address", // 0
"Instruction", // 1
};
inline calls_chooser_t::calls_chooser_t(
const char *title_,
bool ok,
func_item_iterator_t *fii)
: chooser_t(0, qnumber(widths_), widths_, header_, title_),
list()
{
CASSERT(qnumber(widths_) == qnumber(header_));
// build the list of calls
build_list(ok, fii);
}
void idaapi calls_chooser_t::get_row(
qstrvec_t *cols_,
int *,
chooser_item_attrs_t *,
size_t n) const
{
// assert: n < list.size()
ea_t ea = list[n];
// generate the line
qstrvec_t &cols = *cols_;
cols[0].sprnt("%08a", ea);
generate_disasm_line(&cols[1], ea, GENDSM_REMOVE_TAGS);
CASSERT(qnumber(header_) == 2);
}
//--------------------------------------------------------------------------
// The plugin method
// This is the main function of the plugin.
bool idaapi plugin_ctx_t::run(size_t)
{
qstring title;
// Let's display the functions called from the current one
// or from the selected area
// First we determine the working area
func_item_iterator_t fii;
bool ok;
ea_t ea1, ea2;
if ( read_range_selection(nullptr, &ea1, &ea2) ) // the selection is present?
{
callui(ui_unmarksel); // unmark selection
title.sprnt("Functions called from %08a..%08a", ea1, ea2);
ok = fii.set_range(ea1, ea2);
}
else // nothing is selected
{
func_t *pfn = get_func(get_screen_ea()); // try the current function
if ( pfn == nullptr )
{
warning("Please position the cursor on a function or select an area");
return true;
}
ok = fii.set(pfn);
get_func_name(&title, pfn->start_ea);
title.insert("Functions called from ");
}
// now open the window
calls_chooser_t *ch = new calls_chooser_t(title.c_str(), ok, &fii);
ch->choose(); // the default cursor position is 0 (first row)
return true; //-V773
}
//--------------------------------------------------------------------------
//
// PLUGIN DESCRIPTION BLOCK
//
//--------------------------------------------------------------------------
plugin_t PLUGIN =
{
IDP_INTERFACE_VERSION,
// plugin flags
PLUGIN_MULTI,
// initialize
init,
nullptr,
nullptr,
// long comment about the plugin
// it could appear in the status line
// or as a hint
"This is a sample plugin. It displays the chooser window",
// multiline help about the plugin
"A sample plugin module\n"
"\n"
"This module shows you how to use choose() function.\n",
// the preferred short name of the plugin
"Called functions",
// the preferred hotkey to run the plugin
""
};
custdata
This sample plugin demonstates how to install a custom data type and a custom data format.
custview
This sample plugin demonstates how to create and manipulate a simple custom viewer, that allows you to create a view which displays colored lines.
cvt64_sample
Plugin with CVT64 examples.
dwarf
The source code of the dwarf plugin
ex_debidc
This sample Debugger IDC Helper executes IDC script when the process is launched and allows to hook IDC scripts to various debugger events.
// Debugger IDC Helper
// Executes IDC script when the process is launched
// In fact, this approach can be used to hook IDC scripts to various debugger
// events.
#include <ida.hpp>
#include <idp.hpp>
#include <dbg.hpp>
#include <expr.hpp>
#include <loader.hpp>
int data_id;
//--------------------------------------------------------------------------
// The plugin stores the IDC file name in the database
// It will create a node for this purpose
static const char node_name[] = "$ debugger idc file";
//--------------------------------------------------------------------------
struct plugin_ctx_t;
DECLARE_LISTENER(dbg_listener_t, plugin_ctx_t, ctx);
DECLARE_LISTENER(idp_listener_t, plugin_ctx_t, ctx);
struct plugin_ctx_t : public plugmod_t
{
dbg_listener_t dbg_listener = dbg_listener_t(*this);
idp_listener_t idp_listener = idp_listener_t(*this);
plugin_ctx_t()
{
hook_event_listener(HT_DBG, &dbg_listener);
#ifdef ENABLE_MERGE
hook_event_listener(HT_IDP, &idp_listener);
#endif
set_module_data(&data_id, this);
}
~plugin_ctx_t()
{
clr_module_data(data_id);
// listeners are uninstalled automatically
// when the owner module is unloaded
}
virtual bool idaapi run(size_t) override;
};
//--------------------------------------------------------------------------
// Get the IDC file name from the database
static bool get_idc_name(char *buf, size_t bufsize)
{
// access the node
netnode mynode(node_name);
// retrieve the value
return mynode.valstr(buf, bufsize) > 0;
}
//--------------------------------------------------------------------------
// Store the IDC file name in the database
static void set_idc_name(const char *idc)
{
// access the node
netnode mynode;
// if it doesn't exist yet, create it
// otherwise get its id
mynode.create(node_name);
// store the value
mynode.set(idc, strlen(idc)+1);
}
//--------------------------------------------------------------------------
ssize_t idaapi idp_listener_t::on_event(ssize_t code, va_list va)
{
return 0;
}
//--------------------------------------------------------------------------
ssize_t idaapi dbg_listener_t::on_event(ssize_t code, va_list /*va*/)
{
switch ( code )
{
case dbg_process_start:
case dbg_process_attach:
// it is time to run the script
char idc[QMAXPATH];
if ( get_idc_name(idc, sizeof(idc)) )
{
qstring errbuf;
if ( !exec_idc_script(nullptr, idc, "main", nullptr, 0, &errbuf) )
warning("%s", errbuf.c_str());
}
break;
}
return 0;
}
//--------------------------------------------------------------------------
bool idaapi plugin_ctx_t::run(size_t)
{
// retrieve the old IDC name from the database
char idc[QMAXPATH];
if ( !get_idc_name(idc, sizeof(idc)) )
qstrncpy(idc, "*.idc", sizeof(idc));
char *newidc = ask_file(false, idc, "Specify the script to run upon debugger launch");
if ( newidc != nullptr )
{
// store it back in the database
set_idc_name(newidc);
msg("Script %s will be run when the debugger is launched\n", newidc);
}
return true;
}
//--------------------------------------------------------------------------
static plugmod_t *idaapi init()
{
// Our plugin works only for x86 PE executables
processor_t &ph = PH;
if ( ph.id != PLFM_386 || inf_get_filetype() != f_PE )
return nullptr;
return new plugin_ctx_t;
}
//--------------------------------------------------------------------------
static const char wanted_name[] = "Specify Debugger IDC Script";
static const char wanted_hotkey[] = "";
//--------------------------------------------------------------------------
//
// PLUGIN DESCRIPTION BLOCK
//
//--------------------------------------------------------------------------
plugin_t PLUGIN =
{
IDP_INTERFACE_VERSION,
PLUGIN_MULTI, // The plugin can work with multiple idbs in parallel
init, // initialize
nullptr,
nullptr,
wanted_name, // long comment about the plugin
wanted_name, // multiline help about the plugin
wanted_name, // the preferred short name of the plugin
wanted_hotkey // the preferred hotkey to run the plugin
};
ex_events1
Sample plugin illustrating analysis improvement; it checks branch targets for newly created instructions.
/*
This is a sample plugin.
It illustrates how the analysis can be improved
The plugin checks branch targets for newly created instructions.
If the target does not exist in the program, the plugin
forbids the instruction creation.
*/
#include <ida.hpp>
#include <idp.hpp>
#include <loader.hpp>
#include <kernwin.hpp>
#include <allins.hpp>
//--------------------------------------------------------------------------
struct plugin_ctx_t : public plugmod_t, public event_listener_t
{
plugin_ctx_t()
{
hook_event_listener(HT_IDB, this);
}
~plugin_ctx_t()
{
// listeners are uninstalled automatically
// when the owner module is unloaded
}
virtual bool idaapi run(size_t) override;
virtual ssize_t idaapi on_event(ssize_t code, va_list va) override;
};
//--------------------------------------------------------------------------
// This callback is called by the kernel when database related events happen
ssize_t idaapi plugin_ctx_t::on_event(ssize_t event_id, va_list va)
{
switch ( event_id )
{
case idb_event::make_code: // An instruction is being created
// args: insn_t *
// returns: 1-ok, <=0-the kernel should stop
insn_t *insn = va_arg(va, insn_t *);
// we are interested in the branch instructions
if ( insn->itype >= NN_ja && insn->itype <= NN_jmpshort )
{
// the first operand contains the jump target
ea_t target = to_ea(insn->cs, insn->Op1.addr);
if ( !is_mapped(target) )
return -1;
}
}
return 0; // event not processed
// let other plugins handle it
}
//--------------------------------------------------------------------------
static plugmod_t *idaapi init()
{
return new plugin_ctx_t;
}
//--------------------------------------------------------------------------
bool idaapi plugin_ctx_t::run(size_t)
{
// since the plugin is fully automatic, there is nothing to do
warning("Branch checker is fully automatic");
return true;
}
//--------------------------------------------------------------------------
plugin_t PLUGIN =
{
IDP_INTERFACE_VERSION,
PLUGIN_HIDE // Plugin should not appear in the Edit, Plugins menu
| PLUGIN_MULTI, // The plugin can work with multiple idbs in parallel
init, // initialize
nullptr,
nullptr,
nullptr, // long comment about the plugin
nullptr, // multiline help about the plugin
"Branch checker", // the preferred short name of the plugin
nullptr, // the preferred hotkey to run the plugin
};
extlang
Sample plugin that illustrates how to register a thid party language interpreter.
/*
This is a sample plugin. It illustrates
how to register a thid party language interpreter
*/
#include <ida.hpp>
#include <idp.hpp>
#include <loader.hpp>
#include <expr.hpp>
#include <kernwin.hpp>
//--------------------------------------------------------------------------
static bool idaapi compile_expr(// Compile an expression
const char *name, // in: name of the function which will
// hold the compiled expression
ea_t current_ea, // in: current address. if unknown then BADADDR
const char *expr, // in: expression to compile
qstring *errbuf) // out: error message if compilation fails
{ // Returns: success
qnotused(name);
qnotused(current_ea);
qnotused(expr);
// our toy interpreter doesn't support separate compilation/evaluation
// some entry fields in ida won't be useable (bpt conditions, for example)
if ( errbuf != nullptr )
*errbuf = "compilation error";
return false;
}
//--------------------------------------------------------------------------
static bool idaapi call_func( // Evaluate a previously compiled expression
idc_value_t *result, // out: function result
const char *name, // in: function to call
const idc_value_t args[], // in: input arguments
size_t nargs, // in: number of input arguments
qstring *errbuf) // out: error message if compilation fails
{ // Returns: success
qnotused(name);
qnotused(nargs);
qnotused(args);
qnotused(result);
if ( errbuf != nullptr )
*errbuf = "evaluation error";
return false;
}
//--------------------------------------------------------------------------
bool idaapi eval_expr( // Compile and evaluate expression
idc_value_t *rv, // out: expression value
ea_t current_ea, // in: current address. if unknown then BADADDR
const char *expr, // in: expression to evaluation
qstring *errbuf) // out: error message if compilation fails
{ // Returns: success
qnotused(current_ea);
// we know to parse and decimal and hexadecimal numbers
int radix = 10;
const char *ptr = skip_spaces(expr);
bool neg = false;
if ( *ptr == '-' )
{
neg = true;
ptr = skip_spaces(ptr+1);
}
if ( *ptr == '0' && *(ptr+1) == 'x' )
{
radix = 16;
ptr += 2;
}
sval_t value = 0;
while ( radix == 10 ? qisdigit(*ptr) : qisxdigit(*ptr) )
{
int d = *ptr <= '9' ? *ptr-'0' : qtolower(*ptr)-'a'+10;
value *= radix;
value += d;
ptr++;
}
if ( neg )
value = -value;
ptr = skip_spaces(ptr);
if ( *ptr != '\0' )
{
msg("EVAL FAILED: %s\n", expr);
if ( errbuf != nullptr )
*errbuf = "syntax error";
return false;
}
// we have the result, store it in the return value
if ( rv != nullptr )
{
rv->clear();
rv->num = value;
}
msg("EVAL %" FMT_EA "d: %s\n", value, expr);
return true;
}
//--------------------------------------------------------------------------
struct plugin_ctx_t : public plugmod_t
{
extlang_t my_extlang =
{
sizeof(extlang_t), // Size of this structure
0, // Language features, currently 0
0, // refcnt
"extlang sample", // Language name
nullptr, // fileext
nullptr, // syntax highlighter
compile_expr,
nullptr, // compile_file
call_func,
eval_expr,
nullptr, // create_object
nullptr, // get_attr
nullptr, // set_attr
nullptr, // call_method
nullptr, // eval_snippet
nullptr, // load_procmod
nullptr, // unload_procmod
};
bool installed = false;
plugin_ctx_t()
{
installed = install_extlang(&my_extlang) >= 0;
}
~plugin_ctx_t()
{
if ( installed )
remove_extlang(&my_extlang);
}
virtual bool idaapi run(size_t) override { return false; }
};
//--------------------------------------------------------------------------
static plugmod_t *idaapi init()
{
plugin_ctx_t *ctx = new plugin_ctx_t;
if ( !ctx->installed )
{
msg("extlang: install_extlang() failed\n");
delete ctx;
ctx = nullptr;
}
return ctx;
}
//--------------------------------------------------------------------------
plugin_t PLUGIN =
{
IDP_INTERFACE_VERSION,
PLUGIN_HIDE // Plugin should not appear in the Edit, Plugins menu
| PLUGIN_FIX // Load plugin when IDA starts and keep it in the
// memory until IDA stops
| PLUGIN_MULTI, // The plugin can work with multiple idbs in parallel
init, // initialize
nullptr,
nullptr,
nullptr, // long comment about the plugin
nullptr, // multiline help about the plugin
"Sample third party language", // the preferred short name of the plugin
nullptr, // the preferred hotkey to run the plugin
};
formsample
This plugin demonstrates how to use complex forms.
/*
* This plugin demonstrates how to use complex forms.
*
*/
#include <ida.hpp>
#include <idp.hpp>
#include <loader.hpp>
#include <kernwin.hpp>
//--------------------------------------------------------------------------
struct plugin_ctx_t : public plugmod_t
{
virtual bool idaapi run(size_t) override;
};
//--------------------------------------------------------------------------
static int idaapi btn_cb(int, form_actions_t &)
{
warning("button pressed");
return 0;
}
//--------------------------------------------------------------------------
static int idaapi modcb(int fid, form_actions_t &fa)
{
switch ( fid )
{
case CB_INIT:
msg("initializing\n");
break;
case CB_YES:
msg("terminating\n");
break;
case 5: // operand
msg("changed operand\n");
break;
case 6: // check
msg("changed check\n");
break;
case 7: // button
msg("changed button\n");
break;
case 8: // color button
msg("changed color button\n");
break;
default:
msg("unknown id %d\n", fid);
break;
}
bool is_gui = is_idaq();
qstring buf0;
if ( !fa.get_string_value(5, &buf0) )
INTERR(30145);
if ( buf0 == "on" )
fa.enable_field(12, true);
if ( buf0 == "off" )
fa.enable_field(12, false);
ushort buf1;
if ( !fa.get_cbgroup_value(12, &buf1) )
INTERR(30146);
fa.show_field(7, (buf1 & 1) != 0);
fa.enable_field(8, (buf1 & 2) != 0);
ushort c13;
if ( !fa.get_checkbox_value(13, &c13) )
INTERR(30147);
fa.enable_field(10, c13 != 0);
ushort c14;
if ( !fa.get_checkbox_value(14, &c14) )
INTERR(30148);
fa.enable_field(5, c14 != 0);
ushort c15;
if ( !fa.get_checkbox_value(15, &c15) )
INTERR(30149);
if ( (buf1 & 8) != 0 )
{
sval_t x, y, w, h;
fa.get_signed_value(4, &x);
fa.get_signed_value(3, &y);
fa.get_signed_value(2, &w);
fa.get_signed_value(1, &h);
fa.move_field(5, x, y, w, h);
if ( x != -1 && c15 )
fa.move_field(-5, x-7, y, w, h);
}
// get_field_value() for buttons must return false always
if ( fa._get_field_value(7, nullptr) )
INTERR(30150);
bgcolor_t bgc = -1;
if ( is_gui && !fa.get_color_value(8, &bgc) )
INTERR(30151);
msg(" op=%s change=%x color=%x\n", buf0.c_str(), buf1, bgc);
fa.set_label_value(9, buf0.c_str());
return 1;
}
//--------------------------------------------------------------------------
bool idaapi plugin_ctx_t::run(size_t)
{
static const char form[] =
"@0:477[]\n"
"Manual operand\n"
"\n"
"%/Enter alternate string for the %9X operand\n"
"\n"
" <~O~perand:q5:100:40::>\n"
" <~X~:D4:100:10::>\n"
" <~Y~:D3:100:10::>\n"
" <~W~:D2:100:10::>\n"
" <~H~:D1:100:10::>\n"
"\n"
" <S~h~ow Button:C10>\n"
" <~E~nable color Button:C11>\n"
" <~E~nable C10:C13>\n"
" <~S~et operand bounds:C6>\n"
" <Enable operand:C14>\n"
" <Move label:C15>12>\n"
"\n"
" <~B~utton:B7:0:::> <~C~olor button:K8::::>\n"
"\n"
"\n";
qstring buf("original");
ushort check = 0x12;
bgcolor_t bgc = 0x556677;
uval_t x = -1;
uval_t y = -1;
uval_t w = -1;
uval_t h = -1;
CASSERT(IS_FORMCHGCB_T(modcb));
CASSERT(IS_QSTRING(buf));
if ( ask_form(form, modcb, buf.c_str(), &buf, &x, &y, &w, &h, &check, btn_cb, &bgc) > 0 )
{
msg("operand: %s\n", buf.c_str());
msg("check = %d\n", check);
msg("dim = %a %a %a %a\n", x, y, w, h);
msg("bgc = %x\n", bgc);
}
return true;
}
//--------------------------------------------------------------------------
static plugmod_t *idaapi init()
{
return new plugin_ctx_t;
}
funclist
This sample plugin demonstrates how to get the the entry point prototypes.
/*
* This is a sample plugin module
*
* It demonstrates how to get the the entry point prototypes
*
*/
#include <ida.hpp>
#include <idp.hpp>
#include <auto.hpp>
#include <entry.hpp>
#include <bytes.hpp>
#include <loader.hpp>
#include <kernwin.hpp>
#include <typeinf.hpp>
//--------------------------------------------------------------------------
struct plugin_ctx_t : public plugmod_t
{
virtual bool idaapi run(size_t) override;
};
//-------------------------------------------------------------------------
// non-modal entry point chooser
struct entry_chooser_t : public chooser_t
{
protected:
struct item_t
{
ea_t ea;
qstring decl;
int ord;
uint32 argsize;
};
// remember the information about an entry point in this qvector
qvector<item_t> list;
static const int widths_[];
static const char *const header_[];
public:
// this object must be allocated using `new`
entry_chooser_t();
// function that is used to decide whether a new chooser should be opened
// or we can use the existing one.
// There should be the only window as the entry points data are static.
virtual const void *get_obj_id(size_t *len) const override { *len = 1; return ""; }
// function that returns number of lines in the list
virtual size_t idaapi get_count() const override { return list.size(); }
// function that generates the list line
virtual void idaapi get_row(
qstrvec_t *cols,
int *icon_,
chooser_item_attrs_t *attrs,
size_t n) const override;
// function that is called when the user hits Enter
virtual cbret_t idaapi enter(size_t n) override
{
if ( n < list.size() )
jumpto(list[n].ea);
return cbret_t(); // nothing changed
}
// function that is called when the chooser is initialized
virtual bool idaapi init() override
{
// rebuild the list
list.clear();
size_t n = get_entry_qty();
// gather information about the entry points
for ( size_t i = 0; i < n; ++i )
{
asize_t ord = get_entry_ordinal(int(i));
ea_t ea = get_entry(ord);
if ( ord == ea )
continue;
tinfo_t type;
qstring decl;
qstring long_name;
qstring true_name;
asize_t argsize = 0;
qstring entry_name;
get_entry_name(&entry_name, ord);
if ( get_tinfo(&type, ea) && type.print(&decl, entry_name.c_str()) )
{
// found type info, calc the size of arguments
func_type_data_t fi;
if ( type.get_func_details(&fi) && !fi.empty() )
{
for ( int k=0; k < fi.size(); k++ )
{
int s1 = fi[k].type.get_size();
uchar szi = inf_get_cc_size_i();
s1 = qmax(s1, szi);
argsize += s1;
}
}
}
else if ( get_long_name(&long_name, ea) > 0
&& get_name(&true_name, ea, GN_NOT_DUMMY) > 0
&& long_name != true_name )
{
// found mangled name
}
else
{
// found nothing, just show the name
if ( get_visible_name(&decl, ea) <= 0 )
continue;
}
if ( argsize == 0 )
{
func_t *pfn = get_func(ea);
if ( pfn != nullptr )
argsize = pfn->argsize;
}
item_t x;
x.ord = ord;
x.ea = ea;
x.decl.swap(decl);
x.argsize = uint32(argsize);
list.push_back(x);
}
return true;
}
// function that is called when the user wants to refresh the chooser
virtual cbret_t idaapi refresh(ssize_t n) override
{
init();
if ( n < 0 )
return NO_SELECTION;
return adjust_last_item(n); // try to preserve the cursor
}
};
DECLARE_TYPE_AS_MOVABLE(entry_chooser_t::item_t);
// column widths
const int entry_chooser_t::widths_[] =
{
CHCOL_DEC | 4, // Ordinal
CHCOL_HEX | 8, // Address
CHCOL_HEX | 6, // ArgSize
70, // Declaration
};
// column headers
const char *const entry_chooser_t::header_[] =
{
"Ordinal", // 0
"Address", // 1
"ArgSize", // 2
"Declaration", // 3
};
inline entry_chooser_t::entry_chooser_t()
: chooser_t(CH_CAN_REFRESH, // user can refresh the chooser using Ctrl-U
qnumber(widths_), widths_, header_,
"Exported functions"),
list()
{
CASSERT(qnumber(widths_) == qnumber(header_));
}
void idaapi entry_chooser_t::get_row(
qstrvec_t *cols_,
int *,
chooser_item_attrs_t *,
size_t n) const
{
// assert: n < list.size()
const item_t &item = list[n];
// generate the line
qstrvec_t &cols = *cols_;
cols[0].sprnt("%d", item.ord);
cols[1].sprnt("%08a", item.ea);
if ( item.argsize != 0 )
cols[2].sprnt("%04x", item.argsize);
cols[3] = item.decl;
CASSERT(qnumber(header_) == 4);
}
//--------------------------------------------------------------------------
bool idaapi plugin_ctx_t::run(size_t)
{
if ( !auto_is_ok()
&& ask_yn(ASKBTN_NO,
"HIDECANCEL\n"
"The autoanalysis has not finished yet.\n"
"The result might be incomplete.\n"
"Do you want to continue?") < ASKBTN_YES )
{
return true;
}
// open the window
entry_chooser_t *ch = new entry_chooser_t();
ch->choose();
return true; //-V773
} //lint !e429 'ch' has not been freed or returned
//--------------------------------------------------------------------------
static plugmod_t *idaapi init()
{
if ( get_entry_qty() == 0 )
return nullptr;
return new plugin_ctx_t;
}
//--------------------------------------------------------------------------
plugin_t PLUGIN =
{
IDP_INTERFACE_VERSION,
PLUGIN_MULTI, // The plugin can work with multiple idbs in parallel
init, // initialize
nullptr,
nullptr,
"Generate list of exported function prototypes",
"Generate list of exported function prototypes",
"List of exported functions",
"Ctrl-F11",
};
getlines
This sample plugin demonstrates how to get the disassembly lines for one address.
/*
* This is a sample plugin module
*
* It demonstrates how to get the disassembly lines for one address
*
*/
#include <ida.hpp>
#include <idp.hpp>
#include <bytes.hpp>
#include <loader.hpp>
#include <kernwin.hpp>
//--------------------------------------------------------------------------
struct plugin_ctx_t : public plugmod_t
{
virtual bool idaapi run(size_t) override;
};
//--------------------------------------------------------------------------
bool idaapi plugin_ctx_t::run(size_t)
{
ea_t ea = get_screen_ea();
if ( ask_addr(&ea, "Please enter the disassembly address")
&& is_mapped(ea) ) // address belongs to disassembly
{
int flags = calc_default_idaplace_flags();
linearray_t ln(&flags);
idaplace_t pl;
pl.ea = ea;
pl.lnnum = 0;
ln.set_place(&pl);
msg("printing disassembly lines:\n");
int n = ln.get_linecnt(); // how many lines for this address?
for ( int i=0; i < n; i++ ) // process all of them
{
qstring buf;
tag_remove(&buf, *ln.down()); // get line and remove color codes
msg("%d: %s\n", i, buf.c_str()); // display it on the message window
}
msg("total %d lines\n", n);
}
return true;
}
//--------------------------------------------------------------------------
static plugmod_t *idaapi init()
{
return new plugin_ctx_t;
}
//--------------------------------------------------------------------------
static const char comment[] = "Generate disassembly lines for one address";
static const char help[] = "Generate disassembly lines for one address\n";
//--------------------------------------------------------------------------
// This is the preferred name of the plugin module in the menu system
// The preferred name may be overridden in plugins.cfg file
static const char wanted_name[] = "Disassembly lines sample";
// This is the preferred hotkey for the plugin module
// The preferred hotkey may be overridden in plugins.cfg file
static const char wanted_hotkey[] = "";
//--------------------------------------------------------------------------
//
// PLUGIN DESCRIPTION BLOCK
//
//--------------------------------------------------------------------------
plugin_t PLUGIN =
{
IDP_INTERFACE_VERSION,
PLUGIN_MULTI, // The plugin can work with multiple idbs in parallel
init, // initialize
nullptr,
nullptr,
comment, // long comment about the plugin
help, // multiline help about the plugin
wanted_name, // the preferred short name of the plugin
wanted_hotkey // the preferred hotkey to run the plugin
};
highlighter
This plugin will display a colored box at the executed instructions.
// Highlighter plugin v1.0
// Highlights executed instructions
// This plugin will display a colored box at the executed instructions.
// It will take into account only the instructions where the application
// has been suspended.
// http://www.hexblog.com/2005/11/the_highlighter.html
// Copyright 2005 Ilfak Guilfanov, <[email protected]>
#include <ida.hpp>
#include <idp.hpp>
#include <dbg.hpp>
#include <loader.hpp>
#include <kernwin.hpp>
//--------------------------------------------------------------------------
struct plugin_ctx_t;
struct idd_post_events_t : public post_event_visitor_t
{
plugin_ctx_t &ctx;
idd_post_events_t(plugin_ctx_t &_ctx) : ctx(_ctx) {}
virtual ssize_t idaapi handle_post_event(
ssize_t code,
int notification_code,
va_list va) override;
};
//--------------------------------------------------------------------------
struct exec_prefix_t : public user_defined_prefix_t
{
static const int prefix_width = 1;
plugin_ctx_t &ctx;
exec_prefix_t(plugin_ctx_t &_ctx)
: user_defined_prefix_t(prefix_width, &_ctx), ctx(_ctx) {}
virtual void idaapi get_user_defined_prefix(
qstring *out,
ea_t ea,
const insn_t &insn,
int lnnum,
int indent,
const char *line) override;
};
//--------------------------------------------------------------------------
typedef std::set<ea_t> easet_t;
struct plugin_ctx_t : public plugmod_t, public event_listener_t
{
idd_post_events_t idd_post_events = idd_post_events_t(*this);
exec_prefix_t *exec_prefix = nullptr;
// List of executed addresses
easet_t execset;
ea_t old_ea = BADADDR;
int old_lnnum = 0;
plugin_ctx_t()
{
hook_event_listener(HT_DBG, this);
}
~plugin_ctx_t()
{
// listeners are uninstalled automatically
// when the owner module is unloaded
exec_prefix = nullptr; // make lint happy
}
virtual bool idaapi run(size_t) override;
virtual ssize_t idaapi on_event(ssize_t code, va_list va) override;
};
//--------------------------------------------------------------------------
// A sample how to generate user-defined line prefixes
static const char highlight_prefix[] = { COLOR_INV, ' ', COLOR_INV, 0 };
void idaapi exec_prefix_t::get_user_defined_prefix(
qstring *buf,
ea_t ea,
const insn_t &,
int lnnum,
int indent,
const char *line)
{
buf->qclear(); // empty prefix by default
// We want to display the prefix only the lines which
// contain the instruction itself
if ( indent != -1 )
return; // a directive
if ( line[0] == '\0' )
return; // empty line
if ( tag_advance(line,1)[-1] == ASH.cmnt[0] )
return; // comment line...
// We don't want the prefix to be printed again for other lines of the
// same instruction/data. For that we remember the line number
// and compare it before generating the prefix
if ( ctx.old_ea == ea && ctx.old_lnnum == lnnum )
return;
if ( ctx.execset.find(ea) != ctx.execset.end() )
*buf = highlight_prefix;
// Remember the address and line number we produced the line prefix for:
ctx.old_ea = ea;
ctx.old_lnnum = lnnum;
}
//--------------------------------------------------------------------------
ssize_t idaapi idd_post_events_t::handle_post_event(
ssize_t retcode,
int notification_code,
va_list va)
{
switch ( notification_code )
{
case debugger_t::ev_get_debug_event:
{
gdecode_t *code = va_arg(va, gdecode_t *);
debug_event_t *event = va_arg(va, debug_event_t *);
if ( *code == GDE_ONE_EVENT ) // got an event?
ctx.execset.insert(event->ea);
}
break;
}
return retcode;
}
//--------------------------------------------------------------------------
bool idaapi plugin_ctx_t::run(size_t)
{
info("AUTOHIDE NONE\n"
"This is the highlighter plugin.\n"
"It highlights executed instructions if a debug event occurs at them.\n"
"The plugins is fully automatic and has no parameters.\n");
return true;
}
//--------------------------------------------------------------------------
ssize_t idaapi plugin_ctx_t::on_event(ssize_t code, va_list /*va*/)
{
// We set our debug event handler at the beginning and remove it at the end
// of a debug session
switch ( code )
{
case dbg_process_start:
case dbg_process_attach:
exec_prefix = new exec_prefix_t(*this);
register_post_event_visitor(HT_IDD, &idd_post_events, this);
break;
case dbg_process_exit:
// do not unregister idd_post_events - it should be removed automatically
delete exec_prefix;
exec_prefix = nullptr;
execset.clear();
break;
}
return 0;
}
//--------------------------------------------------------------------------
static plugmod_t *idaapi init()
{
return new plugin_ctx_t;
}
//--------------------------------------------------------------------------
static const char wanted_name[] = "Highlighter";
static const char wanted_hotkey[] = "";
//--------------------------------------------------------------------------
//
// PLUGIN DESCRIPTION BLOCK
//
//--------------------------------------------------------------------------
plugin_t PLUGIN =
{
IDP_INTERFACE_VERSION,
PLUGIN_MULTI, // The plugin can work with multiple idbs in parallel
init, // initialize
nullptr,
nullptr,
wanted_name, // long comment about the plugin
wanted_name, // multiline help about the plugin
wanted_name, // the preferred short name of the plugin
wanted_hotkey, // the preferred hotkey to run the plugin
};
ht_output
This sample plugin demonstrates receiving output window notification callbacks and usage of new output window functions.
/*
* This is a sample plugin demonstrating receiving output window notification callbacks
* and using of new output window functions: get_output_curline, get_output_cursor,
* get_output_selected_text, add_output_popup
*
*/
#include <idp.hpp>
#include <loader.hpp>
#include <kernwin.hpp>
//-------------------------------------------------------------------------
struct ht_output_plugin_t : public plugmod_t, public event_listener_t
{
form_actions_t *fa = nullptr;
qstring selected_data;
virtual bool idaapi run(size_t arg) override;
virtual ssize_t idaapi on_event(ssize_t code, va_list va) override;
void desc_notification(
const char *notification_name) const;
~ht_output_plugin_t();
};
//-------------------------------------------------------------------------
AS_PRINTF(2, 3) static void form_msg(form_actions_t *fa, const char *format, ...)
{
textctrl_info_t ti;
fa->get_text_value(1, &ti);
va_list va;
va_start(va, format);
ti.text.cat_vsprnt(format, va);
va_end(va);
fa->set_text_value(1, &ti);
}
//---------------------------------------------------------------------------
void ht_output_plugin_t::desc_notification(
const char *notification_name) const
{
form_msg(fa, "Received notification from output window: \"%s\"\n",
notification_name);
}
//-------------------------------------------------------------------------
struct printsel_ah_t : public action_handler_t
{
ht_output_plugin_t *plugmod;
printsel_ah_t(ht_output_plugin_t *_plgmod) : plugmod(_plgmod) {}
virtual int idaapi activate(action_activation_ctx_t *) override
{
form_msg(plugmod->fa,
"User menu item is called for selection: \"%s\"\n",
plugmod->selected_data.c_str());
return 1;
}
virtual action_state_t idaapi update(action_update_ctx_t *) override
{
return AST_ENABLE_ALWAYS;
}
};
//---------------------------------------------------------------------------
// Callback for ui notifications
static ssize_t idaapi ui_callback(void *ud, int notification_code, va_list va)
{
switch ( notification_code )
{
// called when IDA is preparing a context menu for a view
// Here dynamic context-depending user menu items can be added.
case ui_populating_widget_popup:
{
TWidget *f = va_arg(va, TWidget *);
if ( get_widget_type(f) == BWN_OUTPUT )
{
TPopupMenu *p = va_arg(va, TPopupMenu *);
ht_output_plugin_t *plgmod = (ht_output_plugin_t *) ud;
plgmod->selected_data.qclear();
if ( get_output_selected_text(&plgmod->selected_data) )
{
action_desc_t desc = DYNACTION_DESC_LITERAL(
"Print selection",
new printsel_ah_t(plgmod),
nullptr, nullptr, -1);
attach_dynamic_action_to_popup(nullptr, p, desc);
}
plgmod->desc_notification("msg_popup");
}
}
break;
}
return 0;
}
//---------------------------------------------------------------------------
ht_output_plugin_t::~ht_output_plugin_t()
{
unhook_from_notification_point(HT_UI, ui_callback, this);
}
//---------------------------------------------------------------------------
// Callback for view notifications
ssize_t idaapi ht_output_plugin_t::on_event(
ssize_t notification_code,
va_list va)
{
switch ( notification_code )
{
case msg_activated:
desc_notification("msg_activated");
break;
case msg_deactivated:
desc_notification("msg_deactivated");
break;
case msg_keydown:
{
desc_notification("msg_keydown");
int key = va_arg(va, int);
int state = va_arg(va, int);
form_msg(fa, "Parameters: Key:%d(\'%c\') State:%d\n", key, key, state);
}
break;
case msg_click:
case msg_dblclick:
{
desc_notification(notification_code == msg_click ? "msg_click" : "msg_dblclick");
int px = va_arg(va, int);
int py = va_arg(va, int);
int state = va_arg(va, int);
qstring buf;
if ( get_output_curline(&buf, false) )
form_msg(fa, "Clicked string: %s\n", buf.c_str());
int cx,cy;
get_output_cursor(&cx, &cy);
msg("Parameters: x:%d, y:%d, state:%d\n", px, py, state);
msg("Cursor position:(%d, %d)\n", cx, cy);
}
break;
case msg_closed:
desc_notification("msg_closed");
}
return 0;
}
//--------------------------------------------------------------------------
static plugmod_t *idaapi init()
{
return new ht_output_plugin_t;
}
//--------------------------------------------------------------------------
// this callback is called when something happens in our editor form
static int idaapi editor_modcb(int fid, form_actions_t &f_actions)
{
ht_output_plugin_t *plgmod = (ht_output_plugin_t *) f_actions.get_ud();
if ( fid == CB_INIT ) // Initialization
{
/* set callback for output window notifications */
hook_to_notification_point(HT_UI, ui_callback, plgmod);
hook_event_listener(HT_OUTPUT, plgmod, plgmod);
plgmod->fa = &f_actions;
}
else if ( fid == CB_CLOSE )
{
unhook_event_listener(HT_OUTPUT, plgmod);
unhook_from_notification_point(HT_UI, ui_callback, plgmod);
}
return 1;
}
//--------------------------------------------------------------------------
bool idaapi ht_output_plugin_t::run(size_t)
{
static const char formdef[] =
"BUTTON NO NONE\n" // we do not want the standard buttons on the form
"BUTTON YES NONE\n"
"BUTTON CANCEL NONE\n"
"Editor form\n" // the form title. it is also used to refer to the form later
"\n"
"%/%*" // placeholder for the 'editor_modcb' callback, and its userdata
"<Text:t1::40:::>\n" // text edit control
"\n";
// structure for text edit control
textctrl_info_t ti;
ti.cb = sizeof(textctrl_info_t);
ti.text = "";
open_form(formdef, 0, editor_modcb, this, &ti);
return true;
}
static const char wanted_name[] = "HT_OUTPUT notifications handling example";
static const char wanted_hotkey[] = "Ctrl-Alt-F11";
//--------------------------------------------------------------------------
static const char comment[] = "HT_OUTPUT notifications handling";
static const char help[] =
"This pluging demonstrates handling of output window\n"
"notifications: Activation/Desactivation, adding\n"
"popup menus, keyboard and mouse events, changing of current\n"
"cursor position and closing of view\n";
//--------------------------------------------------------------------------
//
// PLUGIN DESCRIPTION BLOCK
//
//--------------------------------------------------------------------------
plugin_t PLUGIN =
{
IDP_INTERFACE_VERSION,
PLUGIN_MULTI, // plugin flags
init, // initialize
nullptr,
nullptr,
comment, // long comment about the plugin
// it could appear in the status line
// or as a hint
help, // multiline help about the plugin
wanted_name, // the preferred short name of the plugin
wanted_hotkey // the preferred hotkey to run the plugin
};
ht_view
This sample plugin demonstrates usage of the view callbacks and adding custom menu items to popup menus.
/*
* This is a sample plugin demonstrating usage of the view callbacks
* and adding custom menu items to popup menus
*
*/
#include <ida.hpp>
#include <idp.hpp>
#include <loader.hpp>
#include <kernwin.hpp>
#include <bytes.hpp>
#include <graph.hpp>
#define ACTION1_NAME "ht_view:Act1"
#define ACTION2_NAME "ht_view:Act2"
//-------------------------------------------------------------------------
struct ht_view_plugin_t : public plugmod_t, public event_listener_t
{
bool hooked = false;
ht_view_plugin_t();
virtual ~ht_view_plugin_t();
virtual bool idaapi run(size_t arg) override;
virtual ssize_t idaapi on_event(ssize_t code, va_list va) override;
void desc_notification(
const char *notification_name,
TWidget *view) const;
void desc_mouse_event(
const view_mouse_event_t *event) const;
};
//---------------------------------------------------------------------------
// Callback for ui notifications
static ssize_t idaapi ui_callback(void *ud, int notification_code, va_list va)
{
switch ( notification_code )
{
// called when IDA is preparing a context menu for a view
// Here dynamic context-depending user menu items can be added.
case ui_populating_widget_popup:
{
TWidget *view = va_arg(va, TWidget *);
if ( get_widget_type(view) == BWN_DISASM )
{
TPopupMenu *p = va_arg(va, TPopupMenu *);
ht_view_plugin_t *plgmod = (ht_view_plugin_t *) ud;
plgmod->desc_notification("view_popup", view);
attach_action_to_popup(view, p, ACTION1_NAME);
attach_action_to_popup(view, p, ACTION2_NAME);
}
}
break;
}
return 0;
}
//-------------------------------------------------------------------------
struct ahandler_t : public action_handler_t
{
bool first;
ahandler_t(bool _first) : first(_first) {}
virtual int idaapi activate(action_activation_ctx_t *) override
{
msg("User %s menu item is called\n", first ? "first" : "second");
return true;
}
virtual action_state_t idaapi update(action_update_ctx_t *) override
{
return AST_ENABLE_ALWAYS;
}
};
static ahandler_t ah1(true);
static ahandler_t ah2(false);
//--------------------------------------------------------------------------
static plugmod_t *idaapi init()
{
return new ht_view_plugin_t;
}
//-------------------------------------------------------------------------
ht_view_plugin_t::ht_view_plugin_t()
{
// Register actions
const action_desc_t actions[] =
{
#define ROW(name, label, handler) ACTION_DESC_LITERAL_PLUGMOD(name, label, handler, this, nullptr, nullptr, -1)
ROW(ACTION1_NAME, "First ht_view's popup menu item", &ah1),
ROW(ACTION2_NAME, "Second ht_view's popup menu item", &ah2),
#undef ROW
};
for ( size_t i = 0, n = qnumber(actions); i < n; ++i )
register_action(actions[i]);
}
//-------------------------------------------------------------------------
ht_view_plugin_t::~ht_view_plugin_t()
{
unhook_from_notification_point(HT_UI, ui_callback, this);
}
//-------------------------------------------------------------------------
bool idaapi ht_view_plugin_t::run(size_t)
{
/* set callback for view notifications */
if ( !hooked )
{
hook_event_listener(HT_VIEW, this);
hook_to_notification_point(HT_UI, ui_callback, this);
hooked = true;
msg("HT_VIEW: installed view notification hook.\n");
}
return true;
}
//---------------------------------------------------------------------------
ssize_t idaapi ht_view_plugin_t::on_event(
ssize_t notification_code,
va_list va)
{
TWidget *view = va_arg(va, TWidget *);
switch ( notification_code )
{
case view_activated:
desc_notification("view_activated", view);
break;
case view_deactivated:
desc_notification("view_deactivated", view);
break;
case view_keydown:
{
desc_notification("view_keydown", view);
int key = va_arg(va, int);
int state = va_arg(va, int);
msg("Parameters: Key:%d(\'%c\') State:%d\n", key, key, state);
}
break;
case view_click:
case view_dblclick:
{
desc_notification(notification_code == view_click ? "view_click" : "view_dblclick", view);
desc_mouse_event(va_arg(va, view_mouse_event_t*));
int cx,cy;
get_cursor(&cx, &cy);
msg("Cursor position:(%d, %d)\n", cx, cy);
}
break;
case view_curpos:
{
desc_notification("view_curpos", view);
if ( is_idaview(view) )
{
char buf[MAXSTR];
ea2str(buf, sizeof(buf), get_screen_ea());
msg("New address: %s\n", buf);
}
}
break;
case view_mouse_over:
{
desc_notification("view_mouse_over", view);
desc_mouse_event(va_arg(va, view_mouse_event_t*));
}
break;
case view_close:
desc_notification("view_close", view);
}
return 0;
}
//-------------------------------------------------------------------------
void ht_view_plugin_t::desc_notification(
const char *notification_name,
TWidget *view) const
{
qstring buffer;
get_widget_title(&buffer, view);
msg("Received notification from view %s: \"%s\"\n",
buffer.c_str(),
notification_name);
}
//-------------------------------------------------------------------------
void ht_view_plugin_t::desc_mouse_event(
const view_mouse_event_t *event) const
{
int px = event->x;
int py = event->y;
int state = event->state;
qstring over_txt;
const selection_item_t *item = event->location.item;
if ( event->rtype != TCCRT_FLAT && item != nullptr )
{
if ( item->is_node )
over_txt.sprnt("node %d", item->node);
else
over_txt.sprnt("edge %d -> %d", item->elp.e.src, item->elp.e.dst);
}
else
{
over_txt = "(nothing)";
}
msg("Parameters: x:%d, y:%d, state:%d, over:%s\n", px, py, state, over_txt.c_str());
}
//-------------------------------------------------------------------------
static const char wanted_name[] = "HT_VIEW notification handling example";
static const char wanted_hotkey[] = "";
//--------------------------------------------------------------------------
static const char comment[] = "HT_VIEW notification Handling";
static const char help[] =
"This pluging demonstrates handling of custom and IdaView\n"
"notifications: Activation/Desactivation of views, adding\n"
"popup menus, keyboard and mouse events, changing of current\n"
"address and closing of view\n";
//--------------------------------------------------------------------------
//
// PLUGIN DESCRIPTION BLOCK
//
//--------------------------------------------------------------------------
plugin_t PLUGIN =
{
IDP_INTERFACE_VERSION,
PLUGIN_MULTI, // plugin flags
init, // initialize
nullptr,
nullptr,
comment, // long comment about the plugin
// it could appear in the status line
// or as a hint
help, // multiline help about the plugin
wanted_name, // the preferred short name of the plugin
wanted_hotkey // the preferred hotkey to run the plugin
};
mtsample
Sample multi-threaded plugin module.
/*
* This is a sample multi-threaded plugin module
*
* It creates 3 new threads. Each threads sleeps and prints a message in a loop
*
*/
#ifdef __NT__
#include <windows.h>
#endif
#include <ida.hpp>
#include <idp.hpp>
#include <loader.hpp>
#include <kernwin.hpp>
#ifdef __NT__
#include <windows.h>
#endif
//--------------------------------------------------------------------------
struct plugin_ctx_t : public plugmod_t
{
qthread_t children[10] = { nullptr };
int nchilds = 0;
~plugin_ctx_t() { term(); }
void term()
{
if ( nchilds > 0 )
{
msg("Killing all threads\n");
for ( int i=0; i < nchilds; i++ )
{
qthread_kill(children[i]);
qthread_join(children[i]);
// cancel all pending requests from the killed thread
cancel_thread_exec_requests(children[i]);
qthread_free(children[i]);
}
msg("Killed all threads\n");
nchilds = 0;
}
}
virtual bool idaapi run(size_t) override;
};
//--------------------------------------------------------------------------
static void say_hello(size_t id, qthread_t tid, int cnt)
{
struct ida_local hello_t : public exec_request_t
{
uint64 nsecs;
size_t id;
qthread_t tid;
int cnt;
int idaapi execute(void) override
{
uint64 now = get_nsec_stamp();
int64 delay = now - nsecs;
msg("Hello %d from thread %" FMT_Z ". tid=%p. current tid=%p (delay=%" FMT_64 "d)\n",
cnt, id, tid, qthread_self(), delay);
return 0;
}
hello_t(size_t _id, qthread_t _tid, int _cnt) : id(_id), tid(_tid), cnt(_cnt)
{
nsecs = get_nsec_stamp();
}
};
hello_t hi(id, tid, cnt);
int mff;
switch ( id % 3 )
{
case 0: mff = MFF_FAST; break;
case 1: mff = MFF_READ; break;
default:
case 2: mff = MFF_WRITE; break;
}
execute_sync(hi, mff);
}
//--------------------------------------------------------------------------
static int idaapi thread_func(void *ud)
{
size_t id = (size_t)ud;
qthread_t tid = qthread_self();
int cnt = 0;
srand(id ^ (size_t)tid);
while ( true )
{
say_hello(id, tid, cnt++);
int r = rand() % 1000;
qsleep(r);
}
return 0;
}
//--------------------------------------------------------------------------
bool idaapi plugin_ctx_t::run(size_t)
{
if ( nchilds == 0 )
{
children[nchilds] = qthread_create(thread_func, (void *)(ssize_t)nchilds); nchilds++;
children[nchilds] = qthread_create(thread_func, (void *)(ssize_t)nchilds); nchilds++;
children[nchilds] = qthread_create(thread_func, (void *)(ssize_t)nchilds); nchilds++;
msg("Three new threads have been created. Main thread id %p\n", qthread_self());
for ( int i=0; i < 5; i++ )
say_hello(-1, 0, 0);
}
else
{
term();
}
return true;
}
//--------------------------------------------------------------------------
static plugmod_t *idaapi init()
{
return new plugin_ctx_t;
}
//--------------------------------------------------------------------------
plugin_t PLUGIN =
{
IDP_INTERFACE_VERSION,
PLUGIN_MULTI, // The plugin can work with multiple idbs in parallel
init, // initialize
nullptr,
nullptr,
nullptr, // long comment about the plugin
nullptr, // multiline help about the plugin
"Multi-threaded sample", // the preferred short name of the plugin
nullptr, // the preferred hotkey to run the plugin
};
navcolor
This sample plugin demonstrates how to customize navigation band colors.
/*
* This plugin demonstrates how to customize navigation band colors.
* Launch the plugin like so:
* - to install: ida_loader.load_and_run_plugin("navcolor", 1)
* - to uninstall: ida_loader.load_and_run_plugin("navcolor", 0)
*/
#include <ida.hpp>
#include <idp.hpp>
#include <loader.hpp>
#include <kernwin.hpp>
//--------------------------------------------------------------------------
struct plugin_ctx_t : public plugmod_t
{
nav_colorizer_t *old_col_fun = nullptr;
void *old_col_ud = nullptr;
bool installed = false;
//lint -esym(1540, plugin_ctx_t::old_col_fun, plugin_ctx_t::old_col_ud)
~plugin_ctx_t()
{
// uninstall our callback for navigation band, otherwise ida will crash
maybe_uninstall();
}
virtual bool idaapi run(size_t) override;
bool maybe_install();
bool maybe_uninstall();
};
//--------------------------------------------------------------------------
bool idaapi plugin_ctx_t::run(size_t code)
{
return code == 1 ? maybe_install() : maybe_uninstall();
}
//--------------------------------------------------------------------------
// Callback that calculates the pixel color given the address and the number of bytes
static uint32 idaapi my_colorizer(ea_t ea, asize_t nbytes, void *ud)
{
plugin_ctx_t &ctx = *(plugin_ctx_t *)ud;
// you are at your own here. just for the sake of illustrating how things work
// we will invert all colors
uint32 color = ctx.old_col_fun(ea, nbytes, ctx.old_col_ud);
return ~color;
}
//-------------------------------------------------------------------------
bool plugin_ctx_t::maybe_install()
{
bool ok = !installed;
if ( ok )
{
set_nav_colorizer(&old_col_fun, &old_col_ud, my_colorizer, this);
installed = true;
}
return ok;
}
//-------------------------------------------------------------------------
bool plugin_ctx_t::maybe_uninstall()
{
bool ok = installed;
if ( ok )
{
set_nav_colorizer(nullptr, nullptr, old_col_fun, old_col_ud);
installed = false;
}
return ok;
}
//--------------------------------------------------------------------------
// initialize the plugin
static plugmod_t *idaapi init()
{
return new plugin_ctx_t;
}
//--------------------------------------------------------------------------
plugin_t PLUGIN =
{
IDP_INTERFACE_VERSION,
PLUGIN_MULTI, // The plugin can work with multiple idbs in parallel
init, // initialize
nullptr,
nullptr,
nullptr, // long comment about the plugin
nullptr, // multiline help about the plugin
"Modify navigation band colors",// the preferred short name of the plugin
nullptr, // the preferred hotkey to run the plugin
};
openform
This plugin demonstrates how to use non modal forms.
/*
* This plugin demonstrates how to use non modal forms.
* It creates 2 windows on the screen:
* - a window with 4 buttons: dock, undock, show, hide (CONTROL FORM)
* - a window with a text edit control and a list control (EDITOR FORM)
* The buttons of the first window can be used to manage the second window.
* We will call the first window 'CONTROL FORM' and the second window 'EDITOR
* FORM', just to be able to reference them easily.
*/
#include <ida.hpp>
#include <idp.hpp>
#include <loader.hpp>
#include <kernwin.hpp>
//---------------------------------------------------------------------------
// chooser (list view) items
static const char *const names[] =
{
"Item one",
"Item two",
"Item three"
};
//--------------------------------------------------------------------------
struct plugin_ctx_t : public plugmod_t
{
// the editor form
TWidget *editor_widget = nullptr;
// contents of the text field for each item
qstring txts[qnumber(names)] =
{
"Text one:\n This is text for item one",
"Text two:\n And this is text for item two",
"Text three:\n And finally text for the last item"
};
// Current index for chooser list view
size_t curidx = 0;
// Form actions for control dialog
form_actions_t *control_fa = nullptr;
// Defines where to place new/existing editor window
bool dock = false;
virtual bool idaapi run(size_t) override;
int editor_modcb(int fid, form_actions_t &fa);
void open_editor_form(int options = 0);
void close_editor_form();
int control_modcb(int fid, form_actions_t &fa);
void update_buttons(form_actions_t &fa);
};
//---------------------------------------------------------------------------
struct of_chooser_t : public chooser_t
{
public:
// this object must be allocated using `new`
// as it used in the non-modal form
of_chooser_t() : chooser_t()
{
columns = 1;
static const int widths_[] = { 12 };
static const char *const header_[] = { "Name" };
widths = widths_;
header = header_;
}
virtual size_t idaapi get_count() const override { return qnumber(names); }
virtual void idaapi get_row(
qstrvec_t *cols,
int *,
chooser_item_attrs_t *,
size_t n) const override
{
(*cols)[0] = names[n];
}
};
// Form actions for editor window
enum editor_form_actions
{
TEXT_CHANGED = 1,
ITEM_SELECTED = 2,
};
// Form actions for control window
enum control_form_actions
{
BTN_DOCK = 10,
BTN_UNDOCK = 11,
BTN_OPEN = 12,
BTN_CLOSE = 13,
};
//--------------------------------------------------------------------------
inline void enable_button(form_actions_t &fa, int fid, bool enabled)
{
fa.enable_field(fid, enabled);
}
//--------------------------------------------------------------------------
// Update control window buttons state
void plugin_ctx_t::update_buttons(form_actions_t &fa)
{
bool visible = editor_widget != nullptr;
enable_button(fa, 10, !dock && visible);
enable_button(fa, 11, dock && visible);
enable_button(fa, 12, !visible);
enable_button(fa, 13, visible);
}
//--------------------------------------------------------------------------
// this callback is called when the user clicks on a button
static int idaapi btn_cb(int, form_actions_t &)
{
msg("button has been pressed -> \n");
return 0;
}
//--------------------------------------------------------------------------
// this callback is called when something happens in our non-modal editor form
static int idaapi editor_modcb_(int fid, form_actions_t &fa)
{
plugin_ctx_t &ctx = *(plugin_ctx_t *)fa.get_ud();
return ctx.editor_modcb(fid, fa);
}
int plugin_ctx_t::editor_modcb(int fid, form_actions_t &fa)
{
switch ( fid )
{
case CB_INIT: // Initialization
msg("init editor form\n");
break;
case CB_CLOSE: // Closing the form
msg("closing editor form\n");
// mark the form as closed
editor_widget = nullptr;
// If control form exists then update buttons
if ( control_fa != nullptr )
update_buttons(*control_fa);
break;
case TEXT_CHANGED: // Text changed
{
textctrl_info_t ti;
fa.get_text_value(1, &ti);
txts[curidx] = ti.text;
}
msg("text has been changed\n");
break;
case ITEM_SELECTED: // list item selected
{
sizevec_t sel;
if ( fa.get_chooser_value(2, &sel) )
{
curidx = sel[0];
textctrl_info_t ti;
ti.cb = sizeof(textctrl_info_t);
ti.text = txts[curidx];
fa.set_text_value(1, &ti);
}
}
msg("selection has been changed\n");
break;
default:
msg("unknown id %d\n", fid);
break;
}
return 1;
}
//---------------------------------------------------------------------------
// create and open the editor form
void plugin_ctx_t::open_editor_form(int options)
{
static const char formdef[] =
"BUTTON NO NONE\n" // we do not want the standard buttons on the form
"BUTTON YES NONE\n"
"BUTTON CANCEL NONE\n"
"Editor form\n" // the form title. it is also used to refer to the form later
"\n"
"%/%*" // placeholder for the 'editor_modcb' callback
"\n"
"<List:E2::30:1::><|><Text:t1::60:::>\n" // text edit control and chooser control separated by splitter
"\n";
// structure for text edit control
textctrl_info_t ti;
ti.cb = sizeof(textctrl_info_t);
ti.text = txts[0];
// structure for chooser list view
of_chooser_t *ofch = new of_chooser_t();
// selection for chooser list view
sizevec_t selected;
selected.push_back(0); // first item by default
editor_widget = open_form(formdef,
options,
editor_modcb_, this,
ofch, &selected,
&ti);
} //lint !e429 custodial pointer 'ofch' likely not freed nor returned
//---------------------------------------------------------------------------
void plugin_ctx_t::close_editor_form()
{
msg("closing editor widget\n");
close_widget(editor_widget, WCLS_CLOSE_LATER);
editor_widget = nullptr;
}
//--------------------------------------------------------------------------
inline void dock_form(bool _dock)
{
set_dock_pos("Editor form",
"IDA View-A",
_dock ? DP_TAB : DP_FLOATING);
}
//--------------------------------------------------------------------------
// this callback is called when something happens in our non-modal control form
static int idaapi control_modcb_(int fid, form_actions_t &fa)
{
plugin_ctx_t &ctx = *(plugin_ctx_t *)fa.get_ud();
return ctx.control_modcb(fid, fa);
}
int plugin_ctx_t::control_modcb(int fid, form_actions_t &fa)
{
switch ( fid )
{
case CB_INIT: // Initialization
msg("init control form\n");
dock = false;
control_fa = &fa; // remember the 'fa' for the future
break;
case CB_CLOSE: // Closing
msg("closing control form\n");
control_fa = nullptr;
return 1;
case BTN_DOCK:
msg("dock editor form\n");
dock = true;
dock_form(dock);
break;
case BTN_UNDOCK:
msg("undock editor form\n");
dock = false;
dock_form(dock);
break;
case BTN_OPEN:
msg("open editor form\n");
open_editor_form(WOPN_DP_TAB|WOPN_RESTORE);
dock_form(dock);
break;
case BTN_CLOSE:
close_editor_form();
break;
default:
msg("unknown id %d\n", fid);
return 1;
}
update_buttons(fa);
return 1;
}
//--------------------------------------------------------------------------
// the main function of the plugin
bool idaapi plugin_ctx_t::run(size_t)
{
// first open the editor form
open_editor_form(WOPN_RESTORE);
static const char control_form[] =
"BUTTON NO NONE\n" // do not display standard buttons at the bottom
"BUTTON YES NONE\n"
"BUTTON CANCEL NONE\n"
"Control form\n" // the title. it is used to refer to the form later
"%/%*" // placeholder for control_modcb
"<Dock:B10:30:::><Undock:B11:30:::><Show:B12:30:::><Hide:B13:30:::>\n"; // Create control buttons
open_form(control_form,
WOPN_RESTORE,
control_modcb_, this,
btn_cb, btn_cb, btn_cb, btn_cb);
set_dock_pos("Control form", nullptr, DP_FLOATING, 0, 0, 300, 100);
return true;
}
//--------------------------------------------------------------------------
// initialize the plugin
static plugmod_t *idaapi init()
{
return new plugin_ctx_t;
}
//--------------------------------------------------------------------------
plugin_t PLUGIN =
{
IDP_INTERFACE_VERSION,
PLUGIN_MULTI, // The plugin can work with multiple idbs in parallel
init,
nullptr,
nullptr,
nullptr,
nullptr,
"Open non-modal form sample",// the preferred short name of the plugin
nullptr,
};
procext
Sample plugin that extends the IBM PC processor module to disassemble some NEC V20 instructions.
/*
* This is a sample plugin module
* It extends the IBM PC processor module to disassemble some NEC V20 instructions
* This is a sample file, it supports just two instructions!
*
*/
#include <ida.hpp>
#include <idp.hpp>
#include <bytes.hpp>
#include <loader.hpp>
#include <kernwin.hpp>
int data_id;
//--------------------------------------------------------------------------
// Context data for the plugin. This object is created by the init()
// function and hold all local data.
struct plugin_ctx_t : public plugmod_t, public event_listener_t
{
ea_t ea = 0; // current address within the instruction
netnode nec_node;
bool hooked = false;
plugin_ctx_t();
~plugin_ctx_t();
// This function is called when the user invokes the plugin.
virtual bool idaapi run(size_t) override;
// This function is called upon some events.
virtual ssize_t idaapi on_event(ssize_t code, va_list va) override;
size_t ana(insn_t &insn);
void process_rm(insn_t &insn, op_t &x, uchar postbyte);
};
static const char node_name[] = "$ sample NEC processor extender parameters";
// Some definitions from IBM PC:
#define segrg specval_shorts.high // IBM PC expects the segment address
// to be here
#define aux_short 0x0020 // short (byte) displacement used
#define aux_basess 0x0200 // SS based instruction
#define R_ss 18
#define R_ds 19
//--------------------------------------------------------------------------
// This plugin supports just 2 instructions:
// Feel free to add more...
// 0FH 20H ADD4S ; Addition for packed BCD strings
// 0FH 12H Postbyte CLEAR1 reg/mem8,CL ; Clear one bit
enum nec_insn_type_t
{
NEC_add4s = CUSTOM_INSN_ITYPE,
NEC_clear1,
};
//----------------------------------------------------------------------
static int get_dataseg(insn_t &insn, int defseg)
{
if ( defseg == R_ss )
insn.auxpref |= aux_basess;
return defseg;
}
//--------------------------------------------------------------------------
//
// process r/m byte of the instruction
//
void plugin_ctx_t::process_rm(insn_t &insn, op_t &x, uchar postbyte)
{
int Mod = (postbyte >> 6) & 3;
x.reg = postbyte & 7;
if ( Mod == 3 ) // register
{
if ( x.dtype == dt_byte )
x.reg += 8;
x.type = o_reg;
}
else // memory
{
if ( Mod == 0 && x.reg == 6 )
{
x.type = o_mem;
x.offb = uchar(ea-insn.ea);
x.addr = get_word(ea); ea+=2;
x.segrg = (uint16)get_dataseg(insn, R_ds);
}
else
{
x.type = o_phrase; // x.phrase contains the base register
x.addr = 0;
int reg = (x.phrase == 2 || x.phrase == 3 || x.phrase == 6) ? R_ss : R_ds;
x.segrg = (uint16)get_dataseg(insn, reg);
// [bp+si],[bp+di],[bp] by SS
if ( Mod != 0 )
{
x.type = o_displ; // i.e. phrase + offset
x.offb = uchar(ea-insn.ea);
if ( Mod == 1 )
{
x.addr = char(get_byte(ea++));
insn.auxpref |= aux_short;
}
else
{
x.addr = get_word(ea); ea+=2;
}
}
}
}
}
//--------------------------------------------------------------------------
// Analyze an instruction and fill the 'insn' structure
size_t plugin_ctx_t::ana(insn_t &insn)
{
int code = get_byte(ea++);
if ( code != 0x0F )
return 0;
code = get_byte(ea++);
switch ( code )
{
case 0x20:
insn.itype = NEC_add4s;
return 2;
case 0x12:
insn.itype = NEC_clear1;
{
uchar postbyte = get_byte(ea++);
process_rm(insn, insn.Op1, postbyte);
insn.Op2.type = o_reg;
insn.Op2.reg = 9; // 9 is CL for IBM PC
return size_t(ea - insn.ea);
}
default:
return 0;
}
}
//--------------------------------------------------------------------------
// Return the instruction mnemonics
const char *get_insn_mnem(const insn_t &insn)
{
if ( insn.itype == NEC_add4s )
return "add4s";
return "clear1";
}
//--------------------------------------------------------------------------
// This function can be hooked to various kernel events.
// In this particular plugin we hook to the HT_IDP group.
// As soon the kernel needs to decode and print an instruction, it will
// generate some events that we intercept and provide our own response.
//
// We extend the processor module to disassemble opcode 0x0F
// (This is a hypothetical example)
// There are 2 different possible approaches for the processor extensions:
// A. Quick & dirty
// Implement reaction to ev_ana_insn and ev_out_insn.
// The first checks if the instruction is valid.
// The second generates its text.
// B. Thourough and clean
// Implement all relevant callbacks.
// ev_ana_insn fills the 'insn' structure.
// ev_emu_insn creates all xrefs using ua_add_[cd]ref functions.
// ev_out_insn generates the textual representation of the instruction.
// It is required only if the instruction requires special processing
// or the processor module cannot handle the custom instruction for
// any reason.
// ev_out_operand generates the operand representation (only if the
// operand requires special processing).
// ev_out_mnem generates the instruction mnemonics.
// The main difference between these 2 approaches is in the creation of
// cross-references and the amount of special processing required by the
// new instructions.
// The quick & dirty approach.
// We just produce the instruction mnemonics along with its operands.
// No cross-references are created. No special processing.
ssize_t idaapi plugin_ctx_t::on_event(ssize_t code, va_list va)
{
switch ( code )
{
case processor_t::ev_ana_insn:
{
insn_t *insn = va_arg(va, insn_t *);
ea = insn->ea;
size_t length = ana(*insn);
if ( length )
{
insn->size = (uint16)length;
return insn->size; // event processed
}
}
break;
case processor_t::ev_out_mnem:
{
outctx_t *ctx = va_arg(va, outctx_t *);
const insn_t &insn = ctx->insn;
if ( insn.itype >= CUSTOM_INSN_ITYPE )
{
ctx->out_line(get_insn_mnem(insn), COLOR_INSN);
return 1;
}
}
break;
#ifdef ENABLE_MERGE
#endif
case processor_t::ev_privrange_changed:
// recreate node as it was migrated
if ( nec_node != BADNODE )
nec_node.create(node_name);
break;
}
return 0; // event is not processed
}
//--------------------------------------------------------------------------
// Initialize the plugin.
// IDA will call this function only once.
// If this function returns nullptr, IDA will unload the plugin.
// Otherwise the plugin returns a pointer to a newly created context structure.
//
// In this example we check the processor type and make the decision.
// You may or may not check any other conditions to decide what you do:
// whether your plugin wants to work with the database or not.
static plugmod_t *idaapi init()
{
processor_t &ph = PH;
if ( ph.id != PLFM_386 )
return nullptr;
auto plugmod = new plugin_ctx_t;
set_module_data(&data_id, plugmod);
return plugmod;
}
//-------------------------------------------------------------------------
plugin_ctx_t::plugin_ctx_t()
{
nec_node.create(node_name);
hooked = nec_node.altval(0) != 0;
if ( hooked )
{
hook_event_listener(HT_IDP, this);
msg("NEC V20 processor extender is enabled\n");
}
}
//--------------------------------------------------------------------------
// Terminate the plugin.
// This destructor will be called before unloading the plugin.
plugin_ctx_t::~plugin_ctx_t()
{
clr_module_data(data_id);
// listeners are uninstalled automatically
// when the owner module is unloaded
}
//--------------------------------------------------------------------------
// The plugin method
// This is the main function of plugin.
// It will be called when the user selects the plugin from the menu.
// The input argument is usually zero. Non-zero values can be specified
// by using load_and_run_plugin() or through plugins.cfg file (discouraged).
bool idaapi plugin_ctx_t::run(size_t)
{
if ( hooked )
unhook_event_listener(HT_IDP, this);
else
hook_event_listener(HT_IDP, this);
hooked = !hooked;
nec_node.create(node_name);
nec_node.altset(0, hooked);
info("AUTOHIDE NONE\n"
"NEC V20 processor extender now is %s", hooked ? "enabled" : "disabled");
return true;
}
//--------------------------------------------------------------------------
static const char comment[] = "NEC V20 processor extender";
static const char help[] =
"A sample plugin module\n"
"\n"
"This module shows you how to create plugin modules.\n"
"\n"
"It supports some NEC V20 instructions\n"
"and shows the current address.\n";
//--------------------------------------------------------------------------
// This is the preferred name of the plugin module in the menu system
// The preferred name may be overridden in plugins.cfg file
static const char desired_name[] = "NEC V20 processor extender";
// This is the preferred hotkey for the plugin module
// The preferred hotkey may be overridden in plugins.cfg file
static const char desired_hotkey[] = "";
//--------------------------------------------------------------------------
//
// PLUGIN DESCRIPTION BLOCK
//
//--------------------------------------------------------------------------
plugin_t PLUGIN =
{
IDP_INTERFACE_VERSION,
PLUGIN_PROC // this is a processor extension plugin
| PLUGIN_MULTI, // this plugin can work with multiple idbs in parallel
init, // initialize
nullptr,
nullptr,
comment, // long comment about the plugin. not used.
help, // multiline help about the plugin. not used.
desired_name, // the preferred short name of the plugin
desired_hotkey // the preferred hotkey to run the plugin
};
ui_requests
This plugin demonstrates the UI requests and the process_ui_action()
/*
* This is a sample plugin to demonstrate the UI requests and the process_ui_action()
* One process_ui_action() can be processed during an UI request.
* The UI request is a nice example to show how to schedule UI actions for sequential execution
*/
#include <ida.hpp>
#include <idp.hpp>
#include <graph.hpp>
#include <loader.hpp>
#include <kernwin.hpp>
//--------------------------------------------------------------------------
struct plugin_ctx_t : public plugmod_t
{
int req_id = 0;
~plugin_ctx_t()
{
if ( req_id != 0 && cancel_exec_request(req_id) )
msg("Cancelled unexecuted ui_request\n");
}
virtual bool idaapi run(size_t) override;
};
//--------------------------------------------------------------------------
bool idaapi plugin_ctx_t::run(size_t)
{
class msg_req_t: public ui_request_t
{
const char *_msg;
public:
msg_req_t(const char *mesg): _msg(qstrdup(mesg)) {}
~msg_req_t() { qfree((void *)_msg); }
virtual bool idaapi run() override
{
msg("%s", _msg);
return false;
}
};
class msgs_req_t: public ui_request_t
{
int count;
public:
msgs_req_t(int cnt): count(cnt) {}
virtual bool idaapi run() override
{
msg("%d\n", count);
return --count != 0;
}
};
req_id = execute_ui_requests(
new msg_req_t("print "),
new msg_req_t("3 countdown "),
new msg_req_t("mesages:\n"),
new msgs_req_t(3),
nullptr);
return true;
}
//--------------------------------------------------------------------------
static plugmod_t *idaapi init()
{
return new plugin_ctx_t;
}
//--------------------------------------------------------------------------
//
// PLUGIN DESCRIPTION BLOCK
//
//--------------------------------------------------------------------------
plugin_t PLUGIN =
{
IDP_INTERFACE_VERSION,
PLUGIN_MULTI, // The plugin can work with multiple idbs in parallel
init, // initialize
nullptr,
nullptr,
"This is a sample ui_requests plugin.",
// long comment about the plugin
"A sample ui_requests and process_ui_commands plugin",
// multiline help about the plugin
"UI requests demo", // the preferred short name of the plugin
"Shift-F8" // the preferred hotkey to run the plugin
};
More plugin samples
We encourage you to browse the plugins folder inside the SDK directory to check out all of examples, including more complex and advances ones, like FindCrypt program, that finds constants used in crypto algorithms, or qproject, that demonstrates how to fully use the Qt environment in IDA.
Modules samples
The modules folder contains sample processor modules, that are used to add support for new instruction sets or architectures to IDA. Inside the README file you will find instructions on how to compile and run the modules.
If you are going to write a new processor module, it’s recommended to follow the below steps:
- copy the sample module files to a new directory
- edit
ins.cppandins.hppfiles - write the analyser
ana.cpp - then outputter
- and emulator (you can start with an almost empty emulator)
- describe the processor & assembler, write the notify() function
Loaders samples
The ldr folder includes source code for new file format loaders:
aifARM Image FileamigaAmige Hunk FileaofARM Object Fileaouta.outdosMS DOS FiledumpMemory Dump FilegeosGEOS FilehexIntel/Motorola HEX FilehpsomHP SOMintelomfIntel Object FilejavaldrJava Class LoadermasMacro AssemblernlmNetware Loader Moduleos9FLEX/9pefPortable Executable Format (MAC)pilotPalm PilotqnxQnxrt11RT/11w32runWatcom RUN32
ready to be compiled, similarly as processor module samples.
Decompiler SDK sample plugins
The exemplary decompiler plugins are shipped with the C++ SDK and can be found in the plugins folder (vds1-vds20) alongside other plugins.
Below are descriptions of sample decompiler plugins.
Sample 1
This plugin decompiles the current function and prints the result in the message window. It is useful to learn how to initialize a decompiler plugin. Please note that all decompiler sample plugins have the “hexrays_” prefix in their names. This is done to make sure that the decompiler plugins are loaded after the hexrays plugin. Otherwise they would see that the decompiler is missing and immediately terminate.
We recommend you to keep the same naming scheme: please use the “hexrays_” prefix for your decompiler plugins.
N.B.: if you’re writing a plugin for non-x86 version of the decompiler, you should use another prefix. For example, the x64 decompiler is named “hexx64”, ARM is “hexarm” and so on. To be certain, check IDA’s “plugins” directory. To debug plugin loading issues, you can use -z20 switch when running IDA.
Sample 2
This plugin shows how to hook to decompiler events and react to them. It also shows how to visit all ctree elements and modify them.
This plugin waits for the decompilation result to be ready and replaces zeroes in pointer contexts with NULLs. One might say that this is just cosmetic change, but it makes the output more readable.
Since the plugin hooks to events, it is fully automatic. The user can disable it by selecting it from the Edit, Plugins menu.
Sample 3
This plugin shows
- how to add a new popup menu item
- how to map the cursor position to ctree element
- how to modify ctree
- how to make the changes persistent
This is a quite complex plugin but it is thoroughly commented.
Sample 4
This plugin dumps all user-defined information to the message window. Read the source code to learn how to access various user-defined data from your plugins:
- label names
- indented comments
- number formats
- local variable names, types, comments
Sample 5
This plugin generates a graph from the current pseudocode and displays it with wingraph32.
The source code can be used to learn ctree details.
Sample 6
This plugin modifies the decompilation output: removes some space characters.
The source code can be used to learn the output text.
Sample 7
This plugin demonstrates how to use the cblock_t::iterator class. It enumerates all instructions of a block statement.
Sample 8
This plugin demonstrates how to use the udc_filter_t (User-Defined Call generator) class, which allows replacing cryptic function calls, with a simpler/more-readable counterpart.
Sample 9
This plugin demonstrates how to generate microcode for a given function and print it into the output window. It displays fully optimized microcode but it is also possible to retrieve microcode from earlier stages of decompilation. Generating the microcode text should be used only for debugging purposes. Printing microcode in production code may lead to crashes or wrong info.
Sample 10
This plugin installs a custom microcode optimization rule: call !DbgRaiseAssertionFailure fast:.0 => call !DbgRaiseAssertionFailure <fast:“char *” “assertion text”>.0
See also sample19 for another example.
Sample 11
This plugin installs a custom inter-block optimization rule:
goto L1 => goto L@
...
L1: goto L2
In other words we fix a goto target if it points to a chain of gotos. This improves the decompiler output is some cases.
Sample 12
This plugin displays list of direct references to a register from the current instruction.
Sample 13
This plugin generates microcode for selection and dumps it to the output window.
Sample 14
This plugin shows xrefs to the called function as the decompiler output. All calls are displayed with the call arguments.
Sample 15
This plugin shows list of possible values of a register using the value range analysis.
Sample 16
This plugin installs a custom instruction optimization rule:
mov #N, var.4 mov #N, var.4
xor [email protected], #M, [email protected] => mov #NM, [email protected]
where NM == (N>>8)^M
We need this rule because the decompiler cannot propagate the second byte of VAR into the xor instruction.
The XOR opcode can be replaced by any other, we do not rely on it. Also operand sizes can vary.
Sample 17
This plugin shows how to use “Select offsets” widget (select_udt_by_offset() API). This plugin repeats the Alt-Y functionality.
Sample 18
This plugin shows how to specify a register value at a desired location. Such a functionality may be useful when the code to decompile is obfuscated and uses opaque predicates.
Sample 19
This plugin shows how to install a custom microcode optimization rule. Custom rules are useful to handle obfuscated code. See also sample10 for another example.
Sample 20
This plugin shows how to modify the decompiler output on the fly by adding dynamic comments.
How to create a plugin with C++ SDK?
Intro
The C++ SDK allows developers to create powerful plugins that can extend the IDA Pro capabilities, that enable deeper integration and more control over IDA’s core functionality.
This guide will walk you through creating a basic plugin using the C++ SDK, demonstrating the structure and best practices for developing C++ plugins for IDA.
Prerequistes
- Installed the latest C++ SDK. You can get it from our GitHub repository.
- A working C++ development environment (compiler, debugger, etc.). For the Windows Visual Studio users, a plugin template has been created that can be used to create plugin solutions.
Before you start
-
Check the C++ SDK Reference Documentation for a comprehensive list of classes, functions, and available APIs.
-
Familiarize yourself with the
plugin_tclass andplugmod_t, that are fundamental for creating plugins using the C++ SDK. -
Ensure compatibility with the latest version of IDA Pro and refer to the C++ SDK Porting Guide for any recent changes that might affect your plugin.
Overview of the Plugin Structure
An IDA Pro plugin written in C++ typically involves:
- A class that inherits from
plugmod_t, this class will implement the actual plugin functionality. - An init() function that will return a pointer to the above mentioned class.
- Flags that specify when and how the plugin should be loaded and unloaded.
Writing a plugin in C++—basic steps
Create a basic plugin structure
Start by creating a new C++ source file for your plugin. This file will contain the main logic and define the necessary classes and methods for your plugin.
Define base classes
When creating a plugin, it’s recommended to create an instace of the class plugin_t with specific flags and a class inheriting from plugmod_t that performs the core functionality.
Example of `implementation:
#include <ida.hpp>
#include <idp.hpp>
#include <loader.hpp>
#include <funcs.hpp>
// Define the class that inherits from plugmod_t
class MyPlugmod : public plugmod_t
{
public:
// Constructor
MyPlugmod()
{
msg("MyPlugmod: Constructor called.\n");
}
// Destructor
virtual ~MyPlugmod()
{
msg("MyPlugmod: Destructor called.\n");
}
// Method that gets called when the plugin is activated
virtual bool idaapi run(size_t arg) override
{
msg("MyPlugmod.run() called with arg: %d\n", arg);
// Iterate through all functions and print their names and addresses
int n = get_func_qty();
for (int i = 0; i < n; i++) {
func_t* pfn = getn_func(i);
if (pfn == nullptr)
continue;
qstring name;
get_func_name(&name, pfn->start_ea);
msg("Function %s at address 0x%llX\n", name.length() ? name.c_str(): "-UNK-" , pfn->start_ea);
}
return true;
}
};
static plugmod_t* idaapi init(void)
{
return new MyPlugmod();
}
plugin_t PLUGIN =
{
IDP_INTERFACE_VERSION,
PLUGIN_MULTI, // plugin flags
init, // initialize
nullptr, // terminate. this pointer can be nullptr
nullptr, // invoke the plugin
nullptr, // long comment about the plugin
nullptr, // multiline help about the plugin
"List functions", // the preferred short name of the plugin
"" // the preferred hotkey to run the plugin
};
In our example:
-
MyPlugmodclass: This class inherits from plugmod_t and overrides the run() method to perform the plugin’s main functionality. The constructor and destructor provide initialization and cleanup messages. -
PLUGINexported plugin_t instance: This object sets the PLUGIN_MULTI flag to allow the plugin to be loaded multiple times if needed. -
initfunction: This function is called by the by the kernel in order to initialize the plugin. It returns an instance ofMyPlugmod.
Include an ida-plugin.json file
To ensure your plugin is well-organized and can be easily included in the Hex-Rays plugins repository, add the ida-plugin.json file with essential metadata to your plugin directory.
Build and install your plugin
- Compile your plugin. Once your plugin code is ready, Use your C++ development environment to compile the plugin source code into a shared library (.dll on Windows, .so on Linux, or .dylib on macOS).
- Install your plugin. Copy the compiled plugin binary to the
pluginsdirectory in your IDA installation folder. - Run your plugin. Execute the plugin via the specified hotkey or by selecting it from the Edit -> Plugins submenu.
Porting Guide from IDA 8.x to 9.0
IDA 9.0 API Changes and porting guide
- Introduction
- struct.hpp
- enum.hpp
- bytes.hpp
- dirtree.hpp
- diskio.hpp
- err.h
- expr.hpp
- frame.hpp
- funcs.hpp
- gdl.hpp
- hexrays.hpp
- graph.hpp
- idalib.hpp
- idd.hpp
- idp.hpp
- kernwin.hpp
- lex.hpp
- lines.hpp
- nalt.hpp
- parsejson.hpp
- pro.h
- regex.hpp
- regfinder.hpp
- registry.hpp
- search.hpp
- typeinf.hpp
- IDB events
Introduction
The largest change is the removal of two headers:
struct.hppenum.hpp
The functionalities for working with user-defined types are now available in typeinf.hpp (tinfo_t class).
struct.hpp
Removed classes
class member_t;class struc_t;
struc_t is replaced by the notion of “user-defined type” (udt_type_data_t class) and member_t by dt member (udm_t class).
Removed APIs
get_struc_qty()Rough equivalent isget_ordinal_limit()orget_ordinal_count()but note that it also includes enums and typedefs.get_first_struc_idx()get_last_struc_idx()get_prev_struc_idx()get_next_struc_idx()
Local type ordinals always start at 1 (0 is invalid ordinal) and go up to get_ordinal_limit().
get_struc_idx(tid_t id)get_struc_by_idx(uval_t idx)
enum.hpp
Enumerations are now manipulated via:
tinfo_tclassenum_type_data_tclassedm_tclass. intypeinf.hpp
Removed APIs
get_enum_qty(void)getn_enum(size_t idx)get_enum_idx(enum_t id)get_enum(const char *name)is_bf(enum_t id)is_enum_hidden(enum_t id)set_enum_hidden(enum_t id, bool hidden)is_enum_fromtil(enum_t id)set_enum_fromtil(enum_t id, bool fromtil)is_ghost_enum(enum_t id)set_enum_ghost(enum_t id, bool ghost)get_enum_name(qstring *out, enum_t id)get_enum_name2(qstring *out, enum_t id, int flags=0)get_enum_name(tid_t id, int flags=0)get_enum_width(enum_t id)set_enum_width(enum_t id, int width)get_enum_cmt(qstring *buf, enum_t id, bool repeatable)get_enum_size(enum_t id)get_enum_flag(enum_t id)get_enum_member_by_name(const char *name)get_enum_member_value(const_t id)get_enum_member_enum(const_t id)get_enum_member_bmask(const_t id)get_enum_member(enum_t id, uval_t value, int serial, bmask_t mask)get_first_bmask(enum_t enum_id)get_last_bmask(enum_t enum_id)get_next_bmask(enum_t enum_id, bmask_t bmask\)get_prev_bmask(enum_t enum_id, bmask_t bmask)get_first_enum_member(enum_t id, bmask_t bmask=DEFMASK)get_last_enum_member(enum_t id, bmask_t bmask=DEFMASK)get_next_enum_member(enum_t id, uval_t value, bmask_t bmask=DEFMASK)get_prev_enum_member(enum_t id, uval_t value, bmask_t bmask=DEFMASK)get_enum_member_name(qstring *out, const_t id)get_enum_member_cmt(qstring *buf, const_t id, bool repeatable)get_first_serial_enum_member(uchar *out_serial, enum_t id, uval_t value, bmask_t bmask)get_last_serial_enum_member(uchar *out_serial, enum_t id, uval_t value, bmask_t bmask)get_next_serial_enum_member(uchar *in_out_serial, const_t first_cid)get_prev_serial_enum_member(uchar *in_out_serial, const_t first_cid)for_all_enum_members(enum_t id, enum_member_visitor_t &cv)ida_export get_enum_member_serial(const_t cid)get_enum_type_ordinal(enum_t id)set_enum_type_ordinal(enum_t id, int32 ord)add_enum(size_t idx, const char *name, flags64_t flag)del_enum(enum_t id)set_enum_idx(enum_t id, size_t idx)set_enum_bf(enum_t id, bool bf)set_enum_name(enum_t id, const char *name)set_enum_cmt(enum_t id, const char *cmt, bool repeatable)set_enum_flag(enum_t id, flags64_t flag)add_enum_member(enum_t id, const char *name, uval_t value, bmask_t bmask=DEFMASK)del_enum_member(enum_t id, uval_t value, uchar serial, bmask_t bmask)set_enum_member_name(const_t id, const char *name)set_enum_member_cmt(const_t id, const char *cmt, bool repeatable)is_one_bit_mask(bmask_t mask)set_bmask_name(enum_t id, bmask_t bmask, const char *name)get_bmask_name(qstring *out, enum_t id, bmask_t bmask)set_bmask_cmt(enum_t id, bmask_t bmask, const char *cmt, bool repeatable)get_bmask_cmt(qstring *buf, enum_t id, bmask_t bmask, bool repeatable)
bytes.hpp
Added APIs
idaman ea_t ida_export find_binary(ea_t startea, ea_t endea, const char *ubinstr, int radix, int sflag, int strlits_encoding=0)
Modified APIs
| In 8.4 | In 9.0 |
|---|---|
idaman bool ida_export get_octet2(uchar *out, octet_generator_t *ogen) | idaman bool ida_export get_octet(uchar *out, octet_generator_t *ogen) |
idaman bool ida_export op_enum(ea_t ea, int n, enum_t id, uchar serial=0) | idaman bool ida_export op_enum(ea_t ea, int n, tid_t id, uchar serial=0) |
idaman enum_t ida_export get_enum_id(uchar *serial, ea_t ea, int n) | idaman tid_t ida_export get_enum_id(uchar *serial, ea_t ea, int n) |
idaman ea_t ida_export bin_search3(size_t *out_matched_idx, ea_t start_ea, ea_t end_ea, const compiled_binpat_vec_t &data, int flags) | idaman ea_t ida_export bin_search(ea_t start_ea, ea_t end_ea, const compiled_binpat_vec_t &data, int flags, size_t *out_matched_idx=nullptr) |
Removed APIs
bin_search2(ea_t start_ea, ea_t end_ea, const compiled_binpat_vec_t &data, int flags)bin_search(ea_t, ea_t, const uchar *, const uchar *, size_t, int, int)get_8bit(ea_t *ea, uint32 *v, int *nbit)get_octet(ea_t *ea, uint64 *v, int *nbit)free_chunk(ea_t bottom, asize_t size, int32 step)
dirtree.hpp
Modified APIs
| In 8.4 | In 9.0 |
|---|---|
idaman bool ida_export dirtree_get_abspath_by_cursor2(qstring *out, const dirtree_impl_t *d, const dirtree_cursor_t &cursor, uint32 name_flags) | idaman bool ida_export dirtree_get_abspath_by_cursor(qstring *out, const dirtree_impl_t *d, const dirtree_cursor_t &cursor, uint32 name_flags) |
diskio.hpp
Modified APIs
| In 8.4 | In 9.0 |
|---|---|
idaman THREAD_SAFE int ida_export enumerate_files2(char *answer, size_t answer_size, const char *path, const char *fname, file_enumerator_t &fv) | idaman THREAD_SAFE int ida_export enumerate_files(char *answer, size_t answer_size, const char *path, const char *fname, file_enumerator_t &fv) |
Removed APIs
ecreate(const char *file)eclose(FILE *fp)eread(FILE *fp, void *buf, size_t size)ewrite(FILE *fp, const void *buf, size_t size)eseek(FILE *fp, qoff64_t pos)enumerate_files(char *answer, size_t answer_size, const char *path, const char *fname, int (idaapi*func)(const char *file,void *ud), void *ud=nullptr)
err.h
Removed APIs
qerrcode(int new_code=-1)
expr.hpp
Modified APIs
| In 8.4 | In 9.0 |
|---|---|
bool extlang_t::(idaapi *compile_file)(const char *file, qstring *errbuf) | bool extlang_t::(idaapi *compile_file)(const char *file, const char *requested_namespace, qstring *errbuf) |
frame.hpp
Added APIs
idaman bool ida_export add_frame_member(const func_t *pfn, const char *name, uval_t offset, const tinfo_t &tif, const struct value_repr_t *repr=nullptr, uint etf_flags=0)THREAD_SAFE bool is_anonymous_member_name(const char *name)THREAD_SAFE bool is_dummy_member_name(const char *name)idaman bool ida_export is_special_frame_member(tid_t tid)idaman bool ida_export set_frame_member_type(const func_t *pfn, uval_t offset, const tinfo_t &tif, const struct value_repr_t *repr=nullptr, uint etf_flags=0)idaman bool ida_export delete_frame_members(const func_t *pfn, uval_t start_offset, uval_t end_offset)idaman sval_t ida_export calc_frame_offset(func_t *pfn, sval_t off, const insn_t *insn = nullptr, const op_t *op = nullptr)
Modified PIs
| In 8.4 | In 9.0 |
|---|---|
idaman struc_t *ida_export get_frame(const func_t *pfn) | idaman bool ida_export get_func_frame(tinfo_t *out, const func_t *pfn) |
idaman bool ida_export define_stkvar(func_t *pfn, const char *name, sval_t off, flags64_t flags, const opinfo_t *ti, asize_t nbytes) | idaman bool ida_export define_stkvar(func_t *pfn, const char *name, sval_t off, const tinfo_t &tif, const struct value_repr_t *repr=nullptr) |
idaman void ida_export build_stkvar_xrefs(xreflist_t *out, func_t *pfn, const member_t *mptr) | idaman void ida_export build_stkvar_xrefs(xreflist_t *out, func_t *pfn, uval_t start_offset, uval_t end_offset) |
Removed APIs
get_frame_member_by_id(qstring *out_mname, struc_t **out_fptr, tid_t mid)get_stkvar(sval_t *actval, const insn_t &insn, const op_t &x, sval_t v)See get_stkvar in ida_typeinf.tinfo_tget_min_spd_ea(func_t *pfn)delete_unreferenced_stkvars(func_t *pfn)delete_wrong_stkvar_ops(func_t *pfn)
funcs.hpp
Added APIs
bool func_item_iterator_t::set_ea(ea_t _ea)
Removed APIs
save_signatures(void)invalidate_sp_analysis(func_t *pfn)invalidate_sp_analysis(ea_t ea)
gdl.hpp
Added classes/structures
struct edge_tclass node_ordering_t
hexrays.hpp
Added classes/structures
class control_graph_tclass edge_mapper_tclass node_bitset_tclass array_of_node_bitset_tstruct ctry_tstruct cthrow_tstruct catchexpr_tstruct ccatch_tstruct cblock_pos_t
Added APIs
uvlr_t max_vlr_value(int size)uvlr_t min_vlr_svalue(int size)uvlr_t max_vlr_svalue(int size)bool is_unsigned_cmpop(cmpop_t cmpop)bool is_signed_cmpop(cmpop_t cmpop)bool is_cmpop_with_eq(cmpop_t cmpop)bool is_cmpop_without_eq(cmpop_t cmpop)
lvar_t
bool was_scattered_arg() constvoid set_scattered_arg()void clr_scattered_arg()
lvars_t
int find_input_reg(int reg, int _size=1)
simple_graph_t
virtual bool ignore_edge(int /*src*/, int /*dst*/ ) constvoid hexapi compute_dominators(array_of_node_bitset_t &domin, bool post=false) constvoid hexapi compute_immediate_dominators(const array_of_node_bitset_t &domin, intvec_t &idomin, bool post=false) constint hexapi depth_first_preorder(node_ordering_t *pre) constint hexapi depth_first_postorder(node_ordering_t *post) constvoid depth_first_postorder(node_ordering_t *post, edge_mapper_t *et) constvoid depth_first_postorder_for_all_entries(node_ordering_t *post) constintvec_t find_dead_nodes() constvoid find_reaching_nodes(int n, node_bitset_t &reaching) constbool path_exists(int m, int n) constbool path_back(const array_of_node_bitset_t &domin, int m, int n) constbool path_back(const edge_mapper_t &et, int m, int n) constiterator begin() constiterator end()int front()void inc(iterator &p, int n=1) constvirtual int hexapi goup(int node) const
fnumber_t
int calc_max_exp() constbool is_nan() const
minsn_t
bool was_unpaired() const
mba_t
mblock_t *hexapi split_block(mblock_t *blk, minsn_t *start_insn)merror_t hexapi inline_func(codegen_t &cdg, int blknum, mba_ranges_t &ranges, int decomp_flags=0, int inline_flags=0)const stkpnt_t *hexapi locate_stkpnt(ea_t ea) const
codegen_t
void hexapi clear()
vd_failure_t
virtual const char *what() const noexcept override
Modified APIs
| In 8.4 | In 9.0 |
|---|---|
void hexapi save_user_labels2(ea_t func_ea, const user_labels_t *user_labels, const cfunc_t *func=nullptr) | void hexapi save_user_labels(ea_t func_ea, const user_labels_t *user_labels, const cfunc_t *func=nullptr) |
user_labels_t *hexapi restore_user_labels2(ea_t func_ea, const cfunc_t *func=nullptr) | user_labels_t *hexapi restore_user_labels(ea_t func_ea, const cfunc_t *func=nullptr) |
stkvar_ref_t
| In 8.4 | In 9.0 |
|---|---|
member_t *hexapi get_stkvar(uval_t *p_off=nullptr) const | ssize_t hexapi get_stkvar(udm_t *udm=nullptr, uval_t *p_off=nullptr) const |
mop_t
| In 8.4 | In 9.0 |
|---|---|
member_t *get_stkvar(uval_t *p_off) const | ssize_t get_stkvar(udm_t *udm=nullptr, uval_t *p_off=nullptr) const |
mba_t
| In 8.4 | In 9.0 |
|---|---|
member_t *get_stkvar(sval_t vd_stkoff, uval_t *poff) const | ssize_t get_stkvar(udm_t *udm, sval_t vd_stkoff, uval_t *poff=nullptr) const |
const mblock_t *get_mblock(int n) const | const mblock_t *get_mblock(uint n) const |
mblock_t *get_mblock(int n) | mblock_t *get_mblock(uint n) |
bool hexapi combine_blocks() | bool hexapi merge_blocks() |
valrng_t
| In 8.4 | In 9.0 |
|---|---|
bool cvt_to_cmp(cmpop_t *cmp, uvlr_t *val, bool strict) const | bool valrng_t::cvt_to_cmp(cmpop_t *cmp, uvlr_t *val) const |
Removed APIs:
bool hexapi get_member_type(const member_t *mptr, tinfo_t *type)bool hexapi checkout_hexrays_license(bool silent)bool get_member_type(const member_t *mptr, tinfo_t *type)
valrng_t
static uvlr_t max_value(int size_)static uvlr_t min_svalue(int size_)static uvlr_t max_svalue(int size_)
ctree_item_t
member_t *hexapi get_memptr(struc_t **p_sptr=nullptr) const
ctree_parentee_t
cblock_t *get_block()
vdui_t
bool hexapi set_strmem_type(struc_t *sptr, member_t *mptr)bool hexapi rename_strmem(struc_t *sptr, member_t *mptr)
graph.hpp
Removed classes/structures
Modified classes/structures
| In 8.4 | In 9.0 |
|---|---|
class abstract_graph_t | class drawable_graph_t |
class mutable_graph_t | class interactive_graph_t |
Modified APIs
| In 8.4 | In 9.0 |
|---|---|
mutable_graph_t *idaapi create_mutable_graph(uval_t id) | interactive_graph_t *idaapi create_interactive_graph(uval_t id) |
mutable_graph_t *idaapi create_disasm_graph(ea_t ea) | interactive_graph_t *idaapi create_disasm_graph(ea_t ea) |
mutable_graph_t *idaapi create_disasm_graph(const rangevec_t &ranges) | interactive_graph_t *idaapi create_disasm_graph(const rangevec_t &ranges) |
mutable_graph_t *idaapi get_viewer_graph(graph_viewer_t *gv) | interactive_graph_t *idaapi get_viewer_graph(graph_viewer_t *gv) |
void idaapi set_viewer_graph(graph_viewer_t *gv, mutable_graph_t *g) | void idaapi set_viewer_graph(graph_viewer_t *gv, interactive_graph_t *g) |
void idaapi delete_mutable_graph(mutable_graph_t *g) | void idaapi delete_interactive_graph(interactive_graph_t *g) |
void idaapi mutable_graph_t::del_custom_layout(void) | void idaapi interactive_graph_t::del_custom_layout(void) |
void idaapi mutable_graph_t::set_custom_layout(void) const | void idaapi interactive_graph_t::set_custom_layout(void) const |
void idaapi mutable_graph_t::set_graph_groups(void) const | void idaapi interactive_graph_t::set_graph_groups(void) const |
void idaapi mutable_graph_t::clear(void) | void idaapi interactive_graph_t::clear(void) |
bool idaapi mutable_graph_t::create_digraph_layout(void) | bool idaapi interactive_graph_t::create_digraph_layout(void) |
bool idaapi abstract_graph_t::create_tree_layout(void) | bool idaapi drawable_graph_t::create_tree_layout(void) |
bool idaapi abstract_graph_t::create_circle_layout(point_t c, int radius) | bool idaapi drawable_graph_t::create_circle_layout(point_t c, int radius) |
int idaapi mutable_graph_t::get_node_representative(int node) | int idaapi interactive_graph_t::get_node_representative(int node) |
int idaapi mutable_graph_t::_find_subgraph_node(int gr, int n) const | int idaapi interactive_graph_t::_find_subgraph_node(int gr, int n) const |
int idaapi mutable_graph_t::create_group(const intvec_t &_nodes) | int idaapi interactive_graph_t::create_group(const intvec_t &_nodes) |
bool idaapi mutable_graph_t::get_custom_layout(void) | bool idaapi interactive_graph_t::get_custom_layout(void) |
bool idaapi mutable_graph_t::get_graph_groups(void) | bool idaapi interactive_graph_t::get_graph_groups(void) |
bool idaapi mutable_graph_t::empty(void) const | bool idaapi interactive_graph_t::empty(void) const |
bool idaapi mutable_graph_t::is_visible_node(int node) const | bool idaapi interactive_graph_t::is_visible_node(int node) const |
bool idaapi mutable_graph_t::delete_group(int group) | bool idaapi interactive_graph_t::delete_group(int group) |
bool idaapi mutable_graph_t::change_group_visibility(int gr, bool exp) | bool idaapi interactive_graph_t::change_group_visibility(int gr, bool exp) |
bool idaapi mutable_graph_t::set_edge(edge_t e, const edge_info_t *ei) | bool idaapi interactive_graph_t::set_edge(edge_t e, const edge_info_t *ei) |
int idaapi mutable_graph_t::node_qty(void) const | int idaapi interactive_graph_t::node_qty(void) const |
rect_t &idaapi mutable_graph_t::nrect(int n) | rect_t &idaapi interactive_graph_t::nrect(int n) |
idalib.hpp
The new header for the IDA library
Added APIs
idaman int ida_export init_library(int argc = 0, char *argv[] = nullptr)idaman int ida_export open_database(const char *file_path, bool run_auto)idaman void ida_export close_database(bool save)
idd.hpp
Added APIs
idaman int ida_export cpu2ieee(fpvalue_t *ieee_out, const void *cpu_fpval, int size)idaman int ida_export ieee2cpu(void *cpu_fpval, const fpvalue_t &ieee_out, int size)
idp.hpp
Removed APIs:
processor_t::has_realcvt(void) const
Modified APIs:
| In 8.4 | In 9.0 |
|---|---|
static ssize_t processor_t::gen_stkvar_def(outctx_t &ctx, const class member_t *mptr, sval_t v) | static ssize_t processor_t::gen_stkvar_def(outctx_t &ctx, const struct udm_t *mptr, sval_t v, tid_t tid) |
Added APIs
procmod_t
const op_t *procmod_t::make_op_reg(op_t *op, int reg, int8 dtype = -1) constconst op_t *procmod_t::make_op_imm(op_t *op, uval_t val, int8 dtype = -1) constconst op_t *procmod_t::make_op_displ(op_t *op, int base_reg, uval_t displ, int8 dtype = -1) constconst op_t *procmod_t::make_op_phrase(op_t *op, int base_reg, int index_reg, int8 dtype = -1) const
See also IDB events for a table providing a list a event replacement and removal.
kernwin.hpp
Removed APIs
open_enums_window(tid_t const_id=BADADDR)open_structs_window(tid_t id=BADADDR, uval_t offset=0)choose_struc(const char *title)choose_enum_by_value(const char *title, enum_t default_id, uint64 value, int nbytes, uchar *serial)
Removed classes/structures
class enumplace_tclass structplace_t
Added APIs
bool is_ida_library(char *path, size_t pathsize, void** handle)
tagged_line_section_t
const tagged_line_section_t::tagged_line_section_t *nearest_before(const tagged_line_section_t &range, cpidx_t start, color_t tag=0) constconst tagged_line_section_t::tagged_line_section_t *nearest_after(const tagged_line_section_t &range, cpidx_t start, color_t tag=0) const
chooser_base_t
bool chooser_base_t::has_widget_lifecycle() const
Modified APIs
| In 8.4 | In 9.0 |
|---|---|
ea_t choose_stkvar_xref(func_t *pfn, member_t *mptr) | ea_t choose_stkvar_xref(func_t *pfn, tid_t srkvar_tid) |
bool tagged_line_section_t::substr(qstring *out, const qstring &in) const | bool tagged_line_section_t::substr(qstring *out,,const qstring &in, const tagged_line_section_t *end = nullptr) const |
lex.hpp
Modified APIs
| In 8.4 | In 9.0 |
|---|---|
idaman lexer_t *ida_export create_lexer(const char *const *keys, size_t size, void *ud=nullptr) | idaman lexer_t *ida_export create_lexer(const char *const *keys, size_t size, void *ud=nullptr, uint32 macro_flags=0) |
lines.hpp
Removed APIs
set_user_defined_prefix(size_t width, void (idaapi *get_user_defined_prefix)(qstring *buf, ea_t ea, int lnnum, int indent, const char *line))
Modified APIs
| In 8.4 | In 9.0 |
|---|---|
idaman void ida_export update_extra_cmt(ea_t ea, int what, const char *str) | idaman bool ida_export update_extra_cmt(ea_t ea, int what, const char *str) |
idaman void ida_export del_extra_cmt(ea_t ea, int what) | idaman bool ida_export del_extra_cmt(ea_t ea, int what) |
nalt.hpp
Modified APIs
| In 8.4 | In 9.0 |
|---|---|
idaman int ida_export validate_idb_names2(bool do_repair) | idaman int ida_export validate_idb_names(bool do_repair) |
parsejson.hpp
Added APIs
jvalue_t
void jvalue_t::set_str(const char *s)
jobj_t
void jobj_t::put(const char *key, const jobj_t &value)
pro.h
Removed APIs
unpack_memory(void *buf, size_t size, const uchar **pptr, const uchar *end)
Added APIs
idaman THREAD_SAFE bool ida_export get_login_name(qstring *out)idaman void *ida_export pipe_process(qhandle_t *read_handle, qhandle_t *write_handle, launch_process_params_t *lpp, qstring *errbuf=nullptr)
bytevec_t
qstring bytevec_t::tohex(bool upper_case=true) const
qlist
void qlist::splice(iterator pos, qlist &other, iterator first, iterator last)
Added classes/structures
struct memory_serializer_t
regex.hpp
Removed APIs
regcomp(struct regex_t *preg, const char *pattern, int cflags)regerror(int errcode, const struct regex_t *preg, char *errbuf, size_t errbuf_size)regexec(const struct regex_t *preg, const char *str, size_t nmatch, struct regmatch_t pmatch[], int eflags)regfree(struct regex_t *preg)
regfinder.hpp
Modified APIs
| In 8.4 | In 9.0 |
|---|---|
void ida_export reg_finder_invalidate_cache(reg_finder_t *_this, ea_t ea) | void ida_export reg_finder_invalidate_cache(reg_finder_t *_this, ea_t to, ea_t from) |
bool ida_export reg_finder_calc_op_addr(reg_finder_t *_this, reg_value_info_t *addr, const op_t *memop, const insn_t *insn, ea_t ea, ea_t ds) | bool ida_export reg_finder_calc_op_addr(reg_finder_t *_this, reg_value_info_t *addr, const op_t *memop, const insn_t *insn, ea_t ea, ea_t ds, int max_depth) |
bool ida_export reg_finder_may_modify_stkvars(const reg_finder_t *_this, reg_finder_op_t op, const insn_t *insn) | bool ida_export reg_finder_may_modify_stkvar(const reg_finder_t *_this, reg_finder_op_t op, const insn_t *insn) |
void idaapi invalidate_regfinder_cache(ea_t ea = BADADDR) | void idaapi invalidate_regfinder_cache(ea_t to = BADADDR, ea_t from = BADADDR) |
Removed APIs
reg_finder_op_make_rfop(func_t *pfn, const insn_t &insn, const op_t &op)
Added APIs
void reg_value_info_t::movt(const reg_value_info_t &r, const insn_t &insn)static int reg_finder_op_t::get_op_width(const op_t &op)static reg_finder_op_t reg_finder_op_t::make_stkoff(sval_t stkoff, int width)
registry.hpp
Removed APIs
reg_load(void)reg_flush(void)
search.hpp
Removed APIs
user2bin(uchar *, uchar *, ea_t, const char *, int, bool)find_binary(ea_t, ea_t, const char *, int, int)
typeinf.hpp
Removed APIs
set_numbered_type(til_t *ti, uint32 ordinal, int ntf_flags, const char *name, const type_t *type, const p_list *fields=nullptr, const char *cmt=nullptr, const p_list *fldcmts=nullptr, const sclass_t *sclass=nullptr)get_ordinal_from_idb_type(const char *name, const type_t *type)is_autosync(const char *name, const type_t *type)is_autosync(const char *name, const tinfo_t &tif)import_type(const til_t *til, int idx, const char *name, int flags=0)get_udm_tid(const udm_t *udm, const char *udt_name)
Modified APIs
| In 8.4 | In 9.0 |
|---|---|
bool ida_export create_tinfo2(tinfo_t *_this, type_t bt, type_t bt2, void *ptr) | bool ida_export create_tinfo(tinfo_t *_this, type_t bt, type_t bt2, void *ptr) |
int ida_export verify_tinfo(uint32 typid) | int ida_export verify_tinfo(typid_t typid) |
bool ida_export get_tinfo_details2(uint32 typid, type_t bt2, void *buf) | bool ida_export get_tinfo_details(typid_t typid, type_t bt2, void *buf) |
size_t ida_export get_tinfo_size(uint32 *p_effalign, uint32 typid, int gts_code) | size_t ida_export get_tinfo_size(uint32 *p_effalign, typid_t typid, int gts_code) |
size_t ida_export get_tinfo_pdata(void *outptr, uint32 typid, int what) | size_t ida_export get_tinfo_pdata(void *outptr, typid_t typid, int what) |
size_t ida_export get_tinfo_property(uint32 typid, int gta_prop) | size_t ida_export get_tinfo_property(typid_t typid, int gta_prop) |
size_t ida_export get_tinfo_property4(uint32 typid, int gta_prop, size_t p1, size_t p2, size_t p3, size_t p4) | size_t ida_export get_tinfo_property4(typid_t typid, int gta_prop, size_t p1, size_t p2, size_t p3, size_t p4) |
bool ida_export deserialize_tinfo2(tinfo_t *tif, const til_t *til, const type_t **ptype, const p_list **pfields, const p_list **pfldcmts, const char *cmt) | bool ida_export deserialize_tinfo(tinfo_t *tif, const til_t *til, const type_t **ptype, const p_list **pfields, const p_list **pfldcmts, const char *cmt) |
int ida_export find_tinfo_udt_member(udm_t *udm, uint32 typid, int strmem_flags) | int ida_export find_tinfo_udt_member(udm_t *udm, typid_t typid, int strmem_flags) |
bool ida_export compare_tinfo(uint32 t1, uint32 t2, int tcflags) | bool ida_export compare_tinfo(typid_t t1, typid_t t2, int tcflags) |
int ida_export lexcompare_tinfo(uint32 t1, uint32 t2, int) | int ida_export lexcompare_tinfo(typid_t t1, typid_t t2, int) |
uint64 ida_export read_tinfo_bitfield_value(uint32 typid, uint64 v, int bitoff) | uint64 ida_export read_tinfo_bitfield_value(typid_t typid, uint64 v, int bitoff) |
uint64 ida_export write_tinfo_bitfield_value(uint32 typid, uint64 dst, uint64 v, int bitoff) | uint64 ida_export write_tinfo_bitfield_value(typid_t typid, uint64 dst, uint64 v, int bitoff) |
bool ida_export get_tinfo_attr(uint32 typid, const qstring &key, bytevec_t *bv, bool all_attrs) | bool ida_export get_tinfo_attr(typid_t typid, const qstring &key, bytevec_t *bv, bool all_attrs) |
bool ida_export get_tinfo_attrs(uint32 typid, type_attrs_t *tav, bool include_ref_attrs) | bool ida_export get_tinfo_attrs(typid_t typid, type_attrs_t *tav, bool include_ref_attrs) |
bool ida_export append_tinfo_covered(rangeset_t *out, uint32 typid, uint64 offset) | bool ida_export append_tinfo_covered(rangeset_t *out, typid_t typid, uint64 offset) |
bool ida_export calc_tinfo_gaps(rangeset_t *out, uint32 typid) | bool ida_export calc_tinfo_gaps(rangeset_t *out, typid_t typid) |
bool ida_export name_requires_qualifier(qstring *out, uint32 typid, const char *name, uint64 offset) | bool ida_export name_requires_qualifier(qstring *out, typid_t typid, const char *name, uint64 offset) |
void ida_export tinfo_get_innermost_udm(tinfo_t *itif, const tinfo_t *tif, uint64 offset, size_t *udm_idx, uint64 *bit_offset) | void ida_export tinfo_get_innermost_udm(tinfo_t *itif, const tinfo_t *tif, uint64 offset, size_t *udm_idx, uint64 *bit_offset, bool return_member_type) |
tinfo_code_t tinfo_t::find_edm(edm_t *edm, uint64 value, bmask64_t bmask=DEFMASK64, uchar serial=0) const | ssize_t tinfo_t::find_edm(edm_t *edm, uint64 value, bmask64_t bmask=DEFMASK64, uchar serial=0) const |
tinfo_code_t tinfo_t::find_edm(edm_t *edm, const char *name) const | ssize_t tinfo_t::find_edm(edm_t *edm, const char *name) const |
bool tinfo_t::get_type_by_edm_name(const char *mname, til_t *til=nullptr) | ssize_t tinfo_t::get_edm_by_name(const char *mname, const til_t *til=nullptr) |
void ida_export gen_use_arg_tinfos2(struct argtinfo_helper_t *_this, ea_t caller, func_type_data_t *fti, funcargvec_t *rargs) | void ida_export gen_use_arg_tinfos(struct argtinfo_helper_t *_this, ea_t caller, func_type_data_t *fti, funcargvec_t *rargs) |
Added classes/structures
struct udm_visitor_t
Added APIs
bool ida_export detach_tinfo_t(tinfo_t *_this)bool stroff_as_size(int plen, const tinfo_t &tif, asize_t value)int ida_export visit_stroff_udms(udm_visitor_t &sfv, const tid_t *path, int plen, adiff_t *disp, bool appzero)bool is_one_bit_mask(uval_t mask)
til_t
til_t *til_t::find_base(const char *n)
callregs_t
void callregs_t::set_registers(reg_kind_t kind, int first_reg, int last_reg)
tinfo_t
bool tinfo_t::get_named_type(const char *name, type_t decl_type=BTF_TYPEDEF, bool resolve=true, bool try_ordinal=true)bool tinfo_t::get_numbered_type(uint32 ordinal, type_t decl_type=BTF_TYPEDEF, bool resolve=true)bool tinfo_t::detach()bool tinfo_t::is_punknown()int tinfo_t::find_udm(uint64 offset, int strmem_flags=0) constint tinfo_t::find_udm(const char *name, int strmem_flags=0) constsize_t tinfo_t::get_enum_nmembers() constbool tinfo_t::is_empty_enum() consttinfo_code_t tinfo_t::get_enum_repr(value_repr_t *repr) constint tinfo_t::get_enum_width() constuint64 tinfo_t::calc_enum_mask() consttid_t tnfo_t::get_edm_tid(size_t idx) consttinfo_t tinfo_t::get_innermost_member_type(uint64 bitoffset, uint64 *out_bitoffset=nullptr) constbool tinfo_t::is_udm_by_til(size_t idx) consttinfo_code_t tinfo_t::set_udm_by_til(size_t idx, bool on=true, uint etf_flags=0)tinfo_code_t tinfo_t::set_fixed_struct(bool on=true)tinfo_code_t tinfo_t::set_struct_size(size_t new_size)bool tinfo_t::is_fixed_struct() constbool tinfo_t::get_func_frame(const func_t *pfn)bool tinfo_t::is_frame() constea_t tinfo_t::get_frame_func() constssize_t tinfo_t::get_stkvar(sval_t *actval, const insn_t &insn, const op_t *x, sval_t v)tinfo_code_t tinfo_t::set_enum_radix(int radix, bool sign, uint etf_flags=0)tinfo_code_t tinfo_t::set_funcarg_type(size_t index, const tinfo_t &tif, uint etf_flags=0)tinfo_code_t tinfo_t::set_func_rettype(const tinfo_t &tif, uint etf_flags=0)tinfo_code_t tinfo_t::del_funcargs(size_t idx1, size_t idx2, uint etf_flags=0)tinfo_code_t tinfo_t::del_funcarg(size_t idx, uint etf_flags=0)tinfo_code_t tinfo_t::add_funcarg(const funcarg_t &farg, uint etf_flags=0, ssize_t idx=-1)tinfo_code_t tinfo_t::set_func_cc(cm_t cc, uint etf_flags=0)tinfo_code_t tinfo_t::set_funcarg_loc(size_t index, const argloc_t &argloc, uint etf_flags=0)tinfo_code_t tinfo_t::et_func_retloc(const argloc_t &argloc, uint etf_flags=0)
func_type_data_t
ssize_t func_type_data_t::find_argument(const char *name, size_t from=0, size_t to=size_t(-1)) const
enum_type_data_t
tinfo_code_t enum_type_data_t::get_value_repr(value_repr_t *repr) constuchar enum_type_data_t::get_serial(size_t index) constuchar enum_type_data_t::get_max_serial(uint64 value) const
udm_t
bool udm_t::is_retaddr() constbool udm_t::is_savregs() constbool udm_t::is_special_member() constbool udm_t::is_by_til() constvoid udm_t::set_retaddr(bool on=true)void udm_t::set_savregs(bool on=true)void udm_t::set_by_til(bool on=true)
udt_type_data_t
bool udt_type_data_t::is_fixed() constvoid udt_type_data_t::set_fixed(bool on=true)
IDB events
The following table provide a list of IDB events that have been replaced or, in some cases, removed.
| Since 7 | In 9.0 |
|---|---|
truc_created | local_types_changed |
deleting_struc | none |
struc_deleted | local_types_changed |
changing_struc_align | none |
struc_align_changed | local_types_changed |
renaming_struc | none |
struc_renamed | local_types_changed |
expanding_struc | none |
struc_expanded | lt_udt_expanded, frame_expanded, local_types_changed |
struc_member_created | lt_udm_created, frame_udm_created, local_types_changed |
deleting_struc_member | none |
struc_member_deleted | lt_udm_deleted, frame_udm_deleted, local_types_changed |
renaming_struc_member | none |
struc_member_renamed | lt_udm_renamed, frame_udm_renamed, local_types_changed |
changing_struc_member | none |
struc_member_changed | lt_udm_changed, frame_udm_changed, local_types_changed |
changing_struc_cmt | none |
struc_cmt_changed | local_types_changed |
enum_created | local_types_changed |
deleting_enum | none |
enum_deleted | local_types_changed |
renaming_enum | none |
enum_renamed | local_types_changed |
changing_enum_bf | local_types_changed |
enum_bf_changed | local_types_changed |
changing_enum_cmt | none |
enum_cmt_changed | local_types_changed |
enum_member_created | local_types_changed |
deleting_enum_member | none |
enum_member_deleted | local_types_changed |
enum_width_changed | local_types_changed |
enum_flag_changed | local_types_changed |
enum_ordinal_changed | none |
IDAPython SDK
IDAPython SDK allows you to use the Python code in IDA to write scripts and customize basic IDA functionality. It offers more advanced and powerful automation than the IDC language and gives you access to Python modules and native Python abilities to interact with our API.
Where to find the IDAPython SDK?
- IDA Pro: IDAPython SDK is shipped out-of-the-box with IDA Pro. You can find it int the
pythonfolder located in your IDA intallation directory. - Other IDA Products: Check our IDA SDK GitHub repository
Resources
| IDAPython Reference | https://python.docs.hex-rays.com/ | ||
| IDA SDK Source Code on GitHub | https://github.com/HexRaysSA/ida-sdk |
Typical use cases
When you are asking yourself how to automate work in IDA, like renaming variables or performing custom analyses, the IDAPython API comes in handy. You can use simple code snippets directly inside the IDA output window to perform specific tasks or more advanced scripts for complex usage. Moreover, with IDAPython, you can write plugins to expand basic IDA capabilities even further.
Looking for a beginner-friendly entry point?
We’ve got you covered. The Domain API, built on top of the IDAPython SDK, provides a simple and intuitive starting point for those new to scripting in IDA. For more advanced use cases or finer control, you can fall back to the IDAPython SDK. The Domain API is fully compatible with the IDAPython SDK, so both can be used together to complement each other.
What to check next?
| IDAPython Getting Started | Check this guide to kickstart learning IDAPython with simple snippets. | idapython-getting-started.md | |
| IDAPython Examples | Dig into complex examples that showcase the full potential and versatility of our PythonAPI. | migration-guides.md | |
| IDAPython Reference | Explore the technical details of all functions, classes, and more. | https://python.docs.hex-rays.com | |
| Writing Plugins in IDAPython | Learn the best practices for creating plugins with IDAPython. | how-to-create-a-plugin.md |
IDAPython Porting Guide
Check out our Porting Guide, which is prepared to help you migrate and adapt your existing scripts and plugins from IDA 8.x to IDA 9.0.
Getting started with IDAPython
Intro
The IDAPython API provides you a range of functions to interact with the disassembler, navigate through the output, and manipulate various elements such as functions, instructions, data, and comments.
This guide is is designed to speed up the learning curve in IDAPython and kickstart your journey with scripting in IDA, assuming that you are already found your way around IDA and got familiar with IDA basics.
Our IDA SDK is open source and available on GitHub.
How this guide is structured?
First, check basics for the core concepts like common variables, then dive into our simple, short and reusable code snippets showing basic examples of commonly used functions.
Where can I find the complete examples library?
When you feel comfortable with most popular IDAPython API usage, you can delve into our set of more complex examples. The full library of our examples is shipped with your IDA instance in the python/examples folder. You can find them also in the GitHub repository.
Basics
Common modules
IDAPython API is organized in modules, however their number may be a bit overwhelming for the first sigh. Here’s the list of modules that should catch your attention first:
-
idautils: This module extracts the most useful and handy functions allowing you to jump right away and interact with the disassembly without the need to scrutinize the whole IDAPython API from the start. You can find here functions to iterate through whole segments, functions (founded by IDA and also user-defined), named locations, etc. -
ida_idaapi: Theida_idaapimodule comes handy when you want to create custom plugins or handle events, as it gives you access to more advanced functions and allows interaction with overall system -
idc: This module provides functions that were originally part of native IDA IDC scripting language, wrapped for use in IDAPython API. This is a great starting point if you’re already familiar with IDC scripting. -
ida_funcs: This module gives you tools to create and manipulate functions within IDA. -
ida_kernwin: This module provides functionality to interact with IDA UI, so you can create custom dialogs and more.
Common variables and constants
When you start working with IDAPython, you’ll realize that one of the most commonly passed variables is ea, which refers to the valid memory address (effective address).
On the other hand, the BADADDR is a constant that indicates an invalid address. It is used to indicate that an operation (such as querying a function) has failed or returned an invalid result, or signify that a specific memory location is unusable. Whenever you’re working with functions that return memory addresses, it’s a best practice to check whether the result equals BADADDR to ensure the operation was successful.
Code snippets
Here you can check the most common functions grouped by topics and short code samples that can serve as building blocks for longer scripts. They are usually focused on performing one specific action and can be easily reusable in more complex scripts, which you can find later under examples.
Part 1: Navigating the disassembly—addresses and names
Get the current address:**
ea = idc.here() # Get the current address
print(f"Current address: {hex(ea)}")
idc.get_screen_ea()
Set the current address
idc.jumpto(0x401000) # Jump to address 0x401000
Get the minimum address in IDB
idc.get_inf_attr(INF_MIN_EA)
Get the maximum address in IDB
idc.get_inf_attr(INF_MAX_EA)
List all instruction addresses
for ea in idautils.Heads():
print(hex(ea))
Get the name associated with a given address
ida_name.get_name(0x100000da0)
Get the address associated with a given name
ida_name.get_name_ea(0, "_main")
Part 2: Reading and Writing Data
Reading Bytes and Words
byte_value = idc.get_wide_byte(0x401000) # Read a byte at address 0x401000
word_value = idc.get_wide_word(0x401002) # Read a word (2 bytes) at address 0x401002
dword_value = idc.get_wide_dword(0x401004) # Read a double word (4 bytes) at address 0x401004
print(f"Byte: {byte_value}, Word: {word_value}, Dword: {dword_value}")
Writing Bytes and Words
idc.patch_byte(0x401000, 0x90) # Write a byte (0x90) at address 0x401000
idc.patch_word(0x401002, 0x9090) # Write a word (0x9090) at address 0x401002
idc.patch_dword(0x401004, 0x90909090) # Write a double word (0x90909090) at address 0x401004
Part 3: Comments
Add a regular (non-repetable) or repeatable comment
idc.set_cmt(0x401000, "This is a comment", 0) # Add a regular comment at address 0x401000
idc.set_cmt(0x401000, "This is a repeatable comment", 1) # Add a repeatable comment at address 0x401000
Get a regular comment
comment = idc.get_cmt(0x401000, 0) # Get a regular comment at address 0x401000
print(f"Comment: {comment}")
Segments
Get a segment name
idc.get_segm_name(ea)
Get the first segment address:
get_first_seg()
Iterate through all segments and return segment names
for seg in idautils.Segments(): print (idc.get_segm_name(seg))
Add segment
Part X: Functions
Create and delete function
idc.add_func(0x401000, 0x401050) # Create a function starting at 0x401000 and ending at 0x401050
idc.del_func(0x401000) # Delete the function at 0x401000
Get the name of the function
get_func_name(ea)
Iterate through all functions and print their effective addresses and names
for func_ea in idautils.Functions(): func_name = idc.get_func_name(func_ea); print(hex(func_ea), func_name)
Part: Navigating cross-references (Xrefs)
List cross-references to an address
for xref in idautils.XrefsTo(0x401000):
print(f"Xref to 0x401000 from {hex(xref.frm)}")
List cross-references from an address:**
for xref in idautils.XrefsFrom(0x401000):
print(f"Xref from 0x401000 to {hex(xref.to)}")
Iterate through all cross-references to the specific address and print the address from where the reference originates.
for ref in idautils.XrefsTo(ea):
print(hex(ref.frm))
Part X: UI
Set background color of a function
set_color(0x401000, idc.CIC_FUNC, 0x007fff) # Set background color for the function starting at address 0x401000
Display a custom dialog
ida_kernwin.info("This is a custom message dialog. Good luck with learning IDAPython API!")
Complex script examples
If you feel more comfortable with IDAPython now, you can delve into more complex and advanced examples shipped with your IDA instance. You can find them in the python/examples folder where your IDA is installed or check them from our docs.
These collection gathered more advanced code samples, which usually make use of more modules and APIs.
What’s next?
Delve into our tutorial on how to create your first custom plugin in IDAPython.
Reference
Examples
IDAPython examples
This collection of examples organizes all IDAPython sample code into categories for easy reference. Each example demonstrates practical implementation for the IDAPython API, complementing the reference documentation with a real-world usage scenario.
How to run the examples?
Load the script via File Loader
- Navigate to File -> Script file….
- In the new dialog, select the
.pyscript you want to run and click Open.
Load the script via Script command
- Navigate to File -> Script command….
- Paste the code into Please enter script body field and click Run.
Load the script via output window/console
- In the output window/IDAPython console, type the following command:
exec(open("path/to/your_script.py").read())to execute the script.
Example Categories: Overview
| User interface | Creating & manipulating user-interface widgets, prompting the user with forms, enriching existing widgets, or creating your own UI through Python Qt bindings. |
| Disassembly | Various ways to query, or modify the disassembly listing, alter the way analysis is performed, or be notified of changes made to the IDB. |
| Decompilation | Querying the decompiler, manipulating the decompilation trees (either at the microcode level, or the C-tree), and examples showing how to intervene in the decompilation output. |
| Debuggers | Driving debugging sessions, be notified of debugging events. |
| Working with types | These samples utilize our Type APIs, which allow you to manage the types and perform various operations on them, like creating the structures or enums and adding their members programmatically. |
| Miscellaneous | Miscellaneous examples that don't quite fall into another category, but don't really justify one of their own. |
User interface
Disassembly
Decompilation
Debuggers
| Level | Examples |
|---|---|
| Beginner | |
| Intermediate | |
| Advanced |
Working with types
Miscellaneous
| Level | Examples |
|---|---|
| Beginner | |
| Intermediate | |
| Advanced |
Examples list
Assign a shortcut to a custom function
ida_kernwin.add_hotkey is a simpler, but much less flexible alternative to ida_kernwin.register_action (though it does use the same mechanism under the hood.)
It’s particularly useful during prototyping, but note that the actions that are created cannot be inserted in menus, toolbars or cannot provide a custom ida_kernwin.action_handler_t.update callback.
| Source code | Keywords | Level |
|---|---|---|
| add_hotkey.py | actions | Beginner |
APIs Used:
ida_kernwin.add_hotkeyida_kernwin.del_hotkey
Add custom menus to IDA
It is possible to add custom menus to IDA, either at the toplevel (i.e., into the menubar), or as submenus of existing menus.
Notes:
- the same action can be present in more than 1 menu
- this example does not deal with context menus
| Source code | Keywords | Level |
|---|---|---|
| add_menus.py | actions | Beginner |
APIs Used:
ida_kernwin.AST_ENABLE_ALWAYSida_kernwin.SETMENU_INSida_kernwin.action_desc_tida_kernwin.action_handler_tida_kernwin.attach_action_to_menuida_kernwin.create_menuida_kernwin.register_action
Assign a background color to an address, function & segment
This illustrates the setting/retrieval of background colours using the IDC wrappers
In order to do so, we’ll be assigning colors to specific ranges (item, function, or segment). Those will be persisted in the database.
| Source code | Keywords | Level |
|---|---|---|
| colorize_disassembly.py | coloring idc | Beginner |
APIs Used:
idc.CIC_FUNCidc.CIC_ITEMidc.CIC_SEGMidc.get_coloridc.hereidc.set_color
Override the default “Functions” chooser colors
Color the function in the Function window according to its size. The larger the function, the darker the color.
The key, is overriding ida_kernwin.UI_Hooks.get_chooser_item_attrs
| Source code | Keywords | Level |
|---|---|---|
| func_chooser_coloring.py | UI_Hooks | Beginner |
APIs Used:
ida_funcs.get_funcida_kernwin.UI_Hooksida_kernwin.enable_chooser_item_attrs
Create a dockable container, and populate it with Qt widgets
Using ida_kernwin.PluginForm.FormToPyQtWidget, this script converts IDA’s own dockable widget into a type that is recognized by PyQt5, which then enables populating it with regular Qt widgets.
| Source code | Keywords | Level |
|---|---|---|
| populate_pluginform_with_pyqt_widgets.py | Beginner |
APIs Used:
ida_kernwin.PluginForm
Prevent an action from being triggered
Using ida_kernwin.UI_Hooks.preprocess_action, it is possible to respond to a command instead of the action that would otherwise do it.
| Source code | Keywords | Level |
|---|---|---|
| prevent_jump.py | UI_Hooks | Beginner |
APIs Used:
ida_kernwin.UI_Hooks
Use timers for delayed execution
Register (possibly repeating) timers.
| Source code | Keywords | Level |
|---|---|---|
| register_timer.py | Beginner |
APIs Used:
ida_kernwin.register_timer
Show, update & hide the progress dialog
Using the progress dialog (aka ‘wait box’) primitives.
| Source code | Keywords | Level |
|---|---|---|
| show_and_hide_waitbox.py | actions | Beginner |
APIs Used:
ida_hexrays.decompileida_kernwin.hide_wait_boxida_kernwin.replace_wait_boxida_kernwin.show_wait_boxida_kernwin.user_cancelledidautils.Functions
Custom actions, with icons & tooltips
How to create user actions, that once created can be inserted in menus, toolbars, context menus, …
Those actions, when triggered, will be passed a ‘context’ that contains some of the most frequently needed bits of information.
In addition, custom actions can determine when they want to be available (through their ida_kernwin.action_handler_t.update callback)
| Source code | Keywords | Level |
|---|---|---|
| actions.py | actions ctxmenu UI_Hooks | Intermediate |
APIs Used:
ida_kernwin.AST_DISABLE_FOR_WIDGETida_kernwin.AST_ENABLE_FOR_WIDGETida_kernwin.BWN_DISASMida_kernwin.SETMENU_APPida_kernwin.UI_Hooksida_kernwin.action_desc_tida_kernwin.action_handler_tida_kernwin.attach_action_to_menuida_kernwin.attach_action_to_popupida_kernwin.attach_action_to_toolbarida_kernwin.get_widget_typeida_kernwin.load_custom_iconida_kernwin.register_actionida_kernwin.unregister_action
Show tabular data
Shows how to subclass the ida_kernwin.Choose class to show data organized in a simple table. In addition, registers a couple actions that can be applied to it.
| Source code | Keywords | Level |
|---|---|---|
| choose.py | actions chooser ctxmenu | Intermediate |
APIs Used:
ChooseChoose.ALL_CHANGEDChoose.CH_CAN_DELChoose.CH_CAN_EDITChoose.CH_CAN_INSChoose.CH_CAN_REFRESHChoose.CH_RESTOREChoose.NOTHING_CHANGEDida_kernwin.AST_DISABLE_FOR_WIDGETida_kernwin.AST_ENABLE_FOR_WIDGETida_kernwin.action_desc_tida_kernwin.action_handler_tida_kernwin.attach_action_to_popupida_kernwin.is_chooser_widgetida_kernwin.register_actionida_kernwin.unregister_action
Show tabular data, with multiple selection
Similar to choose, but with multiple selection
| Source code | Keywords | Level |
|---|---|---|
| choose_multi.py | actions chooser | Intermediate |
APIs Used:
ChooseChoose.ALL_CHANGEDChoose.CHCOL_HEXChoose.CH_MULTIChoose.NOTHING_CHANGED
Create custom listings in IDA
How to create simple listings, that will share many of the features as the built-in IDA widgets (highlighting, copy & paste, notifications, …)
In addition, creates actions that will be bound to the freshly-created widget (using ida_kernwin.attach_action_to_popup.)
| Source code | Keywords | Level |
|---|---|---|
| custom_viewer.py | actions ctxmenu listing | Intermediate |
APIs Used:
ida_kernwin.AST_ENABLE_ALWAYSida_kernwin.IK_DELETEida_kernwin.IK_ESCAPEida_kernwin.action_desc_tida_kernwin.action_handler_tida_kernwin.ask_longida_kernwin.ask_strida_kernwin.attach_action_to_popupida_kernwin.register_actionida_kernwin.simplecustviewer_tida_kernwin.simplecustviewer_t.Createida_kernwin.simplecustviewer_t.Showida_kernwin.unregister_actionida_lines.COLOR_DEFAULTida_lines.COLOR_DNAMEida_lines.COLSTRida_lines.SCOLOR_PREFIXida_lines.SCOLOR_VOIDOP
Implement an alternative “Functions” window
Partially re-implements the “Functions” widget present in IDA, with a custom widget.
| Source code | Keywords | Level |
|---|---|---|
| func_chooser.py | chooser functions | Intermediate |
APIs Used:
ida_funcs.get_func_nameida_kernwin.Chooseida_kernwin.Choose.ALL_CHANGEDida_kernwin.Choose.CHCOL_FNAMEida_kernwin.Choose.CHCOL_HEXida_kernwin.Choose.CHCOL_PLAINida_kernwin.get_icon_id_by_nameidautils.Functionsidc.del_func
Implement a “jump to next comment” action within IDA’s listing
We want our action not only to find the next line containing a comment, but to also place the cursor at the right horizontal position.
To find that position, we will have to inspect the text that IDA generates, looking for the start of a comment. However, we won’t be looking for a comment “prefix” (e.g., “; “), as that would be too fragile.
Instead, we will look for special “tags” that IDA injects into textual lines, and that bear semantic information.
Those tags are primarily used for rendering (i.e., switching colors), but can also be very handy for spotting tokens of interest (registers, addresses, comments, prefixes, instruction mnemonics, …)
| Source code | Keywords | Level |
|---|---|---|
| jump_next_comment.py | actions idaview | Intermediate |
APIs Used:
ida_bytes.next_headida_idaapi.BADADDRida_kernwin.AST_DISABLE_FOR_WIDGETida_kernwin.AST_ENABLE_FOR_WIDGETida_kernwin.BWN_DISASMida_kernwin.CVNF_LAZYida_kernwin.action_desc_tida_kernwin.action_handler_tida_kernwin.custom_viewer_jumpida_kernwin.get_custom_viewer_locationida_kernwin.place_t_as_idaplace_tida_kernwin.register_actionida_kernwin.unregister_actionida_lines.SCOLOR_AUTOCMTida_lines.SCOLOR_ONida_lines.SCOLOR_REGCMTida_lines.SCOLOR_RPTCMTida_lines.generate_disassemblyida_lines.tag_strlenida_moves.lochist_entry_t
Dynamically colorize [parts of] lines
Shows how one can dynamically alter the lines background rendering (as opposed to, say, using ida_nalt.set_item_color()), and also shows how that rendering can be limited to just a few glyphs, not the whole line.
| Source code | Keywords | Level |
|---|---|---|
| lines_rendering.py | UI_Hooks | Intermediate |
APIs Used:
ida_bytes.next_headida_idaapi.BADADDRida_kernwin.CK_EXTRA1ida_kernwin.CK_EXTRA10ida_kernwin.CK_EXTRA11ida_kernwin.CK_EXTRA12ida_kernwin.CK_EXTRA13ida_kernwin.CK_EXTRA14ida_kernwin.CK_EXTRA15ida_kernwin.CK_EXTRA16ida_kernwin.CK_EXTRA2ida_kernwin.CK_EXTRA3ida_kernwin.CK_EXTRA4ida_kernwin.CK_EXTRA5ida_kernwin.CK_EXTRA6ida_kernwin.CK_EXTRA7ida_kernwin.CK_EXTRA8ida_kernwin.CK_EXTRA9ida_kernwin.CK_TRACEida_kernwin.CK_TRACE_OVLida_kernwin.LROEF_CPS_RANGEida_kernwin.UI_Hooksida_kernwin.get_screen_eaida_kernwin.line_rendering_output_entry_tida_kernwin.refresh_idaview_anyway
React to UI events/notifications
Hooks to be notified about certain UI events, and dump their information to the “Output” window
| Source code | Keywords | Level |
|---|---|---|
| log_misc_events.py | UI_Hooks | Intermediate |
APIs Used:
ida_kernwin.UI_Hooks
Paint on top of the navigation band
Using an “event filter”, we will intercept paint events targeted at the navigation band widget, let it paint itself, and then add our own markers on top.
| Source code | Keywords | Level |
|---|---|---|
| paint_over_navbar.py | Intermediate |
APIs Used:
ida_kernwin.PluginForm.FormToPyQtWidgetida_kernwin.get_navband_pixelida_kernwin.open_navband_windowida_segment.get_segm_qtyida_segment.getnsegidc.here
Save, and then restore, positions in a listing
Shows how it is possible re-implement IDA’s bookmark capability, using 2 custom actions: one action saves the current location, and the other restores it.
Note that, contrary to actual bookmarks, this example:
- remembers only 1 saved position
- doesn’t save that position in the IDB (and therefore cannot be restored if IDA is closed & reopened.)
| Source code | Keywords | Level |
|---|---|---|
| save_and_restore_listing_pos.py | actions listing | Intermediate |
APIs Used:
ida_kernwin.AST_DISABLE_FOR_WIDGETida_kernwin.AST_ENABLE_FOR_WIDGETida_kernwin.BWN_CUSTVIEWida_kernwin.BWN_DISASMida_kernwin.BWN_PSEUDOCODEida_kernwin.BWN_TILVIEWida_kernwin.action_desc_tida_kernwin.action_handler_tida_kernwin.custom_viewer_jumpida_kernwin.find_widgetida_kernwin.get_custom_viewer_locationida_kernwin.register_actionida_kernwin.unregister_actionida_moves.lochist_entry_t
Retrieve the selection from the “Strings” window
In IDA it’s possible to write actions that can be applied even to core (i.e., “standard”) widgets. The actions in this example use the action “context” to know what the current selection is.
This example shows how you can either retrieve string literals data directly from the chooser (ida_kernwin.get_chooser_data), or by querying the IDB (ida_bytes.get_strlit_contents)
| Source code | Keywords | Level |
|---|---|---|
| show_selected_strings.py | actions ctxmenu | Intermediate |
APIs Used:
ida_bytes.get_strlit_contentsida_idaapi.BADADDRida_kernwin.AST_DISABLE_FOR_WIDGETida_kernwin.AST_ENABLE_FOR_WIDGETida_kernwin.BWN_STRINGSida_kernwin.action_desc_tida_kernwin.action_handler_tida_kernwin.attach_action_to_popupida_kernwin.find_widgetida_kernwin.get_chooser_dataida_kernwin.open_strings_windowida_kernwin.register_actionida_kernwin.unregister_actionida_strlist.get_strlist_itemida_strlist.string_info_t
Follow the movements of one graph, in another
Since it is possible to be notified of movements that happen take place in a widget, it’s possible to “replay” those movements in another.
In this case, “IDA View-B” (will be opened if necessary) will show the same contents as “IDA View-A”, slightly zoomed out.
| Source code | Keywords | Level |
|---|---|---|
| sync_two_graphs.py | graph idaview | Intermediate |
APIs Used:
ida_graph.GLICTL_CENTERida_graph.viewer_fit_windowida_graph.viewer_get_gliida_graph.viewer_set_gliida_kernwin.DP_RIGHTida_kernwin.IDAViewWrapperida_kernwin.MFF_FASTida_kernwin.TCCRT_GRAPHida_kernwin.execute_syncida_kernwin.find_widgetida_kernwin.get_custom_viewer_placeida_kernwin.jumptoida_kernwin.open_disasm_windowida_kernwin.set_dock_posida_kernwin.set_view_renderer_typeida_moves.graph_location_info_t
Trigger actions programmatically
It’s possible to invoke any action programmatically, by using either of those two:
- ida_kernwin.execute_ui_requests()
- ida_kernwin.process_ui_action()
Ideally, this script should be run through the “File > Script file…” menu, so as to keep focus on “IDA View-A” and have the ‘ProcessUiActions’ part work as intended.
| Source code | Keywords | Level |
|---|---|---|
| trigger_actions_programmatically.py | actions | Intermediate |
APIs Used:
ida_kernwin.ask_ynida_kernwin.execute_ui_requestsida_kernwin.msgida_kernwin.process_ui_action
Advanced usage of the form API
How to query for complex user input, using IDA’s built-in forms.
Note: while this example produces full-fledged forms for complex input, simpler types of inputs might can be retrieved by using ida_kernwin.ask_str and similar functions.
| Source code | Keywords | Level |
|---|---|---|
| askusingform.py | forms | Advanced |
APIs Used:
ida_kernwin.Chooseida_kernwin.Choose.CH_MULTIida_kernwin.Formida_kernwin.PluginForm.FORM_TABida_kernwin.ask_str
Restore custom widgets across sessions
This is an example demonstrating how one can create widgets from a plugin, and have them re-created automatically at IDA startup-time or at desktop load-time.
This example should be placed in the ‘plugins’ directory of the IDA installation, for it to work.
There are 2 ways to use this example:
- reloading an IDB, where the widget was opened
- open the widget (‘View > Open subview > …’)
- save this IDB, and close IDA
- restart IDA with this IDB => the widget will be visible
- reloading a desktop, where the widget was opened
- open the widget (‘View > Open subview > …’)
- save the desktop (‘Windows > Save desktop…’) under, say, the name ‘with_auto’
- start another IDA instance with some IDB, and load that desktop => the widget will be visible
| Source code | Keywords | Level |
|---|---|---|
| auto_instantiate_widget_plugin.py | desktop plugin UI_Hooks | Advanced |
APIs Used:
ida_idaapi.plugin_tida_kernwin.AST_ENABLE_ALWAYSida_kernwin.SETMENU_APPida_kernwin.UI_Hooksida_kernwin.action_desc_tida_kernwin.action_handler_tida_kernwin.attach_action_to_menuida_kernwin.find_widgetida_kernwin.register_actionida_kernwin.simplecustviewer_tida_kernwin.simplecustviewer_t.Create
Showing tabular data in a flat, or tree-like fashion
By adding the necessary bits to a ida_kernwin.Choose subclass, IDA can show the otherwise tabular data, in a tree-like fashion.
The important bits to enable this are:
- ida_dirtree.dirspec_t (and my_dirspec_t)
- ida_kernwin.CH_HAS_DIRTREE
- ida_kernwin.Choose.OnGetDirTree
- ida_kernwin.Choose.OnIndexToInode
| Source code | Keywords | Level |
|---|---|---|
| chooser_with_folders.py | actions chooser folders | Advanced |
APIs Used:
ida_dirtree.DTE_OKida_dirtree.direntry_tida_dirtree.direntry_t.BADIDXida_dirtree.dirspec_tida_dirtree.dirtree_tida_dirtree.dirtree_t.isdirida_kernwin.CH_CAN_DELida_kernwin.CH_CAN_EDITida_kernwin.CH_CAN_INSida_kernwin.CH_HAS_DIRTREEida_kernwin.CH_MULTIida_kernwin.Chooseida_kernwin.Choose.ALL_CHANGEDida_kernwin.Choose.CHCOL_DRAGHINTida_kernwin.Choose.CHCOL_INODENAMEida_kernwin.Choose.CHCOL_PLAINida_kernwin.ask_strida_netnode.BADNODEida_netnode.netnode
Colorize lines interactively
This builds upon the ida_kernwin.UI_Hooks.get_lines_rendering_info feature, to provide a quick & easy way to colorize disassembly lines.
Contrary to @colorize_disassembly, the coloring is not persisted in the database, and will therefore be lost after the session.
By triggering the action multiple times, the user can “carousel” across 4 predefined colors (and return to the “no color” state.)
| Source code | Keywords | Level |
|---|---|---|
| colorize_disassembly_on_the_fly.py | coloring UI_Hooks | Advanced |
APIs Used:
ida_kernwin.AST_DISABLE_FOR_WIDGETida_kernwin.AST_ENABLE_FOR_WIDGETida_kernwin.CK_EXTRA5ida_kernwin.CK_EXTRA6ida_kernwin.CK_EXTRA7ida_kernwin.CK_EXTRA8ida_kernwin.UI_Hooksida_kernwin.action_desc_tida_kernwin.action_handler_tida_kernwin.get_current_viewerida_kernwin.get_custom_viewer_locationida_kernwin.get_custom_viewer_place_xcoordida_kernwin.get_widget_titleida_kernwin.line_rendering_output_entry_tida_kernwin.register_actionida_moves.lochist_entry_t
Add a custom command-line interpreter
Illustrates how one can add command-line interpreters to IDA
This custom interpreter doesn’t actually run any code; it’s there as a ‘getting started’. It provides an example tab completion support.
| Source code | Keywords | Level |
|---|---|---|
| custom_cli.py | Advanced |
APIs Used:
ida_idaapi.NW_CLOSEIDBida_idaapi.NW_OPENIDBida_idaapi.NW_REMOVEida_idaapi.NW_TERMIDAida_idaapi.notify_whenida_kernwin.cli_t
Draw custom graphs
Showing custom graphs, using ida_graph.GraphViewer. In addition, show how to write actions that can be performed on those.
| Source code | Keywords | Level |
|---|---|---|
| custom_graph_with_actions.py | actions graph View_Hooks | Advanced |
APIs Used:
ida_funcs.get_funcida_funcs.get_func_nameida_graph.GraphViewerida_graph.get_graph_viewerida_graph.screen_graph_selection_tida_graph.viewer_get_selectionida_idp.is_call_insnida_kernwin.AST_ENABLE_ALWAYSida_kernwin.View_Hooksida_kernwin.action_desc_tida_kernwin.action_handler_tida_kernwin.attach_dynamic_action_to_popupida_kernwin.get_screen_eaida_ua.decode_insnida_ua.insn_tida_xref.XREF_FARida_xref.xrefblk_t
Retrieve & dump current selection
Shows how to retrieve the selection from a listing widget (“IDA View-A”, “Hex View-1”, “Pseudocode-A”, …) as two “cursors”, and from there retrieve (in fact, generate) the corresponding text.
After running this script:
- select some text in one of the listing widgets (i.e., “IDA View-…”, “Local Types”, “Pseudocode-…”)
- press Ctrl+Shift+S to dump the selection
| Source code | Keywords | Level |
|---|---|---|
| dump_selection.py | Advanced |
APIs Used:
ida_kernwin.ACF_HAS_SELECTIONida_kernwin.AST_DISABLE_FOR_WIDGETida_kernwin.AST_ENABLE_FOR_WIDGETida_kernwin.BWN_DISASMida_kernwin.BWN_PSEUDOCODEida_kernwin.BWN_TILVIEWida_kernwin.IWID_ANY_LISTINGida_kernwin.action_desc_tida_kernwin.action_handler_tida_kernwin.get_last_widgetida_kernwin.get_viewer_user_dataida_kernwin.l_compare2ida_kernwin.linearray_tida_kernwin.read_selectionida_kernwin.register_actionida_kernwin.twinpos_tida_kernwin.unregister_actionida_lines.tag_remove
Inject commands in the “Output” window
This example illustrates how one can execute commands in the “Output” window, from their own widgets.
A few notes:
- the original, underlying
cli:Executeaction, that has to be triggered for the code present in the input field to execute and be placed in the history, requires that the input field has focus (otherwise it simply won’t do anything.) - this, in turn, forces us to do “delayed” execution of that action, hence the need for a
QTimer - the IDA/SWiG ‘TWidget’ type that we retrieve through
ida_kernwin.find_widget, is not the same type as aQtWidgets.QWidget. We therefore need to convert it usingida_kernwin.PluginForm.TWidgetToPyQtWidget
| Source code | Keywords | Level |
|---|---|---|
| inject_command.py | Advanced |
APIs Used:
ida_kernwin.PluginForm.TWidgetToPyQtWidgetida_kernwin.disabled_script_timeout_tida_kernwin.find_widgetida_kernwin.process_ui_action
A lazy-loaded, tree-like data view
Brings lazy-loading of folders to the tree-like tabular views.
The important bit to enable this are:
- ida_kernwin.Choose.OnLazyLoadDir
| Source code | Keywords | Level |
|---|---|---|
| lazy_loaded_chooser.py | actions chooser folders | Advanced |
Paint text on graph view edges
This sample registers an action enabling painting of a recognizable string of text over horizontal nodes edge sections beyond a satisfying size threshold.
In a disassembly view, open the context menu and select “Paint on edges”. This should work for both graph disassembly, and proximity browser.
Using an “event filter”, we will intercept paint events targeted at the disassembly view, let it paint itself, and then add our own markers along.
| Source code | Keywords | Level |
|---|---|---|
| paint_over_graph.py | ctxmenu UI_Hooks | Advanced |
APIs Used:
ida_gdl.edge_tida_graph.get_graph_viewerida_graph.get_viewer_graphida_graph.point_tida_graph.viewer_get_gliida_kernwin.AST_DISABLE_FOR_WIDGETida_kernwin.AST_ENABLE_FOR_WIDGETida_kernwin.BWN_DISASMida_kernwin.PluginForm.FormToPyQtWidgetida_kernwin.UI_Hooksida_kernwin.action_desc_tida_kernwin.action_handler_tida_kernwin.attach_action_to_popupida_kernwin.get_widget_typeida_kernwin.register_actionida_moves.graph_location_info_t
Programmatically manipulate disassembly and graph widgets
This is an example illustrating how to manipulate an existing IDA-provided view (and thus possibly its graph), in Python.
| Source code | Keywords | Level |
|---|---|---|
| wrap_idaview.py | graph idaview | Advanced |
APIs Used:
ida_graph.NIF_BG_COLORida_graph.NIF_FRAME_COLORida_graph.node_info_tida_kernwin.IDAViewWrapperida_kernwin.MFF_FASTida_kernwin.TCCRT_FLATida_kernwin.TCCRT_GRAPHida_kernwin.execute_sync
Dump function flowchart
Dumps the current function’s flowchart, using 2 methods:
- the low-level
ida_gdl.qflow_chart_ttype - the somewhat higher-level, and slightly more pythonic
ida_gdl.FlowCharttype.
| Source code | Keywords | Level |
|---|---|---|
| dump_flowchart.py | Beginner |
APIs Used:
ida_funcs.get_funcida_gdl.FlowChartida_gdl.qflow_chart_tida_kernwin.get_screen_ea
Insert information into listing prefixes
By default, disassembly line prefixes contain segment + address information (e.g., ‘.text:08047718’), but it is possible to “inject” other bits of information in there, thanks to the ida_lines.user_defined_prefix_t helper type.
| Source code | Keywords | Level |
|---|---|---|
| install_user_defined_prefix.py | plugin | Beginner |
APIs Used:
ida_idaapi.PLUGIN_KEEPida_idaapi.plugin_tida_lines.SCOLOR_INVida_lines.user_defined_prefix_t
Enumerate file imports
Using the API to enumerate file imports.
| Source code | Keywords | Level |
|---|---|---|
| list_imports.py | Beginner |
APIs Used:
ida_nalt.enum_import_namesida_nalt.get_import_module_nameida_nalt.get_import_module_qty
Enumerate patched bytes
Using the API to iterate over all the places in the file, that were patched using IDA.
| Source code | Keywords | Level |
|---|---|---|
| list_patched_bytes.py | Beginner |
APIs Used:
ida_bytes.visit_patched_bytesida_idaapi.BADADDR
Enumerate known problems
Using the API to list all problems that IDA encountered during analysis.
| Source code | Keywords | Level |
|---|---|---|
| list_problems.py | Beginner |
APIs Used:
ida_ida.inf_get_min_eaida_idaapi.BADADDRida_problems.PR_ATTNida_problems.PR_BADSTACKida_problems.PR_COLLISIONida_problems.PR_DECIMPida_problems.PR_DISASMida_problems.PR_FINALida_problems.PR_HEADida_problems.PR_ILLADDRida_problems.PR_JUMPida_problems.PR_MANYLINESida_problems.PR_NOBASEida_problems.PR_NOCMTida_problems.PR_NOFOPida_problems.PR_NONAMEida_problems.PR_NOXREFSida_problems.PR_ROLLEDida_problems.get_problemida_problems.get_problem_name
List segment functions (and cross-references to them)
List all the functions in the current segment, as well as all the cross-references to them.
| Source code | Keywords | Level |
|---|---|---|
| list_segment_functions.py | xrefs | Beginner |
APIs Used:
ida_funcs.get_funcida_funcs.get_func_nameida_funcs.get_next_funcida_kernwin.get_screen_eaida_segment.getsegida_xref.xrefblk_t
List all functions (and cross-references) in segment
List all the functions in the current segment, as well as all the cross-references to them.
Contrary to @list_segment_functions, this uses the somewhat higher-level idautils module.
| Source code | Keywords | Level |
|---|---|---|
| list_segment_functions_using_idautils.py | xrefs | Beginner |
APIs Used:
ida_funcs.get_func_nameida_idaapi.BADADDRida_kernwin.get_screen_eaida_segment.getsegidautils.CodeRefsToidautils.Functions
Dump the strings that are present in the file
This uses idautils.Strings to iterate over the string literals that are present in the IDB. Contrary to @show_selected_strings, this will not require that the “Strings” window is opened & available.
| Source code | Keywords | Level |
|---|---|---|
| list_strings.py | Beginner |
APIs Used:
ida_nalt.STRTYPE_Cida_nalt.STRTYPE_C_16idautils.Strings
Produce disassembly listing for the entire file
Automate IDA to perform auto-analysis on a file and, once that is done, produce a .lst file with the disassembly.
Run like so:
ida -A "-S...path/to/produce_lst_file.py" <binary-file>
where:
- -A instructs IDA to run in non-interactive mode
- -S holds a path to the script to run (note this is a single token; there is no space between ‘-S’ and its path.)
| Source code | Keywords | Level |
|---|---|---|
| produce_lst_file.py | Beginner |
APIs Used:
ida_auto.auto_waitida_fpro.qfile_tida_ida.inf_get_max_eaida_ida.inf_get_min_eaida_loader.OFILE_LSTida_loader.PATH_TYPE_IDBida_loader.gen_fileida_loader.get_pathida_pro.qexit
Rewrite the representation of some instructions
Implements disassembly of BUG_INSTR used in Linux kernel BUG() macro, which is architecturally undefined and is not disassembled by IDA’s ARM module
See Linux/arch/arm/include/asm/bug.h for more info
| Source code | Keywords | Level |
|---|---|---|
| ana_emu_out.py | IDP_Hooks | Intermediate |
APIs Used:
ida_bytes.get_wide_dwordida_bytes.get_wide_wordida_idp.CUSTOM_INSN_ITYPEida_idp.IDP_Hooksida_idp.PLFM_ARMida_idp.ph.idida_idp.str2regida_segregs.get_sreg
Implement assembly of instructions
We add support for assembling the following pseudo instructions:
- “zero eax” -> xor eax, eax
- “nothing” -> nop
| Source code | Keywords | Level |
|---|---|---|
| assemble.py | IDP_Hooks | Intermediate |
APIs Used:
ida_idp.IDP_Hooksidautils.DecodeInstruction
Retrieve comments surrounding instructions
Use the ida_lines.get_extra_cmt API to retrieve anterior and posterior extra comments.
This script registers two actions, that can be used to dump the previous and next extra comments.
| Source code | Keywords | Level |
|---|---|---|
| dump_extra_comments.py | ctxmenu | Intermediate |
APIs Used:
ida_kernwin.AST_DISABLE_FOR_WIDGETida_kernwin.AST_ENABLE_FOR_WIDGETida_kernwin.BWN_DISASMida_kernwin.action_desc_tida_kernwin.action_handler_tida_kernwin.attach_action_to_popupida_kernwin.find_widgetida_kernwin.get_screen_eaida_kernwin.register_actionida_kernwin.unregister_actionida_lines.E_NEXTida_lines.E_PREVida_lines.get_extra_cmtida_view
Dump function information
Dump some of the most interesting bits of information about the function we are currently looking at.
| Source code | Keywords | Level |
|---|---|---|
| dump_func_info.py | Intermediate |
APIs Used:
ida_funcs.FUNC_FRAMEida_funcs.FUNC_LUMINAida_funcs.FUNC_OUTLINEida_funcs.FUNC_THUNKida_funcs.get_fchunkida_funcs.is_func_entryida_funcs.is_func_tailida_kernwin.get_screen_ea
Using “ida_bytes.find_string”
IDAPython’s ida_bytes.find_string can be used to implement a simple replacement for the ‘Search > Sequence of bytes…’ dialog, that lets users search for sequences of bytes that compose string literals in the binary file (either in the default 1-byte-per-char encoding, or as UTF-16.)
| Source code | Keywords | Level |
|---|---|---|
| find_string.py | Intermediate |
APIs Used:
ida_bytes.BIN_SEARCH_FORWARDida_bytes.BIN_SEARCH_NOBREAKida_bytes.BIN_SEARCH_NOSHOWida_bytes.find_stringida_ida.inf_get_max_eaida_idaapi.BADADDRida_kernwin.AST_DISABLE_FOR_WIDGETida_kernwin.AST_ENABLE_FOR_WIDGETida_kernwin.BWN_DISASMida_kernwin.Formida_kernwin.Form.ChkGroupControlida_kernwin.Form.StringInputida_kernwin.action_desc_tida_kernwin.action_handler_tida_kernwin.get_screen_eaida_kernwin.jumptoida_kernwin.register_actionida_nalt.BPU_1Bida_nalt.BPU_2Bida_nalt.get_default_encoding_idx
Print notifications about function prototype changes
The goal of this script is to demonstrate some usage of the type API. In this script, we will create an IDB hook that intercepts ti_changed IDB events, and if it is a function prototype that changed, print it.
| Source code | Keywords | Level |
|---|---|---|
| func_ti_changed_listener.py | IDB_Hooks | Intermediate |
APIs Used:
ida_funcs.get_func_nameida_idp.IDB_Hooksida_typeinf.tinfo_t
List listing bookmarks
This sample shows how to programmatically access the list of bookmarks placed in a listing widget (e.g., “IDA View-A”, “Pseudocode-”, …) using the low-level ida_moves.bookmarks_t type.
| Source code | Keywords | Level |
|---|---|---|
| list_bookmarks.py | bookmarks | Intermediate |
APIs Used:
ida_kernwin.AST_DISABLE_FOR_WIDGETida_kernwin.AST_ENABLE_FOR_WIDGETida_kernwin.action_desc_tida_kernwin.action_handler_tida_kernwin.get_current_viewerida_kernwin.get_viewer_user_dataida_kernwin.get_widget_titleida_kernwin.register_actionida_moves.bookmarks_t
Showcase (some of) the iterators available on a function
This demonstrates how to use some of the iterators available on the func_t type.
This example will focus on:
func_t[.__iter__]: the default iterator; iterates on instructionsfunc_t.data_items: iterate on data items contained within a functionfunc_t.head_items: iterate on ‘heads’ (i.e., addresses containing the start of an instruction, or a data item.func_t.addresses: iterate on all addresses within function (code and data, beginning of an item or not)
Type help(ida_funcs.func_t) for a full list of iterators.
In addition, one can use:
func_tail_iterator_t: iterate on all the chunks (including the main one) of the functionfunc_parent_iterator_t: iterate on all the parent functions, that include this chunk
| Source code | Keywords | Level |
|---|---|---|
| list_function_items.py | funcs iterator | Intermediate |
APIs Used:
ida_bytes.get_flagsida_bytes.is_codeida_bytes.is_dataida_bytes.is_tailida_bytes.is_unknownida_funcs.func_tail_iterator_tida_funcs.get_fchunkida_funcs.get_funcida_funcs.get_func_nameida_kernwin.get_screen_eaida_ua.print_insn_mnem
React to database events/notifications
These hooks will be notified about IDB events, and dump their information to the “Output” window
| Source code | Keywords | Level |
|---|---|---|
| log_idb_events.py | IDB_Hooks | Intermediate |
APIs Used:
ida_idp.IDB_Hooks
React to processor events/notifications
These hooks will be notified about IDP events, and dump their information to the “Output” window
| Source code | Keywords | Level |
|---|---|---|
| log_idp_events.py | IDP_Hooks | Intermediate |
APIs Used:
ida_idp.IDP_Hooks
Record and replay changes in function prototypes
This is a sample script, that will record (in memory) all changes in functions prototypes, in order to re-apply them later.
To use this script:
- open an IDB (say, “test.idb”)
- modify some functions prototypes (e.g., by triggering the ‘Y’ shortcut when the cursor is placed on the first address of a function)
- reload that IDB, without saving it first
- call rpc.replay(), to re-apply the modifications.
Note: ‘ti_changed’ is also called for changes to the function frames, but we’ll only record function prototypes changes.
| Source code | Keywords | Level |
|---|---|---|
| replay_prototypes_changes.py | IDB_Hooks | Intermediate |
APIs Used:
ida_funcs.get_funcida_idp.IDB_Hooksida_typeinf.PRTYPE_1LINEida_typeinf.TINFO_DEFINITEida_typeinf.apply_tinfoida_typeinf.get_idatiida_typeinf.tinfo_t
Add a new member to an existing function frame
The goal of this script is to demonstrate some usage of the type API. In this script, we show a way to add a new frame member (a pointer to an uint64) inside a wide enough gap in the frame:
- Get the function object surrounding cursor location.
- Use this function to retrieve the corresponding frame object.
- Find a wide enough gap to create our new member.
- If found, we use cal_frame_offset() to get the actual offset in the frame structure.
- Use the previous result to add the new member.
| Source code | Keywords | Level |
|---|---|---|
| add_frame_member.py | Advanced |
APIs Used:
ida_frame.add_frame_memberida_frame.calc_frame_offsetida_frame.get_func_frameida_funcs.get_funcida_range.rangeset_tida_typeinf.BTF_UINT64ida_typeinf.tinfo_tidc.here
Custom data types & printers
IDA can be extended to support certain data types that it does not know about out-of-the-box.
A ‘custom data type’ provide information about the type & size of a piece of data, while a ‘custom data format’ is in charge of formatting that data (there can be more than one format for a specific ‘custom data type’.)
| Source code | Keywords | Level |
|---|---|---|
| custom_data_types_and_formats.py | Advanced |
APIs Used:
ida_bytes.data_format_tida_bytes.data_type_tida_bytes.find_custom_data_typeida_bytes.get_byteida_bytes.register_data_types_and_formatsida_bytes.unregister_data_types_and_formatsida_idaapi.NW_CLOSEIDBida_idaapi.NW_OPENIDBida_idaapi.NW_REMOVEida_idaapi.NW_TERMIDAida_idaapi.notify_whenida_idaapi.struct_unpackida_lines.COLSTRida_lines.SCOLOR_IMPNAMEida_lines.SCOLOR_INSNida_lines.SCOLOR_NUMBERida_lines.SCOLOR_REGida_nalt.get_input_file_pathida_netnode.netnodeida_typeinf.tinfo_t
List operands representing a “path” to a (possibly nested) structure member
It is possible to assign, to instruction operands, the notion of “structure offset”, which really is a pointer to a specific offset in a type, leading to a possible N-deep path within types.
E.g., assuming the following types
struct c
{
int foo;
int bar;
int baz;
int quux;
int trail;
};
struct b
{
int gap;
c c_instance;
};
struct a
{
int count;
b b_instance;
};
and assuming an instruction that initially looks like this:
mov eax, 10h
by pressing t, the user will be able set the “structure offset” to either:
c.trailb.c_instance.quuxa.b_inscance.c_instance.baz
Here’s why IDA offers a.b_inscance.c_instance.baz:
0000 struct a
{
0000 int count;
0004 struct b
{
0004 int gap;
0008 struct c
{
0008 int foo;
000C int bar;
0010 int baz;
0014 int quux;
0018 int trail;
};
};
};
This sample shows how to programmatically retrieve information about that “structure member path” that an operand was made pointing to.
| Source code | Keywords | Level |
|---|---|---|
| list_struct_accesses.py | bookmarks | Advanced |
APIs Used:
ida_bytes.get_full_flagsida_bytes.get_stroff_pathida_bytes.is_stroffida_typeinf.get_tid_nameida_typeinf.tinfo_tida_ua.decode_insnida_ua.insn_tida_ua.o_immida_ua.o_void
Notify the user when an instruction operand changes
Show notifications whenever the user changes an instruction’s operand, or a data item.
| Source code | Keywords | Level |
|---|---|---|
| operand_changed.py | IDB_Hooks | Advanced |
APIs Used:
ida_bytes.ALOPT_IGNCLTida_bytes.ALOPT_IGNHEADSida_bytes.get_flagsida_bytes.get_max_strlit_lengthida_bytes.get_opinfoida_bytes.get_strlit_contentsida_bytes.is_custfmtida_bytes.is_customida_bytes.is_enumida_bytes.is_offida_bytes.is_strlitida_bytes.is_stroffida_bytes.is_structida_idp.IDB_Hooksida_nalt.STRENC_DEFAULTida_nalt.get_default_encoding_idxida_nalt.get_encoding_nameida_nalt.get_str_encoding_idxida_nalt.get_strtype_bpuida_nalt.opinfo_tida_typeinf.get_tid_nameida_typeinf.tinfo_t
Produce C listing for the entire file
Automate IDA to perform auto-analysis on a file and, once that is done, produce a .c file containing the decompilation of all the functions in that file.
Run like so:
ida -A "-S...path/to/produce_c_file.py" <binary-file>
where:
- -A instructs IDA to run in non-interactive mode
- -S holds a path to the script to run (note this is a single token; there is no space between ‘-S’ and its path.)
| Source code | Keywords | Level |
|---|---|---|
| produce_c_file.py | Beginner |
APIs Used:
ida_auto.auto_waitida_hexrays.VDRUN_MAYSTOPida_hexrays.VDRUN_NEWFILEida_hexrays.VDRUN_SILENTida_hexrays.decompile_manyida_loader.PATH_TYPE_IDBida_loader.get_pathida_pro.qexit
Decompile & print current function
Decompile the function under the cursor
| Source code | Keywords | Level |
|---|---|---|
| vds1.py | Beginner |
APIs Used:
ida_funcs.get_funcida_hexrays.decompileida_hexrays.get_hexrays_versionida_hexrays.init_hexrays_pluginida_kernwin.get_screen_eaida_lines.tag_remove
Generate microcode for the selected range of instructions
Generates microcode for selection and dumps it to the output window.
| Source code | Keywords | Level |
|---|---|---|
| vds13.py | Beginner |
APIs Used:
ida_bytes.get_flagsida_bytes.is_codeida_hexrays.DECOMP_WARNINGSida_hexrays.gen_microcodeida_hexrays.hexrays_failure_tida_hexrays.init_hexrays_pluginida_hexrays.mba_ranges_tida_hexrays.vd_printer_tida_kernwin.read_range_selectionida_kernwin.warningida_range.range_t
Dump statement blocks
Using a ida_hexrays.ctree_visitor_t, search for ida_hexrays.cit_block instances and dump them.
| Source code | Keywords | Level |
|---|---|---|
| vds7.py | Hexrays_Hooks | Beginner |
APIs Used:
ida_hexrays.CMAT_BUILTida_hexrays.CV_FASTida_hexrays.Hexrays_Hooksida_hexrays.cit_blockida_hexrays.ctree_visitor_tida_hexrays.init_hexrays_plugin
Provide custom decompiler hints
Handle ida_hexrays.hxe_create_hint notification using hooks, to return our own.
If the object under the cursor is:
- a function call, prefix the original decompiler hint with
==> - a local variable declaration, replace the hint with our own in the form of
!{varname}(where{varname}is replaced with the variable name) - an
ifstatement, replace the hint with our own, saying “condition”
| Source code | Keywords | Level |
|---|---|---|
| vds_create_hint.py | Hexrays_Hooks | Beginner |
APIs Used:
ida_hexrays.Hexrays_Hooksida_hexrays.USE_MOUSEida_hexrays.VDI_EXPRida_hexrays.VDI_LVARida_hexrays.cit_ifida_hexrays.cot_call
Interactively color decompilation lines
Provides an action that can be used to dynamically alter the lines background rendering for pseudocode listings (as opposed to using ida_hexrays.cfunc_t.pseudocode[N].bgcolor)
After running this script, pressing ‘M’ on a line in a “Pseudocode-?” widget, will cause that line to be rendered with a special background color.
| Source code | Keywords | Level |
|---|---|---|
| colorize_pseudocode_lines.py | colors UI_Hooks | Intermediate |
APIs Used:
ida_hexrays.get_widget_vduiida_kernwin.AST_DISABLE_FOR_WIDGETida_kernwin.AST_ENABLE_FOR_WIDGETida_kernwin.BWN_PSEUDOCODEida_kernwin.CK_EXTRA11ida_kernwin.UI_Hooksida_kernwin.action_desc_tida_kernwin.action_handler_tida_kernwin.get_custom_viewer_locationida_kernwin.line_rendering_output_entry_tida_kernwin.refresh_custom_viewerida_kernwin.register_actionida_moves.lochist_entry_t
Decompile entrypoint automatically
Attempts to load a decompiler plugin corresponding to the current architecture right after auto-analysis is performed, and then tries to decompile the function at the first entrypoint.
It is particularly suited for use with the ‘-S’ flag, for example: idat -Ldecompile.log -Sdecompile_entry_points.py -c file
| Source code | Keywords | Level |
|---|---|---|
| decompile_entry_points.py | Intermediate |
APIs Used:
ida_auto.auto_waitida_entry.get_entryida_entry.get_entry_ordinalida_entry.get_entry_qtyida_hexrays.decompileida_hexrays.init_hexrays_pluginida_idp.PLFM_386ida_idp.PLFM_ARMida_idp.PLFM_MIPSida_idp.PLFM_PPCida_idp.PLFM_RISCVida_idp.ph.idida_kernwin.cvar.batchida_kernwin.msgida_loader.load_pluginida_pro.qexitidc.get_idb_path
Add custom microcode instruction optimization rule
Installs a custom microcode instruction optimization rule, to transform:
call !DbgRaiseAssertionFailure <fast:>.0
into
call !DbgRaiseAssertionFailure <fast:"char *" "assertion text">.0
To see this plugin in action please use arm64_brk.i64
| Source code | Keywords | Level |
|---|---|---|
| vds10.py | plugin | Intermediate |
APIs Used:
ida_bytes.get_cmtida_hexrays.init_hexrays_pluginida_hexrays.mop_strida_hexrays.optinsn_tida_idaapi.PLUGIN_HIDEida_idaapi.PLUGIN_KEEPida_idaapi.plugin_tida_typeinf.STI_PCCHARida_typeinf.tinfo_t.get_stock
Dynamically provide a custom call type
This plugin can greatly improve decompilation of indirect calls:
call [eax+4]
For them, the decompiler has to guess the prototype of the called function. This has to be done at a very early phase of decompilation because the function prototype influences the data flow analysis. On the other hand, we do not have global data flow analysis results yet because we haven’t analyzed all calls in the function. It is a chicked-and-egg problem.
The decompiler uses various techniques to guess the called function prototype. While it works very well, it may fail in some cases.
To fix, the user can specify the call prototype manually, using “Edit, Operand types, Set operand type” at the call instruction.
This plugin illustrates another approach to the problem: if you happen to be able to calculate the call prototypes dynamically, this is how to inform the decompiler about them.
| Source code | Keywords | Level |
|---|---|---|
| vds21.py | Hexrays_Hooks plugin | Intermediate |
APIs Used:
ida_hexrays.Hexrays_Hooksida_hexrays.init_hexrays_pluginida_hexrays.m_callida_hexrays.mcallinfo_tida_idaapi.PLUGIN_HIDEida_idaapi.PLUGIN_KEEPida_idaapi.plugin_tida_kernwin.msgida_kernwin.warningida_nalt.get_op_tinfoida_typeinf.BT_INTida_typeinf.CM_CC_STDCALLida_typeinf.CM_N32_F48ida_typeinf.parse_declida_typeinf.tinfo_t
Dump user-defined information for a function
Prints user-defined information to the “Output” window. Namely:
- user defined label names
- user defined indented comments
- user defined number formats
- user defined local variable names, types, comments
This script loads information from the database without decompiling anything.
| Source code | Keywords | Level |
|---|---|---|
| vds4.py | Intermediate |
APIs Used:
ida_bytes.get_radixida_funcs.get_funcida_hexrays.CIT_COLLAPSEDida_hexrays.NF_NEGATEida_hexrays.init_hexrays_pluginida_hexrays.lvar_uservec_tida_hexrays.restore_user_cmtsida_hexrays.restore_user_iflagsida_hexrays.restore_user_labelsida_hexrays.restore_user_lvar_settingsida_hexrays.restore_user_numformsida_hexrays.user_cmts_freeida_hexrays.user_iflags_freeida_hexrays.user_labels_freeida_hexrays.user_numforms_freeida_kernwin.get_screen_ea
Superficially modify the decompilation output
Modifies the decompilation output in a superficial manner, by removing some white spaces
Note: this is rather crude, not quite “pythonic” code.
| Source code | Keywords | Level |
|---|---|---|
| vds6.py | Hexrays_Hooks plugin | Intermediate |
APIs Used:
ida_hexrays.Hexrays_Hooksida_hexrays.init_hexrays_pluginida_idaapi.PLUGIN_HIDEida_idaapi.PLUGIN_KEEPida_idaapi.plugin_tida_lines.tag_advanceida_lines.tag_skipcodes
Improve decompilation by turning specific patterns into custom function calls
Registers an action that uses a ida_hexrays.udc_filter_t to decompile svc 0x900001 and svc 0x9000F8 as function calls to svc_exit() and svc_exit_group() respectively.
You will need to have an ARM + Linux IDB for this script to be usable
In addition to having a shortcut, the action will be present in the context menu.
| Source code | Keywords | Level |
|---|---|---|
| vds8.py | ctxmenu UI_Hooks | Intermediate |
APIs Used:
ida_allins.ARM_svcida_hexrays.get_widget_vduiida_hexrays.init_hexrays_pluginida_hexrays.install_microcode_filterida_hexrays.udc_filter_tida_kernwin.AST_DISABLE_FOR_WIDGETida_kernwin.AST_ENABLE_FOR_WIDGETida_kernwin.BWN_PSEUDOCODEida_kernwin.UI_Hooksida_kernwin.action_desc_tida_kernwin.action_handler_tida_kernwin.attach_action_to_popupida_kernwin.get_widget_typeida_kernwin.register_action
React to decompiler events/notifications
Shows how to hook to many notifications sent by the decompiler.
This plugin doesn’t really accomplish anything: it just prints the parameters.
The list of notifications handled below should be exhaustive, and is there to hint at what is possible to accomplish by subclassing ida_hexrays.Hexrays_Hooks
| Source code | Keywords | Level |
|---|---|---|
| vds_hooks.py | Hexrays_Hooks | Intermediate |
APIs Used:
ida_hexrays.Hexrays_Hooksida_hexrays.cfunc_tida_hexrays.lvar_tida_hexrays.vdui_t
Modifying function local variables
Use a ida_hexrays.user_lvar_modifier_t to modify names, comments and/or types of local variables.
| Source code | Keywords | Level |
|---|---|---|
| vds_modify_user_lvars.py | Intermediate |
APIs Used:
ida_hexrays.modify_user_lvarsida_hexrays.user_lvar_modifier_tida_typeinf.parse_declidc.here
Print information about the current position in decompilation
Shows how user input information can be retrieved during processing of a notification triggered by that input
| Source code | Keywords | Level |
|---|---|---|
| curpos_details.py | Hexrays_Hooks | Advanced |
APIs Used:
ida_hexrays.Hexrays_Hooksida_kernwin.get_user_input_eventida_kernwin.iek_key_pressida_kernwin.iek_key_releaseida_kernwin.iek_mouse_button_pressida_kernwin.iek_mouse_button_releaseida_kernwin.iek_mouse_wheelida_kernwin.iek_shortcutida_kernwin.input_event_t
Add a custom microcode block optimization rule
Installs a custom microcode block optimization rule, to transform:
goto L1
...
L1:
goto L2
into
goto L2
In other words we fix a goto target if it points to a chain of gotos. This improves the decompiler output in some cases.
| Source code | Keywords | Level |
|---|---|---|
| vds11.py | plugin | Advanced |
APIs Used:
ida_hexrays.getf_reginsnida_hexrays.init_hexrays_pluginida_hexrays.m_gotoida_hexrays.optblock_tida_idaapi.PLUGIN_HIDEida_idaapi.PLUGIN_KEEPida_idaapi.plugin_t
List instruction registers
Shows a list of direct references to a register from the current instruction.
| Source code | Keywords | Level |
|---|---|---|
| vds12.py | Advanced |
APIs Used:
ida_bytes.get_flagsida_bytes.is_codeida_funcs.get_funcida_hexrays.ACFL_GUESSida_hexrays.DECOMP_NO_CACHEida_hexrays.DECOMP_WARNINGSida_hexrays.GCO_DEFida_hexrays.GCO_USEida_hexrays.GC_REGS_AND_STKVARSida_hexrays.MERR_OKida_hexrays.MMAT_PREOPTIMIZEDida_hexrays.MUST_ACCESSida_hexrays.gco_info_tida_hexrays.gen_microcodeida_hexrays.get_current_operandida_hexrays.get_merror_descida_hexrays.hexrays_failure_tida_hexrays.init_hexrays_pluginida_hexrays.mba_ranges_tida_hexrays.mlist_tida_hexrays.op_parent_info_tida_hexrays.voff_tida_kernwin.Chooseida_kernwin.get_screen_eaida_kernwin.jumptoida_kernwin.warningida_lines.GENDSM_REMOVE_TAGSida_lines.generate_disasm_lineida_pro.eavec_t
Invoke the structure offset-choosing dialog from decompilation
Registers an action opens the “Select offsets” widget (select_udt_by_offset() call).
This effectively repeats the functionality already available through Alt+Y.
Place cursor on the union field and press Shift+T
| Source code | Keywords | Level |
|---|---|---|
| vds17.py | plugin | Advanced |
APIs Used:
ida_hexrays.USE_KEYBOARDida_hexrays.cot_addida_hexrays.cot_castida_hexrays.cot_memptrida_hexrays.cot_memrefida_hexrays.cot_numida_hexrays.cot_refida_hexrays.get_hexrays_versionida_hexrays.get_widget_vduiida_hexrays.init_hexrays_pluginida_hexrays.select_udt_by_offsetida_hexrays.ui_stroff_applicator_tida_hexrays.ui_stroff_ops_tida_idaapi.BADADDRida_idaapi.PLUGIN_HIDEida_idaapi.PLUGIN_KEEPida_idaapi.plugin_tida_kernwin.AST_DISABLE_FOR_WIDGETida_kernwin.AST_ENABLE_FOR_WIDGETida_kernwin.BWN_PSEUDOCODEida_kernwin.action_desc_tida_kernwin.action_handler_tida_kernwin.get_custom_viewer_curlineida_kernwin.msgida_kernwin.register_actionida_kernwin.warningida_lines.tag_removeida_typeinf.PRTYPE_1LINEida_typeinf.print_tinfoida_typeinf.remove_pointer
Add a custom microcode instruction optimization rule
Installs a custom microcode instruction optimization rule, to transform:
x | ~x
into
-1
To see this plugin in action please use be_ornot_be.idb
| Source code | Keywords | Level |
|---|---|---|
| vds19.py | plugin | Advanced |
APIs Used:
ida_hexrays.init_hexrays_pluginida_hexrays.m_bnotida_hexrays.m_movida_hexrays.m_orida_hexrays.minsn_visitor_tida_hexrays.mop_tida_hexrays.optinsn_tida_idaapi.PLUGIN_HIDEida_idaapi.PLUGIN_KEEPida_idaapi.plugin_t
Invert if/else blocks in decompilation
Registers an action that can be used to invert the if and else blocks of a ida_hexrays.cif_t.
For example, a statement like
if ( cond )
{
statements1;
}
else
{
statements2;
}
will be displayed as
if ( !cond )
{
statements2;
}
else
{
statements1;
}
The modifications are persistent: the user can quit & restart IDA, and the changes will be present.
| Source code | Keywords | Level |
|---|---|---|
| vds3.py | ctxmenu Hexrays_Hooks IDP_Hooks plugin | Advanced |
APIs Used:
ida_hexrays.CMAT_FINALida_hexrays.CV_FASTida_hexrays.CV_INSNSida_hexrays.Hexrays_Hooksida_hexrays.ITP_ELSEida_hexrays.USE_KEYBOARDida_hexrays.VDI_TAILida_hexrays.cexpr_tida_hexrays.cit_ifida_hexrays.ctree_visitor_tida_hexrays.get_widget_vduiida_hexrays.init_hexrays_pluginida_hexrays.lnotida_hexrays.qswapida_idaapi.PLUGIN_HIDEida_idaapi.PLUGIN_KEEPida_idaapi.plugin_tida_idp.IDP_Hooksida_kernwin.AST_DISABLE_FOR_WIDGETida_kernwin.AST_ENABLE_FOR_WIDGETida_kernwin.BWN_PSEUDOCODEida_kernwin.action_desc_tida_kernwin.action_handler_tida_kernwin.attach_action_to_popupida_kernwin.register_actionida_netnode.netnode
Dump C-tree graph
Registers an action that can be used to show the graph of the ctree. The current item will be highlighted in the graph.
The command shortcut is Ctrl+Shift+G, and is also added to the context menu.
To display the graph, we produce a .gdl file, and request that ida displays that using ida_gdl.display_gdl.
| Source code | Keywords | Level |
|---|---|---|
| vds5.py | ctxmenu Hexrays_Hooks plugin | Advanced |
APIs Used:
ida_gdl.display_gdlida_hexrays.Hexrays_Hooksida_hexrays.USE_KEYBOARDida_hexrays.cit_asmida_hexrays.cit_gotoida_hexrays.cot_helperida_hexrays.cot_memptrida_hexrays.cot_memrefida_hexrays.cot_numida_hexrays.cot_objida_hexrays.cot_ptrida_hexrays.cot_strida_hexrays.cot_varida_hexrays.ctree_parentee_tida_hexrays.get_ctype_nameida_hexrays.get_widget_vduiida_hexrays.init_hexrays_pluginida_idaapi.PLUGIN_HIDEida_idaapi.PLUGIN_KEEPida_idaapi.plugin_tida_kernwin.AST_DISABLE_FOR_WIDGETida_kernwin.AST_ENABLE_FOR_WIDGETida_kernwin.BWN_PSEUDOCODEida_kernwin.action_desc_tida_kernwin.action_handler_tida_kernwin.attach_action_to_popupida_kernwin.register_actionida_kernwin.warningida_lines.tag_removeida_pro.str2user
Show decompiler cross-references
Show decompiler-style Xref when the Ctrl+X key is pressed in the Decompiler window.
- supports any global name: functions, strings, integers, …
- supports structure member.
| Source code | Keywords | Level |
|---|---|---|
| vds_xrefs.py | ctxmenu Hexrays_Hooks | Advanced |
APIs Used:
ida_funcs.get_func_nameida_hexrays.DECOMP_GXREFS_FORCEida_hexrays.Hexrays_Hooksida_hexrays.USE_KEYBOARDida_hexrays.VDI_EXPRida_hexrays.VDI_FUNCida_hexrays.cexpr_tida_hexrays.cfunc_tida_hexrays.cinsn_tida_hexrays.decompileida_hexrays.get_widget_vduiida_hexrays.init_hexrays_pluginida_hexrays.open_pseudocodeida_hexrays.qstring_printer_tida_idaapi.BADADDRida_kernwin.AST_DISABLEida_kernwin.AST_DISABLE_FOR_WIDGETida_kernwin.AST_ENABLEida_kernwin.BWN_PSEUDOCODEida_kernwin.PluginFormida_kernwin.PluginForm.Showida_kernwin.action_desc_tida_kernwin.action_handler_tida_kernwin.attach_action_to_popupida_kernwin.register_actionida_typeinf.PRTYPE_1LINEida_typeinf.STRMEM_OFFSETida_typeinf.print_tinfoida_typeinf.tinfo_tida_typeinf.udm_tidautils.Functionsidautils.XrefsTo
Print all registers, for all threads in the debugged process
Iterate over the list of threads in the program being debugged, and dump all registers contents
To use this example:
- run
ida64on test programsimple_appcall_linux64, oridaon test programsimple_appcall_linux32, and wait for auto-analysis to finish - put a breakpoint somewhere in the code
- select the ‘linux debugger’ (either local, or remote)
- start debugging
- Press Alt+Shift+C at the breakpoint
| Source code | Keywords | Level |
|---|---|---|
| print_registers.py | Beginner |
APIs Used:
ida_dbg.get_reg_valsida_dbg.get_thread_qtyida_dbg.getn_threadida_idd.get_dbgida_kernwin.AST_ENABLE_ALWAYSida_kernwin.action_desc_tida_kernwin.register_action
Dump symbols from a process being debugged
Queries the debugger (possibly remotely) for the list of symbols that the process being debugged, provides.
| Source code | Keywords | Level |
|---|---|---|
| show_debug_names.py | Beginner |
APIs Used:
ida_dbg.DSTATE_SUSPida_dbg.get_process_stateida_dbg.is_debugger_onida_ida.inf_get_max_eaida_ida.inf_get_min_eaida_name.get_debug_names
Print call stack
Print the return addresses from the call stack at a breakpoint, when debugging a Linux binary. (and also print the module and the debug name from debugger)
To use this example:
- run
idaon test programsimple_appcall_linux64, oridaon test programsimple_appcall_linux32, and wait for auto-analysis to finish - put a breakpoint where you want to see the call stack
- select the ‘linux debugger’ (either local, or remote)
- start debugging
- Press Shift+C at the breakpoint
| Source code | Keywords | Level |
|---|---|---|
| print_call_stack.py | Intermediate |
APIs Used:
ida_dbg.collect_stack_traceida_dbg.get_current_threadida_dbg.get_module_infoida_idd.call_stack_tida_idd.modinfo_tida_kernwin.AST_ENABLE_ALWAYSida_kernwin.action_desc_tida_kernwin.register_actionida_name.GNCN_NOCOLORida_name.GNCN_NOLABELida_name.GNCN_NOSEGida_name.GNCN_PREFDBGida_name.get_nice_colored_name
Add a custom action to the “registers” widget
It’s possible to add actions to the context menu of pretty much all widgets in IDA.
This example shows how to do just that for registers-displaying widgets (e.g., “General registers”)
| Source code | Keywords | Level |
|---|---|---|
| registers_context_menu.py | ctxmenu UI_Hooks | Intermediate |
APIs Used:
ida_dbg.get_dbg_reg_infoida_dbg.get_reg_valida_idd.register_info_tida_kernwin.AST_DISABLE_FOR_WIDGETida_kernwin.AST_ENABLE_FOR_WIDGETida_kernwin.BWN_CPUREGSida_kernwin.UI_Hooksida_kernwin.action_desc_tida_kernwin.action_handler_tida_kernwin.attach_action_to_popupida_kernwin.get_widget_typeida_kernwin.register_actionida_ua.dt_byteida_ua.dt_dwordida_ua.dt_qwordida_ua.dt_word
Programmatically drive a debugging session
Start a debugging session, step through the first five instructions. Each instruction is disassembled after execution.
| Source code | Keywords | Level |
|---|---|---|
| automatic_steps.py | DBG_Hooks | Advanced |
APIs Used:
ida_dbg.DBG_Hooksida_dbg.get_reg_valida_dbg.request_exit_processida_dbg.request_run_toida_dbg.request_step_overida_dbg.run_requestsida_ida.inf_get_start_ipida_idaapi.BADADDRida_lines.generate_disasm_lineida_lines.tag_remove
React to trace notifications
This script demonstrates using the low-level tracing hook (ida_dbg.DBG_Hooks.dbg_trace). It can be run like so:
ida.exe -B -Sdbg_trace.py -Ltrace.log file.exe
| Source code | Keywords | Level |
|---|---|---|
| dbg_trace.py | DBG_Hooks | Advanced |
APIs Used:
GENDSM_FORCE_CODEGENDSM_REMOVE_TAGSNN_callNN_callfiNN_callnigenerate_disasm_lineida_dbg.DBG_Hooksida_dbg.ST_OVER_DEBUG_SEGida_dbg.ST_OVER_LIB_FUNCida_dbg.enable_step_traceida_dbg.get_process_stateida_dbg.get_reg_valida_dbg.get_step_trace_optionsida_dbg.load_debuggerida_dbg.refresh_debugger_memoryida_dbg.request_continue_processida_dbg.request_enable_step_traceida_dbg.request_set_step_trace_optionsida_dbg.run_requestsida_dbg.run_toida_dbg.set_step_trace_optionsida_dbg.wait_for_next_eventida_ida.f_ELFida_ida.f_MACHOida_ida.f_PEida_ida.inf_get_filetypeida_ida.inf_get_max_eaida_ida.inf_get_min_eaida_ida.inf_get_start_ipida_pro.qexitida_ua.decode_insnida_ua.insn_tidc.ARGV
Execute code into the application being debugged (on Linux)
Using the ida_idd.Appcall utility to execute code in the process being debugged.
This example will run the test program and stop wherever the cursor currently is, and then perform an appcall to execute the ref4 and ref8 functions.
To use this example:
- run
ida64on test programsimple_appcall_linux64, oridaon test programsimple_appcall_linux32, and wait for auto-analysis to finish - select the ‘linux debugger’ (either local, or remote)
- run this script
Note: the real body of code is in simple_appcall_common.py.
| Source code | Keywords | Level |
|---|---|---|
| simple_appcall_linux.py | Advanced |
APIs Used:
ida_dbg.DBG_Hooksida_dbg.run_toida_idaapi.BADADDRida_idd.Appcallida_idd.Appcall.byrefida_idd.Appcall.int64ida_kernwin.get_screen_eaida_name.get_name_eaida_name.set_nameida_typeinf.apply_cdecl
Execute code into the application being debugged (on Windows)
Using the ida_idd.Appcall utility to execute code in the process being debugged.
This example will run the test program and stop wherever the cursor currently is, and then perform an appcall to execute the ref4 and ref8 functions.
To use this example:
- run
idaon test programsimple_appcall_win64.exe, oridaon test programsimple_appcall_win32.exe, and wait for auto-analysis to finish - select the ‘windows debugger’ (either local, or remote)
- run this script
Note: the real body of code is in simple_appcall_common.py.
| Source code | Keywords | Level |
|---|---|---|
| simple_appcall_win.py | Advanced |
APIs Used:
ida_dbg.DBG_Hooksida_dbg.run_toida_ida.inf_is_64bitida_idaapi.BADADDRida_idd.Appcallida_idd.Appcall.byrefida_idd.Appcall.int64ida_kernwin.get_screen_eaida_name.get_name_eaida_name.set_nameida_typeinf.apply_cdecl
Create a structure by parsing its definition
The goal of this script is to demonstrate some usage of the type API. In this script, we create a structure using the “parsing” method.
| Source code | Keywords | Level |
|---|---|---|
| create_struct_by_parsing.py | Beginner |
APIs Used:
ida_typeinf.tinfo_t
Delete structure members that fall within an offset range
The goal of this script is to demonstrate some usage of the type API. In this script, we first create a structure with many members, and then remove all those that fall within a range.
| Source code | Keywords | Level |
|---|---|---|
| del_struct_members.py | Beginner |
APIs Used:
ida_typeinf.STRMEM_OFFSETida_typeinf.TERR_OKida_typeinf.tinfo_tida_typeinf.udm_t
Print enumeration members
In this example, we will first ask the user to provide the name of an enumeration, and then iterate on it
| Source code | Keywords | Level |
|---|---|---|
| list_enum_member.py | Beginner |
APIs Used:
ida_kernwin.ask_str
Print function stack frame information
The goal of this script is to demonstrate some usage of the type API. In this script, we retrieve the function frame structure, and iterate on the frame members.
| Source code | Keywords | Level |
|---|---|---|
| list_frame_info.py | Beginner |
APIs Used:
ida_funcs.get_funcida_kernwin.get_screen_ea
List database functions prototypes
This script demonstrates how to list a function return type along with its parameters types and name if any. We do this for all the functions found in the database.
| Source code | Keywords | Level |
|---|---|---|
| list_func_details.py | Beginner |
APIs Used:
ida_funcs.get_funcidautils.Functions
List structure members
The goal of this script is to demonstrate some usage of the type API. In this script, we:
- Ask the user for a structure name. It must already be present in the local types.
- Retrieve the structure type info from the local type
- Extract its type details (udt)
- Iterates it members and prints their names.
| Source code | Keywords | Level |
|---|---|---|
| list_struct_member.py | Beginner |
APIs Used:
ida_kernwin.ask_strida_typeinf.BTF_STRUCTida_typeinf.get_idatiida_typeinf.tinfo_tida_typeinf.udt_type_data_t
List cross-references to a structure
The goal of this script is to demonstrate some usage of the type API. In this script, we:
- Ask the user for a structure name. It must already be present in the local types.
- Get its tid
- Create the list of all the reference.
- Print it
| Source code | Keywords | Level |
|---|---|---|
| list_struct_xrefs.py | Beginner |
APIs Used:
ida_kernwin.choose_structida_typeinf.tinfo_tida_xref.xrefblk_t
List union members
The goal of this script is to demonstrate some usage of the type API. In this script, we:
- Ask the user for a union name. It must already be present in the local types.
- Retrieve the union type info from the local type
- Extract its type details (udt)
- Iterates it members and prints their names.
| Source code | Keywords | Level |
|---|---|---|
| list_union_member.py | Beginner |
APIs Used:
ida_kernwin.ask_strida_typeinf.BTF_UNIONida_typeinf.get_idatiida_typeinf.tinfo_tida_typeinf.udt_type_data_t
Mark a register “spoiled” by a function
At least two possibilies are offered in order to indicate that a function spoils registers (excluding the “normal” ones):
You can either parse & apply a declaration:
func_tfinfo = ida_typeinf.tinfo_t("int _spoils<rsi> main();")
ida_typeinf.apply_tinfo(func.start_ea, func_tinfo, ida_typeinf.TINFO_DEFINITE)
or retrieve & modify the tinfo_t object directly.
This script showcases the latter.
| Source code | Keywords | Level |
|---|---|---|
| mark_func_spoiled.py | Beginner |
APIs Used:
ida_funcs.get_funcida_idp.parse_reg_nameida_idp.reg_info_tida_kernwin.get_screen_eaida_nalt.get_tinfoida_typeinf.FTI_SPOILEDida_typeinf.TINFO_DEFINITEida_typeinf.apply_tinfoida_typeinf.func_type_data_tida_typeinf.tinfo_t
Apply function prototype to call sites
The goal of this script is to demonstrate some usage of the type API. In this script, we:
- Open the private type libary.
- Load its declaration in the type library by parsing its declaration and keep the return tuple for future use.
- Deserialize the type info stored in the returned tuple.
- Get the address of the function.
- Get the address of the code reference to the function and apply the type info there.
| Source code | Keywords | Level |
|---|---|---|
| apply_callee_tinfo.py | Intermediate |
APIs Used:
ida_idaapi.BADADDRida_name.get_name_eaida_typeinf.PT_REPLACEida_typeinf.apply_callee_tinfoida_typeinf.get_idatiida_typeinf.idc_parse_declida_typeinf.tinfo_tidautils.CodeRefsTo
Create an array type
The goal of this script is to demonstrate some usage of the type API. In this script, we create an array using both versions of create_array tinfo_t method.
| Source code | Keywords | Level |
|---|---|---|
| create_array.py | Intermediate |
APIs Used:
ida_typeinf.BTF_INTida_typeinf.array_type_data_tida_typeinf.tinfo_t
Create a structure with bitfield members
The goal of this script is to demonstrate some usage of the type API. In this script, we:
- Create a bitfield structure. In the present case the bitfield is an int32 made of three ‘members’ spanning it entirely: bit0->bit19: bf1 bit20->bit25: bf2 bit26->bit31: bf3
- For each member create a repeatable comment.
| Source code | Keywords | Level |
|---|---|---|
| create_bfstruct.py | Intermediate |
APIs Used:
ida_typeinf.tinfo_tida_typeinf.udm_tida_typeinf.udt_type_data_t
Create a bitmask enumeration
The goal of this script is to demonstrate some usage of the type API. In this script, we create a bitmask enumeration member by member.
| Source code | Keywords | Level |
|---|---|---|
| create_bmenum.py | Intermediate |
APIs Used:
ida_typeinf.BTE_BITMASKida_typeinf.BTE_HEXida_typeinf.tinfo_t
Create a type library file
The goal of this script is to demonstrate some usage of the type API. In this script:
- We create a new libssh2-64.til file holding some libssh2 64-bit structures.
- Once the file has been created, it can copied in the IDA install til directory or in the user IDA til directory.
| Source code | Keywords | Level |
|---|---|---|
| create_libssh2_til.py | Intermediate |
APIs Used:
ida_typeinf.HTI_DCLida_typeinf.HTI_PAKDEFida_typeinf.compact_tilida_typeinf.free_tilida_typeinf.new_tilida_typeinf.parse_declsida_typeinf.store_til
Create a structure programmatically
The goal of this script is to demonstrate some usage of the type API. In this script, we create a structure by building it member by member.
| Source code | Keywords | Level |
|---|---|---|
| create_struct_by_member.py | Intermediate |
APIs Used:
ida_typeinf.BTF_UINT32ida_typeinf.NTF_TYPEida_typeinf.del_named_typeida_typeinf.tinfo_errstrida_typeinf.tinfo_tida_typeinf.udt_type_data_t
Create & populate a structure
Usage of the API to create & populate a structure with members of different types.
| Source code | Keywords | Level |
|---|---|---|
| create_structure_programmatically.py | Intermediate |
APIs Used:
ida_typeinf.BTF_BYTEida_typeinf.BTF_DOUBLEida_typeinf.BTF_FLOATida_typeinf.BTF_INTida_typeinf.BTF_INT128ida_typeinf.BTF_INT16ida_typeinf.BTF_INT64ida_typeinf.BTF_TBYTEida_typeinf.BTF_UINT32ida_typeinf.FRB_NUMOida_typeinf.NTF_TYPEida_typeinf.PRTYPE_DEFida_typeinf.PRTYPE_MULTIida_typeinf.PRTYPE_TYPEida_typeinf.del_named_typeida_typeinf.idc_parse_typesida_typeinf.tinfo_errstrida_typeinf.tinfo_tida_typeinf.udm_tida_typeinf.udt_type_data_tida_typeinf.value_repr_t
Create a union
The goal of this script is to demonstrate some usage of the type API. In this script, we create a union by building it member after member.
| Source code | Keywords | Level |
|---|---|---|
| create_union_by_member.py | Intermediate |
APIs Used:
ida_typeinf.BTF_CHARida_typeinf.BTF_FLOATida_typeinf.BTF_INT32ida_typeinf.BTF_UNIONida_typeinf.NTF_TYPEida_typeinf.PRTYPE_DEFida_typeinf.PRTYPE_MULTIida_typeinf.PRTYPE_TYPEida_typeinf.del_named_typeida_typeinf.tinfo_tida_typeinf.udm_tida_typeinf.udt_type_data_t
Create a segment, and define (complex) data in it
The goal of this script is to demonstrate some usage of the type API. In this script, we show how to create, set type and name of a user shared data region in an ntdll IDB:
- Load the
_KUSER_SHARED_DATAdata type from a type info library shipped with IDA, and import it into the IDB’s “local types” - Create a data segment with UserSharedData as its name.
- Apply the type to the start of the newly created segment base address.
- Set the address name.
| Source code | Keywords | Level |
|---|---|---|
| create_user_shared_data.py | Intermediate |
APIs Used:
ida_name.set_nameida_segment.add_segm_exida_segment.saRelParaida_segment.scPubida_segment.segment_tida_segment.setup_selectorida_typeinf.TINFO_DEFINITEida_typeinf.apply_tinfoida_typeinf.free_tilida_typeinf.load_til
Utilities to detect structure gaps & alignment
The goal of this script is to illustrate ways to detect gaps & alignments in structures, from a structure name & (byte) offset.
| Source code | Keywords | Level |
|---|---|---|
| gap_size_align_snippet.py | Intermediate |
APIs Used:
ida_range.rangeset_t
Get member by offset, taking into account variable sized structures
The goal of this script is to provide a way to figure out what structure member, is most likely referenced by an offset.
This also works for variable sized types.
| Source code | Keywords | Level |
|---|---|---|
| get_best_fit_member.py | Intermediate |
APIs Used:
ida_typeinf.tinfo_tida_typeinf.udt_type_data_t
Get information about the “innermost” member of a structure
Assuming the 2 following types:
struct b
{
int low;
int high;
};
struct a
{
int foo;
b b_instance;
int bar;
};
looking at an offset of 5 bytes inside an a instance, might be interpreted as pointing somewhere inside member b_instance, of type b. Alternatively, that same offset might be intprereted as pointing somewhere inside low, of type int.
We refer to that latter interpretation as “innermost”, and this sample shows how the API lets us “drill down” to retrieve that innermost member.
| Source code | Keywords | Level |
|---|---|---|
| get_innermost_member.py | Intermediate |
APIs Used:
ida_typeinf.get_idatiida_typeinf.parse_decls
Load a type library from a file, and then a type from it
The goal of this script is to demonstrate some usage of the type API. In this script, we:
- ask the user for a specific til to be lodaed
- if successfully loaded ask the user for a type name to be imported.
- append the type to the local types.
| Source code | Keywords | Level |
|---|---|---|
| import_type_from_til.py | Intermediate |
APIs Used:
ida_kernwin.ask_strida_typeinf.load_til
Inject a member in the middle of a structure
This sample will retrieve the type info object by its name, find the member at the specified offset, and insert a new member right before it
| Source code | Keywords | Level |
|---|---|---|
| insert_struct_member.py | Intermediate |
APIs Used:
ida_typeinf.TERR_OKida_typeinf.tinfo_t
List all xrefs to a function stack variable
Contrary to (in-memory) data & code xrefs, retrieving stack variables xrefs requires a bit more work than just using ida_xref’s first_to(), next_to() (or higher level utilities such as idautils.XrefsTo)
| Source code | Keywords | Level |
|---|---|---|
| list_stkvar_xrefs.py | xrefs | Intermediate |
APIs Used:
ida_bytes.get_flagsida_bytes.is_stkvarida_frame.calc_stkvar_struc_offsetida_funcs.get_funcida_ida.UA_MAXOPida_kernwin.AST_DISABLE_FOR_WIDGETida_kernwin.AST_ENABLE_FOR_WIDGETida_kernwin.BWN_DISASMida_kernwin.action_desc_tida_kernwin.action_handler_tida_kernwin.get_current_viewerida_kernwin.get_highlightida_kernwin.get_screen_eaida_kernwin.register_actionida_typeinf.tinfo_tida_ua.decode_insnida_ua.insn_t
List cross-references to function stack frame variables
The goal of this script is to demonstrate some usage of the type API. In this script, we demonstrate how to list each stack variables xref:
- Get the function object surrounding cursor location.
- Use this function to retrieve the corresponding frame object.
- For each frame element:
- Build the stack variable xref list
- Print it.
| Source code | Keywords | Level |
|---|---|---|
| print_stkvar_xrefs.py | Intermediate |
APIs Used:
ida_frame.build_stkvar_xrefsida_frame.get_func_frameida_frame.xreflist_tida_funcs.get_funcida_kernwin.get_screen_eaida_typeinf.tinfo_tida_typeinf.udt_type_data_tida_xref.dr_Rida_xref.dr_W
Assign DOS/PE headers structures to a PE binary
The goal of this script is to demonstrate some usage of the type API.
In this script, we:
- load a PE64 file in binary mode
- import some types from the mssdk64 til
- apply these types at the correct ofsset in the DB
- finally, rebase the program based on the information stored in the ImageBase field of the IMAGE_OPTIONAL_HEADER64.
| Source code | Keywords | Level |
|---|---|---|
| setpehdr.py | Intermediate |
APIs Used:
ida_bytes.create_structida_bytes.get_dwordida_bytes.get_qwordida_bytes.get_wordida_hexrays.get_typeida_name.set_nameida_netnode.BADNODEida_segment.MSF_FIXONCEida_segment.rebase_programida_typeinf.ADDTIL_DEFAULTida_typeinf.BTF_STRUCTida_typeinf.add_tilida_typeinf.tinfo_tida_typeinf.udt_type_data_tidc.import_type
Recursively visit a type and its members
In this script, we show an example of tinfo_visitor_t to list a user define type members, recursively.
This scripts skips array & pointer members (by calling tinfo_visitor_t.prune_now())
| Source code | Keywords | Level |
|---|---|---|
| visit_tinfo.py | Intermediate |
APIs Used:
ida_netnode.BADNODEida_typeinf.ADDTIL_DEFAULTida_typeinf.TVST_DEFida_typeinf.add_tilida_typeinf.array_type_data_tida_typeinf.get_idatiida_typeinf.tinfo_tida_typeinf.tinfo_visitor_tidc.import_type
Change the name of an existing stack variable
The goal of this script is to demonstrate some usage of the type API. In this script, we demonstrate a way to change the name of a stack variable:
- Get the function object surrounding cursor location.
- Use this function to retrieve the corresponding frame object.
- Find the frame member matching the given name.
- Using its offset in the frame structure object, calculate the actual stack delta.
- Use the previous result to redefine the stack variable name if it is not a special or argument member.
| Source code | Keywords | Level |
|---|---|---|
| change_stkvar_name.py | Advanced |
APIs Used:
ida_frame.define_stkvarida_frame.get_func_frameida_frame.is_funcarg_offida_frame.is_special_frame_memberida_frame.soff_to_fpoffida_funcs.get_funcida_typeinf.tinfo_tida_typeinf.udm_tidc.here
Change the type & name of a function stack frame variable
The goal of this script is to demonstrate some usage of the type API.
In this script, we show a way to change the type and the name of a stack variable. In this case we will take advantage of the fact that RtlImageNtHeader calls RtlImageNtHeaderEx which takes a pointer to PIMAGE_NT_HEADERS as its fourth parameter and, for this, uses a stack variable of its caller.
- Get the function object for RtlImageNtHeader.
- Iterate through the function item to localize the load of the stack variable address before the call to RtlImageNtHeaderEx. We keep this information.
- Localize the call and take advantage of the previoulsy stored instruction to get the stack variable index in the frame.
- Set the type and rename the stack variable.
| Source code | Keywords | Level |
|---|---|---|
| change_stkvar_type.py | Advanced |
APIs Used:
ida_allins.NN_callida_allins.NN_leaida_frame.get_func_frameida_funcs.func_item_iterator_tida_funcs.get_funcida_funcs.get_func_nameida_ida.inf_get_procnameida_ida.inf_is_64bitida_idaapi.BADADDRida_name.get_name_eaida_typeinf.BTF_STRUCTida_typeinf.TERR_OKida_typeinf.tinfo_tida_ua.decode_insnida_ua.insn_tida_ua.o_regidautils.procregs.r9.reg
Turn instruction operand into a structure offset
The goal of this script is to demonstrate some usage of the type API. In this script, we:
- ask the user to choose the structure that will be used for the conversion.
- build the structure path and call ida_bytes.op_stroff. In case an enum is found a modal chooser is displayed in order to select a member.
| Source code | Keywords | Level |
|---|---|---|
| operand_to_struct_member.py | Advanced |
APIs Used:
ida_bytes.op_stroffida_kernwin.Chooseida_kernwin.Choose.CHCOL_HEXida_kernwin.Choose.CHCOL_PLAINida_kernwin.choose_structida_kernwin.get_opnumida_kernwin.get_screen_eaida_pro.tid_arrayida_typeinf.STRMEM_OFFSETida_typeinf.tinfo_tida_typeinf.udm_tida_typeinf.udt_type_data_tida_ua.decode_insnida_ua.insn_t
Code to be run right after IDAPython initialization
The idapythonrc.py file:
- %APPDATA%\Hex-Rays\IDA Pro\idapythonrc.py (on Windows)
- ~/.idapro/idapythonrc.py (on Linux & Mac)
can contain any IDAPython code that will be run as soon as IDAPython is done successfully initializing.
| Source code | Keywords | Level |
|---|---|---|
| idapythonrc.py | Beginner |
Add functions to the IDC runtime, from IDAPython
You can add IDC functions to IDA, whose “body” consists of IDAPython statements!
We’ll register a ‘pow’ function, available to all IDC code, that when invoked will call back into IDAPython, and execute the provided function body.
After running this script, try switching to the IDC interpreter (using the button on the lower-left corner of IDA) and executing pow(3, 7)
| Source code | Keywords | Level |
|---|---|---|
| extend_idc.py | Intermediate |
APIs Used:
ida_expr.VT_LONGida_expr.add_idc_func
Add 64-bit (.idb->.i64) conversion capabilities to custom plugins
For more infortmation see SDK/plugins/cvt64_sample example
| Source code | Keywords | Level |
|---|---|---|
| py_cvt64_sample.py | Advanced |
APIs Used:
ida_idaapi.BADADDRida_idaapi.BADADDR32ida_netnode.atagida_netnode.htagida_netnode.stag
Add merge functionality to a simple plugin
This is a primitive plugin which asks user for some info and saves it for some addresses.
We will add a merge functionality to plugin.
An IDA plugin may have two kinds of data with permanent storage:
- Data common for entire database (e.g. the options). To describe them we will use the idbattr_info_t type.
- Data specific to a particular address. To describe them we will use the merge_node_info_t type.
Also, see SDK/plugins/mex1 example
| Source code | Keywords | Level |
|---|---|---|
| py_mex1.py | IDP_Hooks plugin | Advanced |
APIs Used:
ida_funcs.get_funcida_ida.IDI_ALTVALida_ida.IDI_CSTRida_ida.IDI_SCALARida_ida.IDI_SUPVALida_ida.idbattr_info_tida_idaapi.BADADDRida_idaapi.PLUGIN_MODida_idaapi.PLUGIN_MULTIida_idaapi.plugin_tida_idaapi.plugmod_tida_idp.IDP_Hooksida_kernwin.Formida_kernwin.Form.ChkGroupControlida_kernwin.Form.StringInputida_kernwin.get_screen_eaida_merge.MERGE_KIND_ENDida_merge.MERGE_KIND_NONEida_merge.NDS_IS_STRida_merge.NDS_MAP_IDXida_merge.merge_handler_params_tida_merge.merge_node_info_tida_merge.moddata_diff_helper_tida_mergemod.create_std_modmerge_handlersida_netnode.BADNODEida_netnode.SIZEOF_nodeidx_tida_netnode.atagida_netnode.netnodeida_netnode.stag
Implement merging functionality for custom plugins
IDA Teams uses a chooser to display the merge conflicts. To fill the chooser columns IDA Teams uses the following methods from diff_source_t type:
- print_diffpos_name()
- print_diffpos_details()
and UI hints from merge_handler_params_t type:
- ui_has_details()
- ui_complex_details()
- ui_complex_name()
In general, chooser columns are filled as following:
columns.clear()
NAME = print_diffpos_name()
if ui_complex_name()
then
columns.add(split NAME by ui_split_char())
else
columns[0] = NAME
if not ui_complex_details()
then
columns.add(print_diffpos_details())
Also, see SDK/plugins/mex3 example
| Source code | Keywords | Level |
|---|---|---|
| py_mex3.py | IDP_Hooks plugin | Advanced |
APIs Used:
ida_funcs.get_funcida_ida.IDI_ALTVALida_ida.IDI_CSTRida_ida.IDI_SCALARida_ida.IDI_SUPVALida_ida.idbattr_info_tida_idaapi.BADADDRida_idaapi.PLUGIN_MODida_idaapi.PLUGIN_MULTIida_idaapi.plugin_tida_idaapi.plugmod_tida_idp.IDP_Hooksida_kernwin.Formida_kernwin.Form.ChkGroupControlida_kernwin.Form.StringInputida_kernwin.get_screen_eaida_merge.MERGE_KIND_ENDida_merge.MERGE_KIND_NONEida_merge.MH_UI_COLONNAMEida_merge.MH_UI_COMMANAMEida_merge.MH_UI_NODETAILSida_merge.NDS_IS_STRida_merge.NDS_MAP_IDXida_merge.create_nodeval_merge_handlersida_merge.get_ea_diffpos_nameida_merge.merge_handler_params_tida_merge.merge_node_helper_tida_merge.merge_node_info_tida_merge.moddata_diff_helper_tida_mergemod.create_std_modmerge_handlersida_nalt.node2eaida_netnode.BADNODEida_netnode.SIZEOF_nodeidx_tida_netnode.atagida_netnode.netnodeida_netnode.stag
Intro
The IDAPython API enables you to extend IDA’s core functionality and create custom plugins. Whether running as standalone scripts in the output window or leveraging advanced UI features, these plugins can significantly enhance your workflow.
Compared to C++ plugins, IDAPython plugins are faster and easier to develop—no need for lengthy build or compilation steps—while maintaining almost the same capabilities.
This tutorial outlines how to write plugins using the updated plugin framework and best practices to streamline your development process.
Before you start
-
Check our IDAPython reference docs for an up-to-date list of all modules, classes, functions, and so on. You can get the latest version of IDAPython SDK from our GitHub repository.
-
Get familiar with the
ida_idaapi.plugin_tclass, a basic and required class that provides the necessary structure for your plugin. It mirrors the C++ SDKplugin_tclass. -
Ensure compatibility with the latest IDA version by reviewing our IDAPython Porting Guide for recent updates.
Get a sample plugin
In this tutorial, we’ll use a simple sample plugin designed to work with the new plugin framework, that simplifies plugin development. The plugin performs a straightforward task: once invoked by the user after loading a database, it lists all functions and their addresses for the current IDA database before exiting.
You can download “My First Plugin” from here: {% file src=“assets/my-first-IDAPython-plugin.zip” %}
Writing a plugin in IDAPython—basic steps
Create a single .py file to start
To begin, your plugin should consist of a single Python file that serves as the entry point. This file should define the main logic and include necessary imports and primary functions that will be executed when the plugin runs.
Define base classes
It’s recommended to create a class that inherits from plugin_t with specific flags and a class inheriting from plugmod_t that performs the core functionality.
Define a class that inherits from ida_idaapi.plugin_t
Include a class that inherits from plugin_t. This base class will outline the core functionality and lifecycle of your plugin.
Example of plugin_t class implementation:
class MyPlugin(ida_idaapi.plugin_t):
flags = ida_idaapi.PLUGIN_UNL | ida_idaapi.PLUGIN_MULTI
comment = "This is my first simple IDA Pro plugin"
help = "This plugin lists all functions in the current database"
wanted_name = "My First Plugin"
wanted_hotkey = "Shift-P"
def init(self):
print(">>>MyPlugin: Init called.")
return MyPlugmod()
Define a subclass that inherits from ida_idaapi.plugmod_t
To implement the main functionality of your plugin within the new framework, it is recommended to define a subclass of plugmod_t, that performs the main task of the plugin.
Example of plugmod_t class implementation:
class MyPlugmod(ida_idaapi.plugmod_t):
def __del__(self):
print(">>> MyPlugmod: destructor called.")
def run(self, arg):
print(">>> MyPlugmod.run() is invoked with argument value: {arg}.")
for func_ea in idautils.Functions():
func_name = ida_funcs.get_func_name(func_ea)
print(f">>>MyPlugmod: Function{func_name} at address {func_ea:x}")
Overview of MyPlugin class attributes
flags attribute
The flags attribute defines the behavior and plugin properties, and what is crucial, describe its lifecycle: how and when it is loaded into IDA.
Your plugin may have no flags (flags = 0). It is usually a good strategy for basic plugins that perform a specific task once and then are no longer needed. Assigning 0 to flags apply a default behavior to your plugin:
- it can be loaded and reloaded at any time;
- it is triggered by the user and does not run constantly in the background;
- it does not modify the database.
Common flags for plugins:
PLUGIN_MULTI: Recommended for all plugins; this flag enables the plugin to run simultaneously across multiple opened IDBs within the same IDA instance.PLUGIN_FIX: The plugin loads when IDA launches and stays loaded until IDA exits.PLUGIN_DRAW: The plugin needs to be invoked for every screen refresh.PLUGIN_MOD: The plugin modifies the IDA database.PLUGIN_PROC: The plugin is a processor module extension.PLUGIN_DBG: The plugin will be loaded only when a debugger is active (for debugger-related plugins)PLUGIN_UNL: The plugin will be unloaded immediately after calling therunmethod.
In our example, we used PLUGIN_UNL flag, as after performing a specific task—listing functions in the current database—is no longer needed.
For a full list of available flags, refer to the ida_idaapi module.
comment attribute
The comment attribute allows you to provide a brief description of your plugin.
wanted_name attribute
The wanted_name attribute specifies the preferred short name of the plugin, as it apperas under Edit -> Plugins submenu.
wanted_hotkey attribute
The wanted_hotkey attribute specifies a preferred shortcut to run the plugin.
{% hint style=“info” %}
The preferred name and hotkey may be overridden by changing the settings in the plugins.cfg file.
{% endhint %}
Specify your plugin lifecycle
Below we scrutinize the key components for defining your plugin lifecycle.
Define a PLUGIN_ENTRY function
Declare a function called PLUGIN_ENTRY that returns a plugin_t instance (or an object containing all attributes of a plugin_t object).
Initialization
The init() method is called when the plugin is loaded into IDA and is responsible for initializing your plugin.
The init() method returns an pointer to a plugmod_t object and indicate that this object run method is going to be used.
{% hint style=“info” %}
In the new plugin framework, run/term functions of plugin_t are not used. Virtual functions of plugmod_t are used instead.
{% endhint %}
In our example, when MyPlugin.init() is called it initalizes the plugin and returns a new instance of MyPlugmod.
def init(self):
print(">>>MyPlugin: Init called.")
return MyPlugmod()
Activation
The run method is executed when the user triggers your plugin activation, whether via hotkey or Edit -> Plugins submenu.
{% hint style=“info” %} An alternative way of activation your plugin is via IDA events and registering a callback functions. {% endhint %}
In our example, when the run() method of MyPlugmod is called, it prints function names and addresses in Output window.
def run(self, arg):
print(">>> MyPlugmod.run() is invoked with argument value: {arg}.")
for func_ea in idautils.Functions():
func_name = ida_funcs.get_func_name(func_ea)
print(f">>>MyPlugmod: Function{func_name} at address {func_ea:x}")
Unloading
The __del__() is called automatically when the plugin is going to be unloaded (destroyed). The conditions that define the circumstances under which the plugin should be unloaded depend on the flags setting.
Example of plugin lifecycle implementation:
class MyPlugmod(ida_idaapi.plugmod_t):
def __del__(self):
print(">>> MyPlugmod: destructor called.")
def run(self, arg):
print(">>> MyPlugmod.run() is invoked with argument value: {arg}.")
for func_ea in idautils.Functions():
func_name = ida_funcs.get_func_name(func_ea)
print(f">>>MyPlugmod: Function{func_name} at address {func_ea:x}")
class MyPlugin(ida_idaapi.plugin_t):
flags = ida_idaapi.PLUGIN_UNL | ida_idaapi.PLUGIN_MULTI
comment = "This is my first simple IDA Pro plugin"
help = "This plugin lists all functions in the current database"
wanted_name = "My First Plugin"
wanted_hotkey = "Shift-P"
def init(self):
print(">>>MyPlugin: Init called.")
return MyPlugmod()
def PLUGIN_ENTRY():
return MyPlugin()
In our example:
PLUGIN_ENTRY()returns an instance of theMyPluginclass.MyPlugin.init()is called to initialize the plugin and returns an instance ofMyPlugmod. MyPlugmod.run() is called when the plugin is activated by the user via the hotkey or the Plugins menu. Then, therun()method ofMyPlugmodis called, which prints function names and addresses in the current IDA database.MyPlugmod.__del__()is called automatically when the plugin is destroyed (unloaded), and it prints a termination message. As we defined inflags, our exemplary plugin unloads directly after performing its task.
Include an ida-plugin.json file
To ensure your plugin is well-organized and can be easily included in the Hex-Rays plugins repository, add the ida-plugin.json file with essential metadata to your plugin directory.
Install and execute your plugin
- Copy the plugin directory (in our example, the folder containing
my-first-plugin.pyandida-plugin.jsonfiles) or single script to plugins directory in your IDA installation folder. Once it’s done, you may need to restart your IDA to see your plugin name under Edit -> Plugins submenu. - Run the plugin by pressing the specified hotkey or execute it from Edit -> Plugins -> <your_plugin>.
Porting Guide from IDA 8.x to 9.0
IDA 9.0 IDAPython changes and porting guide
{% hint style=“info” %} How to use this Porting Guide? This guide provides a comprehensive list of all changes in IDAPython API between IDA 8.4 and 9.0. Here’s how you can make the most of it:
-
Explore by module: navigate directly to a specific module and review the changes affecting it
-
Jump to alternative examples demonstrating how to port removed functions
-
Check how-to examples that demonstrate the usage of new/udpated APIs {% endhint %}
-
- Removed functions
- Added classes
- plugin_options_t
- uchar_pointer
- ushort_pointer
- uint_pointer
- sint8_pointer
- int8_pointer
- uint8_pointer
- int16_pointer
- uint16_pointer
- int32_pointer
- uint32_pointer
- int64_pointer
- uint64_pointer
- ssize_pointer
- bool_pointer
- short_pointer
- char_pointer
- sel_pointer
- asize_pointer
- adiff_pointer
- uval_pointer
- ea32_pointer
- ea64_pointer
- flags_pointer
- flags64_pointer
- tid_pointer
- Added functions
Introduction
This guide provides information about what has been changed in the IDAPython API between IDA 8.4 and 9.0.
The largest change is due to the removal of two modules:
ida_structida_enum
For years now, those 2 modules have been superseded by the ida_typeinf module, which offers similar functionality.
In case you are not familiar with ida_typeinf’s main concepts, we recommend having a look at them first.
ida_struct
ida_structstructures were accessed mostly through their index (or ID), whileida_typeinfadopts another approach using type names (or ordinals). Consequently, the notion of “structure index” bears less importance, and doesn’t have a direct alternative.- many
ida_struct.get_struc_*operations were accepting atid_t. While the notion oftid_tis still present in IDA 9.0, it is not part of identifying a type anymore (a type is now identified either by its name, or its ordinal). The notion oftid_tis mostly used to “bind” types to data & functions in the IDB. For example, callingida_nalt.get_strid(address)will return you such atid_t. From atid_t, you can load the correspondingtinfo_tobject by usingtinfo_t(tid=id).
Removed functions:
The table below provides alternatives to the functions that have been removed in IDA 9.0.
| 8.4 | 9.0 |
|---|---|
add_struc | tinfo_t.create_udt |
add_struc_member | tinfo_t.add_udm |
del_struc | del_numbered_type, del_named_type |
del_struc_member | tinfo_t.del_udm |
del_struc_members | see example |
expand_struc | tinfo_t.expand_udt |
get_best_fit_member | udt_type_data_t.get_best_fit_member |
get_first_struc_idx | til_t.numbered_types (see notes) |
get_innermost_member | tinfo_t.get_innermost_udm |
get_last_struc_idx | see notes |
get_max_offset | tinfo_t.get_size (structures), or tinfo_t.get_udt_nmembers (unions) |
get_member | tinfo_t.get_udm / tinfo_t.get_udm_by_offset |
get_member_by_fullname | get_udm_by_fullname |
get_member_by_id | tinfo_t.get_udm_by_tid |
get_member_by_name | tinfo_t.get_udm |
get_member_cmt | tinfo_t.get_udm + udm_t.cmt |
get_member_fullname | get_tif_name |
get_member_id | tinfo_t(tid=...) + tinfo_t.get_udm_tid |
get_member_name | tinfo_t(tid=...) + tinfo_t.get_udm + udm_t.name |
get_member_size | tinfo_t(tid=...) + tinfo_t.get_udm + udm_t.size |
get_member_struc | get_udm_by_fullname |
get_member_tinfo | udm_t.type |
get_next_member_idx | see notes |
get_next_struc_idx | see notes |
get_or_guess_member_tinfo | |
get_prev_member_idx | see notes |
get_prev_struc_idx | see notes |
get_sptr | see example |
get_struc | tinfo_t(tid=...) |
get_struc_by_idx | see notes |
get_struc_cmt | tinfo_t.get_type_cmt |
get_struc_first_offset | |
get_struc_id | get_named_type_tid |
get_struc_idx | see notes |
get_struc_last_offset | tinfo_t.get_udt_details + udm_t.offset |
get_struc_name | get_tid_name |
get_struc_next_offset | |
get_struc_prev_offset | |
get_struc_qty | see example |
get_struc_size | tinfo_t(tid=...) + tinfo_t.get_size |
is_anonymous_member_name | ida_frame.is_anonymous_member_name |
is_dummy_member_name | ida_frame.is_dummy_member_name |
is_member_id | idc.is_member_id |
is_special_member | see example |
is_union | tinfo_t(tid=...) + tinfo_t.is_union |
is_varmember | udm_t.is_varmember |
is_varstr | tinfo_t(tid=...) + tinfo_t.is_varstruct |
retrieve_member_info | |
save_struc | tinfo_t.save_type / tinfo_t.set_named_type / tinfo_t.set_numbered_type |
set_member_cmt | tinfo_t(tid=...) + tinfo_t.set_udm_cmt |
set_member_name | tinfo_t(tid=...) + tinfo_t.rename_udm |
set_member_tinfo | |
set_member_type | tinfo_t(tid=...) + tinfo_t.set_udm_type |
set_struc_align | |
set_struc_cmt | tinfo_t(tid=...) + tinfo_t.set_type_cmt |
set_struc_hidden | |
set_struc_idx | |
set_struc_listed | set_type_choosable |
set_struc_name | tinfo_t(tid=...) + tinfo_t.rename_type |
stroff_as_size | ida_typeinf.stroff_as_size |
struct_field_visitor_t | ida_typeinf.tinfo_visitor_t |
unsync_and_delete_struc | |
visit_stroff_fields | |
visit_stroff_udms | ida_typeinf.visit_stroff_udms |
Removed methods and members
member_t
by_tilseeida_typeinf.udm_t.is_by_tileoffflagget_sizeuseida_typeinf.udm_t.size // 8instead.get_soffseesoffbelow.has_tihas_unionidis_baseclassseeida_typeinf.udm_t.is_baseclassis_destructorseeida_typeinf.udm_t.can_be_dtoris_dupnamepropssoffuseida_typeinf.udm_t.offset // 8instead.thisthisownunimem
struct_t
agefrom_tilget_alignmentget_last_memberget_memberhas_unionseeida_typeinf.tinfo_t.has_unionidseeida_typeinf.tinfo_t.get_tidis_choosableis_copyofis_frameseeida_typeinf.tinfo_t.is_frameis_ghostis_hiddenis_mappedtois_syncedis_unionseeida_typeinf.tinfo_t.is_unionis_varstrseeida_typeinf.tinfo_t.is_varstructlike_unionmembersmemqtyseeida_typeinf.tinfo_t.get_udt_nmembersordinalseeida_typeinf.tinfo_t.get_ordinalpropsset_alignmentthisown
struct_field_visitor_t
visit_field
udm_visitor_t
visit_udm
ida_enum
Removed functions
The functions below 8.4 are removed those under 9.0 are alternatives.
The idc alternatives are based on:
ida_typeinfmoduleida_typeinf.tinfo_t, the type info classida_typeinf.enum_type_data_t, the enumeration type classida_typeinf.edm_t, the enumeration member class
| 8.4 | 9.0 |
|---|---|
add_enum | idc.add_enum |
add_enum_member | idc.add_enum_member |
del_enum | idc.del_enum |
del_enum_member | idc.del_enum_member |
for_all_enum_members | |
get_bmask_cmt | idc.get_bmask_cmt |
get_bmask_name | idc.get_bmask_name |
get_enum | idc.get_enum |
get_enum_cmt | idc.get_enum_cmt |
get_enum_flag | idc.get_enum_flag |
get_enum_idx | |
get_enum_member | idc.get_enum_member |
get_enum_member_bmask | idc.get_enum_member_bmask |
get_enum_member_by_name | idc.get_enum_member_by_name |
get_enum_member_cmt | idc.get_enum_member_cmt |
get_enum_member_enum | idc.get_enum_member_enum |
get_enum_member_name | idc.get_enum_member_name |
get_enum_member_serial | |
get_enum_member_value | idc.get_enum_member_value |
get_enum_name | idc.get_enum_name |
get_enum_name2 | |
get_enum_qty | |
get_enum_size | idc.get_enum_size |
get_enum_type_ordinal | |
get_enum_width | idc.get_enum_width |
get_first_bmask | idc.get_first_bmask |
get_first_enum_member | idc.get_first_enum_member |
get_first_serial_enum_member | |
get_last_bmask | idc.get_last_bmask |
get_last_enum_member | idc.get_last_enum_member |
get_last_serial_enum_member | |
get_next_bmask | idc.get_next_bmask |
get_next_enum_member | idc.get_next_enum_member |
get_next_serial_enum_member | |
get_prev_bmask | idc.get_prev_bmask |
get_prev_enum_member | idc.get_prev_enum_member |
get_prev_serial_enum_member | |
getn_enum | |
is_bf | idc.is_bf |
is_enum_fromtil | |
is_enum_hidden | |
is_ghost_enum | |
is_one_bit_mask | |
set_bmask_cmt | idc.set_bmask_cmt |
set_bmask_name | idc.set_bmask_name |
set_enum_bf | idc.set_enum_bf |
set_enum_cmt | idc.set_enum_cmt |
set_enum_flag | idc.set_enum_flag |
set_enum_fromtil | |
set_enum_ghost | |
set_enum_hidden | |
set_enum_idx | |
set_enum_member_cmt | idc.set_enum_member_cmt |
set_enum_member_name | idc.set_enum_member_name |
set_enum_name | idc.set_enum_name |
set_enum_type_ordinal | |
set_enum_width | idc.set_enum_width |
enum_member_visitor_t
visit_enum_member
ida_typeinf
Removed functions
callregs_t_regcountget_ordinal_from_idb_typeis_autosyncget_udm_tid: usetinfo_t.get_udm_tidas an alternative.get_tinfo_tid: usetinfo_t.get_tidas an alternative.tinfo_t_get_stockget_ordinal_qty: useida_typeinf.get_ordinal_countorida_typeinf.get_ordinal_limitas alternatives.import_type: useidc.import_typeas an alternative.
Added functions
detach_tinfo_t(_this: "tinfo_t") -> "bool"get_tinfo_by_edm_name(tif: "tinfo_t", til: "til_t", mname: "char const *") -> "ssize_t"stroff_as_size(plen: "int", tif: "tinfo_t", value: "asize_t") -> "bool"visit_stroff_udms(sfv: "udm_visitor_t", path: "tid_t const *", disp: "adiff_t *", appzero: "bool") -> "adiff_t *"is_one_bit_mask(mask: "uval_t") -> "bool"get_idainfo_by_udm(flags: "flags64_t *", ti: "opinfo_t", set_lzero: "bool *", ap: "array_parameters_t", udm: "udm_t") -> "bool"
Added class
udm_visitor_t
visit_udm
Removed methods
enum_type_data_t
get_constant_group
Added methods
callregs_t
set_registers(self, kind: "callregs_t::reg_kind_t", first_reg: "int", last_reg: "int") -> "void"
enum_type_data_t
all_constants(self)all_groups(self, skip_trivial=False)get_constant_group(self, *args) -> "PyObject *"get_max_serial(self, value: "uint64") -> "uchar"get_serial(self, index: "size_t") -> "uchar"
func_type_data_t.
find_argument(self, *args) -> "ssize_t"
til_t
find_base(self, n: "char const *") -> "til_t *"get_type_names(self) -> "const char *"
tinfo_t
detach(self) -> "bool"is_punknown(self) -> "bool"get_enum_nmembers(self) -> "size_t"is_empty_enum(self) -> "bool"get_enum_width(self) -> "int"calc_enum_mask(self) -> "uint64"get_edm_tid(self, idx: "size_t") -> "tid_t"is_udm_by_til(self, idx: "size_t") -> "bool"set_udm_by_til(self, idx: "size_t", on: "bool"=True, etf_flags: "uint"=0) -> "tinfo_code_t"set_fixed_struct(self, on: "bool"=True) -> "tinfo_code_t"set_struct_size(self, new_size: "size_t") -> "tinfo_code_t"is_fixed_struct(self) -> "bool"get_func_frame(self, pfn: "func_t const *") -> "bool"is_frame(self) -> "bool"get_frame_func(self) -> "ea_t"set_enum_radix(self, radix: "int", sign: "bool", etf_flags: "uint"=0) -> "tinfo_code_t"rename_funcarg(self, index: "size_t", name: "char const *", etf_flags: "uint"=0) -> "tinfo_code_t"set_funcarg_type(self, index: "size_t", tif: "tinfo_t", etf_flags: "uint"=0) -> "tinfo_code_t"set_func_rettype(self, tif: "tinfo_t", etf_flags: "uint"=0) -> "tinfo_code_t"del_funcargs(self, idx1: "size_t", idx2: "size_t", etf_flags: "uint"=0) -> "tinfo_code_t"del_funcarg(self, idx: "size_t", etf_flags: "uint"=0) -> "tinfo_code_t"add_funcarg(self, farg: "funcarg_t", etf_flags: "uint"=0, idx: "ssize_t"=-1) -> "tinfo_code_t"set_func_cc(self, cc: "cm_t", etf_flags: "uint"=0) -> "tinfo_code_t"set_funcarg_loc(self, index: "size_t", argloc: "argloc_t", etf_flags: "uint"=0) -> "tinfo_code_t"set_func_retloc(self, argloc: "argloc_t", etf_flags: "uint"=0) -> "tinfo_code_t"get_stkvar(self, insn: "insn_t const &", x: "op_t const", v: "sval_t") -> "ssize_t"
udm_t
is_retaddr(self) -> "bool"is_savregs(self) -> "bool"is_special_member(self) -> "bool"is_by_til(self) -> "bool"set_retaddr(self, on: "bool"=True) -> "void"set_savregs(self, on: "bool"=True) -> "voidset_by_til(self, on: "bool"=True) -> "void"
udtmembervec_t
set_fixed(self, on: "bool"=True) -> "void"
Modified methods:
tinfo_t
| 8.4 | 9.0 |
|---|---|
find_udm(self, udm: "udmt_t *", strmem_flags: "int") -> "int" | find_udm(self, udm: "udmt_t *", strmem_flags: "int") -> "int" |
find_udm(self, name: "char const *", strmem_flags: "int") -> "int" | |
get_type_by_edm_name(self, mname: "const char *", til: "til_t"=None) -> "bool" | get_edm_by_name(self, mname: "char const *", til: "til_t"=None) -> "ssize_t" |
ida_frame
8.4 To access the structure of a function frame, use:
get_struc() (use func_t::frame as structure ID)get_frame(const func_t *pfn)get_frame(ea_t ea)
9.0 To access the structure of a function frame, use:
tinfo_t::get_func_frame(const func_t *pfn)as the preferred way.get_func_frame(tinfo_t *out, const func_t *pfn)
Removed functions
get_stkvar: see tinfo_tget_frame: see tinfo_t.get-func_frameget_frame_member_by_idget_min_spd_eadelete_unreferenced_stkvarsdelete_wrong_stkvar_ops
Added functions
get_func_frame(out: "tinfo_t",pfn: "func_t const *") -> "bool"add_frame_member(pfn: "func_t const *", name: "char const *", offset: "uval_t", tif: "tinfo_t", repr: "value_repr_t"=None, etf_flags: "uint"=0) -> "bool"is_anonymous_member_name(name: "char const *") -> "bool"is_dummy_member_name(name: "char const *") -> "bool"is_special_frame_member(tid: "tid_t") -> "bool"set_frame_member_type(pfn: "func_t const *",offset: "uval_t", tif: "tinfo_t", repr: "value_repr_t"=None, etf_flags: "uint"=0) -> "bool"delete_frame_members(pfn: "func_t const *",start_offset: "uval_t", end_offset: "uval_t") -> "bool"calc_frame_offset(pfn: "func_t *", off: "sval_t", insn: "insn_t const *"=None, op: "op_t const *"=None) -> "sval_t"
Modified functions
| 8.4 | 9.0 |
|---|---|
define_stkvar(pfn: "func_t *", name: "const char *", off: "sval_t", flags: "flags64_t", ti: "const opinfo_t *", nbytes: "asize_t") -> bool | define_stkvar(pfn: "func_t *", name: "char const *", off: "sval_t", tif: "tinfo_t", repr: "value_repr_t"=None) -> "bool" |
ida_bytes
Removed functions
free_chunckget_8bit
Added functions
find_bytes(bs: typing.Union[bytes, bytearray, str], range_start: int, range_size: typing.Optional[int] = None, range_end: typing.Optional[int] = ida_idaapi.BADADDR, mask: typing.Optional[typing.Union[bytes, bytearray]] = None, flags: typing.Optional[int] = BIN_SEARCH_FORWARD | BIN_SEARCH_NOSHOW, radix: typing.Optional[int] = 16, strlit_encoding: typing.Optional[typing.Union[int, str]] = PBSENC_DEF1BPU) -> intfind_string(_str: str, range_start: int, range_end: typing.Optional[int] = ida_idaapi.BADADDR, range_size: typing.Optional[int] = None, strlit_encoding: typing.Optional[typing.Union[int, str]] = PBSENC_DEF1BPU, flags: typing.Optional[int] = BIN_SEARCH_FORWARD | BIN_SEARCH_NOSHOW) -> int
Modified functions
| 8.4 | 9.0 |
|---|---|
op_enum(ea: "ea_t", n: "int", id: "enum_t", serial: "uchar"=0) -> "bool" | op_enum(ea: "ea_t", n: "int", id: "tid_t", serial: "uchar"=0) -> "bool" |
get_enum_id(ea: "ea_t", n: "int") -> "tid_t" | get_enum_id(ea: "ea_t", n: "int") -> "enum_t" |
parse_binpat_str(out: "compiled_binpat_vec_t", ea: "ea_t", _in: "char const *", radix: "int", strlits_encoding: "int"=0) -> "str" | parse_binpat_str(out: "compiled_binpat_vec_t", ea: "ea_t", _in: "char const *", radix: "int", strlits_encoding: "int"=0) -> "bool" |
bin_search3(start_ea: "ea_t", end_ea: "ea_t", data: "compiled_binpat_vec_t", flags: "int) -> ea_t | bin_search(start_ea: "ea_t", end_ea: "ea_t", data: "compiled_binpat_vec_t const &", flags: "int") -> (ea_t, size_t) |
bin_search(start_ea: "ea_t", end_ea: "ea_t", image: "uchar const *", mask: "uchar const *", len: "size_t", flags: "int") -> ea_t | |
get_octet2(ogen: "octet_generator_t") -> "uchar_t*" | get_octet(ogen: "octet_generator_t") -> "uchar_t*" |
idc
Removed functions
ida_dirtree
Removed functions
dirtree_cursor_root_cursordirtree_t_errstr
ida_diskio
Removed functions
enumerate_files2eclose
ida_fpro
Added functions
qflcose(fp: "FILE *") -> "int"
ida_funcs
Added methods
func_item_iterator_t
set_ea(self, _ea: "ea_t") -> "bool"
ida_gdl
Added classes
edge_t
edgevec_t
node_ordering_t
clear(self)resize(self, n: "int") -> "void"size(self) -> "size_t"set(self, _node: "int", num: "int") -> "void"clr(self, _node: "int") -> "bool"node(self, _order: "size_t") -> "int"order(self, _node: "int") -> "int"
ida_graph
Removed classes
node_ordering_t
See ida-gdl node_ordering_t has been made an alias of ida_gdl.node_ordering_t
edge_t
See ida-gdl edge_t has been made an alias of ida_gdl.edge_t
Renamed clases
| 8.4 | 9.0 |
|---|---|
abstract_graph_t | drawable_graph_t |
mutable_graph_t | interactive_graph_t |
abstract_graph_t has been made an alias of drawable_graph_t mutbale_graph_t has been made an alias of interactive_graph_t
Renamed functions
| 8.4 | 9.0 |
|---|---|
create_mutable_graph | create_interactive_graph |
delete_mutable_graph | delete_interactive_graph |
grcode_create_mutable_graph | grcode_create_interactive_graph |
create_mutable_graph has been made an alias of create_interactive_graph delete_mutable_graph has been made an alias of delete_interactive_graph grcode_create_mutable_graph has been made an alias of grcode_create_interactive_graph
ida_hexrays
Removed functions
get_member_typecheckout_hexrays_licensecinsn_t_insn_is_epilog
Modified functions
| 8.4 | 9.0 |
|---|---|
save_user_labels2(func_ea: "ea_t", user_labels: "user_labels_t", func: "cfunc_t"=None) -> "void" | save_user_labels(func_ea: "ea_t", user_labels: "user_labels_t", func: "cfunc_t"=None) -> "void" |
restore_user_labels2(func_ea: "ea_t", func: "cfunc_t"=None) -> "user_labels_t *" | restore_user_labels(func_ea: "ea_t", func: "cfunc_t"=None) -> "user_labels_t *" |
Added functions
max_vlr_value(size: "int") -> "uvlr_t"min_vlr_svalue(size: "int") -> "uvlr_t"max_vlr_svalue(size: "int") -> "uvlr_t"is_unsigned_cmpop(cmpop: "cmpop_t") -> "bool"is_signed_cmpop(cmpop: "cmpop_t") -> "bool"is_cmpop_with_eq(cmpop: "cmpop_t") -> "bool"is_cmpop_without_eq(cmpop: "cmpop_t") -> "bool"
Added classes
catchexpr_tccatch_tctry_tcthrow_tcblock_pos_t
Removed methods
vdui_t
set_strmem_typerename_strmem
Added methods
cinsn_list_t
splice(self, pos: "qlist< cinsn_t >::iterator", other: "cinsn_list_t", first: "qlist< cinsn_t >::iterator", last: "qlist< cinsn_t >::iterator") -> "void"
Hexrays_Hooks
pre_structural(self, ct: "control_graph_t *", cfunc: "cfunc_t", g: "simple_graph_t") -> "int"begin_inlining(self, cdg: "codegen_t", decomp_flags: "int") -> "int"inlining_func(self, cdg: "codegen_t", blk: "int", mbr: "mba_ranges_t") -> "int"inlined_func(self, cdg: "codegen_t", blk: "int", mbr: "mba_ranges_t", i1: "int", i2: "int") -> "int"collect_warnings(self, warnings: "qstrvec_t *", cfunc: "cfunc_t") -> "int"
lvar_t
was_scattered_arg(self) -> "bool"set_scattered_arg(self) -> "void"clr_scattered_arg(self) -> "void"
lvars_t
find_input_reg(self, reg: "int", _size: "int"=1) -> "int"
simple_graph_t
compute_dominators(self, domin: "array_of_node_bitset_t &", post: "bool"=False) -> "void"compute_immediate_dominators(self, domin: "array_of_node_bitset_t const &", idomin: "intvec_t", post: "bool"=False) -> "void"depth_first_preorder(self, pre: "node_ordering_t") -> "int"depth_first_postorder(self, post: "node_ordering_t") -> "int"begin(self) -> "simple_graph_t::iterator"end(self) -> "simple_graph_t::iterator"front(self) -> "int"inc(self, p: "simple_graph_t::iterator &", n: "int"=1) -> "void"goup(self, node: "int") -> "int"
fnumber_t
calc_max_exp(self) -> "int"is_nan(self) -> "bool"
minsn_t
was_unpaired(self) -> "bool"
mba_t
split_block(self, blk: "mblock_t", start_insn: "minsn_t") -> "mblock_t *"inline_func(self, cdg: "codegen_t", blknum: "int", ranges: "mba_ranges_t", decomp_flags: "int"=0, inline_flags: "int"=0) -> "merror_t"locate_stkpnt(self, ea: "ea_t") -> "stkpnt_t const *"
codegen_t
clear(self) -> "void"
Modified methods
Hexrays_Hooks
| 8.4 | 9.0 |
|---|---|
flowchart(self, fc: "qflow_chart_t") -> "int" | flowchart(self, fc: "qflow_chart_t", mba: "mba_t") -> "int" |
valrng_t
| 8.4 | 9.0 |
|---|---|
cvt_to_cmp(self, strict: "bool") -> "bool" | cvt_to_cmp(self) -> "bool" |
max_value(self, size_ : "int") -> "uvlr_t" | max_value(self) -> "uvlr_t" |
min_svalue(self, size_: "int") -> "uvlr_t" | min_svalue(self) -> "uvlr_t" |
max_svalue(self, size_: "int") -> "uvlr_t" | max_svalue(self) -> "uvlr_t" |
stkvar_ref_t
| 8.4 | 9.0 |
|---|---|
get_stkvar(self, p_off=None: "uval_t *") -> "member_t *" | get_stkvar(self, udm: "udm_t"=None, p_off: "uval_t *"=None) -> "ssize_t" |
mop_t
| 8.4 | 9.0 |
|---|---|
get_stkvar(self, p_off: "uval_t *") -> "member_t *" | get_stkvar(self, udm: "udm_t"=None, p_off: "uval_t *"=None) -> "ssize_t" |
ida_ida
Added classes
idbattr_valmap_t
idbattr_info_t
is_node_altval(self) -> "bool"is_node_supval(self) -> "bool"is_node_valobj(self) -> "bool"is_node_blob(self) -> "bool"is_node_var(self) -> "bool"is_struc_field(self) -> "bool"is_cstr(self) -> "bool"is_qstring(self) -> "bool"is_bytearray(self) -> "bool"is_buf_var(self) -> "bool"is_decimal(self) -> "bool"is_hexadecimal(self) -> "bool"is_readonly_var(self) -> "bool"is_incremented(self) -> "bool"is_val_mapped(self) -> "bool"is_hash(self) -> "bool"use_hlpstruc(self) -> "bool"is_bitmap(self) -> "bool"is_onoff(self) -> "bool"is_scalar_var(self) -> "bool"is_bitfield(self) -> "bool"is_boolean(self) -> "bool"has_individual_node(self) -> "bool"str_true(self) -> "char const *"str_false(self) -> "char const *"ridx(self) -> "size_t"hashname(self) -> "char const *"
inf_structure accessors
As will be shown in ida_idaapi Removed functions get_inf_structure has been removed. It has been replaced by the following accessors.
Replacement examples:
| In 8.4 | In 9.0 |
|---|---|
ida_idaapi.get_inf_structure().procname | ida_ida.inf_get_procname() |
ida_idaapi.get_inf_structure().max_ea | ida_ida.inf_get_max_ea() |
ida_idaapi.get_inf_structure().is_32bit() | ida_ida.inf_is_32bit_exactly() |
The list of getters and setters is given below.
inf_structure getters
inf_get_version() -> "ushort"inf_get_genflags() -> "ushort"inf_get_lflags() -> "uint32"inf_get_app_bitness() -> "uint"inf_get_database_change_count() -> "uint32"inf_get_filetype() -> "filetype_t"inf_get_ostype() -> "ushort"inf_get_apptype() -> "ushort"inf_get_asmtype() -> "uchar"inf_get_specsegs() -> "uchar"inf_get_af() -> "uint32"inf_get_af2() -> "uint32"inf_get_baseaddr() -> "uval_t"inf_get_start_ss() -> "sel_t"inf_get_start_cs() -> "sel_t"inf_get_start_ip() -> "ea_t"inf_get_start_ea() -> "ea_t"inf_get_start_sp() -> "ea_t"inf_get_main() -> "ea_t"inf_get_min_ea() -> "ea_t"inf_get_max_ea() -> "ea_t"inf_get_omin_ea() -> "ea_t"inf_get_omax_ea() -> "ea_t"inf_get_lowoff() -> "ea_t"inf_get_highoff() -> "ea_t"inf_get_maxref() -> "uval_t"inf_get_netdelta() -> "sval_t"inf_get_xrefnum() -> "uchar"inf_get_type_xrefnum() -> "uchar"inf_get_refcmtnum() -> "uchar"inf_get_xrefflag() -> "uchar"inf_get_max_autoname_len() -> "ushort"inf_get_nametype() -> "char"inf_get_short_demnames() -> "uint32"inf_get_long_demnames() -> "uint32"inf_get_demnames() -> "uchar"inf_get_listnames() -> "uchar"inf_get_indent() -> "uchar"inf_get_cmt_indent() -> "uchar"inf_get_margin() -> "ushort"inf_get_lenxref() -> "ushort"inf_get_outflags() -> "uint32"inf_get_cmtflg() -> "uchar"inf_get_limiter() -> "uchar"inf_get_bin_prefix_size() -> "short"inf_get_prefflag() -> "uchar"inf_get_strlit_flags() -> "uchar"inf_get_strlit_break() -> "uchar"inf_get_strlit_zeroes() -> "char"inf_get_strtype() -> "int32"inf_get_strlit_sernum() -> "uval_t"inf_get_datatypes() -> "uval_t"inf_get_abibits() -> "uint32"inf_get_appcall_options() -> "uint32"inf_get_privrange_start_ea() -> "ea_t"inf_get_privrange_end_ea() -> "ea_t"inf_get_cc_id() -> "comp_t"inf_get_cc_cm() -> "cm_t"inf_get_cc_size_i() -> "uchar"inf_get_cc_size_b() -> "uchar"inf_get_cc_size_e() -> "uchar"inf_get_cc_defalign() -> "uchar"inf_get_cc_size_s() -> "uchar"inf_get_cc_size_l() -> "uchar"inf_get_cc_size_ll() -> "uchar"inf_get_cc_size_ldbl() -> "uchar"inf_get_procname() -> "size_t"inf_get_strlit_pref() -> "size_t"inf_get_cc(out: "compiler_info_t") -> "bool"inf_get_privrange(*args) -> "range_t"inf_get_af_low() -> "ushort"inf_get_af_high() -> "ushort"inf_get_af2_low() -> "ushort"inf_get_pack_mode() -> "int"inf_get_demname_form() -> "uchar"inf_is_auto_enabled() -> "bool"inf_is_graph_view() -> "bool"inf_is_32bit_or_higher() -> "bool"inf_is_32bit_exactly() -> "bool"inf_is_16bit() -> "bool"inf_is_64bit() -> "bool"inf_is_dll() -> "bool"inf_is_flat_off32() -> "bool"inf_is_be() -> "bool"inf_is_wide_high_byte_first() -> "bool"inf_is_snapshot() -> "bool"inf_is_kernel_mode() -> "bool"inf_is_limiter_thin() -> "bool"inf_is_limiter_thick() -> "bool"inf_is_limiter_empty() -> "bool"inf_is_mem_aligned4() -> "bool"inf_is_hard_float() -> "bool"inf_abi_set_by_user() -> "bool"inf_allow_non_matched_ops() -> "bool"inf_allow_sigmulti() -> "bool"inf_append_sigcmt() -> "bool"inf_big_arg_align(*args) -> "bool"inf_check_manual_ops() -> "bool"inf_check_unicode_strlits() -> "bool"inf_coagulate_code() -> "bool"inf_coagulate_data() -> "bool"inf_compress_idb() -> "bool"inf_create_all_xrefs() -> "bool"inf_create_func_from_call() -> "bool"inf_create_func_from_ptr() -> "bool"inf_create_func_tails() -> "bool"inf_create_jump_tables() -> "bool"inf_create_off_on_dref() -> "bool"inf_create_off_using_fixup() -> "bool"inf_create_strlit_on_xref() -> "bool"inf_data_offset() -> "bool"inf_dbg_no_store_path() -> "bool"inf_decode_fpp() -> "bool"inf_del_no_xref_insns() -> "bool"inf_final_pass() -> "bool"inf_full_sp_ana() -> "bool"inf_gen_assume() -> "bool"inf_gen_lzero() -> "bool"inf_gen_null() -> "bool"inf_gen_org() -> "bool"inf_huge_arg_align(cc: cm_t) -> "bool"inf_like_binary() -> "bool":inf_line_pref_with_seg() -> "bool"inf_loading_idc() -> "bool"inf_macros_enabled() -> "bool"inf_map_stkargs() -> "bool"inf_mark_code() -> "bool"inf_merge_strlits() -> "bool"inf_no_store_user_info() -> "bool"inf_noflow_to_data() -> "bool"inf_noret_ana() -> "bool"inf_op_offset() -> "bool"inf_pack_idb() -> "bool"inf_pack_stkargs(*args) -> "bool"inf_prefix_show_funcoff() -> "bool"inf_prefix_show_segaddr() -> "bool"inf_prefix_show_stack() -> "bool"inf_prefix_truncate_opcode_bytes() -> "bool"inf_propagate_regargs() -> "bool"inf_propagate_stkargs() -> "bool"inf_readonly_idb() -> "bool"inf_rename_jumpfunc() -> "bool"inf_rename_nullsub() -> "bool"inf_should_create_stkvars() -> "bool"inf_should_trace_sp() -> "bool"inf_show_all_comments() -> "bool"inf_show_auto() -> "bool"inf_show_hidden_funcs() -> "bool"inf_show_hidden_insns() -> "bool"inf_show_hidden_segms() -> "bool"inf_show_line_pref() -> "bool"inf_show_repeatables() -> "bool"inf_show_src_linnum() -> "bool"inf_show_void() -> "bool"inf_show_xref_fncoff() -> "bool"inf_show_xref_seg() -> "bool"inf_show_xref_tmarks() -> "bool"inf_show_xref_val() -> "bool"inf_stack_ldbl() -> "bool"inf_stack_varargs() -> "bool"inf_strlit_autocmt() -> "bool"inf_strlit_name_bit() -> "bool"inf_strlit_names() -> "bool"inf_strlit_savecase() -> "bool"inf_strlit_serial_names() -> "bool"inf_test_mode() -> "bool"inf_trace_flow() -> "bool"inf_truncate_on_del() -> "bool"inf_unicode_strlits() -> "bool"inf_use_allasm() -> "bool"inf_use_flirt() -> "bool"inf_use_gcc_layout() -> "bool"
inf_structure setters
inf_set_allow_non_matched_ops(_v: "bool"=True) -> "bool"inf_set_graph_view(_v: "bool"=True) -> "bool"inf_set_lflags(_v: "uint32") -> "bool"inf_set_decode_fpp(_v: "bool"=True) -> "bool"inf_set_32bit(_v: "bool"=True) -> "bool"inf_set_64bit(_v: "bool"=True) -> "bool"inf_set_dll(_v: "bool"=True) -> "bool"inf_set_flat_off32(_v: "bool"=True) -> "bool"inf_set_be(_v: "bool"=True) -> "bool"inf_set_wide_high_byte_first(_v: "bool"=True) -> "bool"inf_set_dbg_no_store_path(_v: "bool"=True) -> "bool"inf_set_snapshot(_v: "bool"=True) -> "bool"inf_set_pack_idb(_v: "bool"=True) -> "bool"inf_set_compress_idb(_v: "bool"=True) -> "bool"inf_set_kernel_mode(_v: "bool"=True) -> "bool"inf_set_app_bitness(bitness: "uint") -> "void"inf_set_database_change_count(_v: "uint32") -> "bool"inf_set_filetype(_v: "filetype_t") -> "bool"inf_set_ostype(_v: "ushort") -> "bool"inf_set_apptype(_v: "ushort") -> "bool"inf_set_asmtype(_v: "uchar") -> "bool"inf_set_specsegs(_v: "uchar") -> "bool"inf_set_af(_v: "uint32") -> "bool"inf_set_trace_flow(_v: "bool"=True) -> "bool"inf_set_mark_code(_v: "bool"=True) -> "bool"inf_set_create_jump_tables(_v: "bool"=True) -> "bool"inf_set_noflow_to_data(_v: "bool"=True) -> "bool"inf_set_create_all_xrefs(_v: "bool"=True) -> "bool"inf_set_del_no_xref_insns(_v: "bool"=True) -> "bool"inf_set_create_func_from_ptr(_v: "bool"=True) -> "bool"inf_set_create_func_from_call(_v: "bool"=True) -> "bool"inf_set_create_func_tails(_v: "bool"=True) -> "bool"inf_set_should_create_stkvars(_v: "bool"=True) -> "bool"inf_set_propagate_stkargs(_v: "bool"=True) -> "bool"inf_set_propagate_regargs(_v: "bool"=True) -> "bool"inf_set_should_trace_sp(_v: "bool"=True) -> "bool"inf_set_full_sp_ana(_v: "bool"=True) -> "bool"inf_set_noret_ana(_v: "bool"=True) -> "bool"inf_set_guess_func_type(_v: "bool"=True) -> "bool"inf_set_truncate_on_del(_v: "bool"=True) -> "bool"inf_set_create_strlit_on_xref(_v: "bool"=True) -> "bool"inf_set_check_unicode_strlits(_v: "bool"=True) -> "bool"inf_set_create_off_using_fixup(_v: "bool"=True) -> "bool"inf_set_create_off_on_dref(_v: "bool"=True) -> "bool"inf_set_op_offset(_v: "bool"=True) -> "bool"inf_set_data_offset(_v: "bool"=True) -> "bool"inf_set_use_flirt(_v: "bool"=True) -> "bool"inf_set_append_sigcmt(_v: "bool"=True) -> "bool"inf_set_allow_sigmulti(_v: "bool"=True) -> "bool"inf_set_hide_libfuncs(_v: "bool"=True) -> "bool"inf_set_rename_jumpfunc(_v: "bool"=True) -> "bool"inf_set_rename_nullsub(_v: "bool"=True) -> "bool"inf_set_coagulate_data(_v: "bool"=True) -> "bool"inf_set_coagulate_code(_v: "bool"=True) -> "bool"inf_set_final_pass(_v: "bool"=True) -> "bool"inf_set_af2(_v: "uint32") -> "bool"inf_set_handle_eh(_v: "bool"=True) -> "bool"inf_set_handle_rtti(_v: "bool"=True) -> "bool"inf_set_macros_enabled(_v: "bool"=True) -> "bool"inf_set_merge_strlits(_v: "bool"=True) -> "bool"inf_set_baseaddr(_v: "uval_t") -> "bool"inf_set_start_ss(_v: "sel_t") -> "bool"inf_set_start_cs(_v: "sel_t") -> "bool"inf_set_start_ip(_v: "ea_t") -> "bool"inf_set_start_ea(_v: "ea_t") -> "bool"inf_set_start_sp(_v: "ea_t") -> "bool"inf_set_main(_v: "ea_t") -> "bool"inf_set_min_ea(_v: "ea_t") -> "bool"inf_set_max_ea(_v: "ea_t") -> "bool"inf_set_omin_ea(_v: "ea_t") -> "bool"inf_set_omax_ea(_v: "ea_t") -> "bool"inf_set_lowoff(_v: "ea_t") -> "bool"inf_set_highoff(_v: "ea_t") -> "bool"inf_set_maxref(_v: "uval_t") -> "bool"inf_set_netdelta(_v: "sval_t") -> "bool"inf_set_xrefnum(_v: "uchar") -> "bool"inf_set_type_xrefnum(_v: "uchar") -> "bool"inf_set_refcmtnum(_v: "uchar") -> "bool"inf_set_xrefflag(_v: "uchar") -> "bool"inf_set_show_xref_seg(_v: "bool"=True) -> "bool"inf_set_show_xref_tmarks(_v: "bool"=True) -> "bool"inf_set_show_xref_fncoff(_v: "bool"=True) -> "bool"inf_set_show_xref_val(_v: "bool"=True) -> "bool"inf_set_max_autoname_len(_v: "ushort") -> "bool"inf_set_nametype(_v: "char") -> "bool"inf_set_short_demnames(_v: "uint32") -> "bool"inf_set_long_demnames(_v: "uint32") -> "bool"inf_set_demnames(_v: "uchar") -> "bool"inf_set_listnames(_v: "uchar") -> "bool"inf_set_indent(_v: "uchar") -> "bool"inf_set_cmt_indent(_v: "uchar") -> "bool"inf_set_margin(_v: "ushort") -> "bool"inf_set_lenxref(_v: "ushort") -> "bool"inf_set_outflags(_v: "uint32") -> "bool"inf_set_show_void(_v: "bool"=True) -> "bool"inf_set_show_auto(_v: "bool"=True) -> "bool"inf_set_gen_null(_v: "bool"=True) -> "bool"inf_set_show_line_pref(_v: "bool"=True) -> "bool"inf_set_line_pref_with_seg(_v: "bool"=True) -> "bool"inf_set_gen_lzero(_v: "bool"=True) -> "bool"inf_set_gen_org(_v: "bool"=True) -> "bool"inf_set_gen_assume(_v: "bool"=True) -> "bool"inf_set_gen_tryblks(_v: "bool"=True) -> "bool"inf_set_cmtflg(_v: "uchar") -> "bool"inf_set_show_repeatables(_v: "bool"=True) -> "bool"inf_set_show_all_comments(_v: "bool"=True) -> "bool"inf_set_hide_comments(_v: "bool"=True) -> "bool"inf_set_show_src_linnum(_v: "bool"=True) -> "bool"inf_set_show_hidden_insns(_v: "bool"=True) -> "bool"inf_set_show_hidden_funcs(_v: "bool"=True) -> "bool"inf_set_show_hidden_segms(_v: "bool"=True) -> "bool"inf_set_limiter(_v: "uchar") -> "bool"inf_set_limiter_thin(_v: "bool"=True) -> "bool"inf_set_limiter_thick(_v: "bool"=True) -> "bool"inf_set_limiter_empty(_v: "bool"=True) -> "bool"inf_set_bin_prefix_size(_v: "short") -> "bool"inf_set_prefflag(_v: "uchar") -> "bool"inf_set_prefix_show_segaddr(_v: "bool"=True) -> "bool"inf_set_prefix_show_funcoff(_v: "bool"=True) -> "bool"inf_set_prefix_show_stack(_v: "bool"=True) -> "bool"inf_set_prefix_truncate_opcode_bytes(_v: "bool"=True) -> "bool"inf_set_strlit_flags(_v: "uchar") -> "bool"inf_set_strlit_names(_v: "bool"=True) -> "bool"inf_set_strlit_name_bit(_v: "bool"=True) -> "bool"inf_set_strlit_serial_names(_v: "bool"=True) -> "bool"inf_set_unicode_strlits(_v: "bool"=True) -> "bool"inf_set_strlit_autocmt(_v: "bool"=True) -> "bool"inf_set_strlit_savecase(_v: "bool"=True) -> "bool"inf_set_strlit_break(_v: "uchar") -> "bool"inf_set_strlit_zeroes(_v: "char") -> "bool"inf_set_strtype(_v: "int32") -> "bool"inf_set_strlit_sernum(_v: "uval_t") -> "bool"inf_set_datatypes(_v: "uval_t") -> "bool"inf_set_abibits(_v: "uint32") -> "bool"inf_set_mem_aligned4(_v: "bool"=True) -> "bool"inf_set_pack_stkargs(_v: "bool"=True) -> "bool"inf_set_big_arg_align(_v: "bool"=True) -> "bool"inf_set_stack_ldbl(_v: "bool"=True) -> "bool"inf_set_stack_varargs(_v: "bool"=True) -> "bool"inf_set_hard_float(_v: "bool"=True) -> "bool"inf_set_abi_set_by_user(_v: "bool"=True) -> "bool"inf_set_use_gcc_layout(_v: "bool"=True) -> "bool"inf_set_map_stkargs(_v: "bool"=True) -> "bool"inf_set_huge_arg_align(_v: "bool"=True) -> "bool"inf_set_appcall_options(_v: "uint32") -> "bool"inf_set_privrange_start_ea(_v: "ea_t") -> "bool"inf_set_privrange_end_ea(_v: "ea_t") -> "bool"inf_set_cc_id(_v: "comp_t") -> "bool"inf_set_cc_cm(_v: "cm_t") -> "bool"inf_set_cc_size_i(_v: "uchar") -> "bool"inf_set_cc_size_b(_v: "uchar") -> "bool"inf_set_cc_size_e(_v: "uchar") -> "bool"inf_set_cc_defalign(_v: "uchar") -> "bool"inf_set_cc_size_s(_v: "uchar") -> "bool"inf_set_cc_size_l(_v: "uchar") -> "bool"inf_set_cc_size_ll(_v: "uchar") -> "bool"inf_set_cc_size_ldbl(_v: "uchar") -> "bool"inf_set_procname(*args) -> "bool"inf_set_strlit_pref(*args) -> "bool"inf_set_cc(_v: "compiler_info_t") -> "bool"inf_set_privrange(_v: "range_t") -> "bool"inf_set_af_low(saf: "ushort") -> "void"inf_set_af_high(saf2: "ushort") -> "void"inf_set_af2_low(saf: "ushort") -> "void"inf_set_pack_mode(pack_mode: "int") -> "int"inf_inc_database_change_count(cnt: "int"=1) -> "void"
ida_idaapi
Removed functions
get_inf_structuresee inf_structure getters and inf_structure settersloader_input_t_from_linputloader_input_t_from_capsuleloader_input_t_from_fp
ida_idd
Added functions
cpu2ieee(ieee_out: "fpvalue_t *", cpu_fpval: "void const *", size: "int") -> "int"ieee2cpu(cpu_fpval: "void *", ieee_out: "fpvalue_t const &", size: "int") -> "int"
ida_idp
See also IDB events below.
Removed methods
_processor_t
has_realcvt
processor_t
get_uFlag
Modified methods
_processor_t
| 8.4 | 9.0 |
|---|---|
gen_stkvar_def(ctx: "outctx_t &", mptr: "member_t const *", v: : "sval_t") -> ssize_t | gen_stkvar_def(ctx: "outctx_t &", mptr: "udm_t", v: "sval_t", tid: "tid_t") -> "ssize_t" |
IDP_Hooks
| 8.4 | 9.0 |
|---|---|
ev_gen_stkvar_def(self, *args) -> "int" | ev_gen_stkvar_def(self, outctx: "outctx_t *", stkvar: "udm_t", v: "sval_t", tid: "tid_t") -> "int" |
Added methods
IDB_Hooks
lt_udm_created(self, udtname: "char const *", udm: "udm_t") -> "void"lt_udm_deleted(self, udtname: "char const *", udm_tid: "tid_t", udm: "udm_t") -> "void"lt_udm_renamed(self, udtname: "char const *", udm: "udm_t", oldname: "char const *") -> "void"lt_udm_changed(self, udtname: "char const *", udm_tid: "tid_t", udmold: "udm_t", udmnew: "udm_t") -> "void"lt_udt_expanded(self, udtname: "char const *", udm_tid: "tid_t", delta: "adiff_t") -> "void"frame_created(self, func_ea: "ea_t") -> "void"frame_udm_created(self, func_ea: "ea_t", udm: "udm_t") -> "void"frame_udm_deleted(self, func_ea: "ea_t", udm_tid: "tid_t", udm: "udm_t") -> "void"frame_udm_renamed(self, func_ea: "ea_t", udm: "udm_t", oldname: "char const *") -> "void"frame_udm_changed(self, func_ea: "ea_t", udm_tid: "tid_t", udmold: "udm_t", udmnew: "udm_t") -> "void"frame_expanded(self, func_ea: "ea_t", udm_tid: "tid_t", delta: "adiff_t") -> "void"
Removed functions
All the _processor_t functions have been removed from ida_idp.
ida_ieee
Removed methods
fpvalue_t
_get_10bytes_set_10bytes
ida_kernwin
Removed functions
place_t_as_enumplace_tplace_t_as_structplace_topen_enums_windowopen_structs_windowchoose_strucchoose_enum(title, default_id) -> "enum_t"choose_enum_by_value(title, default_id, value, nbytes) -> "enum_t"
Modified function
place_t_as_idaplace_thas been made an alias ofplace_t.as_idaplace_tplace_t_as_simpleline_place_thas been made an alias ofplace_t.as_simpleline_place_tplace_t_as_tiplace_thas been made an alias ofplace_t.as_tiplace_t
Removed classes
enumplace_tstructplace_t
Removed methods
place_t
as_enumplace_tas_structplace_t
twinpos_t
place_as_enumplace_tplace_as_structplace_t
tagged_line_sections_t
find_in
Added methods
tagged_line_sections_t
nearest_before(self, range: "tagged_line_section_t", start: "cpidx_t", tag: "color_t"=0) -> "tagged_line_section_t const *"nearest_after(self, range: "tagged_line_section_t", start: "cpidx_t", tag: "color_t"=0) -> "tagged_line_section_t const *"
chooser_base_t
has_widget_lifecycle(self) -> "bool"
Added functions
is_ida_library(path: "char *", pathsize: "size_t", handle: "void **") -> "bool"
ida_lines
Removed functions
set_user_defined_prefix
ida_moved
Modified functions
bookmarks_t_markhas been made an alias ofbookmarks_t.markbookmarks_t_get_deschas been made an alias ofbookmarks_t.get_descbookmarks_t_find_indexhas been made an alias ofbookmarks_t.find_indexbookmarks_t_sizehas been made an alias ofbookmarks_t.sizebookmarks_t_erasehas been made an alias ofbookmarks_t.erasebookmarks_t_get_dirtree_idhas been made an alias ofbookmarks_t.get_dirtree_idbookmarks_t_gethas been made an alias ofbookmarks_t.get
ida_nalt
Removed functions
validate_idb_names
ida_netnode
Modified functions
netnode.exist has been made an alias of netnode.exist
ida_pro
Removed functions
uchar_array_frompointertid_array_frompointerea_array_frompointersel_array_frompointerint_pointer_frompointersel_pointer_frompointerea_pointer_frompointer
See Added classes below
Added classes
plugin_options_t
erase(self, name: "char const *") -> "bool"
uchar_pointer
assign(self, value: "uchar") -> "void"value(self) -> "uchar"cast(self) -> "uchar *"frompointer(t: "uchar *") -> "uchar_pointer *"
ushort_pointer
assign(self, value: "ushort") -> "void"value(self) -> "ushort"cast(self) -> "ushort *"frompointer(t: "ushort *") -> "ushort_pointer *"
uint_pointer
assign(self, value: "uint") -> "void"value(self) -> "uint"cast(self) -> "uint *"frompointer(t: "uint *") -> "uint_pointer *"
sint8_pointer
assign(self, value: "sint8") -> "void"value(self) -> "sint8"cast(self) -> "sint8 *"frompointer(t: "sint8 *") -> "sint8_pointer *"
int8_pointer
assign(self, value: "int8") -> "void"value(self) -> "int8"cast(self) -> "int8 *"frompointer(t: "int8 *") -> "int8_pointer *"
uint8_pointer
assign(self, value: "uint8") -> "void"value(self) -> "uint8"cast(self) -> "uint8 *"frompointer(t: "uint8 *") -> "uint8_pointer *"
int16_pointer
assign(self, value: "int16") -> "void"value(self) -> "int16"cast(self) -> "int16 *"frompointer(t: "int16 *") -> "int16_pointer *"
uint16_pointer
assign(self, value: "uint16") -> "void"value(self) -> "uint16"cast(self) -> "uint16 *"frompointer(t: "uint16 *") -> "uint16_pointer *"
int32_pointer
assign(self, value: "int32") -> "void"value(self) -> "int32"cast(self) -> "int32 *"frompointer(t: "int32 *") -> "int32_pointer *"
uint32_pointer
assign(self, value: "uint32") -> "void"value(self) -> "uint32"cast(self) -> "uint32 *"frompointer(t: "uint32 *") -> "uint32_pointer *"
int64_pointer
assign(self, value: "int64") -> "void"value(self) -> "int64"cast(self) -> "int64 *"frompointer(t: "int64 *") -> "int64_pointer *"
uint64_pointer
assign(self, value: "uint64") -> "void"value(self) -> "uint64"cast(self) -> "uint64 *"frompointer(t: "uint64 *") -> "uint64_pointer *"
ssize_pointer
assign(self, value: "ssize_t") -> "void"value(self) -> "ssize_t"cast(self) -> "ssize_t *"frompointer(t: "ssize_t *") -> "ssize_pointer *"
bool_pointer
assign(self, value: "bool") -> "void"value(self) -> "bool"cast(self) -> "bool *"frompointer(t: "bool *") -> "bool_pointer *"
short_pointer
assign(self, value: "short") -> "void"value(self) -> "short"cast(self) -> "short *"frompointer(t: "short *") -> "short_pointer *"
char_pointer
assign(self, value: "char") -> "void"value(self) -> "char"cast(self) -> "char *"frompointer(t: "char *") -> "char_pointer *"
sel_pointer
assign(self, value: "sel_t") -> "void"value(self) -> "sel_t"cast(self) -> "sel_t *"frompointer(t: "sel_t *") -> "sel_pointer *"
asize_pointer
assign(self, value: "asize_t") -> "void"value(self) -> "asize_t"cast(self) -> "asize_t *"frompointer(t: "asize_t *") -> "asize_pointer *"
adiff_pointer
assign(self, value: "adiff_t") -> "void"value(self) -> "adiff_t"cast(self) -> "adiff_t *"from_pointer(t: "adiff_t*") -> "adiff_pointer *"
uval_pointer
assign(self, value: "uval_t") -> "void"value(self) -> "uval_t"cast(self) -> "uval_t *"frompointer(t: "uval_t *") -> "uval_pointer *"
ea32_pointer
assign(self, value: "ea32_t") -> "void"value(self) -> "ea32_t"cast(self) -> "ea32_t *"frompointer(t: "ea32_t *") -> "ea32_pointer *"
ea64_pointer
assign(self, value: "ea64_t") -> "void"value(self) -> "ea64_t"cast(self) -> "ea64_t *"frompointer(t: "ea64_t *") -> "ea64_pointer *"
flags_pointer
assign(self, value: "flags_t") -> "void"value(self) -> "flags_t"cast(self) -> "flags_t *"frompointer(t: "flags_t *") -> "flags_pointer *"
flags64_pointer
assign(self, value: "flags64_t") -> "void"value(self) -> "flags64_t"cast(self) -> "flags64_t *"frompointer(t: "flags64_t *") -> "flags64_pointer *"
tid_pointer
assign(self, value: "tid_t") -> "void"value(self) -> "tid_t"cast(self) -> "tid_t *"frompointer(t: "tid_t *") -> "tid_pointer *"
Added functions
get_login_name() -> "qstring *"
ida_regfinder
Removed functions
reg_value_info_t_make_dead_endreg_value_info_t_make_abortedreg_value_info_t_make_badinsnreg_value_info_t_make_unkinsnreg_value_info_t_make_unkfuncreg_value_info_t_make_unkloopreg_value_info_t_make_unkmultreg_value_info_t_make_numreg_value_info_t_make_initial_sp
Modified functions
| 8.4 | 9.0 |
|---|---|
invalidate_regfinder_cache(ea: "ea_t") -> "void" | invalidate_regfinder_cache(from=BADADDR: "ea_t", to=BADADDR: "ea_t") -> "void" |
Added methods
reg_value_info_t
movt(self, r: "reg_value_info_t", insn: "insn_t const &") -> "void"
ida_registry
Removed functions
reg_loadreg_flush
ida_search
Removed functions
find_binary
ida_ua
Removed Function
construct_macro(insn: "insn_t *", enable: "bool", build_macro: "PyObject *") -> bool (See [Modified functions](#modified-functions-4))
Modified functions
| 8.4 | 9.0 |
|---|---|
construct_macro2(_this: "macro_constructor_t *", insn: "insn_t *", enable: "bool") -> "bool" | construct_macro(_this: "macro_constructor_t *", insn: "insn_t *", enable: "bool") -> "bool" |
Added methods
macro_constructor_t
construct_macro(self, insn: "insn_t", enable: "bool") -> "bool"
idautils
Modified functions
| 8.4 | 9.0 |
|---|---|
Structs() -> [(idx, sid, name)] | Structs() -> [(ordinal, sid, name)] |
StructMembers(sid) -> [(offset, name, size)] | StructMembers(sid) -> [(offset_in_bytes, name, size_in_bytes)] |
IDB events
The following table provide a list of IDB events that have been replaced or, in some cases, removed.
| Since 7 | In 9.0 |
|---|---|
truc_created | local_types_changed |
deleting_struc | none |
struc_deleted | local_types_changed |
changing_struc_align | none |
struc_align_changed | local_types_changed |
renaming_struc | none |
struc_renamed | local_types_changed |
expanding_struc | none |
struc_expanded | lt_udt_expanded, frame_expanded, local_types_changed |
struc_member_created | lt_udm_created, frame_udm_created, local_types_changed |
deleting_struc_member | none |
struc_member_deleted | lt_udm_deleted, frame_udm_deleted, local_types_changed |
renaming_struc_member | none |
struc_member_renamed | lt_udm_renamed, frame_udm_renamed, local_types_changed |
changing_struc_member | none |
struc_member_changed | lt_udm_changed, frame_udm_changed, local_types_changed |
changing_struc_cmt | none |
struc_cmt_changed | local_types_changed |
enum_created | local_types_changed |
deleting_enum | none |
enum_deleted | local_types_changed |
renaming_enum | none |
enum_renamed | local_types_changed |
changing_enum_bf | local_types_changed |
enum_bf_changed | local_types_changed |
changing_enum_cmt | none |
enum_cmt_changed | local_types_changed |
enum_member_created | local_types_changed |
deleting_enum_member | none |
enum_member_deleted | local_types_changed |
enum_width_changed | local_types_changed |
enum_flag_changed | local_types_changed |
enum_ordinal_changed | `none |
Type information error codes
Following is the list of error values returned by the type info module. It can also be found in typeinf.hpp in the IDASDK:
| Error name | Val. | Meaning |
|---|---|---|
| TERR_OK | 0 | ok |
| TERR_STABLE | 1 | it means no errors occurred but nothing has changed (this code is internal: should never be returned to caller) -* |
| TERR_SAVE_ERROR | -1 | failed to save |
| TERR_SERIALIZE | -2 | failed to serialize |
| TERR_BAD_NAME | -3 | name is not acceptable |
| TERR_BAD_ARG | -4 | bad argument |
| TERR_BAD_TYPE | -5 | bad type |
| TERR_BAD_SIZE | -6 | bad size |
| TERR_BAD_INDEX | -7 | bad index |
| TERR_BAD_ARRAY | -8 | arrays are forbidden as function arguments |
| TERR_BAD_BF | -9 | bitfields are forbidden as function arguments |
| TERR_BAD_OFFSET | -10 | bad member offset |
| TERR_BAD_UNIVAR | -11 | unions cannot have variable sized members |
| TERR_BAD_VARLAST | -12 | variable sized member must be the last member in the structure |
| TERR_OVERLAP | -13 | the member overlaps with other members that cannot be deleted |
| TERR_BAD_SUBTYPE | -14 | recursive structure nesting is forbidden |
| TERR_BAD_VALUE | -15 | value is not acceptable |
| TERR_NO_BMASK | -16 | bitmask is not found |
| TERR_BAD_BMASK | -17 | Bad enum member mask. The specified mask should not intersect with any existing mask in the enum. Zero masks are prohibited too |
| TERR_BAD_MSKVAL | -18 | bad bmask and value combination |
| TERR_BAD_REPR | -19 | bad or incompatible field representation |
| TERR_GRP_NOEMPTY | -20 | could not delete group mask for not empty group |
| TERR_DUPNAME | -21 | duplicate name |
| TERR_UNION_BF | -22 | unions cannot have bitfields |
| TERR_BAD_TAH | -23 | bad bits in the type attributes (TAH bits) |
| TERR_BAD_BASE | -24 | bad base class |
| TERR_BAD_GAP | -25 | bad gap |
| TERR_NESTED | -26 | recursive structure nesting is forbidden |
| TERR_NOT_COMPAT | -27 | the new type is not compatible with the old type |
| TERR_BAD_LAYOUT | -28 | failed to calculate the structure/union layout |
| TERR_BAD_GROUPS | -29 | bad group sizes for bitmask enum |
| TERR_BAD_SERIAL | -30 | enum value has too many serials |
| TERR_ALIEN_NAME | -31 | enum member name is used in another enum |
| TERR_STOCK | -32 | stock type info cannot be modified |
| TERR_ENUM_SIZE | -33 | bad enum size |
| TERR_NOT_IMPL | -34 | not implemented |
| TERR_TYPE_WORSE | -35 | the new type is worse than the old type |
| TERR_BAD_FX_SIZE | -36 | cannot extend struct beyond fixed size |
Alternative examples
This section gives examples of how to port some ida_struct and ida_enum functions using ida_typeinf.
del_struct_members
The following code can be used as an example of how to replace ida_struct.del_struct_members.
def del_struct_members(sid, offset1, offset2):
tif = ida_typeinf.tinfo_t()
if tif.get_type_by_tid(sid) and tif.is_udt():
udm = ida_typeinf.udm_t()
udm.offset = offset1 * 8
idx1 = tif.find_udm(udm, ida_typeinf.STRMEM_OFFSET)
udm = ida_typeinf.udm_t()
udm.offset = offset2 * 8
idx2 = tif.find_udm(udm, ida_typeinf.STRMEM_OFFSET)
return tif.del_udms(idx1, idx2)
get_member_by_fullname
The following code can be used as an example of how to replace ida_struct.get_member_by_fullname.
def get_member_by_fullname(fullname):
udm = ida_typeinf.udm_t()
idx = ida_typeinf.get_udm_by_fullname(udm, fullname)
if idx == -1:
return None
else:
return udm
get_struc_qty
The following code can be used as an example of how to replace ida_struct.get_struc_qty.
def get_struc_qty():
count = 0
limit = ida_typeinf.get_ordinal_limit()
for i in range(1, limit):
tif = ida_typeinf.tinfo_t()
if not tif.get_numbered_type(i, ida_typeinf.BTF_STRUCT):
continue
else:
count += 1
return count
is_special_member
The following code can be used as an example of how to replace ida_struct.is_special_member.
def is_special_member(member_id):
tif = ida_typeing.tinfo_t()
udm = ida_typeinf.udm_t()
if tif.get_udm_by_tid(udm, member_id) != -1:
return udm.is_special_member()
return False
get_sptr
The following code can be used as an example of how to replace ida_struct.get_sptr.
def get_sptr(udm):
tif = udm.type
if tif.is_udt() and tif.is_struct():
return tif
else:
return None
How to examples
List structure members
Example 1
def list_enum_members(name)
tid = idc.get_struc_id(name)
if not tid == ida_idaapi.BADADDR:
for (offset, name, size) in idautils.StructMembers(tid):
print(f'Member {name} at offset {offset} of size {size}')
Example 2
def list_struct_members2(name):
til = ida_typeinf.get_idati()
tif = ida_typeinf.tinfo_t()
if not tif.get_named_type(til, name, ida_typeinf.BTF_STRUCT, True, False):
print(f"'{name}' is not a structure")
elif tif.is_typedef():
print(f"'{name}' is not a (non typedefed) structure.")
else:
udt = ida_typeinf.udt_type_data_t()
if tif.get_udt_details(udt):
idx = 0
print(f'Listing the {name} structure {udt.size()} field names:')
for udm in udt:
print(f'Field {idx}: {udm.name}')
idx += 1
else:
print(f"Unable to get udt details for structure '{name}'")
List enum members
def list_enum_members(name):
til = ida_typeinf.get_idati()
tif = ida_typeinf.tinfo_t()
if not tif.get_named_type(til, name, ida_typeinf.BTF_ENUM, True, False):
print(f"'{name}' is not an enum")
elif tif.is_typedef():
print(f"'{name}' is not a (non typedefed) enum.")
else:
edt = ida_typeinf.enum_type_data_t()
if tif.get_enum_details(edt):
idx = 0
bitfield = ''
if edt.is_bf():
bitfield = '(bitfield)'
print(f"Listing the '{name}' {bitfield} enum {edt.size()} field names:")
for edm in edt:
print(f'Field {idx}: {edm.name} = {edm.value}')
idx += 1
else:
print(f"Unable to get udt details for enum '{name}'")
List frame information
func = ida_funcs.get_func(here())
if func:
func_name = ida_funcs.get_func_name(func.start_ea)
frame_tif = ida_typeinf.tinfo_t()
if ida_frame.get_func_frame(frame_tif, func):
frame_udt = ida_typeinf.udt_type_data_t()
if frame_tif.get_udt_details(frame_udt):
print('List frame information:')
print('-----------------------')
print(f'{func_name} @ {func.start_ea:x} framesize {frame_tif.get_size():x}')
print(f'Local variable size: {func.frsize:x}')
print(f'Saved registers: {func.frregs:x}')
print(f'Argument size: {func.argsize:x}')
print('{')
idx = 0
for udm in frame_udt:
print(f'\t[{idx}] {udm.name}: soff={udm.offset//8:x} eof={udm.end()//8:x} {udm.type.dstr()}')
idx += 1
print('}')
else:
print(f'{here():x} is not inside a function.')
List stack variables xrefs
func = ida_funcs.get_func(here())
if func:
print(f'Function @ {func.start_ea:x}')
frame_tif = ida_typeinf.tinfo_t()
if ida_frame.get_func_frame(frame_tif, func):
print('Frame found')
nmembers = frame_tif.get_udt_nmembers()
print(f'Frame has {nmembers} members')
if nmembers > 0:
frame_udt = ida_typeinf.udt_type_data_t()
if frame_tif.get_udt_details(frame_udt):
for frame_udm in frame_udt:
start_off = frame_udm.begin() // 8
end_off = frame_udm.end() // 8
xreflist = ida_frame.xreflist_t()
ida_frame.build_stkvar_xrefs(xreflist, func, start_off, end_off)
size = xreflist.size()
print(f'{frame_udm.name} stack variable starts @ {start_off:x}, ends @ {end_off:x}, xref size: {size}')
for idx in range(size):
match xreflist[idx].type:
case ida_xref.dr_R:
type = 'READ'
case ida_xref.dr_W:
type = 'WRITE'
case _:
type = 'UNK'
print(f'\t[{idx}]: xref @ {xreflist[idx].ea:x} of type {type}')
else:
print('Unable to get the frame details.')
else:
print('No members found.')
else:
print('No function under the cursor')
Create a structure with parsing
struct_str = """struct pcap_hdr_s {
uint32_t magic_number; /* magic number */
uint16_t version_major; /* major version number */
uint16_t version_minor; /* minor version number */
int32_t thiszone; /* GMT to local correction */
uint32_t sigfigs; /* accuracy of timestamps */
uint32_t snaplen; /* max length of captured packets, in octets */
uint32_t network; /* data link type */
};"""
tif = ida_typeinf.tinfo_t()
if tif.get_named_type(None, 'pcap_hdr_s'):
ida_typeinf.del_named_type(None, 'pcap_hdr_s', ida_typeinf.NTF_TYPE)
ida_typeinf.idc_parse_types(struct_str, 0)
if not tif.get_named_type(None, 'pcap_hdr_s'):
print('Unable to retrieve pcap_hdr_s structure')
Create a structure member by member
tif = ida_typeinf.tinfo_t()
if tif.get_named_type(None, 'pcaprec_hdr_s'):
ida_typeinf.del_named_type(None, 'pcaprec_hdr_s', ida_typeinf.NTF_TYPE)
field_list = [('ts_sec', ida_typeinf.BTF_UINT32),
('ts_usec', ida_typeinf.BTF_UINT32),
('incl_len', ida_typeinf.BTF_UINT32),
('orig_len', ida_typeinf.BTF_UINT32)]
udt = ida_typeinf.udt_type_data_t()
udm = ida_typeinf.udm_t()
for (name, type) in field_list:
udm.name = name
udm.type = ida_typeinf.tinfo_t(type)
udt.push_back(udm)
if tif.create_udt(udt):
tif.set_named_type(None, 'pcaprec_hdr_s')
Create a union member by member
tif = ida_typeinf.tinfo_t()
if tif.get_named_type(None, 'my_union'):
ida_typeinf.del_named_type(None, 'my_union', ida_typeinf.NTF_TYPE)
tif = ida_typeinf.tinfo_t()
udt = ida_typeinf.udt_type_data_t()
field_list = [('member1', ida_typeinf.BTF_INT32),
('member2', ida_typeinf.BTF_CHAR),
('member3', ida_typeinf.BTF_FLOAT)]
udt.is_union = True
udm = ida_typeinf.udm_t()
for (name, type) in field_list:
udm.name = name
udm.type = ida_typeinf.tinfo_t(type)
udt.push_back(udm)
tif.get_named_type(None, 'pcap_hdr_s')
if tif.create_ptr(tif):
udm.name = 'header_ptr'
udm.type = tif
udt.push_back(udm)
tif.clear()
tif.create_udt(udt, ida_typeinf.BTF_UNION)
tif.set_named_type(None, 'my_union')
Create a bitmask enum
edt = ida_typeinf.enum_type_data_t()
edm = ida_typeinf.edm_t()
for name, value in [('field1', 1), ('field2', 2), ('field3', 4)]:
edm.name = name
edm.value = value
edt.push_back(edm)
tif = ida_typeinf.tinfo_t()
if tif.create_enum(edt):
tif.set_enum_is_bitmask(ida_typeinf.tinfo_t.ENUMBM_ON)
tif.set_named_type(None, 'bmenum')
Create an array
Example 1
tif = ida_typeinf.tinfo_t(ida_typeinf.BTF_INT)
if tif.create_array(tif, 5, 0):
type = tif._print()
tif.set_named_type(None, 'my_int_array1')
Example 2
atd = ida_typeinf.array_type_data_t()
atd.base = 0
atd.nelems = 5
atd.elem_type = ida_typeinf.tinfo_t(ida_typeinf.BTF_INT)
tif = ida_typeinf.tinfo_t()
if tif.create_array(atd):
type = tif._print()
tif.set_named_type(None, 'my_int_array2')
Log local type events
class lt_logger_hooks_t(ida_idp.IDB_Hooks):
def __init__(self):
ida_idp.IDB_Hooks.__init__(self)
self.inhibit_log = 0
def _format_value(self, v):
return str(v)
def _log(self, msg=None):
if self.inhibit_log <= 0:
if msg:
print(f'>>> lt_logger_hooks_f: {msg}')
else:
stack = inspect.stack()
frame, _, _, _, _, _ = stack[1]
args, _, _, values = inspect.getargvalues(frame)
method_name = inspect.getframeinfo(frame)[2]
argstrs = []
for arg in args[1:]:
argstrs.append("%s=%s" % (arg, self._format_value(values[arg])))
print(f'>>> lt_logger_hooks_t.{method_name}: {", ".join(args)}')
return 0
def lt_udm_created(self, udtname, udm):
msg = f'UDM {udm.name} has been created in UDT {udtname}'
return self._log(msg)
def lt_udm_deleted(self, udtname, udm_tid):
msg = f'UDM tid {udm_tid:x} has been deleted from {udtname}'
return self._log(msg)
def lt_udm_renamed(self, udtname, udm, oldname):
msg = f'UDM {oldname} from UDT {udtname} has been renamed to {udm.name}'
return self._log(msg)
def lt_udm_changed(self, udtname, udm_tid, udmold, udmnew):
return self._log()
# Remove an existing hook on second run
try:
idp_hook_stat = "un"
print("Local type IDB hook: checking for hook...")
lthook
print("Local type IDB hook: unhooking....")
idp_hook_stat2 = ""
lthook.unhook()
del lthook
except:
print("local type IDB hook: not installed, installing now....")
idp_hook_stat = ""
idp_hook_stat2 = "un"
lthook = lt_logger_hooks_t()
lthook.hook()
print(f'Local type IDB hook {idp_hook_stat}installed. Run the script again to {idp_hook_stat2}install')
Log frame events
class frame_logger_hooks_t(ida_idp.IDB_Hooks):
def __init__(self):
ida_idp.IDB_Hooks.__init__(self)
self.inhibit_log = 0
def _format_value(self, v):
return str(v)
def _log(self, msg=None):
if self.inhibit_log <= 0:
if msg:
print(f'>>> frame_logger_hooks_f: {msg}')
else:
stack = inspect.stack()
frame, _, _, _, _, _ = stack[1]
args, _, _, values = inspect.getargvalues(frame)
method_name = inspect.getframeinfo(frame)[2]
argstrs = []
for arg in args[1:]:
argstrs.append("%s=%s" % (arg, self._format_value(values[arg])))
print(f'>>> frame_logger_hooks_t.{method_name}: {", ".join(args)}')
return 0
def frame_udm_created(self, func_ea, udm):
return self._log()
def frame_udm_deleted(self, func_ea, udm_tid, udm):
return self._log()
def frame_udm_renamed(self, func_ea, udm, oldname):
return self._log()
def frame_udm_changed(self, func_ea, udm_tid, udmold, udmnew):
return self._log()
# Remove an existing hook on second run
try:
frame_idp_hook_stat = "un"
print("Frame IDP hook: checking for hook...")
framehook
print("Frame IDP hook: unhooking....")
frame_idp_hook_stat2 = ""
framehook.unhook()
del framehook
except:
print("Frame IDP hook: not installed, installing now....")
frame_idp_hook_stat = ""
frame_idp_hook_stat2 = "un"
framehook = frame_logger_hooks_t()
framehook.hook()
print(f'Frame IDB hook {frame_idp_hook_stat}installed. Run the script again to {frame_idp_hook_stat2}install')
IDC
IDC is an IDA native, embedded scripting language semantically similar to C/C++.
Typical use cases
With IDC, you can write simple scripts for automating repetitive tasks and extending out-of-the-box IDA functionality (for example, for getting the list of all functions or marked positions) without creating more complex plugins with C++ SDK or IDAPython.
What to check next?
| IDC Getting Started | Learn core concepts of IDC. | core-concepts.md | |
| IDC Reference | Check the list of all IDC functions with details | idc-api-reference.md | |
| IDC Examples | Explore ready-to-use samples. | idc-examples.md |
Core concepts
IDC language is a C-like language. It has the same lexical tokens as C does: character set, constants, identifiers, keywords, etc. However, since it is a scripting language, there are no pointers, and all variable types can be handled by the interpreter. Any variable may hold any value; variables are declared without specifying their type;
auto myvar;
An IDC program consists of function declarations. By default, execution starts from a function named ‘main’.
Select a topic to read:
- Variables
- Functions
- Statements
- Expressions
- Predefined symbols
- Slices
- Exceptions
- Index of IDC functions
- Index of debugger related IDC functions
Expressions
In the IDC expressions you can use almost all C operations except:
complex assignment operations as '+='
Constants are defined more or less like in C, with some minor differences.
There are four type conversion operations:
long(expr) floating point numbers are truncated during conversion
char(expr)
float(expr)
__int64(expr)
However, explicit type conversions are rarely required because all type conversions are made automatically:
- addition:
if both operands are strings,
string addition is performed (strings are concatenated);
if both operands are objects,
object combination is performed (a new object is created)
if floating point operand exists,
both operands are converted to floats;
otherwise
both operands are converted to longs;
- subtraction/multiplication/division:
if floating point operand exists,
both operands are converted to floats;
if both operands are objects and the operation is subtraction,
object subtraction is performed (a new object is created)
otherwise
both operands are converted to longs;
- comparisons (==,!=, etc):
if both operands are strings, string comparison is performed;
if floating point operand exists,
both operands are converted to floats;
otherwise
both operands are converted to numbers;
- all other operations:
operand(s) are converted to longs;
If any of the long operands is 64bit, the other operand is converted to 64bit too.
There is one notable exception concerning type conversions: if one operand is a string and the other is zero (0), then a string operation is performed. Zero is converted to an empty string in this case.
The & operator is used to take a reference to a variable. References themselves cannot be modified once created. Any assignment to them will modify the target variable. For example:
auto x, r;
r = &x;
r = 1; // x is equal to 1 now
References to references are immediately resolved:
auto x, r1, r2;
r1 = &x;
r2 = &r1; // r2 points to x
Since all non-object arguments are passed to functions by value, references are a good way to pass arguments by reference.
Statements
In IDC there are the following statements:
expression; (expression-statement) if (expression) statement
if (expression) statement else statement
for ( expr1; expr2; expr3 ) statement
while (expression) statement
do statement while (expression);
break;
continue;
return ;
return; the same as ‘return 0;’
{ statements… }
try statement catch ( var ) statement
throw ;
; (empty statement)
Please note that the ‘switch’ statement is not supported.
Functions
An IDC function always returns a value. There are 2 kinds of functions:
- built-in functions
- user-defined functions A user-defined function is declared this way: static func(arg1,arg2,arg3) { statements … } It is not necessary to specify the parameter types because all necessary type conversions are performed automatically.
By default all function arguments are passed by value, except:
- objects are always passed by reference
- functions are always passed by reference
- it is possible to pass a variable by reference using the & operator
If the function to call does not exist, IDA tries to resolve the name using the debugged program labels. If it succeeds, an dbg_appcall is performed.
Variables
There are two kinds of variables in IDC:
- local variables: they are created at the function entry
and destroyed at the exit
- global variables: they are created at the compilation time
and destroyed when the database is closed
A variable can contain:
- LONG: a 32-bit signed long integer (64-bit in 64-bit version of IDA)
- INT64: a 64-bit signed long integer
- STR: a character string
- FLOAT: a floating point number (extra precision, up to 25 decimal digits)
- OBJECT: an object with attributes and methods (a concept very close to C++ class) more
- REF: a reference to another variable
- FUNC: a function reference
A local variable is declared this way:
auto var1;
auto var2 = <expr>;
Global variables are declared like this:
extern var;
Global variables can be redefined many times. IDA will silently ignore subsequent declarations. Please note that global variables cannot be initialized at the declaration time.
All C and C++ keywords are reserved and cannot be used as a variable name.
While it is possible to declare a variable anywhere in the function body, all variables are initialized at the function entry and all of them are destroyed only at the exit. So, a variable declared in a loop body will not be reinitialized at each loop iteration, unless explicitly specified with an assignment operator.
If a variable or function name cannot be recognized, IDA tries to resolve them using the names from the disassembled application. In it succeeds, the name is replaced by its value in the disassembly listing.
For example:
.data:00413060 errtable dd 1 ; oscode
.data:00413060 dd 16h ; errnocode
msg("address is: %x\n", _errtable);
will print 413060. If the label denotes a structure, it is possible to refer to its fields:
msg("address is: %x\n", _errtable.errnocode);
will print 413064. Please note that IDA does not try to read the data but just returns the address of the structure field. The field address can also be calculated using the get_field_ea function.
NOTE: The processor register names can be used in the IDC scripts when the debugger is active. Reading from such a variable return the corresponding register value. Writing to such a variable modifies the register value in the debugged process. Such variables are accessible only when the application is in the suspended mode.
NOTE: another way to emulate global scope variables is to use array functions and create global persistent arrays.
Constants
The following constants can be used in IDC:
- long numbers (32-bit for 32-bit version of IDA
and 64-bit for 64-bit version of IDA)
12345 - decimal constants
0x444 - hex constants
01236 - octal constants
0b110 - binary constants
'c' - character constants
Any numeric constant may have 'u' and 'l' suffixes, they are ignored.
- 64-bit numbers. To declare a 64-bit constant, use 'i64' suffix:
123i64
Also, if a constant does not fit 32-bits, it will automatically be
stored as a 64-bit constant.
- strings. Strings are declared using the double quotes. The backslash
character can be used to as an escape:
"string"
"string\nwith four embedded \x0\x00\000\0 zeroes"
Multiple string constants in a row will be automatically concatenated:
"this" " is" " one " "string"
Exceptions
Any runtime error generates an exception. Exceptions terminate the execution. It is possible to catch an exception instead of terminating the execution:
auto e;
try
{
... some statements that cause a runtime error...
}
catch ( e )
{
// e holds the exception information
// it is an instance of the exception class
}
See the details of classes.
The try/catch blocks can be nested. If the current function has no try/catch blocks, the calling function will be examined, and so on, until we find a try/catch block or exit the main function. If no try/catch block is found, an unhandled exception is reported.
It is also possible to throw an exception explicitly. Any object can be thrown. For example:
throw 5;
will throw value ‘5’.
Classes
Classes can be declared the following way:
class name
{
method1(...) {}
...
};
Inside the class, method functions are declared without the ‘static’ keyword. The method with the name of the class is the class constructor. For example:
class myclass
{
myclass(x,y)
{
print("myclass constructor has been called with two arguments: ", x, y);
this.x = x;
this.y = x;
}
~myclass()
{
print("destructor has been called: ", this);
}
};
Inside the class methods, the ‘this’ variable can be used to refer to the current object.
Only one constructor per class is allowed.
Class instances are created like this:
o = myclass(1, 2);
And object attributes (or fields) are accessed like this:
print(o.x);
o.y = o.x + 1;
A new attribute is created upon assigning to it:
o.new_attr = 1;
Accessing an unexisting attribute generates an exception, which can be caught.
The following special method names exist:
__setattr__(attr, value)
This method is called when an object attribute is assigned a new value.
Instead of assigning a value, this method can do something else.
To modify a class attribute from this method, please use the setattr()
global function.
Compare with: Python _setattr_ method
__getattr__(attr)
This method is called when an object attribute is accessed for reading.
Instead of simply returning a value, this method can do something else,
for example to calculate the attribute on the fly. To retrieve a
attribute from this function, use the getattr() global function.
Compare with: Python _getattr_ method
Simple class inheritance is support. Derived classed are declared like this:
class derived : base
{
...
};
Here we declare the ‘derived’ class that is derived from the ‘base’ class. For derived classes, the base class constructor can be called explicitly:
class derived : base
{
derived() : base(args...)
{
}
};
If the base class constructor is not called explicitly, IDA will call it implicitly, without any arguments.
It is possible to call base class methods using full names:
base::func(this, args...);
The ‘this’ argument must be passed explicitly in this case.
When there are no more references to an object, it is automatically destroyed. We use a simple reference count algorithm to track the object use. Circularly dependent objects are not detected: they are never destroyed.
The following built-in object classes exist:
- object: the default base class for all new classes. When the base class
is not specified, the new class will inherit from 'object'
This class has no fields and no special constructor. It has the following
methods:
-
void object.retrieve(typeinfo, ea, flags)
- exception: class used to report exceptions. It has the following attributes: file - source file name where the exception occurred func - current function name line - line number pc - program counter value (internal to idc) Runtime errors are reported as exceptions too. They are two more fields: qerrno - runtime error code description - printable error description This class has no special constructor and has no methods. - typeinfo: class used to represent type info. It has the following attributes: type - binary encoded type string fields - field names for the type (e.g. structure member names) name - (optional) variable/function name
Human readable form of the typeinfo can be obtained by calling the print() method. The type size can be calculated using the size() method.
- loader_input_t: class to read files.
Predefined symbols
The following symbols are predefined in the IDC preprocessor:
_NT_ IDA is running under MS Windows
_LINUX_ IDA is running under Linux
_MAC_ IDA is running under Mac OS X
_UNIX_ IDA is running under Unix (linux or mac)
_EA64_ 64-bit version IDA
_QT_ GUI version of IDA (Qt)
_GUI GUI version of IDA
_TXT_ Text version of IDA
_IDA_VERSION_ The current IDA version. For example: "9.1"
_IDAVER_ The current, numerical IDA version. For example: "900" means v9.0
These symbols are also defined when parsing C header files.
loader_input_t class
The loader_input_t class can read from input files. It has the following methods:
- long read(vref buf, long size);
- long size();
- long seek(long pos, long whence);
- long tell();
- string gets(long maxsize);
- string getz(long pos, long maxsize);
- long getc();
- long readbytes(vref result, long size, long mf);
- void close();
Instances of this class can be created by calling the open_loader_input function.
See other IDC classes.
Slices
The slice operator can be applied IDC objects are strings.
For strings, the slice operator denotes a substring:
str[i1:i2] - substring from i1 to i2. i2 is excluded
str[idx] - one character substring at 'idx'.
this is equivalent to str[idx:idx+1]
str[:idx] - substring from the beginning of the string to idx
this is equivalent to str[0:idx]
str[idx:] - substring from idx to the end of the string
this is equivalent to str[idx:0x7fffffff]
Any indexes that are out of bounds are silently adjusted to correct values. If i1 >= i2, empty string is returned. Negative indexes are used to denote positions counting from the end of the string.
String slices can be used on the right side of an assignment. For example:
str[0:2] = "abc";
will replace 2 characters at the beginning of the string by “abc”.
For objects, the slice operator denotes a subset of attributes. It can be used to emulate arrays:
auto x = object();
x[0] = value1;
x[1] = "value2";
x[i1:i2] denotes all attributes with numeric values between i1 and i2 (i2 is excluded).
Any non-numeric attributes are ignored by the slice operator.
Reference
IDC examples
The following examples demonstrate the usage of native IDA scripting language in more complex scripts. Our selection illustrates how IDC can help you automate everyday tasks and speed up your learning efforts while learning IDC scripting.
Where can I find all the examples?
The full library of our examples is shipped with your IDA instance in the idc folder.
Before you start
Some of the examples shows below used an imports another scripts, like idc.idc: the file that contains IDA built-in function declarations and internal bit definitions. It is recommend to check the idc folder for all sample scripts.
How to run the examples?
Load the script via File Loader
- Navigate to File -> Script file…
- In the new dialog, select the
.idcscript you want to run and click Open.
Load the script via Script command
- Navigate to File -> Script command….
- Change the scripting language to IDC.
- Paste the code into Please enter script body field and click Run.
Sample scripts
You can also find the scripts below in the idc folder inside your IDA directory.
analysis
Sample IDC program to automate IDA.
//
// Sample IDC program to automate IDA.
//
// IDA can be run from the command line in the batch (non-interactive) mode.
//
// If IDA is started with
//
// ida -A -Sanalysis.idc file
//
// then this IDC file will be executed. It performs the following:
//
// - analyzes the input file
// - creates the output file
// - exits to the operating system
//
// Feel free to modify this file as you wish
// (or write your own script/plugin to automate IDA)
//
// Since the script calls the qexit() function at the end,
// it can be used in the batch files (use text mode idat)
//
// NB: "ida -B file" is a shortcut for the command line above
//
#include <idc.idc>
static main()
{
// turn on coagulation of data in the final pass of analysis
set_inf_attr(INF_AF, get_inf_attr(INF_AF) | AF_DODATA | AF_FINAL);
// .. and plan the entire address space for the final pass
auto_mark_range(0, BADADDR, AU_FINAL);
msg("Waiting for the end of the auto analysis...\n");
auto_wait();
msg("\n\n------ Creating the output file.... --------\n");
auto file = get_idb_path()[0:-4] + ".asm";
auto fhandle = fopen(file, "w");
gen_file(OFILE_ASM, fhandle, 0, BADADDR, 0); // create the assembler file
msg("All done, exiting...\n");
// the following line instructs IDA to quit without saving the database
// process_config_directive("ABANDON_DATABASE=YES");
qexit(0); // exit to OS, error code 0 - success
}
arraytst
Sample demonstration on how to use array manipulation functions.
//
// This example shows how to use array manipulation functions.
//
#include <idc.idc>
#define MAXIDX 100
static main() {
auto id,idx,code;
id = create_array("my array");
if ( id == -1 ) {
warning("Can't create array!");
} else {
msg("Filling array of longs...\n");
for ( idx=0; idx < MAXIDX; idx=idx+10 )
set_array_long(id,idx,2*idx);
msg("Displaying array of longs...\n");
for ( idx=get_first_index(AR_LONG,id);
idx != -1;
idx=get_next_index(AR_LONG,id,idx) )
msg("%d: %d\n",idx,get_array_element(AR_LONG,id,idx));
msg("Filling array of strings...\n");
for ( idx=0; idx < MAXIDX; idx=idx+10 )
set_array_string(id, idx, sprintf("This is %d-th element of array", idx));
msg("Displaying array of strings...\n");
for ( idx=0; idx < MAXIDX; idx=idx+10 )
msg("%d: %s\n",idx,get_array_element(AR_STR,id,idx));
}
}
bds
Sample executed when IDA detects Delphi 6-7 or BDS.
//
// This file is executed when IDA detects Delphi6-7 or BDS2005-BDS2006
// invoked from pe_bds.pat
//
// Feel free to modify this file as you wish.
//
#include <idc.idc>
static main()
{
// Set Delphi-Style string
//set_inf_attr(INF_STRTYPE,STRTYPE_LEN4);
// Set demangled names to display
//set_inf_attr(INF_DEMNAMES,DEMNAM_NAME);
// Set compiler to Borland
set_inf_attr(INF_COMPILER, COMP_BC);
}
// Add old borland signatures
static bor32(ea)
{
AddPlannedSig("bh32rw32");
AddPlannedSig("b32vcl");
SetOptionalSigs("bdsext/bh32cls/bh32owl/bh32ocf/b5132mfc/bh32dbe/b532cgw");
return ea;
}
// Add latest version of Borland Cbuilder (Embarcadero)
static emb(ea)
{
AddPlannedSig("bds8rw32");
AddPlannedSig("bds8vcl");
SetOptionalSigs("bdsboost/bds8ext");
return ea;
}
static has_Emb(ea)
{
ea = ea & 0xFFFFFFFF;
return ea+2 < 0xFFFFFFFF
&& get_wide_byte(ea ) == 'E'
&& get_wide_byte(ea + 1) == 'm'
&& get_wide_byte(ea + 2) == 'b';
}
// Detect the latest version of Borland Cbuilder (Embarcadero)
static detect(ea)
{
// Use version string to detect which signatures to use. Both bds08
// and bds10 (up to xe10) have two null bytes after the string we are
// testing for, which comes immediately before the argument ea.
//
// bds06: Borland C++ - Copyright 2005 Borland Corporation
// bds08: CodeGear C++ - Copyright 2008 Embarcadero Technologies
// bds10: Embarcadero RAD Studio - Copyright 2009 Embarcadero Technologies, Inc.
if ( has_Emb(ea-0x1A) || has_Emb(ea-0x20) )
{
ResetPlannedSigs();
emb(ea);
}
return ea;
}
biosdata
Sample that makes comments to BIOS data area.
//
// This script creates a segment at paragraph 0x40 and
// makes comments to BIOS data area. To see mnemonical names of
// BIOS data area variables, please use this file:
//
// - press F2 when running IDA
// - select this file
//
#include <idc.idc>
//-------------------------------------------------------------------------
static CW(off,name,cmt) {
auto x;
x = 0x400 + off;
create_word(x);
set_name(x,name);
set_cmt(x,cmt, 1);
}
//-------------------------------------------------------------------------
static CD(off,name,cmt) {
auto x;
x = 0x400 + off;
create_dword(x);
set_name(x,name);
set_cmt(x,cmt, 1);
}
//-------------------------------------------------------------------------
static CB(off,name,cmt) {
auto x;
x = 0x400 + off;
create_byte(x);
set_name(x,name);
set_cmt(x,cmt, 1);
}
//-------------------------------------------------------------------------
static CmtBdata() {
CW(0x000,"com_port_1","Base I/O address of 1st serial I/O port");
CW(0x002,"com_port_2","Base I/O address of 2nd serial I/O port");
CW(0x004,"com_port_3","Base I/O address of 3rd serial I/O port");
CW(0x006,"com_port_4","Base I/O address of 4th serial I/O port");
CW(0x008,"prn_port_1","Base I/O address of 1st parallel I/O port");
CW(0x00A,"prn_port_2","Base I/O address of 2nd parallel I/O port");
CW(0x00C,"prn_port_3","Base I/O address of 3rd parallel I/O port");
CW(0x00E,"prn_port_4","Base I/O address of 4th parallel I/O port");
CW(0x010,"equip_bits", "Equipment installed info bits\n"
"15 14 13 12 11 10 9 8\n"
"\\ / game \\ /\n"
"# of print port # of RS-232\n"
"ports 0-3 used ports 0-4\n"
"\n"
"7 6 5 4 3 2 1 0\n"
"\\ / \\ / \\ / Math |\n"
"# of video mode RAM uP no\n"
"disk- at boot up 00=16K dsk\n"
"ettes 00=EGA/VGA 01=32K driv\n"
" 1-4 01=CGA-40 10=48K if 0\n"
"if bit 10=CGA-80 11=64K\n"
"0 = 1 11=MDA-80 (old PCs)\n"
"\n"
"Note: bit 13=modem on PC lap-tops\n"
" bit 2=mouse on MCA & others");
CB(0x012,"manufactr_test", "Manufacturing Test get_wide_byte\n"
"bit 0 = 1 while in test mode\n"
"MCA systems use other bits\n"
" during POST operations");
CW(0x013,"base_ram_size", "Base memory size in KBytes (0-640)");
CB(0x015,"mtest_scratchpad", "[AT] {Manufacturing test scratch pad}\n"
"[Compaq Deskpro 386] previous scan code");
CB(0x016,"error_codes", "[AT] {Manufacturing test scratch pad}\n"
"[PS/2 Mod 30] {BIOS control flags}\n"
"[Compaq Deskpro 386] keyclick loudness (00h-7Fh)");
CB(0x017,"keybd_flags_1", "Keyboard flag bits\n"
" 7 6 5 4 3 2 1 0\n"
"ins- cap num scrl alt ctl lef rig\n"
"sert --toggles--- --shifts down--");
CB(0x018,"keybd_flags_2", "Keyboard flag bits\n"
" 7 6 5 4 \n"
"insert caps num scroll\n"
"------now depressed------\n"
"\n"
" 3 2 1 0\n"
" pause sys left right\n"
" lock request -alt-down-");
CB(0x019,"keybd_alt_num", "Alt-nnn keypad workspace");
CW(0x01A,"keybd_q_head", "pointer to next character in keyboard buffer");
CW(0x01C,"keybd_q_tail", "pointer to first free slot in keyboard buffer");
CW(0x01E,"keybd_queue", "Keyboard circular buffer");
make_array(0x41E, 16 );
CB(0x03E,"dsk_recal_stat", "Recalibrate floppy drive bits\n"
" 3 2 1 0\n"
"drive-3 drive-2 drive-1 drive-0\n"
"\n"
"bit 7 = interrupt flag");
CB(0x03F,"dsk_motor_stat", "Motor running status & disk write\n"
" bit 7=1 disk write in progress\n"
" bits 6&5 = drive selected 0 to 3\n"
" 3 2 1 0\n"
" drive-3 drive-2 drive-1 drive-0\n"
" --------- 1=motor on-----------");
CB(0x040,"dsk_motor_timer", "Motor timer, at 0, turn off motor");
CB(0x041,"dsk_ret_code", "Controller return code\n"
" 00h = ok\n"
" 01h = bad command or parameter\n"
" 02h = can't find address mark\n"
" 03h = can't write, protected dsk\n"
" 04h = sector not found\n"
" 08h = DMA overrun\n"
" 09h = DMA attempt over 64K bound\n"
" 10h = bad CRC on disk read\n"
" 20h = controller failure\n"
" 40h = seek failure\n"
" 80h = timeout, no response");
CB(0x042,"dsk_status_1", "Status bytes-disk controller chip\n"
" Note: 7 info bytes returned from\n"
" controller are saved here. Refer\n"
" to the NEC uPD 765 chip manual\n"
" for the specific info, depending\n"
" on the previous command issued.");
CB(0x043,"dsk_status_2", "");
CB(0x044,"dsk_status_3", "");
CB(0x045,"dsk_status_4", "");
CB(0x046,"dsk_status_5", "");
CB(0x047,"dsk_status_6", "");
CB(0x048,"dsk_status_7", "");
CB(0x049,"video_mode", "Present display mode");
CW(0x04A,"video_columns", "Number of columns");
CW(0x04C,"video_buf_size", "Video buffer size in bytes\n"
" Note: size may be rounded up to\n"
" the nearest 2K boundary. For\n"
" example, 80x25 mode=4000 bytes,\n"
" but value may be 4096.");
CW(0x04E,"video_pageoff", "Video page offset of the active\n"
" page, from start of current \n"
" video segment.");
CW(0x050,"vid_curs_pos0", "Cursor position page 0\n"
" bits 15-8=row, bits 7-0=column");
CW(0x052,"vid_curs_pos1", "Cursor position page 1\n"
" bits 15-8=row, bits 7-0=column");
CW(0x054,"vid_curs_pos2", "Cursor position page 2\n"
" bits 15-8=row, bits 7-0=column");
CW(0x056,"vid_curs_pos3", "Cursor position page 3\n"
" bits 15-8=row, bits 7-0=column");
CW(0x058,"vid_curs_pos4", "Cursor position page 4\n"
" bits 15-8=row, bits 7-0=column");
CW(0x05A,"vid_curs_pos5", "Cursor position page 5\n"
" bits 15-8=row, bits 7-0=column");
CW(0x05C,"vid_curs_pos6", "Cursor position page 6\n"
" bits 15-8=row, bits 7-0=column");
CW(0x05E,"vid_curs_pos7", "Cursor position page 7\n"
" bits 15-8=row, bits 7-0=column");
CW(0x060,"vid_curs_mode", "Active cursor, start & end lines \n"
" bits 12 to 8 for starting line\n"
" bits 4 to 0 for ending line");
CB(0x062,"video_page", "Present page");
CW(0x063,"video_port", "Video controller base I/O address");
CB(0x065,"video_mode_reg", "Hardware mode register bits");
CB(0x066,"video_color", "Color set in CGA modes");
CW(0x067,"gen_use_ptr", "General use offset pointer");
CW(0x069,"gen_use_seg", "General use segment pointer");
CB(0x06B,"gen_int_occurd", "Unused interrupt occurred\n"
" value holds the IRQ bit 7-0 of\n"
" the interrupt that occurred");
CW(0x06C,"timer_low", "Timer, low word, cnts every 55 ms");
CW(0x06E,"timer_high", "Timer, high word");
CB(0x070,"timer_rolled", "Timer overflowed, set to 1 when\n"
" more than 24 hours have elapsed");
CB(0x071,"keybd_break", "Bit 7 set if break key depressed");
CW(0x072,"warm_boot_flag", "Boot (reset) type\n"
" 1234h=warm boot, no memory test \n"
" 4321h=boot & save memory");
CB(0x074,"hdsk_status_1", "Hard disk status\n"
" 00h = ok\n"
" 01h = bad command or parameter\n"
" 02h = can't find address mark\n"
" 03h = can't write, protected dsk\n"
" 04h = sector not found\n"
" 05h = reset failure\n"
" 07h = activity failure\n"
" 08h = DMA overrun\n"
" 09h = DMA attempt over 64K bound\n"
" 0Ah = bad sector flag\n"
" 0Bh = removed bad track\n"
" 0Dh = wrong # of sectors, format\n"
" 0Eh = removed control data addr\n"
" mark\n"
" 0Fh = out of limit DMA\n"
" arbitration level\n"
" 10h = bad CRC or ECC, disk read\n"
" 11h = bad ECC corrected data\n"
" 20h = controller failure\n"
" 40h = seek failure\n"
" 80h = timeout, no response\n"
" AAh = not ready\n"
" BBh = error occurred, undefined\n"
" CCh = write error, selected dsk\n"
" E0h = error register = 0\n"
" FFh = disk sense failure");
CB(0x075,"hdsk_count", "Number of hard disk drives");
CB(0x076,"hdsk_head_ctrl", "Head control (XT only)");
CB(0x077,"hdsk_ctrl_port", "Hard disk control port (XT only)");
CB(0x078,"prn_timeout_1", "Countdown timer waits for printer\n"
" to respond (printer 1)");
CB(0x079,"prn_timeout_2", "Countdown timer waits for printer\n"
" to respond (printer 2)");
CB(0x07A,"prn_timeout_3", "Countdown timer waits for printer\n"
" to respond (printer 3)");
CB(0x07B,"prn_timeout_4", "Countdown timer waits for printer\n"
" to respond (printer 4)");
CB(0x07C,"rs232_timeout_1", "Countdown timer waits for RS-232 (1)");
CB(0x07D,"rs232_timeout_2", "Countdown timer waits for RS-232 (2)");
CB(0x07E,"rs232_timeout_3", "Countdown timer waits for RS-232 (3)");
CB(0x07F,"rs232_timeout_4", "Countdown timer waits for RS-232 (4)");
CW(0x080,"keybd_begin", "Ptr to beginning of keybd queue");
CW(0x082,"keybd_end", "Ptr to end of keyboard queue");
CB(0x084,"video_rows", "Rows of characters on display - 1");
CW(0x085,"video_pixels", "Number of pixels per charactr * 8");
CB(0x087,"video_options", "Display adapter options\n"
" bit 7 = clear RAM\n"
" bits 6,5 = memory on adapter\n"
" 00 - 64K\n"
" 01 - 128K\n"
" 10 - 192K\n"
" 11 - 256K\n"
" bit 4 = unused\n"
" bit 3 = 0 if EGA/VGA active\n"
" bit 2 = wait for display enable\n"
" bit 1 = 1 - mono monitor\n"
" = 0 - color monitor\n"
" bit 0 = 0 - handle cursor, CGA");
CB(0x088,"video_switches", "Switch setting bits from adapter\n"
" bits 7-4 = feature connector\n"
" bits 3-0 = option switches");
CB(0x089,"video_1_save", "Video save area 1-EGA/VGA control\n"
" bit 7 = 200 line mode\n"
" bits 6,5 = unused\n"
" bit 4 = 400 line mode\n"
" bit 3 = no palette load\n"
" bit 2 = mono monitor\n"
" bit 1 = gray scale\n"
" bit 0 = unused");
CB(0x08A,"video_2_save", "Video save area 2");
CB(0x08B,"dsk_data_rate", "Last data rate for diskette\n"
" bits 7 & 6 = 00 for 500K bit/sec\n"
" = 01 for 300K bit/sec\n"
" = 10 for 250K bit/sec\n"
" = 11 for 1M bit/sec\n"
" bits 5 & 4 = step rate"
"Rate at start of operation\n"
" bits 3 & 2 = 00 for 500K bit/sec\n"
" = 01 for 300K bit/sec\n"
" = 10 for 250K bit/sec\n"
" = 11 for 1M bit/sec");
CB(0x08C,"hdsk_status_2", "Hard disk status");
CB(0x08D,"hdsk_error", "Hard disk error");
CB(0x08E,"hdsk_complete", "When the hard disk controller's\n"
" task is complete, this byte is\n"
" set to FFh (from interrupt 76h)");
CB(0x08F,"dsk_options", "Diskette controller information\n"
" bit 6 = 1 Drv 1 type determined\n"
" 5 = 1 Drv 1 is multi-rate\n"
" 4 = 1 Drv 1 change detect\n"
" 2 = 1 Drv 0 type determined\n"
" 1 = 1 Drv 0 is multi-rate\n"
" 0 = 1 Drv 0 change detect");
CB(0x090,"dsk0_media_st", "Media state for diskette drive 0\n"
" 7 6 5 4\n"
" data xfer rate two media\n"
" 00=500K bit/s step known\n"
" 01=300K bit/s\n"
" 10=250K bit/s\n"
" 11=1M bit/sec\n"
" 3 2 1 0\n"
" unused -----state of drive-----\n"
" bits floppy drive state\n"
" 000= 360K in 360K, ?\n"
" 001= 360K in 1.2M, ?\n"
" 010= 1.2M in 1.2M, ?\n"
" 011= 360K in 360K, ok\n"
" 100= 360K in 1.2M, ok\n"
" 101= 1.2M in 1.2M, ok\n"
" 111= 720K in 720K, ok\n"
" or 1.44M in 1.44M\n"
" (state not used for 2.88)");
CB(0x091,"dsk1_media_st", "Media state for diskette drive 1\n"
" (see dsk0_media_st)");
CB(0x092,"dsk0_start_st", "Starting state for drive 0");
CB(0x093,"dsk1_start_st", "Starting state for drive 1");
CB(0x094,"dsk0_cylinder", "Current track number for drive 0");
CB(0x095,"dsk1_cylinder", "Current track number for drive 1");
CB(0x096,"keybd_flags_3", "Special keyboard type and mode\n"
" bit 7 Reading ID of keyboard\n"
" 6 last char is 1st ID char\n"
" 5 force num lock\n"
" 4 101/102 key keyboard\n"
" 3 right alt key down\n"
" 2 right ctrl key down\n"
" 1 E0h hidden code last\n"
" 0 E1h hidden code last");
CB(0x097,"keybd_flags_4", "Keyboard Flags (advanced keybd)\n"
" 7 6 5 4 3 2 1 0\n"
"xmit char Resend Ack \ /\n"
"error was ID Rec'd Rec'd LEDs");
CW(0x098,"timer_waitoff", "Ptr offset to wait done flag");
CW(0x09A,"timer_waitseg", "Ptr segment to wait done flag");
CW(0x09C,"timer_clk_low", "Timer low word, 1 microsecond clk");
CW(0x09E,"timer_clk_high", "Timer high word");
CB(0x0A0,"timer_clk_flag", "Timer flag 00h = post acknowledgd\n"
" 01h = busy\n"
" 80h = posted");
CB(0x0A1,"lan_bytes", "Local area network bytes (7)");
make_array(0x4A1, 7);
CD(0x0A8,"video_sav_tbl", "Pointer to a save table of more\n"
"pointers for the video system \n"
" SAVE TABLE\n"
" offset type pointer to\n"
" ------ ---- --------------------\n"
" 0 dd Video parameters\n"
" 4 dd Parms save area\n"
" 8 dd Alpha char set\n"
" 0Ch dd Graphics char set\n"
" 10h dd 2nd save ptr table\n"
" 14h dd reserved (0:0)\n"
" 18h dd reserved (0:0)\n"
" \n"
" 2ND SAVE TABLE (from ptr above)\n"
" offset type functions & pointers\n"
" ------ ---- --------------------\n"
" 0 dw Bytes in this table\n"
" 2 dd Combination code tbl\n"
" 6 dd 2nd alpha char set\n"
" 0Ah dd user palette tbl\n"
" 0Eh dd reserved (0:0)\n"
" 12h dd reserved (0:0)\n"
" 16h dd reserved (0:0)");
CW(0x0CE,"days_since1_80", "Days since 1-Jan-1980 counter");
make_array(0x4AC,0xCE-0xAC);
}
//-------------------------------------------------------------------------
static main() {
if ( !add_segm_ex(0x400, 0x4D0, 0x40, 0, 0, 2, ADDSEG_NOSREG) ) {
warning("Can't create BIOS data segment.");
return;
}
set_segm_name(0x400, "bdata");
set_segm_class(0x400, "BIOSDATA");
CmtBdata();
}
entrytst
Sample that shows how to get list of entry points.
//
// This example shows how to get list of entry points.
//
#include <idc.idc>
static main() {
auto i;
auto ord,ea;
msg("Number of entry points: %ld\n",get_entry_qty());
for ( i=0; ; i++ ) {
ord = get_entry_ordinal(i);
if ( ord == 0 ) break;
ea = get_entry(ord);
msg("Entry point %08lX at %08lX (%s)\n",ord,ea,Name(ea));
}
}
find_insn
Script to be used with the ‘grep’ plugins.
#include <idc.idc>
// This script is to be used with the 'grep' ida plugin
// It looks for the specified instruction mnemonics and saves all matches
static find_insn(mnem)
{
auto ea;
for ( ea=get_inf_attr(INF_MIN_EA); ea != BADADDR; ea=next_head(ea, BADADDR) )
{
if ( print_insn_mnem(ea) == mnem )
save_match(ea, "");
}
}
fixuptst
Sample that gets fixup information about the file.
//
// This example shows how to get fixup information about the file.
//
#include <idc.idc>
static main() {
auto ea;
for ( ea = get_next_fixup_ea(get_inf_attr(INF_MIN_EA));
ea != BADADDR;
ea = get_next_fixup_ea(ea) ) {
auto type,sel,off,dis,x;
type = get_fixup_target_type(ea);
sel = get_fixup_target_sel(ea);
off = get_fixup_target_off(ea);
dis = get_fixup_target_dis(ea);
msg("%08lX: ",ea);
x = type & FIXUP_MASK;
if ( x == FIXUP_BYTE ) msg("BYTE ");
else if ( x == FIXUP_OFF16 ) msg("OFF16");
else if ( x == FIXUP_SEG16 ) msg("SEG16");
else if ( x == FIXUP_PTR32 ) msg("PTR32");
else if ( x == FIXUP_OFF32 ) msg("OFF32");
else if ( x == FIXUP_PTR48 ) msg("PTR48");
else if ( x == FIXUP_HI8 ) msg("HI8 ");
else msg("?????");
msg((type & FIXUP_EXTDEF) ? " EXTDEF" : " SEGDEF");
msg(" [%s,%X]",get_segm_name(get_segm_by_sel(sel)),off);
if ( type & FIXUP_EXTDEF ) msg(" (%s)",Name([sel2para(sel),off]));
if ( type & FIXUP_SELFREL ) msg(" SELF-REL");
if ( type & FIXUP_UNUSED ) msg(" UNUSED");
msg("\n");
}
}
functest
Sample that gets list of funcions.
//
// This example shows how to get list of functions.
//
#include <idc.idc>
static main() {
auto ea,x;
for ( ea=get_next_func(0); ea != BADADDR; ea=get_next_func(ea) ) {
msg("Function at %08lX: %s",ea,get_func_name(ea));
x = get_func_flags(ea);
if ( x & FUNC_NORET ) msg(" Noret");
if ( x & FUNC_FAR ) msg(" Far");
msg("\n");
}
ea = choose_func("Please choose a function");
msg("The user chose function at %08lX\n",ea);
}
kernel
Sample that insert custom comments for the imported DLLs.
//
// This file show how to insert you own comments for the imported DLLs.
// This file inserts a comment for the kernel function #23 'LOCKSEGMENT'.
// You may add your own comments for other functions and DLLs.
// To execute this file your should choose 'Execute IDC file' command
// from the IDA menu. Usually the hotkey is F2.
//
#include <idc.idc>
static main(void)
{
auto faddr;
auto fname;
msg("Loading comments...\n");
fname = sprintf("KERNEL_%ld", 23); // build the function name
faddr = get_name_ea_simple(fname); // get function address
if ( faddr != -1 ) { // if the function exists
update_extra_cmt(faddr,E_PREV + 0,";ƒƒƒƒƒƒƒƒƒƒƒƒƒƒƒƒƒƒƒƒƒƒƒƒƒƒƒƒƒƒƒƒƒƒƒƒƒƒƒƒƒƒƒƒƒƒƒƒƒƒƒƒƒƒƒƒƒƒƒƒƒƒƒƒƒƒƒƒƒƒƒƒƒƒƒƒ");
update_extra_cmt(faddr,E_PREV + 1,"; LockSegment (2.x)");
update_extra_cmt(faddr,E_PREV + 2,"; ");
update_extra_cmt(faddr,E_PREV + 3,"; In: AX - segment to lock");
update_extra_cmt(faddr,E_PREV + 4,"; LockSegment function locks the specified discardable");
update_extra_cmt(faddr,E_PREV + 5,"; segment. The segment is locked into memory at the given");
update_extra_cmt(faddr,E_PREV + 6,"; address and its lock count is incremented (increased by one).");
update_extra_cmt(faddr,E_PREV + 7,"; Returns");
update_extra_cmt(faddr,E_PREV + 8,"; The return value specifies the data segment if the function is");
update_extra_cmt(faddr,E_PREV + 9,"; successful. It is NULL if the segment has been discarded or an");
update_extra_cmt(faddr,E_PREV + 10,"; error occurs.");
}
msg("Comment(s) are loaded.\n");
}
loaddef
Sample that loads DEF file with dialog.
// Load a DEF file with Dialog
// Saved the last browsed path in the Database
// This file is donated by Dietrich Teickner.
#include <idc.idc>
#define VERBOSE 1
#define WITHSELFEDITED 1
static main(void)
{
auto defFileName, defFile, w, p, modulImport;
defFileName = AskFileEx(0,"*.def","Choose a definition-file");
modulImport = defFileName;
while (1) {
p = strstr(modulImport,"\\");
if (-1 == p) break;
modulImport = substr(modulImport,p+1,-1);
};
p = strstr(modulImport,".");
if (-1 < p)
modulImport = substr(modulImport,0,p);
modulImport = translate(modulImport);
if(VERBOSE) msg("Opening definition file %s\n", defFileName);
defFile = fopen(defFileName, "rb");
if (0 != defFile)
{
auto defline, ea, bea, sea, eea, newName, oldName, badName, x, z, id;
//
// Process all of the DEF's in this file.
//
if(VERBOSE) msg("Processing %s\n", defFileName);
defline = "";
do
{
defline = ReadDefLine(defFile);
if (strlen(defline) == 0) break;
w = wordn(defline,1);
w = translate(w);
if ("LIBRARY" == w) {
w = wordn(substr(defline,strlen(w)+1,-1),1);
if (strlen(w) > 0) modulImport = w;
continue;
}
if ("EXPORTS" != w) continue;
if (strlen(modulImport) == 0) break;
sea = get_first_seg();
while ((-1 != sea) & (get_segm_name(sea) != modulImport)) {
sea = get_next_seg(sea);
}
if (-1 == sea) break;
w = get_segm_name(sea);
eea = get_segm_end(sea);
do
{
defline = ReadDefLine(defFile);
if (strlen(defline) == 0) break;
p = strstr(defline," @");
if (0 > p) continue;
w = substr(defline,p+2,-1);
defline = substr(defline,0,p);
w = wordn(w,1); /* import-number */
w = translate(modulImport)+"_"+w;
newName = w+"_"+wordn(defline,1);
if (WITHSELFEDITED) {
z = wordn(defline,1);
badName = z+"_"+w;
p = strstr(z,"@");
if (p != -1) {
x = substr(z,0,p);
badName = badName+" "+x+" "+w+"_"+x+" "+x+"_"+w;
}
while (substr(z,0,1) == "_") {
z = substr(z,1,-1);
badName = badName+" "+z+" "+w+"_"+z+" "+z+"_"+w;
if (p != -1) {
x = substr(x,1,-1);
badName = badName+" "+x+" "+w+"_"+x+" "+x+"_"+w;
}
}
z = " "+newName+" "+w+" "+defline+" "+badName+" ";
} else {
z = " "+newName+" "+w+" "+defline+" ";
}
x = "__imp_";
p = strlen(x);
for (ea = sea;ea < eea;ea++) {
oldName = Name(ea);
if (strstr(z," "+oldName+" ") != -1) break;
if (strstr(oldName,x) != 0) continue;
if (strstr(z," "+substr(oldName,p,-1)+" ") != -1) break;
}
if (ea == eea) continue;
p = strstr(defline,"@");
if (-1 != p) {
z = substr(defline,p+1,-1);
z = wordn(z,1);
z = atol(z);
p = get_frame_args_size(ea);
if (p != z) {
set_frame_size(ea,get_frame_lvar_size(ea),get_frame_regs_size(ea),z);
auto_wait();
}
}
if (oldName != newName) {
set_name(ea ,newName);
if(VERBOSE) msg("--> %x,%s->%s\n", ea, oldName, newName);
}
}
while (strlen(defline) > 0);
}
while (strlen(defline) > 0);
fclose(defFile);
}
}
static wordn(c,i) {
auto t, l, p, s;
p = 0;
l = strlen(c);
t = "";
while (0 < i) {
i = i-1;
while ((p < l) & (" " == substr(c,p,p+1))) p++;
while (p < l) {
s = substr(c,p,++p);
if (s == " ") break;
if (i == 0) t = t + s;
}
}
return (t);
}
static translate(c) {
auto s,t;
s = "abcdefghijklmnopqrst";
t = "ABCDEFGHIJKLMNOPQRST";
return translate2(c,s,t);
}
static translate2(c,s,t) {
auto i,j,k,l;
l = strlen(s) - strlen(t);
for (i = 0;i < l;i++) {
t = t + " ";
}
l = strlen(c);
for (i = 0;i < l;i++) {
k = substr(c,i,i+1);
j = strstr(s,k);
if (0 <= j) {
c = substr(c,0,i) + substr(t,j,j+1) + substr(c,i+1,-1);
}
}
return c;
}
static ReadDefLine(defFile)
{
auto line, wordstr, c, delim, i, first;
delim = ""+0x0d+" "+0x09+0x0a;
do {
line = "";
i = 0;
first = 1;
do {
wordstr = "";
c = "";
do {
wordstr = wordstr + c;
c = fgetc(defFile);
if (-1 != c) {
i = strstr(delim,c);
} else i = - 2;
} while (-1 == i);
if (strlen(wordstr) > 0) {
if (!first) line = line + " ";
first = 0;
line = line + wordstr;
};
} while (0 < i);
if ((strlen(line) > 0) & (substr(line,0,1) == ";")) line = "";
} while ((strlen(line) == 0) & (0 == i));
return(line);
}
static getPath(fileName) {
auto pos, path;
path = "";
while (1) {
pos = strstr(fileName,"\\");
if (-1 == pos) break;
path = path + substr(fileName,0,pos+1);
fileName = substr(fileName,pos+1,-1);
}
return path;
}
static AskFileEx(forSave, ext, dialogText) {
auto fileName, w, p, extArrayId, lastPath, newPath, extKey;
w = ext;
if (substr(w,0,1) == "*") w = substr(w,1,-1);
if (substr(w,0,1) == ".") w = substr(w,1,-1);
/* is case-sensitive */
extKey = "DT#"+w;
extArrayId = get_array_id("DT#EXT#Array");
if (-1 == extArrayId)
extArrayId = create_array("DT#EXT#Array");
lastPath = get_hash_string(extArrayId,extKey);
/* without this, we have at first only '*' as Mask, but not "*.ext". IDA 4.20 */
if ("" == lastPath)
lastPath = getPath(get_root_filename());
w = lastPath+"*."+w;
if(VERBOSE) msg("--> lastPath %s\n", w);
fileName = askfile(forSave,w,dialogText);
if (("" == fileName) | (-1 == extArrayId))
return fileName;
newPath = getPath(fileName);
if (("" != newPath) & (lastPath != newPath))
// Save the new path, associated with the extension in the Database
set_hash_string(extArrayId, extKey, newPath);
return fileName;
}
loadsym
Sample that loads a SYM file with dialog.
//
// Load a SYM file with Dialog
// Saved the last browsed path associated with the extension in the Database
// (use with dbg2map and mapsym)
//
// History:
//
// v1.00 - This file is originally donated by David Cattley.
// v1.07 - Bugfix, improved interface, handles larger SegDefs
// v1.08 - extended for save tha last used path associaded with *.sym in the current database
// set VAC to 0 for aktivating v1.07
// set VAC to 1 for sym-files from IBM/Microsoft MAPSYM for OS/2 (Loadsym V1.00)
//
#include <idc.idc>
#define VERBOSE 1
// set to version before IDA 4.30, for mapsym.exe VAC, not found any informations about the last changes
#define VAC 1
static main(void)
{
auto symFileName, symFile;
symFileName = AskFileEx(0,"*.sym","Choose the symbol-file");
if(symFileName=="")
{ if(VERBOSE) msg("Operation cancelled by user.\n");
return -1; }
if(VERBOSE) msg("Opening symbol file %s\n", symFileName);
symFile = fopen(symFileName, "rb");
if (0 != symFile)
{
auto nextMapDef;
//
// Process all of the MAPDEF's in this file.
//
// if(VERBOSE) msg("%0.4x: ", ftell(symFile));
if(VERBOSE) msg("Processing %s\n", symFileName);
nextMapDef = 0;
do
{
nextMapDef = DoMapDef(symFile, nextMapDef);
}
while (0 != nextMapDef);
}
else
{ if(VERBOSE) msg("Can't open symbol file:\n%s\n", symFileName);
return -1;
}
if(VERBOSE) msg("Symbol file has been loaded successfully.\n");
}
static DoMapDef(File, Position)
{
auto ppNextMap;
//
// Process the specified MAPDEF structure.
//
fseek(File, Position, 0);
if(VERBOSE) msg("%0.4x: ", ftell(File));
ppNextMap = readshort(File, 0);
if (0 == ppNextMap)
{
//
// This is the last one! It is special.
//
auto release, version;
release = fgetc(File);
version = fgetc(File);
if(VERBOSE) msg("VERSION Next:%x Release:%x Version:%x\n",
ppNextMap,
release,
version
);
}
else
{
auto bFlags, bReserved1, pSegEntry,
cConsts, pConstDef, cSegs, ppSegDef,
cbMaxSym, achModName;
auto i, nextSegDef;
bFlags = fgetc(File);
bReserved1 = fgetc(File);
pSegEntry = readshort(File, 0);
cConsts = readshort(File, 0);
pConstDef = readshort(File, 0);
cSegs = readshort(File, 0);
ppSegDef = readshort(File, 0);
cbMaxSym = fgetc(File);
achModName = ReadSymName(File);
if(VERBOSE) msg("MAPDEF Next:%x Flags:%x Entry:%x Con:%d@%x Seg:%d@%x Max:%d Mod:%s\n",
ppNextMap,
bFlags,
pSegEntry,
cConsts, pConstDef,
cSegs, ppSegDef,
cbMaxSym,
achModName
);
//
// Process the SEGDEFs in this MAPDEF
//
nextSegDef = ppSegDef << 4;
for (i=0; i<cSegs; i=i+1)
{
nextSegDef = DoSegDef(File, nextSegDef);
}
}
//
// Return the file position of the next MAPDEF
//
return (ppNextMap << 4);
}
static DoSegDef(File, Position)
{
auto ppNextSeg, cSymbols, pSymDef,
wSegNum, wReserved2, wReserved3, wReserved4,
bFlags, bReserved1, ppLineDef, bReserved2,
bReserved3, achSegName;
auto i, n, symPtr, segBase;
//
// Process the specified SEGDEF structure.
//
fseek(File, Position, 0);
if(VERBOSE) msg("%0.4x: ", ftell(File));
ppNextSeg = readshort(File, 0);
cSymbols = readshort(File, 0);
pSymDef = readshort(File, 0);
wSegNum = readshort(File, 0);
wReserved2 = readshort(File, 0);
wReserved3 = readshort(File, 0);
wReserved4 = readshort(File, 0);
bFlags = fgetc(File);
bReserved1 = fgetc(File);
ppLineDef = readshort(File, 0);
bReserved2 = fgetc(File);
bReserved3 = fgetc(File);
achSegName = ReadSymName(File);
if (VAC) {
segBase = get_segm_by_sel(wSegNum);
// the others will access the externals, sym-files from MAPSYM contains only internals
} else {
// segBase = get_segm_by_sel(wSegNum); //fixed
segBase = get_first_seg();
for (i=wSegNum; i > 1; i=i-1) { segBase = get_next_seg(segBase); }
}
if(VERBOSE) msg("SEGDEF Next:%x Sym:(%d)@%x Flags:%x Lines:%x Seg:%s [%04x %08x]\n",
ppNextSeg,
cSymbols, pSymDef,
bFlags,
ppLineDef,
achSegName, wSegNum, segBase
);
//
// Process the symbols in this SEGDEF
//
n = 2;
if (!VAC) {
// sym-files from MAPSYM (VAC) works with unshifted pSymDef
pSymDef = pSymDef << (bFlags & 0xFE);
if ((bFlags & 0xFE) != 0) n++;
}
for (i=0; i<cSymbols; i=i+1)
{
// fseek(File, Position+pSymDef+(i*2), 0); //fixed
fseek(File, Position+pSymDef+(i*n), 0);
if (n>2) symPtr = Position+(readlong(File, 0)&0xFFFFFF);
else symPtr = Position+readshort(File, 0);
DoSymDef(File, symPtr, (bFlags & 1), wSegNum);
}
//
// Return the position of the next SEGDEF
//
return (ppNextSeg << 4);
}
static DoSymDef(File, Position, Size, Segment)
{
auto dwSymVal, achSymName, ea, i;
fseek(File, Position, 0);
if(VERBOSE) msg("%0.4x: ", ftell(File));
if (0 == Size)
dwSymVal = readshort(File, 0);
else
dwSymVal = readlong(File, 0);
achSymName = ReadSymName(File);
//
// Calculate the EA of this symbols.
//
if (VAC) {
ea = get_segm_by_sel(Segment) + dwSymVal;
// sym-files from MAPSYM contains only internals
} else {
// ea = get_segm_by_sel(Segment) + dwSymVal; // fixed
ea = get_first_seg(); // This points to the externals ???
for (i=Segment; i > 1; i=i-1) { ea = get_next_seg(ea); }
ea = ea + dwSymVal;
}
if(VERBOSE) msg("SYM%d: %04x:%08x [%08x] %s\n",
(16+Size*16),
Segment, dwSymVal, ea,
achSymName);
//
// Now go and name the location!
//
set_name(ea, "");
set_name(ea, achSymName);
}
static ReadSymName(symFile)
{
auto i, nameLen, name;
name = "";
nameLen = fgetc(symFile);
for (i=0; i<nameLen; i=i+1)
{
name = name + fgetc(symFile);
}
return(name);
}
static getPath(fileName) {
auto pos, path;
path = "";
while (1) {
pos = strstr(fileName,"\\");
if (-1 == pos) break;
path = path + substr(fileName,0,pos+1);
fileName = substr(fileName,pos+1,-1);
}
return path;
}
static AskFileEx(forSave, ext, dialogText) {
auto fileName, w, p, extArrayId, lastPath, newPath, extKey;
w = ext;
if (substr(w,0,1) == "*") w = substr(w,1,-1);
if (substr(w,0,1) == ".") w = substr(w,1,-1);
/* is case-sensitive */
extKey = "DT#"+w;
extArrayId = get_array_id("DT#EXT#Array");
if (-1 == extArrayId)
extArrayId = create_array("DT#EXT#Array");
lastPath = get_hash_string(extArrayId,extKey);
/* without this, we have at first only '*' as Mask, but not "*.ext". IDA 4.20 */
if ("" == lastPath)
lastPath = getPath(get_input_file_path());
w = lastPath+"*."+w;
if(VERBOSE) msg("--> lastPath %s\n", w);
fileName = askfile(forSave,w,dialogText);
if (("" == fileName) | (-1 == extArrayId))
return fileName;
newPath = getPath(fileName);
if (("" != newPath) & (lastPath != newPath))
// Save the new path, associated with the extension in the Database
set_hash_string(extArrayId, extKey, newPath);
return fileName;
}
marktest
Sample that shows how to get list of marked positions.
//
// This example shows how to get list of marked positions.
//
#include <idc.idc>
static main() {
auto x;
put_bookmark(get_screen_ea(),10,5,5,6,"Test of Mark Functions");
for ( x=0; x<10; x++ )
msg("%d: %a %s\n",x,get_bookmark(x),get_bookmark_desc(x));
}
memcpy
Sample that demonstrates how to copy memory blocks.
//
// This file demonstrates how to copy blocks of memory
// using IDC. To use it, press F2 and select this file.
// Once loaded and compiled all IDC functions stay in memory
// so afterwards you can copy blocks simply pressing Shift-F2
// and entering something like:
//
// memcpy(0x30000, 0x20000, 0x100);
//
// This construction copies 0x100 bytes from 0x20000 to 0x30000.
//
// Also, you can delete main() function below.
// When you try to execute this file, you'll get an error:
// can find function 'main', don't pay attention.
// You will get memcpy() function in the memory.
// In this case you should create a segment youself (if nesessary).
//
#include <idc.idc>
//------------------------------------------------------------------------
static memcpy(to, from, size)
{
auto i;
for ( i=0; i < size; i=i+1 )
{
auto b = get_wide_byte(from);
patch_byte(to, b);
from = from + 1;
to = to + 1;
}
}
//------------------------------------------------------------------------
static main(void)
{
auto from = ask_addr(here, "Please enter the source address");
if ( from == BADADDR )
return;
auto to = ask_addr(BADADDR, "Please enter the target address");
if ( to == BADADDR )
return;
auto size = ask_long(0, "Please enter the number of bytes to copy");
if ( size == 0 )
return;
memcpy(to, from, size);
}
ndk
Android bionic lib.
#include <idc.idc>
static main()
{
}
// Android Bionic libc
//
// These functions are called while loading startup signatures from
// elf.sig to obtain the address of main.
static get_main_ea(ea, got_ldr, got_off, main_off)
{
auto got_ea = 0;
if ( got_off != 0 )
{
auto _ea = TRUNC(ea + got_ldr);
create_insn(_ea);
got_ea = get_first_dref_from(_ea);
if ( got_ea == BADADDR )
return BADADDR;
got_ea = get_wide_dword(got_ea);
if ( got_ea == BADADDR )
return BADADDR;
got_ea = TRUNC(got_ea + ea + got_off + 8);
ea = TRUNC(ea + main_off);
create_insn(ea);
ea = get_first_dref_from(ea);
if ( ea == BADADDR )
return BADADDR;
ea = get_wide_dword(ea);
if ( ea == BADADDR )
return BADADDR;
}
ea = TRUNC(got_ea + ea);
ea = get_wide_dword(ea);
if ( ea == BADADDR )
return BADADDR;
// Check that segment is executable
if ( (get_segm_attr(ea, SEGATTR_PERM) & SEGPERM_EXEC) == 0 )
return BADADDR;
return ea;
}
static get_main_ea_pic(ea, got_ldr, got_off, main_off)
{
return get_main_ea(ea, long(got_ldr), long(got_off), long(main_off));
}
static get_main_ea_abs(ea)
{
return get_main_ea(ea, 0, 0, 0);
}
onload
File called after a new file is loaded into IDA.
//
// This IDC file is called after a new file is loaded into IDA
// database.
// IDA calls "OnLoad" function from this file.
//
// You may use this function to read extra information (such as
// debug information) from the input file, or for anything else.
//
#include <idc.idc>
// If you want to add your own processing of newly created databases,
// you may create a file named "userload.idc":
//
// #define USERLOAD_IDC
// static userload(input_file,real_file,filetype) {
// ... your processing here ...
// }
//
#softinclude <userload.idc>
// Input parameteres:
// input_file - name of loaded file
// real_file - name of actual file that contains the input file.
// usually this parameter is equal to input_file,
// but is different if the input file is extracted from
// an archive.
// filetype - type of loaded file. See FT_.. definitions in idc.idc
static OnLoad(input_file, real_file, filetype)
{
#ifdef USERLOAD_IDC // if user-defined IDC file userload.idc
// exists...
if ( userload(input_file, real_file, filetype) )
return;
#endif
if ( filetype == FT_DRV )
DriverLoaded();
// msg("File %s is loaded into the database.\n",input_file);
}
//--------------------------------------------------------------------------
// This function is executed when a new device driver is loaded.
// Device drivers have extensions DRV or SYS.
//
// History:
//
// 08/12/95 20:16 by Alexey Kulentsov:
// + Check for Device Request Block
// + Kludge with Drv/Com supported
// 04/01/96 04:21 by ig:
// + 0000:0000 means end of devices chain too.
// 16/05/96 16:01 by ig:
// + modified to work with the new version of IDA (separate operand types)
static DriverLoaded(void)
{
auto x,i,base;
auto intr,strt;
auto attr,cmt;
auto nextbase;
auto DevReq;
i = 0;
x = get_inf_attr(INF_MIN_EA);
base = (x >> 4); // The segment base
while ( 1 )
{
msg("Device driver block at %04X\n",x);
set_name(x, sprintf("NextDevice_%ld",i));
create_word(x);
op_num(x,0);
if ( get_wide_word(x) == 0xFFFF ) {
set_cmt(x, "The last device", 0);
} else {
nextbase = base + get_wide_word(x+2);
op_plain_offset(x,0,nextbase<<4);
set_cmt(x, "Offset to the next device", 0);
}
create_word(x+2);
op_num(x+2,0);
set_name(x+4, sprintf("DevAttr_%ld",i));
create_word(x+4);
op_num(x+4,0);
attr = get_wide_word(x+4);
cmt = "";
if ( attr & (1<< 0) ) cmt = cmt + "stdin device\n";
if ( attr & (1<< 1) ) cmt = cmt + ((attr & (1<<15)) ? "stdout device\n" : ">32M\n");
if ( attr & (1<< 2) ) cmt = cmt + "stdnull device\n";
if ( attr & (1<< 3) ) cmt = cmt + "clock device\n";
if ( attr & (1<< 6) ) cmt = cmt + "supports logical devices\n";
if ( attr & (1<<11) ) cmt = cmt + "supports open/close/RM\n";
if ( attr & (1<<13) ) cmt = cmt + "non-IBM block device\n";
if ( attr & (1<<14) ) cmt = cmt + "supports IOCTL\n";
cmt = cmt + ((attr & (1<<15)) ? "character device" : "block device");
set_cmt(x+4, cmt, 0);
set_name(x+6, sprintf("Strategy_%ld",i));
create_word(x+6);
op_plain_offset(x+6,0,get_inf_attr(INF_MIN_EA));
set_name(x+8, sprintf("Interrupt_%ld",i));
create_word(x+8);
op_plain_offset(x+8, -1, get_inf_attr(INF_MIN_EA));
set_name(x+0xA, sprintf("DeviceName_%ld",i));
create_strlit (x+0xA,8);
set_cmt(x+0xA, "May be device number", 0);
strt = (base << 4) + get_wide_word(x+6);
intr = (base << 4) + get_wide_word(x+8);
create_insn( strt );
create_insn( intr );
auto_mark_range(strt, strt+1, AU_PROC);
auto_mark_range(intr, intr+1, AU_PROC );
set_name( strt, sprintf("Strategy_Routine_%ld",i));
set_name( intr, sprintf("Interrupt_Routine_%ld",i));
set_cmt( strt, "ES:BX -> Device Request Block", 0);
set_cmt( intr, "Device Request Block:\n"
"0 db length\n"
"1 db unit number\n"
"2 db command code\n"
"5 d? reserved\n"
"0D d? command specific data", 0);
if( get_wide_byte( strt )==0x2E && get_wide_word(strt+1)==0x1E89
&& get_wide_byte(strt+5)==0x2E && get_wide_word(strt+6)==0x068C
&& get_wide_word(strt+3)==get_wide_word(strt+8)-2)
{
DevReq=get_wide_word(strt+3);
msg("DevReq at %x\n",DevReq);
del_items(x+DevReq);
del_items(x+DevReq+2);
create_dword(x+DevReq);
set_name(x+DevReq, sprintf("DevRequest_%ld",i));
}
if ( get_wide_word(x) == 0xFFFF ||
((get_wide_byte(x)==0xE9 || get_wide_byte(x)==0xEB) && i==0) ) break;
if ( get_wide_dword(x) == 0 ) break; // 04.01.96
x = (nextbase << 4) + get_wide_word(x);
i = i + 1;
}
}
opertest
Sample demonstrates how to use get_operand_value() function.
//
// This example shows how to use get_operand_value() function.
//
#include <idc.idc>
static main() {
auto ea;
for ( ea = get_inf_attr(INF_MIN_EA); ea != BADADDR; ea=find_code(ea,1) ) {
auto x;
x = get_operand_value(ea,0);
if ( x != -1 ) msg("%08lX: operand 1 = %08lX\n",ea,x);
x = get_operand_value(ea,1);
if ( x != -1 ) msg("%08lX: operand 2 = %08lX\n",ea,x);
x = get_operand_value(ea,2);
if ( x != -1 ) msg("%08lX: operand 3 = %08lX\n",ea,x);
}
}
pilot
File executed when a PalmPilot program is loaded.
//
// This file is executed when a PalmPilot program is loaded.
// You may customize it as you wish.
//
// TODO:
// - decompilation of various resource types
// (we don't have any information on the formats)
//
#include <idc.idc>
//-----------------------------------------------------------------------
//
// Process each resource and make some routine tasks
//
static process_segments()
{
auto ea,segname,prefix;
for ( ea=get_first_seg(); ea != BADADDR; ea=get_next_seg(ea) )
{
segname = get_segm_name(ea);
prefix = substr(segname,0,4);
if ( segname == "data0000" )
{
if ( get_wide_dword(ea) == 0xFFFFFFFF )
{
create_dword(ea);
set_cmt(ea,"Loader stores SysAppInfoPtr here", 0);
}
continue;
}
if ( prefix == "TRAP" )
{
create_word(ea);
op_hex(ea,0);
set_cmt(ea,"System trap function code", 0);
continue;
}
if ( prefix == "tSTR" )
{
create_strlit(ea,get_segm_end(ea));
set_cmt(ea,"String resource", 0);
continue;
}
if ( prefix == "tver" )
{
create_strlit(ea,get_segm_end(ea));
set_cmt(ea,"Version number string", 0);
continue;
}
if ( prefix == "tAIN" )
{
create_strlit(ea,get_segm_end(ea));
set_cmt(ea,"Application icon name", 0);
continue;
}
if ( prefix == "pref" )
{
auto flags,cmt;
flags = get_wide_word(ea);
create_word(ea); op_hex(ea,0); set_name(ea,"flags");
#define sysAppLaunchFlagNewThread 0x0001
#define sysAppLaunchFlagNewStack 0x0002
#define sysAppLaunchFlagNewGlobals 0x0004
#define sysAppLaunchFlagUIApp 0x0008
#define sysAppLaunchFlagSubCall 0x0010
cmt = "";
if ( flags & sysAppLaunchFlagNewThread ) cmt = cmt + "sysAppLaunchFlagNewThread\n";
if ( flags & sysAppLaunchFlagNewStack ) cmt = cmt + "sysAppLaunchFlagNewStack\n";
if ( flags & sysAppLaunchFlagNewGlobals) cmt = cmt + "sysAppLaunchFlagNewGlobals\n";
if ( flags & sysAppLaunchFlagUIApp ) cmt = cmt + "sysAppLaunchFlagUIApp\n";
if ( flags & sysAppLaunchFlagSubCall ) cmt = cmt + "sysAppLaunchFlagSubCall";
set_cmt(ea,cmt, 0);
ea = ea + 2;
create_dword(ea); op_hex(ea,0); set_name(ea,"stack_size");
ea = ea + 4;
create_dword(ea); op_hex(ea,0); set_name(ea,"heap_size");
}
}
}
//-----------------------------------------------------------------------
//
// Create a enumeration with system action codes
//
static make_actions()
{
auto ename = "SysAppLaunchCmd";
auto id = get_named_type_tid(ename);
if ( id == BADADDR )
{
auto ei = enum_type_data_t();
ei.bte = ei.bte | BTE_UDEC;
ei.add_constant("sysAppLaunchCmdNormalLaunch", 0, "Normal Launch");
ei.add_constant("sysAppLaunchCmdFind", 1, "Find string");
ei.add_constant("sysAppLaunchCmdGoTo", 2, "Launch and go to a particular record");
ei.add_constant("sysAppLaunchCmdSyncNotify", 3, "Sent to apps whose databases changed\n"
"during HotSync after the sync has\n"
"been completed");
ei.add_constant("sysAppLaunchCmdTimeChange", 4, "The system time has changed");
ei.add_constant("sysAppLaunchCmdSystemReset", 5, "Sent after System hard resets");
ei.add_constant("sysAppLaunchCmdAlarmTriggered", 6, "Schedule next alarm");
ei.add_constant("sysAppLaunchCmdDisplayAlarm", 7, "Display given alarm dialog");
ei.add_constant("sysAppLaunchCmdCountryChange", 8, "The country has changed");
ei.add_constant("sysAppLaunchCmdSyncRequest", 9, "The \"HotSync\" button was pressed");
ei.add_constant("sysAppLaunchCmdSaveData", 10, "Sent to running app before\n"
"sysAppLaunchCmdFind or other\n"
"action codes that will cause data\n"
"searches or manipulation");
ei.add_constant("sysAppLaunchCmdInitDatabase", 11, "Initialize a database; sent by\n"
"DesktopLink server to the app whose\n"
"creator ID matches that of the database\n"
"created in response to the \"create db\" request");
ei.add_constant("sysAppLaunchCmdSyncCallApplication", 12, "Used by DesktopLink Server command\n"
"\"call application\"");
id = create_enum_type(ename, ei, 0, TYPE_SIGN_NO_SIGN, 0, "Action codes");
}
}
//-----------------------------------------------------------------------
//
// Create a enumeration with event codes
//
static make_events()
{
auto ename = "events";
auto id = get_named_type_tid(ename);
if ( id == BADADDR )
{
auto ei = enum_type_data_t();
ei.bte = ei.bte | BTE_UDEC;
ei.add_constant( "nilEvent", 0);
ei.add_constant("penDownEvent", 1);
ei.add_constant("penUpEvent", 2);
ei.add_constant("penMoveEvent", 3);
ei.add_constant("keyDownEvent", 4);
ei.add_constant("winEnterEvent", 5);
ei.add_constant("winExitEvent", 6);
ei.add_constant("ctlEnterEvent", 7);
ei.add_constant("ctlExitEvent", 8);
ei.add_constant("ctlSelectEvent", 9);
ei.add_constant("ctlRepeatEvent", 10);
ei.add_constant("lstEnterEvent", 11);
ei.add_constant("lstSelectEvent", 12);
ei.add_constant("lstExitEvent", 13);
ei.add_constant("popSelectEvent", 14);
ei.add_constant("fldEnterEvent", 15);
ei.add_constant("fldHeightChangedEvent", 16);
ei.add_constant("fldChangedEvent", 17);
ei.add_constant("tblEnterEvent", 18);
ei.add_constant("tblSelectEvent", 19);
ei.add_constant("daySelectEvent", 20);
ei.add_constant("menuEvent", 21);
ei.add_constant("appStopEvent", 22);
ei.add_constant("frmLoadEvent", 23);
ei.add_constant("frmOpenEvent", 24);
ei.add_constant("frmGotoEvent", 25);
ei.add_constant("frmUpdateEvent", 26);
ei.add_constant("frmSaveEvent", 27);
ei.add_constant("frmCloseEvent", 28);
ei.add_constant("tblExitEvent", 29);
id = create_enum_type(ename, ei, 0, TYPE_SIGN_NO_SIGN, 0, "Event codes");
}
}
//-----------------------------------------------------------------------
static main()
{
process_segments();
make_actions();
make_events();
}
//-----------------------------------------------------------------------
#ifdef __undefined_symbol__
// WE DO NOT USE IDC HOTKEYS, JUST SIMPLE KEYBOARD MACROS
// (see IDA.CFG, macro Alt-5 for mc68k)
//-----------------------------------------------------------------------
//
// Register Ctrl-R as a hotkey for "make offset from A5" command
// (not used, simple keyboard macro is used instead, see IDA.CFG)
//
// There is another (manual) way to convert an operand to an offset:
// - press Ctrl-R
// - enter "A5BASE"
// - press Enter
//
static setup_pilot()
{
auto h0,h1;
h0 = "Alt-1";
h1 = "Alt-2";
add_idc_hotkey(h0,"a5offset0");
add_idc_hotkey(h1,"a5offset1");
msg("Use %s to convert the first operand to an offset from A5\n",h0);
msg("Use %s to convert the second operand to an offset from A5\n",h1);
}
static a5offset0(void) { op_plain_offset(get_screen_ea(),0,get_name_ea_simple("A5BASE")); }
static a5offset1(void) { op_plain_offset(get_screen_ea(),1,get_name_ea_simple("A5BASE")); }
#endif // 0
renimp
Script that renames imports.
/*
Rename imports.
This script renames entries of a dynamically built import table.
For example, from a table like this:
dd offset ntdll_NtPowerInformation
dd offset ntdll_NtInitiatePowerAction
dd offset ntdll_NtSetThreadExecutionState
dd offset ntdll_NtRequestWakeupLatency
dd offset ntdll_NtGetDevicePowerState
dd offset ntdll_NtIsSystemResumeAutomatic
dd offset ntdll_NtRequestDeviceWakeup
dd offset ntdll_NtCancelDeviceWakeupRequest
dd offset ntdll_RtlQueryRegistryValues
it will create a table like this:
NtPowerInformation dd offset ntdll_NtPowerInformation
NtInitiatePowerAction dd offset ntdll_NtInitiatePowerAction
NtSetThreadExecutionState dd offset ntdll_NtSetThreadExecutionState
NtRequestWakeupLatency dd offset ntdll_NtRequestWakeupLatency
NtGetDevicePowerState dd offset ntdll_NtGetDevicePowerState
NtIsSystemResumeAutomatic dd offset ntdll_NtIsSystemResumeAutomatic
NtRequestDeviceWakeup dd offset ntdll_NtRequestDeviceWakeup
NtCancelDeviceWakeupRequest dd offset ntdll_NtCancelDeviceWakeupRequest
RtlQueryRegistryValues dd offset ntdll_RtlQueryRegistryValues
Usage: select the import table and run the script.
Known problems: if the dll name contains an underscore, the function
names might be incorrect. Special care is taken for the ws2_32.dll but
other dlls will have wrong function names.
*/
#include <idc.idc>
static main()
{
auto ea1, ea2, idx, dllname, name;
ea1 = read_selection_start();
ea2 = read_selection_end();
if ( ea1 == BADADDR )
{
warning("Please select the import table before running the renimp script");
return;
}
auto ptrsz, DeRef;
auto bitness = get_segm_attr(ea1, SEGATTR_BITNESS);
if ( bitness == 1 )
{
ptrsz = 4;
DeRef = get_wide_dword;
}
else if ( bitness == 2 )
{
ptrsz = 8;
DeRef = get_qword;
}
else
{
warning("Unsupported segment bitness!");
return;
}
while ( ea1 < ea2 )
{
name = Name(DeRef(ea1));
idx = strstr(name, "_");
dllname = substr(name, 0, idx);
// Most likely the dll name is ws2_32
if ( dllname == "ws2" )
idx = idx + 3;
// Extract the function name
name = substr(name, idx+1, -1);
if ( !set_name(ea1, name, SN_CHECK|SN_NOWARN) )
{
// failed to give a name - it could be that the name has already been
// used in the program. add a suffix
for ( idx=0; idx < 99; idx++ )
{
if ( set_name(ea1, name + "_" + ltoa(idx, 10), SN_CHECK|SN_NOWARN) )
break;
}
}
ea1 = ea1 + ptrsz;
}
}
resource
Sample that demonstrates how new executable format can be analyzed.
//
// This is an example how New Executable Format resources can be
// analyzed. In this example we analyze Version Information resource
// type only.
// It is possible to write functions to analyze other types too.
//
//
#include <idc.idc>
//-------------------------------------------------------------------
static nextResource(ea) { // find next resource
auto next;
auto name;
next = ea;
while ( (next=get_next_seg(next)) != -1 ) {
name = get_segm_name(next);
if ( substr(name,0,3) == "res" ) break; // Yes, this is a resource
}
return next;
}
//-------------------------------------------------------------------
static getResourceType(cmt) {
auto i;
i = strstr(cmt,"(");
if ( i != -1 ) {
i = i + 1;
return xtol(substr(cmt,i,i+4)); // get type of the resource
}
return 0; // couldn't determine rsc type
}
//-------------------------------------------------------------------
static getResourceID(cmt) {
auto i;
i = strstr(cmt,":");
if ( i != -1 ) {
i = i + 1;
return long(substr(cmt,i,-1)); // get ID of the resource
}
return 0; // couldn't determine rsc ID
}
//-------------------------------------------------------------------
static ResourceCursor(ea,id) {
msg("Cursor, id: %ld\n",id);
}
//-------------------------------------------------------------------
static ResourceBitmap(ea,id) {
msg("Bitmap, id: %ld\n",id);
}
//-------------------------------------------------------------------
static ResourceIcon(ea,id) {
msg("Icon, id: %ld\n",id);
}
//-------------------------------------------------------------------
static ResourceMenu(ea,id) {
msg("Menu, id: %ld\n",id);
}
//-------------------------------------------------------------------
static ResourceDbox(ea,id) {
msg("Dbox, id: %ld\n",id);
}
//-------------------------------------------------------------------
static ResourceStrT(ea,id) {
msg("String Table, id: %ld\n",id);
}
//-------------------------------------------------------------------
static ResourceFontDir(ea,id) {
msg("FontDir, id: %ld\n",id);
}
//-------------------------------------------------------------------
static ResourceFont(ea,id) {
msg("Font, id: %ld\n",id);
}
//-------------------------------------------------------------------
static ResourceAccl(ea,id) {
msg("Accelerator, id: %ld\n",id);
}
//-------------------------------------------------------------------
static ResourceData(ea,id) {
msg("Resource Data, id: %ld\n",id);
}
//-------------------------------------------------------------------
static ResourceCurDir(ea,id) {
msg("Cursor Dir, id: %ld\n",id);
}
//-------------------------------------------------------------------
static ResourceIconDir(ea,id) {
msg("Icon Dir, id: %ld\n",id);
}
//-------------------------------------------------------------------
static ResourceName(ea,id) {
msg("Cursor, id: %ld\n",id);
}
//-------------------------------------------------------------------
static ResourceVersion(ea,id) {
msg("Version info, id: %ld\n",id);
ea = AnalyzeVBlock(ea,0);
}
//-------------------------------------------------------------------
static ConvertToStr(vea,len) {
auto ea;
auto slen;
ea = vea;
for ( ea=vea; len > 0; vea = ea ) {
while ( get_wide_byte(ea) != 0 ) ea = ea + 1;
ea = ea + 1;
slen = ea - vea;
create_strlit(vea,slen);
len = len - slen;
}
}
//-------------------------------------------------------------------
static Pad32(ea) {
auto vea;
vea = (ea + 3) & ~3; // align to 32-bit boundary
if ( vea != ea ) { // extra bytes found
make_array(ea,vea-ea);
set_cmt(ea, "Padding bytes", 0);
}
return vea;
}
//-------------------------------------------------------------------
static AnalyzeVBlock(ea,blnum) {
auto key,block,vsize,x,vea,keyea;
auto blstart,blend;
blstart = ea; // save block start
block = get_wide_word(ea);
set_name(ea, sprintf("rscVinfoBlSize_%ld", blnum));
create_word(ea);
op_num(ea,0);
ea = ea + 2;
vsize = get_wide_word(ea);
set_name(ea, sprintf("rscVinfoValSize_%ld", blnum));
create_word(ea);
op_num(ea,0);
ea = ea + 2;
keyea = ea;
set_name(key, sprintf("rscVinfoKey_%ld", blnum));
key = "";
while ( get_wide_byte(ea) != 0 ) {
key = key + char(get_wide_byte(ea));
ea = ea + 1;
}
ea = ea + 1;
create_strlit(keyea,ea-keyea);
vea = Pad32(ea);
set_name(vea, sprintf("rscVinfoValue_%ld", blnum));
blend = vea + vsize; // find block end
// msg("At %lX key is: %s\n",keyea,key);
if ( key == "VS_VERSION_INFO" ) {
; // nothing to do
} else if ( key == "VarFileInfo" ) {
; // nothing to do
} else if ( key == "Translation" ) {
for ( ea=vea; ea < blend; ea=ea+4 ) {
auto lang,charset;
lang = get_wide_word(ea);
charset = get_wide_word(ea+2);
if ( lang == 0x0401 ) lang = "Arabic";
else if ( lang == 0x0402 ) lang = "Bulgarian";
else if ( lang == 0x0403 ) lang = "Catalan";
else if ( lang == 0x0404 ) lang = "Traditional Chinese";
else if ( lang == 0x0405 ) lang = "Czech";
else if ( lang == 0x0406 ) lang = "Danish";
else if ( lang == 0x0407 ) lang = "German";
else if ( lang == 0x0408 ) lang = "Greek";
else if ( lang == 0x0409 ) lang = "U.S. English";
else if ( lang == 0x040A ) lang = "Castilian Spanish";
else if ( lang == 0x040B ) lang = "Finnish";
else if ( lang == 0x040C ) lang = "French";
else if ( lang == 0x040D ) lang = "Hebrew";
else if ( lang == 0x040E ) lang = "Hungarian";
else if ( lang == 0x040F ) lang = "Icelandic";
else if ( lang == 0x0410 ) lang = "Italian";
else if ( lang == 0x0411 ) lang = "Japanese";
else if ( lang == 0x0412 ) lang = "Korean";
else if ( lang == 0x0413 ) lang = "Dutch";
else if ( lang == 0x0414 ) lang = "Norwegian - Bokmal";
else if ( lang == 0x0415 ) lang = "Polish";
else if ( lang == 0x0416 ) lang = "Brazilian Portuguese";
else if ( lang == 0x0417 ) lang = "Rhaeto-Romanic";
else if ( lang == 0x0418 ) lang = "Romanian";
else if ( lang == 0x0419 ) lang = "Russian";
else if ( lang == 0x041A ) lang = "Croato-Serbian (Latin)";
else if ( lang == 0x041B ) lang = "Slovak";
else if ( lang == 0x041C ) lang = "Albanian";
else if ( lang == 0x041D ) lang = "Swedish";
else if ( lang == 0x041E ) lang = "Thai";
else if ( lang == 0x041F ) lang = "Turkish";
else if ( lang == 0x0420 ) lang = "Urdu";
else if ( lang == 0x0421 ) lang = "Bahasa";
else if ( lang == 0x0804 ) lang = "Simplified Chinese";
else if ( lang == 0x0807 ) lang = "Swiss German";
else if ( lang == 0x0809 ) lang = "U.K. English";
else if ( lang == 0x080A ) lang = "Mexican Spanish";
else if ( lang == 0x080C ) lang = "Belgian French";
else if ( lang == 0x0810 ) lang = "Swiss Italian";
else if ( lang == 0x0813 ) lang = "Belgian Dutch";
else if ( lang == 0x0814 ) lang = "Norwegian - Nynorsk";
else if ( lang == 0x0816 ) lang = "Portuguese";
else if ( lang == 0x081A ) lang = "Serbo-Croatian (Cyrillic)";
else if ( lang == 0x0C0C ) lang = "Canadian French";
else if ( lang == 0x100C ) lang = "Swiss French";
if ( charset == 0 ) charset = "7-bit ASCII";
else if ( charset == 932 ) charset = "Windows, Japan (Shift - JIS X-0208)";
else if ( charset == 949 ) charset = "Windows, Korea (Shift - KSC 5601)";
else if ( charset == 950 ) charset = "Windows, Taiwan (GB5)";
else if ( charset == 1200 ) charset = "Unicode";
else if ( charset == 1250 ) charset = "Windows, Latin-2 (Eastern European)";
else if ( charset == 1251 ) charset = "Windows, Cyrillic";
else if ( charset == 1252 ) charset = "Windows, Multilingual";
else if ( charset == 1253 ) charset = "Windows, Greek";
else if ( charset == 1254 ) charset = "Windows, Turkish";
else if ( charset == 1255 ) charset = "Windows, Hebrew";
else if ( charset == 1256 ) charset = "Windows, Arabic";
set_cmt(ea, "Language: " + lang, 0);
create_word(ea);
op_num(ea,0);
set_cmt(ea+2, "Character set: " + charset, 0);
create_word(ea+2);
op_num(ea+2,0);
}
} else if ( key == "StringFileInfo" ) {
ConvertToStr(vea,vsize);
} else {
ConvertToStr(vea,vsize);
}
blend = Pad32(blend);
update_extra_cmt(blend,E_NEXT + 0,";------------------------------------------------------");
blnum = (blnum+1) * 10; // nested block number
while ( (blend-blstart) < block ) { // nested block exist
msg("Nested block at %lX\n",blend);
set_cmt(blend, sprintf("Nested block...%ld",blnum), 0);
blend = AnalyzeVBlock(blend,blnum);
blnum = blnum + 1;
}
return blend;
}
//-------------------------------------------------------------------
static main(void) {
auto ea;
auto type,id;
msg("Searching for resources...\n");
ea = get_first_seg();
while ( (ea=nextResource(ea)) != -1 ) {
msg("Found a resource at %08lX, name: %s\n",ea,get_segm_name(ea));
type = getResourceType(get_extra_cmt(ea,E_PREV + 0)); // get rsc type
id = getResourceID(get_extra_cmt(ea,E_PREV + 3)); // get rsc id
if ( type == 0x8001 ) ResourceCursor(ea,id);
else if ( type == 0x8002 ) ResourceBitmap(ea,id);
else if ( type == 0x8003 ) ResourceIcon(ea,id);
else if ( type == 0x8004 ) ResourceMenu(ea,id);
else if ( type == 0x8005 ) ResourceDbox(ea,id);
else if ( type == 0x8006 ) ResourceStrT(ea,id);
else if ( type == 0x8007 ) ResourceFontDir(ea,id);
else if ( type == 0x8008 ) ResourceFont(ea,id);
else if ( type == 0x8009 ) ResourceAccl(ea,id);
else if ( type == 0x800A ) ResourceData(ea,id);
else if ( type == 0x800C ) ResourceCurDir(ea,id);
else if ( type == 0x800E ) ResourceIconDir(ea,id);
else if ( type == 0x800F ) ResourceName(ea,id);
else if ( type == 0x8010 ) ResourceVersion(ea,id);
else msg("Unknown resource type %04lX\n",type);
}
msg("Done.\n");
}
struct2
Sample that demonstrates structure manipulation functions.
//
// This example shows how to use structure manipulation functions.
//
#include <idc.idc>
#define MAXSTRUCT 200
// Create MAXSTRUT structures.
// Each structure will have 3 fields:
// - a byte array field
// - a word field
// - a structure field
static main()
{
auto i, idx, name, id2;
for ( i=0; i < MAXSTRUCT; i++ )
{
name = sprintf("str_%03d", i);
idx = add_struc(-1, name, 0); // create a structure
if ( idx == -1 ) // if not ok
{
warning("Can't create structure %s, giving up",name);
break;
}
else
{
add_struc_member(idx,
"bytemem",
get_struc_size(idx),
FF_DATA|FF_BYTE,
-1,
5*1); // char[5]
add_struc_member(idx,
"wordmem",
get_struc_size(idx),
FF_DATA|FF_WORD,
-1,
1*2); // short
id2 = get_struc_id(sprintf("str_%03d",i-1));
if ( i != 0 ) add_struc_member(idx,
"inner",
get_struc_size(idx),
FF_DATA|FF_STRUCT,
id2,
get_struc_size(id2)); // sizeof(str_...)
msg("Structure %s is successfully created, idx=%08lX, prev=%08lX\n",
name, idx, id2);
}
}
msg("Done, total number of structures: %d\n",get_struc_qty());
}
structst
Sample that demonstrates structure access functions.
//
// This example shows how to use structure access functions.
//
#include <idc.idc>
// Create a simple structure
// dump layout of all structures (including the created one)
// dump current function's frame (if it exists)
static dump_struct(id)
{
auto m;
msg("Structure %s (id 0x%X):\n",get_struc_name(id), id);
msg(" Regular comment: %s\n",get_struc_cmt(id,0));
msg(" Repeatable comment: %s\n",get_struc_cmt(id,1));
msg(" Size : %d\n",get_struc_size(id));
msg(" Number of members : %d\n",get_member_qty(id));
for ( m = 0;
m != get_struc_size(id);
m = get_next_offset(id,m) )
{
auto mname;
mname = get_member_name(id,m);
if ( mname == "" )
{
msg(" Hole (%d bytes)\n",get_next_offset(id,m)-m);
}
else
{
auto type;
msg(" Member name : %s\n",get_member_name(id,m));
msg(" Regular cmt : %s\n",get_member_cmt(id,m,0));
msg(" Rept. cmt : %s\n",get_member_cmt(id,m,1));
msg(" Member size : %d\n",get_member_size(id,m));
type = get_member_flag(id,m) & DT_TYPE;
if ( type == FF_BYTE ) type = "Byte";
else if ( type == FF_WORD ) type = "Word";
else if ( type == FF_DWORD ) type = "Double word";
else if ( type == FF_QWORD ) type = "Quadro word";
else if ( type == FF_TBYTE ) type = "Ten bytes";
else if ( type == FF_STRLIT ) type = "ASCII string";
else if ( type == FF_STRUCT ) type = sprintf("Structure '%s'",get_struc_name(get_member_strid(id,m)));
else if ( type == FF_FLOAT ) type = "Float";
else if ( type == FF_DOUBLE ) type = "Double";
else if ( type == FF_PACKREAL ) type = "Packed Real";
else type = sprintf("Unknown type %08X",type);
msg(" Member type : %s",type);
type = get_member_flag(id,m);
if ( is_off0(type) ) msg(" Offset");
else if ( is_char0(type) ) msg(" Character");
else if ( is_seg0(type) ) msg(" Segment");
else if ( is_dec0(type) ) msg(" Decimal");
else if ( is_hex0(type) ) msg(" Hex");
else if ( is_oct0(type) ) msg(" Octal");
else if ( is_bin0(type) ) msg(" Binary");
msg("\n");
}
}
}
static main() {
auto idx,code;
idx = add_struc(-1, "str1_t", 0); // create a structure
if ( idx != -1 ) { // if ok
auto id2;
// add member: offset from struct start 0, type - byte, 5 elements
add_struc_member(idx,"bytemem",0,FF_DATA|FF_BYTE,-1,5*1);
add_struc_member(idx,"wordmem",5,FF_DATA|FF_WORD,-1,1*2);
set_member_cmt(idx,0,"This is 5 element byte array",0);
set_member_cmt(idx,5,"This is 1 word",0);
id2 = add_struc(-1, "str2_t", 0); // create another structure
add_struc_member(id2,"first", 0,FF_DATA|FF_BYTE,-1,1*1);
add_struc_member(id2,"strmem",1,FF_DATA|FF_STRUCT,idx,get_struc_size(idx));
set_member_cmt(id2,1,"This is structure member",0);
}
msg("Total number of structures: %d\n",get_struc_qty());
auto id;
for ( idx=get_first_struc_idx(); idx != -1; idx=get_next_struc_idx(idx) ) {
id = get_struc_by_idx(idx);
if ( id == -1 ) error("Internal IDA error, get_struc_by_idx returned -1!");
dump_struct(id);
}
// dump current function's stack frame
id = get_func_attr(here, FUNCATTR_FRAME);
if ( id != -1 )
{
msg("current function frame layout:\n");
dump_struct(id);
}
}
tpdll
Example executed when IDA detects Turbo Pascal DLL.
//
// This file is executed when IDA detects Turbo Pascal DLL
//
#include <idc.idc>
static main()
{
// Set pascal type strings. Just in case
set_inf_attr(INF_STRTYPE, STRTYPE_PASCAL);
// System unit used protected commands so
// set protected mode processor
set_processor_type("80386p", SETPROC_USER);
auto start = get_inf_attr(INF_START_EA);
// Give pascal style name to the entry point
// and delete the bogus one-instruction function
// which was created by the startup signature
set_name(start, "LIBRARY");
del_func(start);
// Plan to create a good PROGRAM function instead of
// the deleted one
auto_mark_range(start, start+1, AU_PROC);
// Get address of the initialization subrountine
auto init = get_first_fcref_from(start+5);
set_name(init, "@__SystemInit$qv");
// Delete the bogus function which was created by the secondary
// startup signature.
del_func(init);
// Create a good initialization function
add_func(init);
set_func_flags(init, FUNC_LIB|get_func_flags(init));
// Check for presence of LibExit() function
auto exit = get_name_ea_simple("@__LibExit$qv");
// If we have found function then define it
// with FUNC_NORET attribute
if ( exit != BADADDR )
{
add_func(exit);
set_func_flags(exit, FUNC_NORET|FUNC_LIB|get_func_flags(exit));
}
}
tpdos
Example executed when IDA detects Turbo Pascal DOS app.
//
// This file is executed when IDA detects Turbo Pascal DOS application.
//
#include <idc.idc>
static main()
{
// Set pascal type strings. Just in case
set_inf_attr(INF_STRTYPE, STRTYPE_PASCAL);
auto start = get_inf_attr(INF_START_EA);
// Give pascal style name to the entry point
// and delete the bogus one-instruction function
// which was created by the startup signature
set_name(start,"PROGRAM");
del_func(start);
// Plan to create a good PROGRAM function instead of
// the deleted one
auto_mark_range(start, start+1, AU_PROC);
// Get address of the initialization subrountine
auto init = get_first_fcref_from(start);
set_name(init, "@__SystemInit$qv");
// Delete the bogus function which was created by the secondary
// startup signature.
del_func(init);
// Create a good initialization function
add_func(init);
set_func_flags(init, FUNC_LIB|get_func_flags(init));
// find sequence of
// xor cx, cx
// xor bx, bx
// usually Halt() starts with these instructions
auto halt = find_binary(init,1,"33 c9 33 db");
// If we have found the sequence then define Halt() function
// with FUNC_NORET attribute
if ( halt != BADADDR )
{
set_name(halt, "@Halt$q4Word");
add_func(halt);
set_func_flags(halt, FUNC_NORET|FUNC_LIB|get_func_flags(halt));
}
}
tpne
Example executed when IDA detects Windows or DPMI app.
//
// This file is executed when IDA detects Turbo Pascal Windows
// or DPMI application.
//
#include <idc.idc>
static main()
{
// Set pascal type strings. Just in case
set_inf_attr(INF_STRTYPE, STRTYPE_PASCAL);
// System unit used protected commands so
// set protected mode processor
set_processor_type("80386p", SETPROC_USER);
auto start = get_inf_attr(INF_START_EA);
// Give pascal style name to the entry point
// and delete the bogus one-instruction function
// which was created by the startup signature
set_name(start, "PROGRAM");
del_func(start);
// Plan to create a good PROGRAM function instead of
// the deleted one
auto_mark_range(start, start+1, AU_PROC);
// Get address of the initialization subrountine
auto init = get_first_fcref_from(start+5);
set_name(init, "@__SystemInit$qv");
// Delete the bogus function which was created by the secondary
// startup signature.
del_func(init);
// find sequence of
// xor cx, cx
// xor bx, bx
// usually Halt() starts with these instructions
auto halt = find_binary(init, 1, "33 c9 33 db");
// If we have found the sequence then define Halt() function
// with FUNC_NORET attribute
if ( halt != BADADDR )
{
set_name(halt, "@Halt$q4Word");
add_func(halt);
set_func_flags(halt, FUNC_NORET|FUNC_LIB|get_func_flags(halt));
}
// Create a good initialization function
add_func(init);
set_func_flags(init, FUNC_LIB|get_func_flags(init));
}
xrefs
Example shows how to use cross-reference related functions.
//
//
// This example shows how to use cross-reference related functions.
// It displays xrefs to the current location.
//
#include <idc.idc>
static main() {
auto ea,flag,x,y;
flag = 1;
ea = get_screen_ea();
// add_dref(ea,ea1,dr_R); // set data reference (read)
// add_cref(ea,ea1,fl_CN); // set 'call near' reference
// del_cref(ea,ea1,1);
//
// Now show all reference relations between ea & ea1.
//
msg("\n*** Code references from " + atoa(ea) + "\n");
for ( x=get_first_cref_from(ea); x != BADADDR; x=get_next_cref_from(ea,x) )
msg(atoa(ea) + " refers to " + atoa(x) + xrefchar() + "\n");
msg("\n*** Code references to " + atoa(ea) + "\n");
x = ea;
for ( y=get_first_cref_to(x); y != BADADDR; y=get_next_cref_to(x,y) )
msg(atoa(x) + " is referred from " + atoa(y) + xrefchar() + "\n");
msg("\n*** Code references from " + atoa(ea) + " (only non-trivial refs)\n");
for ( x=get_first_fcref_from(ea); x != BADADDR; x=get_next_fcref_from(ea,x) )
msg(atoa(ea) + " refers to " + atoa(x) + xrefchar() + "\n");
msg("\n*** Code references to " + atoa(ea) + " (only non-trivial refs)\n");
x = ea;
for ( y=get_first_fcref_to(x); y != BADADDR; y=get_next_fcref_to(x,y) )
msg(atoa(x) + " is referred from " + atoa(y) + xrefchar() + "\n");
msg("\n*** Data references from " + atoa(ea) + "\n");
for ( x=get_first_dref_from(ea); x != BADADDR; x=get_next_dref_from(ea,x) )
msg(atoa(ea) + " accesses " + atoa(x) + xrefchar() + "\n");
msg("\n*** Data references to " + atoa(ea) + "\n");
x = ea;
for ( y=get_first_dref_to(x); y != BADADDR; y=get_next_dref_to(x,y) )
msg(atoa(x) + " is accessed from " + atoa(y) + xrefchar() + "\n");
}
static xrefchar()
{
auto x, is_user;
x = get_xref_type();
is_user = (x & XREF_USER) ? ", user defined)" : ")";
if ( x == fl_F ) return " (ordinary flow" + is_user;
if ( x == fl_CF ) return " (call far" + is_user;
if ( x == fl_CN ) return " (call near" + is_user;
if ( x == fl_JF ) return " (jump far" + is_user;
if ( x == fl_JN ) return " (jump near" + is_user;
if ( x == dr_O ) return " (offset" + is_user;
if ( x == dr_W ) return " (write)" + is_user;
if ( x == dr_R ) return " (read" + is_user;
if ( x == dr_T ) return " (textual" + is_user;
return "(?)";
}
Other sample scripts
Batch analysis
This program forces the IDA Disassembler in “batch” analysis mode if it is started in the following way : ida -Sanalysis.idc file.
static main() {
auto x,y;
Message("Waiting for the end of auto analys...\n");
Wait();
x = SegStart(BeginEA());
y = SegEnd(BeginEA());
Message("Analysing area %08X - %08X...\n",x,y);
AnalyseArea(x,y);
Wait(); // wait for code segment analysis to finish
Message("\n\n------ Creating output file.... --------\n");
WriteTxt("ida.out",0,0xFFFFFFFF);
Message("All done, exiting...\n");
Exit(0); // exit to OS, error code 0 - success
}
Device driver analysis
This program is automatically executed when a new device driver is loaded.
//
// This file is executed when a new device driver is loaded.
// Device drivers have extensions DRV or SYS.
//
#include <idc.idc>
static main(void) {
auto x,i,base;
auto intr,strt;
auto attr,cmt;
auto nextbase;
auto DevReq;
i = 0;
x = MinEA();
base = (x >> 4); // The segment base
while ( 1 ) {
Message("Device driver block at %04X\n",x);
MakeName(x,form("NextDevice_%ld",i));
MakeWord(x);
OpNumber(x,0);
if ( Word(x) == 0xFFFF ) {
MakeComm(x,"The last device");
} else {
nextbase = base + Word(x+2);
OpOff(x,0,[nextbase,0]);
MakeComm(x,"Offset to the next device");
}
MakeWord(x+2);
OpNumber(x+2,0);
MakeName(x+4,form("DevAttr_%ld",i));
MakeWord(x+4);
OpNumber(x+4,0);
attr = Word(x+4);
cmt = "";
if ( attr & (132M\n");
if ( attr & (1 Device Request Block");
MakeComm( intr, "Device Request Block:\n"
"0 db length\n"
"1 db unit number\n"
"2 db command code\n"
"5 d? reserved\n"
"0D d? command specific data");
if( Byte( strt )==0x2E && Word(strt+1)==0x1E89
&& Byte(strt+5)==0x2E && Word(strt+6)==0x068C
&& Word(strt+3)==Word(strt+8)-2)
{
DevReq=Word(strt+3);
Message("DevReq at %x\n",DevReq);
MakeUnkn(x+DevReq,0);MakeUnkn(x+DevReq+2,0);
MakeDword(x+DevReq);MakeName(x+DevReq,form("DevRequest_%ld",i));
}
if ( Word(x) == 0xFFFF ||
((Byte(x)==0xE9 || Byte(x)==0xEB) && i==0) ) break;
if ( Dword(x) == 0 ) break; // 04.01.96
x = [ nextbase, Word(x) ];
i = i + 1;
}
}
New file format definition
//
// This is an example how New Executable Format resources can be
// analysed. In this example we analyse Version Information resource
// type only.
//-------------------------------------------------------------------
static nextResource(ea) { // find next resource
auto next;
auto name;
next = ea;
while ( (next=NextSeg(next)) != -1 ) {
name = SegName(next);
if ( substr(name,0,3) == "res" ) break; // Yes, this is a resource
}
return next;
}
//-------------------------------------------------------------------
static getResourceType(cmt) {
auto i;
i = strstr(cmt,"(");
if ( i != -1 ) {
i = i + 1;
return xtol(substr(cmt,i,i+4)); // get type of the resource
}
return 0; // couldn't determine rsc type
}
//-------------------------------------------------------------------
static getResourceID(cmt) {
auto i;
i = strstr(cmt,":");
if ( i != -1 ) {
i = i + 1;
return long(substr(cmt,i,-1)); // get ID of the resource
}
return 0; // couldn't determine rsc ID
}
//-------------------------------------------------------------------
static ResourceCursor(ea,id) {
Message(form("Cursor, id: %ld\n",id));
}
//-------------------------------------------------------------------
static ResourceBitmap(ea,id) {
Message(form("Bitmap, id: %ld\n",id));
}
//-------------------------------------------------------------------
static ResourceIcon(ea,id) {
Message(form("Icon, id: %ld\n",id));
}
//-------------------------------------------------------------------
static ResourceMenu(ea,id) {
Message(form("Menu, id: %ld\n",id));
}
//-------------------------------------------------------------------
static ResourceDbox(ea,id) {
Message(form("Dbox, id: %ld\n",id));
}
//-------------------------------------------------------------------
static ResourceStrT(ea,id) {
Message(form("String Table, id: %ld\n",id));
}
//-------------------------------------------------------------------
static ResourceFontDir(ea,id) {
Message(form("FontDir, id: %ld\n",id));
}
//-------------------------------------------------------------------
static ResourceFont(ea,id) {
Message(form("Font, id: %ld\n",id));
}
//-------------------------------------------------------------------
static ResourceAccl(ea,id) {
Message(form("Accelerator, id: %ld\n",id));
}
//-------------------------------------------------------------------
static ResourceData(ea,id) {
Message(form("Resource Data, id: %ld\n",id));
}
//-------------------------------------------------------------------
static ResourceCurDir(ea,id) {
Message(form("Cursor Dir, id: %ld\n",id));
}
//-------------------------------------------------------------------
static ResourceIconDir(ea,id) {
Message(form("Icon Dir, id: %ld\n",id));
}
//-------------------------------------------------------------------
static ResourceName(ea,id) {
Message(form("Cursor, id: %ld\n",id));
}
//-------------------------------------------------------------------
static ResourceVersion(ea,id) {
Message(form("Version info, id: %ld\n",id));
ea = AnalyseVBlock(ea,0);
}
//-------------------------------------------------------------------
static ConvertToStr(vea,len) {
auto ea;
auto slen;
ea = vea;
for ( ea=vea; len > 0; vea = ea ) {
while ( Byte(ea) != 0 ) ea = ea + 1;
ea = ea + 1;
slen = ea - vea;
MakeStr(vea,slen);
len = len - slen;
}
}
//-------------------------------------------------------------------
static Pad32(ea) {
auto vea;
vea = (ea + 3) & ~3; // align to 32-bit boundary
if ( vea != ea ) { // extra bytes found
MakeArray(ea,vea-ea);
MakeComm(ea,"Padding bytes");
}
return vea;
}
//-------------------------------------------------------------------
static AnalyseVBlock(ea,blnum) {
auto key,block,vsize,x,vea,keyea;
auto blstart,blend;
blstart = ea; // save block start
block = Word(ea);
MakeName(ea,form("rscVinfoBlSize_%ld",blnum));
MakeWord(ea);
OpNumber(ea,0);
ea = ea + 2;
vsize = Word(ea);
MakeName(ea,form("rscVinfoValSize_%ld",blnum));
MakeWord(ea);
OpNumber(ea,0);
ea = ea + 2;
keyea = ea;
MakeName(key,form("rscVinfoKey_%ld",blnum));
key = "";
while ( Byte(ea) != 0 ) {
key = key + char(Byte(ea));
ea = ea + 1;
}
ea = ea + 1;
MakeStr(keyea,ea-keyea);
vea = Pad32(ea);
MakeName(vea, form("rscVinfoValue_%ld",blnum));
blend = vea + vsize; // find block end
// Message(form("At %lX key is: ",keyea) + key + "\n");
if ( key == "VS_VERSION_INFO" ) {
; // nothing to do
} else if ( key == "VarFileInfo" ) {
; // nothing to do
} else if ( key == "Translation" ) {
for ( ea=vea; ea
Structures manipulation
This program demonstrates basic structure manipulation.
#include <idc.idc>
static main() {
auto idx;
for ( idx=GetFirstStrucIdx(); idx != -1; idx=GetNextStrucIdx(idx) ) {
auto id,m;
id = GetStrucId(idx);
if ( id == -1 ) Fatal("Internal IDA error, GetStrucId returned -1!");
Message("Structure %s:\n",GetStrucName(id));
Message(" Regular comment: %s\n",GetStrucComment(id,0));
Message(" Repeatable comment: %s\n",GetStrucComment(id,1));
Message(" Size : %d\n",GetStrucSize(id));
Message(" Number of members : %d\n",GetMemberQty(id));
for ( m = 0;
m != GetStrucSize(id);
m = GetStrucNextOff(id,m) ) {
auto mname;
mname = GetMemberName(id,m);
if ( mname == "" ) {
Message(" Hole (%d bytes)\n",GetStrucNextOff(id,m)-m);
} else {
auto type;
Message(" Member name : %s\n",GetMemberName(id,m));
Message(" Regular cmt : %s\n",GetMemberComment(id,m,0));
Message(" Rept. cmt : %s\n",GetMemberComment(id,m,1));
Message(" Member size : %d\n",GetMemberSize(id,m));
type = GetMemberFlag(id,m) & DT_TYPE;
if ( type == FF_BYTE ) type = "Byte";
else if ( type == FF_WORD ) type = "Word";
else if ( type == FF_DWRD ) type = "Double word";
else if ( type == FF_QWRD ) type = "Quadro word";
else if ( type == FF_TBYT ) type = "Ten bytes";
else if ( type == FF_ASCI ) type = "ASCII string";
else if ( type == FF_STRU ) type = form("Structure '%s'",GetStrucName(GetMemberStrId(id,m)));
else if ( type == FF_XTRN ) type = "Unknown external?!"; // should not happen
else if ( type == FF_FLOAT ) type = "Float";
else if ( type == FF_DOUBLE ) type = "Double";
else if ( type == FF_PACKREAL ) type = "Packed Real";
else type = form("Unknown type %08X",type);
Message(" Member type : %s",type);
type = GetMemberFlag(id,m);
if ( isOff0(type) ) Message(" Offset");
else if ( isChar0(type) ) Message(" Character");
else if ( isSeg0(type) ) Message(" Segment");
else if ( isDec0(type) ) Message(" Decimal");
else if ( isHex0(type) ) Message(" Hex");
else if ( isOct0(type) ) Message(" Octal");
else if ( isBin0(type) ) Message(" Binary");
Message("\n");
}
}
}
Message("Total number of structures: %d\n",GetStrucQty());
}
VxD analysis
This program is automatically executed when a new VxD is loaded.
static Describe(ddb,i) {
auto next,x,y;
x = ddb;
MakeDword(x);
MakeComm (x,form("Next_%ld",i));
next = Dword(x);
if ( next != 0 ) OpOffset(x,0);
x = x + 4;
MakeWord(x);
MakeName(x,form("SDK_Version_%ld",i));
OpNum (x);
x = x + 2;
MakeWord(x);
MakeName(x,form("Req_Device_Number_%ld",i));
OpNum (x);
x = x + 2;
MakeByte(x);
MakeName(x,form("Dev_Major_Version_%ld",i));
OpNum(x);
MakeComm(x,"Major device number");
x = x + 1;
MakeByte(x);
MakeName(x,form("Dev_Minor_Version_%ld",i));
OpNum (x);
MakeComm(x,"Minor device number");
x = x + 1;
MakeWord(x);
MakeName(x,form("Flags_%ld",i));
OpNum (x);
MakeComm(x,"Flags for init calls complete");
x = x + 2;
MakeStr (x,8);
MakeName(x,form("Name_%ld",i));
MakeComm(x,"Device name");
x = x + 8;
MakeDword(x);
MakeName(x,form("Init_Order_%ld",i));
OpNum (x);
MakeComm(x,"Initialization Order");
x = x + 4;
MakeDword(x);
MakeName(x,form("Control_Proc_%ld",i));
OpOffset(x,0);
MakeComm(x,"Offset of control procedure");
MakeCode( Dword(x) );
MakeName( Dword(x), form("Control_%ld",i) );
x = x + 4;
MakeDword(x);
MakeName(x,form("V86_API_Proc_%ld",i));
MakeComm(x,"Offset of API procedure (or 0)");
y = Dword(x);
if ( y != 0 ) {
OpOffset(x,0);
MakeCode( y );
MakeName( y, form("V86_%ld",i) );
}
x = x + 4;
MakeDword(x);
MakeName(x,form("PM_API_Proc_%ld",i));
MakeComm(x,"Offset of API procedure (or 0)");
y = Dword(x);
if ( y != 0 ) {
OpOffset(x,0);
MakeCode( y );
MakeName( y, form("PM_%ld",i) );
}
x = x + 4;
MakeDword(x);
MakeName(x,form("V86_API_CSIP_%ld",i));
MakeComm(x,"CS:IP of API entry point");
x = x + 4;
MakeDword(x);
MakeName(x,form("PM_API_CSIP_%ld",i));
MakeComm(x,"CS:IP of API entry point");
x = x + 4;
MakeDword(x);
MakeName(x,form("Reference_Data_%ld",i));
MakeComm(x,"Reference data from real mode");
x = x + 4;
MakeDword(x);
MakeName(x,form("Service_Table_Ptr_%ld",i));
MakeComm(x,"Pointer to service table");
y = Dword(x);
if ( y != 0 ) {
OpOffset(x,0);
MakeName( y, form("Service_Table_%ld",i) );
MakeDword(y);
MakeArray( y, Dword(x+4) );
}
x = x + 4;
MakeDword(x);
MakeName(x,form("Service_Size_%ld",i));
MakeComm(x,"Number of services");
x = x + 4;
return next;
}
//-----------------------------------------------------------------------
static main() {
auto ea;
auto i;
i = 0;
ea = ScreenEA();
while ( GetFlags(ea) != 0 ) { // While ea points to valid address
ea = Describe(ea,i);
if ( ea == 0 ) break;
i = i + 1;
}
}
Analyzing encrypted code
This small tutorial demonstrates how to use IDC to decrypt part of a program at analysis time. The sample file is a portion of the Ripper virus.
1st step
The binary image of the virus is loaded into IDA and analysis is started at the entry point
Obviously, the bytes right after the call don’t make sense, but the call gives us a clue: it is a decryption routine.
2nd step
We create a small IDC program that mimicks the decryption routine.
static decrypt(from, size, key ) {
auto i, x; // we define the variables
for ( i=0; i < size; i=i+1 ) {
x = Byte(from); // fetch the byte
x = (x^key); // decrypt it
PatchByte(from,x); // put it back
from = from + 1; // next byte
}
}
Save it on disk and press F2 to load it into IDA’s interpreter.
3rd step
Then, we press shift-F2 to call it with the appropriate values. Please note the linear address used for the starting point. Pressing OK executes the statement.

The bytes are now decrypted
4th step
We move the cursor to offset 0x50 and press C to inform IDA that there is now code at that location.
And the code to allocate memory for the virus appears, along with a rather impolite message… The analysis may now resume.
Admin Guide
Welcome to the Hex-Rays Admin Guide, designed to support system administrators in managing and configuring servers for IDA add-ons and floating licenses. Inside, you’ll find in-depth guides for:
IDA Pro Lumina server Admin Guide
Introduction
This manual describes the installation, management, and interaction with an on-the-premises IDA Pro Lumina server.
It is primarily intended for administrators, and will focus on the Lumina server component, that can be purchased for IDA Pro.
While we will (at least superficially) make use of the lc command-line client that is used to access/manage the server, this manual will not offer a detailed explanation of its usage: that is the role of the lc user manual.
We recommend having the lc user manual ready before starting the installation and configuration of the Lumina server.
Prerequisites
After your purchase of Lumina server, go to the customer portal, where you will find an installer for the Lumina server. Please go ahead and download it.
Quick alternative {% hint style=“success” %}
HCLI Commands | See HCLI Docs
hcli license gethcli download{% endhint %}
You will also need root access on the host where you will be installing the Lumina server (to install the server, not to run it).
MySQL server
The Lumina server stores its data in a MySQL DBMS server. It is therefore necessary to have valid credentials to such a server, as well as a fresh, empty database.
NOTE: The Lumina server requires a MySQL server version 5.8 or newer.
For illustration purposes, let’s assume the MySQL database the server will use, is called: "lumina_db".
Installation
At installation-time, the Lumina server installer will need information about the MySQL instance the Lumina server will be using (host, port, username, password). Eventually, that information will end up in the lumina.conf file, sitting next to the lumina_server binary:
CONNSTR="mysql;Server=127.0.0.1;Port=3306;Database=lumina_db;Uid=lumina;Pwd=<snipped>"
Installation in a Teams setup
When Lumina is installed in a Teams setup, in addition to information about the MySQL database in which the Lumina server will store the metadata, the installer asks for the host+port pair where to find a running Hex-Rays Vault server to which user authentication will be delegated.
That information will also end up in the lumina.conf file:
VAULT_HOST="vault.acme.com:65433"
Supported platforms
The Lumina server can be installed on Linux servers. We have tested it on Debian and Ubuntu, but other major flavors of Linux should be fine too.
To install the server, run the Lumina installer as root and follow the instructions (the server will not require root permissions; only the installer does.)
NOTE: If your Linux system is based on systemd (e.g., Debian/Ubuntu, Red-Hat, CentOS, …), it is recommended to let the installer create systemd units so that the server will start automatically at the next reboot.
Supported architectures
Lumina functionality in IDA Pro is currently available only when analyzing binaries compiled for the following architectures:
- PC (x86/x64)
- ARM
- PPC
- MIPS
- RISC-V
If a user loads a binary compiled for an unsupported architecture, the Lumina menu will not appear in IDA Pro and pushing or pulling metadata will not be possible.
Activating the server license
In order for the Lumina server license to be activated, it must be bound to a Host ID (an Ethernet MAC address.)
From a command prompt, run /sbin/ifconfig, and lookup the “ether” address for the network interface through which the server will be accessible.
>/sbin/ifconfig
enp4s0: flags=4163<UP,BROADCAST,RUNNING,MULTICAST> mtu 1500
[...snipped...]
ether bf:e2:91:10:58:d2 txqueuelen 1000 (Ethernet)
[...snipped...]
In this case, our mac address is: bf:e2:91:10:58:d2
Go to Hex-Rays customer portal and activate your license for Lumina server. During that process, you will need to provide the MAC address of the device where the Lumina server will be running. Once the activation is complete, you’ll be able to download the following files:
- lumina server certificate
lumina_server_<LID>.hexlic(license key, where LID is your license ID)
Installing the server license
Those need to be copied in the Lumina installation directory. As root:
>cd /opt/lumina
>cp .../path/to/lumina_server.crt .
>cp .../path/to/lumina_server.key .
>cp .../path/to/lumina_server_<LID>.hexlic .
>chown lumina:lumina lumina_server.crt lumina_server.key lumina_server_<LID>.hexlic
>chmod 640 lumina_server.crt lumina_server.key lumina_server_<LID>.hexlic
Creating the initial database schema
At this point, the server should be ready to run.
NOTE: If your system is already in production and hosts files, skip this section. Using the --recreate-schema option as in the example below, will re-create an empty database and lose all data.
For the Lumina server to work, it needs to have a proper database schema to work with (at this point, the MySQL database (i.e., "lumina_db") must already exist but is still empty.)
That is why, on the first install, you will need to initialize the database the server will use as well as specify which user authentication will be used (either lumina or vault, we will use lumina in the example below):
>sudo -u lumina ./lumina_server --config-file lumina.conf \
--certchain-file lumina_server.crt \
--privkey-file lumina_server.key \
--recreate-schema lumina
Hex-Rays Lumina Server v8.0 Hex-Rays (c) 2022-2024
2022-09-02 10:28:30 Database has been initialized; exiting.
If you see “Error: Cannot connect to lumina db” please refer to troubleshooting section.
Testing the server
Now that the server is installed and has a database to work with, we can test that it works:
>sudo -u lumina ./lumina_server --config-file lumina.conf \
--certchain-file lumina_server.crt \
--privkey-file lumina_server.key
Hex-Rays Lumina Server v8.0 Hex-Rays (c) 2022-2024
2022-09-22 12:14:37 Listening on 0.0.0.0:443...
Good, the server appears to run! (If you are observing more worrying messages than this one, please refer to the troubleshooting section.)
At this point, you may want to either let the server run, or stop it (Ctrl+C will do) and restart it using systemd:
>systemctl restart lumina.service
…and make sure it runs:
>ps aux | grep lumina_server
lumina 78812 0.0 0.0 ...
or:
>systemctl status lumina.service
If you don’t see a running lumina_server process or systemctl reports a startup failure, please refer to the systemd diagnostic tools (e.g., journalctl) for more info.
Initial configuration
This chapter explains how to perform the initial configuration of the Lumina server, and in particular how to create the first (i.e., “administrator”) user.
Creating the administrator
NOTE: The very first user to log into the server becomes the first administrator. S/he can create new administrators and otherwise manage the server.
Once the server is up and running, login to it using a username and password of your choice using the lc utility.
NOTE: lc is the Lumina command-line administration client, which comes with the Lumina server installer. We will assume the server has been installed in /opt/lumina/, and thus lc is present in /opt/lumina/lc.
>cd /opt/lumina
>./lc -hlumina.acme.com -ualice -psecr3t info
Hex-Rays Lumina Server v8.0
Lumina time: 2022-09-01 14:28:02, up since 2022-09-01 14:27:58
MAC address: <snipped macaddr>
Client name: alice *ADMIN*
Client host: 127.0.0.1
Since Alice is the first user to login to the server, the credentials she provided, will be used to create the server’s primary administrator.
You can verify that you are the only user by checking the user list:
>./lc -hlumina.acme.com -ualice -psecr3t users
LastActive Adm Login License User name Email
------------------- --- ----- --------------- --------- --------------
2022-09-01 14:28:04 * alice AA-A11C-AC8E-01 Alice [email protected]
# Shown 1 results
Useful environment variables
To facilitate using lc, you may consider defining the following environment variables:
export LUMINA_HOST=lumina.acme.com
export LUMINA_USER=alice
export LUMINA_PASS=secr3t
After that, you can connect to the server effortlessly. For example, this command will print information about the server and the client:
>./lc info
Hex-Rays Lumina Server v8.0
Lumina time: 2022-09-01 14:28:02, up since 2022-09-01 14:27:58
MAC address: <snipped macaddr>
Client name: alice *ADMIN*
Client host: 127.0.0.1
...
The lumina server looks up an additional LUMINA_RECV_HELO_TIMEOUT environment variable, which can be used to set
the timeout for client login phase (the time between the TLS handshake and the arrival of the first packet). The
value is in milliseconds, and setting it to -1 disables the timeout.
Note that when a client attempts to connect, the lumina server creates a new thread and keeps it running for the entire duration of this timeout. Hence, for publicly exposed lumina servers, it is advised to keep it as short as possible (e.g. 1000 ms).
Lumina server command-line options
| -p … (–port-number …) | Port number (default 443) |
| -i … (–ip-address …) | IP address to bind to (default to any) |
| -c … (–certchain-file …) | TLS certificate chain file |
| -k … (–privkey-file …) | TLS private key file |
| -v (–verbose) | Verbose mode |
| (–recreate-schema [lumina|vault]) | Drop & re-create schema using either lumina or vault user authentication. Note that THIS WILL ERASE ALL DATA |
| (–upgrade-schema) | Upgrade database schema; then quit. Only necessary when upgrading to a newer version of the Lumina server. |
| -C … (–connection-string …) | Connection string |
| -l … (–log-file …) | Log file |
| -f … (–config-file …) | Config file |
| -D … (–badreq-dir …) | Directory holding dumps of requests causing internal errors |
Troubleshooting
The server complains about a “world-accessible” file, and exits
The following files shouldn’t be readable by everyone on the system, but only by root and lumina:
lumina.conf: this file file holds the connection string to the database the server will use, and might contain credentials.lumina_server.crt: the certificate chainlumina_server.key: the private key filelumina_server_<LID>.hexlic: the license file whererepresents your lumina server license ID.
As a precaution, the Lumina server will refuse to start if these files are readable by unauthorized users.
Please make sure they:
- have
lumina:luminaownership:chown lumina:lumina lumina_server.crt lumina_server.key lumina_server_<LID>.hexlic lumina.conf - are not world-accessible:
chmod 640 lumina_server.crt lumina_server.key lumina_server_<LID>.hexlic lumina.conf
MySQL
Before the first --recreate-schema command can succeed, it is necessary to create the MySQL database, as well as the user that it will be accessed as.
“Authentication plugin ‘caching_sha2_password’ cannot be loaded”
Some recent Linux distributions ship versions of MySQL that use the "caching_sha2_password" password-checking plugin (as opposed to the traditional “native password” one.)
In order for the Lumina server to able to use this strategy, it would have to ship with a libmysqlclient.so file that is linked against libssl.so.3.
Unfortunately, this library is not yet available on all of the various [versions of] distributions that we currently support, and introducing this dependency would significantly reduce the diversity of platforms on which the Lumina server can run.
Consequently (for now) we have opted for another approach: the “lumina” MySQL user should use MySQL’s “native password” strategy. This can be accomplished by issuing the following command in a MySQL prompt:
ALTER USER lumina@localhost IDENTIFIED WITH mysql_native_password BY '<luminauserpassword>';
Once libssl.so.3 is more generally available, Lumina will not require this particular fine-tuning anymore.
MySQL TLS connections
For the same reasons as the caching_sha2_passwordissue, the Lumina server does not use TLS connections and thus will negotiate a plain TCP connection to the MySQL server.
Creating the user and database
What follows is an example creating a user + database, on a Debian system:
>sudo mysql -uroot -p
[sudo] password for aundro:
Enter password:
Welcome to the MySQL monitor. Commands end with ; or \g.
Your MySQL connection id is 14306
Server version: 10.1.48-MySQL-0+deb9u2 Debian 9.13
Copyright (c) 2000, 2018, Oracle, MySQL Corporation Ab and others.
Type 'help;' or '\h' for help. Type '\c' to clear the current input statement.
MySQL [(none)]> create user lumina@localhost;
Query OK, 0 rows affected (0.00 sec)
MySQL [(none)]> set password for lumina@localhost = PASSWORD('<snipped>');
Query OK, 0 rows affected (0.00 sec)
MySQL [(none)]> grant all on *.* to lumina@localhost;
Query OK, 0 rows affected (0.00 sec)
MySQL [(none)]> ALTER USER lumina@localhost IDENTIFIED WITH mysql_native_password BY '<snipped>';
Query OK, 0 rows affected (0.00 sec)
MySQL [(none)]> create database lumina_db;
Query OK, 1 row affected (0.00 sec)
MySQL [(none)]> [Ctrl+C] Bye
“Index column size too large. The maximum column size is 767 bytes.”
The Lumina server cannot create its schema due to a particularly stringent limit on “index prefix sizes” in older versions of MySQL.
This limit was increased in MySQL version 5.8, and thus this is the minimum version the Lumina server can work with.
“Error: Cannot connect to lumina db”
In this case, edit the configuration file, by default /opt/lumina/lumina.conf and replace Server=localhost by Server=127.0.0.1 in CONNSTR.
Concepts
What is the Lumina server
The Lumina server is a “functions metadata” repository.
It is a place where IDA users can push, and pull such metadata, to ease their reverse-engineering work: metadata can be extracted from existing projects, and re-applied effortlessly to new projects, thereby reducing (sometimes dramatically) the amount of time needed to analyze binaries.
Functions metadata
The Lumina server associates “function metadata” to functions, by means of a (md5) hash of those functions: whenever it wants to push information to, or pull information from the server, IDA will first have to compute hashes of the functions it wants to retrieve metadata for, and send those hashes to the Lumina server.
Similarly, when IDA pushes information to the Lumina server, it will first compute hashes for the corresponding functions, extract the metadata corresponding to those from the .idb file, and send those hash+metadata pairs to the server.
Metadata contents
Metadata about functions can include:
- function name
- function address
- function size
- function prototype
- function [repeatable] comments
- instruction-specific [repeatable] comments
- anterior/posterior (i.e., “extra”) comments
- user-defined “stack points” in the function’s frame
- the function frame description and stack variables
- instructions operands representations
Pushing & overriding metadata
When a user pushes metadata about a function whose md5 hash isn’t present in the database, the Lumina server will simply create a new record for it.
However, when a user pushes metadata about a function whose md5 hash (and associated metadata) is already present in the database, the Lumina server will attempt to “score” the quality of the old metadata and the quality of the new metadata. If the score of the new metadata is higher, the new function metadata will override the previous one.
{% hint style=“info” %}
When a user asks IDA to push all functions to the Lumina server, IDA will automatically skip some functions: those that still have a “dummy” name (e.g., sub_XXXX), or that are below a certain size threshold (i.e., 32 bytes) will be ignored.
{% endhint %}
Metadata history
The Lumina server retains a history of the metadata associated to functions. Using the lc utility, it is possible to dig into that history, and view changes (detailed diffs, too.)
File contents
It’s worth pointing out that when pushing metadata to the Lumina server, IDA will not push the binary file itself. Only the following metadata about the file itself will be sent:
- the name of the input file
- the name of the IDB file
- a
md5hash of the input file
The Lumina server cannot therefore be used as a backup/repository for binary files & IDBs (that is the role of the vault_server)
Teams Admin Guide
Introduction
This manual describes the installation, management, and interaction with the key server-side components of the Teams deployment.
It is primarily intended for administrators, and will focus on the different servers that are part of Teams:
- The Hex-Rays Vault server
- The Lumina server
While we will (at least superficially) make use of the command-line clients that are used to access/manage those servers, this manual will not offer a detailed explanation of their usage: there are dedicated documents for that (e.g., the hv user manual, the lc user manual, …).
Let’s get started
The first server to install, and the one that is at the center of the Teams deployment, is the Hex-Rays Vault server.
It is recommended to have the hv user manual ready before proceeding.
Prerequisites
After your purchase of Teams server, go to the customer portal, where you will find an installer for the Teams server (also called the “Hex-Rays Vault server”). Please go ahead and download it.
Quick alternative {% hint style=“success” %}
HCLI Commands | See HCLI Docs
hcli license gethcli download{% endhint %}
You will also need root access on the host where you will be installing the server.
Installation
This chapter explains how to install two parts of Teams: the vault server, and a client.
We recommend installing a client first, to be able to connect to the server immediately after installation. The very first user to connect to the server becomes the administrator.
Installing clients
There are 2 Hex-Rays Vault clients:
hv: a command-line client (which we’ll use in this document)hvui: a GUI interface to the server
Vault clients are bundled with IDA installers: simply run the IDA installer (if you haven’t done it yet) and follow the instructions. That will install IDA, and the 2 clients next to it.
Installing the server
The Hex-Rays Vault server can be installed on Linux servers. We have tested it on Debian and Ubuntu, but other major flavors of Linux should be fine too.
To install the server, run the Hex-Rays Vault installer as root and follow the instructions (the server will not require root permissions; only the installer does.)
If your Linux system is based on systemd (e.g., Debian/Ubuntu, Red-Hat, CentOS, …), it is recommended to let the installer create systemd units so that the server will start automatically at the next reboot.
Once the server is installed, it will be necessary to activate its license.
Activating the server license
In order for the Hex-Rays Vault server license to be activated, it must be bound to a Host ID (an Ethernet MAC address.)
From a command prompt, run /sbin/ifconfig, and lookup the “ether” address for the network interface through which the server will be accessible.
>/sbin/ifconfig
enp4s0: flags=4163<UP,BROADCAST,RUNNING,MULTICAST> mtu 1500
[...snipped...]
ether bf:e2:91:10:58:d2 txqueuelen 1000 (Ethernet)
[...snipped...]
In this case, our mac address is: bf:e2:91:10:58:d2
You will be able to activate both Hex-Rays Vault server and Lumina server in one activation if you have also the Host ID of your Lumina server.
Go to Hex-Rays customer portal and activate your license for Teams server. During that process, you will need to provide the MAC address of the device where the Teams server will be running. Once the activation is complete, you’ll be able to download the following files:
- teams server certificate
teams_server_<LID>.hexlic(license key, where <LID> is your teams server license ID)
Those need to be copied in the Hex-Rays Vault installation directory. As root:
>cd /opt/hexvault
>cp .../path/to/hexvault.crt .
>cp .../path/to/hexvault.key .
>cp .../path/to/hexvault_*.hexlic .
>chown hexvault:hexvault hexvault.crt hexvault.key teams_server_<LID>.hexlic
>chmod 640 hexvault.crt hexvault.key teams_server_<LID>.hexlic
Creating the initial database
At this point, the server should be ready to run.
NOTE: If your system is already in production and hosts files, skip this section. Using the --recreate-schema option as in the example below, will re-create an empty database and lose all history.
On the first install, you will need to initialize the database the server will use:
>sudo -u hexvault ./vault_server --config-file hexvault.conf \
--vault-dir ./files \
--certchain-file hexvault.crt \
--privkey-file hexvault.key \
--recreate-schema
>2022-04-14 14:30:28 Vault Server v1.0 Hex-Rays (c) 2022-2024
>2022-04-14 14:30:28 Database initialized; exiting.
Testing the server
Now that the server is installed and has a database to work with, we can test that it works:
>sudo -u hexvault ./vault_server --config-file hexvault.conf \
--certchain-file hexvault.crt \
--privkey-file hexvault.key \
--license-file teams_server_<LID>.hexlic \
--vault-dir ./files
>2022-04-14 14:35:47 Vault Server v1.0 Hex-Rays (c) 2022-2024
>2022-04-14 14:35:47 Using a license with 5 seats
>2022-04-14 14:35:47 Listening on 0.0.0.0:65433...
Good, the server appears to run! (If you are observing more worrying messages than this one, please refer to the troubleshooting section.)
At this point, you may want to either let the server run, or stop it (Ctrl+C will do) and restart it using systemd:
>systemctl restart hexvault.service
…and make sure it runs:
>ps aux | grep vault_server
hexvault 58246 0.0 0.0 ...
or:
>systemctl status hexvault.service
If you don’t see a running vault_server process or a failed systemctl start status, please refer to the systemd diagnostic tools (e.g., journalctl) for more info.
Initial configuration
This chapter explains how to perform the initial configuration of the vault server.
For the sake of the examples below, we’ll imagine the following fictional group of users:
- Jane Smith, the department admin/IT head
- Fred Bloggs, senior reverse engineer
In addition, we’ll assume:
- the company name is
Acme - the Hex-Rays Vault server has been installed on the company’s LAN, on the host
hexvault.acme.com
Creating the administrator
NOTE: The very first user to log into the server becomes the first administrator. S/he can create new administrators and otherwise manage the server.
Once the server is up and running, login to server using a username and password of your choice (hv is the vault client utility, it is installed as part of the client package.)
NOTE: We will assume Jane installed IDA (and thus hv) in /home/jane/idateams
>cd /home/jane/idateams
>./hv -hhexvault.acme.com -ujane -psecr3t info
Hex-Rays Vault Server v1
Vault time: 2022-04-14 15:28:03, up since 2022-04-14 15:17:25
License user : Jane Smith, IDA Ultimate
License email: [email protected]
License: IDAULTTM; 1 users out of 5; expires on 2023-04-05
MAC address: xx:xx:xx:xx:xx:xx
Vault directory: /opt/hexvault/files
Client name: jane *ADMIN*
Client site:
Client host: 127.0.0.1
Client root:
Login time : 2022-04-14 15:28:03
Last active: 2022-04-14 15:28:03
NOTE: No space between the command line switches and values.
Since Jane is the first user to login to the server, the credentials she provided, will be used to create the server’s primary administrator.
You can verify that you are the only user by checking the user list:
>./hv -hhexvault.acme.com -ujane -psecr3t users
LastActive Adm Login License Email
---------- --- ------------ --------------- ------------
2022-04-14 * jane <>
You may also add information (like your real name) to your user record by issuing:
>./hv -hhexvault.acme.com -ujane -psecr3t user edit jane "Jane Smith" [email protected] 1 "" 48-XXXX-XXXX-XX
>./hv -hhexvault.acme.com -ujane -psecr3t users
LastActive Adm Login License Email
---------- --- ------------ --------------- ------------
2022-04-14 * jane 48-XXXX-XXXX-XX Jane Smith <[email protected]>
However, note that having to pass a user name, host name and a password on the command line each time will get very tedious very fast. The next chapter will show how we can make our lives easier.
hv credentials
In order to connect to the vault server, hv must at least have:
- a username
- a password
- a hostname
For example:
$ hv -hhexvault.acme.com:65433 -uadmin -psecret users
LastActive Adm Login Email
---------- --- ------------ ------------
2022-06-27 * admin
2022-06-22 alice Alice <[email protected]>
Never bob Bob <[email protected]>
...
There are 3 ways to specify credentials (in decreasing order of priority):
- providing them as command-line arguments (as in the example above)
- storing them in environment variables
- storing them in the registry+keychain (recommended)
All credentials, including usernames, are case-senstive, meaning that “Joe” and “joe” would be different users.
Command line
Passing credentials on the command line will always take precedence over environment variables and registry+keychain.
-uUSERNAME | specify username |
-pPASSWORD | specify password |
-hHOST | specify host (server:port) (if port is omitted, defaults to 65433) |
-sSITENAME | specify site |
--set | remember credentials. This option doesn’t require the credentials to be passed through the command line, credentials passed through environment variables will work as well |
Environment variables
Credentials can also be passed through environment variables. They will take precedence over those possibly found in the registry+keychain.
VAULT_HOST | the server host name |
VAULT_PORT | the server port |
VAULT_USER | the username to connect to the server |
VAULT_PASS | the user’s password |
VAULT_SITE | the site to use (most commands need a site to operate) |
Registry + keychain
Unless environment variables or command-line arguments are provided, hv will look for credentials in the registry (and the OS’s keychain for passwords.)
Credentials can be stored in the registry (and keychain) like so:
alice@alice_PC$ hv --set -ualice -palice -hvaultserver -salice_on_alicepc
The user, host (and optional site) will be persisted in the registry, while the password will be saved to the OS’s keychain.
For this operation to succeed, at least a user and host must be provided
In order to keep the various commands’ syntax as clear as possible, we will assume that the user has stored credentials (in either the registry+keychain or environment variables) for the rest of this manual.
Best practices
We recommend persisting credentials using the registry+keychain method.
Once that is done, commands will become cleaner:
>./hv info
Hex-Rays Vault Server v1
Vault time: 2022-04-14 15:36:29, up since 2022-04-14 15:17:25
...
if you login to the server using hvui and save the login information, it will end up in the the registry+keychain method, and thus hv will then be able to use that information as well.
Adding users
To be able to connect to the vault server, users need to be added to the server. That can be done with the user add command:
>./hv user add fred "Fred Bloggs" [email protected] 0 ""
>./hv users
LastActive Adm Login Email
---------- --- ------------ ------------
Never fred Fred Bloggs <[email protected]>
2022-04-14 * jane Jane Smith <[email protected]>
Setting the new user’s password
Then, we need to set the user’s password, using the passwd command:
>./hv passwd stea1thy fred
Adding groups
To facilitate user management, sometimes it makes sense to make user groups. All users of a group then can be granted or denied access to certain files on the server.
Let’s add a few groups:
>./hv group add org
>./hv group add analysts
Using the groups command, we can see the new groups are still empty:
>./hv groups
analysts:
org:
We can now add group members:
>./hv group edit org jane 1
>./hv group edit org fred 1
>./hv group edit analysts fred 1
>./hv groups
analysts: fred
org: fred jane
Groups are especially useful for managing permissions.
Management
This chapter explains in detail how to perform regular administrator tasks.
Managing permissions
If you want to limit access to the files that will be stored on the vault server, you can specify who can access what. By default, the permission table grants all users access to all files:
>hv perm get
# The permission for each vault file is determined as the result of applying
# all matching lines, from the beginning of the permission table to the end.
# An empty permission table grants all access to everyone.
# A non-empty permission table starts by denying all access to everyone.
You will need to prepare a new permission table and put it into a file. The permission table consists of lines with the following format:
ACTION CATEGORY WHO PERM PATH
where:
ACTION
one of “grant” or “deny”
CATEGORY
one of “user” or “group”
WHO
name of the user or group to match
PERM
one of “list”, “read”, “write”
PATH
path pattern that the rule is for
Below is a sample permission table:
We’ll assume the server has been in use for a while, and holds some files in the directories subdir-for-fred/, local-secret/, and subdir/for/idbs/.
# The permission for each vault file is determined as the result of applying
# all matching lines, from the beginning of the permission table to the end.
# An empty permission table grants all access to everyone.
# A non-empty permission table starts by denying all access to everyone.
# Fred can freely list, read, and modify all files inside "subdir-for-fred"
grant user fred write //subdir-for-fred/
# The "remote" group cannot even see "local-secret":
deny group remote list //local-secret
# The analysts can work on IDBs:
grant group analysts write //subdir/for/idbs/
# Everyone else may read them:
grant user * read //subdir/for/idbs/
The permissions have the following order:
- Adding the
readpermission also adds thelistpermission. - Adding the
writepermission also adds thelistandreadpermissions. - Removing the
readpermission also removes thewritepermission. - Removing the
listpermission also removes thereadandwritepermissions.
Once the permission table is ready and stored in a file, we can install it:
>hv perm set @path/to/permission-file
After setting the permissions, it is a good idea to verify them. For example, this is how we can get a full list of files that fred can see, with the rw or r- prefixes, depending on the permissions:
>hv perm check fred //
rw //subdir-for-fred/afile
rw //subdir-for-fred/anotherfile
r- //subdir/for/idbs/malware.idb
Or we could limit our check to a particular file:
>hv perm check fred //local-secret
The empty output means that fred cannot see local-secret even though it exists.
Optimizing server storage
The vault server can store full file copies or deltas between them, or both full files and deltas. With time, the server storage may grow too big, or become inefficient because of too many deltas. To keep the server storage optimal, the admin should periodically run the following command:
>hv optsrv -y paths...
This command examines the storage of all specified files and optimizes them using the following configuration parameters:
--full-file-freq After how many deltas create a full file?
--max-delta-size Size of consecutive deltas compared to the full file size (%)
--keep-full-files Keep superfluous full files during storage optimization
--delete-deltas Delete superfluous delta files during storage optimization
These parameters can be specified in the server configuration file.
The full file frequency parameter specifies after how many deltas there should be a full file. The default value is 10, which means that after 10 deltas the server will create a full file. If you want the server to store only full files, set this parameter to 0. If you want the server to store only deltas during optimization, set this parameter to a very high value, like 100000.
The max delta size specifies the maximum cumulative size of deltas between full files. It is specified as a percentage of the full file. The default value is 80%. Let us consider this situation: the server stores a full file for the revision #1 and a few deltas:
- full_file#1, 100MB
- delta for #1->#2, 30MB
- delta for #2->#3, 40MB
- delta for #3->#4, 20MB
During optimization, the last delta will be deleted because the cumulative size of all deltas (30+40+20) is greater than 80% of 100MB.
If max delta size is specified as 0, then it is ignored.
Both the full file frequency and max delta size influence creation of full
files. By setting max-delta-size=0 and full-file-freq=1000000 we could ensure
that during optimization only delta files would be created. However, please note
that this would mean that the server may take a really long time to prepare full
copies. For example, take the situation where the file has 100 revisions and
only the first revision is stored as a full file and 99 other revisions are
stored as deltas. If a client asks for the revision 100 of the file and claims
that it has no previous revisions of the file, the server will have to apply 99
delta files to the revision 1 and only then send the file to the client.
By setting full-file-freq=0 we would ensure that during optimization we would always create full files in addition to deltas. This will speed up serving files to clients but eat up lots of disk space.
Finally, --keep-full-files ensures that after creating a delta file the
corresponding full file would be kept on the server disk. By default, the server
deletes the full file to optimize the disk space. Also, --delete-deltas
ensures that after creating a full file the corresponding delta file would be
deleted. By default, the server keeps delta files.
The above parameters are used only during the optsrv command. Clients can
still commit delta files or full files, and the server storage may become
suboptimal over time. We suggest adding the hv optsrv as a cron job.
Backup and restore
Currently, there is no dedicated procedure to back up the vault contents. It can be done by temporarily stopping the vault server and making a copy of the sqlite3 database as well as the files. The server must be stopped only during the backup of the sqlite3 database and then can be immediately restarted. It is ok to let the server run when making copies of the vault files. In the worst case some additional files will get copied in the backup, which normally will not cause problems. Since we never modify vault files but always create new revisions, there is no danger of copying inconsistent data.
Alternatively, it is possible to use sqlite3 backup functionality to make a backup of the database. Vault files can be copied using any Linux command (e.g. rsync or tar).
Upgrading the server
Switching to the newest versions of the Hex-Rays Vault server is recommended in order for the team to benefit from its improvements and new features.
The upgrade procedure consists of the following steps:
- stopping the server. E.g.,
sudo systemctl stop hexvaultif you are usingsystemdto manage the server. - performing a backup of the database
- putting the new server instead of the old one
- making sure the new server runs, upgrading the database schema to the new version if needed
- restarting the server. E.g.,
sudo systemctl start hexvault
Verifying the database schema
Right after putting the new Hex-Rays Vault server binary into place, it is recommended to make sure it runs fine. To do that, we’ll run the server manually just like we did the first time we installed it:
>sudo -u hexvault ./vault_server --config-file hexvault.conf \
--certchain-file hexvault.crt \
--privkey-file hexvault.key \
--license-file teams_server_<LID>.hexlic \
--vault-dir ./files \
>2022-10-07 11:13:55 Vault Server v1.0 Hex-Rays (c) 2022-2024
>2022-10-07 11:13:55 Using a license with 30 seats
>Error: obsolete database schema (5); use --upgrade-schema to upgrade it
In this case, the server complains that the database schema is outdated. This may happen as we will keep improving the Hex-Rays Vault server, and new versions might require an upgrade of the database schema in order to be able to work correctly.
Note that the Hex-Rays Vault server will not perform that upgrade automatically. That is on-purpose, to give you a chance to backup the database before proceeding.
Let’s tell the server to upgrade to the latest schema:
>sudo -u hexvault ./vault_server --config-file hexvault.conf \
--certchain-file hexvault.crt \
--privkey-file hexvault.key \
--license-file teams_server_<LID>.hexlic \
--vault-dir ./files \
--upgrade-schema
>2022-10-07 11:15:59 Vault Server v1.0 Hex-Rays (c) 2022-2024
>2022-10-07 11:15:59 Upgrading the database schema from 5 to 8...
>2022-10-07 11:15:59 Database schema is up to date; exiting.
Please ensure you performed a backup of the database before issuing this command.
Once this is done, you should be able to restart the server in a normal way, and resume work.
Managing vault files
We plan to introduce additional functionalities like:
- obliteration of files
- periodic vault self-verification
- periodic backups
- usage stats
Hex-Rays Vault server command-line options
| Short form | Long form | Description |
|---|---|---|
| -p … | –port-number … | Port number (default 65433) |
| -i … | –ip-address … | IP address to bind to (default to any) |
| -c … | –certchain-file … | TLS certificate chain file |
| -k … | –privkey-file … | TLS private key file |
| -v | –verbose | Verbose mode |
| –upgrade-schema | Upgrade database schema; then quit | |
| -C … | –connection-string … | Connection string |
| -l … | –log-file … | Log file |
| -L … | –license-file … | License file |
| -f … | –config-file … | Config file |
| -D … | –badreq-dir … | Directory holding dumps of requests causing internal errors |
| –recreate-schema | Drop & re-create schema; then quit THIS WILL ERASE ALL DATA | |
| –set-admin … | Set admin password; requires username:password | |
| -d … | –vault-dir … | Directory for vault files |
| -e … | –log-level … | Log level |
| –full-file-freq … | After how many deltas create a full file? | |
| –max-delta-size … | Size of consecutive deltas compared to the full file size (%) | |
| –keep-full-files | Keep superfluous full files during storage optimization | |
| –delete-deltas | Delete superfluous delta files during storage optimization |
Troubleshooting
This chapter explains how to solve typical problems with the vault server.
Connection issues
By default, the vault server listens on the TCP port 65433 on all interfaces. Please ensure that this port is enabled in your firewalls.
The vault server uses secure TLS connections with the clients. The TLS layer requires the certificate (.crt) and private key (.key) files. Usually, they are attached to the email message with the activation information.
Lost admin password
A lost admin password can be reset by following these steps:
- Stop the running server
- Launch the server with the
--set-admincommand line switch - Start the server
In practice it may look like this:
>systemctl stop hexvault.service
>vault_server --config-file hexvault.conf --set-admin USERNAME:PASSWORD
>systemctl start hexvault.service
The uppercase USERNAME and PASSWORD placeholders should be replaced by the desired values. The user name and the password are separated by a colon.
The specified user must exist. If sh/e was not an admin before, s/he will be promoted to an admin by this command.
NOTE: If you do not know any valid users of the vault, use the sqlite3 command line utility to list the users. They are stored in the users table.
Site verification
The following command:
>hv md5 PATH REVISION
can be used to retrieve MD5 checksums of the specified files.
PATH
path pattern to retrieve checksums from
REVISION
optional file revision. If not specified, the checksum of the last revision is reported
The server complains about a “world-accessible” file, and exits
The following files shouldn’t be readable by everyone on the system, but only by root and hexvault:
hexvault.conf: this file file holds the connection string to the database the server will use, and might contain credentials.hexvault.crt: the certificate chainhexvault.key: the private key fileteams_server_<LID>.hexlic: the license file
As a precaution, the Hex-Rays Vault server will refuse to start if these files are readable by unauthorized users.
Please make sure they:
- have
hexvault:hexvaultownership:chown hexvault:hexvault hexvault.crt hexvault.key teams_server_*.hexlic hexvault.conf - are not world-accessible:
chmod 640 hexvault.crt hexvault.key teams_server_*.hexlic hexvault.conf
Licensing
The hexvault.lic file is tied to the MAC address of the first network interface. If they do not match, the server will not start. To change the MAC address, please contact [email protected]
Restoring from backups
There are no special precautions to take: restoring the sqlite3 database and vault files from a backup should be enough.
IDA Teams Lumina server
In addition to the Hex-Rays Vault server, the Teams users can make use of a private, on-the-premises Lumina server (unlike the Hex-Rays Vault server, the Lumina server isn’t a strictly necessary component of the Teams deployment.)
In the Teams setup, the Lumina server must have access to a running Hex-Rays Vault server in order to work: indeed, all user management is done through the Hex-Rays Vault server.
Please make sure the Hex-Rays Vault server is properly installed & running.
Prerequisites
After your purchase of Lumina server, go to the customer portal, where you will find an installer for the Lumina server. Please go ahead and download it.
Quick alternative {% hint style=“success” %}
HCLI Commands | See HCLI Docs
hcli license gethcli download{% endhint %}
You will also need root access on the host where you will be installing the Lumina server (to install the server, not to run it).
MySQL server
The Lumina server stores its data in a MySQL DBMS server. It is therefore necessary to have valid credentials to such a server, as well as a fresh, empty database.
NOTE: The Lumina server requires a MySQL server version 5.8 or newer.
For illustration purposes, let’s assume the MySQL database the server will use, is called: "lumina_db".
Installation
At installation-time, the Lumina server installer will need information about the MySQL instance the Lumina server will be using (host, port, username, password). Eventually, that information will end up in the lumina.conf file, sitting next to the lumina_server binary:
CONNSTR="mysql;Server=127.0.0.1;Port=3306;Database=lumina_db;Uid=lumina;Pwd=<snipped>"
Installation in a Teams setup
When Lumina is installed in a Teams setup, in addition to information about the MySQL database in which the Lumina server will store the metadata, the installer asks for the host+port pair where to find a running Hex-Rays Vault server to which user authentication will be delegated.
That information will also end up in the lumina.conf file:
VAULT_HOST="vault.acme.com:65433"
Supported platforms
The Lumina server can be installed on Linux servers. We have tested it on Debian and Ubuntu, but other major flavors of Linux should be fine too.
To install the server, run the Lumina installer as root and follow the instructions (the server will not require root permissions; only the installer does.)
NOTE: If your Linux system is based on systemd (e.g., Debian/Ubuntu, Red-Hat, CentOS, …), it is recommended to let the installer create systemd units so that the server will start automatically at the next reboot.
Activating the server license
In order for the Lumina server license to be activated, it must be bound to a Host ID (an Ethernet MAC address.)
From a command prompt, run /sbin/ifconfig, and lookup the “ether” address for the network interface through which the server will be accessible.
>/sbin/ifconfig
enp4s0: flags=4163<UP,BROADCAST,RUNNING,MULTICAST> mtu 1500
[...snipped...]
ether bf:e2:91:10:58:d2 txqueuelen 1000 (Ethernet)
[...snipped...]
In this case, our mac address is: bf:e2:91:10:58:d2
Go to Hex-Rays customer portal and activate your license for Lumina server. During that process, you will need to provide the MAC address of the device where the Lumina server will be running. Once the activation is complete, you’ll be able to download the following files:
- lumina server certificate
lumina_server_<LID>.hexlic(license key, where LID is your license ID)
Installing the server license
Those need to be copied in the Lumina installation directory. As root:
>cd /opt/lumina
>cp .../path/to/lumina_server.crt .
>cp .../path/to/lumina_server.key .
>cp .../path/to/lumina_server_<LID>.hexlic .
>chown lumina:lumina lumina_server.crt lumina_server.key lumina_server_<LID>.hexlic
>chmod 640 lumina_server.crt lumina_server.key lumina_server_<LID>.hexlic
Creating the initial database schema
At this point, the server should be ready to run.
NOTE: If your system is already in production and hosts files, skip this section. Using the --recreate-schema option as in the example below, will re-create an empty database and lose all data.
For the Lumina server to work, it needs to have a proper database schema to work with (at this point, the MySQL database (i.e., "lumina_db") must already exist but is still empty.)
That is why, on the first install, you will need to initialize the database the server will use as well as specify which user authentication will be used (either lumina or vault, we will use lumina in the example below):
>sudo -u lumina ./lumina_server --config-file lumina.conf \
--certchain-file lumina_server.crt \
--privkey-file lumina_server.key \
--recreate-schema lumina
Hex-Rays Lumina Server v8.0 Hex-Rays (c) 2022-2024
2022-09-02 10:28:30 Database has been initialized; exiting.
If you see “Error: Cannot connect to lumina db” please refer to troubleshooting section.
Testing the server
Now that the server is installed and has a database to work with, we can test that it works:
>sudo -u lumina ./lumina_server --config-file lumina.conf \
--certchain-file lumina_server.crt \
--privkey-file lumina_server.key
Hex-Rays Lumina Server v8.0 Hex-Rays (c) 2022-2024
2022-09-22 12:14:37 Listening on 0.0.0.0:443...
Good, the server appears to run! (If you are observing more worrying messages than this one, please refer to the troubleshooting section.)
At this point, you may want to either let the server run, or stop it (Ctrl+C will do) and restart it using systemd:
>systemctl restart lumina.service
…and make sure it runs:
>ps aux | grep lumina_server
lumina 78812 0.0 0.0 ...
or:
>systemctl status lumina.service
If you don’t see a running lumina_server process or systemctl reports a startup failure, please refer to the systemd diagnostic tools (e.g., journalctl) for more info.
Hex-Rays Vault authentication
The Lumina server delegates authentication to the Hex-Rays Vault server. That is where the primary source of users information is located.
Consequently, it is the exact same set of users, with the exact same credentials as those that are able to use the Hex-Rays Vault server, that will be able to make use of the Lumina server.
Assuming Alice was registered in the Hex-Rays Vault server (and has admin rights), she should be able to use the lc utility to perform operations on the Lumina server.
NOTE: lc is the Lumina command-line administration client, which comes with the Lumina server installer. We will assume the server has been installed in /opt/lumina/, and thus lc is present in /opt/lumina/lc.
>cd /opt/lumina
>./lc -hlumina.acme.com -ualice -psecr3t info
Hex-Rays Lumina Server v8.0
Lumina time: 2022-09-01 14:28:02, up since 2022-09-01 14:27:58
MAC address: <snipped macaddr>
Client name: alice *ADMIN*
Client host: 127.0.0.1
>./lc -hlumina.acme.com -ualice -psecr3t users
LastActive Adm Login License User name Email
------------------- --- ----- --------------- --------- --------------
2022-09-01 14:28:04 * alice AA-A11C-AC8E-01 Alice [email protected]
# Shown 1 results
“shadow” copy of users in the Lumina server
Although the authority for user management & authentication is the Hex-Rays Vault server, the Lumina server will need to “shadow” that information for its own database to be in a coherent state.
Every time a user opens a new connection to the Lumina server it will in turn perform a call to the Hex-Rays Vault server to authenticate the user against the provided credentials.
Depending on the success of that latter call, a “shadow” of the user will be recorded, updated, or deleted from the Lumina server’s database.
NOTE: Not everything is copied to the Lumina server’s shadow users table; in particular, the password hash isn’t.
Useful environment variables
To facilitate using lc, you may consider defining the following environment variables:
export LUMINA_HOST=lumina.acme.com
export LUMINA_USER=alice
export LUMINA_PASS=secr3t
After that, you can connect to the server effortlessly. For example, this command will print information about the server and the client:
>./lc info
Hex-Rays Lumina Server v8.0
Lumina time: 2022-09-01 14:28:02, up since 2022-09-01 14:27:58
MAC address: <snipped macaddr>
Client name: alice *ADMIN*
Client host: 127.0.0.1
...
The lumina server looks up an additional LUMINA_RECV_HELO_TIMEOUT environment variable, which can be used to set
the timeout for client login phase (the time between the TLS handshake and the arrival of the first packet). The
value is in milliseconds, and setting it to -1 disables the timeout.
Note that when a client attempts to connect, the lumina server creates a new thread and keeps it running for the entire duration of this timeout. Hence, for publicly exposed lumina servers, it is advised to keep it as short as possible (e.g. 1000 ms).
Lumina server command-line options
| -p … (–port-number …) | Port number (default 443) |
| -i … (–ip-address …) | IP address to bind to (default to any) |
| -c … (–certchain-file …) | TLS certificate chain file |
| -k … (–privkey-file …) | TLS private key file |
| -v (–verbose) | Verbose mode |
| (–recreate-schema [lumina|vault]) | Drop & re-create schema using either lumina or vault user authentication. Note that THIS WILL ERASE ALL DATA |
| (–upgrade-schema) | Upgrade database schema; then quit. Only necessary when upgrading to a newer version of the Lumina server. |
| -C … (–connection-string …) | Connection string |
| -l … (–log-file …) | Log file |
| -f … (–config-file …) | Config file |
| -D … (–badreq-dir …) | Directory holding dumps of requests causing internal errors |
Troubleshooting
The server complains about a “world-accessible” file, and exits
The following files shouldn’t be readable by everyone on the system, but only by root and lumina:
lumina.conf: this file file holds the connection string to the database the server will use, and might contain credentials.lumina_server.crt: the certificate chainlumina_server.key: the private key filelumina_server_<LID>.hexlic: the license file whererepresents your lumina server license ID.
As a precaution, the Lumina server will refuse to start if these files are readable by unauthorized users.
Please make sure they:
- have
lumina:luminaownership:chown lumina:lumina lumina_server.crt lumina_server.key lumina_server_<LID>.hexlic lumina.conf - are not world-accessible:
chmod 640 lumina_server.crt lumina_server.key lumina_server_<LID>.hexlic lumina.conf
MySQL
Before the first --recreate-schema command can succeed, it is necessary to create the MySQL database, as well as the user that it will be accessed as.
“Authentication plugin ‘caching_sha2_password’ cannot be loaded”
Some recent Linux distributions ship versions of MySQL that use the "caching_sha2_password" password-checking plugin (as opposed to the traditional “native password” one.)
In order for the Lumina server to able to use this strategy, it would have to ship with a libmysqlclient.so file that is linked against libssl.so.3.
Unfortunately, this library is not yet available on all of the various [versions of] distributions that we currently support, and introducing this dependency would significantly reduce the diversity of platforms on which the Lumina server can run.
Consequently (for now) we have opted for another approach: the “lumina” MySQL user should use MySQL’s “native password” strategy. This can be accomplished by issuing the following command in a MySQL prompt:
ALTER USER lumina@localhost IDENTIFIED WITH mysql_native_password BY '<luminauserpassword>';
Once libssl.so.3 is more generally available, Lumina will not require this particular fine-tuning anymore.
MySQL TLS connections
For the same reasons as the caching_sha2_passwordissue, the Lumina server does not use TLS connections and thus will negotiate a plain TCP connection to the MySQL server.
Creating the user and database
What follows is an example creating a user + database, on a Debian system:
>sudo mysql -uroot -p
[sudo] password for aundro:
Enter password:
Welcome to the MySQL monitor. Commands end with ; or \g.
Your MySQL connection id is 14306
Server version: 10.1.48-MySQL-0+deb9u2 Debian 9.13
Copyright (c) 2000, 2018, Oracle, MySQL Corporation Ab and others.
Type 'help;' or '\h' for help. Type '\c' to clear the current input statement.
MySQL [(none)]> create user lumina@localhost;
Query OK, 0 rows affected (0.00 sec)
MySQL [(none)]> set password for lumina@localhost = PASSWORD('<snipped>');
Query OK, 0 rows affected (0.00 sec)
MySQL [(none)]> grant all on *.* to lumina@localhost;
Query OK, 0 rows affected (0.00 sec)
MySQL [(none)]> ALTER USER lumina@localhost IDENTIFIED WITH mysql_native_password BY '<snipped>';
Query OK, 0 rows affected (0.00 sec)
MySQL [(none)]> create database lumina_db;
Query OK, 1 row affected (0.00 sec)
MySQL [(none)]> [Ctrl+C] Bye
“Index column size too large. The maximum column size is 767 bytes.”
The Lumina server cannot create its schema due to a particularly stringent limit on “index prefix sizes” in older versions of MySQL.
This limit was increased in MySQL version 5.8, and thus this is the minimum version the Lumina server can work with.
“Error: Cannot connect to lumina db”
In this case, edit the configuration file, by default /opt/lumina/lumina.conf and replace Server=localhost by Server=127.0.0.1 in CONNSTR.
What is the Lumina server
The Lumina server is a “functions metadata” repository.
It is a place where IDA users can push, and pull such metadata, to ease their reverse-engineering work: metadata can be extracted from existing projects, and re-applied effortlessly to new projects, thereby reducing (sometimes dramatically) the amount of time needed to analyze binaries.
Functions metadata
The Lumina server associates “function metadata” to functions, by means of a (md5) hash of those functions: whenever it wants to push information to, or pull information from the server, IDA will first have to compute hashes of the functions it wants to retrieve metadata for, and send those hashes to the Lumina server.
Similarly, when IDA pushes information to the Lumina server, it will first compute hashes for the corresponding functions, extract the metadata corresponding to those from the .idb file, and send those hash+metadata pairs to the server.
Metadata contents
Metadata about functions can include:
- function name
- function address
- function size
- function prototype
- function [repeatable] comments
- instruction-specific [repeatable] comments
- anterior/posterior (i.e., “extra”) comments
- user-defined “stack points” in the function’s frame
- the function frame description and stack variables
- instructions operands representations
Pushing & overriding metadata
When a user pushes metadata about a function whose md5 hash isn’t present in the database, the Lumina server will simply create a new record for it.
However, when a user pushes metadata about a function whose md5 hash (and associated metadata) is already present in the database, the Lumina server will attempt to “score” the quality of the old metadata and the quality of the new metadata. If the score of the new metadata is higher, the new function metadata will override the previous one.
{% hint style=“info” %}
When a user asks IDA to push all functions to the Lumina server, IDA will automatically skip some functions: those that still have a “dummy” name (e.g., sub_XXXX), or that are below a certain size threshold (i.e., 32 bytes) will be ignored.
{% endhint %}
Metadata history
The Lumina server retains a history of the metadata associated to functions. Using the lc utility, it is possible to dig into that history, and view changes (detailed diffs, too.)
File contents
It’s worth pointing out that when pushing metadata to the Lumina server, IDA will not push the binary file itself. Only the following metadata about the file itself will be sent:
- the name of the input file
- the name of the IDB file
- a
md5hash of the input file
The Lumina server cannot therefore be used as a backup/repository for binary files & IDBs (that is the role of the vault_server)
Lumina server vs Hex-Rays Vault server: what is the difference?
While the workflow with the Hex-Rays Vault server and associated tools (hv, hvui and IDA’s diff/merge modes) are extremely powerful for working on multiple revisions of the same binaries, the Lumina server in turn eases the replication of past efforts to new projects.
In effect, the Lumina server offers another “dimension” to collaborative reverse-engineering efforts.
Concepts
What is a “site”?
A site represents a mapping of the server files to the local filesystem. Normally each computer has a site associated with it. A site has the following attributes:
- A site name
- A host name
- The path to a folder on the filesystem (a.k.a., “root directory”)
- Path filters (optional)

Root directory
The root directory is the essential attribute of a site. It denotes where all files from the vault server will be mapped to the local disk. Everything inside the root directory can potentially be uploaded to the vault server and shared with other team members.
The vault server cannot manage files located outside the root directory. However, this limitation is straightforward to overcome: create a symbolic link (or, on Windows, a junction point) from the root directory to the directory of your choice. This will make the target of the symbolic link visible as part of the root directory.
The vault server keeps track of each site’s state: what files have been downloaded to the local disk, what files have been checked out for editing, etc. This simplifies the housekeeping tasks, especially for big repositories with millions of files. Even for them, downloading the latest files or reconciling the local disk with the server, are almost instantaneous.
The host name is a security feature that prevents from using a site on a wrong computer. Since the server keeps track of the files downloaded to each site, using a wrong site may lead to an inconsistent mapping between the server and local disk. However, if the user does not want this protection, it is possible to erase the host name in the site definition.
Sites can be edited from the “Sites” view.
Path filters
By default all server files are visible, but for servers that manage gigabytes of data this can be problematic: it may be undesirable for users to download all files to their local computer.
Site filters provide a mechanism that lets users restrict the set of files their IDA Teams client works with. Users who want to work on some specific projects can set a filter that restricts the visibility only to selected subdirectories.
Each site has its own filters, that con be modified at any time. Filters do not directly affect any files on the local disk, or on the server: they are strictly about visibility.
WARNING: Site filters are meant simplify a user’s life by letting them focus on specific projects. Since they can be modified by users, they should not be considered a security measure: that would be the role of the permissions system, which can only be managed by vault_server administrators.
NOTE: The purpose of site filters is to create a subset of the full set of files provided by the server. Site filters don’t directly affect what locally-available files (i.e., present in the site’s rootdir, but not tracked by the server) are visible by IDA Teams clients.
There is another mechanism to specify what files should not be added to the vault.
See .hvignore for more info.
Examples
An empty filter
$ cat empty_filter.txt
$
Hide all files, except those in malware/
$ cat only_malware.txt
malware/
$
Show all files, except those from the pentesting team
$ cat hide_pentest.txt
!pentesting/
$
Show all files but those from the pentesting team, except their produced documents
$ cat hide_pentest_but_docs.txt
!pentesting/
pentesting/research_docs/
$
The registry
On Microsoft Windows, IDA Teams will store certain bits of information in the registry (host name, user name, site name.)
On macOS and Linux, it will use a pseudo-registry file, located at
$HOME/.idapro/hvui.reg.
Passwords storage in the OS’s keychain
While hosts, user names & site names are persisted to the registry, passwords are stored securely in the operating system’s keychain.
- On Windows, the Windows Credential Store is used (therefore requiring Windows 7 or newer)
- On macOS, the macOS Keychain is used
- On Linux, the “Secret service” is used (through
libsecret-1)
Hex-Rays License Server Administrator Guide
Introduction
{% hint style=“info” %} To ensure proper functionality, we recommend that the License Server version match the IDA Pro version and that both are updated to the latest version. The 9.1 License Server has backward compatibility with the 9.0 IDA Pro version (client). However, the reverse is not supported. Ensure that the License Server version is equal to or higher than the client version to maintain compatibility.
For the latest installers, visit the Download Center in My Hex-Rays portal. {% endhint %}
This manual describes the installation, management, and interaction with a Hex-Rays License Server deployment. It is primarily intended for administrators, and will focus on the setup and management of the Hex-Rays License Server.
While we will (at least superficially) make use of the command-line client used to access/manage the server, this manual will not offer a detailed explanation of its usage, although there is a dedicated section for essential lsadm commands
Let’s get started
The first step is to install the Hex-Rays License Server, which is the central component of the deployment.
Installing the Hex-Rays License Server
Prerequisites
After your purchase of a Hex-Rays product with floating licenses, go to the customer portal, where you will find:
- an installer for the Hex-Rays License Server
- the installer for the product you have purchased
- a
license_server_<LID>.hexlic(where <LID> is your license ID) and the certificate bundle will be available after License Server activation, under Licenses tab
All those will be necessary, so please go ahead and download them.
Quick alternative {% hint style=“success” %}
HCLI Commands | See HCLI Docs
hcli license gethcli download{% endhint %}
You will also need root access on the host where you will be installing the server.
Installation
This chapter explains how to install the Hex-Rays License Server.
Installing clients
The command-line client lsadm is bundled with the Hex-Rays License Server installer. To install both Hex-Rays License Server and lsadm, simply run the installer and follow the instructions.
Every Hex-Rays product using floating licenses, such as IDA, is also a client of Hex-Rays License Server. For installation instructions for these products, please refer to their documentation.
Installing the server
The Hex-Rays License Server can be installed on x64 Linux servers. We have tested it on Debian and Ubuntu, but other major flavors of Linux should be fine too.
The installer is provided as an executable file. If needed, use chmod to ensure it has execute permissions.
To install the server, run the Hex-Rays License Server installer as root and follow the instructions (the server will not require root permissions; only the installer does.)
{% hint style=“info” %}
If your Linux system is based on systemd (e.g., Debian/Ubuntu, Red-Hat, CentOS, …), it is recommended to let the installer create systemd units so that the server will start automatically at the next reboot.
{% endhint %}
{% hint style=“info” %}
During server installation, you’ll be prompted to create the hexlicsrv.conf configuration file.
We recommend accepting the default option to create it automatically, as this file is required to run the server.
{% endhint %}
Activating the server license
In order for the Hex-Rays License Server license to be activated, it must be bound to a Host ID (an Ethernet MAC address.)
From a command prompt, run /sbin/ifconfig, and lookup the "ether" address for the network interface through which the server will be accessible.
>/sbin/ifconfig
enp4s0: flags=4163<UP,BROADCAST,RUNNING,MULTICAST> mtu 1500
[...snipped...]
ether bf:e2:91:10:58:d2 txqueuelen 1000 (Ethernet)
[...snipped...]
In this case, our MAC address is: bf:e2:91:10:58:d2
Go to Hex-Rays customer portal and activate your license for license server. During that process, you will need to provide the MAC address of the device where the license server will be running. Once the activation is complete, you’ll be able to download the following files:
- license server certificate bundle
license_server_<LID>.hexlic(license key)
Those need to be copied in the Hex-Rays License Server installation directory. As root:
>cd /opt/hexlicsrv
>cp .../path/to/hexlicsrv.crt .
>cp .../path/to/hexlicsrv.key .
>cp .../path/to/license_server*.hexlic .
>chown hexlicsrv:hexlicsrv hexlicsrv.crt hexlicsrv.key license_server*.hexlic
>chmod 640 hexlicsrv.crt hexlicsrv.key license_server*.hexlic
Creating the initial database
At this point, the server should be ready to run.
{% hint style=“caution” %}
If your system is already in production, skip this section. Using the --recreate-schema option as in the example below, will re-create an empty database.
{% endhint %}
On the first install, you will need to initialize the database the server will use:
>sudo -u hexlicsrv ./license_server --config-file hexlicsrv.conf \
--certchain-file hexlicsrv.crt \
--privkey-file hexlicsrv.key \
--recreate-schema
>2024-04-14 14:30:28 License Server v1.0 Hex-Rays (c) 2024
>2024-04-14 14:30:28 Database initialized; exiting.
Testing the server
Now that the server is installed and has a database to work with, we can test that it works:
>sudo -u hexlicsrv ./license_server --config-file hexlicsrv.conf \
--certchain-file hexlicsrv.crt \
--privkey-file hexlicsrv.key \
--license-file license_server_<LID>.hexlic
>2024-04-14 14:35:47 License Server v1.0 Hex-Rays (c) 2024
>2024-04-14 14:35:47 Using a license with 1 seats
>2024-04-14 14:35:47 Listening on 0.0.0.0:65434...
Good, the server appears to run! If you are observing more worrying messages than this one, please refer to the troubleshooting section.
At this point, you may want to either let the server run, or stop it (Ctrl+C will do) and restart it using systemd:
>systemctl restart hexlicsrv.service
…and make sure it runs:
>ps aux | grep license_server
hexlicsrv 58246 0.0 0.0 ...
If you don’t see a running license_server process, please refer to the systemd diagnostic tools (e.g., journalctl) for more info.
Management
This chapter explains in detail how to perform regular administrator tasks.
Backup and restore
Currently, there is no dedicated procedure to back up the Hex-Rays License Server database. It can be done by temporarily stopping the Hex-Rays License Server and making a copy of the sqlite3 database. The server must be stopped only during the backup of the sqlite3 database and then can be immediately restarted.
Alternatively, it is possible to use sqlite3 backup functionality to make a backup of the database.
Upgrading the server
Switching to the newest versions of the Hex-Rays License Server is recommended in order for the team to benefit from its improvements and new features.
The upgrade procedure consists of the following steps:
-
Stop the server. For example, if you are using
systemdto manage the server:sudo systemctl stop hexlicsrv -
Perform a backup of the database
-
Launch the installer
-
Follow the on-screen instructions
-
Upgrade the database with
./license_server --config-file hexlicsrv.conf --upgrade-schema -
Restart the server. E.g.,
sudo systemctl start hexlicsrv
License Borrowing Limits
The server supports limiting the maximum duration for which licenses can be borrowed using the MAX_BORROW_HOURS environment variable.
| Example | Behavior |
|---|---|
MAX_BORROW_HOURS=0 or unset | No limit (default) |
MAX_BORROW_HOURS=-1 | Borrowing is completely disabled |
MAX_BORROW_HOURS=<hours> | Limits borrowing to the specified number of hours |
Note: Changes to this environment variable require a server restart to take effect.
Hex-Rays License Server command-line options
-p ... (\--port-number ...) Port number (default 65434)
-i ... (\--ip-address ...) IP address to bind to (default to any)
-c ... (\--certchain-file ...) TLS certificate chain file
-k ... (\--privkey-file ...) TLS private key file
-v (\--verbose) Verbose mode
(\--upgrade-schema) Upgrade database schema; then quit
-C ... (\--connection-string ...) Connection string
-l ... (\--log-file ...) Log file
-L ... (\--license-file ...) License file
-f ... (\--config-file ...) Config file
(\--recreate-schema) Drop & re-create schema; then quit **THIS WILL ERASE ALL DATA**
Troubleshooting
This chapter explains how to solve typical problems with the Hex-Rays License Server.
Connection issues
By default, the Hex-Rays License Server listens on the TCP port 65434 on all interfaces. Please ensure that this port is enabled in your firewalls.
The Hex-Rays License Server uses secure TLS connections with the clients. The TLS layer requires the certificate (.crt) and private key (.key) files. Usually, they are attached to the email message with the activation information.
The server complains about a "world-accessible" file, and exits
The following files shouldn’t be readable by everyone on the system, but only by root and hexlicsrv:
hexlicsrv.conf: this file file holds the connection string to the database the server will use, and might contain credentials.hexlicsrv.crt: the certificate chainhexlicsrv.key: the private key filelicense_server_<LID>.hexlic: the license file
As a precaution, the Hex-Rays License Server will refuse to start if these files are readable by unauthorized users.
Please make sure they:
- have
hexlicsrv:hexlicsrvownership:chown hexlicsrv:hexlicsrv hexlicsrv.crt hexlicsrv.key licensesrv.hexlic hexlicsrv.conf - are not world-accessible:
chmod 640 hexlicsrv.crt hexlicsrv.key license_server_<LID>.hexlic hexlicsrv.conf
Licensing
The licensesrv.hexlic file is tied to the MAC address of the first network interface. If they do not match, the server will not start. To change the MAC address, please contact support
"Error: Failed to list licenses"
This error means that the currently installed license server license file (hexlic) content is incorrect. More precisly, the “licenses” list does not contain an entry with the following items:
...
"product_id": "IDAPRO",
"edition_id": "ida-pro",
...
or that the activation end date in the same section has expired.
Make sure to activate all the floating license plans owned by the license server before downloading the license server hexlic file.
“Error: stat() failed on “hexlicsrv.conf”: No such file or directory“
This error occurs when the hexlicsrv.conf configuration file is missing.
During the server installation, the user is asked whether to automatically create this configuration file for pre-configuring the server. Replying “no” will require creating the configuration file manually (which may be a bit tedious).
Solution:
The simplest approach is to reinstall the server:
- Uninstall the server by executing the uninstall program in the installation directory.
- Re-run the installer and accept the prompt to automatically create the configuration file.
"Error: Failed to initialize the license manager: No valid license file could be found"
This error can occur if a recent hexlic file is loaded in the version 9.0 of the license server.
Solution Make sure to download and install the latest version of the license server.
"Missing private key path" when upgrading the schema
This is a known regression in the version 9.2 of the license server.
Solution Use the following command line:
>sudo -u hexlicsrv ./license_server --config-file hexlicsrv.conf \
--certchain-file hexlicsrv.crt \
--privkey-file hexlicsrv.key \
--upgrade-schema
Restoring from backups
There are no special precautions to take: restoring the sqlite3 database from a backup should be enough.
lsadm Tool Quick Guide
This quick manual presents the basic common commands for lsadm tool.
Note: Replace <IP_ADDRESS>:<PORT> with your actual server address and port.
List All Licenses
./lsadm -h <IP_ADDRESS>:<PORT> list
This command shows:
- Licensed products and their IDs (IDA, License server, Teams Server or Lumina Server)
- Add-ons/decompilers associated with each license
- License start and expiration dates
- Available and total seats
- License owner information
Example Output Structure
Licenses (assigned to [email protected], <[email protected]>):
License:
License ID: 96-C43F-B0F4-96
Product: IDAPRO
Add-ons:
HEXX86:
License ID: 97-DCD8-46B5-86
Owner ID: 96-C43F-B0F4-96
Start: 2024-10-07
Expiration: 2025-10-07
<snipped>
Features:
Start: 2024-10-07
Expiration: 2025-10-07
Available seats: 32
Total seats: 35
License:
License ID: 96-E735-E78D-9B
Product: LICENSE_SERVER
Add-ons:
Features:
Start: 2024-10-08
Expiration: 2025-10-08
Available seats: 1
Total seats: 1
Check Active and Borrowed Licenses
./lsadm -h <IP_ADDRESS>:<PORT> active
This command shows:
- currently used licenses
- users using those licenses (both online and borrowed)
- end dates for borrowed licenses
Example Output Structure
Active licenses:
96-C43F-B0F4-96 IDAPRO (HEXX86, HEXX64, HEXARM, HEXMIPS, HEXARM64, HEXMIPS64, HEXPPC, HEXPPC64, HEXARC, HEXRV, TEAMS, LUMINA, HEXRV64): used 3 out of 35 seat(s)
Expires: 2025-10-07
Online users: root@secrethost (192.168.0.131): 1 instance(s)
Borrowed by: bob@chronos until 2025-03-14 17:10:32
alice@badger until 2025-10-01 00:00:00
Display Server Information
./lsadm -h <IP_ADDRESS>:<PORT> info
This command shows:
- Server version
- MAC address
- Connected client details and session timestamp
Example Output Structure
Server info:
Version: v1.0
MAC address: AA:BB:CC:DD:EE:FF
Client:
Name: 192.168.0.104
Session ID: 187
Established: 2025-02-10 17:37:35
Hex-Rays License Server Migration Guide
Introduction
Up to now our floating license management has been based around the following components:
- the license server manager, lmadmin, provided by Flexera
- the vendor daemon, hexrays, provided by Hex-Rays
As of the IDA Pro new release (9.0) and its new licensing model these have been replaced by:
- The Hex-Rays License Server, and
- lsadm command line tool
Both components are provided by Hex-Rays.
Differences between the servers
| Flexera | Hex-Rays | |
|---|---|---|
| Server setup | Two binaries and processes: lmadmin or lmdrd server + hexrays vendor daemon | Single binary (license_server) |
| Ports required | Two ports required, plaintext communication | Single TCP port, communication protected by TLS |
| OS supported | Server available for Windows, Linux, or macOS x64. Manual service configuration on Linux. | Server available for Linux x64 only. Automatic configuration of systemd service at install time. |
Migration steps
Moving from the 8.4 to the 9.0 license server management infrastructure is really easy:
- First make sure that you have the license server admin guide at hand.
- Follow the installation steps (section 2 of the admin guide).
- Install an IDA 9.0 instance and test your installation by trying to connect to the license server, to select a license, borrow and finally return it.
You are now ready to switch.
Attention points for the switch
Since an 8.4 client will not be able to connect to the new license server (and a 9.0 client won’t be able to connect to the 8.4 license server), you should make sure that all users are using the new clients which are configured with the correct server and port. If your workflow requires using 8.4, you can keep the old server running until all users have switched to the new IDA version. Then you can stop and decommission the old server.
Hex-Rays License Server on Windows with WSL: Configuration Guide
Introduction
This tutorial will guide you through the steps to configure Windows Subsystem for Linux (WSL) to install and use the new Hex-Rays license server in a WSL Ubuntu instance.
You will learn how to:
- Properly configure the WSL and optionally make it run in the background.
- Install the Hex-Rays license server and verify it’s up and running.
- Troubleshoot common issues.
Prerequisites
To follow this tutorial:
- Ensure you have an up-to-date Windows Subsystem for Linux with an installed Ubuntu distribution. If not, refer to this guide for installation instructions.
- You should use Windows 11 version 22H2 or later, as we will enable the WSL mirrored mode networking.
WSL configuration
Mirrored mode
Enabling mirrored mode configures WSL to an entirely new networking architecture that replicates (mirrors) your Windows network interfaces within the Linux environment.
Create WSL configuration file
- To enable this mode, create a new file named
%UserProfile%\\.wslconfig. - Add the following lines to the file:
[wsl2]
networkingMode = mirrored
- Save the file.
Verify mirrored network configuration
- First, make sure that all the WSL instances are stopped and restart a fresh Ubuntu instance:
wsl --shutdown
wsl
- In the WSL instance, type:
ip a
Examples comparison
On our current machine, we have the following output:
...
10: eth7: <BROADCAST,MULTICAST,UP,LOWER_UP> mtu 1500 qdisc mq state UP group default qlen 1000
link/ether f4:7b:09:3f:7c:44 brd ff:ff:ff:ff:ff:ff
inet 192.168.1.131/24 brd 192.168.1.255 scope global noprefixroute eth7
valid_lft forever preferred_lft forever
inet6 fe80::b944:ac9b:bd85:2a6c/64 scope link nodad noprefixroute
valid_lft forever preferred_lft forever
...
On Windows, ipconfig /all output gives matching details:
...
Wireless LAN adapter Wi-Fi:
Connection-specific DNS Suffix . :
Description . . . . . . . . . . . : Intel(R) Wi-Fi 6E AX210 160MHz
Physical Address. . . . . . . . . : F4-7B-09-3F-7C-44
DHCP Enabled. . . . . . . . . . . : Yes
Autoconfiguration Enabled . . . . : Yes
Link-local IPv6 Address . . . . . : fe80::b944:ac9b:bd85:2a6c%12(Preferred)
IPv4 Address. . . . . . . . . . . : 192.168.1.131(Preferred)
Subnet Mask . . . . . . . . . . . : 255.255.255.0
Lease Obtained. . . . . . . . . . : Wednesday, February 19, 2025 7:35:07 PM
Lease Expires . . . . . . . . . . : Sunday, February 23, 2025 7:09:58 AM
Default Gateway . . . . . . . . . : 192.168.1.1
DHCP Server . . . . . . . . . . . : 192.168.1.1
DHCPv6 IAID . . . . . . . . . . . : 150240009
DHCPv6 Client DUID. . . . . . . . : 00-01-00-01-29-0A-D1-50-84-A9-38-6F-0B-65
DNS Servers . . . . . . . . . . . : 192.168.1.1
NetBIOS over Tcpip. . . . . . . . : Enabled
...
When properly configured, the wireless interface is “mirrored” in the WSL Ubuntu instance, i.e., the Windows machine and the WSL Ubuntu instance share the Wifi interface IP and MAC address. In fact, all the Windows interfaces are mirrored, but we focus on wireless network interface.
Systemd
The Hex-Rays license server installation supports configuring the server as a systemd service. To use this feature, you should enable systemd in your WSL instance.
- Start a WSL Ubuntu instance as root:
wsl -u root
- Use your preferred editor to create or add the following lines to the
/etc/wsl.conffile:
[boot]
systemd = true
- Execute the following lines:
wsl --shutdown
wsl
Networking
To communicate with the WSL-hosted Hex-Rays license server from the network, you have to know the IP address of your WSL Ubuntu instance as seen by your Windows host.
Use wsl hostname -i command to retrieve the IP address:
wsl hostname -i
127.0.1.1
Setting up port forwarding
To allow external connections to reach the license server, you must forward incoming connections from the Windows host to the Ubuntu instance. This is achieved using the port proxy interface.
In this setup, we forward all connections coming to our Windows host on port 65435 to our license server listening on the default port 65434 in WSL.
- In an elevated command prompt, type the following command:
netsh interface portproxy add v4tov4 listenport=65435 listenaddress=192.168.1.131 connectport=65434 connectaddress=127.0.1.1
- Verify the result:
netsh interface portproxy show all
Listen on ipv4: Connect to ipv4:
Address Port Address Port
--------------- ---------- --------------- ----------
192.168.1.131 65435 127.0.1.1 65434
Firewall configuration
Finally, ensure that the Hyper-V firewall allows inbound connections on your port (in this example, 65434).
- Execute the following PowerShell command in an elevated command prompt:
New-NetFirewallHyperVRule -Name "H-RLicenseServer" -DisplayName "Hex-Rays License Servr" -Direction Inbound -VMCreatorId '{40E0AC32-46A5-438A-A0B2-2B479E8F2E90}' -Protocol TCP -LocalPorts 65434
- If your setup requires it, you might have to open the TCP forwarding port (
65435in our case) in the Windows firewall.
With this final step, the WSL networking configuration is complete.
Running WSL in the background - optional configuration
In a typical scenario, a WSL instance starts at system startup or within a command prompt, however when the command prompt is closed, WSL will silently stop after about a minute. To keep WSL running until it is explicitly stopped with wsl --shutdown, a simple script can be used.
- Create a script that executes the following command:
wsl --exec dbus-launch true
- To verify if your instance is still running, use the following command:
wsl --list --running
Windows Subsystem for Linux Distributions:
Ubuntu (Default)
Installing the Hex-Rays license server
After your WSL is properly configured, you can go ahead and install the Hex-Rays license server.
The procedure to install the Hex-Rays license server can be found here.
Verify the Hex-Rays license server is up and running
To verify that the Hex-Rays license server is accessible, make the following checks:
- Check the network configuration
In our exemplary case, we retrieved the IPv4 address of the Windows machine to ensure the correct network settings.

- Connect with Hex-Rays license server in IDA License Manager
In the License Manager, we set a server address at 192.168.1.131 and port 65435.
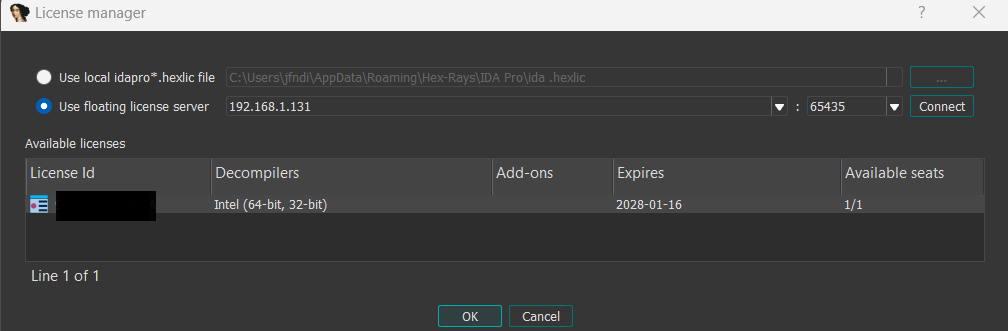
Troubleshooting
License server connection fails after reboot
We have noticed that for some reason, the Windows IP Helper service has to be restarted after rebooting your computer, otherwise an RST (Reset) response is received when trying to connect to the License server.
The solution: Restart the IP Helper automatically
Add this command to a startup script so that Windows runs it automatically after every reboot:
Restart-Service -Name iphlpsvc